Embed Size (px)
Citation preview

Software Change Notice
Revision C Dell 12G Workstation and Servers Honeywell Custom BIOS patch 1 10/2013
Third Party Components
Dell 12G Workstation and Servers Honeywell Custom BIOS patch
Software Change Notice 10/13
Revision C

Software Change Notice
Revision C Dell 12G Workstation and Servers Honeywell Custom BIOS patch 2 10/2013
About This Document
Release Information
Document Name Document ID Release Number
Publication Date
Dell 12G Workstation and Server Honeywell Custom BIOS patch SCN A 03/13 Dell 12G Workstation and Server Honeywell Custom BIOS patch SCN B 05/13 Dell 12G Workstation and Server Honeywell Custom BIOS patch SCN C 10/13
Document Category
Software Change Notice : Dell 12G Workstation and Server Honeywell Custom BIOS patch SCN
References The following list identifies all documents that may be sources of reference for material discussed in this publication.
Document Title
--NA--
Revision History Revision A – Initial Release, Revision B – Replaced T3600XL Custom BIOS “M25” with “M26” to support Matrox Extio-2 RPS, Revision C – Replaced T3600XL Custom BIOS “M26” with “M27” which fixed the Diagnostic LED blinking issue on Dell T3600XL with Honeywell Custom BIOS M25 / M26 reported by BW#2013-11,
Software Change Notice
Revision C Dell 12G Workstation and Servers Honeywell Custom BIOS patch 3 10/2013
Date: Oct, 2013 Subject: Release of patches – Dell T3600XL workstation, Dell T320 and Dell R320 server’s
system BIOS updates. (T3600XLBIOSM27.ISO, T320BIOS1.0.0.ISO and R320BIOS1.0.0.ISO) Dell 12Generation Workstation and Server System BIOS Patches – (T3600XLBIOSM27.ISO, T320BIOS1.0.0 and R320BIOS1.0.0.ISO) has been released. These patches has been approved by the Program Management Team for use by all sites using Honeywell Configured Dell T3600XL (MZ-PCWS91), Dell T320 server (MZ-PCSV71, 72 & 73) and Dell R320 server (MZ-PCSV61) workstation and server based Experion PKS nodes running on Windows 7 Professional 32bit / 64bit and Windows Server 2008 Standard 32bit / R2 64bit Operating system. If you have any questions concerning this notice, please contact your local Honeywell National Response Center (NRC), Customer Response Center (CRC), Global TAC Center, or Solution Support Center (SSC).
Purpose of this Patches: 1) These patches are used to perform the upgrade of Dell T3600XL, T320 and R320 System
BIOS to work with Honeywell LCNP4e (TP-LCNP04) on Honeywell Configured Dell T3600XL, T320 and R320 systems based Experion PKS nodes.
2) The T3600XL Honeywell Custom BIOS “M27” patch fixes the Diagnostic LED blinking issue reported in T3600XL with Honeywell Custom BIOS M25 / M26 by BW2013-11,
Anomalies Fixed by this Patch: • The Honeywell LCNP4e (TP-LCNP04) controller will work properly with the Dell
12Generation workstation and servers. • The Matrox Extio-2 RPS (TP-RPSF02) controller will work properly with the Dell
T3600XL workstation. • Fixed the Diagnostic LED blinking issue on T3600XL system,
Where to apply the patch: If the target systems (T3600XL, T320 & R320) are expected to support T-Nodes and the LCNP4e (TP-LCNP04) card, then these system BIOS updates must be utilized. If the target T3600XL expected to use with Matrox Extio-2 RPS controller, then this system BIOS patch must be utilized. If the target system is T3600XL then this system BIOS patch must be utilized.

Software Change Notice
Revision C Dell 12G Workstation and Servers Honeywell Custom BIOS patch 4 10/2013
Patch Pre-Requisites: System with CD/DVD RW drive and CD/DVD Burning software installed on it.
Note: Honeywell supplied Dell T3600XL, T320 & R320 systems come with CD/DVD RW drive which will help user burn media using .ISO format patch files distributed under this patch.
This BIOS update must be implemented before starting the Experion (T-node) installation on Dell 12G systems.
This BIOS update must be implemented before installing the Honeywell LCNP4e (TP-LCNP04) on Dell 12G systems.
This BIOS update must be implemented before installing the Matrox Extio-2 (TP-RPSF02) PCIe controller on Dell T3600XL workstation if it installed with BIOS M25 (Or) if it is higher than M25 then need not to uninstall the Extio-2 PCIe controller from Dell T3600XL system for flashing this BIOS M27 update .
This System BIOS update requires the system to reboot. As this patch requires reboot, you will lose process view from this node. Make sure the alternate station is available for process control during the patch application.
AM Ride-through functionality will not be available on ACE-T and E-APP node running on Dell T320 / R320 servers on Windows Server 2008standard 32bit and R2 64bit OS.
Patch Installation: 1. Download the patch from the location as mentioned in the notification alert. 2. Extract the ZIP files and burn each ISO file on separate CD Medias.
For Dell T3600XL:
1. Power On the Dell T3600XL system and identify the System BIOS version by Pressing “F2” function key from Keyboard.
2. In System BIOS browse to General System Information BIOS Version =M27, if the System BIOS version is mentioned as “M27” then this patch is not applicable for your system. Exit from system BIOS and continue.
3. If the System BIOS is not mentioned as “M27” then this patch is applicable for your system, continue with below steps.
4. In System BIOS browse to General Boot Sequence is set to below order and exit. • CD/DVD/CD-RW Drive • Diskette Drive • PCI RAID Adapter
5. Insert the T3600XLBIOSM27.ISO file burned CD media in to T3600XL system and boot the system from CD-ROM drive.

Software Change Notice
Revision C Dell 12G Workstation and Servers Honeywell Custom BIOS patch 5
6. Press “Y” key from Keyboard to continue the BIOS update.
10/2013

Software Change Notice
Revision C Dell 12G Workstation and Servers Honeywell Custom BIOS patch 6
7. It will start collecting the information of the currently installed BIOS on your T3600XL system.
8. Press “Y” key from Keyboard to continue the BIOS update. Note: above screenshot was shown as an example; however the actual “Mxx / Axx” version BIOS may be different in your system.
10/2013

Software Change Notice
Revision C Dell 12G Workstation and Servers Honeywell Custom BIOS patch 7
9. It will show “Flash Progress” with % detail.
10. Once the BIOS update is successful, it will show above screen and reboot the system
automatically. Remove the inserted BIOS CD Media from the system. 11. In the system Splash Screen note BIOS Revision is mentioned as “M27”. Power off the
system and remove the Power cord from SMPS, wait for 30sec. 12. Remove the system Side cover and insert the Honeywell LCNP4e (TP-LCNP04)
controller in PCIe Slot 1 (Or) for Extio-2 installation refer Extio-2 PISG (EP-DPCX24) for more details, and close the side cover.
13. Connect the Power Cord and Power On the system, and continue. For Dell T320:
1. Power On the Dell T320 system and identify the System BIOS version by Pressing “F2” function key from Keyboard.
2. In System BIOS browse to System Information BIOS Version = (1.3.5 [Honeywell 1.0.0]), if the System BIOS version is mentioned as “(1.3.5 [Honeywell 1.0.0])” then this patch is not applicable for your system. Exit from system BIOS and continue.
3. If the System BIOS is not mentioned as “(1.3.5 [Honeywell 1.0.0])” then this patch is applicable for your system, continue with below steps.
4. In System BIOS browse to Boot Sequence and set to below order and exit. • Embedded SATA Port Optical Drive • Hard Drive • Embeded NIC Port1
10/2013

Software Change Notice
Revision C Dell 12G Workstation and Servers Honeywell Custom BIOS patch 8
5. Insert the T320BIOS1.0.0.ISO file burned CD media in to T320 system and boot the system from CD-ROM drive.
6. Press any key to continue,
7. It will show the current version of the BIOS installed on your system and replace with
version. Press “Y” key from Keyboard to continue.
10/2013
Software Change Notice
Revision C Dell 12G Workstation and Servers Honeywell Custom BIOS patch 9
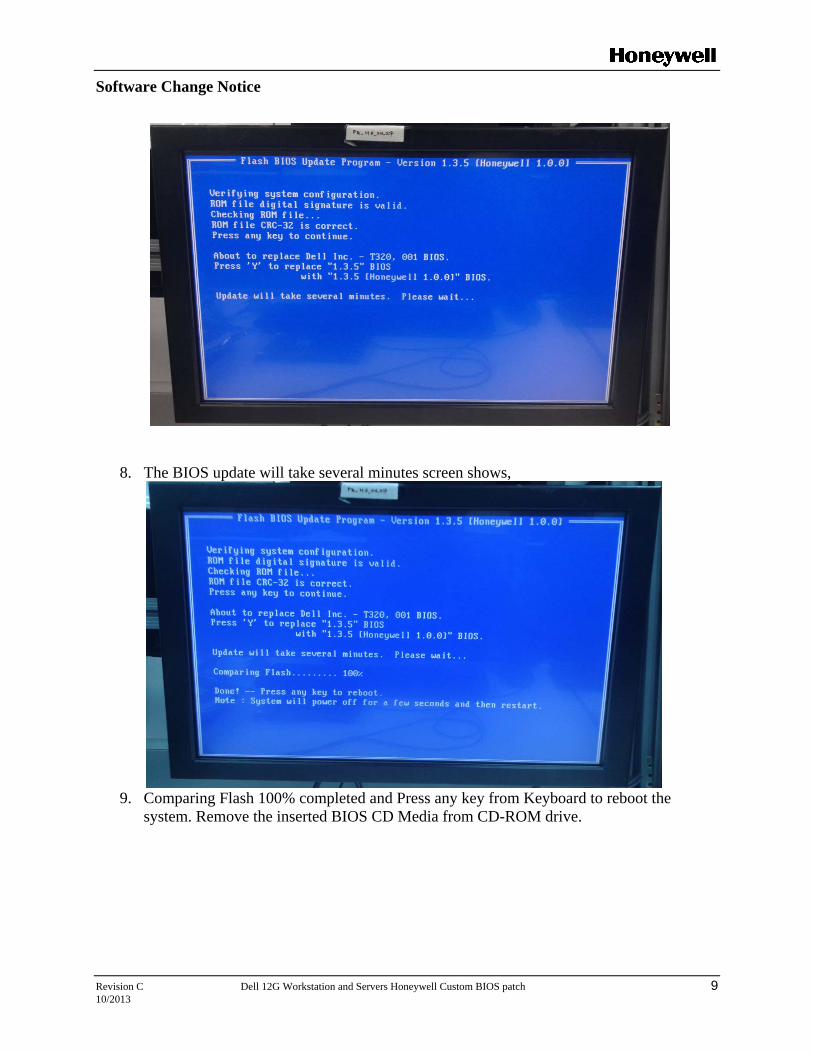
8. The BIOS update will take several minutes screen shows,
9. Comparing Flash 100% completed and Press any key from Keyboard to reboot the
system. Remove the inserted BIOS CD Media from CD-ROM drive.
10/2013

Software Change Notice
Revision C Dell 12G Workstation and Servers Honeywell Custom BIOS patch 10
10. In POSTscreen note BIOS versions is mentioned as “[Honeywell 1.0.0]” Power off the
system and remove the Power cord from SMPS, wait for 30sec. 11. Remove the system Side cover and insert the Honeywell LCNP4e (TP-LCNP04)
controller in PCIe Slot 3 and close the side cover. 12. Connect the Power Cord and Power On the system, and continue.
For Dell R320:
1. Power On the Dell R320 system and identify the System BIOS version by Pressing “F2” function key from Keyboard.
2. In System BIOS browse to System Information BIOS Version = (1.3.5 [Honeywell 1.0.0]), if the System BIOS version is mentioned as “(1.3.5 [Honeywell 1.0.0])” then this patch is not applicable for your system. Exit from system BIOS and continue.
3. If the System BIOS is not mentioned as “(1.3.5 [Honeywell 1.0.0])” then this patch is applicable for your system, continue with below steps.
4. In System BIOS browse to Boot Sequence and set to below order and exit. • Embedded SATA Port Optical Drive • Hard Drive
10/2013

Software Change Notice
Revision C Dell 12G Workstation and Servers Honeywell Custom BIOS patch 11
5. Insert the R320BIOS1.0.0.ISO file burned CD media in to T320 system and boot the system from CD-ROM drive.
6. Press any key to continue,
7. It will show the current version of the BIOS installed on your system and replace with
version. Press “Y” key from Keyboard to continue.
10/2013

Software Change Notice
Revision C Dell 12G Workstation and Servers Honeywell Custom BIOS patch 12
8. The BIOS update will take several minutes screen shows,
9. Comparing Flash 100% completed and Press any key from Keyboard to reboot the
system. Remove the inserted BIOS CD Media from CD-ROM drive.
10/2013

Software Change Notice
Revision C Dell 12G Workstation and Servers Honeywell Custom BIOS patch 13
10. In POST screen note BIOS versions is mentioned as “[Honeywell 1.0.0]” Power off the
system and remove the Power cord from SMPS, wait for 30sec. 11. Remove the system Side cover and insert the Honeywell LCNP4e (TP-LCNP04)
controller in PCIe Slot 2 and close the side cover. 12. Connect the Power Cord and Power On the system, and continue.
Patch Removal: N/A
10/2013


![[GUNSMITHING] The 12g Pistol](https://img.dokumen.tips/doc/110x75/5529676f550346b52e8b474c/gunsmithing-the-12g-pistol.jpg)


