Embed Size (px)
Citation preview

ACP HEBEL
PANEL INSTALLATION
Protectant™ ACP Termite & Waterproofing Barrier System designed for
Hebel®
• Stops termites and water from entering the building cavity
• Additional protection is provided through the use of a termite resistant commercial construction adhesive which fully bonds the system to the structure
Protectant™ ACP Termite & Waterproofing Barrier System for Hebel® is
so versatile that every change in construction can easily be treated.
THEWHITE ANTCO

CONTENTS
Pg. 3
Introducing Protectant™ ACP Termite & waterproofing Barriers for Hebel®
Pg. 5 Technical and Training Manual
Pg. 7 Training Protocol
Pg. 8 Pre-pour Penetrations
Pg. 10 Hebel Panel Surface Preparation
Pg. 12 Perimeter Barrier Installation
Pg. 17 Points to Remember
Pg. 18 Job Safety Analysis Worksheets
Pg. 22 ACP DRawings

ACP Hebel Panel installation manual, V. 5, May 2018 Page 3
INTRODUCTION WE ARE:
• A 100% Australian business established in 1995 be an established builder who pioneered the development of a unique physical Termite Barrier System
• Our research team, work with the CSIRO and Department of Primary Industry and Fisheries
• All products are A.P.V.M.A. approved
• A company that focuses on updating the skills and training of all its employees and associates
• We supply physical Termite Barriers to many Leading Australian Builders How do builders and home owners benefit from using our Protectant™ ACP
Termite & Waterproofing Barrier system designed for Hebel®?
• You get a Quality Patented Termite Barrier & Waterproofing System that can be adapted to any construction method incorporating Hebel Panels
• We also control all installations with trained installers
ACP Hebel Panel installation manual, V. 5, May 2018 Page 4
Protectant™ ACP Termite Barrier & Waterproofing System for Hebel®
• A four part installation
• Primer
• Termite resistant ADULETH sealant
• Waterproofing undercoat
• Patented termite resistant cloth
• Fully bonded to both concrete and Hebel Panel
• 20 year warranty (conditions apply)

ACP Hebel Panel installation manual, V. 5, May 2018 Page 5
Technical and Training Manual This Technical and Training Manual is the property of The White Ant Co Pty Ltd and its contents is specific to the installation of Protectant™ Termite Barrier &
Waterproofing System for Hebel®, with products referred to within the manual. At
no time may the contents of this manual be given to others or discussed outside The White Ant Co Pty Ltd. Should your involvement with The White Ant Co Pty Ltd cease, this manual must be returned to a company representative. The Technical and Training Manual gives instruction on the basic installation techniques required for the correct installation of Protectant™ ACP Barrier &
Waterproofing System designed for Hebel®. Should an installer be unsure of
any installation they are required to contact a White Ant Co Pty Ltd’s supervisor, manager or the technical and training manager for assistance. The White Ant Co Pty Ltd’s range of products have been tested and appraised by ABSAC, CSIRO and the Department of Primary Industry and Fisheries (QLD) as a physical Termite Barrier System and should be installed accordingly. Independant waterproofing and bonding reports have also been obtained for Hebel Panels. The appraisals — 224 and 321 (ABSAC and CSIRO) — refer to The White Ant Co Pty Ltd system for the installation of PVC and the Protectant™ Polymer Termite Barrier System products respectively, to be used in conjunction with the adhesives AD-TR-SOL Red and ADULETH Termiticide. The adhesives may never be considered as a Termite Barrier without use of one of the appraised products. While the use of the products has been heavily researched and the application techniques proven over a number of years, ongoing research, development and testing may result in changes. Should a change be made, an update to the manual will be provided. Any update is to be placed into the manual and the redundant sections removed. Updates will be provided when necessary. It is the responsibility of regional managers and trainers to ensure all installers are made aware of any alterations and ensure the version and date of the manuals are current. While this manual provides the instructions required to install the products in a manner to ensure the efficiency of the system, be aware that the presentation of the completed installation, yourself and your vehicle are equally important. An installation that looks to be professionally installed by a well presented and competent tradesperson will ensure faith in both the product and yourself. You are the company representative on any installation and it is up to you to ensure that continuity of work is achieved for both yourself and The White Ant Co Pty Ltd.

ACP Hebel Panel installation manual, V. 5, May 2018 Page 6
Pre-requisite for License Approval Before any work can be commenced for The White Ant Co Pty Ltd, it is a requirement that the Job Safety Analysis included in this manual be signed and returned to the Technical and Training Manager. Failure to accept the conditions of the Job Safety Analysis or failure to comply with the conditions during the course of installation will result in instant dismissal. Procedures
• Comply with all site requirements such as site safety inductions, personal protective equipment and reasonable directions from the builder / supervisor
• The Workplace Heath and Safety requirements of The White Ant Co Pty Ltd must be followed at all times
• Before commencing work ensure the Site Safety Analysis is complete — your safety is your responsibility
• All installations from Penetrations to Perimeter Barriers will only be as good as the preparation carried out — dust, mortar and concrete slurry will ensure the installation will fail. Therefore employees must clean the slab rebate and use a bolster / chisel to remove slurry and mortar.
• All installations are to be carried out to the requirements of The White Ant Co Pty Ltd — not the builders request. Should a builder insist on an installation that is not to specification, or he refuses to allow a complete installation, contact a supervisor and supply the builder with a site instruction to prevent any warranty issues at a later time — you are the expert in this field
• On completeion of the installation you must be confident you have installed a
complete Protectant™ Termite & Waterproofing Barrier System for Hebel®
that will; physically prevent termites and water from entering the building, be well presented and leave a clean site for following tradespeople

ACP Hebel Panel installation manual, V. 5, May 2018 Page 7
Training Protocol Licensed Installers An Installers license will not be issued until the following criteria have been met:
• Understanding of the barrier components
• Understanding of how and why the barrier is installed
• Understanding of and training in external waterproofing
• Competency in the standard installation types
• Knowledge of varying types of installations from the training manual When the listed criteria have been satisfied a Level 1 — Accredited Installer’s License will be issued by The White Ant Co Pty Ltd.

ACP Hebel Panel installation manual, V. 5, May 2018 Page 8
Pre-Pour Penetrations Points To Remember
• Penetrations are to be fitted no later than the day before the slab pour
• Do not attempt to install penetrations until the moisture membrane and reinforcing mesh have been placed
• Cut the reinforcing mesh back 65mm from all pipes and remove tape from caps or pipes
• Take care when removing caps as the drainage pipe work may be under pressure Installation
• Push the flange in a single movement to the required position at mid-slab height
• Apply The white Ant Co Pty Ltd tape from above the reinforcing mesh, spiralled to the top of the pipe
• Reapply any tape or caps that have been removed to ensure concrete cannot enter the pipe during the pour
• Check that the reinforcing mesh has been cut back sufficiently from the pipe
• Check that all pipes and conduits have been treated

ACP Hebel Panel installation manual, V. 5, May 2018 Page 9
In some cases due to space restrictions, it may not be possible to fit rigid Penetration Flanges. If it is necessary, use Protectant™ Termite Barrier and zip ties. The Protectant™ Termite Barrier should be firm and neatly trimmed to increase the opportunity for the concrete flow under and around the cluster.

ACP Hebel Panel installation manual, V. 5, May 2018 Page 10
Hebel Panel Surface Preparation
Clean the slab edge and Hebel Panel of dirt, debris, oil, dust, etc. and remove the loose particles of the Hebel Panel with a wire brush. Once done, use banister brush
or blower to clear it away. All surfaces must be firm, clean, dry, sound and smooth.

ACP Hebel Panel installation manual, V. 5, May 2018 Page 11
Prime the clean and dry surfaces for better adhesion, with a brush or spray bottle to the height of the ‘V’ joint (floor level). Concrete must be allowed to cure for 28 days prior to the application of Protek WPU. As the Hebel Panels are porous in nature, they must be sealed — no
exceptions.

ACP Hebel Panel installation manual, V. 5, May 2018 Page 12
Perimeter Barrier Installation
Run a line across the Hebel Panel at finish floor height. Apply a 20mm bead of ADULETH Termiticide on the join of the Hebel Panel and rebate. Then, using a trowel or gloved fingers, smooth out the bead of ADULETH Termiticide to form a solid barrier with the rebate and the Hebel Panel.

ACP Hebel Panel installation manual, V. 5, May 2018 Page 13
Protek WPU cannot span gaps for dynamic cracks, therefore any imperfections in the base of the Hebel Panel are to be repaired by filling them with ADULETH
Termiticide. Vertical expansion joints are to be covered with a self adhesive waterproofing tape.

ACP Hebel Panel installation manual, V. 5, May 2018 Page 14
Apply Protek WPU with a brush, as per the label, to a minimum thickness of 1mm, to a height of 180mm (or internal floor height). Ensuring to get into all cracks and crevices for complete waterproofing.

ACP Hebel Panel installation manual, V. 5, May 2018 Page 15
Once Protek WPU has dried, spray panel with 3M ’90 High Strength’ spray adhesive. Making an even coat to top of termite resistant cloth height (finished floor
level).

ACP Hebel Panel installation manual, V. 5, May 2018 Page 16
Once applied, press cloth across panel ensuring an even coverage.

ACP Hebel Panel installation manual, V. 5, May 2018 Page 17
Points to Remember
• The installation must create a complete physical barrier to termites
• The installation must be well presented
• No waste is to be left on site — refer to the job safety analysis
• If the installation is to require additional work in the immediate future, ensure you notify a supervisor and inform the builder that this work is required, to ensure a complete barrier that does not require rectification
• Clean tools and equipment with water and detergent while membrane is still wet
• Health and safety: gloves and eye protection should be worn during application, if product is splashed onto skin it should be washed off with water before it dries

JOB SAFETY ANALYSIS WORKSHEET – ACTION PLAN
INSTALLER /SUB CONTRACTOR
JOB STEPS
POTENTIAL HAZARDS/INJURIES
CONTROL MEASURES RESPONSIBILITY
IMPLEMENTATION
Prior to commencing any work all installer/contractors must possess the relevant safety induction card for that state
Not meeting legal requirements will result in expulsion from the site and a possible fine for both the installer and the employer
Ensure all state requirements are understood
Employer, regional/area managers and licensees
Prior to commencing work for The White Ant Co
Builder/site specific induction requirements must be met
Expulsion from the site and/or a lack of awareness of site specific hazards
Be aware of builder specific requirements prior to commencing work
Regional/area managers, licensees and supervisors
Prior to commencing work on the site
Site observation and planning
Work areas to be checked for hazards – slip, trip, fall, projections, noise or hazards created by other trades, is site access suitable?
If hazards can be safely and easily removed, this Can be done while the site safety audit is carried out. Should any hazard be of high risk – no work is to be carried out prior to contacting a supervisor.
Installer/supervisor
Prior to commencing work on the site
Other trades on site - trades working overhead
Serious injury Overhead work in progress ie working either sheet or tile
Installer No access to site
ACP Hebel Panel™ installation manual, V.5, May. 2018

Electrical equipment and hand tools
Electrocution or injury
Electrical tools must carry current test and tag details. All hand tools must be in good working condition and only used for their intended purpose, guards in place as per original design.
Installer/supervisor
Regularly maintain and update test and tag as required.
JOB STEPS
POTENTIAL HAZARDS/INJURIES
CONTROL MEASURES RESPONSIBILITY
IMPLEMENTATION
The White Ant Co personal protective equipment
Injury, loss of income
Steel cap boots to be worn on all sites, gloves are to be worn when handling all products, wash hands prior to eating, drinking or smoking
Installer/supervisor
Prior to commencing work on the site and at job completion.
Site specific PPE requirements
Expulsion from the site, loss of income
Site specific PPE requirements to be met at all times
Installer/supervisor Gain knowledge of site specific
Outdoor work
UV exposure (skin damage/cancer risk)
Wear adequate clothing (eg shirt, broad brimmed hat, Sunglasses etc) and apply sunscreen
Installer
Prior to commencing work and at regular intervals
Materials handling to and from site
Environmental hazard
Ensure all materials particularly adhesives are secure from spillage - all materials to be secured in a locked tool box
Installer
Prior to leaving home/warehouse or site
ACP Hebel Panel™ installation manual, V.5, May. 2018

Materials handling on site
Severe injury from site traffic, sprains/strains
Decant adhesives prior to carrying to site
Installer Be aware at all times
Confined spaces in lift or stair well
Breathing difficulties, headache
Breathing apparatus may be required. Do not commence without clearance from Technical Manager. Wall Sheeting to be installed to front side of walls, do not commence if machinery is operating near excavation
Installer/supervisor Assess work area requirements before entering
ACP Hebel Panel™ installation manual, V.5, May. 2018
Acceptance Signature: Date:
JOB STEPSPOTENTIAL
HAZARDS/INJURIESCONTROL
MEASURES RESPONSIBILITYIMPLEMENTATI
ON
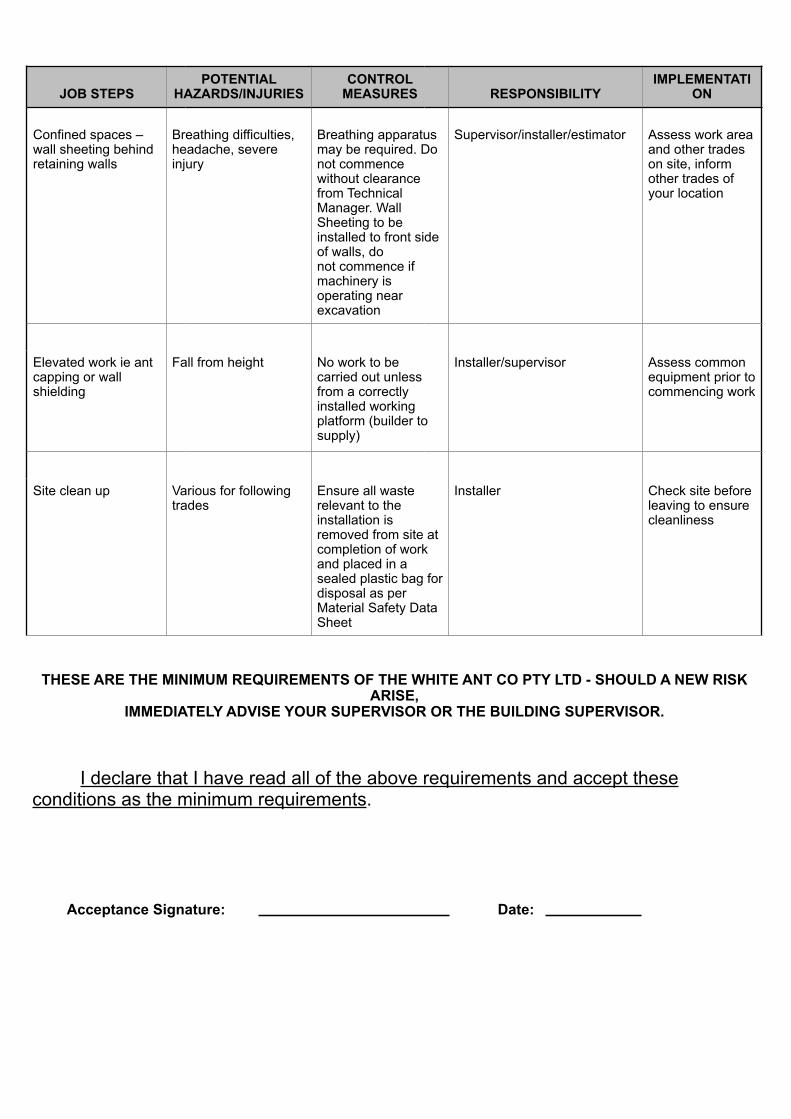
Confined spaces – wall sheeting behind retaining walls
Breathing difficulties, headache, severe injury
Breathing apparatus may be required. Do not commence without clearance from Technical Manager. Wall Sheeting to be installed to front side of walls, do not commence if machinery is operating near excavation
Supervisor/installer/estimator
Assess work area and other trades on site, inform other trades of your location
Elevated work ie ant capping or wall shielding
Fall from height
No work to be carried out unless from a correctly installed working platform (builder to supply)
Installer/supervisor
Assess common equipment prior to commencing work
Site clean up
Various for following trades
Ensure all waste relevant to the installation is removed from site at completion of work and placed in a sealed plastic bag for disposal as per Material Safety Data Sheet
Installer
Check site before leaving to ensure cleanliness
THESE ARE THE MINIMUM REQUIREMENTS OF THE WHITE ANT CO PTY LTD - SHOULD A NEW RISK ARISE,
IMMEDIATELY ADVISE YOUR SUPERVISOR OR THE BUILDING SUPERVISOR.
I declare that I have read all of the above requirements and accept these conditions as the minimum requirements.

™

™

™

™

SLIDING DOOR
≥
270
mm
, the
Heb
elPa
nel
may
be
insta
lled
wher
e <
270m
m. T
hissh
ould
be m
ason
ary b
rick o
r con
cret
ebu
ild o
ut in
line
with
Heb
el ex
tern
alwa
ll pan
els, o
r Heb
el Pa
nelin
g
™

SL
IDIN
GD
OO
R
™

™

™

≥3
™

™


™

™

™ACP
™
–105mm
™

™

™

DOOR
™

™

••
•
Timber or Steel Frame
Hebel® 75 PP XL
Std
B Ve
neer
Conc
rete
Sla
b
Ad-U
leth
term
itici
de se
al b
etw
een
base
of H
ebel
® Pan
el a
nd fo
otin
g(2
0mm
wid
e an
d 20
mm
hig
h,m
imim
um 7
mm
tick
ness
)
V-Gr
oove
app
lied
by H
ebel
®re
nder
ers d
urin
g re
nder
proc
ess a
t int
erna
l �oo
r lev
el.
Hebe
l®Re
nder
Dam
p co
urse
5m
m fr
om fa
ce o
f pan
el
Hebe
l® M
orta
r (on
lyw
here
�at
ness
>3m
mpe
r 600
mm
pan
el w
idth
Hebe
l Pow
erPa
nel X
L Ter
mite
and
Slab
Edge
Trea
tmen
t
Stee
l tro
wel
�ni
sh to
the
top
of th
e fo
otin
g
Prou
dly
Austr
alia
n De
signe
d, M
anuf
actu
red, O
wned
and
Oper
ated
.
FULL
Y PA
TENT
ED
SYST
EMFr
eeca
ll 13
00 5
52 5
32em
ail u
s at
: enq
uiri
es@
ppm
gmt.
com
.au
or v
isit
our w
ebsi
te a
t w
ww
.pro
tect
antp
estm
anag
emen
t.co
m.a
uA
BN 5
1 10
0 70
6 00
9
Q
BCC
1014
982
PRIM
ER
WAT
ERPR
OOF
PROT
ECTA
NTTE
RMIT
EBA
RRIE
R
REND
ER
Min
imum
20m
m fr
om to
p ed
ge o
fre
bate
to fa
ce o
f pan
el
150m
m
90mm (minimum)180mm (maximum)
75m
m (m
inim
um)
V-Gr
oove
abo
ve F
GL,
20m
m a
bove
slab
or
tiled
�oo
r.(S
ee a
lso N
ote
A)75mm
(minimum)
15mm(min.)
Inte
rnal
Sla
b Le
vel
15m
m m
inim
um (1
05m
mm
axim
um) p
anel
em
bedm
ent
belo
w F
GL, o
r 70m
m m
inim
um(1
60m
m m
axim
um) w
here
pane
l em
bedd
ed b
elow
slab
or ti
led
�oor
.
FGL
Prot
ecta
ntAC
P Ba
rrier
�xed
to th
eHe
bel®
pane
l
NOTE
A:
The
heig
ht o
f the
inte
rnal
slab
leve
l abo
ve th
e ad
jace
ntex
tern
al �
nish
ed g
roun
d le
vel
(FGL
) mus
t com
ply
with
the
min
imum
requ
irem
ents
as
set o
ut in
Cla
use
3.1.
2.3
ofNC
C 20
16 V
olum
e Tw
o.
Prot
ecta
nt A
CP C
loth
Bar
rier
�xed
to th
e He
bel p
anel
.
CMA-
CM40
036
CertMark International
Prot
ecta
nt A
CP (A
d-Ul
eth)
seal
ant –
m
in. 2
0mm
wid
e x
20m
m h
igh
min
. 7m
m
PRIMERWATERPROOF PROTECTANT
TERMITE BARRIERRENDER