Embed Size (px)
Citation preview

THE WORLD OF DMR
DIGITAL MOBILE RADIO
The who, what, where, how
do you know show!
by Scott Bratt KG5VW 2/09/2016
DMR is an open standard for digital mobile radio, defined in the European Telecommunications
Standards Institute (ETSI).
The DMR standard operates within the existing 12.5 kHz channel spacing (Narrow Band) used in
land mobile frequency bands globally, but achieves two voice channels through two-slot TDMA
technology. For comparison, normal ham radio VHF/UHF FM radios are 25 kHz channel spacing
(Wide Band).
Because of the two-slot TDMA technology two separate conversations can be done on the same
12.5 kHz frequency simultaneously. In effect, you double the number of available conversations
while using ½ the bandwidth of traditional wide band FM signal.
Many often claim that DMR has superior coverage and performance to analog FM. Forward error
correction can achieve a higher quality of voice when the receive signal is still relatively high. In
practice, however, digital modulation protocols are much more susceptible to multipath
interference and fail to provide service in areas where FM would otherwise provide a degraded
but audible voice service. However, digital has the effect of being more legible over a wider
range due to being either “there” or “completely gone”. No hash or white noise.
An internet connection is required to link the repeaters together through a server. The local servers
are linked to other servers at a national and international level to create the connections to all of
the other repeaters, so you can virtually talk to anywhere in the world that has a DMR repeater.

System configuration and access to talkgroups is dependent on network system owners who
decide which talkgroups are available for use through each C-Bridge. Standardized talkgroups
are strongly recommended and non-standard and private talkgroups are not recommended.
A list of all the standard talkgroups (TG’s) is available on the DMR-MARC website, however, only a
portion of those are avalible for use on your local repeater(s).
The server (C-Bridge) your local repeater links to dictates which TG’s are available for use.
Otherwise, any talkgroup could be configured for private radio to radio communications (not
recommended).
Radio to radio (Simplex) operation without a repeater is also available, as long as both radios are
configured the same.
The repeater and the mobile/portable radios are capable of both analog FM and digital modes
but not at the same time. It is either analog FM or digital on a channel by channel basis, set by
the user programming. A simple change of the channel knob will go from digital on the digital
repeater frequency to a FM repeater on another frequency.
All users must register to receive a unique ID# from the DMR-MARC website:
http://www.dmr-marc.net/cgi-bin/trbo-database/register.cgi

EXAMPLE OF TYPICALLY AVAILABLE TG’S ON THE
PONCA CITY DMR 444.750 REPEATER AND OTHERS:
Time Slot 1 TG’s:
TG 1 Worldwide or Tech Talk
TG 3 North America (Calling channel, 2 minute rule)
TG 13 Worldwide English
TG 99 Simplex only (Direct, radio to radio)
TG 9998 Parrot (Records & plays back your audio)
Time Slot 2 TG’s:
TG 2 Local
TG 8810 Eastern Oklahoma
TG 3140 Oklahoma Statewide ****
TG 3175 TX/OK Regional
****Notice that TG 3140 is the same as a DMR-MARC ID number begins???
(Example: My number is 3140059)

BASIC INFORMATION NEEDED FOR
CONFIGURING YOUR RADIO:
User ID# from the DMR-MARC website (multiple radios, multiple ID#’s, mixed opinions?)
Repeater operating frequency – 444.750/449.750 Mhz (Ponca City)
Color Code: CC0 through CC15 – Helps keep overlapping repeaters from being accessed by
the user. You only bring up the repeater you are configured for, similar to the way CTCSS tones
limit access.
Correct Time Slots and available TG’s on the repeater you are using (See previous slide). These
TG’s will need to be configured in your contact list as “GROUP CALL” before you configure the
digital channel.
Examples of contacts with TG information:
Contact #1 Name: Local Call type: GROUP CALL CALL ID 2 Tone: NO
Contact #2 Name: E. OKLA Call type: GROUP CALL CALL ID 8810 Tone: NO
Contact #3 Name: OK ST Call type: GROUP CALL CALL ID 3140 Tone: NO
Etc….
CREATING A CODEPLUG FROM SCRATCH
WITH CONNECTSYSTEMS CUSTOMER
PROGRAMMING SOFTWARE (CPS)
(Software and firmware upgrades are available from www.connectsystems.com website)
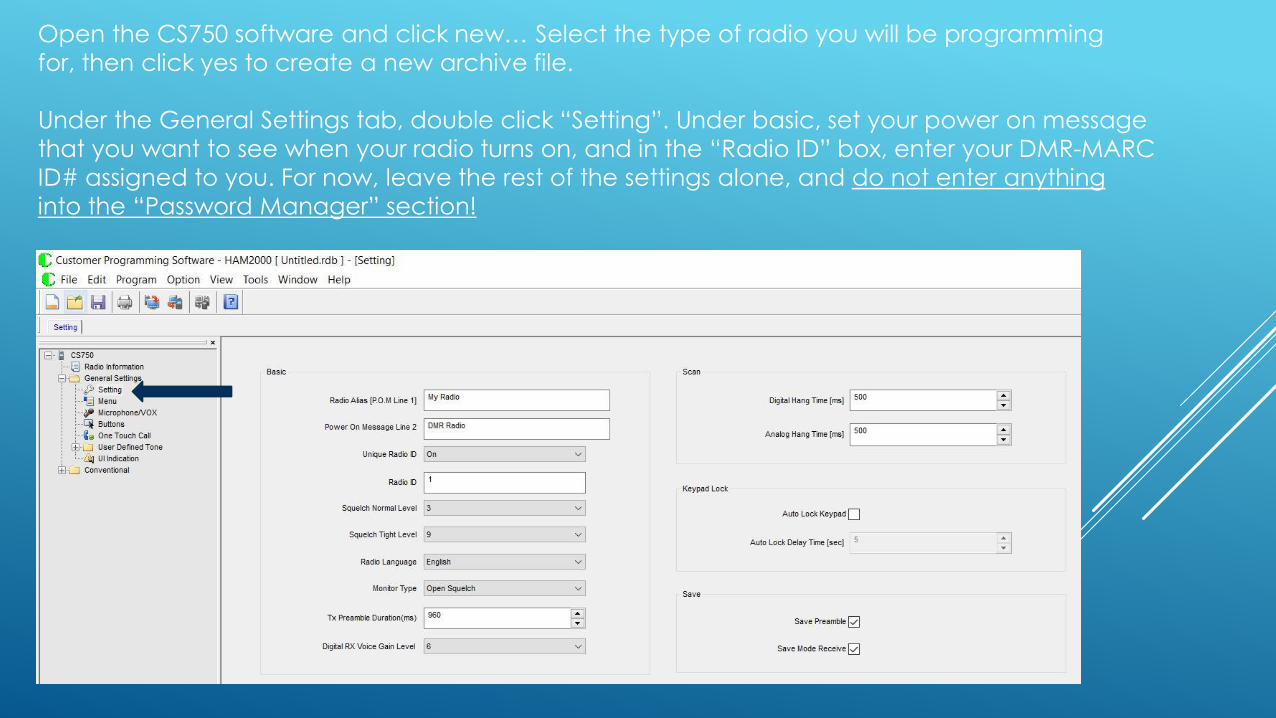
Under the General Settings tab, double click “Setting”. Under basic, set your power on message
that you want to see when your radio turns on, and in the “Radio ID” box, enter your DMR-MARC
ID# assigned to you. For now, leave the rest of the settings alone, and do not enter anything
into the “Password Manager” section!
Open the CS750 software and click new… Select the type of radio you will be programming
for, then click yes to create a new archive file.

Next, add contacts to your contact database:
Click the “+” next to DMR Services
to expand the menu structure to
see the “Contacts” tab
Double click “Contact” to
open contact list:

Fill in Contact #1 with the appropriate TG
information, tab between fields or just
double click on each field to select. Add
new contacts as needed until all your TG’s
are setup. These will be used when you
configure your digital channels.
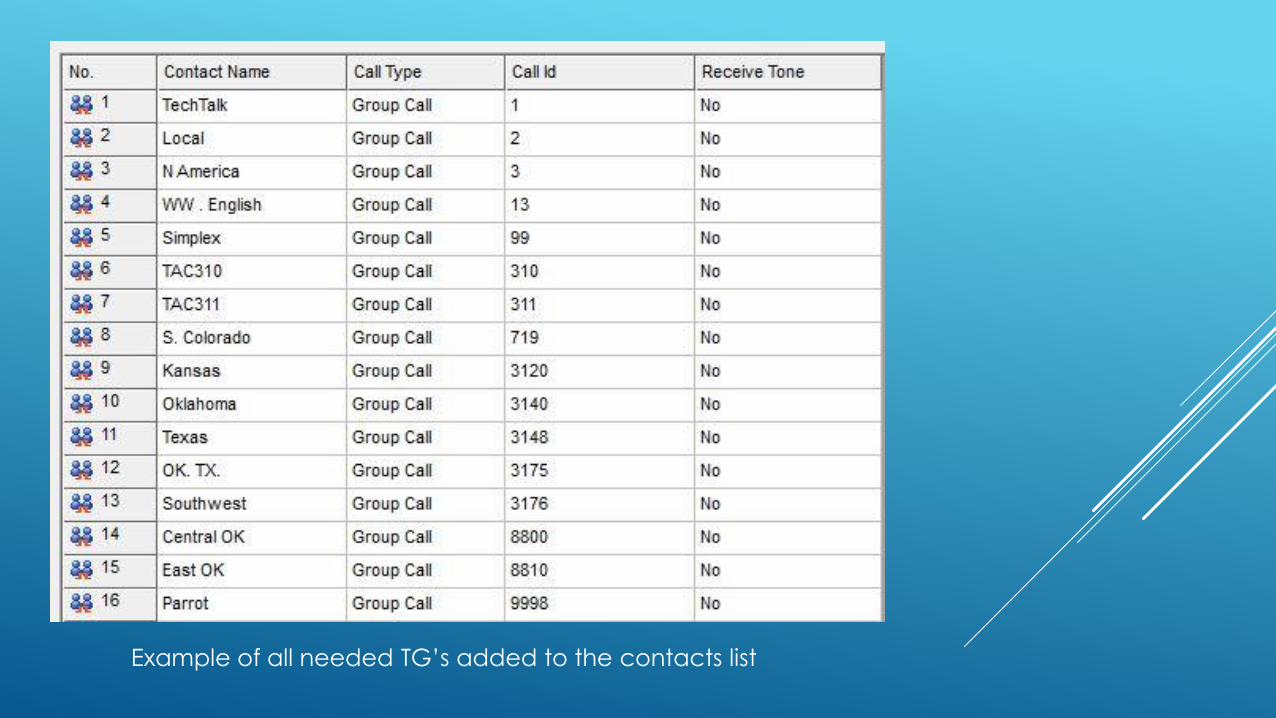
Example of all needed TG’s added to the contacts list
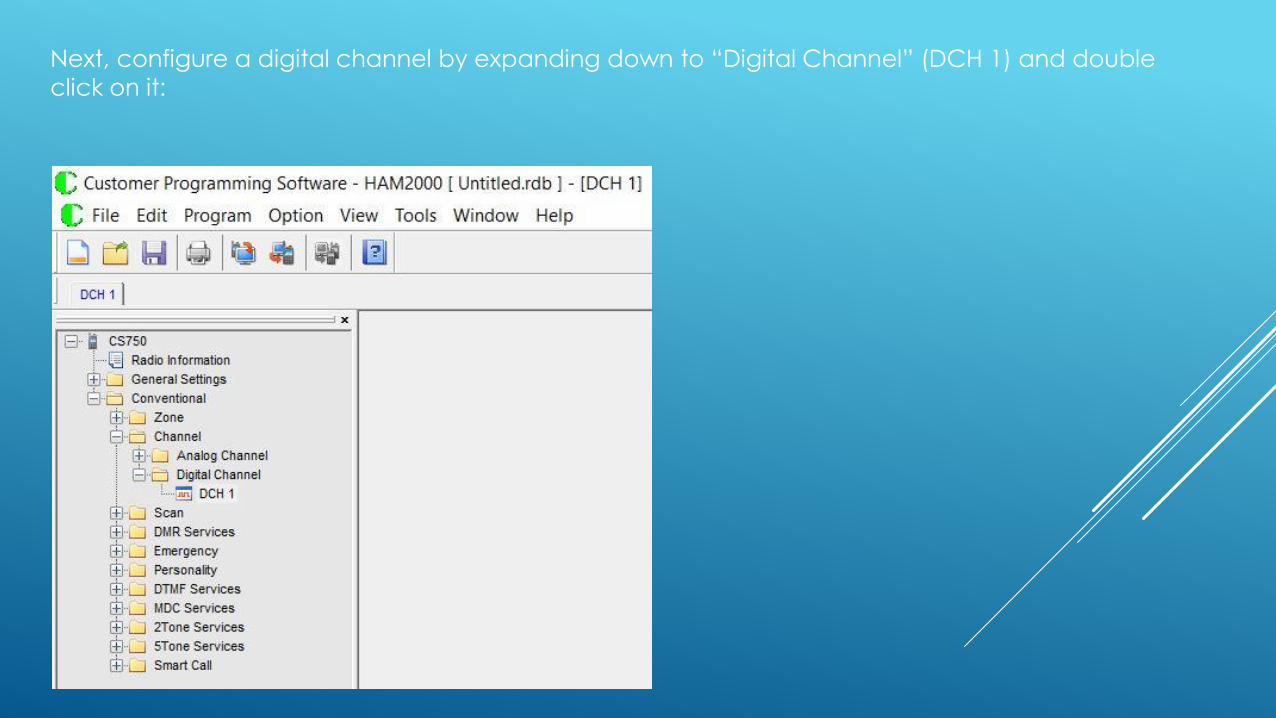
Next, configure a digital channel by expanding down to “Digital Channel” (DCH 1) and double
click on it:

Add Channel name, Color Code, Time Slot, RX and TX frequency, TX Contact, TX Admit to Color Code Free, TX Time-Out to 120 seconds. Leave everything else set to the defaults.
When finished click on “+” to add another channel.

Finished channel should look like this one. Once you learn more in-depth
what each option is for you can add or remove features from your digital channel configuration. This is the basics.

Analog channel configuration is almost the same, be sure to select 25Khz Channel Band instead of the
default 12.5 KHz. Configure the frequency and any CTCSS tones as needed. After creation, this channel can be added to the zones the same way as the digital channels can.

Next, create a zone and
add your new channel into it. In this case I would change the Zone Alias to “PONCA”. As you add more digital and analog channels
you can add them to this zone, or create new zones. Zones are a bank of up to 16 channels. You can have many zones for covering each repeater, or you can
mix and match all created channels however you want. It would be a good idea to save your work at this point by clicking on the save ICON
or “File” then “Save as” and naming this file whatever you want to so you can remember what it is. This file is what is referred to as a “Codeplug”. This file can be
shared with others with the same model radio to program their new radio exactly like yours.

Programming for the TYT MD-380 is very similar with almost the exact same menu structure. Here, under General settings you have Radio Name, and ID
which will be your DMR-MARC registration number, and under Intro Screen you can program your start up screen message.
The rest is very similar, you must program your contacts first, then your channels, then your zones. As with all software, be sure to save your work!
Next, with either program you can program the codeplug to your radio by clicking on “Program” then “Write”. If your cable is correct with the correct
driver, and the radio is turned on, it should start writing to your radio.
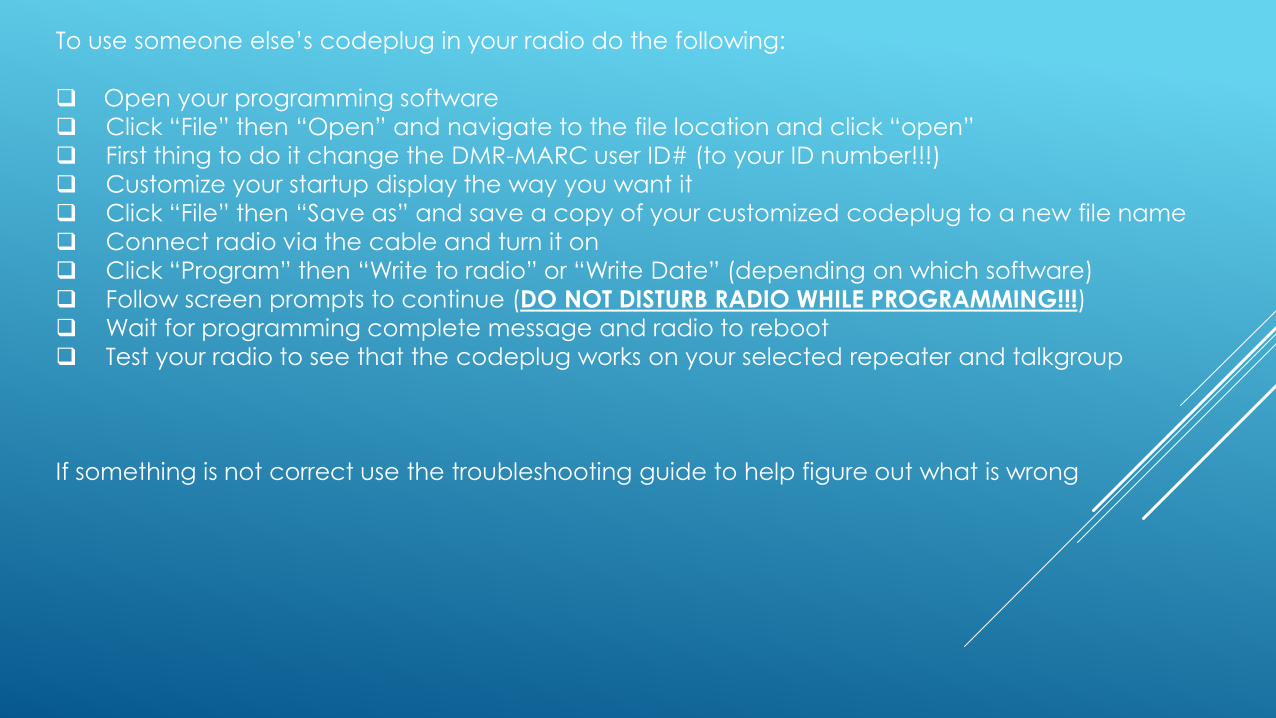
To use someone else’s codeplug in your radio do the following:
Open your programming software
Click “File” then “Open” and navigate to the file location and click “open”
First thing to do it change the DMR-MARC user ID# (to your ID number!!!)
Customize your startup display the way you want it
Click “File” then “Save as” and save a copy of your customized codeplug to a new file name
Connect radio via the cable and turn it on
Click “Program” then “Write to radio” or “Write Date” (depending on which software)
Follow screen prompts to continue (DO NOT DISTURB RADIO WHILE PROGRAMMING!!!)
Wait for programming complete message and radio to reboot
Test your radio to see that the codeplug works on your selected repeater and talkgroup
If something is not correct use the troubleshooting guide to help figure out what is wrong

As you can see, it can be very time consuming to create a codeplug from scratch so many hams are willing to share what they have created with others. Some codeplugs will have thousands of channels and hundreds of zones, and also the entire DMR-MARC contact database programmed into the codeplug. Once you learn how, you can customize one of those to fit your needs, and possibly save yourself some time!
There is no one, perfect codeplug except for the one you create specifically for yourself. Maybe you only require the local repeater, or only want to have the ones from surrounding areas in your radio? Maybe you are travelling to another city or state and want to take your DMR radio with you? You can create a second codeplug with those settings so you can use it there and program it from your laptop.
DMR-MARC website has a searchable database to help locate repeaters and other DMR users.
A great reference to how DMR works can be found online at http://guide.k4usd.org “$2.00 Amateur Radio Guide to Digital Mobile Radio (DMR) By John S. Burningham, W2XAB May 2015”
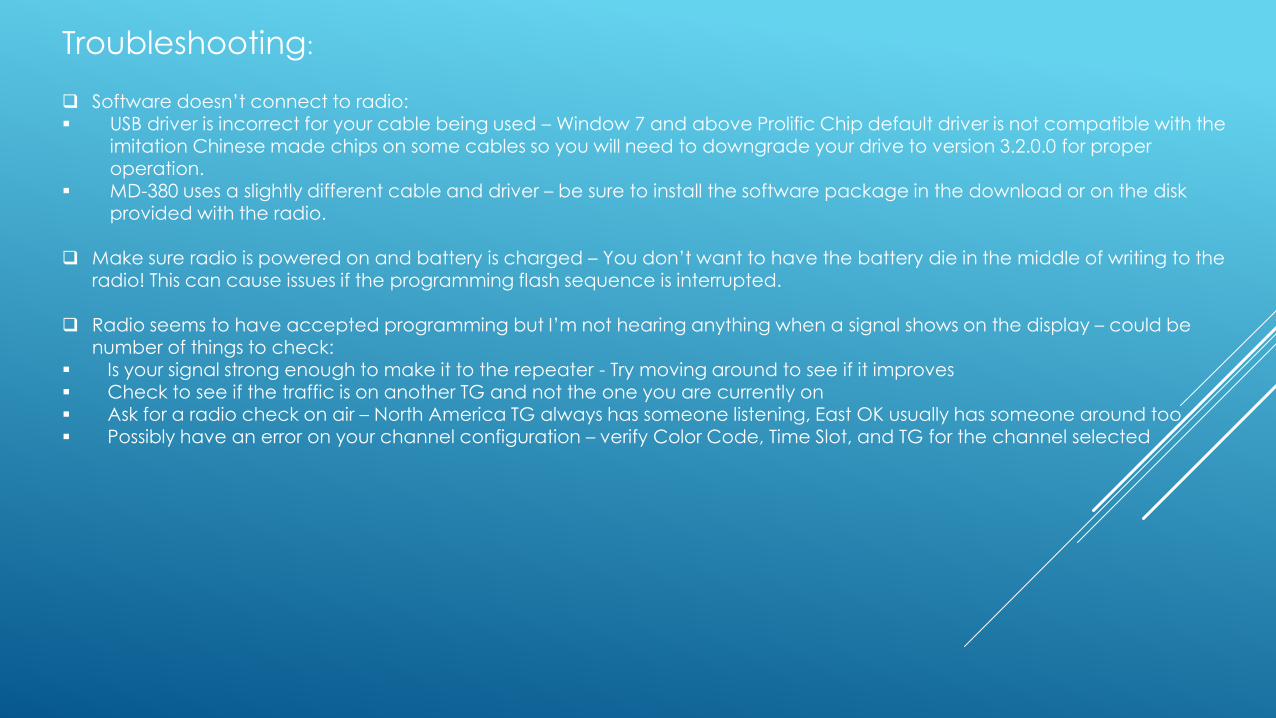
Troubleshooting:
Software doesn’t connect to radio: USB driver is incorrect for your cable being used – Window 7 and above Prolific Chip default driver is not compatible with the
imitation Chinese made chips on some cables so you will need to downgrade your drive to version 3.2.0.0 for proper operation.
MD-380 uses a slightly different cable and driver – be sure to install the software package in the download or on the disk provided with the radio.
Make sure radio is powered on and battery is charged – You don’t want to have the battery die in the middle of writing to the radio! This can cause issues if the programming flash sequence is interrupted.
Radio seems to have accepted programming but I’m not hearing anything when a signal shows on the display – could be number of things to check:
Is your signal strong enough to make it to the repeater - Try moving around to see if it improves Check to see if the traffic is on another TG and not the one you are currently on Ask for a radio check on air – North America TG always has someone listening, East OK usually has someone around too Possibly have an error on your channel configuration – verify Color Code, Time Slot, and TG for the channel selected