Embed Size (px)
Citation preview

1 3D SOP, v2.0, 5/2013
The University of Alabama Rodgers Library 3D Printing Studio
Standard Operating Procedures
Vincent F. [email protected]
IntroductionThe University of Alabama Libraries maintains a Bits from Bytes (BFB) 3D Touch Printer in the Rodgers Library for Science and Engineering 3D Printing Studio. Supporting 3D design and conversion software is installed on all work-stations within the Scholars’ Station (adjacent to the 3D Studio). The 3D Touch Printer is capable of precisely extruding plastic layer on top of layer into a multitude of 3D objects. Briefly, the instrument melt-processes plastic into fine thread and deposits this thread in the melt phase as thin layers according to a 3D digital model.
Figure 1–1. Photograph of BFB 3D Touch Printer in Rodgers Library.

2 3D SOP, v2.0, 5/2013
Policies Users
The BFB 3D Touch Printer is available for use by all current University of Alabama faculty, students, and staff.
Operation and Safety Training
Participation in a Rodgers Library 3D training workshop, followed by an individual meeting with Vincent F. Scalfani or a Rodgers Library staff member, is required before using the 3D Printing Studio. Training will be offered as needed and promptly scheduled for future users. Contact Vincent F. Scalfani ([email protected]) to sign up for training. The safety guide on page 7 will need to be completed and returned to the Rodgers Library circulation/reserve desk before experimenting in the studio.
Availability And Scheduling Print Jobs
3D print jobs can be started between 9 AM – 6 PM on M–F. Users may schedule print jobs online after attending a Rodgers Library 3D training workshop. First time users must meet with us individually before printing, see below for details. Link to online calender:
https://www.lib.ua.edu/content/selmrbs
Users may book multiple time slots. 3D print jobs requiring more than 6 hours can be run overnight and should be scheduled to start between 3–6 PM M–F. This will allow other 3D users with shorter print jobs to use the 3D Printing Studio during the day.
Cost
3D printing is completely free. Enjoy!
Assistance and Starting Print Jobs
New users that have attended the Rodgers Library 3D training workshop should first schedule print time online. We will then meet with you during your scheduled time (either Vincent F. Scalfani or a Rodgers Library staff member). The purpose of this meeting is to give you an opportunity to review procedures, ask questions, perform the calibration, and become comfortable operating the 3D printer. After you have met with us individually at least once and feel confident enough to use the 3D Printing Studio independently, we will add you to an authorized user list.
As an authorized user, you may experiment in the 3D Printing Studio inde-pendently. However, please do not hesitate to ask questions and seek further assistance from us at anytime. The 3D printer toolkit, manual, and log book are available at the front circulation/reserve desk for checkout to authorized users.
3 3D SOP, v2.0, 5/2013
Responsibilities of Authorized Users
Authorized users are to follow all operating and safety training administered. It is expected that users will be considerate of others and maintain a safe working environment around the 3D Printing Studio. Accurate note-taking of print jobs should be recorded in the Rodgers 3D Printing Studio log book.
See log book form (page 8) for required data logging. The data fields, such as material mass and estimated print, time are available within the Axon build file report.
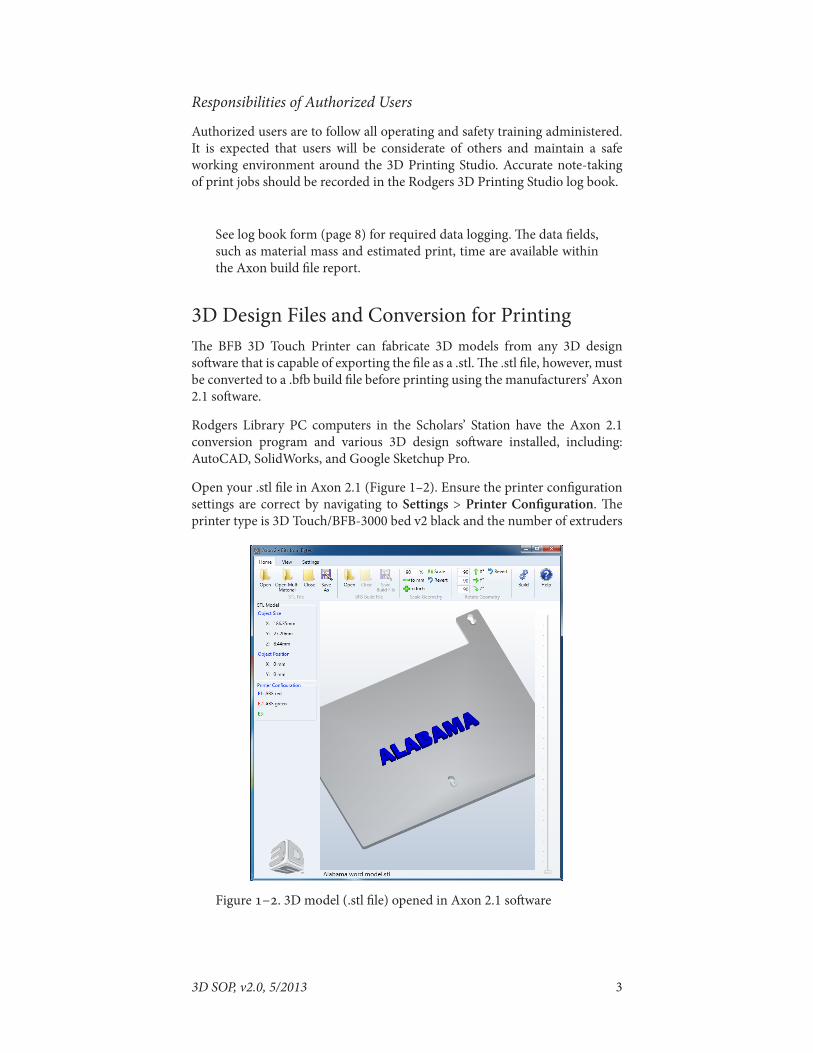
3D Design Files and Conversion for PrintingThe BFB 3D Touch Printer can fabricate 3D models from any 3D design software that is capable of exporting the file as a .stl. The .stl file, however, must be converted to a .bfb build file before printing using the manufacturers’ Axon 2.1 software.
Rodgers Library PC computers in the Scholars’ Station have the Axon 2.1 conversion program and various 3D design software installed, including: AutoCAD, SolidWorks, and Google Sketchup Pro.
Open your .stl file in Axon 2.1 (Figure 1–2). Ensure the printer configuration settings are correct by navigating to Settings > Printer Configuration. The printer type is 3D Touch/BFB-3000 bed v2 black and the number of extruders
Figure 1–2. 3D model (.stl file) opened in Axon 2.1 software

4 3D SOP, v2.0, 5/2013
is two. Set the plastic type and color for extruder 1 (left extruder when looking at the front of the printer) and extruder 2 (right extruder).
Next, start the conversion process by navigating to the Build tool path on the main tool bar. Select your layer thickness (default is 0.25 mm), raft material, part material, and optional support material, if you suspect it may be necessary based on your design (Figure 1–3). You may also choose to adjust the fill density and fill pattern.
Hypothesize which fill pattern(s) and what fill density range may be ideal for your object. A 20% fill and random line fill pattern is a good starting point for the first print. However, you may need to experiment with a few different settings in order to achieve an acceptable 3D printed object. After you have entered your adjustments, click on Build. The software will report various build statistics, such as the approximate mass of the 3D printed object and the required print time.
Figure 1–3. Build settings in Axon 2.1 (top). Build progress window in Axon 2.1 (bottom).

5 3D SOP, v2.0, 5/2013
Before clicking OK within the build progress window, write down the build file statistics so you can record them in the 3D printing log book. If you forget to record these values, they are also reported on the left-hand side of the Axon 2.1 menu, under the sub heading Build File.
Lastly, save your build file to a flash drive under the main directory. The 3D Touch Printer cannot read files in folders.
Printing an ObjectBefore printing an object, the 3D printer must be calibrated such that the print extrusion heads are at an ideal distance from a level print bed. The calibration ensures you will not damage the 3D printer. In addition, proper calibration is required for best print results.
The calibration file is located on the supplied flash drive within the 3D toolkit. There is one file for checking ABS printing (RaftABS_checkfile) and one for checking PLA printing (RaftPLA_checkfile). As a reminder from the training, there are three operations you should perform before printing:
1. Check the level of the print board and adjust if needed.
2. Check Z height and adjust if needed.
3. Run the calibration file and repeat steps 1 and 2 if calibration print is not acceptable (compare to photos in BFB 3D Touch Printer manual).
After proper calibration, insert your flash drive into the left USB port located towards the bottom of the instrument front panel. Press the home button on the touch screen display to bring the print heads and print board to the zero, zero (home) position.
Next, touch the print symbol, and select your file by touching the file name. The 3D printer will now start heating the extrusion print head (only one is heated at a time), and then start printing. Before leaving, watch the print job for 10–20 minutes to ensure the raft print was successful (clean print lines that are not wavy or overlapping) and there are no early errors with the print job. If the raft was successful, you can safely leave the print job to complete automati-cally. Please place a note on the 3D printer to notify others that the printer is in use. If the raft print was not successful, cancel the print job and re-calibrate the instrument. Vincent F. Scalfani, or a trained Rodgers Library staff member, can assist you with the calibration.
Removing an Object From the Print BoardVerify the printer is not in operation, and then, remove the print board. Using the thin scraping tool, carefully pry around your object, lifting it off of the board.

6 3D SOP, v2.0, 5/2013
Notes11/20/2012 — Poly(lactide) (PLA) material does not like to sit in guide tube for more than a day. If the printer has not been used for more than 24 hours, check for cracks in plastic. If a crack is located, reload PLA feed material.
12/1/2012 — Between commands on touch screen, home the extruder heads. We have noticed the printer may lose its position between commands. Sending the extrusion heads to the home position before executing a command avoids this issue.
4/1/2013 — Extruder 2 would not operate, motor would oscillate slowly with clicking noise. DL diagnosed and found unplugged stepper motor cable.
4/10/2013 — Extruder 2 bearings failed, extruder was re-built by DL.
7 3D SOP, v2.0, 5/2013
The University of Alabama Rodgers Library 3D Safety Training Instructions
☐ I understand the extrusion print heads are hot during operation (> 200 °C) and while cooling down after operation. Do not touch the extrusion print heads and always assume the print heads are hot.
☐ I understand there are multiple moving parts (e.g. XY movement of ex-trusions print heads, Z movement of printing stage). Always assume the instrument is under operation before attempting to install or remove any printer components or 3D printed objects. Do not attempt to install or remove components/objects from the instrument until you have ensured it is not in use (verify by checking status of electronic screen). Be sure to also tie back any long hair or baggy clothing. Do not attempt to make any mechanical adjustments while the printer is in operation. Addition-ally, if the instrument locks up or gets “jammed” during operation, do not attempt to manually move any parts of the instrument. Instead, use the automated controls on the electronic panel to cancel the print job and move the Z stage/XY print heads clear of the obstruction. As a last resort, you may also perform an emergency system shutoff by unplugging the power to the instrument.
☐ I understand when removing an object from the print board with the scraper tool to always scrap away from myself. Be conscious of how you hold the print board when scraping off an object. Keep you hands clear of the scraper for safety.
☐ I will post a notice on the instrument when it is in use for the safety of others and maintain accurate logs of print jobs in the Rodgers 3D printing log book.
I, ___________________________, understand and agree to abide by the safety regulations set forth above, as well as any further instructions received from Rodgers Library personnel.
Signature:
Date:

Date
Name/e-mail
Department
UA status
Description of print job
Number of objects
Dimensions
Print material
Estimated print job time
Calibration
Adjustments to instrument
Outcome/observations of printed object
Errors/notes
The University of Alabama Rodgers Library 3D Printing Studio Log Book Form