Embed Size (px)
Citation preview
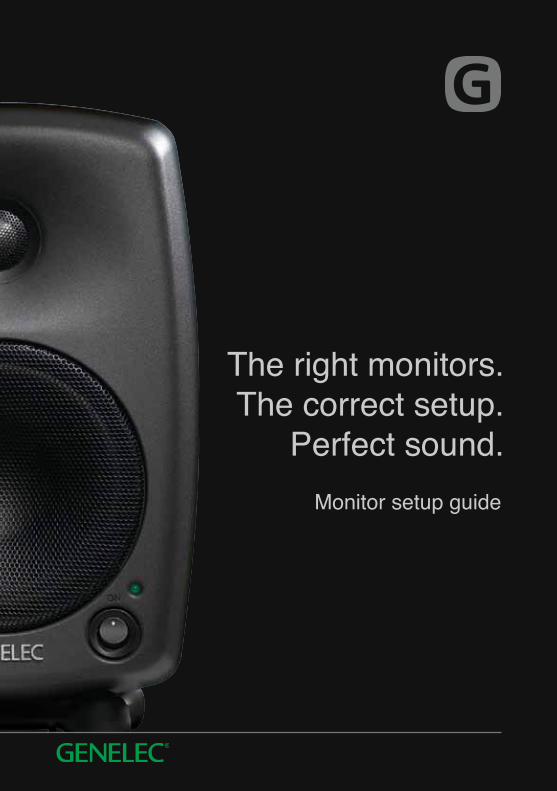
The right monitors.The correct setup.
Perfect sound.Monitor setup guide

3
Active electronic crossover operating at low signal levels.
Optimized amplifiers. Each transducer is driven by its own optimized amplifier.
Protection circuitry. Sophisticated drive unit protection circuitry for safe operation.
Room response controls. Precise room response controls for optimizing in-room performance.
Directivity Control Waveguide DCW for flat on- and off- axis response.
Genelec key technologies ..................... 3
What is a monitor? ............................. 4
Monitoring ............................................. 5
Basics of system setup ...................... 6
Monitor placement ................................ 7
Monitor settings ..................................... 11
Subwoofer placement ........................... 12
Room improvements .......................... 14
Room treatments .................................. 15
Acoustic improvements ........................ 18
Fundamentals ..................................... 20
Monitor listening distancerecommendations ................................. 25
Genelec key technologiesTable of contents
Monitor setup guide2
4 5Monitor setup guideWhat is a monitor?
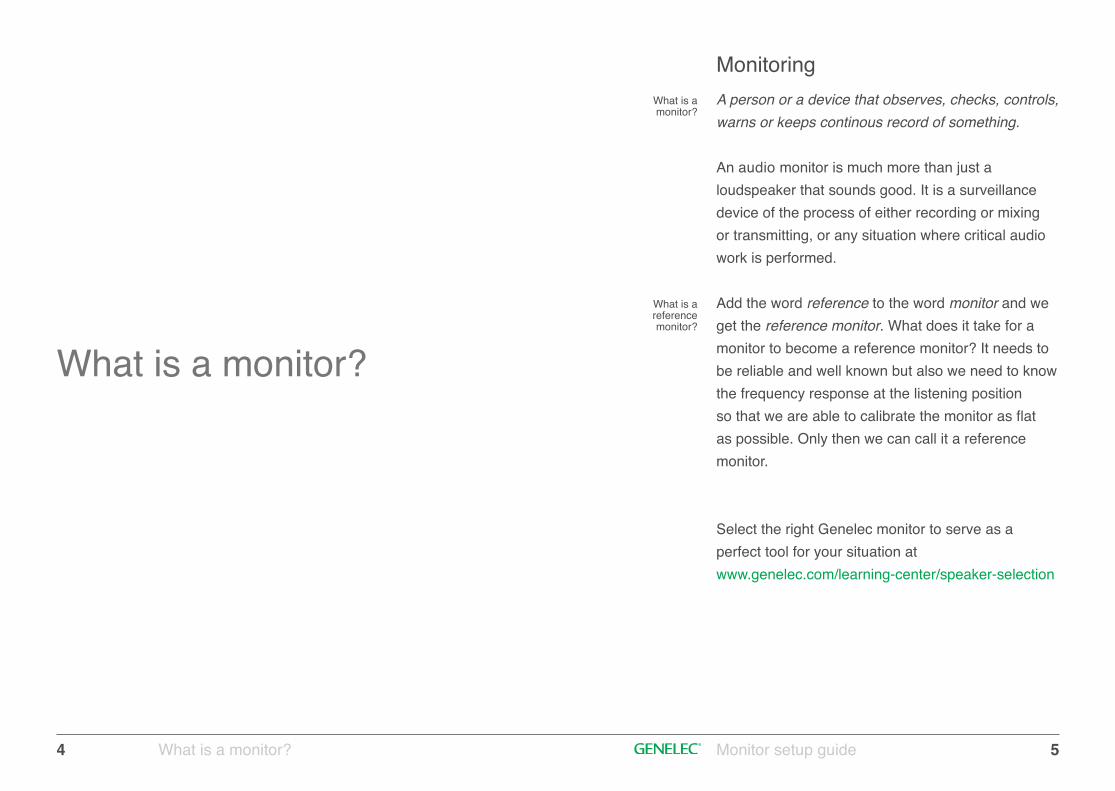
A person or a device that observes, checks, controls, warns or keeps continous record of something.
An audio monitor is much more than just a loudspeaker that sounds good. It is a surveillance device of the process of either recording or mixing or transmitting, or any situation where critical audio work is performed.
Add the word reference to the word monitor and we get the reference monitor. What does it take for a monitor to become a reference monitor? It needs to be reliable and well known but also we need to know the frequency response at the listening position so that we are able to calibrate the monitor as flat as possible. Only then we can call it a reference monitor.
Select the right Genelec monitor to serve as a perfect tool for your situation atwww.genelec.com/learning-center/speaker-selection
What is a monitor?
What is a reference monitor?
Monitoring
What is a monitor?
6 7
Basics of system setup.
Monitor placementStep 1
Step 2
Step 3
Step 4
Step 1
Step 2
Basics of system setup. Monitor setup guide
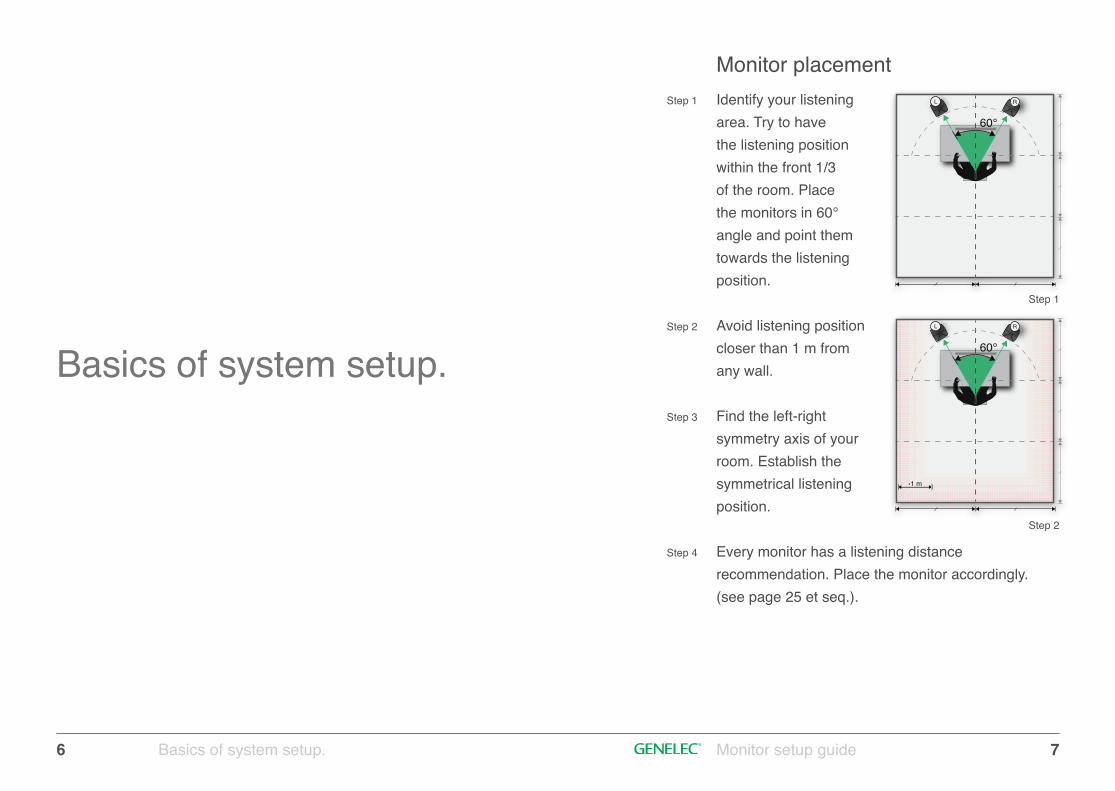
Identify your listening area. Try to have the listening position within the front 1/3 of the room. Place the monitors in 60° angle and point them towards the listening position.
Avoid listening position closer than 1 m from any wall.
Find the left-right symmetry axis of your room. Establish the symmetrical listening position.
Every monitor has a listening distance recommendation. Place the monitor accordingly. (see page 25 et seq.).
60°
L R
60°
L R
›1 m
8 9Monitor setup guide
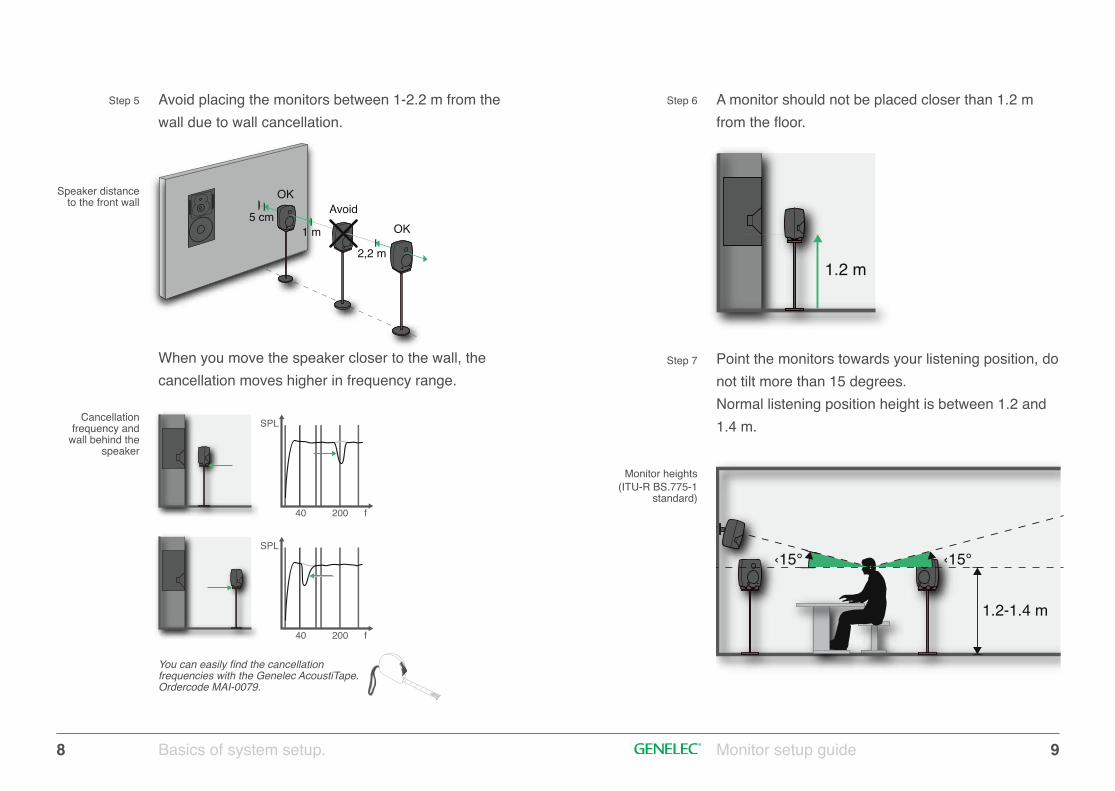
Avoid placing the monitors between 1-2.2 m from the wall due to wall cancellation.
A monitor should not be placed closer than 1.2 m from the floor.
Point the monitors towards your listening position, do not tilt more than 15 degrees.Normal listening position height is between 1.2 and 1.4 m.
When you move the speaker closer to the wall, the cancellation moves higher in frequency range.
You can easily find the cancellation frequencies with the Genelec AcoustiTape. Ordercode MAI-0079.
Step 5
Speaker distance to the front wall
Cancellationfrequency and
wall behind the speaker
Step 6
Step 7
Monitor heights (ITU-R BS.775-1
standard)
5 cm1 m
2,2 m
OKAvoid
OK
Basics of system setup.
SPL
f40 200
SPL
f40 200
‹15° ‹15°
1.2-1.4 m
1.2 m
1 0 1 1Monitor setup guide
Set the sensitivity control on all speakers clockwise to full (-6 dBu) to begin with.More information can be found in the operating manual of your product.
If you use an acoustic measurement device like RoomEQ Wizard, measure ear height at the listening position. Analyse the results and adjust DIP-switches to achieve as flat and similar frequency response as possible in each monitor.
If you have a large horizontal surface in front of the monitors, a boost around 160 Hz boost typically occurs. Some Genelec monitors have a desktop control DIP switch, which compensates the 160 Hz boost by -4 dB.
Monitor settingsStep 1
Input sensitivity control
Step 2
Step 3
Desktop control DIP switch
Basics of system setup.
An ideal 5.1 setup.Correct monitor placement
1110°
60°
+10°
-10°
RS
R
LS
L
C
dBu+12
+6
-6
+3-3
-4
0
SENSITIVITY FOR100 dB SPL @ 1 m
1 2 3 4
OFF
ON
dB
4 dB @ 160 Hz frequency1 2 3 4
OFF
ON

1 2 1 3Monitor setup guide
Adjust the subwoofer phase and level according to the procedure described in the operating manual.
Recommended distance from
front wall(without
subwoofer)
Speaker and subwoofer
distance from the front wall
Step 3
Basics of system setup.
Subwoofer placementFinding a subwoofer position can be difficult. Try to find a location between left-center or center-right area at the front wall. Avoid exact center position, where the room modes may cause problems.
Placing the subwoofer to a corner or near the front wall boosts the bass. Use sensitivity control to compensate the bass boost.
A Genelec subwoofer reproduces the frequencies up to 85 Hz and the monitors reproduce the frequencies above 85 Hz. The LFE channel in the subwoofer reproduces frequencies up to 120 Hz.
Step 1
Subwooferplacement
Step 2
RS
R
LS
L
Cpossiblesubwooferplacement
possiblesubwooferplacement
5 cm1 m
2.2 m
OKAvoid
OK
5 cm 1.1 m 2 m
60 cm
SPL
frequency
subwoofer main speakers
85 Hz

1 4 1 5Monitor setup guideRoom improvements.
Room improvements.Adjusting the listening space
Calibration doesn’t necessarily give best results if the room is not acoustically properly treated. Some improvements can be made quite easily. There is plenty of information in the Internet and many acoustic professionals to help you out with room issues.
Wall surfaces, ceilings and floors can be reflective, diffusive or absorptive. Combinations of these are often used.
Hard surfaces such as glass, concrete, dry wall or MDF reflect the sound.
Soft materials such as rock/mineral wool, carpets and curtains absorb the sound. The thicker the layer is, better is the absorption.
Irregular surfaces such as diffusers or bookshelves diffuse and spread the sound around.
Combination of diffusive and absorptive surface.
Room treatments
Diffusion and absorption
1 6 Room improvements. 1 7Monitor setup guide
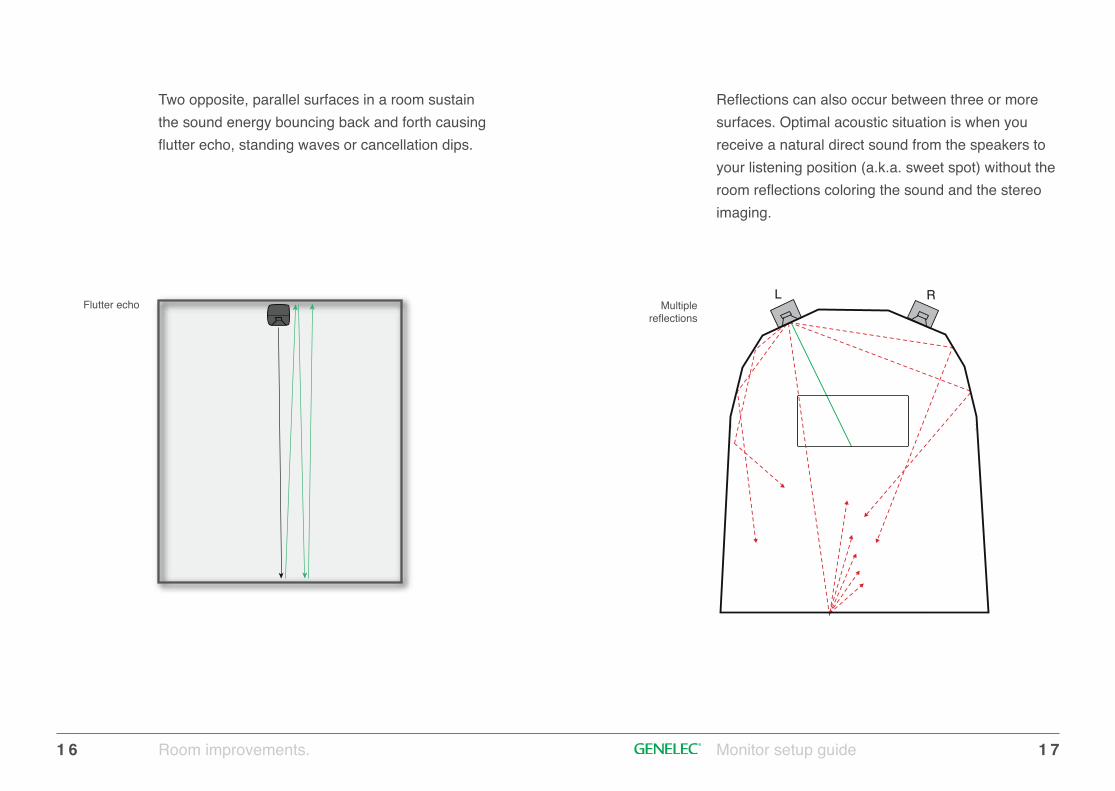
Multiple reflections
Two opposite, parallel surfaces in a room sustain the sound energy bouncing back and forth causing flutter echo, standing waves or cancellation dips.
Reflections can also occur between three or more surfaces. Optimal acoustic situation is when you receive a natural direct sound from the speakers to your listening position (a.k.a. sweet spot) without the room reflections coloring the sound and the stereo imaging.
Flutter echoL R
1 8 1 9Room improvements. Monitor setup guide
Acoustic improvements
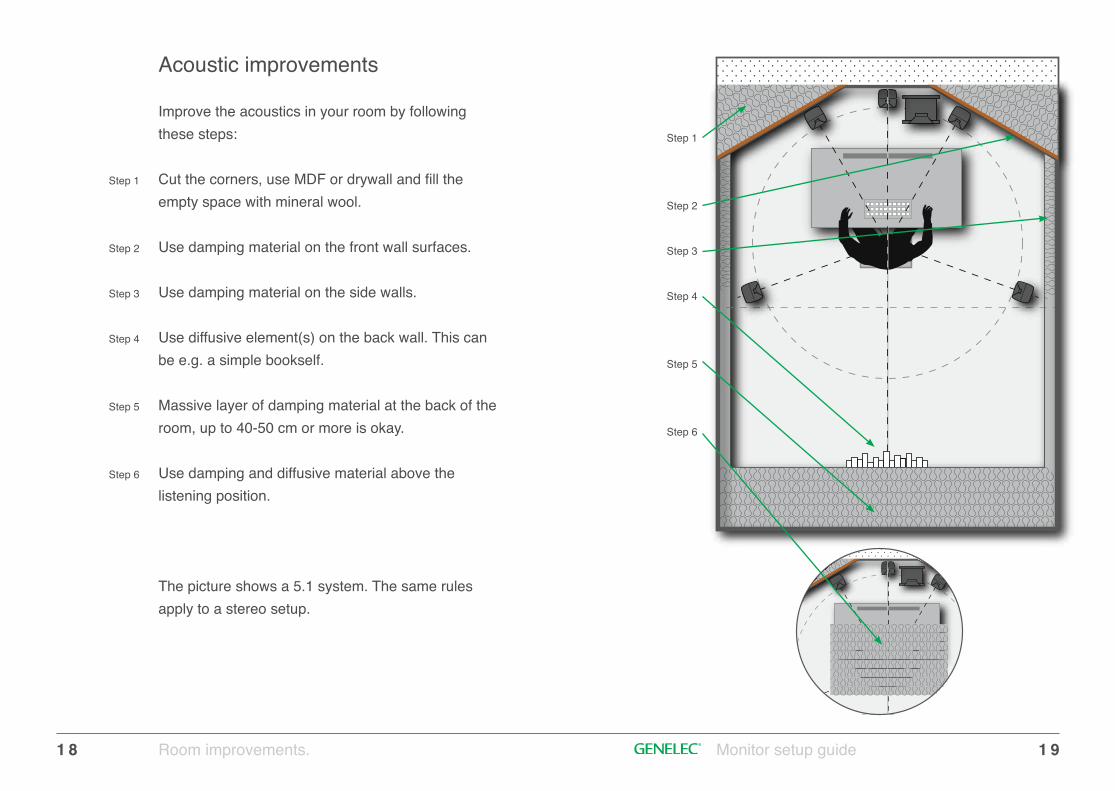
Improve the acoustics in your room by following these steps:
Cut the corners, use MDF or drywall and fill the empty space with mineral wool.
Use damping material on the front wall surfaces. Use damping material on the side walls.
Use diffusive element(s) on the back wall. This can be e.g. a simple bookself.
Massive layer of damping material at the back of the room, up to 40-50 cm or more is okay.
Use damping and diffusive material above the listening position.
The picture shows a 5.1 system. The same rules apply to a stereo setup.
Step 1
Step 2
Step 3
Step 4
Step 5
Step 6
Step 1
Step 2
Step 3
Step 4
Step 5
Step 6

Sound travels approximately 340 m/s. It takes 3 ms to travel 1 meter.
Industry standard SPL for cinema mixing work is85 dB at the listening position.
Common definitions of Frequency spectra:
Ideally the sound volume drops by 6 dB when the distance doubles.
2 0 2 1Fundamentals Monitor setup guide
Fundamentals.Basics of sound
Sound volume increases 3 dB when the power doubles.
Useful low frequency spectrum extension
5004003002001009080706050403020
Large Pipe Organ 16 Hz
5 strings Electric bass 31 Hz
Guitar 80 Hz
Male fundamental
Tuba (horn) 45 Hz
Double bass 40 Hz
Concert grand piano 29 Hz
frequency 120 Hz
Female fundamental
frequency 230 Hz
1 m 100 dB 0 dB2 m 94 dB -6 dB4 m 88 dB -12 dB
100 W 85 dB 0 dB200 W 88 dB +3 dB400 W 91 dB +6 dB
Subsonic frequencies 1 Hz - 20 Hz Not audible to humans.
Very low frequencies 20 Hz - 40 Hz Lowest audible octave to humans.
Low frequencies 40 Hz - 160 Hz Music lowfrequencies, here are the kick drum, bass and low register of grand piano.
Middle lowfrequencies
160 Hz – 400 Hz Middle C of piano is here.
Middle frequencies 400 Hz - 2.5 kHz Low-order harmonics of most instruments.
Middle high frequencies
2.5 kHz - 5 kHz Ear most sensitive to this range. Presence, voice frequencies are here.
High frequencies 5 kHz - 10 kHz Brightness andharmonics are here.
Very high frequencies 10 kHz - 20 kHz Highest harmonics are here.
2 2 2 3
Sound radiation
Radiation load
Monitor setup guide
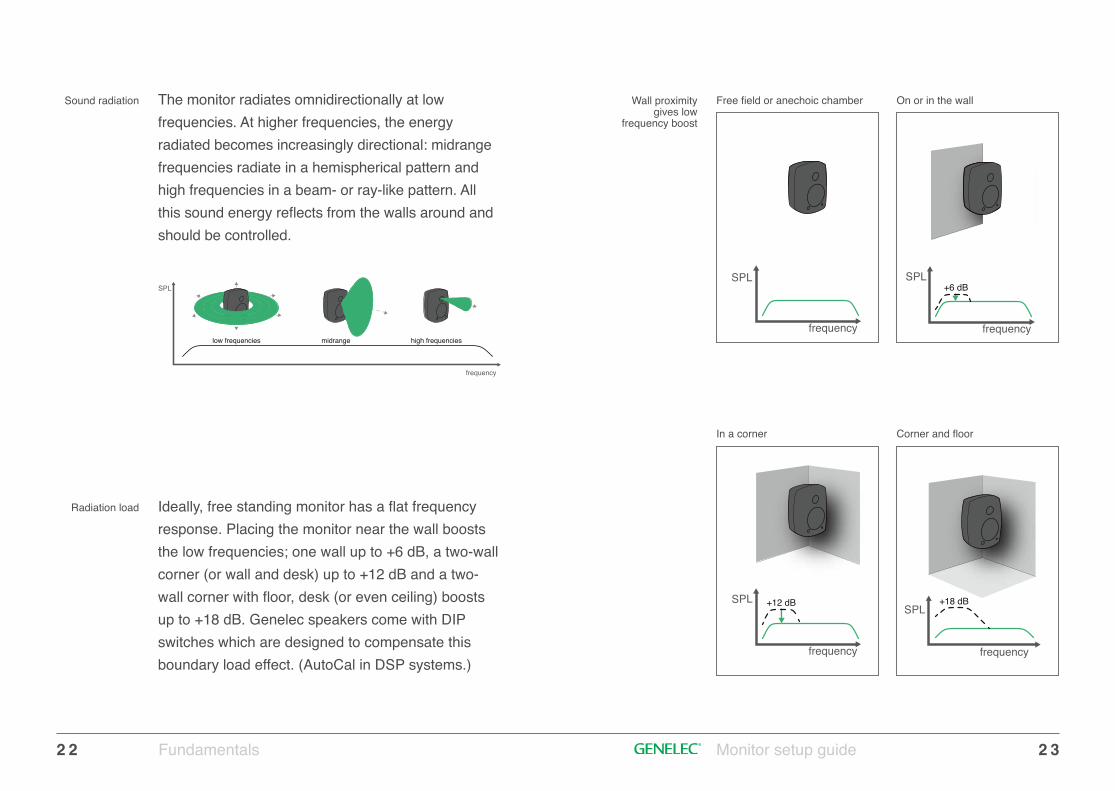
The monitor radiates omnidirectionally at low frequencies. At higher frequencies, the energy radiated becomes increasingly directional: midrange frequencies radiate in a hemispherical pattern and high frequencies in a beam- or ray-like pattern. All this sound energy reflects from the walls around and should be controlled.
Ideally, free standing monitor has a flat frequency response. Placing the monitor near the wall boosts the low frequencies; one wall up to +6 dB, a two-wall corner (or wall and desk) up to +12 dB and a two-wall corner with floor, desk (or even ceiling) boosts up to +18 dB. Genelec speakers come with DIP switches which are designed to compensate this boundary load effect. (AutoCal in DSP systems.)
low frequencies midrange high frequencies
SPL
frequency
Fundamentals
Free field or anechoic chamber
In a corner
On or in the wall
Corner and floor
Wall proximity gives low
frequency boost
SPL
frequency
SPL+6 dB
frequency
+12 dB
frequency
frequency
SPL +18 dB
frequency
SPL
Low frequency boost correction
SPL
frequency
1 2 3 4
OFF
ON
2 4 2 5Monitor setup guideFundamentals
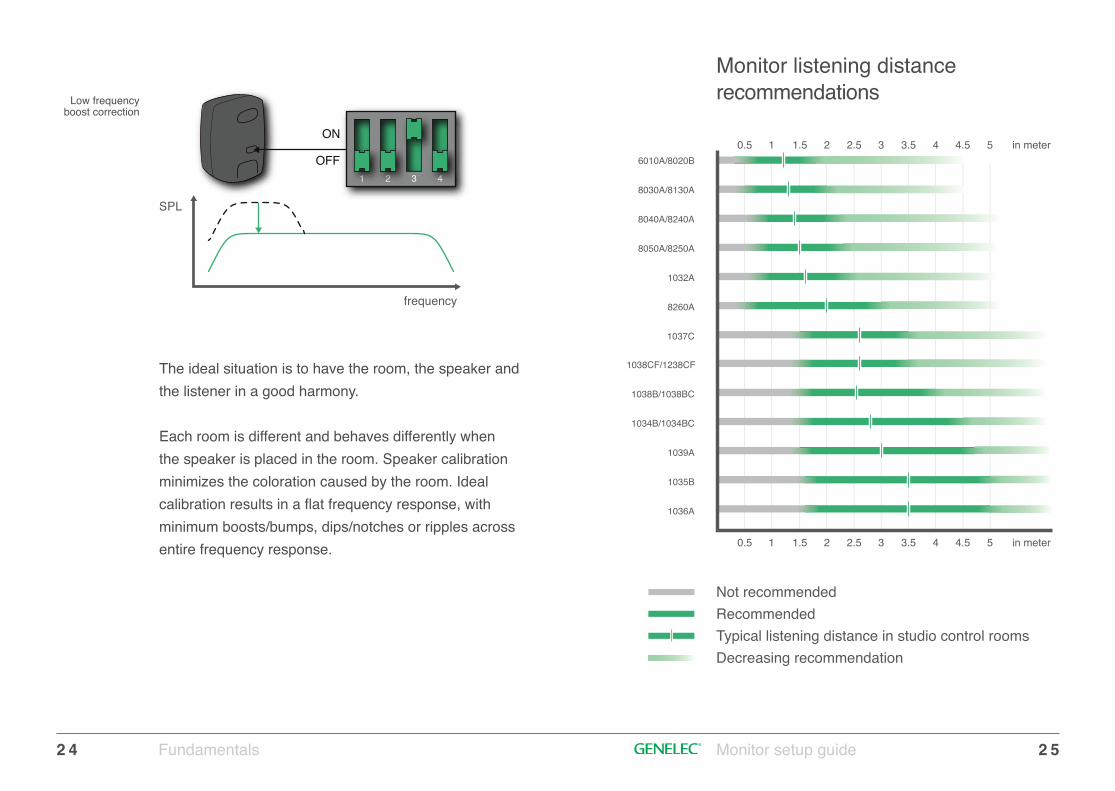
The ideal situation is to have the room, the speaker and the listener in a good harmony.
Each room is different and behaves differently when the speaker is placed in the room. Speaker calibration minimizes the coloration caused by the room. Ideal calibration results in a flat frequency response, with minimum boosts/bumps, dips/notches or ripples across entire frequency response.
Monitor listening distance recommendations
1038CF/1238CF
1038B/1038BC
1034B/1034BC
1039A
1035B
1036A
0.5 1 1.5 2 2.5 3 3.5 4 4.5 5 in meter
0.5 1 1.5 2 2.5 3 3.5 4 4.5 5 in meter
Not recommendedRecommendedTypical listening distance in studio control roomsDecreasing recommendation
6010A/8020B
8030A/8130A
8040A/8240A
8050A/8250A
1032A
8260A
1037C

2 6 Fundamentals 2 7Monitor setup guide
Monitors -3 dB LF extension
SPL short term RMS @ 1 m *)
6010A 73 Hz 93 dB8020B 66 Hz 95 dB
8030A / 8130A 55 Hz 100 dB8040A / 8240A 45 Hz 105 dB8050A / 8250A 35 Hz 110 dB
1032A 40 Hz 113 dB8260A 26 Hz 113 dB1037C 35 Hz 116 dB
1038CF / 1238CF 55 Hz 118 dB1038B 33 Hz 120 dB1034B 32 Hz 123 dB1039A 29 Hz 126 dB1035B 29 Hz 131 dB1036A 19 Hz 131 dB
Subwoofers Frequency +/-3 dB
SPL short term RMS @ 1 m
5040A 35 - 85 Hz 96 dB7050B 25 - 85 Hz 100 dB
7060B / 7260A 19 - 85 / 120 Hz 108 dB7070A / 7270A 19 - 85 / 120 Hz 112 dB7071A / 7271A 19 - 85 / 120 Hz 118 dB
7073A 19 - 85 / 120 Hz 124 dB
*) Maximum short term sine wave acoustic output on axis in half space, averaged from 100 Hz to 3 kHz @ 1m
Room volume up to
Subwoofers for 2-channel
(Stereo)
Subwoofers for 5-channel (Surround)
55 m3 5040A 5040A65 m3 7050B 7050B 75 m3 7050B 7060B / 7260A 85 m3 7060B / 7260A 7070A / 7270A 95 m3 7070A / 7270A 7071A / 7271A 100 m3 7070A / 7270A 7071A / 7271A 115 m3 7071A / 7271A 7071A / 7271A125 m3 7071A / 7271A 7073A125 m3 7071A / 7271A 7073A170 m3 7071A / 7271A 7073A200 m3 7073A 2 x 7073A240 m3 7073A 2 x 7073A400 m3 2 x 7073A 3 x 7073A400 m3 2 x 7073A 3 x 7073A

Polished Aluminium
White Mystic BlackMattBlack
Minimum Diffraction Enclosure™
(MDE™)
Advanced Directivity Control
Waveguide (DCW™)
Die-cast aluminium structure
Rear-mounted reflex port
Iso-Pod™ (Isolation Positioner
Decoupler™)
2 8 2 98000 Series
8000 Series – The perfectmonitoring loudspeakerThe Genelec 8000 Series represents the culmination in two-way active monitor design with several groundbreaking innovations combined into one single product. With the 8000 Series, Genelec introduced the Minimum Diffraction Enclosure™ (MDE™) with its rounded edges curving gently and seamlessly into the shape of the Advanced Directivity Control Waveguide (DCW™) and the rear-mounted reflex port. Made out of die-cast aluminium, the 8000 Series enclosures offer excellent vibration damping and sturdy structure with thin walls to maximize the internal volume.
Designed to performThe rounded edges in the 8000 Series products are there not just for the fancy looks, they also give the loudspeakers several acoustical benefits. The curved MDE™ cabinet significantly contributes to the product’s unsurpassed frequency and power responses. The minimized cabinet edge diffraction yields superb imaging qualities. The long, curved reflex tube is flow optimized to increase the woofer’s low frequency extension and SPL capacity. Low distortion drivers combined with carefully designed filters improve resolution and minimize listening fatigue over the entire audio spectrum. Every Genelec 8000 Series loudspeaker comes with an elastic Iso-Pod™ (Isolation Positioner/Decoupler™) which prevents coloration caused by conduction of unwanted vibration to the mounting surfaces. The Iso-Pod™ also features adjustable speaker tilt for precise aiming of the acoustical axis. All 8000 Series models are now available in the new Mystic Black finish in addition to the White, Matt Black and Polished Aluminium finishes.
A sound investmentQuality and long lasting value have been hallmarks of Genelec active monitors for more than thirty years. Our products are built to last, which has been road-proven throughout all these years. We also offer extensive support services through our sales network and with on-line tools. With the Genelec 8000 Series you can experience the best sound quality for decades. The Genelec Community atwww.genelec.com/community is a place to meet fellow Genelec users or discuss about your loudspeaker set-up directly with us. The latest development in our Community site is the possibility to register your Genelec products for an extended warranty. All products that are registered under your Community user account are eligible for two-year warranty extension.
Monitor setup guide
s o u n d p a s s i o n
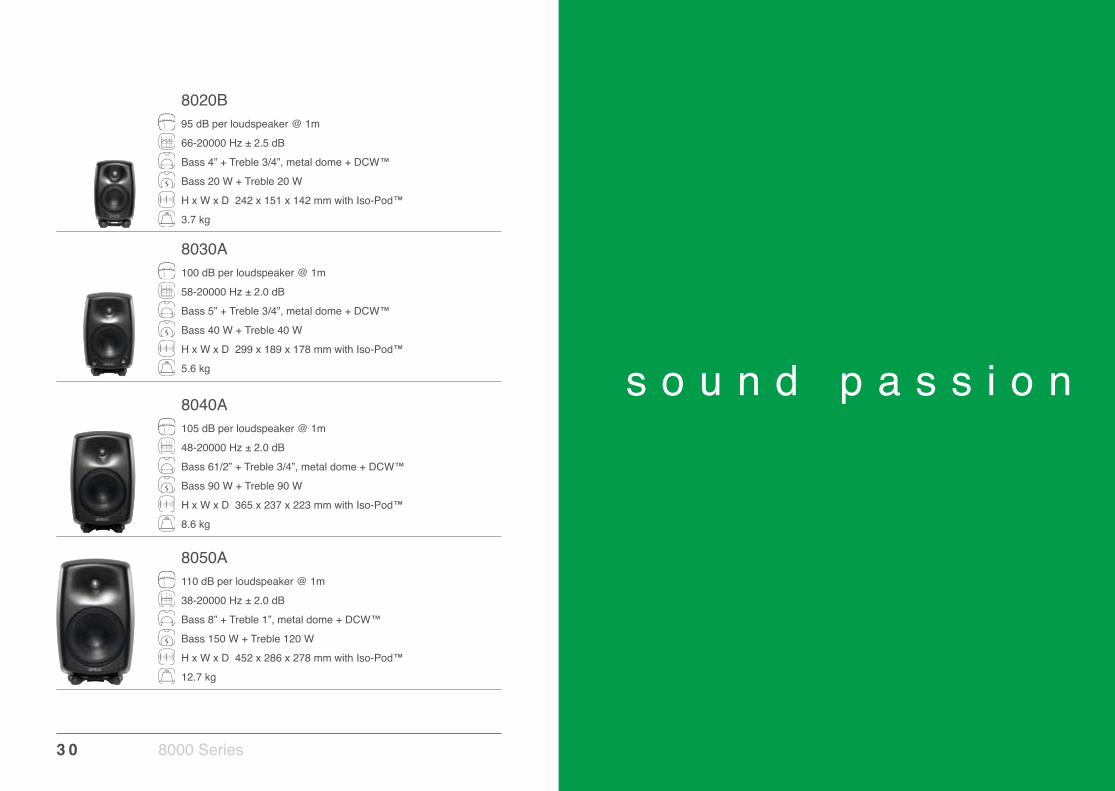
95 dB per loudspeaker @ 1m
66-20000 Hz ± 2.5 dB
Bass 4” + Treble 3/4”, metal dome + DCW™
Bass 20 W + Treble 20 W
H x W x D 242 x 151 x 142 mm with Iso-Pod™
3.7 kg
8020B
100 dB per loudspeaker @ 1m
58-20000 Hz ± 2.0 dB
Bass 5” + Treble 3/4”, metal dome + DCW™
Bass 40 W + Treble 40 W
H x W x D 299 x 189 x 178 mm with Iso-Pod™
5.6 kg
8030A
105 dB per loudspeaker @ 1m
48-20000 Hz ± 2.0 dB
Bass 61/2” + Treble 3/4”, metal dome + DCW™
Bass 90 W + Treble 90 W
H x W x D 365 x 237 x 223 mm with Iso-Pod™
8.6 kg
8040A
110 dB per loudspeaker @ 1m
38-20000 Hz ± 2.0 dB
Bass 8” + Treble 1”, metal dome + DCW™
Bass 150 W + Treble 120 W
H x W x D 452 x 286 x 278 mm with Iso-Pod™
12.7 kg
8050A
3 0 8000 Series
2 0 1 1 - 1 1
Genelec OyOlvitie 5 · 74100 Iisalmi · FinlandT +358 17 83 881 F +358 17 81 2267e-mail: [email protected]
Genelec Document BBAGE097. Copyright Genelec Oy 2011. All data subject to change without prior notice.
www.genelec.com