Embed Size (px)
Citation preview

The Powered WheelchairTraining Guide
Written by Peter Axelson, Jean Minkel,
Anita Perr and Denise Yamada
Illustrations by Clay Butler
PAX PressMinden, NV

This training guide was completed with a grant from theParalyzed Veterans of America’s Spinal Cord Injury Educationand Training Foundation.
The illustrations were completed with funding from BeneficialDesigns, Inc.
Designed by Kathleen Wong, Peter Axelson, Wayne Wright, andJeff Conger
PAX Press is a division of Beneficial Designs, Inc.P.O. Box 69Minden, Nevada 89423-0069
ISBN 1-882632-11-7
Copyright © 2002 by PAX Press. All rights reserved. No part ofthis work covered by the copyright hereon may be reproduced orused in any form or by any means – graphic, electronic, ormechanical, including photocopying, recording, taping, or informa-tion storage and retrieval systems – without prior written consentof the publisher.
Printed in the United States of America
iv

Table of Contents Acknowledgments ixIntroduction xHow to Use this Book xWarnings xi
Chapter 1: Getting to Know Your Wheels 1
1.1 The Owner’s Manual 2
1.2 Determining the Powered Wheelchair Type Best for You 3Wheelchair Types 3Drive Configurations 5
1.3 Specifying the Seating Components and Control Input Device 7Selecting and Ordering Your Powered Wheelchair 7Seating Dimensions and Components 7Joystick Type 11Alternate Controls 12
1.4 Seating Setup and Wheel Adjustments 13Seat Surface Angle Adjustment 13Back Angle Adjustment 14Drive Wheel Position Adjustment 14Arm Support Height Adjustment 15Caster Adjustments 15
Foot Support Adjustment 16Seat Height Adjustment 16
1.5 Joystick Setup, Adjustments and Operation 17Joystick Positioning 17Joystick Handles 17Dealer Programmable Drive PerformanceAdjustments 18Reversal of Controls 20User Adjustable Settings and Joystick Operations 20Checking Your Stability with a Spotter 22
Chapter 2: General Skills 252.1 Asking for Help 26
Defining “Assistance” 26Who Can Help? 26How to Ask for Help 28Manually Rolling Your Wheelchair 29Describing Safe Body Mechanics to the Spotter or Assistant 29When You Do Not Want or Need Assistance 29Experiencing New Environments 29
2.2 Learning Your Limits 30Techniques for Keeping Your Weight Back 30Techniques for Keeping Your Weight Forward 32When You are Learning Your Limits 33
v
Table of Contents

2.3 Relieving Pressure 34Forward Weight Shift 34Side-to-Side Weight Shift 35Push Up Weight Shift 36Weight Shift Through Powered Seating 36
2.4 Reaching, Bending and Lifting 38Reaching Sideways 38Reaching Forward 39
2.5 Main Wheel and Caster Management 41Wheel Position 41Wheel Size 42Composition 42Condition 42Caster Management and Caster Trail 43Type of Caster 44Caster Flutter 44
Chapter 3: Navigation Skills 453.1 Smooth Surfaces 47
Crossing Smooth Surfaces 47
3.2 Thresholds and Obstacles 48Foot Support Clearance 48Crossing a Door Threshold or Obstacle 49
3.3 Doorways and Tight Environments 53Manual Swinging Doors 54Manual Sliding Doors 56Doors in a Sequence 57
Double-leaf Doors 57Narrow Doors 58Automatic Doors 58Revolving Doors and Turnstiles 59Doors with Objects Around Them 59Tight Environments 59Vans 62
3.4 Rough Terrain 63Hard, Uneven Surfaces 63Soft Surfaces 64
3.5 Ramps 66Going Up a Ramp 66Going Down a Ramp 67Very Steep Ramps 69Telescoping or Portable Ramps 69Turning Around on a Ramp 69Grade Transitions 70
3.6 Cross Slopes 71Walkways and Hills with Cross Slopes 71Curb Ramps 72Driveway Crossings 73
3.7 Curbs and Steps 74Going Up Curbs or Steps 74Going Down Curbs 77
3.8 Elevators and Platform Lifts 80Catching an Elevator 80Entering and Exiting an Elevator 82Platform Lifts 84
vi
Table of Contents

3.9 Tracks and Grates 85Crossing Railroad and Trolley Tracks 85Crossing Grates 86
Chapter 4: Emergency Skills 894.1 Stairs 90
Going Up Stairs 91Going Down Stairs 91
4.2 Falling and Getting Up 93Falling 93Battery Acid 94Getting Up 94
4.3 Electromagnetic Compatibility 97Sources of Electromagnetic Energy 98Dealing with EMI 98
4.4 Evacuation Procedures 100Creating an Emergency Plan 101Personal Emergency 101
Chapter 5: Special Circumstances 1035.1 Planning Your Route 104
Transit Stops 104Trains and Automobiles 105Airplanes 105Rental Vehicles 105
5.2 Crossing Streets 106Understand the Local Driver Mentality 106Examining Street Terrain 106Crossing at a Crosswalk 107Crossing at Mid-block 108
5.3 Nighttime Safety 110General Pointers 110Emergency Equipment 111Protect Yourself 112Moving Around 112
5.4 Hiking 113Hiking Hazards 113Prepare for Your Trip 113Take Precautions 114Asking for Assistance 114
5.5 Traveling 116Travel Planning Tips 116Hotel Rooms 117Restrooms 117New Environments 118Other Hazards 118
5.6 Weather 119Precipitation 119Sun 121Wind 121
vii
Table of Contents

5.7 Transportation 122General Considerations and Safety Issues 122Transferring In and Out of Your Wheelchair 123Riding in Vehicles While in Your Wheelchair 124Air Travel 126
Chapter 6: Body Mechanics 1296.1 Protecting Yourself 130
Body Position 130Using Safe Body Mechanics 131
6.2 Setting Limits and Offering Help 134How to Say “No” 134Offering Assistance 134
Appendix A: The Americans withDisabilities Act of 1990 137
Appendix B: Specialty PoweredWheelchairs and Accessories 139
Appendix C: References and Resources 148
viii
Table of Contents

3
Section 1.2
Determining the PoweredWheelchair TypeBest for You
Section 1.2: Determining the Powered Wheelchair Type Best for You
Wheelchair TypesAs with the automobile, inventors have developed many different styles andmodels of wheelchairs. Each is designed for a different purpose, and permitsdifferent types of adjustments to be made.
Changes easily made on standard powered wheelchairs include:
• foot support positioning (typically only length adjustment)
• arm support adjustment
• joystick positioning
• upholstery replacement
There are many types of powered wheelchairs currently on the market. Theygenerally fall into two main categories: scooters and powered wheelchairs.
ScootersScooters usually have three or four wheels and have a seat that is mountedon a pedestal attached to the floor of the scooter. One main differencebetween a scooter and a conventional powered wheelchair is the way it issteered. On a conventional powered wheelchair, an electronic control inputdevice, such as a joystick, causes different amounts of power to go to each ofthe rear wheels to control both speed and direction. On a scooter, users
This is a front-wheeldrive powered wheel-chair with a power base.

generally hold handlebars at the end of a tiller that is attached tothe front wheel (or wheels) to mechanically turn the wheelchair.Four-wheeled scooters typically have the front wheels connectedtogether such that turning the tiller left and right causes the frontwheels to turn left and right together. While turning the tiller oftencontrols the direction of movement, the speed of the scooter isusually controlled with a lever attached to the handlebars, which ispressed with the thumbs or another part of the hand. Scootersoften require more arm movement and hand function to operatethan traditional powered wheelchairs. Scooters do not typicallyprovide foot positioning to accommodate users that have no legfunction. The seating on a scooter is typically not designed toaccommodate someone with poor trunk stability. For these rea-sons, scooters are generally used by persons who have the abilityto walk, but who may be limited on how far they can stand or walk.
The seats of most scooters rotate and lock into position. The seatis often rotated and locked when the person is transferring ontoand off the scooter. If the person cannot get close enough to atable or other object when approaching it from the front, the usercan rotate the pivoting seat, to the side or all the way around tothe rear. Some scooters also have elevating seats that may be
adjusted, depending on the height of the user or the activity per-formed. Many manufacturers of cushions and back supports makeproducts that can easily be placed on the seat of the scooter.
One of the positive features of scooters is that their overall wheel-base tends to be longer, providing greater stability in the fore-aftdirection. That length however, can make it difficult to maneuver insome situations. A scooter may be more stable side-to-side thana powered wheelchair, depending on the width of the scooter. Themanual linkage for the tiller steering allows the scooter user toturn rapidly and this can cause the scooter to begin to tip to theside. If not corrected immediately by turning the tiller back in theother direction, the scooter could tip over.
Powered wheelchairs with power basesWhen talking about powered wheelchairs, people usually picturea powered wheelchair with a power base. They differ from scoot-ers in their design and operation. Power base wheelchairs have abase that houses the motors, batteries and wheels, along with aseating system that is mounted on top of the base. Most poweredwheelchair bases have at least four wheels. While scooters aresteered using a tiller that is mechanically linked to the frontwheel(s), power base wheelchairs can be controlled using a vari-ety of input switches. The most common control input device is ajoystick that is operated by the hand. Powered wheelchairs canalso be controlled using joysticks operated by other parts of thebody, or by a variety of single or multiple switches, including sipand puff breath-activated ones. Many people who are unable tooperate scooters due to limited arm function, are able to use tra-ditional powered wheelchairs.
Powered wheelchairs come in a variety of drive wheel types: front-wheel drive, mid-wheel drive and rear-wheel drive. There are alsoa variety of specialty powered wheelchairs. These fall into severalcategories, including stair climbing powered chair bases that areintended for independent or attendant operation, those that areable to move laterally, and those designed for off-road use.
4
Chapter One: Getting to Know Your Wheels
This is a three-wheeled scooter.

Powered chairs for travelingDue to the weight of most power base chairs, transportation is amajor consideration. Users of power base chairs often preferusing a modified van or mini van for their personal vehicle. Thereare a limited number of powered chairs available that are ideal fortravel. These chairs differ from the typical power base chairs thatdo not fold. They are easier to remove the batteries, have smallerdrive wheels and can be quickly folded to put in the back of avehicle.
Traveling powered chairs more closely resemble a folding manualwheelchair equipped with motors and batteries. The folding frameallows for easier transport. The batteries are often housed in sep-arate boxes with easy to separate electrical connectors, whichfacilitate dismantling the chair. After removing the batteries andthe battery tray, the chair can fold. The motors and controller areusually still mounted to the frame, which results in at least oneheavy component to be lifted into and out of a vehicle. While dis-mantling and folding the chair would not likely be a daily activity,knowing a chair can be folded and transported in a car, may bevery useful for some users.
In terms of durability, generally traveling powered chairs are notdesigned to be as durable as power base chairs. You will need toconsider the trade-off of car transportation and your power mobili-ty driving needs – light-duty versus heavy-duty use.
Add-on power systems and power-assist wheelsTwo other options are available if you are considering powermobility. Both of these product types – add-on power systems andpower-assist wheels – use a manual wheelchair frame as thebase structure.
Add-on power systems are a means of converting a manualwheelchair frame into a power mobility device. Several methodsare available, including a conversion unit that operates like ascooter with tiller steering, and another unit that uses specialized
wheels, a battery pack and a joystick to create a more traditionalpowered chair conversion.
Wheelchairs with power-assist wheels can be considered as atransitional product between manual mobility and power mobility.Most wheelchairs with power-assist wheels are sold as completewheelchairs. Power-assist wheels have motors inside of thewheels that amplify the push of the user on the handrim – theswitch that tells the wheel to go forward. Depending on how hardthe user pushes on the handrim, the wheel puts out more or lesspower to amplify the user’s push. The power-assist wheels extendthe length of the roll from a single push. The effect is to travellonger distances with less effort.
While either option may be suitable to meet a person’s needs,these devices are not designed to be as durable or as powerfulas a power base chair.
Drive ConfigurationsFront-, rear- and mid-wheel drive powered chairsFront-wheel drive chairs have large drive wheels in the front ofthe chair with casters (usually smaller wheels) in the rear. Front-wheel drive chairs were first introduced in Europe and are nowbecoming more popular in the U.S., where rear-wheel drive chairshave traditionally been most predominant.
Rear-wheel drive chairs have the larger wheels in the rear withthe casters in front.
In the mid 1990’s, several manufacturers introduced mid-wheeldrive powered chairs. These wheelchairs have the main drivewheel centered under the user’s center of mass. Mid-wheel drivepowered chairs have six wheels: two drive wheels, a pair of cast-ers and a pair of anti-tipping wheels. The casters and anti-tippersmay be mounted either in the front or the rear of the chair. Theadvent of computer microprocessors for power base wheelchairs
5
Section 1.2: Determining the Powered Wheelchair Type Best for You
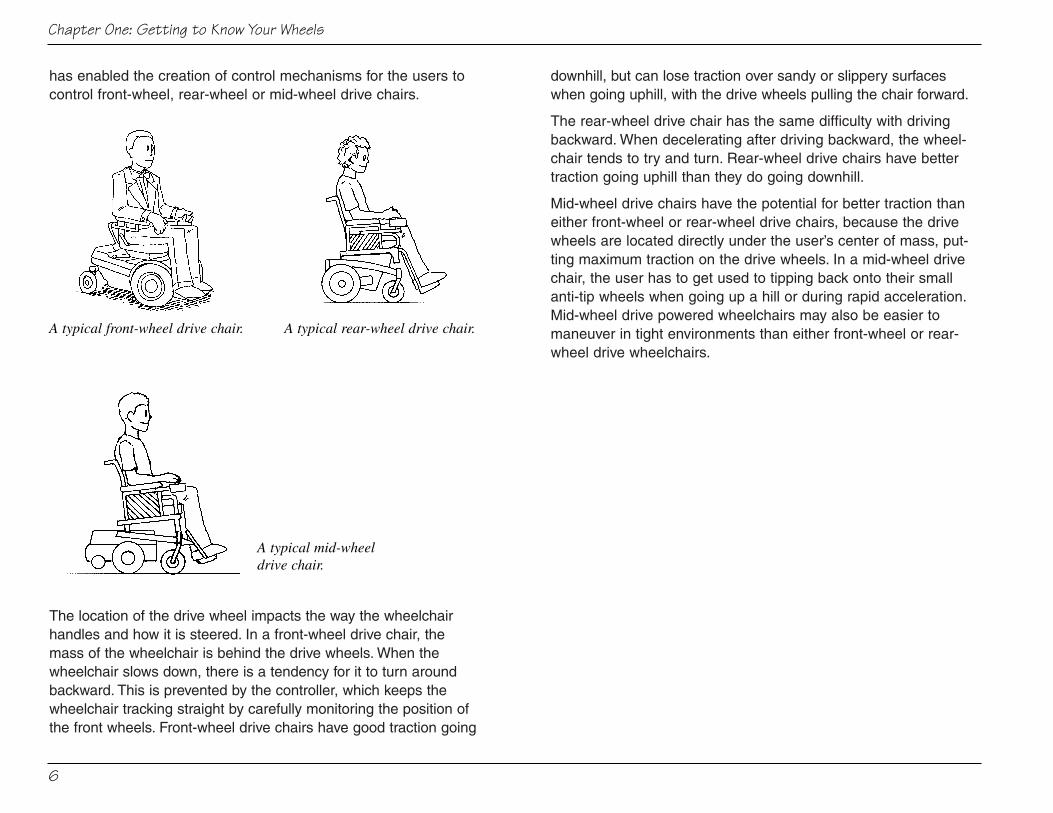
has enabled the creation of control mechanisms for the users tocontrol front-wheel, rear-wheel or mid-wheel drive chairs.
The location of the drive wheel impacts the way the wheelchairhandles and how it is steered. In a front-wheel drive chair, themass of the wheelchair is behind the drive wheels. When thewheelchair slows down, there is a tendency for it to turn aroundbackward. This is prevented by the controller, which keeps thewheelchair tracking straight by carefully monitoring the position ofthe front wheels. Front-wheel drive chairs have good traction going
downhill, but can lose traction over sandy or slippery surfaceswhen going uphill, with the drive wheels pulling the chair forward.
The rear-wheel drive chair has the same difficulty with drivingbackward. When decelerating after driving backward, the wheel-chair tends to try and turn. Rear-wheel drive chairs have bettertraction going uphill than they do going downhill.
Mid-wheel drive chairs have the potential for better traction thaneither front-wheel or rear-wheel drive chairs, because the drivewheels are located directly under the user’s center of mass, put-ting maximum traction on the drive wheels. In a mid-wheel drivechair, the user has to get used to tipping back onto their smallanti-tip wheels when going up a hill or during rapid acceleration.Mid-wheel drive powered wheelchairs may also be easier tomaneuver in tight environments than either front-wheel or rear-wheel drive wheelchairs.
6
Chapter One: Getting to Know Your Wheels
A typical mid-wheeldrive chair.
A typical rear-wheel drive chair.A typical front-wheel drive chair.

13
Section 1.4: Seating Setup and Wheel Adjustments
One change to your wheelchair usually affects the fit of all the other components, so be prepared to spend a fair amount of time setting up
the seating and positioning within your wheelchair. Ideally, when adjustingyour wheelchair, you should enlist the help of an assistive technology practi-tioner or supplier certified by RESNA (Rehabilitation Engineering andAssistive Technology Society of North America).
After each adjustment, test drive the wheelchair with assistance on ramps,different surfaces, and side slopes to make sure your mobility needs havebeen met. This can be done by driving the wheelchair onto a sloped surfaceor by physically tipping the wheelchair to its balance point in various direc-tions. Extreme caution should be exercised using the help of multiple assis-tants. If your seating system is adjustable, the stability of your chair shouldalso be checked with the seating system in all of its extreme positions.
Whenever you alter the setup of your wheelchair, check your forward, side-to-side, and rear stability with a spotter to make sure your wheelchairperforms the way you would like.
The set up and adjustment of your wheelchair is a topic worthy of an entirebook. There are many adjustments which you will probably refine over manyyears; others you will want to make throughout each day.
Seat Surface Angle AdjustmentThe seat surface angle can be adjusted on some wheelchairs. A forwardsloping seat might cause you to slide forward. Raising the front edge of theseat creates a “bucket” between the back support and seat and closes theseat-to-back angle. If the seat back is reclined at the same time the front ofthe seat is tipped upward, and the seat-to-back angle stays the same, this iscalled “tilt-in-space.”
Several powered wheelchair frames allow seat angle adjustments. If the chairframe itself does not adjust, you can still adjust the seat surface angle by:
• Adding a wedge to the seat base beneath the seat cushion
• Purchasing a cushion that will angle the seat surface
• Adding a solid seat with angle adjustable hardware
Section 1.4
Seating Setupand WheelAdjustments

Back Angle AdjustmentYour back support angle should provide a comfortable sitting pos-ture while you are upright in the chair. The back angle should notcause you to curl your shoulders, hold your head forward for bal-ance, or cause you to slide out of your seat.
The angle formed by the seat and the back support is called theseat-to-back angle. A seat-to-back angle greater than 90 degreesis often referred to as an “open angle,” while an angle smallerthan 90 degrees is referred to as a “closed angle.” An open anglelets you use gravity to help balance your trunk. People with highspinal cord injuries who cannot flex well at the hips often use anopen seat-to-back angle. However, an open angle can cause peo-ple to slide down in their chairs. If you have the flexibility, a closedangle cradles the body in the curve of the seat, holding you inplace. A more open or closed angle can often reduce spasticity.
Drive Wheel Position Adjustment Though less critical than on manual wheelchairs, the distributionof weight carried between the drive wheels and the casters on apowered chair will influence the driving performance of the chair.Due to the weight of a powered chair, when attempting to traversesoft terrain like gravel or sand, the chair will tend to sink and thecasters will get stuck.
When negotiating low obstacles, for example small curbs, thelocation of the drive wheels (front, mid, or rear) can make a differ-ence. On a few powered wheelchairs, the actual mounting posi-tion of the drive wheels on the frame can be adjusted.Alternatively, some manufacturers allow for adjustment of the seatframe on the power base. Moving the entire seat forward or back-ward on the power base has the same effect as moving the drivewheel mounting position – to redistribute the weight between thedrive wheels and the casters.
Front-Wheel Drive – For the most part, the drive wheels onfront-wheel drive chairs have a fixed mounting position on theframe. Frequently, the batteries will be positioned on the chair insuch a way as to evenly distribute the weight on the frame, get-ting as much weight forward as possible. Because the casters arein the rear, one advantage to front-wheel drive chairs is the abilityfor you to just drive forward over obstacles. The larger drivewheels mounted in the front will not get “hung up,” but rather willdrive right up and over an obstacle.
Mid-Wheel Drive – This style of chair is available in a wide numberof configurations. If you are interested in a mid-wheel drive stylechair, it is important to test drive the particular wheelchair model tounderstand what effect the setup of drive wheels and casters willhave on the drive performance of the chair. The first thing to lookat is the actual position of the drive wheel on the frame. There issome variation among manufacturers as to where the drivewheels are mounted to the power base, relative to the seat:
• Directly under the seat
• Slightly behind the mid-point of the seat (though forward ofthe back posts)
Check with your supplier or the manufacturer to determine if theposition of the seat or the drive wheel can be adjusted slightly for-ward or backward.
A “true” mid-wheel driving wheel location may increase the “rock-ing” of the chair when you rapidly speed-up or come to a quick
14
Chapter One: Getting to Know Your Wheels
This powered wheelchairhas an electrically poweredreclining back support.

stop. If you look carefully, some mid-wheel drive chairs are actual-ly six-wheeled chairs, with two drive wheels and four stabilizingwheels (usually two casters in front and two large anti-tip wheelsin the rear).
Rear-Wheel Drive – Rear-wheel drive chairs most often have afixed drive wheel mount. The position of the batteries and yourweight when sitting in the chair naturally tend to increase the loadon the rear wheels. In many rear-wheel drive chairs, the actualmounting of the drive wheels is behind the backpost of the seat(placing your center of gravity in front of the wheels). This rearplacement of the drive wheel makes for a very stable configura-tion that is more difficult to “pop a wheelie” (lifting the front cast-ers off the ground). A very stable configuration may give yousecurity when negotiating ramps and inclines, but will make negotiating small obstacles very difficult.
Changing the drive wheel position or the position of the seat onthe frame is a “heavy duty” adjustment and most often should bedone by a qualified wheelchair service technician.
Arm Support Height AdjustmentThe arm support should be adjusted so the arms are not pullingdown on the shoulders. Your elbows should be slightly forward ofyour shoulders when your arms are resting on the arm supports.The front-to-back position of the arm supports should allow theupper arm to slope forward slightly. Some people like to be ableto pull their elbows back for stability on non-level surfaces. If yourjoystick is mounted on the arm support of the wheelchair, makesure you can reach it easily. When adjusting the arm supportheight on a wheelchair with power recline, make sure the armsupport does not interfere with moving the back support from thecompletely reclined to fully upright position.
Caster AdjustmentsMounting adjustmentsYour casters should be mounted on the frame so they are perpendicular to the ground. If they are not, your front castersmay become afflicted with “shopping cart syndrome” and flutterwhen you drive your chair. This may also make it difficult to turnyour wheelchair or change direction. Use a carpenter’s square toverify that the caster housing is perpendicular to the ground.
Height and suspension adjustmentsDue to the tendency of a mid-wheel drive chair to “rock,” there aresmaller wheels mounted on the front and the back of the chair.Look carefully at these wheels. In most cases, one set will beallowed to swivel and will function as casters. The second set arefixed and will function as anti-tip devices. The position of the“caster wheels” and the “anti-tipper wheels” may be at the front orrear, depending on the specific wheelchair design.
Frequently, the “anti-tipper wheels” will have these adjustments:
• Height off the ground
• Tension of suspension
Height – The position of the anti-tip wheels off the ground willaffect the amount of rocking you feel when you either acceleraterapidly or come to a quick stop. The closer the wheels are to theground, the less rocking you will experience. However, the closerthe wheels are to the ground, the greater the likelihood will be ofgetting “hung-up.” If the anti-tipper wheels are too close to theground, when you drive off of a small threshold or through a curbramp, you run the risk of having all the “little” wheels being on theground, with the drive wheels being “suspended” in the air. Withno drive wheels contacting the ground, you are stuck!
Suspension – In an attempt to reduce the likelihood of gettinghung-up and to smooth out the “rocking” sensation, some models
15
Section 1.4: Seating Setup and Wheel Adjustments

have suspension in the anti-tipper wheels. The spring in the suspension may be adjustable to match your weight and drivingstyle. Other power base wheelchairs have suspension on thecasters and the main drive wheels.
Much like any adjustment to the drive wheel position, changingthe height or tension of the anti-tipper wheels is a “heavy-duty”adjustment. Working with a trained wheelchair technician canfacilitate getting the adjustments made to meet your driving style.
Foot Support AdjustmentAdjust your foot supports after you have your seat cushion, backsupport, and other positioning aids in place. Don’t forget to putyour shoes on; sole height affects your leg positioning. Make sureyou are seated upright against the back of the chair. When adjust-ing the foot supports, make sure you have:
• A minimum clearance of 2 inches underneath the foot plates
• Clearance for your knees under desks and tables
If you do not have enough foot or knee clearance, you might needto readjust your seat height. If your feet are supported at the cor-rect height by your foot supports, your thighs should rest in a bal-anced manner on your cushion. Foot supports that are too highcan lead to little or no weight under the thighs and excessiveweight under your sitting bones, the ischial tuberosities. You mightneed to compromise on your knee height to get the desiredweight distribution on the seat cushion.
If your knees will not fit under a table, you can slip coasters orwooden blocks under the table legs to raise the table up higher.At a restaurant, it is possible to turn small plates upside downand slide them underneath each of the table legs. Make sure thetable is secure and will not slip off the leg props.
Seat Height AdjustmentTo increase the foot support to ground clearance (raise yourselfhigher off the ground), you can adjust the seat up. Alternatively,you can increase the seat cushion thickness by adding a layer ofstiff foam or a solid insert under the seat cushion. If all of thewheels are vertically adjustable it may be possible to move all ofthe wheels lower to raise the seat height, or to raise all of thewheels to lower the seat height.
To lower your knee height and decrease ground clearance (loweryourself closer to the ground), you could decrease the thicknessof the seat cushion only if appropriate.
Sometimes you can push your knees down as you pull forwardunderneath the table and your knees can spring back up underthe table. If you try this, be sure that there is not too much pres-sure on the top of your legs from the edge of the table.
Swing-away foot supports permit you to get under some obsta-cles because one or both foot supports can be removed, allowingthe feet to dangle and the knees to drop lower for maneuvering intight quarters. If you do this, you will need to be very careful back-ing up from underneath the table. The casters can swing aroundand catch on your feet, potentially causing injury.
16
Chapter One: Getting to Know Your Wheels

Access improvements for people with disabilities are being made everyday. However, you will still encounter situations where you need help.
Everyone with or without a disability needs help now and then. The need forassistance will vary from situation to situation, and person to person. Thehardest part for many people is knowing and understanding when they havereached their limits.
Defining “Assistance”“Assistance” has many meanings. You may need to be lifted up stairs, helpedover a loose gravel pathway, up a steep ramp, across a street, up or down acurb, over a railroad track, etc.
• Independent Skills: Independent skills are those things you can dowithout help.
• Supervised/Assisted Skills: Supervised/assisted skills are those thingsyou are uncomfortable doing totally by yourself, but you can do partially.You might need occasional help or someone nearby “just in case.” Beingable to ask for help and being able to instruct others is very important.
• Dependent Skills: Dependent skills are those things you can only dowith a lot of help.
Who Can Help?The amount of help you need will depend on your present skills and abilities,as well as the task you need to accomplish. In some cases, you might wantsomeone nearby because you are learning a new skill or you are just a bitunsure about the situation. At other times, you may be trying to get past anobstruction that you are unable to negotiate. This section gives you somepointers on working with different kinds of helpers, including spotters, assis-tants, personal care attendants or PCA’s, family or friends, coworkers,acquaintances and strangers.
26
Chapter Two: General Skills
Section 2.1
Asking for Help

SpotterA spotter is a person who stands nearby to help if you need it.Always use a spotter when learning a new skill, such as drivingdown a steep ramp, and when you are not confident in your abilityto handle a situation alone. The spotter could help to prevent youfrom tipping or falling forward out of your wheelchair. It is up toyou to decide when you are uncomfortable with a maneuver andwould like to use a spotter. You might need more than one spotterwhen learning a new skill. It is also important to instruct yourspotter(s) as to exactly how you need to be spotted. For example,going down a ramp you might ask a spotter to walk alongside ofthe wheelchair, ready to catch your upper body should you loseyour balance in the forward direction.
AssistantA spotter becomes an assistant when you know you will needhelp or will require more assistance than someone standing byoffering an occasional hand. Assisting often involves pushing orlifting the wheelchair in some capacity (e.g., up a curb or thresh-old that is too high to cross independently). An assistant mightalso be required to perform other tasks, such as picking up thingsyou drop or getting things you cannot reach. In many cases, anassistant is hired and trained by the wheelchair rider. Theseassistants are often referred to as personal care assistants(PCA’s) and attendants.
Personal Care Assistant (PCA)If you need help frequently or at regular times during the day, youmay want to hire a personal care assistant. Some wheelchairusers find it difficult to ask a family member or a friend to helpbecause they feel they are burdening them. Relationships withfamily members or friends may become strained if they alwaysfeel responsible for helping you.
A potential advantage of a hired assistant is that the assistant canhelp you with personal tasks, such as bowel and bladder care,and is generally not as emotionally involved with you.
It is the job of a hired assistant to provide the help you need in agiven situation. You can train your professional assistant to dothings the way you want. If the arrangement does not work out,you also have the freedom to replace the PCA.
Family and friendsFamily and friends with whom you spend most of your time willneed to spot or assist you on some occasions. It can be valuableto rely on people you feel comfortable with when facing a difficultor challenging situation.
Do not assume that a family member or friend will always becomfortable helping you. Be sure to ask if they are willing to help.Make sure they know not to help you unless you request assis-tance. You probably have a good idea of which friends and familymembers you can trust as assistants based on your familiaritywith their personalities.
Coworkers or acquaintancesCoworkers or friendly acquaintances can also make good assis-tants when you need help at work. If you are on good terms witha coworker, you may be comfortable casually asking for assis-tance (e.g., “Hi. Can you give me a push over this threshold?”).
People you meet after your injury may be more comfortable withyou as a wheelchair user than friends or family still making theadjustment to your new circumstances.
StrangersWhen you are alone, situations may arise where you need theassistance of a stranger. For example, you may have dropped
27
Section 2.1: Asking for Help

your car keys where you cannot reach them. In these cases, youmay need to ask someone you do not know for help.
Alternatively, you may be out with a friend and find yourself in asituation where the assistance of a second person is necessary.For example, you may need an additional person to help lift thefront end of your wheelchair up a curb.
How to Ask for HelpHow you ask for help will vary from situation to situation. Ask forassistance in a way that allows the person to comfortably decline.You can practice asking for assistance with a companion actingas a stranger. This will help you learn how to ask strangers forassistance, as well as teach your companion to help only whenasked. This type of practice also helps you learn how to instructothers to safely assist you.
Remember that there can be many valid reasons for people todecline to help you. Some people have disabilities that may notbe visible, such as arthritis or heart disease, and they may bereluctant to disclose their condition to you. Other people’s beliefsor customs may present a barrier to assisting you.
Gracefully accept refusals to help. After all, you don’t want helpfrom a person who feels uncomfortable with the task becausetheir apprehension can increase the risk of injury for both of you.
Consider the following before asking a stranger for help:
• Do not ask for assistance from anyone you feel might be athreat.
• Consider the people around you and approach only thosewho look prepared to provide some physical assistance.
• Body size is not that critical when performing most assistingskills. Do not assume a smaller person is not strong enoughto help you.
• Ask for assistance from people involved in activities similar toyour own. For example, if you are shooting baskets in the parkand lose the basketball in a bush, ask another ball player forassistance.
• If you enjoy challenging environments, such as hiking trails,remember that this type of environment attracts a lot of peo-ple who, like yourself, might be looking for an adventure. Theymay see helping you as yet another challenge and be veryeager to assist.
• If there are few people around and you know you will needassistance soon (e.g., there is a curb around the corner), asksomeone if they would be willing to follow you to the placewhere you will need help.
• Try “Do you mind giving me a hand up this curb?” or “Couldyou help me down this steep curb ramp? I can talk youthrough what I need you to do.”
Observe the people around you and ask those who look ready and willing to assist.
Be clear and concise when giving instructions. Most of the skillsin this book include instructions you can give an assistant.
• You are in charge. Instruct your assistant not to do anythingunless you specifically ask.
28
Chapter Two: General Skills

• Read Section 6.1 for more information about protecting theback. Make sure friends and family who assist frequently readthat chapter also.
• Tell your assistant where to stand.
• Indicate how to hold onto your wheelchair (e.g., “Please donot lift from the foot supports because it might break off. Holdthe frame next to my knees instead”).
• Give body mechanics suggestions (e.g., “Bend at your kneesand keep your back straight”).
• Always instruct your assistant to move on your count of threeto coordinate the efforts of all parties.
• Remember to thank your assistant for the help.
Manually Rolling Your WheelchairIt will be difficult or impossible to manually push your wheelchairwith the motor engaged. Know how to explain the disengagementof the motors so an assistant can push you if necessary. Be sureyou know where the motors are located and how to operate themotor disconnect system.
Describing Safe Body Mechanicsto the Spotter or AssistantBe sure to protect your spotter or assistant from injury by remind-ing her to watch her body position. Remind your spotter or assis-tant to:
• Bend at the knees, not at the waist.
• Use her legs for strength rather than the weaker muscles ofthe back or arms. This will help prevent back strain.
• Keep her knees bent, not locked straight.
• Never twist at the waist. Instead, she should keep her torsofacing the same direction as her hips. This will help preventback strain.
• Keep her back straight. Hunching over or rounding at theshoulders can cause back strain.
• Keep breathing. Sometimes people forget to breathe whenthey are involved in physical activity. When someone holdstheir breath, they are more likely to tense their muscles andwhen their muscles are tense, they are more prone to strainand injury.
When You Do Not Want or NeedAssistanceSometimes people will try to help even when you do not ask. Thiscan be very frustrating.
• A simple “Thanks, but I would like to do this by myself” or“Thank you, but it is actually easier for me to do this withoutassistance” can be effective.
• “Please don’t grab my wheelchair” or a similar instruction issometimes necessary for the more aggressive helper.
Experiencing New EnvironmentsIt is important to have assistance available when you try things forthe first time (e.g., your first time using a crosswalk with curbramps). Having a companion along to both spot and assist makesit safer to experiment with new or different skills.
The goal is to develop full independence. This does not necessar-ily mean that you will be able to perform all skills independently.Rather, it means that you are able to understand when and whereyou may need assistance, how to ask for it, and how to instructothers to assist safely.
29
Section 2.1: Asking for Help

Riding at different speeds, going up and down hills, over different surfacesand past obstacles affects your stability. Depending on the terrain and
your speed, you might have difficulty keeping your balance or your hand onthe joystick. It is important to know your limits. To learn what you can do, youhave to experience a variety of situations. Each time you try something new,it is best to have another person stand by to help you regain your balanceand prevent you from falling. That person is referred to as a spotter through-out this book.
Techniques for Keeping Your Weight BackHitting an obstacle, coming to an abrupt stop or driving down a ramp, curbramp or hill can all cause you to fall forward. Shifting your weight back inyour wheelchair might help you keep your balance.
In order to counteract falling forward, it is important to stay as far back inyour wheelchair as possible. Although the wheelchair’s back support will prevent you from leaning back very far, leaning even your head and shoul-ders back will help keep you in your wheelchair. If you tend to lose your balance or fall forward, the following suggestions might be useful to you.
Hook your arm behind youHooking will help keep your body “locked against the back of your wheel-chair.” You will need sufficient arm movement and strength to position yourarm and hold the push handle in the crook of your elbow. You may find thathooking your non-driving arm around the push handle will provide addedstability while driving over obstacles or down ramps.
30
Chapter Two: General Skills
Section 2.2
Learning YourLimits

Hooking your arm can help you keep your balance when you ride downhill or over rough ground in your powered wheelchair.
Since hooking requires you to twist and lean, using this techniqueover many years can lead to back pain, pressure ulcers on yourbuttocks, and skeletal deformation. Hooking also occupies an armthat might be better used for other activities. If you find you needto hook often to feel safe while driving, you may want to obtainadditional postural supports to minimize usage of this technique.Extended lateral supports or a chest support might be of greatbenefit.
Use of additional strapsA lap belt will help hold your buttocks back and keep you fromsliding forward in your seat. Sliding forward in your seat couldallow you to get dumped out on the ground. A lap belt can bepositioned at different angles; however, a strap that crosses yourthighs at an angle between 60 and 90 degrees will work the best.
A chest strap can help hold your upper body in place, preventingyou from falling forward. Different styles are available dependingon your needs and preferences. An alternative to the traditionalchest strap is an across-the-shoulder automotive style belt orbackpack style straps that come down across each shoulder.
Chest straps should be used with great care, because if you slidedown (or forward) in your wheelchair, a chest strap can getcaught around your throat and choke you. Chest straps of anytype should only be used with a properly functioning lap belt.
Power recline back supportIf your wheelchair is equipped with power recline, you can adjustthe back support rearward to prevent you from losing forward stability. The next section discusses this type of seating system inmore detail.
31
Section 2.2: Learning Your Limits
WARNING!Lap belts mounted at angles less than 60 degrees havethe potential of pivoting up, and can allow the hips to slideunderneath and forward on the wheelchair seat. Forpeople using a chest support of some type, sliding downin the wheelchair can create a strangulation hazard.People have also slid down in their wheelchairs such thatthe lap belt created a strangulation hazard.
A chest strap in combinationwith a lap belt can help youmaintain your sitting balance.Try several chest support stylesto see what works best for you.

Power tilt-in-space seating systemIn a power tilt-in-space seating system the entire seating systemtilts back, not just the back support. This type of seating system isdiscussed in more detail in the next section.
A power tilt-in-space feature can also help you keep your balance when going downhill.
Techniques for Keeping YourWeight ForwardWhen traveling uphill, you may need to keep your weight forwardto prevent your wheelchair from tipping backward.
• Lean forward with your head and shoulders when driving overobstacles and when driving up hills and ramps.
• If you use a chest strap, it may be easier to lean forwardagainst the strap with it slightly loosened.
When traveling up a steep hill, you may need to keep your weight forward to prevent your wheelchair from tipping backward.
32
Chapter Two: General Skills
Reclining the back supporta little bit might help youkeep your balance whengoing downhill.
CAUTIONNever recline your back support when traveling uphill.Thiscould lead to rearward instability when driving uphill,through a curb ramp or other uphill sloped situation.
CAUTIONNever use the power tilt feature when traveling uphill.Thiscould lead to rearward instability when driving uphill,through a curb ramp or other uphill sloped situation.

When You are Learning Your Limits• First learn your balance point when sitting in your powered
wheelchair. With a spotter’s assistance, find out how steep aramp (forward, rearward and sideways) you can handle beforeyou start to lose your balance.
• Try different postural supports to see which will help youmaintain your upper body balance.
• Learn to recognize environments that are beyond your abilityto maintain your postural stability. Learn how to recognizeramps that are too steep for you to manage.
• Have a spotter stand by to help you regain your balance andprevent you from falling.
33
Section 2.2: Learning Your Limits

According to the Americans with Disabilities Act (ADA) AccessibilityGuidelines, a standard ramp in the built environment should have a
grade no steeper than 1:12. This means that for every inch of rise (change inheight), there should be 12 inches of run (change in length). This is some-times referred to as an 8 percent grade or slope. Using this formula, a rampgoing to a door with two 8-inch steps should be at least 16 feet long.
A standard ramp is gradual enough for powered wheelchairs to climb safely,but the limit beyond that is different for each powered wheelchair.
With experimentation, you will learn how steep a ramp you can negotiatewithout assistance. Always use a spotter when practicing on ramps andwhen driving up a steeper ramp for the first time. Practice descending steepramps with a spotter until you find one that is at the limit of your trunk stabili-ty. Experience the loss of stability, and remember the steepness of the slopethat caused this to happen. When climbing steeper ramps you may reach apoint where you will begin to tip to the rear or the wheelchair may just runout of power. Obtain assistance before going up or down slopes this steep,or steeper, in the future. Loading docks are good places to find steeper thannormal ramps for practice on steep ramps.
Going Up a Ramp• There will be a tendency for the wheelchair to tip backward when driving
up a steep ramp. A backpack or other gear on the back of your wheel-chair will cause you to tip backward more easily. If you use a recliningback wheelchair or a tilt-in-space seating system, you will find that hav-ing your back support in the fully upright position gives you the greateststability when driving up a ramp.
• Drive slowly to maintain control.
• On steep ramps, it is best to keep a straight path. Approaching a steepramp at an angle will increase the severity of the cross slope. Crossslopes are discussed later in this section.
66
Chapter Three: Navigational Skills
Section 3.5
Ramps

Lean forward when you are going up a steep ramp facing forward.
How a spotter can help• Walk behind the wheelchair and place your hands close to the
push handles or back posts. Try not to influence the move-ment of the wheelchair.
• Prevent the front casters from lifting off the ground by lifting upor by pushing forward on the push handles or back support.
• If the wheelchair runs out of power, assist by pushing thewheelchair up the slope.
Going Down a RampBefore descending a ramp, always check for obstacles such ascracks and changes in level. Also examine the base of the rampfor obstacles you may need to cross, such as drainage grates.
Always shift your weight back when going down ramps, and pro-ceed slowly to maintain control. As you get more comfortable andconfident with ramps, you will be able to increase your speed andremain safe.
Be careful of foot support clearance when you get to the base ofthe ramp. Drive slowly in case your foot supports contact theground. If they do, you will come to an abrupt stop.
Always practice descending ramps with a spotter. Travel downramps of increasing steepness until you find the angle where youcan no longer descend the ramp alone with confidence. Alwaysobtain assistance when you do not feel comfortable descending aramp independently.
Practice with a spotter on the non-joystick side of your wheel-chair, ready to catch your upper body if you should fall forward.
Going down a ramp forward independently• Examine the ramp for obstacles.
• Drive slowly to maintain control.
• The ramp may be so steep that you will lose forward balance.If this happens, compensate by shifting your weight back (seeSection 2.3 for more information about shifting your weight).
• Putting the joystick in reverse can further slow the speed ofsome chairs. However, this technique is not recommended forwheelchairs with non-digital controllers on a continuous basis,as the braking action could permanently damage the con-troller or motors.
• Some ramps might be so steep that you will lose tractionunder the rear wheels and begin to slide. You will maintainmore control by driving forward than you will sliding forward.
67
Section 3.5: Ramps

Hooking one arm around a push handle and leaning back into yourback support may help you keep your balance when going down ramps.
How a spotter can help• Walk on the non-joystick side of the wheelchair rider as the
rider moves down the ramp.
• Be ready to catch the wheelchair rider’s upper body if therider falls forward.
• Stand behind the wheelchair rider and reach over the shoulderto provide additional trunk support.
Going down a ramp backward independentlyTraveling down a steep ramp can cause you to lose trunk stabilityin the forward direction. When shifting your weight back during thedescent or hooking your elbow on the push handle is not enoughto maintain your balance, descend the ramp backward. Youshould also descend a ramp backward if you believe it is so steepthat the foot supports will hit the ground at the bottom.
• Check the ramp for any obstacles.
• Move slowly to maintain control.
• It may be difficult to maintain the direction you want to go whenyou are driving backward down a ramp. Have a spotter or anassistant ready to help guide the wheelchair from the rear.
• If you are using anti-tippers, watch for clearance of the anti-tip-pers at the bottom of the ramp. If your anti-tippers get caughtat the bottom of the ramp, you could tip over backwards.
• Letting go of the joystick should cause the wheelchair todynamically brake and slow or stop.
How a spotter can help• Walk on the non-joystick side of the wheelchair and hold on to
the wheelchair frame to physically assist with guiding thewheelchair straight.
• If the ramp is steep, position yourself behind the wheelchair,hold the push handles, and walk backward down the ramp.Move with the wheelchair as it drives backward.
To slow the wheelchair, a spotter can walk behind the wheelchair withhis or her hands on the push handles, leaning forward into the backsupport.
68
Chapter Three: Navigational Skills
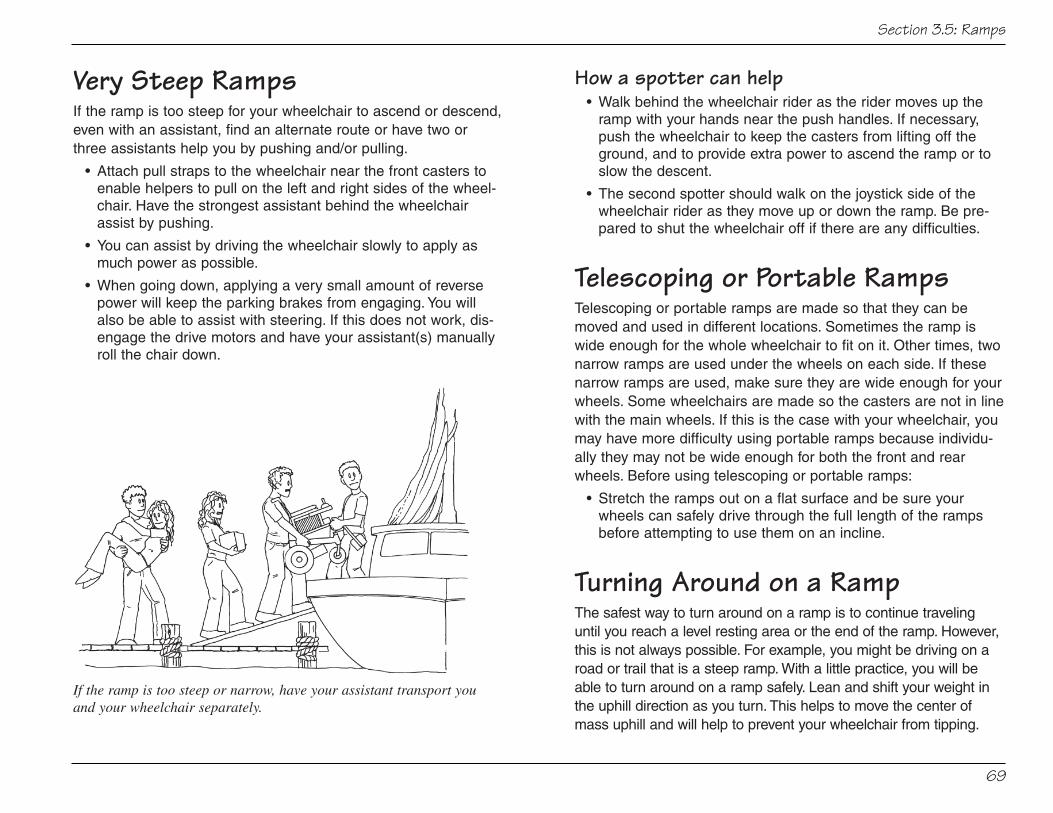
Very Steep RampsIf the ramp is too steep for your wheelchair to ascend or descend,even with an assistant, find an alternate route or have two orthree assistants help you by pushing and/or pulling.
• Attach pull straps to the wheelchair near the front casters toenable helpers to pull on the left and right sides of the wheel-chair. Have the strongest assistant behind the wheelchairassist by pushing.
• You can assist by driving the wheelchair slowly to apply asmuch power as possible.
• When going down, applying a very small amount of reversepower will keep the parking brakes from engaging. You willalso be able to assist with steering. If this does not work, dis-engage the drive motors and have your assistant(s) manuallyroll the chair down.
If the ramp is too steep or narrow, have your assistant transport you and your wheelchair separately.
How a spotter can help• Walk behind the wheelchair rider as the rider moves up the
ramp with your hands near the push handles. If necessary,push the wheelchair to keep the casters from lifting off theground, and to provide extra power to ascend the ramp or toslow the descent.
• The second spotter should walk on the joystick side of thewheelchair rider as they move up or down the ramp. Be pre-pared to shut the wheelchair off if there are any difficulties.
Telescoping or Portable RampsTelescoping or portable ramps are made so that they can bemoved and used in different locations. Sometimes the ramp iswide enough for the whole wheelchair to fit on it. Other times, twonarrow ramps are used under the wheels on each side. If thesenarrow ramps are used, make sure they are wide enough for yourwheels. Some wheelchairs are made so the casters are not in linewith the main wheels. If this is the case with your wheelchair, youmay have more difficulty using portable ramps because individu-ally they may not be wide enough for both the front and rearwheels. Before using telescoping or portable ramps:
• Stretch the ramps out on a flat surface and be sure yourwheels can safely drive through the full length of the rampsbefore attempting to use them on an incline.
Turning Around on a RampThe safest way to turn around on a ramp is to continue travelinguntil you reach a level resting area or the end of the ramp. However,this is not always possible. For example, you might be driving on aroad or trail that is a steep ramp. With a little practice, you will beable to turn around on a ramp safely. Lean and shift your weight inthe uphill direction as you turn. This helps to move the center ofmass uphill and will help to prevent your wheelchair from tipping.
69
Section 3.5: Ramps
How to turn around on a ramp• Look behind you to check for oncoming traffic.
• If the path is clear, move to the non-joystick side of the rampand stop.
• When you have come to a halt, turn your wheelchair in thedirection of the joystick until you are sideways on the ramp.This allows you to maintain your upper body position with yourjoystick arm. You may find it easier to turn in the other direc-tion if you have more ability to balance with the other arm.
• Keep your weight shifted uphill.
• Continue to turn your wheelchair using the joystick until youare facing downhill. Be sure to keep your weight shifted back.
• Drive your wheelchair forward down the ramp.
Note: It will be important for you to determine the steepest rampon which you can ascend, descend, and turn around. Alwayshave a spotter with you when determining the maximum limits ofyour wheelchair.
When you makea turn on a ramp,be careful thatyour wheelchairdoes not tip side-ways.
How a spotter can help• Stand downhill from the rider throughout the turn to keep the
rider from falling forward out of the chair and to keep the chairfrom tipping.
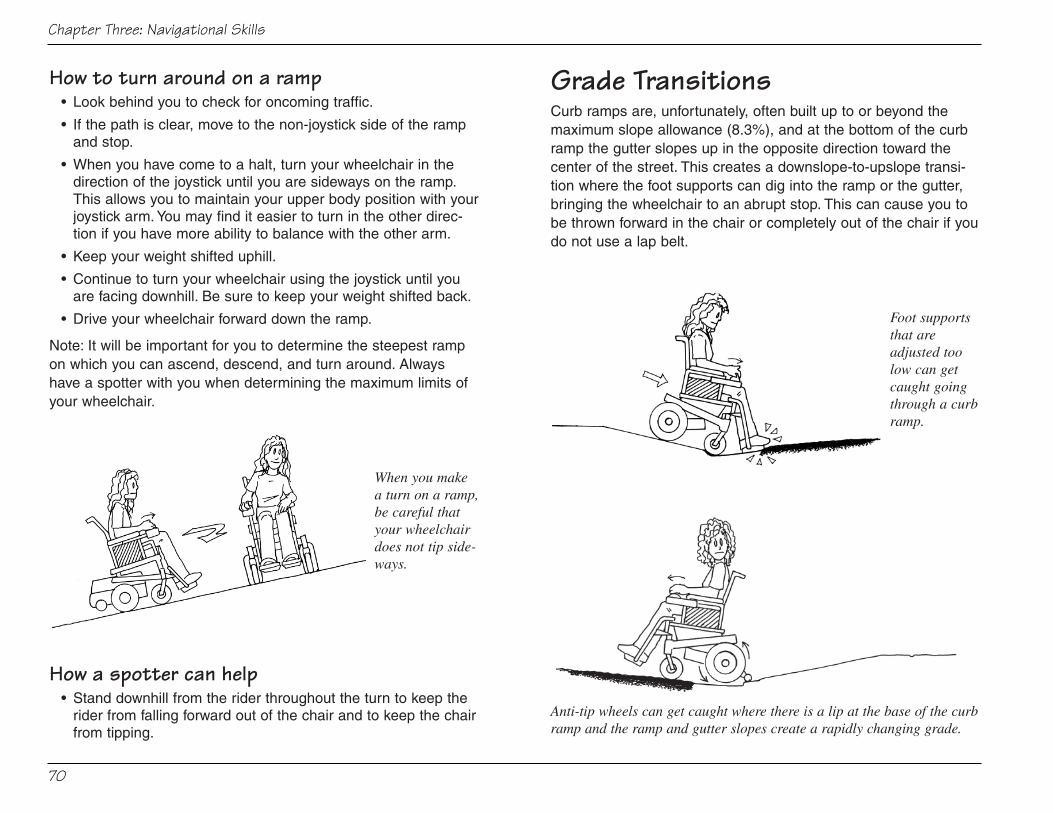
Grade TransitionsCurb ramps are, unfortunately, often built up to or beyond themaximum slope allowance (8.3%), and at the bottom of the curbramp the gutter slopes up in the opposite direction toward thecenter of the street. This creates a downslope-to-upslope transi-tion where the foot supports can dig into the ramp or the gutter,bringing the wheelchair to an abrupt stop. This can cause you tobe thrown forward in the chair or completely out of the chair if youdo not use a lap belt.
Foot supportsthat areadjusted toolow can getcaught goingthrough a curbramp.
Anti-tip wheels can get caught where there is a lip at the base of the curbramp and the ramp and gutter slopes create a rapidly changing grade.
70
Chapter Three: Navigational Skills

134
Chapter Six: Body Mechanics
Section 6.2
Setting Limitsand Offering Help
It can be hard to admit you have reached your limits. However, you shouldsafeguard your own health and well-being. You need to know your limits
and how to say “no” when you have reached them.
How to Say “No”It is important to understand that you should not assist a wheelchair rider if itpresents a physical hazard to your own health or you are not confident in theoutcome. This could result in injury to the wheelchair rider and/or yourself.For example, pushing a wheelchair up a curb with an injured back could bepainful and may cause further injury to your back. Do not be afraid to say“No.” The following are several ways to decline to help:
• Politely decline by saying, “I don’t feel comfortable or safe assisting youin that way.” Explaining why you declined is often appreciated. However,if your reasons are personal, you have no obligation to explain yourself.
• Offer to find someone who can help. “I’m not able to assist you up thiscurb because I have a shoulder injury. Can I help you find someone elseto assist?”
• Offer an alternative skill. “I’m not comfortable pulling your wheelchairbackward up the curb because I don’t think I can lift the weight of thewheelchair. Can we try lifting your casters up onto the curb and then Ican push you up the curb?”
• Offer an alternative route. “I’m concerned about trying to assist you downthis steep hill. The hill isn’t so steep if we go to the next corner.”
Offering AssistanceSometimes watching a wheelchair rider do something is difficult becauseyou can see that whatever the rider is doing is not easy. Remember that theperson may not want assistance; it may be important for the person toaccomplish the activity independently. It might be easier for the wheelchairrider to do the activity alone than to explain to others how they can help. Thewheelchair rider might have had bad experiences or even injuries in the pastwhen people tried to help. It may be difficult to watch, but you do not neces-sarily need to help the person.

Only assist a wheelchair rider when you are asked and/or havebeen given permission. If you think a wheelchair rider might needassistance, offer. The wheelchair rider may be in a position thatlooks precarious, but have the situation under control.Unexpected assistance might throw him or her off balance.
• Ask if the wheelchair user wants help. Avoid assertive state-ments such as, “Let me do this for you,” which make it difficultfor the wheelchair rider to decline your help.
• Try wording your offer more casually. “Could you use a hand?”or “Can I help you out?”
If your offer to assist has been accepted, let the wheelchair riderbe in charge. Ask the wheelchair rider how you can help and fol-low the rider’s instructions. Ask the wheelchair rider to talk youthrough the sequence before trying it, then work together to do itcorrectly.
• Do not push, lift or pull unless the wheelchair rider asks. Oftenyou will be working together (e.g. to climb a curb, you may bepushing on the push handles as the wheelchair user drives forward).
• Speak up if you feel in danger of injuring yourself by followingthe rider’s instructions.
135
Section 6.2: Setting Limits and Offering Help

137
Appendix A: The Americans With Disabilities Act of 1990
The Americans with Disabilities Act (ADA) was adopted as law in 1990 toensure that equal access is provided to all individuals without regard to
needs related to disability. This comprehensive law focuses on a number ofareas, including accessibility to and within public buildings and services.
If you encounter problems with the accessibility of a building, you should firstspeak with the building owner or manager and explain your problem. Theymay have been unaware of any accessibility difficulties, and could makeimmediate changes for you. If the building manager or owner is unwilling tohelp, the next step is to get other people in the building to talk to the manage-ment. Local advocacy groups, such as Centers for Independent Living, mayoffer intermediary services or provide alternative resources for addressingproblems. If you cannot achieve a resolution of the problem using these meth-ods, you can file a complaint with the Department of Justice. For informationabout filing a complaint, call the ADA information line at 800-514-0301.
A problem might be as simple as a plant that was placed in front of the elevator buttons or within the clear passage of a hallway. It may be as com-plex as a multi-level building not serviced by an elevator or doorways thatare too narrow for you to pass through.
U.S. Department of JusticeThe U.S. Department of Justice provides general information about theAmericans with Disabilities Act (ADA), answers to specific technical ques-tions, ADA materials, and information about filing a complaint.
websites www.usdoj.gov/disabilities.htmwww.usdoj.gov/crt/ada/adahom1.htm
ADA Information Line Voice 800-514-0301TTY 800-514-0383
Appendix A
The Americanswith DisabilitiesAct of 1990

The Access BoardThe U.S. Architectural and Transportation Barriers ComplianceBoard (The Access Board) provides technical assistance on theADA Accessibility Guidelines.
website www.access-board.govVoice 800-872-2253TTY 800-993-2822
U.S. Department of TransportationThe ADA also addresses accessibility to transportation services.The U.S. Department of Transportation oversees this aspect ofthe ADA.
website www.dot.gov/accessibility
Office of the SecretaryOffice of Civil Rights Voice 202-366-4648
TTY 202-366-5273
Federal Transit AdministrationOffice of Civil Rights Voice 888-446-4511
E-mail [email protected]
138
Appendix A: The Americans With Disabilities Act of 1990

If you are interested in obtaining additional information about wheelchairsand mobility skills, there are a number of resources you can tap with a
visit, a phone call, a letter or a modem.
Centers for Independent Living (CIL)Most communities have a Center for Independent Living (also calledIndependent Living Centers or ILCs). These centers are run by and for peoplewith disabilities. Their mission is to help people with disabilities live moreindependently and become productive, fully participating members of society.
Rehabilitation CentersThe rehabilitation center in your area may have facilities you can use to tryout equipment and see which devices might benefit you. They may recom-mend an evaluation by an occupational or physical therapist, or a RESNAcertified assistive technology practitioner. These professionals can often pro-vide you with insight into your abilities and potential needs, and may be ableto direct you toward other helpful accessories. Your rehabilitation center mayalso refer you to other centers that can better meet your specific needs.
Medical Equipment SuppliersMedical Equipment Suppliers represent equipment manufacturers andshould be able to help you make equipment choices compatible with yourlifestyle. Remember that these companies are in the business of sellingequipment, so you need to be an educated consumer and look further thanthe salesperson. The National Registry of Rehabilitation TechnologySuppliers has a registry of equipment suppliers.
When buying equipment, consider the resources and reliability of the suppli-er. Ask them about their repair policies. For instance, will they loan youequipment when yours is being repaired? Are they helpful on the telephone?Do they seem willing to spend time telling you about the pros and cons ofthe variety of equipment? Will they help you adjust and re-adjust your equip-ment? The supplier should be willing to give you the names of a few of their
148
Appendix C: References and Resources
Appendix C
References andResources

customers. Contact these people to determine how they feelabout the supplier’s services.
Equipment ManufacturersMost wheelchair and related equipment manufacturers have toll-free numbers and are available for assistance. They will oftenrefer you to a local supplier or others in your area who are famil-iar with their products. Some manufacturers have technical assis-tance departments that may be able to help you with specificquestions about modifications, adjustments or repairs. Somemanufacturers publish documents in addition to their wheelchairowner’s manuals. You can talk with your local supplier about get-ting documents from any of the manufacturers.
Other UsersFind people in your community who have similar interests andneeds. Other people often have recommendations for equipmentand you can combine their information with the recommendationsyou get from rehab professionals and equipment suppliers. Bylearning as much as you can, you will be able to make informeddecisions about your equipment.
Professional OrganizationsSome professional organizations may be able to provide you withinformation directly or refer you to members in your area whomay be familiar with similar circumstances to yours.
APTAAmerican Physical Therapy Association1111 N. Fairfax St. (800) 999-2782Alexandria, VA 22314 www.apta.org
AOTAAmerican Occupational Therapy Association4720 Montgomery Lane (800) 729-2682PO Box 31220 www.aota.orgBethesda, MD 20824-1220 [email protected]
NRRTSNational Registry of Rehabilitation Technology SuppliersP.O. Box 4033 (512) 267-6832Lago Vista, TX 78645-4033 www.nrrts.org
Paralyzed Veterans of AmericaSpinal Cord Injury Education and Training Foundation801 18th Street NW (800) 424-8200Washington, DC 20006 www.pva.org
RESNARehabilitation Engineering and Assistive TechnologySociety of North America1700 N. Moore St., Suite 1540 (703) 524-6686Arlington, VA 22209-1903 www.resna.org
149
Appendix C: References and Resources

PublicationsA Guide to Wheelchair Selection: How to Use theANSI/RESNA Wheelchair Standards to Buy a WheelchairWritten by Peter Axelson, Jean Minkel and Denise ChesneyParalyzed Veterans of America, Washington, DCPVA Publications Distribution Center (888) 860-7244
Active Living MagazineP.O. Box 2659Niagara Falls, NY 14302-9945www.cripworld.com/themall/activeliving/shtml
Enable MagazineMagazine of the American Association of People with Disabilities (AAPD) (800) 840-88441819 H Street NW,Suite 300 www.dnaco.net/~elainc/enable.htmlWashington, DC 20006 [email protected]
New MobilityNo Limits, Inc.P.O. Box 220 (888) 850-0344Horsham, PA 19044 www.newmobility.com
Paraplegia NewsPVA Publications (606) 224-05002111 East Highland Avenue, Suite 180 www.pn-magazine.comPhoenix, AZ 85016-4702 [email protected]
Sports ’n SpokesPVA Publications (602) 224-05002111 East Highland Avenue, Suite 180 www.sns-magazine.comPhoenix, AZ 85016-4702 [email protected] ‘n Spokes publishes articles comparing available wheel-chair models.
WebsitesThere are numerous websites with information about wheelchairsand for wheelchair users. Here are a few of them.
ABLEDATA www.abledata.comA searchable database of rehabilitation products.
Beneficial Designs, Inc.www.beneficialdesigns.comA rehabilitation engineering design firm specializing in recreation-al technologies, innovative wheeled mobility and seating, andaccess to outdoor recreation environments.
SpinLifewww.SpinLife.comA site featuring wheelchairs, scooters and accessories.
WheelchairJunkiewww.WheelchairJunkie.comA site for wheelchair users by wheelchair users.
WheelchairNetwww.WheelchairNet.orgA virtual community that provides information, support and aforum for wheelchair users.
150
Appendix C: References and Resources