Embed Size (px)
Citation preview

The (Nearly) Perfect Forensic Boot CD
Windows Forensic Environment
Th
e (
Ne
arl
y) P
erf
ect
Fo
ren
sic
Bo
ot
CD
|

1 | P a g e B r e t t S h a v e r s b s h a v e r s @ g m a i l . c o m
The (Nearly) Perfect Forensic Boot CD
Windows Forensic Environment
Introduction
As a quick introduction to the Windows Forensics Environment (WinFE); it is a bootable CD, based on the Windows Pre-Installed Environment
(PE), with a few changes to create a forensically sound boot CD in which a variety of forensic tasks can be conducted on a suspect machine. Many
current forensic software applications can be run in this environment where imaging, analysis, or triage can be done without altering the evidence drive.
It is not a complete replacement for every imaging tool, but certainly deserves its place in your toolbox.
In the beginning….there was the forensic DOS floppy boot disk. Placed into the suspect computer floppy disk drive, the hard
drive could be accessed and imaged at the speed of…DOS. An entire
1.44mb of storage space to be had storing all the forensic apps you could
squeeze onto it. The life of imaging was wonderful. At least that‟s what I
remember anyway.
Given the loss of floppy drives in newer computers coupled with the speed
of imaging in Windows with hardware write blockers, it was only a short
matter of time before DOS boot disks went the way of the dinosaur. With
the hardware imaging devices of advertised speeds up to 7GB per minute,
imaging through Windows may have also started down the road to being
obsolete. Why would anyone want to image through Windows at 1 or 2
GB/min when you can directly image at up to 7GB per minute with a hardware device? You have to look a little closer at
WinFE to get the answer.
Understanding the Neatness Factor of Windows F orensic Environment
So here comes WinFE, comparable to many of the forensic Linux Boot CDs, with one important difference; it‟s not a Linux
Operating System…it‟s Windows! This is not a small point because many of your everyday Windows forensics applications
can be run on the WinFE disk whereas with the Linux CD, you must accept only those applications that run on Linux.
Given the vast number of examiners being more proficient with Windows than Linux, the ease to which the WinFE CD can
be modified with drivers and software compared with a Linux CD cannot be overstated.
Probably the hesitation I had in even thinking to get started creating a WinFE CD was the fear of how much time, effort, and
testing to get it right, particularly since there are so many freely downloaded Linux Boot CDs. However, after several failures
with my favorite Linux Boot CD (which was not free…), I committed myself to try the WinFE. My only regret is not having
done this sooner. My suggestion is that if you are looking for a forensic boot CD that can do so much more than just image,
then the time you spend making your own will not only be worth it, but you will wonder why you also hesitated so long as
well.
I followed Troy Larson‟s (of Microsoft fame) instructions of creating a bootable Windows Forensic Environment CD a few
years ago. Granted, at the time, I was quite content with the then current system of using hardware write blockers, an
occasional use of a hardware imaging tool, and the even fewer occasions of using a variety of forensic Linux boot CDs. As
neat as WinFE sounded and looked, I just didn‟t put a lot of effort into it as I didn‟t see the value of building the disk it at the
time compared to what I was already using. But as usual, Troy was ahead of his time with his ideas and work and the rest of
us play catch up.
As the number of computers that were being imaged onsite nowadays increased, coupled with the problems of using Linux
Boot CDs that seem to be sporadically (if ever) updated or configured for what I needed onsite, WinFE has come to the top
FIGURE 1 WWW.FORENSICS-INTL.COM
2 | P a g e B r e t t S h a v e r s b s h a v e r s @ g m a i l . c o m
of my first choices of imaging. With WinFE, I can quite easily add the specific drivers needed for most imaging work in
minutes. Most impressive however, is the ability to use the forensic tools I use every day in a forensically sound environment
in a bootable Windows OS. As you read through the instructions and see the dreaded command line, have no fear, this is all easily
put into a batch file and automated.
For those that have not yet grasped why the WinFE CD may be a better (faster) option compared to hardware imaging,
consider the comparison of imaging speeds. Hardware imaging may get you up to an advertised 7.0GB/min for imaging
while the WinFE may get you only 2.5 to 3.0GB/min. But the real speed difference starts when you have more hard drives to
image than you have hardware imaging devices. At the WinFE speeds of up to 3.0GB/min and being able to image as many
computer hard drives as you have WinFE CDs, your practical image speed increases much faster if you have only a few
hardware imaging devices.
As an example, with two hardware imaging devices, two hard drives can be imaged very quickly at 7GB/min. With five or
more hard drives to image, you will need more than double that time because you can only image 2 drives at a time, or bear
the expense of buying more hardware imager devices. With a WinFE boot CD, you can image them all practically at the same
time, limited by only the number of WinFE disks you have and destination drives for the images. Given an entire office of
computers to image, you can see where the time savings begin to add up quickly with the least expense.
And yes, you can still output to multiple drives, in multiple formats, using multiple types of Windows based tools. On top of
that, you can even triage the computer using the tools you know best to determine if it needs to be imaged in the first place.
That is time savings that beats any hardware imaging device.
Booting a non-Windows disk may cause writes to the evidence disk. These changes are well documented and do
not affect the integrity of the user data (WinFE is not going to create a user generated file…it may just write a disk signature).
Of course, knowing that an evidence hard drive is non-Windows, simply choose another method to capture the image, or
document the changes that are knowingly made. This paper does not provide any testing data as it is merely a write-up on
creating the WinFE boot CD.
Using any method of booting an evidence machine runs the risk of inadvertently booting the operating system. As with any
bootable media, take the same precautions of ensuring the system boots to the CD rather than the evidence hard drive
through changes to the BIOS. Once booted to WinFE, you will be presented with a command shell. The program
DISKPART is used to access your evidence drive and destination drives. There are only a few commands that need to be
used.
A recommendation on the use and development of your WinFE CD…it is always a good idea to understand the licensing agreements for any of the
software you choose to use with the WinFE CD. Although a great deal of freeware/shareware is available, much of it has limitations on its
commercial use unless explicitly stated or you have a license of the software. Beyond that warning, the limitation of what you can do with WinFE is
limited only by your imagination.

3 | P a g e B r e t t S h a v e r s b s h a v e r s @ g m a i l . c o m
Building Your Very Own WinFE
You can have your very own WinFE today after a few minutes of effort. One download, two registry changes, some copying
of files, and burn your WinFE CD. In many of the to be described steps, you can choose your own folder structure and
names of the folders as to where to store your WinFE files, but for simplicity of explanations, you may want to use the
structure set out in this guide at first. Create a folder at the root of C:\ as below:
FIGURE 2
As you can see, you will have a set of batch files, drivers, software, and an ISO which is not only bootable to WinFE, but also
has a „live‟ side for running machines. This is not a daunting task, so hang in there as it is a lot easier than it sounds. Keep in
mind that is folder you create is separate from a folder structure that will be automatically created once your run the first
command line (# 2 below).
1) Download and install Windows Automated Installation Kit (AIK) from www.microsoft.com
2) From the AIK command line (run as Administrator) copy the winpe files to your computer with the command:
a. copype.cmd x86 C:\WinFE
b. You may choose to replace the “x86” with either “amd64”, or “ia64”
FIGURE 3
4 | P a g e B r e t t S h a v e r s b s h a v e r s @ g m a i l . c o m
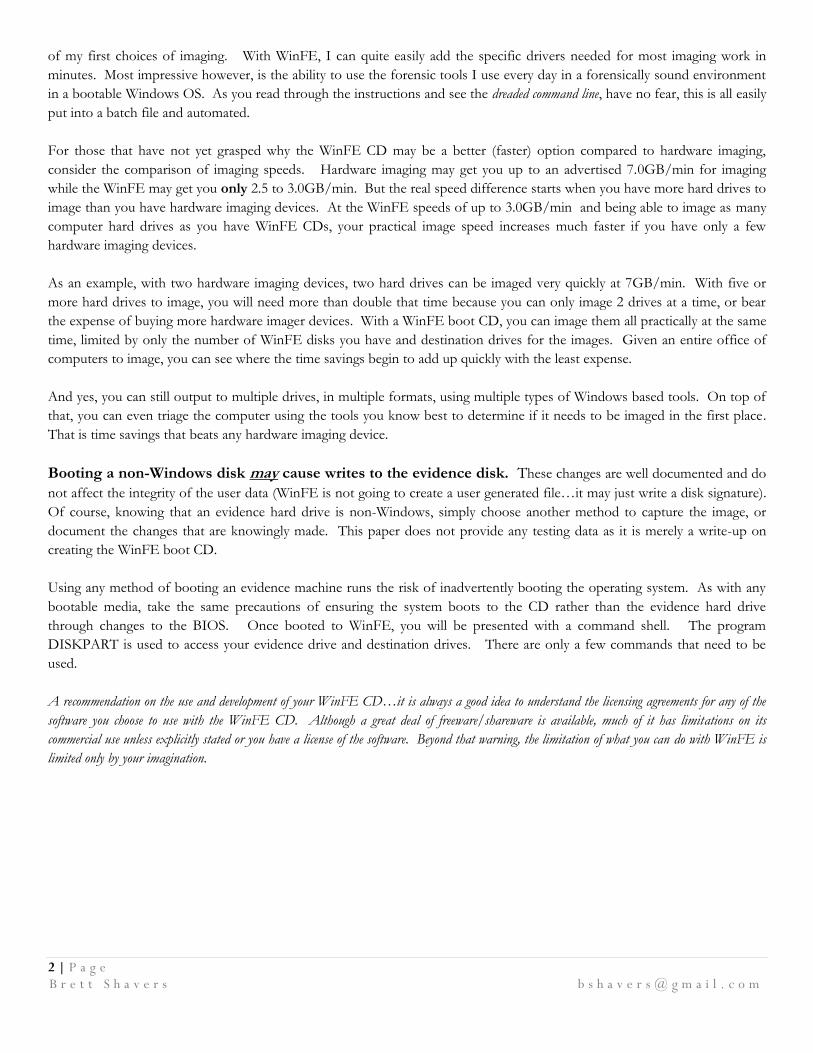
c. After completed, the directory structure on your C:\ drive will look like:
3) The boot.wim image (Windows Imaging File Format)
a. Instead of an ISO image, you will first be working with a .wim image. In order to modify this image and
make it forensically sound, you need to mount it.
b. There are two .wim images in the folder structure above.
i. WinFE\ISO\sources\boot.wim
ii. WinFE\winpe.wim
c. The boot.wim will be used to create your final ISO. You can mount the winpe.wim or the boot.wim to
install your tools. If you use the winpe.wim, simply delete the current boot.wim and move/rename
winpe.wim to WinFE\ISO\sources (in order to replace the non-modified boot.wim).
d. Mount the .wim image through the AIK command line (this will mount the image under the “mount” folder
in order to make modifications and add your forensic applications).
imagex /mountrw C:\winFE\ISO\sources\boot.wim 1 C:\winFE\mount
FIGURE 5
FIGURE 4

5 | P a g e B r e t t S h a v e r s b s h a v e r s @ g m a i l . c o m
4) Modify the registry of the winpe mounted image
a. Using Regedit, there are two registry modifications
to be made for a forensically sound boot process.
b. Load SYSTEM HIVE
c. In Regedit, Choose File – Load Hive
d. Select the System file located at:
C:\WinFE\mount\Windows\System32\config
e. Name it WinFE
f. HKEY_LOCAL_MACHINE\WinFE\ControlS
et001\services\mountmgr
1. Create a DWORD named
NoAutoMount if it doesn‟t exist
already by “right clicking” in
Regedit and change the DWORD
value to 1
FIGURE 7
.
ii. HKEY_LOCAL_MACHINE\WinFE\ControlSet001\services\partmgr\Parameters
1. Sans Policy -change the DWORD value to 3
iii. Unload the WinFE SYSTEM HIVE
1. Select the WinFE hive.
2. With Regedit, choose File – Unload Hive – “yes”
5) Options: Add your tools
Create a WinFE folder in the mounted winpe image at the root of the mounted image. Copy your tools into this
folder. Generally, only those programs that can run without installation can be successfully used with WinFE,
such as most portable applications. Detailed instructions for specific software are outlined further in this paper.
6) Options: Drivers
Common or specific video drivers can be injected (aka..installed) into the mounted image through the AIK
command line (AIK command line (where “drivers\*.inf is the location of your drivers to be injected). As
needed, drivers can be added just as easily, to include RAID drivers and other hardware specific drivers. WinRAR
can be used to extract drivers (.inf) files from driver installation executables.
peimg.exe /inf=C:\drivers\*.inf C:\winFE\mount\Windows
FIGURE 6

6 | P a g e B r e t t S h a v e r s b s h a v e r s @ g m a i l . c o m
7) Unmount your winpe.wim image (commit changes or you will have lost your work)
imagex.exe /unmount /commit C:\winFE\mount
8) Delete bootfix.bin located in C:\WinFE\ISO\boot (deleting this file will prevent the warning of „press any key to
boot from cd‟)
9) Create ISO from the AIK command line (this command uses the boot.wim image):
oscdimg -n -m -o -bC:\WinFE\etfsboot.com C:\WinFE\ISO C:\WinFE\WinFE.iso
10) And finally, burn the ISO to a CD and test it.
FIGURE 8
7 | P a g e B r e t t S h a v e r s b s h a v e r s @ g m a i l . c o m
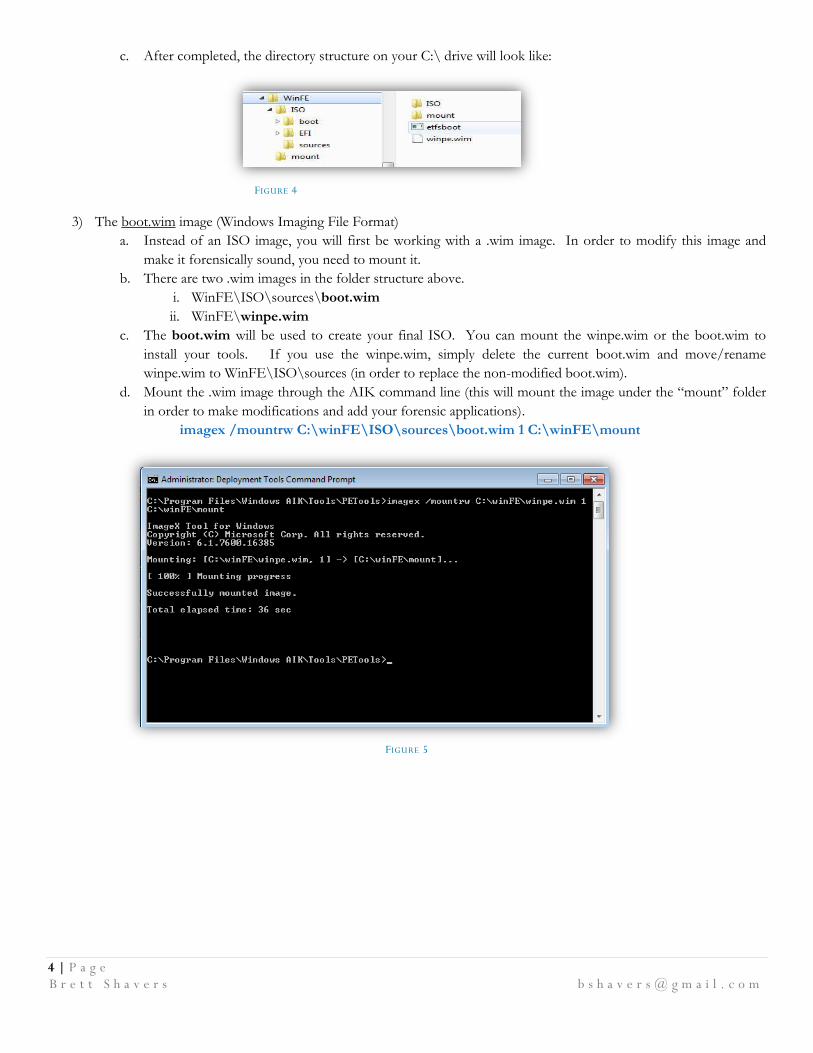
How to Use WinFE
You now have created a basic WinFE Boot CD. More advanced features are described further, but first and more
importantly, how to use it.
The first step after booting to the CD is prepping the hard drives attached to the system. For sake of clarity, the “evidence”
drive will be the hard drive contained in your suspect/custodian machine. The “destination” drive will be the external drive to
which your image of the evidence drive will be stored.
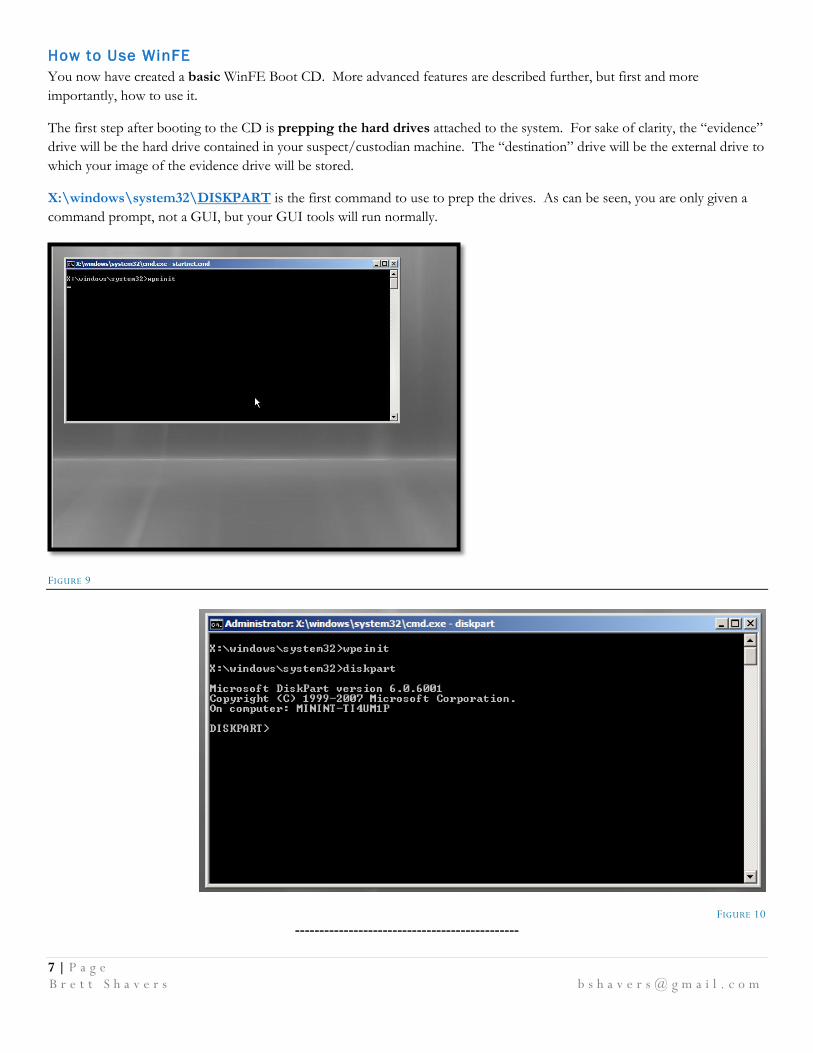
X:\windows\system32\DISKPART is the first command to use to prep the drives. As can be seen, you are only given a
command prompt, not a GUI, but your GUI tools will run normally.
FIGURE 9
FIGURE 10
----------------------------------------------
8 | P a g e B r e t t S h a v e r s b s h a v e r s @ g m a i l . c o m
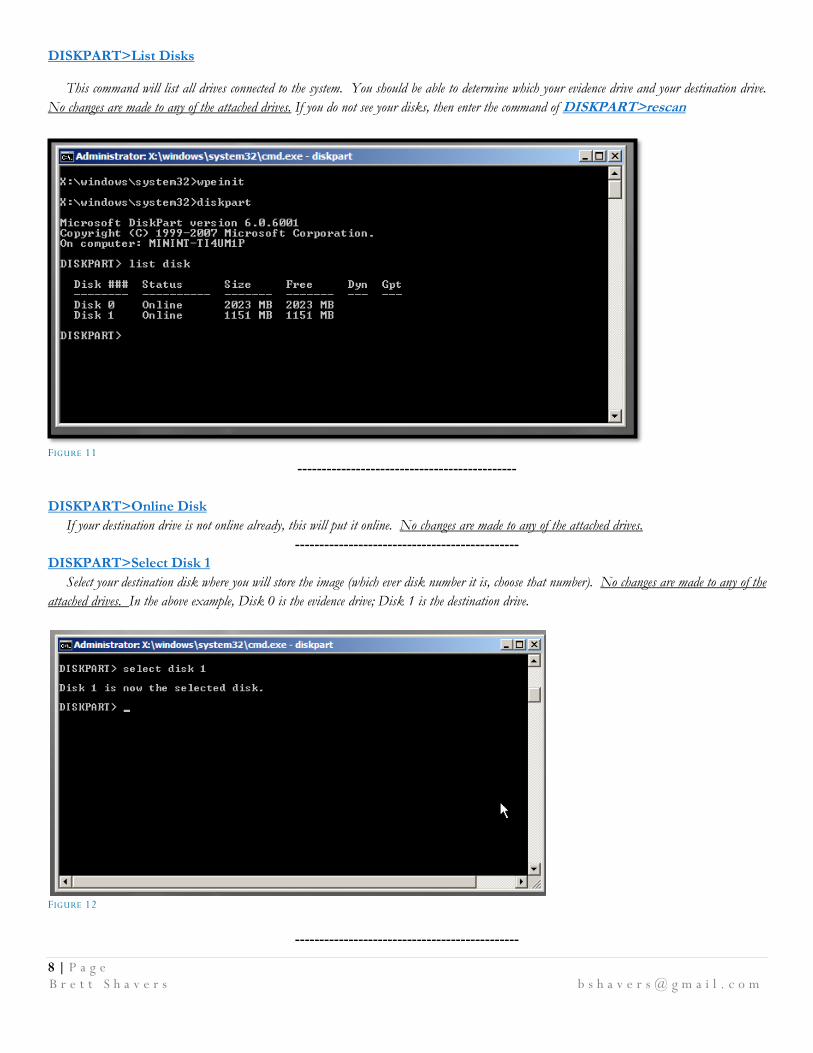
DISKPART>List Disks
This command will list all drives connected to the system. You should be able to determine which your evidence drive and your destination drive.
No changes are made to any of the attached drives. If you do not see your disks, then enter the command of DISKPART>rescan
FIGURE 11
---------------------------------------------
DISKPART>Online Disk
If your destination drive is not online already, this will put it online. No changes are made to any of the attached drives.
----------------------------------------------
DISKPART>Select Disk 1
Select your destination disk where you will store the image (which ever disk number it is, choose that number). No changes are made to any of the
attached drives. In the above example, Disk 0 is the evidence drive; Disk 1 is the destination drive.
FIGURE 12
----------------------------------------------

9 | P a g e B r e t t S h a v e r s b s h a v e r s @ g m a i l . c o m
DISKPART>Detail Disk
If you are unsure of the disk selected, this command will give you more information about it. No changes are made to any of the attached drives.
FIGURE 13
----------------------------------------------
DISKPART>List Volume
This command will list the volume(s) on your selected disk. No changes are made to any of the attached drives. If your destination drive does not
have any volumes, you can create a volume by DISKPART>create partition primary
FIGURE 14
----------------------------------------------
DISKPART>Select Volume 1
Select the volume to where the image will be stored (whichever volume you need, choose that number).
FIGURE 15
----------------------------------------------

10 | P a g e B r e t t S h a v e r s b s h a v e r s @ g m a i l . c o m
DISKPART>Attribute clear readonly
This will allow your destination disk to be read/write. Do not do this to the evidence disk!
----------------------------------------------
DISKPART>Assign Letter=T
This will assign a drive letter to your destination drive (you can choose any letter for your destination drive).
FIGURE 16
----------------------------------------------
DISKPART>Exit
This will exit DISKPART, but keep the prompt open. Do not close the prompt!
You are now able to write to your destination drive and your evidence drive is ReadOnly. After you exit from DiskPart, you
will be at the command line. Change directories to your forensic tool folder, in this example, WinFE.
FIGURE 17
From here, simply run the executable of your tool to run as a GUI application. Or you can use a 3rd party application
launcher, such as PStart (http://www.pegtop.net) to access your GUI applications.

11 | P a g e B r e t t S h a v e r s b s h a v e r s @ g m a i l . c o m
FIGURE 18
Image away! Your destination drive will be accessible via the “T” drive as assigned prior.
Setting a disk to read-only does not alter the hard drive.
Setting the volume to read-only does alter the disk.
To Shutdown: wpeutil shutdown

12 | P a g e B r e t t S h a v e r s b s h a v e r s @ g m a i l . c o m
Brief Overview of Steps
The following are a brief of the steps to create a WinFE CD, previously described in more detail.
Copy Winpe files:
copype.cmd x86 C:\winFE
Mount Winpe.wim
imagex /mountrw C:\winFE\ISO\boot.wim 1 C:\winFE\mount
(If you mount winpe.wim, remember to replace the boot.wim with your modified winpe.wim and rename it boot.wim).
Add scripting package (to access the Bitlocker/Shadow Volume Copies)
peimg /install=WinPE-Scripting-Package C:\WinFE\mount\windows
peimg /install=WinPE-WMI-Package C:\WinFE\mount\Windows
Modify Registry:
HKLM\WINFE\ControlSet001\Services\MountMgr /v NoAutoMount /t REG_DWORD /d 1 /f HKLM\WINFE\ControlSet001\Services\partmgr\Parameters /v SanPolicy /t REG_DWORD /d 3 /f
Install drivers:
peimg.exe /inf=c:\mydevice.inf c:\winfe\mount\windows\
Create forensic tools folder and copy tools into;
C:\WinFE\mount\WinFE
C:\WinFE\mount\boot
Delete boot.fix
Located in C:\winFE\ISO\sources
Unmount wimpe.wim and commit the changes
imagex.exe /unmount /commit C:\winFE\mount
(If you mounted winpe.wim and not boot.wim, then rename winpe.wim to boot.wim and replace the WinFE\ISO\sources\boot.wim file. Your
ISO will be built using the boot.wim file)
Create ISO
oscdimg -n -m -o -bC:\WinFE\etfsboot.com C:\WinFE\ISO C:\WinFE\WinFE.iso
Test it.

13 | P a g e B r e t t S h a v e r s b s h a v e r s @ g m a i l . c o m
DISKPART Commands in Brief
DISKPART> List Disks
This command will list all drives connected to the system. You should be able to determine which your evidence drive is and which your
destination drive is
DISKPART> Select Disk 1
Select your destination disk where you will store the image
DISKPART> Detail Disk
If you are unsure of the disk selected, this command will give you more information about it
DISKPART> Online Disk
If your destination drive is not online already, this will put it online
DISKPART> List Volume
This command will list the volume(s) on your selected disk
DISKPART> Select Volume 1
Select the volume to where the image will be stored
DISKPART> Attribute clear readonly
This will set your destination disk to read/write
DISKPART> Assign Letter=T
This will assign a drive letter to your destination drive
DISKPART> Exit
This will exit DISKPART, but keep the prompt open

14 | P a g e B r e t t S h a v e r s b s h a v e r s @ g m a i l . c o m
Imaging Bitlocked Drives
The two scripting packages installed (“Scripting-Package” and “WMI-Package”) are needed for imaging Volume Shadow
Copies and Bitlocked hard drives. You will need the key to unlock the Bitlocked drives.
For Bitlocked drives, set the evidence drive to readonly:
attribute disk set readonly
Once set to readonly, mount the volume “select volume #” then “assign”. You will need to use…
manage-bde.wsf –status
…which is located at Windows\System32\ in order to unlock the Bitlocked volume. With the key, the volume can be
unlocked with (where the X‟s=the volume):
cscript manage-bde.wsf –unlock C: -rp XXXXXX-XXXXXX-…
Using a command line tool, such as a dd imaging application, you can image the now unlocked volume
Imaging Volume Shadow Copies (VSS)
Imaging a Shadow Copy can be conducted by using vssadmin to list the VSS volumes. The volume shadow copies can be
imaged using known imaging methods with dd applications.

15 | P a g e B r e t t S h a v e r s b s h a v e r s @ g m a i l . c o m
Detai ls of Instal l ing Software
For organization, it may help to keep the tools located in the previously created folder of C:\WinFETools\Tools in which you
can test the functioning prior to copying them onto your mounted WinFE tools folder. Running any of the applications after
copying to the mounted WinFE folder will more than likely cause conflicts with your system requiring a restart.
Keeping your tools in the root folder of C:\WinFE Tools\tools will allow a simplified method of ensuring your applications
are quickly updated and copied from C:\WinFE\Tools to C:\WinFE\mount\WinFE through one command or batch file.
Command Line Applications Command line applications can be copied into the mounted WinFE folder. These applications can include the Garner
Forensic Acquisition Utilities, NTI Suite, Sysinternals, and Maresware applications.
FTK Imager Lite (www.accessdata.com) FTK Imager Lite can be copied directly to your mounted WinFE tools folder. However, a file, “oledlg.dll” needs to be
copied (not injected) from your Windows host system to the mounted image for FTK Imager to run from a booted WinFE
disk. Simply copy and paste it into the Windows\System32 folder of your mounted image.
FIGURE 19
ProDiscoverBasic U3 (www.techpathways.com) The U3 version of ProDiscoverBasic will run without the need of installing any files. Change the .U3 extension to .zip and
unzip all files to a folder. The folder can be copied to your WinFE tools folder.
X-Ways Forensics (www.x-ways.net) The X-Ways Forensics folder can be copied to your mounted WinFE tools folder without installing the program. The X-
Ways dongle is still required to run, but the dongle does not require any installation either. Evidor, another forensic
application from X-Ways, can also be copied (and does not require a dongle).

16 | P a g e B r e t t S h a v e r s b s h a v e r s @ g m a i l . c o m
Encase If Encase has been installed on your C:\ drive, you can copy the entire folder (minus any files not needed) for Encase to
function in WinFE. Encase will run in acquisition mode, without a dongle. It is possible to install Encase to be able to run
fully, however, this requires additional steps. As WinFE runs off the “X” drive, you will need to replicate an “X” drive on
your system, install Encase to the “X” drive, and then copy the Encase folder to your mounted WinFE tools folder.
Additionally, you will need to install the hasp drivers. Hasp drivers are injected in the same manner as .inf drivers, such as the
example below;
Peimg.exe /inf=C:\hasp.inf[hash]\hasp.inf C:\winFE\mount\Windows
F-Response F-Response also works in the WinFE environment, as the F-Response folder containing the executables only need to be
copied onto the mounted image. As seen in the below screenshot (from http://www.f-response.com), you can run F-
Response as designed. The background shown is available for download from the F-Response website, with instructions on
changing the desktop provided later in the WinFE customization section of this paper.
Other Forensic Programs For any program not detailed, in order to know if it will run on WinFE, you can copy the files, create a WinFE ISO, and test
in a virtual environment. Applications that do not run may need additional .dll files, which you might be able to copy from
your host machine to your mounted WinFE folder for the program to run.
Stand-alone programs, such as RegRipper, are the easiest to
Non-Forensic Applications The ability to use other portable applications is convenient to create an environment whereby you not only can image the
drive, but also take screenshots of your activity, take notes, and create chain of custody reports to be saved onto your
destination drive. There are many portable applications with word processors, screen capture, and spreadsheet capabilities,
which are light on resources and space.
17 | P a g e B r e t t S h a v e r s b s h a v e r s @ g m a i l . c o m
Work Files You can also copy templates to forms used in your normal course of forensic work on the WinFE CD (such as evidence
control forms, report forms, etc…), which can be saved onto your external drive with the image of that evidence drive. If
done, this should be only on the bootable side of WinFE as running unnecessary programs on the live side will unnecessarily
alter the evidence drive.
GUI Start Menu There are several freely available GUI start menus, such as PStart (/www.pegtop.net/), which can be used to access and run
your GUI forensic programs. Another useful application is A43, which is an Explorer replacement but also has a “quick start
menu‟ to access your programs. Many of these menus are portable (and free), not requiring any installation. These menus
can work on both the bootable and live side of WinFE.
Additionally, there are other start menu modifications that more closely mimic the traditional Windows Start menu. Generally,
the smaller, portable GUI menu applications are easier to update with your tools.
The “Live” Side
Given extra space on your bootable CD, you have the ability to copy programs onto your mounted WinFE folder that will run
on a live system, much like many of the Linux boot disks. Again, the limitation of the number of programs is that of available
space on the CD. The limitations on the type of programs are those that can run in a portable mode.

18 | P a g e B r e t t S h a v e r s b s h a v e r s @ g m a i l . c o m
Customizing WinFE
Customizing your WinFE is primarily for cosmetic reasons and does not affect the functioning of the tool; although, errors in
modifications can cause WinFE to not function at all. These steps also add to the time involved in creating a WinFE CD. But
then again, a personalized boot disk is something to be proud of ;)
One option is to change the booting screen “Windows is loading files…” to something different in order to see that it is
your WinFE booting and not the evidence machine booting into Windows. This change involves modifying the
bootmgr.exe.mui file located in the mounted image at Windows\Boot\PCAT\en-US, using a Hex Editor and PEChecksum
(http://www.codeproject.com/KB/cpp/PEChecksum.aspx).
1) Create a folder, “en-US”, at your directory of C:\WinFE\ISO\boot\. 2) Copy the bootmgr.exe.mui from the mounted image to this folder. 3) After finding the location of the text, change the “i” and “s” to “F” and “E” respectively. Be certain not to change
anything else, including the „periods‟ between each letter, as they are not simply „periods‟. 4) Save your changes after editing and open the file with PEChecksum. 5) With PEChecksum, you will need to change the checksum of bootmgr.exe.mui. After opening bootmgr.exe.mui with
PEChecksum, retrieve the checksum. Copy the retrieved checksum (calculated value) to the new value checksum box and select write.
6) Exit PEChecksum.
Your new booting screen is seen compared with the default booting screen on the following page as “Windows FE loading
files…”
You should now copy the „new‟ bootmgr.exe.mui to your “C:\WinFE Files\en-US” folder in order to quickly copy it to future
WinFE disks you build. This command can be added to your CreateWinFE.bat file if desired.
FIGURE 20 PECHECKSUM
19 | P a g e B r e t t S h a v e r s b s h a v e r s @ g m a i l . c o m
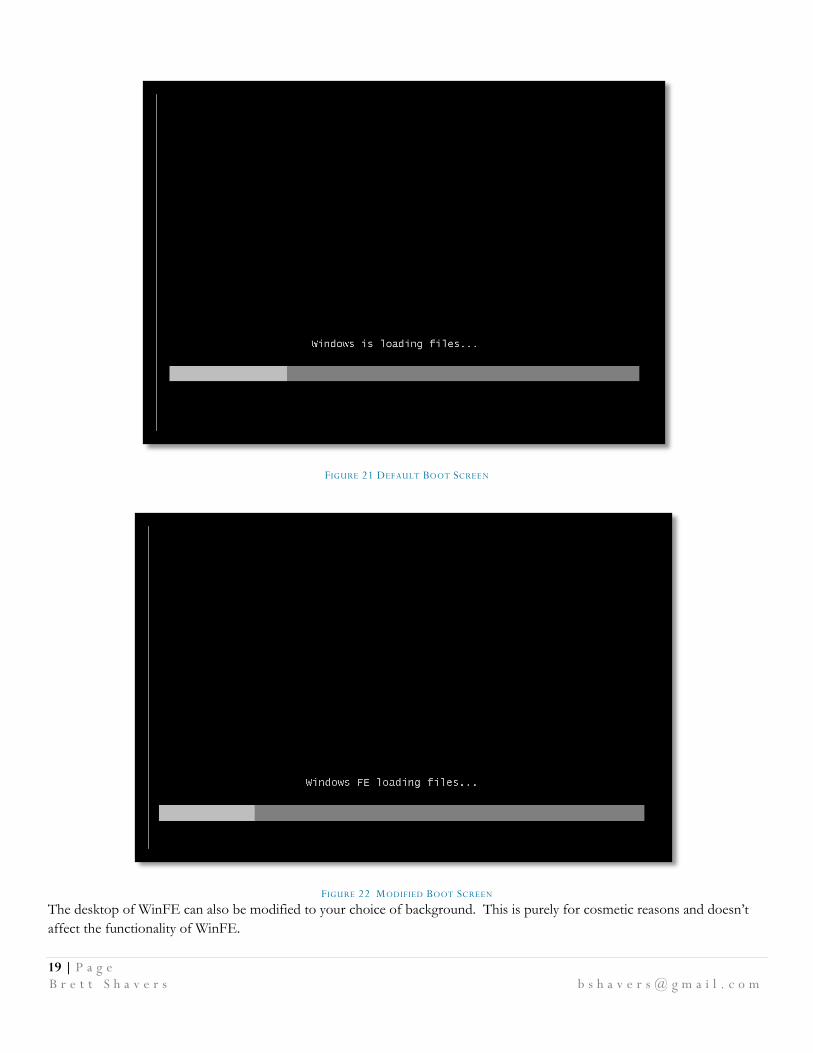
FIGURE 21 DEFAULT BOOT SCREEN
FIGURE 22 MODIFIED BOOT SCREEN
The desktop of WinFE can also be modified to your choice of background. This is purely for cosmetic reasons and doesn‟t
affect the functionality of WinFE.
20 | P a g e B r e t t S h a v e r s b s h a v e r s @ g m a i l . c o m
FIGURE 23
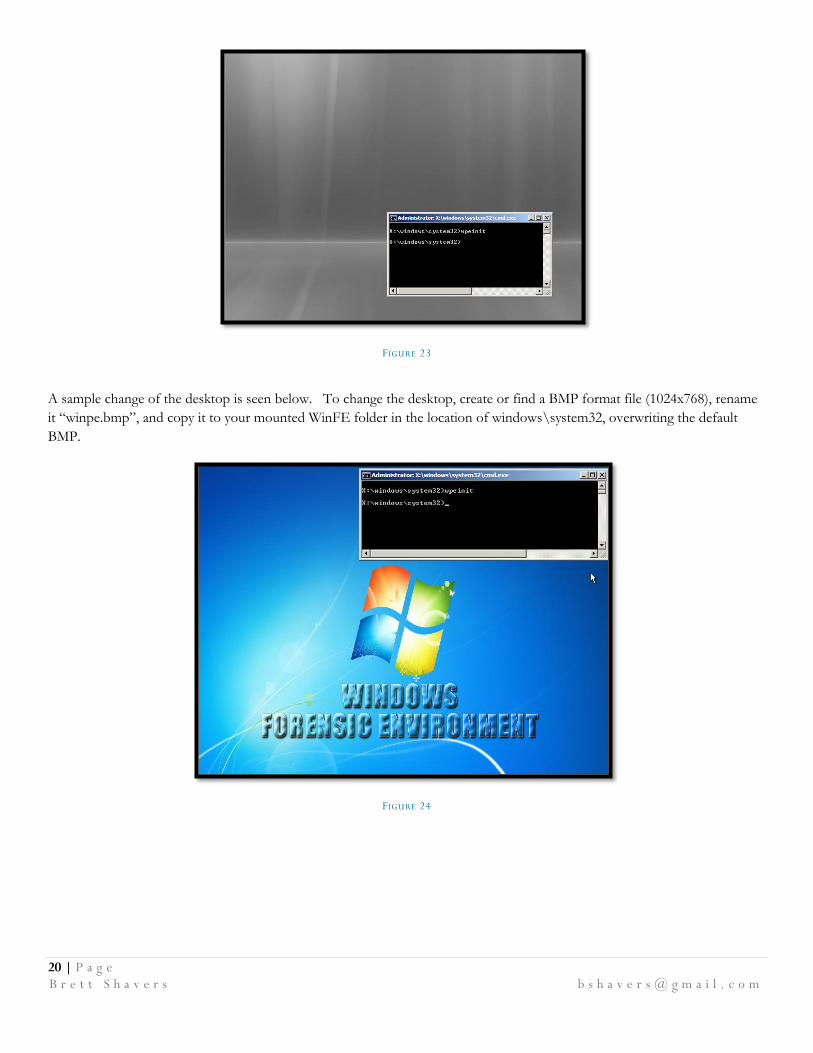
A sample change of the desktop is seen below. To change the desktop, create or find a BMP format file (1024x768), rename
it “winpe.bmp”, and copy it to your mounted WinFE folder in the location of windows\system32, overwriting the default
BMP.
FIGURE 24
21 | P a g e B r e t t S h a v e r s b s h a v e r s @ g m a i l . c o m
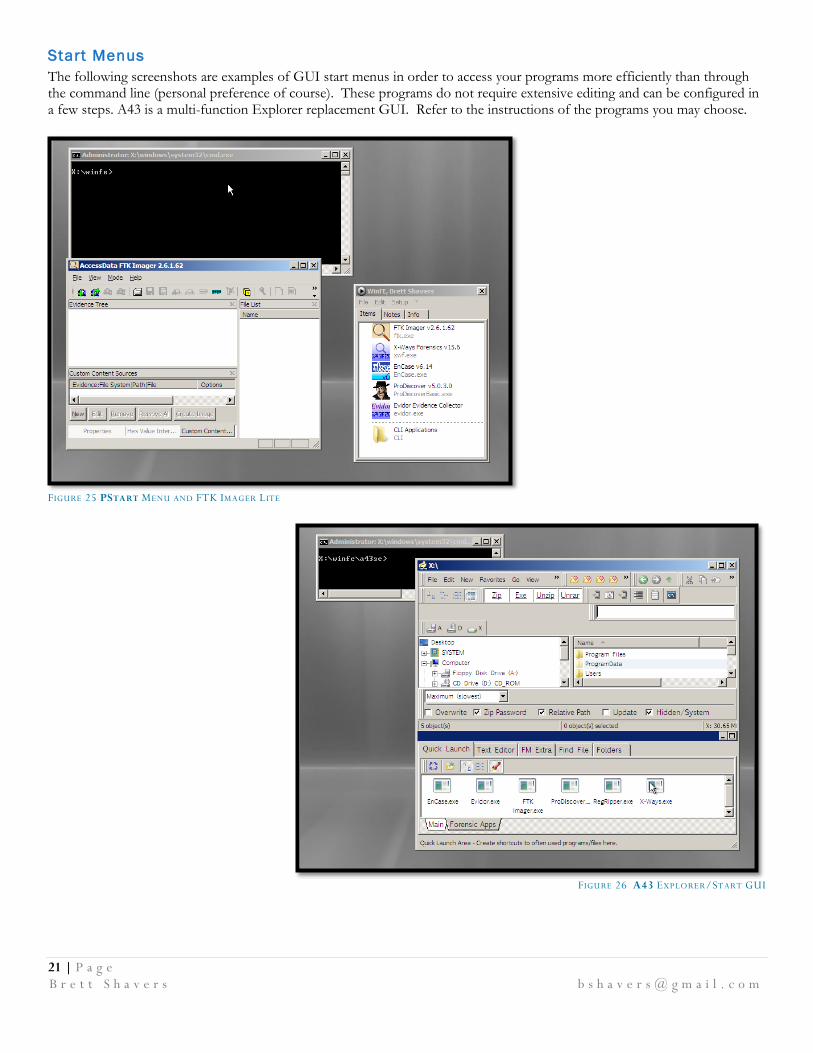
Start Menus
The following screenshots are examples of GUI start menus in order to access your programs more efficiently than through the command line (personal preference of course). These programs do not require extensive editing and can be configured in a few steps. A43 is a multi-function Explorer replacement GUI. Refer to the instructions of the programs you may choose.
FIGURE 25 PSTART MENU AND FTK IMAGER LITE
FIGURE 26 A43 EXPLORER/START GUI

22 | P a g e B r e t t S h a v e r s b s h a v e r s @ g m a i l . c o m
Some Tips and Ideas on Using WinFE
Building
Work off the root of your C:\ drive as it may be easier to find your work and decrease the chances that long paths will cause copying problems. Also, working off an external drive (other than the C:\ drive) may cause some issues with AIK. If you are having problems mounting your winpe.wim image, run the command Dism /Cleanup-Wim (this is helpful before you create a new WinFE to ensure you start clean):
If a command doesn‟t work (such as any peimg command), consider using a different AIK version (such the Vista version, or
Windows 7 version). Different builds may behave differently, even on the same OS or different OS.
Need More Space for Appl ications?
Consider using an external hard drive in tandem with a WinFE boot CD. Any portable program that can be accessed on the
system can be run, or better yet, create a WinFE bootable USB drive.
Usage
To speed imaging an evidence drive with WinFE, inject eSATA drivers and image the evidence drive using an eSATA card.
This will drastically increase the speed of imaging.
For applications to install or copy, nearly every portable type of program can be used. Programs that do not advertise to be
portable might be able to run with a simple copy of its program folder, with X-Ways Forensics being a prime example. With
other applications, you will need to test each program, which typically will involve finding files that will need to be copied onto
the mounted winpe.wim (such as .dll files) in order for the application to run correctly.
Triage
WinFE disks can be built with tools to triage computers to determine if they even need to be imaged or examined further.
Automated batch files or specific forensic programs can be run to search for text strings or file types across the evidence drive,
and if found, the drive can be imaged. If no files of value are found, it can be assumed the drive may not need to be imaged.
There are a multitude of available applications useful in a triage situation. Non-commercial use of the NirSoft
(http://www.nirsoft.net) applications will allow for numerous functions to be available on a WinFE CD. The NirSoft
applications include the ability to exam USB device use, link files, internet history, system information recovery, and other
pertinent information that can help make the decision on whether a computer needs further analysis. The Sysinternals Suite
(http://www.microsoft.com) also contains a multitude of applications at no cost.
A triage boot CD with the additional option of running tools on a live computer can be put together at virtually no cost, save
for commercial forensic applications. Automated scripts can be created to further simplify the triage function in order to
allow for non-technical (or less trained) persons assist in large scale data collection efforts.
Analysis
Completing an entire analysis with WinFE is probably not the best option as it will be running on the suspect machine, which
will limit WinFE processing power due to that computer‟s hardware. However, in cases where imaging is impractical or not
allowed, substantial analysis can be done with WinFE onsite. This type of capability will greatly benefit those instances of
being onsite and not being allowed to image drives for offsite analysis. The time savings of not having to remove hard drives,
especially from problematic machines, as well as not having to use multiple forensic machines, increases the number of
computers that can be processed simultaneously.

23 | P a g e B r e t t S h a v e r s b s h a v e r s @ g m a i l . c o m
Test ing
There are several results of tests with the Windows Forensic Environment that can be found online. Some of the tests show
that Windows FE will write a signature to a disk that has not been connected to a Windows system prior. This would include
a new disk or non-Windows disk (that has not been connected to a Windows system). At least one test shows that this may
not happen all the time.
With any forensic tool, tests conducted by the user need to be conducted because in court, nothing beats the statement of, “I
know this because I personally tested it”. Even with the freely downloaded Linux boot variants, simply downloading one,
using it to collect evidence and relying upon someone else‟s efforts to test it, just isn‟t a good practice.
With the Windows Forensic Environment, given that you put your own tools on it and work with Windows every day, you
absolutely know everything you need to know about it. Can you say the same for a Linux boot CD that you use?

24 | P a g e B r e t t S h a v e r s b s h a v e r s @ g m a i l . c o m
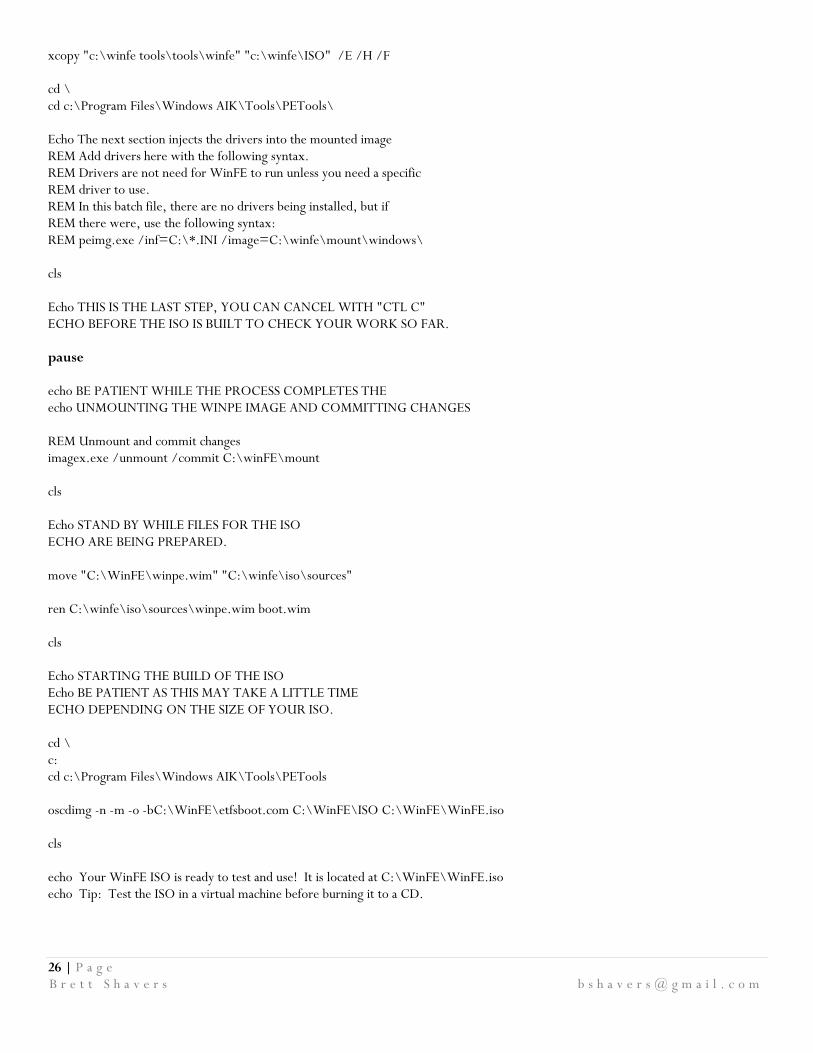
Batch Fi le – CreateWinFE.bat
A batch file of the previously described steps can be created to speed and automate the process of building a
WinFE ISO. The following pages show a simple batch file that will process all the steps of in this paper up
to the point of creating the ISO. At that point, the batch file will pause and ask if you want to check your
progress before continuing. You can remove this „pause‟ and have it run from beginning to completion. A
full CD of 700MB will take less than 15 minutes to build.
The following sample batch file (copy the text to notepad and save as CreateWinFE.bat) makes assumptions as to;
1) Where you stored your forensic applications to be copied (C:\WinFE Tools\Bootable and C:\WinFE\Boot\) 2) Where you stored your drivers to be injected (C:\WinFE Tools\Drivers) 3) You have a personalized desktop image (winpe.bmp) stored at C:\WinFE Tools\Desktop 4) You have a personalized boot message (bootmgr.exe.mui) is stored at C:\WinFE Tools\Bootmgr\en-US

25 | P a g e B r e t t S h a v e r s b s h a v e r s @ g m a i l . c o m
-----------------------------------------
rd /s/q c:\WinFE c: cd "c:\program files\windows aik\tools\petools" call copype.cmd x86 c:\WinFE ECHO MOUNTING THE WINPE IMAGE cd \ cd c:\Program Files\Windows AIK\Tools\x86 imagex /mountrw C:\WinFE\winpe.wim 1 C:\winFE\mount del C:\winfe\iso\sources\boot.wim del C:\WinFE\ISO\boot\bootfix.bin REM INSTALLING PACKAGES 'SCRIPTING' AND 'WMI' Echo INSTALLING PACKAGES 'SCRIPTING' AND 'WMI' cd \ cd c:\Program Files\Windows AIK\Tools\PETools\ peimg /install=WinPE-Scripting-Package c:\WinFE\mount\Windows peimg /install=WinPE-WMI-Package C:\WinFE\mount\Windows ::The packages have now been installed (Scripting and WMI). REM MODIFYING THE REGISTRY Echo Registry modification-Turning off automounting of all drives; echo 1) Creating and setting NoAutoMount to "1" Echo 2) Setting SanPolicy to "3" REG LOAD HKLM\WinFE C:\WinFE\mount\Windows\System32\config\SYSTEM REG ADD HKLM\WinFe\ControlSet001\Services\MountMgr /v NoAutoMount /t REG_DWORD /d 1 /f REG ADD HKLM\WinFe\ControlSet001\Services\partmgr\Parameters /v SanPolicy /t REG_DWORD /d 3 /f REG UNLOAD HKLM\WinFE cls Echo COPYING DLL FOR FTK IMAGER LITE - 'oledlg.dll' Echo COPYING FORENSIC APPS FROM C:\WINFE TOOLS\BOOTSIDE Echo COPYING FORENSIC APPS FROM C:\WINFE TOOLS\WINFE REM The next section copies two files, one for the desktop background REM and the other for a custom boot message. Both are optional. cd \ mkdir c:\winfe\mount\winfe mkdir c:\winfe\iso\boot\en-US xcopy "C:\WinFE Tools\Bootmgr\en-US\bootmgr.exe.mui" "c:\winfe\iso\boot\en-US\" /E /H /F xcopy "C:\WinFE Tools\Desktop\winpe.bmp" "c:\winfe\mount\windows\system32\" /E /H /F /Y REM The next section copies the required FTK Imager Lite file to system32 and REM also copies all forensics apps contained in the "tools" folder xcopy "C:\WinFE Tools\Drivers\oledlg.dll" "c:\WinFE\mount\windows\system32\" /E /H /F xcopy "c:\winfe tools\tools\bootside" "c:\WinFE\mount\winfe" /E /H /F
26 | P a g e B r e t t S h a v e r s b s h a v e r s @ g m a i l . c o m
xcopy "c:\winfe tools\tools\winfe" "c:\winfe\ISO" /E /H /F cd \ cd c:\Program Files\Windows AIK\Tools\PETools\ Echo The next section injects the drivers into the mounted image REM Add drivers here with the following syntax. REM Drivers are not need for WinFE to run unless you need a specific REM driver to use. REM In this batch file, there are no drivers being installed, but if REM there were, use the following syntax: REM peimg.exe /inf=C:\*.INI /image=C:\winfe\mount\windows\ cls Echo THIS IS THE LAST STEP, YOU CAN CANCEL WITH "CTL C" ECHO BEFORE THE ISO IS BUILT TO CHECK YOUR WORK SO FAR. pause echo BE PATIENT WHILE THE PROCESS COMPLETES THE echo UNMOUNTING THE WINPE IMAGE AND COMMITTING CHANGES REM Unmount and commit changes imagex.exe /unmount /commit C:\winFE\mount cls Echo STAND BY WHILE FILES FOR THE ISO ECHO ARE BEING PREPARED. move "C:\WinFE\winpe.wim" "C:\winfe\iso\sources" ren C:\winfe\iso\sources\winpe.wim boot.wim cls Echo STARTING THE BUILD OF THE ISO Echo BE PATIENT AS THIS MAY TAKE A LITTLE TIME ECHO DEPENDING ON THE SIZE OF YOUR ISO. cd \ c: cd c:\Program Files\Windows AIK\Tools\PETools oscdimg -n -m -o -bC:\WinFE\etfsboot.com C:\WinFE\ISO C:\WinFE\WinFE.iso cls echo Your WinFE ISO is ready to test and use! It is located at C:\WinFE\WinFE.iso echo Tip: Test the ISO in a virtual machine before burning it to a CD.
27 | P a g e B r e t t S h a v e r s b s h a v e r s @ g m a i l . c o m
References and Credits Due
Troy Larson mentioned WinFE to me in 2008 (maybe even in 2007) and I said that it sounds like the perfect OS. After following his guides of creating a WinFE CD, I now believe that it is about as close to being the perfect forensic OS as possible.
Troy Larson
CTIN Presentation: http://www.slideshare.net/ctin/ctin-windows-fe-1256287 Research Windows FE v3: http://www.twine.com/item/113421dk0-g99/windows-fe Forensics From The Sausage Factory (blog) http://forensicsfromthesausagefactory.blogspot.com/2008/07/windows-fe.html Grand Stream Dreams (blog) http://grandstreamdreams.blogspot.com/2009/02/windows-fe-details-teased-out-of-web.html Windows FE A Windows PE Based Forensic Boot CD Marc Remmert Hackin9, Vol 4, No 6, P14
RegRipper http://www.regripper.net X-Ways Forensics http://www.x-ways.net FTK Imager Lite http://www.accessdata.com
F-Response http://www.f-response.com ProDiscover http://www.techpathways.com Encase Forensics http://www.guidancesoftware.com Microsoft.com (Windows, Automated Install Kit) http://www.microsoft.com PEChecksum
http://www.codeproject.com/KB/cpp/PEChecksum.aspx PStart http://pegtop.net NirSoft http://www.nirsoft.net
Sam Brothers SAS Forensics V1.4