Embed Size (px)
Citation preview

1
The Illustrator User InterfaceAdobe Illustrator is the industry-standard application for creating digital drawings or vector images (graphics composed of mathematically defined lines instead of pixels). Our goal in this book is to teach you how to use the available tools to create different types of work that you might encounter in your professional career. Some projects focus specifically on creating graphics and illustrations — which is the true heart of the application.
Although not originally intended as a page-layout application, you can use the tools in Illustrator to combine type, graphics, and images into a cohesive design. Many people create flyers, posters, and other projects entirely within Illustrator. With the option of multiple-artboard capability, we will likely see more of this type of Illustrator work in the future.
The simple exercises in this introduction are designed to allow you to explore the Illustrator user interface. Whether you are new to the application or upgrading from a previous version, we highly recommend that you follow these steps to click around and become familiar with the basic workspace.
ExplorE thE Illustrator IntErfacE
The first time you launch Illustrator, you will see the default user interface (UI) settings as defined by Adobe. When you relaunch after you or another user has quit, the workspace defaults to the last-used settings — including open panels and the position of those panels on your screen. We designed the following exercise so you can explore different ways of controlling panels in the Illustrator user interface.
1. Create a new empty folder named WIP on any writable disk (where you plan to save your work).
2. Download the InterfaceAI_AICC14_RF.zip archive from the Student Files Web page.
3. Macintosh users: Place the ZIP archive in your WIP folder, then double-click the file icon to expand it.
Double-click the archive file icon
to expand it.
Windows users: Double-click the ZIP archive file to open it. Click the folder inside the archive and drag it into your primary WIP folder.
Open the archive file...
...then drag the Interface folder from the archive
to your WIP folder.
The resulting InterfaceAI folder contains all the files you need to complete the exercises in this introduction.
Some people argue that Adobe Illustrator should not be used for page layout and that Adobe InDesign is the preferred page-layout application. However, the tools needed for basic page design are built into Illustrator, so many people use Illustrator for that type of job.
Note:

2 The Illustrator CC User Interface
4. Macintosh users: While pressing Command-Option-Shift, launch Illustrator. Hold down the modifier keys until Illustrator opens.
Windows users: Launch Illustrator, then immediately press Control-Alt-Shift. Hold down the modifier keys until Illustrator opens.
This step resets Illustrator to the preference settings that are defined by Adobe as the application defaults. This helps to ensure that your application functions in the same way as what we show in our screen shots.
5. Open the Window>Workspace menu.
If you see a Reset Essentials option near the bottom, choose that option. If the Reset command has any other workspace name, choose Essentials near the top of the list, then choose Window>Workspace>Reset Essentials.
This step might or might not do anything, depending on what was done in Illustrator before you started this project. If you or someone else changed anything and then quit the application, those changes are remembered when Illustrator is relaunched. Because we can’t be sure what your default settings show, by completing this step you are resetting the user interface to one of the built-in, default workspaces so your screen shots will match ours.
6. Macintosh users: Open the Window menu and choose Application Frame to toggle that option on.
Many menu commands and options in Illustrator are toggles, which means they are either on or off; when an option is already checked, that option is toggled on (visible or active). You can toggle an active option off by choosing the checked menu command, or toggle an inactive option on by choosing the unchecked menu command.
This option should be checked.
On Windows, each running application is contained within its own frame; all elements of the application — including the Menu bar, panels, tools, and open documents — are contained within the Application frame.
Adobe also offers the Application frame to Macintosh users as an option for controlling your workspace. When the Application frame is active, the entire workspace exists in a
self-contained area that can be moved around the screen. All elements of the workspace (excluding the Menu bar) move when you move the Application frame.
The Application frame is inactive by default; you can toggle it on by choosing Window>Application Frame. If the menu option is checked, the Application frame is active; if the menu option is not checked, it is inactive.
When the Application frame is not active, the desktop is visible behind the workspace elements.
ILLU
STR
ATO
R F
OU
ND
ATI
ON
S
Understanding the Application Frame
If a menu option is grayed out, it is not available for the active selection.
Note:
Saved workspaces (accessed in the Window>Workspaces menu, or in the Workspace switcher on the Application/Menu bar) provide one-click access to a defined group of tools.
Note:

3The Illustrator CC User Interface
The Welcome screen, which includes four panes, defaults to show the New Features pane. The Create pane includes links to create a variety of new document types, as well quickly reopen recently used files. The New Features, Getting Started, and the Tips & Techniques panes include a number of video tutorials.
Application bar
Menu bar
Control panel
Panel dock
Iconized panels
Tools panel
Welcome screen
Workplace switcherArrange Documents panelGo to Bridge button
Menu bar
Control panel
On Windows, the same options in the Macintosh Application bar are available to the right of the menus.
In general, the Macintosh and Windows workspaces are very similar, but there are a few slight differences.
• On Macintosh, the application’s title bar appears below the Menu bar; the Close, Minimize, and Restore buttons appear on the left side of the title bar, and the menu bar is not part of the Application frame.
• On Macintosh, the Application bar includes a link to the Adobe Bridge application, a panel with different arrangements for tiling multiple open documents, a menu for accessing different saved workspaces, and a search option. On Windows systems, those same options are available on the Menu bar.
• On Windows, the Close, Minimize, and Restore buttons appear at the right end of the Menu bar, which is part of the overall Application frame.
Also, Macintosh users have two extra menus (consistent with the Macintosh operating system structure). The Apple menu provides access to system-specific commands. The Illustrator menu follows the Macintosh system-standard format for all applications; this menu controls basic application operations such as About, Hide, Preferences, and Quit.

4 The Illustrator CC User Interface
7. Macintosh users: Choose Illustrator>Preferences>User Interface.
Windows users: Choose Edit>Preferences>User Interface.
Remember that on Macintosh systems, the Preferences dialog box is accessed in the Illustrator menu; Windows users access the Preferences dialog box in the Edit menu.
Preferences customize the way many of the program’s tools and options function. When you open the Preferences dialog box, the active pane is the one you choose in the Preferences submenu. Once open, however, you can access any of the Preference categories by clicking a different option in the left pane; the right side of the dialog box displays options related to the active category.
Macintosh Windows
8. In the Brightness section, choose any option that you prefer.
You might have already noticed the rather dark appearance of the panels and interface background. The application uses the medium-dark “theme” as the default. (We used the Light option throughout this book because text in the interface elements is easier to read in printed screen captures.)
9. Check the option to Auto-Collapse Iconic Panels, then click OK to close the Preferences dialog box.
Check this option.
Use these options to lighten or darken the user interface.
10. Continue to the next exercise.
As you work your way through this book, you will learn not only what you can do with these different collections of Preferences, but also why and when you might want to adjust them.
Note:

5The Illustrator CC User Interface
ExplorE thE arrangEmEnt of Illustrator panEls
As you gain experience and familiarity with Illustrator, you will develop personal artistic and working styles. Illustrator includes a number of options for arranging and managing the numerous panels, so you can customize and personalize the workspace to suit your specific needs.
We designed the following exercise to give you an opportunity to explore different ways of controlling Illustrator panels. Because workspace preferences are largely a matter of personal taste, the projects in this book instruct you to use certain tools and panels, but where you place those elements within the interface is up to you.
1. With Illustrator open, Control/right-click the title bar above the column of docked panel icons. Make sure the Auto-Collapse Iconic Panels option is checked, then click away from the contextual menu to dismiss it.
As we explained in the Getting Started section, when commands are different for the Macintosh and Windows operating systems, we include the different commands in the Macintosh/Windows format. In this case, Macintosh users who do not have right-click mouse capability can press the Control key and click to access the contextual menu. You do not have to press Control and right-click to access the menus.
Dock title bar
This option should be checked (active).
Control/right-clicking a dock title bar opens the dock contextual menu, where you can change the default panel behavior. Many elements in Illustrator have contextual menus, which make it easy to access item-specific options.
Because you turned on the Auto-Collapse option in the User Interface preferences, this toggle is already checked. You can use either option — preference or contextual menu command — to toggle the option on or off at any time.
2. In the panel dock, click the third button from the top (Swatches).
Most Illustrator functionality is accessed in one of 30+ panels. Virtually everything you do in Illustrator requires interacting with at least one panel; more often than not, you will use multiple panels to complete any given project.
Icons that are grouped together in the dock represent a panel group.
When you expand a panel that is part of a panel group,
the entire group expands.
The icon you clicked is the active panel in the
expanded group.
Clicking a panel icon expands that panel to
the left of the icon.
Panel group title bar
Dock title bar
The panel name appears in a tool tip when the cursor hovers over the icon.
3. Click away from the expanded panel, anywhere in the workspace.
Because the Auto-Collapse option is active, the expanded panel group collapses back to an icon when you click away from the panel.
If you’re using a Macintosh with a mouse that doesn’t have right-click capability, we highly recommend that you purchase one that does. They’re inexpensive, available in most retail stores, and will save you significant amounts of time when accessing contextual options.
Note:

6 The Illustrator CC User Interface
4. Hover the mouse cursor over the left edge of the dock column until you see a two-facing arrow icon, then click the left edge of the docked panels (on the right side of the screen) and drag left.
When panels are iconized, you can expand the icons to show the panel names as well as the panel icons. This can be particularly useful until you become more familiar with the application and the icons used to symbolize the various panels.
Click here and drag left to show the panel names in addition to the icons.
5. Double-click the dock title bar above the docked icons to expand the docked panels.
Double-clicking the dock title bar expands or collapses the entire dock column.
7The Illustrator CC User Interface
6. On the left side of the workspace, review the Tools panel. If you don’t see all of the panel options, double-click the Tools panel title bar.
The Tools panel can be displayed as either one or two columns; double-clicking the Tools panel title bar toggles between these two modes.
Some monitors — especially laptops — are not high enough to display the large number of tools that are available in Illustrator’s Tools panel. If this is the case, you should use the two-column mode.
Double-click the Tools panel title bar to toggle between the one-column and two-column layouts.
If your monitor is not large enough to show all options, you should use the panel in
two-column mode.
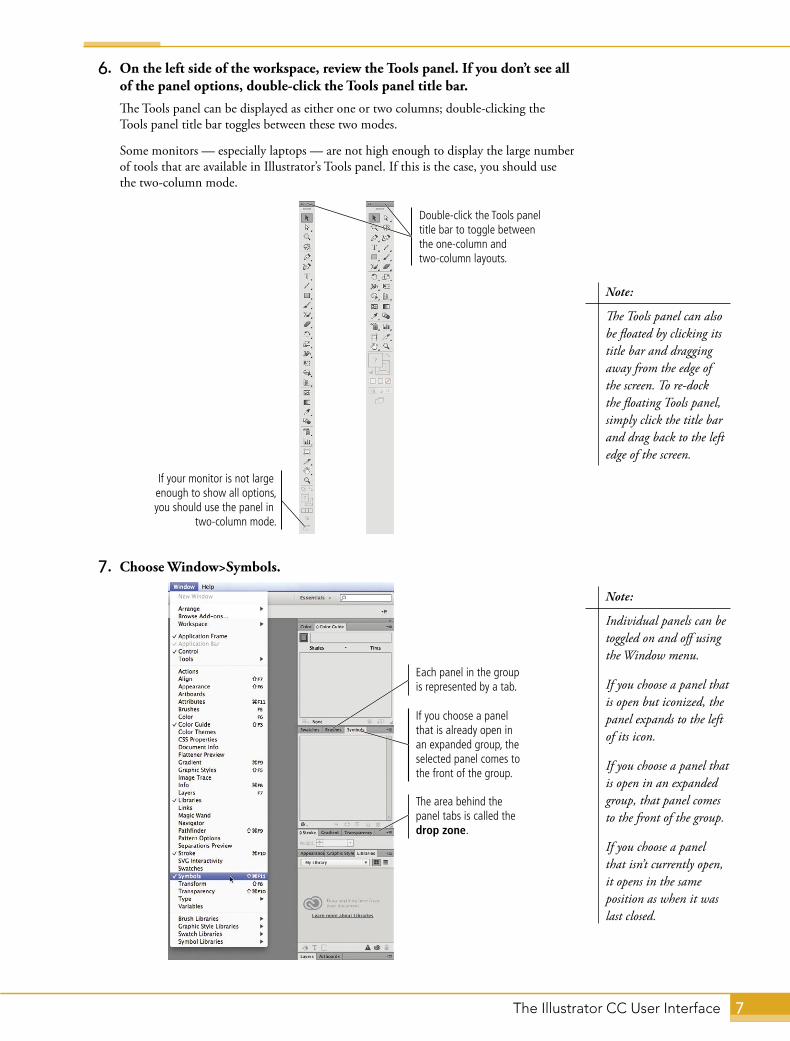
7. Choose Window>Symbols.
If you choose a panel that is already open in an expanded group, the selected panel comes to the front of the group.
Each panel in the group is represented by a tab.
The area behind the panel tabs is called the drop zone.
The Tools panel can also be floated by clicking its title bar and dragging away from the edge of the screen. To re-dock the floating Tools panel, simply click the title bar and drag back to the left edge of the screen.
Note:
Individual panels can be toggled on and off using the Window menu.
If you choose a panel that is open but iconized, the panel expands to the left of its icon.
If you choose a panel that is open in an expanded group, that panel comes to the front of the group.
If you choose a panel that isn’t currently open, it opens in the same position as when it was last closed.
Note:

8 The Illustrator CC User Interface
The Illustrator Tools panel appears to contain 28 tools; however, many of the primary tools also have variations or similar tools nested under the primary tools.
Tool icons that show a small black arrow in the lower-right corner have nested tools. You can access nested tools by clicking the primary tool and holding down the mouse button until a pop-up menu shows the nested variations.
If you hover your mouse over a tool, a pop-up tool tip shows the name of the tool, as well as the associated keyboard shortcut for that tool if one exists. If a tool has a defined shortcut, pressing that key activates the associated tool. (If you don’t see tool tips, check the Show Tool Tips option in the General pane of the Preferences dialog box.)
A tool tip shows the name of the tool.
This arrow means the tool has other nested tools.
If you drag the mouse cursor to the bar on the right of the nested-tool menu, the nested-tool options separate into their own floating toolboxes, so you can more easily access the nested variations. (The primary tool is not removed from the main Tools panel.)
While holding down the mouse button, drag to here, then release the mouse button...
...to tear off a separate panel with all the related tools.
The chart to the right offers a quick refer-ence of nested tools, as well as the keyboard shortcut for each tool (if any). Nested tools are shown indented and in italics.
ILLU
STR
ATO
R F
OU
ND
ATI
ON
SIdentifying and Accessing Illustrator Tools
Zoom tool (Z)
Hand tool (H)
Print Tiling tool
Slice tool (Shift-K)
Slice Selection tool
Artboard tool (Shift-O)
Radar Graph tool
Pie Graph tool
Scatter Graph tool
Area Graph tool
Line Graph tool
Stacked Bar Graph tool
Bar Graph tool
Stacked Column Graph tool
Column Graph tool (J)
Symbol Styler tool
Symbol Screener tool
Symbol Stainer tool
Symbol Spinner tool
Symbol Sizer tool
Symbol Scruncher tool
Symbol Shifter tool
Symbol Sprayer tool (Shift-S)
Blend tool (W)
Eyedropper tool (I)
Measure tool
Gradient tool (G)
Mesh tool (U)
Perspective Grid tool (Shift-P)
Perspective Selection tool (Shift-V)
Live Paint Bucket tool (K)
Live Paint Selection tool (Shift-L)
Shape Builder tool (Shift-M)
Free Transform tool (E)
Wrinkle tool
Crystallize tool
Scallop tool
Bloat tool
Pucker tool
Twirl tool
Warp tool (Shift-R)
Width tool (Shift-W)
Reshape tool
Shear tool
Scale tool (S)
Reflect tool (O)
Rotate tool (R)
Scissors tool (C)
Knife tool
Eraser tool (Shift-E)
Blob Brush tool (Shift-B)
Path Eraser tool
Join tool
Smooth tool
Pencil tool (N)
Paintbrush tool (B)
Flare tool
Star tool
Polygon tool
Ellipse tool (L)
Rounded Rectangle tool
Rectangle tool (M)
Polar Grid tool
Rectangular Grid tool
Spiral tool
Arc tool
Line Segment tool (\)
Vertical Type on a Path tool
Touch Type tool (Shift-T)
Vertical Area Type tool
Vertical Type tool
Type on a Path tool
Area Type tool
Type tool (T)
Curvature tool (Shift-`)
Convert Anchor Point tool (Shift-C)
Delete Anchor Point tool (-)
Add Anchor Point tool (+)
Pen tool (P)
Lasso tool (L)
Magic Wand tool (Y)
Group Selection tool
Direct Selection tool (A)
Selection tool (V)

9The Illustrator CC User Interface
In addition to customizing the position of built-in Illustrator panels, you can also create custom Tools panels to show only certain tools that you might want for the job you’re doing at the moment.
Choosing Window>Tools>New Tools Panel opens a dialog box where you can name the new panel.
Clicking OK creates a new empty panel that closely resembles the original Tools panel. The large plus-sign icon indicates that you have not yet added any tools to the new panel. You can click and drag any tool from the regular Tools panel onto the custom Tools panel.
Drag any tool from the regular Tools panel to the new custom Tools panel.
If tools already exist in the custom panel, a blue line indicates where the tool you’re dragging will appear in the panel. You can also drag existing tools to a new position in the custom panel at any time. (You cannot, however, remove tools from a custom panel.)
Drag tools to any specific position in the custom Tools panel.
Changes to a custom Tools panel are saved automatically. If you close a custom panel (by clicking the panel’s Close button), the same tools appear in the same position when you reopen it. Existing custom Tools panels can always be opened in the Window>Tools submenu.
Choosing Window>Tools>Manage Tools Panel opens a dialog box where you can rename or delete custom panels.
Click to create a new Tools panel.
Select a panel in the list, then use the field below to rename it.
Click to delete the selected Tools panel.
ILLU
STR
ATO
R F
OU
ND
ATI
ON
SCreating Custom Tools Panels
10 The Illustrator CC User Interface
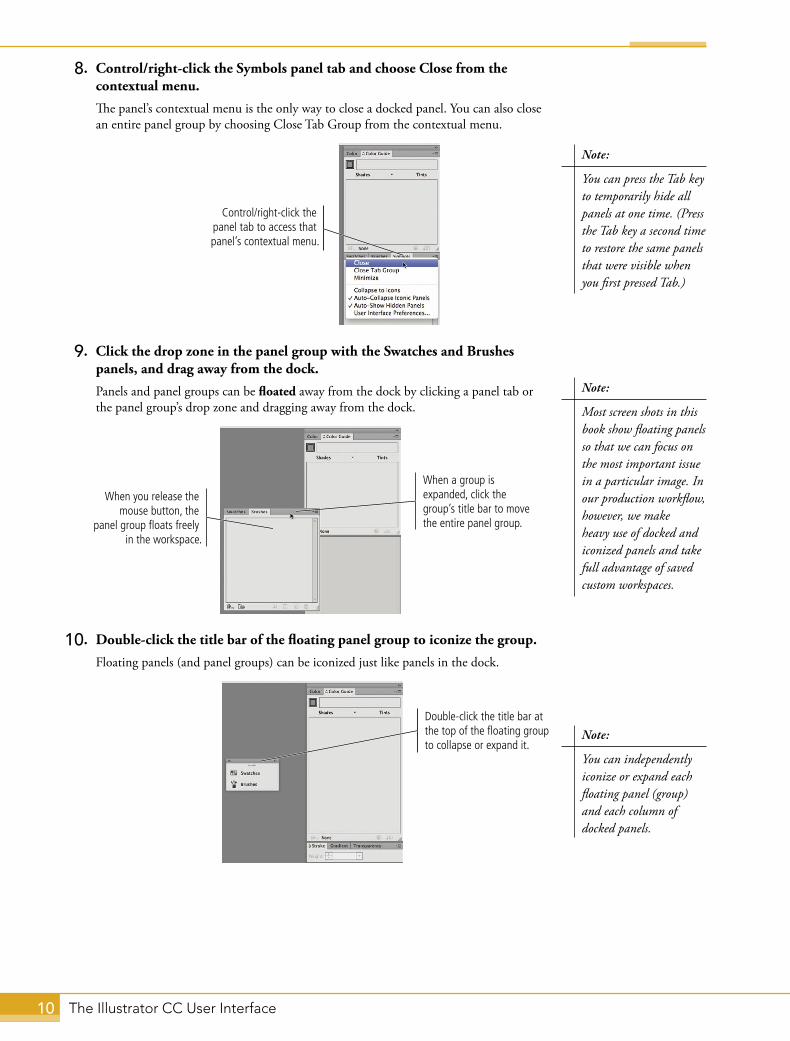
8. Control/right-click the Symbols panel tab and choose Close from the contextual menu.
The panel’s contextual menu is the only way to close a docked panel. You can also close an entire panel group by choosing Close Tab Group from the contextual menu.
Control/right-click the panel tab to access that panel’s contextual menu.
9. Click the drop zone in the panel group with the Swatches and Brushes panels, and drag away from the dock.
Panels and panel groups can be floated away from the dock by clicking a panel tab or the panel group’s drop zone and dragging away from the dock.
When you release the mouse button, the
panel group floats freely in the workspace.
When a group is expanded, click the group’s title bar to move the entire panel group.
10. Double-click the title bar of the floating panel group to iconize the group.
Floating panels (and panel groups) can be iconized just like panels in the dock.
Double-click the title bar at the top of the floating group to collapse or expand it.
You can press the Tab key to temporarily hide all panels at one time. (Press the Tab key a second time to restore the same panels that were visible when you first pressed Tab.)
Note:
You can independently iconize or expand each floating panel (group) and each column of docked panels.
Note:
Most screen shots in this book show floating panels so that we can focus on the most important issue in a particular image. In our production workflow, however, we make heavy use of docked and iconized panels and take full advantage of saved custom workspaces.
Note:

11The Illustrator CC User Interface
11. Click the Swatches panel icon (in the floating panel group) and drag the panel into the dock, below the first panel group. Release the mouse button.
Individual panels can be dragged to different locations (including into different groups) by dragging the panel’s tab. The target location — where the panel will be located when you release the mouse button — is identified by the blue highlight.
The blue highlight shows where the panel will be placed if you
release the mouse button.
The dragged panel is moved from the floating
group to the dock.
12. Click the Swatches panel tab, drag onto the drop zone area of the top panel group in the dock, then release the mouse button.
When you release the mouse button...
...the Swatches panel becomes part of the top
panel group.

12 The Illustrator CC User Interface
13. Click the Appearance panel tab (in the dock), and drag the panel left until the blue highlight shows a second column added to the dock.
You can create multiple columns of panels in the dock. This can be very useful if you need easy access to a large number of panels, and if you have a monitor with enough available screen space.
This pop-out “drawer” indicates that releasing the mouse button...
...will create a second column in the panel dock.
14. Double-click the title bar above the left dock column to collapse the left column.
Each column in the dock can be iconized independently.
Floating panels and panel groups can also be iconized independently from dock columns.
When you have more than one column in the dock, each column can be expanded or iconized independently of the other column(s).
Note:
In addition to positioning specific panels in precise locations, you can also add to or modify the keyboard shortcuts used for different functions in the application.
Choosing Edit>Keyboard Shortcuts opens a dialog box where you can modify the shortcuts for menu commands and tools. If you assign a shortcut that isn’t part of the default set, you have to save a custom set of shortcuts (Illustrator won’t let you modify the default set of keyboard shortcuts).
When more than one set of shortcuts exists (i.e., if you or someone else has added to or changed the default settings), you can switch between the different sets using the menu at the top of the dialog box.
ILLU
STR
ATO
R F
OU
ND
ATI
ON
S
Customizing Keyboard Shortcuts

13The Illustrator CC User Interface
15. Hover the mouse cursor over the left edge of the dock column until you see a two-facing arrow icon, then click the left edge of the right dock column and drag left.
Dragging the left edge of a dock column changes the width of all panels in that column.
16. Hover the mouse cursor over the bottom edge of the Swatches panel group (in the right column of the dock) until you see a two-facing arrow icon, then click and drag up.
When you drag the bottom edge of a docked group, other variable panels in the same column expand or contract to fit the available space. By “variable panels,” we mean any panel that has an undefined number of options. Some panels, such as the Stroke panel that is visible here, have a fixed number of options so they do not expand or contract. The Layers panel, on the other hand, can list a variable number of items so it can be made larger or smaller.
Other panels in the dock column expand as necessary to fill the same vertical space.
Dragging the bottom edge of a docked panel group changes the height of that group.
17. Continue to the next exercise.

14 The Illustrator CC User Interface
crEatE a savEd WorkspacE
By now you should understand that you have virtually unlimited control over the appearance of your Illustrator workspace — what panels are visible, where and how they appear, and even the size of individual panels and panel groups.
Over time you will develop personal preferences based on your work habits and project needs. Rather than re-establishing every workspace element each time you return to Illustrator, you can save your custom workspace settings so you can recall them with a single click.
1. Click the Workspace switcher in the Application/Menu bar and choose New Workspace.
Again, keep in mind that we list differing commands in the Macintosh/Windows format. On Macintosh, the Workspace switcher is in the Application bar; on Windows, it’s in the Menu bar.
The Workspace switcher shows the name of the last-called workspace.
2. In the New Workspace dialog box, type Portfolio and click OK.
After saving the current workspace, the Workspace switcher shows the name of the new saved workspace.
3. Click the Workspace switcher and choose Essentials from the list of available workspaces.
Calling a saved workspace restores the last-used state of the workspace. You made a number of changes since calling the Essentials workspace at the beginning of the previous exercise, so calling the Essentials workspace restores the last state of that workspace — in essence, nothing changes from the saved Portfolio workspace.
Custom workspaces are listed at the top of the Workspace switcher.
Nothing apparent changes when you recall the Essential workspace.
Because workspace preferences are largely a matter of personal taste, the projects in this book instruct you regarding which panels to use, but not where to place those elements within the interface.
Note:
The Manage Workspaces option opens a dialog box where you can rename or delete user-defined custom workspaces. You can’t alter the default workspaces that come with the application.
Note:
Saved workspaces can be accessed in the Window> Workspace submenu as well as the Workspace switcher on the Application/Menu bar.
Note:

15The Illustrator CC User Interface
4. Open the Workspace switcher and choose Reset Essentials (or choose Window>Workspace>Reset Essentials).
Remember, saved workspaces remember the last-used state; calling a workspace again restores the panels exactly as they were the last time you used that workspace. For example, if you close a panel that is part of a saved workspace, the closed panel will not be reopened the next time you call the same workspace. To restore the saved state of the workspace, including opening closed panels or repositioning moved ones, you have to use the Reset option.
5. Continue to the next exercise.
ExplorE thE Illustrator documEnt WIndoW
There is much more to using Illustrator than simply arranging panels around the workspace. In this exercise, you open an Illustrator file and explore interface elements that will be important as you begin creating digital artwork.
Before completing this exercise, you should download and install the ATC fonts from the Student Files Web page.
1. In Illustrator, choose File>Open.
2. Navigate to your WIP>InterfaceAI folder and select lion.ai in the list of available files.
The Open dialog box is a system-standard navigation dialog box. This is one area of significant difference between Macintosh and Windows users.
Macintosh Windows
Press Command/Control-O to access the Open dialog box.
Note:

16 The Illustrator CC User Interface
3. Click Open.
The document tab shows the active file name, view percentage, color space, and current viewing mode.
Illustrator files appear in a document window.
The artboard is essentially the digital page, or the area where artwork should be created or placed.
View Percentage menu/field
The canvas (sometimes called the pasteboard) around the artboard defaults to a gray color.
Use these options to navigate from one artboard to another
within a single file.
4. Open the View Percentage menu in the bottom-left corner of the document window and choose 200%.
Different people prefer different view percentages, depending on a number of factors such as eyesight, monitor size, and so on. As you complete the projects in this book, you’ll see our screen shots zoom in or out as necessary to show you the most relevant part of a particular file. In most cases we do not tell you what specific view percentage to use for a particular exercise unless it is specifically required for the work being done.
Type a specific percentage in the field or choose one of the predefined percentages from the attached menu.
You can zoom an Illustrator document from 3.13% to 6400%.
Note:
Macintosh users: If you turn off the Application frame (Window>Application Frame), the new document will have its own title bar.
Note:

17The Illustrator CC User Interface
5. Choose View>Fit Artboard in Window.
The Fit Artboard in Window command automatically calculates view percentage based on the size of the document window.
These five options affect the view percentage of a file.
6. Review the options in the Control panel.
The Control panel appears by default at the top of the workspace below the Menu bar (and the Application bar on Macintosh systems). It is context sensitive, which means it provides access to different options depending on which tool is active and what is selected in the document.
When nothing is selected in the file, the most important Control panel options open the Document Setup dialog box and the Preferences dialog box (more about these specific elements in the projects). Other options set the default stroke and fill attributes for the next object you create.
This button opens a dialog box where you can change
attributes related to the basic document (size, etc.).
This button opens the Preferences dialog box, where you can change
specific application behaviors (units of measurement, etc.).
7. Click the Selection tool at the top of the Tools panel to make that tool active.
The Selection tool (the solid arrow) is used to select entire objects in the file.
8. Click the black area behind the lion to select that object in the file.
Many of the options available in the Control panel duplicate options in other panels or menu commands.
Note:

18 The Illustrator CC User Interface
9. Review the options in the Control panel.
When an object is selected in the file, the Control panel shows the attributes of the selected object.
Selected object (indicated by bounding box handles on all four sides of the object)
Selection tool
Bounding box handles
The Control panel shows options for the selected object (in this case, a path).
10. Click the text near the bottom of the artwork to select the type object.
Again, the Control panel changes to show options related to type objects.
Selected object (indicated by bounding box handles on all four sides of the object)
The Control panel shows options related to the selected object (in this case, the type object).
11. Continue to the next exercise.

19The Illustrator CC User Interface
ExplorE thE arrangEmEnt of multIplE documEnts
Because designers frequently need to work with more than one Illustrator file at once, Illustrator incorporates a number of options for arranging multiple documents. We designed the following simple exercise to allow you to explore these options.
1. With the lion.ai file open in Illustrator, choose File>Open.
The Open dialog box defaults to the last-used location, so you should not have to navigate back to the WIP>InterfaceAI folder.
2. Click horse.ai in the list to select that file.
3. Press Command/Control, and click zebra.ai to add it to the active selection.
You can open more than one file at a time as long as those files are in the same folder. Pressing Shift allows you select multiple contiguous (consecutive) files; pressing Command/Control allows you to select non-contiguous files.
Macintosh Windows
4. Click Open to open both selected files.
Each open file is represented by a tab at the top of the document window.
5. Click the horse.ai tab at the top of the document window.
Clicking a specific tab makes that file active in the document window.
6. Choose Window>Arrange>Float in Window.
Floating a document separates the file into its own document window.
The title bar of the separate document window shows the same information that was in the document tab.
20 The Illustrator CC User Interface
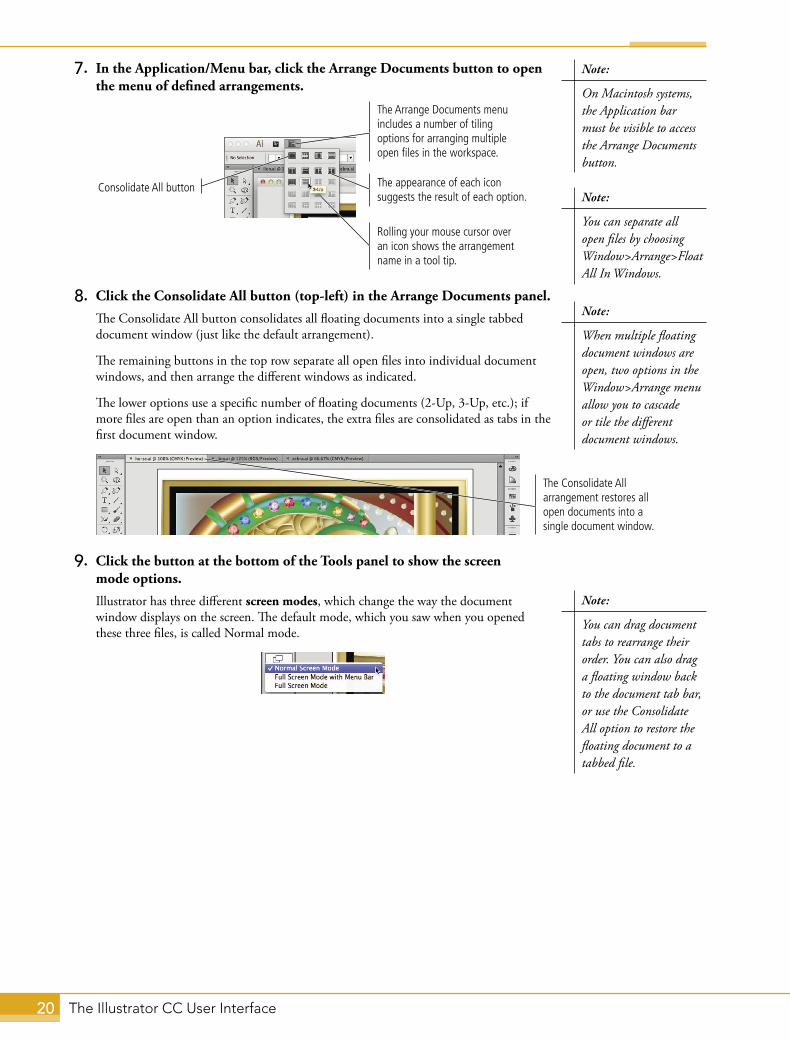
7. In the Application/Menu bar, click the Arrange Documents button to open the menu of defined arrangements.
The Arrange Documents menu includes a number of tiling options for arranging multiple open files in the workspace.
The appearance of each icon suggests the result of each option.
Rolling your mouse cursor over an icon shows the arrangement name in a tool tip.
Consolidate All button
8. Click the Consolidate All button (top-left) in the Arrange Documents panel.
The Consolidate All button consolidates all floating documents into a single tabbed document window (just like the default arrangement).
The remaining buttons in the top row separate all open files into individual document windows, and then arrange the different windows as indicated.
The lower options use a specific number of floating documents (2-Up, 3-Up, etc.); if more files are open than an option indicates, the extra files are consolidated as tabs in the first document window.
The Consolidate All arrangement restores all open documents into a single document window.
9. Click the button at the bottom of the Tools panel to show the screen mode options.
Illustrator has three different screen modes, which change the way the document window displays on the screen. The default mode, which you saw when you opened these three files, is called Normal mode.
When multiple floating document windows are open, two options in the Window>Arrange menu allow you to cascade or tile the different document windows.
Note:
You can separate all open files by choosing Window>Arrange>Float All In Windows.
Note:
On Macintosh systems, the Application bar must be visible to access the Arrange Documents button.
Note:
You can drag document tabs to rearrange their order. You can also drag a floating window back to the document tab bar, or use the Consolidate All option to restore the floating document to a tabbed file.
Note:

21The Illustrator CC User Interface
10. Choose Full Screen Mode with Menu Bar from the Screen Mode menu.
In Full Screen Mode with Menu Bar, the document window fills the entire workspace and extends behind the docked panels.
In Full Screen Mode with Menu Bar, the document tabs are hidden behind the Menu bar.
11. Click the Screen Mode button at the bottom of the Tools panel and choose Full Screen Mode.
In Full Screen Mode, the Menu bar, title bar, and all panels are hidden.
12. Press the Escape key to exit Full Screen Mode and return to Normal Screen Mode.
Press the F key to cycle though the screen modes.
Note:
All open files are listed at the bottom of the Window menu. You can use these menu options to navigate from one file to another, which is particularly useful if you’re working in Full Screen Mode with Menu Bar because the document tabs are not visible in this mode.
Note:

22 The Illustrator CC User Interface
Most Illustrator projects require some amount of zooming in and out to various view percentages, as well as navigating around the document within its window. As we show you how to complete different stages of the workflow, we usually won’t tell you when to change your view percentage because that’s largely a matter of personal preference. But you should understand the different options for navigating around an Illustrator file so you can efficiently get to what you want.
To change the view percentage, you can type a specific percent in the View Percentage field of the document window or choose from the predefined options in the related menu.
You can also click with the Zoom tool to increase the view percentage in specific, predefined intervals (the same intervals you see in the View Percentage menu in the bottom-left corner of the document window). Pressing Option/Alt with the Zoom tool allows you to zoom out in the same defined percentages. If you drag a marquee with the Zoom tool, you can zoom into a specific location; the area surrounded by the marquee fills the available space in the document window.
The View menu also provides options for changing view percentage. (The Zoom In and Zoom Out options step through the same predefined view percentages as clicking with the Zoom tool.)
Zoom In Command/Control-plus (+)
Zoom Out Command/Control-minus (-)
Fit Artboard in Window Command/Control-0 (zero)
Fit All in Window Command-Option-0/ Control-Alt-0 (zero)
Actual Size (100%) Command/Control-1
Whatever your view percentage, you can use the Hand tool to drag the file around in the document window. The Hand tool changes what is visible in the window; it has no effect on the actual content of the image.
The Navigator PanelThe Navigator panel (Window> Navigator) is another method of adjusting what you see, including the view percentage and the specific area that is visible in the document window. The Navigator panel shows a thumbnail of the active file; a red rectangle (called the Proxy Preview Area) represents exactly how much of the document shows in the document window.
Saved ViewsNamed views can be helpful if you repeatedly return to the same area and view percentage. By choosing View>New View, you can save the current view with a specific name.
Saved views can be accessed at the bottom of the View menu.
Change view names or delete specific views by choosing View>Edit Views.
ILLU
STR
ATO
R F
OU
ND
ATI
ON
SMoving Around an Illustrator File
The red rectangle shows the area of the file that is visible in the document window.
Drag the red rectangle to change the visible portion of the file.
Use the slider and field at the bottom of the panel to change the view percentage.

23The Illustrator CC User Interface
13. Click the Close button on the horse.ai tab. If asked whether you want so save changes, click Don’t Save.
Clicking the close button on a document tab closes only that file.
Macintosh Windows
14. Macintosh: Click the Close button in the top-left corner of the Application bar. If asked, click Don’t Save for all files.
Closing the Macintosh Application frame closes all open files, but does not quit the application.
On Macintosh, closing the Application frame closes all
files open in that frame.
Windows: Click the Close button on each document tab to close the files. If asked, click Don’t Save for all files.
Clicking the Close button on the Windows Menu bar closes all open files and quits the application. To close open files without quitting, you have to manually close each file using the document tabs.
Clicking the Menu bar Close button closes all open files,
and also quits the application.
Click the Close buttons on each document tab to close the open files.

24 The Illustrator CC User Interface
As part of your Adobe Creative Cloud subscription, you can use the Sync Settings options to share certain custom assets between different computers. This means that you can access those same assets on any computer where you are logged in to your Creative Cloud account.
First, you must be logged into your Creative Cloud account and connected to the Internet for the sync process to work. You can open the Help menu to verify that you are signed in to your Creative Cloud account. (If you see an option to Sign In, choose that option and follow the instructions to sign in with your user name and password.)
If you open the Sync Settings pane of the Preferences dialog box, you can customize which assets will be synchronized.
Options that can be synchronized are:
• Preferences • Workspaces
• Presets • Keyboard shortcuts
• Swatches • Symbols
• Brushes • Graphic styles
• East Asian settings
When a file is open, you can use the Sync icon in the bottom-left corner of the document window to initiate the sync process.
Sync button
Depending on which options you choose to sync, you might need to relaunch the application. In that case, a message appears after the sync settings are finished downloading.
If you try to sync settings and a conflict exists between your local and Creative Cloud settings, you are asked how you want to resolve the conflict.
• Clicking Sync Local overwrites the settings on the Cloud with the settings from your local computer.
• Clicking Sync Cloud overwrites the settings on your local computer with the settings in your Creative Cloud account.
• Clicking Keep Latest File applies whichever settings files are more recent (local or Cloud).
ILLU
STR
ATO
R F
OU
ND
ATI
ON
SSynchronizing Settings