Embed Size (px)
Citation preview

The City of New Orleans
Enterprise eTIME Supervisor Guide

eTIME Supervisor Guide V.8.0 Page 2 of 39 Version 2.0
Contents
eTIME ................................................................................................................... 4
Employee Types ................................................................................................. 7
Navigation ........................................................................................................... 7
Timecard Views (Hourly and Salaried Employees) .......................................... 9
QuickNavs ........................................................................................................... 9
Searching for Employees ................................................................................. 10
Viewing Employee Data ................................................................................... 11
Selecting and Opening Timecards .................................................................. 11
Saving ................................................................................................................ 12
Helpful Tabs ...................................................................................................... 12
View Timecard Totals ....................................................................................... 12
Search for Missed Punches ............................................................................. 13
Managing Employee Schedules ...................................................................... 14
One Day Schedule Change .............................................................................. 14
Add/Edit Shift Patterns (multiple day schedule changes) ............................. 16
Transferring to another Location-Budget Code ............................................. 17
Adding Holiday Credit ...................................................................................... 19
Subtracting Holiday Credit ............................................................................... 19
Adding Comments for Sick or Annual Leave ................................................. 20
Mark as Reviewed ............................................................................................. 21
Work Rule Transfers ......................................................................................... 21
Work Rule Transfer – One time change during regular shift ........................ 22
Work Rule Transfer – Moving the punch for Unscheduled Hours ................ 23

eTIME Supervisor Guide V.8.0 Page 3 of 39 Version 2.0
An employee works PRIOR to his/her regular shift ....................................... 24
Overriding a Punch ........................................................................................... 26
Cancelling Automatic Meal Deductions .......................................................... 26
Employee Approvals ........................................................................................ 27
Hourly Employee: Approve Timecard and Remove a Timecard Approval .. 28
Hourly Employees - Annual Leave or /Sick .................................................... 29
Supervisor Approvals ...................................................................................... 31
Remove Approval ............................................................................................. 33
Hourly Employee: Using the Time Clock ........................................................ 34
Hourly Employee: Approving your time via Time Clock ............................... 36
Hourly Employee: Biometric Enrollment at the Time Clock .......................... 38
Biometric Enrollment Steps: ............................................................................ 38
eTIME Supervisor Guide V.8.0 Page 4 of 39 Version 2.0
eTIME
Overview
eTIME is a time and attendance, labor management application primarily used to monitor and
manage employee data on a real time basis. You will be reviewing, editing, addressing time off
requests and approving timecards.
Important:
It’s the HR Manager’s responsibility to notify his/her employees on which time entry method below
the employee will be using:
Hourly Employees will:
Punch in AND enter their annual leave/sick time one of two ways:
The physical time clock
The Timestamp button in eTIME from your computer
and…
Hourly Employees can see their accruals in eTIME
Run relevant employee reports in eTIME
NOTE: Employees should check with their supervisors or HR Manager on departmental regulations concerning annual and sick leave entries, as regulation differ department by department.

eTIME Supervisor Guide V.8.0 Page 5 of 39 Version 2.0
Details surrounding time entry methods:
A. Hourly Employees (Normal): Time Clock Method
- Enter EMPLID + biometrics (fingerprint – no thumb, no pinky)
- Note: If the EMPLID is 00001234, the employee would enter 1234 (no leading zeros).
B. Hourly Employees (Normal): Time Stamp
- Hourly Employees use an online “time clock” in which the employee stamps in and out each day
using the Timestamp button.
C. Salary Employees (EAPS): Direct entry of hours into eTIME
- Hours are populated based on your permanent work schedule.
- If there are no changes to your timesheet, simply approve your hours at the end of the
pay period
- If there are exceptions, such as Annual Leave or Sick Pay, click the Insert a Row icon and select
the correct pay code and enter the total amount of hours. Note: Be sure to delete the “purple”
system generated hours that defaulted based on your schedule under the pay code hours worked.

eTIME Supervisor Guide V.8.0 Page 6 of 39 Version 2.0
Logging in to the Employee Self Service/ADP Portal Accessing the Employee Self Service/ADP Portal Home Page
Once you have registered you can log in and begin using the Employee Self Service/ADP Portal.
Step 1: Using an internet web browser, go to https://portal.adp.com (Please bookmark the above URL for future use)
Step 2: In the pop up window, enter your User ID and Password and then click Sign In.
Once you are logged in, you will see the following NOLA PAY home page:
From the home page you will have the ability to access eTIME (Time & Attendance - time entry system, Pay & Taxes, and Personal Information) by clicking on the tabs at the top of the page as show above.
NOTE: If you need help with logging-into Employee Self Service/ADP Portal, please
contact NOLA PAY Employee Service Center at 1-855-NOLA PAY (1-855-665-2729).

eTIME Supervisor Guide V.8.0 Page 7 of 39 Version 2.0
Employee Types
EAPS – Salaried employees use Project View in eTIME. These employees are paid automatically
by a schedule. There is no need to enter information into eTIME unless an exception occurs, i.e.
Sick or Annual Leave. The Employee and Supervisor will then approve the time card at the end of
the pay period.
Hourly (non-EAPS) – Employees enter their EMPLID + fingerprint (no thumb or pinky) scan which automatically update their time cards with a punch. Hourly employees can enter their own sick or annual leave time. Employees should check with their supervisors or HR Manager on departmental regulations concerning annual and sick leave entries, as regulation differ department by department.
Note: Some employees will have an automatic 30 or 60-minute lunch. Supervisors only have
the ability to cancel the entire meal deduction. If a Supervisor approves cancelling a portion
of the employee’s meal deduction, the employee will need to clock out/in for the lunch time
approved to override the rule.
Navigation
The eTime screen has three sections (Primary, Secondary and Related Items workspaces as
shown below).
Items that cannot fit on the screen are stored in the Related Items section located to the right of the
screen as shown above. Click on the arrow as shown above to see the data in the related items
section as shown below.
Primary Workspace
Secondary Workspace
Related Items
workspace

eTIME Supervisor Guide V.8.0 Page 8 of 39 Version 2.0
To expand an item, click the tool button ( ) as shown above and select Pop-out which will
expand the item you want to view in the Primary Workspace area. To remove an item click on the
tool button of the next item you want to view or sign out.
Carousel
The Carousel as shown below is used to customize the appearance of your screen. There are several ways to visibly see the data on your screens and workspaces. Here you can access different workspaces if more than one is assigned to you. The Carousel is only visible to Supervisors.
You can access the following workstations using the Carousel by clicking on the arrows as shown below:
My information tab:
Allows Supervisors the ability to view and approve their own timecard, leave balances and total hours.
Scheduling tab:
Allows Supervisors the ability to create and change employee’s schedule. Reports:
Allows Supervisors the ability to run standard and customize reports.

eTIME Supervisor Guide V.8.0 Page 9 of 39 Version 2.0
Timecard Views (Hourly and Salaried Employees)
There are two types of timecard views that Supervisors will see depending on if the employee is a
Hourly or a Salaried Employee.
Hourly Employee’s Timecard View (In and Out Punches will be displayed) as shown below:
Salary Employee’s Timecard View (there will be No In and Out Punches because salary
employees are not required to punch in or out) as shown below:
QuickNavs
QuickNavs gives you the ability to navigate to other items to place them on your primary
workspace for view.

eTIME Supervisor Guide V.8.0 Page 10 of 39 Version 2.0
Searching for Employees
From the QuickNavs menu you can search for employees from QuickFind that is found as a
default on your QuickNavs panel as shown below:
QuickFind is an item used to search for employees by name or by the Employee’s ID#.
To view all employees that you have access to follow these steps:
In the Name or ID field, confirm there’s an asterisk * enter the employee’s ID# and click the Find
button as shown above or you can:
1. Search by last name as shown below or use the wildcard (*) function. The system is NOT case sensitive.
2. Click the down arrow to open the Time Period choice list, then select the appropriate time period as shown below.
3. Double-click an employee's name as shown below to open the employee's timecard.

eTIME Supervisor Guide V.8.0 Page 11 of 39 Version 2.0
Viewing Employee Data
Selecting and Opening Timecards
1. Within QuickFind, to view a single employee enter a Name or ID and select the appropriate
Time Period and click the Find button or enter the Time Period and all employees will populate.
2. Double click anywhere on the employee’s row to open the timecard OR to select multiple employees (use your CTRL key + click to select multiple employees) and click the Timecard
link . Note, make sure the Time Period is correct before selecting the employee.
The Timecard will populate as follows for Hourly Timecard View.
Within the timecard, you’ll see columns that contain information pertaining to: Pay Code, Days of
the Week and Totals. Two weeks of data will need to be entered each pay period, except only
one week at a time will show for Weekly Employees.
If you have more than one action on the same date such as sick or annual leave, click the Insert a
Row icon as shown below to add another pay code for the same date with the corresponding hours.

eTIME Supervisor Guide V.8.0 Page 12 of 39 Version 2.0
Saving
The Save Icon as shown below is gray when no changes are made. When a change is made the Save Icon changes to blue indicating that a change need to be saved. Once you hit the blue Save Icon it will go back to gray.
Helpful Tabs
View Timecard Totals
At the bottom of the timecard, you can view the total hours your employees have worked.
Step Action
1 Access the employee’s timecard using the QuickFind tab.
2 Move the mouse over the small icon as shown below to expand the screen to view the Totals tab. Click the Totals tab.
3 On the Totals tab, view the timecard and accrual totals for the selected pay period.
To view time accrued, taken and the balance Click the ACCRUALS tab as shown below.

eTIME Supervisor Guide V.8.0 Page 13 of 39 Version 2.0
Search for Missed Punches
Throughout the pay period Supervisors will need to search for employees who have missed
punches. Address the missed punch and click Save OR the employee will not be paid for that day
that’s associated with the missing punch.
1. To search for Missed Punches, click Reconcile Timecard.
2. Click the down arrow to open the Time Period choice list as shown below, then select the
appropriate time period. If it’s within the current pay period, select Current Pay Period. If it’s after and you are working on the previous week’s payroll, select Previous Pay Period. Then select ALL Home in the drop down next to the Time Period.
3. Click on the Missed Punch column heading twice to sort so that all of the employees with a
missed punch will appear at the top of the list.
4. Your employee list appears as shown above. Select the employees that you need to view.
When you see a missed punch “check mark” highlight all of those employees and click the Go
To button then click the Timecard link to open the employee’s timecard. Note: Address the
missed punch or the employee will not be paid for that day that’s associated with the missing
punch.
5. The missing punch is indicated with a solid red filled cell as shown below. Correct the missing
punch by entering an In or Out punch and click Save.
eTIME Supervisor Guide V.8.0 Page 14 of 39 Version 2.0
Managing Employee Schedules
A schedule needs to be created for ALL EMPLOYEES. EAPS timecards get populated based on
their schedule, so it’s required that you add a schedule for all EAPS.
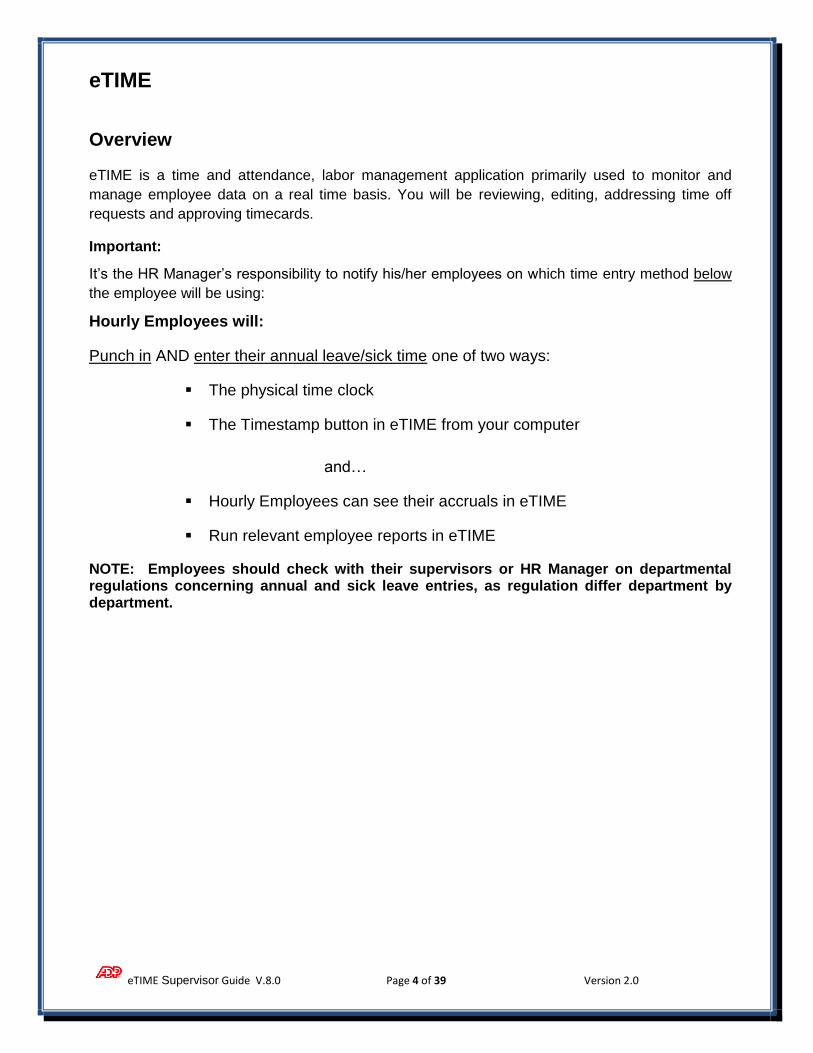
One Day Schedule Change
1. To make a change to an employee(s) schedule, highlight the appropriate employee, select the
correct Time Period and click on the Go To button and click the Schedule Planner link as
shown below.
The Employee’s Schedule appears and is listed horizontally across a row as shown below.
2. To change a schedule, click in the cell that requires a schedule change and delete the current
schedule by pressing the delete or backspace key.

eTIME Supervisor Guide V.8.0 Page 15 of 39 Version 2.0
3. Enter schedule for the day. Be sure to enter P or PM when entering time for the afternoon/evening hours. eTIME assumes AM. For example, 5 will appear as 5:00am unless you enter 5p or 5pm.
4. Click Apply. The schedule is now changed.
eTIME Supervisor Guide V.8.0 Page 16 of 39 Version 2.0
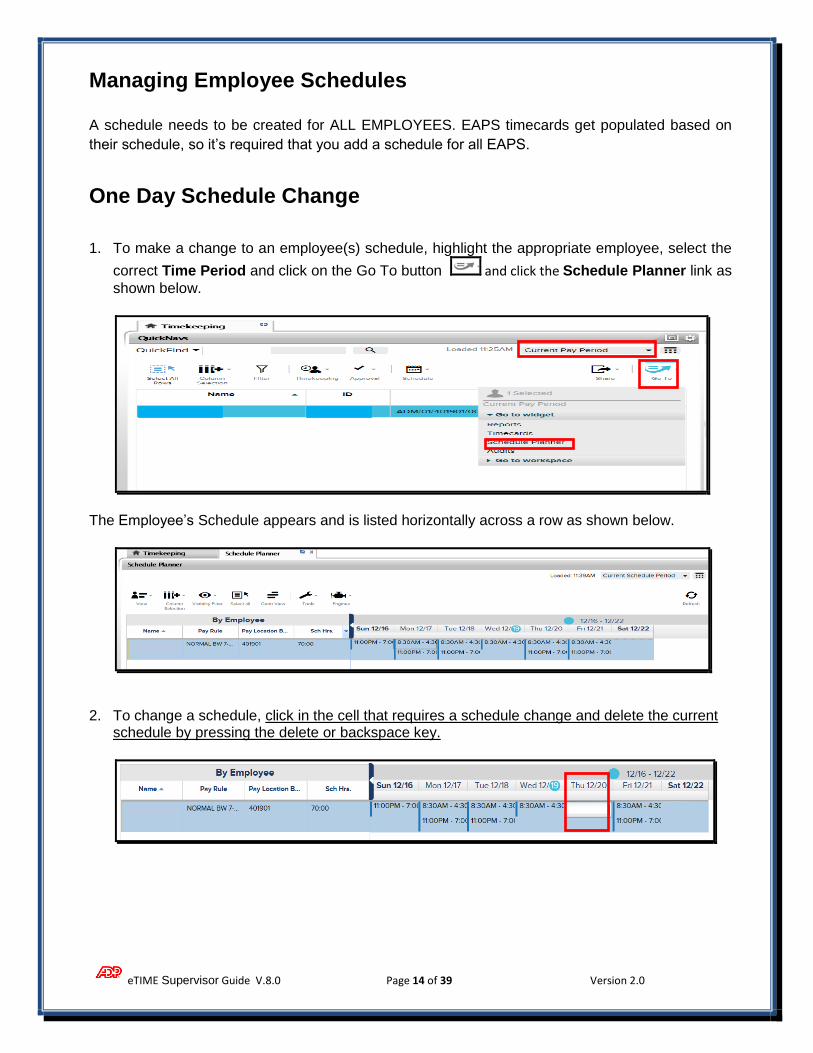
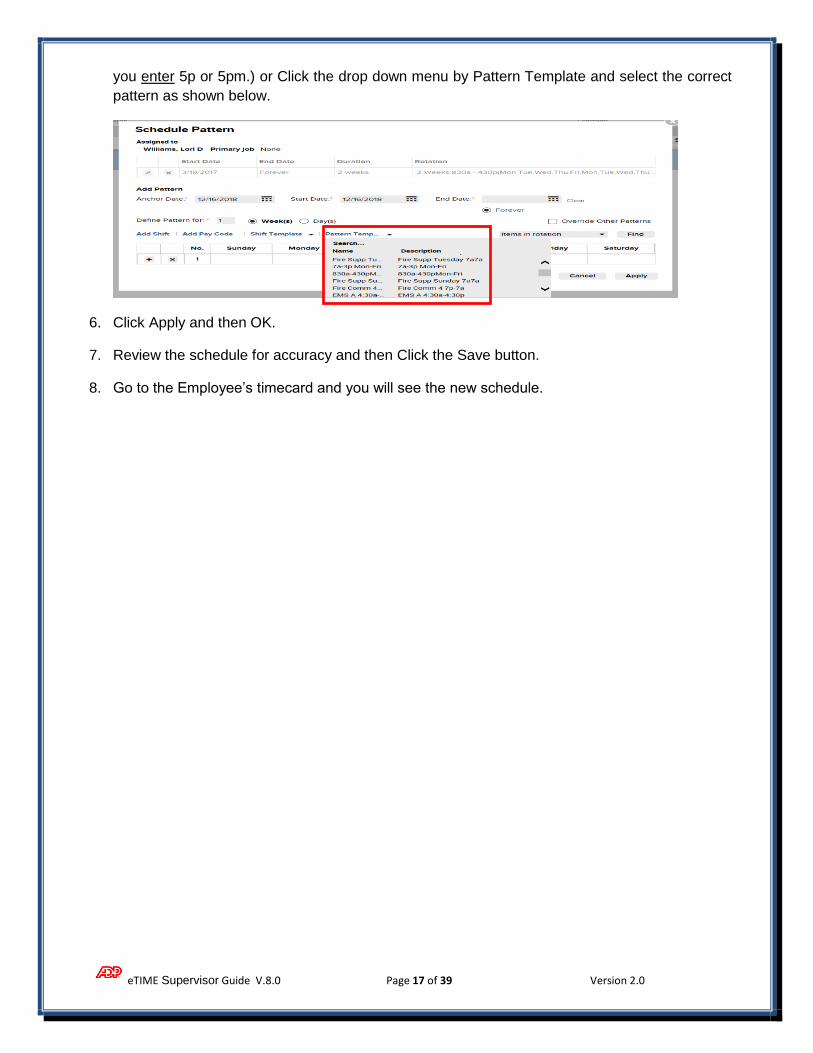
Add/Edit Shift Patterns (multiple day schedule changes)
1. Find the employee that you need to change or edit their schedule.
2. Click the Go To button to the far right top of screen and select Schedule Planner.
3. When the Schedule Planner opens right click on the employee’s name and Click Schedule
Pattern to view the employee’s current schedule.
4. If applicable, delete the incorrect pattern by clicking the X next to the pattern.
5. Now Click the Add Pattern button as shown above.
Either type in the schedule (Be sure to enter P or PM when entering time for the
afternoon/evening hours. eTIME assumes AM. For example, 5 will appear as 5:00am unless
eTIME Supervisor Guide V.8.0 Page 17 of 39 Version 2.0
you enter 5p or 5pm.) or Click the drop down menu by Pattern Template and select the correct
pattern as shown below.
6. Click Apply and then OK.
7. Review the schedule for accuracy and then Click the Save button.
8. Go to the Employee’s timecard and you will see the new schedule.

eTIME Supervisor Guide V.8.0 Page 18 of 39 Version 2.0
Transferring to another Location-Budget Code
A Supervisor performs a labor level transfer when an employee transfers to different Location-
Budget Codes thoughout the pay period.
1. Select the timecard. Make sure the correct Time Period is selected as show below.
2. Select “Search” from the Transfer drop down menu as shown below.
3. Highlight the Location-Budget Code as shown below and click Apply.
4. The employee’s timecard will populate with the Budget Code as follows:
5. Save the timecard.
NOTE: The last five selections that you’ve chosen will display in the drop down menu so that you
can easily select them next time you are in the timecard.

eTIME Supervisor Guide V.8.0 Page 19 of 39 Version 2.0
Adding Holiday Credit
To add holiday credit for a part time employee:
1. Click on the Pay Code column and select the Holiday Credit pay code
2. Enter the corresponding number of hours that the part time employee should receive.
3. Save the timecard.
Subtracting Holiday Credit Because holidays are pre-populated (and appear in purple), supervisors will need to add a negative
line on the timecard if an employee is not eligible for a pre-populated holiday credit (as shown
below).
Steps to insert a row – entering a negative
Since you cannot delete “holiday” hours that are system generated, you will be entering a negative
line on the timecard.
1. Locate the holiday within the appropriate Time Period and insert another row by clinking on that same date.
2. Select the Holiday Credit pay code and enter a (-) and the number of hours that the employee received but should not.
3. Save the timecard.
eTIME Supervisor Guide V.8.0 Page 20 of 39 Version 2.0
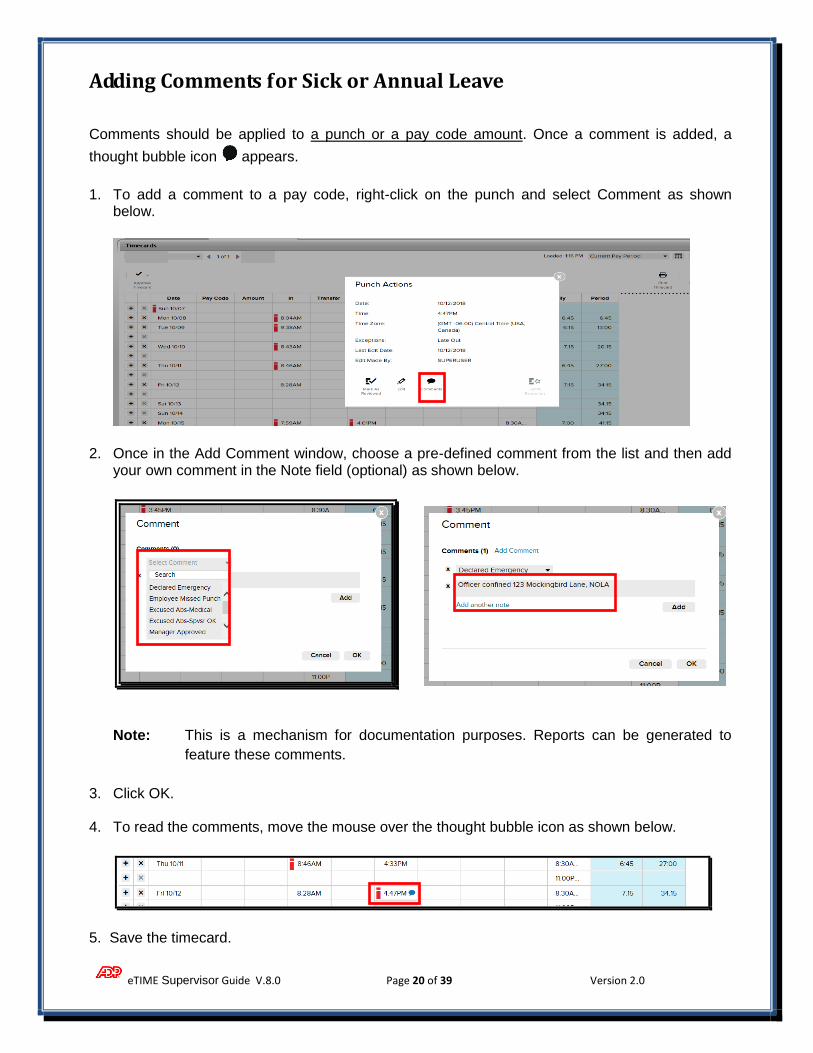
Adding Comments for Sick or Annual Leave
Comments should be applied to a punch or a pay code amount. Once a comment is added, a
thought bubble icon appears.
1. To add a comment to a pay code, right-click on the punch and select Comment as shown below.
2. Once in the Add Comment window, choose a pre-defined comment from the list and then add your own comment in the Note field (optional) as shown below.
Note: This is a mechanism for documentation purposes. Reports can be generated to
feature these comments.
3. Click OK. 4. To read the comments, move the mouse over the thought bubble icon as shown below.
5. Save the timecard.

eTIME Supervisor Guide V.8.0 Page 21 of 39 Version 2.0
Mark as Reviewed In some cases, several supervisors will be reviewing time cards, if there are several “exceptions” to
a timecard and you would like to show that it’s been reviewed, do the following:
1. Right click on an In or Out punch.
2. Select Mark as Reviewed.
The punch will no longer display a red border. A green border displays as shown below
indicating this exception has been reviewed by a supervisor.
3. Save the timecard.
Work Rule Transfers
A Supervisor performs a work rule transfer when one of the examples below occurs, there may be more or less options depending on your agency.
Unscheduled 1st Shift (*multiple due to meal breaks) NM = No Meal
Unscheduled 2nd Shift (*multiple due to meal breaks) NM = No Meal
Unscheduled 3rd Shift (*multiple due to meal breaks) NM = No Meal
There are two methods to performing work rule transfers, based on need.
Scenario 1 – One time occurrence. If the employee clocks in and out for an entire day but may be working an unscheduled shift with a particular meal break, you’ll need to perform a work rule transfer but do not need to adjust any punches. Scenario 2 – Continuous shift. You will need to move a punch to show when the employee began the unscheduled time.

eTIME Supervisor Guide V.8.0 Page 22 of 39 Version 2.0
Work Rule Transfer – One time change during regular shift
Scenario 1 – One time occurrence. If the employee has an exception during a regularly
scheduled shift, you need to perform a work rule transfer but do not need to adjust any
punches.
1. Open a timecard and locate the day that they worked a different or unscheduled shift.
2. Click in the Transfer column and select Search.
3. Select a Work Rule from the Labor Account drop down menu as shown below, such as
Unscheduled Time NM (No Meal). Click Apply.
4. The Work Rule Transfer of Unscheduled Time NM appears on the employee’s timecard as
shown below.
5. Click Save.
eTIME Supervisor Guide V.8.0 Page 23 of 39 Version 2.0
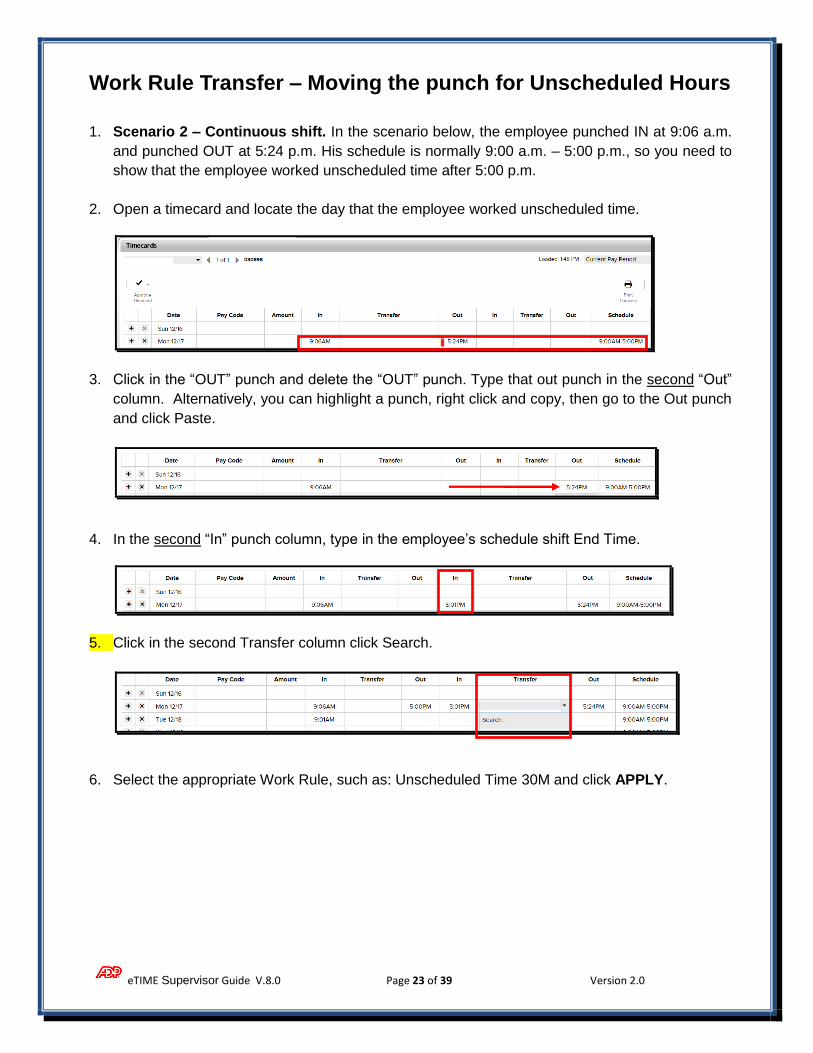
Work Rule Transfer – Moving the punch for Unscheduled Hours
1. Scenario 2 – Continuous shift. In the scenario below, the employee punched IN at 9:06 a.m.
and punched OUT at 5:24 p.m. His schedule is normally 9:00 a.m. – 5:00 p.m., so you need to
show that the employee worked unscheduled time after 5:00 p.m.
2. Open a timecard and locate the day that the employee worked unscheduled time.
3. Click in the “OUT” punch and delete the “OUT” punch. Type that out punch in the second “Out”
column. Alternatively, you can highlight a punch, right click and copy, then go to the Out punch
and click Paste.
4. In the second “In” punch column, type in the employee’s schedule shift End Time.
5. Click in the second Transfer column click Search.
6. Select the appropriate Work Rule, such as: Unscheduled Time 30M and click APPLY.
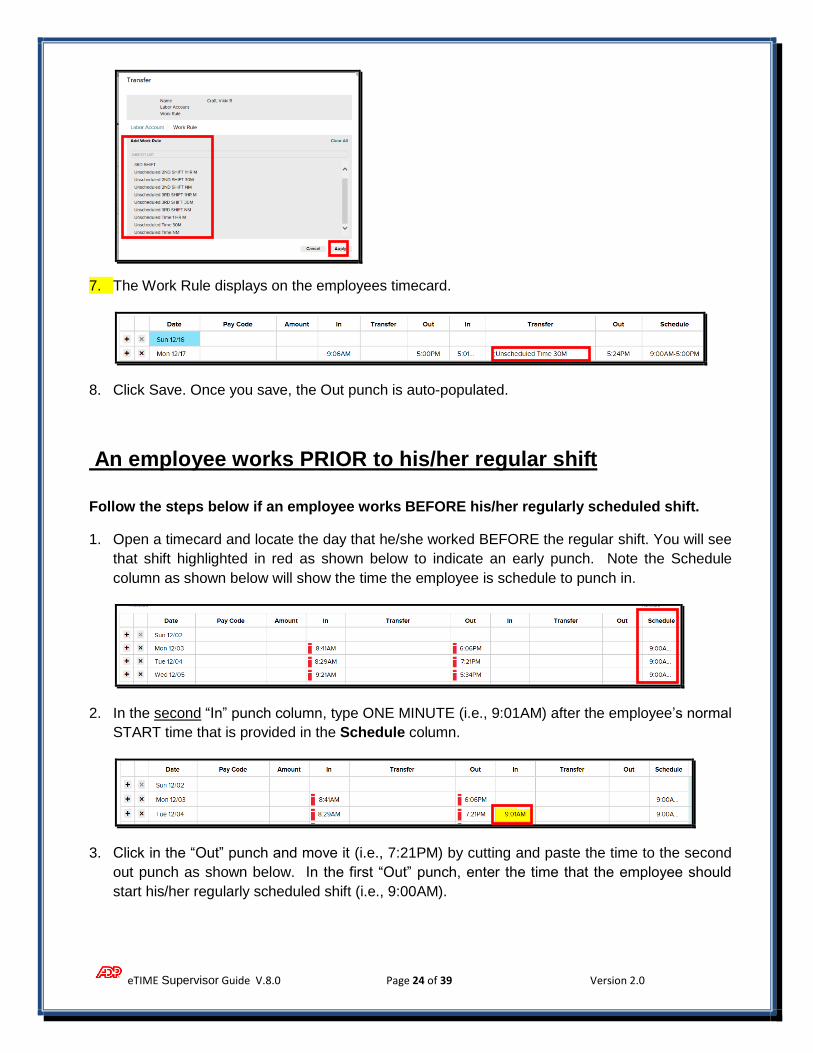
eTIME Supervisor Guide V.8.0 Page 24 of 39 Version 2.0
7. The Work Rule displays on the employees timecard.
8. Click Save. Once you save, the Out punch is auto-populated.
An employee works PRIOR to his/her regular shift
Follow the steps below if an employee works BEFORE his/her regularly scheduled shift.
1. Open a timecard and locate the day that he/she worked BEFORE the regular shift. You will see
that shift highlighted in red as shown below to indicate an early punch. Note the Schedule
column as shown below will show the time the employee is schedule to punch in.
2. In the second “In” punch column, type ONE MINUTE (i.e., 9:01AM) after the employee’s normal
START time that is provided in the Schedule column.
3. Click in the “Out” punch and move it (i.e., 7:21PM) by cutting and paste the time to the second
out punch as shown below. In the first “Out” punch, enter the time that the employee should
start his/her regularly scheduled shift (i.e., 9:00AM).

eTIME Supervisor Guide V.8.0 Page 25 of 39 Version 2.0
4. In the first Transfer column, select Search.
5. Select the correct Work Rule Transfer, such as Unscheduled time 30M and click Apply.
6. Right click on the second “In’ punch and select Edit Punch and then Select Override New
Shift and Click OK.
7. Click Save.

eTIME Supervisor Guide V.8.0 Page 26 of 39 Version 2.0
Overriding a Punch
To correct an employee’s punch that should be listed as an “Out Punch” but shows as an
”In Punch” or vice versa, go to the punch and RIGHT click to select Edit as shown below. 1. Select Override and then select IN punch or OUT punch and click OK.
2. Click the Save button. The punch will have moved.
Cancelling Automatic Meal Deductions
To temporarily change a meal deduction, follow the steps below. If this is a permanent
change, reach out to your HR Manager who can change it for you permanently. Note the
HR Manager can only cancel the employee’s entire allotted meal deduction.
1. Go to the IN or OUT punch and RIGHT click to select Edit Punch.
2. Select 1 Hr Meal Deduct or 30 min Meal Deduct and click the OK button. Note if the
employee is allotted a 1 Hr Meal Deduction, you can only cancel 1 HR. You cannot cancel
anytime less than 1 Hr.

eTIME Supervisor Guide V.8.0 Page 27 of 39 Version 2.0
3. The screen will show that the daily hours have been increased by one hour.
4. Click the Save button
Employee Approvals
IMPORTANT: You must approve your timecard by end of day on Fridays. If you work on Saturday,
you must approve your timecard by the end of your shift on Saturday. It is recommended that
employees approve their timecards on the last day of the pay period that they work.
1. Go to My Timecard under the My Information tab. Review your timecard to make sure
everything is accurate. If you notice any discrepancies, please contact your Supervisor. Please
make sure that the pay period is current by choosing the correct time frame.
2. Click the drop down menu as shown below and click approve timecard.
3. Information highlighted in yellow will appear as shown below to confirm that your timecard has
been approved.
eTIME Supervisor Guide V.8.0 Page 28 of 39 Version 2.0
Hourly Employee: Approve Timecard and Remove a Timecard
Approval
You must view and approve your timecard at the end of every pay period to avoid pay
discrepancies and ensure timecard accuracy.
Follow the steps below to Approve Your Timecard:
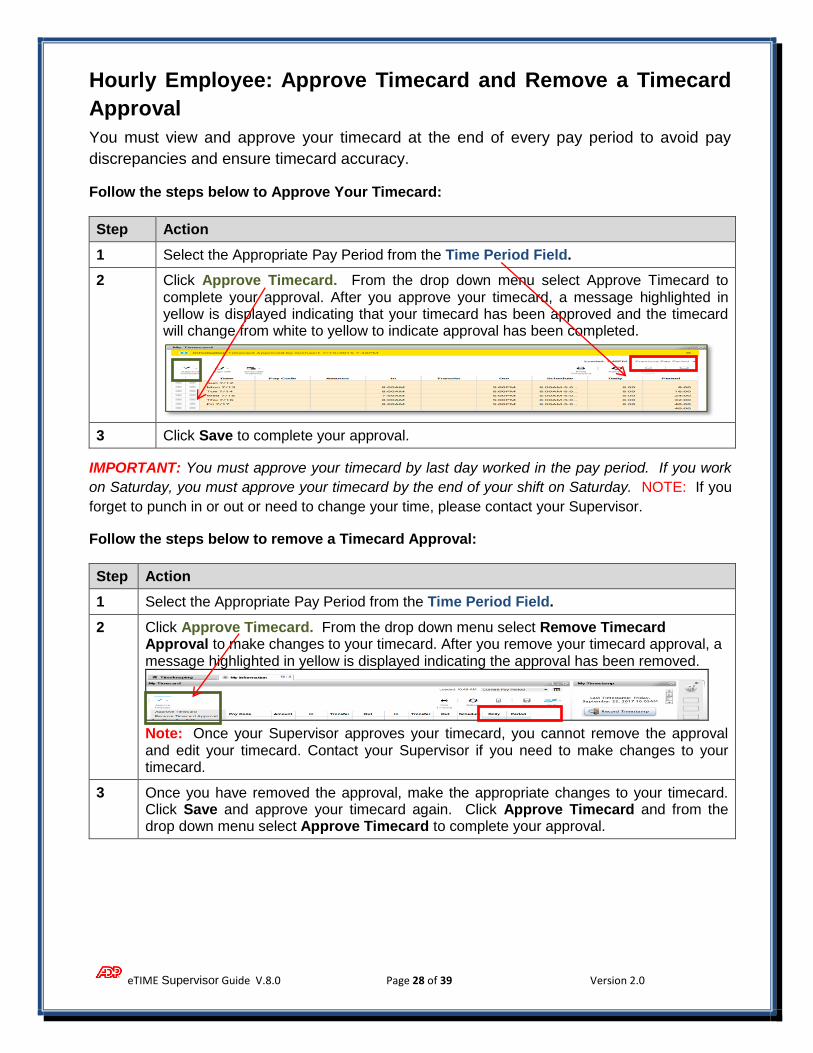
Step Action
1 Select the Appropriate Pay Period from the Time Period Field.
2 Click Approve Timecard. From the drop down menu select Approve Timecard to complete your approval. After you approve your timecard, a message highlighted in yellow is displayed indicating that your timecard has been approved and the timecard will change from white to yellow to indicate approval has been completed.
3 Click Save to complete your approval.
IMPORTANT: You must approve your timecard by last day worked in the pay period. If you work
on Saturday, you must approve your timecard by the end of your shift on Saturday. NOTE: If you
forget to punch in or out or need to change your time, please contact your Supervisor.
Follow the steps below to remove a Timecard Approval:
Step Action
1 Select the Appropriate Pay Period from the Time Period Field.
2 Click Approve Timecard. From the drop down menu select Remove Timecard Approval to make changes to your timecard. After you remove your timecard approval, a message highlighted in yellow is displayed indicating the approval has been removed.
Note: Once your Supervisor approves your timecard, you cannot remove the approval and edit your timecard. Contact your Supervisor if you need to make changes to your timecard.
3 Once you have removed the approval, make the appropriate changes to your timecard. Click Save and approve your timecard again. Click Approve Timecard and from the drop down menu select Approve Timecard to complete your approval.

eTIME Supervisor Guide V.8.0 Page 29 of 39 Version 2.0
Hourly Employees - Annual Leave or /Sick
Employees should check with their supervisors or HR Manager on departmental regulations concerning annual and sick leave entries, as regulation differ department by department.
Follow the steps below to Enter Annual Leave or Sick Pay:
Step Action
1 Double click the Pay Code Column on the Date leave will be entered. From the drop down menu select annual leave or sick pay.
2 Enter the hours in the Amount Column as shown, then hit the enter key.
Note: If you are NOT taking annual leave or sick pay for the entire day, follow these steps:
Add a row by clicking (+) as shown. From the down menu select the leave that you will be taken.
Enter the hours that will be charged to leave. Remember the total daily hours (punch hours and leave hours) cannot exceed your regular scheduled hours for that day. Your regular scheduled hours are shown here in this column.
3 Click Save to record.
eTIME Supervisor Guide V.8.0 Page 30 of 39 Version 2.0
Hourly Employees - Viewing Leave Balances and Total Hours
Follow the steps below to view the total hours you have worked from your timecard and see how
much time off you have accrued:
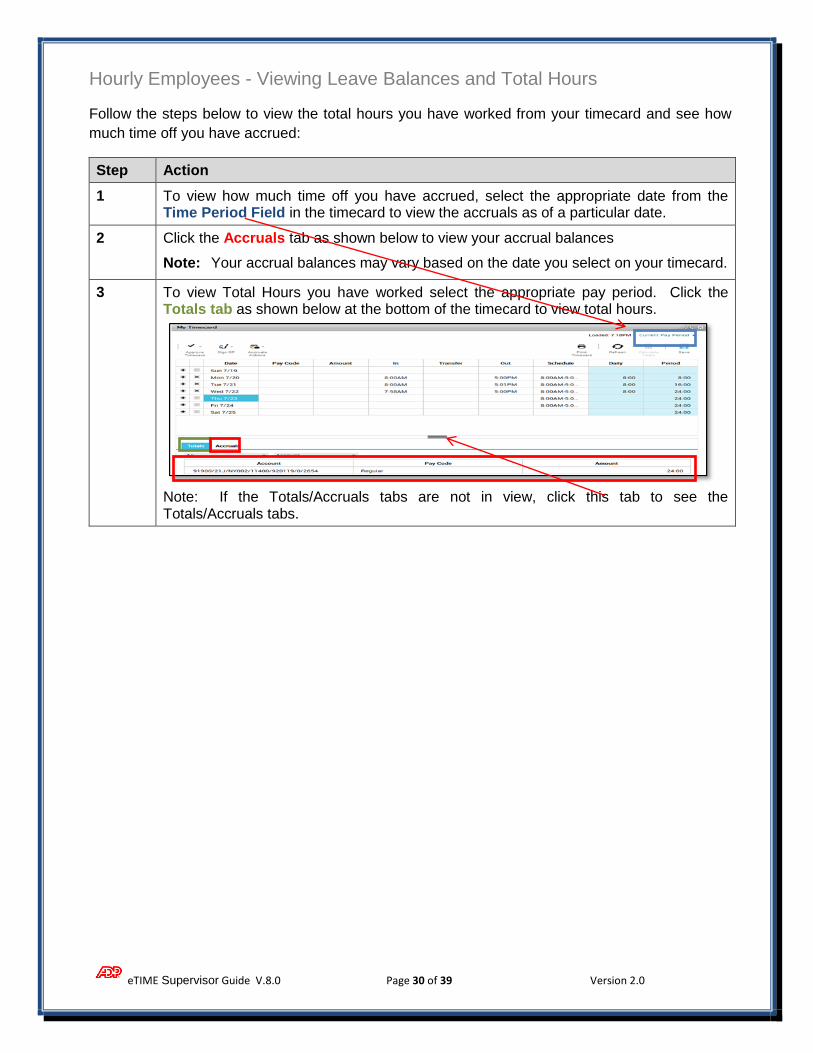
Step Action
1 To view how much time off you have accrued, select the appropriate date from the Time Period Field in the timecard to view the accruals as of a particular date.
2 Click the Accruals tab as shown below to view your accrual balances
Note: Your accrual balances may vary based on the date you select on your timecard.
3 To view Total Hours you have worked select the appropriate pay period. Click the Totals tab as shown below at the bottom of the timecard to view total hours.
Note: If the Totals/Accruals tabs are not in view, click this tab to see the Totals/Accruals tabs.

eTIME Supervisor Guide V.8.0 Page 31 of 39 Version 2.0
Supervisor Approvals
Timecards need to be reviewed individually before you approve all of the timecards at once. You are responsible for the timecards and you should review each timecard for accuracy.
Supervisor approval can be applied even if an employee has not approved his own timecard. Supervisor approval prevents further edits to the timecard and tells payroll that these employee time cards are ready to be processed. Supervisor approval is required current practice and it locks down the timecard so changes cannot be made.
Supervisors can approve individual or multiple employees and need to complete their review and approval by end of the work week, but no later than Monday by 10:00 a.m. The employee will approve and then the Supervisor at the end of the pay period. The Supervisor should review at least weekly to ensure there are no exceptions or questions. Timecards must be approved by the time the employee has completed their last shift or by 10 a.m. Monday following the end of the pay period.
a. Departments with Weekly Employees must approve timecards weekly.
b. All other pay groups should be approved at the end of the pay period.
Timecard Approval Tab
1. Go to your secondary workspace, click the Timecard Approval gear icon and choose Pop-Out
to expand Timecard Approval.
2. Time Period: Select the time period as shown below. If you’re approving on a Friday or
Saturday choose Current Pay Period. If you’re approving on Sunday or Monday select
Previous Pay Period. After the time period is selected the employees will populate as shown
below.
Secondary Workspace

eTIME Supervisor Guide V.8.0 Page 32 of 39 Version 2.0
3. If you are a supervisor that approves more than one department, you can view and approve
one department at a time by selecting from the Home drop down menu as shown below. Select
from the subset query available.
4. Be sure that all timecards are reconciled before approving timecards. Go to Reconcile
Timecard, select the right Time Period. Look at the Missed Punch column as shown below.
Double click on the employee ONLY if there is a check mark in that column. Address the
missed punch and click Save OR the employee will not be paid for that day that’s associated
with the missing punch.
5. Return to Timecard Approval after reconciling all the timecards, highlight the employees and
click Approval to approve all employees’ timecards.
6. Note, to approve one employee click on the employee to highlight your selection. Click
Approval as shown below to approve the employee’s timecard.
Once the supervisor approves the employees’ timecards, the timecards are considered
“locked’ and employees cannot update their timecards.
eTIME Supervisor Guide V.8.0 Page 33 of 39 Version 2.0
Remove Approval
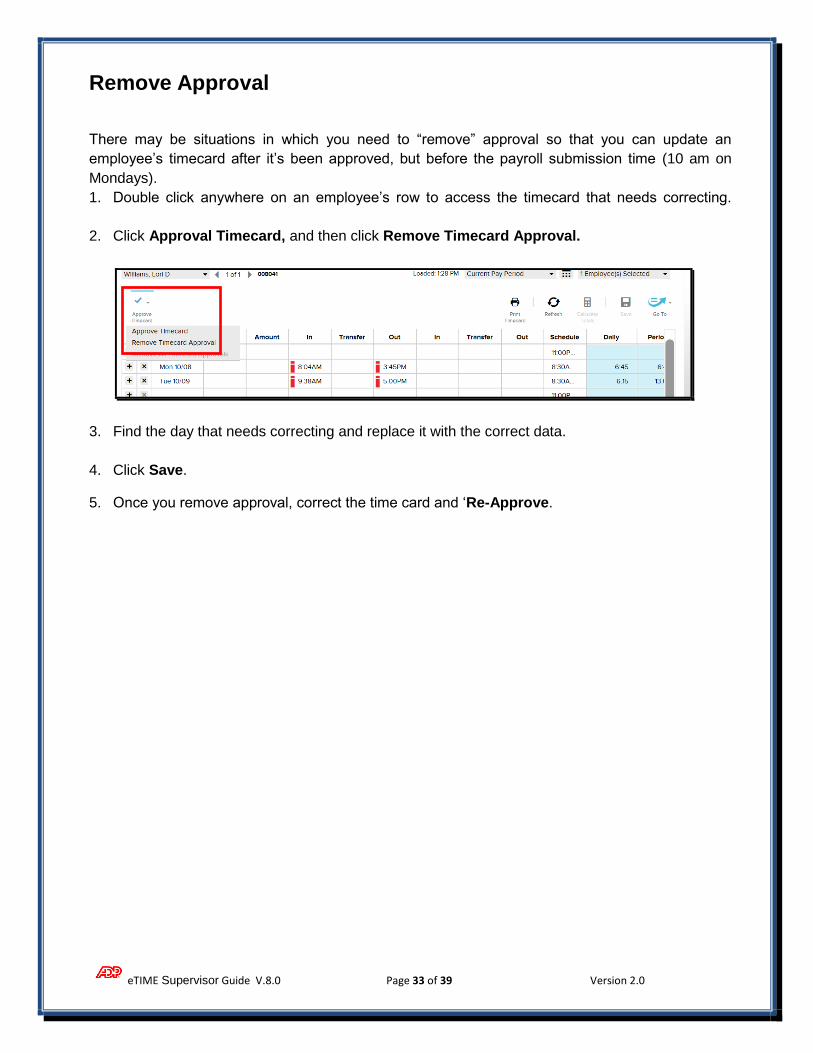
There may be situations in which you need to “remove” approval so that you can update an
employee’s timecard after it’s been approved, but before the payroll submission time (10 am on
Mondays).
1. Double click anywhere on an employee’s row to access the timecard that needs correcting.
2. Click Approval Timecard, and then click Remove Timecard Approval.
3. Find the day that needs correcting and replace it with the correct data.
4. Click Save.
5. Once you remove approval, correct the time card and ‘Re-Approve.
eTIME Supervisor Guide V.8.0 Page 34 of 39 Version 2.0
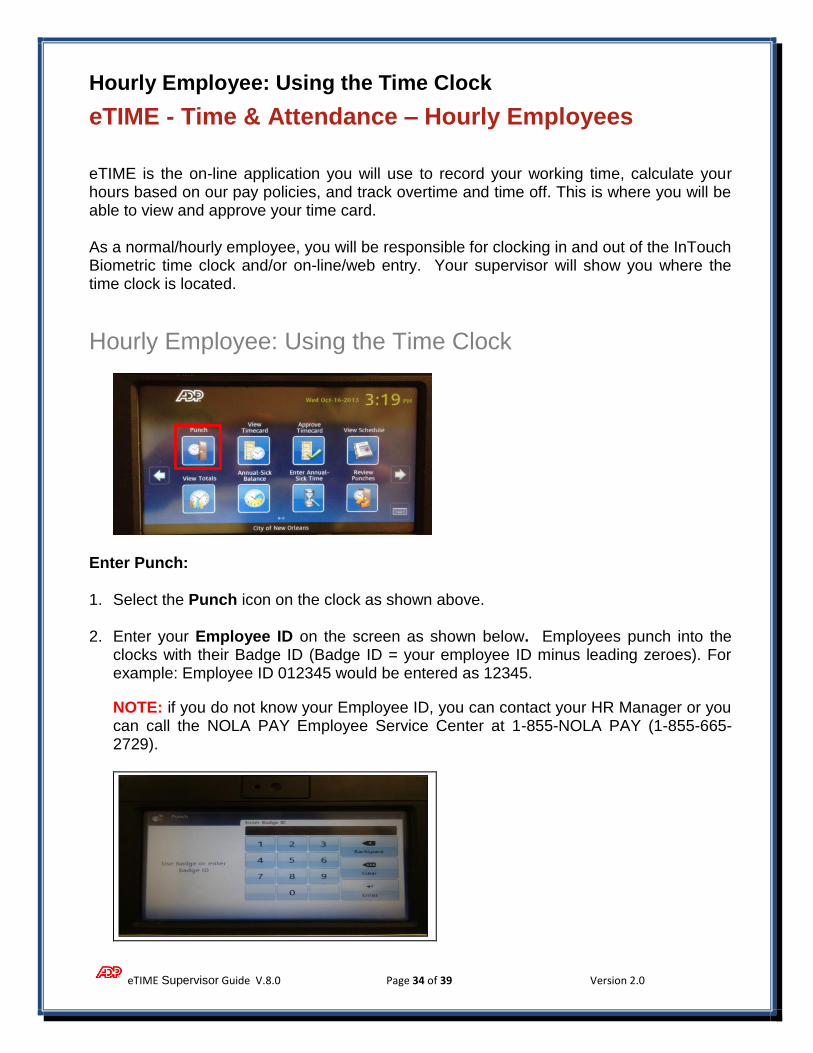
Hourly Employee: Using the Time Clock
eTIME - Time & Attendance – Hourly Employees
eTIME is the on-line application you will use to record your working time, calculate your hours based on our pay policies, and track overtime and time off. This is where you will be able to view and approve your time card. As a normal/hourly employee, you will be responsible for clocking in and out of the InTouch Biometric time clock and/or on-line/web entry. Your supervisor will show you where the time clock is located.
Hourly Employee: Using the Time Clock
Enter Punch:
1. Select the Punch icon on the clock as shown above.
2. Enter your Employee ID on the screen as shown below. Employees punch into the clocks with their Badge ID (Badge ID = your employee ID minus leading zeroes). For example: Employee ID 012345 would be entered as 12345.
NOTE: if you do not know your Employee ID, you can contact your HR Manager or you can call the NOLA PAY Employee Service Center at 1-855-NOLA PAY (1-855-665-2729).

eTIME Supervisor Guide V.8.0 Page 35 of 39 Version 2.0
3. Biometrically validate. You will be instructed to place your right hand index finger on sensor located on top right side of the clock. Your fingerprint is used to clock in and out. Contact your supervisor or HR Manager to biometrically enroll at the clock.
4. The punch is accepted by the clock as shown below.
Note: If the punch is not accepted you will see a rejected punch as shown below. Place your finger on the sensor again to try again.

eTIME Supervisor Guide V.8.0 Page 36 of 39 Version 2.0
Hourly Employee: Approving your time via Time Clock
Step 1: Select Approve Time Card as shown above.
Step 2: Enter your Employee ID and then press Enter. Employees punch into the clocks with their Badge ID (Badge ID = your employee ID minus leading zeroes). For example: Employee ID 012345 would be entered as 12345.
Step 3: Use your fingerprint to biometrically validate to proceed. You will be instructed to place your right hand index finger on sensor located on top right side of the clock. Your fingerprint is used to clock in and out. Contact your supervisor or HR Manager to biometrically enroll at the clock.

eTIME Supervisor Guide V.8.0 Page 37 of 39 Version 2.0
Step 4: Choose the Current Pay Period.
Step 5: Click Approve as shown above.
Step 6: Your timecard is approved.
eTIME Supervisor Guide V.8.0 Page 38 of 39 Version 2.0
Hourly Employee: Biometric Enrollment at the Time Clock
NOTE: For Biometric Enrollment your Supervisor needs to be present
Below is the enrollment plan for the In Touch clocks for the Biometric validation.
First, the clocks will be setup initially to not force Biometric validation.
Employees can punch into the clocks with their PIN (PIN = your employee ID minus leading zeroes) until either of the two below occur:
Employee enrolls for Biometric. Once they have enrolled for Biometric validation, they must authenticate via Biometric validation.
Clocks are switched to force Biometric validation.
The biometric enrollment will continue as a “rolling” enrollment for a period of time. Once the clocks are changed to Biometric validation, if an employee goes to the clock who has not enrolled they will not be able to enroll until their Supervisor “opens” the clock for the employee to enroll for Biometric as shown on the next page:
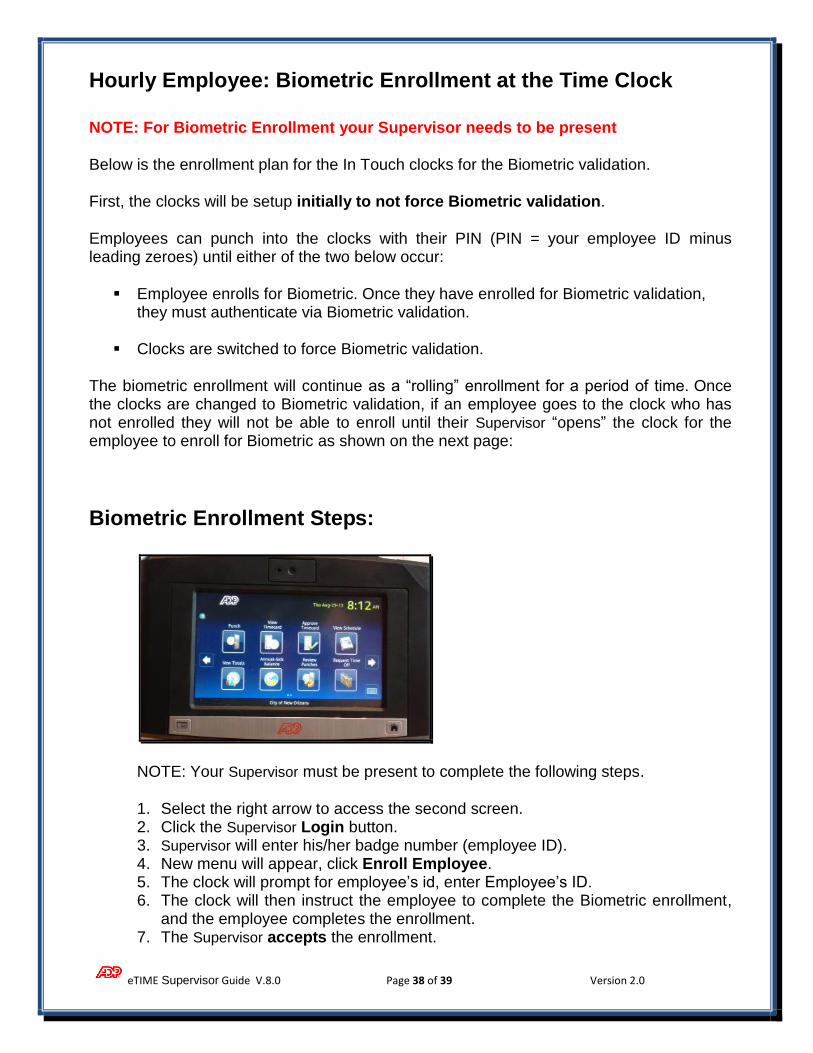
Biometric Enrollment Steps:
NOTE: Your Supervisor must be present to complete the following steps.
1. Select the right arrow to access the second screen. 2. Click the Supervisor Login button. 3. Supervisor will enter his/her badge number (employee ID). 4. New menu will appear, click Enroll Employee. 5. The clock will prompt for employee’s id, enter Employee’s ID. 6. The clock will then instruct the employee to complete the Biometric enrollment,
and the employee completes the enrollment. 7. The Supervisor accepts the enrollment.

eTIME Supervisor Guide V.8.0 Page 39 of 39 Version 2.0
Hourly Employee: Recording Time via the Time Stamp Button
Step 1: Log on to Employee Self Service/ADP Portal – https://portal.adp.com
Step 2: Go to Time & Attendance > eTIME.
Step 3: Click Record Timestamp.
Step 4: Once you click on Record Timestamp, you will see a message confirming that the
time has been recorded as shown above.
If you want to see the timestamped on your timecard, click Refresh to populate the time
and it will show as noted below.