Embed Size (px)
Citation preview

OperatOperatOperatOperationionionion ManualManualManualManual
1
ThanksThanksThanksThanks veryveryveryvery muchmuchmuchmuch forforforfor purchasingpurchasingpurchasingpurchasing cuttingcuttingcuttingcutting plotter.plotter.plotter.plotter.
���� ForForForFor ensuringensuringensuringensuring youyouyouyou totototo makemakemakemake bestbestbestbest useuseuseuse ofofofof thethethethe machine,machine,machine,machine, pleasepleasepleaseplease
readreadreadread thisthisthisthis manualmanualmanualmanual carefullycarefullycarefullycarefully andandandand thoroughlythoroughlythoroughlythoroughly beforebeforebeforebefore youyouyouyou
startingstartingstartingstarting totototo useuseuseuse thethethethe machinemachinemachinemachine....
� PleasePleasePleasePlease turnturnturnturn offoffoffoff thethethethe powerpowerpowerpower quicklyquicklyquicklyquickly ifififif youyouyouyou encounterencounterencounterencounter anyanyanyany
problems,problems,problems,problems, andandandand referreferreferrefer totototo thisthisthisthis manualmanualmanualmanual orororor contactcontactcontactcontact youryouryouryour dealer.dealer.dealer.dealer.
SpecialSpecialSpecialSpecial DeclarationDeclarationDeclarationDeclaration
1. ManufacturerManufacturerManufacturerManufacturer keepskeepskeepskeeps thethethethe rightrightrightright ofofofof changingchangingchangingchanging productproductproductproduct
specificationspecificationspecificationspecification withoutwithoutwithoutwithout priorpriorpriorprior noticenoticenoticenotice;;;;
2. ManufacturerManufacturerManufacturerManufacturer onlyonlyonlyonly takestakestakestakes thethethethe legallegallegallegal dutydutydutyduty ofofofof productproductproductproduct itself,itself,itself,itself,
notnotnotnot undertakingundertakingundertakingundertaking anyanyanyany otherotherotherother losslosslossloss producedproducedproducedproduced afterafterafterafter productproductproductproduct
waswaswaswas wrongwrongwrongwrong....
OperatOperatOperatOperationionionion ManualManualManualManual
2
ContentsContentsContentsContents
Chap1. Attention ------------------------------------------------ (3)
Chap2. Basic operation ------------------------------------------- (3)
2-1 Packing box-----------------------------------------------(3)
2-2 Accessories------------------------------------------------(4)
2-3 Installation and connection------------------------------(4)
2-4 Installation of tools---------------------------------------(4)
2-5 Parts of stand----------------------------------------------(6)
Chap.3 Operation instruction (Practical type)---------------- --(7)
3-1 Item of the component-----------------------------------(7)
3-2 Assembly of machine stand-----------------------------(7)
3-3 Control Panel ---------------------------------------------(8)
3-4 Basic Operation-------------------------------------------(9)
3-5 Operating instruction------------------------------------(11)
Chap. 4 Parameters Table------------------------------------------(15)
Chap. 5 USB installing driver-------------------------------------(16)
Chap. 6 About software--------------------------------------------(17)
6-1 Artcut software-------------------------------------------(17)
6-2 CorelDraw software-------------------------------------(18)
6-3 FlexiSTARTER software-------------------------------(19)
6-4 SignBlazer software ------------------------------------(26)
Chap. 7 Troubleshooting-------------------------------------------(28)

OperatOperatOperatOperationionionion ManualManualManualManual
3
ChapChapChapChap.... 1111 AttentionAttentionAttentionAttentionPleasePleasePleasePlease readreadreadread thethethethe attentionattentionattentionattention carefullycarefullycarefullycarefully beforebeforebeforebefore operatingoperatingoperatingoperating thethethethe machine.machine.machine.machine.
1. No magnetic devices should be placed in the vicinity of the plotter,specifically the carriage.
2. Prevent from dropping foreign matters into cracks such as pins, littlescrews, etc.
3. Please pull out the power plug if not using during a long time.
4. Don’t plug or unplug serial/parallel/usb cables on plotter while the power ison.
5. Don’t leave pinch rollers pressed down while machine is not in use.
6. Always connect the power cord to a grounded outlet.
7. Don’t move the carriage manually.
8. Don’t touch carriage, metal roller, cutter and all moving devices when themachine is working.
9. Place machine in a stable area that is free of strong vibrations,electromagnetic field, dust, moisture and /or direct sunlight.
10. Don’t press top beam or lift up black rail.
ChapChapChapChap.... 2222 BasicBasicBasicBasic operationoperationoperationoperation
2222-1-1-1-1 Packing-boxPacking-boxPacking-boxPacking-boxPlease carefully check up the goods after opening the packing box,and in every box there should be as following:1. A main machine.2. A packet of accessories.3. A set of parts of machine stand.

OperatOperatOperatOperationionionion ManualManualManualManual
4
2222-2-2-2-2 AccessoriesAccessoriesAccessoriesAccessoriesNO. Item Quantity1 Power cord 12 Operation manual 13 Cutter holder 14 Cutter 35 Plotter holder 16 Allen wrench 17 Serial cable 18 Parallel cable(optional) 19 USB cable (optional) 110 Plotter protective cover 111 Driver disk for CorelDraw and USB port 112 Artcut 2009 CD (optional) 1
2-32-32-32-3 InstallationInstallationInstallationInstallation andandandand connectionconnectionconnectionconnection1. Place the machine in a plain and roomy place
2. Connect the signal cable to the COM1,COM2 /USB port of the computer
3. Check voltage of the power source and whether it is grounded, do notconnect the power untill all are in a good condition
2-42-42-42-4 InstallationInstallationInstallationInstallation ofofofof tooltooltooltoolssss
2-4.12-4.12-4.12-4.1 StructureStructureStructureStructure ofofofof cuttercuttercuttercutter holderholderholderholder andandandand itemsitemsitemsitems ofofofof componentscomponentscomponentscomponentsRotate the cutter adjusting screw to adjust theout-stretching length of the cutter as to ensure thatit doesn’t cut off the bottom layer of stickiness.
1. Cutter (diameter is 2mm)2. Cutter holder shell3. Cutter adjusting screw4. Cutter holder body

OperatOperatOperatOperationionionion ManualManualManualManual
5
2-4.22-4.22-4.22-4.2 InstallationInstallationInstallationInstallation andandandand adjustmentadjustmentadjustmentadjustment ofofofof bladebladebladeblade1.Before installing the cutter, you must carefully clean the cutter holder body,the cutter and your hands. Even very slight dirt can affect the performance ofthe cutter. Use a flexible plastic or rubber grip to hold the blade in your hand.Carefully insert the blade into the cutter holder body and it should magneticallyattach.
2.Rotate the shell of the cutter holder and make the out-stretching length of theblade tip not longer than the thickness of the sticker.
3. Don't touch the blade top with your finger to prevent injury.
2-4.32-4.32-4.32-4.3 StructureStructureStructureStructure ofofofof PlotterPlotterPlotterPlotter holderholderholderholder andandandand itemsitemsitemsitems ofofofof componentscomponentscomponentscomponentsFit the ball pen into the plotter holder, the structure is as
show in the following drawing.
1. Rotate the lid.2. Insert a ballpoint pen and let the pen tip out of proper length.3. Cover the pen with the lid then rotate them into the shell.
2-4.42-4.42-4.42-4.4 InstallationInstallationInstallationInstallation1. Turn off the power.2. Loosen the locking screw of the tool carrier, then put the cutter holder orplotter holder in the tool carrier When the tool are in appropriate position,fasten the locking screw clockwise at last.
2-4.52-4.52-4.52-4.5 UsingUsingUsingUsing lifelifelifelife ofofofof thethethethe cuttercuttercuttercutterCutterCutterCutterCutter’’’’ssss usingusingusingusing lifelifelifelife isisisis limited,limited,limited,limited, butbutbutbut youyouyouyou cancancancan useuseuseuse itititit asasasas longlonglonglong asasasas possible.possible.possible.possible.
Note:Note:Note:Note:
1. More longer the out-stretching length of the cutter, more shorter the usinglife. Please avoid cutting off the bottom layer during the process of cutting.
2. The more cutting press, the shorter the using life.
3. As for different materials, the requirement to the cutter sharpness is

OperatOperatOperatOperationionionion ManualManualManualManual
6
different.
4. Set the cutting press as little as possible; only increase it when the cutterfeels blunt.
5. As for the cutters from different factories, the using life is also very different.
6. Renew the cutter timely when it is blunt in case of affecting the machineperformance. As an urgent method, a piece of leather can be used to sharpenthe blade tip just like sharpening a razor.
2222-5-5-5-5 PartsPartsPartsParts ofofofof stanstanstanstandddd
(Practical(Practical(Practical(Practical type)type)type)type)NO. Item Quantity NO. Item Quantity1 Left column 1 6 Paper roller 22 Right column 1 7 Paper hanger 23 Crossbeam 1 8 Connection board 24 Pillar-bars 2 9 Screw M4×20 10/125 Pillars/wheels 4 10 Screw M4×8 8

OperatOperatOperatOperationionionion ManualManualManualManual
7
ChapChapChapChap....3333OperatingOperatingOperatingOperating InstructionInstructionInstructionInstruction (Practical(Practical(Practical(Practical type)type)type)type)
3-13-13-13-1 ItemItemItemItem ofofofof thethethethe componentcomponentcomponentcomponent
1. Left cover 9. Position setting knob2. Metal roller 10. Right cover3. Cutter bracket 11. Pillar4. Cutter holder 12. Power socket5. Carriage 13. Fuse socket6. Cover of guide 14. Power switch7. Pinch roller 15 .USB to serial adapter port (optional)8. Controlling panel 16. Serial port
3333----2222 AssemblyAssemblyAssemblyAssembly ofofofof machinemachinemachinemachine standstandstandstandReferring to the following drawing:(Available to the type with minimum width 780mm only)

OperatOperatOperatOperationionionion ManualManualManualManual
8
Step 1: Connect the pillar bars to left and right columns with screws respectively.
Step 2: Connect the crossbeam to left and right columns with screws.
Step 3: Join the paper hanger to the inside of the left and right columns with screws.
Step 4: Join the connection board to the top of the left and right columns with screws.
Step 5: Lay down the four pillars of main machine, place the machine on the connectionboard, and then insert the pillars into the connection board to connect to the mainmachine.
Step 6: Place the paper-roller on the roller of paper hanger.
3-33-33-33-3 ControlControlControlControl PanelPanelPanelPanel3-3.13-3.13-3.13-3.1 TypeTypeTypeType

OperatOperatOperatOperationionionion ManualManualManualManual
9
1. LCD display 6. origin setting button2. Reset 7. Press +3. Offline / Pause 8.Value –4. Setup 9.Value +5. Test 10. Press –
3-43-43-43-4 BasicBasicBasicBasic OperationOperationOperationOperation
3-4.13-4.13-4.13-4.1 TurnTurnTurnTurn onononon thethethethe machinemachinemachinemachine1. Check whether the power is in OFF position.2. Plug the power cable into the power socket of the machine, and then pressthe switch on / off on the left.
3. LCD in the control panel is on and displays the initializing process andshows following information.
4. When the initializing is over, the red light is on, the machine is in onlinestate and connectable with the computer to be operable.
OperatOperatOperatOperationionionion ManualManualManualManual
10
3-4.23-4.23-4.23-4.2 InstallationInstallationInstallationInstallation ofofofof thethethethe cuttingcuttingcuttingcutting mediamediamediamedia1).Loading the cutting media1. Lift the pinch-roller handles and let it away from the metal rollers.2. Insert the vinyl between metal rollers and pinch rollers of the machine frombehind to front.3. Carefully check the vinyl before cutting, since if vinyl is not well placed,serious deviation will occur. If the vinyl is uneven lift the pinch rollers on oneside to adjust and then press down pinch rollers. It is necessary to trial-run thevinyl several times to attain minimum deviation before cutting work.
2).Adjust the place of pinch rollers according to paper widthCutting plotter has 2 to 4 pinch rollers and they can be moved along the guiderail. The handles of pinch rollers must be lifted before moving pinch rollers,hold the back of the roller and push it to the left or the right. Please don’t pullthe roller bars in the front, otherwise the machine precision will be affected.
3).The place of the rollers must ensure:1. Pinch rollers should be in the place out of the scope of the pattern.2. Pinch rollers should be 10 to 50mm away from the edges of the paper.3. Pinch rollers shouldn’t be let down on the conjunction of two connectingmetal rollers.
3-4.33-4.33-4.33-4.3 TrialTrialTrialTrial runrunrunrun (adjusting(adjusting(adjusting(adjusting thethethethe presspresspresspress andandandand tool)tool)tool)tool)
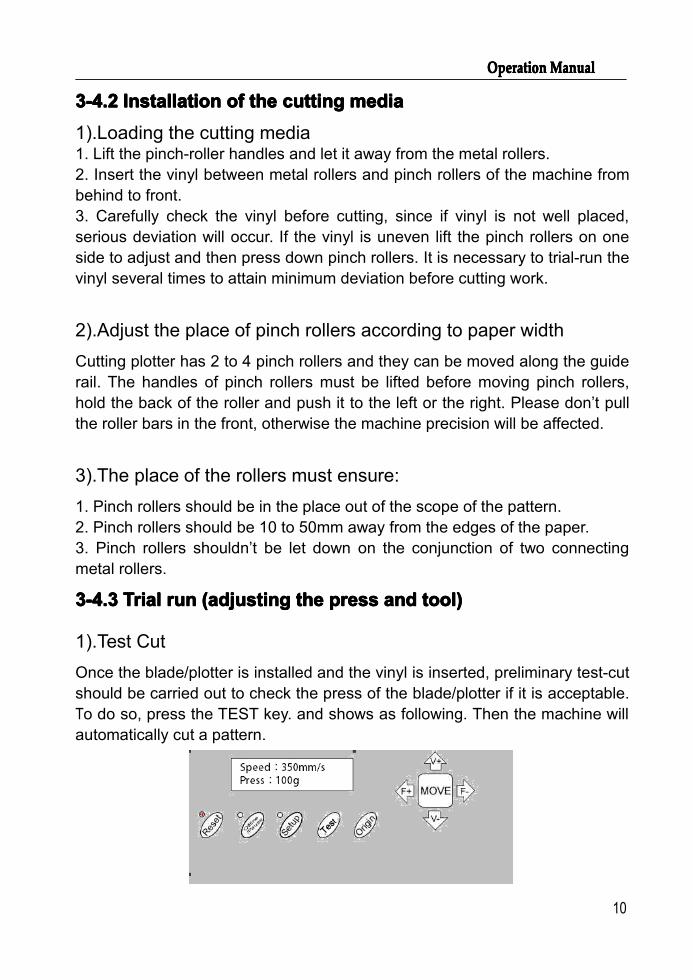
1).Test CutOnce the blade/plotter is installed and the vinyl is inserted, preliminary test-cutshould be carried out to check the press of the blade/plotter if it is acceptable.To do so, press the TEST key. and shows as following. Then the machine willautomatically cut a pattern.
OperatOperatOperatOperationionionion ManualManualManualManual
11
2).Press AdjustmentTake off the cut pattern, if you fail, the pattern need to be further cut , becausethe press is too low or the protruding length of the blade top is too short . If thebase paper is pierced through, it signifies that the protruding length of theblade top is too long and the press is too big. The protruding portion of theblade tip should be about 0.5mm or less in length normally which is 2/3 of thethickness of vinyl. Adjust the protruding length of the blade top and pressaccording to result of test.By pressing F+ or F- the press of the blade will be increased or decreased byone level.
CCCCaution:aution:aution:aution:
AlwaysAlwaysAlwaysAlways testtesttesttest cutcutcutcut everyeveryeveryevery timetimetimetime youyouyouyou useuseuseuse aaaa newnewnewnew typetypetypetype ofofofof vinylvinylvinylvinyl totototo
checkcheckcheckcheck thethethethe cuttingcuttingcuttingcutting press.press.press.press.
3-53-53-53-5 OperatingOperatingOperatingOperating instructioninstructioninstructioninstruction
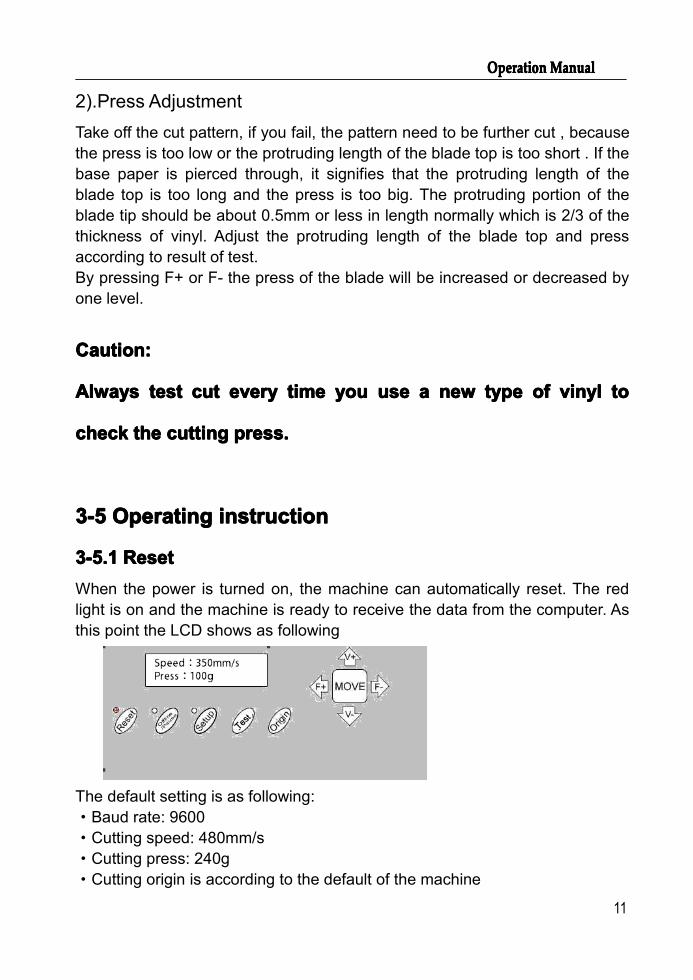
3-5.13-5.13-5.13-5.1 ResetResetResetResetWhen the power is turned on, the machine can automatically reset. The redlight is on and the machine is ready to receive the data from the computer. Asthis point the LCD shows as following
The default setting is as following:·Baud rate: 9600·Cutting speed: 480mm/s·Cutting press: 240g·Cutting origin is according to the default of the machine

OperatOperatOperatOperationionionion ManualManualManualManual
12
The above information may be changed during operation.When it is working, if the RESET key is pressed, the machine will cancel thecurrent job and return to default settings.
3-5.23-5.23-5.23-5.2 OnlineOnlineOnlineOnlineAfter the machine is reset, the red light (reset indicator) should be X on. Whenthe machine receives date from the computer, it is in online mode.In this moment you can change the cutting speed by pressing V+ or V-adjust the cutting press by pressing F+ or F-
3-5.33-5.33-5.33-5.3 OfflineOfflineOfflineOffline /Pause/Pause/Pause/PausePress the OFFLINE key to enter offline mode. The yellow light is on.Meanwhile, “Motion, X= xxx, Y= yyy” will appear on LCD, which shows thecoordinates location of the blade at the moment.

OperatOperatOperatOperationionionion ManualManualManualManual
13
Press the key V+ or V- the carriage can be moved left or right. Press the keyF+ or F- the vinyl can be moved forward or backward. In this state you canmove the blade top to the starting position. the step value of “X, Y” in the LCDwill change accordingly
When it is working you press the Pause Key, the machine will stop workingand if you press again the machine will continue working.
3-5.43-5.43-5.43-5.4 SettingSettingSettingSetting originoriginoriginorigin ofofofof plottingplottingplottingplottingWhen move the blade top to the starting position, press the Origin button thesetting of the new origin is completed, The machine will start plotting from thenew origin.
3-5.53-5.53-5.53-5.5 SetupSetupSetupSetupIn ONLINE status, when you press the SETUP key, the green light is on, andthe baud rate of serial port can be changed. If you press SETUP key again, itwill restore to online status.

OperatOperatOperatOperationionionion ManualManualManualManual
14
Caution:Caution:Caution:Caution:UnlessUnlessUnlessUnless professionalprofessionalprofessionalprofessional technicians,technicians,technicians,technicians, youyouyouyou’’’’rererere notnotnotnot suggestedsuggestedsuggestedsuggested totototochangechangechangechange thisthisthisthis setting.setting.setting.setting.IfIfIfIf somethingsomethingsomethingsomething unusualunusualunusualunusual occursoccursoccursoccurs andandandand youyouyouyou areareareare unableunableunableunable totototo stopstopstopstop thethethethecutter,cutter,cutter,cutter, turnturnturnturn thethethethe powerpowerpowerpower offoffoffoff orororor unplugunplugunplugunplug it.it.it.it.
3-5.63-5.63-5.63-5.6 AfterAfterAfterAfter workworkworkwork isisisis overoveroverover
1. Remove the paper.
2. Remove the cutter holder or plotter holder, then wipe it clean with asoft-cloth and keep it properly.
3. Turn off the power, and pull the power cord out if not using during a longtime.
4. Cover the machine with a cloth or a cover.

OperatOperatOperatOperationionionion ManualManualManualManual
15
ChapChapChapChap.... 4444 ParametersParametersParametersParameters TableTableTableTable
TechnicalTechnicalTechnicalTechnical SpecificationsSpecificationsSpecificationsSpecifications
ModelModelModelModel 363636361111 727272721111 878787871111 1101110111011101 1351351351351111
Max.Max.Max.Max. paperpaperpaperpaper widthwidthwidthwidth 365mm 720mm 870mm 1100mm 1350mm
Max.Max.Max.Max. cuttingcuttingcuttingcutting widthwidthwidthwidth 275mm 630mm 780mm 1010mm 1260mm
CuttingCuttingCuttingCutting speedspeedspeedspeed 10-1000mm/s
CuttingCuttingCuttingCutting presspresspresspress 10-600g
BufferBufferBufferBuffer capacitycapacitycapacitycapacity 4M
LCDLCDLCDLCD YES
CPUCPUCPUCPU 16-bit CPU
StripStripStripStrip ofofofof plotterplotterplotterplotter Plastic sheet
DDDDriveriveriverive Stepping
Min.Min.Min.Min. charactercharactercharactercharacter matrixmatrixmatrixmatrix Approx 5 mm [0.2''] high
BladeBladeBladeBlade typetypetypetype Super steel [1.2mm and 2.0mm]
FilmFilmFilmFilm typetypetypetype Self -adhesive vinyl film, fluorescent film, reflective film, paper
DisplayDisplayDisplayDisplay panelpanelpanelpanel 8digits X 2 line LCD
InterfacesInterfacesInterfacesInterfaces Serial & USB
PowerPowerPowerPower requirementsrequirementsrequirementsrequirements 85~264V
RepeatabilityRepeatabilityRepeatabilityRepeatability 0.0125mm
MechanicalMechanicalMechanicalMechanical resolutionresolutionresolutionresolution 0.0254mm/step
CommandsCommandsCommandsCommands setsetsetset DMPL / HPGL
EnvironmentalEnvironmentalEnvironmentalEnvironmentaltemperaturetemperaturetemperaturetemperature
0-35℃
OperatingOperatingOperatingOperating environmentenvironmentenvironmentenvironment WindowsXP/WindowsVista/Windows7/Windows8(32bit&64bit)
EnvironmentalEnvironmentalEnvironmentalEnvironmental humidityhumidityhumidityhumidity 5%-65%(without condensation)
OperatOperatOperatOperationionionion ManualManualManualManual
16
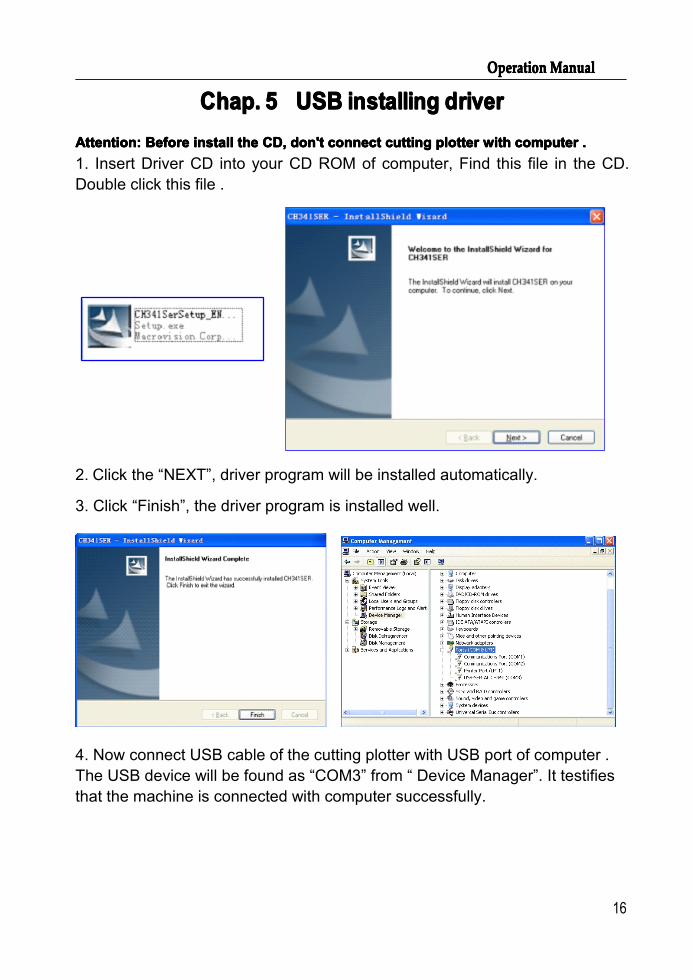
Chap.Chap.Chap.Chap. 5555 USBUSBUSBUSB iiiinstallingnstallingnstallingnstalling driverdriverdriverdriverAttention:Attention:Attention:Attention: BeforeBeforeBeforeBefore installinstallinstallinstall thethethethe CD,CD,CD,CD, don'tdon'tdon'tdon't connectconnectconnectconnect cuttingcuttingcuttingcutting plotterplotterplotterplotter withwithwithwith computercomputercomputercomputer ....1. Insert Driver CD into your CD ROM of computer, Find this file in the CD.Double click this file .
2. Click the “NEXT”, driver program will be installed automatically.
3. Click “Finish”, the driver program is installed well.
4. Now connect USB cable of the cutting plotter with USB port of computer .The USB device will be found as “COM3” from “ Device Manager”. It testifiesthat the machine is connected with computer successfully.

OperatOperatOperatOperationionionion ManualManualManualManual
17
Chap.Chap.Chap.Chap. 6666AboutAboutAboutAboutSoftwareSoftwareSoftwareSoftware6-16-16-16-1 ArtcutArtcutArtcutArtcut softwaresoftwaresoftwaresoftware
6-1.1.6-1.1.6-1.1.6-1.1. PleasePleasePleasePlease referreferreferrefer totototo “UserUserUserUser’’’’ssss ManualManualManualManual” whilewhilewhilewhile installinginstallinginstallinginstallingArtcutArtcutArtcutArtcut softwaresoftwaresoftwaresoftware ....
6-1.2.6-1.2.6-1.2.6-1.2. SoftwareSoftwareSoftwareSoftware settingsettingsettingsetting:
1). Click “Cut Out ”,then choose the right Manufacturer and Device as
the following picture ,then click “Add” ,after then click“Close” to finish it .
2). Check the right “Link to”,( which can be found in “Device Manager“,COM3 as in following picture),Then click“Setup”.

OperatOperatOperatOperationionionion ManualManualManualManual
18
3). After click “set up”, dialogue box display “ Port Setting ” , click“ Parameters”to choose the right values as following picture.
4). Click “OK”,then must click “Change” before closing dialogue box 。
Finally please check whether cutting plotter is well connected with computerbefore click “Cut/Plot” to output .
6-26-26-26-2 CorelDrawCorelDrawCorelDrawCorelDraw softwaresoftwaresoftwaresoftware
1). Check “manager device ” ,whether it has a new port named USB-SERIALCH340,and remember this COM port(COM3)2). Click “start” to add a new printer ,select “local printer attached to thiscomputer “,then choose “GOLDCUT JK Series” which under the file of“coreldraw driver”,then click “next” to finish .

OperatOperatOperatOperationionionion ManualManualManualManual
19
3). Open the properties of this new printer “GOLDCUT JK Series”, adjustingthe COM port to be the same as in device manger(COM 3), click “apply” tofinish .4). Select your graph, and then click "Outline" and choose "Hairline".
5)、Then "Fill", choose "None".
5). Click " Print" and choose "GOLDCUT JK series" as your printer.
6). In "Layout", adjusting as following picture. ,click “Apply”then “Print”.
6-36-36-36-3 FlexiSTARTERFlexiSTARTERFlexiSTARTERFlexiSTARTER softwaresoftwaresoftwaresoftware
6-3.6-3.6-3.6-3.1.1.1.1. FlexiSTARTERFlexiSTARTERFlexiSTARTERFlexiSTARTER softwaresoftwaresoftwaresoftware InstallationInstallationInstallationInstallation:
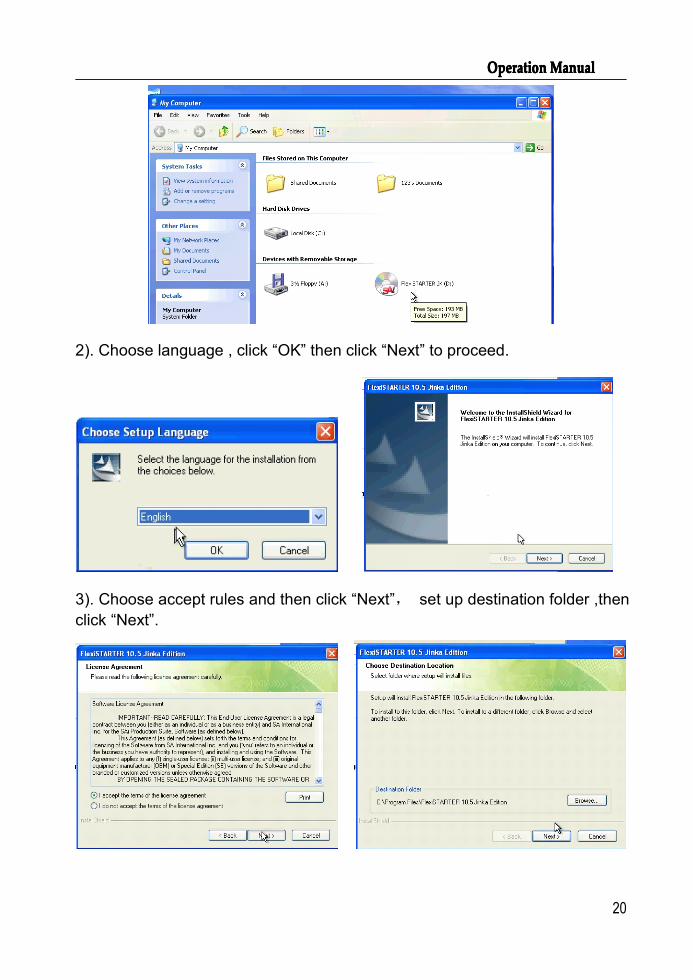
1). Insert “Flexi10”CD disk in to CD ROM ,if installation does not runautomatically(depends on setting in your operating system),find this file onCD ,and double click to set up.
OperatOperatOperatOperationionionion ManualManualManualManual
20
2). Choose language , click “OK” then click “Next” to proceed.
3). Choose accept rules and then click “Next”, set up destination folder ,thenclick “Next”.
OperatOperatOperatOperationionionion ManualManualManualManual
21
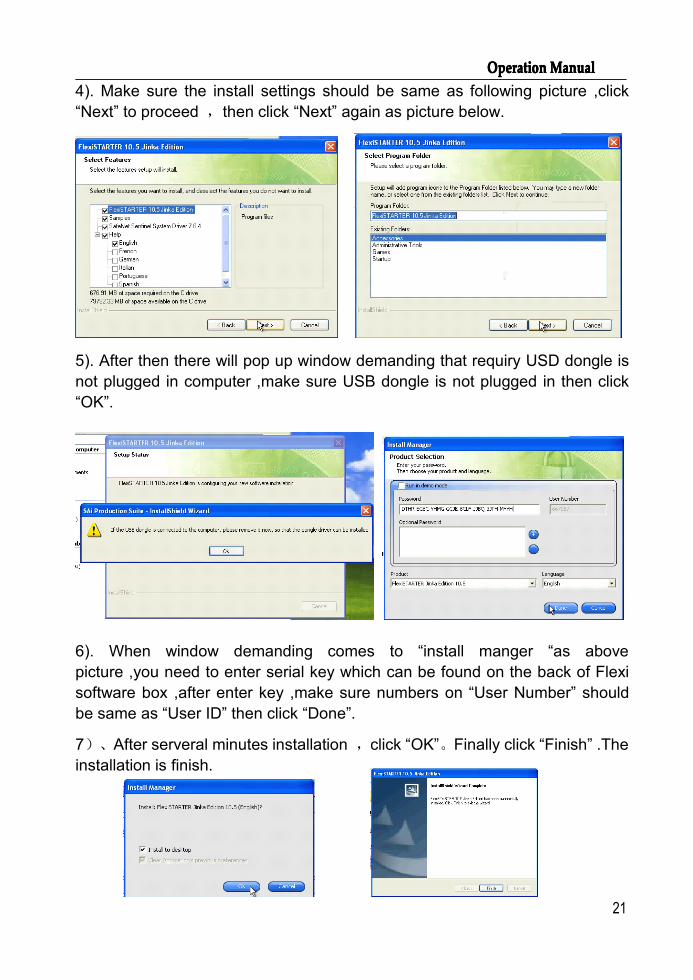
4). Make sure the install settings should be same as following picture ,click“Next” to proceed ,then click “Next” again as picture below.
5). After then there will pop up window demanding that requiry USD dongle isnot plugged in computer ,make sure USB dongle is not plugged in then click“OK”.
6). When window demanding comes to “install manger “as abovepicture ,you need to enter serial key which can be found on the back of Flexisoftware box ,after enter key ,make sure numbers on “User Number” shouldbe same as “User ID” then click “Done”.
7)、After serveral minutes installation ,click “OK”。Finally click “Finish” .Theinstallation is finish.

OperatOperatOperatOperationionionion ManualManualManualManual
22
6-3.2.6-3.2.6-3.2.6-3.2. LaserLaserLaserLaser EyeEyeEyeEye PositioningPositioningPositioningPositioning inininin FlexiFlexiFlexiFlexi softwaresoftwaresoftwaresoftware1). Setting the distance between red point and pen
Open the file from drivers CD,Copy these 2 files
into under FLEXI installation fold.
Double click Cutcontour button during cutting contour process is running, thenadjust offset value into X= -9.5 Y=-11 as below picture. So that the function ofLaser Positioning Contour Cutting will be played.

OperatOperatOperatOperationionionion ManualManualManualManual
23
X and Y values should be adjustment in the following cases:
Finished centre-right then increase Y value
Finished centre-left then reduce Y value
Finished on above then reduce X value
Finished in lower position then increase X value
2). Flexi software positioning institution①. Open Flexi , after make a file , please open “Menu”-“Effects”-“contourcut”.

OperatOperatOperatOperationionionion ManualManualManualManual
24
②、 Then choose “Effects”->Contour cut Mark. It will show four marks asfollowing.
3). Print the file and then fix it on machine,press the “Origin”.
4).Click or “Menu”-“File”-“Cut Contour… ”.5).Choose the right model of machine as following

OperatOperatOperatOperationionionion ManualManualManualManual
25
6). Setting the parameter of plotter as following.
7). Finish, then click “ Send ” button

OperatOperatOperatOperationionionion ManualManualManualManual
26
8). Click“Send”9). Click 4 direction button to make the red point onto the first mark , then click“OK”
10). Click 4 direction button to make the red point onto the second mark , thenclick “OK”.11). Then press “ OK”.

OperatOperatOperatOperationionionion ManualManualManualManual
27
6-46-46-46-4 SignBlazerSignBlazerSignBlazerSignBlazer softwaresoftwaresoftwaresoftwareOpen SignBlazer software, press “Cut”menu, set the parameter as following,press “ OK”
Then press “ Setup” menu, set the parameter as following

OperatOperatOperatOperationionionion ManualManualManualManual
28
Then finish and the file is sent to machine as following
Then please check whether there is “USB Printing Support” in Devicemanager, If it is there, that is OK
ChapChapChapChap.... 7777 TroubleshootingTroubleshootingTroubleshootingTroubleshooting
WhyWhyWhyWhy isisisis thethethethe patternpatternpatternpattern deformeddeformeddeformeddeformed orororor incomplete?incomplete?incomplete?incomplete?

OperatOperatOperatOperationionionion ManualManualManualManual
29
1. More pressure or too long blade tip or too dirty platen or too soft stickiness, all ofthese factors can cause more resistance to the two faces of paper and make it fallbehind the roller rotating, thus result in deformed pattern.
2. The software setting isn’t proper. (The tool compensation value is too big)
3. The carriage belt is too loose, or the metal roller can’t exactly follow the motorrunning.
4. The motor doesn’t run all the steps.
5. The pattern is normal but not complete, this may be resulted from too small toolcompensation value.
WhyWhyWhyWhy doesdoesdoesdoes thethethethe machinemachinemachinemachine plotplotplotplot abnormally?abnormally?abnormally?abnormally?
1. Software setting is not matched to the machine, so you must adopt propercommands set or set proper tool compensation value.
2. The plotting software is suddenly broken up.
3. Plotting software has been damaged or there is virus in computer.
WhyWhyWhyWhy doesdoesdoesdoes thethethethe paperpaperpaperpaper runrunrunrun deviation?deviation?deviation?deviation?
1. The stickiness isn’t placed right.
2. The platen is too dirty so that the resistance from two sides can’t be balancedwhen the paper is moving.
3. The pinch rollers have been deformed or don’t match to each other.
4. The pressure of the pinch roller is a little smaller and the paper is very sensitive tothe external press.
5. The balance of the stickiness weight isn’t very good.
WWWWhyhyhyhy somesomesomesome partspartspartsparts ofofofof lettersletterslettersletters areareareare missing?missing?missing?missing?
6. The vinyl is too heavy or too tightly wrapped. Metal roller might be soiled by someforeign substance or by vinyl chips.
7. Cutting speed is too fast, cutting press is too great, or cutter tip is too long.
8. Synchromesh belt is too tight, or pinch roller is under too much pressure.
9. Metal roller is faulty. Contact local distributor for repairs and replacement.
WWWWhyhyhyhy differentdifferentdifferentdifferent lettersletterslettersletters onononon thethethethe samesamesamesame linelinelineline areareareare cutcutcutcut totototo differentdifferentdifferentdifferent depths?depths?depths?depths?

OperatOperatOperatOperationionionion ManualManualManualManual
30
1. Cutter holder is not tightly attached. It should be tightened.
2. Cutter blade is not tightly set in the holder.
WWWWhyhyhyhy lettersletterslettersletters appearappearappearappear totototo havehavehavehave ripples?ripples?ripples?ripples?
1. Cutting speed is too fast. Except for cutting large letters, speed should not exceed480mm/s.
2. Cutting blade is of poor quality, or it has been damaged. Replace it.
3. Cutter holder is not tightly installed. Tighten screw.
CuttingCuttingCuttingCutting smallsmallsmallsmall lettersletterslettersletters
When cutting small letters, cutting speed and press should be adjusted to the lowestsetting. Similarly cutter tip should be adjusted to as short as possible.
CCCCuttinguttinguttingutting largelargelargelarge lettersletterslettersletters
Cutting speed and press may be increased to higher settings. When cutting large letters SharpAngle in Artcut software may be ignored.