Embed Size (px)
Citation preview
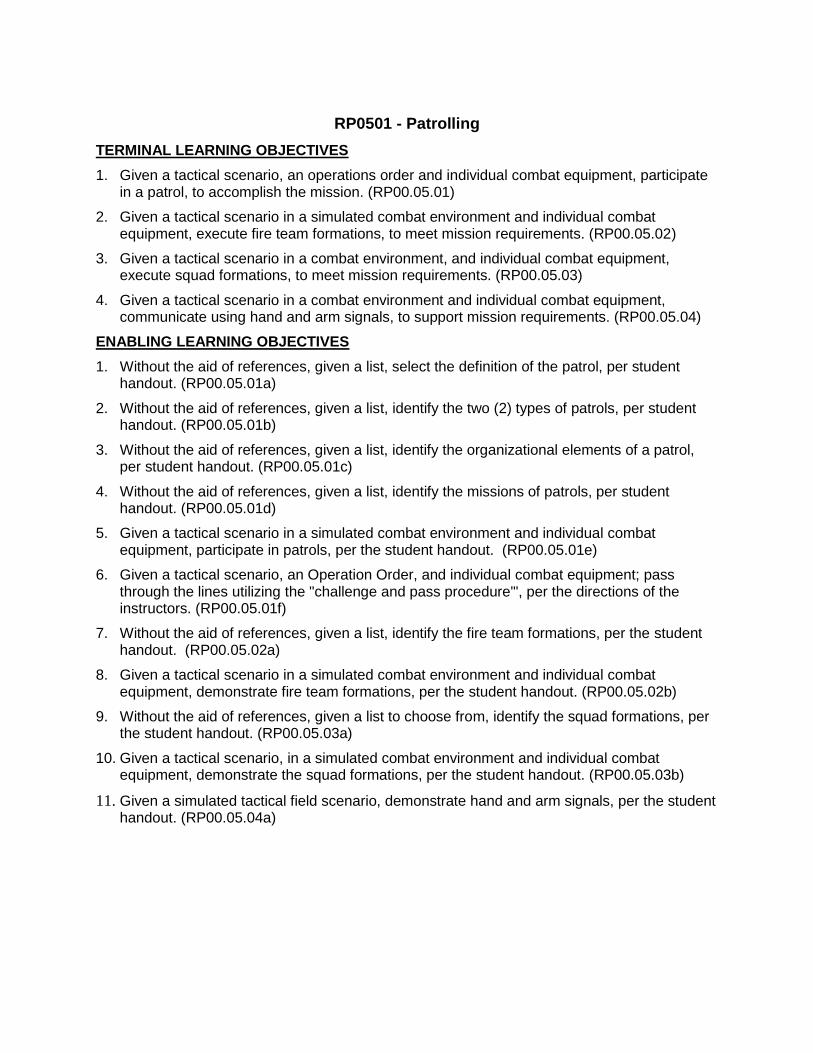
RP0501 - Patrolling
TERMINAL LEARNING OBJECTIVES
1. Given a tactical scenario, an operations order and individual combat equipment, participate in a patrol, to accomplish the mission. (RP00.05.01)
2. Given a tactical scenario in a simulated combat environment and individual combat equipment, execute fire team formations, to meet mission requirements. (RP00.05.02)
3. Given a tactical scenario in a combat environment, and individual combat equipment, execute squad formations, to meet mission requirements. (RP00.05.03)
4. Given a tactical scenario in a combat environment and individual combat equipment, communicate using hand and arm signals, to support mission requirements. (RP00.05.04)
ENABLING LEARNING OBJECTIVES
1. Without the aid of references, given a list, select the definition of the patrol, per student handout. (RP00.05.01a)
2. Without the aid of references, given a list, identify the two (2) types of patrols, per student handout. (RP00.05.01b)
3. Without the aid of references, given a list, identify the organizational elements of a patrol, per student handout. (RP00.05.01c)
4. Without the aid of references, given a list, identify the missions of patrols, per student handout. (RP00.05.01d)
5. Given a tactical scenario in a simulated combat environment and individual combat equipment, participate in patrols, per the student handout. (RP00.05.01e)
6. Given a tactical scenario, an Operation Order, and individual combat equipment; pass through the lines utilizing the "challenge and pass procedure'", per the directions of the instructors. (RP00.05.01f)
7. Without the aid of references, given a list, identify the fire team formations, per the student handout. (RP00.05.02a)
8. Given a tactical scenario in a simulated combat environment and individual combat equipment, demonstrate fire team formations, per the student handout. (RP00.05.02b)
9. Without the aid of references, given a list to choose from, identify the squad formations, per the student handout. (RP00.05.03a)
10. Given a tactical scenario, in a simulated combat environment and individual combat equipment, demonstrate the squad formations, per the student handout. (RP00.05.03b)
11. Given a simulated tactical field scenario, demonstrate hand and arm signals, per the student handout. (RP00.05.04a)

1. DEFINITION OF A PATROL
A patrol is a detachment of ground forces sent out by a larger unit for the purpose of gathering information or carrying out a destructive, harassing, or security mission. Patrols vary in size, depending on the type, mission, and distance from the parent unit. Most combat patrols are platoon-sized, reinforced with crew-served weapons.
2. TYPES OF PATROL
Patrols are classified according to the nature of the mission assigned. The two types are
Combat and Reconnaissance.
Combat Patrols - usually assigned missions to engage in combat. They gather
information as a secondary mission.
Reconnaissance Patrols - collects information about the enemy, terrain, and resources
without detection or engagement, if possible.
3. ORGANIZATIONAL ELEMENTS OF A PATROL
The Platoon Commander - designates a patrol leader, who is normally one of his squad
leaders, and gives them a mission. The patrol leader then establishes their patrol units
required to accomplish the mission.
Patrol Units - patrol units are subdivisions of patrols. Personnel are assigned to units based
on the mission of the patrol and the individuals within the patrol.
Special Organization - patrol units are further subdivided into teams, each of which
performs essential, designated tasks. (EPW team, Litter team, Search team)
Elements of Combat Patrols
Patrol Headquarters - this is the command group of the patrol. It is composed of the
patrol leader, and other support personnel essential to the patrol such as the radio
operator, Corpsman, and forward observer.
Assault Elements - engage the enemy at the objective.
Security Elements - secures the objective rally point, isolates the objective, and covers
the patrols return from the objective area.
Support Elements - provides supporting fires for the assault unit attack and covering fires
if required, for its withdrawal.
Elements of Reconnaissance Patrols
Patrol Headquarters - the command group of the patrol. It consists of the same personnel
as a combat patrol.
Recon Element - maintains surveillance over the objective.
Security Element - provides early warning, secures the objective rally point, and protects
the reconnaissance unit.
4. MISSIONS OF A COMBAT PATROL – (RACES)
Raid - Destroys or captures personnel, equipment, and destroys installations. A
secondary mission is to free friendly personnel who have been captured by the
enemy.

Ambush - patrols that conduct ambushes of enemy patrols, carrying parties, foot
columns, and convoys.
Contact - establishes and/or maintains contact with enemy and/or friendly forces.
Economy of Forces - perform limited objective missions such as seizing and holding key
terrain to allow maximum forces to be used elsewhere.
Security - patrols that detect infiltration by the enemy, kill or capture infiltrators and
protect against surprise attack or ambush.
5. MISSIONS OF RECONNAISSANCE PATROL
Area Reconnaissance - a directed effort to obtain detailed information concerning
specific terrain or enemy activity within a specific location.
Zone Reconnaissance - a directed effort to obtain detailed information concerning all
routes, obstacles, terrain, and enemy forces within a particular zone defined by specific
boundaries.
Route Reconnaissance - a reconnaissance along specific lines of communication such as
a road, railway, or waterway, to provide information on route conditions and activities
along the route of travel.
6. PATROL LEADER PREPARATIONS- (BAMCIS)
Begin Planning
Plan Use of Time - patrol leader will schedule every event which must be done prior to
departing friendly lines.
Study the Mission - identify significant tasks which must be accomplished in order for
the patrol to accomplish primary mission.
Studies Terrain and Situation - the patrol leader makes a thorough study of the map
terrian over which the patrol will operate. The patrol leader will also study the friendly
and enemy situation.
Organizes the Patrol - determines the units and teams required in accomplishing essential
task.
Selects Personnel, Weapons, and Equipment - the patrol leader will select who will go,
what weapons they will carry, how much food and water they will carry, and routine
equipment common to all personnel. The last thing the patrol leader will select is how
they will control the patrol while moving and in the objective area.
Issues the Warning Order - the warning order will include the Situation, Mission, General
Instructions, and Specific Instructions.
Coordinate - the patrol leader begins their coordination from the time they receive the
order. They are primarily concerned with:
- Movement into friendly areas
- Departure and reentry of friendly lines/areas
- Fire support
- Logistic support
- Informational checklist
Arrange Recon - to arrange for the reconnaissance by ensuring that communication and
coordination with other area commands, supporting fire teams, and other patrol leaders that
may be opperating in the same area prior to carrying out the reconnaissance.

Make Recon - whenever possible, the patrol leader makes or sends a physical reconnaissance
of the routes they want to follow and of the objective.
Complete Detailed Plan - the patrol leader will now write their five paragraph order.
Issue Patrol Order - when the patrol leader has completed the plan, they assemble the
members of the patrol and issue the order. They will:
- Ensure that all members are present
- Receive a status on the preparatory tasks assigned to unit leaders
- Precede the order with an orientation
- Build a terrain model
- Issue the entire order
- Conclude the session with a time check and announce time of the next event
Supervise, Inspect, Rehearse, and Re-inspect - inspections and rehearsals are vital for proper
preparation. They are conducted even when the patrol leader and patrol members are
experienced in patrolling.
7. CONDUCTION OF PATROLS
Formation and Order of Movement - the patrol leader determines the formation in which
the patrol will move to the objective area. They also determine the location of units, teams,
and individuals in the formation. The standard squad and fire team formations are adaptable
to any patrol. Patrol formations will depend on:
- Probability of contact with the enemy
- Terrain, weather, vegetation, and visibility
- Time allotted for the patrol to accomplish its mission and return to friendly lines/areas.
Movement Control - the patrol leader positions themselves where they can best control the
patrol. The assistant patrol leader moves at or near the rear and prevents straggling. The
patrol leader will ensure that:
- Hand and arm signals are the primary means of communication (radios provide a means
of positive control within a large patrol, when hand and arm signals are impractical.
- He speaks just loudly enough to be heard
- All personnel are accounted for after crossing danger areas, halts, and after enemy
contact
- Checkpoints and rally points are designated as follows:
Checkpoints - predetermined points along your route used for control and to remain
on course.
Rally points - Easily identifiable points, designated during your patrol, where
members can assemble and reorganize if dispersed. There are three types:
Initial - point within friendly area if patrol becomes dispersed before departing or
reaching first enroute rally point.
Enroute - points along route to and from the objective area.
Objective - point nearest objective for final preparation and to assemble after your
attack.
Navigation - one or more men in the patrol are assigned as navigators to assist the patrol
leader in maintaining direction by use of the compass. The patrol leader also assigns men as

pacers to keep track of the distance from point to point. They should assign at least two
pacers and use the average of their counts for an approximation of the distance traveled. The
pacers are separated so they will not influence each other‟s count.
Security - the patrol leader organizes the formation to provide security while on the move,
during halts, at danger areas, and upon reaching checkpoints and rally points.
Day Patrols
- Adequate dispersion.
- Careful not to silhouette yourself when moving along high ground.
- Avoid open areas and take advantage of available cover and concealment
- Avoid suspected enemy locations and built up areas.
- Maintain an even pace and avoid rushing or running. Sudden movements attract
attention.
- Employ security elements to the front, rear, and flanks, if practical.
Night Patrols - Use the same techniques as for Day Patrols, but modify, as required.
- Patrol members stay closer together.
- Silent movement is essential; sounds carry much further at night.
- Speed is reduced to avoid separation of patrol members and to keep noise down.
Night Movement Techniques
Gear
- Secure loose gear to minimize noise
- Fill canteens
- Break up your outline (camouflage)
- Camouflage shiny objects
- Secure or take off rifle slings
Walking
- Carry your body weight balanced on your rear foot
- Lift your forward foot high enough to clear any brush, or obstacles
- Lower forward foot gently, toes first
- Lower heel of the forward foot slowly and transfer body weight to that foot
- Freeze if caught in a flare that burst in the air. If during the attack, ignore the
flare and continue the attack
- Do not run at night, except in an emergency
Night Vision
- Avoid straining your eyes by not concentrating too long on one object
- If a trip flare activates, drop to the ground quickly and quietly, close one eye and
leave the other open to see if the enemy attacks
- Use lights only in an emergency
Immediate Action Drills - there are times when contact with the enemy is unexpected. For
this we have immediate action drills.
Hasty Ambush - used when you see the enemy before being seen. You quickly
move into a concealed area and engage the enemy or allow them to pass.
Danger Area - is where the patrol is vulnerable to the enemy observation and/or
fire (roads, open areas).

Immediate Assault - used when you are caught in a near ambush. Turn in the
direction of the ambush and assault the ambush.
Near Ambush (50 meters or less) - the killing zone is under heavy, highly
concentrated, close range firing. Turn in the direction of the ambush, staying
aligned, and assault through the ambush.
Far Ambush (Over 50 meters) - the killing zone is under very heavy, highly
concentrated firing, but from a greater range. The range allows people in the
killing zone to seek cover and return fire. Those members not caught in the kill
zone will envelop the ambush.
Characteristics Of Successful Immediate Action Drills Speed - commands and movement
Simplicity - they must be easy to do
Any Unit - any size unit is effective
Any Terrain - they can be used any place in the world
Any Member - any patrol member can be in charge
Limited Rehearsal - minimal signals and commands are required, they also ensure
automatic response
Aggressiveness - though out numbered, you must show the desire to live and allow
the enemy to die for his country, not you for yours
8. COMBAT FORMATIONS
Four Types of Fire Team Formations
Fire Team Column - consist of a rifleman, fire team leader, automatic rifleman and
assistant automatic rifleman. It is mainly used when you want speed and good control of
your people (see figure 1).
Advantages
- Permits fire and
maneuver to the flanks
- Permits rapid controlled
movement
Disadvantages
- Vulnerable to fire from
the front
- The ability to fire to
front is limited
Fire Team Wedge - diamond shape with the rifleman leading followed by the assistant
automatic rifleman to his right, the fire team leader parallel to the assistant automatic
rifleman, and-to the rifleman‟s left. The automatic rifleman brings up the rear and
directly behind the rifleman (see figure 2).
Figure 1. Fire Team Column

Advantages
- It is easily controlled
- Provides all around security
- Fire is adequate in all directions
- It is flexible
Disadvantages
- It can not move as fast as a column
Skirmishers (Left) - a staggered formation starting with the rifleman on the right and the
automatic rifleman the left and parallel to the rifleman. The assistant automatic rifleman
is behind the automatic rifleman and to his left and the fire team leader is parallel to the
assistant automatic rifleman and in-between the automatic rifleman and the rifleman.
Skirmishers (right) is a mirror image of the Skirmishers (left) (see figure 3).
Advantages
- Permits maximum firepower to the front
- Used when the location and strength of
the enemy are known, during the assault,
mopping up, and crossing short open
areas.
Disadvantages
- It is extremely difficult to control
- Movement is slow.
- The ability to fire to the flanks is limited.
Echelon (Left and Right) - this formation is similar to
a skirmish except that one flank is angled to the rear
(see figure 4).
Advantages
- Permits fire to the front and one flank
- It is used mainly to protect exposed flanks
Disadvantages
- It is extremely difficult to control
- Movement is slow
Figure 4. Echelon (Left and Right)
Figure 3. Skirmishers (Left and Right)
Figure 2. Fire Team Wedge

Five Types of Combat Squad Formations
Column - the same as a fire team column except all the fire teams are included one
behind the other (see figure 5).
Advantages
- Permits rapid and easily controlled
movement
- Permits fire and maneuver to the
flanks (same as fire team)
Disadvantages
- Vulnerable to fire from the front
- The ability to fire to the front is
limited
Figure 5. Fire Team in Column
Squad Line - the squad line places all three fire teams abreast or on line and is normally
used in the assault during rapid crossing of short, open areas (see figure 6).
Advantages
- Maximum firepower is concentrated to the front
Disadvantages
- The ability to return fire to the flanks is limited
- Movement is slow
Echelon (Left and Right) - this formation is the same as for fire team except all fire teams
are included (see figure 7).
Advantages
- It is used mainly to protect exposed flanks
- Provides heavy firepower to the front and in the direction of echelon
Disadvantages
- Difficult to control
- Movement is slow
Figure 6. Squad Line

Figure 7. Echelon (Left/Right)
Squad Wedge - the squad wedge places one fire team in the front of the formation
followed by another fire team to the right and diagonally to the rear, with the last fire
team to the left and parallel to the second fire team (see figure 8).
Advantages
- It is easily controlled
- Provides all around security
- It is flexible
- Fires adequately in all directions (same as fire team).
Disadvantages
- It cannot move as fast as a column. (Same as fire team)
Figure 8. Squad Wedge
Squad Vee - the squad vee is an inverted squad wedge (see figure 9).
Advantages
- Facilitates movement into squad line
- Provides excellent firepower to the front and to the flank
- Used when the enemy is to the front and his strength and location are
known. May be used when crossing large open areas.
Disadvantages
- It cannot move as fast as a column

Figure 9. Squad Vee
9. THREE TYPES OF SPECIAL SIGNALS
Whistle Advantages/Uses
- Is an excellent and quick way a unit leader can transmit a message from one
place to another.
- It provides a fast means of transmitting a message to a large group.
Disadvantages
- It must be prearranged and understood or it may by misinterpreted.
- Its effectiveness may be reduced by normal noise, which exist on the battlefield.
Pyrotechnics - devices used to transmit command or information. Flares and smoke
grenades are considered pyrotechnics.
Purpose - is used as a ground to ground or ground to air signaling device. It is used to
identify units on the ground to other ground units and to air support. It can also be used
to screen the movement of small units for short periods.
Body - sheet metal
Color- olive drab with yellow markings
Filler - red, green, yellow, white and violet smoke
Top - the color on the top will indicate the color of the smoke
Advantages and Uses
- Used to mark enemy positions
- Signals to attack, withdraw, shift, or cease-fire
- Mark landing zones
Disadvantages
- Used by only one unit at a time
- Be sure your signal does not already have another set of meanings
- Gives away your position
Hand and Arm Signals - the most commonly used form of signaling. It must be
remembered that the hand and arm signals are orders or commands that must be carried out.
Advantages and Uses
- The noise of the battle does not hinder the use of the hand and arm signals.
- Used when silence must be maintained.
Disadvantages
- The signal must be seen
- Must be aware of other members location
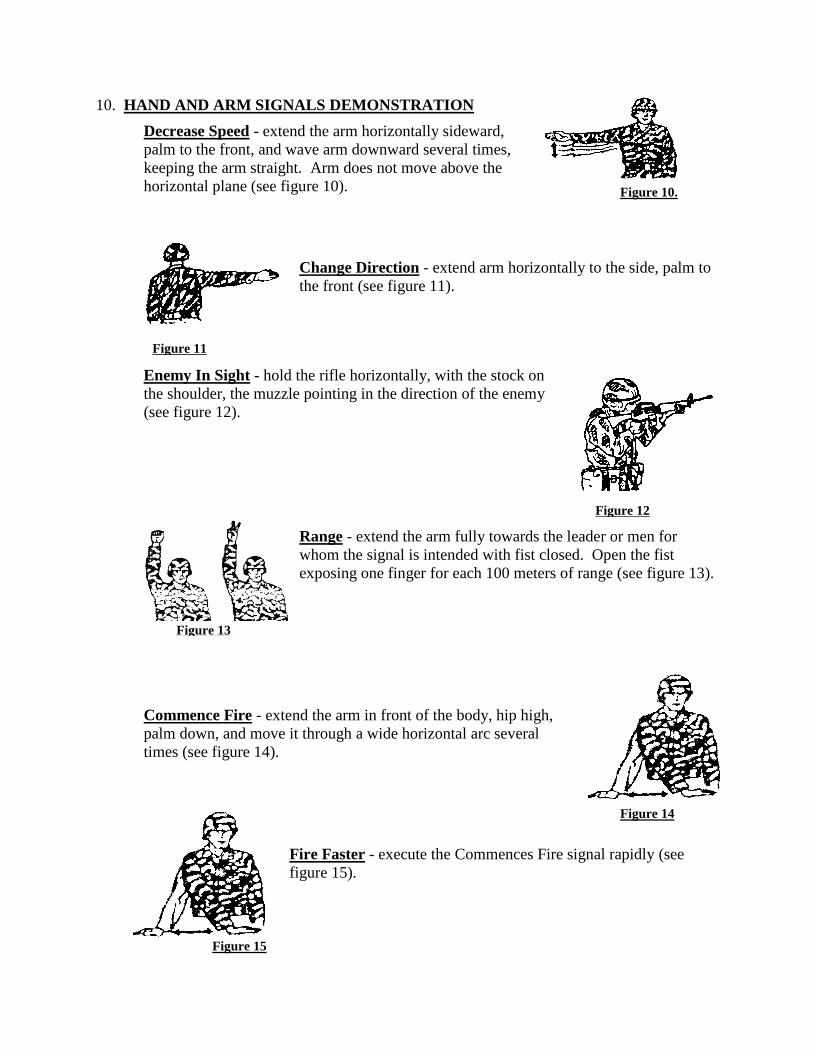
Figure 11
10. HAND AND ARM SIGNALS DEMONSTRATION
Decrease Speed - extend the arm horizontally sideward,
palm to the front, and wave arm downward several times,
keeping the arm straight. Arm does not move above the
horizontal plane (see figure 10).
Change Direction - extend arm horizontally to the side, palm to
the front (see figure 11).
Enemy In Sight - hold the rifle horizontally, with the stock on
the shoulder, the muzzle pointing in the direction of the enemy
(see figure 12).
Range - extend the arm fully towards the leader or men for
whom the signal is intended with fist closed. Open the fist
exposing one finger for each 100 meters of range (see figure 13).
Commence Fire - extend the arm in front of the body, hip high,
palm down, and move it through a wide horizontal arc several
times (see figure 14).
Fire Faster - execute the Commences Fire signal rapidly (see
figure 15).
Figure 10.
Figure 12
Figure 13
Figure 14
Figure 15

Figure 19
Fire Slower - execute the Commences Fire signal slowly (see
figure 16).
Cease Fire - raise the hand in front of the forehead, palm to the
front, and swing the arm and forearm up and down several times in
the front of the face (see figure 17).
Assemble - raise the arm vertically to the full extent of the arm,
fingers extended and joined, palm to the front, and wave in large
horizontal circles (see figure 18).
Form Column - raise either arm to the vertical position. Drop
the arm to the rear, making complete circles in a vertical plane
parallel to the body (see figure 19).
Are You Ready - extend the arm toward the leader for whom the
signal is intended, hand raised, fingers extended and joined, raise
arm slightly above horizontal, palm facing outward (see figure
20).
I Am Ready - execute the signal, are you ready (see figure 21).
Figure 16
Figure 17
Figure 18
Figure 20
Figure 21

Figure 22
Figure 23
Shift - raise the hand that is on the side toward the new
direction across the body, palm to the front; then swing
the arm in a horizontal arc, extending arm and hand to
point in the new direction (see figure 22).
Echelon - face the unit being signaled,
and extend one arm 45 degrees above
the other arm 45 degrees below the
horizontal, palms to the front. The
lower arm indicates the direction of
echelon (see figure 23).
Skirmisher - raise both arms laterally until horizontal, arms
and hands extended, palms down. If it is necessary to indicate
the direction, move in the desired direction at the same time
(see figure 24).
Wedge - extend both arms downward and to the side at an
angle of 45 degrees below the horizontal plane, palms to
the front (see figure 25).
Vee - extend arms at an angle of 45 degrees above the horizontal
plane forming the letter „V‟ with the arms and torso (see figure 26).
Fireteam - place the right arm diagonally across the chest (see
figure 27)
Figure 24
Figure 25
Figure 26
Figure 27

Figure 30
Figure 32
Squad - extend the arm and hand toward the squad leader,
palm of the hand down, distinctly, moving the hand up and
down several times from the wrist holding the arm steady
(see figure 28).
Platoon - extend both arms forward, palm of the hands
down and make large vertical circles with hands (see
figure 29).
Close Up - start signal with both arms extended horizontally,
palm forward, and bring hands together in front of the body
momentarily (see figure 30).
Open Up or Extend - start signal with arms extended in the front
of the body, palms together, and bring arms to the horizontal
position, palms forward (see figure 31).
Disperse - extend either arm vertically overhead, wave
the hand and arm to the front, left, right, and rear, the
palm toward the direction of each movement (see figure
32).
I Do Not Understand - raise both arms horizontally at the
hip level, bend both arms at elbows, palms up, and shrug
shoulders in the manner of universal “I don‟t understand”
(see figure 33).
Figure 28
Figure 29
Figure 31
Figure 33

Figure 36
Figure 37
Forward - face and move to the desired
direction of march, at the same time extend the
arm horizontally to the rear, then swing it
overhead and forward in the direction of
movement until it is horizontal, palm down (see
figure 34).
Halt - carry the hand to the shoulder, palm to the front then
thrust the hand upward vertically to the full extent of the arm
and hold it in the position until the signal is understood (see
figure 35).
Freeze - make the signal for a halt and make a fist with the
hand (see figure 36).
Down, Take Cover - extend arm sideward at an angle of 45
degrees above horizontal, palm down, and lower it to the side
(see figure 37).
Double Time - carry the hand to the shoulder, fist closed rapidly
thrust the fist upward vertically to the full extent of the arm and back
to the shoulder several times (see figure 38).
Hasty Ambush (LEFT OR RIGHT) -
raise fist to shoulder level and thrust it
Figure 34
Figure 35
Figure 38
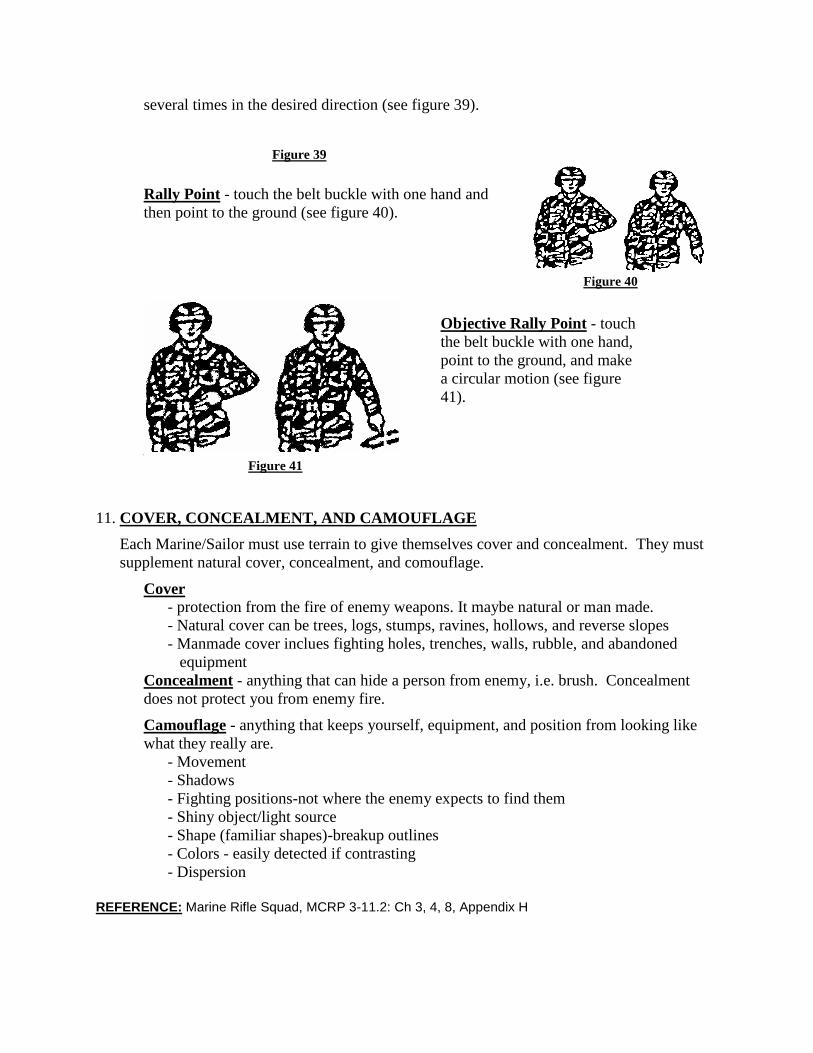
several times in the desired direction (see figure 39).
Rally Point - touch the belt buckle with one hand and
then point to the ground (see figure 40).
11. COVER, CONCEALMENT, AND CAMOUFLAGE
Each Marine/Sailor must use terrain to give themselves cover and concealment. They must
supplement natural cover, concealment, and comouflage.
Cover - protection from the fire of enemy weapons. It maybe natural or man made.
- Natural cover can be trees, logs, stumps, ravines, hollows, and reverse slopes
- Manmade cover inclues fighting holes, trenches, walls, rubble, and abandoned
equipment
Concealment - anything that can hide a person from enemy, i.e. brush. Concealment
does not protect you from enemy fire.
Camouflage - anything that keeps yourself, equipment, and position from looking like
what they really are.
- Movement
- Shadows
- Fighting positions-not where the enemy expects to find them
- Shiny object/light source
- Shape (familiar shapes)-breakup outlines
- Colors - easily detected if contrasting
- Dispersion
REFERENCE: Marine Rifle Squad, MCRP 3-11.2: Ch 3, 4, 8, Appendix H
Figure 39
Figure 40
Figure 41
Objective Rally Point - touch
the belt buckle with one hand,
point to the ground, and make
a circular motion (see figure
41).