Embed Size (px)
Citation preview

8/8/2019 Telnet Server on Windows 2008
http://slidepdf.com/reader/full/telnet-server-on-windows-2008 1/10
Why would I want to configure my Windows 2008
Server as a Telnet Server?
There are a number of reasons to configure a Windows 2008 Server as a Telnet server.
Here is my list of them:
• To perform remote CLI commands on your Windows 2008 Server, over a LAN or
a WAN.
• To be able to configure and troubleshoot all your network devices – whether they
are Cisco routers, Linux servers, or Windows 2008 Servers, from a quick and
simple command line – that is the telnet application.
• To test connectivity to and from the server using a simple & reliable protocol
Let’s talk about an example. Say that I want to check on the status of some files that are
supposed to be transmitted to my IIS server. There are a few quick commands that I can
do to check on those files and I could do those commands much quicker than other alternatives if I could just get to a Windows command prompt. For example, instead of
connecting to the server with Remote Desktop (RDP), with VNC, or another remote
control method, why not just telnet to the server and quickly run the 2 commands that
you need to run?
Of course, this is just a simple example but I am sure that there are many examples in
your own organization where your administrative task could get done quicker if you
could just telnet to the Windows server and perform the CLI commands that you need to
perform.
How do you install the Windows Server 2008 TelnetServer?
To install the Windows 2008 Server Telnet server, you need to add a new Windows
Feature. To do this open up Server Manager and click on the Features section on the
left. Next, click on Add Features on the right, like this:

8/8/2019 Telnet Server on Windows 2008
http://slidepdf.com/reader/full/telnet-server-on-windows-2008 2/10
Figure 1
On the Select Features window, scroll down to the Telnet Server option and click its
checkbox to select it. Now, click Next, then Install.

8/8/2019 Telnet Server on Windows 2008
http://slidepdf.com/reader/full/telnet-server-on-windows-2008 3/10
Figure 2
This begins the installation of the Telnet Server. After a few minutes, you will get amessage that the installation is complete. That’s it - the installation is really “that”
simple!
For more information on the difference between roles & features see my Admin tip: What
is the difference between a Role and a Feature when customizing your Windows 2008Server?
How do you install the Windows Server 2008 Telnet
Client?
While, at this point, you could test your new Telnet Server from any computer that has
the telnet application (like Windows XP or 2003) however, let’s use a Windows 2008Server with the telnet client to connect to your Windows 2008 Server that we just
installed the Telnet server on.
So, unlike in most previous Windows operating systems, we need to install the telnet
client in Windows 2008 Server. To do this, we need to go into the same Server Manager
application, to Features, then to Add Feature.

8/8/2019 Telnet Server on Windows 2008
http://slidepdf.com/reader/full/telnet-server-on-windows-2008 4/10
This time, we will choose to install the Telnet Client, as you see in Figure 3:
Figure 3
After clicking Next, then Install, my telnet client was installed very quickly, as you seein Figure 4, below.

8/8/2019 Telnet Server on Windows 2008
http://slidepdf.com/reader/full/telnet-server-on-windows-2008 5/10
Figure 4
Also, see my Admin Tip entitled Why is there no CLI Telnet in Windows Server 2008?
Enabling and Allowing Access to the Telnet Server
Before you connect to the new telnet server, hold on. Unlike many other features, just
because the telnet server feature is installed, doesn’t mean that it is working. To actuallyuse the telnet server, you need to, minimally, 1) start the service and 2) allow access.
To start the service, go into the Services MMC either through the Start menu or by
running services.msc. Change the telnet service to start automatically and then go
ahead and Start the service.
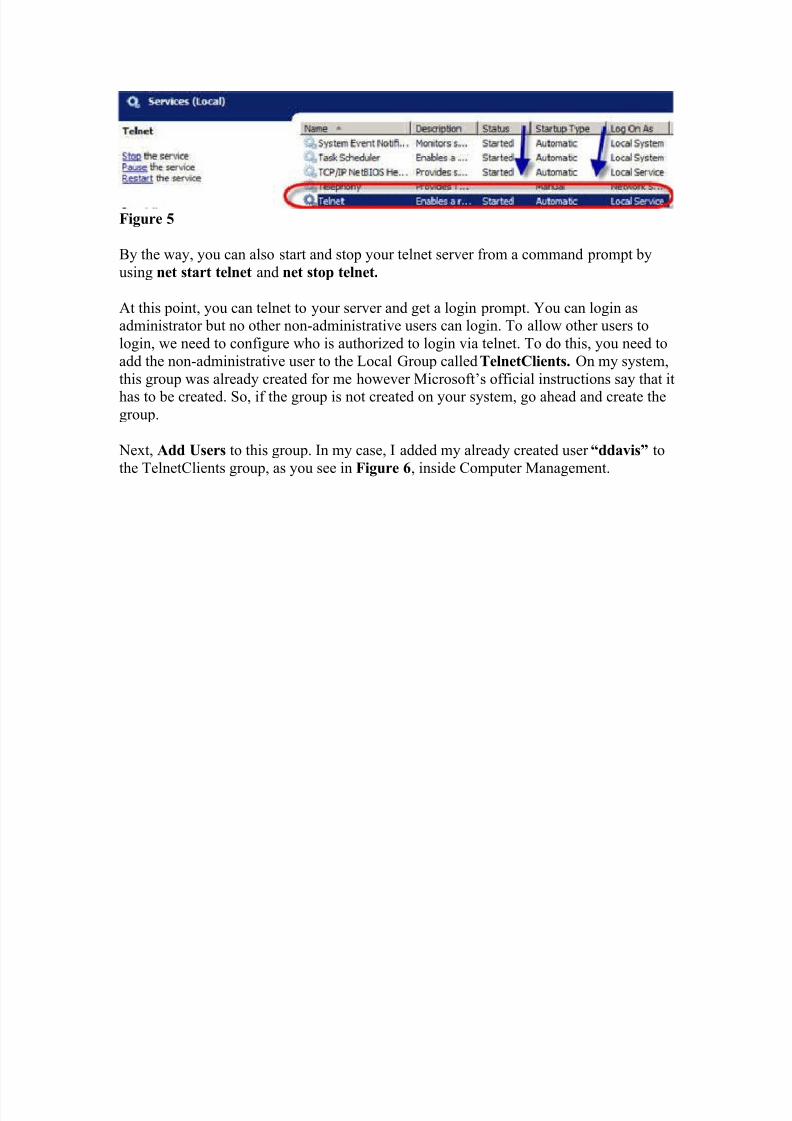
When you are done, it should look like it does in Figure 5:
8/8/2019 Telnet Server on Windows 2008
http://slidepdf.com/reader/full/telnet-server-on-windows-2008 6/10
Figure 5
By the way, you can also start and stop your telnet server from a command prompt by
using net start telnet and net stop telnet.
At this point, you can telnet to your server and get a login prompt. You can login asadministrator but no other non-administrative users can login. To allow other users to
login, we need to configure who is authorized to login via telnet. To do this, you need to
add the non-administrative user to the Local Group called TelnetClients. On my system,
this group was already created for me however Microsoft’s official instructions say that it
has to be created. So, if the group is not created on your system, go ahead and create thegroup.
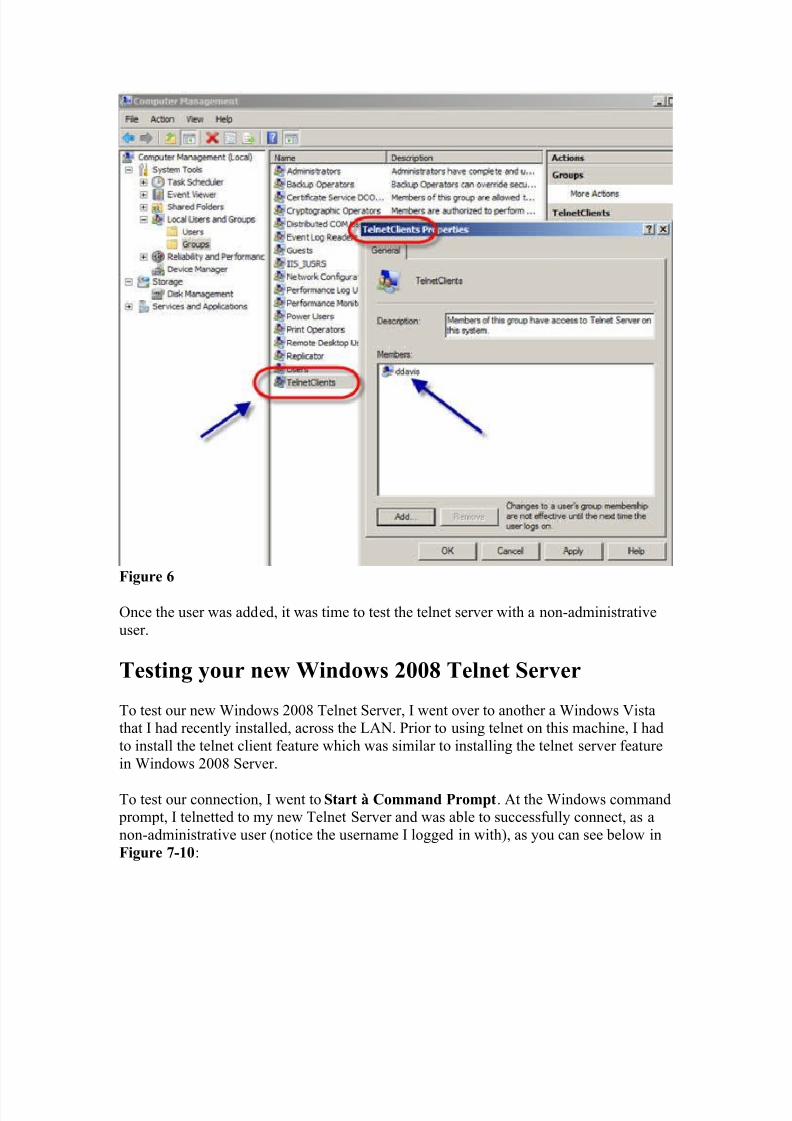
Next, Add Users to this group. In my case, I added my already created user “ddavis” to
the TelnetClients group, as you see in Figure 6, inside Computer Management.
8/8/2019 Telnet Server on Windows 2008
http://slidepdf.com/reader/full/telnet-server-on-windows-2008 7/10
Figure 6
Once the user was added, it was time to test the telnet server with a non-administrative
user.
Testing your new Windows 2008 Telnet Server
To test our new Windows 2008 Telnet Server, I went over to another a Windows Vistathat I had recently installed, across the LAN. Prior to using telnet on this machine, I had
to install the telnet client feature which was similar to installing the telnet server feature
in Windows 2008 Server.
To test our connection, I went to Start à Command Prompt. At the Windows command prompt, I telnetted to my new Telnet Server and was able to successfully connect, as a
non-administrative user (notice the username I logged in with), as you can see below in
Figure 7-10:

8/8/2019 Telnet Server on Windows 2008
http://slidepdf.com/reader/full/telnet-server-on-windows-2008 8/10
Figure 7
Figure 8
Figure 9
Figure 10
I think there are two important things of note that we can learn from Figures 7-10, above:
1. Per the warning message above in Figure 6, Telnet is an insecure protocol. All
traffic sent (including your username & password) are send in clear-text acrossthe network. That means that your username & password could be seen by
someone who is decoding packets on your network. This is a security risk even ona secure internal LAN.
2. However, per the note in Figure 9, Windows Telnet supports NTLM
authentication. You can force the telnet server to only allow NTLM authentication
and this would make your telnet server much more secure.

8/8/2019 Telnet Server on Windows 2008
http://slidepdf.com/reader/full/telnet-server-on-windows-2008 9/10

8/8/2019 Telnet Server on Windows 2008
http://slidepdf.com/reader/full/telnet-server-on-windows-2008 10/10


![[MS-TSRAP]: Telnet Server Remote Administration Protocol...telnet server: An implementation of the server side of Telnet Protocol [RFC854]. telnet session: An active telnet connection](https://img.dokumen.tips/doc/110x75/60b2d507b3d5e976d8381236/ms-tsrap-telnet-server-remote-administration-protocol-telnet-server-an-implementation.jpg)

![[MS-TSRAP]: Telnet Server Remote Administration Protocol... · 2016. 6. 22. · telnet server: An implementation of the server side of Telnet Protocol [RFC854]. telnet session: An](https://img.dokumen.tips/doc/110x75/60b2d555f3bc7731e14c7b76/ms-tsrap-telnet-server-remote-administration-protocol-2016-6-22-telnet.jpg)