Embed Size (px)
Citation preview

Teladoc Video Consult – Provider FAQ
NOTE: For the best video experience, we suggest you use your IPad mobile device and our
Teladoc app. If you do not have access to an IPad or IPhone, you may use your personal
computer with Chrome 56.57+ (Preferred), Firefox v51+ or Internet Explorer v11.
Note: The Teladoc Provider website or mobile app do not currently support Android devices.
Teladoc Provider Mobile App for iPad and iPhone
Installation
Teladoc Provider app is available for download from the provider website. Below are instructions for installing
the app
1) Open your browser from your iPad/iPhone
2) Go to https://provider.teladoc.com
3) Log into your account
4) In the right column of the homepage, click on the Teladoc logo in the purple square to download app.
5) Click install button
6) Go to Settings -> General -> Profiles -> Teladoc
7) Click Trust
Supported Mobile Devices
Teladoc Provider mobile app supports all versions of the iPhone from the 4S – 6S+. The iPad is supported from
iPad 2+. Android devices ARE NOT currently supported.
Bandwidth Requirements
Cellular network connections will likely result in poor audio and video quality. It is highly recommended to
always connect using a Wi-Fi connection or Ethernet cable connected directly from your computer to your
internet router. One-to-one conversations – 500kbps up and down
Although Teladoc video consults can adapt to bandwidths as low as 100kbps, we recommend at least
500kbps is available to the user. HD video requires significantly more bandwidth.
Software Requirements
Teladoc Provider app supports version 7.0 and up.
Software Tech Support
Support issues should be sent to [email protected] and requests for immediate
assistance to 972-658-6352

Teladoc Provider Web Site
The new video software (WebRTC) is installed in the newest version of Chrome V56.57+ (Preferred),
Firefox v51+ and IE v11. IE v11 will require you install a plug.
Note: The Settings button is no longer available in the video window. Click Video Settings icon in the
address bar to change your webcam, microphone or speakers, before beginning the consult – settings
cannot be changed once the Start Call button is selected.
1. If your browser supports the new video software (WebRTC) you will be prompted to Allow use
of your camera and microphone. Please click Allow.
2. If your browser requires installation of a plug-in you will be prompted to Install Video Plug-In.
Please click Install Video Plug-In. You might then also be prompted to approve the installation.
Please click Yes or Allow if you are prompted so the plug-in will complete the installation
process.
3. To begin the video click Start Call.
4. To end the video click End Call.
NOTE: Apple Safari and Microsoft Edge browser are not currently supported.
Troubleshooting
*When you click Start Call and do not see the member or you can see the member but can’t hear them,
please call the member.
*If the video works but not the audio, you can simply use your phone as a workaround for the audio
portion of the consult. If feasible, please put your phone on speaker setting so as not to distract from
the video portion.
*We understand it’s not your role to fix problems a member might have with their video but please ask
the member if they followed the instructions from the Video FAQ link in the Quick Links section on the
Member Site Home Page or call center for instructions to allow access to their computer’s video camera
and microphone to complete the video.
*If the member followed all of the required steps in the Test Your Video Capabilities process and still
can’t conduct the video, please ask them if they are comfortable completing the consult by phone only.
With their permission you can convert the video consultation to phone by selecting the reason you or
the patient cannot connect to video:
Patient unable to connect to video OR Provider unable to connect to video

If they require a video, please ask them to call customer service for further technical assistance and
rescheduling.
*As an alternative, please inform them that they can upload still images to their member account and
request another consult with the images visible to the doctor. If images are uploaded during the
consult, please click refresh under the images section of the EHR and the images will appear after a
few moments.
Test Video Capabilities Click on the ‘Test Video Capabilities’ link from the 1) Log in page, 2) Footer on the Dashboard or 3) Top
right corner on the Video section on the consult page.
Step 1. The next time you test video capabilities or start a video conference will be prompted to allow
Teladoc.com to access your video and microphone for the video consult
Chrome v51+ (Preferred)
Once you go to a video page, the top-right of the URL bar will have an icon that looks like a
camera (see below). This icon lets you block all cameras, or switch cameras. Select the options
you want and then click “Done”.
You then need to refresh the page if you’ve asked it to switch cameras or audio source.
Firefox v56+
Firefox shows the video settings immediately upon entering the video at the top left. (ie, it
automatically “clicks” the camera at the top left of the screen to open the configuration dialog
for you).
You select the camera there and then click “Share Selected Device”. At that point, your video
should be shown using the device you’ve selected and the options change slightly (see
screenshot below)

Firefox: After video has been selected and started.
At the top-left of the screen the camera icon will now be “red” and flash in the top-left corner
while the video is being shared.
If you want to change your settings, you then hit the “x” to the right of “Use the Camera” to
disallow the use of the camera and microphone (clicking on one x changes them both).
At this point you must refresh the page and you’ll be asked for camera and audio options again.
Making your Firefox settings persist (automatically last between sessions):
You have the option of making your Firefox camera setting permanent by click the “down arrow”
to the right of “Share Selected Device” and choosing one of the “Always Share” or “Never Share”
options presented below.
Note: If you choose “Always Share” or “Never Share” then you won’t get the configuration dialog
box auto-open every time you enter a video chat anymore. However, you will still have the
“camera” icon in the top-left url and can configure the video sources etc like normal.

Internet Explorer v11
Requires the user to download a plugin and authorize the application to use your camera and
microphone for the consult.
1: First you see that your browser needs a plugin.
2: Next you see the prompt to download the plugin – you must click the “Accept” checkbox and
the “download” button.
3: Next you will see a “Run/Save/Cancel” option at the bottom of the screen after the
download. You must click the “Run” and the installation happens.
4: Refresh your browser.
5: Next there are two screenshots that show that you must allow firewall access to the
application
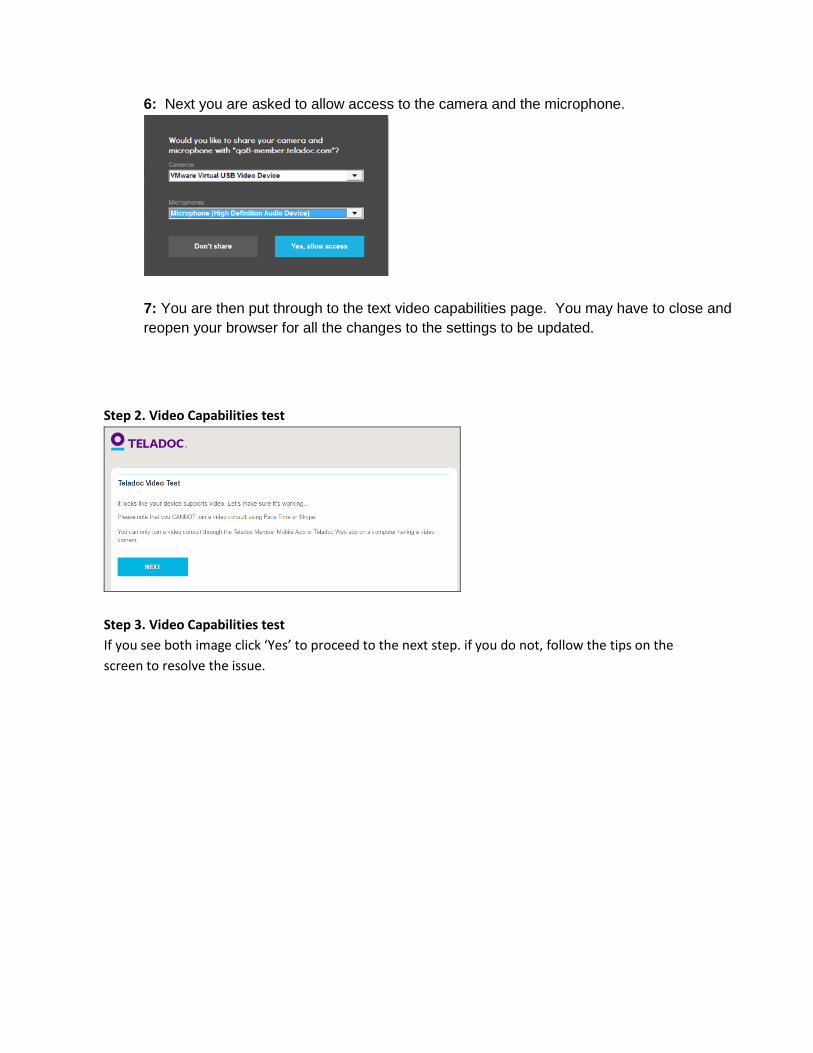
6: Next you are asked to allow access to the camera and the microphone.
7: You are then put through to the text video capabilities page. You may have to close and
reopen your browser for all the changes to the settings to be updated.
Step 2. Video Capabilities test
Step 3. Video Capabilities test
If you see both image click ‘Yes’ to proceed to the next step. if you do not, follow the tips on the
screen to resolve the issue.

Step 4. Video Capabilities test
Click the Play sound button, once the sound audible stops the No and Yes buttons will be enabled.
If you hear the sound, click the Yes button, then Done to proceed to the next step.
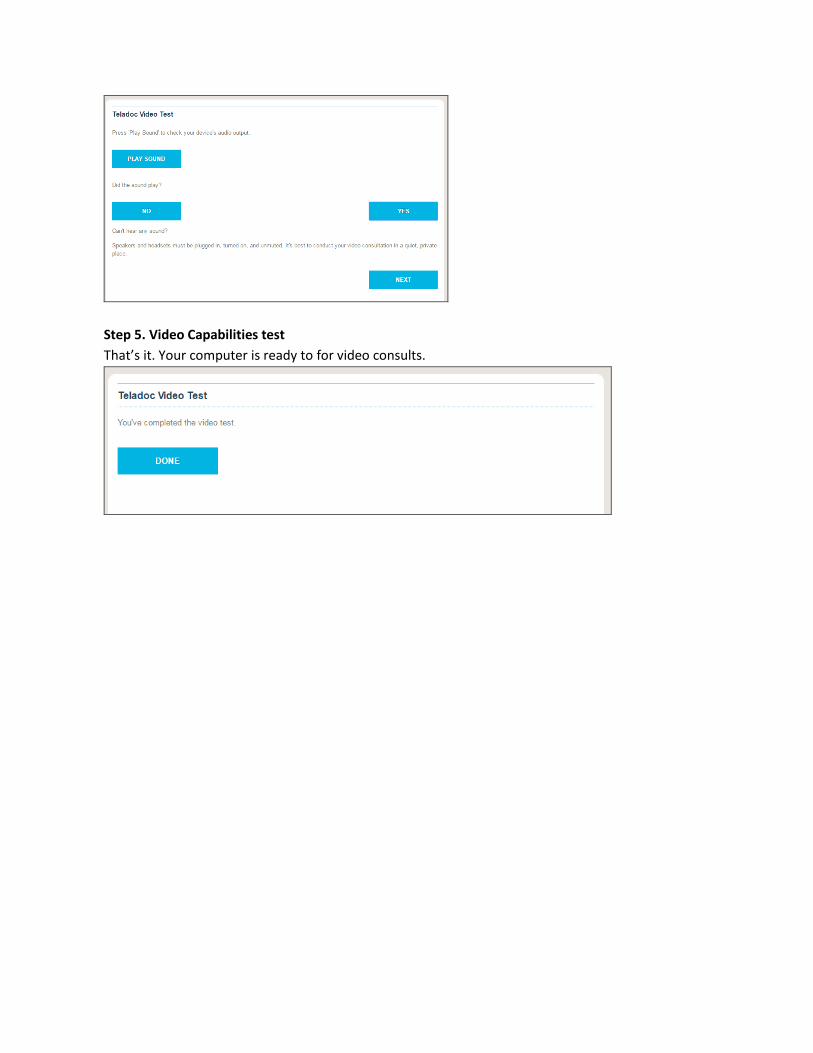
Step 5. Video Capabilities test
That’s it. Your computer is ready to for video consults.
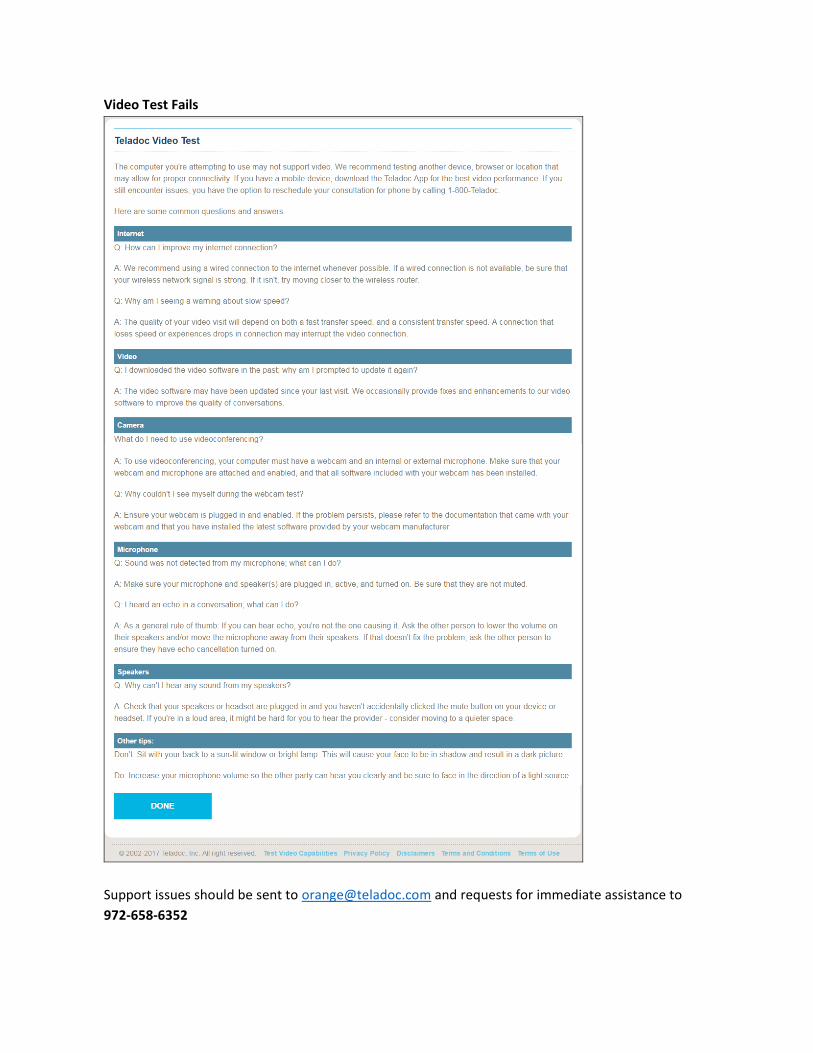
Video Test Fails
Support issues should be sent to [email protected] and requests for immediate assistance to
972-658-6352
Hardware Requirements
Processor
Any 2 Ghz Dual Core Processor or greater, or any Intel Core i5 will suffice for VGA video at 15 frames per
second. For higher video resolutions and higher frame rates, a more powerful processor is
recommended.
Webcam
Users should have a high quality webcam and make sure they are well lit. If lighting is insufficient it may result in blacked out video or low frame rates. Light source should be from behind the computer as
lighting from behind the provider will shadow the face.
Please avoid any sudden movements or gesturing excessively with the hands as this can sometimes cause blurs or tracers on the member’s screen.
Microphone
A good microphone is important as it provides a high fidelity audio experience. Apple iMac and Macbook tend to have higher quality microphones with impressive echo cancellation. When using a headset the
user should make sure their mic is close to their mouth and their headset mic is selected. Please be aware of background noise such as animals or street noise during the call.
Speakers
If users are experiencing audio echo they should ask everyone in the conversation to use headphones. This includes users on mobile devices using ‘speakerphone’ functionality. Remember, if the end user is
hearing echo it is because the person they are talking to is not wearing headphones.
Additional Sound Information
If you have taken the above steps and find that you are still unable to make a clear audio connection, please turn down the volume on your device and ask the member to do the same. If the audio is simply
not working, if possible please try and call the member if both parties are using a desktop or laptop.
Software Requirements
The Provider web apps only support the Chrome V56.57+ (Preferred) or IE v11 browsers on Windows and Macs.


![Uso de WebRTC en la red CUDI · WebRTC [2] • Web Real Time Communication (WebRTC) – draft de la IETF (2012). • VIDEO – Sí soporta VP8, filtros bilinear y none reconstruction](https://img.dokumen.tips/doc/110x75/5ebd2431096a3602386868a2/uso-de-webrtc-en-la-red-webrtc-2-a-web-real-time-communication-webrtc-a.jpg)


![Experimental Performance Evaluation of WebRTC Video ...eprints.networks.imdea.org/1802/1/1570427113 (2).pdf · Cisco, Alcatel-Lucent) [2], WebRTC integrates video stream-ing capabilities](https://img.dokumen.tips/doc/110x75/5e69d7cd2ce2813a6a5388d8/experimental-performance-evaluation-of-webrtc-video-2pdf-cisco-alcatel-lucent.jpg)