Embed Size (px)
Citation preview

TECHNICIAN’S HANDBOOKLIGHTWARE 19, RELEASE 3.0

MITEL, SX-200, SUPERSET, SUPERCONSOLE 1000, MILINK, and LIGHTWARE are trademarks of Mitel Networks Corporation.
All other product names specified in this document are trademarks of their corresponding owners.
SX-200 Technician’s Handbook50002720, Rev. A
LIGHTWARE 19 Release 3.0 Software
October 2002
® ™Trademark of MITEL Networks Corporation ©Copyright 2002, MITEL Networks Corporation
All rights reserved.
NOTICE
The information contained in this document is believed to be accurate in all respects but is not warranted by Mitel Networks Corporation (MITEL). The information is subject to change without notice and should not be construed in any way as a commitment by Mitel Networks or any of its affiliates or subsidiaries. Mitel Networks and its affiliates and subsidiaries assume no responsibility for any errors or omissions in this document. Revisions of this document or new editions of it may be issued to incorporate such changes.

Table of Contents
iii
Chapter 1 IntroductionAbout This Handbook . . . . . . . . . . . . . . . . . . . . . . . . . . . . . . . . . . . . . 3
Purpose of This Handbook . . . . . . . . . . . . . . . . . . . . . . . . . . . . . . 3Who This Handbook is For . . . . . . . . . . . . . . . . . . . . . . . . . . . . . . 3Symbols Used in This Handbook . . . . . . . . . . . . . . . . . . . . . . . . . 3Important Safety Instructions . . . . . . . . . . . . . . . . . . . . . . . . . . . . 4Where You Can Find More Information . . . . . . . . . . . . . . . . . . . . 4
Configurations . . . . . . . . . . . . . . . . . . . . . . . . . . . . . . . . . . . . . . . . . . 5SX-200® EL System . . . . . . . . . . . . . . . . . . . . . . . . . . . . . . . . . . . 5SX-200 ML (RM) System . . . . . . . . . . . . . . . . . . . . . . . . . . . . . . 11SX-200 ML (FD) PBX . . . . . . . . . . . . . . . . . . . . . . . . . . . . . . . . . 11SX-200 LIGHT PBX . . . . . . . . . . . . . . . . . . . . . . . . . . . . . . . . . . 13SX-200 IP Node . . . . . . . . . . . . . . . . . . . . . . . . . . . . . . . . . . . . . 14SX-200 SPINE Peripheral Bay . . . . . . . . . . . . . . . . . . . . . . . . . . 16SX-200 DIGITAL 672-Port PBX . . . . . . . . . . . . . . . . . . . . . . . . . 17SX-200 DIGITAL 336-Port PBX . . . . . . . . . . . . . . . . . . . . . . . . . 18SX-200 DIGITAL 456-Port PBX . . . . . . . . . . . . . . . . . . . . . . . . . 19SX-200 DIGITAL 480-Port PBX . . . . . . . . . . . . . . . . . . . . . . . . . 20LIGHTWARE 19 Software . . . . . . . . . . . . . . . . . . . . . . . . . . . . . . 21
Chapter 2 Routine MaintenanceIs the System Healthy? . . . . . . . . . . . . . . . . . . . . . . . . . . . . . . . . . . 25Checking a System for Alarms . . . . . . . . . . . . . . . . . . . . . . . . . . . . . 26Checking a System for Database Errors . . . . . . . . . . . . . . . . . . . . . 26Backing Up a Customer Database . . . . . . . . . . . . . . . . . . . . . . . . . . 27
SX-200 EL/ML . . . . . . . . . . . . . . . . . . . . . . . . . . . . . . . . . . . . . . . 27SX-200 LIGHT/ DIGITAL . . . . . . . . . . . . . . . . . . . . . . . . . . . . . . . 28
Loading New Software Onto a System . . . . . . . . . . . . . . . . . . . . . . 28SX-200 LIGHT/ DIGITAL . . . . . . . . . . . . . . . . . . . . . . . . . . . . . . . 28SX-200 EL/ML Remote Software Download . . . . . . . . . . . . . . . . 29SX-200 EL/ML Flash Memory Card Replacement . . . . . . . . . . . 32
Upgrading Set Firmware . . . . . . . . . . . . . . . . . . . . . . . . . . . . . . . . . 33Boot Codes . . . . . . . . . . . . . . . . . . . . . . . . . . . . . . . . . . . . . . . . . 33Firmware Revision Levels . . . . . . . . . . . . . . . . . . . . . . . . . . . . . . 33Firmware Commands . . . . . . . . . . . . . . . . . . . . . . . . . . . . . . . . . 33System Log Messages . . . . . . . . . . . . . . . . . . . . . . . . . . . . . . . . 34
Enabling Options or Changing Options . . . . . . . . . . . . . . . . . . . . . . 35Options Are Password Protected . . . . . . . . . . . . . . . . . . . . . . . . 35Enabling Options On a SX-200 EL/ML System . . . . . . . . . . . . . 35Enabling Options On a SX-200 LIGHT/DIGITAL System . . . . . . 35

Technician’s Handbook
iv
Upgrading an SX-200 IP Node . . . . . . . . . . . . . . . . . . . . . . . . . . . . . 36Upgrading from CD-ROM . . . . . . . . . . . . . . . . . . . . . . . . . . . . . . 36Upgrading by Replacing Flash Memory . . . . . . . . . . . . . . . . . . . 38
Trunk SMDR Records Field Summary . . . . . . . . . . . . . . . . . . . . . . . 41
Chapter 3 Troubleshooting and RepairIdentifying Faults . . . . . . . . . . . . . . . . . . . . . . . . . . . . . . . . . . . . . . . . 47
Flowchart 1: Getting Started . . . . . . . . . . . . . . . . . . . . . . . . . . . . 47Flowchart 2: System Is Not Booting . . . . . . . . . . . . . . . . . . . . . . 49Flowchart 3: An Alarm Is Present . . . . . . . . . . . . . . . . . . . . . . . . 50Flowchart 4: Correcting Set / Dataset Problems . . . . . . . . . . . . .51Flowchart 5: Maintenance Terminal Problems . . . . . . . . . . . . . . 53
Interpreting the Main Control Card Power-Up Error Codes . . . . . . . 54Restoring the Database . . . . . . . . . . . . . . . . . . . . . . . . . . . . . . . . . .55
Restoring the SX-200 EL/ML Database . . . . . . . . . . . . . . . . . . . 55Restoring the SX-200 LIGHT/DIGITAL Database . . . . . . . . . . . . 55
Backing Up Log Entries . . . . . . . . . . . . . . . . . . . . . . . . . . . . . . . . . .56Correcting System ID Errors . . . . . . . . . . . . . . . . . . . . . . . . . . . . . . . 57
If the System Reports a System ID Mismatch . . . . . . . . . . . . . . . 57If the System Reports a Decryption Module Error . . . . . . . . . . . . 57
Powering Down the Nodes . . . . . . . . . . . . . . . . . . . . . . . . . . . . . . . . 57Powering Down the SX-200 EL/ML Control Node . . . . . . . . . . . . 57Powering Down the SX-200 LIGHT Control Node . . . . . . . . . . . 58Powering Down the Peripheral Nodes . . . . . . . . . . . . . . . . . . . .58Powering Down the IP Node . . . . . . . . . . . . . . . . . . . . . . . . . . . . 58
Powering Up the Nodes . . . . . . . . . . . . . . . . . . . . . . . . . . . . . . . . . .59Powering Up the SX-200 EL/ML Control Node . . . . . . . . . . . . . . 59Powering Up the SX-200 LIGHT Control Node . . . . . . . . . . . . . . 59Powering Up the Peripheral Nodes . . . . . . . . . . . . . . . . . . . . . . . 59Powering Up the IP Node . . . . . . . . . . . . . . . . . . . . . . . . . . . . . . 59
Replacing Circuit Cards . . . . . . . . . . . . . . . . . . . . . . . . . . . . . . . . . .60Replacing Peripheral Interface Cards . . . . . . . . . . . . . . . . . . . . . 60Replacing a Main Controller Card . . . . . . . . . . . . . . . . . . . . . . . . 61
Correcting Ground Path Problems . . . . . . . . . . . . . . . . . . . . . . . . . . 62Problems Caused by Incorrect PBX Grounding . . . . . . . . . . . . .62Ground Path AC Voltage Test . . . . . . . . . . . . . . . . . . . . . . . . . . .63Ground Path Resistance Test . . . . . . . . . . . . . . . . . . . . . . . . . . .63Testing the CO and PBX Ground Differential . . . . . . . . . . . . . . . 64
Checking the Port Connections to the PBX . . . . . . . . . . . . . . . . . . . 65Checking the Receiver Allocation . . . . . . . . . . . . . . . . . . . . . . . . . . .65

Table of Contents
v
Checking the FIM/CIM Carrier Cards . . . . . . . . . . . . . . . . . . . . . . . . 67Checking the T1 Card, T1/E1 Module, and the PRI Card . . . . . . . . 68Checking the Number of T1 Trunk Cards . . . . . . . . . . . . . . . . . . . . 69Trunk Signaling and Supervision . . . . . . . . . . . . . . . . . . . . . . . . . . . 70
General Signaling & Supervision Concepts . . . . . . . . . . . . . . . . 70Loop Start Line/Trunk . . . . . . . . . . . . . . . . . . . . . . . . . . . . . . . . . 71Ground Start Trunk . . . . . . . . . . . . . . . . . . . . . . . . . . . . . . . . . . . 73Direct Inward Dial (DID)/Loop Trunk . . . . . . . . . . . . . . . . . . . . . . 75Ear & Mouth (E&M) Trunk . . . . . . . . . . . . . . . . . . . . . . . . . . . . . . 77T1 Trunk (D4 DS-1) . . . . . . . . . . . . . . . . . . . . . . . . . . . . . . . . . . . 81
PBX Property Management System Interface . . . . . . . . . . . . . . . . . 86Property Management System Messages . . . . . . . . . . . . . . . . . 86PBX and PMS Cannot Communicate . . . . . . . . . . . . . . . . . . . . . 89Testing the PMS Interface of the PBX . . . . . . . . . . . . . . . . . . . . 89
Disk Drive Maintenance . . . . . . . . . . . . . . . . . . . . . . . . . . . . . . . . . . 91SX-200 LIGHT/DIGITAL Floppy Disk Subsystem Troubleshooting Procedures . . . . . . . . . . . . . . . . . . . . . . . . . . . . 91Disk Drive Strapping . . . . . . . . . . . . . . . . . . . . . . . . . . . . . . . . . . 93
Troubleshooting the SX-200 IP Node . . . . . . . . . . . . . . . . . . . . . . . 93Error Messages . . . . . . . . . . . . . . . . . . . . . . . . . . . . . . . . . . . . . . 94
Test Line . . . . . . . . . . . . . . . . . . . . . . . . . . . . . . . . . . . . . . . . . . . . . . 96
Chapter 4 ProgrammingProgramming an Attendant Console . . . . . . . . . . . . . . . . . . . . . . . 103Programming a Printer Port . . . . . . . . . . . . . . . . . . . . . . . . . . . . . . 104
System Printer Port . . . . . . . . . . . . . . . . . . . . . . . . . . . . . . . . . . 104Dataset Printer Port . . . . . . . . . . . . . . . . . . . . . . . . . . . . . . . . . . 104
Programming Stations/Sets Automatically . . . . . . . . . . . . . . . . . . . 105Deleting a device and all dependent resources . . . . . . . . . . . . 106Deleting a range of devices and all dependent resources . . . . 107
Programming a Single Line Voice Station . . . . . . . . . . . . . . . . . . . 108Programming an Analog Device to a SIM2 . . . . . . . . . . . . . . . . . . 109Programming a Multi-Line Set . . . . . . . . . . . . . . . . . . . . . . . . . . . . 109Programming a Subattendant Set . . . . . . . . . . . . . . . . . . . . . . . . . 111Programming a PRI card . . . . . . . . . . . . . . . . . . . . . . . . . . . . . . . . 112Programming a Non-Dial-In Trunk . . . . . . . . . . . . . . . . . . . . . . . . . 116
Programming a range of Non Dial-in Trunks . . . . . . . . . . . . . . 117Programming a Dial-In Trunk . . . . . . . . . . . . . . . . . . . . . . . . . . . . . 119
Programming a range of Dial-in Trunks . . . . . . . . . . . . . . . . . . 120Programming a DISA Trunk . . . . . . . . . . . . . . . . . . . . . . . . . . . . . . 121

Technician’s Handbook
vi
Programming ANI/DNIS on an Incoming Trunk . . . . . . . . . . . . . . .122Programming a CLASS Trunk . . . . . . . . . . . . . . . . . . . . . . . . . . . .126Programming an SX-200 IP Node . . . . . . . . . . . . . . . . . . . . . . . . .127
Initializing the SX-200 IP Node . . . . . . . . . . . . . . . . . . . . . . . . .127CDE Programming for the SX-200 IP Node . . . . . . . . . . . . . . .128
Registering IP Phones (Optional) . . . . . . . . . . . . . . . . . . . . . . . . . .129Programming a Circuit Descriptor for Hotel/Motel and ACD Datasets . . . . . . . . . . . . . . . . . . . . . . . . . . . . . . . . . . . . . . . . .130Programming the PMS Interface . . . . . . . . . . . . . . . . . . . . . . . . . .131Programming Call Forwarding - External . . . . . . . . . . . . . . . . . . . .135Feature Access Codes (CDE Form 02) . . . . . . . . . . . . . . . . . . . . .136Class of Service Options (CDE Form 03) . . . . . . . . . . . . . . . . . . . .139System Options and Timers (CDE Form 04) . . . . . . . . . . . . . . . . .147CDE Cross Reference Guide . . . . . . . . . . . . . . . . . . . . . . . . . . . . .152SX-200 EL/ML Feature Limitations . . . . . . . . . . . . . . . . . . . . . . . . .154
Chapter 5 InstallationCabinet Card Assignments . . . . . . . . . . . . . . . . . . . . . . . . . . . . . . .161
SX-200 EL Control Cabinet Card Assignments . . . . . . . . . . . . .161SX-200 EL Peripheral Cabinet Card Assignments . . . . . . . . . .162SX-200 ML (RM) Cabinet Card Assignments . . . . . . . . . . . . . .163SX-200 ML (FD) Cabinet Card Assignment . . . . . . . . . . . . . . .165SX-200 LIGHT Cabinet Card Assignment . . . . . . . . . . . . . . . . .166SX-200 SPINE Peripheral Bay Module Assignment . . . . . . . . .167SX-200 Digital 672-Port Cabinet Card Assignment . . . . . . . . . .168SX-200 Digital 336-Port Control Cabinet Card Assignment . . .169SX-200 Digital 456-Port Cabinet Card Assignment . . . . . . . . . .170SX-200 Digital 480-Port Cabinet Card Assignment . . . . . . . . . .171
SX-200 DIGITAL Cable Routing . . . . . . . . . . . . . . . . . . . . . . . . . . .172SX-200 EL/ML Configuration Rules . . . . . . . . . . . . . . . . . . . . . . . .173Initial Power-up Procedure (SX-200 EL/ML) . . . . . . . . . . . . . . . . .179System Initialization Sequence . . . . . . . . . . . . . . . . . . . . . . . . . . . .181
SX-200 EL/ML Initialization . . . . . . . . . . . . . . . . . . . . . . . . . . . .181SX-200 LIGHT/DIGITAL Initialization . . . . . . . . . . . . . . . . . . . .182
Adding a Peripheral Cabinet . . . . . . . . . . . . . . . . . . . . . . . . . . . . . .185Peripheral Interface Cards and Modules . . . . . . . . . . . . . . . . . .186Control and Digital Services Cards and Modules . . . . . . . . . . .189E&M Trunk Card Settings . . . . . . . . . . . . . . . . . . . . . . . . . . . . .191
Adding an SX-200 IP Node . . . . . . . . . . . . . . . . . . . . . . . . . . . . . .193Control Triple CIM Card Switch Settings . . . . . . . . . . . . . . . . . . . .196

Table of Contents
vii
Peripheral Interface Cabling . . . . . . . . . . . . . . . . . . . . . . . . . . . . . . 197USOC Pin Designations . . . . . . . . . . . . . . . . . . . . . . . . . . . . . . 197SX-200 EL/ML Peripheral Interface Card Slot Assignments . . . 197
Adding a PKM . . . . . . . . . . . . . . . . . . . . . . . . . . . . . . . . . . . . . . . . 225PKM to an Attendant Console . . . . . . . . . . . . . . . . . . . . . . . . . . 227
Chapter 6 Maintenance CommandsBasic Commands . . . . . . . . . . . . . . . . . . . . . . . . . . . . . . . . . . . . . . 231
Entering Command Sequences . . . . . . . . . . . . . . . . . . . . . . . . 231Logging In . . . . . . . . . . . . . . . . . . . . . . . . . . . . . . . . . . . . . . . . . 231Logging Out . . . . . . . . . . . . . . . . . . . . . . . . . . . . . . . . . . . . . . . . 232Displaying the Card Configuration . . . . . . . . . . . . . . . . . . . . . . 232Showing the System Identity . . . . . . . . . . . . . . . . . . . . . . . . . . . 232
Log Commands . . . . . . . . . . . . . . . . . . . . . . . . . . . . . . . . . . . . . . . 233System Commands . . . . . . . . . . . . . . . . . . . . . . . . . . . . . . . . . . . . 234Report Commands . . . . . . . . . . . . . . . . . . . . . . . . . . . . . . . . . . . . . 237Diagnostic Commands . . . . . . . . . . . . . . . . . . . . . . . . . . . . . . . . . . 239Traffic Measurement Commands . . . . . . . . . . . . . . . . . . . . . . . . . . 242IndexE-Docs Tips
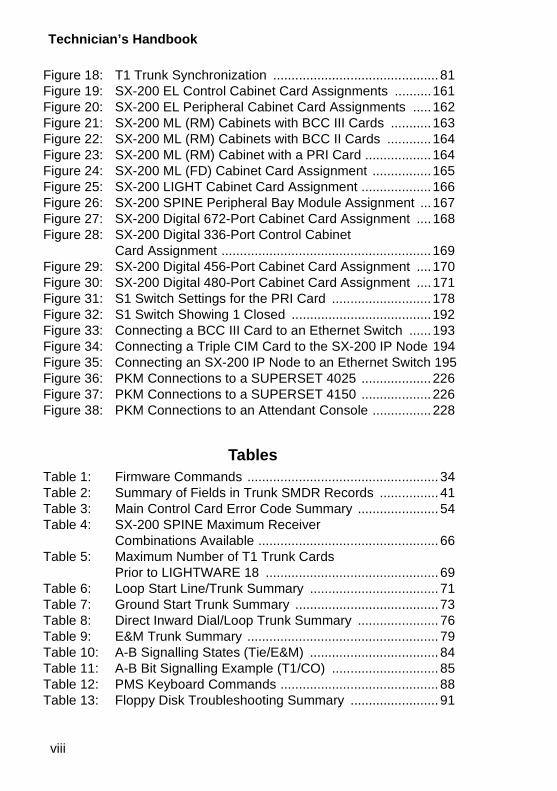
Figures
Figure 1: SX-200 ELx Cabinet ....................................................... 6Figure 2: SX-200 ML (RM) and (FD) PBX ................................... 12Figure 3: SX-200 LIGHT PBX ...................................................... 13Figure 4: SX-200 IP Node Configuration ..................................... 15Figure 5: SX-200 SPINE Peripheral Bay ..................................... 16Figure 6: SX-200 DIGITAL (672-Port) PBX ................................. 17Figure 7: SX-200 DIGITAL (336-Port) PBX ................................. 18Figure 8: SX-200 DIGITAL (456-Port) PBX ................................. 19Figure 9: SX-200 DIGITAL (480-Port) PBX ................................. 20Figure 10: Removing the bottom panel .......................................... 38Figure 11: Removing the flash memory card ................................. 39Figure 12: Inserting the flash memory card ................................... 40Figure 13: Loop Start Line/Trunk ................................................... 71Figure 14: Ground Start Trunk ....................................................... 73Figure 15: Direct Inward Dial (DID)/Loop Trunk ............................. 75Figure 16: E&M Trunk - Type I (2-wire) ......................................... 78Figure 17: E&M Trunk - Type V (4-wire) ........................................ 79
Technician’s Handbook
viii
Figure 18: T1 Trunk Synchronization ............................................. 81Figure 19: SX-200 EL Control Cabinet Card Assignments ..........161Figure 20: SX-200 EL Peripheral Cabinet Card Assignments .....162Figure 21: SX-200 ML (RM) Cabinets with BCC III Cards ...........163Figure 22: SX-200 ML (RM) Cabinets with BCC II Cards ............164Figure 23: SX-200 ML (RM) Cabinet with a PRI Card ..................164Figure 24: SX-200 ML (FD) Cabinet Card Assignment ................165Figure 25: SX-200 LIGHT Cabinet Card Assignment ...................166Figure 26: SX-200 SPINE Peripheral Bay Module Assignment ...167Figure 27: SX-200 Digital 672-Port Cabinet Card Assignment ....168Figure 28: SX-200 Digital 336-Port Control Cabinet
Card Assignment .........................................................169Figure 29: SX-200 Digital 456-Port Cabinet Card Assignment ....170Figure 30: SX-200 Digital 480-Port Cabinet Card Assignment ....171Figure 31: S1 Switch Settings for the PRI Card ...........................178Figure 32: S1 Switch Showing 1 Closed ......................................192Figure 33: Connecting a BCC III Card to an Ethernet Switch ......193Figure 34: Connecting a Triple CIM Card to the SX-200 IP Node 194Figure 35: Connecting an SX-200 IP Node to an Ethernet Switch 195Figure 36: PKM Connections to a SUPERSET 4025 ...................226Figure 37: PKM Connections to a SUPERSET 4150 ...................226Figure 38: PKM Connections to an Attendant Console ................228
TablesTable 1: Firmware Commands .................................................... 34Table 2: Summary of Fields in Trunk SMDR Records ................ 41Table 3: Main Control Card Error Code Summary ...................... 54Table 4: SX-200 SPINE Maximum Receiver
Combinations Available ................................................. 66Table 5: Maximum Number of T1 Trunk Cards
Prior to LIGHTWARE 18 ............................................... 69Table 6: Loop Start Line/Trunk Summary ................................... 71Table 7: Ground Start Trunk Summary .......................................73Table 8: Direct Inward Dial/Loop Trunk Summary ...................... 76Table 9: E&M Trunk Summary .................................................... 79Table 10: A-B Signalling States (Tie/E&M) ................................... 84Table 11: A-B Bit Signalling Example (T1/CO) ............................. 85Table 12: PMS Keyboard Commands ........................................... 88Table 13: Floppy Disk Troubleshooting Summary ........................ 91

Table of Contents
ix
Table 14: Floppy Disk Drive Error Code Summary ....................... 92Table 15: SX-200 IP Node Troubleshooting Table ....................... 94Table 16: Test Line Command Codes .......................................... 97Table 17: Test Line Status Indicator Codes .................................. 98Table 18: Test Line Status Tones ................................................. 99Table 19: ANI/DNIS Digits on Phone Display (COS
Option 502 Enabled and COS Option 613 Disabled) . 124Table 20: ANI/DNIS Digits on Phone Display (COS
Option 502 Enabled and COS Option 613 Enabled) .. 124Table 21: ANI/DNIS for ACD Agents .......................................... 125Table 22: Feature Access Codes ............................................... 136Table 23: Class of Service Options ............................................ 139Table 24: LIGHTWARE 19 Release 2.0 System
Options and Timers .................................................... 147Table 25: Feature Limitations ..................................................... 154Table 26: SX-200 SPINE Configuration Rules ........................... 167Table 27: Cable Assignments for SX-200 DIGITAL Cabinets .... 172Table 28: Main Control Card Codes ........................................... 181Table 29: Main Control Card Test Status Codes ........................ 182Table 30: Main Control Card Power-Up Error Code Summary ... 183Table 31: Peripheral Interface Cards and Modules .................... 186Table 32: Digital Control and Digital Services Cards
and Modules ............................................................... 189Table 33: E&M Trunk Module Switch Settings ........................... 191Table 34: Control Resource Card Switch Setting ....................... 192Table 35: BRI Port to Tip/Ring Assignment ................................ 198Table 36: SFT Port (J7) .............................................................. 199Table 37: Music-on-Hold/Pager Unit Pinouts .............................. 199Table 38: Copper Interface Ports ................................................ 200Table 39: Maintenance Terminal and Printer Ports .................... 200Table 40: Maintenance Module Port ........................................... 201Table 41: T1 or PRI Trunk Port (J5 and J6, BCC III and
PRI Faceplates) .......................................................... 201Table 42: T/R Cable Assembly Pinouts for SX-200 SPINE ........ 202Table 43: SX-200 EL or SX-200 ML (RM)
Tip and Ring Assignments .......................................... 203Table 44: SX-200 EL or SX-200 ML (RM) Universal Card
Tip and Ring Assignments .......................................... 205Table 45: SX-200 DIGITAL Peripheral Bay
Tip and Ring Assignments (High-power Slots) ........... 207

Technician’s Handbook
x
Table 46: SX-200 Digital Tip and Ring Assignments for Universal Card Modules ...................209
Table 47: SX-200 DIGITAL Tip and RingAssignments (Low-power Slots) ..................................211
Table 48: USOC Connector Pin Designations ............................213Table 49: Analog Bay P1 and P7 Tip and Ring Assignments .....215Table 50: Analog Bay P2 and P8 Tip and Ring Assignments .....217Table 51: Analog Bay P3 and P9 Tip and Ring Assignments .....219Table 52: Analog Bay P4 and P10 Tip and Ring Assignments ...221Table 53: Interconnect Card P19 Tip and Ring Assignments .....223Table 54: Log Level Functions ....................................................233Table 55: System Level Functions ..............................................234Table 56: Report Level Functions ...............................................237Table 57: Diagnostic Level Functions .........................................239Table 58: Traffic Measurement Level Functions .........................242Table 41: T1 or PRI Trunk Port (J5 and J6, BCC III and
PRI Faceplates) ..........................................................201Table 42: T/R Cable Assembly Pinouts for SX-200 SPINE ........202Table 43: SX-200 EL or SX-200 ML (RM)
Tip and Ring Assignments ..........................................203Table 44: SX-200 EL or SX-200 ML (RM) Universal Card
Tip and Ring Assignments ..........................................205Table 45: SX-200 DIGITAL Peripheral Bay
Tip and Ring Assignments (High-power Slots) ...........207Table 46: SX-200 Digital Tip and Ring
Assignments for Universal Card Modules ...................209Table 47: SX-200 DIGITAL Tip and Ring
Assignments (Low-power Slots) ..................................211Table 48: USOC Connector Pin Designations ............................213Table 49: Analog Bay P1 and P7 Tip and Ring Assignments .....215Table 50: Analog Bay P2 and P8 Tip and Ring Assignments .....217Table 51: Analog Bay P3 and P9 Tip and Ring Assignments .....219Table 52: Analog Bay P4 and P10 Tip and Ring Assignments ...221Table 53: Interconnect Card P19 Tip and Ring Assignments .....223Table 54: Log Level Functions ....................................................233Table 55: System Level Functions ..............................................234Table 56: Report Level Functions ...............................................237Table 57: Diagnostic Level Functions .........................................239Table 58: Traffic Measurement Level Functions .........................242

Chapter 1
Introduction


Introduction
3
Introduc
tion
About This Handbook
Purpose of This HandbookThis handbook provides
� Quick reference to maintenance commands
� Abbreviated instructions for frequently used procedures
� Programming aids
� Troubleshooting flowcharts
� Installation information.
Who This Handbook is ForThis handbook is for a certified technician.
Symbols Used in This Handbook
Indicates a hazardous situation which, if you don’t avoid, could result in injury or death
Indicates a situation which, if you don’t avoid, could result in damage to the equipment
Identifies an important note or a useful tip
Identifies an important cross reference

Technician’s Handbook
4
Important Safety Instructions
WARNING: Failure to follow all instructions may result in improper equipment operation and/or risk of electrical shock.
See MITEL® document PN 56000950, Safety Instructions, for general safety information. The Safety Instructions document is packaged with each system.
Where You Can Find More InformationSee the MITEL SX-200® EL/ML Technical Documentation for more information.

Introduction
5
Introduc
tion
Configurations
SX-200 EL SystemThe SX-200 EL system contains one control cabinet with the following components:
� A Main Control Card IIIEL (MCC IIIEL) or Main Control Card IIIELx (MCC IIIELx) in slot 12
� One Bay Control Card (BCC II or BCC III) in slot 9
� One Bay Power Supply
� Up to two Control Dual FIM Carriers (CFCII), Control Triple FIM Carriers (CFCIII), or Control Triple CIM (CTC) cards in slots 10 and 11
� Up to 1 PRI card in unused slots 10 or 11
� Up to two T1 Trunk cards in unused slots 10 or 11
� Up to eight Peripheral Interface Cards in slots 1 to 8.
The SX-200 EL Control cabinet with an MCC IIIEL card or MCC IIIELx card supports up to six peripheral bays. The MCC IIIELx card can also support up to two SX-200 IP Nodes. The peripheral bays can be SX-200 EL peripheral cabinets, SX-200 LIGHT peripheral cabinets, SPINE Bays, ISDN Network Gateways, or PRI cards.
A seven cabinet system will provide a non-blocking system if aMCC IIIELx card in the SX-200 ELx cabinet (PN 9109-600-002-NA) is installed with each of the following combinations:
� Two CFCIII cards with LIGHTWARE 17 Release 3.1 or greater
� Two CTC cards set to the triple interface setting with LIGHTWARE 18 Release 2.0 or greater.
The SX-200 IP Node requires LIGHTWARE 19, Release 3.0 with Feature Level 4 enabled.

Technician’s Handbook
6
A seven cabinet system with a MCC IIIEL card and two CFCIII cards provides a system for low traffic configurations such as a hotel/motel environment.
The SX-200 EL and the SX-200 ML systems use the SX-200 ELx cabinet for the main control cabinet and the peripheral cabinets. Located on the rear of the cabinet are connectors for T1 trunks (J5 and J6), connectors for PRI maintenance (J10 and J11), a printer port, a maintenance terminal, and the SFT (System Fail Transfer) control port.
Figure 1: SX-200 ELx Cabinet

Introduction
7
Introduc
tion
Connectivity from the Main Control Cabinet
The following cards with an interface module connect the main control cabinet to the peripheral bays. The Control FIM Carrier cards support fiber connectivity.The Control Triple CIM card and the PRI card support copper and fiber connectivity.
� Control Dual FIM Carrier card - allows the fiber connection of up to two peripheral bays
� Control Triple FIM Carrier card - allows the fiber connection of up to three peripheral bays
� Control Triple CIM card - allows the copper connection of up to three peripheral bays; a copper connection may be substituted with a fiber connection
� PRI card - allows the fiber or copper connection of one peripheral bay
You can have either two or three links to each peripheral bay:
� With a MCC IIIEL / ELx control card, the Control Dual FIM Carrier card provides three links per peripheral bay
� With a MCC IIIEL control card, the Control Triple FIM Carrier card or the Control Triple CIM card (set to dual interface) provides two links per peripheral bay
� With a MCC IIIELx control card (installed in a SX-200 ELx cabinet PN 9109-600-002-NA), the Control Triple FIM Carrier card and the Control Triple CIM card (set to triple interface) provide three links per peripheral bay
If you provide two links to each bay:
� Calls must be evenly distributed across all bays
� Maximum channel blocking ratio is 0.58.

Technician’s Handbook
8
If you provide three links to each bay
� Maximum channel blocking ratio is 0.94.
Connectivity from the Peripheral Bays
Peripheral bays connect to the main control cabinet with the use of an interface module on the Peripheral FIM Carrier II card, Peripheral Interface Module Carrier card (PIMCC), BCC III, or PRI card. The Peripheral FIM Carrier II card supports a FIM. The PIMCC, BCC III, or PRI card support a FIM II or a CIM. A FIM II or CIM sits on a PIMCC when the peripheral cabinet does not have a BCC III.
.
As a guideline to achieve a P.0001 grade of service (one failure in 10,000 calls) for a bay connected via a Control Triple FIM Carrier, the recommended maximum calls/hour is 500 based on traffic tables. With a typical call hold time of 2 minutes and 12 seconds the total Erlang rate is 18.33 (660 CCS) for the whole bay. The half bay would therefore be 9.17 Erlangs (330 CCS) at 250 calls/hour. It is important that calls be evenly distributed across all bays.
Remember to use the same distance variant of FIM or FIM II at both ends of the cable. You can connect a FIM to a FIM II.
Remember that the system sees the PRI card as a separate bay and therefore a PRI card in a peripheral cabinet must always have its own interface module (FIM II or CIM).
Remember that the CIM suits co-located systems; not remote systems. The CIM comes in only one variant. The CIM supports a distance of up to 30 meters or 100 feet between cabinets.

Introduction
9
Introduc
tion
Cabinet Configuration
� The SX-200 EL system can have a maximum of seven bays.
� The BCC III and the BRI card require LIGHTWARE 18 Release 2.0 or greater. The BCC III, BRI card, PRI card, and Control Triple CIM card require the SX-200 ELx cabinet.
� In a main control cabinet: a FIM II or a CIM never goes on aBCC III, a FIM II or a CIM can go on a PRI card.
� For CLASS line functionality on the ONS/CLASS Line card, you must install a DSP module (single) on the BCC III in the same SX-200 ELx cabinet. The ONS Line functionality on the ONS/CLASS Line card is backwards compatible with the older systems. The CLASS line functionality is dependant on LIGHTWARE 18 Release 2.0 or greater.
� For CLASS on the trunk side, you can install a LS/CLASS Trunk card in the SX-200 ELx cabinet or SX-200 ML (FD) cabinet, slots 1-8. The LS/CLASS Trunk card requires LIGHTWARE 19 Release 2.0. Prior to LIGHTWARE 19 Release 2, the system required a LS/CLASS module with the SPINE, a T1 (ANI/DNIS), or ISDN BRI, PRI, or Network Gateway (CLID and CNID).
� A DSP module (single) on the BCC III provides CLASS generators for 1-8 ONS/CLASS Line cards in the same bay. System wide, this DSP module provides 16 conference bridges for Record a Call and 16 DTMF receivers.
� MOSS System Option 96, Number of Links (0-8) monitors the number of T1 links from T1/E1 modules that the system will support. This count includes T1 links from the T1/E1 modules on the PRI cards and BCC III cards. This count does not include T1 links from the T1 cards.
� LIGHTWARE 18 Release 2.0 or greater supports a maximum of 8 T1 links (includes T1 links from T1/E1 modules and T1 cards) in the SX-200 EL system. Any bay can support up to two T1 links to a total of eight in the system.
Remember to program CDE Form 04, Options 71 and 72, to match the configuration.

Technician’s Handbook
10
� LIGHTWARE 17 supports one digital bay with two T1 trunk cards and the other digital bays with one T1 trunk card to total a max of 7.
� If a T1 trunk card is installed in slot 10 of a bay, you cannot install a peripheral interface cards in slot 5; if a T1 trunk card is installed in slot 11, you cannot install a peripheral interface card in slot 6. T1 cards in slots 10 and 11 are seen by the software as slots 5 and 6.
� The two T1 links from the T1/E1 module on a BCC III card also occupy slots (in software) 5 and 6. The BCC III only supports one T1/E1 module.
� The BRI card is a low power peripheral interface card (slots 1-8) and requires a BCC III in the same SX-200 ELx cabinet. If the BRI card is in a control cabinet, the BCCIII must have a Maintenance module. A cabinet holds a maximum of two BRI cards.
� You can have one PRI card in a main control cabinet; up to two in a peripheral cabinet. PRI cards are installed in slots 10 or 11 in the SX-200 ELx cabinet Rev 4.4 or greater (PN 9109-600-002-NA ). The PRI card requires a Statum 3 MCC. The system counts the PRI card as a peripheral bay.
� If a PRI card is installed in slot 10, you can install a peripheral interface card in slot 5; if a PRI card is installed in slot 11, you can install a peripheral interface card in slot 6. Because the system recognizes the PRI card as a peripheral bay, the PRI card does not occupy slots (in software) 5 or 6 in the bay that the card sits in.
� LIGHTWARE 18 and greater allows a maximum of 4 high power cards in any of the slots 1 through 8 (there are no high/low power slots).High power cards are DID, Universal, COV and T1.Low power cards are DNIC, OPS, ONS, BRI, LS/CLASS, and LS/GS.Unlike the T1 card, the PRI card is a separate bay and is not included in the count for the 4 high power cards.
If the cabinet has a BCC II, do not install more than seven DNICs per bay in high traffic applications. If you have more than seven DNICs per bay keep the device count to 84 or less. With two T1 cards in a bay, do not add more than five DNICs or 60 devices. With one T1 card in a bay, do not add more than six DNICs or 72 devices.If the cabinet has a BCC III, you can install eight DNICs per bay.

Introduction
11
Introduc
tion
SX-200 ML (RM) SystemThe SX-200 ML (RM) system contains one control cabinet with the following components:
� A Main Control Card IIIML (MCC IIIML) in slot 12
� One Bay Control Card (BCC II or BCC III) in slot 9
� One Bay Power Supply
� One Control Dual FIM Carrier card, one Control Triple CIM card, or one PRI card in slot 10
� Up to two T1 Trunk cards in unused slots 10 or 11
� Up to eight Peripheral Interface Cards in slots 1 to 8.
The SX-200 ML system supports one peripheral bay. The one peripheral bay can be a SX-200 peripheral cabinet, SX-200 LIGHT peripheral cabinet, SPINE bay, or ISDN bay. The ISDN bay may be an ISDN Network Gateway or a PRI card.The PRI card fits into a main control cabinet.
SX-200 ML (FD) PBXThe SX-200 ML (FD) PBX cabinet resembles the SX-200 LIGHT cabinet. The SX-200 ML (FD) cabinet supports only one peripheral bay, SPINE Bay, or ISDN Network Gateway. The SX-200 ML (FD) PBX contains one control cabinet with the following components:
� a Main Control Card II (MCC II)
� one Bay Control Card and one Bay Power Supply
� one Control FIM Carrier in slot 4 connecting to Bay 2
� up to eight Peripheral Interface Cards in slots 1 to 8.
If the cabinet has a BCC II, do not install more than seven DNICs per bay in high traffic applications. If you have more than seven DNICs per bay keep the device count to 84 or less. With two T1 cards in a bay, do not add more than five DNICs or 60 devices. With one T1 card in a bay, do not add more than six DNICs or 72 devices.With a BCC III, you can install eight DNICs per bay.

Technician’s Handbook
12
.
t
When a SX-200 ML (FD) PBX has a second bay, the Control FIM Carrier is installed in slot 4 of the control cabinet and therefore reduces the number of ports to 84 in the control cabinet.
Figure 2: SX-200 ML (RM) and (FD) PBX

Introduction
13
Introduc
tion
SX-200 LIGHT PBXThe SX-200 LIGHT PBX consists of a Control cabinet with an MCC, a Control Resource card, two disk drives, and up to seven FIM carriers. Each 96-port digital peripheral bay (1 - 7) includes a Bay Control card (with attached FIM Carrier and FIM) and is connected to the Control cabinet by fiber cable.
Figure 3: SX-200 LIGHT PBX
Technician’s Handbook
14
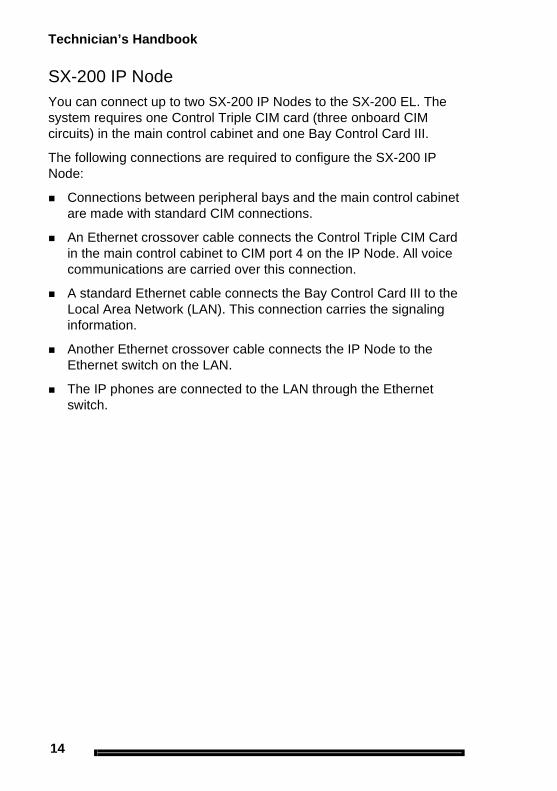
SX-200 IP NodeYou can connect up to two SX-200 IP Nodes to the SX-200 EL. The system requires one Control Triple CIM card (three onboard CIM circuits) in the main control cabinet and one Bay Control Card III.
The following connections are required to configure the SX-200 IP Node:
� Connections between peripheral bays and the main control cabinet are made with standard CIM connections.
� An Ethernet crossover cable connects the Control Triple CIM Card in the main control cabinet to CIM port 4 on the IP Node. All voice communications are carried over this connection.
� A standard Ethernet cable connects the Bay Control Card III to the Local Area Network (LAN). This connection carries the signaling information.
� Another Ethernet crossover cable connects the IP Node to the Ethernet switch on the LAN.
� The IP phones are connected to the LAN through the Ethernet switch.

Introduction
15
Introduc
tion
Figure 4: SX-200 IP Node Configuration
The configuration rules that apply to connecting standard peripheral bays to the control cabinet through CIMs also apply to connecting IP Nodes. For more information about configuration, see the Configuration Rules in the SX-200 Technical Documentation for the
� SX-200 EL Control Cabinet
� Bays supported by the SX-200 EL System
� Control Triple CIM Card and the SX-200 EL System
� SX-200 IP Node Local Area Network Design Guidelines

Technician’s Handbook
16
SX-200 SPINE Peripheral BayThe SX-200 SPINE Peripheral Bay can be used with the SX-200 EL, SX-200 ML, and SX-200 LIGHT Control cabinets.
Refer to SX-200 SPINE Peripheral Bay Module Assignment (page 167).
Figure 5: SX-200 SPINE Peripheral Bay

Introduction
17
Introduc
tion
SX-200 DIGITAL 672-Port PBXThe SX-200 DIGITAL 672-port PBX consists of a Control cabinet with control bay 0, and digital peripheral bays 1, 2, and 3 (96 ports each). Its peripheral cabinet contains digital bays 4, 5, 6, and 7 (96 ports each). Bay 0 includes an MCC, a Switch Matrix Card, and two floppy disk drives.
Figure 6: SX-200 DIGITAL (672-Port) PBX

Technician’s Handbook
18
SX-200 DIGITAL 336-Port PBXThe SX-200 DIGITAL 336-port PBX consists of a Control cabinet with COMBO bays 1 and 2 (144 ports), and digital peripheral bays 3 and 4 (96 ports each). The COMBO bay includes an MCC and two floppy disk drives. There is no peripheral cabinet.
Figure 7: SX-200 DIGITAL (336-Port) PBX

Introduction
19
Introduc
tion
SX-200 DIGITAL 456-Port PBXThe SX-200 DIGITAL 456-port PBX consists of a Control cabinet with COMBO bays 1 and 2 (144 ports), and digital bay 3 (96 ports). The COMBO bay includes an MCC and two floppy disk drives. The peripheral cabinet contains analog bay 4 (120 ports) and analog bay 5 (96 ports).
Figure 8: SX-200 DIGITAL (456-Port) PBX

Technician’s Handbook
20
SX-200 DIGITAL 480-Port PBXThe SX-200 DIGITAL 480-port PBX consists of a Control cabinet with COMBO bays 1 and 2 (144 ports) and an analog bay 3 (120 ports). The COMBO bay includes an MCC and two disk drives. The peripheral cabinet contains analog bay 4 (120 ports) and analog bay 5 (96 ports).
Figure 9: SX-200 DIGITAL (480-Port) PBX

Introduction
21
Introduc
tion
LIGHTWARE 19 SoftwareThe following types of SX-200 systems support the LIGHTWARE 19 software
� SX-200 EL
� SX-200 ML (RM)
� SX-200 ML (FD).
LIGHTWARE 18 introduced the MOSS System Option #102, Feature Level to obtain the new features that are offered with major releases. The feature level for LIGHTWARE 19 Release 2.0 is 3.
LIGHTWARE 17 and greater software are not available for the SX-200 LIGHT or the SX-200 DIGITALsystems.

Technician’s Handbook
22

Chapter 2
Routine Maintenance


Routine Maintenance
25
Routine
Ma
intenance
Is the System Healthy?
System checklist
� No alarms present
� No database errors
� Backed-up database availablefor SX-200 EL/ML onto PCfor SX-200 LIGHT/DIGITAL onto disks

Technician’s Handbook
26
Checking a System for Alarms
1. Log onto the maintenance terminal and select Maintenance mode.
The Maintenance screen displays the version of system software and the system alarm status.
2. Select the following commands:
REPORTSSHOW ALARMS (DEVICE_TYPE or ALL)
or
REPORTSSHOW STATUS (Bay/Slot/Circuit or SWID or Ext_Num or ALL)
SHOW ALARMS displays alarms by device type (or all)SHOW STATUS displays status by Bay/Slot/Circuit (PLID) or SWID or Ext_Num or ALL or Logs Read All
Checking a System for Database Errors
1. Access CDE.
2. Select Form 01.
3. Select VERIFY DATA.
Refer to Logging In (page 231) for instructions on how to log into a maintenance terminal.
Routine Maintenance
27
Routine
Ma
intenance
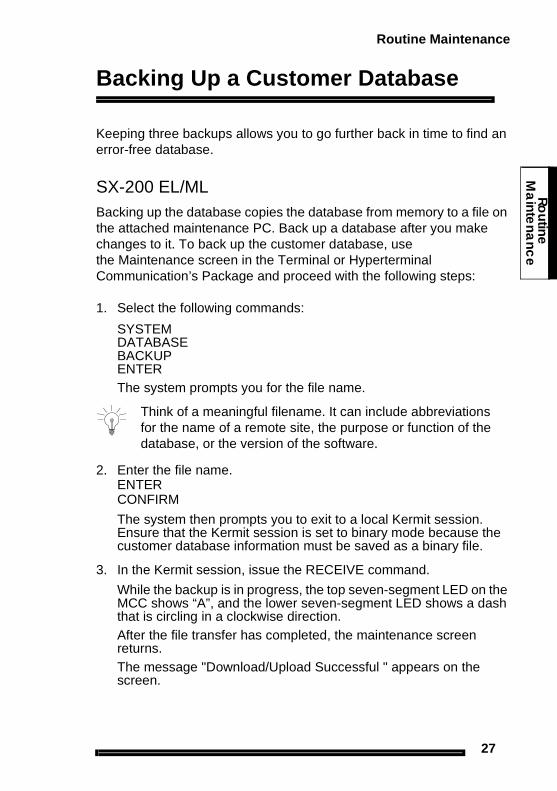
Backing Up a Customer Database
Keeping three backups allows you to go further back in time to find an error-free database.
SX-200 EL/MLBacking up the database copies the database from memory to a file on the attached maintenance PC. Back up a database after you make changes to it. To back up the customer database, use the Maintenance screen in the Terminal or Hyperterminal Communication’s Package and proceed with the following steps:
1. Select the following commands:
SYSTEMDATABASEBACKUPENTERThe system prompts you for the file name.
2. Enter the file name.ENTERCONFIRM
The system then prompts you to exit to a local Kermit session. Ensure that the Kermit session is set to binary mode because the customer database information must be saved as a binary file.
3. In the Kermit session, issue the RECEIVE command.
While the backup is in progress, the top seven-segment LED on the MCC shows “A”, and the lower seven-segment LED shows a dash that is circling in a clockwise direction.After the file transfer has completed, the maintenance screen returns.The message "Download/Upload Successful " appears on the screen.
Think of a meaningful filename. It can include abbreviations for the name of a remote site, the purpose or function of the database, or the version of the software.

Technician’s Handbook
28
SX-200 LIGHT/ DIGITALTo back up the customer database, from the Maintenance screen, do the following:
1. Select the following commands:
SYSTEMCOPYDATABASEThe system verifies the data. The system prompts the user to insert new disks into drives A and B.
2. Insert the new disks into drives A and B.
After inserting new disks, wait for 5 seconds before entering CONTINUE to allow the system to recognize the new disks.
3. Select CONTINUE.
The system notifies the user upon completion.
4. For the same level of software, select CONTINUE.
5. For a different level of software, select RESET.
Loading New Software Onto a System
SX-200 LIGHT/ DIGITALTo load new software you must
1. Copy the existing database to new software disks.
2. Reset the system using the main control card switch.

Routine Maintenance
29
Routine
Ma
intenance
SX-200 EL/ML Remote Software DownloadRequirements:
� A 4 MB Flash card. Make sure the toggle switch on the edge opposite the connector edge of the Flash card has the Write Protect disabled.
� System option 109 (Remote Software Download) must be enabled. This is a purchasable system option.
� The latest software downloaded onto your PC provided by MITEL On-Line or MITEL Product Support.
To Speed Up the Remote Software Download
To speed up the remote software download, increase the packet length to 900 and the block check type to 3 bytes CRC, using the Kermit protocol on your maintenance terminal.
To change the packet length
1. Select SYSTEM from the Maintenance screen.
2. Select the following softkeys:
DATABASESET_PARAMRECEIVEPACKET_SIZEENTERThe following message will display:"Enter Packet Length (10-1024)"
3. Enter the Packet length (900) and select CONFIRM.
The screen confirms your setting with a display of the Kermit Receive Parameters and the Kermit Send Parameters.
The remote software download time can take up to 3 hours. We recommend that you do this operation during a slow time since the traffic on the switch affects the download time. To shorten the remote software download time to approximately 30 minutes, increase the size of the packet length to 900 and change the block check type to 3 bytes CRC.

Technician’s Handbook
30
To change the block check type
1. Select SYSTEM from the Maintenance screen:
2. Select the following softkeys:
DATABASESET_PARAMBLOCK_CHECKENTER
3. Enter the Block Check (03) and select CONFIRM.
The screen confirms your setting with a display of the Kermit Receive Parameters and the Kermit Send Parameters.
Downloading the Remote Software
Downloading LIGHTWARE 19 software for the BCC III and the MCC with a 4 Meg Flash card requires a two step procedure. You download the software for the MCC first and then download the software for the BCC III. Because the system only accepts software that is compatible, the system will inform you of the status of the software during the download process.
1. Back up the database.
2. Load the new operating software from the PC.
Select the following commands from SYSTEM maintenance:DATABASESW_RESTOREENTER
3. Select CONFIRM if you agree with the terms stated in the window.
Note that upgrading software for the BCC III with a 4 Meg Flash card always requires you to download the software for the main control card first.
Refer to Backing Up a Customer Database (page 27).

Routine Maintenance
31
Routine
Ma
intenance
4. When the message “Exit to your local KERMIT session now” appears, return to your KERMIT session.
5. Follow the prompts issued by your local communication application software. When prompted, enter the name of the MCC software file (remote.fix) to be transferred to the SX-200 and transfer the file. A system with a BCC III requires the MCC load before downloading the BCC III load.
If the system has a BCC II and the MCC file transfer has completed, the maintenance screen shows the message "Download/Upload Successful".If the system has a BCC III, the maintenance screen shows the status of the software that is on the Flash card."No BCC III load on Flash card" or "Main Load not compatible with BCC III on Flash card" requires you to download a compatibleBCC III load."The System Identity screen from the Maintenance screen (softkeys System/Show/Identity) also shows incompatible loads of software. An asterisk beside a load tag in the Load on Flash Card column, identifies an incompatiblilty between this bay load and the main load on the flash card. If there is an incompatible load, you must download another load of BCC III software.
6. If necessary,transfer the compatible BCC III load (bccIII.fix). The maintenance screen will again display the status of the software on the Flash card.
7. After all the file transfers are complete and at a time of low or no traffic, return to the Maintenance application. Select SYSTEM, RESTART, then RESET SYSTEM, and then CONFIRM to reset the system to activate the new software. After the system has been reset, the new load is activated and the previous load is removed from the Flash Memory card.
8. Log into Maintenance to verify that the new load was correctly downloaded.
9. Restore the database.
Refer to Restoring the Database (page 55).

Technician’s Handbook
32
SX-200 EL/ML Flash Memory Card Replacement
1. Back up the database.
2. Power down the Control cabinet.
3. Remove the flash memory card and install the new flashmemory card. Make sure the toggle switch on the edge opposite the connector edge of the Flash card has the Write Protect disabled. After installing the card, look at the facing edge. You should see the switch in the down position.
4. Power up the system.
5. Enable new options if new feature options have been purchased.
Refer to Backing Up a Customer Database (page 27).
Refer to Powering Down the Nodes (page 57).
Refer to Powering Up the Nodes (page 59).
Refer to Enabling Options or Changing Options (page 35).

Routine Maintenance
33
Routine
Ma
intenance
Upgrading Set Firmware
Upgrade the firmware for SUPERSET™ 4025, SUPERSET 4090, SUPERSET 4125, and SUPERSET 4150 telephones, only if the revision on the system is higher than the set revision. The boot code and the firmware revision levels must be checked.
Boot CodesThe SUPERSET boot code must be at revision Boot 3.10 or greater or the SX-200 system cannot successfully upgrade the set’s firmware.
The boot code appears when a set is first plugged in.
Firmware Revision LevelsThe firmware revision level of the set that you are upgrading must meet the firmware revision level stated in SYSTEM maintenance. Use the SET_FIRMWARE STATUS maintenance command to identify the revision level.
Firmware CommandsAccess the firmware commands in the SYSTEM maintenance level and then choose SET_FIRMWARE to obtain the softkeys to qualify your target set. See Table 1 on page 34.
If you attempt to upgrade a set with a boot code lower than 3.10, the system will erase the set’s firmware and you will not be able to download the new firmware. The set then becomes unusable.

Technician’s Handbook
34
System Log MessagesIf a firmware download fails, the reason for the failure will be reported in the system logs. If a failure occurs, the download will be aborted and the remaining sets on the list will not receive the download.
Table 1: Firmware Commands
Set_Firmware Qualifiers
Result
STATUS Displays the software revision level the set is running and whether the set is scheduled for a download.
DOWNLOAD Erases and updates the firmware on all specified sets. The set must be idle and the set’s firmware revision must be older than the firmware to be downloaded.
ABORT_DOWNLOAD Removes specified sets from the sched-uled download.
FORCE_DOWNLOAD Forces the download to occur even if the set firmware is newer than the firmware being downloaded. This command allows a set’s firmware to be returned to a previous firmware version when required.
The conditions and restrictions that apply to the firmwaredownload are described in Upgrading Set Firmware in theMaintain section of the SX-200 EL/ML Technical Documentation.

Routine Maintenance
35
Routine
Ma
intenance
Enabling Options or Changing Options
Options Are Password ProtectedCall the MITEL Order Desk to purchase a new set of options. You will receive a new MITEL options password that will enable the options on the system. The working hours for the MITEL Order Desk are Monday to Friday 8:00 to 18:00 E.S.T.
Enabling Options On a SX-200 EL/ML System
1. Select Customer Data Entry mode.
2. Select Form 04, System Options.
3. Set all purchasable options to match those on the MITEL Options Selection Sheet (MOSS). Set all other options as required. Press ENTER only once after each entry.
4. Enter the MITEL options password (from the MOSS sheet received with the software); press ENTER twice to activate the purchased options.
5. Quit the form.
An E.8 error appears on the MCC if the enabled options and purchased options do not match or if the password is incorrect. You can still program a system with an E.8 error but the bays will not bootup.
Enabling Options On a SX-200 LIGHT/DIGITAL System
1. Verify that the correct decryption module is installed for the options required.
When no system identification is installed, or when invalid software is loaded into the system, the default system identification number 65535 appears.

Technician’s Handbook
36
Upgrading an SX-200 IP Node
Upgrading from CD-ROM.
Installer's PC requirements
� Windows NT 4.0 or Windows 2000 operating system
� FTP server running (with IIS installed)
� A communications program such as VT100 or HyperTerm
� A serial connection to the SX-200 Maintenance port
� Windows 2000 users must clear the browser cache.
You also need
� The IP address of the SX-200 IP Node
� SX-200 IP Node software CD-ROM
� Time: The entire upgrade procedure takes approximately 20 minutes.
To upgrade the Sx-200 IP Node software
1. Connect both the PC and the SX-200 IP Node to the LAN.
2. Connect the serial cable from the PC to the Maintenance Port on the SX-200 IP Node.
3. From your PC, ping the SX-200 IP Node to verify that you have a TCP/IP connection.
4. Insert the Mitel Networks SX-200 IP Node software CD-ROM into the CD drive of the installer's PC.
5. Run the "Setup.exe" program from the CD.
6. Select New Installation.
The upgrade procedure will install new software in the IP Node.

Routine Maintenance
37
Routine
Ma
intenance
7. Choose a location for the installSetup program to install files (normally this is C:\intpub\ftproot). The installSetup program provides a progress indicator and a log file.
8. Click Finish when prompted.
You are presented with a text file providing instructions.
9. Launch the communications program that connects to the SX-200 IP Node Maintenance port.
10. Enter “reboot” to reboot the SX-200 IP Node.
11. Press a key at the "Press any key to stop auto-boot" prompt to stop the auto-boot.
12. At [VxWorks Boot] type “c” and then press Enter.
13. Change the following parameters as indicated:
- Boot device : motfcc- File name : Boot_Install- Host inet : <the IP address of the ftp server PC host (your PC)>- User (u) : <user name for FTP server in PC host>- Ftp password (pw) (blank = use rsh) : <password for FTP server in
PC host>- Flags (f) : 0x0 (this is the default setting and should not have to be
changed).
14. Press the reset button on the SX-200 IP Node, or at the PC, enter "@" to reboot the SX-200 IP Node.
The software installation takes about 10 minutes. The SX-200 IP Node reboots two times.

Technician’s Handbook
38
Upgrading by Replacing Flash MemoryYou can upgrade SX-200 IP Node software by replacing the flash memory card in the SX-200 IP Node.
To replace the flash memory card
1. Disconnect all cables from the SX-200 IP Node.
2. Turn the SX-200 IP Node upside down.
3. Remove the six screws on the removable panel, as indicated in the figure below.
Do not remove the four screws indicated in the figure. If you remove the four screws, components will fall into the interior of the box.
Figure 10: Removing the bottom panel

Routine Maintenance
39
Routine
Ma
intenance
4. Gently flip the panel open. Do not remove the panel. If you remove the panel, you might disconnect wires.
5. Pull out the flash memory card.
Figure 11: Removing the flash memory card
6. Insert the new flash memory card. Orient the card as shown in the following figure. The lip that extends from the bottom of the card must face the panel.

Technician’s Handbook
40
Figure 12: Inserting the flash memory card
7. Gently lower the panel.
8. Replace the six screws.
9. Reconnect the cables to the SX-200 IP Node.

Routine Maintenance
41
Routine
Ma
intenance
Trunk SMDR Records Field Summary
Table 2: Summary of Fields in Trunk SMDR Records
NAME COLUMN FORMAT DEFINITION NOTE
OptionalLong Call
1 z - = 5-9 min% = 10-29 min+ = 30 or more min
Date 2-6 mm/dd mm = Month dd = Day mm = 01-12dd = 01-31
Spacer 7
Start Time
8-13 hh:mmp hh = Hoursmm = Minutesp = PM (12-hour clock)
00-2300-59
Spacer 14
Duration of call
15-22 hh:mm:ss hh:mm:ss = duration in hours:minutes:sec-onds
hh = 00-18mm = 00-59ss = 00-59maximum = 18:12:15
Spacer 23
Calling Party
24-27 pppp cccc = Extension Number, Tnnn = Trunk Number (CO),Xnnn = Trunk Number (Non-CO), mmmm = Attendant Console Directory Number
c = 0-9, *, #nnn = 001-200m = 0-9, *, #
Spacer 28

Technician’s Handbook
42
Atten-dant
29 f * = Attendant-- = Attendant not involved
Attendant answered or initiated the call, then transferred it to an extension.
Leading Digits
30-33 cccc cccc = Access Code (outgoing andtandem calls only)
c = 0-9, *, #, left-justified
Time to answer (Alter-nate)
30-32 ttt ttt = time in seconds*** = Call unanswered
ttt = 000 - 255, leading zeroesoutput, incoming calls only
Digits dialed on the trunk
34-59 xx .... x Up to 26 (20 if metering) digits dialed on the trunk
x = 0-9, *, or #; private speed call numbers are not recorded
Optional Meter
55-59 mmmmm mmmmm = number of meter pulses
mmmmm = 00000 to 65535, leading zeroes output
Call Comple-tion Status
60 h A = Answer Supervi-sionB = Callee is BusyE = Caller ErrorT = TAFAS answeredR = Incoming call recalled and was answered by transferer N = Incoming call recalled and was not answered bytransferer
Outgoing/IncomingDirect/Dial-InIncoming/Dial-InIncoming Incoming/Outgoing
Table 2: Summary of Fields in Trunk SMDR Records (Continued)
NAME COLUMN FORMAT DEFINITION NOTE

Routine Maintenance
43
Routine
Ma
intenance
Speed Call or Call Forward Flags
61 C,F, or R C = Number was Speed called (ARS implied)F = Forwarded through External Call ForwardR = default (ARS implied)
Outgoing - All trunk calls are ARS by default.
Called Party
62-65 qqqq cccc = Extension NumberTnnn = Trunk Number (CO)Xnnn = Trunk Number (Non-CO)mmmm = Attendant Console Directory Number
c = 0-9, *, #nnn = 001-200m = 0-9, *, #
Transfer/ Confer-ence Call
66 K T = SupervisedTransferX = Unsupervised TransferC = 3-Way or Conference
Spacer 67
Third Party
68-71 rrrr cccc = Extension NumberTnnn = CO Trunk NumberXnnn = Non-CO Trunk Numbermmm = Attendant
c = 0-9, *, #n = 001 - 200m = 0 - 9, *, #
Spacer 72
Optional Account Code
73-84 aa .... a Length of 1 to 12 digits
a = 0-9, space-filled
Table 2: Summary of Fields in Trunk SMDR Records (Continued)
NAME COLUMN FORMAT DEFINITION NOTE
Technician’s Handbook
44
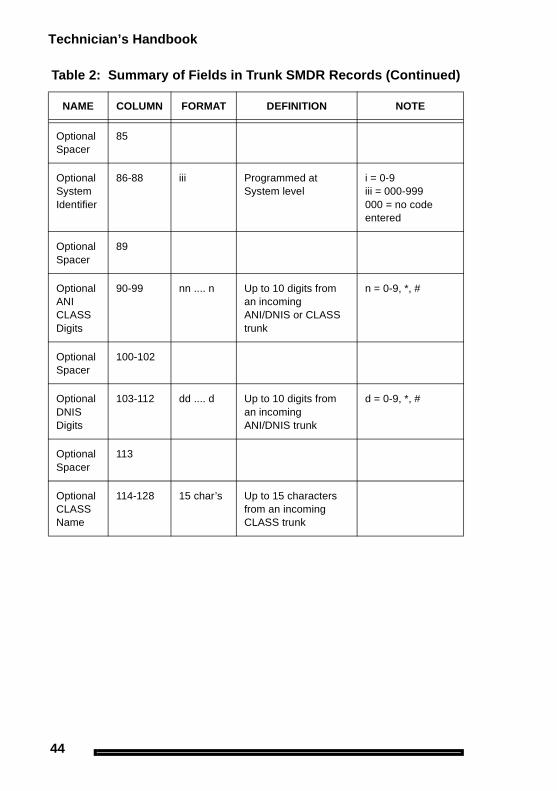
OptionalSpacer
85
Optional System Identifier
86-88 iii Programmed at System level
i = 0-9iii = 000-999000 = no code entered
OptionalSpacer
89
Optional ANICLASS Digits
90-99 nn .... n Up to 10 digits from an incoming ANI/DNIS or CLASS trunk
n = 0-9, *, #
Optional Spacer
100-102
Optional DNIS Digits
103-112 dd .... d Up to 10 digits from an incoming ANI/DNIS trunk
d = 0-9, *, #
Optional Spacer
113
OptionalCLASS Name
114-128 15 char’s Up to 15 characters from an incoming CLASS trunk
Table 2: Summary of Fields in Trunk SMDR Records (Continued)
NAME COLUMN FORMAT DEFINITION NOTE

Chapter 3
Troubleshootingand Repair

Technician’s Handbook
46

Troubleshooting and Repair
47
Trouble
shooting
Identifying Faults
Flowchart 1: Getting Started
Yes
No
Flowchart 1:
Power subsystem is faulty.Check Power Subsystem in the Control Cabinet.Check connection between AC mains and rear of cabinet.Check connection between PDU and backplane.Replace Power SupplySwap Control Cabinet.
Areall system LEDs on the Control Cabinet
out?
Start
Yes
No
NoYes
Is the operating system intact? Check the Main Control Card’s “active” LED.
NO: any other state (e.g., on steady, off steady).YES: slow, steady flashing (1 second flash rate).
Maintenance terminal troubleshooting
Flowchart 5:
A
B
Is the maintenance terminal operating?
(Ensure that maintenance terminal is connected to the maintenance port on
the Control Cabinet)

Technician’s Handbook
48
Flowchart 1: continued
Is a minor, major or critical alarm
LED on?
No
Yes
YesNo
Wait until the system finishes booting. If a minor, major, or critical alarm is present, start
this flowchart again.
Flowchart 2:System is not booting.
An alarm is present.Flowchart 3:
Correcting set / dataset problems.
Flowchart 4:
A B
Is the system in the process of a normal
boot?

Troubleshooting and Repair
49
Trouble
shooting
Flowchart 2: System Is Not Booting
Is the Main Control Card in a cycle showing an Eb
error code?
Yes
No
No
Is the Main Control Card
in a cycle showing any E-0/1/2/3/4/5/6/7/8/9 error codes? If E.8
see p.54.
YesMain Control Card (or onboard module) failureReseat all Control Cabinet cardsReplace Main Control Card (and/or appropriate modules).Replace Control Cabinet.
Flowchart 2: System is not booting.
.
Boot ErrorFor SX-200 LIGHT, reseat all Control Cabinet cards.Replace the system disks with known good copies (use known good backups because disk drive problems may corrupt the booting disks). Check disk drive cables.Replace disk drives (check that disks are in the correct drive).For SX-200 EL/ML, power down, reseat the Flash card (PCMCIA) , reseat MCC, replace Flash Card, reseat System ID.
Any other combination of LEDs and 7-segment
LED displays not covered?
End
Main Control Card or Main Control Cabinet problemReseat all Control Cabinet cards.Try swapping the suspect Main Control Card in a known working cabinet.Try swapping a known working Main Control Card in the suspect cabinet.
Yes
Technician’s Handbook
50
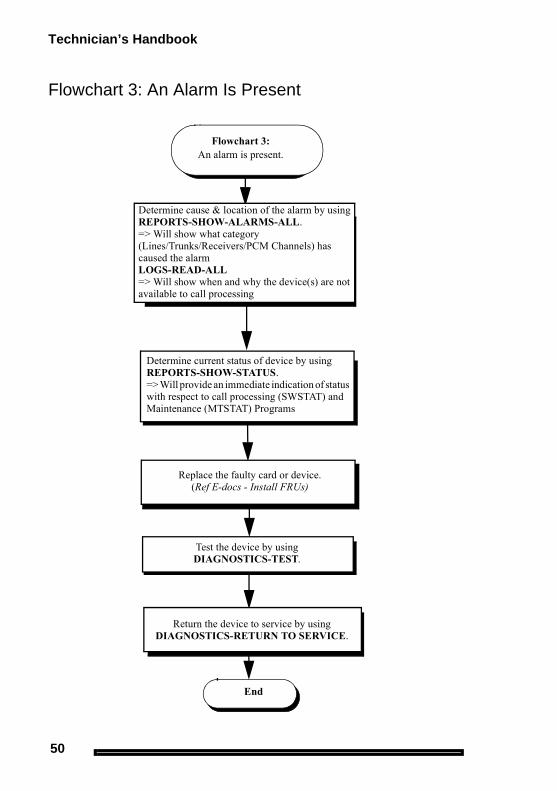
Flowchart 3: An Alarm Is Present
Determine cause & location of the alarm by usingREPORTS-SHOW-ALARMS-ALL.=> Will show what category (Lines/Trunks/Receivers/PCM Channels) has caused the alarm LOGS-READ-ALL=> Will show when and why the device(s) are not available to call processing
Determine current status of device by usingREPORTS-SHOW-STATUS.=> Will provide an immediate indication of status with respect to call processing (SWSTAT) and Maintenance (MTSTAT) Programs
An alarm is present.Flowchart 3:
Return the device to service by usingDIAGNOSTICS-RETURN TO SERVICE.
Replace the faulty card or device.(Ref E-docs - Install FRUs)
Test the device by usingDIAGNOSTICS-TEST.
End

Troubleshooting and Repair
51
Trouble
shooting
Flowchart 4: Correcting Set / Dataset Problems
Swap the set/dataset with a known working set/dataset (note the revision & model).
Return faulty set / dataset for repair.
To clear all dynamic user features for a set useDIAGNOSTIC-CLR-FEATURE
Is the fault corrected?
Yes
No
Ensure that valid features, such as Do Not Disturb, are not causing
the set to appear faulty. Verify the firmware revision.
Try swapping the specific line card.Hint: Remember to advise the users of the
temporary loss of service.
Is the problem related to feature functions or is the problem hardware
based ?
=> Try swapping COS, COR, Tenant with a known working set to isolate programming area.=> Determine what has recently been changed to cause this type of failure.=> Determine COS, COR, Tenant commonality with other sets to rule out specific set hardware problems.=>Verify set errors.
D
Flowchart 4:Correcting set / dataset
problems
Features
Hardware

Technician’s Handbook
52
Flowchart 4: continued
D
See the troubleshooting procedure given for the set/dataset in Troubleshoot Sets of the SX-200 EL/ML
Technical Documentation for other possible corrective actions.
Is the fault corrected ?
Check the cable and cable connections between the set and the line card.=> Try connecting the device directly to the cross-connect field to verify against house wiring problems.=> Try another port on the card to verify against backplane problems.
Yes
No
Return faulty card for repair.

Troubleshooting and Repair
53
Trouble
shooting
Flowchart 5: Maintenance Terminal Problems
Refer to the Maintenance Terminal Troubleshooting Procedures in the SX-200 EL/ML Technical
Documentation for further possible corrective actions.
Ensure that the terminal parameters are set correctly. They are:VT100 / 8 Bits / No Parity / One Stop BitASCII character setXon/Xoff flow control300-38, 400 baudPin 4 & Pin 7 high
Try a selection of baud rates from 300-38,400 and press Esc-6 after each change.Hint: If communication was lost during a session, the system considers the terminal logged-in and will only respond at the current logged-in speed. Try setting to the same speed and press Esc-6 (quit) (or Esc-5 from Maintenance application).If communication was never established, the system should respond at any speed.
Flowchart 5:Maintenance Terminal
troubleshooting
Try a screen reset by toggling the power off then on again.
Verify terminal and cabling to the maintenance port.If available, try connecting to a Peripheral Bay.Check the switch settings on the CRC. If a modem is connected, disconnect it.Try Resetting the system - Hint: Remember to advise users of loss of service.

Technician’s Handbook
54
Interpreting the Main Control Card Power-Up Error Codes
The error codes listed in Table 3 may appear on the Main Control Card numeric display during startup.
NOTE: 1. A normal running system may show other codes (card diagnostics or errors). However, during start-up, only the codes in this table are possible. Any other code shown during start-up indicates a faulty Main Control Card.
2. Codes possible AFTER start-up include card diagnostics codes (last card lo-cation tested - top number indicates bay number, bottom number indicates card slot number). Maintenance logs give results of test, pass or fail with cause.
Table 3: Main Control Card Error Code Summary
Error Code
Likely Cause(s)
(blank) • Faulty power system.
• Faulty Main Control Card.
0 • Faulty Main Control Card.
E.8
• MOSS password was not purchased, a purchased option isnot enabled, an enabled option is not purchased, the systempassword does not match, or the system id does not match.
• Faulty System ID module.
C • Faulty Flash memory or Main Control Card - This code showsfor approximately 15 seconds during a proper power-upsequence. If the code remains, then a problem exists.
--
• Nothing - indicates successful software download. Thisdisplay may be immediately changed to display post-boot-upcodes (see note 1).

Troubleshooting and Repair
55
Trouble
shooting
Restoring the Database
Restoring the SX-200 EL/ML Database To restore a customer database, your communication package must support the Kermit protocol. We recommend Terminal or Hyper Terminal.
1. Select the following maintenance commands:
SYSTEMDATABASERESTOREENTER
2. Exit to a local Kermit session.
3. Specify the name and location of the software file that you want to transfer to the system and send it to the system.
4. After the file transfer has completed, the message "Download/Upload Successful " appears on the screen.After the database file is restored, the system automatically resets the system and the following entry is added to the log file : Main Control was reset due to Database Restore.
The system will reboot automatically when it detects the presence of a new database.
Restoring the SX-200 LIGHT/DIGITAL Database
1. Reset the system.
2. Remove the disks.
3. Insert the disks with the backed-up database.
4. Reset the system.
5. After the system restabilizes, copy the database to the previous disks.

Technician’s Handbook
56
Backing Up Log Entries
To back up log entries, your communication package must support the Kermit protocol.This log back-up procedure allows you to copy all maintenance log entries into a text file on either a directory on your PC’s hard disk, or on a diskette in the PC’s disk drive.
To back up log entries:
1. Select the following commands:
SYSTEMDATABASELOGS_BACKUPENTER
The system prompts you for the file name.
2. Enter the file name.
3. Press ENTER.The system then prompts you to exit to a local Kermit session.
4. In the Kermit session, issue the Receive command.
While the backup is in progress, the top seven-segment LED on the MCC shows “A”, and the lower seven-segment LED shows a dash that is circling in a clockwise direction.
Ensure that the file name is meaningful to you. It can include abbreviations for the name of a remote site, the purpose or function of the database, the version of the software, or the number of the database.
Ensure that the Kermit session is set to text mode, because the maintenance log entries must copy into a text file.

Troubleshooting and Repair
57
Trouble
shooting
Correcting System ID Errors
If the System Reports a System ID MismatchIf the system reports a System ID mismatch, the problem may be one of the following:
� The System ID module is faulty
� The wrong System ID module is installed
� The Password is incorrect.
Verify that the options selected on Form 04, System Options, and the password entered match the data provided on the MOSS sheet.
Contact MITEL Product Support for assistance. Have your tech ID number available.
If the System Reports a Decryption Module ErrorIf the system reports a decryption module error, your decryption module is faulty or wrong for the software that is in your system.
Contact MITEL Product Support for assistance.
Powering Down the Nodes
Powering Down the SX-200 EL/ML Control Node
1. End any customer data entry sessions.
2. If you don’t have an up-to-date database backup, perform a database backup.
3. Switch-off power at the Bay Power Supply. Disconnect the power cords from the AC power source.
Refer to Backing Up a Customer Database (page 27).

Technician’s Handbook
58
Powering Down the SX-200 LIGHT Control Node
1. End any customer data entry sessions.
2. If you don’t have an up-to-date database backup, perform a database backup.
3. Push the System Reset Button.
4. Remove the disks.
5. Turn off the AC power by pushing the 0 (off) button at the rear of the cabinet. Disconnect the power cords from the AC power source.
Powering Down the Peripheral Nodes
1. Set the Bay Power Supply switch to O (OFF).
2. Unplug the AC power cord from the rear of the node.
Powering Down the IP NodeUnplug the AC power cord from the rear of the node.
Refer to Backing Up a Customer Database (page 27).

Troubleshooting and Repair
59
Trouble
shooting
Powering Up the Nodes
Powering Up the SX-200 EL/ML Control Node
1. Connect the external AC power cord(s) at the rear of the node.
2. Switch on the Bay Power Supply switch to ON. Set the power switch(es) on the rear of the node to I (ON) or set the Bay Power Supply switch to I (ON).
Powering Up the SX-200 LIGHT Control Node
1. Connect the external AC power cord(s) at the rear of the cabinet.
2. Set the power switch(es) on the rear of the node to I (ON).
3. Insert the disks into the MCC.
Powering Up the Peripheral Nodes
1. Connect the external AC power cord at the rear of the node.
2. Set the Bay Power Supply switch to I (ON).
Powering Up the IP Node
1. Ensure the SX-200 IP Node is NOT connected to a power source.
2. Using a serial cable, connect a PC to the Maintenance Port on the IP Node.
3. Launch a data communication application, such as Hyperterminal on the PC.
4. Set the parameters: 9600, 8, N, 1, None.
5. Plug the IP Node into a power source.

Technician’s Handbook
60
Replacing Circuit Cards
Wear an anti-static wrist strap whenever you handlecircuit cards.
Replacing Peripheral Interface CardsYou may replace the peripheral interface cards with the power on.
1. From the maintenance terminal select:
DIAGNOSTICSMORE_KEYSBUSY-OUT<bay/slot/circuit> (plid of faulty card).
2. Wait until all the circuits are busied out.
3. Replace the faulty card with a new card of the same type.
WARNING: Hazardous voltages can exist on installed peripheral cards even when power is removed from the system. Grasp cards by the lock latches only. Do not touch the sides of cards.
Power must be off when inserting the Main Control card,Bay Control Card, Control FIM Carrier Card, or Bay Power Supply. Cards that must not be inserted while system power is on carry a caution notice.
Set switches or jumpers on the new card to match switches or jumpers on the existing card.

Troubleshooting and Repair
61
Trouble
shooting
4. To return the circuits to service, select: DIAGNOSTICSMORE_KEYSRET-TO-SVC <plid>.
Replacing a Main Controller CardWhen replacing a main controller card (MCC), you must ensure that the replacement MCC and the installed MCC match – both in card type and stratum clock type. This procedure applies to the MCC II,MCC IIIEL, MCC Yields, MCC IIIML, and the MCC in the SX-200 LIGHT/DIGITAL PBX.
1. Quit the customer data entry mode.
2. If you do not have an up-to-date database backup, create one now.
3. Power-down the Control cabinet.
4. Remove the old MCC.
5. Remove the system ID module or decryption module from the old MCC and install it onto the new MCC.
6. Transfer any modules from the old MCC to the new MCC.
7. Install the new MCC.
8. Power-up the cabinet.
9. Verify the system date and time. Correct as required.
10. Restore the database.
Refer to Backing Up a Customer Database (page 27).
Refer to Powering Down the Nodes (page 57).
CAUTION: Wear an anti-static wrist strap whenever you handle circuit cards.
Refer to Powering Up the Nodes (page 59).
Refer to Restoring the Database (page 55).

Technician’s Handbook
62
Correcting Ground Path Problems
Safety ground absorbs the dangerous voltages that come in contact with the PBX cabinet. The safety ground connects to the PBX through the ground termination of the system’s three-prong power cord.
System ground provides a stable ground reference for the voltages the the system uses. The system ground attaches to the PBX through a separate ground wire (6 AWG recommended) that connects directly to a system cabinet ground-stud.
In most buildings, the metallic cold water system provides the ground source. It must provide a metallic connection all the way back to the building entry point (including a metallic strap that connects around the water meter).
Problems Caused by Incorrect PBX GroundingIf the CO and PBX have different ground reference voltages, each can fail to recognize the signals that the other sends. For example:
� Ground start trunks may not seize when the PBX grounds the ring lead.
� The CO may not release trunks when the PBX removes its termination.
Low-frequency AC ground differentials can disrupt the operation of PBX logic circuits and cause incorrect operation or system failures.
AC ground differentials at radio frequencies can cause audio interference and possibly disrupt PBX logic circuits.

Troubleshooting and Repair
63
Trouble
shooting
Ground Path AC Voltage TestThis test measures the presence of AC voltage in the metallic loop.
1. With your meter connected in the same way as you did for the resis-tance test, measure the AC voltage.
2. Start with your meter set for high AC voltages and adjust it down until you get a reading.
3. You should get a reading of 1 Vac or less.
If your reading is greater than 1 Vac, check to see if your electrical panel ground connects to the building ground. Depending on local utility regulations, the connection usually exists between the electrical panel ground and a cold water pipe entering the building. If this connection is present, try an alternate ground point(s) and measure the AC voltage again.
If the system ground and safety ground both connect to the building ground, your measurement is the metallic loop from the PBX chassis, to the electrical panel ground, to the cold water pipe, and back through the system ground wire.
If the safety ground and system ground do not connect at the electrical panel, your measurement indicates the AC voltage differential between protective earth and the building ground.
Ground Path Resistance Test
1. Turn off the main PBX system circuit breaker.
2. At the PBX system, connect the cabinet’s chassis ground to the electrical panel ground. The wire should be a minimum 10 AWG and not longer than 15 meters.
3. At the PBX system, disconnect the ground wire from the system’s ground-stud.
4. Set your meter to OHMS at the highest scale.
5. Measure the resistance between the PBX chassis safety ground and the ground wire that provides the system ground. Adjust your meter down until you get a reading.

Technician’s Handbook
64
6. The resistance between the two grounds should be less than five OHMS. If not, try alternate ground point(s) and repeat the test.
Testing the CO and PBX Ground DifferentialIf a PBX experiences trunk lock-ups, or trunk seize failures, perform the CO/PBX Ground Differential Test.
This test determines whether the DC ground potential between the selected building ground point and the CO ground point is within acceptable limits by measuring the two currents: “Loop” current and “Ring” current.
Divide the measured “Ring” current by the measured “Loop” current to determine the relation of the building ground potential to the CO ground potential. The result is 2.0 if the CO and PBX ground points are the same potential.
A result between 1.85 and 2.15 indicates an acceptable building ground. A result outside these limits means that you must locate an alternate building ground.
1. Disconnect the building ground wire from the PBX ground-stud.
2. Disconnect a loop-start or ground-start trunk from the PBX.
3. Measure the Loop current.
� Set the meter to Milliamperes = DC and Range = 200 Milliamperes.
� Connect the meter between the Tip and Ring trunk leads.
� For a ground-start trunk, apply the building ground momentarily to the ring side of the trunk. This application of ground will signal the CO to complete the loop and provide DC loop current.
� Allow sufficient time for the current to stabilize and record the loop current.
� DC Loop Current = _______________________

Troubleshooting and Repair
65
Trouble
shooting
4. Measure the Ring current:
� Set the meter to Milliamperes = DC and Range = 200 Milliamperes.
� Connect the meter between the Ring trunk lead and the building’s open-ended ground wire. Be sure that you disconnect the building ground wire from the PBX ground-stud.
5. Allow sufficient time for the current to stabilize and record the Ring current.
� DC Ring current = ________________________
6. Calculate the CO/PBX ground potential by dividing the Ring current value by the Loop current value.
Checking the Port Connectionsto the PBX
Refer to information showing the pin numbers and signals for the T1 and PRI Trunk Port, Table 41 on page 201, the SFT Port,Table 36 on page 199, the Copper Interface Ports,Table 38 on page 200, the Maintenance Terminal and Printer Ports,Table 39 on page 200, or the Maintenance Module Port Table 40 on page 201, in this handbook.
Checking the Receiver Allocation
Receivers allow devices which use DTMF signaling to communicate dialing information to the PBX.
DTMF Receivers (DTMF Module)
DTMF receiver modules may be installed on a Universal Card. Each Universal Card can contain up to four receiver modules; each receiver module contains four receivers, for a total of 16 receivers.

Technician’s Handbook
66
BCC III (DSP Module)
Sixteen DTMF receivers are provided by a DSP module on a BCC III.
DTMF Receivers (DSP on MCC IIIEL, MCC IIIELx, MCC IIIML, or MCC II)
Seven DTMF receivers are standard on each MCC(CDE Form 04,Option 68).
CLASS / DTMF Receivers (SPINE Control Module II)
Seven DTMF receivers are standard on Control Module II. Receivers not assigned as CLASS receivers are available to the system as DTMF receivers. CLASS receivers are only available to the devices in the same bay.
SPINE Receiver provisioning for CLASS trunks (CDE Form 04, Options 61-67) is provided in the following table.
Table 4: SX-200 SPINE Maximum Receiver Combinations Available
CLASS Receivers DTMF Receivers
0 7
1 6
2 5
3 4
4 3
5 1

Troubleshooting and Repair
67
Trouble
shooting
Checking the FIM/CIM Carrier Cards
1. Verify that the cards with the interface module are installed in the correct card slot for the assigned bay.
2. Verify that the interface modules in the main control cabinet are correctly connected to its peripheral bays.The configuration positions are hard coded in the software.
3. Verify that the same distance variant of FIM is installed at each end of the link.
4. Verify that the dip switch on the Control Triple CIM card is set properly. Open switch 4 to set the card as a triple interface card and close switch 4 to set the card as a double interface card. Opening another switch substitutes a CIM circuit for the add on FIM II.
5. Verify that the PRI card in a peripheral cabinet has its own FIM II or CIM.
6. Verify the System Options 71 and 72 in CDE Form 04.
7. Verify that the configuration in a seven cabinet system meets your needs.
� With an MCC IIIEL control card, the Control Triple FIM Carrier card and the Control Triple CIM card provide two links per peripheral bay. Blocking may occur if two T1 trunk cards are installed in a peripheral bay that connect to the Control Triple FIM Carrier or the Control Triple CIM card.
� With an MCC IIIELx control card (installed in a SX-200 ELx cabinet PN 9109-600-002-NA) the Control Triple FIM Carrier card and the Control Triple CIM card provide three links per peripheral bay. The MCC IIIELx card supports a non-blocking seven cabinet system.
Setting the Control Triple CIM card as a triple interface card without a MCC IIIELx provides a system for low traffic configurations such as hotel/motel. For heavy traffic conditions a MCC IIIELx should be used.
Place the first FIM carrier card or Control Triple CIM card in Slot 10; the second FIM Carrier card or Control Triple CIM card in slot 11.
Technician’s Handbook
68
Checking the T1 Card, T1/E1 Module, and the PRI Card
� In the SX-200 EL system, LIGHTWARE 17 supports one digital bay with two T1 trunk cards and the other digital bays with one T1 trunk card to total a maximum of seven T1 trunk cards.LIGHTWARE 18 and greater supports a maximum number of eight T1 links in the SX-200 EL system. These links can be from the T1 cards and from the T1/E1 modules. Any bay can have a maximum of two T1 links to a total of eight T1 links in the SX-200 EL system.
� The system (with MOSS option, Number of Links 0-8) allows a maximum of eight T1 type links. Included in the count are T1 trunks from the T1/E1 module on the BCC III and the T1 ISDN links from the T1/E1 module on the PRI card.
� The BCC III supports one T1/E1 module that provides one or two T1 links. The SX-200 ML system supports a maximum of two T1/E1 modules with a system maximum of four T1 links. The SX-200 EL system supports a maximum of seven T1/E1 modules with a system maximum of eight T1 links.
� The T1/E1 module has two LT/NT connectors (jumpers), one for each T1/E1 link. These connectors must be set to the NT position (the default setting) for T1/D4 functionality.
� If you install a T1 trunk card in slot 10 of a bay, you cannot install a peripheral interface card in slot 5; if you install a T1 trunk card in slot 11, you cannot install a peripheral interface card in slot 6.
� If you program the first T1 link from a T1/E1 module on the BCC III, you cannot install a peripheral interface card in slot 5; if you program the second T1 link from a T1/E1 module on the BCC III, you cannot install a peripheral interface card in slot 6.
� If a PRI card is installed in slot 10, you can install a peripheral interface card in slot 5; if a PRI card is installed in slot 11, you can install a peripheral interface card in slot 6. Because you program the PRI card as its own bay, the PRI card does not occupy slots 5 or 6 in the bay that the card sits in. The T1 links from the PRI card occupy the software slots 5 and 6 in its own bay.
� The PRI card requires a SX-200 ELx cabinet and a Stratum 3 MCC.

Troubleshooting and Repair
69
Trouble
shooting
Checking the Number of T1 Trunk Cards
With LIGHTWARE 18 Release 2.0 or greater software, any peripheral bay can have up to two T1 cards to a total maximum of eight T1 links (with T1 Cards and T1/E1 modules) in the system.
Prior to LIGHTWARE 18 Release 2.0, the maximum number of T1 cards was seven. The following table defines the maximum number (prior to LIGHTWARE 18) of T1 Trunk cards in peripheral bays that can connect to a Control Triple FIM Carrier or a Control Dual FIM Carrier in the Control cabinet (cabinet 1).
Table 5: Maximum Number of T1 Trunk CardsPrior to LIGHTWARE 18
Cab #
0 CFCII or
0 CFCIII
1 CFCII(ML)
1 CFCII(EL)
2 CFCII(EL)
1 CFCIII(EL)
2 CFCIII(EL)
1 CFCII (10)
1 CFCIII
(11) (EL)
1 2 1 1 0 1 0 0
2 2 2 2 2 2 2
3 1 1 1 1 1
4 1 1 1
5 1 1 1
6 1 1
7 1 1
max. 2 3 4 5 5 7 6

Technician’s Handbook
70
Trunk Signaling and Supervision
General Signaling & Supervision ConceptsAll trunks share similar basic handshaking functions. The actual signaling mechanism will vary with the trunk type.
Seize: (request to make a call) The calling party initiates the call by requesting service from the called party.
Seize Acknowledgment: (ready to receive) The called party indicates that the call can commence.
This acknowledgment occurs when the calling party expects a response (Dial Tone) or when the called party needs time to establish appropriate resources (DTMF receivers).
Digits: (who to talk with) The calling party generates the rotary pulse or DTMF.
Stop Dial: (slow down, can’t handle the pace) The called party generates a signal to indicate that digits are in risk of being lost.
Receipt of Digits: (status of call) The called party generates audible tones to indicate the status of the call (for example, Ringback, Busy, and Reorder).
Answer Supervision: (called party has answered) The called party indicates that the call has been answered. This signal is for billing purposes (Hotel/Motel), generation of SMDR reports, etc.
Disconnect Supervision: (release and go back to idle) Either party generates this signal to indicate the termination of a call and to return the trunk to the idle condition.

Troubleshooting and Repair
71
Trouble
shooting
Loop Start Line/TrunkThe Loop Start Line/Trunk serves the standard domestic applications and small businesses that have key systems and PBX applications.
Figure 13: Loop Start Line/Trunk
Table 6: Loop Start Line/Trunk Summary
SignalLoop Start Line PBX
OutgoingLoop Start Line PBX
Incoming
Seize Tip-Ring leads activated (shorted); Loop Current flows in line
90Vac is applied to Ring lead in 2 sec on, 4 sec off cadence
Seize Acknowledgment
Loop Current and/or dial tone generated
-
Digits Loop Current toggled (Rotary) or DTMF
-
Stop Dial - -
(Sheet 1 of 2)

Technician’s Handbook
72
Test/Verify (Loop Start)
Verify far-end (CO) circuits by using a standard telephone set in place of the Loop Start trunk circuit.
Verify near-end (PBX Loop Start) circuits by connecting to a local PBX ONS circuit.
Check for appropriate voltages on Tip-Ring in each call state.
During off-hook condition, 18 mA DC minimum should be drawn from the CO (typical 25-40 mA).
Some Key/PBX systems may be polarity sensitive; reverse Tip-Ring to verify.
Receipt of Digits Audible Tones - Busy, Reorder, Ringback dependent upon digits dialed and called party condition
-
Answer Supervision Some COs can reverse current flow
Tip-Ring leads activated (shorted); Loop Current flows in line
Disconnect Supervision
Near- end termination: PBX/Telephone can break Loop Current
Near- end termination: PBX/Telephone can break Loop Current
Table 6: Loop Start Line/Trunk Summary (Continued)
SignalLoop Start Line PBX
OutgoingLoop Start Line PBX
Incoming
(Sheet 2 of 2)
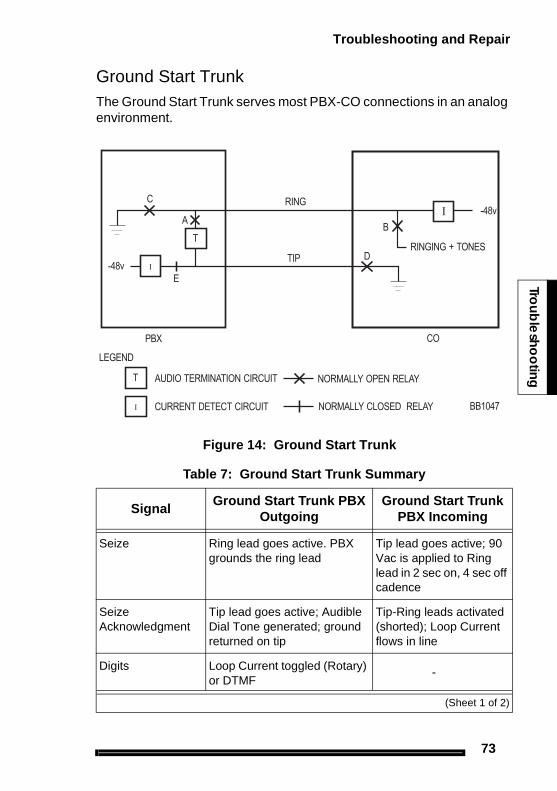
Troubleshooting and Repair
73
Trouble
shooting
Ground Start TrunkThe Ground Start Trunk serves most PBX-CO connections in an analog environment.
Figure 14: Ground Start Trunk
Table 7: Ground Start Trunk Summary
SignalGround Start Trunk PBX
OutgoingGround Start Trunk
PBX Incoming
Seize Ring lead goes active. PBX grounds the ring lead
Tip lead goes active; 90 Vac is applied to Ring lead in 2 sec on, 4 sec off cadence
Seize Acknowledgment
Tip lead goes active; Audible Dial Tone generated; ground returned on tip
Tip-Ring leads activated (shorted); Loop Current flows in line
Digits Loop Current toggled (Rotary) or DTMF
-
(Sheet 1 of 2)

Technician’s Handbook
74
Test/Verify (Ground Start)
Verify the far-end (CO) circuits by using a standard telephone for incoming calls. Verify outgoing calls by using a Butt Set with a ground- start lead (momentarily shorting the ring lead to the ground will produce a dial tone from the far end).
Verify the near-end (PBX Ground Start) circuits by connecting to known working far end Ground Start circuits.
Verify that appropriate voltages are present on Tip-Ring in each call state.
During off-hook condition, 18 mA DC minimum should be drawn from the CO (typical 35-40 mA).
Tip-Ring is polarity sensitive. PBX will be unable to initiate calls if reversed. Reverse polarity to verify.
Stop Dial - -
Receipt of Digits Audible Tones - Busy, Reorder, Ringback dependent upon digits dialed and called party condition
-
Answer Supervision
CO reverses current flow in Tip-Ring
Disconnect Supervision
Near-end: PBX opens loopFar-end: CO removes ground from ring
Near or Far-end termination: Loop Current is broken
Table 7: Ground Start Trunk Summary (Continued)
SignalGround Start Trunk PBX
OutgoingGround Start Trunk
PBX Incoming
(Sheet 2 of 2)

Troubleshooting and Repair
75
Trouble
shooting
Direct Inward Dial (DID)/Loop Trunk
You use the Direct Inward Dial (DID)/Loop trunk primarily in analog DID applications; rarely in PBX-PBX Loop Tie trunk applications.
This trunk uses current reversal to signal supervision information and provides digit flow capability in both directions, when the trunk is in the loop/tie mode.
Figure 15: Direct Inward Dial (DID)/Loop Trunk

Technician’s Handbook
76
Table 8: Direct Inward Dial/Loop Trunk Summary
SignalDID/Loop Trunk PBX
OutgoingDID/Loop Trunk PBX
Incoming
Seize Tip-Ring leads are activated (shorted); Loop Current flows in line
Tip-Ring leads are activated (shorted); Loop Current flows in line
Seize Acknowledgment
Immediate Dial - Tip-Ring leads stay activeOutgoing Wink - Tip-Ring leads toggle Loop Current direction Delay Dial - Tip-Ring leads reverse Loop Current following seizure; reverse again when ready to go
Immediate Dial - Tip-Ring leads stay active.Incoming Wink - Tip-Ring leads toggle Loop Current direction
Digits Loop Current toggled (Rotary) or DTMF
Loop Current toggled (Rotary) or DTMF
Stop Dial Tip-Ring leads reverse Loop Current direction; forward again when ready
-
Receipt of Digits Audible Tones - Busy, Reorder, Ringback dependent upon digits dialed and called party condition
Audible Tones - Busy, Reorder, Ringback generated and sent to calling party dependent upon digits received and state of called party
Answer Supervision
Current flow in Tip-Ring is reversed
Current flow in Tip-Ring is reversed
Disconnect Supervision
Near or Far-end termination: Loop Current broken
Near or Far-end termination: Loop Current is broken

Troubleshooting and Repair
77
Trouble
shooting
Test/Verify (DID)
Verify the far-end circuits by the use of a standard telephone for outgoing calls.
Verify the near-end circuits by connecting to known working DID/Loop circuits.
Verify that appropriate voltages are present on Tip-Ring in each call state.
During off-hook condition, 20-25 mA should be drawn from the far-end.
Ear & Mouth (E&M) TrunkYou use the E&M trunk in Tie Trunk applications. The E&M trunks support all the signaling information.
The Tip-Ring is used in a 2-wire operation shown in Figure 12 - E&M Trunk - Type I (2-wire) on page 78.
The Tip-Ring and Tip Rx-Ring Rx is used in a 4-wire operation shown in Figure 13 - E&M Trunk - Type V (4-wire) on page 79.
Type I
Type 1 is used in applications when a telephone company is providing a transmission path between PBXs. The E&M circuits connect to Telco-provided Signaling circuits, which prepare the E&M signals for long distance use.
Each end is identical to the other; all required voltage translation is provided by the cable carrier.
Type 1 may be used in a 2-or 4-wire operation.
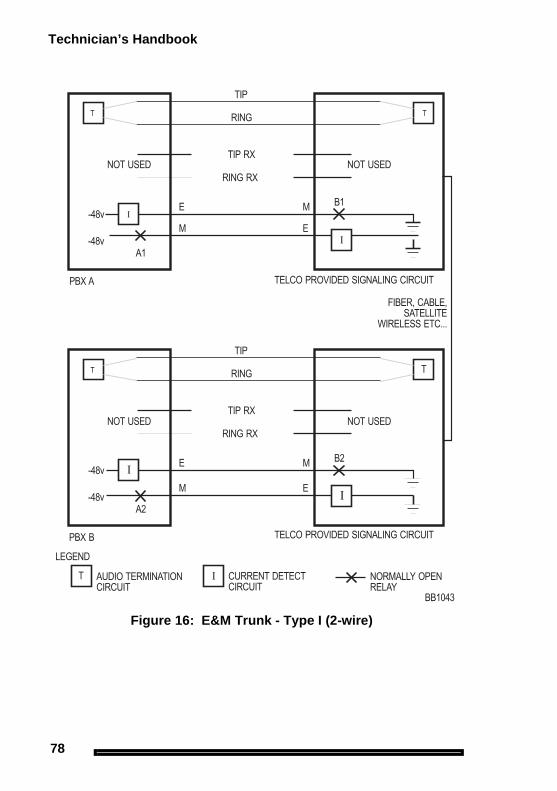
Technician’s Handbook
78
Figure 16: E&M Trunk - Type I (2-wire)

Troubleshooting and Repair
79
Trouble
shooting
Type V
Type V is used in applications where short distance direct back-to-back operation is desired. The M-lead invert is required at both ends.
Figure 17: E&M Trunk - Type V (4-wire)
Table 9: E&M Trunk Summary
SignalE&M Trunk PBX
OutgoingE&M Trunk PBX
Incoming
Seize M lead goes active (voltage is dependent on Type I or Type V operation)
E lead goes active
Seize Acknowledgment
Immediate Dial - E Lead stays idle. Outgoing Wink - E Lead toggles active/idle. Delay Dial - E Lead goes active following M; goes idle when ready to go
Immediate Dial - M Lead stays idle. Incoming Wink - M Lead toggles active/idle
(Sheet 1 of 2)

Technician’s Handbook
80
Test/Verify (E&M)
Loop back to self whenever more than 1 E&M type V circuit is available.
Verify far-end circuits by activating near-end M lead and listening for far- end dial tone.
Verify near-end circuits by activating near-end E lead and listening for near-end dial tone.
Verify that appropriate voltages are present on E&M leads in each call state.
Digits M toggles (Rotary) or DTMF through audio path
E toggles (Rotary) or DTMF through audio path
Stop Dial E lead goes active; goes inactive when ready to go
-
Receipt of Digits Audible Tones - Busy, Reorder, Ringback dependent upon digits dialed and called party condition
Audible Tones - Busy, Reorder, Ringback generated and sent to calling party dependent upon digits received and called party condition
Answer Supervision
E lead goes active M lead goes active
Disconnect Supervision
Near-end termination: M lead goes inactive; E follows Far-end termination: E lead goes inactive; M follows
Near-end termination: M lead goes inactive; E followsFar-end termination: E lead goes inactive; M follows
Table 9: E&M Trunk Summary (Continued)
SignalE&M Trunk PBX
OutgoingE&M Trunk PBX
Incoming
(Sheet 2 of 2)

Troubleshooting and Repair
81
Trouble
shooting
T1 Trunk (D4 DS-1)A T1 Trunk is a digital trunking standard that supports multiple users. Unlike analog trunks, the T-1 hardware signaling layer is independent of trunk usage; synchronization & signaling are dealt with separately.
Synchronization
The T1 trunk establishes and maintains a connection between the two systems. Sampling clocks of each partner must be synchronized.
� The Master-Slave arrangement defines the leader and follower; if connecting to a Public Network T1, the PBX will always be a slave.
� The stratum clock levels define the accuracy of the clock and the ability to match with the incoming master clock signal.The higher stratum number synchronizes to the same or lower stratum number. For example, a Stratum 4 (PBX) clock synchronizes to a Stratum 3 (CO/PBX/Channel Service Unit) clock.
� When the PBX is connecting to more than one T-1 signal, choose the order of preference of clocking sources in CDE Form
Figure 18: T1 Trunk Synchronization
Technician’s Handbook
82
44, T1 Network Sync (always choose a connection as close as possible to the defined master source clock).
Signaling Types
Channel Associated Signaling
The original idea behind the T1 is to emulate 24 independent analog trunks. The Channel Associated signaling supports Loop Start, Ground Start, DID/Loop, and E&M trunks. The function of each channel is decided and programmed at each end.
All handshake signaling is done with bits (A&B) stolen from the bit stream; used to emulate the various analog signals, (offhook, onhook, current reversal, etc.) and is used as the equivalent to that of the analog trunks.
Because A&B bits are taken from the bit stream, this signaling method is not appropriate for direct transmission of digital information unless it is modulated into an analog signal with a modem.
Common Channel Signaling
The Handshake signaling for the first 23 channels is managed by the 24th channel. The Common Channel signaling allows for transmission of digital information and more advanced digital trunk applications (MITEL’s MSDN, Bell Canada’s Megalink, ISDN, etc.). Signaling protocol is defined by the type of service.
Test/Verify (T1)
Synchronization
� Most T1 issues are a result of connectivity problems.
Verify that the incoming T1 signal is seen at both ends; verify all hardware connections. Failure at either end indicates loss of an incoming synchronizing signal.
Verify that the switch settings on the T1 card are set for proper operation. For example: 1 is closed and 2-8 are open.

Troubleshooting and Repair
83
Trouble
shooting
Loopback
Loopback is used to verify and locate the source of either a cable or a synchronization problem through the devices in a T1 transmission path. Devices in the T1 transmission path (PBX, CSU, Channel bank, smart jacks, etc.) will generally have some type of loopback mode. Loopback modes will typically have the effect of taking the input T1 stream and transmitting the stream back to the source; the nodes thereby verify that portion of the link.
In the absence of a loopback mode, the T1 transmits and receives pairs that can be directly connected together to physically create a loopback condition.
A&B bits
Taken from each of the 24 Channels to emulate the various analog trunk signalling conditions (off-hook, on-hook, disconnect supervision, etc.) in either of the two following methods.
Superframe: Over a cycle of twelve frames, bits A&B are taken in frames 6 & 12 to provide basic analog trunk emulation over the T1 facility.
Extended superframe (ESF): ESF is not supported by the SX-200 EL/ML or the SX-200 LIGHT. ESF is supported by an ISDN.
Refer to The S1 Switch Settings for the T1 Trunk Cable Length (not loop length) (page 192).

Technician’s Handbook
84
Table 10: A-B Signalling States (Tie/E&M)
PBX Port Type
CSU Type
PBX port condition to channel
Transmit Receive CSU condition to analog facilityA B A B
Tie Trunk (loop start)
DPO Tx loop open 0 0 x x x
loop closure 1 1 x x x
DPO Rx x x x 0 x normal battery
x x x 1 x reverse battery
DID or Tie Trunk (loop start)
DPT Tx normal battery 0 0 x x x
reverse battery 1 1 x x x
DPT Rx x x x 0 x loop open
x x x 1 x loop closure
TIE Trunk 4wire/2 wire E&M
E&M Tx M-lead grounded or open
0 0 x x x
M-lead battery 1 1 x x x
E&M Rx x x x 0 x E-lead open
x x x 1 x E-lead grounded or open
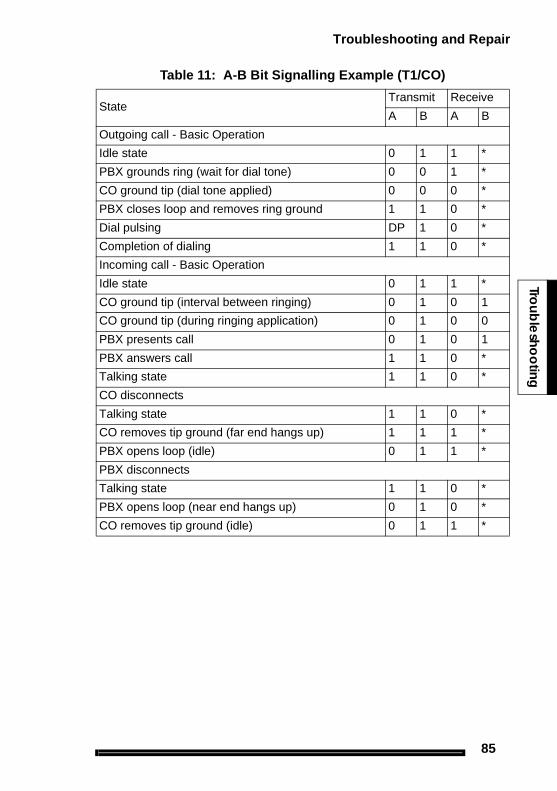
Troubleshooting and Repair
85
Trouble
shooting
Table 11: A-B Bit Signalling Example (T1/CO)
StateTransmit Receive
A B A B
Outgoing call - Basic Operation
Idle state 0 1 1 *
PBX grounds ring (wait for dial tone) 0 0 1 *
CO ground tip (dial tone applied) 0 0 0 *
PBX closes loop and removes ring ground 1 1 0 *
Dial pulsing DP 1 0 *
Completion of dialing 1 1 0 *
Incoming call - Basic Operation
Idle state 0 1 1 *
CO ground tip (interval between ringing) 0 1 0 1
CO ground tip (during ringing application) 0 1 0 0
PBX presents call 0 1 0 1
PBX answers call 1 1 0 *
Talking state 1 1 0 *
CO disconnects
Talking state 1 1 0 *
CO removes tip ground (far end hangs up) 1 1 1 *
PBX opens loop (idle) 0 1 1 *
PBX disconnects
Talking state 1 1 0 *
PBX opens loop (near end hangs up) 0 1 0 *
CO removes tip ground (idle) 0 1 1 *

Technician’s Handbook
86
PBX Property ManagementSystem Interface
The PBX’s Property Management System (PMS) interface collects and sends the following Hotel/Motel information to a customer’s PMS computer through a dedicated bidirectional RS-232 port – typically a Dataset programmed to a DNIC port.
� Maid and room status
� Guest check-in and check-out
� Guest name
� Auto wake-up and message waiting
� PMS related maintenance logs.
Property Management System MessagesA PMS message is a string of ASCII text characters.
For example, to light a message waiting lamp for guest room extension number 2129, the customer’s PMS computer will send a string of ASCII keyboard commands to the PMS interface.
The PMS message sent is: ^BMW 1 2129^C
When the PBX’s PMS interface receives and understands the message, it will send an ACKnowledge character back to the customer’s PMS computer.

Troubleshooting and Repair
87
Trouble
shooting
The following is a PMS message format that enables a telephone’s message waiting lamp.
Message Formats from PBX to PMS
Maid in Room status
Maid in Room status is sent as a 10-character message, as follows:_ _ _ _ _ _ _ _ _ _function code STSstatus code n space (n is assigned room status code)
station number nnnnn (with trailing spaces)
Message Registration of Outgoing Trunk Calls
Message Registration of Outgoing Trunk Calls status is sent as a 12-character message, as follows:_ _ _ _ _ _ _ _ _ _ _ _ function code MRspace
status code nnnn (nnnn is a 4-byte peg count)
station number nnnnn (with trailing spaces)
PBX and PMS 5-digit Extension Number Formats
The extension number is sent between the PBX and the PMS as a 5-digit number. Numbers that are fewer than 5 digits include spaces:
PBX to PMS extension number nnnnn with trailing spaces
PMS to PBX extension number nnnnn with leading spaces
^B M W space 1 space space 2 1 2 9 ^C
Start Trans-action STX
The CTRL (^) B charac-ter signals the start of a PMS mes-sage
End Transac-tion ETX
The CTRL (^) C character signals the end of a PMS message
Function Code
The MW fol-lowed by a space indicates that the PMS requests a message waiting function
Status Code
1 followed by a space turns on the mes-sage waiting lamp. 0 turns the lamp off
Station’s Extension(Room) Number
Identifies the exten-sion number of the telephone on which the message waiting lamp lights. The PMS inserts leading space(s) to indicate that no number is present

Technician’s Handbook
88
Table 12: PMS Keyboard Commands
CommandsPMS Keyboard
KeysComments
Enquire (ENQ) ^E ^ = CTRL key
Acknowledged (ACK)
^F
Not Acknow-ledged (NAK)
^U
Start Transaction (STX)
^B
End Transaction (ETX)
^C
Check In ^BCHK1 XXXXX^C
XXXXX is the 5-digit extension number (use leading spaces).
Check Out ^BCHK0 XXXXX^C
Add Name ^BNAM1 a-z XXXXX^C
a-z is the extension name, 20 characters in length (use trailing spaces), followed by a single space, followed by the extension number. Only the first 10 characters of the name are displayed.
Replace Name ^BNAM2 a-z XXXXX^C
Delete Name ^BNAM3 a-z XXXXX^C
Send Message ^BMW 1 XXXXX^C
Insert a space before and after the digit 1.
Delete Message ^BMW 0 XXXXX^C
Insert a space before and after the digit 0.
Set Wakeup ^BWKPTTTTXXXXX^C
TTTT is the time in hours:minutes. Use a 24-hour clock.
Troubleshooting and Repair
89
Trouble
shooting
PBX and PMS Cannot CommunicateIf the PBX’s PMS interface and the customer’s PMS computer cannot communicate, the system will generate PMS related maintenance log messages. Typically, PMS maintenance log messages will identify
� Operating status of the PMS
� Invalid start (STX) and end (ETX) of text message characters
� Invalid function code message characters
� Invalid status code message characters
� Invalid room number message characters.
Testing the PMS Interface of the PBXPMS problems typically occur in these areas:
� PMS Protocol settings: Ensure that the communication parameters between the systems match.
� PMS Programming: Verify that all the recommended PMS and Dataset programming is complete.
� PMS Cabling: Use a straight-through cable between the customer’s PMS computer and the Dataset.
Test the PBX’s PMS interface as follows:
1. Disconnect the customer’s PMS computer from the Dataset.
2. Connect a personal computer or terminal to the Dataset’s RS-232 port.
� Ensure that the communications parameters of the personal computer / terminal match those expected by the PBX’s PMS interface.
� Verify that you receive the ENQuire character from the PBX’s PMS interface. If not, verify that all the programming and the connections are correct.
3. Type the PMS message required to light a telephone’s message waiting lamp, using CAPITAL letters only. See the following example.
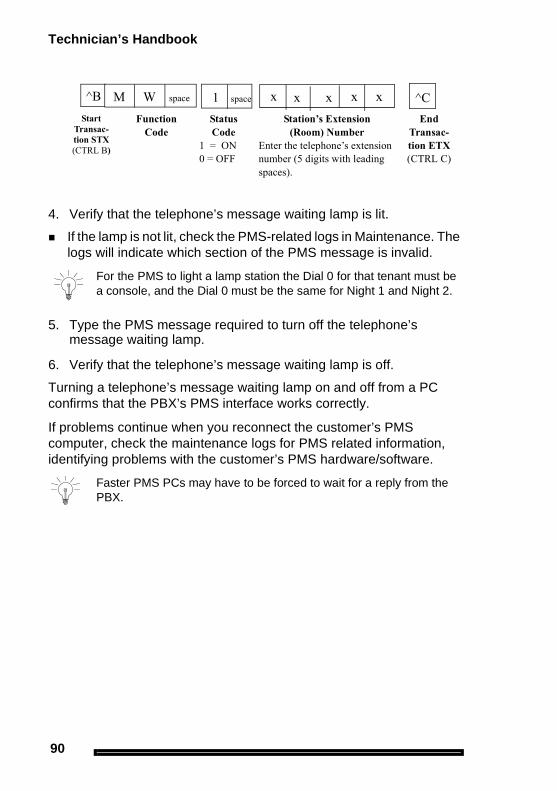
Technician’s Handbook
90
4. Verify that the telephone’s message waiting lamp is lit.
� If the lamp is not lit, check the PMS-related logs in Maintenance. The logs will indicate which section of the PMS message is invalid.
5. Type the PMS message required to turn off the telephone’s message waiting lamp.
6. Verify that the telephone’s message waiting lamp is off.
Turning a telephone’s message waiting lamp on and off from a PC confirms that the PBX’s PMS interface works correctly.
If problems continue when you reconnect the customer’s PMS computer, check the maintenance logs for PMS related information, identifying problems with the customer’s PMS hardware/software.
For the PMS to light a lamp station the Dial 0 for that tenant must be a console, and the Dial 0 must be the same for Night 1 and Night 2.
Faster PMS PCs may have to be forced to wait for a reply from the PBX.
^B M W space 1 space x x x x ^CStart
Transac-tion STX(CTRL B)
End Transac-tion ETX(CTRL C)
Function Code
Status Code
1 = ON0 = OFF
Station’s Extension(Room) Number
Enter the telephone’s extension number (5 digits with leading spaces).
x

Troubleshooting and Repair
91
Trouble
shooting
Disk Drive Maintenance
SX-200 LIGHT/DIGITAL Floppy Disk Subsystem Troubleshooting ProceduresTable 13 outlines the most likely causes of Floppy Disk Subsystem failure.
Table 13: Floppy Disk Troubleshooting Summary
Step Possible Malfunction Source
1.Drive units require resets - power down the control bay (Bay 2 or Bay 0), and power up again. Check for error codes on the Main Control Card numeric display - see Table 14.
2. Faulty backplane connections.
3. Faulty or improperly installed floppy disk.
4. Faulty / corrupt / obsolete software - reload with correct software.
5. Faulty power supply unit(s) - refer to Power System Troubleshooting.
6. Faulty Disk Drive unit.
7. Faulty Main Control.
8. Faulty cable connections.

Technician’s Handbook
92
NOTE: 1. Be aware of the difference between the code “E” and the code “E.”. “E” indi-cates MCC error and “E.” indicates disk drive errors.
2. If system is restarted at this point, the pending logs will be lost.
Table 14: Floppy Disk Drive Error Code Summary
Error Code
Likely Cause(s)
E.1
Original system diskette has been replaced, and logs are pending. Either re-insert original diskette, or restart system. See Note 2.
E.2
Original system diskette has been replaced. Either re-insert original diskette, or restart system. See Note 2.
E.3
Disk drive is empty, and disk updates are pending. Either re-insert original diskette, or restart system. Disks may be locked (try backups). See Note 2.
E.4
Disk drive is empty. Either re-insert original diskette, or restart system. See Note 2.
E.5
There is an obstruction over the diskette “write notch” (a write-protect sticker) - remove it, or on a 31/2” disk, slide protector over the hole.
E.6
Diskettes A and B don’t match (are not of the same load) - insert proper diskettes and restart system.
E.7
Restart system. If this persists, assume faulty Main Control - refer to the Main Control procedures.
E.8
Decryption Module is missing - install correct module, and restart system. If this persists, assume faulty Main Control - refer to the Main Control procedures.
E.F
Information cannot be accessed on disks. Either re-insertdiskette, or restart system.

Troubleshooting and Repair
93
Trouble
shooting
Disk Drive StrappingWhen replacing a floppy disk drive on an SX-200 LIGHT PBX, verify that the switch settings for the drives are set as follows:
� Drive A: AT DC MO D0
� Drive B: AT DC MO D1
When replacing a floppy disk drive on an SX-200 DIGITAL PBX, verify that the switch settings for the drives that are mounted on a floppy disk mounting card are set as follows:
� Drive A: AT DC MO D0
� Drive B: AT DC MO D0
On an ISDN Node, verify that the switch settings for the drive are:
� Drive A: AT DC MO D1
Troubleshooting the SX-200 IP Node
To observe error messages from the SX-200 IP Node
1. Using a serial cable, connect a PC to the Maintenance Port on the IP Node.
2. Launch a data communication application, such as Hyperterminal on the PC.
3. Set the parameters: 9600, 8, N, 1, None.
4. Look for error messages in the SX-200 IP Node Troubleshooting Table on page 94.

Technician’s Handbook
94
Error Messages
Table 15: SX-200 IP Node Troubleshooting Table
Indication Possible Causes Action
WARNING: SX200 Main control not connected or IP Node not supported
Defective Ethernet cables
Replace the Ethernet Crossover cable and CIM cable.
The Control Triple CIM card is programmed as a Dual CIM card.
Reprogram the Triple CIM Card.
The CIM cable is connected to the wrong port on the SX-200 IP Node
Check the hardware connections.
The IP Bay is not programmed in CDE Form 01
Program the IP Bay in CDE Form 01.
Programming in CDE Form 04 and CDE Form 47 is not correct
Check the programming in CDE Form 04 and CDE Form 47.
(Sheet 1 of 2)

Troubleshooting and Repair
95
Trouble
shooting
WARNING: Startup incomplete after 1800
The DHCP server is not functioning properly.
1. If you're not using a Mitel DHCP server, disconnect all DHCP serversORDisconnect the IP Node from the subnet.2. In the serial port window on the PC, type RetrieveDhcpDefaults.3. Type Reboot.4. Connect the BCC III Card to the Ethernet Switch with an Ethernet crossover cable.5. Connect the IP Node to the Ethernet Switch.6. Allow the IP Node to reboot.
If the IP Node is still not working:1. Reboot the IP Node.2. Stop at Autoboot.3. At the [VxWorks Boot] prompt, type c.4. Check all settings.
Table 15: SX-200 IP Node Troubleshooting Table (Continued)
Indication Possible Causes Action
(Sheet 2 of 2)

Technician’s Handbook
96
Test Line
The test line is on the ONS line card at Bay 1, Slot 1, Circuit 1 for the SX-200 EL/ML or Bay 2, Slot 1, Circuit 1 for the SX-200 LIGHT/ DIGITAL. An access code for Feature 18, Maintenance Function - Test Line, must first be programmed in CDE Form 02 (Feature Access Codes).
Specifying Equipment From Test Line
Circuits are specified using their physical location numbers (bay, slot, circuit, subcircuit) or by Link and Channel number.
A receiver circuit at location Bay 1, Slot 3, Circuit 3, Subcircuit 4 is specified as “01 03 03 04”. A line circuit at location Bay 1, Slot 1, Circuit 6 is specified as “01 01 06 00”. Circuits with no subcircuit number (such as lines and trunks) must be specified with “00” as the subcircuit.
Channels are specified by using the required Link number and Channel number. The link number is a two-digit number (Links 0, 1, 14, or 15 cannot be tested). The Channel number is a two-digit number from 00 to 31. Channel 30 on Link 9 is specified as “09 30”.
Commands are entered on the test line by dialing command codes listed in Table 16 using the DTMF keypad or the rotary dial of the set being used.
Refer to Table 22, “Feature Access Codes,” on page 136.
The test line cannot be accessed while CDE or maintenance isactive.

Troubleshooting and Repair
97
Trouble
shooting
Table 16: Test Line Command Codes
Numeric Alpha Command Codes Description
22 BC Busy Out Channel (Remove Channel)
26 BO Busy Out device
35 DL Dump Logs
38 DT Direct Trunk select
72 RC Return Channel
73 SD Stop Dump Logs
77 RS Return Device to Service
78 ST Stop Test Printers
82 TC Test Channel
83 TD Test Device
872 TPB Test Printer Bay_Slot_Circuit
873 TPE Test Printer Extension_Number
877 TPP Test Printer Port

Technician’s Handbook
98
Test Line Indicator LEDs
After the maintenance person enters a command sequence, the MCC LEDs display the results as explained in the following table.
NOTE: Failure of any test line command sequence necessitates using more sophisti-cated maintenance tools.
Table 17: Test Line Status Indicator Codes
Code Meaning
PA The attempted operation was successful (pass).
FA The attempted operation was unsuccessful (fail).
(blank) System is waiting for command input.
II Test was inconclusive.
E5 Invalid command or device location entered; only those commands in Table 16 are acceptable.
bb Device was busy. Try again later.
7E An invalid physical location number was entered. Enter bay number (01), slot number (04), and circuit number (06).
FF Unknown error. Attempt operation again - ensure correct use of command codes (see Table 16).
1E Error in acquiring the software ID of the test line. Attempt operation again - ensure correct use of command codes (see Table 16). If necessary, use maintenance terminal or console.
2E Possible software error. Attempt operation again - ensure correct use of command codes (see Table 16). Use maintenance terminal or console if necessary.
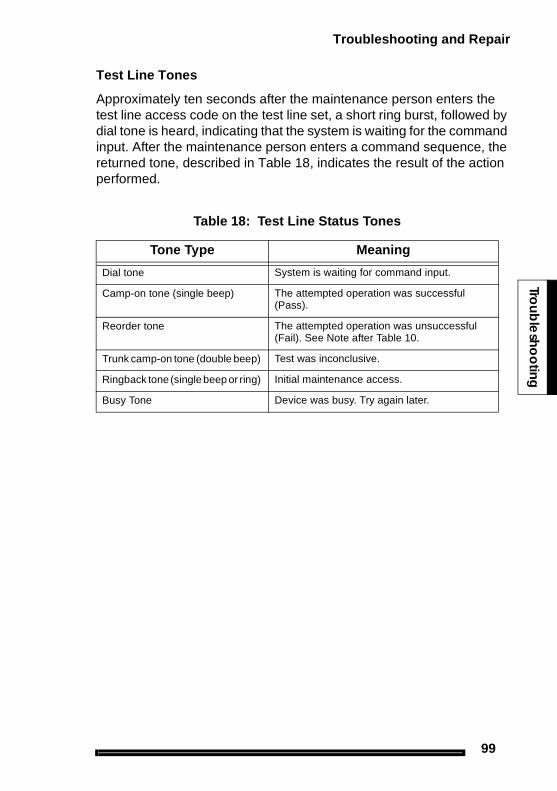
Troubleshooting and Repair
99
Trouble
shooting
Test Line Tones
Approximately ten seconds after the maintenance person enters the test line access code on the test line set, a short ring burst, followed by dial tone is heard, indicating that the system is waiting for the command input. After the maintenance person enters a command sequence, the returned tone, described in Table 18, indicates the result of the action performed.
Table 18: Test Line Status Tones
Tone Type Meaning
Dial tone System is waiting for command input.
Camp-on tone (single beep) The attempted operation was successful (Pass).
Reorder tone The attempted operation was unsuccessful (Fail). See Note after Table 10.
Trunk camp-on tone (double beep) Test was inconclusive.
Ringback tone (single beep or ring) Initial maintenance access.
Busy Tone Device was busy. Try again later.

Technician’s Handbook
100

Chapter 4
Programming


Programming
103
Progra
mm
ing
Programming an Attendant Console
1. Form 01, System Configuration
� Program a Digital Line Card (assigned as a high-power card in the SX-200 LIGHT) or a DNIC module for a DNIC Console. Use the first port on the Digital Line Card for the console.
or
� Program a Console Module on a Universal Card for an LCD Console.
2. Form 07, Console Assignment
� Assign an extension number, COS, COR, and Tenant for each console bay/slot/circuit entry.
3. Form 08, Console LDN Assignment
� Assign a directory number and label to each required console LDN key.
Console Descriptions
SUPERCONSOLE 1000® Attendant Console: uses a two-wire connection to connect to one circuit on a Digital Line Card or DNIC Module (Tip to Tip and Ring to Ring). With LIGHTWARE 18 or greater, the SUPERCONSOLE 1000, PN 9189-000-300 and 9189-000-301 can directly connect up to two PKM48 devices; these consoles with software prior to LIGHTWARE 18 and the SUPERCONSOLE 1000, PN 9189-000-001-NA and 9189-000-003 NA require a DSS/BLF Interface Unit to associate with the PKM48.
SUPERSET 7000 Attendant Console: includes a RS-232 port and requires a 2-wire connection to a DNIC port. This console requires a DSS/BLF Interface Unit in order to associate with a PKM48.
LCD Console: does not include a RS-232 port and requires a 4-wire connection to a console module. The SX-200 EL LIGHTWARE 17 Release 1.1, 2.0, and 3.0 do not support the LCD console; Release 3.1 and greater does.

Technician’s Handbook
104
Programming a Printer Port
System Printer Port
1. Form 34, Directed I/O
� Program the printer port in Form 34.
� Define Printout Types that are to be delivered to the system printer port.
� Remove printer port for print types not used.
� Speed of printer port is programmed in Maintenance.
Dataset Printer Port
1. Form 11, Data Circuit Descriptor
� Define a circuit descriptor to match characteristics of device type. Refer to Form 04, System Options and Timers on page 127 for typical circuit descriptor.
2. Form 12, Dataset Assignment
� Assign type of data device for the dataset PLID.DSCONS Console (output only, maximum 2400 baud)1101M MiLINK® Dataset1103/2103 Standalone dataset
� Assign a Tenant, Extension number, COS, COR, and circuit descriptor number.
3. Form 34, Directed IO
� Define printout type to be delivered to defined dataset.
Printer ports only work on main control cabinets, not on periph-eral cabinets.

Programming
105
Progra
mm
ing
Programming Stations/Sets Automatically
The AUTO PROGRAM function in CDE Form 09, Desktop Device Assignments, checks for unprogrammed circuits on all installed and programmed ONS cards, OPS cards, and DNIC cards. Cards that are installed in Spines are not supported.
All unprogrammed circuits are automatically programmed as follows:
� Extension numbers are automatically assigned according to a Bay, Slot, Circuit address format "BSCC", where
� B is the Bay number (1-7)
� S is the slot number (1-8)
� CC is the cct number (01-12).
For example, extension number 2608 is assigned to a phone connected to Bay 2, Slot 6, Circuit 08.
� Other parameters for ONS and OPS devices are assigned as
� COS = 1
� COR = 1
� Tenant = 1
� Other parameters for DNIC sets are assigned as
� COS = 2
� COR = 4 for all set types except SUPERSET 430 and SUPERSET 4150
� COR = 5 for the SUPERSET 430 and SUPERSET 4150
� Tenant = 1
NOTE: Before an extension number can be automatically assigned, a DNIC set or DMP must be physically connected to the circuit. If no set or console is detected on a circuit, that circuit is skipped and no extension number is assigned.

Technician’s Handbook
106
1. To automatically program all connected stations, DNIC sets and DMPs
2. Install all ONS cards, OPS cards, and DNIC cards. Do not program stations, DNIC, sets or DMPs.
3. Connect the DNIC sets or DMPs to the circuits.
4. Access Form 09, Desktop Device Assignments.
5. Press Auto Program.
After verifying that the unprogrammed sets are physically connected, the system automatically programs all unprogrammed circuits. The system displays all of the devices that have been programmed.
If a circuit cannot be programmed because an extension number has already been assigned to that circuit, a warning is displayed. Press ABORT to cancel the procedure or press CONTINUE to skip the device and resume programming the other devices in the range.
Deleting a device and all dependent resourcesThe DELETE softkey in CDE Form 09, Desktop Device Assignments, deletes a device and all of its dependent resources including
� All line keys (including DLN) that are programmed on a deleted set, standalone BLF, or PKM module
� All line and feature keys that are programmed on associated BLF or PKM modules
� The associated BLF and PKM modules
� Any other line appearances and BLF's of the deleted station or set.
A warning message appears if any of the above conditions exists. To continue, press CONFRIM. To abort, press CANCEL.

Programming
107
Progra
mm
ing
Deleting a range of devices and all dependent resourcesThe RANGE DELETE softkey in CDE Form 09, Desktop Device Assignments, allows block deletion of devices and all dependent resources.
To delete a range of devices and all dependent resources
1. Press RANGE DELETE.
The system displays: FROM BAY: SLOT: CIRCUIT:.
2. Enter valid Bay, Slot and Circuit numbers for the first device and press the ENTER softkey. The system displays: TO BAY: SLOT: CIRCUIT:.
3. Enter valid Bay, Slot and Circuit numbers for the last device and press the ENTER softkey. The system prompts you to choose whether or not you want to receive warnings as devices are deleted.
4. To receive a warning prior to deleting each device and its dependent resources, press YES. To delete all devices and dependent resources without warning, press NO.The system prompts you once again to confirm the deletion of the range.
5. To proceed with the deletion of the range of devices and all dependent resources, press CONFIRM. Press CANCEL to abort.If you chose to receive warnings each time a device is deleted, the system displays "deleting all keys, ..." for each device in the range.
6. To proceed, press CONFIRM. Pess CANCEL to abort the deletion of the specific device and continue with the next device.
To abort the deletion of a range of devices at any time during the procedure, press ABORT. Any devices that were deleted prior to pressing the ABORT key will remain deleted.
Technician’s Handbook
108
Programming a Single Line Voice Station
1. Form 01, System Configuration
� Program an ONS or OPS line card
� Program a Digital Line card or DNIC module forSUPERSET 401, SUPERSET 401+, and SUPERSET 4001 sets.
2. Form 09, Desktop Device Assignments
� Assign an extension number, COS, COR, and name (optional) for each bay/slot/circuit (set type remains STATION).
3. Form 30, Device Interconnection Table (optional)
� Set the required interconnect restrictions (for example, to restrict connections between specific device types).
4. Form 05, Tenant Interconnection Table (optional)
� Set the required interconnect restrictions (for example, to restrict connections between specific tenants).
5. Form 19, Call Rerouting Table (optional)
� Program the action that the system will take to handle the caller’s call violations.
� Each tenant requires its own Call Rerouting Table.
6. Form 03, COS Define (optional)
� Create a unique class of service (COS) if required.
7. Form 20, ARS: COR Group Definition
� Create a COR group that includes the COR number which you will assign to the station.
� This COR group restricts the external calls that the station user can dial.
Ensure that the system is provisioned with a sufficient number of DSP/DTMF receivers.

Programming
109
Progra
mm
ing
Programming an Analog Deviceto a SIM2
The analog interface in the SIM2 supports devices such as analog telephones, fax machines, or modems. The SUPERSET provides the power to the analog interface.
Ensure that the set firmware revision level meets the system firmware revision level. If the revision level on the system is higher than the set revision level, upgrade the set firmware.
When adding an analog set to a SIM2, use CDE Form 12 to program the port. The port type is AIM.
Programming a Multi-Line Set
1. Form 01, System Configuration
� Program a Digital Line Card, DNIC module, or COV line card.
2. Form 09, Desktop Device Assignments
� Assign set type, extension number, COS, COR, and name (optional) for each bay/slot/circuit.
� Set types are SUPERSET 4001, 4015, 4025, 4125, 4090, 4150, 401+, 410, 420, 430, 4150 S/Att, 430 S/Att, 3DN, and 4DN.
� Complete the Form 09 sub-form for key types and options.
Refer to Upgrading Set Firmware (page 33).
LIGHTWARE 16 for the SX-200 ML and LIGHTWARE 17 and greater for the SX-200 EL/ML do not support SUPERSET 3 or SUPERSET 4 sets (COV). COVs are reserved for voice mail only.
Technician’s Handbook
110
3. Form 30, Device Interconnection Table (optional)
� Set the required interconnect restrictions (for example, to restrict connections between specific device types).
4. Form 05, Tenant Interconnection Table (optional)
� Set the required interconnect restrictions (for example, to restrict connections between specific tenants).
5. Form 19, Call Rerouting Table (optional)
� Program the action that the system will take to handle the caller’s call violations.
� Each tenant requires its own Call Rerouting Table.
6. Form 03, COS Define (optional)
� Create a unique class of service (COS) if required, or use an existing COS.
7. Form 20, ARS: COR Group Definition
� Create a COR group that includes the COR number which you will assign to the station, or use an existing COR.
� This COR group restricts the external calls that the station user can dial.
LIGHTWARE 17 Release 3.1 and greater support SUPERSET 3DN and SUPERSET 4DN sets. This feature is a purchasable system option.

Programming
111
Progra
mm
ing
Programming a Subattendant Set
1. Form 01, System Configuration
� Program a Digital Line Card or DNIC module.
2. Form 09, Desktop Device Assignments
� Assign set type to SUB, extension number, COS, COR, and name (optional) for each bay/slot/circuit.
� Complete the sub-form for assigned keys, types, and options.
Assign a separate COS with subattendant options.
Set type SUB can only be SUPERSET 4150, SUPERSET 430, or SUPERSET 4DN.

Technician’s Handbook
112
Programming a PRI card
The PRI card supports the following purchasable MOSS options: Q.SIG (option 86), NFAS (option 91), D-Channel Backup (option 92), Remote LAN Access (option 93), Min/Max (option 94), Auto Min/Max (option 95), Number of Links 0-8 (option 96). Option 91 to 95 are downloaded to each PRI card installed. Option 96 enables the number of ISDN T1 links on the PRI card (these links do not pertain to the ISDN Network Gateway). These MOSS options serve all the PRI cards in the system. If you change any of these options, you must reset the PRI card to enable them, and you may need to download a new IMAT database on to the PRI card(s).
1. Form 01, System Configuration
� Program the PRI card node type as an ISDN bay. The ISDN trunks are programmed in slot 6 and slot 8.
2. Form 03, Class of Service (for the ISDN trunks)
� Enable COS Option 701 (No Dial Tone).
� Disable COS Option 800 (ANI Applies). Ensure this is NOT in the class of service of the ISDN trunks.
� Enable COS Option 801 (Incoming Trunk Call Rotary.
� Enable COS Option 802 (Limited Wait for Dial Tone).
� Enable COS option 811 (ANI/DNIS Trunk) to display CLID (the caller's number) and DDI (the number the caller dialed) on incoming trunks.
If you purchase a number of T1 links (System Option 96) less than the number of T1 links you install and program, Mitel Networks cannot reliably predict which T1 links the SX-200 EL/ML system will use after a reset.If you purchase a number of T1 links (System Option 96) greater than the number of T1 links you install and program, the T1 links programmed will remain consistent.

Programming
113
Progra
mm
ing
� Enable COS option 246 (SMDR - Extended Record) to allow the calling name to appear in SMDR reports for Inciming calls.
� Enable COS Option 814 (SMDR - Record ANI/DNIS) to allow CLID digits to appear in SMDR reports for Incoming calls.
� Enable COS Option 702 (SMDR - Overwrite Buffer) if SMDR - Record Incoming Calls Option 806 is Enabled.
3. Form 03, Class of Service (for the sets & stations)
� Enable COS option 502 (Display ANI/DNIS Information) or COS option 613 (Display ANI Information Only) to allow display of CLID digits on display telephones.
� Enable COS option 503 (Enable Calling Name Display)
� Enable COS option 702 (SMDR - Overwrite Buffer).
� Disable COS option 236 (Outgoing Trunk Callback).
� Disable COS option 237 (Outgoing Trunk Campon).
4. Form 04, System Options/System Timers - Assign a one to five second value to the System Timer Limited Wait For Dial Tone if ISDN trunks are present.
� Enable the MOSS option, Number of Links 0-8 (option 96). If desired, enable Q.SIG (option 86), NFAS (option 91), D-Channel Backup (option 92), Min/Max (option 94), and Auto Min/Max (option 95).
5. Form 13, Trunk Circuit Descriptors
� Assign the ISDN trunk with a T1 trunk circuit descriptor. To receive CLID or DDI digits, the ISDN trunk must be a non-DISA trunk that is programmed with a T1 E&M, T1 E&M DISA, T1 TIE DISA, or T1 DID/TIE trunk circuit descriptor.
For option 92 to be changed to ENABLED. Option 91 must already be ENABLED. Similarly, if both are ENABLED, option 92 must be DISABLED first.
For option 95 to be changed to ENABLED. Option 94 must already be ENABLED. Similarly, if both are ENABLED, option 95 must be DISABLED first.

Technician’s Handbook
114
6. Form 13, Options Subform
� Set the “DTMF” option to “No”
� If you are connecting the ISDN trunk to a Toll Office, set the Toll Office option to “Yes”.
� If you are connecting the ISDN trunk to a Local Office, set the Toll Office option to “No”, and set the “Is a CO?” option to “Yes”.
� Set the Debounce Timer to 100 milliseconds.
� Set the Incoming Start Type to WINK.
� Set the Outgoing Start Type to WINK.
7. Form 14, Non Dial-In Trunks OR Form 15, Dial-In Trunks
� Define the incoming ISDN trunk as a non-dial-in trunk in Form 14, or as a dial-in trunk in Form 15. You cannot program a trunk into both Form 14 and Form 15.
8. Form 16, Trunk Groups
� Assign the ISDN trunks to a trunk group. The trunk group number that you program for the ISDN trunks in this form must match the trunk group numbers that you program for the ISDN trunks in the PRI card bay.
9. Form 42, T1 Link Descriptor
� Select a T1 Link Descriptor for the ISDN trunks in Form 42. In the Link Descriptor Options Subform, enter the following values for the T1 Link Descriptor:
The Toll Office setting takes precedence over the Local Office setting. Also, if neither “Toll Office” nor “Is a CO?” is set to “yes”, the switch assumes a digital TIE trunk is connected.
Option Name Value
Alarm debounce timer (300-3200) 500
B8ZS zero code suppression YES
Slip rate - maintenance limit (0-9000)/24 hrs 255
Slip rate - service limit (0-9000)/24 hrs 7000 (Sheet 1 of 2)
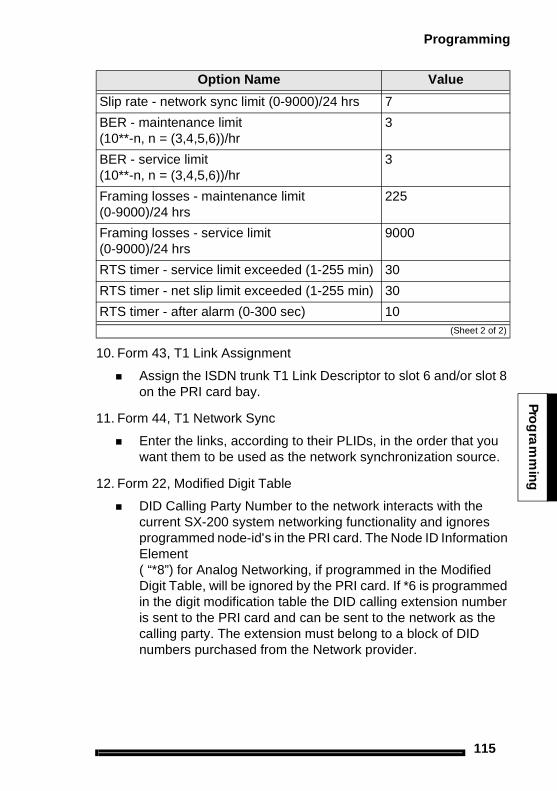
Programming
115
Progra
mm
ing
10. Form 43, T1 Link Assignment
� Assign the ISDN trunk T1 Link Descriptor to slot 6 and/or slot 8 on the PRI card bay.
11. Form 44, T1 Network Sync
� Enter the links, according to their PLIDs, in the order that you want them to be used as the network synchronization source.
12. Form 22, Modified Digit Table
� DID Calling Party Number to the network interacts with the current SX-200 system networking functionality and ignores programmed node-id's in the PRI card. The Node ID Information Element( “*8”) for Analog Networking, if programmed in the Modified Digit Table, will be ignored by the PRI card. If *6 is programmed in the digit modification table the DID calling extension number is sent to the PRI card and can be sent to the network as the calling party. The extension must belong to a block of DID numbers purchased from the Network provider.
Slip rate - network sync limit (0-9000)/24 hrs 7
BER - maintenance limit (10**-n, n = (3,4,5,6))/hr
3
BER - service limit(10**-n, n = (3,4,5,6))/hr
3
Framing losses - maintenance limit(0-9000)/24 hrs
225
Framing losses - service limit (0-9000)/24 hrs
9000
RTS timer - service limit exceeded (1-255 min) 30
RTS timer - net slip limit exceeded (1-255 min) 30
RTS timer - after alarm (0-300 sec) 10
Option Name Value
(Sheet 2 of 2)

Technician’s Handbook
116
The following table shows how Analog Networking and Call-by-Call informationl co-exist in the Modified Digit Table.
In the “Digits to be Inserted” field, the definition of characters are:
*4 No SMDR for further modified digits000 Call-by-Call digits, (speech, default O/G, clid)*6 Send caller id (DID to network)*4 Start SMDR again for further modified digits
13. Complete ARS programming
� ARS programming must match with the service selection programming that is entered through the ISDN Maintenance Administration Tool (IMAT) computer.
Programming a Non-Dial-In Trunk
1. Form 01, System Configuration
� Program a trunk card that meets the trunk type requirements.
2. Form 13, Trunk Circuit Descriptor
� Create a trunk circuit descriptor that corresponds to the type of trunk that you are programming.
3. Form 03, Class of Service
� Assign trunk options only.
EntryQuantity to
DeleteDigits to be
InsertedComments
01 1 *4000*6*4 ISDN CxC and DID
Refer to the IMAT online Help file for information aboutprogramming the IMAT database.

Programming
117
Progra
mm
ing
4. Form 14, Non-Dial-in Trunks
� Assign COS and Tenant.
� Assign the directory number or an abbreviated dial number which incoming calls will ring for Day Service, Night Service 1, and Night Service 2 modes.
� Assign a Circuit Descriptor Number (CDN) (links this form to Form 13).
� Assign a Trunk Name if desired. This name appears on the consoles and on the set displays for incoming and outgoing calls.
� Assign a Trunk Number.
5. Form 16, Trunk Groups
� Assign to a trunk group if outgoing.
Programming a range of Non Dial-in TrunksThe RANGE PRGRM softkey allows block programming of trunks on the same card. You must program the first trunk in the range and then press RANGE PRGM to copy the values to the range of trunks that you specify. The following fields are copied from the first trunk in the range:
� COS, TEN, DAY, N1, N2, CDN
The TK NAME and COMMENTS fields are left blank.
The trunk numbers are assigned in sequence, beginning with the first trunk in the range. If there are trunks that are already programmed
CDE Form 14 does not accept trunk programming changes if the T1 card or T1/E1 module is installed and the T1 link is down but active. To make a programming change for a T1 card, unplug the T1 card, make the programming change and then re-insert the T1 card. To make a programming change for a T1/E1 module, insert a Peripheral Interface Card (PIC) into the software location (slots 5 or 6) for that T1 link, make the programming change, and then remove the PIC from the slot to reset the T1 link.

Technician’s Handbook
118
within that range, those trunks are skipped. The trunk number sequence is incremented each time a trunk is skipped. If the trunk number is incremented to a value that is already used, the sequence continues to increment until a free number is found. The trunk numbers restart at 1 if necessary. An error message is displayed if there are no more free trunk numbers.
NOTE: BRI trunks are not supported.
To program a range of trunks:
1. Program the first trunk in the range. Enter values for the COS, TEN, DAY, N1, N2, CDN fields.
2. Press RANGE PRGRM.The system displays: FROM BAY: SLOT: CIRCUIT:.
3. Enter valid Bay, Slot and Circuit numbers for the first trunk and press the ENTER softkey. The system displays: TO BAY: SLOT: CIRCUIT:.
4. Enter valid Bay, Slot and Circuit numbers for the last trunk and press the ENTER softkey. The system copies the values from the first trunk to all the trunks specified in the range.

Programming
119
Progra
mm
ing
Programming a Dial-In Trunk
1. Form 01, System Configuration
� Program a trunk card that meets the trunk type requirements.
2. Form 13, Trunk Circuit Descriptor
� Create a trunk circuit descriptor that corresponds to the type of trunk that you are programming.
3. Form 03, Class of Service
� Assign trunk options only.
4. Form 15, Dial-in Trunks
� Assign COS, COR, and Tenant.
� Column N lists the number of expected digits.
� Column M lists the number of digits to absorb. To absorb noincoming digits, set to 0. To absorb n digits, enter n (a whole number).
� Column X defines the number of digits to insert.
� Assign a Trunk Name if desired. This name appears on the consoles and on the set displays for incoming and outgoing calls.
Assign a separate COS for the Dial-In Trunk.
If this digit is 0, the system treats this as a Tie trunk. If this digit is not 0, the system treats this as a DID trunk.
Do not insert 0 as a blank. To insert no digits, leave blank.To insert digits, enter the actual digits.

Technician’s Handbook
120
5. Form 16, Trunk Groups
� Assign to a trunk group if outgoing.
Programming a range of Dial-in TrunksThe RANGE PRGRM softkey allows block programming of trunks on the same card. You must program the first trunk in the range and then press RANGE PRGM to copy the values to the range of trunks that you specify. The following fields are copied from the first trunk in the range:
� COS, COR, TEN, N1, M, X, CDN
The TK NAME and COMMENTS fields are left blank.
The trunk numbers are assigned in sequence, beginning with the first trunk in the range. If there are trunks that are already programmed within that range, those trunks are skipped. The trunk number sequence is incremented each time a trunk is skipped. If the trunk number is incremented to a value that is already used, the sequence continues to increment until a free number is found. The trunk numbers restart at 1 if necessary. An error message is displayed if there are no more free trunk numbers.
NOTE: BRI trunks are not supported.
To program a range of trunks:
1. Program the first trunk in the range. Enter values for the COS, COR, TEN, N1, M, X, CDN fields.
2. Press RANGE PRGRM.The system displays: FROM BAY: SLOT: CIRCUIT:.
CDE Form 15 does not accept trunk programming changes if the T1 card or T1/E1 module is installed and the T1 link is down but active. To make a programming change for a T1 card, unplug the T1 card, make the programming change and then re-insert the T1 card . To make a programming change for a T1/E1 module, insert a Peripheral Interface Card (PIC) into the software location (slots 5 or 6) for that T1 link, make the programming change, and then remove the PIC from the slot to reset the T1 link.

Programming
121
Progra
mm
ing
3. Enter valid Bay, Slot and Circuit numbers for the first trunk and press the ENTER softkey. The system displays: TO BAY: SLOT: CIRCUIT:.
4. Enter valid Bay, Slot and Circuit numbers for the last trunk and press the ENTER softkey.
5. The system copies the values from the first trunk to all the trunks specified in the range.
Programming a DISA Trunk
1. Form 01, System Configuration
� Program a trunk card that meets the trunk type requirements.
2. Form 13, Trunk Circuit Descriptors
� Select a DISA circuit descriptor to match hardware type.
3. Form 03, Class of Service
� Assign trunk options only.
4. Form 15, Dial-In Trunks
� Assign COS, COR, and Tenant.
� Column N: set to 0
� Column M: set to 0
� Column X: leave blank
� Assign a Trunk Name if desired. This name appears on the consoles and on the set displays for incoming and outgoing calls.
Recommended Options for system security include:
Form 03: Enable Option 808 (Special DISA).
Form 04: Enable Option 5 (Verified Account Codes) and specify a time for Option 54 (DISA Answer Timer).
Assignment of a DISA circuit descriptor to a trunk changes the trunk to a DISA trunk.
Assign a separate COS for the Dial-In Trunk.

Technician’s Handbook
122
Form 33: Enter appropriate DISA access codes.
Programming ANI/DNIS on anIncoming Trunk
ANI (Automatic Number Identification) - the local carrier sends to the PBX the phone number of the calling party.
DNIS (Dialed Number Identification Service) - the local carrier sends to the PBX the digits dialed by the calling party.
ANI/DNIS is available only to incoming trunks with trunk descriptor “T1-E&M” and “T1-DID/TIE”, which accept DTMF signaling and have the wink timer active.
Only MCI and US Sprint Standards are supported. MCI sends the ANI digits without delimiters. Sprint delimits the DNIS and ANI digits with asterisks.
DNIS digits on a dial-in trunk are used to route that trunk call, and no further digits will be expected.
1. Create an ANI/DNIS trunk by creating a separate COS . Set the fol-lowing options in the trunk's Class Of Service:
� COS Option 811 - ANI/DNIS Trunk to ENABLED
� COS Option 801 - Incoming Trunk Rotary to DISABLED
� COS Option 800 - ANI Applies to DISABLED
� COS Option 246 - SMDR Extended Record to ENABLED (for SMDR to report the ANI and DNIS digits).
2. In the Trunk Circuit Descriptor parameters set
� Incoming Start Type to Wink
If the DISA trunk is a loop-start CO trunk, then loop- start inter-connection rules apply and the restrictions on-loop start CO trunks applies.
Four-circuit/Eight-circuit LS/CLASS trunks can also be programmed as DISA trunks.

Programming
123
Progra
mm
ing
� Wink Timer to 100-350 for MCI and 140-290 for US SPRINT
� Debounce Timer to 100 ms or greater.
3. To define which information will be displayed on the sets, ANI, DNIS, both, or none (standard trunk label display), select the required following COS options:
� COS Option 502 - Display ANI/DNIS Information = ENABLE / DISABLE
� COS Option 613 - Display ANI Information Only = ENABLE / DISABLE
� COS Option 503 - Display CLASS Name if required.
4. To display ANI and DNIS digits on a console when talking to an ANI/DNIS trunk, enable COS Option 502 - Display ANI/DNIS Information for the console.
Intercept reason (FROM xxx DND) and Forwarding Information (FWD FROM xxxx) take priority over DNIS.
Tenant Name and Calling Line ID take priority over ANI information (immediately following the word TRUNK).
COS Option 613 - Display ANI Information Only does not apply to a console.
The following tables identify displays during each call state according to digits sent by the trunk and COS options selected for the display set.
If a name is received on the incoming trunk in the scenario where you would see the DNIS in the ringing state, you will see the ANI instead.

Technician’s Handbook
124
Table 19: ANI/DNIS Digits on Phone Display(COS Option 502 Enabled and COS Option 613 Disabled)
COS Option 502- Display ANI/DNIS = YES (enable)
COS Option 613 - Display ANI only = NO (disable)Phone display during ringing
Phone display after answer
ANI and DNIS sent DNIS ANIANI sent ANI ANIDNIS sent DNIS DNISNeither sent Trunk Number or Label Trunk Number or Label
Table 20: ANI/DNIS Digits on Phone Display(COS Option 502 Enabled and COS Option 613 Enabled)
COS Option 502- Display ANI/DNIS = YES (enable)
COS Option 613 - Display ANI only = YES (enable)Phone display during ringing
Phone display after answer
ANI and DNIS sent ANI ANIANI sent ANI ANIDNIS sent Trunk Number or Label Trunk Number or LabelNeither sent Trunk Number or Label Trunk Number or Label

Programming
125
Progra
mm
ing
The following table describes the set display for logged in ACD Agents with the delivery of ANI/DNIS digits on the incoming trunks.
Table 21: ANI/DNIS for ACD Agents
COS 502
COS 613
COS 654
Path Name
Ringing State
TalkingState
Enabled Enabled Disabled None ANI ANI
Enabled Disabled Disabled None DNIS ANI
Disabled Disabled Disabled None Path Number Trunk Name
Disabled Enabled Disabled None Path Number Trunk Name
Disabled Disabled Enabled None Path Number Path Number
Disabled Enabled Enabled None Path Number Path Number
Enabled Enabled Enabled None ANI Path Number
Enabled Disabled Enabled None DNIS Path Number
Enabled Enabled Disabled Yes Path Name ANI
Enabled Disabled Disabled Yes Path Name ANI
Disabled Disabled Disabled Yes Path Name Calling Trunk Name
Disabled Enabled Disabled Yes Path Name Calling Trunk Name
Disabled Disabled Enabled Yes Path Name Calling Path Name
Disabled Enabled Enabled Yes Path Name Calling Path Name
Enabled Enabled Enabled Yes Path Name Path Name
Enabled Disabled Enabled Yes Path Name Path Name

Technician’s Handbook
126
Programming a CLASS Trunk
1. Form 01, System Configuration
� Program the LS/CLASS Trunk module or the LS/CLASS Trunk card.
2. Form 03, Class of Service, Define for trunks.
� To have Calling Line ID digits reported in the SMDR records, enable COS Option 806 (SMDR-Record Incoming Calls) and COS Option 814 (SMDR-Record ANI/DNIS/CLASS). Enable COS Option 702 (SMDR - Overwrite Buffer).
� To have CLASS name reported in the SMDR records, enable COS Option 246 (SMDR-Extended Record) and COS Option 814 (SMDR-Record ANI/DNIS/CLASS).
3. Form 03, Class of Service, Define for SUPERSET sets.
� To display Calling Line ID digits on a SUPERSET display set or console, enable COS Option 502 (Display ANI/DNIS/CLASS Information) in the class of service for the set/console. Enable COS Option 613 - Display ANI Information Only if required.
� To display CLASS name before Calling Line ID digits on a SUPERSET small display set (SUPERSET 4025, SUPERSET 4125, or SUPERSET 420 telephones), enable COS Option 503 (Display CLASS Name) in the class of service for the set.
4. Form 13, Trunk Circuit Descriptor
� Assign the CLASS trunk with the circuit descriptor. An LS/CLASS Trunk module uses “4-CIRCUIT CLASS ”. An LS/CLASS Trunk card uses “8-CIRCUIT CLASS“
Programming a LS/CLASS Trunk card requiresLIGHTWARE 19 Release 2.0 or greater software.
Assign a separate COS for the trunk.

Programming
127
Progra
mm
ing
� Program the option “CLASS Trunk” in the circuit descriptor options subform for the appropriate 4 or 8-circuit CLASS trunk.
5. Form 14, Non-Dial-In Trunks or Form 15, Dial-in Trunks
� Program the CLASS trunks.
6. Form 04, System Options and Timers
� Program the CLASS receivers for the LS/CLASS Trunk module. The LS/CLASS Trunk card provides its own CLASS receivers and does not require programming in Form 04.
Programming an SX-200 IP Node
Initializing the SX-200 IP Node
1. Ensure the SX-200 IP Node is not connected to a power source.
1. Disconnect the the Ethernet cable from the Ethernet port on the SX-200 IP Node.
2. Using a serial cable, connect a PC to the Maintenance Port on the IP Node.
3. Launch a data communication application, such as Hyperterminal on the PC.
4. Set the parameters: 9600, 8, N, 1, None.
5. Plug in the SX-200 IP Node to a power source.
6. At the “Press any key to stop and auto-boot” prompt, press any key.
7. At the [VxWorks Boot] prompt, type ‘c’.
8. Press Enter to type data in the following fields:
� inet on ethernet (e): IP address of the SX-200 IP Node
� gateway inet (g): IP address of the WAN gateway or router
In Form 15 the CLASS trunk becomes a DISA trunk.

Technician’s Handbook
128
9. Press Enter until the [VxWorks Boot] prompt appears.
10. Type ‘@’.
11. After the Critical Alarm LED goes off, reconnect the Ethernet cable.
CDE Programming for the SX-200 IP Node
1. Form 01 - System Configuration
� Assign IP Line Cards to slots.
2. Form 04 - System Options
� Assign the BCC III Card to the IP Signalling Bay
— Option 116, IP Signalling Bay (1-7) number
— Option 117, IP Signalling Bay IP Address
— Option 118, IP Signalling Bay Gateway Address
— Option 119, IP Signalling Bay Subnet Mask
3. Form 47 - IP & DCHP Parameters
� Enter the IP Controller Address. Enter the SX-200 IP Node address.
� Enter the DHCP Server Subnet.
� Enter the DHCP Server Subnet mask.
� Enter the DHCP Assignable IP Address Start. Enter the start range of the IP phones.
� Enter the DHCP Assignable IP Address End. Enter the end range of the IP phones.
� Enter the TFTP Server Address. Enter the IP address of any SX-200 IP Node.
� Enter the Gateway/Router IP Address.
� Leave blank the Mitel Only field.
� Enter the VLAN ID (optional). Enter a unique ID between 1 and 4095 for the dual-port IP phones.
� Enter the IP phone Priority. Use a priority of 7 (highest).

Programming
129
Progra
mm
ing
� Enter the IP Address Lease Time. Enter the number of minutes before a device is disconnected and its IP address is re-assigned elsewhere. Applies only to the specific bay. To assign an infinite lease time, use 0 minutes.
� Press Enable to enable the DHCP Server.
4. Form 09 - Desktop Device Assignments
� Assign the IP phones to Bay/Slt/Ccts.
� (Optional) Enter the MAC Addresses of the IP phones.
5. (Optional) Form 02 - Feature Access Codes
� Specify the access codes for the IP phones.
6. (Optional) Form 03 - COS Define
� Enable voice compression by selecting COS number 688.
7. Use CDE Forms to program all other station features (for example, Class of Service, Interconnect Restriction, Set Key Assignments, and Class of Restriction).
Registering IP Phones (Optional)
� Ensure you have the access code--if you programmed one--for set registration in CDE Form 02, Feature Access Codes.
� Ensure the directory number and device type is programmed in CDE Form 09, Desktop Device Assignments.
To register IP phones
1. Connect the IP phone to an RJ-45 Ethernet port on the LAN.
2. Press * during power-up (to clear any directory number in memory).
3. Type the acess code followed by the directory number.
4. Press Superkey.

Technician’s Handbook
130
Programming a Circuit Descriptor for Hotel/Motel and ACD Datasets
1. Form 03 - COS Define
� Select the COS number.
� Enable the following COS Options:
— 901 - DTRX Herald
— 904 - DTRX Complete Message Text
— 906 - Data SMDR - Does Not Apply
2. Form 29 - DTE Profile
� Select a DTE profile number. You will use this profile number in Form 12 - Data Assignment.
� Select the SEL. Option Subform.
� Enable: DTRX Echoplex, Editing, and Edit Character = 127.
3. Form 11 - Data Circuit Descriptor
� Select a Circuit Descriptor (CDN). You will use this CDN in Form 12 in the next step.
Match the CDN values to those of the selected Terminal. For example, All Baud Rates = 9600, Parity = None, Character Length = 8, and Stop Bits = 1.
4. Form 12 - Data Assignment
� Select an available PLID and program the selected dataset. In the Data Terminal Equipment profile (DTE) field enter the DTE number you used in Form 29. Use the same CDN you used in Form 11.

Programming
131
Progra
mm
ing
Programming the PMS Interface
1. Determine the customer’s PMS communications protocol require-ments: baud rate, parity, character length, and number of stop bits.
2. Form 11, Circuit Descriptor � Program to match the protocol.
� Select the Circuit Descriptor Options..
Option Name Value
Session Inactivity Timer 0
Guard Timer 2
Minimum Baud Rate match customer’s PMS
Default Baud Rate match customer’s PMS
Maximum Baud Rate match customer’s PMS
Always use Default Baud Rate when called YES
DTR Off Disconnect Timer 5
DTR to CTS Delay Timer 100
DTR Forced High YES
RTS Forced High YES
DSR Is held High when device is Idle YES
CTS Is held High when device is Idle YES
Originate a DTRX Call with Low - High transition of DTR NO
Action taken if the Idle DTE has DTR Low ( Auto-Answer ) REFUSE
ASYNC: Keyboard Origination Allowed ( Auto Baud) DISABLE
ASYNC: ADL Auto Baud DISABLE
ASYNC: Flow Control XON/XOFF
ASYNC:Break Key Function Transparent
ASYNC: PBX Attention Character 0
ASYNC: Parity match customer’s PMS
ASYNC: Character Length match customer’s PMS
ASYNC: Number Of Stop Bits match customer’s PMS
DS2100: Operating Mode ASYNCHRONOUS
If you make changes to a Dataset’s Circuit Descriptor after it is powered-up you must power down then power up the Dataset for the changes to take effect.

Technician’s Handbook
132
3. Form 12, Dataset Assignment
� Assign the Circuit Descriptor COS, COR, and Tenant.
� Ensure that the DTE profile is blank.
4. Form 04, System Options: program the following:
System Options / Timers Status
04 Message Waiting and Message Register Clear Print ENABLE
11 Automatic Wake-Up ENABLE
13 Automatic Wake-Up Print ENABLE
32 Outgoing Call Restriction ENABLE
108 Property Management System ENABLE
27 Room Status Audit DISABLE
33 Room Status DISABLE
34 Auto Room Status Conversion / Wake Up Print DISABLE

Programming
133
Progra
mm
ing
5. Form 03, Class of Service Define: program the following table:
6. Form 19, Call Rerouting: program “Station Dial 0" routing
� The “Station Dial 0" answer point for all tenants must be a Console LDN or Subattendant LDN. To allow the customer’s PMS to set message waiting, you must program Day, Night 1, and Night 2 answer points to the same LDN.
� If you require different “Dial 0" answer points for Day, N1, and N2 use “Priority Dial 0" as an alternate method.
7. Form 34, Directed I/O: program the PMS.
8. Connect the Dataset to the programmed PLID.
� All three Dataset LED’s should light. If not, verify your programming and hardware connections.
Device COS Option Status
AttendantConsoles
101 Attendant Outgoing Restriction / Room Status Set Up ENABLE
105 Attendant Guest Room Key ENABLE
Room Telephones
202 Alarm Call ENABLE
220 Do Not Disturb ENABLE
232 Message Waiting SETUP Lamp ENABLE
703 Message Register Applies ENABLE
239 Priority Dial 0 (optional - see step 6) ENABLE
244 Room Status Applies DISABLE
608 SUPERSET Status Display DISABLE
[ Tenant _____ ] Type Of Call Day N1 N2
Station Dial 0 Routing Same LDN Same LDN Same LDN
EXT NUM PRINTOUT PRINTOUT TYPE GUARANTEED
From Form 12 PMS AUTOPRINT NO

Technician’s Handbook
134
9. Connect the customer’s PMS computer to the Dataset’s RS-232 connector.
10. Verify that the customer’s PMS computer communicateswith the PBX.
� If the PBX’s PMS interface and the customer’s PMS computer communicate properly, you will see an exchange of ENQ (Enquire) and ACK (Acknowledge) commands at the customer’s PMS computer.
� If the PBX’s PMS interface and the customer’s PMS computer do not communicate properly, test the PBX’s PMS interface.
Refer to PBX and PMS Cannot Communicate (page 89).

Programming
135
Progra
mm
ing
Programming Call Forwarding - External
Call Forwarding - External forwards all calls received to a personal speed call key, system abbreviated dial number, or a key system personal speedcall.
� Call Forwarding - External requires a receiver for dialing. If one is not available in Call Forward - Don’t Answer, forwarding is ignored. If one is not available during a reroute, the caller is dropped or given reorder tone.
1. Program the following COS options in the extension’s COS:
� Enable COS Option 245 (Abbreviated Dialing Access).
� Enable COS Option 208 (Call Forwarding External).
� Disable COS Option 200 (Account Code, Forced Entry - External Calls) to allow call forwarding to system abbreviated dial numbers.
2. Enable System Option 21 (Incoming to Outgoing Call Forward) for a trunk or party with a single party trunk on hold to forward externally.
3. Program a feature access code for Feature Access Code 03 (Call Forwarding - All Calls).
4. CDE Form 30 - Device Interconnection Table specifies which devices can be connected together. For external call forwarding that involves two trunks, verify that they can be connected together.
Toll Control applies to the calling party for Call Forwarding - External to personal speed call keys or to key system personal speedcalls.
The device which is calling the destination that is an external call forward must have COS Option 208, Call Forward External, enabled.
Check for split forwarding COS 260 and COS 709.

Technician’s Handbook
136
Toll Control does not apply when forwarding to system abbreviated dial external numbers.
Toll Control does not apply to CO trunks which are externally call forwarded.
The forwarding destination is the current stored speedcall key number, personal abbreviated dial number, or system abbreviated dial number.
Feature Access Codes (CDE Form 02)
Table 22 provides a list of the features which can be assigned an access code.
On a Call Forward - Busy or Call Forward - Always call, the COS of the caller (trunk or extension) is checked. Keep this in mind when transferring calls to a phone which is externally Call Forwarded.
Table 22: Feature Access Codes
Feature Numbers For LIGHTWARE 19
Release 2.0Feature Names
01 Account Code Access
02 Auto-Answer Activation
03 Call Forwarding - All Calls
04 Call Forwarding - Internal Only
05 Call Forwarding - External Only
06 Call Forwarding - I’m Here
07 Call Forwarding - Cancel I’m Here
08 Dial Call Pickup
09 Directed Call Pickup
10 Do Not Disturb
11 Extension General Attendant Access
12 Paging Access To Default Zone(s)
(Sheet 1 of 3)
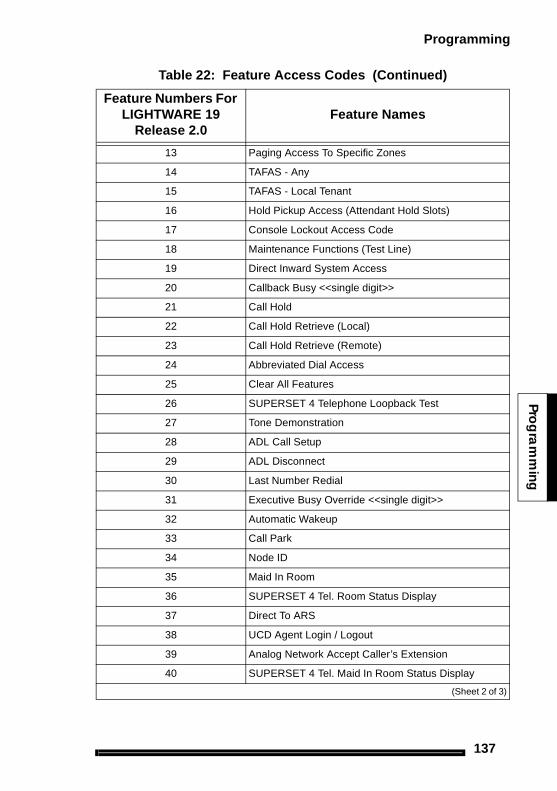
Programming
137
Progra
mm
ing
13 Paging Access To Specific Zones
14 TAFAS - Any
15 TAFAS - Local Tenant
16 Hold Pickup Access (Attendant Hold Slots)
17 Console Lockout Access Code
18 Maintenance Functions (Test Line)
19 Direct Inward System Access
20 Callback Busy <<single digit>>
21 Call Hold
22 Call Hold Retrieve (Local)
23 Call Hold Retrieve (Remote)
24 Abbreviated Dial Access
25 Clear All Features
26 SUPERSET 4 Telephone Loopback Test
27 Tone Demonstration
28 ADL Call Setup
29 ADL Disconnect
30 Last Number Redial
31 Executive Busy Override <<single digit>>
32 Automatic Wakeup
33 Call Park
34 Node ID
35 Maid In Room
36 SUPERSET 4 Tel. Room Status Display
37 Direct To ARS
38 UCD Agent Login / Logout
39 Analog Network Accept Caller’s Extension
40 SUPERSET 4 Tel. Maid In Room Status Display
Table 22: Feature Access Codes (Continued)
Feature Numbers For LIGHTWARE 19
Release 2.0Feature Names
(Sheet 2 of 3)

Technician’s Handbook
138
41 Send Message
42 Call Message Sender of Oldest Message
43 Callback - No Answer
44 ACD Login / Logout
45 ACD Silent Monitoring
46 Flash Over Trunk
47 Program Feature Key
48 Key System - Direct Paging
49 Key System - Group Page Meet-Me-Answer
50 Key System - Direct CO Line Select
51 Key System - Store Personal Speed Call
52 Key System - Retrieve Personal Speed Call
53 Double Flash Over Trunk
54 Analog Network Accept Call Forward Data
55 Analog Network Accept Call Forward Reason
56 Headset Mode On/Off
57 Call Park Orbit Retrieve
Table 22: Feature Access Codes (Continued)
Feature Numbers For LIGHTWARE 19
Release 2.0Feature Names
(Sheet 3 of 3)

Programming
139
Progra
mm
ing
Class of Service Options(CDE Form 03)
Table 23: Class of Service Options
Option # Class of Service Option / Name
100 Attendant Bell Off
101 Attendant O/G Restriction/Room Status Setup
102 Attendant Display of System Alarms
103 Attendant DISA Code Setup
104 Attendant Flexible Night Service Setup
105 Attendant Guest Room Key
106 Attendant New Call Tone
107 Attendant Automatic Call Forward - No Answer
108 Attendant Audible Alarm
109 Attendant Serial Call
110 Attendant Abbr. Dial Confidential Number Display
111 Attendant Abbreviated Dial Programming
112 Attendant Station Busy-Out
113 Attendant Call Block Key
114 Attendant Trunk Busy-Out
115 Attendant-Timed Recall (No Ans) 5 -240 s; 0=Disable
116 Attendant-Timed Recall (Hold) 5 - 240 s; 0=Disable
117 Attendant-Timed Recall (Camp-On) 5 - 240 s; 0=Disable
118 Attendant Call Forward - No Answer Timer 10 - 240 s.
119 Attendant Tone Signaling
120 Attendant Conference Disable
121 Attendant Station Do Not Disturb
122 Attendant Setup Time/Date
123 Attendant Call Forward Setup and Cancel
124 Attendant Hold Position Security
125 Attendant Multi-New Call Tone
126 Apply Key Line Conference Warning Tone
(Sheet 1 of 8)

Technician’s Handbook
140
150 Sub-Attendant Station Setup Advisory Messages
151 RESERVED
152 RESERVED
153 RESERVED
200 Account Code, Forced Entry - External Calls
201 Account Code, Forced Entry - Long Distance Calls
202 Alarm Call
203 Broker’s Call
204 Call Block Applies (Room To Room)
205 Flash For Waiting Call
206 Call Forwarding - Busy
207 Call Forwarding - No Answer
208 Call Forwarding - External
209 Call Forwarding - Always
210 Call Forwarding Inhibit on Dial-In Trunks
211 Call Hold and Retrieve Access
212 Can Flash If Talking to an Incoming Trunk
213 Can Flash If Talking to an Outgoing Trunk
214 Cannot Dial a Trunk after Flashing
215 Cannot Dial a Trunk if Holding or in Conference with One
216 Data Security
217 Direct To ARS
218 Directed Call Pickup
219 Discriminating Dial Tone
220 Do Not Disturb
221 Clear All Features
222 Call Forward Inhibit on Hold Timeout
223 Flash Disable
224 Flash for Attendant
225 Hold Pickup (Attendant Paged Access)
226 Inward Restriction (DID)
227 Lockout Alarm Applies
Table 23: Class of Service Options (Continued)
Option # Class of Service Option / Name
(Sheet 2 of 8)

Programming
141
Progra
mm
ing
228 Manual Line (Dial 0 Hotline)
229 COV/DNIC Voice Mail Port
230 Message Register Overflow Alarm
231 Message Waiting Setup - Bell
232 Message Waiting Setup - Lamp
233 Never a Consultee
234 Never a Forwardee
235 Originate Only
236 Outgoing Trunk Callback
237 Outgoing Trunk Camp-On
238 Override Security
239 Priority Dial 0
240 Line Privacy
241 Receive Only
242 Repeated Camp-On Beep
243 Non-Busy Extension
244 Room Status Applies
245 Abbreviated Dialing Access
246 SMDR - Extended Record
247 SMDR - Record Meter Pulses
248 TAFAS Any Access
249 TAFAS Access Tenant
250 TAFAS Access During Day Service
251 Transfer Dial Tone
252 Broker’s Call with Transfer
253 Call Forward - Don’t Answer Timer (2 - 6 Rings)
254 Call Hold Recall Timer (PBX Telephones) 0 - 10 Minutes
255 Repeated Camp-On Beeps Timer (5 - 15 Seconds)
256 UCD Music On Hold Timer (0 - 50 Minutes)
257 Flash Over Trunk
258 Display Prime as Forwarder
259 Message Sending
Table 23: Class of Service Options (Continued)
Option # Class of Service Option / Name
(Sheet 3 of 8)

Technician’s Handbook
142
260 Internal / External Split Call Forwarding
261 ONS Voice Mail Port
262 Ignore Forward Busy with Free Appearance
263 Delay Ring Timer (2 - 6 Rings)
264 Half Fwd NA timer for DID call with VM msg on
265 Voice Mail System Speed Dial Index (0-255)
266 Camp-on before Forward on Busy
267 Softkey Support for Voicemail
268 Record a Call in Voicemail
269 Record a Call: Start Recording Automatically
270 Record a Call: Start Recording on Hangup
271 Privacy Released at Start of Call
272 Guest Suite Extension
273 Display Held Caller ID to ONS/CLASS
274 ONS Ring Group Member
300 Automatic Callback
301 Camp-On
302 Flash-in Conference
303 Paging Zone 1 Access
304 Paging Zone 2 Access
305 Paging Zone 3 Access
306 Paging Zone 4 Access
307 Paging Zone 5 Access
308 Paging Zone 6 Access
309 Paging Zone 7 Access
310 Paging Zone 8 Access
311 Paging Zone 9 Access
312 Paging Default (0 - 9) (0 Gives All Enabled Zones)
313 CO Trunk to CO Trunk Connect
314 CO Trunk to TIE Trunk Connect
315 CO Trunk to DID Trunk Connect
316 TIE Trunk to TIE Trunk Connect
Table 23: Class of Service Options (Continued)
Option # Class of Service Option / Name
(Sheet 4 of 8)

Programming
143
Progra
mm
ing
317 TIE Trunk to DID Trunk Connect
318 DID Trunk to DID Trunk Connect
319 Extension Non-CO Trunk to Trunk Connect
320 Transparent Multi-Console Operation
321 Ignore Call Forward After Transfer
322 Confirm Wakeup by Off-hook
323 RESERVED
324 RESERVED
325 RESERVED
326 Account Code, Forced Entry - Data Internal Calls
327 Account Code, Forced Entry - Data External Calls
328 Account Code, Forced Entry - Data Long Distance Calls
329 RESERVED
330 RESERVED
331 RESERVED
400 Contact Monitor
401 Call Park
402 Long Loop (Off-Premise Extensions Only)
403 Trunk Recall Partial Inhibit
404 Recording Failure to Hangup Timer (1 - 255 Seconds)
405 RESERVED
406 RESERVED
407 RESERVED
500 Override
501 Override Announce
502 Display ANI/DNIS/CLASS Information
503 Display CLASS Name
504 SUPERSET 420 Optional C lass Display
505 ONS Stations Support CLASS
506 ONS Positive Disconnect
507 Station/Set: Allow My Number to be Displayed
508 Station/Set: Show Internal Numbers on My Phone
Table 23: Class of Service Options (Continued)
Option # Class of Service Option / Name
(Sheet 5 of 8)

Technician’s Handbook
144
509 Display Caller ID for Non-Prime Lines
600 SUPERSET Tel. - Auto-Answer
601 SUPERSET Tel. - Auto-Hold Disable
602 SUPERSET Tel. - Background Music
603 SUPERSET Tel. - Disconnect Alarm
604 PBX SUPERSET Tel. - Automatic Outgoing Line
605 SUPERSET Tel. - Message Program
606 SUPERSET Tel. - Enhanced Answering Position
607 SUPERSET Tel. - Associated Modem Line
608 SUPERSET Tel. - Room Status Display
609 SUPERSET Tel. - Night Service Switching
610 SUPERSET Tel. - Guest Room Template (0 - 3) (DN)
611 SUPERSET Tel. - Limited New Call Ring
612 SUPERSET Tel. - Headset Operation
613 Display ANI Information Only
614 SUPERSET Tel. - Handset Volume Saved
615 SUPERSET Telephone - Offhook Voice Announce
616 Alarm Monitor Point
617 Immediate Off Hook Alarm
618 Alarm Audio Level for Sets
619 Direct Speak@Ease Access
620 SUPERSET Telephone - Max Call Logs Allowed <0-20>
650 ACD - Agent Template (0 - 3; 0 = Disable)
651 ACD - Supervisor Template (0 - 3; 0 = Disable)
652 ACD - Senior Supervisor Template (0 - 3; 0 = Disable)
653 ACD - Agent Always Auto-Answer
654 ACD - Display Path Always
655 ACD - Allow Continuous Monitor of Agent
680 Key System - Direct CO Access
681 Key Set/Sub Att. - Call Hold Notify Timer (0 -600 s)
682 Key System - Auto Answer - Internal Calls (For SUPERSET 3DN and 4DN only)
683 Key System - Direct Paging Handsfree Answerback
Table 23: Class of Service Options (Continued)
Option # Class of Service Option / Name
(Sheet 6 of 8)

Programming
145
Progra
mm
ing
684 Can Make All Set Page
685 Can Receive All Set Page
686 Group Page Includes Overhead Paging
687 All Set Page Includes Overhead Paging
700 SMDR - Does Not Apply
701 No Dial Tone
702 SMDR - Overwrite Buffer
703 Message Register Applies
704 Incoming / Internal Modem Pooling Access
705 Automatic Overflow From Attendant
706 RESERVED
707 RESERVED
708 RESERVED
709 Follow External Call Forward
710 RESERVED
800 ANI Applies
801 Incoming Trunk Call Rotary
802 Limited Wait for Dial Tone
803 SMDR - Drop Calls < n Digits (0... 11, 0 = disable)
804 SMDR - Drop Incomplete Outgoing Calls
805 Trunk No Dial Tone Alarm
806 SMDR - Record Incoming Calls
807 SMDR - Display Private Speedcall
808 Special DISA
809 Standard Ring Applies
810 DISA During Night Service Only
811 ANI/DNIS Trunk
812 Loop Start Trunk to ACD Path Connect
813 Delay ONS Ring - Wait for Network Name (0-6 s)
814 SMDR - Record ANI/DNIS/CLASS
815 DTS/CO LINE KEY Honors Forwarding
816 CENTREX Flash over Trunk
Table 23: Class of Service Options (Continued)
Option # Class of Service Option / Name
(Sheet 7 of 8)

Technician’s Handbook
146
900 Data Station Queuing
901 DTRX Herald
902 DTRX Message Code
903 DTRX Message Code Text
904 DTRX Complete Message Text
905 DTRX Herald Text Select (1- 4)
906 DATA SMDR - Does Not Apply
907 DATA SMDR - Extended Record
908 DATA SMDR - Overwrite Buffer
Table 23: Class of Service Options (Continued)
Option # Class of Service Option / Name
(Sheet 8 of 8)

Programming
147
Progra
mm
ing
System Options and Timers(CDE Form 04)
The following table lists system options and timers for LIGHTWARE 19 Release 2.0 software. Earlier software versions will not include all these options.
Table 24: LIGHTWARE 19 Release 2.0 System Options and Timers
Option # System Option / System Timer Name
01 Clock Format (example 16:00, 4:00, 4:00 a)
02 Message Lamp Test Enable
03 Single Paging Amplifier
04 Message Waiting and Message Register Clear Print
05 Verified Account Codes
06 Analog Networking SMDR
07 Cancel 24-Hour Message Waiting
08 Five-Digit SMDR
09 Attendant Call Block
10 Attendant Conference Beeps
11 Automatic Wake-up
12 Automatic Wake-up Alarm
13 Automatic Wake-up Print
14 Automatic Wake-up Music
15 Data Demultiplexer
17 Discriminating Ringing
18 Discriminating Ringing Always
20 Holiday Messages
21 Incoming to Outgoing Call Forward
22 Last Party Clear - Dial Tone
(Sheet 1 of 5)

Technician’s Handbook
148
23 Message Register Count Additional Supervisions
24 Message Register Audit
25 Message Register Zero After Audit
26 No Overlap Outpulsing
27 Room Status Audit
28 SMDR Indicate Long Call
29 Telephone Last Number Redial
31 Satellite PBX
32 Outgoing Call Restriction
33 Room Status
34 Auto Room Status Conversion / Auto Wake-up Print
35 DSS/BLF Call Pickup
36 End Of Dial Character (#)
37 Calibrated Flash
38 Switch-Hook Flash
39 DATA SMDR Indicate Long Calls
40 Message Register Follows Talker
42 ACD Silent Monitoring
43 ACD Silent Monitoring Beeps
44 ACD Reports
45 Disable PMS Logs
46 Digit Translation Plan (0 - 3)
47 ARS Unknown Digit Length Time-out (2 - 60 Seconds)
48 Limited Wait For Dial Tone (1 - 15 Seconds)
49 Pseudo Answer Supervision Timer (10 - 60 Seconds)
50 Dialing Conflict Timer (2 - 10 Seconds)
Table 24: LIGHTWARE 19 Release 2.0 System Options and Timers (Continued)
Option # System Option / System Timer Name
(Sheet 2 of 5)

Programming
149
Progra
mm
ing
51 Final Ring Time-out (1 - 30 Minutes)
52 Minimum Flash Timer (20 - 50 ms; in 10 ms increments)
53 Maximum Flash Timer (20 - 150 ms; in 10 ms incr)
54 DISA Answer Timer (1 - 8 Seconds)
55 Account Code Length (Variable or 4 - 12 Digits)
56 Auto Room Status Conversion / Wakeup Print Timer
57 Vacant / Reserved Room Default Call Restriction
58 Occupied Room Default Call Restriction
59 Receivers Reserved for Non-Auto-Attendant Use
60Tone Plan Changing this value will cause a system reset
61 CLASS Receivers in SPINE Bay #1 (0..5)
62 CLASS Receivers in SPINE Bay #2 (0..5)
63 CLASS Receivers in SPINE Bay #3 (0..5)
64 CLASS Receivers in SPINE Bay #4 (0..5)
65 CLASS Receivers in SPINE Bay #5 (0..5)
66 CLASS Receivers in SPINE Bay #6 (0..5)
67 CLASS Receivers in SPINE Bay #7 (0..5)
68DSP DTMF Receiver Channels (0...7) default = 7Changing this value will cause a system reset
69 DTMF ON Timer (5-15 in 10 ms increments) default = 9 (90 ms)
70 DTMF OFF Timer (5-15 in 10 ms increments) default = 9 (90 ms)
71Slot 10 FIM/CIM Capacity (2 or 3 Bays)Changing this value will cause a system reset
72Slot 11 FIM/CIM Capacity (2 or 3 Bays)Changing this value will cause a system reset
73 Advance to Daylight Savings Time (mm:dd:hh)
76 Go Back to Standard Time (mm:dd:hh)
79 Daylight - Standard Time Difference (30 to 240 minutes)
Table 24: LIGHTWARE 19 Release 2.0 System Options and Timers (Continued)
Option # System Option / System Timer Name
(Sheet 3 of 5)

Technician’s Handbook
150
80 MyAdministrator Access
84 Multiple Guest Suite Phones
85 Speak@Ease Integration
86 PRI Card: Q.SIG
87 Record a Call
88 Max TAPI desktops (0...50 in increments of 5)
89 CLASS Functionality for ONS Sets
90 ACD Real Time Event
91 PRI Card: NFAS
92 PRI Card: D-Channel Backup
93 PRI Card: Remote LAN Access
94 PRI Card: Min/Max
95 PRI Card: Auto Min/Max
96 Number of Links (0-8)
97 Support Softkey Access to Voicemail
98 Support 3DN and 4DN Set Types
99 Fax Tone Detection
100 MITEL Options Password
101 System Identity Code
102 Feature Level <0-99>
103 Maximum Devices
104 Maximum ACD Agents (Automatic Call Distribution, 0-100)
105 MITEL Application Interface
106 Automated Attendant
107 Lodging
108 Property Management System
109 Remote Software Download
Table 24: LIGHTWARE 19 Release 2.0 System Options and Timers (Continued)
Option # System Option / System Timer Name
(Sheet 4 of 5)

Programming
151
Progra
mm
ing
110 Maximum BNIC Cards (0 - 40)
111 Maximum BONS Cards (0 - 40)
112 SS4000 Series Sets
113 Centralized Attendant / Voicemail
Table 24: LIGHTWARE 19 Release 2.0 System Options and Timers (Continued)
Option # System Option / System Timer Name
(Sheet 5 of 5)

Technician’s Handbook
152
CDE Cross Reference Guide
Legend:A Forms must have specific programming completed to perform the task.B Forms have direct impact on device operation.C Related to process, or device, but not mandatory. Digits denote the required order of entry.
01-
Sys
tem
con
figur
atio
n
02 -
Fea
ture
Acc
ess
Cod
es
03 -
CO
S D
efin
e
04 -
Sys
tem
Opt
ions
/Sys
tem
Tim
ers
05 -
Ten
ant I
nter
conn
ectio
n Ta
ble
06 -
Ten
ant N
ight
Sw
itchi
ng C
ontr
ol
07 -
Con
sole
Ass
ignm
ents
08 -
Atte
ndan
t LD
N A
ssig
nmen
ts
09 -
Des
ktop
Dev
ice
Ass
ignm
ents
10 -
Pic
kup
Gro
ups
11 -
Dat
a C
ircui
t Des
crip
tor
12 -
Dat
a A
ssig
nmen
t
13 -
Tru
nk C
ircui
t Des
crip
tors
14 -
Non
-Dia
l-In
Trun
ks
15 -
Dia
l-In
Trun
ks
16 -
Tru
nk G
roup
s
17 -
Hun
t Gro
ups
18 -
Mis
cella
neou
s S
yste
m P
orts
19 -
Cal
l Rer
outin
g Ta
ble
20 -
AR
S: C
OR
Gro
up D
efin
ition
21 -
AR
S: D
ay Z
one
Def
initi
on
22 -
AR
S: M
odifi
ed D
igit
Tabl
e
23 -
AR
S: R
oute
Def
initi
on
ACD A7 A4 A1 C C C C C C CConsole A1 B2 B C C A2 B1 C C C C C CDataset A1 C B1 C C C C A2 A3 C C C CDID Trunk A1 B1 C C C C A2 A3 B CDISA Dial In A1 C B1 C C C C A2 A3 B B A4 C CE&M “Tie Trk” A1 C B1 C C C A2 A3 A4 B A5 C CHotel C B A C C C B C C CISDN Device A2 A5 A1 B C A3 BKeySystem A1 C B1 C C C A2 C C C C C C C CModem A1 A4 A2 C C BMOH A1 C C C A2 BMultiline set A1 C B1 C C C A2 C C C C C C C CNight Bell A1 C C A2 CNon Dial In Trk A1 B1 C C C C A2 A3 A4 CPager A1 B C A2PrinterRAD A1 B1 C C A2 A3 CSingle Line A1 C B1 C C C A2 C C C C C C C CUCD C C C C C C A1 A2Verified Acct. A2 A3 C C C C B1 B2
FORM
DEVICE orOPTION

Programming
153
Progra
mm
ing
lll
DEVICE
24 -
AR
S: R
oute
Lis
ts
25 -
AR
S: R
oute
Pla
ns
26 -
AR
S: D
igit
Str
ings
27 -
AR
S: M
axim
um D
iale
d D
igits
28 -
For
m A
cces
s R
estr
ictio
n D
ef’n
.
29 -
DT
E P
rofil
e
30 -
Dev
ice
Inte
rcon
nect
ion
Tabl
e
31 -
Sys
tem
Abb
revi
ated
Dia
l Ent
ry
32 -
CD
E D
ata
Prin
t
33 -
Acc
ount
Cod
e E
ntry
34 -
Dire
cted
IO
35 -
Glo
bal F
ind
Acc
ess
Cod
e
36 -
Mod
em A
ssig
nmen
t
37 -
Gue
st R
m S
UP
ER
SE
T K
eysT
empl
ate
38 -
AC
D K
eys
Tem
plat
e
39 -
AC
D A
gent
Gro
ups
40 -
AC
D S
uper
viso
rs
41 -
AC
D P
aths
42 -
T1
Link
Des
crip
tors
43 -
T1
Link
Ass
ignm
ent
44 -
Net
wor
k S
ynch
roni
zatio
n
45 -
BR
I Dev
ices
46 -
Key
Sys
tem
Tol
l Con
trol
C A5 A2 A3 A6 ACDC C C C C C C ConsoleC C C A4 C B B Dataset
B C DID TrunkC C C B C B2 DISA Dial InC C C A6 C C E&M “Tie Trk”C C C C B Hotel
B A4 ISDN DeviceC C C C C C Key System
C A3 ModemMOH
C C C C C Multiline setNight Bell
B Non Dial In TrkPager
B1 PrinterRAD
C C C C C C Single LineUCD
A1 C Verified Acct.
FORM
DEVICEorOPTION
The CDE Cross Reference Guide identifies forms that require completion for each listed device.

Technician’s Handbook
154
SX-200 EL/ML Feature Limitations
The SX-200 EL/ML system offers a wide range of features through software packages. A full description of these features appears in the E-docs under Program Features. Maximum capacities that apply to system features are listed in the following table.
Table 25: Feature Limitations
FeatureSX-200 EL/ML
Limitations
Maximum number of simultaneous calls
2 cabinet configuration7 cabinet configuration
90248
Maximum number of speech paths or channels used byany call any call with DTMF
23
Maximum number of simultaneous consultations 5
Maximum number of simultaneous add-on (3-way) calls 5
Maximum number of simultaneous station-controlled conference calls 5
Maximum number of parties in conference at one time 5
Maximum number of calls that can simultaneously be camped on to a station, trunk group, or hunt group 247
Maximum number of simultaneous callbacks that can be enabled 100
Maximum number of simultaneous call forwards that can be enabled 650
Maximum number of simultaneous “Dial 0” calls 48
Maximum number of ONS telephones ringing simultaneously per bay.
32
Maximum number of messages queued in the system 750
Maximum number of hunt groups 99
(Sheet 1 of 4)

Programming
155
Progra
mm
ing
Maximum number of paths in ACD 99
Maximum number of ACD agents that may be defined 999
Maximum number of active agents in ACD per bay 25
Maximum number of calls that can be simultaneously connected to Music-on-Hold unlimited
Maximum number of stations in a station hunt group 50
Maximum number of stations in a call pickup group 50
Maximum number of dial call pickup groups 50
Maximum number of trunks assignable to night stations
200
Maximum number of trunks in a trunk group 50
Maximum number of trunk groups 50
Maximum number of calls that can override a given extension 1
Maximum number of attendant consoles 11
Maximum number of attendant consoles on a Digital Line Card
4
Maximum number of calls that can be simultaneously held by one attendant 8
Maximum number of incoming calls that can beseparately identified at the attendant console 8
Maximum number of LDNs that can be identified at the attendant console 9
Maximum number of LDNs 100
Maximum Number of Night Bells 25
Maximum number of calls waiting that can bedisplayed at a console 99
Maximum number of calls that can be waiting at a console 200
Maximum number of abbreviated dial numbers 1000
Maximum number SUPERSET Speed Dial numbers 2212
Table 25: Feature Limitations (Continued)
FeatureSX-200 EL/ML
Limitations
(Sheet 2 of 4)

Technician’s Handbook
156
Maximum number of trunk buffers for SMDR 200
Maximum number of DATA SMDR buffers 128
Maximum number of stations for SUPERSET 4001, SUPERSET 4015, SUPERSET 4025, SUPERSET 4090, SUPERSET 4125, SUPERSET 4150, SUPERSET 401+, SUPERSET 410, SUPERSET 420, SUPERSET 430, SUPERSET 3DN and 4DN telephones, DSS Modules, DSS/BLF Interface Units and ONS sets.
650
Maximum number of user devices (all sets, stations, trunks, consoles, stand alone datasets, and DMP units)
768
Maximum number of TAPI desktops running simultaneously per system
50
Maximum number of telephones sets using TAPI running simultaneously per bay
24
Maximum number of telephone sets using TAPI perDNIC card
3
Maximum number of lines:SX-200 EL Control cabinetSX-200 ML (RM) Control cabinetSX-200 ML (FD) Control cabinetSX-200 ML (FD) Control cabinet with a Control FIM CarrierSX-200 ML SPINE baySX-200 Peripheral cabinet
969696
844896
Maximum number of T1 links per systemSX-200 EL
SX-200 ML
8
4
Maximum Number of Page Groups 50
Maximum Number of Paging Zones 9
Maximum Number of Stations in a Page Group unlimited
Maximum Number of Sub-attendants 25
Maximum Number of LDN Appearances 16
Maximum Number of Line Appearances 32
Table 25: Feature Limitations (Continued)
FeatureSX-200 EL/ML
Limitations
(Sheet 3 of 4)

Programming
157
Progra
mm
ing
Maximum Number of Physical PortsSX-200 ELSX-200 ML
672192
Maximum number of ISDN bays 6
Maximum number of T1 links including analog, ISDN Gateway, and ISDN PRI cards
8
Maximum number of BRI cards per bay 2
Table 25: Feature Limitations (Continued)
FeatureSX-200 EL/ML
Limitations
(Sheet 4 of 4)

Technician’s Handbook
158

Chapter 5
Installation


Installation
161
Installa
tion
Cabinet Card Assignments
SX-200 EL Control Cabinet Card Assignments
Figure 19: SX-200 EL Control Cabinet Card Assignments

Technician’s Handbook
162
SX-200 EL Peripheral Cabinet Card Assignments
NOTE: On the BCC III faceplate, a CIM uses only one of the connections; the FIM II uses two.
Figure 20: SX-200 EL Peripheral Cabinet Card Assignments

Installation
163
Installa
tion
SX-200 ML (RM) Cabinet Card Assignments
NOTE: On the BCC III faceplate, a CIM uses only one of the connections; the FIM II uses two.
Figure 21: SX-200 ML (RM) Cabinets with BCC III Cards

Technician’s Handbook
164
Figure 22: SX-200 ML (RM) Cabinets with BCC II Cards
Figure 23: SX-200 ML (RM) Cabinet with a PRI Card

Installation
165
Installa
tion
SX-200 ML (FD) Cabinet Card Assignment
Figure 24: SX-200 ML (FD) Cabinet Card Assignment

Technician’s Handbook
166
SX-200 LIGHT Cabinet Card Assignment
Figure 25: SX-200 LIGHT Cabinet Card Assignment
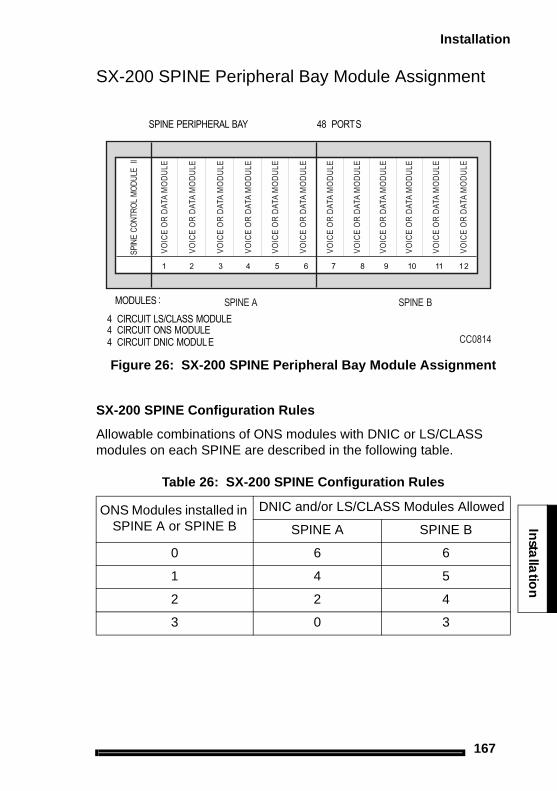
Installation
167
Installa
tion
SX-200 SPINE Peripheral Bay Module Assignment
Figure 26: SX-200 SPINE Peripheral Bay Module Assignment
SX-200 SPINE Configuration Rules
Allowable combinations of ONS modules with DNIC or LS/CLASS modules on each SPINE are described in the following table.
Table 26: SX-200 SPINE Configuration Rules
ONS Modules installed in SPINE A or SPINE B
DNIC and/or LS/CLASS Modules Allowed
SPINE A SPINE B
0 6 6
1 4 5
2 2 4
3 0 3

Technician’s Handbook
168
SX-200 Digital 672-Port Cabinet Card Assignment
Figure 27: SX-200 Digital 672-Port Cabinet Card Assignment

Installation
169
Installa
tion
SX-200 Digital 336-Port Control CabinetCard Assignment
Figure 28: SX-200 Digital 336-Port Control Cabinet Card Assignment

Technician’s Handbook
170
SX-200 Digital 456-Port Cabinet Card Assignment
Figure 29: SX-200 Digital 456-Port Cabinet Card Assignment

Installation
171
Installa
tion
SX-200 Digital 480-Port Cabinet Card Assignment
Figure 30: SX-200 Digital 480-Port Cabinet Card Assignment

Technician’s Handbook
172
SX-200 DIGITAL Cable Routing
Table 27 identifies the cable routing for SX-200 DIGITAL PBX configurations.
Table 27: Cable Assignments for SX-200 DIGITAL Cabinets
Analog Bay Cables
Control cables P103 and P104 must remain (if P104 has single row of pins, it goes on the left side of the connector in Bay 4, and right side of the connector in Bay 5)
Voice cables P101 and P102 must be removed
480-port PCM Cables
COMBO Bay J17A to Analog Bay 3 DIC P2
COMBO Bay J17B to Analog Bay 4 DIC P2
Analog Bay 4 DIC P1 to Analog Bay 5 DIC P3
456-port PCM Cables
COMBO Bay J17A to Digital Bay 3 J17A
COMBO Bay J17B to Analog Bay 4 DIC P2
Analog Bay 4 DIC P1 to Analog Bay 5 DIC P3
336-port PCM Cables
COMBO Bay J17A to Bay 3 J17A
COMBO Bay J17B to Bay 4 J17A
672-port PCM Cables
Bay 0 J40A to Bay 1 J17A
Bay 0 J40B to Bay 2 J17A
Bay 0 J40C to Bay 3 J17A
Bay 0 J40D to Bay 4 J17A (intercabinet cable assembly)
Bay 0 J42A to Bay 5 J17A (intercabinet cable assembly)
Bay 0 J42B to Bay 6 J17A (intercabinet cable assembly)
Bay 0 J42C to Bay 7 J17A (intercabinet cable assembly)

Installation
173
Installa
tion
SX-200 EL/ML Configuration Rules
Cabinet Configuration Rules
� SX-200 EL Control Cabinet with MCC IIIEL or MCC IIIELx plus a maximum of six cabinets that include the following:
— SX-200 RM Peripheral Cabinet
— SX-200 LIGHT Peripheral Cabinet
— SPINE Peripheral Bay
— ISDN Bay (Network Gateway or PRI card)
� SX-200 ML (RM) Control Cabinet with MCC IIIML plusonly one of:
— SX-200 RM Peripheral Cabinet
— SX-200 LIGHT Peripheral Cabinet
— SPINE Peripheral Bay
— ISDN Bay (Network Gateway or PRI card)
� SX-200 ML (FD) Control Cabinet with MCC II plus only one of:
— SX-200 RM Peripheral Cabinet
— SX-200 LIGHT Peripheral Cabinet
— SPINE Peripheral Bay
— Network Gateway (ISDN)
Main Control Card Assignments for Each Cabinet Type
� Main Control Card IIIELx in a SX-200 ELx Control cabinet
� Main Control Card IIIEL in a SX-200 EL Control cabinet
� Main Control Card IIIML in an SX-200 ML (RM) Control cabinet
� Main Control Card II in an SX-200 ML (FD) Control cabinet

Technician’s Handbook
174
FIM Carrier Assignments for Each Cabinet Type
� Control Triple CIM card (FIM II optional) with the SX-200 ELx control cabinet
� Control Triple FIM Carrier and FIM with the SX-200 EL control cabinet
� Control Dual FIM Carrier and FIM with the SX-200 EL control cabinet or SX-200 ML (RM) control cabinet
� Control FIM Carrier and FIM with the SX-200 ML (FD) control cabinet
� Peripheral Interface Module Carrier (FIM II or CIM) with the SX-200 ELx peripheral cabinet
� Peripheral FIM Carrier II with the SX-200 RM peripheral cabinet
� Peripheral FIM Carrier with the SX-200 LIGHT peripheral cabinet
Configuration Rules for the Control Dual FIM Carrier Card
The SX-200 ML (RM) system is limited to only one peripheral cabinet (Bay 2):
� Slot 10 onboard FIM interfaces to first peripheral cabinet (Bay 2)
� Slot 10 add-on FIM interfaces to second peripheral cabinet (Bay 3)
� Slot 11 onboard FIM interfaces to third peripheral cabinet (Bay 4)
� Slot 11 add-on FIM interfaces to fourth peripheral cabinet (Bay 5)
In an SX-200 ELx cabinet, the BCC III can support a FIM II or a CIM in a peripheral cabinet and the PRI card can support a FIM II or a CIM in the main control cabinet and in theperipheral cabinet. Taking advatage of this can replace the need for a Peripheral FIM Carrier II or the Control Dual FIM Carrier.

Installation
175
Installa
tion
Configuration Rules for the Control Triple FIM Carrier Card
The Control Triple FIM Carrier Card can only be installed in a SX-200 EL system.
� Slot 10 first on-board FIM interfaces to first peripheral cabinet (Bay 2)
� Slot 10 second on-board FIM interfaces to second peripheral cabinet (Bay 3)
� Slot 10 add-on FIM interfaces to fifth peripheral cabinet (Bay 6)
� Slot 11 first on-board FIM interfaces to third peripheralcabinet (Bay 4)
� Slot 11 second on-board FIM interfaces to fourth peripheralcabinet (Bay 5)
� Slot 11 add-on FIM interfaces to sixth peripheral cabinet (Bay 7)
Configuration Rules for the Control Triple CIM Card
The Control Triple CIM card has a S1 switch that sets the card as a triple interface card (switch 4 closed) or a double interface card (switch 4 opened). If the S1 switch on the Control Triple CIM card is set to take two circuits (emulates the control dual carrier card), the following positions are hard coded in the software:
� Slot 10 embedded CIM #1 interfaces to Bay 2.
� Slot 10 embedded CIM #2 interfaces to Bay 3.
� Slot 11 embedded CIM #1 interfaces to Bay 4.
� Slot 11 embedded CIM #2 interfaces to Bay 5.
If the S1 switch on the Control Triple CIM card is set to take three circuits (emulates the control triple carrier card), the following positions are hard coded in the software:•
� Slot 10 embedded CIM #1 interfaces to Bay 2.
� Slot 10 embedded CIM #2 interfaces to Bay 3 .
� Slot 10 embedded CIM #3 interfaces to Bay 6.
� Slot 11 embedded CIM #1 interfaces to Bay 4.
Technician’s Handbook
176
� Slot 11 embedded CIM #2 interfaces to Bay 5.
� Slot 11 embedded CIM #3 interfaces to Bay 7.
Configuration Rules for the PRI Card
The main control cabinet supports one PRI card in Slot 10 or 11.
� The PRI card in slot 10 is Bay 2.
� The PRI card in slot 11 is Bay 4.
� The FIM II or CIM on the PRI card in slot 10 interfaces to Bay 3.
� The FIM II or CIM on the PRI card in slot 11 interfaces to Bay 5.
T1 Trunk Rules for SX-200 RM Cabinets
� LIGHTWARE 18 and greater software supports up to two T1 links (includes T1 links from T1/E1 modules and T1 cards) in any bay with a maximum of eight T1 links in the system.
� The MOSS System Option 96, Number of Links (0-8) monitors how many T1 links (from T1/E1 modules) that the system will support. This count includes T1 links from the T1/E1 modules on the PRI cards and BCC III cards. The count does not include T1 links from the T1 cards.
� PIC slot 5 must be left vacant when a T1 card is installed in slot 10 or when Link 1 from a T1/E1 module on a BCC III is programmed.
� PIC slot 6 must be left vacant when a T1 card is installedin slot 11 or when Link 2 from a T1/E1 module on a BCC III is programmed.
.
A FIM II module can take the place of a CIM circuit on the Control Triple CIM Card. Setting switch 1, 2, or 3 closed on the S1 switch defines which specific CIM circuit that the FIM II replaces. The FIM II will then interface to the bay that was assigned to that CIM circuit.
Do NOT insert T1 trunk cards into slots 5 or 6.

Installation
177
Installa
tion
Digital Line Card Rules for SX-200 RM Cabinets
Systems with BCC II cards have performance limits:
� In high traffic configurations, keep the Digital Line Card (DLC) count to a maximum of 7 per bay when using BCC II cards. If you have 8 DLCs per bay, keep the device count to 84 or less. This will avoid slow softkey response during peak traffic periods.
� With 2 T1 cards in a bay, do not add more than 5 DLCs or 60 devices. This avoids dial tone delays during peak traffic periods.
� With 1 T1 card in a bay, do not add more than 6 DLCs or 72 devices. This avoids dial tone delays during peak traffic periods.
PRI Card Rules for SX-200 RM Cabinets
� The PRI card requires the SX-200 ELx cabinet Rev. 4.4 or greater(PN 9109-600-002-NA) with LIGHTWARE 17 Release 4.0 or greater. The PRI card also requires a Stratum 3 MCC.
� Only install one PRI card in a main control cabinet; Slot 10 for the SX-200 ML and Slot 10 or 11 for the SX-200 EL.
� Install the PRI card in a peripheral cabinet for a SX-200 EL system with six or seven bays. This avoids the PRI card using the slot for the Control Triple FIM Carrier card in the main control cabinet.
A BCC III supports 8 DLCs per bay and is therefore ideal for high traffic conditions.
You can only install the PRI card in a SX-200 ELx cabinet Inserting the PRI card in a peripheral interface card slot in any other SX-200 cabinet will cause the power supply to fail.
To change the termination type (the transmit and receive) for the PRI links, change the stuffing of the jumper block on the LT/NT connector. Two LT/NT connectors on the T1 module accomodate the two T1 links. LT is for the network side and NT is for the user side.

Technician’s Handbook
178
� The PRI card in slot 10 of the main control cabinet will appear to the system as Bay 2. The PRI card in slot 11 of the main control cabinet will appear to the system as Bay 4.
� The PRI card in a main control cabinet does not require a FIM II or CIM because the PRI card connects directly to the backplane. You can put a FIM II or CIM on the PRI card to connect the main control cabinet to a peripheral cabinet. The interface module (FIM II or CIM) on the PRI card in slot 10 would connect to Bay 3; in slot 11 would connect to Bay 5.
� Install a maximum of two PRI cards into a SX-200 EL peripheral cabinet; slots 10 and 11.
� The PRI card in a peripheral cabinet does require a FIM II or CIM to connect to the main control cabinet. The system counts the PRI card as a peripheral bay. The PRI card bay number corresponds to the position that the FIM II or CIM terminates on with the Control FIM Carrier card or the Control Triple CIM card.
Figure 31: S1 Switch Settings for the PRI Card
Because the system counts the PRI card as a peripheral bay, the T1/E1 module on the PRI card does NOT occupy the peripheral interface slots 5 and 6 in its residing cabinet.
A S1 switch on the PRI card controls where the source of the clock and link signals come from (the backplane or theinterface module: FIM II or CIM). Switch 1 closed and 2 open provides a backplane source.Switch 1 and 2 closed provides an interface module source.

Installation
179
Installa
tion
Initial Power-up Procedure(SX-200 EL/ML)
When the system is first installed, use the following procedure to enter the database into the system using CDE.
1. Verify that the options identified on the MOSS have been purchased.
2. Ensure that the System ID module is installed.
3. Insert the flash memory card into the slot on the Main Control Card (make sure the toggle switch on the edge opposite the connector edge of the flash memory card has the Write Protect disabled).
4. Turn the power supply ON, and wait for the power-up sequence to complete.
5. Press RETURN four times; the terminal display returns:1 - VT100™ COMPATIBLE 2 - TTY TYPE 3 - IBM PCSELECT A TERMINAL TYPE :
6. Select the terminal type by entering “1”. The display returns:1 - MAINTENANCE2 - CDE6 - QUITSELECT AN APPLICATION ( OR QUIT TO START OVER ) :
If powering up a single cabinet system, immediately revise Alarm Thresholds to eliminate PCM alarms (software defaults to a multi-cabinet system).
Users must purchase the option and its associated password through their usual ordering channels prior to attempting to install or implement the option.
Refer to the SX-200 EL/MLTechnical Documentation, Installation Procedures.

Technician’s Handbook
180
7. Select the Customer Data Entry application by entering “2”. The display returns:ENTER USERNAME :
8. Enter the INSTALLER level of access. The display returns:ENTER PASSWORD:
9. Enter the required password to access Customer Data Entry. The default password is 1000.
A list of the system’s forms is displayed.
10. Select Form 04 and press the return key once to enable the software options that were purchased .You must enter the Maximum Devices and Maximum ACD Agents options, if these options are purchased.
11. Enter the 8 right-most digits of the MITEL Options password to activate the enabled features. The password must be the password that is printed on the MOSS sheet. The MOSS sheet is included with the system software package.
12. Press ENTER.
Both the top and lower seven-segment LEDs show “-” when completed successfully.
For a seven cabinet configuration set option 71 to 3 bays.Confirm. Set option 72 to 3 bays. Confirm. Enter to save the options. A message appears that states a reset is required. Select Confirm to reset the system.
Enable only the purchased options listed on the MOSS sheet for this system.
An E.8 error results when a purchased option is not enabled, when an enabled option is not purchased, or when the MOSS password does not match, or when the system id does not match.

Installation
181
Installa
tion
System Initialization Sequence
SX-200 EL/ML Initialization
Table 28: Main Control Card Codes
CodesSystem
FunctionAction
Top LED: E.Lower LED: 8
MOSS Verification
For SX-200 EL/ML, the MITEL Options pass-word, selected options, or system id does not match. Verify the options and the system id; then, enter the password again. For SX-200 LIGHT/DIGITAL, the decryption module is not correct.
Top LED: A Lower LED: - circles clockwise
Database Upload
Indicates that a customer database backup is in progress, or that a log text file is being saved to the user’s PC storage medium.
Top LED: ALower LED: - circles counter-clockwise
Database Restore
Indicates that a customer database restore from the user’s PC storage medium to the sys-tem is in progress.
Top LED: CLower LED: -
Database Verification
During a system reboot or power up (after C is pressed within 10 sec.) the system clears the default customer database in the random access memory and resets the system.
Top LED: FLower LED: - circles counter-clockwise
Flash Memory Access
Indicates that the system software on the flash memory card is being accessed.
Top LED: HLower LED: - circles clockwise
Software Decompression
Indicates that the system software is in the process of decompressing.
Top LED: -Lower LED: -
Normal Operation
Indicates normal system operation when no applications are using the status indicators.

Technician’s Handbook
182
SX-200 LIGHT/DIGITAL Initialization
* Power Supply Power Fail Sense can cause this test to fail.
** Upon test failure, test error codes will be flashed for 1second, after which testing will begin again from test 1.
Table 29: Main Control Card Test Status Codes
Test Name Test CodeError Code
Bus Error Vector/Stack Test 0 E0
Processor Viability Test 1 E1
PROM Checksum Test 2 E2
RAM Load Checksum Test 3 E3
Limited RAM Test 4 E4
DMA Controller Test/PFS OK* 5 E5
RAM Chip Select Test 6 E6
RAM Data Bit Independent Test 7 E7
Memory Address Test 8 E8
Memory Space Test 9 E9
** Booting System Software b or b. Eb or Eb.
Parity Test P EP
Top of RAM determined and displayed 1.2.2.2.4.005C0
Main load being read in from disk L E (flashing)L
Huffman encoded load being decoded H E (flashing) H
Main load running - -

Installation
183
Installa
tion
SX-200 LIGHT/DIGITAL Main Control Card Power-Up Error Codes
Table 30 shows the Main Control Card numeric display error codes which may appear during start-up. Also shown are the most likely causes of the error condition.
Table 30: Main Control Card Power-Up Error Code Summary
Error Code Likely Cause(s)
(blank) • Faulty power system - refer to that procedure.
• Faulty Main Control Card.
0 • Faulty or loose flea clip W3 (if applicable)
• Faulty Main Control Card.
E0
• Unseated DRAM Module or DX Module.
• Faulty DRAM or DX module (see Note).
E E E E1 3 4 or 5
• Faulty Main Control Card.
E2
• Unseated EPROM IC.
• Faulty EPROM IC - replace Main Control Card.
E E E E6 7 8 or 9
• Unseated DRAM Module.
• Faulty DRAM Module - replace Main ControlCard.
Eb.
• Please note difference between “E” and “E.”. (See below in this table for E. codes.)
• Faulty disk drive connections.
• Faulty installation of diskette.
• Incorrect or damaged diskette - ensure that thewrite protect sticker has been removed.
• Faulty diskette - replace.
• Incorrect setting of switch S3 on Main ControlCard - ensure that it is in the OFF, or OPEN po-sition (pointed upward with respect to the board).
• Faulty disk drive.
• Faulty Main Control Card.
EC
• System will not boot, unable to change systemconfiguration.
Sequence: E2 3 8 9 b b
• Faulty power system - refer to that procedure.
• No disk in drive, bad drive, bad disks.
(Sheet 1 of 2)

Technician’s Handbook
184
NOTE: 1. The SX-200 LIGHT system must be equipped with the Switch Matrix Module instead of the DX Module used in the 336, 456 & 480-port systems or the Switch Matrix Card used in the 672 -port system.
2. A normal running system may show other codes (card diagnostics or errors). However, during start-up, only the codes in this table are possible. Any other code shown during start-up indicates a faulty Main Control Card.
3. Codes possible AFTER start-up include card diagnostics codes (last card lo-cation tested, top number indicates bay number, bottom number indicates card slot number - maintenance logs give results of test, i.e., pass or fail with cause), or disk error codes.
2 3 4 5 6 or 70 0 0 0 0 0
• Problem in a digital bay/node - upper digit is thebay number. Refer to Bay Control Cardprocedures.
2 3 4 5 6 7n n n n n or n
(where n is any number)
• Problem in a peripheral bay/node - upper digit isthe bay/node number, lower digit is the card slotnumber. Use SHOW ALARMS command to gainfurther information (see note 2).
E.n
(where n is any number)
• Note difference between “E” and “E.”(see above in this table for “E” codes).
• Problem with Disk Subsystem - refer to FloppyDisk Subsystem Troubleshooting.
--
• Nothing - indicates successful software down-load. This display may be immediately changedto display post boot-up codes (see note 2).
(any other code) • Faulty Main Control Card (see note 2).
Refer to SX-200 LIGHT/DIGITAL Floppy Disk Subsystem Troubleshooting Procedures (page 91).
Table 30: Main Control Card Power-Up Error Code Summary (Continued)
Error Code Likely Cause(s)
(Sheet 2 of 2)

Installation
185
Installa
tion
Adding a Peripheral Cabinet
1. Install the peripheral cabinet (including Bay Power Supply, Bay Control Card, and required Fiber or Copper Interface Module).
2. Connect the fiber or copper cable to the interface module in the control cabinet.
3. Power up the cabinet.
4. Enter CDE mode on the maintenance terminal.
5. Select Form 01, System Configuration and configure the new cards (select node type as required).
6. Complete remaining CDE for the new cards.
Refer to Powering Up the Nodes (page 59).
Make sure there are enough devices available(CDE Form 04, Option 103).

Technician’s Handbook
186
Peripheral Interface Cards and Modules
Table 31: Peripheral Interface Cards and Modules
Peripheral interface
cardDevices supported Circuits
Maximum loop resistance/loop lengths
COV Line cardhigh power
Voice Mail devices 6 Loop resistance: 280 WLoop length:26 AWG - 1000 m (3300 ft.)24 AWG - 1500 m (5000 ft.)22 AWG - 2000m (6000 ft.)
DID Trunk cardhigh power
Direct Inward Dial (DID) trunks from CO
6 Loop resistance: 2450 WLoop length:26 AWG - 7986 m (25955 ft.)22 AWG - 19995 m (64984 ft.)
LS/GS Trunk cardlow power
Ground start and Loop start CO trunks
6 not applicable
LS/CLASS Trunk cardlow power
Loop Start CO trunks 8 not applicable
ONS/CLASS Line cardlow power
DTMF telephone setsRotary telephone sets
12 External loop resistance:600 WExternal wire resistance: 400 WExternal loop length:22 AWG - 1000 m (3300 ft.)24 AWG - 1500 m (4875 ft.)
OPS Line cardhigh power(low power in SX-200 EL/ML)
DTMF telephone setsRotary telephone sets
6 External loop resistance: 1800 WExternal wire resistance: 1600 WExternal loop length:26 AWG - 5853 m (19022 ft.)22 AWG - 15240 m (49530 ft.)
(Sheet 1 of 3)
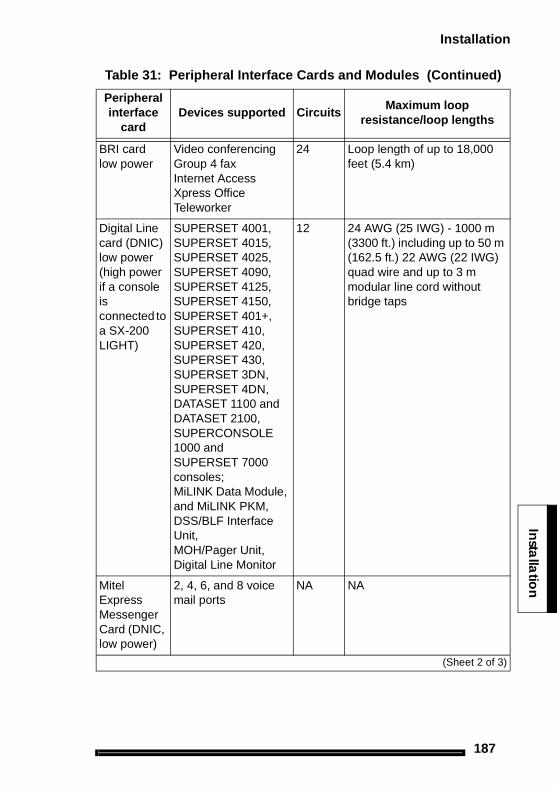
Installation
187
Installa
tion
BRI cardlow power
Video conferencing Group 4 faxInternet AccessXpress OfficeTeleworker
24 Loop length of up to 18,000 feet (5.4 km)
Digital Line card (DNIC)low power(high power if a console isconnected to a SX-200 LIGHT)
SUPERSET 4001,SUPERSET 4015,SUPERSET 4025,SUPERSET 4090,SUPERSET 4125,SUPERSET 4150,SUPERSET 401+,SUPERSET 410,SUPERSET 420, SUPERSET 430, SUPERSET 3DN, SUPERSET 4DN,DATASET 1100 and DATASET 2100,SUPERCONSOLE1000 and SUPERSET 7000 consoles;MiLINK Data Module, and MiLINK PKM, DSS/BLF Interface Unit,MOH/Pager Unit,Digital Line Monitor
12 24 AWG (25 IWG) - 1000 m (3300 ft.) including up to 50 m (162.5 ft.) 22 AWG (22 IWG) quad wire and up to 3 m modular line cord without bridge taps
Mitel Express Messenger Card (DNIC, low power)
2, 4, 6, and 8 voice mail ports
NA NA
Table 31: Peripheral Interface Cards and Modules (Continued)
Peripheral interface
cardDevices supported Circuits
Maximum loop resistance/loop lengths
(Sheet 2 of 3)

Technician’s Handbook
188
T1 Trunk Cardhigh power
to CO or other PBX 24 maximum 655 shielded cable to Channel Service Unit
Universal cardhigh power
Four modules:MOH/PagingDTMF Reciever,E&M Trunk,Console
Total power rating of modules on Universal card cannot exceed 10
Music-on Hold/Paging module
1 each power rating = 1loop length - not applicable
DTMF receiver module
DTMF telephone key-pads and end-to-end signaling equipment.
4 power rating = 2loop length - not applicable
E&M trunk module
E&M tie trunk 1 power rating = 326 AWG - 1068 m (3500 ft.)24 AWG - 1708 m (5600 ft.)22 AWG - 2715m (8900 ft.)
Console module
interfaces to LCD console only (4-wire)
1 power rating = 5loop length - 305 m (1000 ft.)
Peripheral Spine Node
Three Modules:LS/CLASS TrunkDNIC, ONS Line
LS/CLASS Trunk module
4 LS/CLASS trunks plus SFT for circuit 1 (SPINE Bay only)
4 External loop resistance: 1600 W
DNIC module
(for SPINE Bay only) 4 22 or 24 AWG - 1000 m (3300 ft.) including up to 50 m (162.5 ft.) 22 AWG) quad wire and up to 3 m modular line cord without bridge taps.
ONS Line module
(for SPINE Bay only) 4 26 AWG - 700 m (2300 ft.)24 AWG - 1128 m (3700 ft.)22 AWG - 1784m (5850 ft.)
Table 31: Peripheral Interface Cards and Modules (Continued)
Peripheral interface
cardDevices supported Circuits
Maximum loop resistance/loop lengths
(Sheet 3 of 3)

Installation
189
Installa
tion
Control and Digital Services Cards and Modules
Table 32: Digital Control and Digital Services Cards and Modules
Card or Module Important Details
Main Controller II For SX-200 ML FD control cabinet only
Main Controller IIIEL For SX-200 EL control cabinet only
Main Controller IIIELx For SX-200 EL control cabinet. Use the Elx cabinet(9109-600-002-NA)
Main Controller IIIML For SX-200 ML (RM) control cabinet only
Main Controller For SX-200 LIGHT and DIGITAL control cabinet only
Circuit Switch Matrix II For SX-200 DIGITAL 672-port Bay 0 only
Control Resource Card For SX-200 LIGHT control cabinet only
Bay Control Card II One for each bay (except SX-200 LIGHT control cabinet and SX-200 DIGITAL COMBO bays)
Bay Control Card III Requires the SX-200 ELx cabinet
Control Triple CIM Card Requires the SX-200 ELx cabinet
Control FIMCarrier Card
For SX-200 ML FD and SX-200 LIGHT controlcabinets
Control Dual FIMCarrier Card
For SX-200 EL and SX-200 ML (RM) controlcabinets
Control Triple FIMCarrier Card
For SX-200 EL control cabinet only
T1 Trunk Card A 24 circuit, high power card to CO or to another PBX, maximum distance is 655 feet of shielded cable to the Channel Service Unit
PRI Card For the SX-200 ELx cabinet Rev 4.4 or greater (PN 9109-600-002-NA) with LIGHTWARE 17 Release 4.0 or greater Supports the T1/E1 module and the FIM II or CIM. The PRI card is not included in the high power card count. The PRI card is a separate bay.
T1/E1 module Provides up to 2 T1 links of ISDN connectivity (24 or 48 channels) on the PRI card. Provides up to 2 T1 links of T1/D4 connectivity on the BCC III.
(Sheet 1 of 2)

Technician’s Handbook
190
FIM II Installs on the Control Triple CIM Card in the main control cabinet, on the BCC III in a peripheral cabi-net , on the PRI card in a main control cabinet or a peripheral cabinet, or on the Peripheral Interface Module Carrier Card
Copper Interface Module (CIM)
Installs on the BCC III in a peripheral cabinet , on the PRI card in a main control cabinet or a periph-eral cabinet, or on the Peripheral Interface Module Carrier Card
DSP Module (Single) Installs on the BCC III. Provides CLASS functionality for 8 ONS/CLASS Line cards, 16 DTMF receivers and 16 conference conference bridges for Record a Call.
Table 32: Digital Control and Digital Services Cards and Modules (Continued)
Card or Module Important Details
(Sheet 2 of 2)

Installation
191
Installa
tion
E&M Trunk Card SettingsSet switches S-1 to S-8 on the E&M trunk module (1 = closed = on, 0 = open = off, x = don’t care).
Table 33: E&M Trunk Module Switch Settings
Function Switches
1 2 3 4 5 6 7 8
PBX to Line Gain
3 dB 0 X X X X X X X
-13 dB 1 X X X X X X X
Line to PBX Gain
-4 dB X 0 X X X X X X
-11dB X 1 X X X X X X
Termination
600 ohm X X 1 0 X X X X
Complex X X 0 1 X X X X
Transmission
2-wire X X X X 1 X X X
4-wire X X X X 0 X X X
Signaling
Type 1 X X X X X 1 X X
Type 5 X X X X X 0 X X

Technician’s Handbook
192
The S1 Switch Settings for the T1 Trunk Cable Length (not loop length)
0 - 45.8 m (0 - 150 ft.)1 only closed (see figure below)45.8 - 137.3 m (150 - 450 ft.) 2, 3, 4 closed 137.3 - 200.5 m (450 - 655 ft.) 5, 6, 7 closed
Figure 32: S1 Switch Showing 1 Closed
Control Resource Card Switch Settings
NOTE: Open is pressing the switch to the left (away from the PCB); close, to the right (towards the PCB).
Table 34: Control Resource Card Switch Setting
S1 S2 S3 S4
Normal Operation Closed Closed Not Used Not Used
Forced Maintenance to Control
Open or Closed
Open Not Used Not Used
Forced Maintenance to Peripheral
Open Closed Not Used Not Used

Installation
193
Installa
tion
Adding an SX-200 IP Node
1. Install the SX-200 EL Cabinet.
2. Install the SX-200 MCC IIIELx Card.
3. Install the Control Triple CIM Card.
4. Install the BCC III Card.
5. Install an Ethernet Switch.
6. Position the IP Node.
7. Using a standard Ethernet cable with RJ45 Connectors, connect the BCC III Card's 10 Base T port to the Local Area Network (LAN).
Figure 33: Connecting a BCC III Card to an Ethernet Switch

Technician’s Handbook
194
8. Using an Ethernet crossover cable, connect the Control Triple CIM Card to CIM Port 4 on the SX-200 IP Node.
Figure 34: Connecting a Triple CIM Card to the SX-200 IP Node
9. Using an Ethernet crossover cable with RJ45 Connectors, connect the SX-200 IP Node to an Ethernet Switch.

Installation
195
Installa
tion
Figure 35: Connecting an SX-200 IP Node to an Ethernet Switch
10. Program the IP Node as documented in “Programming an SX-200 IP Node” on page 127.
11. Connect the IP phones to the Ethernet Switch.
12. If you did not program the MAC Addresses of each IP phone in CDE Form 09, register the IP Phones as documented in “Registering IP Phones (Optional)” on page 129.

Technician’s Handbook
196
Control Triple CIM Card Switch Settings
The S1 switch (switch 4) on the Control Triple CIM card determines whether the card provides a double interface or a triple interface.
The S1 switch (switch 1, 2, or 3) substitutes one of the CIM circuits for a fiber circuit.
If the Control Triple CIM card is to provide a triple interface (emulate a control triple carrier card with 9 links), verify that switch 4 on the S1 switch is in the closed position (the default).
If the Control Triple CIM card is to provide a double interface (emulate a control dual carrier card with 6 links), set switch 4 to the open position.
If a FIM II is installed on the Control Triple CIM card, set the S1 switch to assign a circuit to the FIM II. Closing switch 1, 2, or 3 replaces the CIM circuit 1, 2, or 3 respectively. Close only one of these switches. The FIM II takes on the configuration rules of the CIM circuit that is replaces.
For example, a FIM II replacing CIM circuit #1 (in slot 10) connects to the FIM or FIM II in Bay 2. A FIM II replacing CIM circuit #1 (in slot 11) connects to the FIM or FIM II in Bay 4.

Installation
197
Installa
tion
Peripheral Interface Cabling
Use the tables in this section to connect backplane connectors to the main distribution frame.
USOC Pin DesignationsThe USOC connector numbers are
� RJ21X for CO trunks
� RJ2EX for 2-wire E&M trunks
� RJ2FX for 4-wire E&M trunks
� RJ2GX for 4-wire E&M trunks
� RJ2HX for 4-wire E&M trunks.
SX-200 EL/ML Peripheral Interface Card Slot Assignments With LIGHTWARE 17 and greater, the SX-200 EL/ML cabinets do not have high power and low power designations. Slots 1 to 8 can accept any peripheral interface card, except T1 trunk. A maximum of four high-power cards are allowed (there are no high-power or low-power slots). Beginning at slot 1, the system accepts the first four high power cards it detects. The high-power cards are DID, Universal, COV, and T1. T1 Trunk cards can be installed in slots 10 and 11 only, but they require slots 5 and 6 respectively to be left empty. Software recognizes slots 5 and 6 as being occupied and the T1 cards are counted as high power cards in slots 5 and 6.

Technician’s Handbook
198
NOTE: 1. The number 1 BRI module is installed in the upper left corner of the BRI card. The number 2 BRI module is installed below the number 1 BRI module, and the number 3 BRI module is installed beside the number 2 BRI module.
2. BRI cards are "hot-swappable"; that is, that you can replace a configured, run-ning BRI card while the power is on. You may also de-program the BRI card, install the card, and re-configure the card for another slot.
3. Each BRI module can be configured with either line-side or trunk-side interfac-es (all four circuits on a module must be in the same mode). Line and trunk side interfaces are software-programmable (using CDE forms), and no jumper changes are needed.
4. If you deprogram a BRI card, remove the BRI card from the cabinet as soon as possible. This action decreases the load on the BCC III.
5. After deprogramming a BRI card, remove the BRI card from the slot BEFORE installing a BRI card in another slot.
6. The U bus can be converted to an S/T interface using an NT 1 where required.
7. Use IMAT to obtain the BRI card’s maintenance logs. The Maintenancemodule provides serial connectivity to the PC (IMAT) for BRI maintenance.
Table 35: BRI Port to Tip/Ring Assignment
BRI Module Number
BRI Module Port Number
Tip/Ring Pair Number
1 1 9
1 2 10
1 3 11
1 4 12
2 1 3
2 2 4
2 3 5
2 4 6
3 1 1
3 2 2
3 3 7
3 4 8

Installation
199
Installa
tion
Table 36: SFT Port (J7)
Pin Signal
1 nc
2 -48 V SFT
3 -48 R SFT
4 SFT0R
5 SFT0
6 nc
Table 37: Music-on-Hold/Pager Unit Pinouts
Wire Signal Color Description
32 MOH- R-O Music-on-Hold Inputs
7 MOH+ O-R
34 PAGE- R-BR Paging Input/Output
9 PAGE+ BR-R
36 PAGEREL(NC) BK-BL Page Relay, Normally Closed contact
11 PAGEREL(C) BL-BK Page Relay Common
37 PAGEREL(NO) BK-O Page Relay, Normally Open contact
12 PAGEREL(C) O-BK Page Relay Common
39 NIGHTBELL1- BK-BR Night Bell 1 relay contacts
14 NIGHTBELL1+ BR-BK
41 NIGHTBELL2- Y-BL Night Bell 2 relay contacts
16 NIGHTBELL2+ BL-Y
45 ALARM- Y-S Alarm relay contacts
20 ALARM+ S-Y
50 RING V-S Connection to DNIC Line
25 TIP S-V Connection to DNIC Line

Technician’s Handbook
200
NOTE: The CIM ports are the same whether the card has a control end connection or a peripheral end connection. Connections from the control cabinet to the peripheral cabinet require Category 5 UTP (unshielded twisted pair) cable with TX and RX pairs reversed.
NOTE: The RS-232 ports (Maintenance, Printer, J10, J11) are all configured asDTE type. All backplane connections use DB-9 connectors. The pins with * and ** are connected together on PRI maintenance ports (slots 10 and 11).
Table 38: Copper Interface Ports
Pin Signal
1 RX+ TX+
2 RX- TX-
3 TX+ RX+
4
5
6 TX- RX-
7
8
Table 39: Maintenance Terminal and Printer Ports
Pin Signal
1 DTR *
2 RXD
3 TXD
4 DTR *
5 GND
6 DSR *
7 RTS **
8 CTS **
9 nc

Installation
201
Installa
tion
NOTE: Pins with a * and a ** are connected together.
Table 40: Maintenance Module Port
Pin Signal
1 RTS *
2 CTS *
3 TXD
4 GND
5 RXD
6 DSR **
7 DTR **
8 DCD **
Table 41: T1 or PRI Trunk Port (J5 and J6, BCC III and PRI Faceplates)
Pin Signal
1 RxRing
2 RxTip
3 nc
4 TxRing
5 TxTip
6 nc
7 nc
8 nc
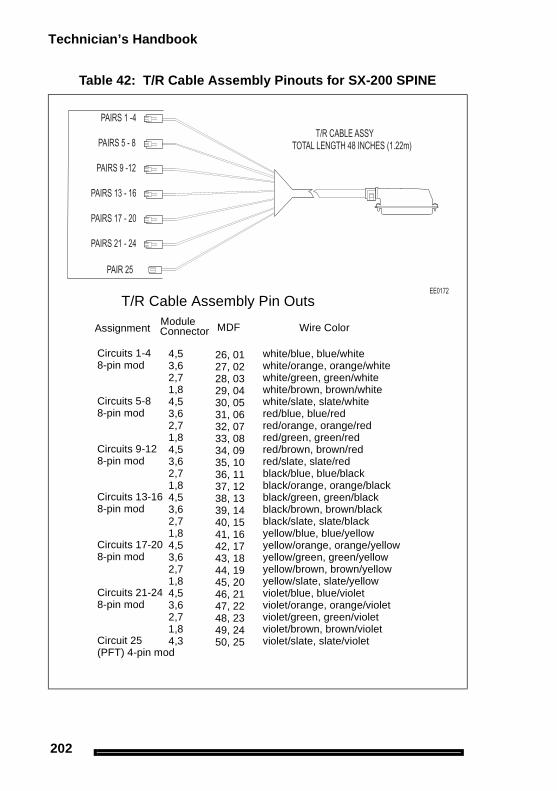
Technician’s Handbook
202
Table 42: T/R Cable Assembly Pinouts for SX-200 SPINE
MDF
26, 0127, 0228, 0329, 0430, 0531, 0632, 0733, 0834, 0935, 1036, 1137, 1238, 1339, 1440, 1541, 1642, 1743, 1844, 1945, 2046, 2147, 2248, 2349, 2450, 25
white/blue, blue/whitewhite/orange, orange/whitewhite/green, green/whitewhite/brown, brown/whitewhite/slate, slate/whitered/blue, blue/redred/orange, orange/redred/green, green/redred/brown, brown/redred/slate, slate/redblack/blue, blue/blackblack/orange, orange/blackblack/green, green/blackblack/brown, brown/blackblack/slate, slate/blackyellow/blue, blue/yellowyellow/orange, orange/yellowyellow/green, green/yellowyellow/brown, brown/yellowyellow/slate, slate/yellowviolet/blue, blue/violetviolet/orange, orange/violetviolet/green, green/violetviolet/brown, brown/violetviolet/slate, slate/violet
Wire ColorModule
4,53,62,71,84,53,62,71,84,53,62,71,84,53,62,71,84,53,62,71,84,53,62,71,84,3
T/R Cable Assembly Pin Outs
Assignment
Circuits 1-48-pin mod
Circuits 5-88-pin mod
Circuits 9-128-pin mod
Circuits 13-168-pin mod
Circuits 17-208-pin mod
Circuits 21-248-pin mod
Circuit 25 (PFT) 4-pin mod
Connector

Installation
203
Installa
tion
Table 43: SX-200 EL or SX-200 ML (RM)Tip and Ring Assignments
J1, J2, J3, and J4 Lead Designation
Slot / Plug Pin Pair Cct
ONS or
DLCCct LS/GS Cct LS/
CLASS Cct COV CctOPS or
DID
26 W-BL 1 T1 1 T1 1 T1 1 T1 1 T1
1 BL-W R1 R1 R1 R1 R1
27 W-O 2 T2 MM1 2 T2 2 T2
2-J1 2 O-W R2 M1 R2 R2
or 28 W-G 3 T3 2 T2 3 T3 3 T3 2 T2
4-J2 3 G-W R3 R2 R3 R3 R2
or 29 W-BR 4 T4 MM2 4 T4 4 T4
6-J3 4 BR-W R4 M2 R4 R4
or 30 W-S 5 T5 3 T3 5 T5 3 T3
8-J4 5 S-W R5 R3 R5 R3
31 R-BL 6 T6 MM3 6 T6
6 BL-R R6 M3 R6
32 R-O 7 T7 4 T4 5 T5 4 T4
7 O-R R7 R4 R5 R4
33 R-G 8 T8 MM4 6 T6
8 G-R R8 M4 R6
34 R-BR 9 T9 5 T5 7 T7 5 T5
9 BR-R R9 R5 R7 R5
35 R-S 10 T10 MM5 8 T8
10 S-R R10 M5 R8
36 BK-BL 11 T11 6 T6 6 T6
11 BL-BK R11 R6 R6
37 BK-O 12 T12 MM6
12 O-BK R12 M6
38 BK-G SPARE
(Sheet 1 of 2)

Technician’s Handbook
204
13 G-BK SPARE
39 BK-BR 1 T1 1 T1 1 T1 1 T1 1 T1
14 BR-BK R1 R1 R1 R1 R1
40 BK-S 2 T2 MM1 2 T2 2 T2
1-J1 15 S-BK R2 M1 R2 R2
or 41 Y-BL 3 T3 2 T2 3 T3 3 T3 2 T2
3-J2 16 BL-Y R3 R2 R3 R3 R2
or 42 Y-O 4 T4 MM2 4 T4 4 T4
5-J3 17 O-Y R4 M2 R4 R4
or 43 Y-G 5 T5 3 T3 5 T5 3 T3
7-J4 18 G-Y R5 R3 R5 R3
44 Y-BR 6 T6 MM3 6 T6
19 BR-Y R6 M3 R6
45 Y-S 7 T7 4 T4 5 T5 4 T4
20 S-Y R7 R4 R5 R4
46 V-BL 8 T8 MM4 6 T6
21 BL-V R8 M4 R6
47 V-O 9 T9 5 T5 7 T7 5 T5
22 O-V R9 R5 R7 R5
48 V-G 10 T10 MM5 8 T8
23 G-V R10 M5 R8
49 V-BR 11 T11 6 T6 6 T6
24 BR-V R11 R6 R6
50 V-S 12 T12 MM6
25 S-V R12 M6
Table 43: SX-200 EL or SX-200 ML (RM)Tip and Ring Assignments (Continued)
J1, J2, J3, and J4 Lead Designation
Slot / Plug Pin Pair Cct
ONS or
DLCCct LS/GS Cct LS/
CLASS Cct COV CctOPS or
DID
(Sheet 2 of 2)

Installation
205
Installa
tion
Table 44: SX-200 EL or SX-200 ML (RM) Universal Card Tip and Ring Assignments
J1, J2, J3, and J4 Lead Designation
Slot / Plug
Pin Pair CctMOH/Pager
Cct DTMF Relay
Cct E&M Trunk
26 W-BL 1 MIA1 1 1 T1
1 BL-W MIB1 R1
27 W-O POA1 K5A1 TR1
2-J1 2 O-W POB1 K5B1 RR1
or 28 W-G PKA1 K6A1 E1
4-J2 3 G-W PKB1 K6B1 M1
or 29 W-BR 2 MIA2 2 2 T2
6-J3 4 BR-W MIB2 R2
or 30 W-S POA2 K5A2 TR2
8-J4 5 S-W POB2 K5B2 RR2
31 R-BL PKA2 K6A2 E2
6 BL-R PKB2 K6B2 M2
32 R-O 3 MIA3 3 3 T3
7 O-R MIB3 R3
33 R-G POA3 K5A3 TR3
8 G-R POB3 K5B3 RR3
34 R-BR PKA3 K6A3 E3
9 BR-R PKB3 K6B3 M3
35 R-S 4 MIA4 4 4 T4
10 S-R MIB4 R4
36 BK-BL POA4 K5A4 TR4
11 BL-BK POB4 K5B4 RR4
37 BK-O PKA4 K6A4 E4
12 O-BK PKB4 K6B4 M4
38 BK-G SPARE
(Sheet 1 of 2)

Technician’s Handbook
206
13 G-BK SPARE
39 BK-BR 1 MIA1 1 1 T1
14 BR-BK MIB1 R1
40 BK-S POA1 K5A1 TR1
1-J1 15 S-BK POB1 K5B1 RR1
or 41 Y-BL PKA1 K6A1 E1
3-J2 16 BL-Y PKB1 K6B1 M1
or 42 Y-O 2 MIA2 2 2 T2
5-J3 17 O-Y MIB2 R2
or 43 Y-G POA2 K5A2 TR2
7-J4 18 G-Y POB2 K5B2 RR2
44 Y-BR PKA2 K6A2 E2
19 BR-Y PKB2 K6B2 M2
45 Y-S 3 MIA3 3 3 T3
20 S-Y MIB3 R3
46 V-BL POA3 K5A3 TR3
21 BL-V POB3 K5B3 RR3
47 V-O PKA3 K6A3 E3
22 O-V PKB3 K6B3 M3
48 V-G 4 MIA4 4 4 T4
23 G-V MIB4 R4
49 V-BR POA4 K5A4 TR4
24 BR-V POB4 K5B4 RR4
50 V-S PKA4 K6A4 E4
25 S-V PKB4 K6B4 M4
Table 44: SX-200 EL or SX-200 ML (RM) Universal Card Tip and Ring Assignments (Continued)
J1, J2, J3, and J4 Lead Designation
Slot / Plug
Pin Pair CctMOH/Pager
Cct DTMF Relay
Cct E&M Trunk
(Sheet 2 of 2)

Installation
207
Installa
tion
Table 45: SX-200 DIGITAL Peripheral BayTip and Ring Assignments (High-power Slots)
J5 and J9Bay 2
slots 5 to 8Lead Designation
Slot / Plug Pin Pair Cct
ONS or
DLCCct LS/GS Cct LS/
CLASS Cct COV CctOPS or
DID
26 W-BL 1 T1 1 T1 1 T1 1 T1 1 T1
1 BL-W R1 R1 R1 R1 R1
27 W-O 2 T2 MM1 2 T2 2 T2
2 O-W R2 M1 R2 R2
28 W-G 3 T3 2 T2 3 T3 3 T3 2 T2
6-J5 3 G-W R3 R2 R3 R3 R2
or 29 W-BR 4 T4 MM2 4 T4 4 T4
8-J9 4 BR-W R4 M2 R4 R4
30 W-S 5 T5 3 T3 5 T5 3 T3
5 S-W R5 R3 R5 R3
31 R-BL 6 T6 MM3 6 T6
6 BL-R R6 M3 R6
32 R-O 7 T7 4 T4 5 T5 4 T4
7 O-R R7 R4 R5 R4
33 R-G 8 T8 MM4 6 T6
8 G-R R8 M4 R6
34 R-BR 9 T9 5 T5 7 T7 5 T5
9 BR-R R9 R5 R7 R5
35 R-S 10 T10 MM5 8 T8
10 S-R R10 M5 R8
36 BK-BL 11 T11 6 T6 6 T6
11 BL-BK R11 R6 R6
37 BK-O 12 T12 MM6
12 O-BK R12 M6
38 BK-G SPARE
(Sheet 1 of 2)

Technician’s Handbook
208
13 G-BK SPARE
39 BK-BR 1 T1 1 T1 1 T1 1 T1 1 T1
14 BR-BK R1 R1 R1 R1 R1
40 BK-S 2 T2 MM1 2 T2 2 T2
15 S-BK R2 M1 R2 R2
41 Y-BL 3 T3 2 T2 3 T3 3 T3 2 T2
5-J5 16 BL-Y R3 R2 R3 R3 R2
or 42 Y-O 4 T4 MM2 4 T4 4 T4
7-J9 17 O-Y R4 M2 R4 R4
43 Y-G 5 T5 3 T3 5 T5 3 T3
18 G-Y R5 R3 R5 R3
44 Y-BR 6 T6 MM3 6 T6
19 BR-Y R6 M3 R6
45 Y-S 7 T7 4 T4 5 T5 4 T4
20 S-Y R7 R4 R5 R4
46 V-BL 8 T8 MM4 6 T6
21 BL-V R8 M4 R6
47 V-O 9 T9 5 T5 7 T7 5 T5
22 O-V R9 R5 R7 R5
48 V-G 10 T10 MM5 8 T8
23 G-V R10 M5 R8
49 V-BR 11 T11 6 T6 6 T6
24 BR-V R11 R6 R6
50 V-S 12 T12 MM6
25 S-V R12 M6
Table 45: SX-200 DIGITAL Peripheral BayTip and Ring Assignments (High-power Slots) (Continued)
J5 and J9Bay 2
slots 5 to 8Lead Designation
Slot / Plug Pin Pair Cct
ONS or
DLCCct LS/GS Cct LS/
CLASS Cct COV CctOPS or
DID
(Sheet 2 of 2)

Installation
209
Installa
tion
Table 46: SX-200 Digital Tip and Ring Assignments for Universal Card Modules
J5 and J9Bay 2 slots 5 to 8
Lead Designation
Slot / Plug
Pin Pair CctMOH/Pager
DTMF Relay
E&M Trunk
DLIC Console
26 W-BL 1 MIA1 T1 T1
1 BL-W MIB1 R1 R1
27 W-O POA1 K5A1 TR1 T2
2 O-W POB1 K5B1 RR1 R2
28 W-G PKA1 K6A1 E1
6-J5 3 G-W PKB1 K6B1 M1
or 29 W-BR 2 MIA2 T2 T1
8-J9 4 BR-W MIB2 R2 R1
30 W-S POA2 K5A2 TR2 T2
5 S-W POB2 K5B2 RR2 R2
31 R-BL PKA2 K6A2 E2
6 BL-R PKB2 K6B2 M2
32 R-O 3 MIA3 T3 T1
7 O-R MIB3 R3 R1
33 R-G POA3 K5A3 TR3 T2
8 G-R POB3 K5B3 RR3 R2
34 R-BR PKA3 K6A3 E3
9 BR-R PKB3 K6B3 M3
35 R-S 4 MIA4 T4 T1
10 S-R MIB4 R4 R1
36 BK-BL POA4 K5A4 TR4 T2
11 BL-BK POB4 K5B4 RR4 R2
37 BK-O PKA4 K6A4 E4
12 O-BK PKB4 K6B4 M4
38 BK-G SPARE
(Sheet 1 of 2)

Technician’s Handbook
210
13 G-BK SPARE
39 BK-BR 1 MIA1 T1 T1
14 BR-BK MIB1 R1 R1
40 BK-S POA1 K5A1 TR1 T2
15 S-BK POB1 K5B1 RR1 R2
41 Y-BL PKA1 K6A1 E1
5-J5 16 BL-Y PKB1 K6B1 M1
or 42 Y-O 2 MIA2 T2 T1
7-J9 17 O-Y MIB2 R2 R1
43 Y-G POA2 K5A2 TR2 T2
18 G-Y POB2 K5B2 RR2 R2
44 Y-BR PKA2 K6A2 E2
19 BR-Y PKB2 K6B2 M2
45 Y-S 3 MIA3 T3 T1
20 S-Y MIB3 R3 R1
46 V-BL POA3 K5A3 TR3 T2
21 BL-V POB3 K5B3 RR3 R2
47 V-O PKA3 K6A3 E3
22 O-V PKB3 K6B3 M3
48 V-G 4 MIA4 T4 T1
23 G-V MIB4 R4 R1
49 V-BR POA4 K5A4 TR4 T2
24 BR-V POB4 K5B4 RR4 R2
50 V-S PKA4 K6A4 E4
25 S-V PKB4 K6B4 M4
Table 46: SX-200 Digital Tip and Ring Assignments for Universal Card Modules (Continued)
J5 and J9Bay 2 slots 5 to 8
Lead Designation
Slot / Plug
Pin Pair CctMOH/Pager
DTMF Relay
E&M Trunk
DLIC Console
(Sheet 2 of 2)
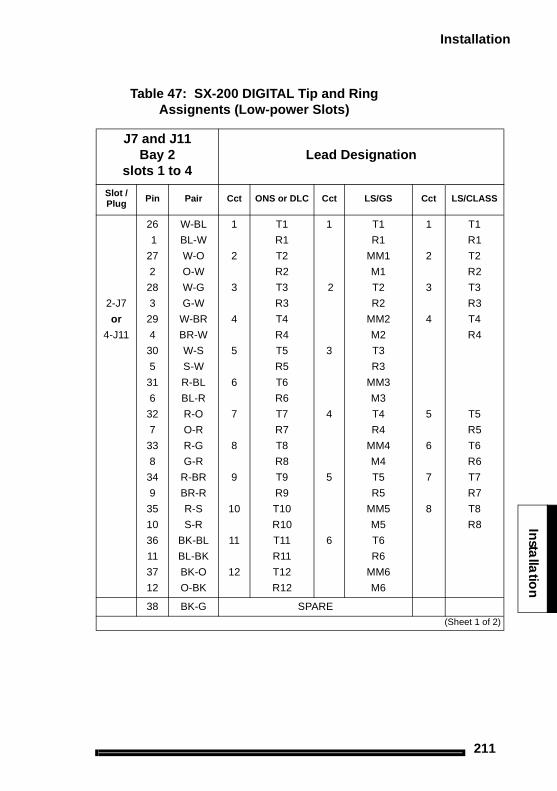
Installation
211
Installa
tion
Table 47: SX-200 DIGITAL Tip and Ring Assignents (Low-power Slots)
J7 and J11Bay 2
slots 1 to 4Lead Designation
Slot / Plug Pin Pair Cct ONS or DLC Cct LS/GS Cct LS/CLASS
26 W-BL 1 T1 1 T1 1 T1
1 BL-W R1 R1 R1
27 W-O 2 T2 MM1 2 T2
2 O-W R2 M1 R2
28 W-G 3 T3 2 T2 3 T3
2-J7 3 G-W R3 R2 R3
or 29 W-BR 4 T4 MM2 4 T4
4-J11 4 BR-W R4 M2 R4
30 W-S 5 T5 3 T3
5 S-W R5 R3
31 R-BL 6 T6 MM3
6 BL-R R6 M3
32 R-O 7 T7 4 T4 5 T5
7 O-R R7 R4 R5
33 R-G 8 T8 MM4 6 T6
8 G-R R8 M4 R6
34 R-BR 9 T9 5 T5 7 T7
9 BR-R R9 R5 R7
35 R-S 10 T10 MM5 8 T8
10 S-R R10 M5 R8
36 BK-BL 11 T11 6 T6
11 BL-BK R11 R6
37 BK-O 12 T12 MM6
12 O-BK R12 M6
38 BK-G SPARE (Sheet 1 of 2)

Technician’s Handbook
212
13 G-BK SPARE
39 BK-BR 1 T1 1 T1 1 T1
14 BR-BK R1 R1 R1
40 BK-S 2 T2 MM1 2 T2
5 S-BK R2 M1 R2
41 Y-BL 3 T3 2 T2 3 T3
1-J7 16 BL-Y R3 R2 R3
or 42 Y-O 4 T4 MM2 4 T4
3-J11 17 O-Y R4 M2 R4
43 Y-G 5 T5 3 T3
18 G-Y R5 R3
44 Y-BR 6 T6 MM3
19 BR-Y R6 M3
45 Y-S 7 T7 4 T4 5 T5
20 S-Y R7 R4 R5
46 V-BL 8 T8 MM4 6 T6
21 BL-V R8 M4 R6
47 V-O 9 T9 5 T5 7 T7
22 O-V R9 R5 R7
48 V-G 10 T10 MM5 8 T8
23 G-V R10 M5 R8
49 V-BR 11 T11 6 T6
24 BR-V R11 R6
50 V-S 12 T12 MM6
25 S-V T12 M6
Table 47: SX-200 DIGITAL Tip and Ring Assignents (Low-power Slots) (Continued)
J7 and J11Bay 2
slots 1 to 4Lead Designation
Slot / Plug Pin Pair Cct ONS or DLC Cct LS/GS Cct LS/CLASS
(Sheet 2 of 2)

Installation
213
Installa
tion
Table 48: USOC Connector Pin Designations
Pin Color RJ21X RJ2EX RJ2GX
26 W-BL T T T
1 BL-W R R R
27 W-O T E T1
2 O-W R M R1
28 W-G T T E
3 G-W R R M
29 W-BR T E T
4 BR-W R M R
30 W-S T T T1
5 S-W R R R1
31 R-BL T E E
6 BL-R R M M
32 R-O T T T
7 O-R R R R
33 R-G T E T1
8 G-R R M R1
34 R-BR T T E
9 BR-R R R M
35 R-S T E T
10 S-R R M R
36 BK-BL T T T1
11 BL-BK R R R1
37 BK-O T E E
12 O-BK R M M
38 BK-G T T T
13 G-BK R R R
39 BK-BR T E T1
(Sheet 1 of 2)

Technician’s Handbook
214
NOTE: RJ21X is a standard trunk.RJ2EX is a two-wire E&M trunk.RJ2GX is a four-wire E&M trunk.
14 BR-BK R M R1
40 BK-S T T E
15 S-BK R R M
41 Y-BL T E T
16 BL-Y R M R
42 Y-O T T T1
17 O-Y R R R1
43 Y-G T E E
18 G-Y R M M
44 Y-BR T T T
19 BR-Y R R R
45 Y-S T E T1
20 S-Y R M R1
46 V-BL T T E
21 BL-V R R M
47 V-O T E T
22 O-V R M R
48 V-G T T T1
23 G-V R R R1
49 V-BR T E E
24 BR-V R M M
50 V-S SPARE
25 S-V SPARE
Table 48: USOC Connector Pin Designations (Continued)
Pin Color RJ21X RJ2EX RJ2GX
(Sheet 2 of 2)

Installation
215
Installa
tion
Table 49: Analog Bay P1 and P7 Tip and Ring Assignments
P1 for Bay 3 or 4 (480-port), Bay 4 (456-port), or P7 for Bay 5 (480- or 456-port)
Slot Cct Pin Color Lines CO DID/TIE E&M
1 26 W-BL T1 T1 T1 T1
1 BL-W R1 R1 R1 R1
2 27 W-O T2 XT2 TR1
1 2 O-W R2 XT1 RR1
3 28 W-G T3 T2 E1
3 G-W R3 R2 M1
4 29 W-BR T4
4 BR-W R4
1 30 W-S T1 T1 T1 T1
5 S-W R1 R1 R1 R1
2 31 R-BL T2 XT2 TR1
2 6 BL-R R2 XT1 RR1
3 32 R-O T3 T2 E1
7 O-R R3 R2 M1
4 33 R-G T4
8 G-R R4
1 34 R-BR T1 T1 T1 T1
9 BR-R R1 R1 R1 R1
2 35 R-S T2 XT2 TR1
10 S-R R2 XT1 RR1
3 3 36 BK-BL T3 T2 E1
11 BL-BK R3 R2 M1
4 37 BK-O T4
12 O-BK R4
1 38 BK-G T1 T1 T1 T1
13 G-BK R1 R1 R1 R1
2 39 BK-BR T2 XT2 TR1
4 14 BR-BK R2 XT1 RR1
3 40 BK-S T3 T2 E1
15 S-BK R3 R2 M1
4 41 Y-BL T4
16 BL-Y R4 (Sheet 1 of 2)

Technician’s Handbook
216
NOTE: For 2-wire E&M Trunk operation DO NOT connect RR and TR leads.
1 42 Y-O T1 T1 T1 T1
17 O-Y R1 R1 R1 R1
2 43 Y-G T2 XT2 TR1
5 18 G-Y R2 XT1 RR1
3 44 Y-BR T3 T2 E1
19 BR-Y R3 R2 M1
4 45 Y-S T4
20 S-Y R4
1 46 V-BL T1 T1 T1 T1
21 BL-V R1 R1 R1 R1
2 47 V-O T2 XT2 TR1
6 22 O-V R2 XT1 RR1
3 48 V-G T3 T2 E1
23 G-V R3 R2 M1
4 49 V-BR T4
24 BR-V R4
50 V-S SPARE
25 S-V SPARE
Table 49: Analog Bay P1 and P7 Tip and Ring Assignments (Continued)
P1 for Bay 3 or 4 (480-port), Bay 4 (456-port), or P7 for Bay 5 (480- or 456-port)
Slot Cct Pin Color Lines CO DID/TIE E&M
(Sheet 2 of 2)

Installation
217
Installa
tion
Table 50: Analog Bay P2 and P8 Tip and Ring Assignments
P2 for Bay 3 or 4 (480-port), Bay 4 (456-port), or P8 for Bay 5 (480- or 456-port)
Slot Cct Pin Color Lines CO DID/TIE E&M
5 26 W-BL T5 T3 T2 T2
1 BL-W R5 R3 R2 R2
6 27 W-O T6 XT4 TR2
1 2 O-W R6 XT3 RR2
7 28 W-G T7 T4 E2
3 G-W R7 R4 M2
8 29 W-BR T8
4 BR-W R8
5 30 W-S T5 T3 T2 T2
5 S-W R5 R3 R2 R2
6 31 R-BL T6 XT4 TR2
2 6 BL-R R6 XT3 RR2
7 32 R-O T7 T4 E2
7 O-R R7 R4 M2
8 33 R-G T8
8 G-R R8
5 34 R-BR T5 T3 T2 T2
9 BR-R R5 R3 R2 R2
6 35 R-S T6 XT4 TR2
10 S-R R6 XT3 RR2
3 7 36 BK-BL T7 T4 E2
11 BL-BK R7 R4 M2
8 37 BK-O T8
12 O-BK R8
5 38 BK-G T5 T3 T2 T2
13 G-BK R5 R3 R2 R2
6 39 BK-BR T6 XT4 TR2
14 BR-BK R6 XT3 RR2
4 7 40 BK-S T7 T4 E2
15 S-BK R7 R4 M2
8 41 Y-BL T8
16 BL-Y R8
(Sheet 1 of 2)

Technician’s Handbook
218
NOTE: For 2-wire E&M Trunk operation DO NOT connect RR and TR leads.
5 42 Y-O T5 T3 T2 T2
17 O-Y R5 R3 R2 R2
6 43 Y-G T6 XT4 TR2
18 G-Y R6 XT3 RR2
5 7 44 Y-BR T7 T4 E2
19 BR-Y R7 R4 M2
8 45 Y-S T8
20 S-Y R8
5 46 V-BL T5 T3 T2 T2
21 BL-V R5 R3 R2 R2
6 47 V-O T6 XT4 TR2
22 O-V R6 XT3 RR2
6 7 48 V-G T7 T4 E2
23 G-V R7 R4 M2
8 49 V-BR T8
24 BR-V R8
50 V-S SPARE
25 S-V SPARE
Table 50: Analog Bay P2 and P8 Tip and Ring Assignments (Continued)
P2 for Bay 3 or 4 (480-port), Bay 4 (456-port), or P8 for Bay 5 (480- or 456-port)
Slot Cct Pin Color Lines CO DID/TIE E&M
(Sheet 2 of 2)

Installation
219
Installa
tion
Table 51: Analog Bay P3 and P9 Tip and Ring Assignments
P3 for Bay 3 or 4 (480-port), Bay 4 (456-port), or P9 for Bay 5 (480- or 456-port)
Slot Cct Pin Color Lines CO DID/TIE E&M
1 26 W-BL T1 T1 T1 T1
1 BL-W R1 R1 R1 R1
2 27 W-O T2 XT2 TR1
7 2 O-W R2 XT1 RR1
3 28 W-G T3 T2 E1
3 G-W R3 R2 M1
4 29 W-BR T4
4 BR-W R4
1 30 W-S T1 T1 T1 T1
5 S-W R1 R1 R1 R1
2 31 R-BL T2 XT2 TR1
8 6 BL-R R2 XT1 RR1
3 32 R-O T3 T2 E1
7 O-R R3 R2 M1
4 33 R-G T4
8 G-R R4
1 34 R-BR T1 T1 T1 T1
9 BR-R R1 R1 R1 R1
2 35 R-S T2 XT2 TR1
10 S-R R2 XT1 RR1
9 3 36 BK-BL T3 T2 E1
11 BL-BK R3 R2 M1
4 37 BK-O T4
12 O-BK R4
1 38 BK-G T1 T1 T1 T1
13 G-BK R1 R1 R1 R1
2 39 BK-BR T2 XT2 TR1
10 14 BR-BK R2 XT1 RR1
3 40 BK-S T3 T2 E1
15 S-BK R3 R2 M1
4 41 Y-BL T4
16 BL-Y R4 (Sheet 1 of 2)

Technician’s Handbook
220
NOTE: For 2-wire E&M Trunk operation DO NOT connect RR and TR leads.
1 42 Y-O T1 T1 T1 T1
17 O-Y R1 R1 R1 R1
2 43 Y-G T2 XT2 TR1
11 18 G-Y R2 XT1 RR1
3 44 Y-BR T3 T2 E1
19 BR-Y R3 R2 M1
4 45 Y-S T4
20 S-Y R4
1 46 V-BL T1 T1 T1 T1
21 BL-V R1 R1 R1 R1
2 47 V-O T2 XT2 TR1
12 22 O-V R2 XT1 RR1
3 48 V-G T3 T2 E1
23 G-V R3 R2 M1
4 49 V-BR T4
24 BR-V R4
50 V-S SPARE
25 S-V SPARE
Table 51: Analog Bay P3 and P9 Tip and Ring Assignments (Continued)
P3 for Bay 3 or 4 (480-port), Bay 4 (456-port), or P9 for Bay 5 (480- or 456-port)
Slot Cct Pin Color Lines CO DID/TIE E&M
(Sheet 2 of 2)

Installation
221
Installa
tion
Table 52: Analog Bay P4 and P10 Tip and Ring Assignments
P4 for Bay 3 or 4 (480-port), Bay 4 (456-port), or P10 for Bay 5 (480- or 456-port)
Slot Cct Pin Color Lines CO DID/TIE E&M
5 26 W-BL T5 T3 T2 T2
1 BL-W R5 R3 R2 R2
6 27 W-O T6 XT4 TR2
7 2 O-W R6 XT3 RR2
7 28 W-G T7 T4 E2
3 G-W R7 R4 M2
8 29 W-BR T8
4 BR-W R8
5 30 W-S T5 T3 T2 T2
5 S-W R5 R3 R2 R2
6 31 R-BL T6 XT4 TR2
8 6 BL-R R6 XT3 RR2
7 32 R-O T7 T4 E2
7 O-R R7 R4 M2
8 33 R-G T8
8 G-R R8
5 34 R-BR T5 T3 T2 T2
9 BR-R R5 R3 R2 R2
6 35 R-S T6 XT4 TR2
10 S-R R6 XT3 RR2
9 7 36 BK-BL T7 T4 E2
11 BL-BK R7 R4 M2
8 37 BK-O T8
12 O-BK R8
5 38 BK-G T5 T3 T2 T2
13 G-BK R5 R3 R2 R2
6 39 BK-BR T6 XT4 TR2
14 BR-BK R6 XT3 RR2
10 7 40 BK-S T7 T4 E2
15 S-BK R7 R4 M2
8 41 Y-BL T8
16 BL-Y R8 (Sheet 1 of 2)

Technician’s Handbook
222
NOTE: For 2-wire E&M Trunk operation DO NOT connect RR and TR leads.
5 42 Y-O T5 T3 T2 T2
17 O-Y R5 R3 R2 R2
6 43 Y-G T6 XT4 TR2
18 G-Y R6 XT3 RR2
11 7 44 Y-BR T7 T4 E2
19 BR-Y R7 R4 M2
8 45 Y-S T8
20 S-Y R8
5 46 V-BL T5 T3 T2 T2
21 BL-V R5 R3 R2 R2
6 47 V-O T6 XT4 TR2
22 O-V R6 XT3 RR2
12 7 48 V-G T7 T4 E2
23 G-V R7 R4 M2
8 49 V-BR T8
24 BR-V R8
50 V-S SPARE
25 S-V SPARE
Table 52: Analog Bay P4 and P10 Tip and Ring Assignments (Continued)
P4 for Bay 3 or 4 (480-port), Bay 4 (456-port), or P10 for Bay 5 (480- or 456-port)
Slot Cct Pin Color Lines CO DID/TIE E&M
(Sheet 2 of 2)

Installation
223
Installa
tion
Table 53: Interconnect Card P19 Tip and Ring Assignments
P19 for Bay 3 or 4 (480-- or 456-port)
Slot Cct Pin Color Lines CO DID/TIE E&M
26 W-BL SPARE 1 BL-W SPARE
8 27 W-O T82 O-W R8
7 28 W-G T7 T4 E215 3 G-W R7 R4 M2
6 29 W-BR T6 XT3 TR24 BR-W R6 XT4 RR2
5 30 W-S T5 T3 T2 T25 S-W R5 R3 R2 R2
8 31 R-BL T86 BL-R R8
7 32 R-O T7 T4 E214 7 O-R R7 R4 M2
6 33 R-G T6 XT3 TR28 G-R R6 XT4 RR2
5 34 R-BR T5 T3 T2 T29 BR-R R5 R3 R2 R2
8 35 R-S T810 S-R R8
7 36 BK-BL T7 T4 E213 11 BL-BK R7 R4 M2
6 37 BK-O T6 XT3 TR212 O-BK R6 XT4 RR2
5 38 BK-G T5 T3 T2 T213 G-BK R5 R3 R2 R2
4 39 BK-BR T4 14 BR-BK R4
3 40 BK-S T3 T2 E115 15 S-BK R3 R2 M1
2 41 Y-BL T2 XT1 TR116 BL-Y R2 XT2 RR1
1 42 Y-O T1 T1 T1 T117 O-Y R1 R1 R1 R1
(Sheet 1 of 2)

Technician’s Handbook
224
NOTE: For 2-wire E&M Trunk operation DO NOT connect RR and TR leads.
4 43 Y-G T418 G-Y R4
3 44 Y-BR T3 T2 E114 19 BR-Y R3 R2 M1
2 45 Y-S T2 XT1 TR120 S-Y R2 XT2 RR1
1 46 V-BL T1 T1 T1 T121 BL-V R1 R1 R1 R1
4 47 V-O T422 O-V R4
3 48 V-G T3 T2 E113 23 G-V R3 R2 M1
2 49 V-BR T2 XT1 TR124 BR-V R2 XT2 RR1
1 50 V-S T1 T1 T1 T125 S-V R1 R1 R1 R1
Table 53: Interconnect Card P19 Tip and Ring Assignments (Continued)
P19 for Bay 3 or 4 (480-- or 456-port)
Slot Cct Pin Color Lines CO DID/TIE E&M
(Sheet 2 of 2)

Installation
225
Installa
tion
Adding a PKM
A Programmable Key Module (PKM) provide the user with additional personal keys for their telephone set. Two types are available: The Mitel Networks Programmable Key Module 48 (PKM 48) and the Mitel Networks Programmable Key Module 12 (PKM 12).
The PKM 48 provides SUPERSET 4025, SUPERSET 4125, and the SUPERSET 4150 telephone users with 48 additional personal keys; the PKM 12 provides 12. The programming for both are the same. Up to two PKM 48 devices can be attached to the telephone or attendant console.
The telephone requires a SUPERSET Interface Module (SIM1 or SIM2) to interface with a PKM. The SUPERSET Interface Module requires programming through CDE to associate with the PKM.
For a SUPERSET Interface Module to work correctly with a SUPERSET 4000-series telephone, the SUPERSET 4000-series telephone must have a Boot Revision of 4.2 or greater, and the SUPERSET 4000-series telephone must be upgraded to the latest firmware available from the system maintenance firmware download command.The SUPERSET Interface Module also requires LIGHTWARE 17 Release 3.0 or greater software.
Any connection of this set to an off-premise application, an out of plant application, or to any other exposed plant application may result in a safety hazard, and/or defective operation, and/or equipment damage.
The PKM 12 and the PKM 48 are the only programmable key modules qualified by Mitel Networks for connection to SUPERSET 4000-series telephones.
The PKM 12 is not designed to connect to a PKM 48.

Technician’s Handbook
226
The SUPERSET 4025 telephone requires a power adapter for the SUPERSET Interface Module connection. The unpowered power adapter plugs into the interface module’s power jack.
Figure 36: PKM Connections to a SUPERSET 4025
The SUPERSET 4150 and the SUPERSET 4125 telephones come with a power adapter. The unpowered power adapter plugs into the telephone itself.
Figure 37: PKM Connections to a SUPERSET 4150
Never plug a power supply into a SIM1or a SIM2 installed in a SUPERSET 4150 or SUPERSET 4125 telephone. If you do, you will lose the full duplex functionality of the speaker phone.
Refer to Programming an Analog Device to a SIM2 (page 109) for instructions on adding an analog device.
Installation
227
Installa
tion
PKM to an Attendant Console The PKM 48 provides an attendant console user with 48 DSS/BLF keys. Up to two PKM 48 devices can be attached.
A SUPERCONSOLE 1000 with part numbers 9189-000-300 and 9189-000-301 can directly connect up to two PKM 48 devices. Direct connection requires a power adapter, LIGHTWARE 18 and greater software and the purchasable MOSS System Option 102, Feature Level 1 or greater.
The attendant console (excluding the SUPERCONSOLE 1000 PN 9189-000-300 and 9189-000-301 with LIGHTWARE 18 or greater) requires a DSS/BLF Interface unit to associate the PKM 48 devices. The DSS/BLF Interface unit requires a power adapter, LIGHTWARE 17 Release 3.1 or greater software, and needs to be programmed in CDE to associate with the PKM.
The SUPERCONSOLE 1000 supports the connection of PKM 48 devices or a printer, both are not supported.

Technician’s Handbook
228
The following diagram shows the connection of two PKM 48 devices with the DSS/BLF Interface Unit. The maximum cable length between the DSS/BLF Interface Unit and the first PKM is 5.0 m. The maximum cable length between the first PKM and second PKM is 0.6 m.
Figure 38: PKM Connections to an Attendant Console
Only use the modular cables that are supplied with the DSS/BLF Interface Unit and the PKM 48 device.

Chapter 6
MaintenanceCommands


Maintenance Commands
231
Ma
intenanc
eC
om
ma
nds
Basic Commands
Maintenance port characteristics are: 8 bits/1 start/1 stop/no parity. Baud rates are: 300, 600, 1200, 2400, 4800, 9600, or 19,200.
Maintenance commands do not require the ESC sequence used with CDE commands.
Entering Command SequencesMaintenance commands are entered by selecting a softkey from a menu, and then selecting another softkey from the subsequent menu.
Start all maintenance sequences from the Maintenance screen.
Press the DELETE key to delete the most recently entered softkey or device number.
At the end of a command sequence, press ENTER.
Press the CANCEL softkey at any time to exit the current operation without committing (saving) any changes, or press the ENTER softkey, when it is available, to commit changes or initiate an activity.
For example, to show time:
Select SYSTEM from the Maintenance screen.
Select SHOW from the System screen.
Select TIME from the Show screen.
Select ENTER from the Show screen or Press ENTER at the keyboard.
Logging In
1. Hit RETURN 4 times within 1 second, (2 times for SX-200 LIGHT/DIGITAL) and then follow the prompts.
2. Select a Terminal Type.
3. Select an Application.
4. Enter your username.
5. Enter your password.

Technician’s Handbook
232
Logging Out
1. Press QUIT (softkey 6).
2. Press key 6 (or wait for logout timer to time out).
Displaying the Card ConfigurationFrom CDE mode:
1. View Form 01, System Configuration
From Maintenance mode:
1. Press:REPORTSSHOWCONFIGALL
Showing the System IdentityFrom Maintenance mode:
1. Press:SYSTEM SHOWIDENTITYENTER

Maintenance Commands
233
Ma
intenanc
eC
om
ma
nds
Log Commands
* TRACE_INFO is a diagnostic tool used only by MITEL personnel.
Table 54: Log Level Functions
COMMAND PARAMETER QUALIFIER
1-SET 4-AUTOPRINT 1-ON
2-OFF
2-READ 1-NEWEST [number]
2-OLDEST [number]
4-ALL
8-LOGS_TEXT*
9-TRACE_INFO*
3-PRINT 1-NEWEST [number]
2-OLDEST [number]
4-ALL
8-LOGS_TEXT*
4-DELETE 1-NEWEST [number]
2-OLDEST [number]
4-ALL
9-TRACE_INFO*
8-STOP

Technician’s Handbook
234
System Commands
Table 55: System Level Functions
COMMAND PARAMETER QUALIFIER QUALIFIER QUALIFIER
1-SET 1-DATE [dd/mm/yy]
2-TIME [hh:mm]
3-PASSWORD 1-ATTENDANT
2-SUPERVISOR
3-MAINT2
4-MAINT1
7-INSTALLER
4-SPEED 1-MAINT-PORT [speed]
8-PRINTER_PORT [speed]
8-RESET_TIME 1-AFTER_N_FLTS
2-DAY/TIME 1-MONDAY 1-TIME [hh:mm]
2-TUESDAY 1-TIME [hh:mm]
3-WEDNESDAY 1-TIME [hh:mm]
4-THURSDAY 1-TIME [hh:mm]
6-FRIDAY 1-TIME [hh:mm]
7-SATURDAY 1-TIME [hh:mm]
8-SUNDAY 1-TIME [hh:mm]
9-DAILY 1-TIME [hh:mm]
3-IMMEDIATELY
9-ALARM_THRESH 1-LINES 1-SYSTEM 8-CONFIRM
2-BAY (user must enter Bay number)
8-CONFIRM
2-TRUNKS 1-SYSTEM 8-CONFIRM
2-BAY (user must enter Bay number)
8-CONFIRM
3-RECEIVERS 1-SYSTEM 8-CONFIRM
2-BAY (user must enter Bay number)
8-CONFIRM
4-PCM_CHANNELS 1-SYSTEM 8-CONFIRM
2-BAY (user must enter Bay number)
8-CONFIRM
2-SHOW 1-DATE
2-TIME
4-DEVICE 1-MAINT-PORT
4-DATASTN_PLID 1-BAY/SLOT/CCT
3-EXT-NUM
8-PRINTER_PORT
(Sheet 1 of 3)

Maintenance Commands
235
Ma
intenanc
eC
om
ma
nds
7-LN_APP_COUNT
8-RESET-TIME
9-IDENTITY
3-DATABASE 1-BACKUP
2-RESTORE
3-SW_RESTORE
4-SHOW_PARAM
6-TRAP_BACKUP*
7-SW-VERIFY
8-LOGS_BACKUP
9-SET_PARAM 1-DEFAULT
2-RETRIES
3-BLOCK_CHECK
4-RECEIVE 1-EOL_CHAR
2-8_BIT_CHAR
3-CTRL_CHAR
4-REPEAT_CHAR
6-PAD_CHAR
7-PACKET_SIZE
8-RX_TIMEOUT
9-NUM_PAD_CHAR
4-MONITOR 1-SMDR
2-DATA_SMDR
3-DIAGNOSTICS 1-STEP 1-STEP
2-SLOW_SCAN
3-FREE_RUN
2-SLOW_SCAN 1-STEP
2-SLOW_SCAN
3-FREE_RUN 1-STEP
3-FREE_RUN
7-LOGS 1-MAINT_PORT
2-SYS_PRINTERS
5-SUSPEND_PRTR 7-PRINTER_PLID 1-BAY/SLOT/CCT
3-EXT-NUM
8-PRINTER_PORT
6-QUIT
7-RESUME_PRTR 7-PRINTER_PLID 1-BAY/SLOT/CCT
3-EXT-NUM
8-PRINTER_PORT
8-RE-START 2-RESET_SYSTEM
9-STOP 7-LOGS
MORE_KEYS 1-SET_FIRMWARE 1-STATUS 1-BAY/SLOT/CCT
Table 55: System Level Functions (Continued)
COMMAND PARAMETER QUALIFIER QUALIFIER QUALIFIER
(Sheet 2 of 3)

Technician’s Handbook
236
2-SET_TYPE 1-SS4150
2-SS4025
3-SS4090
3-EXT_NUM
4-ALL
2-DOWNLOAD 1-BAY/SLOT/CCT
2-SET_TYPE 1-SS4150
2-SS4025
3-SS4090
3-EXT_NUM
4-ALL
3 ABORT_DOWNLOAD 1-BAY/SLOT/CCT
2-SET_TYPE 1-SS4150
2-SS4025
3-SS4090
3-EXT_NUM
4-ALL
4-FORCE_DOWNLOAD 1-BAY/SLOT/CCT
2-SET_TYPE 1-SS4150
2-SS4025
3-SS4090
3-EXT_NUM
4-ALL
Table 55: System Level Functions (Continued)
COMMAND PARAMETER QUALIFIER QUALIFIER QUALIFIER
(Sheet 3 of 3)

Maintenance Commands
237
Ma
intenanc
eC
om
ma
nds
Report Commands
Table 56: Report Level Functions
COMMAND PARAMETER QUALIFIER QUALIFIER QUALIFIER
2-SHOW 1-CONFIG 1-BAY/SLOT/CCT
3-EXT-NUM [number]
4-ALL
2-ALARMS 2-DEVICE TYPE 1-LINES
2-TRUNKS
3-RECEIVERS
4-PCM-CHANNELS
4-ALL 0-MORE
3-STATUS 1-BAY/SLOT/CCT DEVICE STATUS See Note
2-SWID 1-SW_STATION See Note
2-SW_RECEIVER See Note
3-SW_CONSOLE See Note
4-SW_LINE See Note
6-SW_DTMF_GEN See Note
7-SW_SET See Note
9-SW_DATA_STN See Note
0-MORE_KEYS 1-SW_CO_TRUNK
2-SW_DID_TRUNK
3-SW_TIE_TRUNK
4-SW_DISA_TRUNK
6-SW_CAP
7-SW_TRUNK_GRP
8-SW_HUNT_GRP
0-MORE_KEYS
3-EXT-NUM [number]
4-ALL 1-CP_DWA
2-CP_DWA_MEM
3-LINK STATUS
(Sheet 1 of 2)
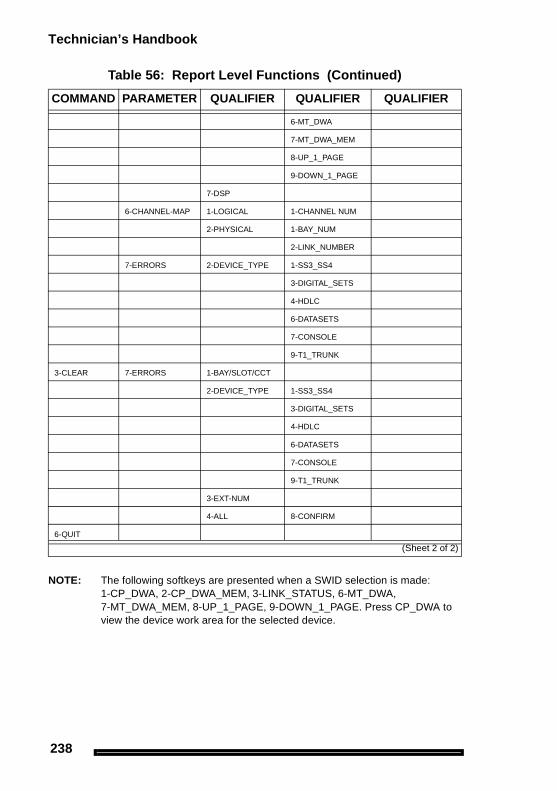
Technician’s Handbook
238
NOTE: The following softkeys are presented when a SWID selection is made: 1-CP_DWA, 2-CP_DWA_MEM, 3-LINK_STATUS, 6-MT_DWA, 7-MT_DWA_MEM, 8-UP_1_PAGE, 9-DOWN_1_PAGE. Press CP_DWA to view the device work area for the selected device.
6-MT_DWA
7-MT_DWA_MEM
8-UP_1_PAGE
9-DOWN_1_PAGE
7-DSP
6-CHANNEL-MAP 1-LOGICAL 1-CHANNEL NUM
2-PHYSICAL 1-BAY_NUM
2-LINK_NUMBER
7-ERRORS 2-DEVICE_TYPE 1-SS3_SS4
3-DIGITAL_SETS
4-HDLC
6-DATASETS
7-CONSOLE
9-T1_TRUNK
3-CLEAR 7-ERRORS 1-BAY/SLOT/CCT
2-DEVICE_TYPE 1-SS3_SS4
3-DIGITAL_SETS
4-HDLC
6-DATASETS
7-CONSOLE
9-T1_TRUNK
3-EXT-NUM
4-ALL 8-CONFIRM
6-QUIT
Table 56: Report Level Functions (Continued)
COMMAND PARAMETER QUALIFIER QUALIFIER QUALIFIER
(Sheet 2 of 2)

Maintenance Commands
239
Ma
intenanc
eC
om
ma
nds
Diagnostic Commands
Table 57: Diagnostic Level Functions
COMMAND SUBCOMMAND PARAMETER QUALIFIER QUALIFIER
1-TEST 1-BAY/SLOT/CCT
2-DEVICE_TYPE 1-ONS
2-LS/GS-TRUNK
3-RECEIVERS
4-JUNCTOR
7-CONSOLE
9-EM
0-MORE_KEYS 1-COV
2-LINK/CHANNEL
3-DID
4-OPS
6-DNIC
7-PRINTER_PLID
8-PRINTER_PORT
9-T1_TRUNK
0-MORE_KEYS
3-EXT-NUM
2-CLR_FEATURE 1-FORWARD 1-BAY/SLOT/CCT
3-EXT_NUM
2-DO_N_DISTURB 1-BAY/SLOT/CCT
3-EXT_NUM
3-CALL_BACK 1-BAY/SLOT/CCT
3-EXT_NUM
4-ALL 1-BAY/SLOT/CCT
3-EXT_NUM
6-QUIT
9-STOP_TEST 6-PRINTERS
0-MORE_KEYS 2-ENABLE_DIAG 1-BACKGROUND 1-BAY/SLOT/CCT
2-DEVICE_TYPE
1-ONS
2-LS/GS-TRUNK
3-RECEIVERS
4-JUNCTOR
(Sheet 1 of 3)

Technician’s Handbook
240
7-CONSOLE
9-EM
0-MORE_KEYS
1-COV
2-LINK/CHANNEL
3-DID
4-OPS
6-DNIC
9-T1_TRUNK
3-EXT-NUM
0-MORE_KEYS 1-RANGE_B_OUT
2-ENABLE-DIAG 2-POWER-UP 1-BAY/SLOT/CCT
2-DEVICE_TYPE 1-ONS
2-LS/GS-TRUNK
3-RECEIVERS
4-JUNCTOR
7-CONSOLE
9-EM
0-MORE_KEYS
1-COV
2-LINK/CHANNEL
3-DID
4-OPS
6-DNIC
9-T1_TRUNK
3-EXT-NUM
3-BUSY-OUT 1-BAY/SLOT/CCT
2-DEVICE_TYPE 2-LINK/CHANNEL
3-EXT-NUM
4-SPINE_WA 1-BAY/SLOT/CCT
5-RANGE_RTS
6-QUIT
7-DISABLE-DIAG 1-BACKGROUND 1-BAY/SLOT/CCT
2-DEVICE_TYPE 1-ONS
1-LS/GS-TRUNK
3-RECEIVERS
4-JUNCTOR
7-CONSOLE
Table 57: Diagnostic Level Functions (Continued)
COMMAND SUBCOMMAND PARAMETER QUALIFIER QUALIFIER
(Sheet 2 of 3)

Maintenance Commands
241
Ma
intenanc
eC
om
ma
nds
9-EM
0-MORE_KEYS
1-COV
2-LINK/CHANNEL
3-DID
4-OPS
6-DNIC
9-T1_TRUNK
3-EXT-NUM
7-DISABLE-DIAG 2-POWER-UP 1-BAY/SLOT/CCT
2-DEVICE_TYPE 1-ONS
2-LS/GS-TRUNK
3-RECEIVERS
4-JUNCTOR
7-CONSOLE
9-EM
0-MORE_KEYS
1-COV
2-LINK/CHANNEL
3-DID
4-OPS
6-DNIC
9-T1_TRUNK
3-EXT-NUM
8-RET-TO-SVC 1-BAY/SLOT/CCT
2-DEVICE_TYPE 2-LINK/CHANNEL
4-JUNCTOR
3-EXT-NUM
9-DISC_TRUNK 1-BAY/SLOT/CCT
Table 57: Diagnostic Level Functions (Continued)
COMMAND SUBCOMMAND PARAMETER QUALIFIER QUALIFIER
(Sheet 3 of 3)

Technician’s Handbook
242
Traffic Measurement Commands
Table 58: Traffic Measurement Level Functions
COMMAND PARAMETER QUALIFIER
1-SET 1-UNITS 1-CCS
2-ERLANGS
2-PERIOD
3-DURATION
4-AUTOPRINT 1-ON
2-OFF
5-CANCEL
7-START_TIME
8-CONDENSED 1-ON
2-OFF
2-SHOW 3-STATUS
3-PRINT
4-READ
6-QUIT
4-DELETE
9-STOP 1-TRAFFIC _RPT
3-PRINT

Index
243
AAlarm
check 26flowchart 50
ANI/DNIS incoming 122Attendant console 103
BBackup
database 27log entries 56
Basic maintenance commands 231
Boot code 33BRI installation 198
CCabling, peripheral interface 196Call Forwarding - External 135Card configuration, display 232CFCII card 5Changing options 35Channel associated signaling 82Circuit cards, replacing 60CLASS trunks 126Command sequences 231Common channel signaling 82Configuration
336 port 18456 port 19480 port 20672 port 17EL 5LIGHT 13SPINE 16
Configuration Rules - SX-200 EL/ML 173
Connector pin designations 213Control 196
Control cards 189Control Dual FIM Carrier card 5Control Triple CIM Card Switch
Settings 196Copper Interface Ports 200Correcting
ground path problems 62set / dataset problems 51
COS Option NameSMDR-Record ANI/DNIS/CLASS (814) 126SMDR-Record Incoming Calls (806) 126
COS Option Number806 (SMDR-Record Incoming Calls) 126814 (SMDR-Record ANI/DNIS/CLASS) 126
COS options 139
DDatabase
backup 27error check 26restore 55
Decryption module 35Decryption module error 57Diagnostics commands 239Dial-in trunk 119Direct inward dial (DID)/Loop
trunk 75DISA trunks 121Disk drive 91Disk drive strapping 93Displaying the card
configuration 232DNIC rules 177DNIS 122DSS/BLF Interface Unit 227

Technician’s Handbook
244
EE&M Trunk
card settings 191Type I 77Type V 79
E.8 error 35EL 5ELx cabinet 6Enabling options 35Entering command sequences
231Error codes, MCC power-up 183
FFaults
alarms, investigate 50identifying 47maintenance terminal 53set / dataset 51system not booting 49
Feature Limitations 154FIM Carrier troubleshooting 67FIM II 178Firmware
commands 33download failure 34revision levels 33system logs 34upgrading 33
Flash MemoryUpgrading in SX-200 IP Node 38
Flowcharts, troubleshooting 47Form 34, Directed I/O 104
GGeneral signalling & supervision
concepts 70Getting started 47Ground start trunk 73
Ground, SystemAC voltage test 63CO and PBX differential 64problems 62resistance test 63
IID errors, correcting 57IMAT 116Initialization sequence 181Interface cards, peripheral 186
LLIGHT 13LIGHTWARE 19 software 21Loading new software 28Log entries, backing up 56Logging in 231Logging out 232, 249Logs commands 233Loop Start Line/Trunk 71
MMain Control Card IIIEL 5Main controller 189
power-up error codes 183Main controller card, replacing 61Main distribution frame 197Maintenance
commands 231logs commands 233port characteristics 231, 249terminal problem 53
Maintenance Module Port 201MCC IIIEL 5MDF 197Mitel options selection sheet 35MOSS 35Multiline sets 109Music On Hold/Pager Unit
Pinouts 199

Index
245
NNon-dial-in trunk 116
OOptions and timers, system 147Options password 35Options, changing or enabling 35
PPBX - PMS interface 131PBX and PMS cannot
communicate 89Peripheral
cabinet, add 185interface cabling 196interface cards 186interface cards, replacing 60
Pinouts for SX-200 SPINE 202PMS
5-digit extension number 87message - PBX to PMS 87messages 86programming interface 131
Pointer, meaning of 3Power cards (EL)
high 10low 10
PRI cardprogramming 112rules 177S1 Switch settings 178
Printer ports 104Programmable Key Modules 225Programming
an analog device to a SIM2 109ANI/DNIS On Incoming Trunks 122attendant console 103Call Forwarding - External 135CLASS trunks 126dial-in trunk 119
DISA Trunks 121multiline sets 109non-dial-in trunk 116PBX PMS Interface 131PRI card 112printer port 104subattendant sets 111voice stations 108
Property Management System 86
RReceivers 65Remote Software Download 29Replacing
circuit cards 60main controller card 61peripheral interface cards 60
Reports commands 237
SS1 Switch Setting 192Set Firmware, upgrading 33SFT Port (J7) 199, 201Show alarms 26Show status 26Signaling
and supervision 70channel associated 82common channel 82
SMDR Trunk Record definitions 41
Software, loading 28SPINE
Module assignment 167Peripheral Bay 16
Subattendant sets 111Superframe 83SX-200
336 Port 18456 Port 19480 Port 20

Technician’s Handbook
246
672 Port 17EL/ML configuration rules 173ELx cabinet 6LIGHT 13ML (FD) and (RM) 12SPINE Bay 16
SX-200 IP NodeConfiguration 14Troubleshooting 93Upgrading 36
SX-200 RM peripheral interface card slot assignments 197
Symbols 3System
checklist 25commands 234correcting ID errors 57ID mismatch 57initialization sequence 181is not booting 49options and timers 147
TT1 or PRI Trunk
port (J5 and J6) 201T1 Trunk
A&B bits 83A-B signalling states 84loopback 83maximum numbers 69signaling types 82superframe 83synchronization 81, 82
T1/E1 Module 178Table
Hotel/MotelCOS Options 133System Options 132
LIGHTWARE 19 system op-tions and timers 147PMS Circuit Descriptor 114, 131SPINE receivers 66SX-200 DIGITAL cable assign-ments 172typical business COS options 139
Test Linecommands 96indicator LEDs 98specifying equipment 96tones 99
Testing the PBX’s PMS interface 89
Tip and ring assignments 203Troubleshooting 47
alarm, investigate 50disk drive 91FIM carriers 67getting started 47maintenance terminal 53set / dataset 51system not booting 49
Trunk Signalinganswer supervision 70digits 70disconnect supervision 70receipt of digits 70seize 70seize acknowledgment 70stop dial 70
Trunk Test/VerifyDID 75E&M 80Ground Start 74Loop Start 72T1 82

Index
247
TrunksANI/DNIS 122CLASS 126Dial-In 119DISA 121Non-Dial-In 116
UUpgrading set firmware 33USOC connector pin
designations 213
VVoice stations 108
WWrist strap 60

Technician’s Handbook
248

E-Doc Tips
Advanced Graphical User Interface Example
How do I print a procedure from the infobase?
1. In the Table of Contents, select the check box of the section that you want to print.
2. On the File menu, click Print.3. Click the Print Document tab.4. Click Section.
CAUTION:Do not click all or you will print the entire infobase.
5. Click OK.
How do I export a section of the infobase to a word processing file?
1. In the Table of Contents, select the check box of the section that you want to export.
2. On the File menu, click Export.3. In the Save In list, select the save location.4. In the File name box, type a name.5. In the Save as type list, select a file type.6. In the Export Range list, select Checked Branches.7. Click Export.

E-Doc Tips
How do I get more information?The documentation CD-ROM contains all of the technical information in an electronic file called an "infobase". Folio Views, the infobase viewer, has powerful search capabilities that let you find information quickly and easily. Once you've found the information that you need, you can read it online, print sections, or export segments to word processing files.
How do I search the entire infobase?
1. Click Advanced Query2. In the Query For box, type your search criteria.
3. Click OK.
To view the next hit, click Next Hit ; to view the previous hit, click Previous Hit .
How do I search a section of the infobase?
1. In the Table of Contents, select the check box of the section that you want to search.
2. Click Advanced Query3. In the Query For box, type your search criteria.4. Ensure that the Checked branches check box is selected.5. Click OK.
To view the next hit, click Next Hit ; to view the previous hit, click Previous Hit .

Notes:

Technician’s Handbook
Notes: