Embed Size (px)
Citation preview

Setting Up a Quest™ QoreStor System with
Veritas™ Backup Exec™
Technical White Paper
Quest Engineering
August 2018

© 2017 Quest Software Inc.
ALL RIGHTS RESERVED.
THIS WHITE PAPER IS FOR INFORMATIONAL PURPOSES ONLY, AND MAY CONTAIN TYPOGRAPHICAL ERRORS AND TECHNICAL INACCURACIES. THE CONTENT IS PROVIDED AS IS, WITHOUT EXPRESS OR IMPLIED WARRANTIES OFANY KIND
This guide contains proprietary information protected by copyright. The software described in this guide is furnished under a software license or nondisclosure agreement. This software may be used or copied only in accordance with the terms of the applicable agreement. No part of this guide may be reproduced or transmitted in any form or by any means, electronic or mechanical, including photocopying and recording for any purpose other than the purchaser’s personal use without the written permission of Quest Software Inc.
The information in this document is provided in connection with Quest Software products. No license, express or implied, by estoppel or otherwise, to any intellectual property right is granted by this document or in connection with the sale of Quest Software products. EXCEPT AS SET FORTH IN THE TERMS AND CONDITIONS AS SPECIFIED IN THE LICENSE AGREEMENT FOR THIS PRODUCT, QUEST SOFTWARE ASSUMES NO LIABILITY WHATSOEVER AND DISCLAIMS ANY EXPRESS, IMPLIED OR STATUTORY WARRANTY RELATING TO ITS PRODUCTS INCLUDING, BUT NOT LIMITED TO, THE IMPLIED WARRANTY OF MERCHANTABILITY, FITNESS FOR A PARTICULAR PURPOSE, OR NON-INFRINGEMENT. IN NO EVENT SHALL QUEST SOFTWARE BE LIABLE FOR ANY DIRECT, INDIRECT, CONSEQUENTIAL, PUNITIVE, SPECIAL OR INCIDENTAL DAMAGES (INCLUDING, WITHOUT LIMITATION, DAMAGES FOR LOSS OF PROFITS, BUSINESS INTERRUPTION OR LOSS OF INFORMATION) ARISING OUT OF THE USE OR INABILITY TO USE THIS DOCUMENT, EVEN IF QUEST SOFTWARE HAS BEEN ADVISED OF THE POSSIBILITY OF SUCH DAMAGES. Quest Software makes no representations or warranties with respect to the accuracy or completeness of the contents of this document and reserves the right to make changes to specifications and product descriptions at any time without notice. Quest Software does not make any commitment to update the information contained in this document.
If you have any questions regarding your potential use of this material, contact:
Quest Software Inc.
Attn: LEGAL Dept
4 Polaris Way
Aliso Viejo, CA 92656
Refer to our Web site (https://www.quest.com) for regional and international office information.
Patents
Quest Software is proud of our advanced technology. Patents and pending patents may apply to this product. For the most current information about applicable patents for this product, please visit our website at https://www.quest.com/legal .
Trademarks
Quest, the Quest logo, and Join the Innovation are trademarks and registered trademarks of Quest Software Inc. For a complete list of Quest marks, visit https://www.quest.com/legal/trademark-information.aspx. Veritas and the Veritas Logo, Backup Exec™, and NetBackup™ are trademarks or registered trademarks of Veritas Technologies LLC or its affiliates in the U.S. and other countries. All other trademarks and registered trademarks are property of their respective owners.
Legend
WARNING: A WARNING icon indicates a potential for property damage, personal injury, or death
CAUTION: A CAUTION icon indicates potential damage to hardware or loss of data if instructions are not followed.
IMPORTANT, NOTE, TIP, MOBILE, or VIDEO: An information icon indicates supporting information.
Veritas Backup Exec for QoreStor 5.0
Updated – August 31, 2018

Setting Up a Quest™ QoreStor System with Veritas™ Backup Exec™ 3
Contents
Contents
Configuring the QoreStor System as a backup to disk target in Veritas Backup Exec ............. 5
Creating a CIFS container for use with Veritas Backup Exec.................................................... 5
Adding the QoreStor container as a disk storage device on Backup Exec ............................... 7
Creating a new backup job with the QoreStor System as a target .......................................... 11
Setting up a QoreStor system replication and restore from the replication target ................... 19
Creating the replication session ........................................................................................ 19
Restoring from the replication target ................................................................................. 22
Configuring an OST container on QoreStor for use with Backup Exec ................................. 26
Creating an OST container ...................................................................................................... 26
Installing the OST plugin .......................................................................................................... 27
Configuring the OST device in Backup Exec ........................................................................... 31
Performing backup using OST Container ................................................................................ 37
Performing restore using QoreStor OST .................................................................................. 46
Setting up the QoreStor system cleaner .............................................................................. 52
Monitoring deduplication, compression and performance .................................................... 55
Setting data expiration for Backup Exec 2014/2015/16 ........................................................ 56
Installing the Backup Exec agent on a Linux client (RALUS) ................................................ 57

Setting Up a Quest™ QoreStor System with Veritas™ Backup Exec™ - 4
Configuring the QoreStor System as a backup to disk target in Veritas Backup Exec
Executive Summary
This document provides information about how to set up the Quest QoreStor Software with Veritas Backup Exec,
including:
Configuring a QoreStor system as a backup to disk target for Veritas Backup Exec 2015, 16, and 20
Configuring an OST container on the QoreStor system for use with Veritas Backup Exec Server 2015, 16,
and 20
For additional information, see the QoreStor system documentation and other data management application best
practices whitepapers for your specific QoreStor version at:
https://support.quest.com/qorestor/
NOTE: The QoreStor system/Veritas Backup Exec build version and screenshots used for this paper
may vary slightly, depending on the version of the QoreStor system/Veritas Backup Exec software
version you are using.

Setting Up a Quest™ QoreStor System with Veritas™ Backup Exec™ - 5
Configuring the QoreStor System as a backup to disk target in Veritas Backup Exec
1
Configuring the QoreStor System as a
backup to disk target in Veritas Backup
Exec
Creating a CIFS container for use with
Veritas Backup Exec
1 Select the Storage Groups tab, then expand the drop down you would like to add the container into. Click
the Add container button

Setting Up a Quest™ QoreStor System with Veritas™ Backup Exec™ - 6
Configuring the QoreStor System as a backup to disk target in Veritas Backup Exec
2 Enter a Container Name, and select NAS from the Access Protocol drop down menu. Then Click Next.
3 Click the drop down on the Access Protocols field then select the check mark for CIFS. Leave Marker
Type on Auto, then click Next
4 Fill in backup container information for CIFS options, then click Next

Setting Up a Quest™ QoreStor System with Veritas™ Backup Exec™ - 7
Configuring the QoreStor System as a backup to disk target in Veritas Backup Exec
NOTE: For improved security, Quest recommends adding IP addresses for only Backup Exec Media
Servers
5 Confirm the settings and Click Finish. Confirm that the container is added.
Adding the QoreStor container as a disk
storage device on Backup Exec
1 Open the Backup Exec console. In the Storage pane, click Configure Storage.

Setting Up a Quest™ QoreStor System with Veritas™ Backup Exec™ - 8
Configuring the QoreStor System as a backup to disk target in Veritas Backup Exec
2 Select Disk-based storage, and click Next.
3 Enter a name for the QoreStor system disk device, add a description, and click Next.

Setting Up a Quest™ QoreStor System with Veritas™ Backup Exec™ - 9
Configuring the QoreStor System as a backup to disk target in Veritas Backup Exec
4 Enter the QoreStor container CIFS share path, and click Next.

Setting Up a Quest™ QoreStor System with Veritas™ Backup Exec™ - 10
Configuring the QoreStor System as a backup to disk target in Veritas Backup Exec
5 Set the number of concurrent write operations allowed. Click Next.
NOTE: Please review the QoreStor interoperability guide for the supported maximum number of connections.
To change this number later at any time, go to the Storage tab, select the required Storage device and see the details.
In the Properties page, there is an option to update concurrent operations.
6 In the Storage Configuration Summary window, click Finish.

Setting Up a Quest™ QoreStor System with Veritas™ Backup Exec™ - 11
Configuring the QoreStor System as a backup to disk target in Veritas Backup Exec
a For Backup Exec 2014/2015, the summary page will include additional details.
7 Verify that the Disk Storage Device is attached to the server.
Creating a new backup job with the
QoreStor System as a target
1 If the required source client server is not added in Backup Exec, it can be added by selecting the Backup
and Restore pane and then clicking the Add button.
Setting Up a Quest™ QoreStor System with Veritas™ Backup Exec™ - 12
Configuring the QoreStor System as a backup to disk target in Veritas Backup Exec
2 Follow the wizard by selecting the required type of server and continue.
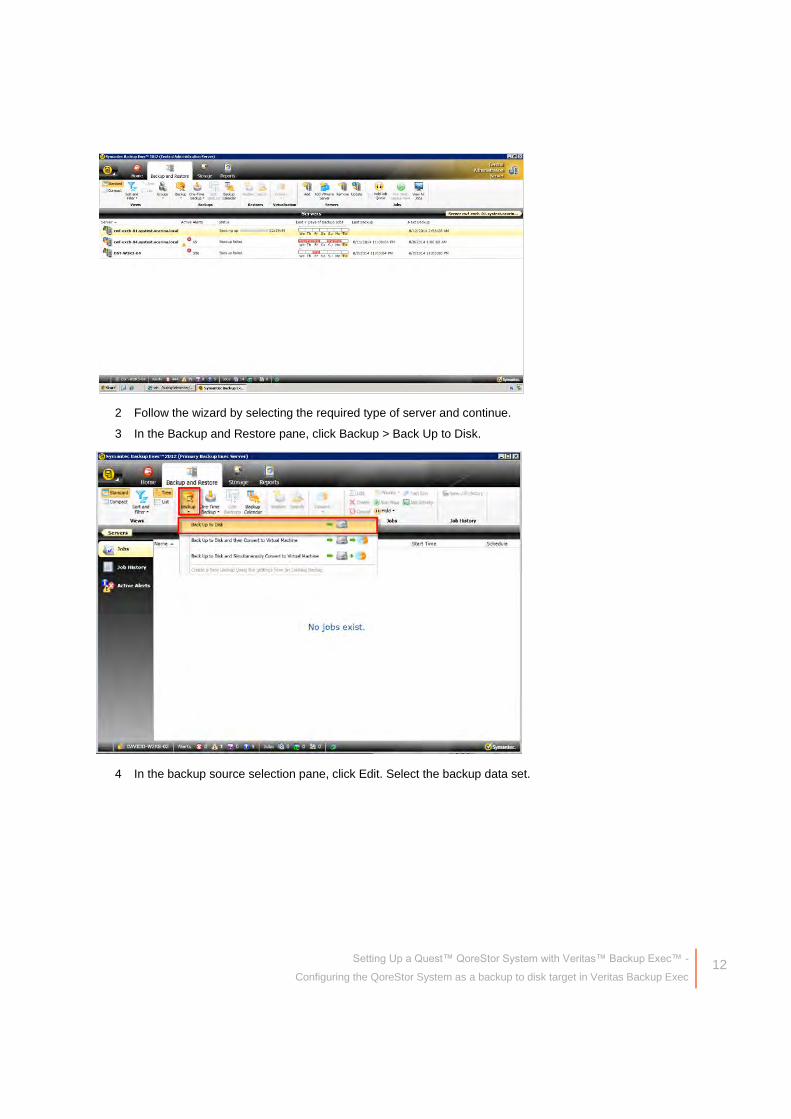
3 In the Backup and Restore pane, click Backup > Back Up to Disk.
4 In the backup source selection pane, click Edit. Select the backup data set.

Setting Up a Quest™ QoreStor System with Veritas™ Backup Exec™ - 13
Configuring the QoreStor System as a backup to disk target in Veritas Backup Exec
a For Backup Exec 2014/2015, backup data sets can be selected from multiple servers within the
same job. To add an additional server, click the “+” button.

Setting Up a Quest™ QoreStor System with Veritas™ Backup Exec™ - 14
Configuring the QoreStor System as a backup to disk target in Veritas Backup Exec
b For Backup Exec 2014/2015, follow the wizard and add the Server with the selected backup data.
The Source Dataset will appear. Click OK to continue.
c For Backup Exec 2014/2015. The final backup selection with two servers is displayed.

Setting Up a Quest™ QoreStor System with Veritas™ Backup Exec™ - 15
Configuring the QoreStor System as a backup to disk target in Veritas Backup Exec
5 In the backup target selection pane, click Edit to define the backup strategy.
6 Click Schedule. Define the backup mode and select schedule options.

Setting Up a Quest™ QoreStor System with Veritas™ Backup Exec™ - 16
Configuring the QoreStor System as a backup to disk target in Veritas Backup Exec
a For Backup Exec 2014/2015 the screen includes additional information.
7 Click Storage and then select the Disk Storage Device pointing to the QoreStor container share. Define
other backup options as needed, and then click OK.

Setting Up a Quest™ QoreStor System with Veritas™ Backup Exec™ - 17
Configuring the QoreStor System as a backup to disk target in Veritas Backup Exec
8 Enter a job Name, and click OK.
9 To run the job, select an Agent, and click OK. The Jobs window shows the job queue status.

Setting Up a Quest™ QoreStor System with Veritas™ Backup Exec™ - 18
Configuring the QoreStor System as a backup to disk target in Veritas Backup Exec
a For Backup Exec 2014, select the required server from the drop down, select the job recently
created, and click Run Now.

Setting Up a Quest™ QoreStor System with Veritas™ Backup Exec™ - 19
Configuring the QoreStor System as a backup to disk target in Veritas Backup Exec
Setting up a QoreStor system replication
and restore from the replication target
Creating the replication session
1 Create a CIFS container 'source' on QS1; create a second CIFS container 'target' on QS2. For each of the
containers, on the Backup Exec media server, configure a corresponding Disk Storage Device.

Setting Up a Quest™ QoreStor System with Veritas™ Backup Exec™ - 20
Configuring the QoreStor System as a backup to disk target in Veritas Backup Exec
a For Backup Exec 2014/2015, after adding the target QoreStor CIFS container, check that the
device was added.
2 From the QS1 GUI, on the Replications page, select the Replication Tab. Then click Add Replication. Set
the 'source' container as the replication source, set the QS2 'target' container as the replication target.
Start the replication session.

Setting Up a Quest™ QoreStor System with Veritas™ Backup Exec™ - 21
Configuring the QoreStor System as a backup to disk target in Veritas Backup Exec
3 Schedule and run backup jobs to the source Disk Storage Device.
a For Backup Exec 2014/2015, view the Job History screen.

Setting Up a Quest™ QoreStor System with Veritas™ Backup Exec™ - 22
Configuring the QoreStor System as a backup to disk target in Veritas Backup Exec
Restoring from the replication target
1 Under Storage > Storage Operations, right-click the replication target device, and select Inventory and
Catalog.

Setting Up a Quest™ QoreStor System with Veritas™ Backup Exec™ - 23
Configuring the QoreStor System as a backup to disk target in Veritas Backup Exec
a For Backup Exec 2014/2015, the following screen appears.
2 After the Inventory and Catalog job is done, check the Backup Sets shown in target storage device.

Setting Up a Quest™ QoreStor System with Veritas™ Backup Exec™ - 24
Configuring the QoreStor System as a backup to disk target in Veritas Backup Exec
3 Disable source storage under Storage > State, right-click the source storage device, and select Disable.
4 Schedule and run a restore job from the target device.

Setting Up a Quest™ QoreStor System with Veritas™ Backup Exec™ - 25
Configuring the QoreStor System as a backup to disk target in Veritas Backup Exec

Setting Up a Quest™ QoreStor System with Veritas™ Backup Exec™ - 26
Configuring an OST container on QoreStor for use with Backup Exec
3
Configuring an OST container on
QoreStor for use with Backup Exec
Creating an OST container
1 Select the Storage Groups tab, then expand the drop down you would like to add the container into. Click
the Add container button
2 Under the Protocol drop down Select OST. Enter a Container Name and then click Next.

Setting Up a Quest™ QoreStor System with Veritas™ Backup Exec™ - 27
Configuring an OST container on QoreStor for use with Backup Exec
3 Set the capacity of the OST LSU as needed, and click Next.
4 Review the configuration Summary page, and then click Finish.
Installing the OST plugin
1 Launch the Backup Exec Admin Console. Click Home, and then select Configuration and Settings >
Backup Exec Services.

Setting Up a Quest™ QoreStor System with Veritas™ Backup Exec™ - 28
Configuring an OST container on QoreStor for use with Backup Exec
2 On the Services Manager page, click Stop all Services.
You now can install the OST Plugin (after all Backup Exec services have been stopped). You can get the
installation packages from the list of binaries provided by Quest, Inc.
3 In the Quest Storage Plugin Installation dialog box, click Next.

Setting Up a Quest™ QoreStor System with Veritas™ Backup Exec™ - 29
Configuring an OST container on QoreStor for use with Backup Exec
4 If you agree, accept the License agreement and click Next.
5 Click the Install button to proceed with installation.

Setting Up a Quest™ QoreStor System with Veritas™ Backup Exec™ - 30
Configuring an OST container on QoreStor for use with Backup Exec
6 Click Finish to complete the installation of the OST plugin.

Setting Up a Quest™ QoreStor System with Veritas™ Backup Exec™ - 31
Configuring an OST container on QoreStor for use with Backup Exec
Configuring the OST device in Backup
Exec
1 Launch the Backup Exec Admin Console. Click Home, and then select Configuration and Settings >
Backup Exec Services.
2 On the Services Manager page, click Start all Services.

Setting Up a Quest™ QoreStor System with Veritas™ Backup Exec™ - 32
Configuring an OST container on QoreStor for use with Backup Exec
3 On the Storage tab, select Configure Storage.

Setting Up a Quest™ QoreStor System with Veritas™ Backup Exec™ - 33
Configuring an OST container on QoreStor for use with Backup Exec
4 Select Network Storage, and click Next.
5 Select OpenStorage, and click Next.

Setting Up a Quest™ QoreStor System with Veritas™ Backup Exec™ - 34
Configuring an OST container on QoreStor for use with Backup Exec
6 Enter the name and description for the configured OST device, and click Next.
7 Select Quest as the provider and click Next.

Setting Up a Quest™ QoreStor System with Veritas™ Backup Exec™ - 35
Configuring an OST container on QoreStor for use with Backup Exec
8 Enter the Server name (IP or FQDN) and select the backup_user as the logon account.
9 Select the created OST container from the list and click Next.

Setting Up a Quest™ QoreStor System with Veritas™ Backup Exec™ - 36
Configuring an OST container on QoreStor for use with Backup Exec
10 Enter the number of concurrent operations to run on the OST device and click Next.
11 Click Finish on the configuration summary page.
12 When prompted, click Yes to restart the Backup Exec Services.

Setting Up a Quest™ QoreStor System with Veritas™ Backup Exec™ - 37
Configuring an OST container on QoreStor for use with Backup Exec
Performing backup using OST Container
This procedure describes how to perform file-based backup and restore. You need to install/push the Backup
Exec agent on the client on which files needs to be protected.
1 On the Backup and Restore tab, click Add to add the client machine.
2 In the Add a Server dialog box, select the type of client to add as Windows/Linux/NDMP.
NOTE: If you are adding a Linux client, you need to install the RALUS package before adding.

Setting Up a Quest™ QoreStor System with Veritas™ Backup Exec™ - 38
Configuring an OST container on QoreStor for use with Backup Exec
3 With the Default settings, click Next to proceed.
4 Provide the access credentials for the server you want to add. Select from the drop drown or create new
logon details if required.

Setting Up a Quest™ QoreStor System with Veritas™ Backup Exec™ - 39
Configuring an OST container on QoreStor for use with Backup Exec
5 With Default settings, click Next to proceed.
6 Click Install on the final summary screen.

Setting Up a Quest™ QoreStor System with Veritas™ Backup Exec™ - 40
Configuring an OST container on QoreStor for use with Backup Exec
a A notification appears of the successful installation of Remote Backup Exec Agent on the server.
b The Backup and Restore tab shows the newly added server and related details.

Setting Up a Quest™ QoreStor System with Veritas™ Backup Exec™ - 41
Configuring an OST container on QoreStor for use with Backup Exec
7 On the Backup and Restore tab, select the server with the data to back up and go to Details.
8 Select Backup > Back up to Deduplication Disk Storage.

Setting Up a Quest™ QoreStor System with Veritas™ Backup Exec™ - 42
Configuring an OST container on QoreStor for use with Backup Exec
9 Enter a name for the policy and click Edit to select the server file systems.
10 Browse and select the data to back up and click OK to continue.

Setting Up a Quest™ QoreStor System with Veritas™ Backup Exec™ - 43
Configuring an OST container on QoreStor for use with Backup Exec
11 Click Edit to update backup settings and to provide the storage location.

Setting Up a Quest™ QoreStor System with Veritas™ Backup Exec™ - 44
Configuring an OST container on QoreStor for use with Backup Exec
12 Click Storage in the left pane and select the required tape library for the storage unit.
13 Review the final selections and click OK to proceed.

Setting Up a Quest™ QoreStor System with Veritas™ Backup Exec™ - 45
Configuring an OST container on QoreStor for use with Backup Exec
14 To run a backup job, select the backup policy (FULL schedule) and click Run Now.
a You can view the backup progress in the Backup and Restore tab.
b You can see the job status on the Job Monitor tab.

Setting Up a Quest™ QoreStor System with Veritas™ Backup Exec™ - 46
Configuring an OST container on QoreStor for use with Backup Exec
Performing restore using QoreStor OST
1 On the Backup and Restore tab, click Restore backup sets created by this job.

Setting Up a Quest™ QoreStor System with Veritas™ Backup Exec™ - 47
Configuring an OST container on QoreStor for use with Backup Exec
2 With the default options, click Next.
3 With the default options, click Next to proceed.
4 Select the data to restore from the appropriate snapshot and click Next to proceed.

Setting Up a Quest™ QoreStor System with Veritas™ Backup Exec™ - 48
Configuring an OST container on QoreStor for use with Backup Exec
5 Select the default setting if restoring to the original location or specify a different location as needed, and
click Next.
6 With the default settings, click Next to proceed.

Setting Up a Quest™ QoreStor System with Veritas™ Backup Exec™ - 49
Configuring an OST container on QoreStor for use with Backup Exec
7 With the default settings, click Next to proceed.
8 With the default settings, click Next to proceed.

Setting Up a Quest™ QoreStor System with Veritas™ Backup Exec™ - 50
Configuring an OST container on QoreStor for use with Backup Exec
9 Enter a name for the restore job and schedule it if required; or select Run now to start the restore job
immediately. Click Next to proceed.
10 Click Finish on the Restore Summary page.

Setting Up a Quest™ QoreStor System with Veritas™ Backup Exec™ - 51
Configuring an OST container on QoreStor for use with Backup Exec
a On the Job Monitor tab, you can view the restore status.

Setting Up a Quest™ QoreStor System with Veritas™ Backup Exec™ - 52
Setting up the QoreStor system cleaner
5
Setting up the QoreStor system
cleaner Performing scheduled disk space reclamation operations are recommended as a method for recovering disk
space from system containers in which files were deleted as a result of deduplication.
The system cleaner runs during idle time. If your workflow does not have a sufficient amount of idle time on a
daily basis, then you should consider scheduling the cleaner to force it to run during a scheduled time. If
necessary, you can perform the procedure shown in the following example screenshot to force the cleaner to run.
After all of the backup jobs are set up, the QoreStor system cleaner can be scheduled. The QoreStor system
cleaner should run at least 40 hours per week when backups are not taking place, and generally after a backup
job has completed. Refer to the QoreStor Series Cleaner Best Practices white paper for guidance on setting up
the cleaner.
1 In the QoreStor system GUI, Click the System Configuration Tab then click Edit Schedule

Setting Up a Quest™ QoreStor System with Veritas™ Backup Exec™ - 53
Setting up the QoreStor system cleaner
2 Define the schedule and click Submit.
The new cleaner event is displayed on the System Configuration Tab.

Setting Up a Quest™ QoreStor System with Veritas™ Backup Exec™ - 54
Setting up the QoreStor system cleaner

Setting Up a Quest™ QoreStor System with Veritas™ Backup Exec™ - 55
Monitoring deduplication, compression and performance
6
Monitoring deduplication, compression
and performance After backup jobs have run, the QoreStor system tracks capacity, storage savings, and throughput in the
QoreStor dashboard. This information is valuable in understanding the benefits of the QoreStor software.
NOTE: Deduplication ratios increase over time. It is not uncommon to see a 2-4x reduction (25-50% total savings) on
the initial backup. As additional full backup jobs are completed, the ratios will increase. Backup jobs with a 12-week
retention will average a 15x ratio, in most cases.

Setting Up a Quest™ QoreStor System with Veritas™ Backup Exec™ - 56
Setting data expiration for Backup Exec 2014/2015/16
A
Setting data expiration for Backup
Exec 2014/2015/16 Backup images are deleted by Backup Exec after image expiration if more backups have run (At least two full
backups of the same data set). Refer to the following article for more information:
https://www.veritas.com/support/en_US/article.TECH187957
For more information about image expiration, refer to the Backup Exec 2012 Administration Guide chapter,
“About Backup Job Settings.” If you want to keep the backup set, refer to the topic, “About Keeping Backup Sets.”
You can change data expiration settings by editing the specific backup job, under Backups > About backup job
settings > Storage > Keep for.

Setting Up a Quest™ QoreStor System with Veritas™ Backup Exec™ - 57
Installing the Backup Exec agent on a Linux client (RALUS)
B
Installing the Backup Exec agent on a
Linux client (RALUS) Refer to the following link on the Veritas web site for detailed information:
https://www.veritas.com/support/en_US/article.TECH46461