Embed Size (px)
Citation preview
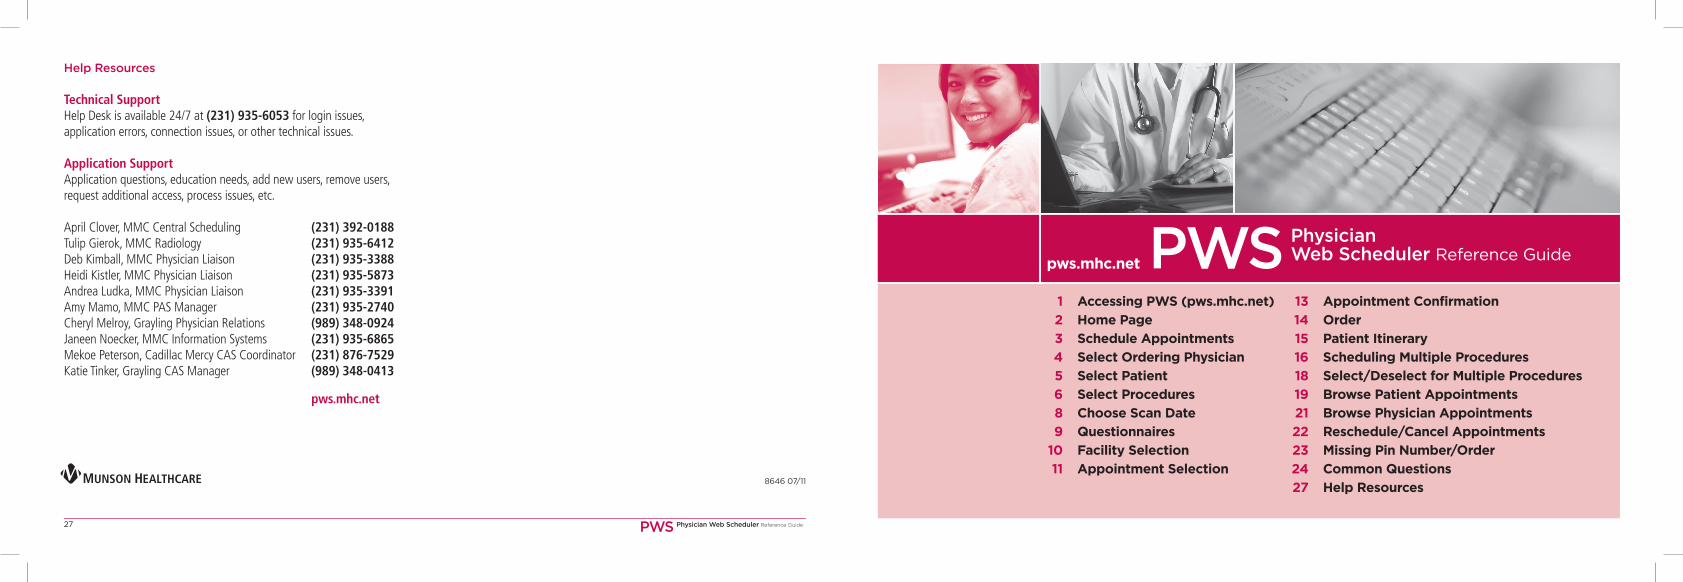
PWS Physician Web Scheduler Reference Guide PWS Physician Web Scheduler Reference Guide
1 Accessing PWS (pws.mhc.net)
2 Home Page
3 Schedule Appointments
4 Select Ordering Physician
5 Select Patient
6 Select Procedures
8 Choose Scan Date
9 Questionnaires
10 Facility Selection
11 Appointment Selection
27
8646 07/11
Help Resources
Technical Support Help Desk is available 24/7 at (231) 935-6053 for login issues, application errors, connection issues, or other technical issues.
Application Support Application questions, education needs, add new users, remove users, request additional access, process issues, etc.
April Clover, MMC Central Scheduling (231) 392-0188Tulip Gierok, MMC Radiology (231) 935-6412Deb Kimball, MMC Physician Liaison (231) 935-3388Heidi Kistler, MMC Physician Liaison (231) 935-5873Andrea Ludka, MMC Physician Liaison (231) 935-3391Amy Mamo, MMC PAS Manager (231) 935-2740Cheryl Melroy, Grayling Physician Relations (989) 348-0924 Janeen Noecker, MMC Information Systems (231) 935-6865Mekoe Peterson, Cadillac Mercy CAS Coordinator (231) 876-7529Katie Tinker, Grayling CAS Manager (989) 348-0413
pws.mhc.net
13 Appointment Confirmation
14 Order
15 Patient Itinerary
16 Scheduling Multiple Procedures
18 Select/Deselect for Multiple Procedures
19 Browse Patient Appointments
21 Browse Physician Appointments
22 Reschedule/Cancel Appointments
23 Missing Pin Number/Order
24 Common Questions
27 Help Resources
PWS Physician Web Scheduler Reference Guide
pws.mhc.net
PWS Physician Web Scheduler Reference Guide PWS Physician Web Scheduler Reference Guide
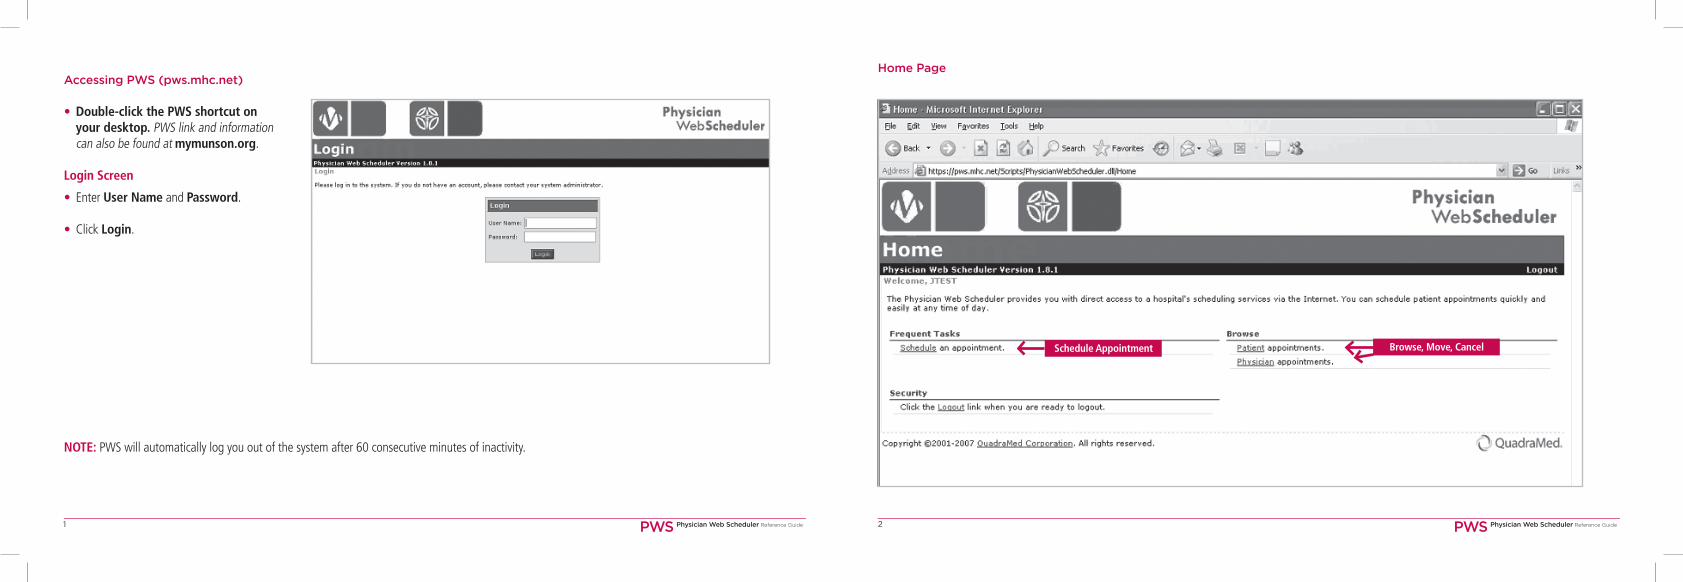
Accessing PWS (pws.mhc.net)
• Double-click the PWS shortcut on your desktop. PWS link and information can also be found at mymunson.org.
Login Screen
• Enter User Name and Password.
• Click Login.
Home Page
1 2
NOTE: PWS will automatically log you out of the system after 60 consecutive minutes of inactivity.
Schedule Appointment Browse, Move, Cancel

PWS Physician Web Scheduler Reference Guide PWS Physician Web Scheduler Reference Guide
Schedule Appointments
• Click Schedule under Frequent Tasks on the Welcome page.
3 4
Select Ordering Physician
A Primary Physician (Ordering Physician or Provider) must be selected.
Primary Physician List
1. Click the down arrow to select a physician.
2. The list of physicians available to you will be displayed.
3. Click the physician you wish to select.
4. Click off the field before using your mouse to scroll.
Note: If a physician has multiple offices, the facility will be displayed at the end of the name. Distribution of test results is driven by the location you select. Ordering Physician
Do Not Use. Go to Diagnoses Line 2
Listed Alphabetically
PWS Physician Web Scheduler Reference Guide PWS Physician Web Scheduler Reference Guide5
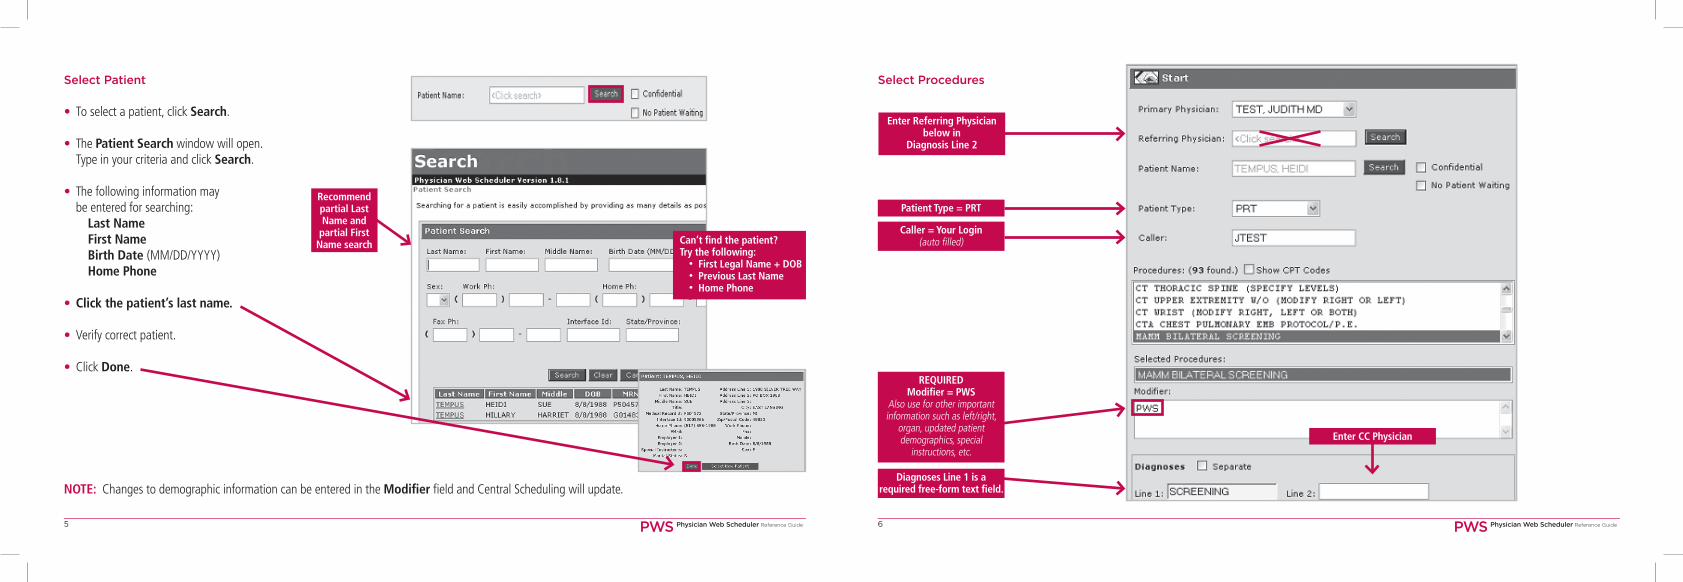
Select Patient
• To select a patient, click Search. • The Patient Search window will open. Type in your criteria and click Search. • The following information may be entered for searching: Last Name First Name Birth Date (MM/DD/YYYY) Home Phone
• Click the patient’s last name.
• Verify correct patient.
• Click Done.
Can’t find the patient? Try the following: • First Legal Name + DOB • Previous Last Name • Home Phone
Recommend partial Last Name and
partial First Name search
6
Patient Type = PRT
Caller = Your Login(auto filled)
Diagnoses Line 1 is arequired free-form text field.
Enter CC Physician
REQUIREDModifier = PWS
Also use for other important information such as left/right,
organ, updated patient demographics, special
instructions, etc.
Select Procedures
NOTE: Changes to demographic information can be entered in the Modifier field and Central Scheduling will update.
Enter Referring Physicianbelow in
Diagnosis Line 2
PWS Physician Web Scheduler Reference Guide PWS Physician Web Scheduler Reference Guide7
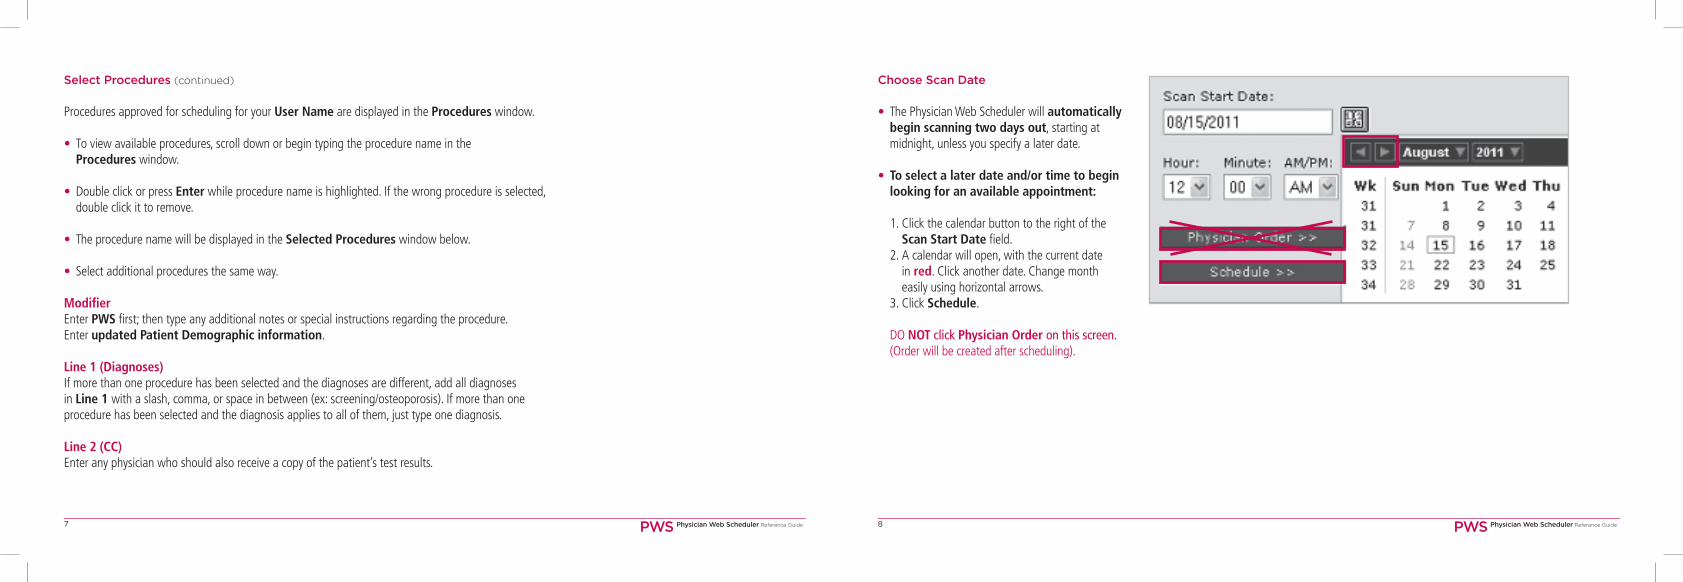
Select Procedures (continued)
Procedures approved for scheduling for your User Name are displayed in the Procedures window.
• To view available procedures, scroll down or begin typing the procedure name in the Procedures window.
• Double click or press Enter while procedure name is highlighted. If the wrong procedure is selected, double click it to remove.
• The procedure name will be displayed in the Selected Procedures window below.
• Select additional procedures the same way.
ModifierEnter PWS first; then type any additional notes or special instructions regarding the procedure. Enter updated Patient Demographic information.
Line 1 (Diagnoses)If more than one procedure has been selected and the diagnoses are different, add all diagnoses in Line 1 with a slash, comma, or space in between (ex: screening/osteoporosis). If more than one procedure has been selected and the diagnosis applies to all of them, just type one diagnosis.
Line 2 (CC)Enter any physician who should also receive a copy of the patient’s test results.
8
Choose Scan Date
• The Physician Web Scheduler will automatically begin scanning two days out, starting at midnight, unless you specify a later date.
• To select a later date and/or time to begin looking for an available appointment:
1. Click the calendar button to the right of the Scan Start Date field. 2. A calendar will open, with the current date in red. Click another date. Change month easily using horizontal arrows. 3. Click Schedule.
DO NOT click Physician Order on this screen. (Order will be created after scheduling).
PWS Physician Web Scheduler Reference Guide PWS Physician Web Scheduler Reference Guide9
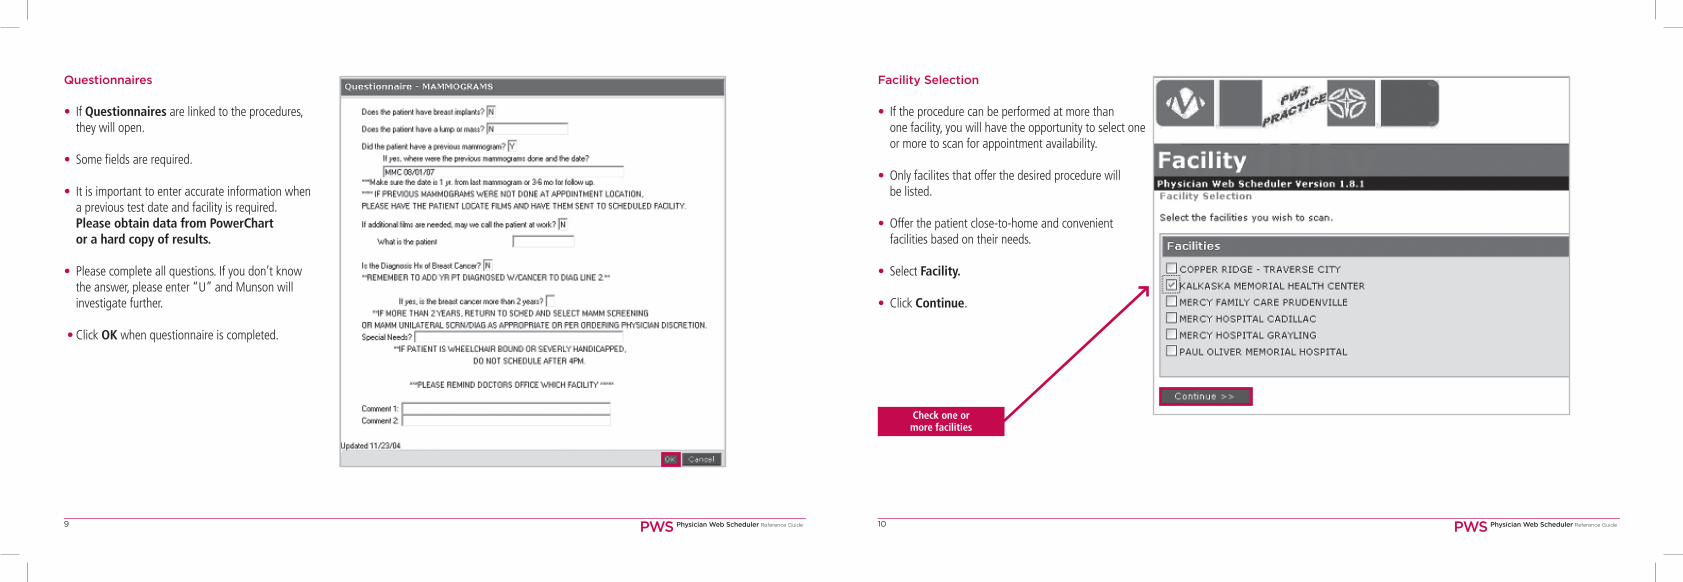
Questionnaires
• If Questionnaires are linked to the procedures, they will open.
• Some fields are required.
• It is important to enter accurate information when a previous test date and facility is required. Please obtain data from PowerChart or a hard copy of results.
• Please complete all questions. If you don’t know the answer, please enter “U” and Munson will investigate further.
• Click OK when questionnaire is completed.
10
Facility Selection
• If the procedure can be performed at more than one facility, you will have the opportunity to select one or more to scan for appointment availability.
• Only facilites that offer the desired procedure will be listed.
• Offer the patient close-to-home and convenient facilities based on their needs.
• Select Facility.
• Click Continue.
Check one or more facilities
PWS Physician Web Scheduler Reference Guide PWS Physician Web Scheduler Reference Guide12
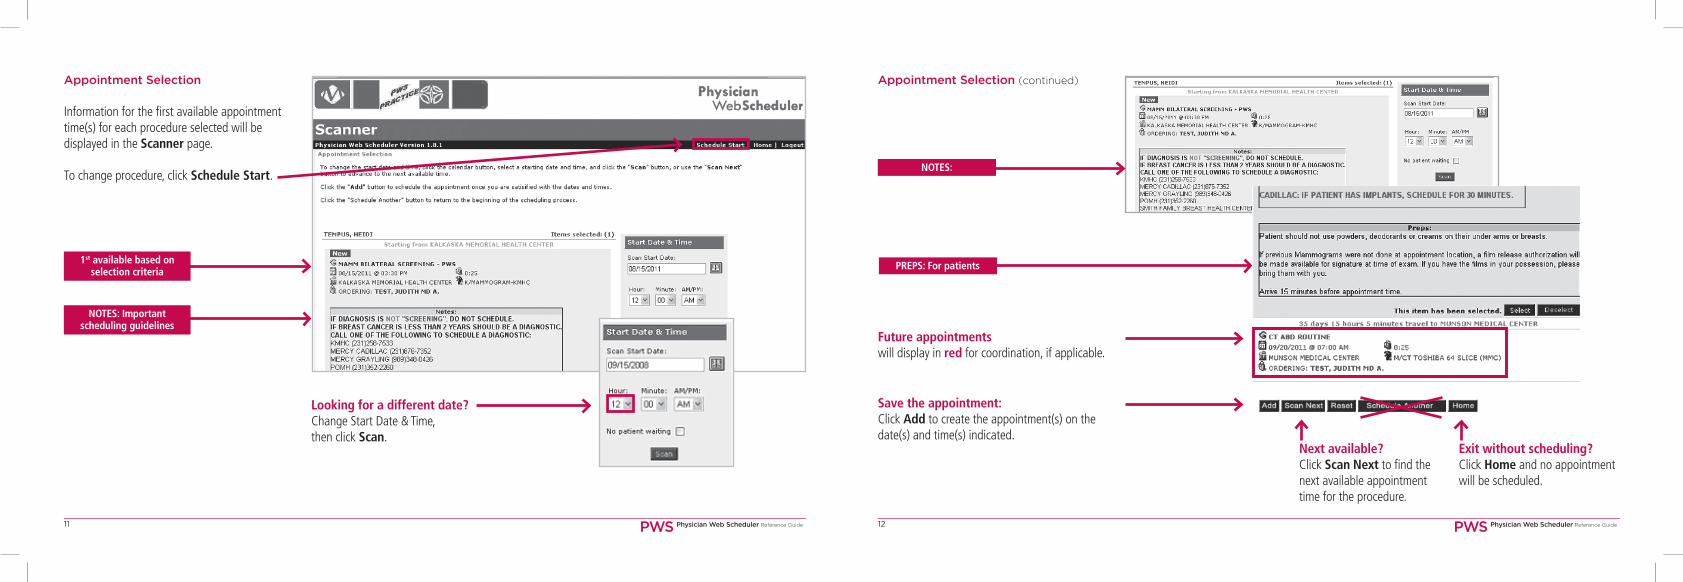
1st available based on selection criteria
NOTES: Important scheduling guidelines
Appointment Selection
Information for the first available appointment time(s) for each procedure selected will be displayed in the Scanner page.
To change procedure, click Schedule Start.
Looking for a different date?Change Start Date & Time, then click Scan.
11
Appointment Selection (continued)
Next available?Click Scan Next to find the next available appointment time for the procedure.
Exit without scheduling?Click Home and no appointment will be scheduled.
Future appointments will display in red for coordination, if applicable.
Save the appointment:Click Add to create the appointment(s) on the date(s) and time(s) indicated.
NOTES:
PREPS: For patients

PWS Physician Web Scheduler Reference Guide PWS Physician Web Scheduler Reference Guide13
Click first
14
Appointment Confirmation
Final Steps:
1. Create Order is required.
2. Print Itinerary to provide to the patient or for physician office chart.
3. Do NOT click Schedule Another.
4. Click Home to schedule another test or browse patients.
Order
Required: Click Create Order from the Appointment Selection window.
• Enter unique alphanumeric PIN code for the Ordering Physician.
• Click OK.
• Click Print to print a paper copy of the Order if needed for patient file. The Order will open. Click File, then Print. Choose a printer from the selection list.
• Click Done.
PWS Physician Web Scheduler Reference Guide PWS Physician Web Scheduler Reference Guide15
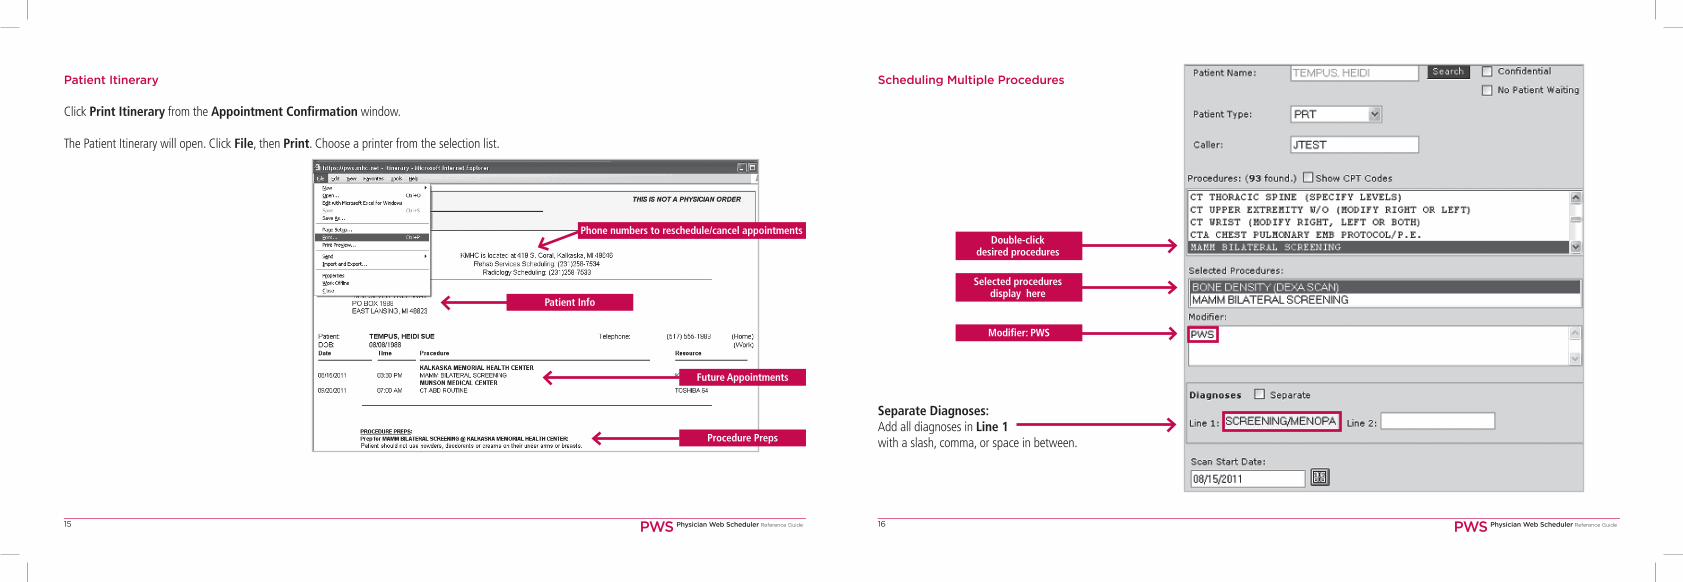
Patient Itinerary
Click Print Itinerary from the Appointment Confirmation window.
The Patient Itinerary will open. Click File, then Print. Choose a printer from the selection list.
Patient Info
Future Appointments
Procedure Preps
16
Phone numbers to reschedule/cancel appointments
Scheduling Multiple Procedures
Separate Diagnoses: Add all diagnoses in Line 1 with a slash, comma, or space in between.
Selected procedures display here
Modifier: PWS
Double-clickdesired procedures

PWS Physician Web Scheduler Reference Guide PWS Physician Web Scheduler Reference Guide17 18
Scheduling Multiple Procedures (continued)
• ALWAYS click Select Facilities.
• Check a Facility for first procedure.
• Highlight the second procedure and check a Facility. Normally, the same facility should be checked for each procedure. Click Continue.
NOTE: At the Appointment Selection window, if one of the procedures scans out farther than the other, change the start date to the date farthest in the future and rescan. Attempt to keep time between procedures to a minimum.
Select/Deselect for Multiple Procedures
•When scheduling two or more procedures, the appointments can be scheduled to different days or times, if preferred. Click Deselect on the procedure that needs to be scheduled to a different date/time. Then click Add at the bottom of the page.
• Afteraddingthefirstprocedure(s), the Start Date & Time can be changed for the remaining procedures. Click Scan, then Add to schedule the remaining procedures.
• If Deselect is clicked accidentally, click Select to reselect and scan the procedure.
PWS Physician Web Scheduler Reference Guide PWS Physician Web Scheduler Reference Guide19 20
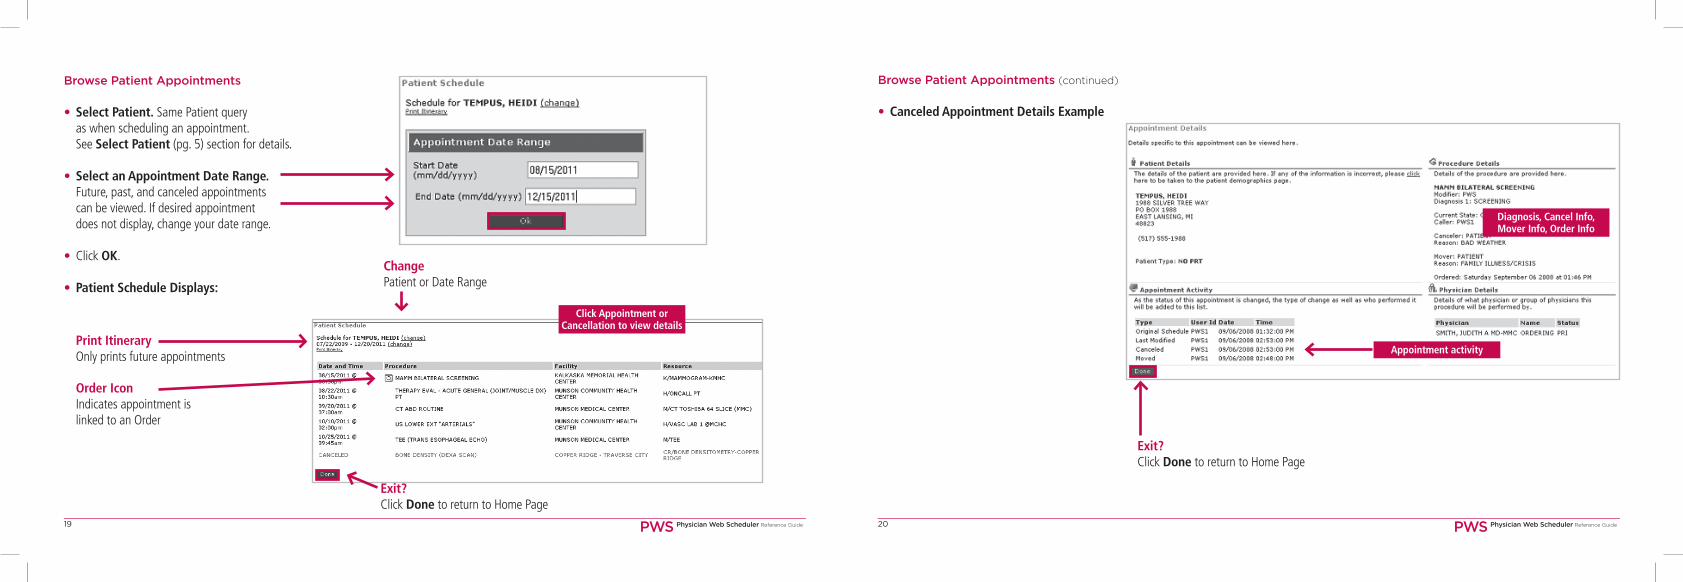
Browse Patient Appointments
• Select Patient. Same Patient query as when scheduling an appointment. See Select Patient (pg. 5) section for details.
• Select an Appointment Date Range. Future, past, and canceled appointments can be viewed. If desired appointment does not display, change your date range.
• Click OK.
• Patient Schedule Displays:
ChangePatient or Date Range
Order IconIndicates appointment is linked to an Order
Print ItineraryOnly prints future appointments
Click Appointment or Cancellation to view details
Exit?Click Done to return to Home Page
Browse Patient Appointments (continued)
• Canceled Appointment Details Example
Diagnosis, Cancel Info,Mover Info, Order Info
Exit?Click Done to return to Home Page
Appointment activity
PWS Physician Web Scheduler Reference Guide PWS Physician Web Scheduler Reference Guide21 22
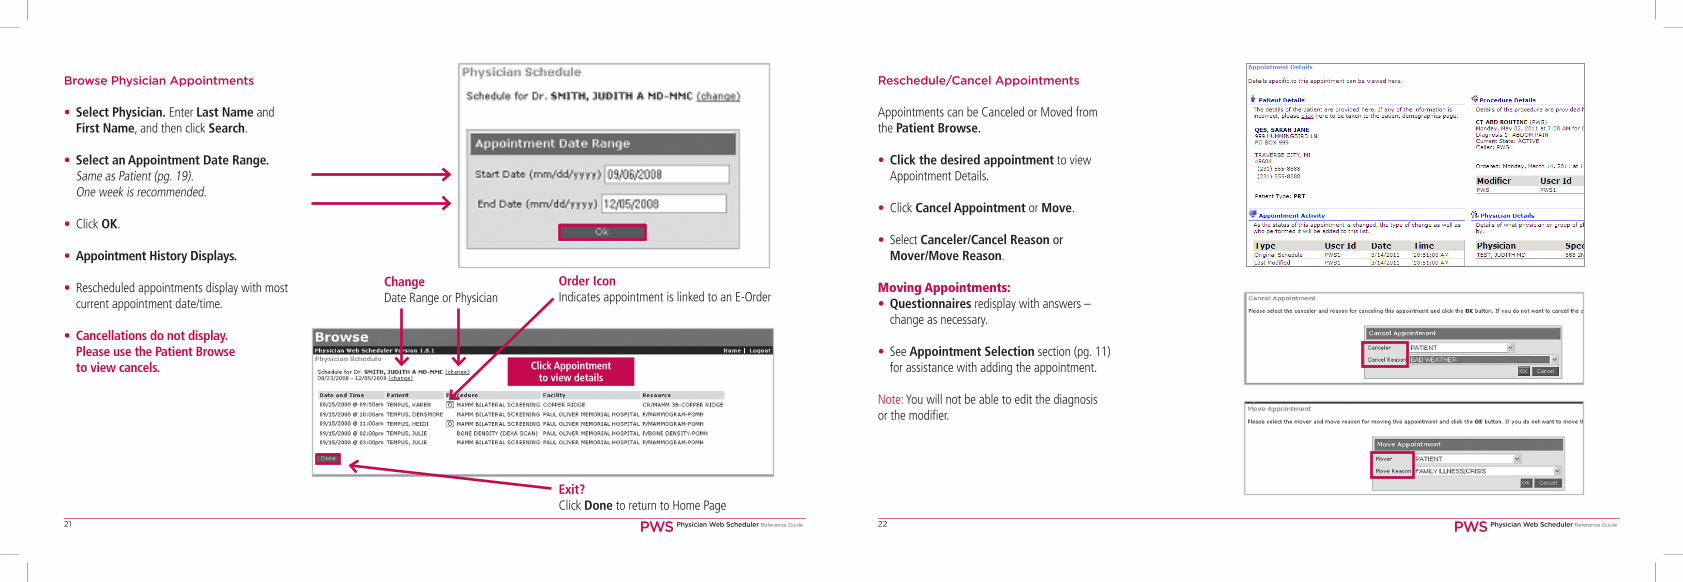
Browse Physician Appointments
• Select Physician. Enter Last Name and First Name, and then click Search.
• Select an Appointment Date Range. Same as Patient (pg. 19). One week is recommended.
• Click OK.
• Appointment History Displays.
• Rescheduled appointments display with most current appointment date/time.
• Cancellations do not display. Please use the Patient Browse to view cancels.
ChangeDate Range or Physician
Order IconIndicates appointment is linked to an E-Order
Exit?Click Done to return to Home Page
Click Appointment to view details
Reschedule/Cancel Appointments
Appointments can be Canceled or Moved from the Patient Browse.
• Click the desired appointment to view Appointment Details.
• Click Cancel Appointment or Move.
• Select Canceler/Cancel Reason or Mover/Move Reason.
Moving Appointments:• Questionnaires redisplay with answers – change as necessary.
• See Appointment Selection section (pg. 11) for assistance with adding the appointment.
Note: You will not be able to edit the diagnosis or the modifier.
PWS Physician Web Scheduler Reference Guide PWS Physician Web Scheduler Reference Guide23 24
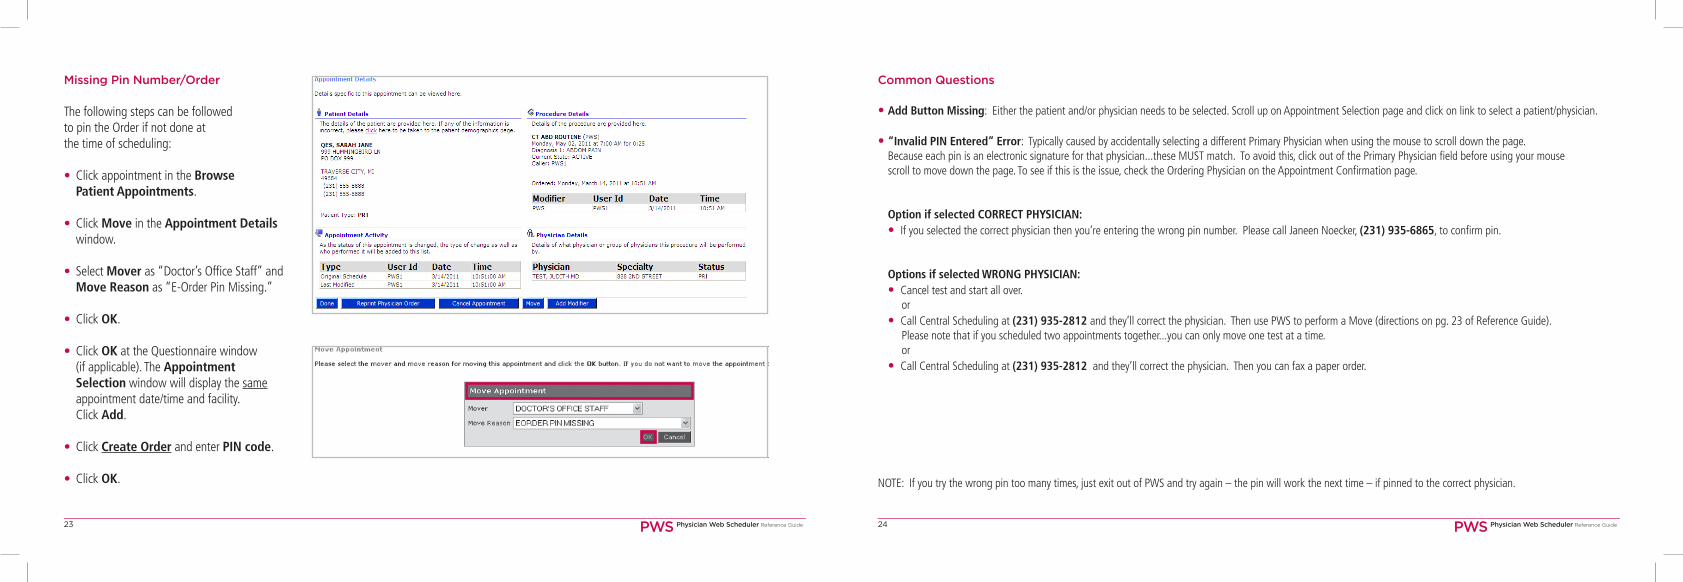
Missing Pin Number/Order
The following steps can be followedto pin the Order if not done at the time of scheduling:
• Click appointment in the Browse Patient Appointments.
• Click Move in the Appointment Details window.
• Select Mover as “Doctor’s Office Staff” and Move Reason as “E-Order Pin Missing.”
• Click OK.
• Click OK at the Questionnaire window (if applicable). The Appointment Selection window will display the same appointment date/time and facility. Click Add.
• Click Create Order and enter PIN code.
• Click OK.
Common Questions
•Add Button Missing: Either the patient and/or physician needs to be selected. Scroll up on Appointment Selection page and click on link to select a patient/physician.
•“Invalid PIN Entered” Error: Typically caused by accidentally selecting a different Primary Physician when using the mouse to scroll down the page. Because each pin is an electronic signature for that physician...these MUST match. To avoid this, click out of the Primary Physician field before using your mouse scroll to move down the page. To see if this is the issue, check the Ordering Physician on the Appointment Confirmation page.
Option if selected CORRECT PHYSICIAN: •If you selected the correct physician then you’re entering the wrong pin number. Please call Janeen Noecker, (231) 935-6865, to confirm pin.
Options if selected WRONG PHYSICIAN: •Cancel test and start all over. or •Call Central Scheduling at (231) 935-2812 and they’ll correct the physician. Then use PWS to perform a Move (directions on pg. 23 of Reference Guide). Please note that if you scheduled two appointments together...you can only move one test at a time. or •Call Central Scheduling at (231) 935-2812 and they’ll correct the physician. Then you can fax a paper order.
NOTE: If you try the wrong pin too many times, just exit out of PWS and try again – the pin will work the next time – if pinned to the correct physician.

PWS Physician Web Scheduler Reference Guide PWS Physician Web Scheduler Reference Guide25 26
Notes
Notes