Embed Size (px)
DESCRIPTION
Technical Search Specialist Course. Module 5 Unit 2: Global Positioning System (GPS). Terminal Objective. Upon completion of this unit, you will be able to Operate the Garmin GPSMAP 60 Csx. Enabling Objectives. - PowerPoint PPT Presentation
Citation preview

1
Technical Search Specialist Course
Module 5 Unit 2: Global Positioning System (GPS)

2
Terminal Objective
Upon completion of this unit, you will be able to Operate the Garmin GPSMAP 60 Csx

3
Enabling Objectives
• Describe the basic segments and principles of the global positioning satellite (GPS) system
• Explain waypoints • Identify and describe the errors, concerns and
considerations related to GPS• Demonstrate the use of the Garmin GPSMAP 60 Csx
4
II. Introduction to GPS
5
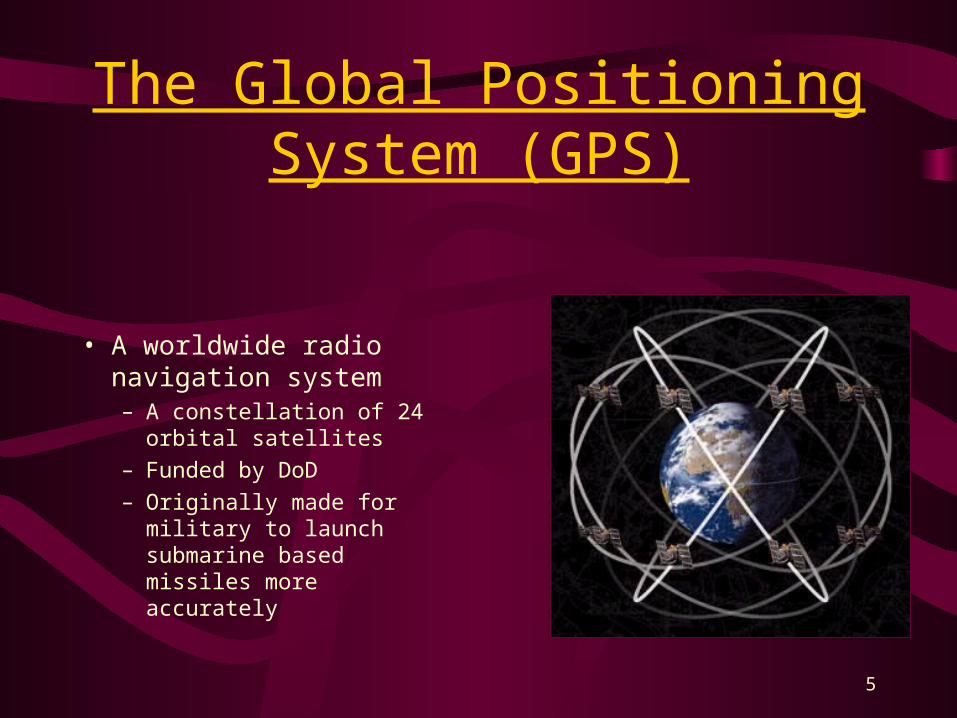
The Global Positioning System (GPS)
• A worldwide radio navigation system– A constellation of 24 orbital
satellites
– Funded by DoD
– Originally made for military to launch submarine based missiles more accurately

6
Four Primary Functions of GPS
GPS provides:• Position and coordinates• The distance and direction between any two
waypoints, or a position and a waypoint• Travel progress reports• Accurate time measurement
7
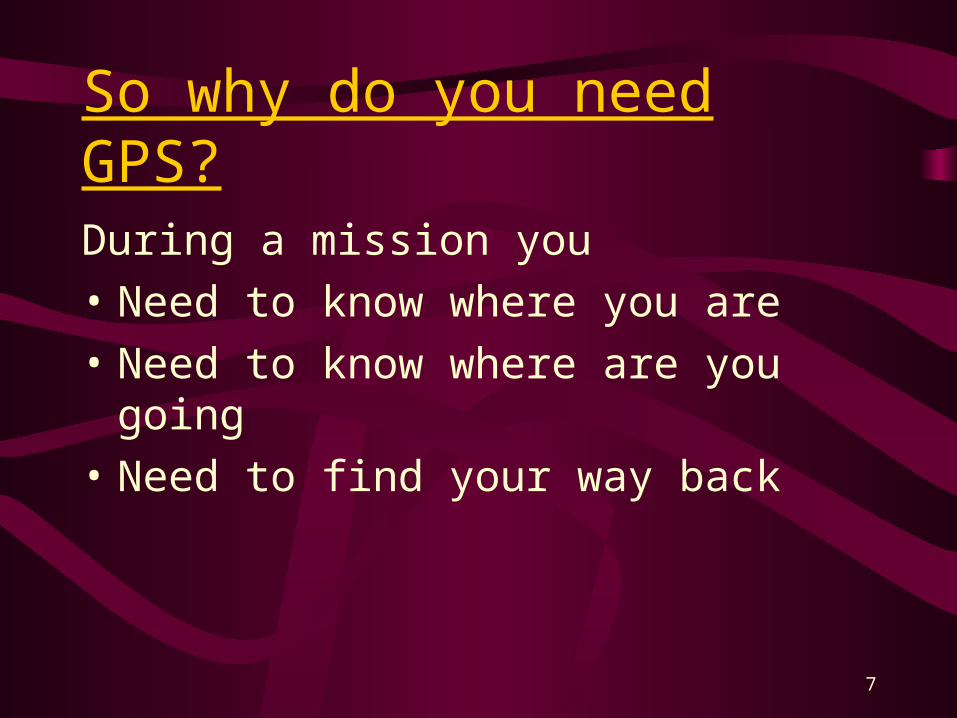
So why do you need GPS?
During a mission you
• Need to know where you are
• Need to know where are you going
• Need to find your way back

8
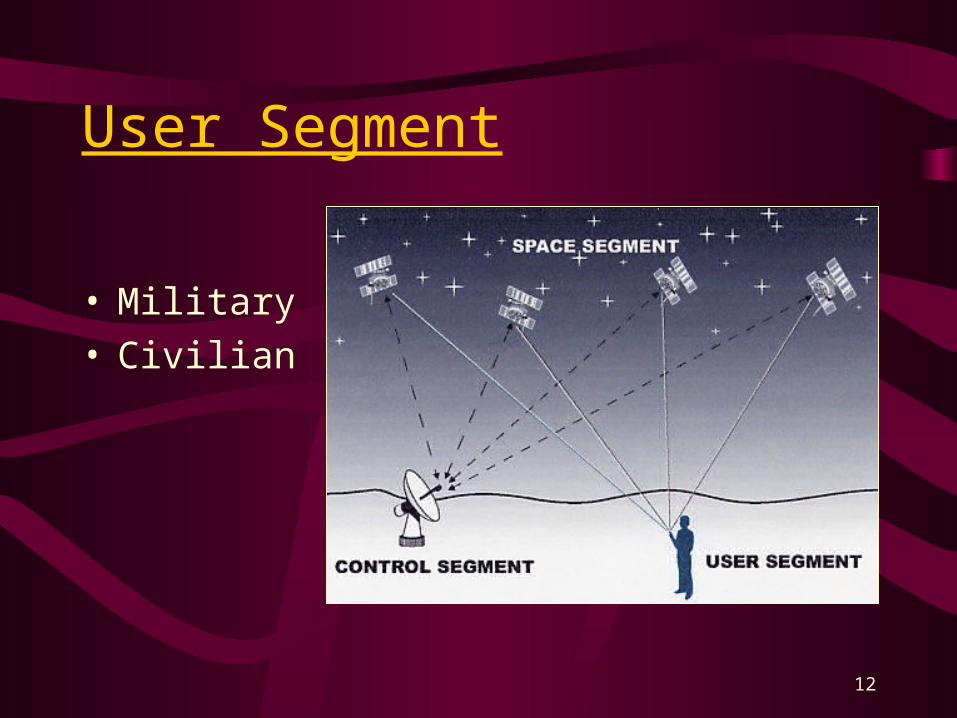
GPS Segments
• Satellite segment
• Control segment
• User segment

9
Control Segment
Space Segment
User Segment
Monitor Stations
GroundAntennas
Master Station
Satellite Segment
10
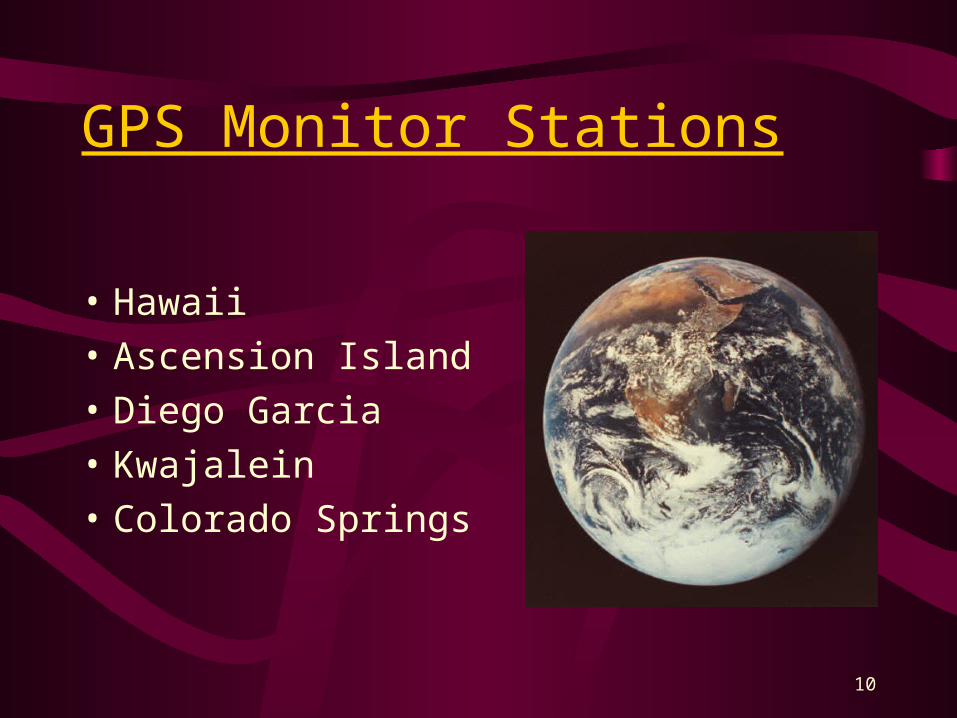
GPS Monitor Stations
• Hawaii
• Ascension Island
• Diego Garcia
• Kwajalein
• Colorado Springs

Kwajalein Atoll
US Space Command
Hawaii
Ascension Island
Diego Garcia
Cape Canaveral
Ground AntennaMaster Control Station Monitor Station
GPS Monitor Stations
12
User Segment
• Military• Civilian

13
III. GPS Cautions and Considerations
14
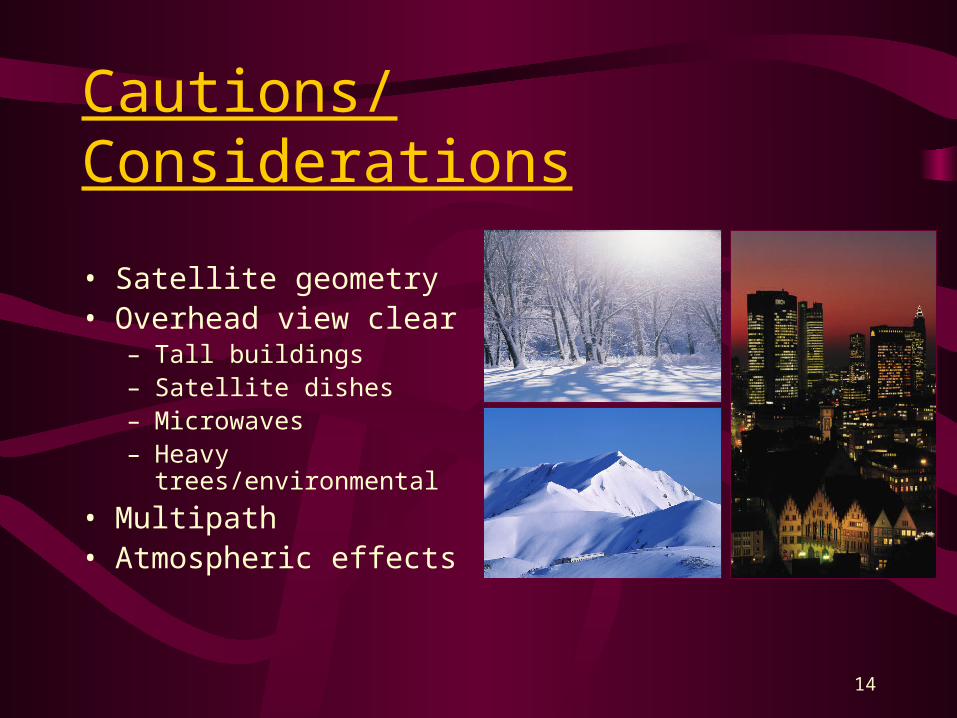
Cautions/Considerations
• Satellite geometry• Overhead view clear
– Tall buildings– Satellite dishes– Microwaves– Heavy trees/environmental
• Multipath• Atmospheric effects

15
Errors Using GPS
• Problems at the satellite – Atomic clocks
– “Ephemeris” errors
• Intentional Errors – "Selective Availability"
– Military receivers use a decryption key to remove the SA errors

16
Errors Using GPS (continued)
• On May 1, 2000 Selective Availability was turned off– However,can be turned on at any time by
government

17
Gotcha’s Using GPS
• Common Map Datums• GPS Almanac Updates
– Control segment orbital corrections need to be downloaded
• Moving the GPS while turned off– If moved more than 300 miles need to either
• Re-Initialize• Allow unit time to self-update (can take up to 20 minutes)

18
Gotcha’s Using GPS (continued)
• Parallel versus Single Channel Receivers– Single Channel receive data one satellite at a time
• Loss of satellite signal - unit must re-acquire satellite lock
– Parallel Channel receivers can receive from multiple satellites simultaneously
• Loss of signal from any one or two satellites will not cause a loss of satellite lock
19
Gotcha’s Using GPS (continued)
• Not allowing enough time for triangulation
• No standard unit for US&R teams

20
Conclusions
Remember …• GPS is not a compass• GPS tells you the direction you are moving• Carry extra batteries• Water resistant is better• Antenna considerations

21
• Understand GPS unit controls.
• Describe GPS unit pages.
• Clear out track logs, routes, & waypoints.
• Set up a GPS unit.
• Make a track log, create waypoints, & project waypoints.
• Navigate to waypoints, addresses, & points of interest using the Find function.
• Use the Track Back feature.
• Create a route.
Enabling Objectives

22
GPS V 60C 60Cx/60CSx Rino 530
Waypoints 50010 Proximity
10 Closest
1,00010 Proximity
10 Closest
1,00010 Proximity
10 Closest
500
Track 200010 Saved
10,00020 Saved / 250 Each
10,00020 Saved / 500 Each
10,00020 Saved / 250 Each
Routes 2050 pts each
50250 pts each
50250 pts each
50250 pts each
Acquisition
Times
Warm: 15 s
Cold: 45 s
Locate: 5 m
Warm: 15 s
Cold: 45 s
Locate: 5 m
Warm: 1 s
Cold: 38 s
Locate: 45 s
Warm: 15 s
Cold: 45 s
Locate: 5 m
Memory 19MBFIXED
56MBFIXED
64MBEXPANDABLE
56MBFIXED
Garmin GPSMAP 60Cx Features

23
The GPSMAP Key Layout
POWER Key
IN/OUT Zoom Keys
FIND/MOB Key
MARK Key
QUIT Key
ROCKER Key
PAGE/COMPASS Key
MENU Key
ENTR Key

24
Two AA batteries, USB cable, 12v DC adapter
Battery Life: 18 hoursAlkaline batteries lose capacity in
low tempsLithium batteries in below freezing
temperaturesExtensive use of backlighting,
electronic compass, and audible tones significantly reduce battery life
Memory Card Location
Battery Compartment
Power Considerations

25
Power On the GPS
Press and hold the Power keyTitle screen appearsSatellite status page
Title Screen Satellite Status

26
Satellite Status Page
Horizon
45º from the horizon Heading bug –
travel direction
Satellite signal strength
Searching / Acquiring
2D Fix (3 Satellites)
3D Fix (4+ Satellites)
27
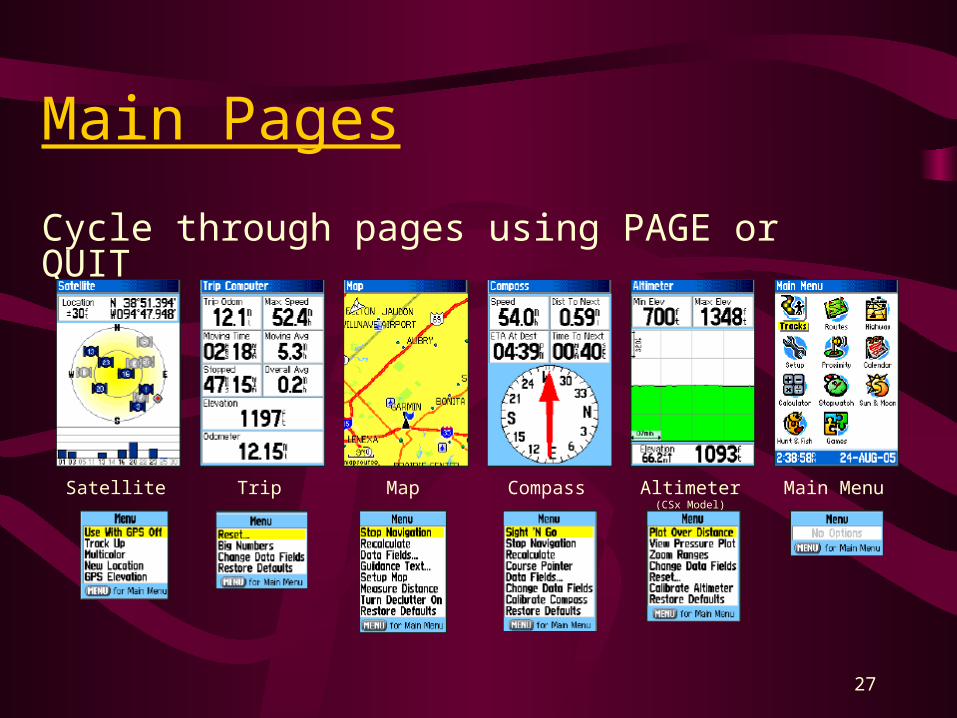
Main Pages
Cycle through pages using PAGE or QUIT
Satellite Trip Map Compass Altimeter (CSx Model)
Main Menu
28
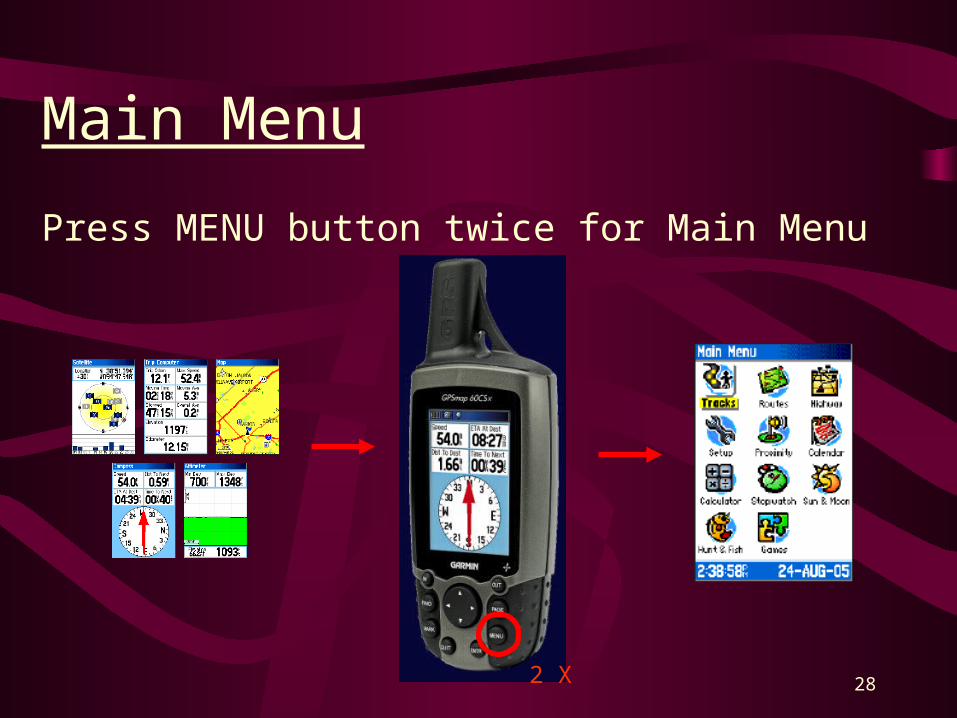
Main Menu
Press MENU button twice for Main Menu
2 X

29
Main Menu
GPSmap 60CS GPSmap 60CSx
Searching / Acquiring
2D Fix (3 Satellites)
3D Fix (4+ Satellites)
Battery Power / Level
Auxiliary Power
Backlight Usage
USB Cable Connection
Electronic Compass On

30
Adjusting Screen Settings
To minimize battery drain, limit or turn off backlight:Press and quickly release the
POWER buttonPress up on ROCKER to
increase, down to decrease
Press ENTER or QUIT to close Backlight adjustment window

31
System Setup Pages
32
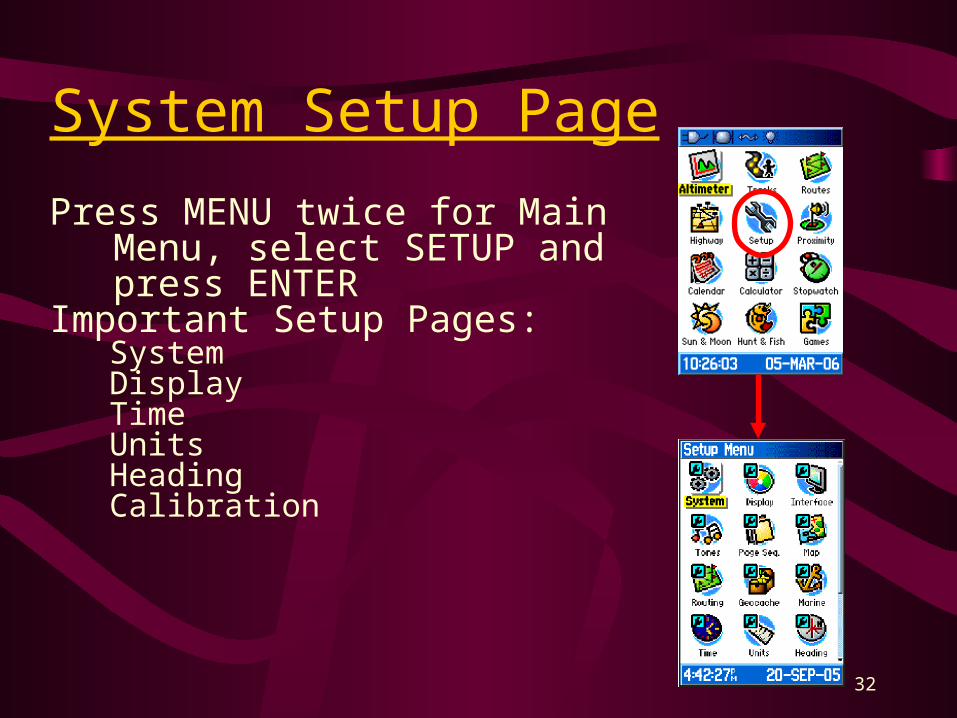
System Setup Page
Press MENU twice for Main Menu, select SETUP and press ENTER
Important Setup Pages:SystemDisplayTimeUnitsHeadingCalibration

33
SETUP: System
GPSNormal - for everyday useDemo - for indoor training
WAASEnabled
Battery TypeAlkalineNiMH
Proximity AlarmsOn
34
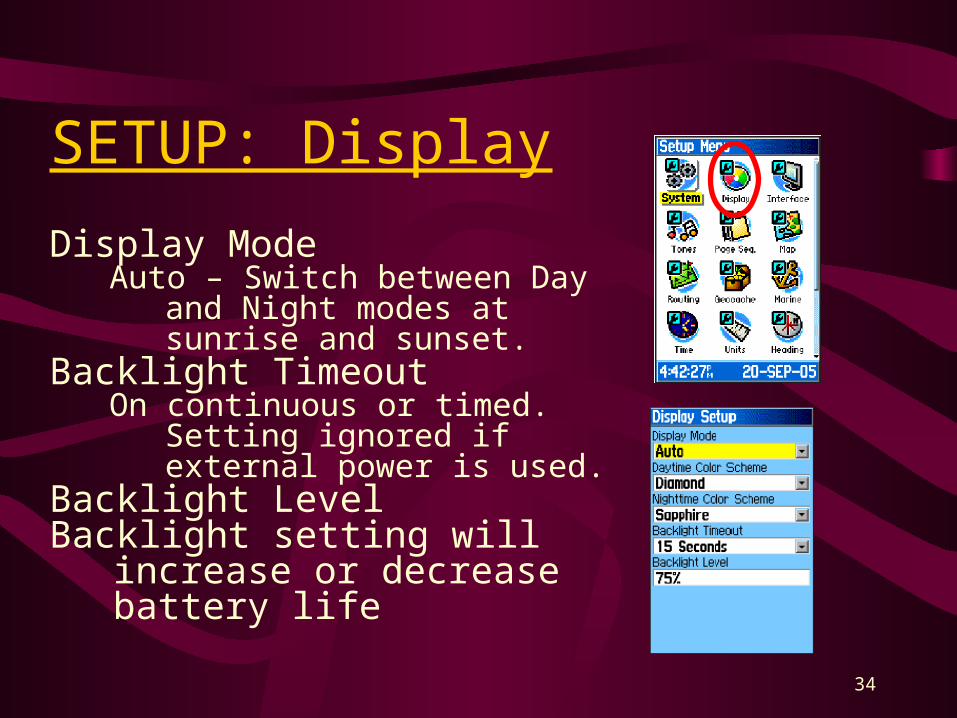
SETUP: Display
Display ModeAuto – Switch between Day and Night
modes at sunrise and sunset.Backlight Timeout
On continuous or timed. Setting ignored if external power is used.
Backlight LevelBacklight setting will increase or
decrease battery life
35
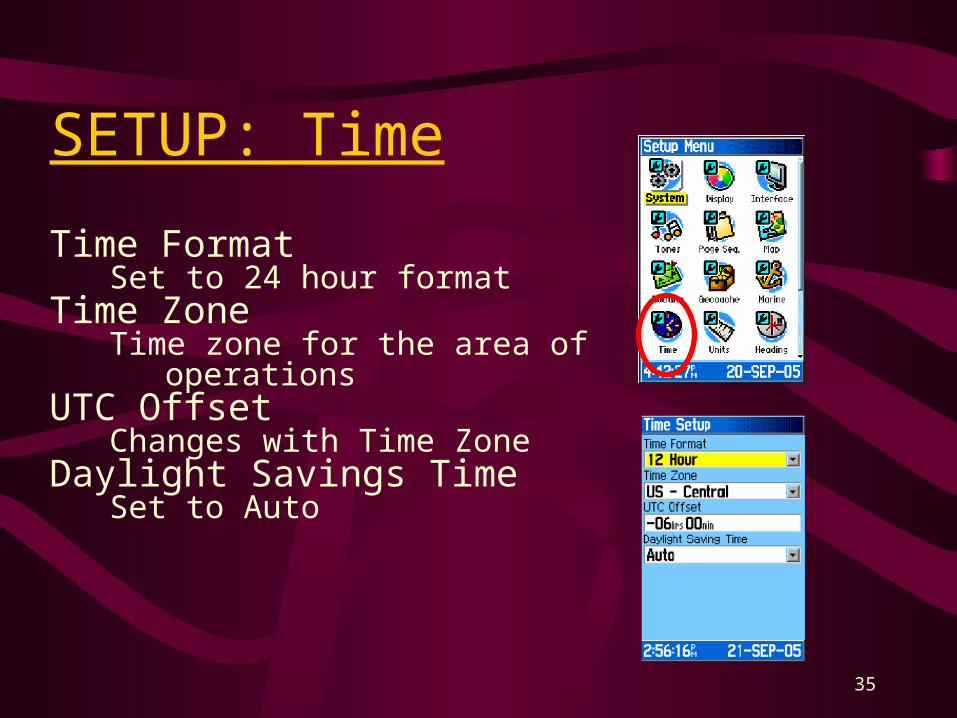
SETUP: Time
Time FormatSet to 24 hour format
Time ZoneTime zone for the area of operations
UTC OffsetChanges with Time Zone
Daylight Savings TimeSet to Auto
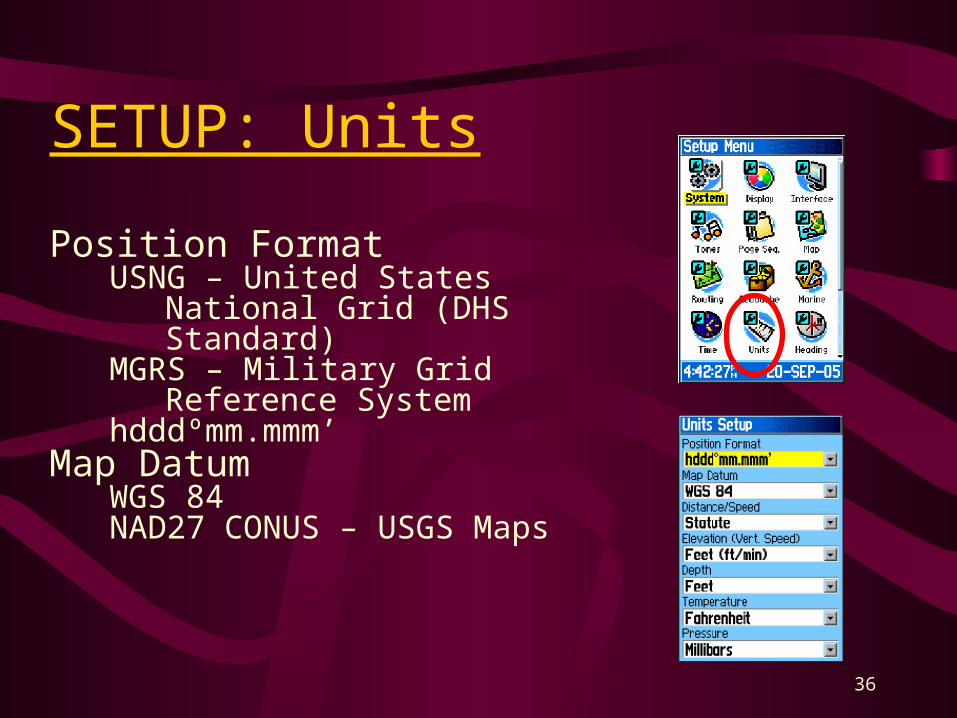
36
SETUP: Units
Position FormatUSNG – United States National Grid
(DHS Standard)MGRS – Military Grid Reference
Systemhdddºmm.mmm’
Map DatumWGS 84NAD27 CONUS – USGS Maps
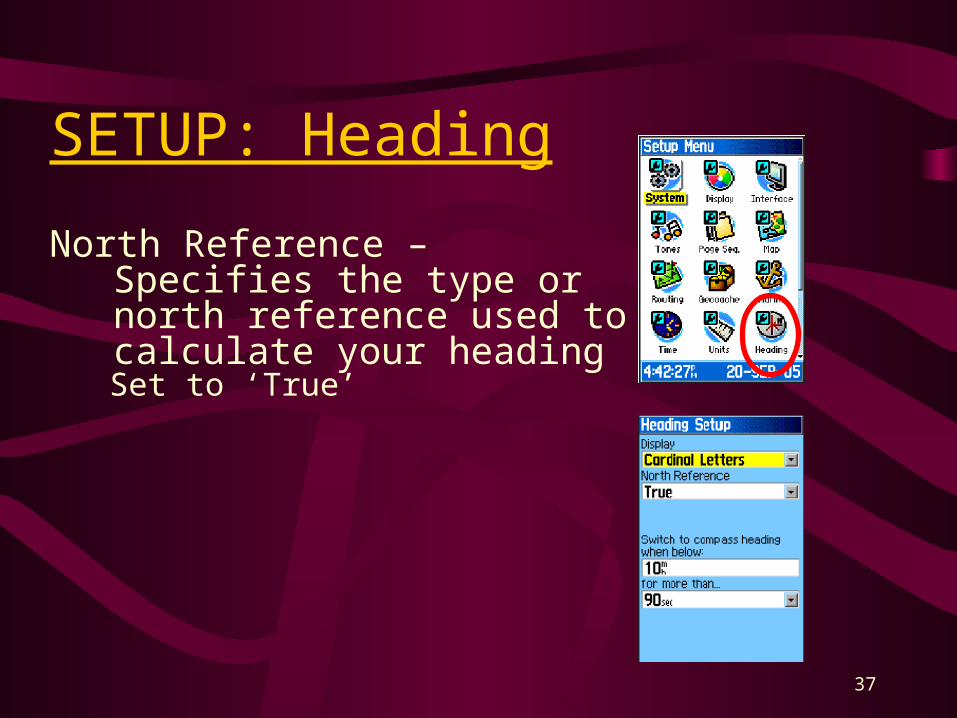
37
SETUP: Heading
North Reference – Specifies the type or north reference used to calculate your headingSet to ‘True’

38
Tracks
39
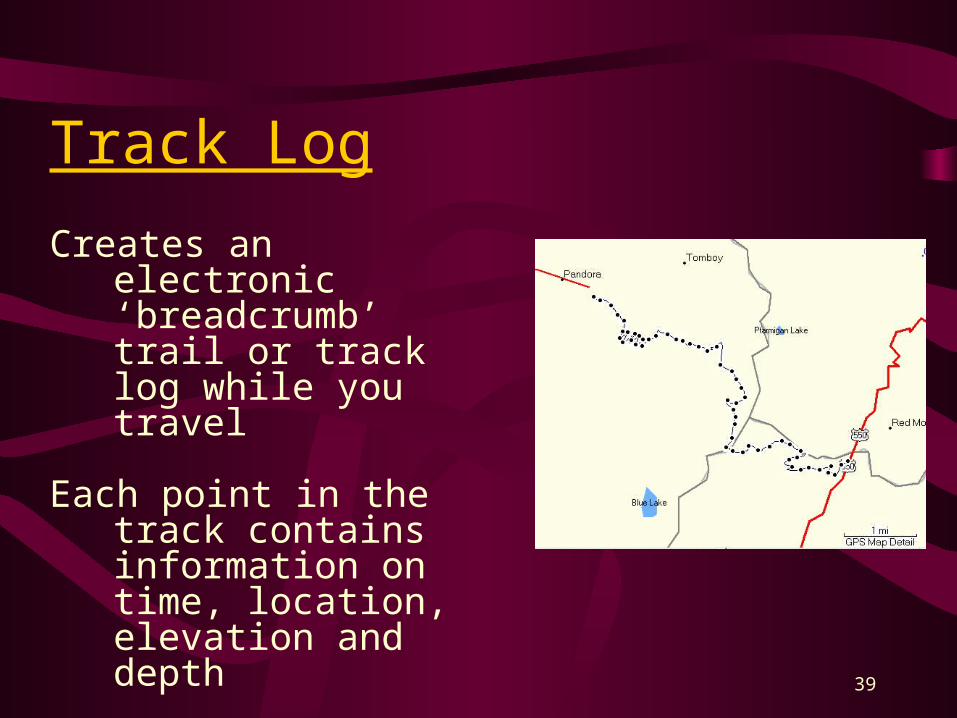
Track Log
Creates an electronic ‘breadcrumb’ trail or track log while you travel
Each point in the track contains information on time, location, elevation and depth
40
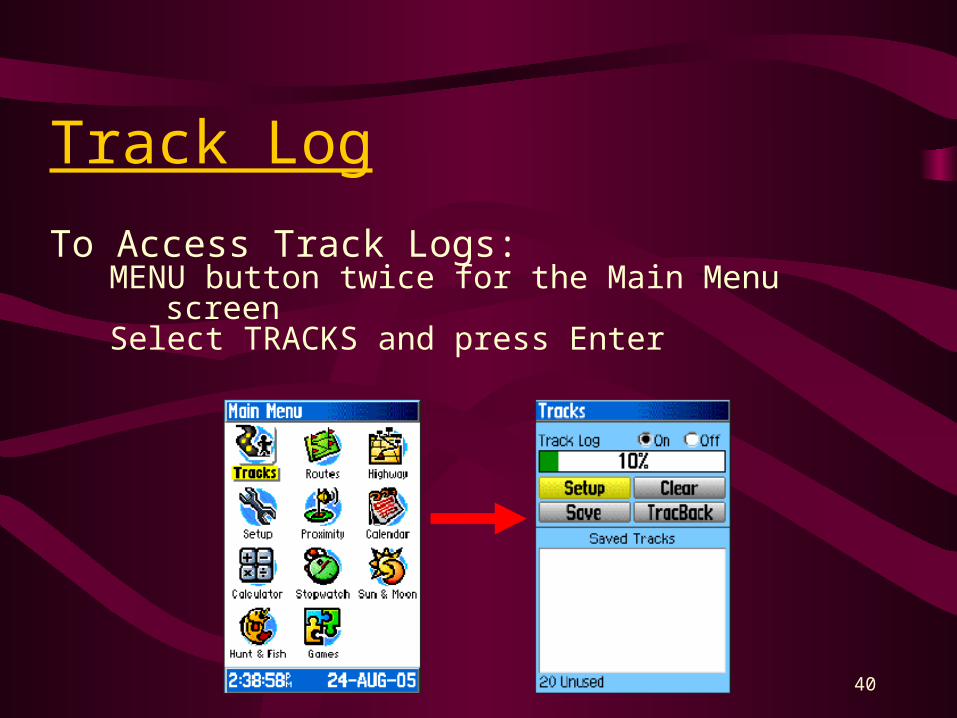
Track Log
To Access Track Logs:MENU button twice for the Main Menu screenSelect TRACKS and press Enter

41
Track Log
On/Off toggle
Percentage of memory used
List of saved Tracks
Remaining available logs

42
Track Log : Clearing
To clear the track log:Highlight Clear and press EnterConfirmation message appears – Press Yes
43
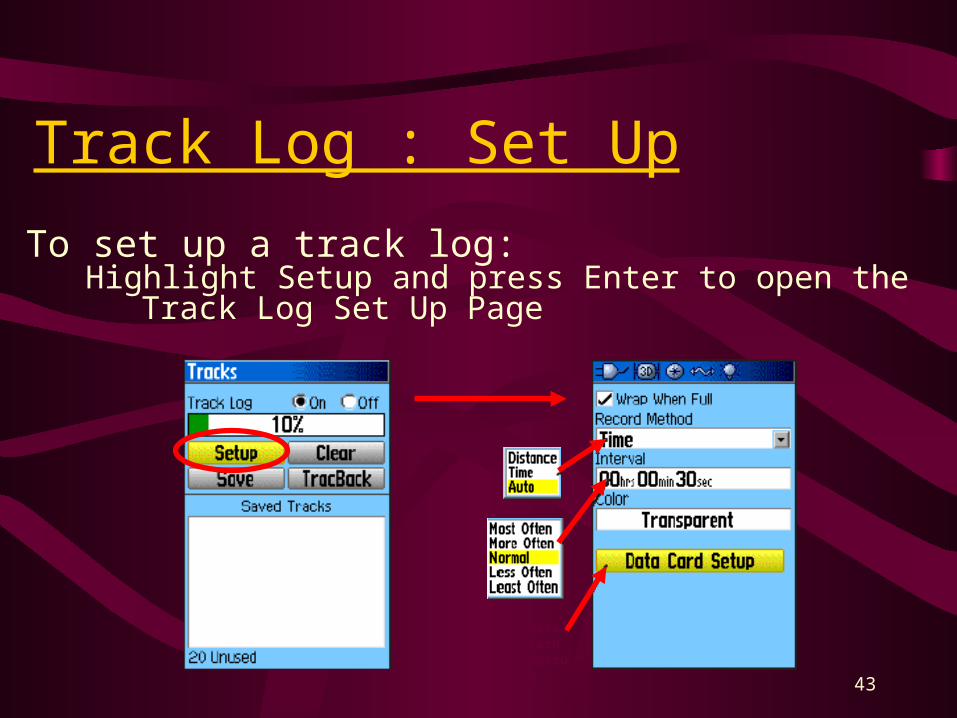
Track Log : Set Up
To set up a track log:Highlight Setup and press Enter to open the Track Log Set Up
Page
Data Card Option

44
Track Log : TracBack
To use the TracBack feature:With Saved Tracks Page for the track or the
Track Log open, highlight TracBack and press Enter
Once the map is displayed, use the Rocker to move the pointer to a point on the map and press Enter
Select Follow Road or Follow TrackFollow the direction arrowTo exit, press Menu then Stop Navigation

45
Waypoints
46
Waypoints
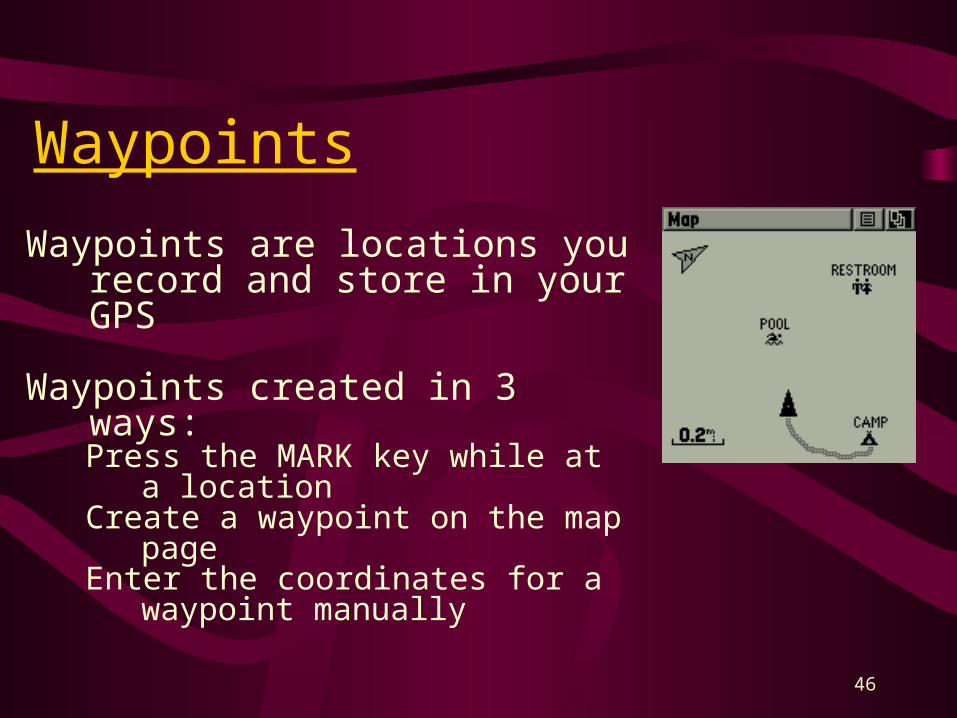
Waypoints are locations you record and store in your GPS
Waypoints created in 3 ways:Press the MARK key while at a locationCreate a waypoint on the map pageEnter the coordinates for a waypoint
manually

47
Waypoints: Circle of Error
X

48
Waypoints: Available Map Symbols
GPSmap 60C Display

49
Waypoints: Common Abbreviations
• PX- Picture (note direction of photo)
• HAZ- Hazards• H-1- Helispot 1• Hosp- Hospital• Str- Structure• Sz- Safety Zone• POA- Point of
Arrival
POD- Point of DepartureBoO- Base of OperationsFwd BOO- Forward Base of operationsStg- StagingUtl- Utilities Apt- ApartmentAir- Airport

50
Waypoints: Mark Current LocationTo mark your current location:
Press and hold the MARK key until the Mark Waypoint page appears
To accept the waypoint with the default information highlight OK and press Enter
Icon Waypoint Name
CoordinateNotes

51
Waypoints: Using The Map Page
To mark a location on the map page:On the map page, use the Rocker to move the arrow to the
location to mark as a waypointPress and quickly release the Enter key to capture the location
and open the information pageHighlight OK and press Enter to save
Map Pointer Mode
Original Location
New Location

52
Waypoints: Entering CoordinatesTo mark a location with known coordinates:
Press and hold the MARK key until the Mark Waypoint page appears
Use the ROCKER to highlight the Location field. Edit the coordinate with your known coordinate.
Highlight OK and press Enter to save
On-screen Keypad
Edit The Coordinate
Change Letters
Navigate Left / Right

53
Waypoints: Entering CoordinatesEnter the following known coordinate:
14S QB 12076 29862Label waypoint as:
HAZARD
On-screen Keypad
Edit The Coordinate
Change Letters
Navigate Left / Right
54
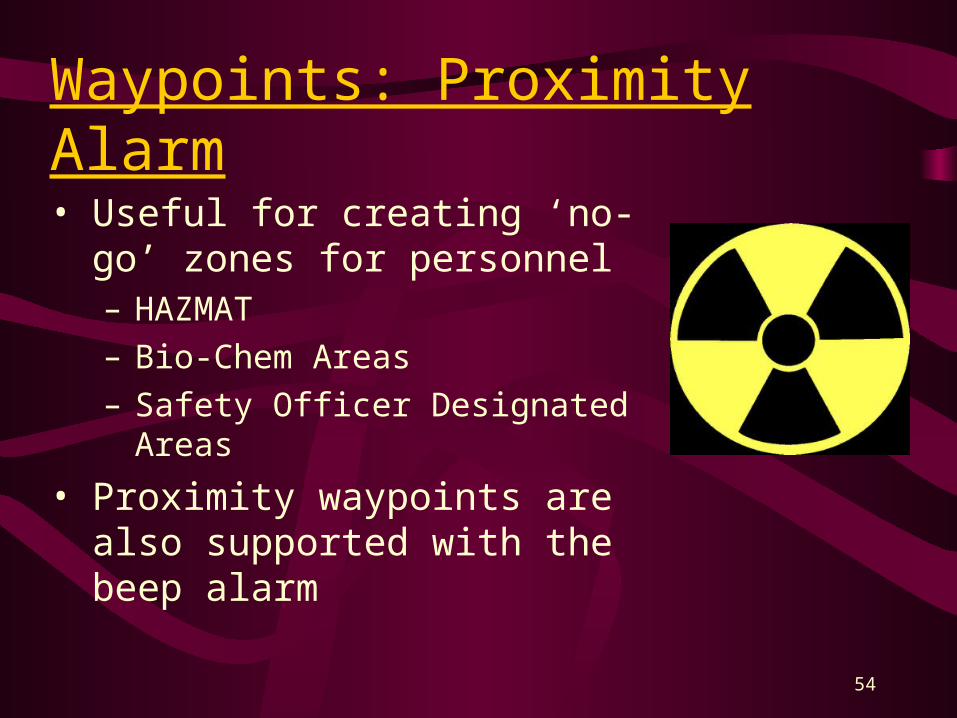
• Useful for creating ‘no-go’ zones for personnel– HAZMAT– Bio-Chem Areas– Safety Officer Designated Areas
• Proximity waypoints are also supported with the beep alarm
Waypoints: Proximity Alarm
55
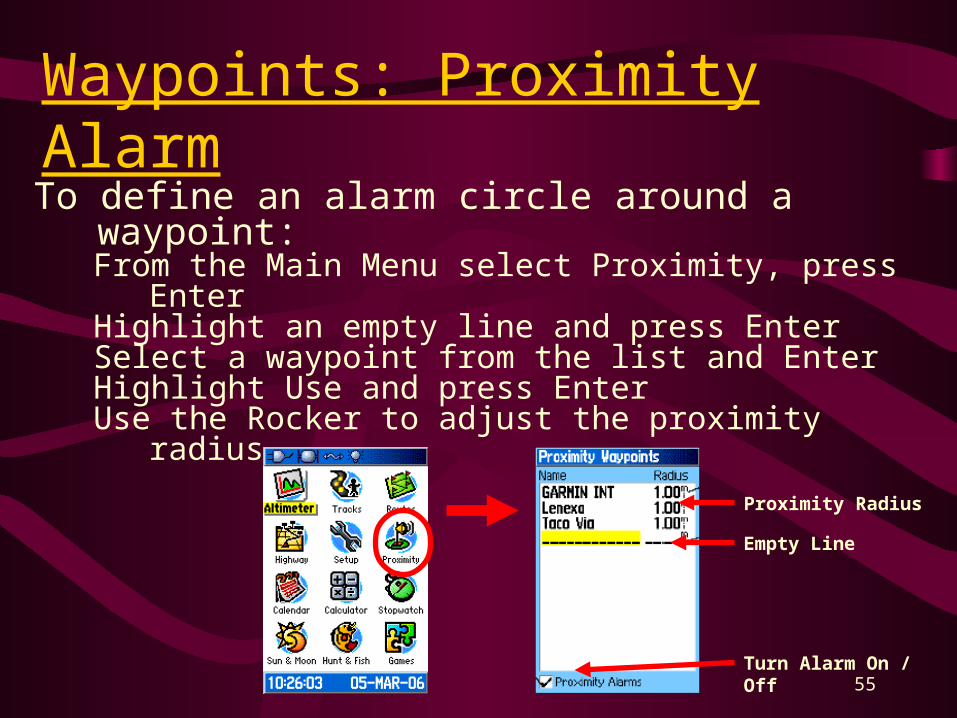
Waypoints: Proximity AlarmTo define an alarm circle around a waypoint:
From the Main Menu select Proximity, press EnterHighlight an empty line and press EnterSelect a waypoint from the list and EnterHighlight Use and press EnterUse the Rocker to adjust the proximity radius
Turn Alarm On / Off
Empty Line
Proximity Radius

56
Waypoints: Proximity AlarmCreate a Proximity Alarm:
Select the HAZARD waypoint and assign it as a proximity alarm
Turn Alarm On / Off
Empty Line
Proximity Radius
57
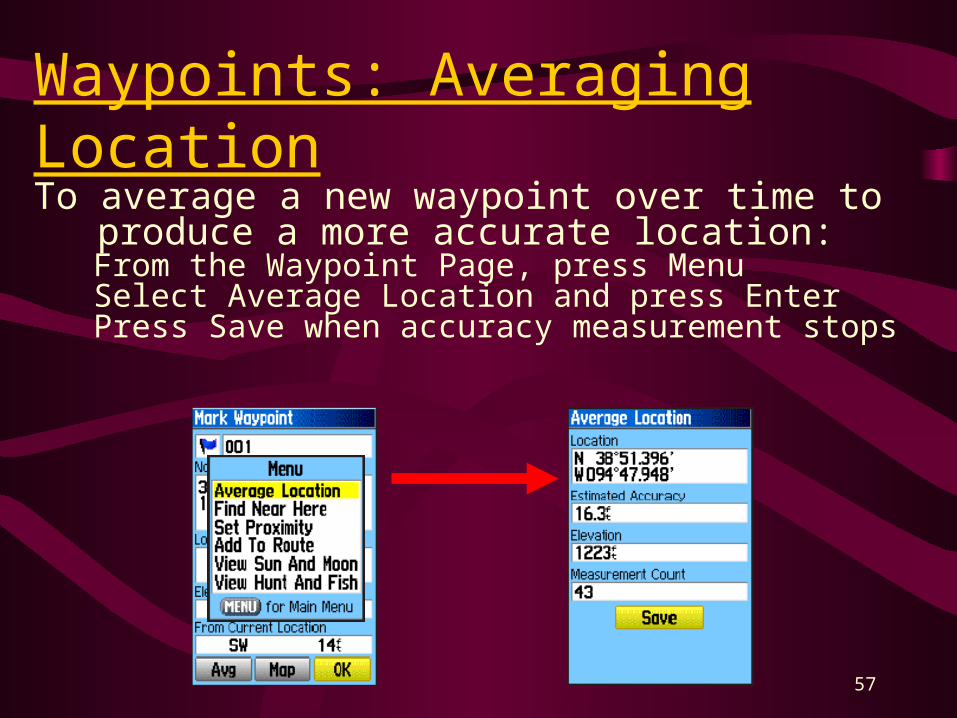
Waypoints: Averaging LocationTo average a new waypoint over time to produce a more
accurate location:From the Waypoint Page, press MenuSelect Average Location and press EnterPress Save when accuracy measurement stops

60
Waypoints: ProjectingCreate a new waypoint by projecting the distance and
bearing from current location to a new location. To use:Sight ‘N Go to lock direction and press ENTERHighlight Project Waypoint and press ENTEREnter distance, highlight Go To and press ENTER

61
Compass

62
Compass: Compass NavigationDuring active navigation, the Compass Page guides you to
your destination with a graphic compass display
The Compass ring moves to indicate North orientation
Bearing pointer
Compass Page

63
Compass: Bearing vs. CourseYou can choose the Bearing Pointer or Course Pointer for
guidanceToggle from Bearing/Course in the Compass Options Menu
The course pointer indicates your course of travel and the distance you drift off course
Course Pointer Bearing Pointer
The bearing pointer
indicates the direction to
your destination

64
Compass: Bearing vs. CourseThe bearing pointer always indicates the direction to your
destination from your current location

65
Compass: Bearing vs. CourseThe course pointer indicates your course of travel from your
original location and the distance off course
67
Routes
68
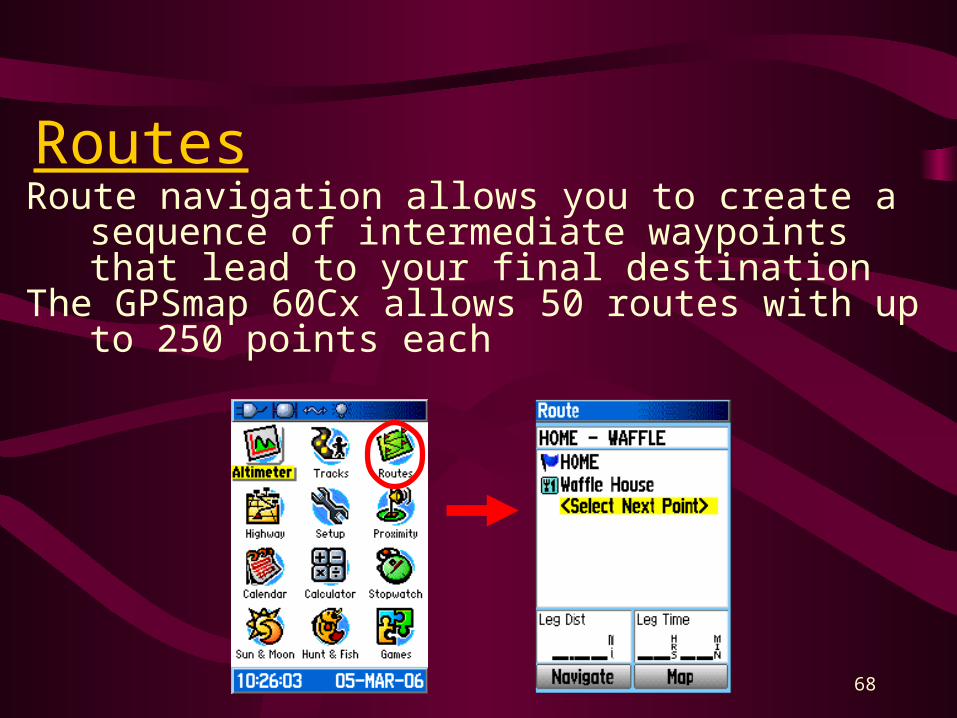
RoutesRoute navigation allows you to create a sequence of
intermediate waypoints that lead to your final destination
The GPSmap 60Cx allows 50 routes with up to 250 points each
69
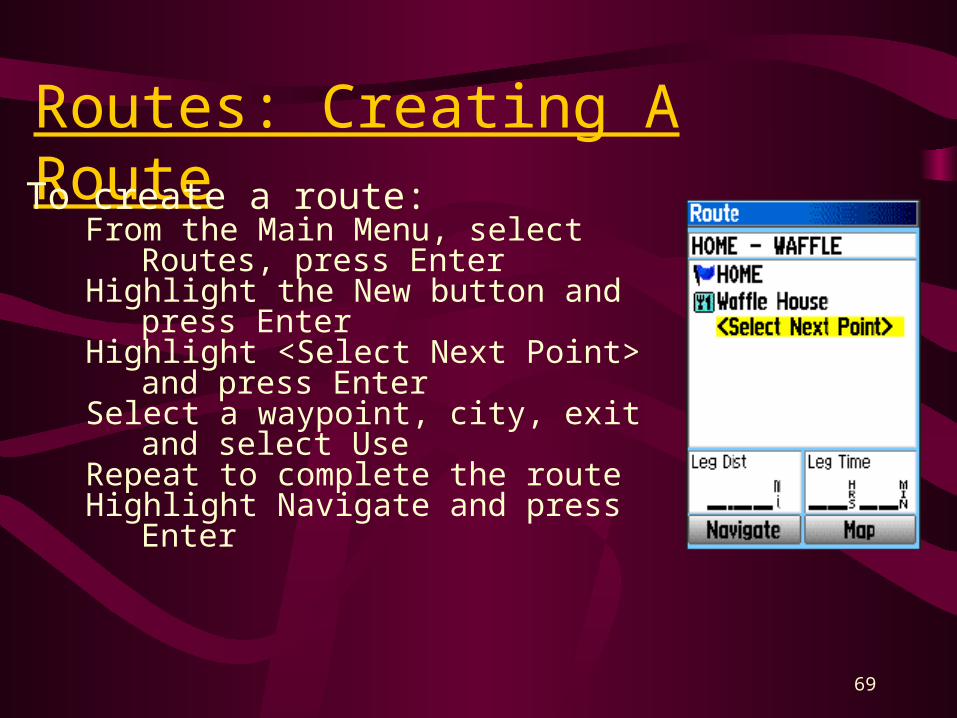
Routes: Creating A RouteTo create a route:
From the Main Menu, select Routes, press Enter
Highlight the New button and press EnterHighlight <Select Next Point> and press
EnterSelect a waypoint, city, exit and select UseRepeat to complete the routeHighlight Navigate and press Enter

70
Planning a Navigation Route
StartStart= Waypoints= Waypoints

71
Yellow stars: where you want to go.
Green stars: where the GPS receiver may take you.
Blue circles: the potential circle of GPS error at each waypoint.
How A Receiver “Sees” Your Route

72
Trip Page
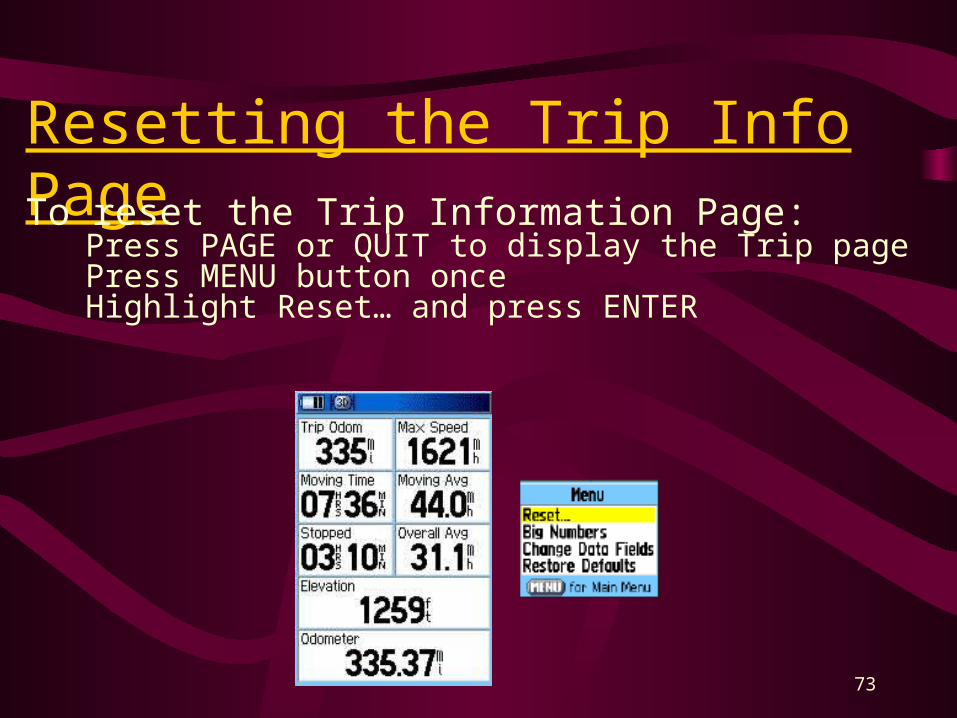
73
Resetting the Trip Info PageTo reset the Trip Information Page:
Press PAGE or QUIT to display the Trip pagePress MENU button onceHighlight Reset… and press ENTER

74
Find Functions

75
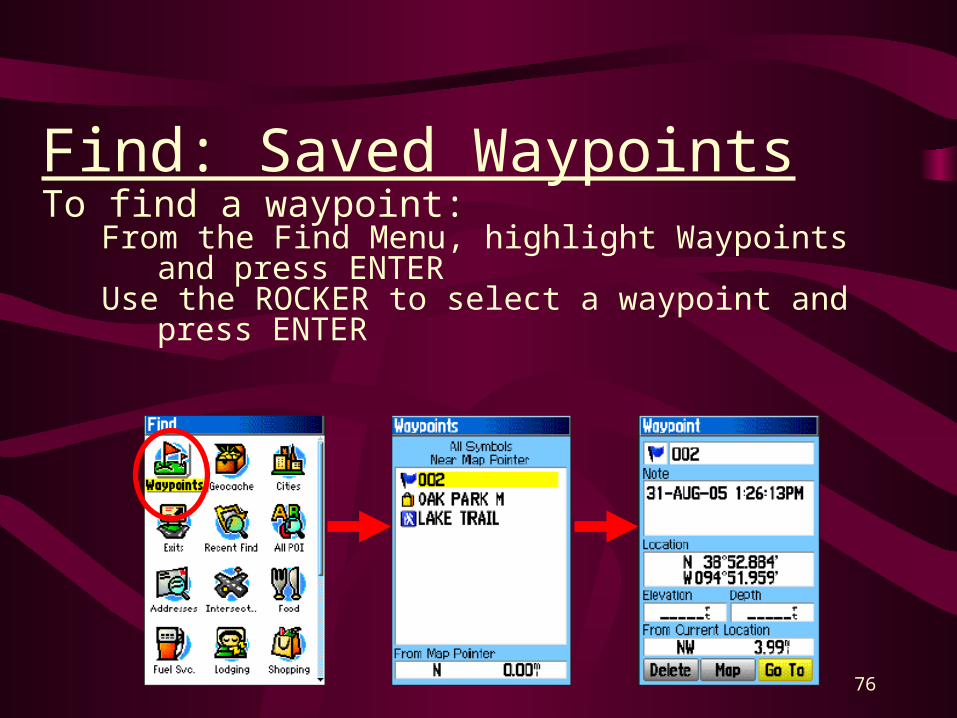
Find
Waypoint Options
Cities Options
Use the FIND function to search for waypoints, cities, exits, or saved geocache points
Additional options with loaded BlueChart and MapSource data.
76
Find: Saved WaypointsTo find a waypoint:
From the Find Menu, highlight Waypoints and press ENTERUse the ROCKER to select a waypoint and press ENTER

77
Find: CitiesTo find a city:
From the Find Menu, highlight Cities and press ENTER. A list of cities near your current location are displayed.
Select a city and press ENTER. If the city is not listed, press MENU for additional search options.

78
Find: Interstate Exit InformationTo find an interstate exit:
From the Find Menu, highlight Exits and press ENTER. A list of exits near your current location are displayed.
Select an exit and press ENTER.Exit information, services, direction to service

79
Find: Street AddressTo find an address:
From the Find Menu, highlight Addresses and press ENTER. Enter the address information until the address is displayed in
the Matches section.
80
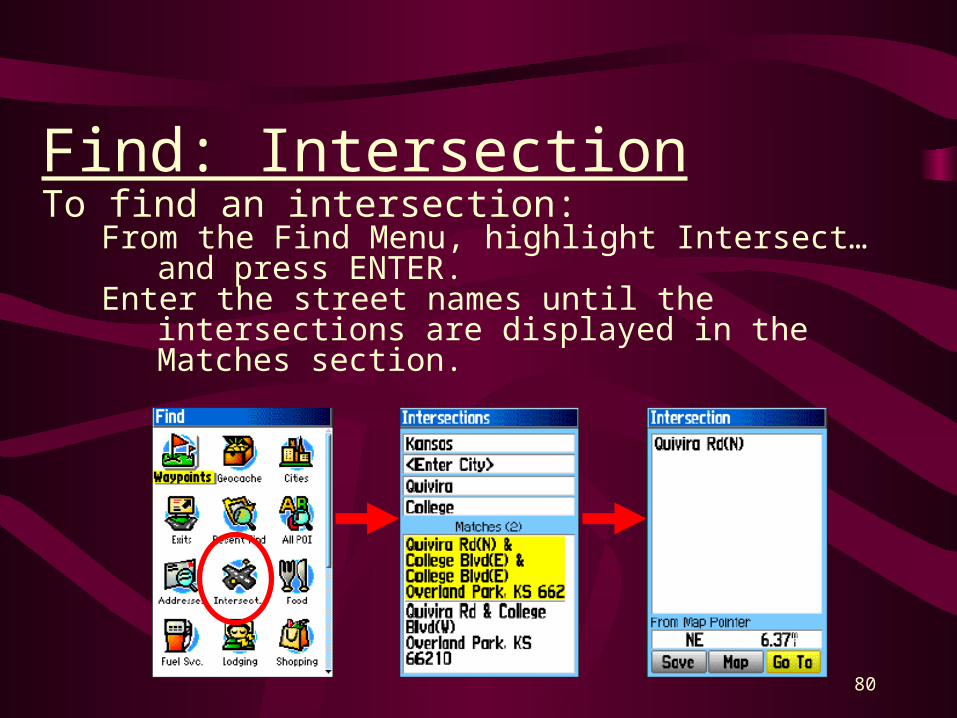
Find: IntersectionTo find an intersection:
From the Find Menu, highlight Intersect… and press ENTER. Enter the street names until the intersections are displayed in
the Matches section.

81
Find: Point Of InterestTo find an intersection:
From the Find Menu, highlight All POI and press ENTER. POI near your location are displayed.
Narrow the search by pressing MENU or select the POI and press ENTER
Options Menu

82
ConclusionsCarry extra batteriesMinimize user error and increase accuracy by keeping
GPS away from bodyAlways carry a paper map as a backupUnless otherwise directed, DHS standard:
DATUM: WGS 84FORMAT: USNG or MGRS
Match the map datum to the GPS datum

83
V. Practical Exercise

84
VI. Module Summary and Evaluation
85
Enabling Objectives
• Describe the basic segments and principles of the global positioning satellite (GPS) system
• Explain waypoints • Identify and describe the errors, concerns and
considerations related to GPS• Demonstrate the use of the Garmin GPS V

86
Questions?