Embed Size (px)
Citation preview
Schlegel Systems, Inc. 1555 Jefferson Road • P.O. Box 23197 • Rochester, NY 14692-3197 • TEL: 800-586-0354
© 2006 Schlegel Systems, Inc., 6/06 HYDROSILL is a trademark of Schlegel Systems, Inc. www.schlegel.com
Hydrosill™ THresHold TecHnical Manual
SCHLEGEL

Hydrosill TecHnical Manual
PaGe
i. BackGround Advantages of HYDROSILL Threshold . . . . . . . . . . . . . . 1 Test Results . . . . . . . . . . . . . . . . . . . . . . . . . . . . . . . . . . 2 Fenestration Test Lab Request Form . . . . . . . . . . . . . . 3-4 Commonly Asked Questions . . . . . . . . . . . . . . . . . . . 5-6 ii. descriPTions and PrinTs Series Descriptions . . . . . . . . . . . . . . . . . . . . . . . . . . . . 7 Product Prints . . . . . . . . . . . . . . . . . . . . . . . . . . . . . 8-10
iii. insTallaTion insTrucTions 1. Mounting Distances, Clearances . . . . . . . . . . . . . . . 11 2-3 Jamb Details . . . . . . . . . . . . . . . . . . . . . . . . . . 12-13 4. End Gaskets . . . . . . . . . . . . . . . . . . . . . . . . . . . . . . . 14 5-6 Jamb Attachment . . . . . . . . . . . . . . . . . . . . . . . . . 15 7. Perimeter Weatherstrip . . . . . . . . . . . . . . . . . . . . . . 16 8-11 Finishing, Caulking . . . . . . . . . . . . . . . . . . . . 17-18 Appendix A - Extenders . . . . . . . . . . . . . . . . . . . . . 19-20 Appendix B - Mullions . . . . . . . . . . . . . . . . . . . . . . 21-22 Appendix C - Astragals . . . . . . . . . . . . . . . . . . . . . . . . 23 Appendix D - Brick Mold . . . . . . . . . . . . . . . . . . . . . . 24 iV. TrouBlesHooTinG Guide Field rePair Troubleshooting . . . . . . . . . . . . . . . . . . . . . . . . . . . 25-26 Field Repair . . . . . . . . . . . . . . . . . . . . . . . . . . . . . . 27-29
HYDROSILL Threshold
BackGround

1
1555 Jefferson Road • P.O. Box 23197 • Rochester, NY 14692-3197 • TEL: 800-586-0354 Schlegel Systems, Inc.
© 2006 Schlegel Systems, Inc. HYDROSILL is a trademark of Schlegel Systems, Inc. www.schlegel.com
Advantages of Hydrosill Threshold
✔ “CONTAIN AND DRAIN” water management system prevents leaks by draining water to outside.
✔ Total perimeter, single plane seal reduces air and water infiltration.
✔ Door systems equipped with HYDROSILL thresholds consistently pass industry air and water infiltration tests. (AAMA/WDMA 101/I.S.2 Grade 20, ANSI/ ISDI 104)
✔ Door bottoms and dust plugs eliminated (inventory reduction).
✔ Significant improvement in closing force of door — no carpet drag.
✔ On-site adjustments eliminated.
✔ Durable and attractive modern design.
✔ Complete marketing and technical support available including an easy to follow installation instructional video.
HYDROSILL Technical Manual BACkGROuND

Schlegel Systems, Inc. 1555 Jefferson Road • P.O. Box 23197 • Rochester, NY 14692-3197 • TEL: 800-586-0354
© 2006 Schlegel Systems, Inc. HYDROSILL is a trademark of Schlegel Systems, Inc. www.schlegel.com2 3
1555 Jefferson Road • P.O. Box 23197 • Rochester, NY 14692-3197 • TEL: 800-586-0354 Schlegel Systems, Inc.
© 2006 Schlegel Systems, Inc. HYDROSILL is a trademark of Schlegel Systems, Inc. www.schlegel.com
Hydrosill Threshold Test results (AAMA/WdMA Grade 20)series 2200 / 2500 / 5000
AIR LeAkAge TeST WATeR PeneTRATIOn TeST OPeRATIng FORce
Measured Air closing Air Pressure Infiltration Water Penetration Pass/Fail Force
single Entry steel doorSize: 37.5"W x 81"H
1.56 psf (25 mph) 0.099 SCFM/LFC 1.56 psf (25 mph) PASS 33 lbs 2.25 psf (30 mph) PASS 3.06 psf (35 mph) PASS French Patio Vinyl doorSize: 72"W x 80"H
1.56 psf (25 mph) .237 SCFM/LFC 1.56 psf (25 mph) PASS 32 lbs 2.25 psf (30 mph) PASS 3.06 psf (35 mph) PASS swing Patio Wood doorSize: 71"W x 81"H
1.56 psf (25 mph) .053 SCFM/LFC 1.56 psf (25 mph) PASS 30 lbs 2.25 psf (30 mph) PASS 3.06 psf (35 mph) PASS French Wood Patio doorSize: 59"W x 80"H
1.56 psf (25 mph) .058 SCFM/LFC 1.56 psf (25 mph) PASS 28 lbs 2.25 psf (30 mph) PASS 3.06 psf (35 mph) PASS outswing French Patio doorSize: 74"W x 82"H
1.56 psf (25 mph) 0.063 SCFM/LFC 1.56 psf (25 mph) PASS 26 lbs 2.25 psf (30 mph) PASS 3.06 psf (35 mph) PASS 4.00 psf (40 mph) PASS
Class ANSI/ISDI-104 = 15 minutes @ 1.56 psf, staticAAMA/WDMA Grade 20 = (4) 5 minute cycles @ 2.86 psf (34 mph)Water Penetration Test = 5 gallons water per square foot/per hour(equivalent to approximately 8" rain per hour)
BACkGROuND HYDROSILL Technical Manual HYDROSILL Technical Manual BACkGROuND
schlegel systems, inc. – Fenestration lab
TEsT rEQUEsTToday’s Date: ________________________ Requested Test Date:_______________________________
SCHLEGEL Sales Representative: ___________________________________________________________
Manufacturer’s Name: ___________________________________________________________________
Address: Street: ________________________________________________________________________
City, State, Zip: _______________________________________________________________
Telephone Number: _____________________________________________________________________
Fax Number: ___________________________________________________________________________
Contact Name and Title: __________________________________________________________________
Will a manufacturing representative be witnessing the test? ____________________________________
Please be sure the unit to be submitted for testing includes all hardware, screens, grilles, and weatherstripping currently used for complete evaluation. Please do not stake or glue the weatherstripping if possible, since the weatherstripping must be removed for evaluation purposes. Ship the unit to be tested to: Schlegel Systems, Inc. 1555 Jefferson Road Rochester, NY 14692 Attn: Fenestration Lab
Please direct any questions or comments you have concerning testing to your sales representative, Fenestration Test Lab Manager or Test Technician, at (585) 427-7200 ext. 5340. Customers must ship to the lab the window or door to be tested, freight prepaid. Customers without a standard shipping company can arrange with the BPD shipping department to be billed. The lab returns windows and doors after testing if requested, shipping the units COD or on the customer's standard carrier.
Standard Product sizes are as follows: Double and Single Hung Windows 3' 0" wide by 5' 0" high Double and Single Sliding Windows 5' 0" wide by 3' 0" high Casement Windows 2' 0" wide by 4' 0" high Awning Windows 4' 0" wide by 2' 0" high Single Entrance Doors 3' 0" wide by 6' 8" high Patio Doors 6' 0" wide by 6' 8" high
Window and door sizes are measured tip to tip from the outer dimension of the main frame. Windows or doors that are larger or smaller than the standard size are very costly to test (special bucking is required). Please consult with the Lab Manager before submitting non standard products for testing.
!
!
trim here
trim here

Schlegel Systems, Inc. 1555 Jefferson Road • P.O. Box 23197 • Rochester, NY 14692-3197 • TEL: 800-586-0354
© 2006 Schlegel Systems, Inc. HYDROSILL is a trademark of Schlegel Systems, Inc. www.schlegel.com4 5
1555 Jefferson Road • P.O. Box 23197 • Rochester, NY 14692-3197 • TEL: 800-586-0354 Schlegel Systems, Inc.
© 2006 Schlegel Systems, Inc. HYDROSILL is a trademark of Schlegel Systems, Inc. www.schlegel.com
sCHlEGEl sysTEMs, iNC. WlNdoW ANd door lAB TEsT rEQUEsT Page 2
A. Product Model/Series Name: ________________________________ Size: _____________________ Operator Style: ____________________________________ (ex.-Double Hung, Single Hung, etc.)
B. Special Tests Required _____ ASTM E283 - Air Leakage Test _____ NFPA 105 - Hot Smoke _____ ASTM E331 - Static Water Penetration _____ Differential Temperature _____ ASTM E547 - Cyclic Water Penetration Air Leakage Test _____ Operating/Breakaway Force _____ Temperature Cycling _____ Other: ____________________ _____ Physcial Cycling
C. Special Testing Instructions: ____________________________________________________________ ___________________________________________________________________________________
D. Product Disposition After Testing: ______________________________________________________
E. Weatherstripping Currently used: Manufacturer: _______________________________________________________________________ Type: _______________________________________________________________________________ Size: _______________________________________________________________________________ Quantity per unit: ____________________________________________________________________ Material: ____________________________________________________________________________
F. What industry specification should this unit be tested to:? _____ AAMA _____ WDMA _____ ISDI _____ OTHER _______________________
G. Is this product certified or previously tested? _________________ If so, what were the results? 1. Air leakage rate @ ________ psf was ______ ______ (units scfm/ft or scfm/ft2) 2. Water penetration (pass/fail) @ ________ psf __________ 3. Operating/closing force (lb/f) ___________________________
H. Will this product require certification or independent test lab results? ________ If yes, which lab would you like us to use if part of the testing is performed in our facilities?
I. Are there other components, e.g. hardware, sills, jambliners, etc., of interest to you from a performance perspective and should we evaluate them and make recommendations?
J. Other comments/history/problems: _____________________________________________________
!
!
trim here
trim here
HYDROSILL Technical Manual BACkGROuND
Commonly Asked Questions
1. Who do i call for technical questions?
Contact your Schlegel Territory Manager or the HYDROSILL Threshold Product Manager at 1-800-586-0354 extension 5298.
2. What lengths are available?
Any length up to 160" for most series. All sills/extenders are cut to the customer's specific length requirements.
3. What finishes are available?
Mill finish and bronze anodize.
4. What is minimum purchase of Hydrosill thresholds?
Standard packaging is ten (10) sills. There is an additional charge for fewer than 10.
5. What is the lead time?
Standard lead time is 2-3 weeks.
6. How do i get a sample?
Call 1-800-586-0354 and ask for your Customer Service Representative.
7. Are samples free?
Nine inch samples are available at no charge.
8. does the Hydrosill threshold change the rough opening size?
No, the completed door unit size stays the same.
9. do i buy the same size sill as before?
No, buy your sills 1/8" shorter to accommodate the end gaskets. Ask your Territory Manager or the Product Manager for exact sizing.
10. Can the sill be cut to length in the door shop?
Yes, the length of any sill/extender can be reduced by as much as two inches from each end.

Schlegel Systems, Inc. 1555 Jefferson Road • P.O. Box 23197 • Rochester, NY 14692-3197 • TEL: 800-586-0354
© 2006 Schlegel Systems, Inc. HYDROSILL is a trademark of Schlegel Systems, Inc. www.schlegel.com6
BACkGROuND HYDROSILL Technical Manual
12. Can extenders be applied in the field?
Extenders cannot be applied in the field. One piece end gaskets must be used between the jamb and the sill, therefore, extenders must be installed during the door assembly process.
13. do you sell drilling templates?
A drilling template for the screw bosses in our sills is available at no charge, specify when ordering.
14. is the Hydrosill threshold weatherstripping replaceable?
Yes, replacement sill seal is available—it has a special plastic insert to snap into the sill.
15. Are screen tracks available for the Hydrosill threshold?
Yes, there are 1" and 3" extenders available with a screen track.
16. Can i use other weatherseals or substitute other components in my Hydrosill threshold door system?
The HYDROSILL threshold system is designed to work with Q-LON® Door Seal. While there are similar looking seals available, only Q-LON® door seals assure long performance with a lifetime performance guarantee. Any design changes or material substitutions unless expressly approved by Schlegel will render the HYDROSILL threshold warranty null and void.
17. Can i test a door at schlegel?
Your Schlegel representative can arrange product testing. Forms are included in this manual to request this service.
schlegel Toll-Free Number
1-800-586-0354
HYDROSILL Threshold
descriPTions & PrinTs

7
1555 Jefferson Road • P.O. Box 23197 • Rochester, NY 14692-3197 • TEL: 800-586-0354 Schlegel Systems, Inc.
© 2006 Schlegel Systems, Inc. HYDROSILL is a trademark of Schlegel Systems, Inc. www.schlegel.com
HYDROSILL Technical Manual DESCRIPTION & PRINTS
series descriptionsContact your Schlegel representative to determine
the best threshold for your application.
iNsWiNGSuperior water management system for 4-9/16" jamb with a 1-5/32" saddle height (extenders available for wider door jambs).
sEriEs 2200: RATED GRADE 20 (AAMA/WDMA). A non-thermally broken all aluminum threshold designed for the southern market.
sEriEs 5000: RATED GRADE 20 (AAMA/WDMA). Our top of the line model is thermally broken with a stainable wood interior saddle.
oUTsWiNGSuperior water management system for 4-9/16" jamb with a 1-1/8" saddle height.
sEriEs 2500: RATED GRADE 20 (AAMA/WDMA). A non-thermally broken all aluminum threshold for outswing applications. This model is used commonly in mild climate markets as well as for exterior doors from a garage or basement.

Schlegel Systems, Inc. 1555 Jefferson Road • P.O. Box 23197 • Rochester, NY 14692-3197 • TEL: 800-586-0354
© 2006 Schlegel Systems, Inc. HYDROSILL is a trademark of Schlegel Systems, Inc. www.schlegel.com8 9
1555 Jefferson Road • P.O. Box 23197 • Rochester, NY 14692-3197 • TEL: 800-586-0354 Schlegel Systems, Inc.
© 2006 Schlegel Systems, Inc. HYDROSILL is a trademark of Schlegel Systems, Inc. www.schlegel.com
Hydrosill Thresholds (Grade 20 AAMA/WdMA)
series 5000 with oak interior saddle
HYDROSILL Technical Manual DESCRIPTIONS & PRINTS
Non Thermally Broken
Hydrosill Thresholds (Grade 20 AAMA/WdMA)
DESCRIPTIONS & PRINTS HYDROSILL Technical Manual
series 2200
series 2500 (out-swing)
Non Thermally Broken
Non Thermally Broken

Schlegel Systems, Inc. 1555 Jefferson Road • P.O. Box 23197 • Rochester, NY 14692-3197 • TEL: 800-586-0354
© 2006 Schlegel Systems, Inc. HYDROSILL is a trademark of Schlegel Systems, Inc. www.schlegel.com10
Hydrosill Thresholds (Grade 20 AAMA/WdMA)
1 inch Extender
Extenders
2 inch Extender
3 inch Extender
DESCRIPTIONS & PRINTS HYDROSILL Technical Manual
1 inch with screen Track 3 inch with screen Track
HYDROSILL Threshold
insTallaTion insTrucTions

11
1555 Jefferson Road • P.O. Box 23197 • Rochester, NY 14692-3197 • TEL: 800-586-0354 Schlegel Systems, Inc.
© 2006 Schlegel Systems, Inc. HYDROSILL is a trademark of Schlegel Systems, Inc. www.schlegel.com
1. The door panel bottom edge must clear the top of the saddle by no less than 3/16" and no more than 5/16" with 1/4" nominal. A 1/8" nominal reveal between the edge of the door slab and the jambs and header must be used. A 3/8" maximum reveal to 5/16" minimum reveal must be used between the exterior face of the door panel and the
jamb (stop). Fig. 1.
FIG. 1
1a. Corner seals, dust plugs, and door bottom seals should not be used. The addition of these may cause the HYDROSILL threshold system to fail.
HYDROSILL Technical Manual INSTALLATION INSTRuCTIONS

Schlegel Systems, Inc. 1555 Jefferson Road • P.O. Box 23197 • Rochester, NY 14692-3197 • TEL: 800-586-0354
© 2006 Schlegel Systems, Inc. HYDROSILL is a trademark of Schlegel Systems, Inc. www.schlegel.com12 13
1555 Jefferson Road • P.O. Box 23197 • Rochester, NY 14692-3197 • TEL: 800-586-0354 Schlegel Systems, Inc.
© 2006 Schlegel Systems, Inc. HYDROSILL is a trademark of Schlegel Systems, Inc. www.schlegel.com
2. The jambs must be mortised to accept the sill and any extenders. Fig. 2.
3. Holes for screws need to be drilled in the jambs using the Schlegel provided template. Figures 3-5 show the proper dimensions for the current HYDROSILL threshold series.
FIG. 2
INSTALLATION INSTRuCTIONS HYDROSILL Technical Manual
FIG. 3
Series C-2200FIG. 5
HYDROSILL Technical Manual INSTALLATION INSTRuCTIONS
FIG. 4
Series 5000
Series 2500

Schlegel Systems, Inc. 1555 Jefferson Road • P.O. Box 23197 • Rochester, NY 14692-3197 • TEL: 800-586-0354
© 2006 Schlegel Systems, Inc. HYDROSILL is a trademark of Schlegel Systems, Inc. www.schlegel.com14 15
1555 Jefferson Road • P.O. Box 23197 • Rochester, NY 14692-3197 • TEL: 800-586-0354 Schlegel Systems, Inc.
© 2006 Schlegel Systems, Inc. HYDROSILL is a trademark of Schlegel Systems, Inc. www.schlegel.com
4. End gaskets must be placed on each end of the HYDROSILL threshold. They must be flush with the interior vertical edge, the top of the saddle, and the top of the cladding. All excess gasket material should be located towards the bottom of the sill. The butyl
surface must face the ends of the sill. Fig. 6.
FIG. 6
INSTALLATION INSTRuCTIONS HYDROSILL Technical Manual
5. use screws to secure the sill to the jamb using the screw bosses provided in the sill. Staples and nails must not be used to secure the sill to the jamb.
Screw SIze chart
hYDrOSILL Series Screw Size
2200 #6
2500 #6
5000 #6
6. The bottom of the sill and jamb must be flush for proper sealing. Fig. 7.
FIG. 7
NOTE: Jambs must compress the end gaskets by at least 50% when secured to the sill.
HYDROSILL Technical Manual INSTALLATION INSTRuCTIONS

Schlegel Systems, Inc. 1555 Jefferson Road • P.O. Box 23197 • Rochester, NY 14692-3197 • TEL: 800-586-0354
© 2006 Schlegel Systems, Inc. HYDROSILL is a trademark of Schlegel Systems, Inc. www.schlegel.com16 17
1555 Jefferson Road • P.O. Box 23197 • Rochester, NY 14692-3197 • TEL: 800-586-0354 Schlegel Systems, Inc.
© 2006 Schlegel Systems, Inc. HYDROSILL is a trademark of Schlegel Systems, Inc. www.schlegel.com
7. The QDS-650 or QEBD-650 foam door seal must be square cut on the end and flush against the top of the threshold. The HYDROSILL threshold sill seal must be cut square to the ends of the sill.
8. A 1/8 inch bead of exterior grade caulk must be applied to the exterior joint between the jamb and sill extrusion. Fig. 8.
FIG. 8
INSTALLATION INSTRuCTIONS HYDROSILL Technical Manual
9. When inoperable door panels are used, spacers should be placed between the door slab, saddle, and the interface between them must be caulked. Fig. 9.
FIG. 9
FIG. 10
10. A 1/4 inch bead of exterior grade caulk must be applied to the full width of the sill plate extending at least 1 inch up the cripples of the rough opening before the door frame is installed. This will provide a water tight seal against any penetration that may occur. Fig. 10.
HYDROSILL Technical Manual INSTALLATION INSTRuCTIONS
Schlegel Systems, Inc. 1555 Jefferson Road • P.O. Box 23197 • Rochester, NY 14692-3197 • TEL: 800-586-0354
© 2006 Schlegel Systems, Inc. HYDROSILL is a trademark of Schlegel Systems, Inc. www.schlegel.com18 19
1555 Jefferson Road • P.O. Box 23197 • Rochester, NY 14692-3197 • TEL: 800-586-0354 Schlegel Systems, Inc.
© 2006 Schlegel Systems, Inc. HYDROSILL is a trademark of Schlegel Systems, Inc. www.schlegel.com
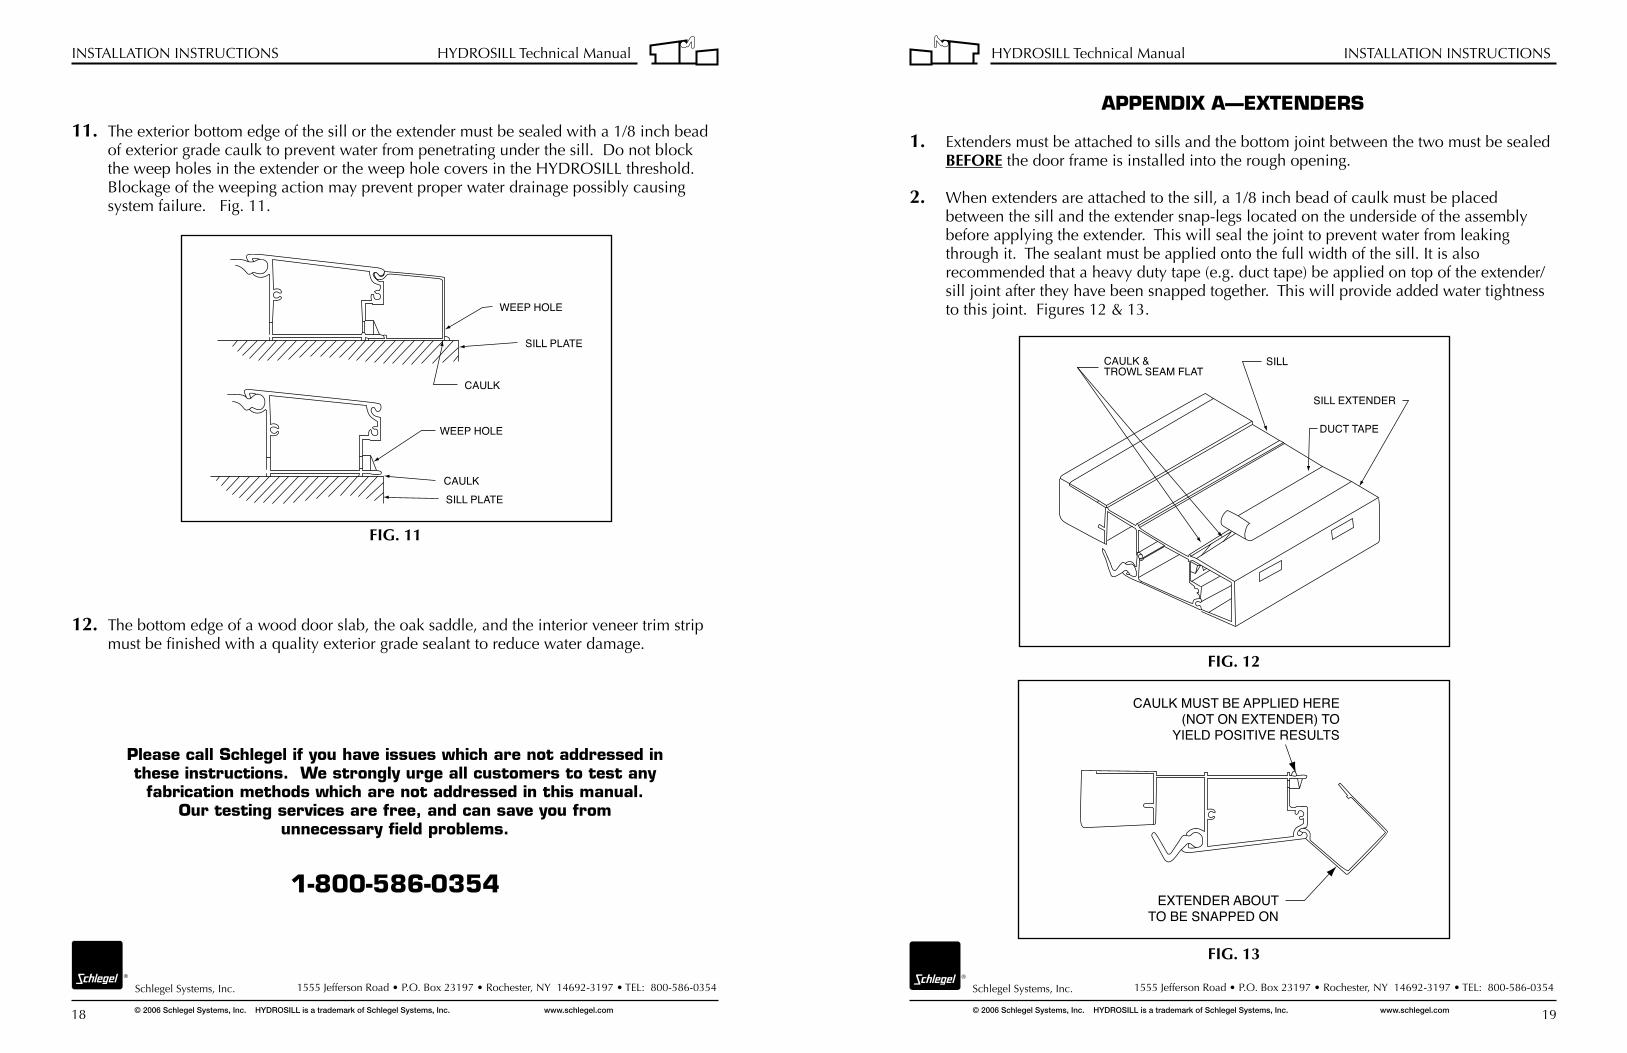
11. The exterior bottom edge of the sill or the extender must be sealed with a 1/8 inch bead of exterior grade caulk to prevent water from penetrating under the sill. Do not block the weep holes in the extender or the weep hole covers in the HYDROSILL threshold. Blockage of the weeping action may prevent proper water drainage possibly causing system failure. Fig. 11.
FIG. 11
12. The bottom edge of a wood door slab, the oak saddle, and the interior veneer trim strip must be finished with a quality exterior grade sealant to reduce water damage.
INSTALLATION INSTRuCTIONS HYDROSILL Technical Manual
Please call schlegel if you have issues which are not addressed in these instructions. We strongly urge all customers to test any
fabrication methods which are not addressed in this manual. our testing services are free, and can save you from
unnecessary field problems.
1-800-586-0354
1. Extenders must be attached to sills and the bottom joint between the two must be sealed beFOre the door frame is installed into the rough opening.
2. When extenders are attached to the sill, a 1/8 inch bead of caulk must be placed between the sill and the extender snap-legs located on the underside of the assembly
before applying the extender. This will seal the joint to prevent water from leaking through it. The sealant must be applied onto the full width of the sill. It is also recommended that a heavy duty tape (e.g. duct tape) be applied on top of the extender/sill joint after they have been snapped together. This will provide added water tightness to this joint. Figures 12 & 13.
FIG. 12
FIG. 13
APPENdix A—ExTENdErs
HYDROSILL Technical Manual INSTALLATION INSTRuCTIONS

Schlegel Systems, Inc. 1555 Jefferson Road • P.O. Box 23197 • Rochester, NY 14692-3197 • TEL: 800-586-0354
© 2006 Schlegel Systems, Inc. HYDROSILL is a trademark of Schlegel Systems, Inc. www.schlegel.com20 21
1555 Jefferson Road • P.O. Box 23197 • Rochester, NY 14692-3197 • TEL: 800-586-0354 Schlegel Systems, Inc.
© 2006 Schlegel Systems, Inc. HYDROSILL is a trademark of Schlegel Systems, Inc. www.schlegel.com
APPENdix A—ExTENdErs
3. When extenders are attached to sills, (1) one piece full length gaskets must be applied. Do not butt join two pieces of gasket as this may leak water. Appropriate end gaskets are
available for all extenders. See example below. Fig. 14.
FIG. 14
INSTALLATION INSTRuCTIONS HYDROSILL Technical Manual
APPENdix B—MUllioNs
1. Mullions must be mortised for sill attachment as detailed in Fig. 15. This will allow the sill weatherseal to operate without interference. The sill weatherseal must also be cut
in half at this location to allow the operable door panel to seal independently from the fixed panel. Mullion post screws must be sealed on the bottom of the sill to prevent water leakage through them. Caulk the heads of the screw and place duct tape over them.
FIG. 16
FIG. 15
SERIES: 2200 SERIES: 2500 5000
HYDROSILL Technical Manual INSTALLATION INSTRuCTIONS

Schlegel Systems, Inc. 1555 Jefferson Road • P.O. Box 23197 • Rochester, NY 14692-3197 • TEL: 800-586-0354
© 2006 Schlegel Systems, Inc. HYDROSILL is a trademark of Schlegel Systems, Inc. www.schlegel.com22 23
1555 Jefferson Road • P.O. Box 23197 • Rochester, NY 14692-3197 • TEL: 800-586-0354 Schlegel Systems, Inc.
© 2006 Schlegel Systems, Inc. HYDROSILL is a trademark of Schlegel Systems, Inc. www.schlegel.com
2. Multiple short length sills mulled together must not be joined with a common extender as this will cause water leakage to the inside of the building. Extenders must be the same length as the sill. Fig. 17.
FIG. 17
APPENdix B—MUllioNs
INSTALLATION INSTRuCTIONS HYDROSILL Technical Manual
1. Astragal seals shall be square cut and flush against the top of the threshold as indicated in Fig. 18. The sill seal must be cut in half at the astragal to allow the two halves of the sill seal to work independently of each other.
FIG. 18
APPENdix C—AsTrAGAl sEAls
HYDROSILL Technical Manual INSTALLATION INSTRuCTIONS

Schlegel Systems, Inc. 1555 Jefferson Road • P.O. Box 23197 • Rochester, NY 14692-3197 • TEL: 800-586-0354
© 2006 Schlegel Systems, Inc. HYDROSILL is a trademark of Schlegel Systems, Inc. www.schlegel.com24
1. Brick mold applications: Method 1 – The extender is attached flush to the ends of the sill and the brick mold compresses the end gasket. Fig. 19.
Method 2 – For horned applications, the extender is cut longer than the sill body. The brick mold sits on top of the extender. For this application, the bottom and sides of the sill and jambs must be caulked as described in Fig. 20.
Method 3 – Brick mold is attached to the front of the jambs and the sill is attached to the jamb in typical fashion. Fig. 21.
FIG. 19
FIG. 21
FIG. 20
APPENdix d—BriCk Mold
INSTALLATION INSTRuCTIONS HYDROSILL Technical Manual
HYDROSILL Threshold
TrouBlesHooTinG & Field rePair

25
1555 Jefferson Road • P.O. Box 23197 • Rochester, NY 14692-3197 • TEL: 800-586-0354 Schlegel Systems, Inc.
© 2006 Schlegel Systems, Inc. HYDROSILL is a trademark of Schlegel Systems, Inc. www.schlegel.com
Troubleshooting GuideIf there is a problem with air or water infiltration following installation of the door system, following are possible causes.
HYDROSILL Technical Manual TROuBLESHOOTING
inadequate Compression of Weatherstripping:
If properly installed, the weatherstrip will be visible no more than 3/8" on top, bottom and sides when viewed from the outside with door in closed position. If not properly compressed, water may fill the trough area faster than the weep system can handle. Causes:• Strike plates improperly located. Relocate strikes further toward outside. • Operating slab warped. Replace slab (consider installing a multipoint locking system).
use alternate edge sealing weatherstrip (Schlegel QEBD-825). • Frame is not plumb (see figure 2). Plumb frame. • Frame is o ut of square (see figure 2). Square frame.
inadequate Clearance Below operating sash:
Bottom edge of operating door panel must clear top of saddle by no less than 3/16" and no more than 5/16" (nominal 1/4").
if clearance is less than 1/4": Check squareness of frame. Check for sagging of operating door panel.
Figure 1
Figure 2
Figure 3

Schlegel Systems, Inc. 1555 Jefferson Road • P.O. Box 23197 • Rochester, NY 14692-3197 • TEL: 800-586-0354
© 2006 Schlegel Systems, Inc. HYDROSILL is a trademark of Schlegel Systems, Inc. www.schlegel.com26 27
1555 Jefferson Road • P.O. Box 23197 • Rochester, NY 14692-3197 • TEL: 800-586-0354 Schlegel Systems, Inc.
© 2006 Schlegel Systems, Inc. HYDROSILL is a trademark of Schlegel Systems, Inc. www.schlegel.com
sill Weatherstripping improperly Compressed:
sill End Gaskets Not Applied Properly:End gaskets must be installed on each end of HYDROSILL threshold with butyl surface facing the sill. These gaskets must be flush with interior vertical edge, top of saddle and top of cladding. If improperly installed or omitted, see Field Repair section for repair procedure which does not require removal of unit from opening.
sill Weep Holes Plugged:Remove trough foam from sill and clean. Check trough for construction debris and remove. To check proper drainage, pour water into cavity adjacent to saddle (trough). Water should flow from exterior at rate consistent with amount of water poured.
TROuBLESHOOTING HYDROSILL Technical Manual
Figure 4
HYDROSILL Technical Manual FIELD REPAIR
Field repairIf properly installed, the HYDROSILL threshold door system should not leak. Proper installation requires that the door panel bottom edge clear the top of the saddle by no less than 3/16" and no more than 5/16" with a 1/4" nominal. A 1/8" nominal reveal between the edge of the door slab and the jambs and header must be maintained. A 3/8" maximum reveal to 5/16" minimum reveal must be used between the exterior face of the door panel and the jamb (stop). See our complete Installation Instructions for further details.
OVERVIEW OF REPAIR: This method restricts the free flow of water throughout the sill cavity by sealing off both sides of the trough with an impervious rigid urethane foam which can be applied in the field. This method does not involve removing the door system from the rough opening and takes approximately one hour. This is a simple, easy to learn procedure with all the necessary tools obtainable in any hardware store. We have found that the “fix” is permanent.
The exact procedure may vary by type of sill (inswing/outswing), French or patio door type, wall construction and by operator technique/preference. The procedure is outlined in general terms and can be applied to specific applications. Call the Fenestration Lab at extension 5340 to discuss specifics. This procedure has been developed and used successfully on several job sites around the country.
To fix a door system that leaks water at the sill location, the following steps are required:
Analyze the door system for the specific locations and causes of the leaks.Pay special attention to the manner the sill is leaking:
• Over the top of the saddle: Indicates faulty sealing at the sill; site wind loads greater than the design capacity of the system; or clogged drainage system.
• At the ends of the sill where it meets the jamb: Indicates water escaping through or around the gasket. Check for staining of walls and floors at these locations.
• underneath the sill at any place along its length: Indicates leakage at the mullion post screw or at the extender snap joint. Check for floor wetness or staining.

Schlegel Systems, Inc. 1555 Jefferson Road • P.O. Box 23197 • Rochester, NY 14692-3197 • TEL: 800-586-0354
© 2006 Schlegel Systems, Inc. HYDROSILL is a trademark of Schlegel Systems, Inc. www.schlegel.com28 29
1555 Jefferson Road • P.O. Box 23197 • Rochester, NY 14692-3197 • TEL: 800-586-0354 Schlegel Systems, Inc.
© 2006 Schlegel Systems, Inc. HYDROSILL is a trademark of Schlegel Systems, Inc. www.schlegel.com
FIELD REPAIR HYDROSILL Technical Manual
repair of Hydrosill Threshold Without Extender:
single, double or triple panel door systems — operable panel jamb side:
1. From the exterior side of the HYDROSILL threshold, drill a 1/4" diameter hole in the vertical wall holding the weep cover. (If an extender is attached, all walls of the extender must also be drilled.) Place this hole approximately one half the distance between the weep hole and the jamb. Cover the interior weep hole in the vertical trough wall (can be accessed under the sill weatherstripping) with duct tape to prevent foam from oozing into the drain trough.
2. Remove the weep cover. using an aerosole can of impervious rigid urethane foam, insert the filler tube into the 1/4" hole until the tube touches the back wall (approximately 1 1/2"). Inject foam into the cavity while slowly withdrawing the filler tube. Stop injecting foam at the weep cover wall. Foam should ooze out of the weep hole indicating complete filling of the cavity. The amount of foam needed will depend on the blow of the foam. NOTE: If the nozzle is not long enough to reach completely to the back wall, an extension can be made with a plastic straw.
3. using exterior grade caulk, trowel a thin layer over the exposed area of the end gasket in the drain trough making sure to cover the trough walls. This will encapsulate the end of the trough. For single entry and French Patio Doors, both ends should be sealed by this method.
4. Mullion Post Location. Drill a 1/4" hole in the exterior vertical wall holding the weep cover approximately six inches from each side of the center of the mullion post. The hole on the side
of the operable panel of the sill should only penetrate one wall. Foam the operable panel hole as above. (See Non-Operable Panel Side for instructions on the fixed panel.)
double or Triple door systems — Non-operable Panel side:
5. Mullion Post Location. Drill a 1/4" hole in the exterior vertical wall holding the weep cover approximately six inches from the center of the mullion post as described in #4 above. However, the hole on the side of the non-operable panel should also penetrate through the first wall of the drain trough. Insert the foam filler tube all the way into the trough area. use the same foaming procedure as the Operable Panel Side. This seals off water from entering the sill under the non-operable panel.
6. Jamb Side. Drill hole as described in #1 except continue through to drain trough area. Foam as above making sure to get foam in the drain trough. use caution not to overfill the drain trough area causing the foam to run over the saddle into the interior.
7. Caulk exterior weather sealing perimeter of non-operable panel, including sill seal, to prevent any water from draining into trough.
HYDROSILL Technical Manual FIELD REPAIR
repair of Hydrosill Threshold With Extender:
Previous repair can be used for extender systems. Simply include the extender area as part of the HYDROSILL threshold making sure to back out foam filler tube slowly into the extender cavity.(See #1. previous page.)
If the leak is occurring at the extender snap joint, there is no known suitable repair without removing the door system. However, the above method should greatly reduce the water penetration and prevent water from staining the jambs.
All Hydrosill Threshold systems:
Allow foam to cure for 24 hours or until rigid and dry before cleaning excess foam which has oozed into areas or surfaces that are visible or not intended to be filled.
using a 3/16" drill bit, drill a hole through the existing weep holes through the foam. Make sure the hole is approximately 1" X 3/16". Replace weep hole covers and test sill system.
Test by pouring water from a hose into the drain trough. Be careful not to overrun channel. Allow the water to run for 15 minutes observing the ends and the mullion post locations of the sill. If no water is observed, the sill is fixed. If water is visible, call the Fenestration Lab at extension 5340 for further assistance.