Embed Size (px)
Citation preview

Network Video Recorder Standard HAW-SIBU June 24, 2018 NVMSTG009 Revision 1.3.1
Technical Guide | Network Video Recorder Standard Edition
Maintenance Guide

Sony Network Video Recorder Standard HAW-SIBU
Technical Guide | Network Video Recorder Standard Edition
Maintenance Guide
1
C O N T E N T S
1. Overview ......................................................................................... 3 1.1. About This Document .......................................................................... 3 1.2. Related Documents ............................................................................. 3
2. Data Backup ................................................................................... 4 2.1. Backup Procedure ............................................................................... 6 2.2. System Image Backup ........................................................................ 8 2.3. Backup of Alarm and Map Configuration ........................................... 12
3. Reinstalling Software ................................................................... 13 3.1. Overview ........................................................................................... 13 3.2. Preparation ........................................................................................ 14 3.3. Creating USB Installer ....................................................................... 15 3.4. Clean Installation ............................................................................... 17 3.5. Recovery Installation ......................................................................... 20 3.6. Clean Format of USB Installer ........................................................... 23
4. Updating ........................................................................................ 24 4.1. HAW-S server version-up installation ................................................ 24 4.2. Device Pack ...................................................................................... 24
5. RAID Configuration Tool .............................................................. 25 5.1. Logging into RAID Configuration Tool ............................................... 25 5.2. Using the RAID Configuration Tool Interface ..................................... 28 5.3. Selecting the Display Language ........................................................ 30 5.4. Viewing the Event Frame .................................................................. 31 5.5. Logging out of RAID Configuration Tool ............................................ 31 5.6. Subsystem Management ................................................................... 32 5.7. Background Activities ........................................................................ 33 5.8. Managing the Background Activity Settings ...................................... 35 5.9. Managing Activity Schedules ............................................................. 39 5.10. Event Logs ........................................................................................ 39 5.11. Administrative Tools .......................................................................... 40 5.12. User Management ............................................................................. 42 5.13. Creating Users .................................................................................. 44 5.14. Viewing Network Settings .................................................................. 45 5.15. Software Management ...................................................................... 46

Sony Network Video Recorder Standard HAW-SIBU
Technical Guide | Network Video Recorder Standard Edition
Maintenance Guide
2
5.16. Email Service .................................................................................... 49 5.17. Performance Monitoring .................................................................... 51 5.18. Controllers ......................................................................................... 53 5.19. Enclosures ......................................................................................... 57 5.20. Physical Drives .................................................................................. 59 5.21. Disk Arrays and Logical Drives .......................................................... 61 5.22. Spare Drives ...................................................................................... 64 5.23. Logical Drive Summary ..................................................................... 65
6. System Expansion ....................................................................... 66 6.1. Adding a Network Video Recorder .................................................... 66
7. Event Notifications ....................................................................... 67 7.1. Hardware Events ............................................................................... 67 7.2. Buzzer ............................................................................................... 76
8. Other Settings .............................................................................. 77 8.1. SNMP ................................................................................................ 77 8.2. UPS ................................................................................................... 80 8.3. External Storage ................................................................................ 81 8.4. Teaming ............................................................................................. 83
9. Troubleshooting ........................................................................... 86 9.1. Startup Is Disabled ............................................................................ 86 9.2. Warning Appears during Startup ....................................................... 87 9.3. Message Appears during Startup ...................................................... 87 9.4. Error during Operation ....................................................................... 88 9.5. HDD Is Defective or in the State of Connection Failure .................... 90 9.6. One HDD Is Defective or in the State of Connection Failure
(System is functioning) ...................................................................... 91 9.7. One or More HDDs Are Defective or in the State of
Connection Failure (System is not functioning) ................................. 93 9.8. Operation of RAID Configuration Tool ............................................... 94 9.9. RAID .................................................................................................. 98
10. Miscellaneous Information ........................................................ 100 10.1. Third Party Software Terms and Conditions .................................... 100
Revision History ............................................................................... 113

Sony Network Video Recorder Standard HAW-SIBU
Technical Guide | Network Video Recorder Standard Edition
Maintenance Guide
3
1. Overview
1.1. About This Document
This document is a maintenance guide summarizing the information required when operating Network Video Recorder Standard Edition. It describes how to back up and reinstall the software.
1.2. Related Documents
In addition to this document, the following documents are provided on the Web. Download the necessary documents from the following URL.
• NVMS Standard Edition Administrator Manual • NVMS Standard Edition Installation Manual https://www.sony.net/CameraSystem/NVMS/Manuals

Sony Network Video Recorder Standard HAW-SIBU
Technical Guide | Network Video Recorder Standard Edition
Maintenance Guide
4
2. Data Backup
This chapter describes how to back up the data on the C drive to a fault-tolerant RAID area. The following data is target for backup. Windows operating system data Configuration data of RAID Configuration Tool Configuration data of surveillance software Alarm and map data of surveillance software System, Event, and Audit log data of surveillance software
To back up this data, the following needs to be backed up. System image file All of the above backup target data are backed up by capturing an
image of all of the data on the C drive. Database file containing the alarms and maps of the surveillance software The data containing the alarms and maps of the surveillance software
is stored in the database of SQL Server. The data can also be backed up by creating a system image but Sony recommends also that a backup be performed periodically so that the transaction log of SQL Server does not become large.
System, Event, and Audit log data of surveillance software This data is stored on the C drive by default. The data can also be
backed up by creating a system image but since backup by system image is only performed when settings have been changed, any data created after the backup will be lost in the event that the C drive fails. Therefore, Sony recommends changing the save path for the log data to the D drive. For how to change the save path, refer to the NVMS Standard Edition Administrator Manual.
Perform the first backup after completing the initial setup described in the NVMS Standard Edition Installation Manual and then periodically perform a backup manually of the database files containing the alarms and maps of the surveillance software during operation. Furthermore, perform a system image backup when settings other than the settings of alarm and map data of the surveillance software are changed.

Sony Network Video Recorder Standard HAW-SIBU
Technical Guide | Network Video Recorder Standard Edition
Maintenance Guide
5
Note: The recording data is saved to the D drive so the recording data of the
cameras registered when a system image is saved can also be viewed after restoring the system image.

Sony Network Video Recorder Standard HAW-SIBU
Technical Guide | Network Video Recorder Standard Edition
Maintenance Guide
6
2.1. Backup Procedure
2.1.1. When Initial Setup Completed
*1: For how to change the save path, refer to the NVMS Standard Edition Administrator Manual.
Change save destination of System,
Event, and Audit log data of
surveillance software*1
Start
End
Perform system image backup (Refer to section 2.2)

Sony Network Video Recorder Standard HAW-SIBU
Technical Guide | Network Video Recorder Standard Edition
Maintenance Guide
7
2.1.2. When Operating
When performing a periodic backup manually during operation, perform the procedure in the following flow diagram.
When settings other than the settings of the alarm and map data of the surveillance software have been changed, perform the backup as described in the following flow diagram.
Perform system image
backup (Refer to section 2.2)
Start
End
Start
End
Perform backup of alarm and
map configuration (Refer to section 2.3)

Sony Network Video Recorder Standard HAW-SIBU
Technical Guide | Network Video Recorder Standard Edition
Maintenance Guide
8
2.2. System Image Backup
Create and save an image containing the data of the C drive that has the surveillance software installed. This will allow you to restore the configuration of the surveillance software from the time the system image was saved in the event that the data on the C drive is damaged.
2.2.1. Preparation
The system image will be saved to the D drive. Before performing a system image backup, check that there is at least 150 GB of free space on the D drive.
2.2.2. Creating a Virtual Hard Disk (VHD)
1. Right-click [Computer] in the Start menu and then click [Manage].
Computer Management opens.
2. Click [Disk Management].
3. Right-click [Disk Management] and then click [Create VHD].
The [Create and Attach Virtual Hard Disk] dialog box appears.
4. Enter “D:\backup.vhd” in [Location].
Note: You can also use the [Browse…] button to select a drive and specify a file.
Caution: The location name must be “D:\backup.vhd”. Inputting the wrong location
name may result in failing to restore a system image.

Sony Network Video Recorder Standard HAW-SIBU
Technical Guide | Network Video Recorder Standard Edition
Maintenance Guide
9
5. Set [Virtual hard disk size] to 100 GB.
6. Click [OK].
Creation of the VHD starts. You can check the progress in the status bar. After the creation of the VHD is completed, you will be able to see the new disk [Disk 2] in an uninitialized state.
7. Right-click [Disk2] and then click [Initialize Disk].
8. Click [OK].
After initialization of the disk is completed, you will be able to see that Disk2 is online.
9. Right-click the newly created disk area and then click [New Simple Volume…].

Sony Network Video Recorder Standard HAW-SIBU
Technical Guide | Network Video Recorder Standard Edition
Maintenance Guide
10
10. Click [Next] and then [Finish] without changing any value.
The new partition is created. If the partition is created correctly, it will be in the following state.
2.2.3. Creating a System Image
1. Click the Start button ( ).
2. Click [Control Panel] - [System and Security] - [Backup and Restore].
3. Click [Create a system image].
The [Create a system image] dialog box appears.
4. Make sure to save the backup on the E drive as follows.

Sony Network Video Recorder Standard HAW-SIBU
Technical Guide | Network Video Recorder Standard Edition
Maintenance Guide
11
Caution:
Don’t select D drive to save the backup. Selecting the D drive may result in unstable operation.
5. Click [Next].
6. Click [Next].
7. Click [Start Backup].
The backup starts.
8. Click [No].
9. Click [Close].

Sony Network Video Recorder Standard HAW-SIBU
Technical Guide | Network Video Recorder Standard Edition
Maintenance Guide
12
2.3. Backup of Alarm and Map Configuration
Perform steps 1 and 2 in “Back up and restore alarm and map configuration” of the NVMS Standard Edition Administrator Manual. In the database backup dialog box, save the configuration to the following location. If there is no SQLBackups folder, create a new one.
D:\SQLBackups\VideoOSDB.bak
Perform step 5 in “Back up and restore alarm and map configuration” after the backup.

Sony Network Video Recorder Standard HAW-SIBU
Technical Guide | Network Video Recorder Standard Edition
Maintenance Guide
13
3. Reinstalling Software
3.1. Overview
Use a USB flash memory device to install the software. There are the following two types of software installation.
Clean installation Initialize the unit and install the operating system and application. The unit will be in the factory default state after initialization. This enables installation that is not dependent on the versions of installed software.
Caution: When a clean installation is performed, all of the data is cleared.
Recovery installation When the unit cannot be started up, an application does not run normally, or other problem occurs, recovery is possible by reinstalling the operating system and applications. The data in the RAID is kept as is and the operating system and applications are reinstalled. However, if trouble occurs which results in the files and other data of the unit being damaged, the settings and data may not remain.

Sony Network Video Recorder Standard HAW-SIBU
Technical Guide | Network Video Recorder Standard Edition
Maintenance Guide
14
3.2. Preparation
Personal computer (hereinafter PC) Operating system: Windows 7 or Windows Server 2012 or later Microsoft .NET Framework v4.0 or later
Monitor USB keyboard USB mouse USB flash memory device (with capacity of at least 16 GB)
Caution: When installation is performed, all of the data stored in the USB flash
memory device is cleared. Be sure to make a backup of any necessary data before the installation.
To delete the installer image in the USB memory device after installation, refer to section 3.6 and then perform a clean format.
Bootable disk creator (Image Writer) File name: NVMS_ImageWriter_NVR_V[x_x_x].zip (where [x_x_x] is
the version number) Download from the following site.
https://www.sony.net/CameraSystem/NVMS/Software Bootable disk image Download from the following site.
https://www.sony.net/CameraSystem/NVMS/Software Installer image for clean installation
NVMS_Standard_InstallationImage_NVR_[xxxx_xx(xx.xx)]_V[x_xx_xxxx_xx].img (where [xxxx_xx(xx.xx)] and [x_xx_xxxx_xx] is the version number)
Bootable disk image for restoring system-image-backup NVMS_Recovery_Restoration_Bootable_Image_NVR_V[x_xx_xxxx_xx].img (where [x_xx_xxxx_xx] is the version number)
For the installer image for a clean installation, download the software version you are used to using.

Sony Network Video Recorder Standard HAW-SIBU
Technical Guide | Network Video Recorder Standard Edition
Maintenance Guide
15
3.3. Creating USB Installer
1. Copy “NVMS_ImageWriter_NVR_V[x_x_x].zip” to the PC.
2. Extract “NVMS_ImageWriter_NVR_V[x_x_x].zip”. “NVMS_ImageWriter_NVR_V[x_x_x].exe” is created.
3. Copy the installer image for a clean installation or recovery installation to the PC.
4. Connect the USB flash memory device to the PC.
5. Double-click “NVMS_ImageWriter_NVR_V[x_x_x].exe”. The User Account Control warning dialog box appears.
6. Click [Yes].
The following dialog box appears.
7. Select the drive of the USB flash memory device in the [Select USB drive] pull-down menu.
8. Click [Select Image] and then select the installer image that was copied to a local location in step 3.
9. Select the [Verify data (Require more time)] check box.
10. Click the [Write!] button.

Sony Network Video Recorder Standard HAW-SIBU
Technical Guide | Network Video Recorder Standard Edition
Maintenance Guide
16
11. Click the [Yes] button.
Writing to the USB flash memory device is executed. When the progress bar indicates 100% and writing ends normally, the “Flash success!” message appears.
12. Click the [OK] button.
13. Disconnect the USB flash memory device.
Proceed to the clean installation or recovery installation procedure.

Sony Network Video Recorder Standard HAW-SIBU
Technical Guide | Network Video Recorder Standard Edition
Maintenance Guide
17
3.4. Clean Installation
1. Check that the power of the unit is off.
2. Connect the USB installer to the unit and then turn on the power of the unit.
The following screen appears.
Caution: If the screen above does not appear, there may be a problem with the
installer. Replace the USB installer with another one and then try again.
3. Press the [c] key on the keyboard.
4. Press the [y] key on the keyboard.
5. Press the [y] key on the keyboard again.
6. When the following screen appears, select the RAID mode.
# Welcome to Storage Appliance target installation-usb[J1900] # Ver: 0.01.2060.03 # OS: Windows Embedded Standard 7 c. Clean All And Full Install. i. Install OS and keep RAID disk data. Please select [ex: c]?
# Welcome to Storage Appliance target installation-usb[J1900] # Ver: 0.01.2060.03 # OS: Windows Embedded Standard 7 1. create RAID_5.[default] 2. create NO_RAID. 3. create RAID_1+0. 4. create RAID_5+HotSpare. 5. create RAID_6. Select the raid mode?[ex: 1] Press any key to stop count down. 17

Sony Network Video Recorder Standard HAW-SIBU
Technical Guide | Network Video Recorder Standard Edition
Maintenance Guide
18
Caution: If the RAID mode is not selected within 30 seconds, installation will be
performed using the standard RAID mode. If only one HDD is installed, this step is skipped.
Updating of the BIOS and installing of the operating system on the HDD are performed. (This work takes several minutes.)
7. When “The BIOS will be updated from USB drive after the reboot” appears, press the [SPACE] key on the keyboard.
The unit reboots automatically. After the reboot, updating of the BIOS starts automatically. After updating of the BIOS ends, the screen of step 1 appears so configure the settings again from step 1.
Note: If updating of the BIOS is not required, this step is skipped automatically.
Caution: Do not disconnect the USB installer.
8. When “Press ‘SPACE’ Key to shutdown” appears, disconnect the USB installer and press the [SPACE] key on the keyboard.
The unit shuts down.
9. Start up the unit again.
10. Log in to RAID Configuration Tool.
For how to log in, refer to the NVMS Standard Edition Installation Manual.
11. Open [Home] - [Subsystems] - [localhost] - [Controllers] in the tree in the RAID Configuration Tool screen and click [Controller 1].
Check that the value of Install Pkg Version on the Installation tab matches the installed version.

Sony Network Video Recorder Standard HAW-SIBU
Technical Guide | Network Video Recorder Standard Edition
Maintenance Guide
19

Sony Network Video Recorder Standard HAW-SIBU
Technical Guide | Network Video Recorder Standard Edition
Maintenance Guide
20
3.5. Recovery Installation
Restore system from system image
(Refer to section 3.5.1)
Restored?
Start
Perform clean installation
(Refer to section 3.4)
End
Yes
Is there a backup of the alarm
and map configuration file?
(Refer to section 3.5.2)
Restore alarm and map
configuration
(Refer to section 3.5.3)
Yes
No
No

Sony Network Video Recorder Standard HAW-SIBU
Technical Guide | Network Video Recorder Standard Edition
Maintenance Guide
21
3.5.1. Restoring System from System Image
1. Check that the power of the unit is off.
2. Connect the USB installer created in section 3.3 to the unit and then turn on the power of the unit.
3. Click the [Next>] button.
4. Select [Restore your computer using a system image that you created earlier.] and then click the [Next>] button.
5. Click the [Next>] button.
6. Click the [Next>] button.
7. Disconnect the USB installer from the unit and then click the [Finish] button.
8. Click the [Yes] button.

Sony Network Video Recorder Standard HAW-SIBU
Technical Guide | Network Video Recorder Standard Edition
Maintenance Guide
22
Restoring from the system image starts. After system restoration, the unit reboots automatically.
3.5.2. Checking Whether Backup Files Exist
1. Check whether or not the following backup data file exists. Backup Data Location
Alarm and map configuration database
of surveillance software
D:\SQLBackups\VideoOSDB.bak
2. Check whether or not the following system image folder exists.
D:\WindowsImageBackup
3. Compare the creation dates and times of the backup data files and the date and time of the system image folder, and if the creation dates and times of the backup data files are more recent, restore the backup data files.
3.5.3. Restoring Alarm and Map Configuration of Surveillance Software
Perform steps 1, 4, and 5 in “Back up and restore alarm and map configuration” of the NVMS Standard Edition Administrator Manual. Use the following backup file.
D:\SQLBackups\VideoOSDB.bak

Sony Network Video Recorder Standard HAW-SIBU
Technical Guide | Network Video Recorder Standard Edition
Maintenance Guide
23
3.6. Clean Format of USB Installer
To use the USB flash memory device used as each tool for another application, perform a clean format of the USB flash memory device.
1. Connect the USB installer to the PC.
2. Double-click “NVMS_ImageWriter_NVR_V[x_x_x].exe”.
The User Account Control warning dialog box appears.
3. Click [Yes].
The following dialog box appears.
4. Select the drive of the connected USB installer in the [Select USB drive] pull-down menu.
5. Select the [Perform quick format] check box.
Caution: If [Perform quick format] is not selected, a standard format will be
performed and it will take a while to complete.
6. Click the [Reset] button.
A clean format is performed. When the clean format is finished, the “Reset USB success!” message appears.
7. Click the [OK] button.

Sony Network Video Recorder Standard HAW-SIBU
Technical Guide | Network Video Recorder Standard Edition
Maintenance Guide
24
4. Updating
4.1. HAW-SIBU server version-up installation
Refer to an appropriate installation manual(s).
4.2. Device Pack
The version of Device Pack is periodically updated. Therefore, Sony recommends checking the latest version of Device Pack periodically, and updating the version whenever a new version of Device Pack is released. For how to check the version of Device Pack and how to install Device Pack, refer to the NVMS Standard Edition Installation Manual.

Sony Network Video Recorder Standard HAW-SIBU
Technical Guide | Network Video Recorder Standard Edition
Maintenance Guide
25
5. RAID Configuration Tool
This chapter describes using RAID Configuration Tool to monitor and manage your RAID system.
5.1. Logging into RAID Configuration Tool
You can log into RAID Configuration Tool in either of two ways: • “Logging in at the Enclosure” • “Logging in over the Network”
5.1.1. Logging in at the Enclosure
To log into RAID Configuration Tool at the Network Video Recorder enclosure, do one of the following: • Double-click the RAID Configuration Tool icon on the desktop. • Choose RAID Configuration Tool in the Windows Programs menu. • Perform the steps in “Logging in over the Network”.
Note: The default IP settings for the Gigabit Ethernet ports are:
Port 1 = 192.168.0.1 Port 2 = 192.168.1.1
For how to change the IP addresses, refer to the NVMS Standard Edition Installation Manual.
5.1.2. Logging in over the Network
You can log into RAID Configuration Tool from any PC that can connect to the Network Video Recorder enclosure via the network.
1. Launch your browser.
2. In the address field of the browser, type the information provided below. Then, press Enter. Note that this example uses the default IP address for port 1.
Connection 1 • RAID Configuration Tool using an HTTP connection: http:// • Enter the subsystem IP address: 192.168.0.1
Sony Network Video Recorder Standard HAW-SIBU
Technical Guide | Network Video Recorder Standard Edition
Maintenance Guide
26
• Enter the port number: 8090 Together, input should look like this: http://192.168.0.1:8090
Connection 2 • RAID Configuration Tool using a secure HTTP connection: https:// • Enter the subsystem IP address: 192.168.0.1 • Enter the port number: 8443 Together, input should look like this: https://192.168.0.1:8443/
Note: Even if you connect with connection 1, you will be redirected to connection
2 after login. You can enter the host Network Video Recorder’s network name instead of
the IP address. If you are logging in at the host Network Video Recorder, you can enter local
host instead of the IP address.
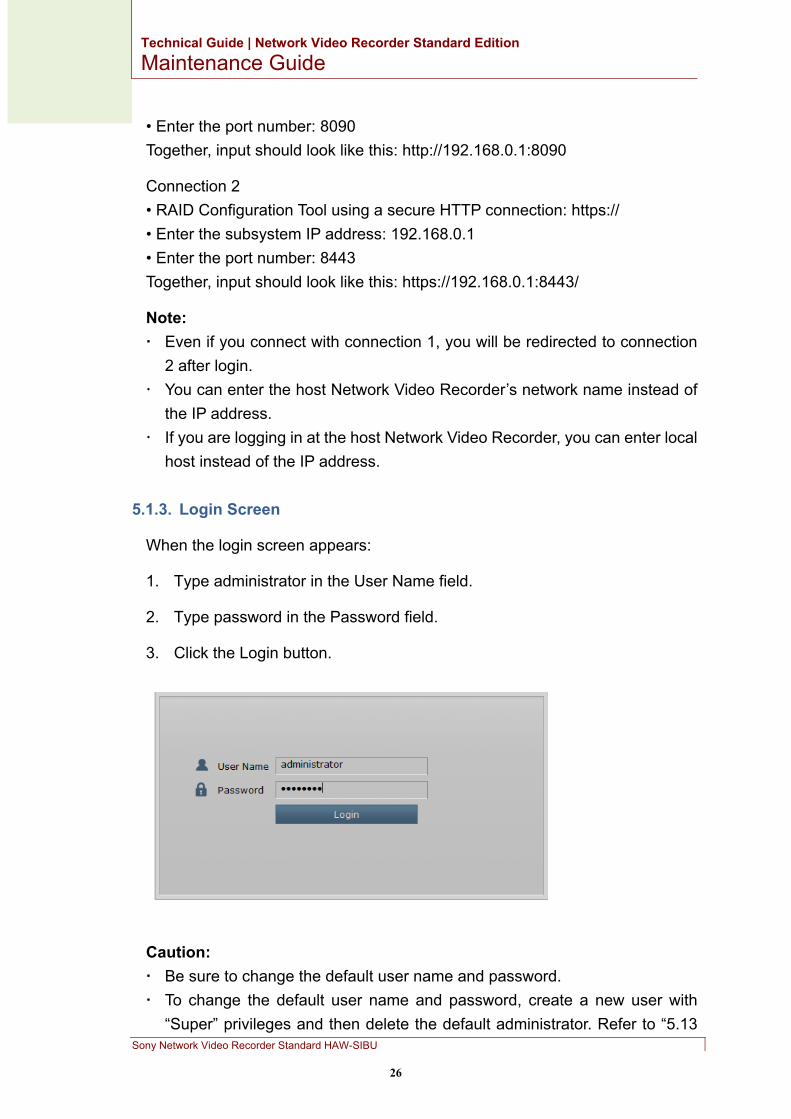
5.1.3. Login Screen
When the login screen appears:
1. Type administrator in the User Name field.
2. Type password in the Password field.
3. Click the Login button.
Caution: Be sure to change the default user name and password. To change the default user name and password, create a new user with
“Super” privileges and then delete the default administrator. Refer to “5.13

Sony Network Video Recorder Standard HAW-SIBU
Technical Guide | Network Video Recorder Standard Edition
Maintenance Guide
27
Creating Users” for how to create a user, and “5.13.2 Deleting Users" for how to delete a user.
After you log in, the Quick Links menu appears.
5.1.4. Quick Links Menu
The Quick Links menu is the administrator’s home page for RAID Configuration Tool. Here you will find links to menus to view settings and manage logical drives, physical drives, and disk arrays, as well as links to view network settings and event logs, and the background activities management menu.

Sony Network Video Recorder Standard HAW-SIBU
Technical Guide | Network Video Recorder Standard Edition
Maintenance Guide
28
5.2. Using the RAID Configuration Tool Interface
RAID Configuration Tool is browser-based RAID management software with a graphic user interface. This section describes the basic user interface components and functions.
There are three major parts to the RAID Configuration Tool interface: • Menu bar • Tree view • Event frame
5.2.1. Using the Menu Bar
The menu bar contains the following items: Language: Displays the Language menu for selecting a display language. View: Displays the event frame. Storage Network: Displays the event log frame. Logout: Logs out. Help: Displays the Help menu. About: Displays the graphical user interface version.
5.2.2. Using the Tree View
The tree view enables you to navigate around all components of the Network Video Recorder enclosure, software management, RAID controller, enclosure, physical drives, disk arrays, logical drives, and spare drives. The figure below shows the components of the tree view.

Sony Network Video Recorder Standard HAW-SIBU
Technical Guide | Network Video Recorder Standard Edition
Maintenance Guide
29
The Administrative Tools section for the administrator and super users is different from that for the other users. The rest of the tree is the same for all users.
5.2.3. Using the Management View
The management view displays information and setting menus according to the item selected in the tree view. It presents the user interface for the Network Video Recorder enclosure, including for the creation, maintenance, deletion, and monitoring of disk arrays and logical drives. Function tabs allow you to access menus to control specific actions and processes. Click the Help link on the right of the tabs in the management view to access the online help for the function currently displayed.
Logged-in User
Network Video Recorder

Sony Network Video Recorder Standard HAW-SIBU
Technical Guide | Network Video Recorder Standard Edition
Maintenance Guide
30
5.3. Selecting the Display Language
RAID Configuration Tool supports the following display languages. • English • Simplified Chinese • Traditional Chinese • French • German • Italian • Japanese • Korean • Spanish • Russian • Arabic • Turkish
To change the display language:
1. Click Language in the menu bar.
2. Select the language you prefer.
RAID Configuration Tool switches the display language to the selected language.

Sony Network Video Recorder Standard HAW-SIBU
Technical Guide | Network Video Recorder Standard Edition
Maintenance Guide
31
5.4. Viewing the Event Frame
To view the event frame, click Show Event Frame in the menu bar. To hide the event frame, click Hide Event Frame in the menu bar. In the event frame, events are listed and sorted as follows. Device: Disk array, logical drive, physical drive, controller, etc. Event ID: The hexadecimal number that identifies the specific type of
event Severity: See below:
• Information: Information only, no action is required • Warning: User can decide whether or not action is required • Minor: Action is required but the condition is not serious at this time • Major: Action is required now • Critical: Action is required now and the implications of the condition are
serious • Fatal: Non-Recoverable error or failure has occurred
Time: Time and date of the occurrence Description: Brief description of the event
You can also view events by clicking the Subsystem icon in the tree view, then clicking the Event tab in the management view.
5.5. Logging out of RAID Configuration Tool
You can log out of RAID Configuration Tool in either of two ways: • Close your browser window • Click Logout in the menu bar in RAID Configuration Tool Clicking Logout brings you back to the Login Screen. After logging out, you must enter your user name and password in order to log in again.

Sony Network Video Recorder Standard HAW-SIBU
Technical Guide | Network Video Recorder Standard Edition
Maintenance Guide
32
5.6. Subsystem Management
The menus listed under Subsystems are all the menus used for device management. Click the Subsystems icon to view read-only information including Alias, Vender, Model, and so on. You can also save a system service report (useful for troubleshooting) in the form of an HTML file to the computer you are using by clicking the Save button. See “Saving a Service Report”. The Subsystem home menu includes the following function tabs: Information (described above) Settings (assign an Alias) Event (lists runtime and NVRAM events) Background Activities Scheduler (schedule background activities) Lock (lock/unlock subsystem)
Sony Network Video Recorder Standard HAW-SIBU
Technical Guide | Network Video Recorder Standard Edition
Maintenance Guide
33
5.7. Background Activities
Background activities perform a variety of preventive and remedial functions on your physical drives, disk arrays, logical drives, and other components. You can run a background activity immediately or schedule it to run at a later time. Setting options for each activity are listed after the scheduling options. These settings determine how the background activity affects I/O performance.
5.7.1. Viewing the Current Background Activities
To view the current background activities:
1. Click the subsystem icon of the subsystem for which you want to view background activities.
2. In the Subsystem menu, click the Background Activities tab. The background activities that are currently running are displayed in the top part of the menu. You can also view the current background activity parameter settings in the lower part of the menu. Click the Background Activity Parameters menu expander to view the current parameter settings.
5.7.2. Viewing Background Activity Parameter Settings
To view the current background parameter settings:
1. Click the Subsystem icon of the subsystem for which you want to view background activities.
2. Click the Background Activity Parameters menu expander to view the current parameter settings. The parameters listed are as follows: • Rebuild Rate • Background Synchronization Rate • Logical Drive Initialization Rate • Redundancy Check Rate • Migration Rate • PDM Rate • Transition Rate • Reassigned Block Threshold • Error Block Threshold • Media Patrol

Sony Network Video Recorder Standard HAW-SIBU
Technical Guide | Network Video Recorder Standard Edition
Maintenance Guide
34
• Auto Rebuild • Last Media Patrol Start Time • Last Media Patrol Stop Time
Caution: Background Synchronization Rate, Redundancy Check Rate, and
Migration Rate are not used. Therefore, changing the settings will have no effect on operation.

Sony Network Video Recorder Standard HAW-SIBU
Technical Guide | Network Video Recorder Standard Edition
Maintenance Guide
35
5.8. Managing the Background Activity Settings
The parameters listed in the Background Activities menu are configured in the Background Activities Settings menu. To change the background activity settings, click the Subsystem icon of the subsystem for which you want to view background activities. Click the menu expander between the Background Activities tab and the Scheduler tab and select the Settings option. The following settings can be configured: • Rebuild Rate: High, Medium, Low • Background Synchronization Rate: High, Medium, Low • Logical Drive Initialization Rate: High, Medium, Low • Redundancy Check Rate: High, Medium, Low • Migration Rate: High, Medium, Low • PDM Rate: High, Medium, Low • Transition Rate: High, Medium, Low • Reassigned Block Threshold • Error Block Threshold • Enable Media Patrol • Enable Auto Rebuild
These settings can also be scheduled using Scheduler. See the instructions on using schedules after the parameters descriptions below.
Caution: Background Synchronization Rate, Redundancy Check Rate, and
Migration Rate are not used. Therefore, changing the settings will have no effect on operation.
5.8.1. Rebuild Setting
To change the Rebuild setting in the Background Activities Settings menu:
1. Select a rate from the Rebuild Rate drop-down menu. Low: Allocates fewer system resources to rebuilding, and more to data
read/write operations. Medium: Balances the system resources between rebuilding and data
read/write operations. High: Allocates more system resources to rebuilding, and fewer to data
read/write operations.

Sony Network Video Recorder Standard HAW-SIBU
Technical Guide | Network Video Recorder Standard Edition
Maintenance Guide
36
2. To enable Auto Rebuild (rebuilds when you swap out the failed drive with a new one), select the Enable Auto Rebuild check box.
3. Click the Submit button.
Rebuild Rate
When you rebuild a disk array, you are actually rebuilding the data on one physical drive. When a physical drive in a disk array fails and a spare drive of adequate
capacity is available, the disk array begins to be rebuilt automatically using the spare drive.
If there is no spare drive of adequate capacity even though the Auto Rebuild function is enabled, the disk array begins to be rebuilt automatically as soon as you remove the failed physical drive and install an unconfigured physical drive in the same slot.
If there is no spare drive of adequate capacity and the Auto Rebuild function is disabled, you must replace the failed drive with an unconfigured physical drive, and then perform a manual rebuild.
5.8.2. Logical Drive Initialization
Technically speaking, initialization is a foreground activity, as you cannot access a logical drive while it is initializing. Initialization is normally done to logical drives after they are created from a disk array. Initialization sets all data bits in the logical drive to zero. The action is useful because there may be residual data on the logical drives left behind from earlier configurations. For this reason, initialization is recommended whenever you create a logical drive.
Logical Drive Initialization Rate
To change the Logical Drive Initialization Rate setting in the Background Activities Settings menu:
1. Click the Logical Drive Initialization Rate drop-down menu and select a rate. Low: Allocates fewer system resources to initialization, and more to
data read/write operations. Medium: Balances system resources between initialization and data
read/write operations. High: Allocates more system resources to initialization, and fewer to

Sony Network Video Recorder Standard HAW-SIBU
Technical Guide | Network Video Recorder Standard Edition
Maintenance Guide
37
data read/write operations.
2. Click the Submit button.
5.8.3. PDM
Predictive Data Migration (PDM) is the migration of data from the suspect physical drive to a spare drive, and is similar to rebuilding a logical drive. But unlike Rebuilding, PDM constantly monitors your physical drives and automatically copies your data to a spare drive before the physical drive fails and your logical drive goes into the critical state.
PDM Settings
To change the PDM setting in the Background Activities Settings menu:
1. Click the PDM Rate drop-down menu and select a rate. Low: Allocates fewer system resources to PDM, and more to data
read/write operations. Medium: Balances system resources between PDM and data read/write
operations. High: Allocates more system resources to PDM, and fewer to data
read/write operations.
2. Highlight the current values in the block threshold fields and input new values. Reassigned Block Threshold range is 1 to 512 blocks. Error Block Threshold range is 1 to 2048 blocks.
3. Click the Submit button.
5.8.4. Transition
Transition is the process of replacing a revertible spare drive that is currently part of a disk array with an unconfigured physical drive or a non-revertible spare drive.
Transition Rate
To change the Transition Rate setting in the Background Activities Settings menu:
1. Click the Transition Rate drop-down menu and select a rate. Low: Allocates fewer system resources to the transition, and more to
Sony Network Video Recorder Standard HAW-SIBU
Technical Guide | Network Video Recorder Standard Edition
Maintenance Guide
38
data read/write operations. Medium: Balances system resources between the transition and data
read/write operations. High: Allocates more system resources to the transition, and fewer to
data read/write operations.
2. Click the Confirm button.
5.8.5. Media Patrol
Media Patrol is a routine maintenance procedure that checks the magnetic media on each disk drive. Media Patrol checks are enabled by default on all disk arrays and spare drives. Media Patrol is concerned with the media itself, not the data recorded on the media. If Media Patrol encounters a critical error, it triggers PDM if PDM is enabled on the disk array.
Media Patrol Settings
Media Patrol can be enabled or disabled in the Background Activities menu. You can also create a schedule to run Media Patrol. • To enable Media Patrol, click Subsystem in the tree view then click the
Background Activities menu tab. Click to check the Enable Media Patrol option. Notice also that the Auto Rebuild option is here as well. If you want to automatically begin rebuilding a logical drive as soon as a faulty drive is replaced, make sure this option is enabled.
• To begin Media Patrol manually, click the menu expander to the right of the Background Activities tab and scroll down and select Start Media Patrol to display the Start Media Patrol menu. Then, click the Start button.
• To schedule Media Patrol, click the menu expander to the right of the Scheduler tab and scroll down and select Add Media Patrol Schedule to open the schedule menu. Use this menu to add a Media Patrol schedule.

Sony Network Video Recorder Standard HAW-SIBU
Technical Guide | Network Video Recorder Standard Edition
Maintenance Guide
39
5.9. Managing Activity Schedules
Schedules for Media Patrol, redundancy check, and spare drive check can be created to run during off peak times.
5.9.1. Adding and Deleting Activity Schedules
To add, enable, or delete an activity schedule, click Subsystem in the tree view, and then click the Scheduler menu expander to the right of the Scheduler tab. Scroll down to the desired schedule option to view that menu. The schedule options are Add Media Patrol Schedule, Add Redundancy Check Schedule, Add Spare Check Schedule, and Delete Schedule.
5.9.2. Viewing and Modifying Existing Activity Schedules
To view existing schedules, including the recurrence, start time, and status of existing schedules, click the Scheduler tab. Here you can then modify any listed schedule by clicking the name of the schedule in the list.
5.10. Event Logs
Event logs are useful for troubleshooting, tracking functions, and monitoring subsystems. To view, save, or clear subsystem event logs, click the subsystem in the tree view, and then click the Event menu expander. Select whether to display runtime events or NVRAM events. Event logs can be saved as a simple text file by clicking the Save button in either menu. To clear the logs and start afresh, click the Clear Event Log button.

Sony Network Video Recorder Standard HAW-SIBU
Technical Guide | Network Video Recorder Standard Edition
Maintenance Guide
40
5.11. Administrative Tools
Click the + of the Administrative Tools icon to display the subsystem administrative tools menu links for User Management, Network Management, Performance Monitoring, and Software Management. The Administrative Tools menu lists text hyperlinks to these same menus, plus links to the Export, Import, Restore Factory Default settings, Clear Statistics, Save System Service Report, and Configuration of Windows Logs menus.
5.11.1. Restoring Factory Default Settings
To restore any of the firmware and software settings to the default values:
1. Click the Administrative Tools icon.
2. Click the Restore Factory Defaults link to display a new menu.
3. Select the option check boxes for the settings you want to return to the factory default values. Default Settings options include:
Firmware Factory Default Settings • Background Activity Settings • Controller Settings • Enclosure Settings • Physical Drive Settings • Subsystem Settings
Software Default Settings • Service Settings • Web Server Settings • Email Settings • User Settings
4. Click the Submit button to return the selected settings to the default values. To deselect all options and start over, click the Reset button.
5.11.2. Clearing Statistics
To clear all subsystem statistics for controllers, port physical drives, and logical drives:
1. Click the Administrative Tools icon.
2. Click the Clear Statistics link to display a new menu.

Sony Network Video Recorder Standard HAW-SIBU
Technical Guide | Network Video Recorder Standard Edition
Maintenance Guide
41
3. Click the Submit button to clear all device statistics.

Sony Network Video Recorder Standard HAW-SIBU
Technical Guide | Network Video Recorder Standard Edition
Maintenance Guide
42
5.12. User Management
User management deals with user accounts.
5.12.1. Viewing User Information
To view a list of users and their statuses, access privileges, display names, and email addresses:
1. Click the Administrative Tools icon.
2. Click the User Management icon.
The Information tab appears in the management view.
Configuring User Settings
To change the settings of other users:
1. Log into RAID Configuration Tool as the administrator or super user.
2. Click the Administrative Tools icon.
3. Click the User Management icon.
4. Click the Information tab.
5. In the list of users, click the link of the user whose settings you want to change.
The Settings screen for the selected user appears.
6. Enter or change the settings for the user. • Enable/disable this user • Display name • Email • Privilege.
7. Click the Submit button.
The administrator or super user can change another user’s password.

Sony Network Video Recorder Standard HAW-SIBU
Technical Guide | Network Video Recorder Standard Edition
Maintenance Guide
43
5.12.2. Configuring Your Own User Settings
To change your own user settings:
1. Log into RAID Configuration Tool under your own user name.
2. Click the Administrative Tools icon.
3. Click the User Management icon.
4. Click the Settings tab in the management view.
5. Enter or change the display name or email address.
6. Click the Submit button.
5.12.3. Changing Your Own Password
To set or change your own password:
1. Log into RAID Configuration Tool under your own user name.
2. Click the Administrative Tools icon.
3. Click the User Management icon.
4. Click the Password tab in the management view.
5. Enter the current password in the Old Password field.
6. If you do not have a password, leave this field blank.
7. Enter the new password in the New Password field.
8. Enter the new password in the Retype Password field.
9. Click the Submit button.

Sony Network Video Recorder Standard HAW-SIBU
Technical Guide | Network Video Recorder Standard Edition
Maintenance Guide
44
5.13. Creating Users
To create a user:
1. Log into RAID Configuration Tool as the administrator or super user.
2. Click the Administrative Tools icon.
3. Click the User Management icon.
4. Click the Create tab in the management view.
5. Enter a user name in the User Name field.
6. Enter a password for this user in the New Password and Retype Password fields. A password is optional. If you do not assign a password, tell the user to leave the password field blank when logging into RAID Configuration Tool.
7. Enter a display name in the Display Name field. A display name is optional but recommended.
8. Enter an email address in the Email field.
9. Choose a privilege level from the Privilege drop-down menu. For definitions of each privilege level, see “List of User Privileges” below.
10. Select the Enabled check box to enable this user on this subsystem.
11. Click the Submit button.
5.13.1. List of User Privileges
• View: Allows the user to see all statuses and settings but not to make any changes.
• Maintenance: Allows the user to perform maintenance tasks including rebuilding, PDM, Media Patrol, and redundancy check.
• Power: Allows the user to create (but not delete) disk arrays and logical drives, change the RAID level, change the stripe size, and change settings of components such as the disk arrays, logical drives, physical drives, and controller.
• Super: Allows the user full access to all functions including creating and deleting users and changing the settings of other users, as well as deleting disk arrays and logical drives. The default “administrator” account is a super user.

Sony Network Video Recorder Standard HAW-SIBU
Technical Guide | Network Video Recorder Standard Edition
Maintenance Guide
45
5.13.2. Deleting Users
There is always at least one super user account. You cannot delete the user account you used to log in. To delete a user:
1. Log into RAID Configuration Tool as the administrator or super user.
2. Click the Administrative Tools icon.
3. Click the User Management icon.
4. Click the Delete tab in the management view.
5. Select the check box to the left of the user you want to delete.
6. Click the Submit button.
7. Click OK in the confirmation box.
5.14. Viewing Network Settings
To view the network settings for the Ethernet ports, including the port used for access to RAID Configuration Tool, click the Network Management icon under Administrative Tools. The information listed for each port includes: • If the port is enabled/disabled • If the link is up/down • IP type IPv4/IPv6 • IP address • Subnet mask • MAC address • Maximum port speed
Sony Network Video Recorder Standard HAW-SIBU
Technical Guide | Network Video Recorder Standard Edition
Maintenance Guide
46
5.15. Software Management
The Software Management menu is used to manage settings for email, Web services, and SNMP settings. The email function is used for sending notifications of events. The Web service is used for the remote network connection to the RAID Configuration Tool management interface. This is also where you can export and import configuration script files and user database files.
5.15.1. Importing a Configuration Script
You can write a configuration script to automatically configure your subsystem. The script must be a plain, non-encrypted text file. You can import the script from the host PC and perform the configuration automatically.
Caution: Do NOT attempt to write or modify a configuration script until you receive
guidance from Technical Support. Importing a configuration script overwrites the current settings on your
subsystem.
Alternatively, you can save and export the configuration from one Network Video Recorder subsystem and then import it to other Network Video Recorder systems to automatically configure them. To import a configuration script:
1. Click the Administrative Tools icon.
2. Click the Software Management icon.
3. Click the Import tab in the Service Management menu.
4. Select Configuration Script from the Type drop-down menu.
5. Click the Choose File button and select the configuration script on the host PC.
The file will be listed in the Local File Name row of the menu.
6. Click the Submit button to continue.
The system verifies that the file is a valid configuration script and displays any errors or warnings.
7. Click the Next button.

Sony Network Video Recorder Standard HAW-SIBU
Technical Guide | Network Video Recorder Standard Edition
Maintenance Guide
47
8. Click the OK button.
The configuration script is imported and applied automatically.
5.15.2. Exporting a Configuration Script
You can save and export the configuration from one subsystem, and then import it to other subsystems to automatically configure them. To export a configuration script:
1. Click the Administrative Tools icon.
2. Click the Software Management icon.
3. Click the Export tab in the Service Management menu.
4. Select Configuration Script from the Type drop-down menu.
5. Click the Export button.
6. Select a location on the host PC for the downloaded file and save the file. The file is saved to your PC.
Caution: Do NOT attempt to write or modify a configuration script until you receive
guidance from Technical Support.
5.15.3. Saving a Service Report
A service report is a detailed report covering the configuration and status of all components in your RAID system. A support technician or field engineer might request a service report for the purpose of diagnosis and troubleshooting. To save a system configuration file:
1. Click the Subsystem icon (IP address and device name) in the tree view to open the Subsystem Information display.
2. Click the Save button in the Save System Service Report row of the information display. Information for the report is gathered and compiled. This action takes up to a few minutes, depending on the size of your RAID system.
3. Determine where you want to store the file on the host PC, then click the Save button in the pop-up menu.

Sony Network Video Recorder Standard HAW-SIBU
Technical Guide | Network Video Recorder Standard Edition
Maintenance Guide
48
The report is saved to your host PC as a compressed HTML file.
4. Double-click the report to open it in your default browser.
The service report includes the following topics: • About – Report utility • BBM Info – Bad Block Manager • BGA Info – Status and settings • Buzzer Info • Controller Info • Disk Array Info • Disk Array Dump Info • Disk Array Verbose Info • Enclosure Info • Error Table Info • Event Info - NVRAM • Event Info - Runtime • Logdrv Info – Basic logical drive information • Logdrv Dump Info – Diagnostic information • Logdrv Verbose Info – Full logical drive information • Network Info – Virtual port • Phydrv Info – Basic physical drive information • Phydrv Verbose Info – Full physical drive • SWMGT Info – Software management • Service Setting – Email • Service Setting – Webserver • Spare Info – Basic spare drive information • Spare Dump Info – Diagnostic information • Spare Verbose Info – Full spare Drive information • Statistic Info • Subsysys info • User Info

Sony Network Video Recorder Standard HAW-SIBU
Technical Guide | Network Video Recorder Standard Edition
Maintenance Guide
49
5.16. Email Service
The email service enables the RAID subsystem to send you email messages about events and status changes. By default, the email service is set to Automatic.
5.16.1. Stopping the Email Service
To stop the email service:
1. Click the Administrative Tools icon.
2. Click the Software Management icon.
3. Click Email in Service List of the Service Management menu.
4. Click the Stop button under Service Status -- Email.
5. Click the OK button.
To start the email service after stopping it:
1. Click the Administrative Tools icon.
2. Click the Software Management icon.
3. Click Email in Service List of the Service Management menu.
4. Click the Start button under Service Status -- Email.
5.16.2. Restarting the Email Service
To restart the email service:
1. Click the Administrative Tools icon.
2. Click the Software Management icon.
3. Click Email in Service List of the Service Management menu.
4. Click the Restart button under Service Status -- Email.
5.16.3. Email Settings
To change the email service settings:
1. Click the Administrative Tools icon.

Sony Network Video Recorder Standard HAW-SIBU
Technical Guide | Network Video Recorder Standard Edition
Maintenance Guide
50
2. Click the Software Management icon.
3. Click Email in Service List of the Service Management menu.
4. Make changes to the settings as required:
Under Service Setting -- Email select a startup type: • Automatic: (Default) Starts and runs with the subsystem. • Manual: You start the service when you need it.
Under Email Server Settings • SMTP Server IP address • SMTP Authentication under Email Server Settings If you select “Yes”, the following values need to be entered. SMTP Authentication Username: Required if SMTP authentication is
enabled. SMTP Authentication Password: Required if SMTP authentication is
enabled.
Under Email Content Customization • Email Sender (From) Address: The sender’s name shown in notification
messages. • Email Subject: The subject line of the notification message.
5. Click the Submit button.
5.16.4. Sending a Test Email Message
After the email settings are completed, you can send a test email. To send a test email message, complete the email settings as described above and select the Send A Test Email option check box, then click the Submit button. A test email message is sent to the address you specified.

Sony Network Video Recorder Standard HAW-SIBU
Technical Guide | Network Video Recorder Standard Edition
Maintenance Guide
51
5.17. Performance Monitoring
Performance Monitoring displays real-time performance statistics for logical drives and physical drives. The vertical scale adjusts dynamically to accommodate the statistical data. Since performance is reported in real-time, to see data in the monitor, there must be I/O data activity taking place between the subsystem and the host.
To monitor performance:
1. Click the Administrative Tools icon.
2. Click the Performance Monitoring icon.
3. Click the Information tab for aggregated statistics, or select the Read/Write tab to view specific read and write performance information separately.
4. Under Logical Drive, select the metric you want to see from the Measurement drop-down menu.
Information • Bandwidth in MB/s • I/Os per second • Average latency in ms • Maximum latency in ms • Minimum latency in ms • Cache usage by % • Dirty cache usage by %
Read/Write • Read bandwidth • Write bandwidth • Maximum Write latency in ms • Maximum Read latency in ms • Minimum Write latency in ms • Minimum Read latency in ms • Average Write latency in ms • Average Read latency in ms • Write Reqs • Read Reqs

Sony Network Video Recorder Standard HAW-SIBU
Technical Guide | Network Video Recorder Standard Edition
Maintenance Guide
52
5. Select the check boxes for the logical drives you want to see. • Total of all logical drives • Up to four devices
6. Under Physical Drive, select the metric you want to see from the Measurement drop-down menu.
Information • Bandwidth in MB/s • I/Os per second • Average latency in ms • Maximum latency in ms • Minimum latency in ms
Read/Write • Read bandwidth • Write bandwidth • Maximum Write latency in ms • Maximum Read latency in ms • Minimum Write latency in ms • Minimum Read latency in ms • Average Write latency in ms • Average Read latency in ms • Write Reqs • Read Reqs
7. Select the check boxes for the physical drives you want to see. • Total of all physical drives • Up to four devices • I/Os per second • Minimum Write latency in ms
Since the performance monitor is a real-time display, it does not accumulate information and there is no clear or save function. To save performance statistics for analysis or troubleshooting, save a service report. See “Saving a Service Report”.

Sony Network Video Recorder Standard HAW-SIBU
Technical Guide | Network Video Recorder Standard Edition
Maintenance Guide
53
5.18. Controllers
Click a specific controller in the tree view to display information or statistics for that controller or change its settings. See the following sections. • “Viewing Controller Information” • “Viewing Controller Statistics” • “Controller Settings”
5.18.1. Viewing Controller Information
To view controller information:
1. Click the Controllers icon.
2. Click the icon of the specific controller for which you want to view information.
3. The Information tab displays the basic controller information. The controller information includes: • Controller ID • Alias • Operational Status • Cache Usage • Dirty Cache Usage • Part Number • Serial Number • Hardware Revision • WWN • Install Package Version • Install Package Build Date
4. Click the Advanced Information menu expander to view advanced information. The advanced controller information includes: • Memory Type • Memory Size • Flash Type • Flash Size • Preferred Cache Line Size • Cache Line Size

Sony Network Video Recorder Standard HAW-SIBU
Technical Guide | Network Video Recorder Standard Edition
Maintenance Guide
54
• Coercion Enabled/Disabled* • Coercion Method* • SMART Log Enabled/Disabled* • Write Back Cache Flush Interval* • Enclosure Polling interval • Host Cache Flushing Enabled/Disabled* • Forced Read Ahead Enabled/Disabled* • Spin Down Type • HDD Power Levels* • HDD Idle Time* • HDD Standby Time* • HDD Stopped Time* • Physical Drive Temperature Threshold* • Physical Drive Critical Temperature Threshold* Items with an asterisk (*) are adjustable under Controller Settings.
5.18.2. Viewing Controller Statistics
To view controller statistics:
1. Click the Controllers icon.
2. Click the icon of the specific controller for which you want to view statistics.
3. Click the menu expander located at the top of the Information display menu between the Information and Settings tabs to display the Statistics link.

Sony Network Video Recorder Standard HAW-SIBU
Technical Guide | Network Video Recorder Standard Edition
Maintenance Guide
55
The controller statistics include: • Data Transferred • Read Data Transferred • Write Data Transferred • Errors • Non-Read/Write Errors • Read Errors • Write Errors • I/O Requests • Non-Read/Write IO Requests • Read IO Requests • Write I/O Requests • Statistics Start Time • Statistics Collection Time
5.18.3. Controller Settings
To configure the controller settings:
1. Click the Controllers icon.
2. Click the icon of the specific controller you want to manage.
3. Click the Settings tab.
4. Make changes to the settings as required: • Enter, change, or delete the alias in the Alias field. • SMART Log: Select or clear the check box to enable or disable this
function. • SMART Polling Interval: Enter a value (1 to 1440 minutes) in the field. • Coercion: Select or clear the check box to enable or disable this
function. • Coercion Method: Select a method from the drop-down menu. GBTruncate 10GBTruncate GrpRounding TableRounding
• Write Back Cache Flush Interval: Enter a value (1 to 12 seconds) in the field.
• HDD Power Levels: Select time periods from the drop-down menus. Set the following for the period of time after an HDD has been idle.

Sony Network Video Recorder Standard HAW-SIBU
Technical Guide | Network Video Recorder Standard Edition
Maintenance Guide
56
Power Saving Idle Time: Parks the read/write heads. Power Saving Standby Time: Lowers the disk rotation speed. Power Saving Stopped Time: Spins down the disk (stops rotation).
• Host Cache Flushing: Select or clear the check box to enable or disable this function.
• Forced Read Ahead (cache): Select or disable the check box to enable or disable this function.
• Physical Drive Temperature Threshold: Enter a temperature (50-55°C (122-131°F)) to trigger an event notice and email alert.
• Physical Drive Critical Temperature Threshold: Enter a temperature (58-65ºC (136-149°F)) to trigger system shutdown.
5. Click the Submit button.

Sony Network Video Recorder Standard HAW-SIBU
Technical Guide | Network Video Recorder Standard Edition
Maintenance Guide
57
5.19. Enclosures
The Enclosure menus are used to provide information for and monitor the status about the various components of the enclosure unit. Click a specific enclosure in the tree view or in the Enclosures list to display information or settings menus for that enclosure. See the following sections. • “Enclosure Information” • “Enclosure Temperature Sensor Settings” • “Buzzer Settings” • “Physical Drives”
5.19.1. Locating an Enclosure
To locate an enclosure in the list, click the Locate button. The LED indicators on the front panel of the enclosure will blink for one minute.
5.19.2. Enclosure Information
The Enclosure Information read-only display menu provides key real-time information about the current hardware status of the enclosure. Click the expander buttons to display the current conditions and status of the enclosure, power supplies, fans, temperature sensors, and voltage sensors. Move the cursor over the icons in the virtual enclosure displayed at the top of the menu to see the current status and relevant conditional statistics for the fans, power supplies, and temperature sensors.

Sony Network Video Recorder Standard HAW-SIBU
Technical Guide | Network Video Recorder Standard Edition
Maintenance Guide
58
5.19.3. Enclosure Temperature Sensor Settings
The temperature threshold settings are used to send event notices when the internal temperature reaches a high level. To set the enclosure temperature thresholds, click the enclosure in the tree view, and then click the Settings tab to display the Enclosure Settings menu. There are two thresholds to configure. • Controller Warning Temperature Threshold [90-95°C (194-203ºF)]: If the
enclosure temperature reaches this threshold, a warning message is sent and an event is recorded in the event log.
• Controller Critical Temperature Threshold [100-105°C (212-221ºF)]: If the enclosure temperature reaches this threshold, a warning message is sent and an event recorded is recorded in the event log.
5.19.4. Buzzer Settings
The audible enclosure alarm buzzer can be enabled or disabled. To enable or disable the buzzer, click the enclosure in the tree view, then click the Buzzer menu expander, scroll to Settings and click the Enable Buzzer option check box. Then, click the Submit button.

Sony Network Video Recorder Standard HAW-SIBU
Technical Guide | Network Video Recorder Standard Edition
Maintenance Guide
59
5.20. Physical Drives
The Physical Drives menus are used to view information and statistics about physical hard drives installed in the enclosure and to set the global settings for hard drives. To see the Physical Drives List, expand the individual Enclosure icon in the tree view to display the Physical Drives icon for the enclosure. To display the information for any populated slot, you can expand the Physical Drives icon in the tree view to display links to each slot, click the slot in Physical Drives List, or click the populated slot in the virtual enclosure displayed in the menu.
The information listed for individual physical drives includes:
Physical Drive Information • Physical Drive ID • Location [Enclosure # Slot #] • Alias • Physical Capacity

Sony Network Video Recorder Standard HAW-SIBU
Technical Guide | Network Video Recorder Standard Edition
Maintenance Guide
60
• Configurable Capacity • Used Capacity • Block Size [Bytes] • Operational Status • Configuration Status • Model • Drive Interface • Serial Number • Firmware Version • Protocol Version • Visible To [Controller #]
Advanced Physical Drive Information • Write Cache [Enabled/Disabled] • Read Look Ahead Cache [Enabled/ Disabled] • SMART Feature Set • SMART Self Test • SMART Error Logging • Command Queuing Support • Command Queuing [Enabled/Disabled] • Queue Depth • Maximum Multiple DMA Mode Supported • Maximum Ultra DMA Mode Supported • DMA Mode • Drive Temperature [°C/°F] • Reference Drive Temperature • Power Saving Mode

Sony Network Video Recorder Standard HAW-SIBU
Technical Guide | Network Video Recorder Standard Edition
Maintenance Guide
61
5.21. Disk Arrays and Logical Drives
Disk arrays and logical drives are created and managed using the Disk Arrays menu. Use the Array Configuration menu to view Disk Array List and to create and delete disk arrays in the enclosure. Expand Disk Arrays in the tree view to view menu links for existing arrays. Each array icon can be expanded again to see the Logical Drives icon, and Logical Drives can be expanded to see each logical drive icon. Use the top-level Disk Arrays menu to view the Disk Array List, to delete existing arrays, and to create new disk arrays using the Automatic, Express, or Advanced disk array creation menus. Note that there must be physical drives available in order to use any of the disk array creation menus. View information for existing disk arrays by clicking the icon in the tree view or the array name in Disk Array List. Each individual array menu is used to create and delete logical drives, to change settings (Alias and enable/disable PDM, Media Patrol, and Power Management) for the array, or to start background activities including PDM, rebuilding, and transition.

Sony Network Video Recorder Standard HAW-SIBU
Technical Guide | Network Video Recorder Standard Edition
Maintenance Guide
62
The information in the Disk Array menu includes: • Disk Array ID [#] • Alias • Operational Status (see below) • Total Physical Capacity • Configurable Capacity • Free Capacity [Bytes] • Max Contiguous Free Capacity [Bytes] • Media Patrol [Enabled/Disabled] • PDM [Enabled/Disabled] • Power Management [Enabled/Disabled] • Number of Physical Drives • Number of Logical Drives • Available RAID Levels
Other lists in this menu: • Physical Drives in the Disk Array • Logical Drives in the Disk Array • Available Spare Drives to the Disk Array Disk Array Operational Status • OK: This is the normal state of a logical drive. When a logical drive is
functional, it is ready for immediate use. For RAID levels other than RAID 0, the logical drive has full redundancy.
• Critical / Degraded: This condition arises as a result of a physical drive failure. A degraded logical drive will still function and your data will still be available. However, the logical drive has lost redundancy (fault tolerance). You must determine the cause of the problem and correct it.
• Rebuilding: This condition is temporary. When a physical drive has been replaced, the logical drive automatically begins rebuilding in order to restore redundancy (fault tolerance). When a logical drive is rebuilding, it will function and your data will be available. However, access will be slower due to the rebuilding operation.

Sony Network Video Recorder Standard HAW-SIBU
Technical Guide | Network Video Recorder Standard Edition
Maintenance Guide
63
5.21.1. Logical Drive Management
Logical drives are made from disk arrays. In the tree view, you can see a graphical representation of the logical drives that belong to each array. Logical Drive List can be accessed in the tree view by expanding Disk Arrays and clicking the Logical Drives icon for any existing disk array, or simply clicking the Logical Drive Summary icon for the Subsystem. Click any logical drive (LD) in the list to view information and statistics, to change settings (Alias, Read Policy, and Write Policy), to start background activities (initialization, redundancy check), or to view Check Table for the LD.
The information displayed in the menu includes: • Logical Drive ID • Alias • Raid Level • Operational Status • Capacity • Physical Capacity • Number of Axles [#] • Number of Used Physical Drives [#] • Stripe Size • Sector Size [Bytes] • Disk Array ID • Read Policy • Write Policy • Current Write Policy • Serial Number • WWN • Synchronized [Yes/No] • Tolerable Number of Dead Drives Per Axle • Parity Pace • Codec Scheme

Sony Network Video Recorder Standard HAW-SIBU
Technical Guide | Network Video Recorder Standard Edition
Maintenance Guide
64
5.22. Spare Drives
When a physical drive in a disk array fails and a spare drive of the same type with adequate capacity is available, the disk array will begin to be rebuilt automatically using the spare drive. In the tree view, click the Spare Drive icon to see Spare Drives List or to create or delete an existing spare drive. Click any spare drive in the list to view information about the drive.
The spare drive information includes: • Spare Drive ID • Physical Drive ID • Spare Type • Revertible Spare [Yes/No] • Operational Status • Spare Check Status • Physical Capacity • Block Size • Drive Interface • Model • Location • Configuration Status • Serial Number • Firmware Version
5.22.1. Running a Spare Check
A spare check verifies the operational status of your spare drives. You can also schedule a spare check. To check a spare drive:
1. Click the Spare Drives icon.
2. Click the Spare Check tab.
3. From the Physical Drive drop-down menu, choose the spare drive you want to check. Or select All to check all the spare drives at the same time.
4. Click the Submit button.
The results of the spare check appear under Spare Check Status in the Information tab. “Healthy” means normal condition.

Sony Network Video Recorder Standard HAW-SIBU
Technical Guide | Network Video Recorder Standard Edition
Maintenance Guide
65
5.23. Logical Drive Summary
The logical drive summary displays a list of all logical drives in the subsystem. This list does not arrange the logical drives under the disk array to which they belong nor under the enclosure in which they are located. The menu functions in the same way as the Logical Drives menu discussed in “5.21.1 Logical Drive Management”.
Sony Network Video Recorder Standard HAW-SIBU
Technical Guide | Network Video Recorder Standard Edition
Maintenance Guide
66
6. System Expansion
6.1. Adding a Network Video Recorder
When adding a new Network Video Recorder to a system that is already in operation, configure the initial settings while referring to the NVMS Standard Edition Installation Manual. However, if the Network Video Recorder to be newly added is to be set to the master, change the Network Video Recorder set as the master to a slave. For how to change a Network Video Recorder to a slave, refer to the NVMS Standard Edition Administrator Manual.
Sony Network Video Recorder Standard HAW-SIBU
Technical Guide | Network Video Recorder Standard Edition
Maintenance Guide
67
7. Event Notifications
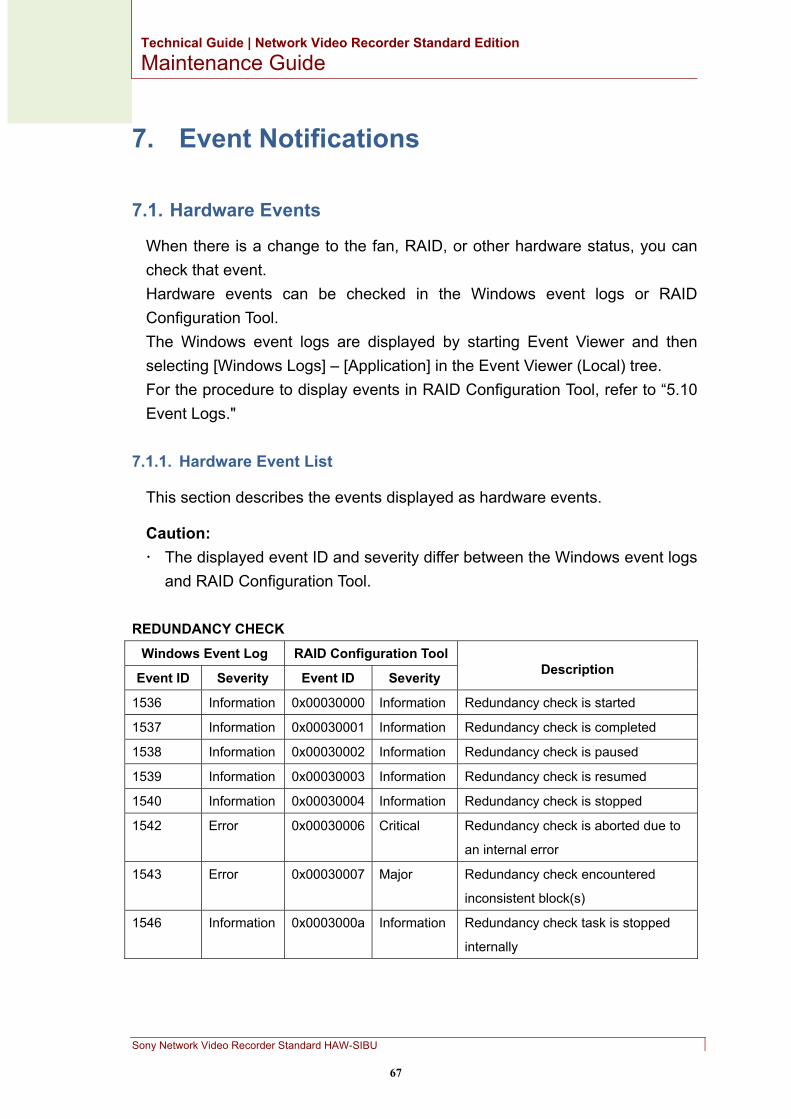
7.1. Hardware Events
When there is a change to the fan, RAID, or other hardware status, you can check that event. Hardware events can be checked in the Windows event logs or RAID Configuration Tool. The Windows event logs are displayed by starting Event Viewer and then selecting [Windows Logs] – [Application] in the Event Viewer (Local) tree. For the procedure to display events in RAID Configuration Tool, refer to “5.10 Event Logs."
7.1.1. Hardware Event List
This section describes the events displayed as hardware events.
Caution: The displayed event ID and severity differ between the Windows event logs
and RAID Configuration Tool.
REDUNDANCY CHECK Windows Event Log RAID Configuration Tool
Description Event ID Severity Event ID Severity
1536 Information 0x00030000 Information Redundancy check is started
1537 Information 0x00030001 Information Redundancy check is completed
1538 Information 0x00030002 Information Redundancy check is paused
1539 Information 0x00030003 Information Redundancy check is resumed
1540 Information 0x00030004 Information Redundancy check is stopped
1542 Error 0x00030006 Critical Redundancy check is aborted due to
an internal error
1543 Error 0x00030007 Major Redundancy check encountered
inconsistent block(s)
1546 Information 0x0003000a Information Redundancy check task is stopped
internally

Sony Network Video Recorder Standard HAW-SIBU
Technical Guide | Network Video Recorder Standard Edition
Maintenance Guide
68
CONTROLLER Windows Event Log RAID Configuration Tool
Description Event ID Severity Event ID Severity
2050 Information 0x00040002 Information Event log buffer is cleared in RAM
2051 Information 0x00040003 Information Event log buffer is cleared in NVRAM
2053 Information 0x00040005 Information The system is started
2054 Information 0x00040006 Information The system is stopped
2055 Information 0x00040007 Information The controller parameter(s) are changed
by user
2114 Information 0x00040042 Information USB flash drive inserted
2115 Information 0x00040043 Information USB flash drive removed
2116 Information 0x00040044 Information OPAS started
2117 Information 0x00040045 Information OPAS finished
2118 Information 0x00040046 Information OPAS error
2119 Information 0x00040047 Information OPAS ended without confirmation of
OPAS plan
2120 Information 0x00040048 Information OPAS ended because USB flash drive
had less than 50MB free space
COOLING DEVICE
Windows Event Log RAID Configuration Tool Description Event ID Severity Event ID Severity
2562 Information 0x00050002 Information Fan speed is increased
2563 Information 0x00050003 Information Fan speed is decreased
2564 Error 0x00050004 Minor Fan is malfunction or speed abnormal
2567 Information 0x00050007 Information Fan is functioning normally
2568 Warning 0x00050008 Warning Fan is NOT installed
FRONT END CONTROLLER (iSCSI/FC/SCSI)
Windows Event Log RAID Configuration Tool Description Event ID Severity Event ID Severity
3589 Warning 0x00070005 Warning Host interface controller has received
"abort task" command

Sony Network Video Recorder Standard HAW-SIBU
Technical Guide | Network Video Recorder Standard Edition
Maintenance Guide
69
LOGICAL DRIVE INITIALIZATION
Windows Event Log RAID Configuration Tool Description Event ID Severity Event ID Severity
4096 Information 0x00080000 Information Logical drive initialization has started
4097 Information 0x00080001 Information Logical drive initialization has completed
4098 Information 0x00080002 Information Logical drive initialization has paused
4099 Information 0x00080003 Information Logical drive initialization has resumed
4100 Information 0x00080004 Information Logical drive initialization has stopped
4101 Warning 0x00080005 Warning Logical drive initialization marks the
logical drive offline
4102 Warning 0x00080006 Warning Logical drive initialization is aborted due
to an internal error
4103 Information 0x00080007 Information Quick Logical drive initialization has
started
4104 Information 0x00080008 Information Quick Logical drive initialization has
completed
4105 Information 0x00080009 Information Quick Logical drive initialization has
paused
4106 Information 0x0008000a Information Quick Logical drive initialization has
resumed
4107 Information 0x0008000b Information Quick Logical drive initialization has
stopped
4108 Warning 0x0008000c Warning Quick Logical drive initialization marks
the logical drive offline
4109 Warning 0x0008000d Warning Quick Logical drive initialization is
aborted due to an internal error
4110 Information 0x0008000e Information Logical drive initialization is queued
4111 Information 0x0008000f Information Quick Logical drive initialization is
queued
LOGICAL DRIVE
Windows Event Log RAID Configuration Tool Description Event ID Severity Event ID Severity
4608 Information 0x00090000 Information A new logical drive has been created
4609 Information 0x00090001 Information Logical drive has been deleted
4610 Information 0x00090002 Information Logical drive has been placed online

Sony Network Video Recorder Standard HAW-SIBU
Technical Guide | Network Video Recorder Standard Edition
Maintenance Guide
70
4611 Error 0x00090003 Minor Logical drive has been placed offline.
Possible data loss
4612 Error 0x00090004 Minor Logical drive has been set to critical
4613 Information 0x00090005 Information Logical drive axle has been placed online
4614 Information 0x00090006 Information Rebuild marks the logical drive
synchronized upon rebuild completion
4615 Information 0x00090007 Information Logical drive settings has been changed
through a user command
4620 Error 0x0009000c Minor Logical drive has been set to degrade
MDD
Windows Event Log RAID Configuration Tool Description Event ID Severity Event ID Severity
5120 Warning 0x000a0000 Warning DDF write failed on disk array
MEDIA PATROL
Windows Event Log RAID Configuration Tool Description Event ID Severity Event ID Severity
5632 Information 0x000b0000 Information Media Patrol is started
5633 Information 0x000b0001 Information Media Patrol is completed
5634 Information 0x000b0002 Information Media Patrol is paused
5635 Information 0x000b0003 Information Media Patrol is resumed
5636 Information 0x000b0004 Information Media Patrol is stopped
5638 Error 0x000b0006 Critical Media Patrol is aborted due to an
internal error
5640 Information 0x000b0008 Information Media Patrol is stopped internally
PHYSICAL DISK
Windows Event Log RAID Configuration Tool Description Event ID Severity Event ID Severity
6656 Information 0x000d0000 Information Physical disk is marked online
6658 Error 0x000d0002 Major Physical disk is marked as DEAD
6659 Information 0x000d0003 Information Physical disk has been reset
6660 Information 0x000d0004 Information Physical disk is assigned as a global
spare
6661 Information 0x000d0005 Information Global spare has been deleted

Sony Network Video Recorder Standard HAW-SIBU
Technical Guide | Network Video Recorder Standard Edition
Maintenance Guide
71
6663 Information 0x000d0007 Information Physical disk is assigned as a
dedicated spare
6664 Information 0x000d0008 Information Dedicated spare has been deleted
6666 Information 0x000d000a Information Physical disk has been inserted
6667 Warning 0x000d000b Warning Physical disk has been removed
6671 Error 0x000d000f Minor Bad sector is found on physical disk
6673 Error 0x000d0011 Minor Command times out on physical disk
6675 Warning 0x000d0013 Warning Previously configured disk is no longer
found
6677 Warning 0x000d0015 Warning A physical disk has encountered PFA
condition
6678 Warning 0x000d0016 Warning A configured dead physical disk has
been inserted
6679 Information 0x000d0017 Information A physical disk page 0 settings has
changed
6680 Information 0x000d0018 Information Physical disk page 1 (SATA related)
settings have changed
6682 Error 0x000d001a Major Physical disk is marked as DEAD due
to removal
6685 Error 0x000d001d Major Physical disk is marked as DEAD due
to forced offline state
6695 Error 0x000d0027 Major Physical disk has been marked
offline/dead due to repeated command
timeouts
6697 Error 0x000d0029 Major Physical disk has exceeded the
medium error threshold and has been
marked offline/dead
6702 Information 0x000d002E Information Physical drive slow response
6713 Warning 0x000d0039 Warning Firmware detects physical drive
temperature is over temperature
threshold
6714 Information 0x000d003A Information Firmware detects physical drive
temperature returned to normal
6715 Warning 0x000d003B Warning Firmware detects physical drive
temperature is over higher critical
temperature threshold

Sony Network Video Recorder Standard HAW-SIBU
Technical Guide | Network Video Recorder Standard Edition
Maintenance Guide
72
6716 Warning 0x000d003C Warning Firmware detects physical drive
temperature is over lower critical
temperature threshold
POWER SUPPLY UNIT
Windows Event Log RAID Configuration Tool Description Event ID Severity Event ID Severity
7184 Error 0x000e0010 Critical PSU 12V power is out of the threshold
range
7185 Error 0x000e0011 Critical PSU 5V power is out of the threshold
range
7186 Error 0x000e0012 Critical PSU 3.3V power is out of the threshold
range
7187 Information 0x000e0013 Information PSU 3.3V power is within the normal
range
7188 Information 0x000e0014 Information PSU 5V power is within the normal
range
7189 Information 0x000e0015 Information PSU 12V power is within the normal
range
7197 Error 0x000e001D Critical PSU 1V power is out of the normal
range
7198 Information 0x000e001E Information PSU 1V power is within the normal
range
REBUILD
Windows Event Log RAID Configuration Tool Description Event ID Severity Event ID Severity
7680 Information 0x000f0000 Information Rebuild is started
7681 Information 0x000f0001 Information Rebuild is completed
7682 Information 0x000f0002 Information Rebuild is paused
7683 Information 0x000f0003 Information Rebuild is resumed
7684 Information 0x000f0004 Information Rebuild is stopped
7687 Warning 0x000f0007 Warning Rebuild is aborted
7690 Information 0x000f000a Information Transition is started
7691 Information 0x000f000b Information Transition is completed
7692 Information 0x000f000c Information Transition is paused

Sony Network Video Recorder Standard HAW-SIBU
Technical Guide | Network Video Recorder Standard Edition
Maintenance Guide
73
7693 Information 0x000f000d Information Transition is resumed
7694 Information 0x000f000e Information Transition is stopped
7695 Information 0x000f000f Information Transition is switched to rebuild
7697 Warning 0x000f0011 Warning Rebuild stopped internally
7700 Warning 0x000f0014 Warning Auto transition cannot be started due
to a mismatch media type of drive or
a configured PD or other illegitimate
condition
S.M.A.R.T
Windows Event Log RAID Configuration Tool Description Event ID Severity Event ID Severity
8192 Error 0x00100000 Minor SMART error is received
SUBSYSTEM
Windows Event Log RAID Configuration Tool Description Event ID Severity Event ID Severity
8714 Information 0x0011000a Information Subsystem parameter(s) are changed
by user
8736 Error 0x00110020 Fatal Enclosure only N-1 PSU left now
SYNCHRONIZATION
Windows Event Log RAID Configuration Tool Description Event ID Severity Event ID Severity
9216 Information 0x00120000 Information Synchronization is started
9217 Information 0x00120001 Information Synchronization is completed
9218 Information 0x00120002 Information Synchronization is paused
9219 Information 0x00120003 Information Synchronization is resumed
9220 Information 0x00120004 Information Synchronization is stopped
9221 Warning 0x00120005 Warning Synchronization is aborted due to an
internal error
9224 Information 0x00120008 Information Synchronization is stopped internally

Sony Network Video Recorder Standard HAW-SIBU
Technical Guide | Network Video Recorder Standard Edition
Maintenance Guide
74
DISK ARRAY
Windows Event Log RAID Configuration Tool Description Event ID Severity Event ID Severity
9728 Information 0x00130000 Information New disk array has been created
9729 Information 0x00130001 Information Disk array has been deleted
9732 Information 0x00130004 Information Disk array settings have been changed
9734 Warning 0x00130006 Warning The array is incomplete. One or more
physical drives are missing
9735 Information 0x00130007 Information The incomplete array was accepted
PREDICTIVE DATA MIGRATION
Windows Event Log RAID Configuration Tool Description Event ID Severity Event ID Severity
13824 Information 0x001b0000 Information PDM is started
13825 Information 0x001b0001 Information PDM is completed
13826 Information 0x001b0002 Information PDM is paused
13827 Information 0x001b0003 Information PDM is resumed
13828 Warning 0x001b0004 Warning PDM is stopped
13833 Information 0x001b0009 Information PDM is switched to rebuild
13836 Warning 0x001b000c Warning Auto PDM cannot be started due to
mismatch media type of drive or
illegitimate condition
SPARE CHECK
Windows Event Log RAID Configuration Tool Description Event ID Severity Event ID Severity
14848 Information 0x001d0000 Information Spare check started on the given spare
drive
14849 Information 0x001d0001 Information Spare check completed successfully on
the given spare drive
14850 Information 0x001d0002 Information Spare check failed on the given spare
drive
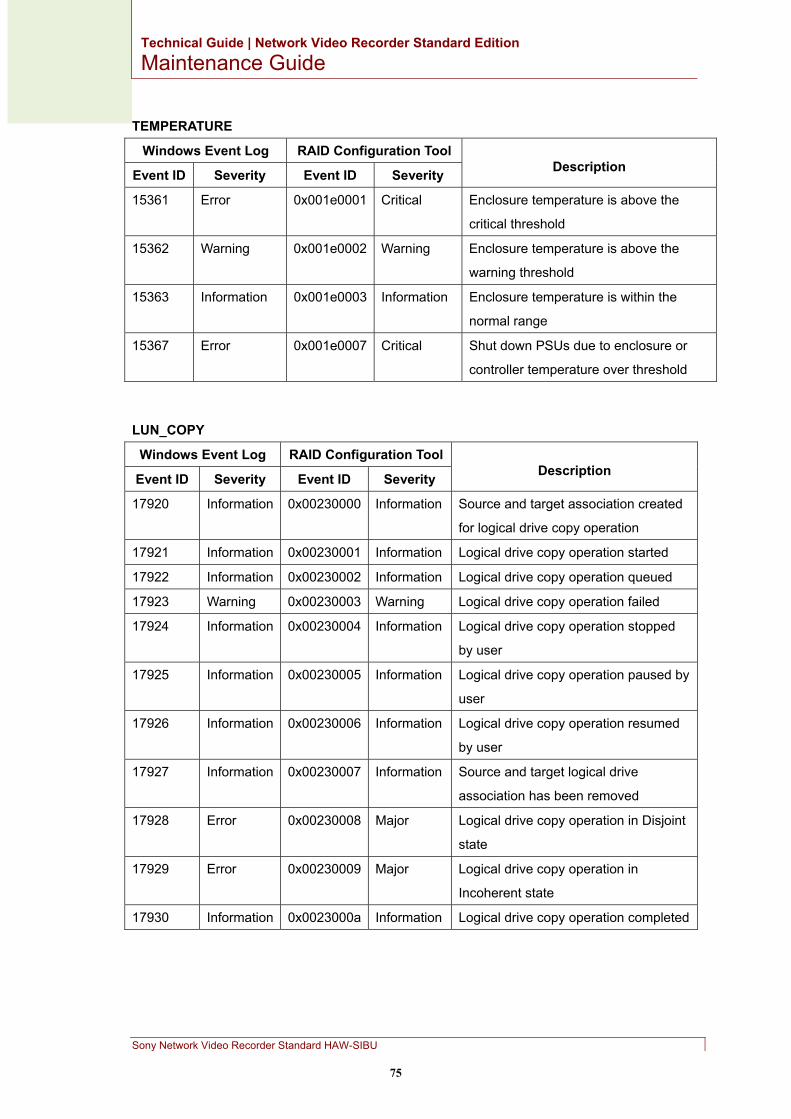
Sony Network Video Recorder Standard HAW-SIBU
Technical Guide | Network Video Recorder Standard Edition
Maintenance Guide
75
TEMPERATURE
Windows Event Log RAID Configuration Tool Description Event ID Severity Event ID Severity
15361 Error 0x001e0001 Critical Enclosure temperature is above the
critical threshold
15362 Warning 0x001e0002 Warning Enclosure temperature is above the
warning threshold
15363 Information 0x001e0003 Information Enclosure temperature is within the
normal range
15367 Error 0x001e0007 Critical Shut down PSUs due to enclosure or
controller temperature over threshold
LUN_COPY
Windows Event Log RAID Configuration Tool Description Event ID Severity Event ID Severity
17920 Information 0x00230000 Information Source and target association created
for logical drive copy operation
17921 Information 0x00230001 Information Logical drive copy operation started
17922 Information 0x00230002 Information Logical drive copy operation queued
17923 Warning 0x00230003 Warning Logical drive copy operation failed
17924 Information 0x00230004 Information Logical drive copy operation stopped
by user
17925 Information 0x00230005 Information Logical drive copy operation paused by
user
17926 Information 0x00230006 Information Logical drive copy operation resumed
by user
17927 Information 0x00230007 Information Source and target logical drive
association has been removed
17928 Error 0x00230008 Major Logical drive copy operation in Disjoint
state
17929 Error 0x00230009 Major Logical drive copy operation in
Incoherent state
17930 Information 0x0023000a Information Logical drive copy operation completed

Sony Network Video Recorder Standard HAW-SIBU
Technical Guide | Network Video Recorder Standard Edition
Maintenance Guide
76
7.2. Buzzer
When the Network Video Recorder makes buzzing sound, please stop it manually by following the steps below. 1. Start RAID Configuration Tool and log in 2. Click alarm button
3. Click Mute button

Sony Network Video Recorder Standard HAW-SIBU
Technical Guide | Network Video Recorder Standard Edition
Maintenance Guide
77
8. Other Settings
8.1. SNMP
If SNMP is enabled, you can monitor the status of this unit from SNMP Manager on the PC for surveillance.
8.1.1. Settings on This Unit
This section describes how to configure the settings of the SNMP agent.
1. Click the Start button ( ).
2. Click [Control Panel] – [System and Security] – [Administrative Tools].
3. Double-click [Services].
4. Double-click [SNMP Service].
5. Click the [Security] tab.
6. Click the [Add...] button in Accepted community names.
7. Set Community rights and Community name, and then click the [Add] button.

Sony Network Video Recorder Standard HAW-SIBU
Technical Guide | Network Video Recorder Standard Edition
Maintenance Guide
78
The new community is added.
Caution: By default, “public" is set. If you will not use this value, click [Remove] to
remove it from the list.
8. Select [Accept SNMP packets from these hosts] and then click the [Add…] button.
9. Enter the IP address of the PC with SNMP Manager installed and then click the [Add] button.
10. When the trap settings will be configured, configure the settings in steps 11 to 14 below. If they will not be configured, go to step 15.
11. Click the [Traps] tab.
12. Enter the community to be monitored in [Community name] and then click the [Add to list] button.
The community is added to the list.
Caution: By default, “public" is set. If you will not use this value, click [Remove from
list] to remove it from the list.

Sony Network Video Recorder Standard HAW-SIBU
Technical Guide | Network Video Recorder Standard Edition
Maintenance Guide
79
13. Click the [Add…] button.
14. Enter the IP address of the trap destination and then click the [Add] button.
15. Click the [OK] button.
8.1.2. SNMP Manager Settings
To monitor this unit with SNMP Manager, you need to register the MIB information to SNMP Manager. Use the MIB information by copying it from inside this unit.
1. Connect the USB flash memory device to the unit.
2. Double-click the computer icon on the desktop.
Explorer appears.
3. Double-click [OS(C:)] - [PromiseApp] - [docs] – [SNMP and Events] – [MIBs].
4. Copy the following two MIB files to the USB flash memory device. IF-MIB.mib Raidv4.mib
5. Register these two MIB files to the SNMP Manager being used.
6. Configure the surveillance settings in SNMP Manager.
Note: For the setting procedure, refer to the manual of SNMP Manager.

Sony Network Video Recorder Standard HAW-SIBU
Technical Guide | Network Video Recorder Standard Edition
Maintenance Guide
80
8.2. UPS
With the default settings of this unit, when you connect the power plug to an outlet, the state when the power was disconnected is restored. For example, if the power of the Network Video Recorder was on when the power was disconnected, the state becomes the powered-on state when the power plug is connected to the outlet. When a UPS will be used, the state when the power plug is connected to an outlet may need to be changed to the always-on state. In that case, change the setting as described in the following procedure.
1. Turn on the power.
2. When the following appears at the bottom of the screen, press the F2 key.
Press <Space> to continue
3. Enter “VessApp” with the keyboard.
4. Go to the [Advanced] tab.
5. Select [Chipset Configuration] and then press the Enter key.
6. Select [Restore on AC/Power Loss] and then press the Enter key.
7. Select [Power On] and then press the Enter key.
8. Press the Esc key.
9. Go to the [Exit] tab.
10. Select [Save Changes and Exit] and then press the Enter key.
11. Select [Yes] and then press the Enter key.
The unit reboots.

Sony Network Video Recorder Standard HAW-SIBU
Technical Guide | Network Video Recorder Standard Edition
Maintenance Guide
81
8.3. External Storage
This section describes how to set external storage using iSCSI. When you connect external storage with iSCSI, the disk in the external storage is recognized as a disk of the unit. If you create a simple volume in the recognized disk, it will be recognized as a drive.
Caution: An IP address needs to be set for the external storage in advance. Do not set the same IP address for multiple devices. Correct setting will
become impossible. The IP address of the external storage needs to be set to one that is in the
same segment as LAN port 1 or LAN port 2 of this unit.
8.3.1. External Storage Connection
1. Click the Start button ( ) on the left side of the taskbar.
The Start menu appears.
2. Click [Control Panel] in the Start menu.
The control panel appears.
3. Click [System and Security] – [Administrative Tools] – [iSCSI Initiator].
Note: When [iSCSI Initiator] is clicked for the first time, the following dialog box
appears. Click [Yes].
4. Enter the IP address of the external storage device for the target on the Targets tab and then click the [Quick Connect…] button.
When setting is complete, the following dialog box appears.

Sony Network Video Recorder Standard HAW-SIBU
Technical Guide | Network Video Recorder Standard Edition
Maintenance Guide
82
5. Click the [Done] button.
8.3.2. Creating Simple Volumes
For how to create simple volumes, refer to the NVMS Standard Edition Installation Manual.

Sony Network Video Recorder Standard HAW-SIBU
Technical Guide | Network Video Recorder Standard Edition
Maintenance Guide
83
8.4. Teaming
Teaming is technology to combine two network adapters in the Network Video Recorder into one virtual network adapter.
8.4.1. Teaming Settings
Caution: Before you begin configuring the settings, check that network cables are
inserted into port 1 and port 2.
1. Click the Start button ( ).
2. Click [All Programs] - [Realtek] - [Realtek Ethernet Diagnostic Utility].
Realtek - Ethernet Diagnostic Utility appears.
3. Click [Realtek PCI GBE Family Controller #2] - [Teaming].
4. Click the [Create Team] button.
The Create Team screen appears.

Sony Network Video Recorder Standard HAW-SIBU
Technical Guide | Network Video Recorder Standard Edition
Maintenance Guide
84
5. Enter “Team1” in [Team Name].
6. Select the teaming mode in [Settings].
The following explains each mode.
(1) Fast/Giga EtherChannel (FEC/GEC) This mode requires a switch that supports FEC/GEC. It is a trunking technology developed mainly to aggregate bandwidth between switches working in Fast Ethernet. Multiple switch ports can be grouped together to provide extra bandwidth. These aggregated ports together are called Fast EtherChannel.
(2) Link Aggregation \ LACP (802.3ad) This mode requires a switch that supports LACP. LACP is similar to FEC/GEC but it does not set which ports are used for teaming. LACP negotiates with the switch to determine the ports that will make up the team.
7. Select the [Realtek PCle GBE Family Controller] and [Realtek PCle GBE Family Controller#2] check boxes.
8. Click the [OK] button.
9. Check that there is [Realtek Virtual Miniport Driver for Teaming (NDIS 6.20)].

Sony Network Video Recorder Standard HAW-SIBU
Technical Guide | Network Video Recorder Standard Edition
Maintenance Guide
85
8.4.2. Removing Teaming Settings
Perform the following procedure to remove the configured settings.
1. Click the Start button ( ).
2. Click [All Programs] - [Realtek] - [Realtek Ethernet Diagnostic Utility]. Realtek - Ethernet Diagnostic Utility appears.
3. Click [Team 1] - [Virtual Adapters].
4. Click the [Remove] button.

Sony Network Video Recorder Standard HAW-SIBU
Technical Guide | Network Video Recorder Standard Edition
Maintenance Guide
86
9. Troubleshooting
9.1. Startup Is Disabled
Turn the power of this unit
off and on again.
Is the symptom
improved?
Start
End
Yes
No
Execute the recovery
installation. (Refer to 3.5
Recovery Installation.)
Is the Windows startup
screen displayed?
Is the symptom
improved? End
Yes
No
Contact your dealer
Contact your dealer No
Yes

Sony Network Video Recorder Standard HAW-SIBU
Technical Guide | Network Video Recorder Standard Edition
Maintenance Guide
87
9.2. Warning Appears during Startup
If the following screen is displayed, the USB flash memory is connected to this unit. Remove the USB flash memory and restart this unit.
BOOTMGR is missing
press Ctrl+Alt+Del to restart
9.3. Message Appears during Startup
If the following message enclosed with rectangle box is displayed, contact your dealer.
Copyright (C) 2013 American Megatrends, Inc.
BIOS Date: 08/16/2016 15:00:26
GP1608-02 UEFI P1.00
Press F2 or DEL to run Setup.
Press F11 for Boot Menu.
UEFI Defaults have been loaded
Press F2 or DEL to Run Setup
Press F1 to Continue
Copyright (C) 2013 American Megatrends, Inc.
BIOS Date: 05/23/2016 12:14:58
Press <CTRL + P> to Enter MEBX setup menu
C236 WSI UEFI L1.09C
CMOS Date / Time Not Set
Press F2 or DEL to Run Setup
Press F1 to Continue

Sony Network Video Recorder Standard HAW-SIBU
Technical Guide | Network Video Recorder Standard Edition
Maintenance Guide
88
9.4. Error during Operation
If an error occurred during the operation of this unit, the error location is indicated by the LED indication. You can check LED on the front panel of this unit.
LED indication (RAID)
RAID HDD
1-8
SYS-
TEM State Reference section
—*1 Not it —*1 HDD is in the state of connection
failure.
“9.5 HDD Is Defective
or in the State of
Connection Failure”
Lit in
orange
Lit in red —*1 One HDD is defective or in the state
of connection failure. System is
functioning normally.
“9.6 One HDD Is
Defective or in the
State of Connection
Failure (System is
functioning)”
Lit in
orange
Lit in
orange*3
and lit in
red*4
Lit in
red
HDD whose LED is lit in orange is
being rebuilt. HDD whose LED is lit in
red is defective or in the state of
connection failure.
“9.6 One HDD Is
Defective or in the
State of Connection
Failure (System is
functioning)”
Lit in
green
Lit in
red*2 —*1 Rebuilding for the hot spare
replacement has been completed. It
is required to replace the defective
HDD (refer to the NVMS Standard
Edition Installation Manual) and to set
the hot spare again.
“9.6 One HDD Is
Defective or in the
State of Connection
Failure (System is
functioning)”
Lit in
red
Lit in
red*4
Lit in
red
One or more HDDs are defective or in
the state of connection failure.
System is not functioning normally.
“9.5 HDD Is Defective
or in the State of
Connection Failure”
*1: — is arbitrary. *2: One HDD LED is lit in red. *3: One LED is lit in orange. *4: One or multiple HDD LEDs are lit in red.
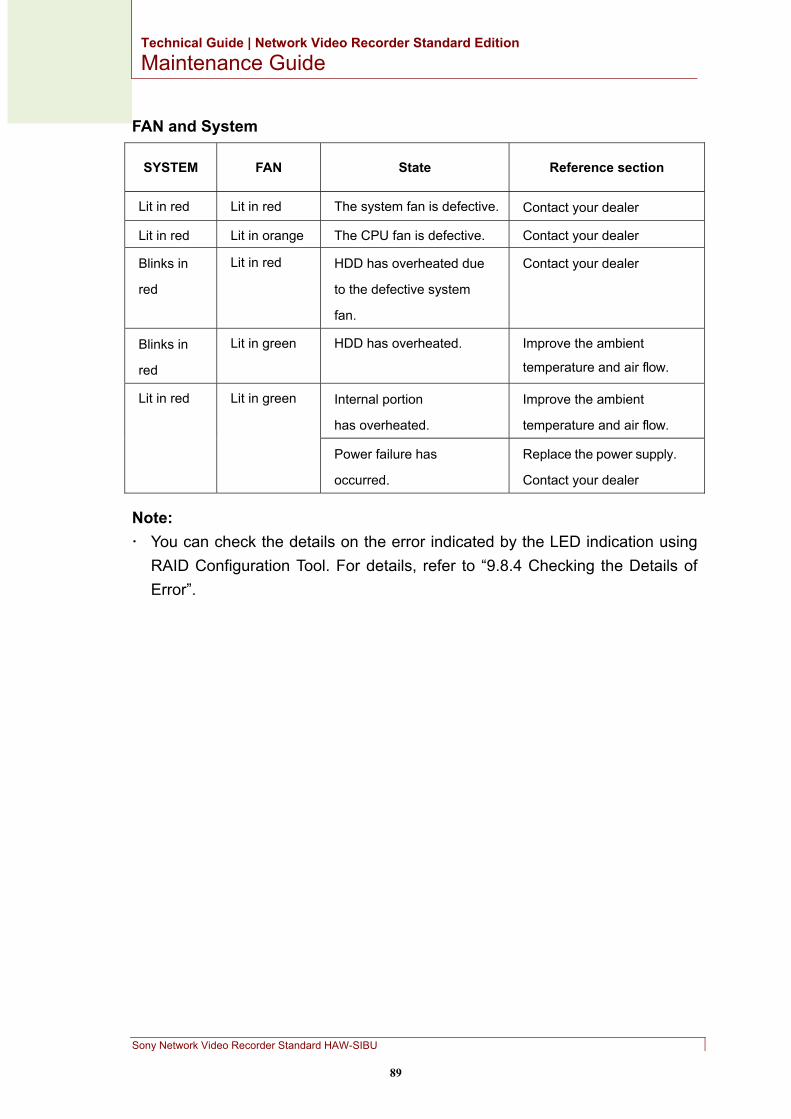
Sony Network Video Recorder Standard HAW-SIBU
Technical Guide | Network Video Recorder Standard Edition
Maintenance Guide
89
FAN and System
SYSTEM FAN State Reference section
Lit in red Lit in red The system fan is defective. Contact your dealer
Lit in red Lit in orange The CPU fan is defective. Contact your dealer
Blinks in
red
Lit in red HDD has overheated due
to the defective system
fan.
Contact your dealer
Blinks in
red
Lit in green HDD has overheated. Improve the ambient
temperature and air flow.
Lit in red Lit in green Internal portion
has overheated.
Improve the ambient
temperature and air flow.
Power failure has
occurred.
Replace the power supply.
Contact your dealer
Note: You can check the details on the error indicated by the LED indication using
RAID Configuration Tool. For details, refer to “9.8.4 Checking the Details of Error”.

Sony Network Video Recorder Standard HAW-SIBU
Technical Guide | Network Video Recorder Standard Edition
Maintenance Guide
90
9.5. HDD Is Defective or in the State of Connection Failure
Remove and install HDD.
(Refer to the NVMS Standard
Edition Installation Manual.)
Start
End
Replace HDD.
(Refer to the NVMS Standard
Edition Installation Manual.)
Check HDD LED. End
Not lit
Lit in green
Check HDD LED. Contact your dealer
Not lit
Lit in green

Sony Network Video Recorder Standard HAW-SIBU
Technical Guide | Network Video Recorder Standard Edition
Maintenance Guide
91
9.6. One HDD Is Defective or in the State of Connection Failure (System is functioning)
If a failure of one HDD occurs, the rebuilding is started automatically using HDD for hot spare.
Steps Contents RAID LED HDD LED
1 If a failure of HDD occurs, the rebuilding is started
automatically.
Lit in orange Lilt in orange
2 When the rebuilding of HDD for hot spare has been
completed, RAID LED and HDD for hot spare change to
green.
Lit in green Lit in green
Note: As for the approximate time required for rebuilding, refer to “9.9 RAID”.
Replace HDD.
(Refer to the NVMS Standard
Edition Installation Manual.)
Start
End End
Check HDD LED.
Create the hot spare.
(Refer to 9.8.1 Creating the
Hot Spare.)
Not lit
Lit in orange

Sony Network Video Recorder Standard HAW-SIBU
Technical Guide | Network Video Recorder Standard Edition
Maintenance Guide
92
After replacing with the new HDD, set the defective HDD to the new hot spare again.
Steps Contents HDD LED
1 Replace the defective HDD (HDD LED is lit in red) with the new HDD. Lit in red
2 Set the new hot spare. Not lit
3 Check that HDD LED is lit in green. Lit in green
In the case that the hot spare is not set
Steps Contents RAID LED HDD LED
1 Replace the defective HDD (HDD LED is lit in red)
with the new HDD. (Refer to the NVMS Standard
Edition Installation Manual)
Lit in orange Lit in red
When the replacement of HDD has been completed,
the rebuilding is started automatically.
Lit in orange Lit in orange
2 When RAID LED and HDD LED changed to green, the
rebuilding is completed.
Lit in green Lit in green
Note: As for the approximate time required for rebuilding, refer to “9.9 RAID”.

Sony Network Video Recorder Standard HAW-SIBU
Technical Guide | Network Video Recorder Standard Edition
Maintenance Guide
93
9.7. One or More HDDs Are Defective or in the State of Connection Failure (System is not functioning)
Steps Contents RAID LED HDD LED HDD LED
1 Replace the defective HDD (HDD LED is lit in
red) with the new HDD. (Refer to the NVMS
Standard Edition Installation Manual)
Lit in red Lit in red Lit in
green
2 After replacing HDD, delete the current RAID
configuration and reconfigure RAID.
For how to delete the RAID configuration, refer
to “9.8.2 Deleting RAID”, and for the procedure
of reconfiguring RAID, refer to “9.8.3
Reconfiguring RAID”.
Lit in red Not lit Lit in
green
3 After reconfiguring RAID, RAID LED and
HDD LED are lit in green.
Lit in green Lit in green Lit in
green
Replace HDD.
(Refer to the NVMS Standard
Edition Installation Manual.)
Start
Delete RAID.
(Refer to 9.8.2 Deleting
RAID.)
Reconfigure RAID.
(Refer to 9.8.3 Reconfiguring
RAID.)

Sony Network Video Recorder Standard HAW-SIBU
Technical Guide | Network Video Recorder Standard Edition
Maintenance Guide
94
9.8. Operation of RAID Configuration Tool
9.8.1. Creating the Hot Spare
1. Log in to RAID Configuration Tool.
Note: For the login procedure, refer to the NVMS Standard Edition Installation
Manual.
2. Open the tree of [Home] - [Subsystems] ‒ [localhost] on the RAID Configuration Tool screen, and then click [Spare Drives]
3. Click the [Create] tab.
4. Click ID in Available of Physical Drives, and then click the [>>] button.
5. Click the [Update] button.
6. Check that “#1” is added to the table of New Hot Spare Drives. The [Submit] button is displayed at the bottom of the screen.
7. Click the [Submit] button.
When the creation of hot spare was successful, Spare 0 of ID is added to the Spare Drive List.

Sony Network Video Recorder Standard HAW-SIBU
Technical Guide | Network Video Recorder Standard Edition
Maintenance Guide
95
9.8.2. Deleting RAID
1. Log in to RAID Configuration.
Note: For the login procedure, refer to the NVMS Standard Edition Installation
Manual.
2. Open the tree of [Home] - [Subsystems] ‒ [localhost] on the RAID Configuration Tool screen, and then click [Disk Arrays].
3. Click the [Delete] tab.
4. Place a check mark in all lines of the table.
5. Click the [Submit] button.
6. Type “CONFIRM”, and then click the [OK] button.
When the deletion of RAID volume was successful, “Selected disk array(s) was deleted successfully” is displayed.
7. Open the tree of [Home] - [Subsystems] ‒ [localhost] on the RAID Configuration Tool screen, and then click [Spare Drives].
8. Click the [Delete] tab.
9. Place a check mark in all lines of the table.

Sony Network Video Recorder Standard HAW-SIBU
Technical Guide | Network Video Recorder Standard Edition
Maintenance Guide
96
10. Type “CONFIRM”, and then click the [OK] button.
When the deletion of Hot Spare volume was successful, “Spare Drives were deleted successfully” is displayed.
9.8.3. Reconfiguring RAID
1. Log in to RAID Configuration Tool.
Note: For the login procedure, refer to the NVMS Standard Edition Installation
Manual.
2. Open the tree of [Home] - [Subsystems] ‒ [localhost] on the RAID Configuration Tool screen, and then click [Disk Arrays].
3. Click the [Create] tab.
4. Click [Automatic Configuration], and then click [Next ->].

Sony Network Video Recorder Standard HAW-SIBU
Technical Guide | Network Video Recorder Standard Edition
Maintenance Guide
97
5. Check that the number in Number of Physical Drivers in Disk Array 1 ‒ Information is one less than the number of HDD installed in this unit, and that #1 exists in Disk Array 1 ‒ Logical drives and Spare Drives respectively. Then click the [Submit] button.
The RAID volume was created. When the RAID volume was created correctly, it is displayed in the D drive as a new disk.
Note: If it was not created correctly, HDD might not have been installed properly. After
turning off the power of this unit, check the installation of HDD.
9.8.4. Checking the Details of Error
1. Log in to RAID Configuration Tool.
Note: For the login procedure, refer to the NVMS Standard Edition Installation
Manual.
2. Open the tree of [Home] - [Subsystems] ‒ [localhost]- [Enclosures] on the RAID Configuration Tool screen, and then click [Enclosure 1].
3. Check the status of temperature, fan and power supply in the [Information] tab.

Sony Network Video Recorder Standard HAW-SIBU
Technical Guide | Network Video Recorder Standard Edition
Maintenance Guide
98
9.9. RAID
9.9.1. RAID Trouble
Contents Solutions
System has been shut down during re-
building.
After the power is turned on again, the
rebuilding is automatically restarted.
System has been shut down while RAID
was in the degraded state.
Even in the degraded state, the system can be
started by turning on the power again.
System has been shut down when the
defective HDD was removed while RAID
was in the degraded state.
Even if the defective HDD is removed, the
system can be started by turning on the
power again.
System has been shut down and the
defective HDD was replaced with the new
HDD while RAID was in the degraded state.
System can be started by turning on the power
again. Also, the rebuilding is automatically
restarted after startup.
A critical problem occurred in the state that
fail-tolerant RAID was configured, and
RAID LED is lit in red.
Even if fail-tolerant RAID 1, RAID1+0, RAID 5
and RAID 6 were configured, when the
defective HDD was left without being replaced
in the degraded state, multiple HDDs may be
damaged at the same time, disabling
continuous operation. When RAID LED is lit in
orange and RAID becomes degraded state,
immediately replace the defective HDD. (Refer
to the NVMS Standard Edition Installation
Manual.)

Sony Network Video Recorder Standard HAW-SIBU
Technical Guide | Network Video Recorder Standard Edition
Maintenance Guide
99
9.9.2. RAID Configuration
The configurable RAID varies depending on the number of the inserted HDD. The configurable RAID level is described below. • HDD×1: No RAID*1 • HDD×2: RAID 0*1/No RAID/RAID 1 • HDD×3: RAID 5*1/No RAID • HDD×4: RAID 5*1/No RAID/RAID 1 + 0/RAID 5 + Hot Spare/RAID 6 • HDD×5: RAID 5*1/No RAID/RAID 5 + Hot Spare/RAID 6 • HDD×6: RAID 5*1/No RAID/RAID 1 + 0/RAID 5 + Hot Spare/RAID 6 *1: Default setting
9.9.3. Time Required for Rebuild
Rebuild: A maximum of 23.5 hours However, this value applies only under the following conditions. • HDD model: Seagate ST4000NM0033 • Number of HDD: 5 • RAID level: 5 • RAID read/write access: None

Sony Network Video Recorder Standard HAW-SIBU
Technical Guide | Network Video Recorder Standard Edition
Maintenance Guide
100
10. Miscellaneous Information
10.1. Third Party Software Terms and Conditions
This product uses third party software for which specific terms and conditions may apply. The details are given below. ======================================================================
7-Zip source code
~~~~~~~~~~~~~~~~~
License for use and distribution
~~~~~~~~~~~~~~~~~~~~~~~~~~~~~~~~
7-Zip Copyright (C) 1999-2015 Igor Pavlov.
Licenses for files are:
1) CPP/7zip/Compress/Rar* files: GNU LGPL + unRAR restriction
2) All other files: GNU LGPL
The GNU LGPL + unRAR restriction means that you must follow both
GNU LGPL rules and unRAR restriction rules.
GNU LGPL information
--------------------
This library is free software; you can redistribute it and/or modify it under the terms of the GNU
Lesser General Public License as published by the Free Software Foundation; either version
2.1 of the License, or (at your option) any later version.
This library is distributed in the hope that it will be useful, but WITHOUT ANY WARRANTY;
without even the implied warranty of MERCHANTABILITY or FITNESS FOR A PARTICULAR
PURPOSE. See the GNU Lesser General Public License for more details.
You should have received a copy of the GNU Lesser General Public License along with this
library; if not, write to the Free Software Foundation, Inc., 59 Temple Place, Suite 330, Boston,

Sony Network Video Recorder Standard HAW-SIBU
Technical Guide | Network Video Recorder Standard Edition
Maintenance Guide
101
MA 02111-1307 USA
unRAR restriction
-----------------
The decompression engine for RAR archives was developed using source code of unRAR
program.
All copyrights to original unRAR code are owned by Alexander Roshal.
The license for original unRAR code has the following restriction:
The unRAR sources cannot be used to re-create the RAR compression algorithm, which is
proprietary. Distribution of modified unRAR sources in separate form or as a part of other
software is permitted, provided that it is clearly stated in the documentation and source
comments that the code may not be used to develop a RAR (WinRAR) compatible archiver.
--
Igor Pavlov
======================================================================
GNU LESSER GENERAL PUBLIC LICENSE
Version 2.1, February 1999
Copyright (C) 1991, 1999 Free Software Foundation, Inc.
59 Temple Place, Suite 330, Boston, MA 02111-1307 USA
Everyone is permitted to copy and distribute verbatim copies of this license document, but
changing it is not allowed.
[This is the first released version of the Lesser GPL. It also counts as the successor of the
GNU Library Public License, version 2, hence the version number 2.1.]
Preamble
The licenses for most software are designed to take away your freedom to share and change it.
By contrast, the GNU General Public Licenses are intended to guarantee your freedom to
share and change free software--to make sure the software is free for all its users.

Sony Network Video Recorder Standard HAW-SIBU
Technical Guide | Network Video Recorder Standard Edition
Maintenance Guide
102
This license, the Lesser General Public License, applies to some specially designated
software packages--typically libraries--of the Free Software Foundation and other authors who
decide to use it. You can use it too, but we suggest you first think carefully about whether this
license or the ordinary General Public License is the better strategy to use in any particular
case, based on the explanations below.
When we speak of free software, we are referring to freedom of use, not price. Our General
Public Licenses are designed to make sure that you have the freedom to distribute copies of
free software (and charge for this service if you wish); that you receive source code or can get
it if you want it; that you can change the software and use pieces of it in new free programs;
and that you are informed that you can do these things.
To protect your rights, we need to make restrictions that forbid distributors to deny you these
rights or to ask you to surrender these rights. These restrictions translate to certain
responsibilities for you if you distribute copies of the library or if you modify it.
For example, if you distribute copies of the library, whether gratis or for a fee, you must give
the recipients all the rights that we gave you. You must make sure that they, too, receive or can
get the source code. If you link other code with the library, you must provide complete object
files to the recipients, so that they can relink them with the library after making changes to the
library and recompiling it. And you must show them these terms so they know their rights.
We protect your rights with a two-step method: (1) we copyright the library, and (2) we offer
you this license, which gives you legal permission to copy, distribute and/or modify the library.
To protect each distributor, we want to make it very clear that there is no warranty for the free
library. Also, if the library is modified by someone else and passed on, the recipients should
know that what they have is not the original version, so that the original author's reputation will
not be affected by problems that might be introduced by others.
Finally, software patents pose a constant threat to the existence of any free program. We wish
to make sure that a company cannot effectively restrict the users of a free program by
obtaining a restrictive license from a patent holder. Therefore, we insist that any patent license
obtained for a version of the library must be consistent with the full freedom of use specified in
this license.
Most GNU software, including some libraries, is covered by the ordinary GNU General Public
License. This license, the GNU Lesser General Public License, applies to certain designated

Sony Network Video Recorder Standard HAW-SIBU
Technical Guide | Network Video Recorder Standard Edition
Maintenance Guide
103
libraries, and is quite different from the ordinary General Public License. We use this license
for certain libraries in order to permit linking those libraries into non-free programs.
When a program is linked with a library, whether statically or using a shared library, the
combination of the two is legally speaking a combined work, a derivative of the original library.
The ordinary General Public License therefore permits such linking only if the entire
combination fits its criteria of freedom. The Lesser General Public License permits more lax
criteria for linking other code with the library.
We call this license the "Lesser" General Public License because it does Less to protect the
user's freedom than the ordinary General Public License. It also provides other free software
developers Less of an advantage over competing non-free programs. These disadvantages
are the reason we use the ordinary General Public License for many libraries. However, the
Lesser license provides advantages in certain special circumstances.
For example, on rare occasions, there may be a special need to encourage the widest
possible use of a certain library, so that it becomes a de-facto standard. To achieve this,
non-free programs must be allowed to use the library. A more frequent case is that a free
library does the same job as widely used non-free libraries. In this case, there is little to gain by
limiting the free library to free software only, so we use the Lesser General Public License.
In other cases, permission to use a particular library in non-free programs enables a greater
number of people to use a large body of free software. For example, permission to use the
GNU C Library in non-free programs enables many more people to use the whole GNU
operating system, as well as its variant, the GNU/Linux operating system.
Although the Lesser General Public License is Less protective of the users' freedom, it does
ensure that the user of a program that is linked with the Library has the freedom and the
wherewithal to run that program using a modified version of the Library.
The precise terms and conditions for copying, distribution and modification follow. Pay close
attention to the difference between a "work based on the library" and a "work that uses the
library". The former contains code derived from the library, whereas the latter must be
combined with the library in order to run.
GNU LESSER GENERAL PUBLIC LICENSE
TERMS AND CONDITIONS FOR COPYING, DISTRIBUTION AND MODIFICATION

Sony Network Video Recorder Standard HAW-SIBU
Technical Guide | Network Video Recorder Standard Edition
Maintenance Guide
104
0. This License Agreement applies to any software library or other program which contains a
notice placed by the copyright holder or other authorized party saying it may be distributed
under the terms of this Lesser General Public License (also called "this License").
Each licensee is addressed as "you".
A "library" means a collection of software functions and/or data prepared so as to be
conveniently linked with application programs (which use some of those functions and data) to
form executables.
The "Library", below, refers to any such software library or work which has been distributed
under these terms. A "work based on the Library" means either the Library or any derivative
work under copyright law: that is to say, a work containing the Library or a portion of it, either
verbatim or with modifications and/or translated straightforwardly into another language.
(Hereinafter, translation is included without limitation in the term "modification".)
"Source code" for a work means the preferred form of the work for making modifications to it.
For a library, complete source code means all the source code for all modules it contains, plus
any associated interface definition files, plus the scripts used to control compilation and
installation of the library.
Activities other than copying, distribution and modification are not covered by this License;
they are outside its scope. The act of running a program using the Library is not restricted, and
output from such a program is covered only if its contents constitute a work based on the
Library (independent of the use of the Library in a tool for writing it). Whether that is true
depends on what the Library does and what the program that uses the Library does.
1. You may copy and distribute verbatim copies of the Library's complete source code as you
receive it, in any medium, provided that you conspicuously and appropriately publish on each
copy an appropriate copyright notice and disclaimer of warranty; keep intact all the notices that
refer to this License and to the absence of any warranty; and distribute a copy of this License
along with the Library.
You may charge a fee for the physical act of transferring a copy, and you may at your option
offer warranty protection in exchange for a fee.
2. You may modify your copy or copies of the Library or any portion of it, thus forming a work
based on the Library, and copy and distribute such modifications or work under the terms of
Section 1 above, provided that you also meet all of these conditions:

Sony Network Video Recorder Standard HAW-SIBU
Technical Guide | Network Video Recorder Standard Edition
Maintenance Guide
105
a) The modified work must itself be a software library.
b) You must cause the files modified to carry prominent notices stating that you changed the
files and the date of any change.
c) You must cause the whole of the work to be licensed at no charge to all third parties under
the terms of this License.
d) If a facility in the modified Library refers to a function or a table of data to be supplied by an
application program that uses the facility, other than as an argument passed when the facility
is invoked, then you must make a good faith effort to ensure that, in the event an application
does not supply such function or table, the facility still operates, and performs whatever part of
its purpose remains meaningful.
(For example, a function in a library to compute square roots has a purpose that is entirely
well-defined independent of the application. Therefore, Subsection 2d requires that any
application-supplied function or table used by this function must be optional: if the application
does not supply it, the square root function must still compute square roots.)
These requirements apply to the modified work as a whole. If identifiable sections of that work
are not derived from the Library, and can be reasonably considered independent and separate
works in themselves, then this License, and its terms, do not apply to those sections when you
distribute them as separate works. But when you distribute the same sections as part of a
whole which is a work based on the Library, the distribution of the whole must be on the terms
of this License, whose permissions for other licensees extend to the entire whole, and thus to
each and every part regardless of who wrote it.
Thus, it is not the intent of this section to claim rights or contest your rights to work written
entirely by you; rather, the intent is to exercise the right to control the distribution of derivative
or collective works based on the Library.
In addition, mere aggregation of another work not based on the Library with the Library (or with
a work based on the Library) on a volume of a storage or distribution medium does not bring
the other work under the scope of this License.
3. You may opt to apply the terms of the ordinary GNU General Public License instead of this
License to a given copy of the Library. To do this, you must alter all the notices that refer to this

Sony Network Video Recorder Standard HAW-SIBU
Technical Guide | Network Video Recorder Standard Edition
Maintenance Guide
106
License, so that they refer to the ordinary GNU General Public License, version 2, instead of to
this License. (If a newer version than version 2 of the ordinary GNU General Public License
has appeared, then you can specify that version instead if you wish.) Do not make any other
change in these notices.
Once this change is made in a given copy, it is irreversible for that copy, so the ordinary GNU
General Public License applies to all subsequent copies and derivative works made from that
copy.
This option is useful when you wish to copy part of the code of the Library into a program that
is not a library.
4. You may copy and distribute the Library (or a portion or derivative of it, under Section 2) in
object code or executable form under the terms of Sections 1 and 2 above provided that you
accompany it with the complete corresponding machine-readable source code, which must be
distributed under the terms of Sections 1 and 2 above on a medium customarily used for
software interchange.
If distribution of object code is made by offering access to copy from a designated place, then
offering equivalent access to copy the source code from the same place satisfies the
requirement to distribute the source code, even though third parties are not compelled to copy
the source along with the object code.
5. A program that contains no derivative of any portion of the Library, but is designed to work
with the Library by being compiled or linked with it, is called a "work that uses the Library".
Such a work, in isolation, is not a derivative work of the Library, and therefore falls outside the
scope of this License.
However, linking a "work that uses the Library" with the Library creates an executable that is a
derivative of the Library (because it contains portions of the Library), rather than a "work that
uses the library". The executable is therefore covered by this License. Section 6 states terms
for distribution of such executables.
When a "work that uses the Library" uses material from a header file that is part of the Library,
the object code for the work may be a derivative work of the Library even though the source
code is not. Whether this is true is especially significant if the work can be linked without the
Library, or if the work is itself a library. The threshold for this to be true is not precisely defined
by law.

Sony Network Video Recorder Standard HAW-SIBU
Technical Guide | Network Video Recorder Standard Edition
Maintenance Guide
107
If such an object file uses only numerical parameters, data structure layouts and accessors,
and small macros and small inline functions (ten lines or less in length), then the use of the
object file is unrestricted, regardless of whether it is legally a derivative work. (Executables
containing this object code plus portions of the Library will still fall under Section 6.)
Otherwise, if the work is a derivative of the Library, you may distribute the object code for the
work under the terms of Section 6. Any executables containing that work also fall under
Section 6, whether or not they are linked directly with the Library itself.
6. As an exception to the Sections above, you may also combine or link a "work that uses the
Library" with the Library to produce a work containing portions of the Library, and distribute
that work under terms of your choice, provided that the terms permit modification of the work
for the customer's own use and reverse engineering for debugging such modifications.
You must give prominent notice with each copy of the work that the Library is used in it and
that the Library and its use are covered by this License. You must supply a copy of this
License. If the work during execution displays copyright notices, you must include the
copyright notice for the Library among them, as well as a reference directing the user to the
copy of this License. Also, you must do one of these things:
a) Accompany the work with the complete corresponding machine-readable source code for
the Library including whatever changes were used in the work (which must be distributed
under Sections 1 and 2 above); and, if the work is an executable linked with the Library, with
the complete machine-readable "work that uses the Library", as object code and/or source
code, so that the user can modify the Library and then relink to produce a modified executable
containing the modified Library. (It is understood that the user who changes the contents of
definitions files in the Library will not necessarily be able to recompile the application to use
the modified definitions.)
b) Use a suitable shared library mechanism for linking with the Library. A suitable mechanism
is one that (1) uses at run time a copy of the library already present on the user's computer
system, rather than copying library functions into the executable, and (2) will operate properly
with a modified version of the library, if the user installs one, as long as the modified version is
interface-compatible with the version that the work was made with.
c) Accompany the work with a written offer, valid for at least three years, to give the same user
the materials specified in Subsection 6a, above, for a charge no more than the cost of

Sony Network Video Recorder Standard HAW-SIBU
Technical Guide | Network Video Recorder Standard Edition
Maintenance Guide
108
performing this distribution.
d) If distribution of the work is made by offering access to copy from a designated place, offer
equivalent access to copy the above specified materials from the same place.
e) Verify that the user has already received a copy of these materials or that you have already
sent this user a copy.
For an executable, the required form of the "work that uses the Library" must include any data
and utility programs needed for reproducing the executable from it. However, as a special
exception, the materials to be distributed need not include anything that is normally distributed
(in either source or binary form) with the major components (compiler, kernel, and so on) of the
operating system on which the executable runs, unless that component itself accompanies the
executable.
It may happen that this requirement contradicts the license restrictions of other proprietary
libraries that do not normally accompany the operating system. Such a contradiction means
you cannot use both them and the Library together in an executable that you distribute.
7. You may place library facilities that are a work based on the Library side-by-side in a single
library together with other library facilities not covered by this License, and distribute such a
combined library, provided that the separate distribution of the work based on the Library and
of the other library facilities is otherwise permitted, and provided that you do these two things:
a) Accompany the combined library with a copy of the same work based on the Library,
uncombined with any other library facilities. This must be distributed under the terms of the
Sections above.
b) Give prominent notice with the combined library of the fact that part of it is a work based on
the Library, and explaining where to find the accompanying uncombined form of the same
work.
8. You may not copy, modify, sublicense, link with, or distribute the Library except as expressly
provided under this License. Any attempt otherwise to copy, modify, sublicense, link with, or
distribute the Library is void, and will automatically terminate your rights under this License.
However, parties who have received copies, or rights, from you under this License will not
have their licenses terminated so long as such parties remain in full compliance.

Sony Network Video Recorder Standard HAW-SIBU
Technical Guide | Network Video Recorder Standard Edition
Maintenance Guide
109
9. You are not required to accept this License, since you have not signed it. However, nothing
else grants you permission to modify or distribute the Library or its derivative works. These
actions are prohibited by law if you do not accept this License. Therefore, by modifying or
distributing the Library (or any work based on the Library), you indicate your acceptance of this
License to do so, and all its terms and conditions for copying, distributing or modifying the
Library or works based on it.
10. Each time you redistribute the Library (or any work based on the Library), the recipient
automatically receives a license from the original licensor to copy, distribute, link with or modify
the Library subject to these terms and conditions. You may not impose any further restrictions
on the recipients' exercise of the rights granted herein. You are not responsible for enforcing
compliance by third parties with this License.
11. If, as a consequence of a court judgment or allegation of patent infringement or for any
other reason (not limited to patent issues), conditions are imposed on you (whether by court
order, agreement or otherwise) that contradict the conditions of this License, they do not
excuse you from the conditions of this License. If you cannot distribute so as to satisfy
simultaneously your obligations under this License and any other pertinent obligations, then as
a consequence you may not distribute the Library at all. For example, if a patent license would
not permit royalty-free redistribution of the Library by all those who receive copies directly or
indirectly through you, then the only way you could satisfy both it and this License would be to
refrain entirely from distribution of the Library.
If any portion of this section is held invalid or unenforceable under any particular circumstance,
the balance of the section is intended to apply, and the section as a whole is intended to apply
in other circumstances.
It is not the purpose of this section to induce you to infringe any patents or other property right
claims or to contest validity of any such claims; this section has the sole purpose of protecting
the integrity of the free software distribution system which is implemented by public license
practices. Many people have made generous contributions to the wide range of software
distributed through that system in reliance on consistent application of that system; it is up to
the author/donor to decide if he or she is willing to distribute software through any other
system and a licensee cannot impose that choice.
This section is intended to make thoroughly clear what is believed to be a consequence of the
rest of this License.

Sony Network Video Recorder Standard HAW-SIBU
Technical Guide | Network Video Recorder Standard Edition
Maintenance Guide
110
12. If the distribution and/or use of the Library is restricted in certain countries either by patents
or by copyrighted interfaces, the original copyright holder who places the Library under this
License may add an explicit geographical distribution limitation excluding those countries, so
that distribution is permitted only in or among countries not thus excluded. In such case, this
License incorporates the limitation as if written in the body of this License.
13. The Free Software Foundation may publish revised and/or new versions of the Lesser
General Public License from time to time. Such new versions will be similar in spirit to the
present version, but may differ in detail to address new problems or concerns.
Each version is given a distinguishing version number. If the Library specifies a version
number of this License which applies to it and "any later version", you have the option of
following the terms and conditions either of that version or of any later version published by the
Free Software Foundation. If the Library does not specify a license version number, you may
choose any version ever published by the Free Software Foundation.
14. If you wish to incorporate parts of the Library into other free programs whose distribution
conditions are incompatible with these, write to the author to ask for permission. For software
which is copyrighted by the Free Software Foundation, write to the Free Software Foundation;
we sometimes make exceptions for this. Our decision will be guided by the two goals of
preserving the free status of all derivatives of our free software and of promoting the sharing
and reuse of software generally.
NO WARRANTY
15. BECAUSE THE LIBRARY IS LICENSED FREE OF CHARGE, THERE IS NO
WARRANTY FOR THE LIBRARY, TO THE EXTENT PERMITTED BY APPLICABLE LAW.
EXCEPT WHEN OTHERWISE STATED IN WRITING THE COPYRIGHT HOLDERS AND/OR
OTHER PARTIES PROVIDE THE LIBRARY "AS IS" WITHOUT WARRANTY OF ANY KIND,
EITHER EXPRESSED OR IMPLIED, INCLUDING, BUT NOT LIMITED TO, THE IMPLIED
WARRANTIES OF MERCHANTABILITY AND FITNESS FOR A PARTICULAR PURPOSE.
THE ENTIRE RISK AS TO THE QUALITY AND PERFORMANCE OF THE LIBRARY IS WITH
YOU. SHOULD THE LIBRARY PROVE DEFECTIVE, YOU ASSUME THE COST OF ALL
NECESSARY SERVICING, REPAIR OR CORRECTION.
16. IN NO EVENT UNLESS REQUIRED BY APPLICABLE LAW OR AGREED TO IN
WRITING WILL ANY COPYRIGHT HOLDER, OR ANY OTHER PARTY WHO MAY MODIFY
AND/OR REDISTRIBUTE THE LIBRARY AS PERMITTED ABOVE, BE LIABLE TO YOU FOR

Sony Network Video Recorder Standard HAW-SIBU
Technical Guide | Network Video Recorder Standard Edition
Maintenance Guide
111
DAMAGES, INCLUDING ANY GENERAL, SPECIAL, INCIDENTAL OR CONSEQUENTIAL
DAMAGES ARISING OUT OF THE USE OR INABILITY TO USE THE LIBRARY (INCLUDING
BUT NOT LIMITED TO LOSS OF DATA OR DATA BEING RENDERED INACCURATE OR
LOSSES SUSTAINED BY YOU OR THIRD PARTIES OR A FAILURE OF THE LIBRARY TO
OPERATE WITH ANY OTHER SOFTWARE), EVEN IF SUCH HOLDER OR OTHER PARTY
HAS BEEN ADVISED OF THE POSSIBILITY OF SUCH DAMAGES.
END OF TERMS AND CONDITIONS
How to Apply These Terms to Your New Libraries
If you develop a new library, and you want it to be of the greatest possible use to the public, we
recommend making it free software that everyone can redistribute and change. You can do so
by permitting redistribution under these terms (or, alternatively, under the terms of the ordinary
General Public License).
To apply these terms, attach the following notices to the library. It is safest to attach them to the
start of each source file to most effectively convey the exclusion of warranty; and each file
should have at least the "copyright" line and a pointer to where the full notice is found.
<one line to give the library's name and a brief idea of what it does.>
Copyright (C) <year> <name of author>
This library is free software; you can redistribute it and/or modify it under the terms of the GNU
Lesser General Public License as published by the Free Software Foundation; either version
2.1 of the License, or (at your option) any later version.
This library is distributed in the hope that it will be useful, but WITHOUT ANY WARRANTY;
without even the implied warranty of MERCHANTABILITY or FITNESS FOR A PARTICULAR
PURPOSE. See the GNU Lesser General Public License for more details.
You should have received a copy of the GNU Lesser General Public License along with this
library; if not, write to the Free Software Foundation, Inc., 59 Temple Place, Suite 330, Boston,
MA 02111-1307 USA
Also add information on how to contact you by electronic and paper mail.
You should also get your employer (if you work as a programmer) or your school, if any, to sign

Sony Network Video Recorder Standard HAW-SIBU
Technical Guide | Network Video Recorder Standard Edition
Maintenance Guide
112
a "copyright disclaimer" for the library, if necessary. Here is a sample; alter the names:
Yoyodyne, Inc., hereby disclaims all copyright interest in the library `Frob' (a library for
tweaking knobs) written by James Random Hacker.
<signature of Ty Coon>, 1 April 1990
Ty Coon, President of Vice
That's all there is to it!

Sony Network Video Recorder Standard HAW-SIBU Revision 1.3.1
Technical Guide | Network Video Recorder Standard Edition
Maintenance Guide
113
Revision History
Date Revision Description
2016/12/19 1.0.0 First edition.
2017/5/30 1.1.0 Added the following chapters.
- 4. Updating
- 5. RAID Configuration Tool
- 6. System Expansion
- 7. Event Notifications
- 8. Other Settings - 9. Troubleshooting
2017/11/14 1.2.0 Updated the steps in 2.3.3.Creating a System Image
2018/6/24 1.3.1 Updated the steps in 2.2.2. Creating a Virtual Hard Disk (VHD)
Added 7.2. Buzzer
Revised section 4.1 Updating

Sony Network Video Recorder Standard HAW-SIBU Revision 1.3.1
Disclaimer This document, in whole or in part, may not be reproduced or transferred for any
purpose without prior written approval from Sony Corporation. Sony Corporation reserves the right to make any modification to this document or the
information contained herein at any time without notice. Sony Corporation shall not bear any responsibility or liability for any damage, lost
earning, and third party claim, resulting from the products and related documents.
Copyright This document contains registered trademarks and trademarks that are owned by their
respective companies.