Embed Size (px)
Citation preview

TeamViewer GmbH • Kuhnbergstraße 16 D-73037 Göppingen www.teamviewer.com
TeamViewer 9
Manual
MSI
Rev 9.0-12/2013

TeamViewer 9 Manual MSI www.teamviewer.com Page 2 of 12
Table of Contents
1 Installation overview ....................................................................................................................... 3
2 Create a Group Policy Object and Deploy TeamViewer MSI package ............................................... 4
3 Deploy TeamViewer Host with your customizations ........................................................................ 7
4 Deploy TeamViewer Host with automated account assignment ...................................................... 7
5 Change TeamViewer Settings (Redeploy) ....................................................................................... 10
6 Uninstall TeamViewer .................................................................................................................... 11
7 Uninstall TeamViewer manually .................................................................................................... 12
8 Enable Windows Installer logging .................................................................................................. 12

TeamViewer 9 Manual MSI www.teamviewer.com Page 3 of 12
Installation overview
1 Installation overview
The following MSI packages are available:
TeamViewer.msi: MSI installation package for TeamViewer (full version)
TeamViewer_host.msi: MSI installation package for TeamViewer Host. In addition you can
also apply your customizations with this package.
How to install TeamViewer MSI:
1. Choose the package you want to install (TeamViewer.msi or TeamViewer_Host.msi)
2. If you have already deployed a TeamViewer MSI version before, you can simply install the
newer Version. The older version will be replaced automatically, even if it's a lower major
version (4.x or higher supported). However, you have to make sure that TeamViewer (full
version) and TeamViewer Host won’t get mixed. If you want to change the TeamViewer
variant, you should uninstall the existing one first.
Note: If you have already installed TeamViewer before through a standard setup (non MSI) it doesn’t matter which variant had been used (full version or Host). In this case any TeamViewer MSI package can be deployed without a previous uninstalling of TeamViewer. The older version will be replaced automatically, even if it's a lower major version (3.x or higher supported).
3. Provide all TeamViewer settings you want to deploy in a file named
TeamViewer_Settings.reg. This filename is mandatory. If you don't provide this file,
TeamViewer will use its default settings. You can get this .reg file through a settings export
from TeamViewer: Install TeamViewer on a single computer and configure it to your needs.
In the Options dialog (Extras / Options) in the category Advanced use the Button Export…
labeled with Export options to a *.reg file. In the following Dialog Export Options you can
also specify your license key. Please keep in mind that only on one side of a TeamViewer
connection a license is needed. Usually this is on the side of the technical support, not on the
client computers.
Note: TeamViewer_Settings.reg is suitable for 32- and 64-bit systems.
4. The chosen MSI package and TeamViewer_Settings.reg have to be placed on the same
network share.
5. Deploy the package with a group policy. It's strongly recommended to deploy TeamViewer
on a per computer base.
The TeamViewer installation will place two entries to the installed programs on your
clients.
Full version: TeamViewer 9 (MSI Wrapper) and TeamViewer 9.
Host: TeamViewer 9 Host (MSI Wrapper) and TeamViewer 9 Host.

TeamViewer 9 Manual MSI www.teamviewer.com Page 4 of 12
Create a Group Policy Object and Deploy TeamViewer MSI package
2 Create a Group Policy Object and Deploy TeamViewer MSI package
For the experienced administrator: you have to create a network share that is accessible from all
computers where you want TeamViewer to be installed. Place the required TeamViewer files on this
network share, create a Group Policy Object and link it to your domain or an organizational unit. Add
your TeamViewer MSI package as a software installation package to this GPO.
The following shows an example for a Windows Server 2008 Domain Controller:
1. Create a network share that is accessible to all computers that receive the TeamViewer
installation. The example shows a network share which already contains the appropriate
installation files.

TeamViewer 9 Manual MSI www.teamviewer.com Page 5 of 12
Create a Group Policy Object and Deploy TeamViewer MSI package
2. Start the Group Policy Management Console and create a Group Policy Object (i.e.
TeamViewer_MSI) under your Domain (or Organizational Unit).
3. Select the created GPO and add all computers or groups to which the GPO has to be applied
to in the section Security Filtering.

TeamViewer 9 Manual MSI www.teamviewer.com Page 6 of 12
Create a Group Policy Object and Deploy TeamViewer MSI package
4. Edit the GPO and navigate to Computer Configuration / Software Settings. Right-click
Software Installation and add a new package.
5. Enter the network share (UNC) of the TeamViewer MSI package
6. When you open the package select the deployment method Assigned.
TeamViewer 9 Manual MSI www.teamviewer.com Page 7 of 12
Deploy TeamViewer Host with your customizations
3 Deploy TeamViewer Host with your customizations
It is possible to customize TeamViewer Host with your own branding, including logo and text.
Visit the Design & Deploy website to setup your customizations within the TeamViewer Management
Console. After you created the Host customizations a MSI Code will be generated.
To deploy the TeamViewer Host with your customizations, simply extend the filename of the
TeamViewer_Host.msi with -idc and append the MSI code to it. Set the new filename within your
group policy as software package.
Filename example:
MSI Code: hcl79ca
Original filename: TeamViewer_Host.msi
Resulting filename: TeamViewer_Host-idchcl79ca.msi
Note: Make sure not to miss the -idc prior to the MSI Code. Also modify your Group Policy to match with the new filename.
4 Deploy TeamViewer Host with automated account assignment
You can customize a TeamViewer Host module in such a way, that the Host module is assigned
automatically to a TeamViewer account when installed.
The assignment doesn’t have to be confirmed at the client computer.
To do so, you have to unlock MSI Codes that support automated account assignment. The unlock can
be deposited using a LDAP editor within a Windows domain in the Active Directory (AD), we
recommend “ADSI Edit”.
First, you have to create a Service Connection Point (SCP) within die Active Directory. The SCP is used
to provide trusted MSI Codes to TeamViewer clients in your domain.
To create a SCP, follow these steps:
1. Open ADSI Edit and connect to the corresponding domain.
2. Navigate to the path of the AD where you want to create the SCP.
We recommend CN=TeamViewer,CN=System,DC=your,DC=domain,DC=com.
3. Create a folder by compiling a new container object called TeamViewer.

TeamViewer 9 Manual MSI www.teamviewer.com Page 8 of 12
Deploy TeamViewer Host with automated account assignment
4. Create a new serviceConnectionPoint object in the folder.
The Create Object dialog box will open.
5. Name the SCP (can be named freely).
6. Click the More attributes button in the last step of the wizard.
The Attributes dialog box will open.
7. Open the keywords attribute dialog.
TeamViewer 9 Manual MSI www.teamviewer.com Page 9 of 12
Deploy TeamViewer Host with automated account assignment
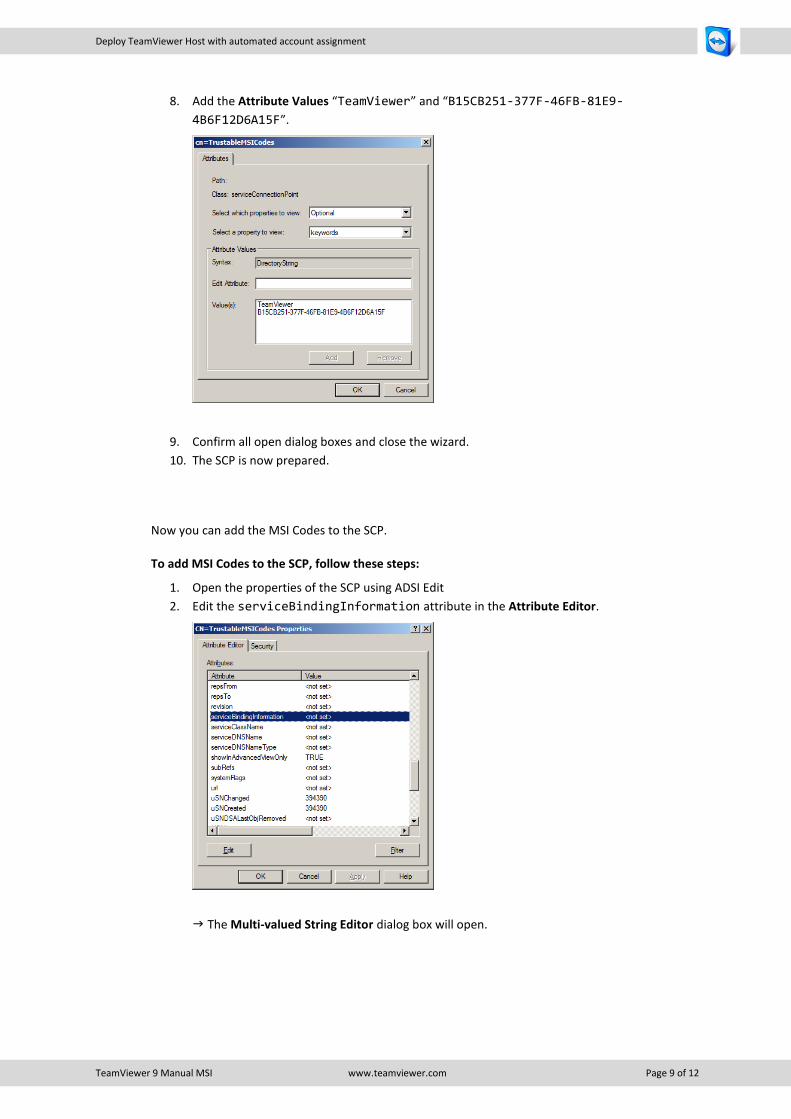
8. Add the Attribute Values “TeamViewer” and “B15CB251-377F-46FB-81E9-
4B6F12D6A15F”.
9. Confirm all open dialog boxes and close the wizard.
10. The SCP is now prepared.
Now you can add the MSI Codes to the SCP.
To add MSI Codes to the SCP, follow these steps:
1. Open the properties of the SCP using ADSI Edit
2. Edit the serviceBindingInformation attribute in the Attribute Editor.
The Multi-valued String Editor dialog box will open.

TeamViewer 9 Manual MSI www.teamviewer.com Page 10 of 12
Change TeamViewer Settings (Redeploy)
3. Enter the desired MSI Codes.
You can now deploy the customized TeamViewer Host module with automated account assignment
as described in section 3, page 7.
Note: Do not create more than one (1) SCP for your customized MSI Codes (not supported by TeamViewer).
5 Change TeamViewer Settings (Redeploy)
If you only want to change your settings without installing a newer version of TeamViewer, you can
adjust your TeamViewer_Settings.reg file and use the existing Group Policy Object for the
TeamViewer.msi or TeamViewer_Host.msi. Right-click the package in the Group Policy Management
Editor and select All Tasks / Redeploy application.

TeamViewer 9 Manual MSI www.teamviewer.com Page 11 of 12
Uninstall TeamViewer
6 Uninstall TeamViewer
To Remove TeamViewer use the existing Group Policy Object for the TeamViewer.msi or
TeamViewer_Host.msi. Right-click the package in the Group Policy Management Editor and select All
Tasks / Remove... .

TeamViewer 9 Manual MSI www.teamviewer.com Page 12 of 12
Uninstall TeamViewer manually
7 Uninstall TeamViewer manually
To uninstall TeamViewer manually on a client computer you only need to uninstall the
TeamViewer 9 (MSI Wrapper) and TeamViewer 9 Host (MSI Wrapper), respectively, under Add or
Remove Programs in the Windows control panel. The second TeamViewer entry will then be
removed automatically, which you can check by refreshing the program list.
8 Enable Windows Installer logging
For trouble shooting purposes it might be useful to enable Windows Installer logging. You can enable
logging manually through settings in the registry or with Group Policies. For further notes please
have a look at: http://support.microsoft.com/kb/223300/en-us.