Embed Size (px)
Citation preview

1
WWW.ICEWARP.COM
TeamChat12.0 Guide for administrators

1
1. Content 1
2. About TeamChat 2
3. General 3
4. How to enable and disable TeamChat feature 4
5. Domains 7
6. Users 7
7. Groups 8
8. How to create a new group and enable TeamChat 9
9. Permissions 11
10. Guest Accounts 12
11. Guest Account Invitation Process 14
12. Guest Account TeamChat Interface 17
1. Content
WebClient User GuideTeamChat Guide

2
Real-time communication is TeamChat
TeamChat provides real-time messaging and collaboration for teams & projects. It lets users get in touch with other people on the team, organize conversations around one topic, share files or create ad-hoc meetings. Users can invite each other to private or public rooms and organize their conversations around a project, a topic, a team, or anything they want! It’s intuitive and fun.
Any user of the server can access their TeamChat from anywhere in the world via WebClient interface. Another possibility how to access TeamChat is TeamChat Desktop. TeamChat Desktop allows users to link multiple TeamChat accounts and work with them at the same time. It integrates with the native desktop notifications on Mac and Windows, alerting users of any new posts, comments or mentions.
With IceWarp Server v12 the collaboration tool Teamchat is not included by default as in v11.4 was. The TeamChat license is now required for its functionality when the promotion or trial expires and is licensed for all the server users. For a 1000 mail server user license a 1000 user license for TeamChat is required.
2. About TeamChat
Registered TrademarksiPhone, iPad, Mac, OS X are trademarks of Apple Inc., registered in the U.S. andother countries. Microsoft, Windows, Outlook and Windows Phone are either registered trademarks or trademarks of Microsoft Corporation in the United States and/or other countries. Android is a trademark of Google Inc. IceWarp is a registered trademark in the USA and other countries.
Published on 4/1/2017.
TeamChat Guide
TeamChat Features:
• Real-time conversation among users• Invite external guests for free• Start WebMeetings• Create new events• Uploadanyfiles–pictures,spreadsheets,documents,powerpoints,audioformats,etc.• Sharelinks• Createpublicorprivatechatrooms• Managegroupswithmultiplechatrooms• Anytimeaccessiblearchiveofconversation• Pin,LikeorCommentinterestingcontent• … more features coming soon

3
3. General
TeamChat Guide
TeamChat feature can be enabled or disabled for every group account with a public folder. During upgrade of IceWarp Server 11.3.x (or older) to version 11.4.1 (or newer) TeamChat is automatically enabled for groups with public folder. During fresh installation of IceWarp Server 11.4.1 (or newer), TeamChat is enabled for the automatically created group with public folder in the default domain.
TeamChat feature will work only in the case that your GroupWare service is configured to use MySQL, MS SQL or Oracle database. If your GroupWare is running on SQLite database, TeamChat feature may not work properly.
We recommend checking the license first. The active license is required for full functionality and needs to be visible in Help - License window. Installations first upgraded to 11.4.1 or later will have TeamChat automatically enabled for 30 days even without a license, after that the customer receives a server generated alert that TeamChat has expired.
If the license is active, as an administrator you can manage TeamChat feature from administration Desktop console or WebAdmin.

4
4. How to enable & disable TeamChat feature
TeamChat Guide
Administrator has several options how to enable or disable this feature.Let´s see how to do it in the Desktop console first:
4.1. Policies
Go to Domain&Accounts – Management – Domain – Policies, in the third table of Services you will find TeamChat checkbox that you can check to enable TeamChat feature or uncheck to disable TeamChat feature. This is valid for the whole domain.
Go to Domain&Accounts – Management – Domain – User – Policies, in the third table of Services you will find TeamChat checkbox that you can check to enable TeamChat feature or uncheck to disable TeamChat feature. This is valid for the selected user.

5
TeamChat Guide
4.2. Services
Go to System – Services – General and find Collaboration section. Within this section is also displayed TeamChat feature. Right-click on the TeamChat row. A popup menu with options will appear. Click Start to run TeamChat application or Stop to stop running this application. This option is valid for the whole server.
4.3. API console
Go to Domain&Accounts – Management – Domain, right-click on the selected domain and choose API console from the popup menu. Use filter and find TeamChat API variables. Change Value to True to enable TeamChat feature or False to disable TeamChat feature. This is valid for the domain.
Go to Domain&Accounts – Management – Domain - User, right-click on the selected user and choose API console from the popup menu. Use filter and find TeamChat API variables. Change Value to True to enable TeamChat feature or False to disable TeamChat feature. This is valid for the selected user.

6
TeamChat Guide
4.4. Groups
Go to Domain&Accounts – Management – Domain – Groups – Group. In the first folder – Group – administrator, check Create a public Folder box and Create TeamChat boxes.
WebAdmin has following options:Within Users&Domains administrators have possibility to manage TeamChat for domains, users and groups.
7
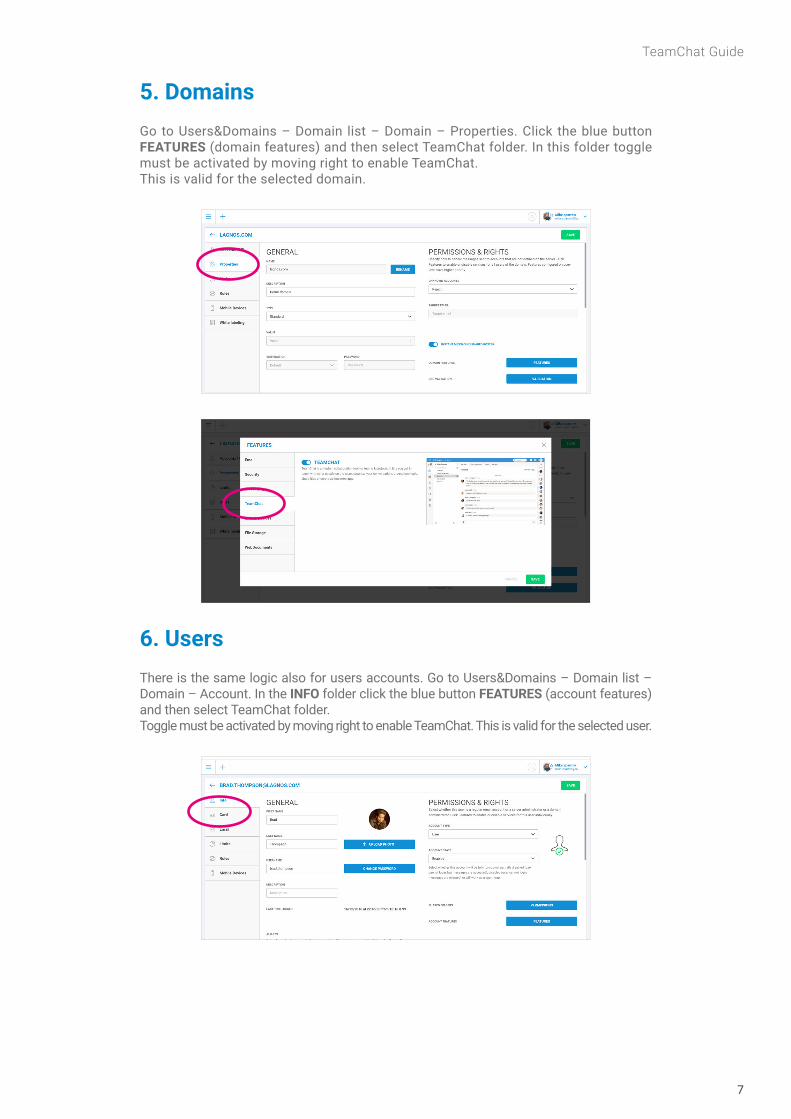
5. Domains
6. Users
TeamChat Guide
Go to Users&Domains – Domain list – Domain – Properties. Click the blue button FEATURES (domain features) and then select TeamChat folder. In this folder toggle must be activated by moving right to enable TeamChat.This is valid for the selected domain.
There is the same logic also for users accounts. Go to Users&Domains – Domain list – Domain – Account. In the INFO folder click the blue button FEATURES (account features) and then select TeamChat folder.Toggle must be activated by moving right to enable TeamChat. This is valid for the selected user.

8
TeamChat Guide
7. GroupsTo setup an option for Group, go to Users&Domains – Domain list – Domain – Account and select any group you want to setup. In the INFO folder under Group Sharing Create a public folder toggle must be turned on. When this toggle is activated, TeamChat option is appeared and administrator can enable TeamChat feature for selected group.
Of course, in WebAdmin you can also find START or STOP option for TeamChat in SERVICES tab.
Go to Dashboard – Service status and find Collaboration section. Within this section is also displayed TeamChat feature. Left-click on the „HAMBURGER“ menu next to the TeamChat section will appear table with START option if TeamChat is disabled or RESTART/STOP if TeamChat is already running. This is valid for the whole server.

9
TeamChat Guide
8. How to create a new group and enable TeamChatLets see how to create a new group in Desktop console:
Go to Domain&Accounts – Management – Domain. Select any domain where you want to create new group. Right-click on the Group folder and context menu will pop up. Choose Create new – Group. All red fields must be filled in (Alias). Then check the Create a public folder box to create a public shared folder for this group.A shared GroupWare and IMAP folder will be created for the group members. Final step is to check Create TeamChat box and Save.

10
TeamChat Guide
To create new group in WebAdmin follow these steps:
From the Plus menu in the top left corner choose New group option. Fill in appropriate tables - name and alias. After filling out this table and click Save you will be moved to a new window with group details and possibility to add group members. In the INFO folder under Group Sharing table Create a public folder toggle must be turned on. When this toggle is activated, TeamChat option is appeared and administrator is able to enable TeamChat feature for selected group.

11
TeamChat Guide
9. PermissionsRead, Write and Edit Documents rights are set by default. The rest (Modify, Rename and Delete) must be set by administrator. An administrator is able to set rights for individual group members.
Desktop console:Go to Domain&Accounts – Management – Domain – Groups. Click Permissions button within Group to open Folders dialog. It is possible to set rights for either whole email account or selected folders (e.g. Inbox, Contacts, TeamChat, etc.). In Folders dialog select TeamChat and click Permissions...Click the Add button and within the Select Item dialog select either the whole group or individual members and choose the desired access levels. Click the Apply Changes button to save these settings.
WebAdmin:To setup rights and permissions for user / group, go to Users&Domains – Domain list – Domain – Account and select any user / group you want to setup rights. In the INFO folder under Group Sharing table click the blue Permissions button. Click show all folders, select TeamChat and you can set rights for the whole group or individual members.

12
TeamChat Guide
10. Guest AccountsSome members of the team may not be WebClient users and only may need to access to specific channels. These team members can be invited as Guest Accounts. External guests can join channels by invitation only, so access to other channels and information is restricted.Administrators are also able to manage these Guest Accounts from Desktop Console and WebAdmin interface.
Desktop Console:Go to Domain&Accounts – Guest Accounts. There you will find the list with all external accounts invited to the TeamChat. As an administrator you can manage general informa-tion about these users and change password to their account via the first tab named User. The second tab Card allows you to fill in the detailed information about user – Gender, Company, Birthday, Job, Department etc.

13
TeamChat Guide
WebAdmin:Go to Users&Domains – Guest Accounts. There you will find the list with all guest accounts invited to the TeamChat. As an administrator you can manage general information about these users and change password to their account via the first tab named User. The second tab Card allows you to fill in the detailed information about user – Gender, Company, Birthday, Job, Department etc.

14
TeamChat Guide
11. GUest Accounts Invitation Process1.Thefirststep is the same as with an internal invitation. Click the plus button and then Invite Guest. In the opened dialogue you need to type an email and optional reason of invitation. After that click Invite button. Bubble with a notification that you invited someone to the chat room is shown within conversation area.(There will also be a notification that someone joined the chat room when invitation process is completed).
2.Guestaccountwill receive an email with TeamChat invitation in a few seconds. This email message contains information about sender of the invitation and chat room where sender wants to invite participant. There are no special actions required to register for the chatroom, the guest simply needs to click on the CREATE TEAMCHAT ACCOUNT button.
Note: If the invited account is already member of any other chat room, there is JOIN THE TEAM button instead of CREATE TEAMCHAT ACCOUNT in the invitation email. When click JOIN THE TEAM, user is linked directly to the WebClient login page.

15
TeamChat Guide
3.Afterwards click the CREATE TEAMCHAT ACCOUNT button the new dialogue at the login page will be opened. There are 3 boxes requested to be filled in. Name as it will appear in TeamChat, Password and Confirm password. Finally the guest has to click the blue Verify my email address button to verify the accuracy of the email account.The verification email is sent to the guest’s email account.

16
TeamChat Guide
4.Verification process is finished by clicking on the blue VERIFY YOUR ACCOUNT button in the verification email sent to the invited user´s account in the previous step. Guest verification dialog is shown.
5.Inthelaststep, after clicking the blue VERIFY YOUR ACCOUNT button the guest is redirected to the WebClient login page with prefilled username. He/she will be required to enter their password and click Sign In. Then he/she can join TeamChat.

17
TeamChat Guide
6.Finally, you can check the guest account in the Members tab. New guest is included to the guest section and if you are an administrator you can manage this account.
12. GUest Accounts TeamChat InterfaceWhen guest user completes all the steps and is logged into WebClient, the welcome window with TeamChat tips is displayed. These tips provide user with the main points how to work with TeamChat.

18
TeamChat Guide
Guest user will see standard TeamChat interface after login. Guest accounts allow users to have conversation within the chat rooms where they were invited in (the list of chat rooms on the left side) and can manage Chat room, Files&Documents, Events and Members tabs. Conversation also includes conversation discussing before joining user to the chat room.
For more information please contact our support: [email protected]
Guest user can enable / disable notifications selectively for the chat rooms where member is.
Clicking the avatar in the top right corner will open 4 options that user can choose.
1. My detailsUser can fill in personal information that he/she wants to be published. Data will automatically appear in all GAL folders in GroupWare.
2. OptionsThis option allows guest to setup several things. The main option in this section is possibility to change password. Through the next toggles user can enable sound notifications, use system noti-fications and use emoticons.
3. HelpChoosing the Help option tab opens a quick help guide containing some useful hints and information plus “What´s new” document with details on the current version of WebClient and TeamChat tips.
4. LogoutClick the menu Logout item to log out from IceWarp WebClient. The WebClient login screen is displayed.

19
IceWarp North American HQ
6225 Brandon Ave,Suite 310,Springfield, VA 22150
Tel: (888) ICEWARP (432-9277)Fax: (703) 563-9269Local: (571) 481-4611
www.icewarp.com
Enterprise Messaging For Companies Of All Sizes