Embed Size (px)
Citation preview


Thank you for purchasing this digital drum. The drum has been developed to act and play like a drum set but with greater ease. Before you use the instrument, we recommend you to read through this manual.
Taking Care of Your Digital DrumYour digital drum will give you years of playing pleasure if you follow the rules shownbelow:
LocationDo not expose the unit to the following
conditions to avoid deformation, discoloration, or more serious damage.! Direct sunlight.! High temperature (near a heat source, or in a
car during the day time).! Excessive humidity.! Excessive dust.! Strong vibration
Power Supply! Turn the power switch OFF when the
instrument is not in use.! If an AC adaptor is used, it should be
unplugged from the AC outlet i f the instrument is not to be used for an extended period of time.
! Unplug the AC adaptor during electric storms.
! Avoid plugging the AC adaptor into the same AC outlet as appliance with high power consumption, such as electric heaters or ovens. Also avoid using multi-plug adaptors since these can result in reduced sound quality, operation errors, and possibly damage.
Turn Power OFF When Making Connections! To avoid damage to the instrument and other
devices to which it is connected, turn the power switches of all related device OFF prior to connecting or disconnecting cables.
Handling and Transport
! Never apply excessive force to the controls, connectors or other parts of the instrument.
! Always unplug cables by gripping the plug firmly, but not pulling on the cable.
! Disconnect all cables before moving the instrument.
! Physical shocks caused by dropping, bump-ing, or placing heavy objects on the instru- ment can result in scratches and more serious damage.
Cleaning! Clean the cabinet and panel with a dry soft
cloth.! A slightly damp cloth may be used to remove
stubborn grime and dirt.! Never use cleaners such as alcohol or thinner.! Avoid placing vinyl object on top of the unit
(vinyl can stick to and discolor the surface).
Electrical Interference! This instrument contains digital circuitry
and may cause interference if placed too close to radio or television receivers. If this occurs, move the instrument further away from the affected equipment.
1

Setting up
Control Panel
Playing the Demo Song
Play the Pads/Pedals
Playing a SONG
Recording
MIDI
Power SupplyUsing Headphones
Connecting the foot pedals 1 & 2Supplied Accessories
MASTER VOLUMESONG VOLUME
Pad NamesAssigning a Drum Kit to thePads and PedalsAssigning a Voice to IndividualPads and PedalsREVERB ON/OFF
Select the REVERB DepthMETRONOME ON/OFF
Selecting a SONGSUPER BASSAdjusting the TEMPOTRACK ON/OFFTAP STARTLEARN
RECORDPLAYBACK
Data
What is MIDI?What you can do with MIDI
SpecificationsDrum Voice ListDrum Kit ListSong List
2
3
33
4
44
5
55
6
6
7
7889
10
101011111112
13
1313
1414
14
15
15161718

Power Supply
Your Digital Drum will run either from batteries or power adaptor. Follow the instructions belowaccording to the power source you intend to use.
Using an AC-AdaptorConnect the power adaptor to the DC IN
jack located on the rear panel of the unit, and plug the AC power adaptor into an AC power outlet.
An optional set of stereo headphones can be connected to the PHONE/OUTPUT jack located on the rear panel. When a pair of headphones is connected to the jack, the internal speakers of the unit will switch off automatically, perfect for private practice or late night playing. If you want to use an external sound system, the headphone jack can also be used to connect the digital drum to a stereo system or mixing console.
* Turn the power OFF on all equipment before making any connections.
Using Batteries
1 Open the battery compartment cover on the underside of the unit.
2
OPEN
Insert six "C" size, R14, SUM-2 or equivalent batteries. When insertingthe batteries, be care to follow thepolarity markings in the illustration.
3 Close the battery compartment securely.
OPEN
NOTES Power will be automatically drawn from the AC adaptor if an optional AC adaptor is connected while batteries are installed in the instrument.
CAUTION It is recommended that you replace worn batteries as soon as possible. When battery voltage drops, the display will dim and/or the sound will becomedistorted. When this occurs, replace the batterieswith a complete set of six new batteries of the same type.
NEVER mix old and new batteries, different types ofbatteries (alkaline, magnesium, etc.), batteries bydifferent makers, or batteries from the same makerbut of different types.Misuse may cause the instrument to become hot,result in fire, or battery leakage.
Also, to prevent damage due to battery leakage,remove all the batteries from the instrument when it is not to be used for an extended period of time.Batteries left in an unused instrument will also loose their power overtime.
3
DC IN 12V
AC power socket
Using Headphones
Do not use adaptors other than the onespecified. The technical specificationof the adaptor is 12V DC output, 2200mA,centre negative type.

Front Panel
1
2
POWER ON/OFFMASTER VOLUMESONG VOLUMETEMPOSTART/STOPTAP STARTNUMBER KEYSSONGPAD ASSIGNKITSLEARNINGSUPER BASSRECORDPLAY/STOPMETRONOME
REVERBDEMODRUM1DRUM2BASSCHORDDisplayDrum Pads (x7)Drum Pad Indicator
Rear Panel
PEDAL 1
DRUM 1DRUM 2
PEDAL 2
BASS CHORD
SONG KITS PAD ASS.
BEAT
ON
OFF
POWER
MASTE
ER M
V UOL
- +SONG
VOLUME
+
-TEMPO
TAP START
START/STOP
SONG
KITS
PAD ASSIGN
LEARNING RECORD
SUPER BASS PLAY/STOP
METRONOME REVERB
DEMO
1 2 3
4 5 6
7 8 9
- 0 +
1 2 3 4 5 6 7 89
PEDAL 1 & 2 JacksMIDI IN/MIDI OUT TerminalsPHONES/OUTPUT JackDC IN 12V (AC Adaptor) Jack
3
4
5
6
7
8
9
Connecting the Foot Pedals (1 & 2)
The supplied foot pedals can be connected to the unit to similarly play the drum set's hi-hat pedal or bass drum voices or they can also be assigned to play other voices as well.
Note: Do not press the pedal while connecting it to the unit or while turning on the power. (Connecting in this manner with the power on, the pedal's function may be reversed.)
Supplied Accessories
Foot Pedal x 2Drum Stick x 2
4
PEDAL
MIDI
DC-12V2 1
IN OUT
PHONES/OUTPUT

The Digital Drum comes with a demo song for showing you the possibilities of the drum. Toplayback the demo song, follow the instruction below:
ON
OFF
POWER
1 Turn on the power
Turn the [POWER] switch ON.The LED Display light up.
2 Start the Demo SongDEMO
Press the [DEMO] button, the demo song will start and the LEARNINGindicator light up at the same time. At this time the demo song is startingin learning mode, the LED of the drum pads will flash by following therhythm of the demo song. To exit the learning mode, press [LEARNING]button again.
MASTE
ER M
V UOL
- +SONG
VOLUME
MASTER VOLUMEThe overall volume level of the instrument is controlled by a [MASTER VOLUME] button.
Turn the [MASTER VOLUME] clockwise to increase the overallvolume . To decrease volume, turn anti-clockwise.
SONG VOLUMEThe song's volume level is controlled by two [SONG VOLUME]buttons (volume levels 0-9)
The SONG VOLUME can be used to adjust the balance betweenthe song accompaniment and your own performance on the pads.
Press the top [SONG VOLUME] button to increase the songvolume by one level. Press the bottom [SONG VOLUME] buttonto decrease the song volume by one level. Holding either of thebuttons increases or decreases the song volume level rapidly.
DEMO START/STOP
3 Stop the Demo Song
To stop playback, press either the [DEMO] button again or the[START/STOP] button.
5

Strike the pad with the supplied drum sticks to play the drum voices. Drum Kit "001" is auto-matically chosen whenever the power is turned on and the [KITS] button is pressed.
Striking the pads with different forces results in relatively loud or soft sounds accordingly.Loudness of the sound may vary according to which part of the pad is struck.
Pad Names
Pad 1
Pad 2
Pad 4
Pad 3
Pad 5
Pad 6
Pad 7
41: CrashCymbal 1
16: High Tom 1 18: Mid Tom 1
43: Ride Cymbal
7: Snare Drum High
40: Hi-HatOpen/Close
(Pedal 2 Off/On)
20: Low Tom 1
Ex. Shown, Drum Kit 001 Standard 1
A hi-hat sound is assigned to the Pad 6(Drum Kit 001). Striking the Pad 6 whilepressing on Pedal 2 produces a closedhi-hat sound. Striking the pad without pressing the pedal produces an open hi-hat sound.
Pedal 2Pedal 11: Bass Drum Low40: Hi-Hat Pedal
The bass drum voice is control-led by pressing Pedal 2.Use Pedal 1 to control the Hi-Hat. (This is in the case of DrumKit 001).
6
PAD No.
PAD Assign No.
Percussion
Present Pad number and Drum Kit

Assigning a Drum Kit to the Pads and Pedals
The Digital Drum allows you to choose from 20 different Drum Kits plus one custom kit(1 - 20: see "Drum Kit List " on page 17) quickly and easily. 20 of the kits have preset voice combinations that will be set to the pads and pedals when the kit is selected. Select some different kits and try playing them.
1 Press the [KITS] button
Pressing the [KITS] button, the KITS's indicator will light andthe current selected Drum Kit appears on the display.
Note
KITSSONG KITS PAD ASS.
2 Select a Drum Kit Number
1 2 3
4 5 6
7 8 9
- 0 +
You can select the Drum Kit by pressing the number keys, forexample, when you want to select Drum Kit 08, press "0" and"8" correspondingly, "08" appear on the display,
Note Drum Kit number 01 is normally selected when the "KITS" is turned ON.
You should enter two digit to select the Drum Kit.
There are 20 Drum Kits (01-20) can be select, if you enter a number other than 01-20, the unit will not accept and the drum kit number fails to change.
Assigning a Voice to Individual Pads and Pedals("CU" Custom Kit)
The Digital Drum has a total of 76 high quality percussion sounds (see the "Drum Voice List" page 16) that can be assigned to each of the 7 drum pads and 2 foot pedals. Try assigning some different voices to the "CU" Custom Drum Kit.
Note Any change made to one of the preset drum kits will automatically be saved in the "CU" Custom Drum Kit.Both the Custom and "001" drum kit contents are same until modified (see the "Drum Kit List" on page 16)
1 Press the [PAD ASSIGN] button
Pressing the [PAD ASSIGN] button, PAD ASSIGN indicator appearon the display and the indicator light below PAD 1 light up. PAD 1 is currently assigned.
PAD ASSIGN
7
SONG KITS PAD ASS.
SONG KITS PAD ASS.
You are unable to select the Drum Kits when you are playing the digital drum in learning mode.

2 Select a Pad/PedalSONG KITS PAD ASS.
Strike the Drum Pad that you want to assign once, for example, DrumPad 7, the indicator on PAD 7 light up, the display show the currentPercussion number.
3 Select a Percussion
You can select the voice by repeatedly striking the pad, repeatedlypressing the pedal (while listening to the voice) or by pressing thenumber keys.
Strike the Drum Pad until you reach the voice that you desired.
Enter the percussion number by pressing the number keys shown on the Drum Voice List on page 16)
SONG KITS PAD ASS.
4 Press the KITS Button
Press the [KITS] button, "CU" (Custom Kit) appears on the displayand the DRUM KIT indicator light up instead of PAD ASSIGN indicator.
KITS
SONG KITS PAD ASS.
5 Play the Pads and Pedals
Now you can play your drum with the custom drum kits.Repeat steps 2-4 if you want to assign another drum pad.
REVERB
REVERBDifferent depths of the Digital Drum's reverb effect can be selectedto the instrument's overall sound.The REVERB effect is turned on automatically every time you turnthe power on and the default level is set to [r-2].
Select the REVERB DepthPress the reverb button to display the current setting, use the "-" or "+" button on the keypad to select one of the four reverb depths that appear in the display. [r-0], 1], [r-2], [r-3]; [r-0] means reverb off.
Select [r-3] adds the most reverb depth to the effect.
[r-
Note You should adjust the level of Reverb while reverb level is showing on the display.
REVERB Depth data is not transmitted or received via MIDI.
7 8 9
- 0 +
SONG KITS PAD ASS.
8
1.
2.
OR
Note Your "CU" Drum Kit will be preserve even you turn off the power.To recall the "CU" Drum Kit, press the [KITS] button to enter the "Kits" mode, then press "-" or "+" button on the numeric keypad until "CU" show on the display.

METRONOME ON/OFF
METRONOME The Digital Drum's METRONOME feature produces a metronome to make the tempo easier to follow and improve your timingwhile playing the pads. To hear the metronome vocal sound, press the [METRONOME] button once,to hear the click sound, press the [METRONOME] button twice. To turn off, press the button again.Press [TEMPO +] or [TEMPO -] to adjust the speed of metronome.Press the [SONG VOLUME] buttons to adjust the sound levelor metronome.
9

The Digital Drum features 100 (00-99)different songs that can be used to provide accompaniment(see the "Song List" on page 18). Select one of the song and have a listen.
Selecting a SONG
1 Press the [SONG] button
Press the [SONG] button, its LED indicator will light, and the currently selected song number will appear in the display.
2 Select a song
Song number will increase when the "+" button on the key padis pressed, and "-" button for decrease. You can also select asong by inserting number using the number keys. (See the "Song List" on page 18)
Note Song number "00" is automatically selected whenever the power is turned on.You should enter a two digit number whenever you select a song.
1 2 3
4 5 6
7 8 9
- 0 +
SONG
SONG KITS PAD ASS.
3 Press the [START/STOP] button
Press the [START/STOP] button, after a count-in, the song willplayback.As the song is playing, the song's current measure will be shown in the display. Try playing the pads and pedals along the song.To stop playback of the song, press the [START/STOP] buttonagain.
NOTES You can also use the TAP START function to start songs (see page 11)
The Digital Drum's songs consists of loop type and sequence type(see the "Song List" on page 18)Loop type songs (00-79)will continuously play from the time the [START/STOP] button is initially pressed, until the button is pressed again.Sequence type songs (80-99)will automatically stop when the song reaches its end.
START/STOP
Loop
Sequence
The Super Bass option is create for making the voices deeper, and more powerful bass.
SUPER BASS
The Super Bass is turned ON at the time you turn on the Digital Drum. To turn off, press the [SUPER BASS] button. Press the [SUPER BASS] button to turn on the Super Bass again.
SUPER BASS
SONG KITS PAD ASS.
SONG KITS PAD ASS.
10

Adjusting the TEMPO
The song tempo can be set anywhere from 40 to 240 beats per minute. As tempo numbers increase, the tempo will become faster.
Set the Tempo Use the [TEMPO +] and [TEMPO -] to increase and decreasetempo value correspondingly. (Tempo values ranges from 40 to 240)
+
-TEMPO
SONG KITS PAD ASS.
TRACK ON/OFF
The Digital Drum's song accompaniment consist of 4 tracks: DRUM 1, DRUM 2, BASS and CHORD tracks.
DRUM 1
DRUM 2
BASS
CHORD
Main Drum track
Main Percussion track
Bass track
Main Chord track
9 11 13
PEDAL 1
DRUM 1DRUM 2
PEDAL 2
BASS CHORD
SONG KITS PAD ASS.
BEAT
Pressing a Track button ([DRUM 1], [DRUM 2], [BASS], [CHORD]) will mute the corresponding track and its indicator lamp will turn off.
Muting DRUM 1 and DRUM 2 tracks allows youto practice your technique in Karaoke mode.
TAP START
The TAP START function allows you to set the song's overall tempo as well as start the accompaniment. The accompaniment will playback at the tempo with which the pads are struck or the pedals are pressed.
1 Press the [TAP START] button
Press the [TAP START] button, the light will turn on.TAP START
11
Note If you select another song, your preset Tempo will retain.
Press and hold both the [TEMPO +] and [TEMPO -] buttons to return to the default tempo.

2 Tap Start
Strike any pad or press any pedal four times, the accompanimentwill start at the desired tempo. When the song start playback, theTAP START indicator will turn off.
3 Stop the Song Playback
To stop playback, press the [START/STOP] button.
START/STOP
LEARNING
LEARN
The Digital Drum's Learning feature let drum beginners learn and play a song (00-99 from the song list) easily.
1 Press the [LEARNING] button and play thesong
When you are on SONG mode, choose a song from the Song List, then press the [LEARNING] button, the [LEARNING] button indicator will light up.
2 Start Learning
Press the [START/STOP] button, the indicator light below the drum pad and pedal indicator on the display panel will start flashing, strike the pad or press the pedal with flashing light.
12
Note When you have started LEARNING, the KITS and PAD ASSIGN button will not response.
START/STOP
Note When you are playing the song, you can shift the Learning mode between "on" and "off" at any time by pressing the [LEARNING] button.

The Digital Drum's recording feature allows you to record and playback a song (1000 notesapproximately).
Data that can be recorded in the recording mode.
Drum pad and pedal data.Song data (the number cannot be changed while in the RECORD mode).Track ON/OFF setting.Tempo setting (The tempo cannot be changed while in the RECORD mode).Song Volume settingReverb ON/OFF setting
* MIDI data cannot be recorded to the memory.
RECORD
1 Prepare to Record
Select the desired song, drum kit, tempo, track on/off setting,and reverb settings.
2 Start RecordingRECORD
Press the [RECORD] button, the light start flashing.START/STOP
Press the [START/STOP] button, the light stop flashing andthe recording process starts.
3 Stop Recording
To stop recording, press the [START/STOP] or [RECORD] button. The record indicator will turn off.
When the memory becomes full, "FL" will appear on the displayand recording process stops automatically.
Playback
PLAY/STOP
The recorded song can be played back by pressing the [PLAY/STOP] button.To stop the playback, press [PLAY/STOP] again.
13
The recording process also start once you strike on a drumpad.
Note When you record a new song, this song will replace the previous recording.
The song recorded most recently will remain even you turn the power off.
Note When you start the recording, the vocal metronome also start to count. Butthe sound of the vocal will not be record. To stop the metronome, pressthe [METRONOME] button.

The MIDI IN and MIDI OUT terminals, located on the rear panel of the unit, offer broadenedmusical possibilities through use of MIDI. The following shows the description of MIDI and Howcan you use MIDI with the Digital Drum.
What is MIDI?
MIDI stand for Musical Instrument Digital Interface. MIDI is a world wide standard that makes it possible for various electronic musical instruments and other devices, such as computers, to "communicate with each other. For example, by connecting a MIDI tone generator to the Digital Drum's MIDI OUT terminal, you can play the tone generator's voices from the drum's pads and pedals.
The Digital Drum is equipped with two types of MIDI terminals,both are located on the rear panel.
MIDI IN
Data transmitted from other MIDI instruments via MIDI, isreceived at this terminal.
MIDI OUT
Data produced by the Digital Drum, is transmitted to otherMIDI instruments via MIDI from this terminal.
MIDI IN/OUTTerminals
What you can do with MIDI
MIDI OUT
MIDI IN
MIDI OUT
MIDI IN
MIDI Keyboards
Digital Drum
SequencerMIDI OUT
MIDI IN
MIDI OUT
MIDI IN
Connect the Digital Drum's MIDI OUT jack to a MIDI keyboard's MIDI IN terminal.This setup allows you to use the drum's pad to control another MIDI instrument. Playing the drum's pads will result in the other MIDI instrument's voice sounding simultaneously, creating a thicker overall sound.
Digital Drum
MIDI Keyboards
Digital Drum
Digital Drum
Sequencer
Connect the Digital Drum's MIDI IN jack to aMIDI keyboard's MIDI OUT terminal.In This setup the digital drum can be used as a tonegenerator and its voices can be played from a MIDI keyboard. Using a keyboard as a controller, it is possible to play the drum voices that are not assignedto the pads/pedals.
Connect the Digital Drum's MIDI OUT jack to aMIDI sequencer's MIDI IN terminal.Data produce by the Digital Drum can be recordedto a MIDI sequencer. Data can also be record recordedto computers or other sequencers as well.
Connect the Digital Drum's MIDI IN jack to aMIDI sequencer's MIDI OUT terminal.The sequencer's data can be used to drive the drum's sound.
14

15
Specifications
Pads:Drum Voices:Drum Kits:Songs:Demo Song:Panel Controls:
Connectors:
Power Source:
Dimensions:Weight:
7 Drum Pads with Touch Sensitive76 PCM Drum Voices20 Preset + 1 Custom100 1 POWER ON/OFF, MASTER VOLUME, SONG VOLUMETEMPO, START/STOP, TAP START, NUMERIC KEYS,SONG, PAD ASSIGN, KITS, LEARNING, SUPER BASSRECORD, PLAY/STOP, METRONOME, REVERB, DEMOTRACK(DRUM1/DRUM2/BASS/CHORD)PEDAL 1&2 MIDI IN/OUTPHONES/OUTPUTDC 12 V (AC Adaptor)Six "C" size, SUM-2, R14, or equivalent batteriesDC 12V adaptor, 2200mA, centre negative type600(W) X 385(D) X 130(H) mm3.3 kg

Drum Voice List
Pad Assign No. Percussion
123456789
10111213141516171819202122232425262728293031323334353637
Kick Drum 2Kick Drum 1Power KickElectronic Bass DrumTR-808 Bass DrumSnare Drum 1Snare Drum 2Gated Snare DrumElectronic Snare Drum LowElectronic Snare Drum HighTR-808 Snare DrumBrush TapBrush SwirlSide StickSticksHigh Tom High Mid Tom Low Mid TomLow TomHigh Floor TomLow Floor TomRock High Tom 1Rock High Tom 2Rock Mid Tom 1Rock Mid Tom 2Rock Low Tom 1Rock Low Tom 2Electronic High Tom 1Electronic High Tom 2Electronic Mid Tom 1Electronic Mid Tom 2Electronic Low Tom 1Electronic Low Tom 2TR-808 High Tom 1TR-808 High Tom 2TR-808 Mid Tom 1TR-808 Mid Tom 2
383940414243444546474849505152535455565758596061626364656667686970717273747576
TR-808 Low Tom 1TR-808 Low Tom 2*Hi-Hat Open/ClosedCrash Cymbal 1Crash Cymbal 2Ride CymbalRide BellChinese CymbalSplash CymbalVibra-slapHand ClapTambourineCowbellTR-808 CowbellMute High CongaOpen High CongaLow CongaHigh BongoLow BongoHigh TimbaleLow TimbaleHigh AgogoLow AgogoCabasaShakerClavesMute TriangleOpen TriangleShort GuiroLong GuiroMute CuicaOpen CuicaMute SurdoOpen SurdoMaracasHigh-QSlapScratch PullScratch Push
* By assigning Closed and Open Hi-Hat voices to both the Pad and Pedal, those voices can be controlled with the foot pedal as follows:
Strike the pad while pressing the Foot Pedal, the "Closed" Hi-Hat voice will sound.Strike the pad without pressing the Foot Pedal, the "Open" Hi-Hat voice will sound.Press the Foot Pedal without striking the pad, the Hi-Hat "Pedal" voice will sound.
16

Drum Kit List
No 001002003004005006007008009010011012013014015016017018019020
Kit NameStandard 1Standard 2Standard 3Standard 4Standard 5Standard 6Standard 7Standard 8
RockHeavy Metal
Dance 1Dance 2
Samba Perc.Timbales
CongaTR-808BrushJazz
Ballad Perc.Cymbal
Pad1 Pad2 Pad3 Pad4
4140414041464040414140456841554243406240
Crash Cymbal 1HH Open/ClosedCrash Cymbal 1HH Open/CloseCrash Cymbal 1Splash CymbalHH Open/CloseHH Open/CloseCrash Cymbal 1Crash Cymbal 1HH Open/CloseChinese Cymbal
Mute CuicaCrash Cymbal 1
High BongoCrash Cymbal 2
Ride CymbalHH Open/Close
ShakerHH Open/Close
1617161617171614222328295946523417166341
High Tom 1High Tom 2High Tom 1High Tom 1High Tom 2High Tom 2High Tom 1Side Stick
Rock High Tom 1Rock High Tom 2
Electronic High Tom 1Electronic High Tom 2
High AgogoSplash Cymbal
Mute High CongaTR-808 High Tom 1
High Tom 2High Tom 1
ClavesCrash Cymbal 1
1819181819191818242530316072533619184943
Mid Tom 1Mid Tom 2Mid Tom 1Mid Tom 1Mid Tom 2Mid Tom 2Mid Tom 1Mid Tom 1
Rock Mid Tom 1Rock Mid Tom 2
Electronic Mid Tom 1Electronic Mid Tom 2
Low AgogoMaracas
Open High CongaTR-808 Mid Tom 1
Mid Tom 2Mid Tom 1
TambourineRide Cymbal
434150415049434449504673697
565141436144
Ride CymbalCrash Cymbal 1
CowbellCrash Cymbal 1
CowbellTambourineRide Cymbal
Ride BellTambourine
CowbellSplash Cymbal
High-QOpen Cuica
Snare Drum HighLow Bongo
808 CowbellCrash Cymbal 1
Ride CymbalCabasa
Ride Bell
Pad5 Pad6 Pad7 Pedal 1
7677776678
10
9
70587111213647
Snare Drum HighSnare Drum LowSnare Drum HighSnare Drum HighSnare Drum HighSnare Drum HighSnare Drum LowSnare Drum LowSnare Drum High
Gated Snare DrumElectronic Snare
Drum HighElectronic Snare
Drum LowMute SurdoLow Timbale
Snare Drum High808 Snare Drum
Brush TapBrush Swirl
Mute TriangleSnare Drum High
4050401440404141404048
40
6150584040624646
HH Open/CloseCowbell
HH Open/CloseSide Stick
HH Open/CloseHH Open/CloseCrash Cymbal 1Crash Cymbal 1HH Open/CloseHH Open/Close
Hand Clap
HH Open/Close
CabasaCowbell
Low TimbaleHH Open/CloseHH Open/Close
ShakerSplash CymbalSplash Cymbal
2021202021212020262732
33
7157543814206545
Low Tom 1Low Tom 2Low Tom 1Low Tom 1Low Tom 2Low Tom 2Low Tom 1Low Tom 1
Rock Low Tom 1Rock Low Tom 2Electronic Low
Tom 1Electronic Low
Tom 2Open Surdo
High TimbaleLow Conga
TR-808 Low Tom 1Side StickLow Tom 1
Open TriangleChinese Cymbal
11211111234
4
5011511
501
Bass Drum LowBass Drum LowBass Drum HighBass Drum LowBass Drum LowBass Drum LowBass Drum LowBass Drum LowBass Drum High
MONDO Bass DrumElectronic Bass
DrumElectronic Bass
DrumCowbell
Bass Drum LowBass Drum Low
TR-808 Bass DrumBass Drum LowBass Drum Low
CowbellBass Drum Low
Pedal 2
4040404040404040404040
40
4963504040407440
HH PedalHH PedalHH PedalHH PedalHH PedalHH PedalHH PedalHH PedalHH PedalHH PedalHH Pedal
HH Pedal
TambourineClavesCowbell
HH PedalHH PedalHH Pedal
SlapHH Pedal
Pad 1
Pad 2
Pad 4
Pad 3
Pad 5
Pad 6
Pad 7
Pedal 1 Pedal 2
17

Song List
No
00010203040506070809101112131415
Song Name
8 Beat 18 Beat 28 Beat 38 Beat 48 Beat 58 Beat Ballad 18 Beat Ballad 28 Beat Ballad 3Soft RockRock 1Rock 2Rock 3Rock 4Rock 5Hard Rock 1Hard Rock 2
1617181920212223242526272829
16 Beat 116 Beat 216 Beat 316 Beat 416 Beat 516 Beat 616 Beat 716 Beat Ballad 116 Beat Ballad 216 Beat Ballad 316 Beat Ballad 416 Beat Ballad 516 Beat Funk 116 Beat Funk 2
303132333435
Dance 1Dance 2Dance 3Dance 4Dance 5Dance 6
5152
Slow Rock 3Slow Rock 4
6970717273747576777879
Waltz3/4 BalladSwing BluesBluesMarch 1March 2R&BHip-HopFunkCountryBig Band
53545556575859606162636465
Reggae 1Reggae 2Bossa Nova 1Bossa Nova 2SambaSalsaLatin RockCha-ChaMamboRhumba 1Rhumba 2Afro CubanTango
808182838485868788
8 Beat 18 Beat 2BalladHard Rock 1Hard Rock 2Hard Rock 3Pop Dance 1Pop Dance 2R&B
8990
16 BeatFusion
9192
Funk 1Funk 2
93949596
Shuffle 1Shuffle 216 Beat Shuffle16 Beat Triplet
979899
ReggaeBossa NovaBig Band
Song Number 00-79: Loop Type (Short)Song Number 80-99: Sequence Type (Long)
8 Beat
16 Beat
Dance
Rap
Latin
Others
8 Beat
16 Beat
Funk
Shuffle
Others
363738
Rap 1Rap 2Rap 3
42434445464748
Shuffle 1Shuffle 2Shuffle 3Shuffle 4Shuffle 5Shuffle 6Shuffle 7
Shuffle
Bounce
394041
Bounce 1Bounce 2Bounce 3
4950
Slow Rock 1Slow Rock 2
Slow Rock
Swing
666768
Swing 1Swing 2Swing 3
18
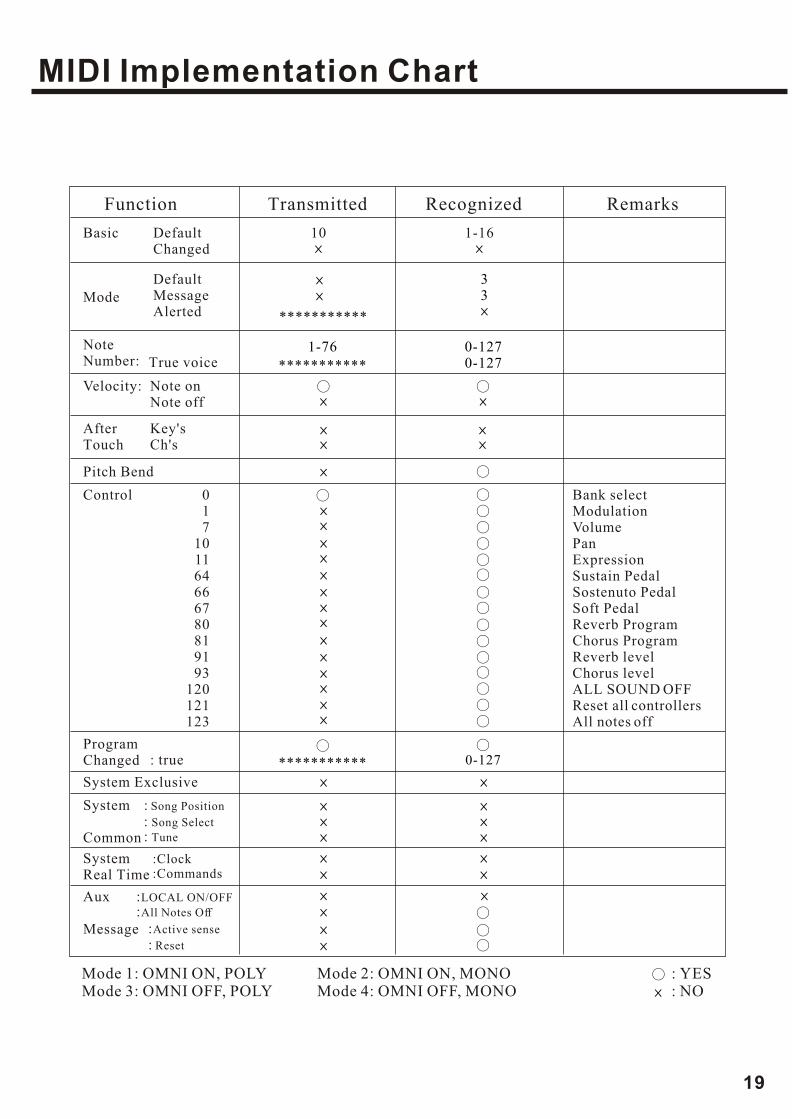
Function Transmitted Recognized Remarks
Basic DefaultChanged
ModeDefaultMessageAlerted
NoteNumber: True voice
Velocity: Note onNote off
AfterTouch
Key'sCh's
Pitch Bend
Control 017
101164666780819193
120121123
Bank selectModulationVolumePanExpressionSustain PedalSostenuto PedalSoft PedalReverb ProgramChorus ProgramReverb levelChorus levelALL SOUND OFFReset all controllersAll notes off
ProgramChanged : true
System Exclusive
System
Common
: Song Position
: Song Select
: Tune
System Real Time
:Clock:Commands
Aux
Message
:LOCAL ON/OFF
:All Notes Off
:Active sense
: Reset
MIDI Implementation Chart
19


![[Drum] Colin Bailey - Bass Drum Control](https://img.dokumen.tips/doc/110x75/5571f30449795947648d5ee9/drum-colin-bailey-bass-drum-control.jpg)
