Embed Size (px)
Citation preview

Tactual Materials in a Learning-Styles
Classroom: A Hands-On Approach

Dr. Karen Burke 2
Learning Styles Learning styles are a combination of many biological and experientially imposed characteristics that contribute to learning, each in its own way and all together as a unit. Learning style is more than merely whether a child remembers new and difficult information most easily by hearing, seeing, reading, writing, illustrating, verbalizing, or actively experiencing; perceptual strength is only one part of learning style.
Teaching with Tactual Resources Students who frequently tap their fingers, play with objects, wiggle, rock back and forth, get out of their seats, or move their feet incessantly need to understand that they either are tactual and/or kinesthetic and usually have too much energy to sit still. They need to have something to do while concentrating. Such students should be shown how to create their own instructional resources (Dunn & Dunn, 1992). When we teach tactual and/or kinesthetic youngsters by talking, they focus for only a brief amount of time and then wander off into their own thoughts and quickly forget (Burke & Dunn, 2002). When these learners create their own instructional resources, their long-term memory is stimulated.
Tactile Resources Students who perform poorly in a conventional school often have tactile strengths, but are required to learn by listening or by reading. These and other students need to learn how to teach themselves by using tactual materials such as Multipart Task Cards, Flip Chutes, Pic-A-Holes, and Electroboards (Dunn & Dunn, 1992; 1993).
To respond to tactual students, teachers should make fundamental changes in their instructional methods and resources. Assign tactual resources as homework and allow them to work and study together when doing assignments. Every time new and difficult material is introduced, students should create new cards for these manipulatives so that they value the resources, learn at least one or two methods for teaching themselves, and have at least one strategy for becoming successful academically.
• Many students of all ages learn best when utilizing tactual resources.
• The setting can be adjusted to accommodate varied learning style preferences.
• The resources are often game like and therefore very motivating.
• The resources are self corrective.
• Fear of failure, embarrassment, or anxiety is eliminated or reduced.

Dr. Karen Burke 3
Task Cards Multipart Task Cards are easy-to-make, self-corrective, tactile, and visual resources that help many students who do not remember easily by listening or by reading. Task Cards are effective in introducing new material and in reinforcing previously learned material. Students who use Task Cards may
work at their desk, or anywhere in the classroom, school, or home. Task Cards may be used by individuals, or by pairs, or by a small group--provided that everyone follows the rules. Task Cards present information about a specific topic, concept, or skill that has been translated into either questions and answers or sample answers (some true, some false). A student can make Task Cards by, for example, (1) printing the name of each state in the United States on the left side of an index card; (2) printing the name of the state's capitol in the middle; and (3) gluing a picture of the state's outline (or famous product) on the right side of the card. Then the card can be cut into irregularly shaped thirds so that only the correct answers fit together.
Flip Chutes Make Flip Chutes from half-gallon orange juice or milk containers. Design small question-and-answer cards to insert into the upper face of the container. As each question card descends on an inner slide, it flips over and emerges from a lower opening, displaying the answer. Decorate the container with paint, contact paper, and lettering that relate to the topic.
Pic-A-Holes Pic-A-Hole is a holder that includes a series of cards, each with one question and possible answers printed near the bottom. The student inserts a golf tee into the hole directly below the answer chosen. If the question card lifts from the holder with the tee in place, the answer is correct.
Electroboards Electroboards consistently hold the attention of most students. Immediate visual feedback is provided by a continuity tester bulb that lights up when an answer is correct. Questions are on one side of the Electroboard and the answers are out of sequence on the other. Students use a two-prong continuity tester to choose a question on one side and the answer on the other. The right answer illuminates the bulb. Electroboards and all other tactile resources are particularly inviting if the shapes reflect the subject. For example, make an Electroboard in the shape of a whale.

Dr. Karen Burke 4
Materials and Equipment for Development of Tactual Resources
Items listed below are needed to create one each of the following: ♦ Flip Chute ♦ Electroboard ♦ Task Cards (set) ♦ Pic-A-Hole ♦ Learning Circle ♦ Fact Wheel ♦ Fact Fan ♦ Magic Window ♦ Window Game ♦ Wrap Around ♦ Slide
Materials: ♦ 20 index cards (5”x8”) ♦ 14 paper fasteners ♦ 2 sheets of tag board (9x12) or a file folder ♦ 15” of aluminum foil ♦ 1 pocket folder ♦ 1 golf tee ♦ 1” of velcro ♦ 1 milk or juice carton (half gallon) ♦ 15” piece of contact paper ♦ a Continuity Tester (can be purchased after the workshop) ♦ 8 clothespins ♦ 4 paper fasteners ♦ 8 sheets of tag board (9x12) ♦ 24” of yarn
The supplies/equipment listed below can be shared by the participants: ♦ hole puncher ♦ ruler ♦ scissors ♦ x-acto knife ♦ magic markers ♦ masking tape (1 inch width)

Dr. Karen Burke 5
• Cut out a set of cards in the same shape.
• Randomly divide each shape into three parts.
• On one part of the shape print a question. On another part of the shape print the corresponding answer. Add a picture to the third part.
• Add self-correcting codes through either color, picture, shapes, or symbols on the back of each section of the divided shape.
• Package the set in an attractive box or bag.
Pythagorean Theorem

Dr. Karen Burke 6
• List questions on the left
side of a file folder with the answers, out of sequence, on the right side.
• Place one brad on the left side of the file folder for each question. Then place corresponding brads on the right side for the answers.
• Open the file folder and create circuits by con-necting a foil strip from each question to the corresponding answer. Be sure the brads are covered with the foil.
• Cover each piece of foil with masking tape before adding the next piece of foil.
• Use a continuity tester to check every circuit to be sure that it is working.
• Close the file folder and seal the edges with tape.

Dr. Karen Burke 7
• Use a standard pocket folder to create a Pic-A-Hole.
• Cut out the shaded areas as shown in this diagram.
• Punch out three equally-spaced holes below the smaller box.
• Place an index card (5 X 8) in the pocket. Trace the openings onto the card. Remove the same area from the index card. This will serve as a guide for the placement of questions and answers, which can be written on 5 x 8 index cards.
• Using the 5 x 8 index cards, write questions in the appropriate place. Write answers in space indicated at the bottom. Punch a hole below each answer. Cut a slit for the correct answer.
A triangle has ___ sides.
4 3 5

Dr. Karen Burke 8
• Pull open the top of a half gallon container.
• Remove a one inch strip, 1 1/2" from the top.
• Remove a one inch strip, 1 1/2" from the bottom.
• Cut 2 index cards; one to measure 6 1/2" X 3 1/2", one to measure 7 1/2" X 3 1/2".
• Attach the smaller strip to the inner openings.
• Attach one side of the larger strip to the bottom opening, the other to the top of the opposite side.
• Construct 2" X 2 1/2" cards with questions on one side and answers on the other.

Dr. Karen Burke 9
♦ Cut a circle with
a diameter of 8 inches from a piece of tagboard. Draw a circle with a diameter of 6 inches in the center.
♦ Divide the border into eight sections.
♦ Write a question in each section of the border. Punch a hole in the center of the circle.
♦ On another sheet of tagboard, draw and cut out a second circle with a diameter of 6 inches. Place an arrow near the edge of the circle.
♦ To make an answer flap, mark a fold line 45 degrees from the arrow. Cut a flap in the circle. Punch a hole in the center.
♦ Using a paper fastener, attach the two circles. Turn the arrow to each question around the border, open the flap, and write the answer on the large circle.

Dr. Karen Burke 10
• Start with a sturdy
board that is large enough to hold two columns of items. Draw a one-inch margin on the left and right.
• Place a column of questions on the left and a column of answers on the right. Items should be randomly placed in each column.
• Cut triangular notches on each side of the board that correspond to the items.
• Punch a hole in the top of the board. Tie a long string in the hole.
• Wrap the string around the back of the board and across to the corresponding answer. Continue to the end.
• Draw a pattern of corresponding lines on the back panel to create the self-correcting feature.

Dr. Karen Burke 11
• Create a pattern of boxes on a piece of tagboard.
• Completely cut out each box to create a window.
• Write a question or problem above each window. Place a piece of paper under the windows and write the correct answers in the boxes on the paper.
• Flip the tagboard over and write the correct answers on the tagboard above each window.
• Students place the tagboard over their paper, insert the answers in each window, and then flip the tagboard over to self correct.

Dr. Karen Burke 12
• Fold a square sheet of tagboard in half on a diagonal.
• Unfold the triangle. In the top half of the shape, draw a square for each of your questions.
• Cut each square on the three sides. This will create a flap.
• Fold and glue the two shapes together. Do not glue the flaps.
• Print questions on the front of each flap.
• Fold the flap back and write in the correct answer.

Dr. Karen Burke 13
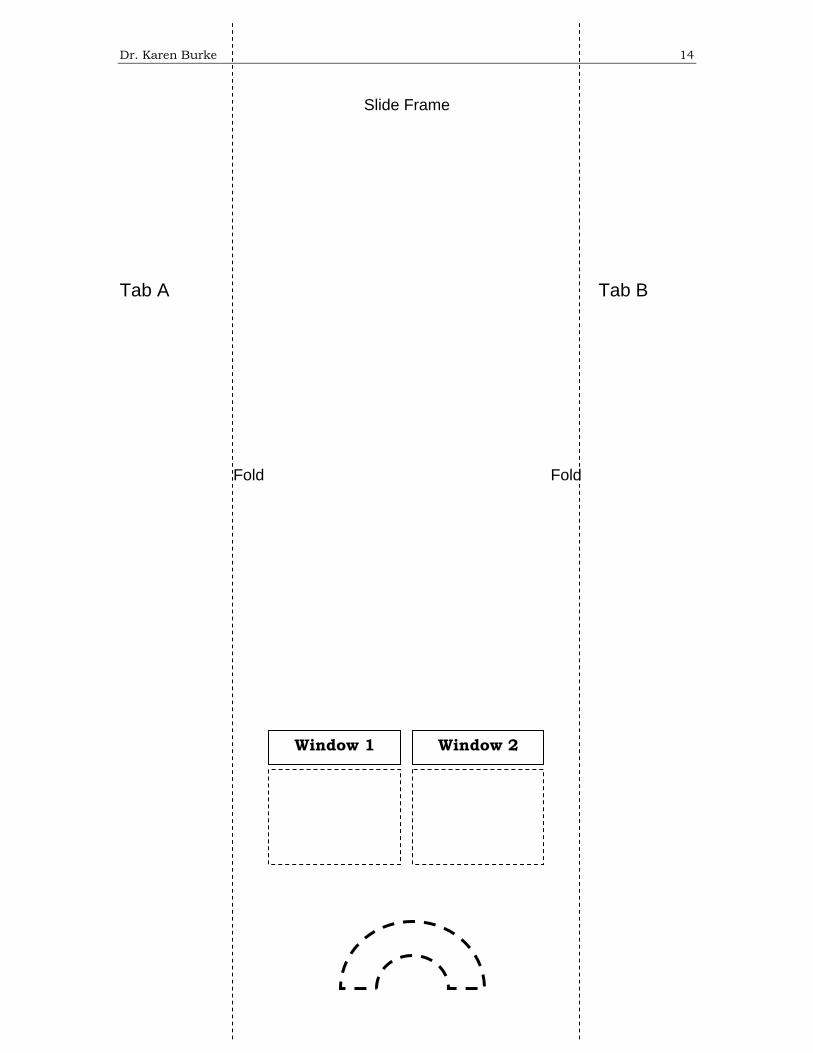
• Using the pattern for the slide frame cut out the two windows and the thumb notch.
• Fold back along the dotted lines.
• Tape tab A to tab B along the back.
• Cut out the pattern for the slider.
• Print a question or a word to be defined in window #1. Print an answer or definition in the next space above the window #2.
• Complete all five windows in this way.
• Place the slider in the frame. Read the question in window #1. Check your answer by moving the slider to the answer in window #2.
Dr. Karen Burke 14
Slide Frame
Tab A Tab B
Fold Fold
Window 1 Window 2

Dr. Karen Burke 15
Slide

Dr. Karen Burke 16
• Draw a semi-circle with a diameter of 10 inches on a piece of tagboard. Divide the semi-circle into five or six equal sections.
• Cut the sections into five or six wedges. Make a hole in the point of each wedge.
• Draw a second semi-circle with a diameter of 8 inches. Divide the semi-circle into five or six equal sections. Make a hole ½ inch from the bottom of the center.
• Insert a paper fastener into the hole and attach the wedges to the back of the fastener.
• Print questions on each section of the semicircle. Print answers on the visible edges of the wedges.
• Provide a self-correcting symbol on the back of the semi-circle and the same symbol on the corresponding wedge.

Dr. Karen Burke 17
• Cut out a large circle (at least 8 inches) from oaktag or heavy construction paper.
• Divide the circle into eight equal segments.
• Write a question or problem in each segment.
• Write the answer to each question on the end of a clothespin.
• Color-code or picture-code each correct answer to match its problem. The code should be placed on the back of the circle and the clothespin.

Dr. Karen Burke 18
The information in this booklet is based on the Dunn and Dunn Learning-Style Model.
Burke, K. & Dunn, R. (Spring, 2002). Teaching math effectively to
elementary students. Academic Exchange Quarterly, 6(1). Dunn, R. & Burke, K. (Winter, 2002). Teaching science to unreachable
students: Their way! The Art of Significantly Increasing Science Achievement Scores: Research and Practical Applications. St. John’s University, Center for the Study of Learning and Teaching Styles, 89-96.
Dunn, R. & Dunn, K. (1992). Teaching elementary students through their
individual learning styles. Boston: Allyn & Bacon. Dunn, R. & Dunn, K. (1993). Teaching secondary students through their
individual learning styles: Practical approach for grades 7-12. Boston: Allyn and Bacon.
Dunn, R., Dunn, K., & Perrin, J. (1994). Teaching young children through
their individual learning styles (K-2). Boston: Allyn and Bacon.
The resources in the photos in this booklet were created by preservice teachers from St. Joseph’s College and classroom teachers from the American School Foundation of Monterrey, Mexico and Central Elementary School, Oxford, Mississippi.
Dr. Karen Burke, Director Learning Style: The Clue to You!


![Tactual Articulatory Feedback and Gestural InputInternational Journal of Human-Computer Studies [ co n ditaly ep rsubm ,206] 1 Tactual Articulatory Feedback and Gestural Input Bert](https://img.dokumen.tips/doc/110x75/60a7572f9acd1337867d78fb/tactual-articulatory-feedback-and-gestural-input-international-journal-of-human-computer.jpg)


![tactual information processing problems site [Alleen-lezen]](https://img.dokumen.tips/doc/110x75/5899aa951a28abc3468b8742/tactual-information-processing-problems-site-alleen-lezen.jpg)