Embed Size (px)
Citation preview


WinDev Mobile 18Documentation version 18 - 2- 0413
Email address of Free Technical Support: [email protected]
This documentation is not contractually binding. PC SOFT reserves the right to modify or delete any topic dealt with in this document.
All product names or other trademarks mentioned in this publication are registered trademarks of their respective owners.
© PC SOFT 2013: This publication may not be reproduced in part or in whole in any form without the express permission of PC SOFT.
Don't forget to visit our site (www.windev.com) on a regular basis to fi nd out whether upgraded versions are available.
TABLE OF CONTENTS
IntroductionPreliminary points ..................................................................................................................................................11Overview of the tutorial ..........................................................................................................................................11How do I access the online help? ......................................................................................................................... 12Legend of symbols..................................................................................................................................................14If you are familiar with WinDev Mobile 17... .........................................................................................................14What is WinDev Mobile used for? .........................................................................................................................14
PART 1 - OVERVIEW OF WINDEV MOBILE
Lesson 1.1. Discover WinDev MobileOverview ..................................................................................................................................................................20Starting WinDev Mobile .........................................................................................................................................20Development environment ....................................................................................................................................21
The editor ................................................................................................................................................. 21The menu bar (ribbon) in details ............................................................................................................. 22
PART 2 - ANDROID APPLICATION
Lesson 2.1. My fi rst Android projectOverview ..................................................................................................................................................................28Necessary confi guration for Android ....................................................................................................................28My fi rst project ........................................................................................................................................................28
Creating the project ................................................................................................................................. 28My fi rst window .......................................................................................................................................................31
Overview .................................................................................................................................................. 31Creating the window ................................................................................................................................ 31Displaying a message ............................................................................................................................. 33
First test ...................................................................................................................................................................34First deployment on the device .............................................................................................................................35
Principle ................................................................................................................................................... 35Implementation ....................................................................................................................................... 36
Lesson 2.2. Interface (GUI)Overview ..................................................................................................................................................................39Choosing the resolution according to the device .................................................................................................39Orientation of the window ......................................................................................................................................39
Practical example .................................................................................................................................... 40Management of touchscreen ................................................................................................................................42
Practical example .................................................................................................................................... 42The different types of available controls ..............................................................................................................43
Table of contents 3

Lesson 2.3. DatabasesThe available databases ........................................................................................................................................45
Overview .................................................................................................................................................. 45HyperFileSQL database .......................................................................................................................... 45SQLite database ...................................................................................................................................... 45
The synchronization ...............................................................................................................................................46Accessing the data via a Webservice ....................................................................................................................46
Lesson 2.4. Advanced programmingOverview ..................................................................................................................................................................48
Opening the project ................................................................................................................................. 48Project description .................................................................................................................................. 48
Display the list of products .....................................................................................................................................49Creating the window ................................................................................................................................ 49Creating the Looper control .................................................................................................................... 49Improving the window ............................................................................................................................. 51
Creating the form window ......................................................................................................................................52Creating the window ................................................................................................................................ 52Creating the controls ............................................................................................................................... 52Displaying the form from the list of products ......................................................................................... 54
Managing the creation and the modifi cation of a product .................................................................................55Modifying the product form..................................................................................................................... 55Creating a new product ........................................................................................................................... 56Deploying the application ....................................................................................................................... 58
Using the camera and displaying an image .........................................................................................................60Overview .................................................................................................................................................. 60Creating the button for taking photos .................................................................................................... 60Taking photos .......................................................................................................................................... 61Selecting a photo in the photo album .................................................................................................... 62Deploying the application ....................................................................................................................... 62
Managing the bar code of the product ..................................................................................................................64Overview .................................................................................................................................................. 64Implementation ....................................................................................................................................... 64
Using the Map control ............................................................................................................................................65Creating the window ................................................................................................................................ 65Creating the Map control ........................................................................................................................ 65Displaying the stores on the map ........................................................................................................... 66Deploying the application ....................................................................................................................... 67
Using a multiline zone ............................................................................................................................................68Creating the window ................................................................................................................................ 69Creating the Multiline Zone control ........................................................................................................ 69Modifying the Multiline Zone control ...................................................................................................... 69Programming the menu .......................................................................................................................... 71
Running the test of the application .......................................................................................................................72
4 Table of contents
Lesson 2.5. Distributing the applicationOverview ..................................................................................................................................................................74Deployment via Android Market/Google Play .....................................................................................................74Deployment via a Web server ................................................................................................................................75Deployment from the PC via ADB (advanced mode) ...........................................................................................75Copying the application onto the Mobile device ..................................................................................................75
Lesson 2.6. Questions/AnswersQuestions/Answers ................................................................................................................................................77
How do I use the messaging of the device? ........................................................................................... 77How do I send an email directly? ........................................................................................................... 77How do I establish the dialog with an FTP server? ................................................................................. 78How do I use the GPS of the device and the geo-localization functions? ............................................. 78How do I send an SMS from my Android application? ........................................................................... 79How do I call native JAVA code from my Android application? ............................................................... 80
PART 3 - IOS APPLICATION
Lesson 3.1. My fi rst iOS projectOverview ..................................................................................................................................................................84Required confi guration for iOS ..............................................................................................................................84My fi rst project ........................................................................................................................................................85
Creating the project ................................................................................................................................. 85My fi rst window .......................................................................................................................................................87
Overview .................................................................................................................................................. 87Creating the window ................................................................................................................................ 87Displaying a message ............................................................................................................................. 89
First test ...................................................................................................................................................................90First deployment on the device .............................................................................................................................92
Principle ................................................................................................................................................... 92Implementation ....................................................................................................................................... 92
Lesson 3.2. Interface (GUI)Overview ..................................................................................................................................................................95Choosing the resolution according to the device .................................................................................................95Orientation of the window ......................................................................................................................................95
Practical example .................................................................................................................................... 97Management of touchscreen ................................................................................................................................99
Practical example .................................................................................................................................... 99The different types of available controls ........................................................................................................... 100
Table of contents 5

Lesson 3.3. DatabasesThe available databases ..................................................................................................................................... 102
Overview ................................................................................................................................................102HyperFileSQL database ........................................................................................................................102
The synchronization ............................................................................................................................................ 102Accessing the data via a Webservice ................................................................................................................. 103
Lesson 3.4. Advanced programmingOverview ............................................................................................................................................................... 105
Opening the project ...............................................................................................................................105Project description ................................................................................................................................105
Display the list of products .................................................................................................................................. 106Creating the window ..............................................................................................................................106Creating the Looper control ..................................................................................................................106
Creating the form window ................................................................................................................................... 109Creating the window ..............................................................................................................................109Creating the controls .............................................................................................................................109Displaying the form from the list of products .......................................................................................111
Managing the creation and the modifi cation of a product .............................................................................. 112Modifying the product form...................................................................................................................112Creating a new product .........................................................................................................................113
Using the camera and displaying an image ...................................................................................................... 115Overview ................................................................................................................................................115Creating the button for taking photos ..................................................................................................115Taking photos ........................................................................................................................................116Selecting a photo in the photo album .................................................................................................. 117
Managing the bar code of the product ............................................................................................................... 118Overview ................................................................................................................................................118Implementation .....................................................................................................................................118
Using the Map control ......................................................................................................................................... 119Creating the window ..............................................................................................................................119Creating the Map control ......................................................................................................................119Displaying the stores on the map .........................................................................................................119Closing the window................................................................................................................................120
Using a multiline zone ......................................................................................................................................... 121Creating the window ..............................................................................................................................121Creating the Multiline Zone control ......................................................................................................121Modifying the multiline zone control ....................................................................................................122Programming the menu ........................................................................................................................124
Running the test of the application .................................................................................................................... 124Generate the application .................................................................................................................................... 125
Lesson 3.5. Distributing the applicationOverview ............................................................................................................................................................... 128Deployment .......................................................................................................................................................... 128
6 Table of contents
Lesson 3.6. Questions/AnswersQuestions/Answers ............................................................................................................................................. 130
How do I use the messaging of the device? .........................................................................................130How do I send an email directly? .........................................................................................................130How do I establish the dialog with an FTP server? ...............................................................................131How do I use the GPS of the device and the geo-localization functions? ...........................................131How do I display a chart in an iOS application? ...................................................................................132How do I call native Objective C code from my iOS application? .........................................................133
PART 4 - WINDOWS MOBILE APPLICATION
Lesson 4.1. My fi rst Windows Mobile projectOverview ............................................................................................................................................................... 138My fi rst project ..................................................................................................................................................... 138
Creating the project ...............................................................................................................................138My fi rst window .................................................................................................................................................... 140
Overview ................................................................................................................................................140Creating the window .............................................................................................................................. 141Displaying a message ...........................................................................................................................142
First test ................................................................................................................................................................ 144First deployment on the device .......................................................................................................................... 145
Principle .................................................................................................................................................145Implementation .....................................................................................................................................145
Lesson 4.2. DatabasesFormat of the databases ..................................................................................................................................... 148
HyperFileSQL .........................................................................................................................................148CEDB ......................................................................................................................................................149AS/400 ..................................................................................................................................................150
Sharing data between two applications ............................................................................................................ 150Handling the same data fi les ................................................................................................................ 151Copying the data fi les onto the Pocket PC ............................................................................................152
Lesson 4.3. Advanced programmingOverview ............................................................................................................................................................... 154
Opening the project ...............................................................................................................................154Project description ................................................................................................................................154
Display the list of products .................................................................................................................................. 155Creating the window ..............................................................................................................................155Creating the Table control .....................................................................................................................155
Creating the form window ................................................................................................................................... 158Creating the window ..............................................................................................................................158Creating the controls .............................................................................................................................159Displaying the form from the list of products ....................................................................................... 161
Table of contents 7
Managing the creation and the modifi cation of a product .............................................................................. 162Modifying the product form...................................................................................................................162Creating a new product .........................................................................................................................163
Creating a menu window .................................................................................................................................... 165Creating the window ..............................................................................................................................165Customizing the menu ..........................................................................................................................167Programming the menu ........................................................................................................................168
Running the test of the application .................................................................................................................... 169Creating the executable ...................................................................................................................................... 169
Lesson 4.4. Distributing the applicationOverview ............................................................................................................................................................... 173Setup in CAB format ............................................................................................................................................ 175
Initial setup ............................................................................................................................................175Update in CAB format ............................................................................................................................175
Setup in MSI format............................................................................................................................................. 175Initial setup ............................................................................................................................................175Update in MSI format ............................................................................................................................ 176
Lesson 4.5. Questions/AnswersControls, windows................................................................................................................................................ 178
How do I change the type of a window?................................................................................................178How do I modify the type of the "OK/Close" button displayed in the title bar? ...................................178How do I display the keyboard on the Pocket PC? ...............................................................................179How do I display all the drop-down menus of a window? .....................................................................179How do I manage the planes of a window? ..........................................................................................179How do I display the progress of a process? ........................................................................................180How do I create a popup menu? ...........................................................................................................180How do I pass parameters to a window? ..............................................................................................181How do I group the controls in order to modify their properties by programing? ...............................181How do I align the controls? ..................................................................................................................182How do I give the same size to the buttons? ........................................................................................182
Environment ......................................................................................................................................................... 183How do I display or hide the panes? .....................................................................................................183How do I add a language to my project? ...............................................................................................183How do I modify the options of WinDev Mobile? ..................................................................................183
Various .................................................................................................................................................................. 183What are the image formats supported by WinDev Mobile? ...............................................................183I want to compress data, can I do it with WinDev Mobile? ..................................................................183How do I uninstall an application developed with WinDev Mobile? ....................................................184How do I detect the elements not used by my application? ................................................................184
Managing the fi les and disks .............................................................................................................................. 184How do I manage the fi les found on the Pocket PC from a standard WinDev application? ...............184
HyperFileSQL Mobile ........................................................................................................................................... 185Are the formats of the HyperFileSQL and HyperFileSQL Mobile data fi les compatible?....................185How do I manage a duplicate error during a write operation in a data fi le? .......................................185How do I manage an integrity error during a write operation or during a deletion in a data fi le? ......185How do I manage a composite key during a search? ...........................................................................186
8 Table of contents
Printing ................................................................................................................................................................. 186How do I print from a WinDev Mobile application? ..............................................................................186What is the PCL standard? ...................................................................................................................186Why does the font on the printed page differ from the font in my report? ..........................................187
Ports ..................................................................................................................................................................... 187How do I read a bar code? .....................................................................................................................187How do I read the data sent by a magnetic card reader? ....................................................................187
Conclusion
Table of contents 9

10 Table of contents
INTRODUCTION
Preliminary points
Caution: This manual is a tutorial. We advise you to refer to the online help when you are using WinDev Mobile.The aim of the tutorial is to help you discover WinDev Mobile, become familiar with the editors and teach you the concepts of WinDev Mobile. This manual does not cover all the features of WinDev Mobile.
This manual is intended for the developers who are already familiar with WinDev. This manual only presents the main concepts required to develop an application for a mobile device (operating in Android, iPhone, iPad, Windows Mobile, Windows Phone, ...).If you are not familiar with our standard WinDev product, we recommend that you to read the WinDev tutorial beforehand.Note: To receive the standard WinDev tutorial, get in touch with the sales department of PC SOFT.You should plan on spending a few hours to follow this course and to learn WinDev Mobile: you'll fi nd it well worth it!WinDev Mobile evolves all the time, so the screen shots found in this course may differ from the screen shots found in your product.
Overview of the tutorial
This tutorial presents the development on the three main mobile platforms:• Android• iOS (iPhone/iPad)• Windows Mobile/CEA lesson is proposed for each one of these platforms. You choose your development platform and you follow the corresponding lesson.
Not
es
WinDev Mobile can also be used to develop:• Windows Store apps applications that operate in the new interface of Windows
8 (Windows 8/RT tablets and PC running Windows 8).• applications for Windows Phone 8.See the online help for more details.
The tutorial was designed to progressively teach you how to use WinDev Mobile. By following this course:
• you will discover the main concepts explained informally ; these are the concepts you must learn and understand.
• you will also be asked to perform operations that illustrate the concepts just explained.As you progress through the tutorial, if you want to take a closer look at a concept or if you want to get more details about a programming function, see the online help (accessible from the editors).The size of a lesson is not necessarily proportional to its relevance ...
Introduction 11
And don't forget to take a look at the examples supplied with WinDev Mobile: they are very instructive!
Tip
The Tutorial may have evolved since this document was published. Don't forget to see the online version of the tutorial. The PDF fi le is accessible from the menu of WinDev Mobile: on the "Home" pane, in the "Online help" group, expand "Tutorial" and select "Tutorial (PDF)".
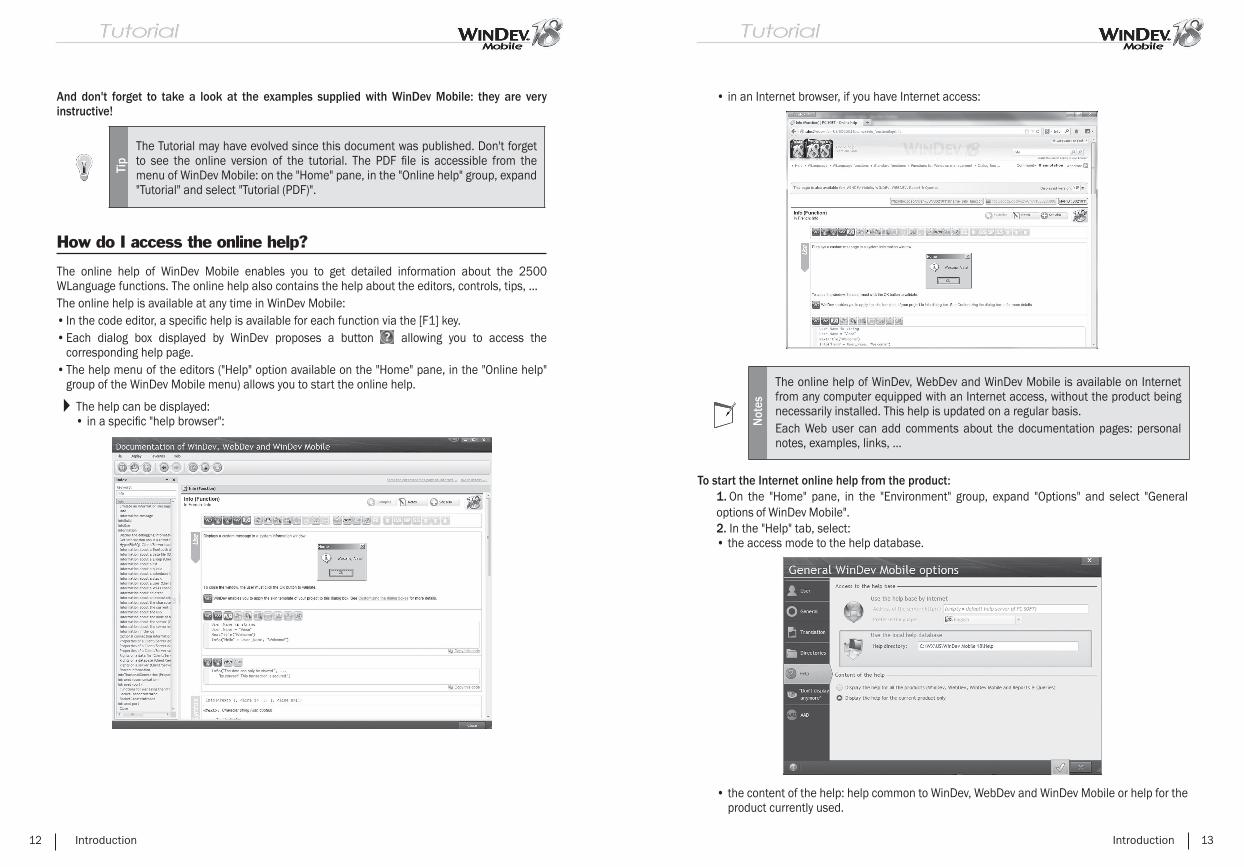
How do I access the online help?
The online help of WinDev Mobile enables you to get detailed information about the 2500 WLanguage functions. The online help also contains the help about the editors, controls, tips, ...The online help is available at any time in WinDev Mobile:• In the code editor, a specifi c help is available for each function via the [F1] key.• Each dialog box displayed by WinDev proposes a button allowing you to access the
corresponding help page.• The help menu of the editors ("Help" option available on the "Home" pane, in the "Online help"
group of the WinDev Mobile menu) allows you to start the online help.
The help can be displayed:• in a specifi c "help browser":
12 Introduction
• in an Internet browser, if you have Internet access:
Not
es
The online help of WinDev, WebDev and WinDev Mobile is available on Internet from any computer equipped with an Internet access, without the product being necessarily installed. This help is updated on a regular basis.Each Web user can add comments about the documentation pages: personal notes, examples, links, ...
To start the Internet online help from the product:1. On the "Home" pane, in the "Environment" group, expand "Options" and select "General options of WinDev Mobile". 2. In the "Help" tab, select:• the access mode to the help database.
• the content of the help: help common to WinDev, WebDev and WinDev Mobile or help for the product currently used.
Introduction 13
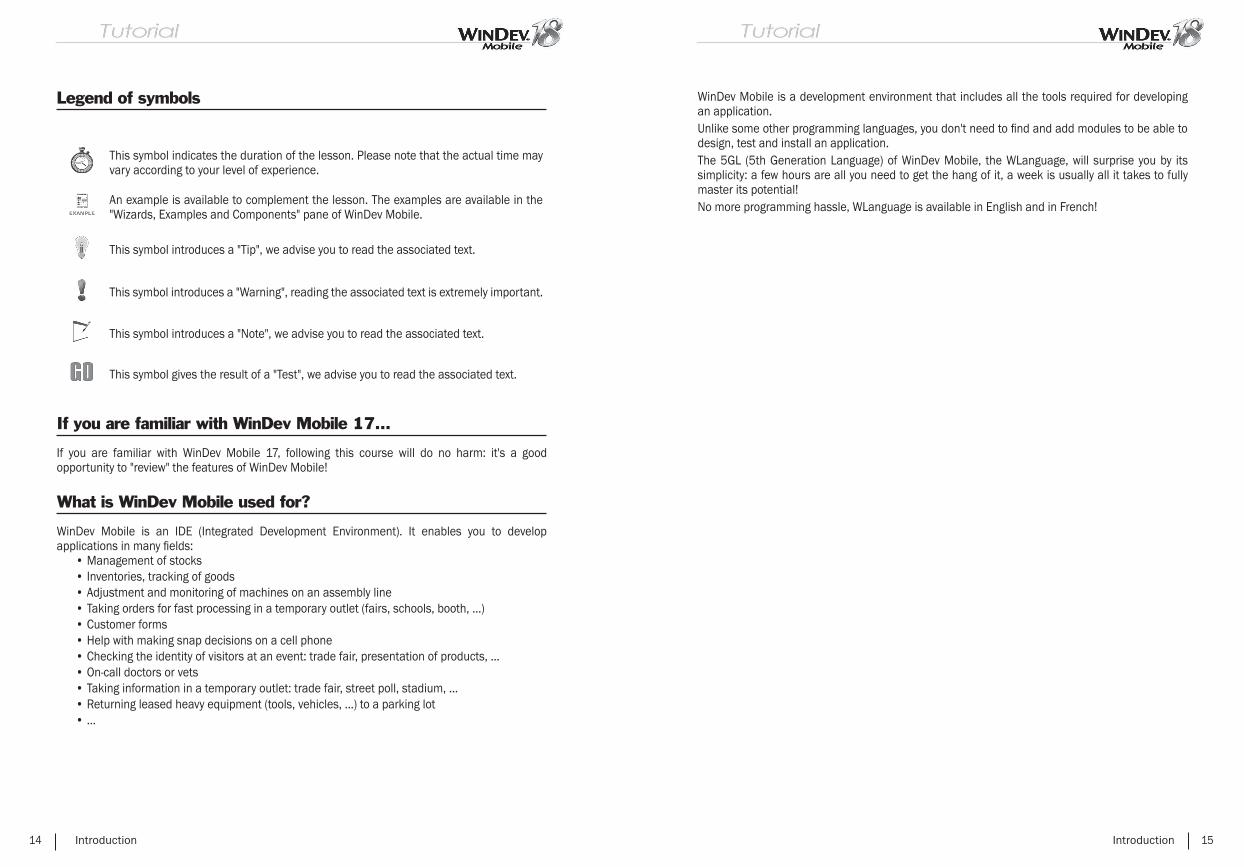
Legend of symbols
This symbol indicates the duration of the lesson. Please note that the actual time may vary according to your level of experience.
An example is available to complement the lesson. The examples are available in the "Wizards, Examples and Components" pane of WinDev Mobile.
This symbol introduces a "Tip", we advise you to read the associated text.
This symbol introduces a "Warning", reading the associated text is extremely important.
This symbol introduces a "Note", we advise you to read the associated text.
This symbol gives the result of a "Test", we advise you to read the associated text.
If you are familiar with WinDev Mobile 17...
If you are familiar with WinDev Mobile 17, following this course will do no harm: it's a good opportunity to "review" the features of WinDev Mobile!
What is WinDev Mobile used for?
WinDev Mobile is an IDE (Integrated Development Environment). It enables you to develop applications in many fi elds:
• Management of stocks• Inventories, tracking of goods• Adjustment and monitoring of machines on an assembly line• Taking orders for fast processing in a temporary outlet (fairs, schools, booth, ...)• Customer forms• Help with making snap decisions on a cell phone• Checking the identity of visitors at an event: trade fair, presentation of products, ...• On-call doctors or vets• Taking information in a temporary outlet: trade fair, street poll, stadium, ...• Returning leased heavy equipment (tools, vehicles, ...) to a parking lot• ...
14 Introduction
WinDev Mobile is a development environment that includes all the tools required for developing an application.Unlike some other programming languages, you don't need to fi nd and add modules to be able to design, test and install an application.The 5GL (5th Generation Language) of WinDev Mobile, the WLanguage, will surprise you by its simplicity: a few hours are all you need to get the hang of it, a week is usually all it takes to fully master its potential!No more programming hassle, WLanguage is available in English and in French!
Introduction 15

16 Introduction
Overview ofWinDev Mobile
PART 1
18 Part 1: Overview of WinDev Mobile
LESSON 1.1. DISCOVER WINDEV MOBILE
This lesson will teach you the following concepts...
• Starting WinDev Mobile
Estimated time: 30 min
Part 1: Overview of WinDev Mobile 19

Overview
WinDev Mobile is an IDE (Integrated Development Environment) allowing you to develop Windows applications in several fi elds: management, industry, health care, ... The applications can provide access to information stored in databases.This tutorial will explain how to create your applications (with or without database) and how to improve them by using the different features proposed by WinDev Mobile.
Starting WinDev Mobile
Start WinDev Mobile 18 (if not already done).
If WinDev Mobile 18 was never started before, a welcome wizard is displayed. This wizard is used to:• If you own an earlier version of WinDev Mobile, retrieve the existing confi gurations.• If you are a new user, confi gure your environment. This enables you to confi gure the Control
Centers.
If WinDev Mobile 18 was already started, identify yourself if necessary. The development environment appears. The home window is opened.
Let's take a look at the development environment of WinDev Mobile.
20 Part 1: Overview of WinDev Mobile
Development environment
The editor
The development environment of WinDev Mobile includes a specifi c interface and several editors allowing you to create the different elements of your applications.For example, the window editor is used to create windows, the report editor is used to create reports, ...All the editors use the same environment:
1. Menu of editors, displayed in the format of a ribbon (we'll see how to use it in the next paragraph).
2. Current editor (window editor here). This space allows you to view the element currently created or modifi ed in WYSIWYG (What You See Is What You Get).
3. Panes. The interface of WinDev Mobile includes several panes allowing you to quickly access different types of information. Some examples:• The "Project explorer" pane (displayed on the right) is used to list all the project elements by
category.• The "Wizards, Examples and Components" pane (at the bottom) is used to quickly access the full
examples, sample pages, controls that can easily be included in your applications.If necessary, these panes can be hidden by pressing [CTRL] + [W].
Part 1: Overview of WinDev Mobile 21
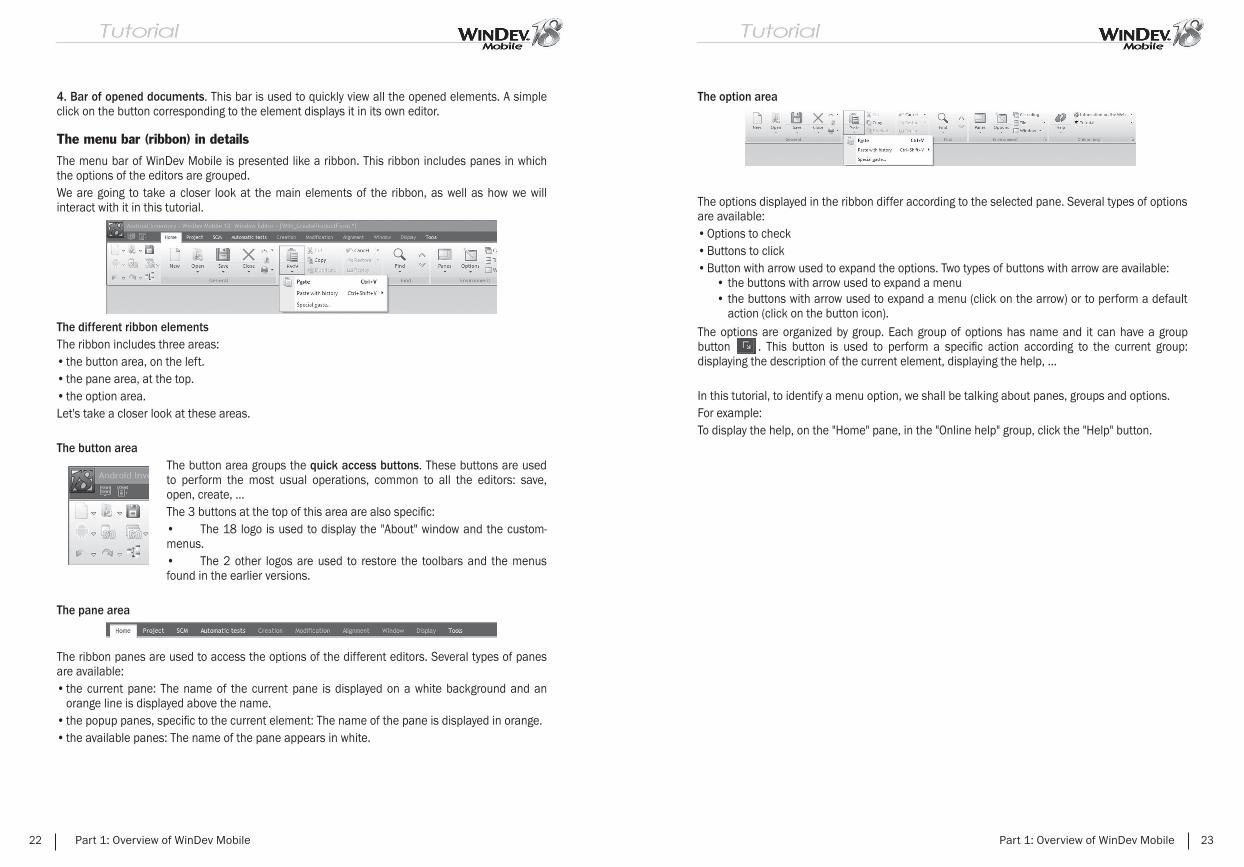
4. Bar of opened documents. This bar is used to quickly view all the opened elements. A simple click on the button corresponding to the element displays it in its own editor.
The menu bar (ribbon) in details
The menu bar of WinDev Mobile is presented like a ribbon. This ribbon includes panes in which the options of the editors are grouped.We are going to take a closer look at the main elements of the ribbon, as well as how we will interact with it in this tutorial.
The different ribbon elementsThe ribbon includes three areas:• the button area, on the left.• the pane area, at the top. • the option area.Let's take a closer look at these areas.
The button areaThe button area groups the quick access buttons. These buttons are used to perform the most usual operations, common to all the editors: save, open, create, ...The 3 buttons at the top of this area are also specifi c:• The 18 logo is used to display the "About" window and the custom-menus.• The 2 other logos are used to restore the toolbars and the menus found in the earlier versions.
The pane area
The ribbon panes are used to access the options of the different editors. Several types of panes are available:• the current pane: The name of the current pane is displayed on a white background and an
orange line is displayed above the name.• the popup panes, specifi c to the current element: The name of the pane is displayed in orange.• the available panes: The name of the pane appears in white.
22 Part 1: Overview of WinDev Mobile
The option area
The options displayed in the ribbon differ according to the selected pane. Several types of options are available:• Options to check• Buttons to click• Button with arrow used to expand the options. Two types of buttons with arrow are available:
• the buttons with arrow used to expand a menu• the buttons with arrow used to expand a menu (click on the arrow) or to perform a default
action (click on the button icon).The options are organized by group. Each group of options has name and it can have a group button . This button is used to perform a specifi c action according to the current group: displaying the description of the current element, displaying the help, ...
In this tutorial, to identify a menu option, we shall be talking about panes, groups and options.For example:To display the help, on the "Home" pane, in the "Online help" group, click the "Help" button.
Part 1: Overview of WinDev Mobile 23

24 Part 1: Overview of WinDev Mobile
Androidapplication
PART 2
26 Part 2: Android application
LESSON 2.1. MY FIRST ANDROID PROJECT
This lesson will teach you the following concepts...
• Required confi guration• Creating an Android project• My fi rst window• My fi rst test• First deployment
Estimated time: 1h
Part 2: Android application 27
Overview
To start working with WinDev Mobile, we are going to create a fi rst project. This project will contain a window used to display a message.This fi rst example will present the main concepts of development with WinDev Mobile.Before creating our fi rst project for Android, a confi guration of the development computer is required.
Necessary confi guration for Android
To develop an application for the Android platform, the following elements must be installed on the development computer:• The JDK: The JDK (Java Development Kit) distributed by Oracle is used to compile the generated
Java fi les.• The Android SDK of Google: The Android SDK (Software Development Kit) is a set of fi les and
applications distributed by Google in order to allow the compilation of applications for the Android operating system. Caution: The Android SDK includes sections corresponding to the versions of device platforms (2.2, 2.3, 4, ...).
See the online help for more details (download addresses, ...).
We advise you to restart the computer after these two setups.
My fi rst project
Creating the project
We are now going to create our fi rst project for Android. If you own the Android device on which the application must be run, we advise you to connect this device to the development computer. Therefore, the characteristics of the device will be automatically detected and proposed when creating the Android project.
Answ
ers A corrected project is available. This project contains the different windows
created in this lesson. To open the corrected project, on the "Home" pane, in the "Online help" group, expand "Tutorial" and select "My Android project (Answer)".
To create a project:1. Start WinDev Mobile 18 (if not already done). Close (if necessary) the current project to display the home window.
28 Part 2: Android application
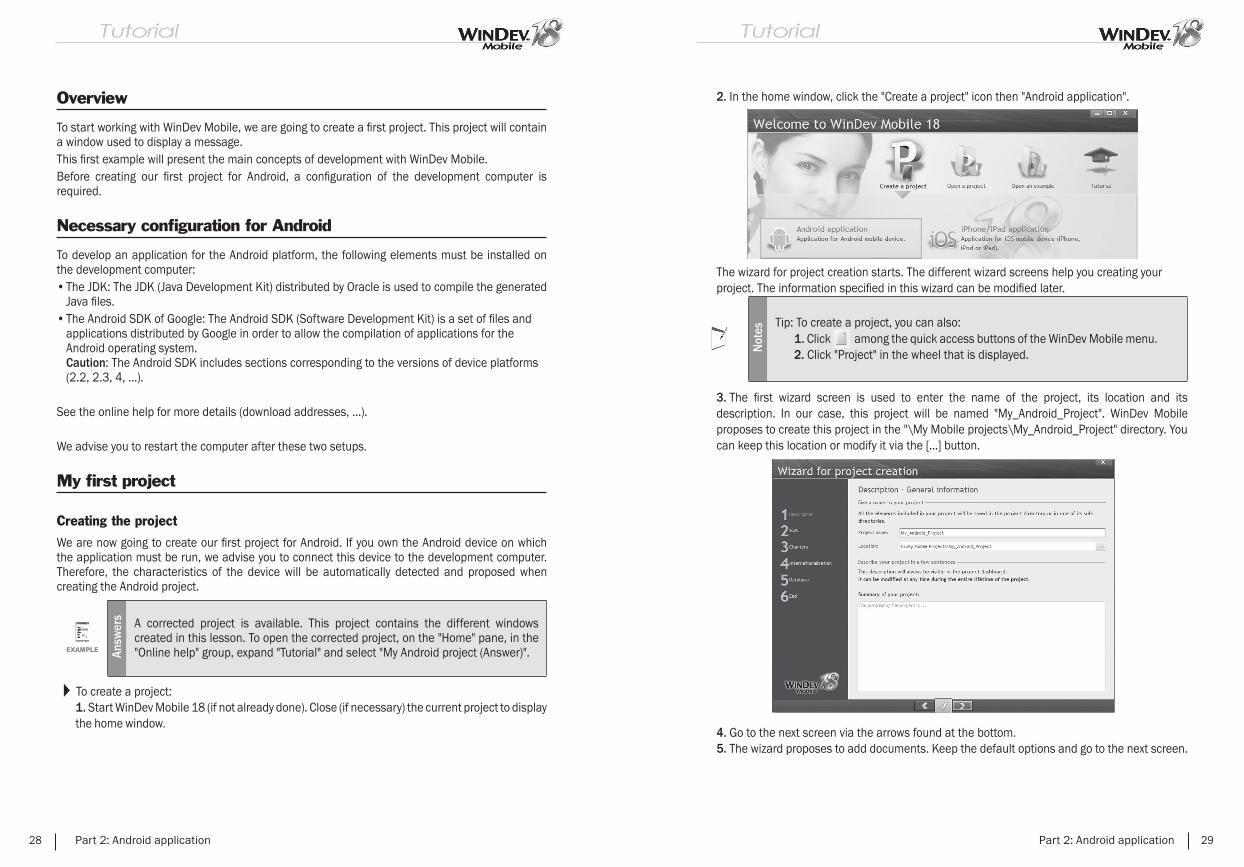
2. In the home window, click the "Create a project" icon then "Android application".
The wizard for project creation starts. The different wizard screens help you creating your project. The information specifi ed in this wizard can be modifi ed later.
Not
es
Tip: To create a project, you can also:1. Click among the quick access buttons of the WinDev Mobile menu.2. Click "Project" in the wheel that is displayed.
3. The fi rst wizard screen is used to enter the name of the project, its location and its description. In our case, this project will be named "My_Android_Project". WinDev Mobile proposes to create this project in the "\My Mobile projects\My_Android_Project" directory. You can keep this location or modify it via the [...] button.
4. Go to the next screen via the arrows found at the bottom.5. The wizard proposes to add documents. Keep the default options and go to the next screen.
Part 2: Android application 29
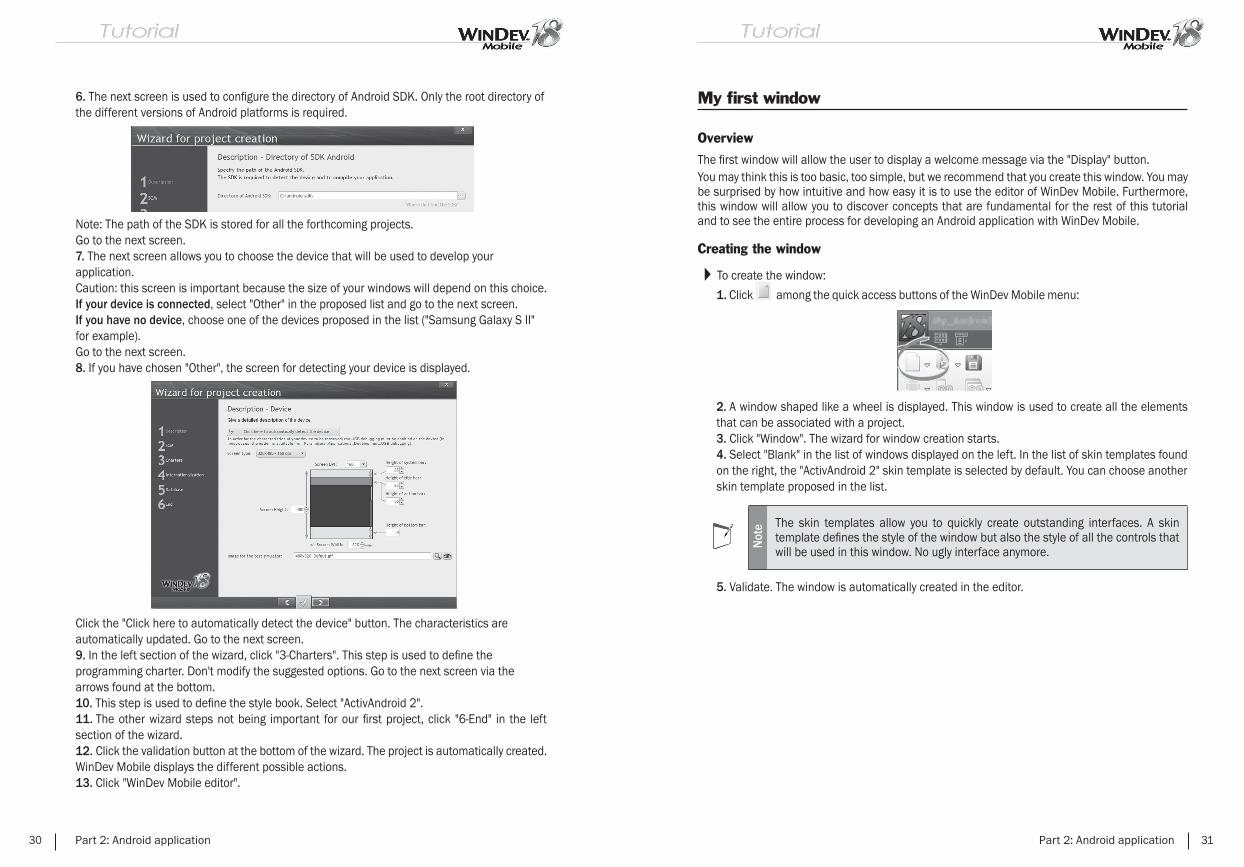
6. The next screen is used to confi gure the directory of Android SDK. Only the root directory of the different versions of Android platforms is required.
Note: The path of the SDK is stored for all the forthcoming projects.Go to the next screen.7. The next screen allows you to choose the device that will be used to develop your application. Caution: this screen is important because the size of your windows will depend on this choice. If your device is connected, select "Other" in the proposed list and go to the next screen. If you have no device, choose one of the devices proposed in the list ("Samsung Galaxy S II" for example). Go to the next screen.8. If you have chosen "Other", the screen for detecting your device is displayed.
Click the "Click here to automatically detect the device" button. The characteristics are automatically updated. Go to the next screen.9. In the left section of the wizard, click "3-Charters". This step is used to defi ne the programming charter. Don't modify the suggested options. Go to the next screen via the arrows found at the bottom.10. This step is used to defi ne the style book. Select "ActivAndroid 2".11. The other wizard steps not being important for our fi rst project, click "6-End" in the left section of the wizard.12. Click the validation button at the bottom of the wizard. The project is automatically created. WinDev Mobile displays the different possible actions.13. Click "WinDev Mobile editor".
30 Part 2: Android application
My fi rst window
Overview
The fi rst window will allow the user to display a welcome message via the "Display" button.You may think this is too basic, too simple, but we recommend that you create this window. You may be surprised by how intuitive and how easy it is to use the editor of WinDev Mobile. Furthermore, this window will allow you to discover concepts that are fundamental for the rest of this tutorial and to see the entire process for developing an Android application with WinDev Mobile.
Creating the window
To create the window:
1. Click among the quick access buttons of the WinDev Mobile menu:
2. A window shaped like a wheel is displayed. This window is used to create all the elements that can be associated with a project.3. Click "Window". The wizard for window creation starts.4. Select "Blank" in the list of windows displayed on the left. In the list of skin templates found on the right, the "ActivAndroid 2" skin template is selected by default. You can choose another skin template proposed in the list.
Not
e The skin templates allow you to quickly create outstanding interfaces. A skin template defi nes the style of the window but also the style of all the controls that will be used in this window. No ugly interface anymore.
5. Validate. The window is automatically created in the editor.
Part 2: Android application 31
Save the window by clicking among the quick access buttons. When the fi rst backup is performed, a specifi c window is displayed. This window proposes to enter:• the title of the element: enter "Welcome". In our case, this title will be displayed in the title
bar of the window.• the name of the element is the name of the window. This name will be used in programming.
By default, this name includes "WIN_" that corresponds to the programing charter and "Welcome" that corresponds to the title of the window.
Not
e
Let's take a look at the window name proposed by WinDev Mobile: this name starts with the letters "WIN_". This prefi x is automatically added because the project uses a programming charter.The programming charter is used to defi ne a prefi x for each type of object, allowing you to quickly identify the element handled:• a window starts with WIN,• a button starts with BTN,• etc.If you don't want to use this charter, all you have to do is disable it: on the "Project" pane, in the "Other actions" group, expand "Charter" and uncheck "Use the charter" .
• the location that corresponds to the fi le name created for the window. The window is a fi le whose extension is "WPW", saved in the project directory.
Click the green button to validate.
32 Part 2: Android application
Displaying a message
You are now going to create a button used to display a message.
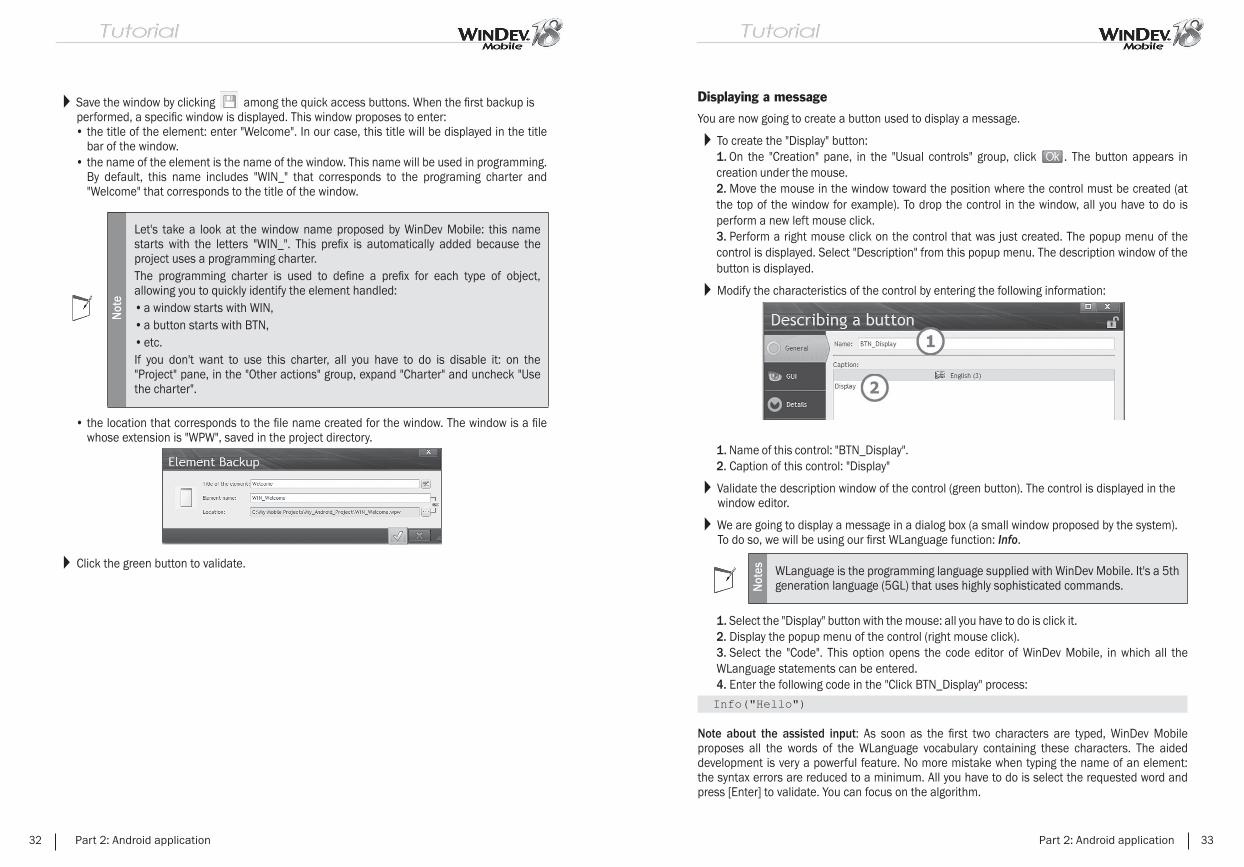
To create the "Display" button:1. On the "Creation" pane, in the "Usual controls" group, click . The button appears in creation under the mouse.2. Move the mouse in the window toward the position where the control must be created (at the top of the window for example). To drop the control in the window, all you have to do is perform a new left mouse click.3. Perform a right mouse click on the control that was just created. The popup menu of the control is displayed. Select "Description" from this popup menu. The description window of the button is displayed.
Modify the characteristics of the control by entering the following information:
1. Name of this control: "BTN_Display".2. Caption of this control: "Display"
Validate the description window of the control (green button). The control is displayed in the window editor.
We are going to display a message in a dialog box (a small window proposed by the system). To do so, we will be using our fi rst WLanguage function: Info.
Not
es WLanguage is the programming language supplied with WinDev Mobile. It's a 5th generation language (5GL) that uses highly sophisticated commands.
1. Select the "Display" button with the mouse: all you have to do is click it.2. Display the popup menu of the control (right mouse click).3. Select the "Code". This option opens the code editor of WinDev Mobile, in which all the WLanguage statements can be entered.4. Enter the following code in the "Click BTN_Display" process:
Note about the assisted input: As soon as the fi rst two characters are typed, WinDev Mobile proposes all the words of the WLanguage vocabulary containing these characters. The aided development is very a powerful feature. No more mistake when typing the name of an element: the syntax errors are reduced to a minimum. All you have to do is select the requested word and press [Enter] to validate. You can focus on the algorithm.
Part 2: Android application 33
Not
esWhen entering this code in the code editor, you have noticed that different colors are used by the different elements. This is the syntactic coloring. The code editor enables you to easily identify the different elements handled by the code:
• the WLanguage functions are colored in blue,• the character strings (between quotes) are colored in purple,• the names of controls are colored in cyan.
The Info function displays the message passed in parameter.
Save the modifi cations by clicking among the quick access buttons (on the left of ribbon), or by pressing [Ctrl]+[S].
Close the code editor (cross at the top right of the code editor). The window re-appears.
First test
For an Android application, WinDev Mobile allows you to run the test of the application on the development computer via the simulation mode. This test simulates an Android device on the development computer. This test is useful when the developer has no Android device. However, this test does not allow you to use the hardware components of the device (GPS, SMS, camera, ...).
Not
es
WinDev Mobile also enables you to run a test of the application via the Android emulator (AVD) supplied with the SDK.To run this test, you must:• start the AVD emulator and create different confi gurations corresponding to
the requested targets.• generate the Android application. This operation is explained in the next
paragraph.• select the requested target confi guration at the end of generation to run the
application test on the emulator.
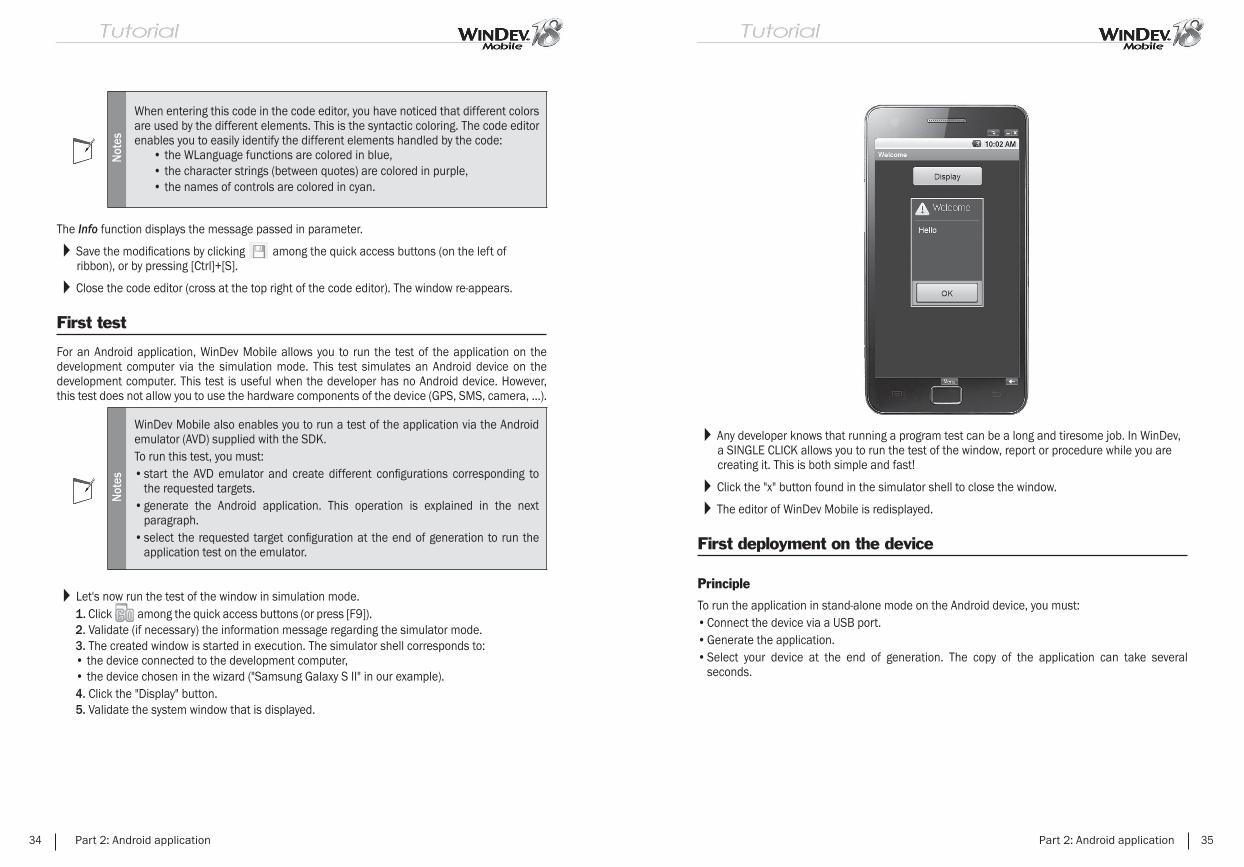
Let's now run the test of the window in simulation mode.1. Click among the quick access buttons (or press [F9]).2. Validate (if necessary) the information message regarding the simulator mode.3. The created window is started in execution. The simulator shell corresponds to:• the device connected to the development computer,• the device chosen in the wizard ("Samsung Galaxy S II" in our example).4. Click the "Display" button.5. Validate the system window that is displayed.
34 Part 2: Android application
Any developer knows that running a program test can be a long and tiresome job. In WinDev, a SINGLE CLICK allows you to run the test of the window, report or procedure while you are creating it. This is both simple and fast!
Click the "x" button found in the simulator shell to close the window.
The editor of WinDev Mobile is redisplayed.
First deployment on the device
Principle
To run the application in stand-alone mode on the Android device, you must:• Connect the device via a USB port.• Generate the application.• Select your device at the end of generation. The copy of the application can take several
seconds.
Part 2: Android application 35

Implementation
To generate the Android application:1. On the "Project" pane, in the "Generation" group, click "Generate" (you can also click among the quick access buttons).2. WinDev Mobile proposes to select the fi rst project window. In our example, select "WIN_Welcome" and validate (green button at the bottom of the screen).3. The wizard for generating an Android application starts.
4. The fi rst wizard screen is used to:• defi ne the name of the application (displayed below the icon used to start the application)
and the corresponding package.• select the icon of the application in the image catalog of WinDev Mobile.5. Go to the next screen by clicking the arrow keys found at the bottom of the screen. This screen is used to defi ne:• the splash screen of the application.• the information saved in the manifest,• the start mode of the application (when the device is started or not).6. Go to the next screen. This screen is used to defi ne the version number of the application.7. Go to the next screen. This screen is used to sign the application. The wizard proposes a generic signature that can be used for the tests of the application. A specifi c signature is required to distribute the application. See the online help for more details.8. Go to the next screen. This screen is used to include specifi c fi les (data fi les, images, ...). This possibility will not be used in our example. Keep the default options.9. Go to the next screen. This screen is used to include specifi c libraries. Keep the default options.10. Go to the next screen. This screen is used to defi ne the permissions of the application. By default, according to the WLanguage functions used in the application, WinDev Mobile detects the necessary permissions.
36 Part 2: Android application
11. Go to the next screen. This screen is used to restrict the download of the application on Google Play store to the devices equipped with the features used. This possibility will not be used in our example. Keep the default options.12. Go to the next screen. This screen is used to confi gure the options of Android SDK. Keep the default options.13. Go to the next screen. The last wizard screen is used to specify whether the application must be copied and run on the device connected to the computer or on an emulator.
Not
es If no device is connected or if no emulator is displayed, you must create an emulator ("Create an emulator" button).
If this option is checked, a new screen allows you to select the runtime device:
That's it, our fi rst application is generated and run on the Android device.
Part 2: Android application 37
LESSON 2.2. INTERFACE (GUI)
This lesson will teach you the following concepts...
• Choosing the resolution according to the device• Orientation of the window• Management of touchscreen
Estimated time: 30 min
38 Part 2: Android application
Overview
The Android system is available on the phones and on the tablets. WinDev Mobile allows you to easily create interfaces that adapt to the device used.
Choosing the resolution according to the device
When creating a project, you will have to choose the resolution that will be used for the project windows. Two cases may occur:• You know the target device: in this case, all you have to do is select it in the list proposed by the
wizard.• You do not know the target devices: in this case, you must choose the smallest resolution
common to all these devices. Via the anchoring of controls in the window, the content will be adapted to the resolution.
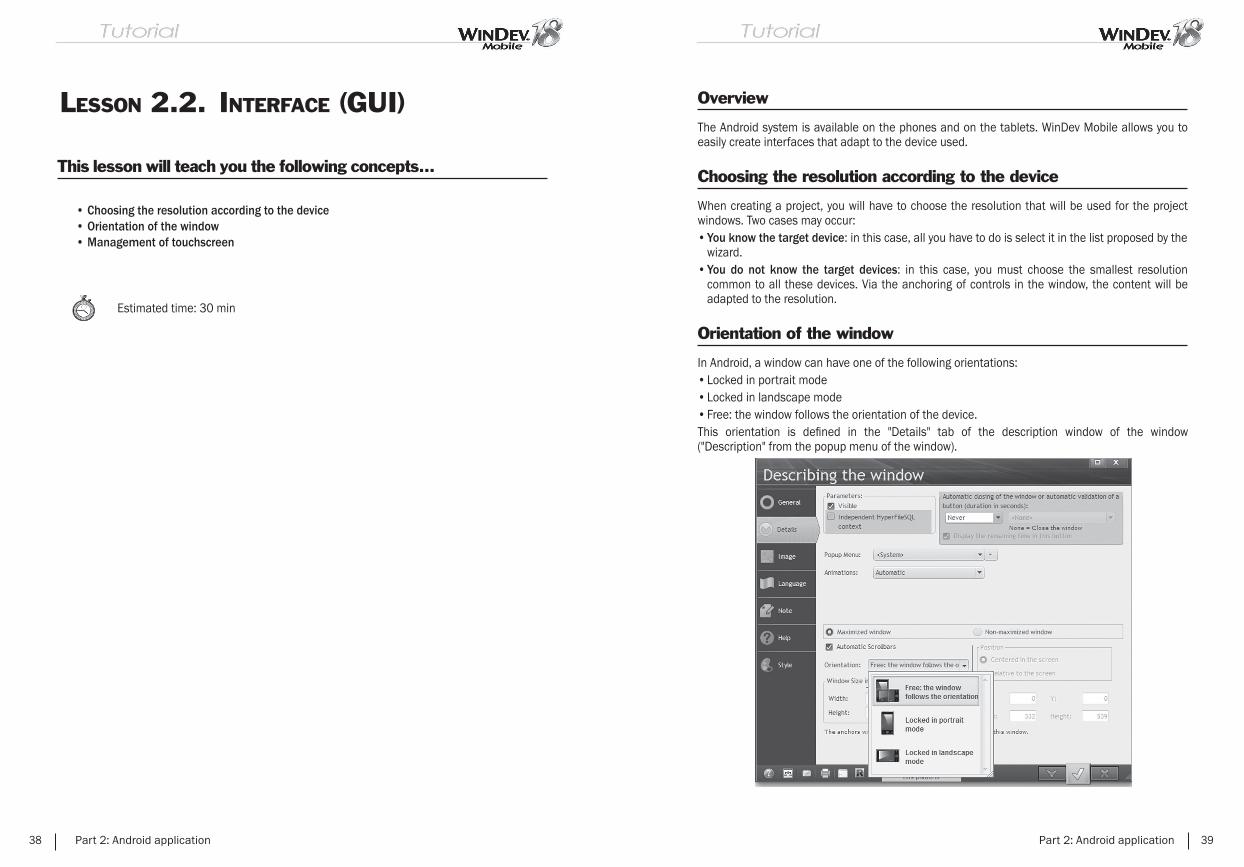
Orientation of the window
In Android, a window can have one of the following orientations:• Locked in portrait mode• Locked in landscape mode• Free: the window follows the orientation of the device.This orientation is defi ned in the "Details" tab of the description window of the window ("Description" from the popup menu of the window).
Part 2: Android application 39

No specifi c operation must be performed in the two fi rst cases.For a free window, the organization of the controls and their size must adapt to the orientation. The anchoring mechanism must be use to get a proper result.
Practical example
Open (if necessary) the "My_Android_Project" project that was created in the previous lesson.
Answ
ers A corrected project is available. This project contains the different windows
created in this lesson. To open the corrected project, on the "Home" pane, in the "Online help" group, expand "Tutorial" and select "My Android project (Answer)".
In our example, the project was created for a phone and its test was run in portrait mode in the simulator.We are now going to run its test in landscape mode in the simulator.
Run the test of the project ( among the quick access buttons).1. The window is displayed in portrait mode.2. In the simulator, click the arrow in the shell ( ).3. The orientation of the window changes on the screen.4. In our example, the location of the button does not change: it does not adapt to the orientation of the screen.
We are now going to modify our window in order for the "Display" button to be centered in the window and to remain centered regardless of the device orientation.
Stop the test and go back to the editor.
40 Part 2: Android application
To center the button in the window:1. Select the button (click the button).2. On the "Alignment" pane, in the “Centering and distribution” group, click "Center in the parent (horz)".
In order for the button to remain centered in the window, we are going to use the control anchoring:1. Select the button (click the button).2. Display the popup menu (right mouse click).3. Select "Anchor": the window for defi ning the anchors is displayed:
4. Select "Horizontally centered" and validate (green button).
Run the test of the project ( among the quick access buttons):• The button is centered in portrait mode.• Change the orientation of the simulator.• The button remains centered in landscape mode.
Part 2: Android application 41

Management of touchscreen
One of the most important aspects of the interface for a mobile application is the management of the touchscreen feature.A "multitouch" feature is a technique allowing the user to interact with a device via several contact points.Handling images is one of the most common features of the multi-touch. The display size on a phone being reduced, it is often necessary to perform a zoom and/or to move in an image.This enables you to perform a zoom on an image via the contact of 2 fi ngers that move apart.
To manage the "multi-touch", WinDev Mobile proposes:• Specifi c options available in the Image control.• Specifi c WLanguage functions.• Specifi c optional processes.See the online help for more details.
Practical example
Open (if necessary) the "My_Android_Project" project that was created in the previous lesson.
Answ
ers A corrected project is available. This project contains the different windows
created in this lesson. To open the corrected project, on the "Home" pane, in the "Online help" group, expand "Tutorial" and select "My Android project (Answer)".
In the "WIN_Welcome" window, create an Image control:1. On the "Creation" pane, in the "Usual controls" group, click "Image".2. The image appears in creation under the mouse.3. Move the mouse in the window toward the position where the control must be created. To drop the control in the window, all you have to do is perform a new left mouse click.4. Double-click the Image control: the description window of the control is displayed.5. In the "General" tab, select an image found on your disk in the "Image" edit control via the fi le picker.
42 Part 2: Android application
6. Display the "Details" tab: the options for managing the multi-touch are displayed:
7. Select "Automatic scroll and zoom".8. Validate the description window of the control.9. Save the window (click among the quick access buttons).10. A GUI error appears in the error pane: the automatic scrollbars of the window are in confl ict with the scroll features of the Image controls.11. To avoid this GUI error, disable the scrollbars of the window:• Display the description window of the window ("Description" from the popup menu).• In the "Details" tab, uncheck "Automatic scrollbars".• Validate the description window.12. Save the window (click among the quick access buttons). The GUI error disappears.13. Close the project.
The different types of available controls
WinDev Mobile proposes several controls to communicate with the user. Some controls are specifi cally intended for a mobile interface.To develop your applications, you can use the standard controls (edit controls, images, radio buttons and check boxes) but also more specifi c controls such as:• the multiline zones to create GUI similar to the native Android windows,• the Map control to view a position on a map or an itinerary,• the Ad control to display an ad banner.• the menu in the format of "Action bar".Some of these controls are presented in the "Advanced programming" lesson.
Part 2: Android application 43
LESSON 2.3. DATABASES
This lesson will teach you the following concepts...
• Available databases• Synchronization
Estimated time: 15 min
44 Part 2: Android application
The available databases
Overview
Two types of databases are available in Android:• HyperFileSQL (Classic mode and Client/Server mode).• SQLite.
HyperFileSQL database
HyperFileSQL ClassicIn HyperFileSQL Classic mode, the data fi les are stored on the device (Smartphone or tablet).In this case, the application is stand-alone. No Wi-Fi or 3G connection is required.The data is stored in the memory of the device. The maximum storage size depends on the amount of memory on the device.In the "Advanced programming" lesson, we will develop an application that uses a HyperFileSQL Classic database.
HyperFileSQL Client/ServerIn HyperFileSQL Client/Server mode, no data is stored on the device. The data is stored on a computer on which a HyperFileSQL server is installed.
To access this computer (and therefore the database), a method for communicating with the server must have been enabled in the mobile application (Wi-Fi or 3G) in order to connect via the network or Internet.The response times depend on the quality of the WiFi or Internet network and on the volume of requested data.The access to the data will be performed by the Hxxx functions of WLanguage and/or by SQL queries.
SQLite database
SQLite is a free database format recognized by the Android system.This database is stored in the memory of the device. It is accessible from WinDev Mobile via the Native SQLite Access.The access to the data will be performed by the Hxxx functions of WLanguage and/or by SQL queries.
The SQLite database is also available in WinDev and WebDev via the same Native Access.
You cannot directly handle a SQLite database found on a PC from a mobile device (tablet or Smartphone) and conversely. The synchronization methods must be used to keep the data updated.
Part 2: Android application 45
The synchronization
The synchronization mechanism is used to "synchronize" the data stored on a mobile device with the data stored on a server. The synchronization uses the mechanism of "universal replication".This technique is available in WinDev, WebDev and WinDev Mobile.
See the online help (keyword: "Replication") for more details.
Accessing the data via a Webservice
An other method can also be used to access the data on a server from a mobile device: the call to a Webservice.
In this case, the mobile device must be equipped with a Wi-Fi or 3G connection to connect to the Webservice.The mobile application does not directly access the database. The application calls the functions of the Webservice. These functions return the data.It is the Webservice that accesses the database.
This technique is used to have a business layer (the Webservice) common to several types of applications and interfaces (WinDev, WebDev or WinDev Mobile) and different types of operating systems (Windows, Android, iOS, ...)
See the online help (keyword: "Webservice") for more details.
46 Part 2: Android application
LESSON 2.4. ADVANCED PROGRAMMING
This lesson will teach you the following concepts...
• Creating a management application• Specifi c controls: looper, multiline zone, Map control, ...• Handling the database• Features specifi c to the device used (GPS, Photo, ...)
Estimated time: 1h
Part 2: Android application 47

Overview
In this lesson, we are going to develop an Android application that uses a HyperFileSQL Classic database.This application will allow us to present some specifi c features of the Android programming.
Opening the project
Start WinDev Mobile 18 (if not already done). Close (if necessary) the current project to display the home window.
Open the "Android Managing Products" project. To do so, in the home window, click "Tutorial" and select the fi rst project "Android Managing Products (Exercise)". Tip: if the home window is not displayed, on the "Home" pane, in the "Online help" group, expand "Tutorial" and select "Android Managing Products (Exercise)".
Answ
ers A corrected project is available. This project contains the different windows
created in this lesson. To open the corrected project, on the "Home" pane, in the "Online help" group, expand "Tutorial" and select "Android Managing Products (Answer)".
Project description
Let's take a look at our source project. This project is an empty project, already created. It contains no window. It only contains the analysis describing the HyperFileSQL Classic data fi les that will be used. In the EXE directory, the corresponding data fi les are supplied with data in order to run the different tests.
To view the analysis associated with the project:1. Click among the quick access buttons of the WinDev Mobile menu .2. The data model editor is displayed.
48 Part 2: Android application
3. This analysis includes 3 data fi les:• A "Product" fi le, that contains the description of the product: name, price, quantity, ...• A "Characteristic" fi le, that contains the different characteristics of the product. For example,
if the product is a tee-shirt, its characteristics will correspond to the size, the color, ... Therefore, the "Characteristic" fi le is linked to the "Product" fi le.
• A "Store" fi le, that contains the GPS coordinates of each store.4. Close the data model editor (click the cross at the top right of the editor).
We are now going to develop our application.
Display the list of products
We are going to create a window used to list the different products. These products will be displayed in a "Looper" control.
Creating the window
To create a new window:1. Create a new blank window. Click among the quick access buttons. Click "Window" in the wheel that is displayed. Choose "Blank" and validate the wizard.2. Save the window by clicking among the quick access buttons.3. In the window that is opened, enter the title of the window: "List of products". The name and location of the window are automatically fi lled. Keep the default values and validate (green button at the bottom of the screen).4. The window is added to the project.
Creating the Looper control
A "Looper" control will be used to display the list of products. The main information about the products will be displayed in this control.
To create the "Looper" control:1. On the "Creation" pane, in the "Data" group, expand "Looper" and select "Looper (vertical)". The control appears under the mouse.2. In the window, click the position where the control must be created (at the top for example). The wizard for looper creation starts.3. In the wizard, select "Display the data coming from a fi le or from a query". Go to the next screen.4. Select the "Product" fi le. Go to the next screen.
Part 2: Android application 49

5. Select the items to display:
6. Keep the "Name", "Description" and "Price" items (a checkmark must be found in front of these items). Go to the next screen.7. Keep the proposed sort item (ProductID). The products will be sorted in the looper according to this item. Go to the next screen.8. In the "Additional parameters" screen, keep the default options. Go to the next screen.9. Keep the default name ("LOOP_Product") and validate.10. A message regarding the management of scrollbars in the window is displayed.Indeed, the window and the looper have their own scrollbar. Therefore, a confl ict occurs. A single scrollbar must be enabled. We advise you to:• disable the scrollbar in the window because the window has a fi xed size,• keep the scrollbar enabled in the looper.
The vertical scroll will be performed in the looper and not in the window. Therefore, controls can be located above or below the looper without scrolling.11. Click "Disable the automatic scrollbar". The looper is displayed in the window editor.
Not
es The data automatically appears in the window displayed in the editor. This concept is called "Live Data": you see the data found in your fi les in real time!This feature is very useful to adapt the size of controls to their content.
Save the window by clicking among the quick access buttons.
50 Part 2: Android application
We are going to run a fi rst test in the simulator to view the result. Click among the quick access buttons (or press [F9]).
Close the simulator to go back to the window editor.
Improving the window
As you have noticed during the test, the controls created in the looper are displayed beyond the looper. We are going to resize the controls.
To resize the "Name" control:1. Select the "Name" control.2. Reduce the size of the control with the handles in order for the control to fi t in the window.
Run the window test to see the result. Click among the quick access buttons.
Our window is now created.
Part 2: Android application 51
Creating the form window
We are now going to create a new window used to display the product form. Then, this window will be started from the list of products to display the details of the selected product.
Creating the window
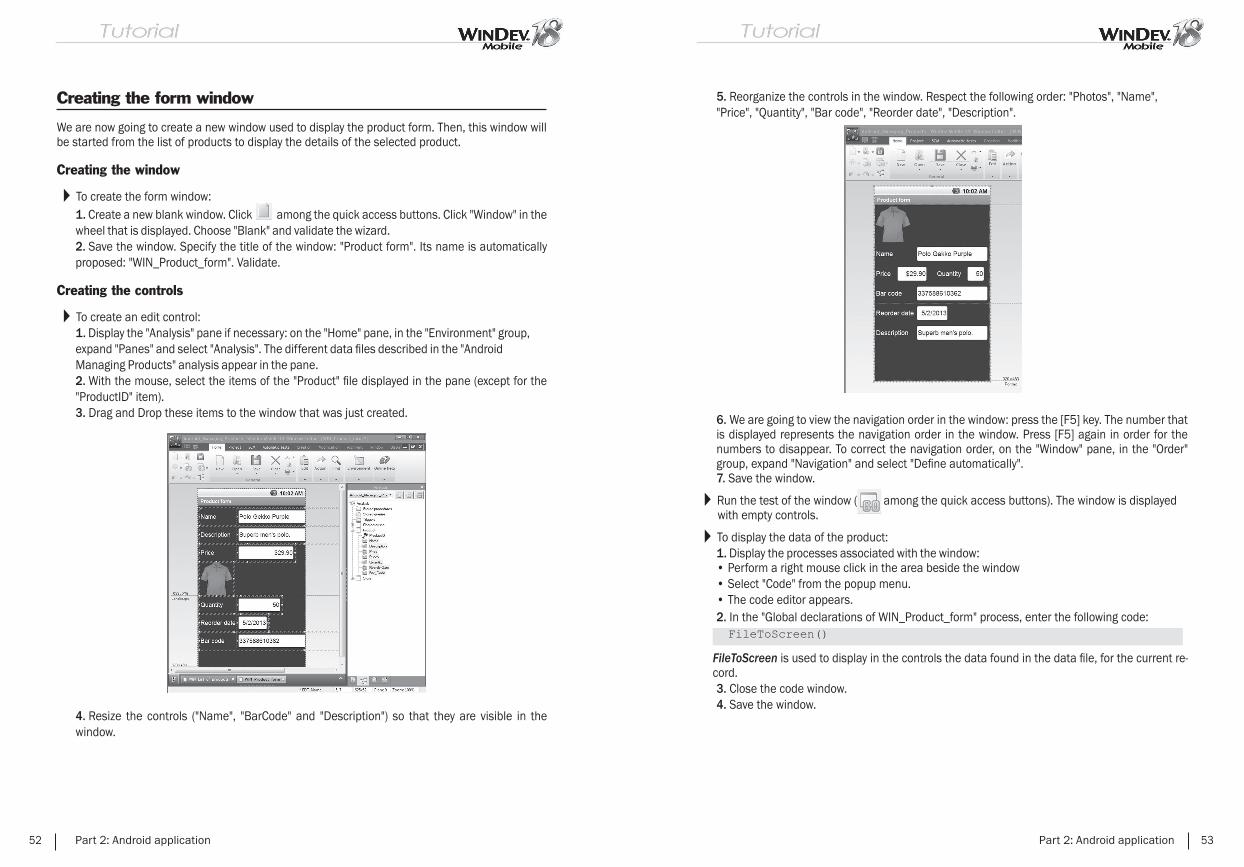
To create the form window:1. Create a new blank window. Click among the quick access buttons. Click "Window" in the wheel that is displayed. Choose "Blank" and validate the wizard.2. Save the window. Specify the title of the window: "Product form". Its name is automatically proposed: "WIN_Product_form". Validate.
Creating the controls
To create an edit control:1. Display the "Analysis" pane if necessary: on the "Home" pane, in the "Environment" group, expand "Panes" and select "Analysis". The different data fi les described in the "Android Managing Products" analysis appear in the pane.2. With the mouse, select the items of the "Product" fi le displayed in the pane (except for the "ProductID" item).3. Drag and Drop these items to the window that was just created.
4. Resize the controls ("Name", "BarCode" and "Description") so that they are visible in the window.
52 Part 2: Android application
5. Reorganize the controls in the window. Respect the following order: "Photos", "Name", "Price", "Quantity", "Bar code", "Reorder date", "Description".
6. We are going to view the navigation order in the window: press the [F5] key. The number that is displayed represents the navigation order in the window. Press [F5] again in order for the numbers to disappear. To correct the navigation order, on the "Window" pane, in the "Order" group, expand "Navigation" and select "Defi ne automatically".7. Save the window.
Run the test of the window ( among the quick access buttons). The window is displayed with empty controls.
To display the data of the product:1. Display the processes associated with the window:• Perform a right mouse click in the area beside the window• Select "Code" from the popup menu.• The code editor appears.2. In the "Global declarations of WIN_Product_form" process, enter the following code:
FileToScreen is used to display in the controls the data found in the data fi le, for the current re-cord.3. Close the code window.4. Save the window.
Part 2: Android application 53
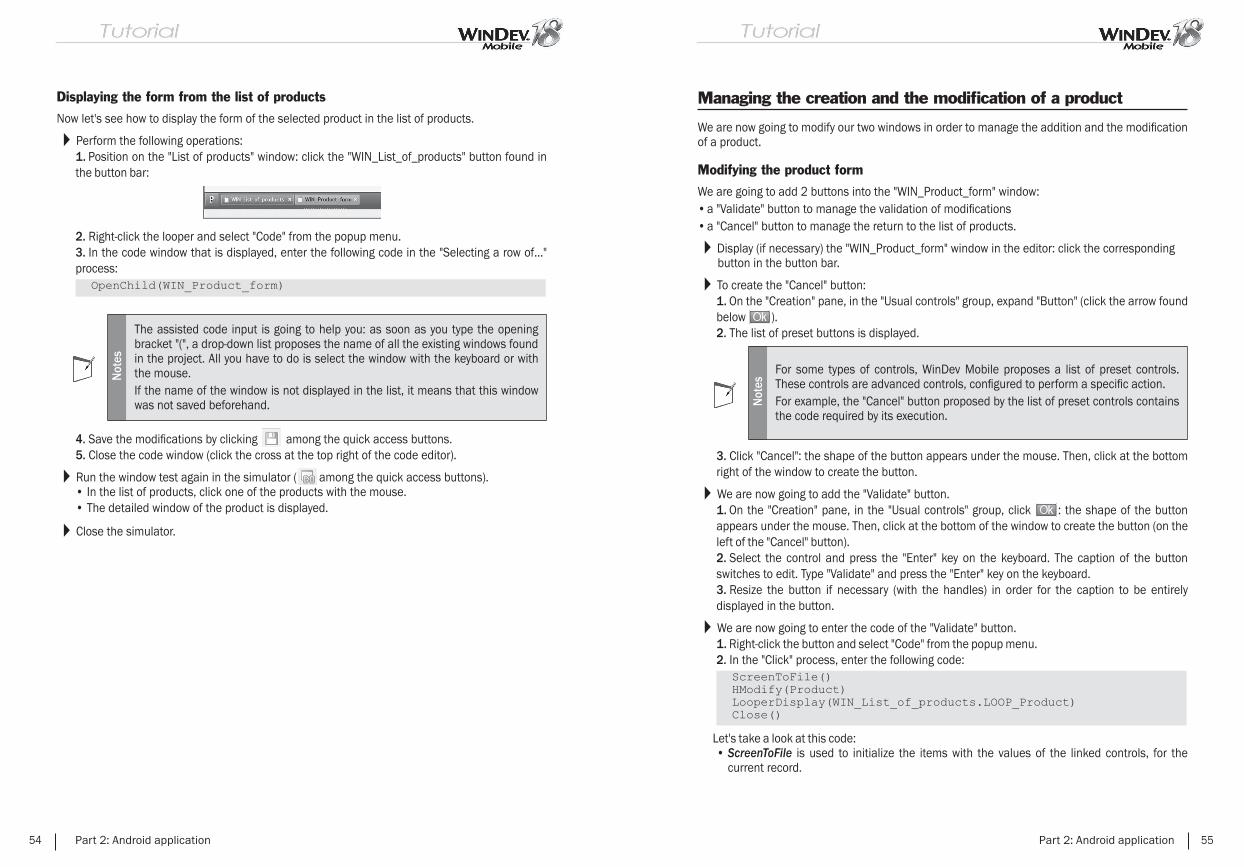
Displaying the form from the list of products
Now let's see how to display the form of the selected product in the list of products.
Perform the following operations:1. Position on the "List of products" window: click the "WIN_List_of_products" button found in the button bar:
2. Right-click the looper and select "Code" from the popup menu.3. In the code window that is displayed, enter the following code in the "Selecting a row of..." process:
Not
es
The assisted code input is going to help you: as soon as you type the opening bracket "(", a drop-down list proposes the name of all the existing windows found in the project. All you have to do is select the window with the keyboard or with the mouse.If the name of the window is not displayed in the list, it means that this window was not saved beforehand.
4. Save the modifi cations by clicking among the quick access buttons.5. Close the code window (click the cross at the top right of the code editor).
Run the window test again in the simulator ( among the quick access buttons).• In the list of products, click one of the products with the mouse.• The detailed window of the product is displayed.
Close the simulator.
54 Part 2: Android application
Managing the creation and the modifi cation of a product
We are now going to modify our two windows in order to manage the addition and the modifi cation of a product.
Modifying the product form
We are going to add 2 buttons into the "WIN_Product_form" window:• a "Validate" button to manage the validation of modifi cations• a "Cancel" button to manage the return to the list of products.
Display (if necessary) the "WIN_Product_form" window in the editor: click the corresponding button in the button bar.
To create the "Cancel" button:1. On the "Creation" pane, in the "Usual controls" group, expand "Button" (click the arrow found below ).2. The list of preset buttons is displayed.
Not
es
For some types of controls, WinDev Mobile proposes a list of preset controls. These controls are advanced controls, confi gured to perform a specifi c action.For example, the "Cancel" button proposed by the list of preset controls contains the code required by its execution.
3. Click "Cancel": the shape of the button appears under the mouse. Then, click at the bottom right of the window to create the button.
We are now going to add the "Validate" button.1. On the "Creation" pane, in the "Usual controls" group, click : the shape of the button appears under the mouse. Then, click at the bottom of the window to create the button (on the left of the "Cancel" button).2. Select the control and press the "Enter" key on the keyboard. The caption of the button switches to edit. Type "Validate" and press the "Enter" key on the keyboard.3. Resize the button if necessary (with the handles) in order for the caption to be entirely displayed in the button.
We are now going to enter the code of the "Validate" button.1. Right-click the button and select "Code" from the popup menu.2. In the "Click" process, enter the following code:
Let's take a look at this code:• ScreenToFile is used to initialize the items with the values of the linked controls, for the
current record.
Part 2: Android application 55

• HModify is used to update the fi le data for the current record.• LooperDisplay is used to update the looper data for the "WIN_List_of_products" window.
3. Save the modifi cations by clicking among the quick access buttons.4. Close the code window (click the cross at the top right of the code editor).
Display the "WIN_List_of_products" window in the window editor and run its test in the simulator ( among the quick access buttons).• In the list of products, click one of the products with the mouse: for example, the "Polo
Hibbiscus Blue" product whose price is 25.90 Dollars.• The detailed window of the product is displayed. Modify the price of 25.90 Dollars and enter
19.90 Dollars then click the "Validate" button.• When going back to the list of products, you will notice that the price was updated for this
article.
Close the simulator. The editor of WinDev Mobile is displayed.
Creating a new product
The principle for creating a product is as follows:• In the window for the list of products, we are going to add a menu option ("New product") that will
be used to open the "Product form" window.• Then, we will modify the code of the "Product form" window to manage the addition into the
Product data fi le.
To add a menu into the list of products:1. Display the "WIN_List_of_products" window in the editor.2. On the "Window" pane, in the "Bars and menus" group, expand "Main menu" and select "Add the main menu".3. A menu with an option is added at the bottom of the window. This option is named "menu".
56 Part 2: Android application
4. We are going to modify it:• Right-click the option to display the popup menu.• Select "Option description". The description window is displayed.• Modify the name of the option ("OPT_NewProduct") and its caption ("New Product"). Validate
the description window.5. The code of this option is used to open the "Product form" window and to reset its controls. To enter this code:• Right-click the option.• Select "Code" from the popup menu.• In the "Selecting the menu" process, enter the following code:
HReset initializes the variables of the items found in the Product fi le with the default values to manage a new record.6. Save the modifi cations by clicking among the quick access buttons.7. Close the code window (click the cross at the top right of the code editor).
We are now going to modify the window of the product form to manage the addition of a new record.1. Display the "WIN_Product_form" window in the editor.2. We are going to modify the code of the validation button:• Right-click the button and select "Code" from the popup menu.• In the "Click" process, replace the existing code by the following code:
Let's take a look at this code:• ..NewRecord is used to fi nd out whether the current record must be created.• If HReset was called beforehand, the property returns True (case of the click on "New
product") and the record must be created by HAdd.• Otherwise, the current record already exists and it must be modifi ed by HModify.
3. Save the modifi cations by clicking among the quick access buttons.4. Close the code window (click the cross at the top right of the code editor).
Display the "WIN_List_of_products" window in the window editor and run its test in the simulator ( among the quick access buttons).• In the list of products, click the "New product" button.• Enter a new product.• Validate. The new product appears in the list of products.• Close the simulator.
Part 2: Android application 57

Deploying the application
If you own an Android device, the operating mode of the application can be checked on your mobile. To do so, generate the application and install it on the mobile device connected to the PC.
Before generating the application, we are going to defi ne the fi rst window that will be started by the application.
To defi ne the fi rst window of the project:1. Select the "WIN_List_of_products" window in the project explorer.2. Display the popup menu.3. Select "First project window". A specifi c icon (with a small 1) is displayed in front of the name of the window, in the project explorer.
To generate the Android application:1. On the "Project" pane, in the "Generation" group, click "Generate" (you can also click among the quick access buttons).2. The wizard for generating an Android application starts. Keep the default options. Via the arrow buttons found at the bottom of the screen, go to the "Including fi les" screen by keeping the default options. The HyperFileSQL data fi les are pre-fi lled in our example. They will be supplied with the application. In this case, they must be specifi ed in the "Including fi les" screen.3. Click the "Add" button at the bottom of the screen. In the "EXE" directory of the project, select:• the HyperFileSQL data fi les (*.fi c, *.ndx, *.mmo)• the SQLite database (android_managing_products.db fi le). This database will be used only if
the Android version installed on the device is earlier than version 3.2 (minimum version for HyperFileSQL).
58 Part 2: Android application
4. Check the "Write" box for each fi le (required to be able to modify the data from the application).
5. The "Including libraries" screen is used to include specifi c libraries (HyperFileSQL and Java).
If you own a device that uses Android 3.2 (or later), you can check "Include the HyperFileSQL library in the application".6. Validate the other screens until you reach the "Confi guration" screen. This screen is used to confi gure the options of Android SDK. If you have chosen to include the HyperFileSQL library, check whether the minimum version to run the application is "Android 3.2" (or later). Otherwise, a warning message is displayed in the wizard.
Not
es A database in SQLite format is supplied in our example. This database will be used by default if the Android version is earlier than version 3.2.
Part 2: Android application 59
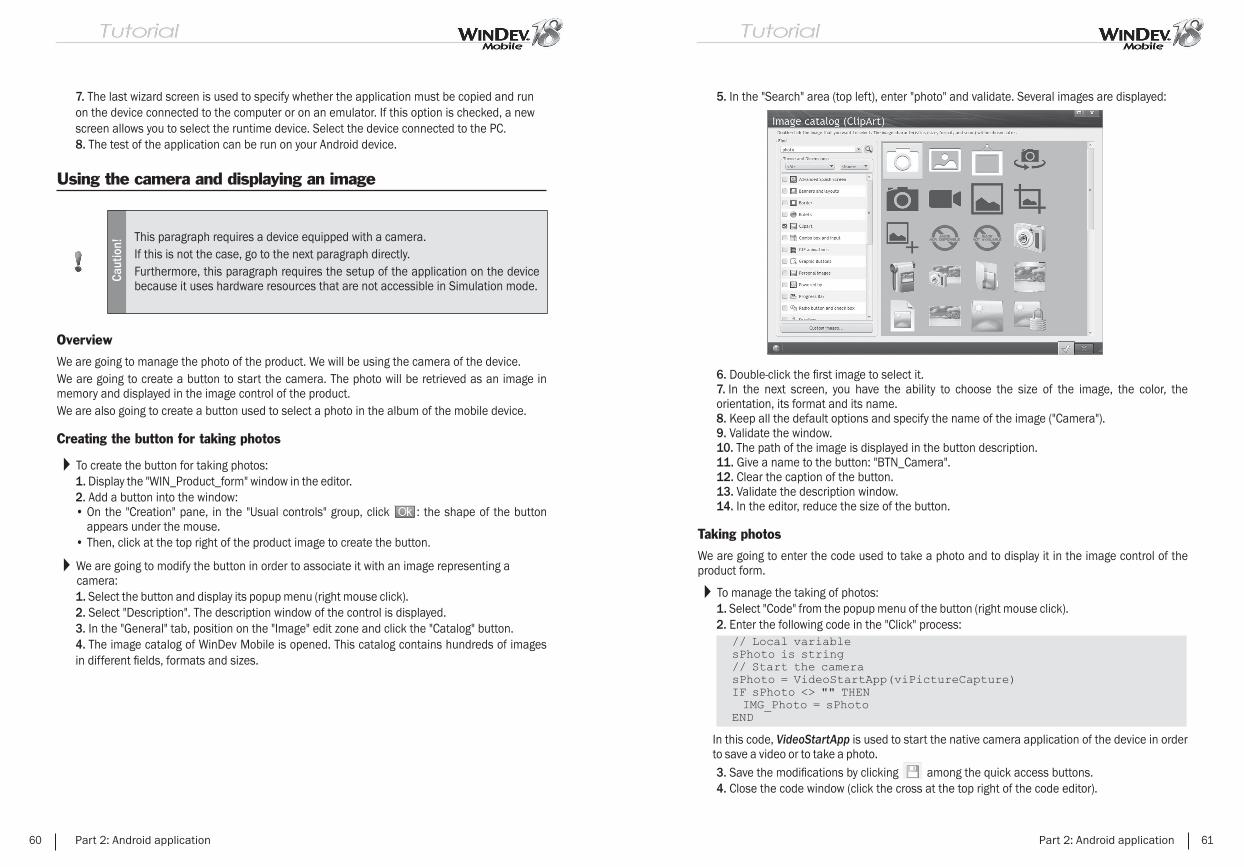
7. The last wizard screen is used to specify whether the application must be copied and run on the device connected to the computer or on an emulator. If this option is checked, a new screen allows you to select the runtime device. Select the device connected to the PC.8. The test of the application can be run on your Android device.
Using the camera and displaying an image
Caut
ion! This paragraph requires a device equipped with a camera.
If this is not the case, go to the next paragraph directly.Furthermore, this paragraph requires the setup of the application on the device because it uses hardware resources that are not accessible in Simulation mode.
Overview
We are going to manage the photo of the product. We will be using the camera of the device.We are going to create a button to start the camera. The photo will be retrieved as an image in memory and displayed in the image control of the product.We are also going to create a button used to select a photo in the album of the mobile device.
Creating the button for taking photos
To create the button for taking photos:1. Display the "WIN_Product_form" window in the editor.2. Add a button into the window:• On the "Creation" pane, in the "Usual controls" group, click : the shape of the button
appears under the mouse.• Then, click at the top right of the product image to create the button.
We are going to modify the button in order to associate it with an image representing a camera:1. Select the button and display its popup menu (right mouse click).2. Select "Description". The description window of the control is displayed.3. In the "General" tab, position on the "Image" edit zone and click the "Catalog" button.4. The image catalog of WinDev Mobile is opened. This catalog contains hundreds of images in different fi elds, formats and sizes.
60 Part 2: Android application
5. In the "Search" area (top left), enter "photo" and validate. Several images are displayed:
6. Double-click the fi rst image to select it.7. In the next screen, you have the ability to choose the size of the image, the color, the orientation, its format and its name.8. Keep all the default options and specify the name of the image ("Camera").9. Validate the window.10. The path of the image is displayed in the button description.11. Give a name to the button: "BTN_Camera".12. Clear the caption of the button.13. Validate the description window.14. In the editor, reduce the size of the button.
Taking photos
We are going to enter the code used to take a photo and to display it in the image control of the product form.
To manage the taking of photos:1. Select "Code" from the popup menu of the button (right mouse click).2. Enter the following code in the "Click" process:
In this code, VideoStartApp is used to start the native camera application of the device in order to save a video or to take a photo.3. Save the modifi cations by clicking among the quick access buttons.4. Close the code window (click the cross at the top right of the code editor).
Part 2: Android application 61
Selecting a photo in the photo album
We are going to add a button used to select a photo in the album of the device and to associate it with the product.
To create the button for selecting the photo:1. Add a button into the "WIN_Product_form" window:• on the "Creation" pane, in the "Usual controls" group, click .• the shape of the button appears under the mouse.• create the button below the previous button.2. Display the description window of the button (double-click the control):• Give a name to the button: "BTN_PhotoAlbum".• Clear the caption of the button.• Select an image in the image catalog.3. Validate the description window.4. In the editor, reduce the size of the button.
The code of this button is used to open the photo album of the device and to select an image in order to display it in the image control of the product form.1. Select "Code" from the popup menu of the button (right mouse click).2. Enter the following code in the "Click" process:
In this code, AlbumPicker is used to retrieve the photo selected in the photo album.3. Save the modifi cations by clicking among the quick access buttons.4. Close the code window (click the cross at the top right of the code editor).
Deploying the application
If you own an Android device, the operating mode of the camera can be checked on your mobile. To do so, generate the application and install it on the mobile device connected to the PC.
Caut
ion!
This paragraph requires a device equipped with a camera.If this is not the case, go to the next paragraph directly.Furthermore, this paragraph requires the setup of the application on the device because it uses hardware resources that are not accessible in Simulation mode. The deployment is not mandatory: the application can be deployed at the end of the tutorial to see all the features on the mobile device directly.
62 Part 2: Android application
To generate the Android application:1. On the "Project" pane, in the "Generation" group, click "Generate" (you can also click among the quick access buttons).2. The wizard for generating an Android application starts. Keep the default options. Via the arrow buttons found at the bottom of the screen, go to the "Including fi les" screen by keeping the default options. The HyperFileSQL data fi les are pre-fi lled in our example. They will be supplied with the application. In this case, they must be specifi ed in the "Including fi les" screen.3. Click the "Add" button at the bottom of the screen. In the "EXE" directory of the project, select:• the HyperFileSQL data fi les (*.fi c, *.ndx, *.mmo)• the SQLite database (android_managing_products.db fi le). This database will be used only if
the Android version installed on the device is earlier than version 3.2 (minimum version for HyperFileSQL).
4. Check the "Write" box for each fi le (required to be able to modify the data from the application).5. The "Including libraries" screen is used to include specifi c libraries (HyperFileSQL and Java).If you own a device that uses Android 3.2 (or later), you can check "Include the HyperFileSQL library in the application".6. Validate the other screens until you reach the "Confi guration" screen. This screen is used to confi gure the options of Android SDK. If you have chosen to include the HyperFileSQL library, check whether the minimum version to run the application is "Android 3.2" (or later). Otherwise, a warning message is displayed in the wizard.
Not
es A database in SQLite format is supplied in our example. This database will be used by default if the Android version is earlier than version 3.2.
7. The last wizard screen is used to specify whether the application must be copied and run on the device connected to the computer or on an emulator. If this option is checked, a new screen allows you to select the runtime device. Select the device connected to the PC.8. The test of the application can be run on your Android device.
Part 2: Android application 63

Managing the bar code of the productCa
utio
n! This paragraph requires a device equipped with a camera.If this is not the case, go to the next paragraph directly.Furthermore, this paragraph requires the setup of the application on the device because it uses hardware resources that are not accessible in Simulation mode.
Overview
The "Product" data fi le contains a "Bar_Code" item. This item is used to store the value of a bar code. Some devices (especially the ones equipped with a camera) can scan a bar code to retrieve its value.The bar code will be managed via the camera of the device and by a specifi c WLanguage function.
Implementation
To create the button for managing the bar codes:1. Display (if necessary) the "WIN_Product_form" window in the editor.2. Add a button into the window:• on the "Creation" pane, in the "Usual controls" group, click .• the shape of the button appears under the mouse.• create the button beside the "Bar Code" control (resize the edit control if necessary).3. Display the description window of the button (double-click the control):• Give a name to the button: "BTN_Bar_Code".• Clear the caption of the button.• Select an image of bar code in the image catalog (use the "Code" keyword for example).4. Validate the description window.5. In the editor, reduce the size of the button.
The code of this button is used to scan the bar code.1. Select "Code" from the popup menu of the button (right mouse click).2. Enter the following code in the "Click" process:
In this code, BCCapture is used to decode the information stored in a bar code by using the camera of the device.3. Save the modifi cations by clicking among the quick access buttons.4. Close the code window (click the cross at the top right of the code editor).
64 Part 2: Android application
Using the Map control
We will now present the Map control and the GPS functions of WLanguage.Our database contains a "Store" data fi le. This fi le contains the addresses of 2 stores that will be localized on a map via the mapping functions.
Creating the window
We are going to create a blank window and add a Map control into it.
To create the window:1. Create a new blank window. Click among the quick access buttons. Click "Window" in the wheel that is displayed. Choose "Blank" and validate the wizard.2. Save the window. Specify the title of the window: "Map of stores". Its name is automatically proposed: "WIN_Map_of_stores". Validate.
Creating the Map control
To create the Map control:1. On the "Creation" pane, in the "Graphic controls" group, click "Map". The shape of the control appears under the mouse.2. Click inside the window to create the control.3. A message regarding the management of scrollbars in the window is displayed.Indeed, the window and the Map control have their own scrollbar. Therefore, a confl ict occurs. A single scrollbar must be enabled. We advise you to:• disable the scrollbar in the window because the window has a fi xed size,• keep the scrollbar enabled in the Map control.4. Click "Disable the automatic scrollbar". The Map control is displayed in the window editor.5. Display the description window of the "Map" control (double-click the control for example).6. In the description window of the control, specify the name of the control ("MAP_Store") and validate.7. In the editor, resize the control (with the handles) so that it occupies the entire window.8. Save the modifi cations by clicking among the quick access buttons.
Part 2: Android application 65
Displaying the stores on the map
PrincipleWe are now going to add the code used to display on a map all the stores found in the "Store" fi le.To do so, the "Store" fi le will be browsed by a FOR EACH loop. Then, the Marker variables will be used. A Marker variable is used to defi ne a marker that will be displayed on a map.A marker contains different information. We will be using the following information:• Name• Latitude• LongitudeMapAddMarker is used to add a marker onto the map. Then, all you have to do is defi ne a suffi cient zoom level to see all the markers on the map. If the zoom is not properly set, some markers may not be visible or they may overlap on the map.
Implementation
To enter the code used to display the stores:1. Right-click outside the window. Select "Code" from the popup menu. The processes associated with the window are displayed.2. Enter the following code in the "Global declarations of..." process.
3. Save the modifi cations by clicking among the quick access buttons.4. Close the code window (click the cross at the top right of the code editor).
A test can be run in the simulator but the mapping functions can only be run on the device. Indeed, this feature requires functions specifi c to the device and to the Android SDK.
66 Part 2: Android application
Deploying the application
If you own an Android device, the operating mode of the Map control can be checked on your mobile. To do so, generate the application and install it on the mobile device connected to the PC.
Defi ne the fi rst window of the project (the fi rst window that will be started when running the application).1. Select the requested window in the project explorer: "WIN_Map_of_stores" in our example.2. Display the popup menu.3. Select "First project window". A specifi c icon (with a small 1) is displayed in front of the name of the window, in the project explorer.
To generate the Android application:1. On the "Project" pane, in the "Generation" group, click "Generate" (you can also click among the quick access buttons).2. The wizard for generating an Android application starts. Keep the default options. Via the arrow buttons found at the bottom of the screen, go to the "Including fi les" screen by keeping the default options. The HyperFileSQL data fi les are pre-fi lled in our example. They will be supplied with the application. In this case, they must be specifi ed in the "Including fi les" screen.3. Click the "Add" button at the bottom of the screen. In the "EXE" directory of the project, select:• the HyperFileSQL data fi les (*.fi c, *.ndx, *.mmo)• the SQLite database (android_managing_products.db fi le). This database will be used only if
the Android version installed on the device is earlier than version 3.2 (minimum version for HyperFileSQL).
4. Check the "Write" box for each fi le (required to be able to modify the data from the application).5. The "Including libraries" screen is used to include specifi c libraries (HyperFileSQL and Java).If you own a device that uses Android 3.2 (or later), you can check "Include the HyperFileSQL library in the application".6. Validate the other screens until you reach the "Confi guration" screen. This screen is used to confi gure the options of Android SDK. If you have chosen to include the HyperFileSQL library, check whether the minimum version to run the application is "Android 3.2" (or later). Otherwise, a warning message is displayed in the wizard.
Not
es A database in SQLite format is supplied in our example. This database will be used by default if the Android version is earlier than version 3.2.
Part 2: Android application 67
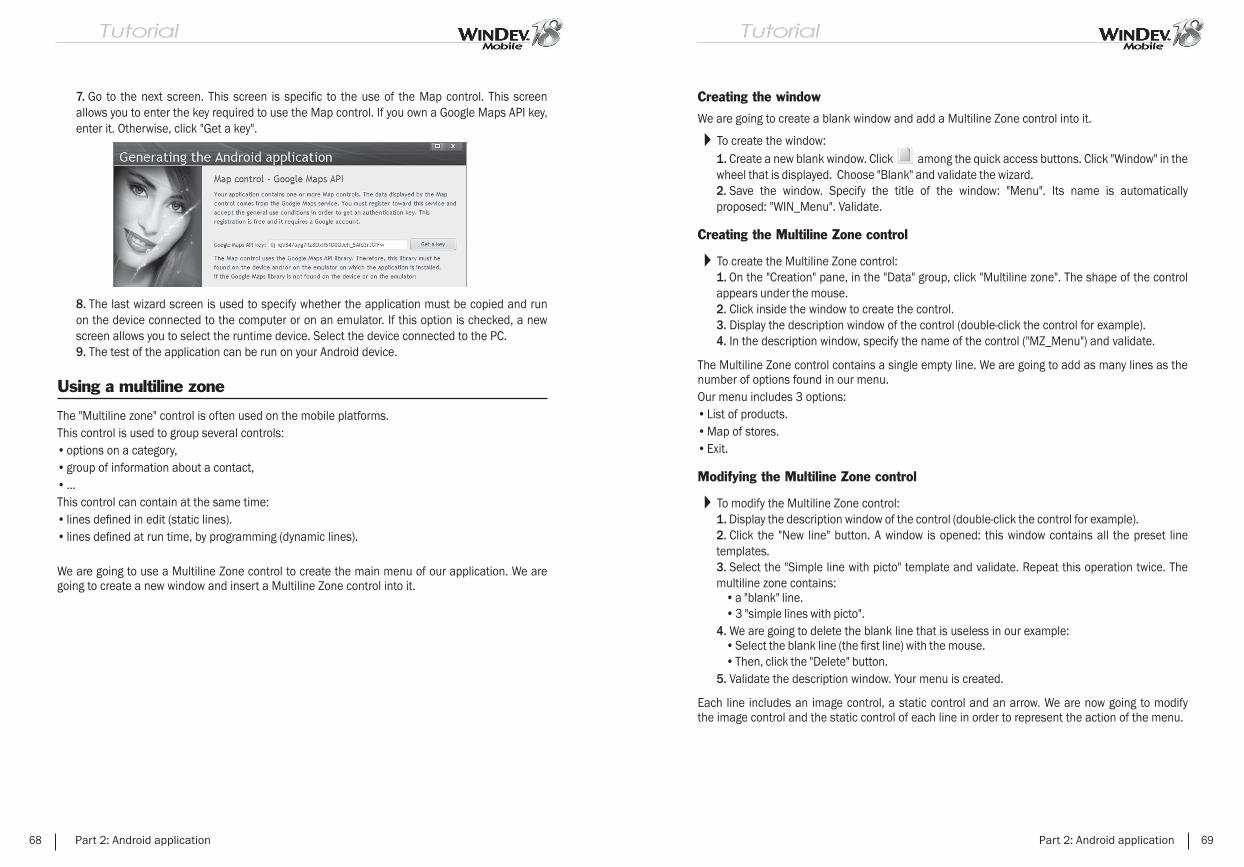
7. Go to the next screen. This screen is specifi c to the use of the Map control. This screen allows you to enter the key required to use the Map control. If you own a Google Maps API key, enter it. Otherwise, click "Get a key".
8. The last wizard screen is used to specify whether the application must be copied and run on the device connected to the computer or on an emulator. If this option is checked, a new screen allows you to select the runtime device. Select the device connected to the PC.9. The test of the application can be run on your Android device.
Using a multiline zone
The "Multiline zone" control is often used on the mobile platforms.This control is used to group several controls:• options on a category,• group of information about a contact,• ...This control can contain at the same time:• lines defi ned in edit (static lines).• lines defi ned at run time, by programming (dynamic lines).
We are going to use a Multiline Zone control to create the main menu of our application. We are going to create a new window and insert a Multiline Zone control into it.
68 Part 2: Android application
Creating the window
We are going to create a blank window and add a Multiline Zone control into it.
To create the window:1. Create a new blank window. Click among the quick access buttons. Click "Window" in the wheel that is displayed. Choose "Blank" and validate the wizard.2. Save the window. Specify the title of the window: "Menu". Its name is automatically proposed: "WIN_Menu". Validate.
Creating the Multiline Zone control
To create the Multiline Zone control:1. On the "Creation" pane, in the "Data" group, click "Multiline zone". The shape of the control appears under the mouse.2. Click inside the window to create the control.3. Display the description window of the control (double-click the control for example).4. In the description window, specify the name of the control ("MZ_Menu") and validate.
The Multiline Zone control contains a single empty line. We are going to add as many lines as the number of options found in our menu.Our menu includes 3 options:• List of products.• Map of stores.• Exit.
Modifying the Multiline Zone control
To modify the Multiline Zone control:1. Display the description window of the control (double-click the control for example).2. Click the "New line" button. A window is opened: this window contains all the preset line templates.3. Select the "Simple line with picto" template and validate. Repeat this operation twice. The multiline zone contains:
• a "blank" line.• 3 "simple lines with picto".
4. We are going to delete the blank line that is useless in our example:• Select the blank line (the fi rst line) with the mouse.• Then, click the "Delete" button.
5. Validate the description window. Your menu is created.
Each line includes an image control, a static control and an arrow. We are now going to modify the image control and the static control of each line in order to represent the action of the menu.
Part 2: Android application 69
Modifying the 1st line: access to the list of products
To modify the image control of the fi rst line found in the multiline zone:1. Click the fi rst line and select the image control.2. Display the description window of the image (double-click the control).3. In the description window:• Give a name to the image ("IMG_ListOfProducts" for example).• Click the "Catalog" button in order to choose an image representing the action.• In the window of the image catalog, type "List" in the search control and press the "Enter"
key.• Select an image via a double click.• In the window for confi guring the generated image, select a size (80 for example), give a
name to the image ("ListOfProducts" for example) and validate.4. Validate the description window.
To modify the static control of the fi rst line found in the multiline zone:1. Click the fi rst line and select the static control.2. Display the description window (double-click the control).3. In the description window:• Give a name to the control ("STC_ListOfProducts" for example).• Change the caption ("List of products" for example).4. Validate the description window.
Modifying the 2nd line: access to the map of stores
To modify the image control of the second line found in the multiline zone:1. Click the second line and select the image control.2. Display the description window of the image (double-click the control).3. In the description window:• Give a name to the image ("IMG_MapOfStores" for example).• Click the "Catalog" button in order to choose an image representing the action.• In the window of the image catalog, type "Map" in the search control and press the "Enter"
key.• Select an image via a double click.• In the window for confi guring the generated image, select a size (80 for example), give a
name to the image ("MapOfStores" for example) and validate.4. Validate the description window.
To modify the static control of the second line found in the multiline zone:1. Click the second line and select the static control.2. Display the description window (double-click the control).3. In the description window:• Give a name to the control ("STC_MapOfStores" for example).• Change the caption ("Map of stores" for example).4. Validate the description window.
70 Part 2: Android application
Modifying the 3rd line: exit from the application
To modify the image control of the third line found in the multiline zone:1. Click the third line and select the image control.2. Display the description window of the image (double-click the control).3. In the description window:• Give a name to the image ("IMG_Exit" for example).• Click the "Catalog" button in order to choose an image representing the action.• In the window of the image catalog, type "Close" in the search control and press the "Enter"
key.• Select an image via a double click.• In the window for confi guring the generated image, select a size (80 for example), give a
name to the image ("Close" for example) and validate.4. Validate the description window.
To modify the static control of the third line found in the multiline zone:1. Click the third line and select the static control.2. Display the description window (double-click the control).3. In the description window:• Give a name to the control ("STC_Exit" for example).• Change the caption ("Exit from the application" for example).4. Validate the description window.
Programming the menu
We are now going to write the code used to perform each menu action:1. Right-click the multiline zone and select "Code". Caution: make sure you select the multiline zone and not one of the controls included in it.2. In the code editor, in the "Selection (click) of a line in..." section, enter the following code:
3. Save the modifi cations by clicking among the quick access buttons.4. Close the code window (click the cross at the top right of the code editor).
Part 2: Android application 71
Running the test of the application
There is a last step to perform, specifying that the menu window is the fi rst window of the application. To do so, we are going to run a full test of the project and defi ne the fi rst project window.
To defi ne the fi rst window of the project:1. Select the "WIN_Menu" window in the project explorer.2. Display the popup menu.3. Select "First project window". A specifi c icon (with a small 1) is displayed in front of the name of the window, in the project explorer.
Until now, the test of windows was run individually by clicking among the quick access buttons.
To run the test of the project:
1. Click among the quick access buttons.2. Your project starts with the menu window. Click an option of your menu to check whether the different links are correct.
That's it, our application is created, we must now compile it and install on the device in order to run its test. The procedure to follow is the same as the one presented in “Using the Map control”, page 65.
72 Part 2: Android application
LESSON 2.5. DISTRIBUTING THE APPLICATION
This lesson will teach you the following concepts...
• Generating the APK• Available distribution modes
Estimated time: 20 min
Part 2: Android application 73
Overview
WinDev Mobile allows you to develop applications for the Android operating system.Once the applications are created, developed and checked, all you have to do is deploy them. Several deployment modes are available:• Deployment via Android Market/Google Play (or another market).• Deployment on a Web server.• Deployment from the PC via ADB.• Deployment by copy.
Deployment via Android Market/Google Play
Google Play (formerly Android Market) is an online service used to download applications (free of charge or not) on mobiles devices compatible with Android.Once published, the application can be downloaded by the users all around the world via the Google Play application installed on their phone.
Publishing applications on Google Play must comply with some rules:
During the fi rst publication, you must register toward the Google Play service via a Google account. Once registered, you have the ability to publish or update an many applications as you want as many times as necessary.The published application must be signed with a private cryptographic key. You have the ability to sign your own application: using a third-party organism is not mandatory. The validity period of the certifi cate must end after October 23, 2033.The applications generated by WinDev Mobile are automatically signed by using the information specifi ed in the generation wizard ("Signature of the application" screen) with a suffi cient validity period.Caution: The published application must not be signed with a generic key (whose use must be limited to the tests in GO mode).An icon must be associated with the application. The generation wizard of WinDev Mobile allows you to defi ne the icon to use.Note: Google Play is the most common application but other ones are available.
74 Part 2: Android application
Deployment via a Web server
You have the ability to propose Android applications for download from a link on a Web page.To do so, you must:
1. Copy the "apk" fi le of the application onto the Web server that hosts the page proposing the download of the application.2. Add a link into the Web page for download. This link has the following format:
3. On the server, add the following MIME type: application/vnd.android.package-archive
The user will only have to display the page with the browser of the phone. The application will be downloaded when the link is clicked. Then, all you have to do is click the downloaded fi le (in download manager) to install the application.Caution: The "Unknown sources" option must be enabled on the phone to allow this setup mode. To enable this option, go to the "Parameters" menu of the phone, in the "Applications" sub-menu.
Deployment from the PC via ADB (advanced mode)
ADB (Android Debug Bridge) is a tool supplied with the Android SDK. It is used to install or uninstall from the PC an Android application (APK fi le) on a mobile device compatible with Android.This setup mode is an advanced mode. We recommend that you see in the online help the specifi c commands used to install an application (http://developer.android.com/intl/fr/guide/developing/tools/adb.html)Caution: The "Unknown sources" option must be enabled on the phone to allow this setup mode. To enable this option, go to the "Parameters" menu of the phone, in the "Applications" sub-menu.
Copying the application onto the Mobile device
The easiest way to install an Android application on a mobile device is to copy the apk fi le onto the device and to run it. The following operations must be performed:
1. Connect the device to the PC by USB.2. Copy the apk fi le of the application onto the device (external memory for example).3. On the device, use a fi le explorer to go to the directory where the apk fi le was copied and click the fi le to start its setup.
Note: Some devices do not propose a fi le explorer but several ones are available for free.
Caution: The "Unknown sources" option must be enabled on the phone to allow this setup mode. To enable this option, go to the "Parameters" menu of the phone, in the "Applications" sub-menu.
Part 2: Android application 75
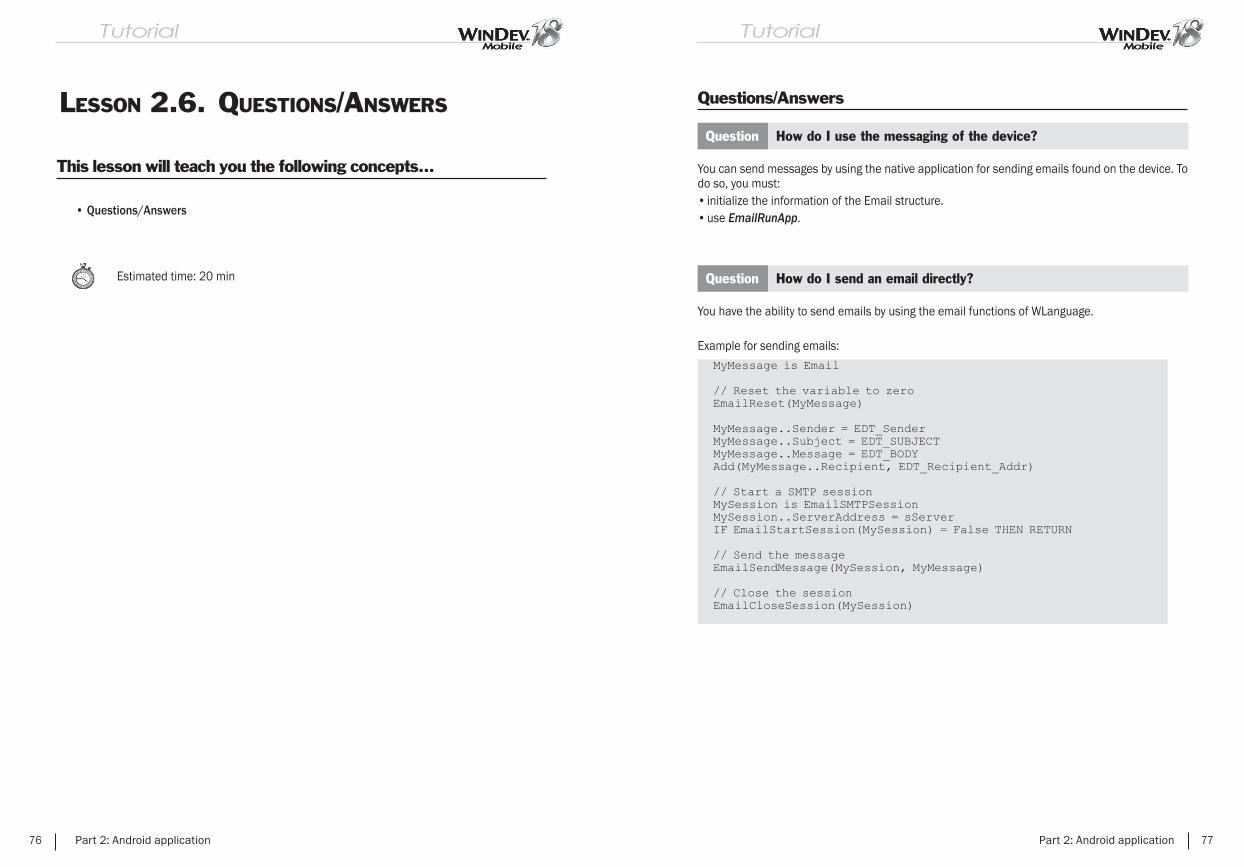
LESSON 2.6. QUESTIONS/ANSWERS
This lesson will teach you the following concepts...
• Questions/Answers
Estimated time: 20 min
76 Part 2: Android application
Questions/Answers
Question How do I use the messaging of the device?
You can send messages by using the native application for sending emails found on the device. To do so, you must:• initialize the information of the Email structure.• use EmailRunApp.
Question How do I send an email directly?
You have the ability to send emails by using the email functions of WLanguage.
Example for sending emails:
Part 2: Android application 77
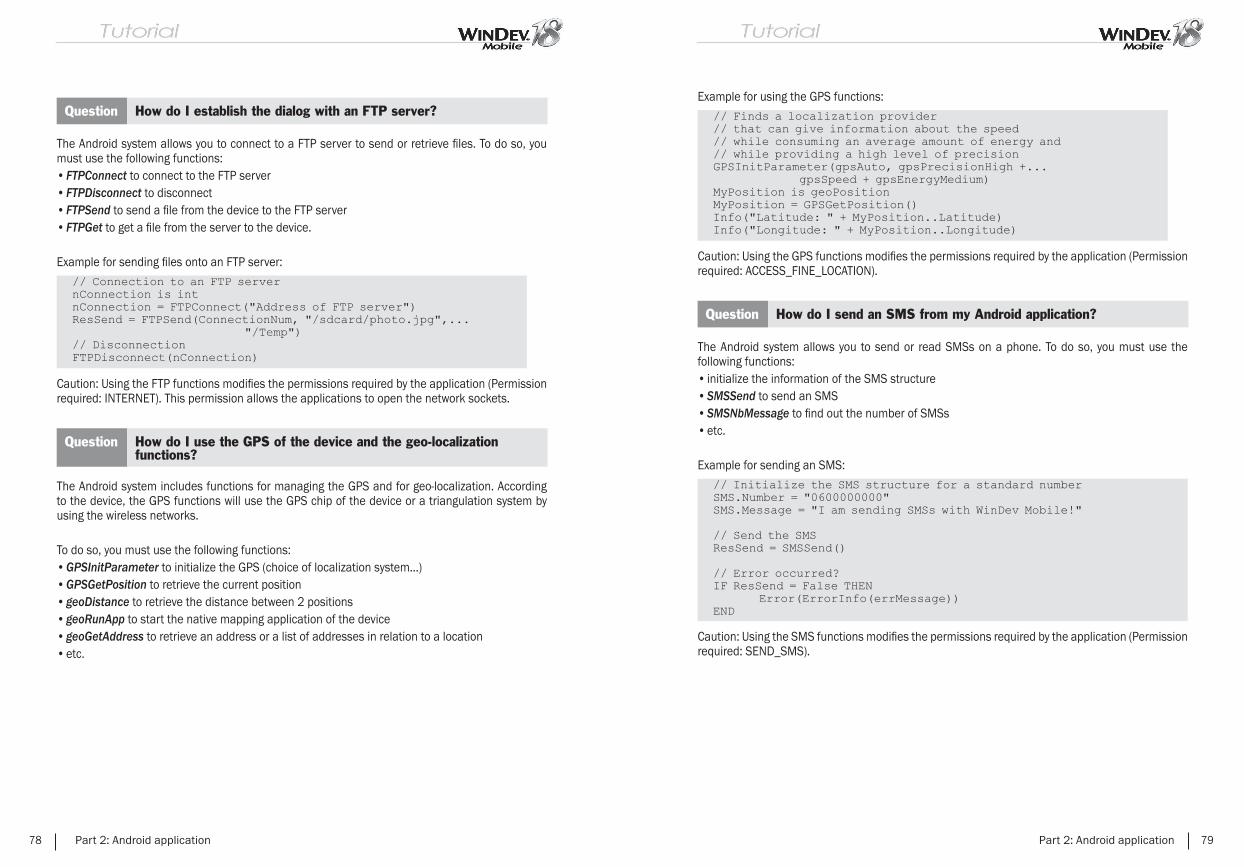
Question How do I establish the dialog with an FTP server?
The Android system allows you to connect to a FTP server to send or retrieve fi les. To do so, you must use the following functions:• FTPConnect to connect to the FTP server• FTPDisconnect to disconnect• FTPSend to send a fi le from the device to the FTP server• FTPGet to get a fi le from the server to the device.
Example for sending fi les onto an FTP server:
Caution: Using the FTP functions modifi es the permissions required by the application (Permission required: INTERNET). This permission allows the applications to open the network sockets.
Question How do I use the GPS of the device and the geo-localization functions?
The Android system includes functions for managing the GPS and for geo-localization. According to the device, the GPS functions will use the GPS chip of the device or a triangulation system by using the wireless networks.
To do so, you must use the following functions:• GPSInitParameter to initialize the GPS (choice of localization system...) • GPSGetPosition to retrieve the current position• geoDistance to retrieve the distance between 2 positions• geoRunApp to start the native mapping application of the device• geoGetAddress to retrieve an address or a list of addresses in relation to a location• etc.
78 Part 2: Android application
Example for using the GPS functions:
Caution: Using the GPS functions modifi es the permissions required by the application (Permission required: ACCESS_FINE_LOCATION).
Question How do I send an SMS from my Android application?
The Android system allows you to send or read SMSs on a phone. To do so, you must use the following functions:• initialize the information of the SMS structure• SMSSend to send an SMS• SMSNbMessage to fi nd out the number of SMSs• etc.
Example for sending an SMS:
Caution: Using the SMS functions modifi es the permissions required by the application (Permission required: SEND_SMS).
Part 2: Android application 79
Question How do I call native JAVA code from my Android application?
When you develop an Android application WinDev Mobile, the native code is in JAVA. The WLanguage is translated into JAVA when compiling and generating the application. You have the ability, from the WinDev Mobile environment, to include native procedures in JAVA language. To do so, you must:• create a set of global procedures• create a global procedure• click the gray bar of the procedure header (where the WL word is found).• the header bar changes and it becomes purple. The WL word is transformed into Java.
Then, all you have to do is enter native JAVA code or copy JAVA code.Caution: Make sure that the code entered or copied is properly written: WinDev Mobile does not check the completion. The errors will occur when compiling the project.
80 Part 2: Android application
iOS application
PART 3

82 Part 3: iOS application
LESSON 3.1. MY FIRST IOS PROJECT
This lesson will teach you the following concepts...
• Required confi guration• Creating an iOS project (iPhone or iPad)• My fi rst window• My fi rst test• First deployment
Estimated time: 40 min
Part 3: iOS application 83
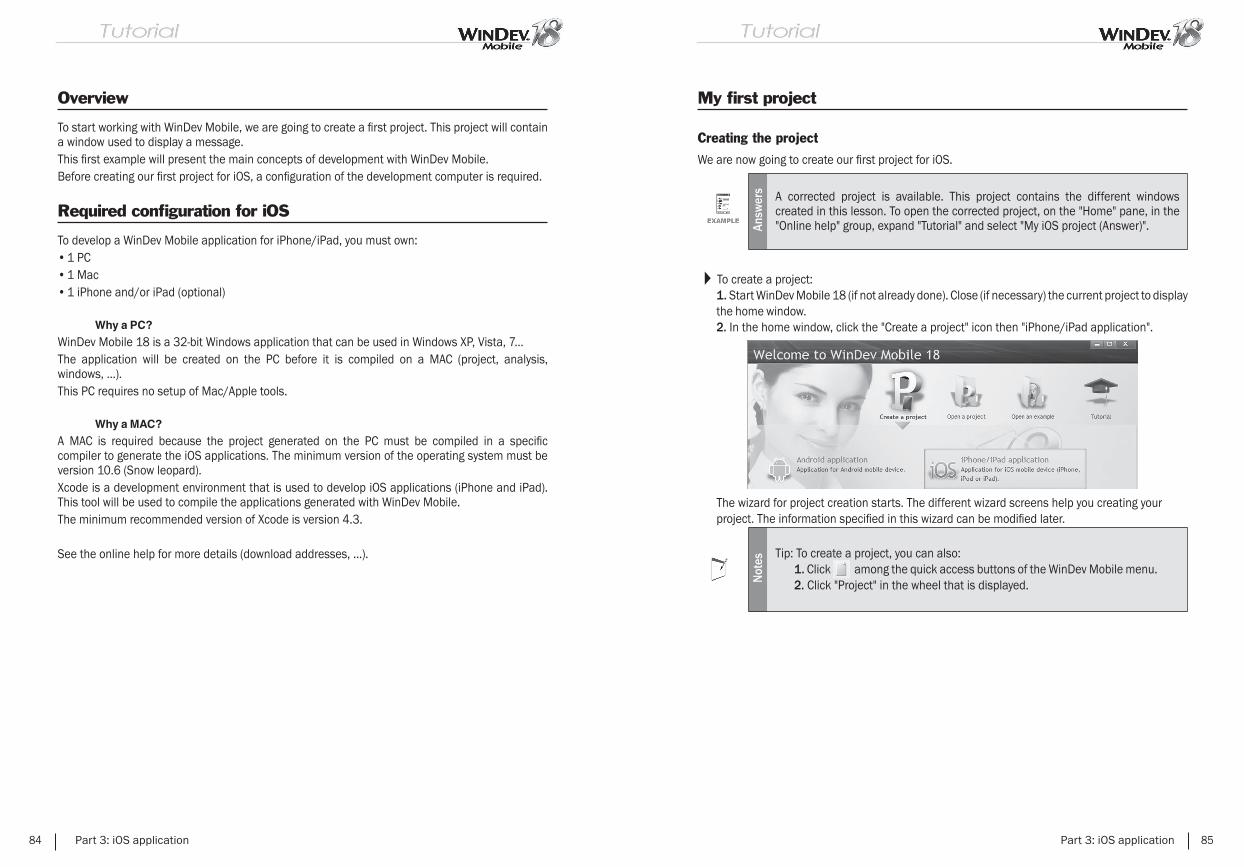
Overview
To start working with WinDev Mobile, we are going to create a fi rst project. This project will contain a window used to display a message.This fi rst example will present the main concepts of development with WinDev Mobile.Before creating our fi rst project for iOS, a confi guration of the development computer is required.
Required confi guration for iOS
To develop a WinDev Mobile application for iPhone/iPad, you must own:• 1 PC• 1 Mac• 1 iPhone and/or iPad (optional)
Why a PC?
WinDev Mobile 18 is a 32-bit Windows application that can be used in Windows XP, Vista, 7...The application will be created on the PC before it is compiled on a MAC (project, analysis, windows, ...).This PC requires no setup of Mac/Apple tools.
Why a MAC?
A MAC is required because the project generated on the PC must be compiled in a specifi c compiler to generate the iOS applications. The minimum version of the operating system must be version 10.6 (Snow leopard).Xcode is a development environment that is used to develop iOS applications (iPhone and iPad). This tool will be used to compile the applications generated with WinDev Mobile.The minimum recommended version of Xcode is version 4.3.
See the online help for more details (download addresses, ...).
84 Part 3: iOS application
My fi rst project
Creating the project
We are now going to create our fi rst project for iOS.
Answ
ers A corrected project is available. This project contains the different windows
created in this lesson. To open the corrected project, on the "Home" pane, in the "Online help" group, expand "Tutorial" and select "My iOS project (Answer)".
To create a project:1. Start WinDev Mobile 18 (if not already done). Close (if necessary) the current project to display the home window.2. In the home window, click the "Create a project" icon then "iPhone/iPad application".
The wizard for project creation starts. The different wizard screens help you creating your project. The information specifi ed in this wizard can be modifi ed later.
Not
es Tip: To create a project, you can also:1. Click among the quick access buttons of the WinDev Mobile menu.2. Click "Project" in the wheel that is displayed.
Part 3: iOS application 85

3. The fi rst wizard screen is used to enter the name of the project, its location and its description. In our case, this project will be named "My_iOS_Project". By default, WinDev Mobile proposes to create this project in the "\My Mobile projects\My_iOS_Project" directory. You can keep this location or modify it via the [...] button.
4. Go to the next screen via the arrows found at the bottom.5. The wizard proposes to add documents. Keep the default options and go to the next screen.6. The next screen is used to select the device for which the application is developed. In this example, we will keep "iPad" and "iPhone".
7. In the left section of the wizard, click "3-Charters". This step is used to defi ne the programming charter. Don't modify the suggested options. Go to the next screen via the arrows found at the bottom.8. This step is used to defi ne the style book. Select "ActivPhone 5".9. The other wizard steps not being important for our fi rst project, click "6-End" in the left section of the wizard.
86 Part 3: iOS application
10. Click the validation button at the bottom of the wizard. The project is automatically created. WinDev Mobile displays the different possible actions.11. Click "WinDev Mobile editor".
My fi rst window
Overview
The fi rst window will allow the user to display a welcome message via the "Display" button.You may think this is too basic, too simple, but we recommend that you create this window. You may be surprised by how intuitive and how easy it is to use the editor of WinDev Mobile. Furthermore, this window will allow you to discover concepts that are fundamental for the rest of this tutorial and to see the entire process for developing an iOS application with WinDev Mobile.
Creating the window
To create the window:
1. Click among the quick access buttons of the WinDev Mobile menu:
2. A window shaped like a wheel is displayed. This window is used to create all the elements that can be associated with a project.3. Click "Window". The wizard for window creation starts.4. Select "Blank for iPhone" in the list of windows displayed on the left. In the list of skin templates found on the right, the "ActivPhone 5" skin template is selected by default. You can choose another skin template proposed in the list.
Not
e The skin templates allow you to quickly create outstanding interfaces. A skin template defi nes the style of the window but also the style of all the controls that will be used in this window. No ugly interface anymore.
5. Validate. The window is automatically created in the editor.
Part 3: iOS application 87

Save the window by clicking among the quick access buttons. During the fi rst backup, a specifi c window is displayed. This window proposes to enter:• the title of the element: enter "Welcome". In our case, this title will be displayed in the title
bar of the window.• the name of the element is the name of the window. This name will be used in programming.
By default, this name includes "WIN_" that corresponds to the programing charter and "Welcome" that corresponds to the title of the window.
Not
e
Let's take a look at the window name proposed by WinDev Mobile: this name starts with the letters "WIN_". This prefi x is automatically added because the project uses a programming charter.The programming charter is used to defi ne a prefi x for each type of object, allowing you to quickly identify the element handled:• a window starts with WIN,• a button starts with BTN,• etc.If you don't want to use this charter, all you have to do is disable it: on the "Project" pane, in the "Other actions" group, expand "Charter" and uncheck "Use the charter" .
• the location that corresponds to the fi le name created for the window. The window is a fi le whose extension is "WPW", saved in the project directory.
Click the green button to validate.
88 Part 3: iOS application
Displaying a message
You are now going to create a button used to display a message.
To create the "Display" button:1. On the "Creation" pane, in the "Usual controls" group, click . The button appears in creation under the mouse.2. Move the mouse in the window toward the position where the control must be created (at the top of the window for example). To drop the control in the window, all you have to do is perform a new left mouse click.3. Perform a right mouse click on the control that was just created. The popup menu of the control is displayed. Select "Description" from this popup menu. The description window of the button is displayed.
Modify the characteristics of the control by entering the following information:
1. Name of this control: "BTN_Display".2. Caption of this control: "Display"
Validate the description window of the control (green button). The control is displayed in the window editor.
We are going to display a message in a dialog box (a small window proposed by the system). To do so, we will be using our fi rst WLanguage function: Info.
Not
es WLanguage is the programming language supplied with WinDev Mobile. It's a 5th generation language (5GL) that uses highly sophisticated commands.
1. Select the "Display" button with the mouse: all you have to do is click it.2. Display the popup menu of the control (right mouse click).3. Select the "Code". This option opens the code editor of WinDev Mobile, in which all the WLanguage statements can be entered.4. Enter the following code in the "Click BTN_Display" process:
Note about the assisted input: As soon as the fi rst two characters are typed, WinDev Mobile proposes all the words of the WLanguage vocabulary containing these characters. The aided development is very a powerful feature. No more mistake when typing the name of an element: the syntax errors are reduced to a minimum. All you have to do is select the requested word and press [Enter] to validate. You can focus on the algorithm.
Part 3: iOS application 89
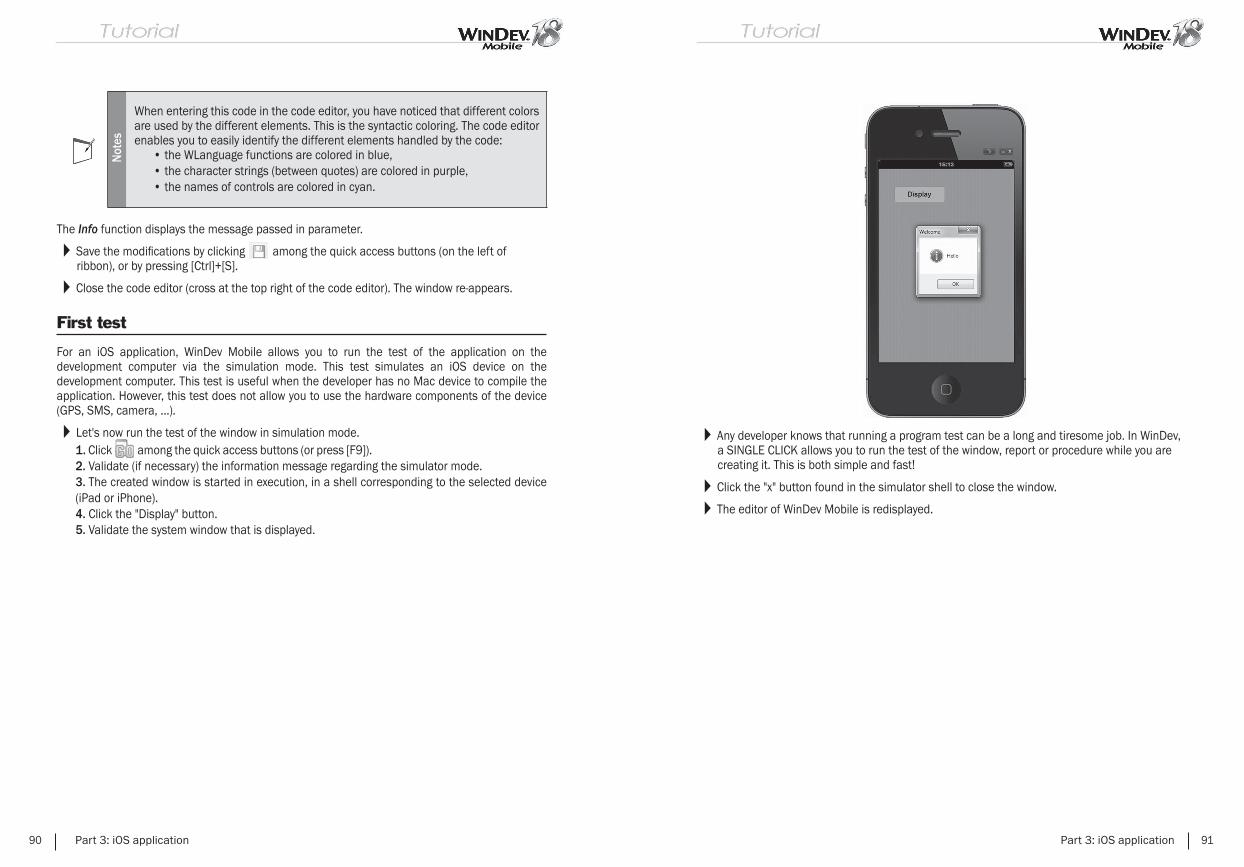
Not
esWhen entering this code in the code editor, you have noticed that different colors are used by the different elements. This is the syntactic coloring. The code editor enables you to easily identify the different elements handled by the code:
• the WLanguage functions are colored in blue,• the character strings (between quotes) are colored in purple,• the names of controls are colored in cyan.
The Info function displays the message passed in parameter.
Save the modifi cations by clicking among the quick access buttons (on the left of ribbon), or by pressing [Ctrl]+[S].
Close the code editor (cross at the top right of the code editor). The window re-appears.
First test
For an iOS application, WinDev Mobile allows you to run the test of the application on the development computer via the simulation mode. This test simulates an iOS device on the development computer. This test is useful when the developer has no Mac device to compile the application. However, this test does not allow you to use the hardware components of the device (GPS, SMS, camera, ...).
Let's now run the test of the window in simulation mode.1. Click among the quick access buttons (or press [F9]).2. Validate (if necessary) the information message regarding the simulator mode.3. The created window is started in execution, in a shell corresponding to the selected device (iPad or iPhone).4. Click the "Display" button.5. Validate the system window that is displayed.
90 Part 3: iOS application
Any developer knows that running a program test can be a long and tiresome job. In WinDev, a SINGLE CLICK allows you to run the test of the window, report or procedure while you are creating it. This is both simple and fast!
Click the "x" button found in the simulator shell to close the window.
The editor of WinDev Mobile is redisplayed.
Part 3: iOS application 91
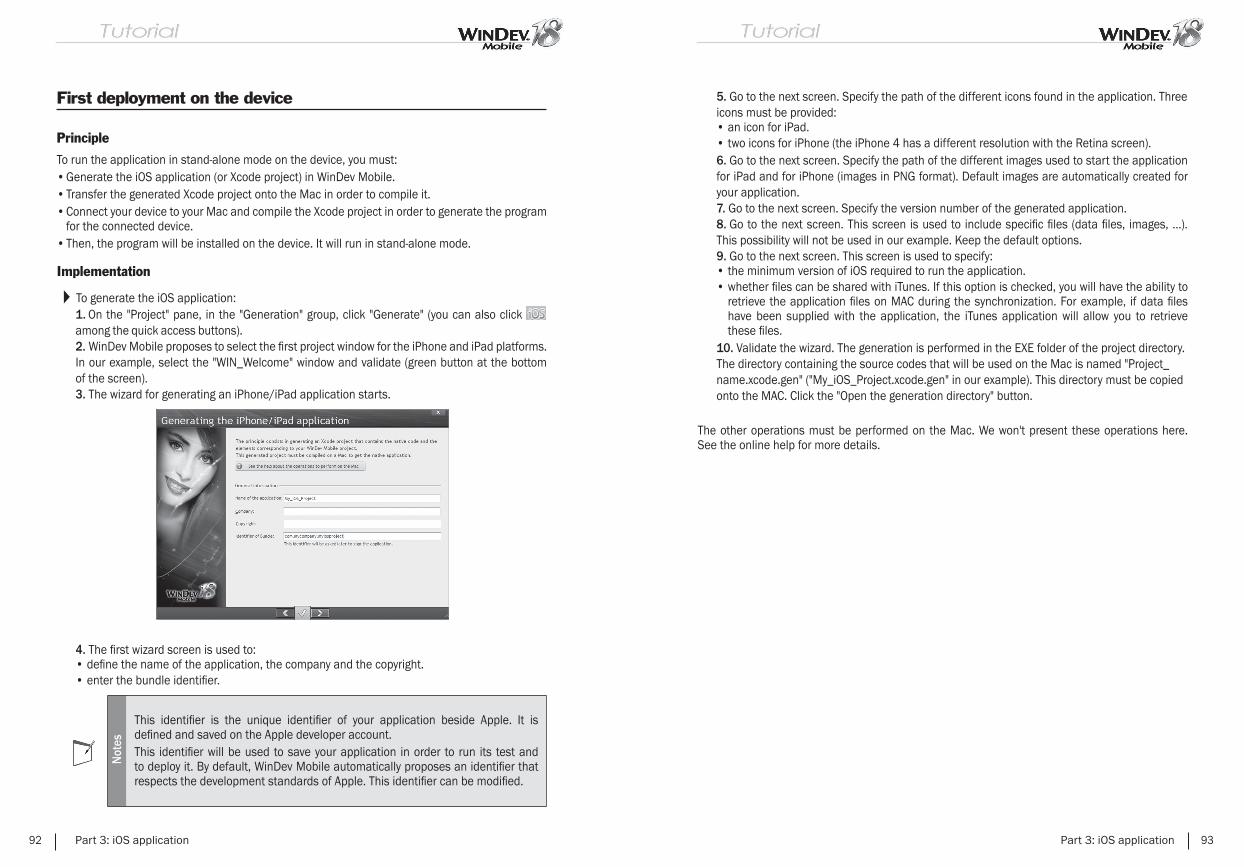
First deployment on the device
Principle
To run the application in stand-alone mode on the device, you must:• Generate the iOS application (or Xcode project) in WinDev Mobile.• Transfer the generated Xcode project onto the Mac in order to compile it.• Connect your device to your Mac and compile the Xcode project in order to generate the program
for the connected device.• Then, the program will be installed on the device. It will run in stand-alone mode.
Implementation
To generate the iOS application:1. On the "Project" pane, in the "Generation" group, click "Generate" (you can also click among the quick access buttons).2. WinDev Mobile proposes to select the fi rst project window for the iPhone and iPad platforms. In our example, select the "WIN_Welcome" window and validate (green button at the bottom of the screen).3. The wizard for generating an iPhone/iPad application starts.
4. The fi rst wizard screen is used to:• defi ne the name of the application, the company and the copyright.• enter the bundle identifi er.
Not
es
This identifi er is the unique identifi er of your application beside Apple. It is defi ned and saved on the Apple developer account.This identifi er will be used to save your application in order to run its test and to deploy it. By default, WinDev Mobile automatically proposes an identifi er that respects the development standards of Apple. This identifi er can be modifi ed.
92 Part 3: iOS application
5. Go to the next screen. Specify the path of the different icons found in the application. Three icons must be provided:• an icon for iPad.• two icons for iPhone (the iPhone 4 has a different resolution with the Retina screen).6. Go to the next screen. Specify the path of the different images used to start the application for iPad and for iPhone (images in PNG format). Default images are automatically created for your application.7. Go to the next screen. Specify the version number of the generated application.8. Go to the next screen. This screen is used to include specifi c fi les (data fi les, images, ...). This possibility will not be used in our example. Keep the default options.9. Go to the next screen. This screen is used to specify:• the minimum version of iOS required to run the application.• whether fi les can be shared with iTunes. If this option is checked, you will have the ability to
retrieve the application fi les on MAC during the synchronization. For example, if data fi les have been supplied with the application, the iTunes application will allow you to retrieve these fi les.
10. Validate the wizard. The generation is performed in the EXE folder of the project directory. The directory containing the source codes that will be used on the Mac is named "Project_name.xcode.gen" ("My_iOS_Project.xcode.gen" in our example). This directory must be copied onto the MAC. Click the "Open the generation directory" button.
The other operations must be performed on the Mac. We won't present these operations here. See the online help for more details.
Part 3: iOS application 93
LESSON 3.2. INTERFACE (GUI)
This lesson will teach you the following concepts...
• Choosing the resolution according to the device• Orientation of the window• Management of touchscreen
Estimated time: 20 min
94 Part 3: iOS application
Overview
The iOS system is available on the phones (iPhone), on the tablets (iPad) and on the iPod. WinDev Mobile allows you to easily create interfaces that adapt to the device used.
Choosing the resolution according to the device
When creating a project, you must choose the device on which the application will be deployed:• iPhone.• iPad.• iPhone and iPad.
Two cases may occur:• You know the target device: in this case, all you have to do is select. The wizard for window
creation will allow you to create windows for this target device only.• You do not know the target devices: in this case, in the wizard for project creation, select "iPhone
and iPad". When creating the windows, you can:• develop your windows for the iPhone. Via the anchoring of controls in the window, the
content will be adapted to the iPad (recommended solution).• develop 2 sets of windows, one for the iPhone, one for the iPad.
Orientation of the window
In iPhone or iPad, a window can have one of the following orientations:• Locked in portrait mode• Locked in landscape mode• Free: the window follows the orientation of the device.
Part 3: iOS application 95

This orientation is defi ned in the "Details" tab of the description window of the window ("Description" from the popup menu of the window).
No specifi c operation must be performed in the two fi rst cases.For a free window, the organization of the controls and their size must adapt to the orientation. The anchoring mechanism must be use to get a proper result.
96 Part 3: iOS application
Practical example
Open (if necessary) the "My_iOS_Project" project that was created in the previous lesson.
Answ
ers A corrected project is available. This project contains the different windows
created in this lesson. To open the corrected project, on the "Home" pane, in the "Online help" group, expand "Tutorial" and select "My iOS project (Answer)".
In our example, the project was created for a phone and its test was run in portrait mode in the simulator.We are now going to run its test in landscape mode in the simulator.
Run the test of the project ( among the quick access buttons).1. The window is displayed in portrait mode.2. In the simulator, click the arrow in the shell ( ).3. The orientation of the window changes on the screen.4. In our example, the location of the button does not change: it does not adapt to the orientation of the screen.
We are now going to modify our window in order for the "Display" button to be centered in the window and to remain centered regardless of the device orientation.
Stop the test and go back to the editor.
To center the button in the window:1. Select the button (click the button).2. On the "Alignment" pane, click "Center in the parent (horz)".
Part 3: iOS application 97
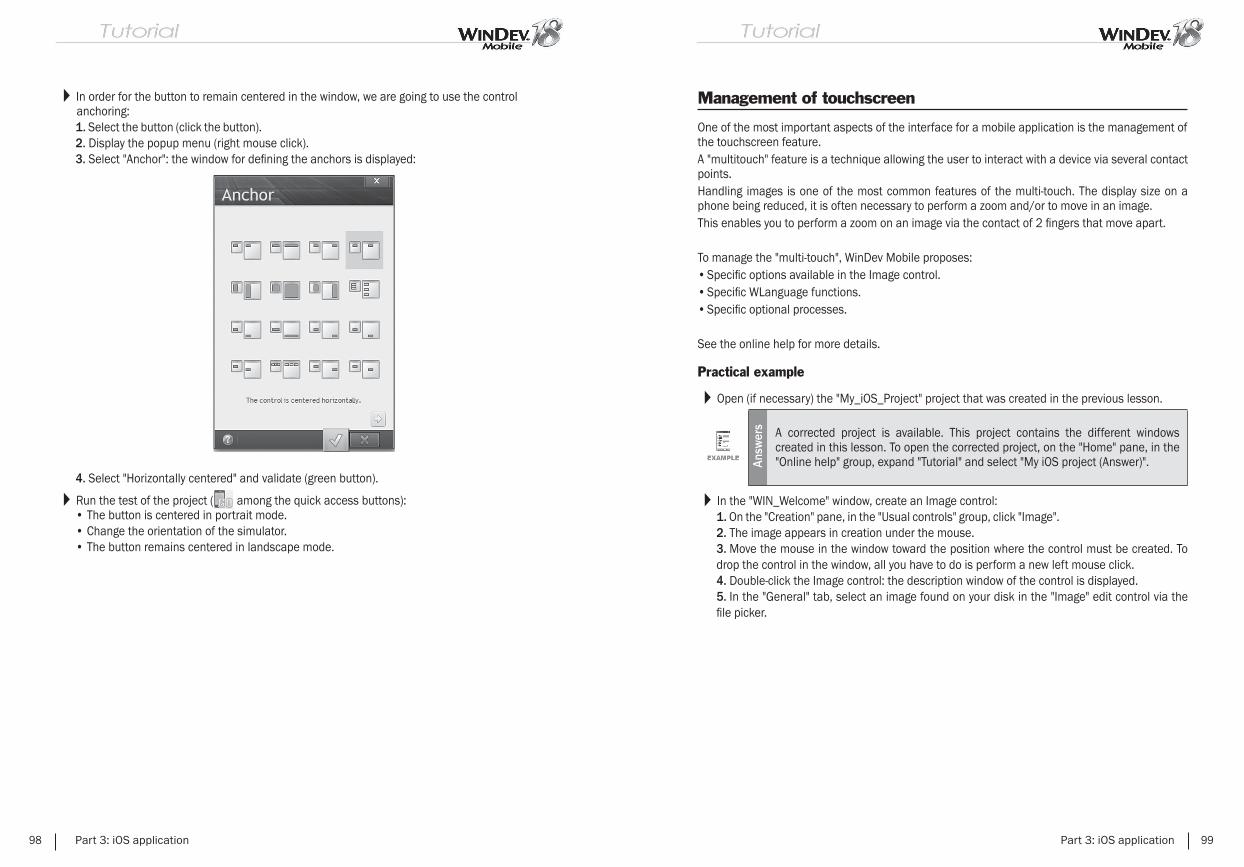
In order for the button to remain centered in the window, we are going to use the control anchoring:1. Select the button (click the button).2. Display the popup menu (right mouse click).3. Select "Anchor": the window for defi ning the anchors is displayed:
4. Select "Horizontally centered" and validate (green button).
Run the test of the project ( among the quick access buttons):• The button is centered in portrait mode.• Change the orientation of the simulator.• The button remains centered in landscape mode.
98 Part 3: iOS application
Management of touchscreen
One of the most important aspects of the interface for a mobile application is the management of the touchscreen feature.A "multitouch" feature is a technique allowing the user to interact with a device via several contact points.Handling images is one of the most common features of the multi-touch. The display size on a phone being reduced, it is often necessary to perform a zoom and/or to move in an image.This enables you to perform a zoom on an image via the contact of 2 fi ngers that move apart.
To manage the "multi-touch", WinDev Mobile proposes:• Specifi c options available in the Image control.• Specifi c WLanguage functions.• Specifi c optional processes.
See the online help for more details.
Practical example
Open (if necessary) the "My_iOS_Project" project that was created in the previous lesson.
Answ
ers A corrected project is available. This project contains the different windows
created in this lesson. To open the corrected project, on the "Home" pane, in the "Online help" group, expand "Tutorial" and select "My iOS project (Answer)".
In the "WIN_Welcome" window, create an Image control:1. On the "Creation" pane, in the "Usual controls" group, click "Image".2. The image appears in creation under the mouse.3. Move the mouse in the window toward the position where the control must be created. To drop the control in the window, all you have to do is perform a new left mouse click.4. Double-click the Image control: the description window of the control is displayed.5. In the "General" tab, select an image found on your disk in the "Image" edit control via the fi le picker.
Part 3: iOS application 99
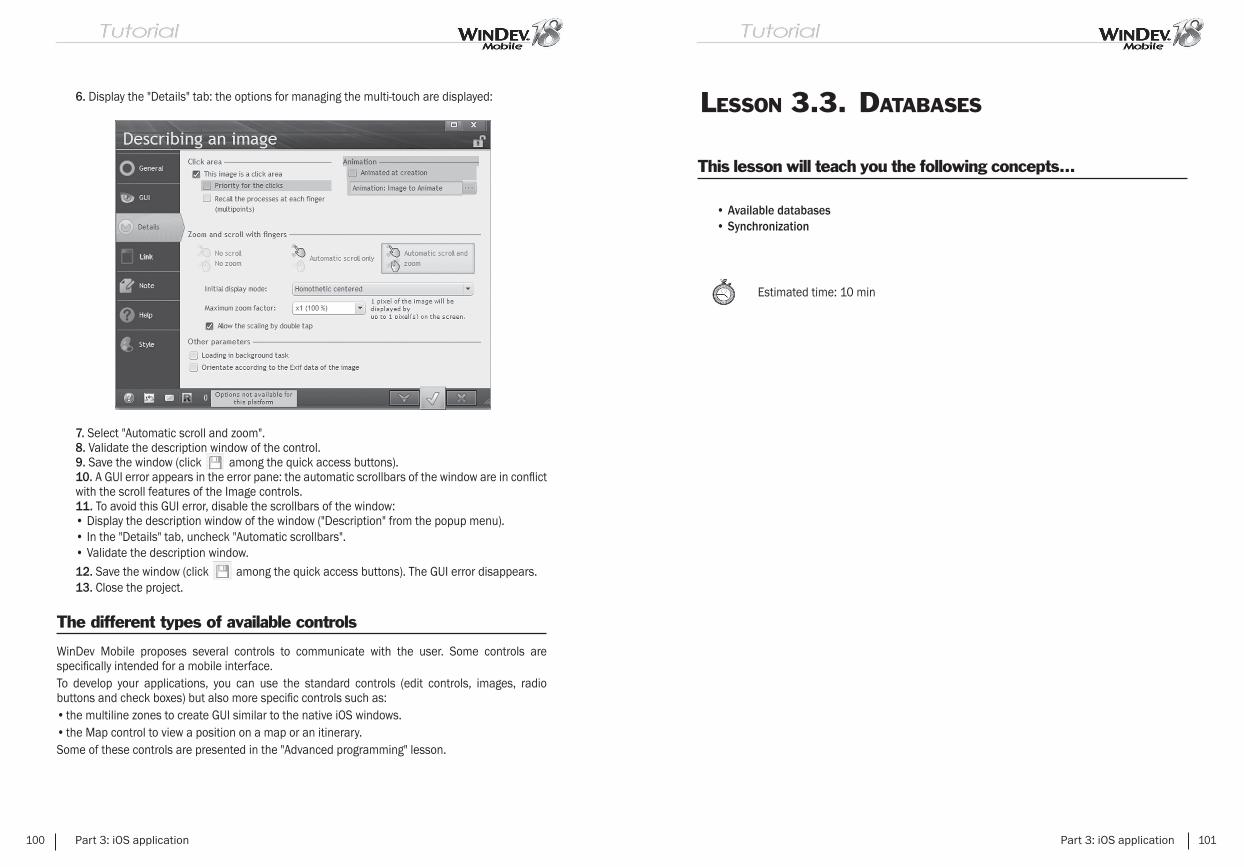
6. Display the "Details" tab: the options for managing the multi-touch are displayed:
7. Select "Automatic scroll and zoom".8. Validate the description window of the control.9. Save the window (click among the quick access buttons).10. A GUI error appears in the error pane: the automatic scrollbars of the window are in confl ict with the scroll features of the Image controls.11. To avoid this GUI error, disable the scrollbars of the window:• Display the description window of the window ("Description" from the popup menu).• In the "Details" tab, uncheck "Automatic scrollbars".• Validate the description window.12. Save the window (click among the quick access buttons). The GUI error disappears.13. Close the project.
The different types of available controls
WinDev Mobile proposes several controls to communicate with the user. Some controls are specifi cally intended for a mobile interface.To develop your applications, you can use the standard controls (edit controls, images, radio buttons and check boxes) but also more specifi c controls such as:• the multiline zones to create GUI similar to the native iOS windows.• the Map control to view a position on a map or an itinerary.Some of these controls are presented in the "Advanced programming" lesson.
100 Part 3: iOS application
LESSON 3.3. DATABASES
This lesson will teach you the following concepts...
• Available databases• Synchronization
Estimated time: 10 min
Part 3: iOS application 101
The available databases
Overview
In iOS, on the HyperFileSQL database is accessible in native mode. Both the Classic mode and the Client/Server mode are available.
HyperFileSQL database
HyperFileSQL ClassicIn HyperFileSQL Classic mode, the data fi les are stored on the device (iPhone or iPad).In this case, the application is stand-alone. No Wi-Fi or 3G connection is required.The data is stored in the memory of the device. The maximum storage size depends on the amount of memory on the device.In the "Advanced programming" lesson, we will develop an application that uses a HyperFileSQL Classic database.
HyperFileSQL Client/ServerIn HyperFileSQL Client/Server mode, no data is stored on the device. The data is stored on a computer on which a HyperFileSQL server is installed.
To access this computer (and therefore the database), a method for communicating with the server must have been enabled in the mobile application (Wi-Fi or 3G) in order to connect via the network or Internet.The response times depend on the quality of the WiFi or Internet network and on the volume of requested data.The access to the data will be performed by the Hxxx functions of WLanguage and/or by SQL queries.
The synchronization
The synchronization mechanism is used to "synchronize" the data stored on a mobile device with the data stored on a server. The synchronization uses the mechanism of "universal replication".This technique is available in WinDev, WebDev and WinDev Mobile.
See the online help (keyword: "Replication") for more details.
102 Part 3: iOS application
Accessing the data via a Webservice
An other method can also be used to access the data on a server from a mobile device: the call to a Webservice.
In this case, the mobile device must be equipped with a Wi-Fi or 3G connection to connect to the Webservice.The mobile application does not directly access the database. The application calls the functions of the Webservice. These functions return the data.It is the Webservice that accesses the database.
This technique is used to have a business layer (the Webservice) common to several types of applications and interfaces (WinDev, WebDev or WinDev Mobile) and different types of operating systems (Windows, Android, iOS, ...).
See the online help (keyword: "Webservice") for more details.
Part 3: iOS application 103

LESSON 3.4. ADVANCED PROGRAMMING
This lesson will teach you the following concepts...
• Creating a management application• Specifi c controls: looper, multiline zone, Map control, ...• Handling the database• Features specifi c to the device used (GPS, Photo, ...)
Estimated time: 1h30
104 Part 3: iOS application
Overview
In this lesson, we are going to develop an iOS application that uses a HyperFileSQL Classic database.This application will allow us to present some specifi c features of the iOS programming.
Opening the project
Start WinDev Mobile 18 (if not already done). Close (if necessary) the current project to display the home window.
Open the "iOS Managing Products" project. To do so, in the home window, click "Tutorial" and select the "iOS Managing Products (Exercise)" project. Tip: if the home window is not displayed, on the "Home" pane, in the "Online help" group, expand "Tutorial" and select "iOS Managing Products (Exercise)".
Answ
ers A corrected project is available. This project contains the different windows
created in this lesson. To open the corrected project, on the "Home" pane, in the "Online help" group, expand "Tutorial" and select "iOS Managing Products (Answer)".
Project description
Let's take a look at our source project. This project is an empty project, already created. It contains no window. It only contains the analysis describing the HyperFileSQL Classic data fi les that will be used. In the EXE directory, the corresponding data fi les are supplied with data in order to run the different tests.
To view the analysis associated with the project:1. Click among the quick access buttons of the WinDev Mobile menu .2. The data model editor is displayed.
Part 3: iOS application 105
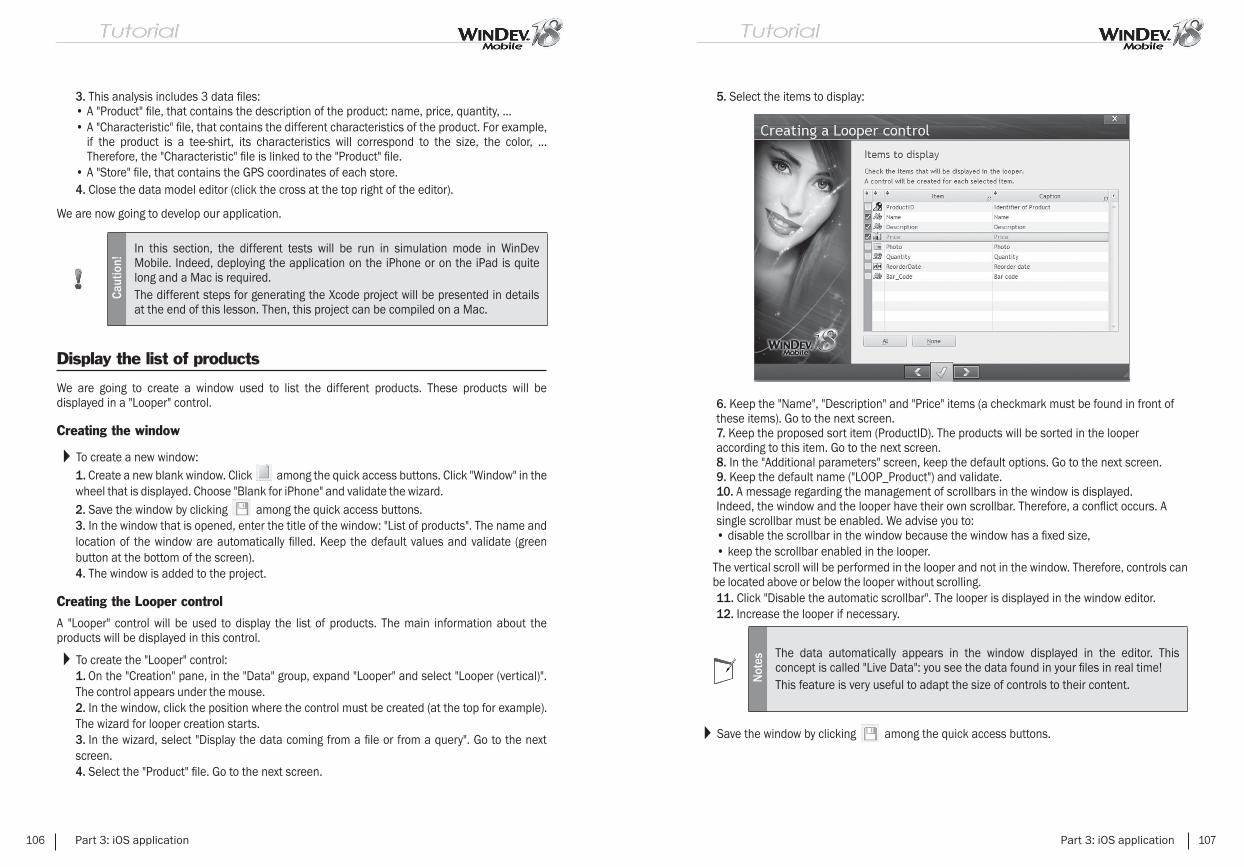
3. This analysis includes 3 data fi les:• A "Product" fi le, that contains the description of the product: name, price, quantity, ...• A "Characteristic" fi le, that contains the different characteristics of the product. For example,
if the product is a tee-shirt, its characteristics will correspond to the size, the color, ... Therefore, the "Characteristic" fi le is linked to the "Product" fi le.
• A "Store" fi le, that contains the GPS coordinates of each store.4. Close the data model editor (click the cross at the top right of the editor).
We are now going to develop our application.
Caut
ion!
In this section, the different tests will be run in simulation mode in WinDev Mobile. Indeed, deploying the application on the iPhone or on the iPad is quite long and a Mac is required.The different steps for generating the Xcode project will be presented in details at the end of this lesson. Then, this project can be compiled on a Mac.
Display the list of products
We are going to create a window used to list the different products. These products will be displayed in a "Looper" control.
Creating the window
To create a new window:1. Create a new blank window. Click among the quick access buttons. Click "Window" in the wheel that is displayed. Choose "Blank for iPhone" and validate the wizard.2. Save the window by clicking among the quick access buttons.3. In the window that is opened, enter the title of the window: "List of products". The name and location of the window are automatically fi lled. Keep the default values and validate (green button at the bottom of the screen).4. The window is added to the project.
Creating the Looper control
A "Looper" control will be used to display the list of products. The main information about the products will be displayed in this control.
To create the "Looper" control:1. On the "Creation" pane, in the "Data" group, expand "Looper" and select "Looper (vertical)". The control appears under the mouse.2. In the window, click the position where the control must be created (at the top for example). The wizard for looper creation starts.3. In the wizard, select "Display the data coming from a fi le or from a query". Go to the next screen.4. Select the "Product" fi le. Go to the next screen.
106 Part 3: iOS application
5. Select the items to display:
6. Keep the "Name", "Description" and "Price" items (a checkmark must be found in front of these items). Go to the next screen.7. Keep the proposed sort item (ProductID). The products will be sorted in the looper according to this item. Go to the next screen.8. In the "Additional parameters" screen, keep the default options. Go to the next screen.9. Keep the default name ("LOOP_Product") and validate.10. A message regarding the management of scrollbars in the window is displayed.Indeed, the window and the looper have their own scrollbar. Therefore, a confl ict occurs. A single scrollbar must be enabled. We advise you to:• disable the scrollbar in the window because the window has a fi xed size,• keep the scrollbar enabled in the looper.
The vertical scroll will be performed in the looper and not in the window. Therefore, controls can be located above or below the looper without scrolling.11. Click "Disable the automatic scrollbar". The looper is displayed in the window editor.12. Increase the looper if necessary.
Not
es The data automatically appears in the window displayed in the editor. This concept is called "Live Data": you see the data found in your fi les in real time! This feature is very useful to adapt the size of controls to their content.
Save the window by clicking among the quick access buttons.
Part 3: iOS application 107
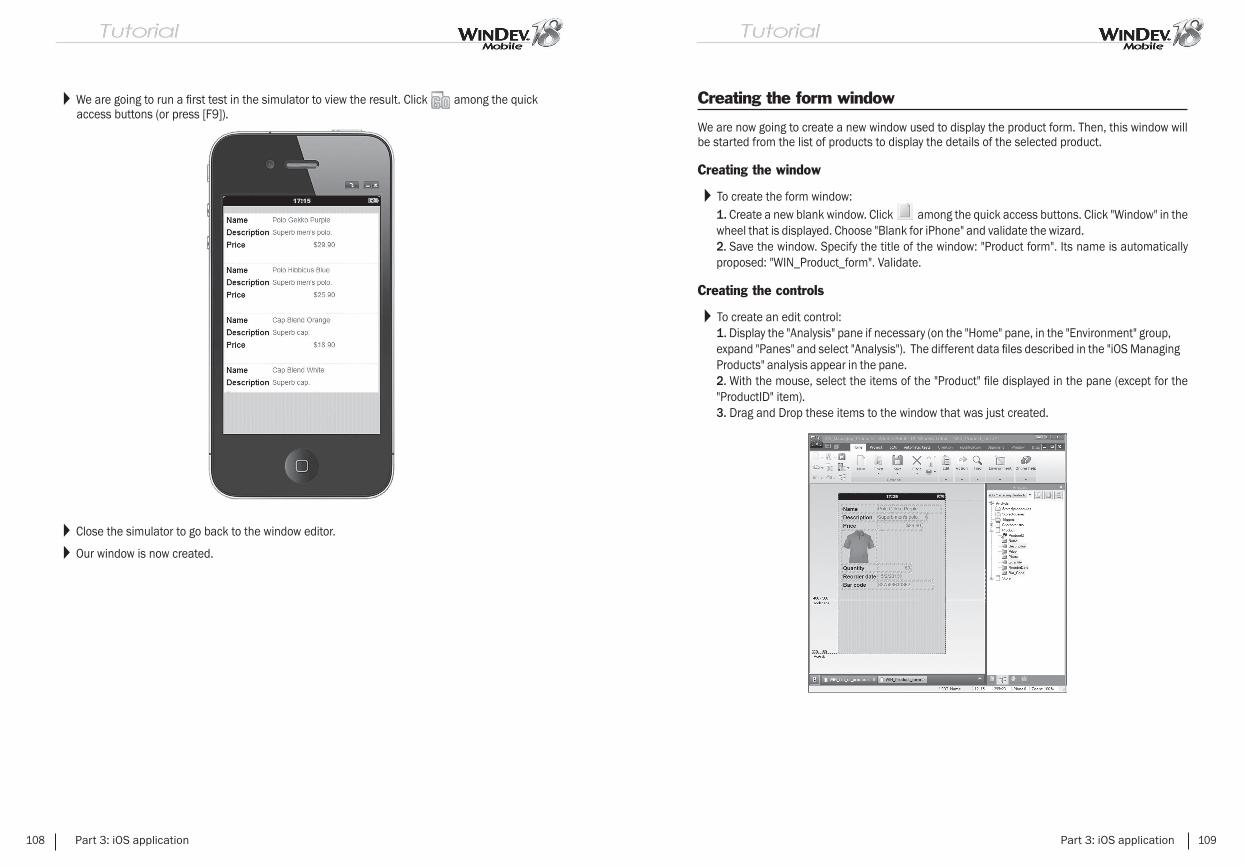
We are going to run a fi rst test in the simulator to view the result. Click among the quick access buttons (or press [F9]).
Close the simulator to go back to the window editor.
Our window is now created.
108 Part 3: iOS application
Creating the form window
We are now going to create a new window used to display the product form. Then, this window will be started from the list of products to display the details of the selected product.
Creating the window
To create the form window:1. Create a new blank window. Click among the quick access buttons. Click "Window" in the wheel that is displayed. Choose "Blank for iPhone" and validate the wizard.2. Save the window. Specify the title of the window: "Product form". Its name is automatically proposed: "WIN_Product_form". Validate.
Creating the controls
To create an edit control:1. Display the "Analysis" pane if necessary (on the "Home" pane, in the "Environment" group, expand "Panes" and select "Analysis"). The different data fi les described in the "iOS Managing Products" analysis appear in the pane.2. With the mouse, select the items of the "Product" fi le displayed in the pane (except for the "ProductID" item).3. Drag and Drop these items to the window that was just created.
Part 3: iOS application 109
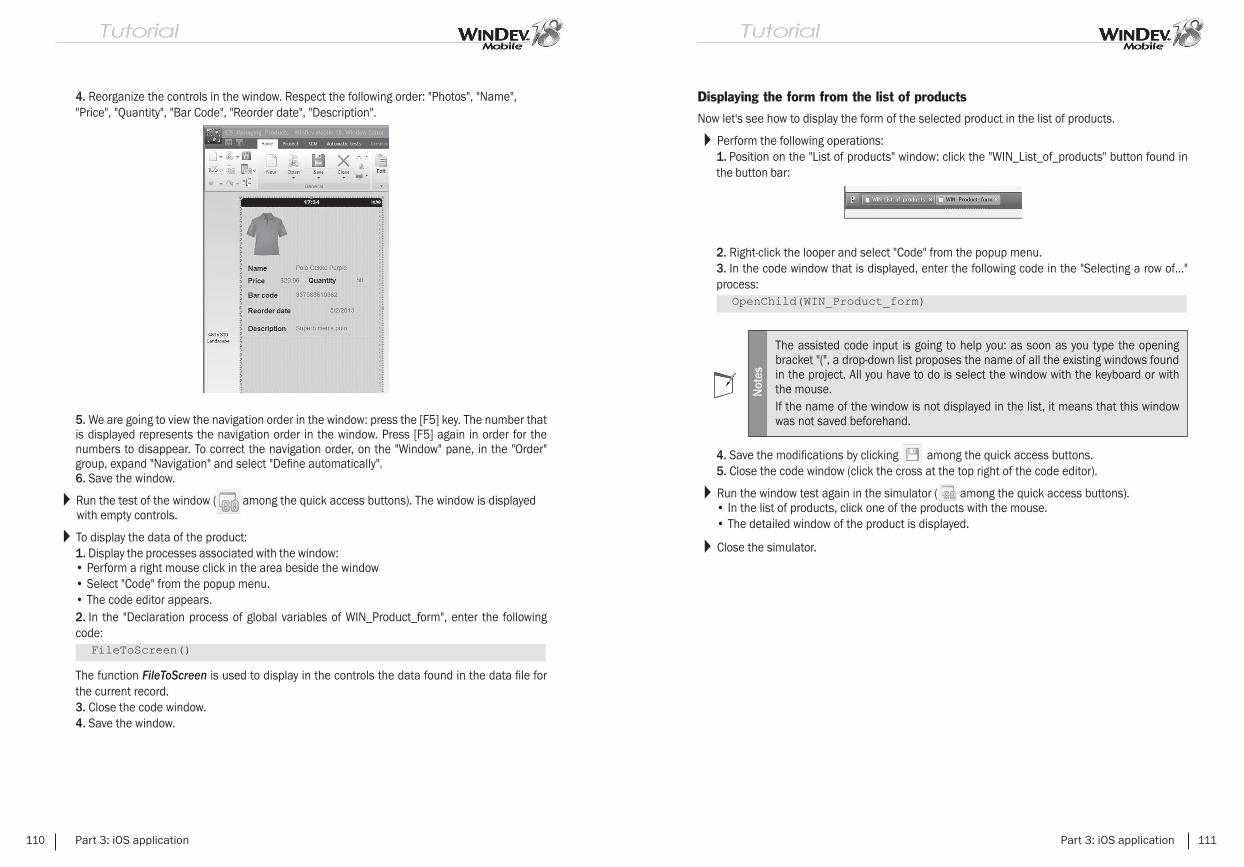
4. Reorganize the controls in the window. Respect the following order: "Photos", "Name", "Price", "Quantity", "Bar Code", "Reorder date", "Description".
5. We are going to view the navigation order in the window: press the [F5] key. The number that is displayed represents the navigation order in the window. Press [F5] again in order for the numbers to disappear. To correct the navigation order, on the "Window" pane, in the "Order" group, expand "Navigation" and select "Defi ne automatically".6. Save the window.
Run the test of the window ( among the quick access buttons). The window is displayed with empty controls.
To display the data of the product:1. Display the processes associated with the window:• Perform a right mouse click in the area beside the window• Select "Code" from the popup menu.• The code editor appears.2. In the "Declaration process of global variables of WIN_Product_form", enter the following code:
The function FileToScreen is used to display in the controls the data found in the data fi le for the current record.3. Close the code window.4. Save the window.
110 Part 3: iOS application
Displaying the form from the list of products
Now let's see how to display the form of the selected product in the list of products.
Perform the following operations:1. Position on the "List of products" window: click the "WIN_List_of_products" button found in the button bar:
2. Right-click the looper and select "Code" from the popup menu.3. In the code window that is displayed, enter the following code in the "Selecting a row of..." process:
Not
es
The assisted code input is going to help you: as soon as you type the opening bracket "(", a drop-down list proposes the name of all the existing windows found in the project. All you have to do is select the window with the keyboard or with the mouse.If the name of the window is not displayed in the list, it means that this window was not saved beforehand.
4. Save the modifi cations by clicking among the quick access buttons.5. Close the code window (click the cross at the top right of the code editor).
Run the window test again in the simulator ( among the quick access buttons).• In the list of products, click one of the products with the mouse.• The detailed window of the product is displayed.
Close the simulator.
Part 3: iOS application 111

Managing the creation and the modifi cation of a product
We are now going to modify our two windows in order to manage the addition and the modifi cation of a product.
Modifying the product form
We are going to add 2 buttons into the "WIN_Product_form" window:• a "Validate" button to manage the validation of modifi cations• a "Cancel" button to manage the return to the list of products.
Display (if necessary) the "WIN_Product_form" window in the editor: click the corresponding button in the button bar.
To create the "Cancel" button:1. On the "Creation" pane, in the "Usual controls" group, expand "Button" (click the arrow found below ).
Not
es
For some types of controls, WinDev Mobile proposes a list of preset controls. These controls are advanced controls, confi gured to perform a specifi c action.For example, the "Cancel" button proposed by the list of preset controls contains the code required by its execution.
2. The list of preset buttons is displayed.3. Click "Cancel": the shape of the button appears under the mouse. Then, click at the bottom right of the window to create the button.
We are now going to add the "Validate" button.1. On the "Creation" pane, in the "Usual controls" group, click : the shape of the button appears under the mouse. Then, click at the bottom of the window to create the button.2. Select the control and press the "Enter" key on the keyboard. The caption of the button switches to edit. Type "Validate" and press the "Enter" key on the keyboard.
We are now going to enter the code of the "Validate" button.1. Right-click the button and select "Code" from the popup menu.2. In the "Click" process, enter the following code:
Let's take a look at this code:• ScreenToFile is used to initialize the items with the values of the linked controls, for the
current record.• HModify is used to update the fi le data for the current record.• LooperDisplay is used to update the looper data for the "WIN_List_of_products" window.
112 Part 3: iOS application
3. Save the modifi cations by clicking among the quick access buttons.4. Close the code window (click the cross at the top right of the code editor).
Display the "WIN_List_of_products" window in the window editor and run its test in the simulator ( among the quick access buttons).• In the list of products, click one of the products with the mouse: for example, the "Polo
Hibiscus Blue" product whose price is 25.90 Dollars.• The detailed window of the product is displayed. Modify the price of 25.90 Dollars and enter
19.90 Dollars, then click the "Validate" button.• When going back to the list of products, you will notice that the price was updated for this
article.
Close the simulator. The editor of WinDev Mobile is displayed.
Creating a new product
The principle for creating a product is as follows:• In the window for the list of products, we are going to add a "New product" button that will be
used to open the "Product form" window.• Then, we will modify the code of the "Product form" window to manage the addition into the
Product data fi le.
To add a button into the list of products:1. Display the "WIN_List_of_products" window in the editor.2. On the "Creation" pane, in the "Usual controls" group, click : the shape of the button appears under the mouse. Then, click at the bottom of the window to create the button.3. Select the control and press the "Enter" key on the keyboard. The caption of the button switches to edit. Type "New product" and press the "Enter" key on the keyboard.
Part 3: iOS application 113

4. The code of this option is used to open the "Product form" window and to reset its controls. To enter this code:• Right-click the control.• Select "Code" from the popup menu.• In the "Click" process, enter the following code:
HReset initializes the variables of the items found in the Product fi le with the default values to manage a new record.5. Save the modifi cations by clicking among the quick access buttons.6. Close the code window (click the cross at the top right of the code editor).
We are now going to modify the window of the product form to manage the addition of a new record.1. Display the "WIN_Product_form" window in the editor.2. We are going to modify the code of the validation button:• Right-click the button and select "Code" from the popup menu.• In the "Click" process, replace the existing code by the following code:
Let's take a look at this code:• ..NewRecord is used to fi nd out whether the current record must be created.• If HReset was called beforehand, the property returns True (case of the click on "New
product") and the record must be created by HAdd.• Otherwise, the current record already exists and it must be modifi ed by HModify.
3. Save the modifi cations by clicking among the quick access buttons.4. Close the code window (click the cross at the top right of the code editor).
Display the "WIN_List_of_products" window in the window editor and run its test in the simulator ( among the quick access buttons).• In the list of products, click the "New product" button.• Enter a new product.• Validate. The new product appears in the list of products.• Close the simulator.
114 Part 3: iOS application
Using the camera and displaying an image
Caut
ion!
In this section, the different tests will be run in simulation mode in WinDev Mobile. Indeed, deploying the application on the iPhone or on the iPad is quite long and a Mac is required. The different steps for generating the Xcode project will be presented in details at the end of this lesson. Then, this project can be compiled on a Mac.
Overview
We are going to manage the photo of the product. We will be using the camera of the device.We are going to create a button to start the camera. The photo will be retrieved as an image in memory and displayed in the image control of the product.We are also going to create a button used to select a photo in the album of the mobile device.
Creating the button for taking photos
To create the button for taking photos:1. Display the "WIN_Product_form" window in the editor.2. Add a button into the window:• On the "Creation" pane, in the "Usual controls" group, click : the shape of the button
appears under the mouse.• Then, click at the top right of the product image to create the button.
We are going to modify the button in order to associate it with an image representing a camera:1. Select the button and display its popup menu (right mouse click).2. Select "Description". The description window of the control is displayed.3. In the "General" tab, position on the "Image" edit zone and click the "Catalog" button.4. The image catalog of WinDev Mobile is opened. This catalog contains hundreds of images in different fi elds, formats and sizes.
Part 3: iOS application 115

5. In the "Search" area (top left), enter "photo" and validate. Several images are displayed:
6. Double-click the fi rst image to select it.7. In the next screen, you have the ability to choose the size of the image, the color, the orientation, its format and its name.8. Keep all the default options and specify the name of the image ("Camera").9. Validate the window.10. The path of the image is displayed in the button description.11. Give a name to the button: "BTN_Camera".12. Clear the caption of the button.13. Validate the description window.14. In the editor, reduce the size of the button.
Taking photos
We are going to enter the code used to take a photo and to display it in the image control of the product form.
To manage the taking of photos:1. Select "Code" from the popup menu of the button (right mouse click).2. Enter the following code in the "Click" process:
In this code, VideoStartApp is used to start the native camera application of the device in order to save a video or to take a photo.3. Save the modifi cations by clicking among the quick access buttons.4. Close the code window (click the cross at the top right of the code editor).
116 Part 3: iOS application
Selecting a photo in the photo album
We are going to add a button used to select a photo in the album of the device and to associate it with the product.
To create the button for selecting the photo:1. Add a button into the "WIN_Product_form" window:• on the "Creation" pane, in the "Usual controls" group, click .• the shape of the button appears under the mouse.• create the button below the previous button.2. Display the description window of the button (double-click the control):• Give a name to the button: "BTN_PhotoAlbum".• Clear the caption of the button.• Select an image in the image catalog.3. Validate the description window.4. In the editor, reduce the size of the button.
The code of this button is used to open the photo album of the device and to select an image in order to display it in the image control of the product form.1. Select "Code" from the popup menu of the button (right mouse click).2. Enter the following code in the "Click" process:
In this code, AlbumPicker is used to retrieve the photo selected in the photo album.3. Save the modifi cations by clicking among the quick access buttons.4. Close the code window (click the cross at the top right of the code editor).
Part 3: iOS application 117
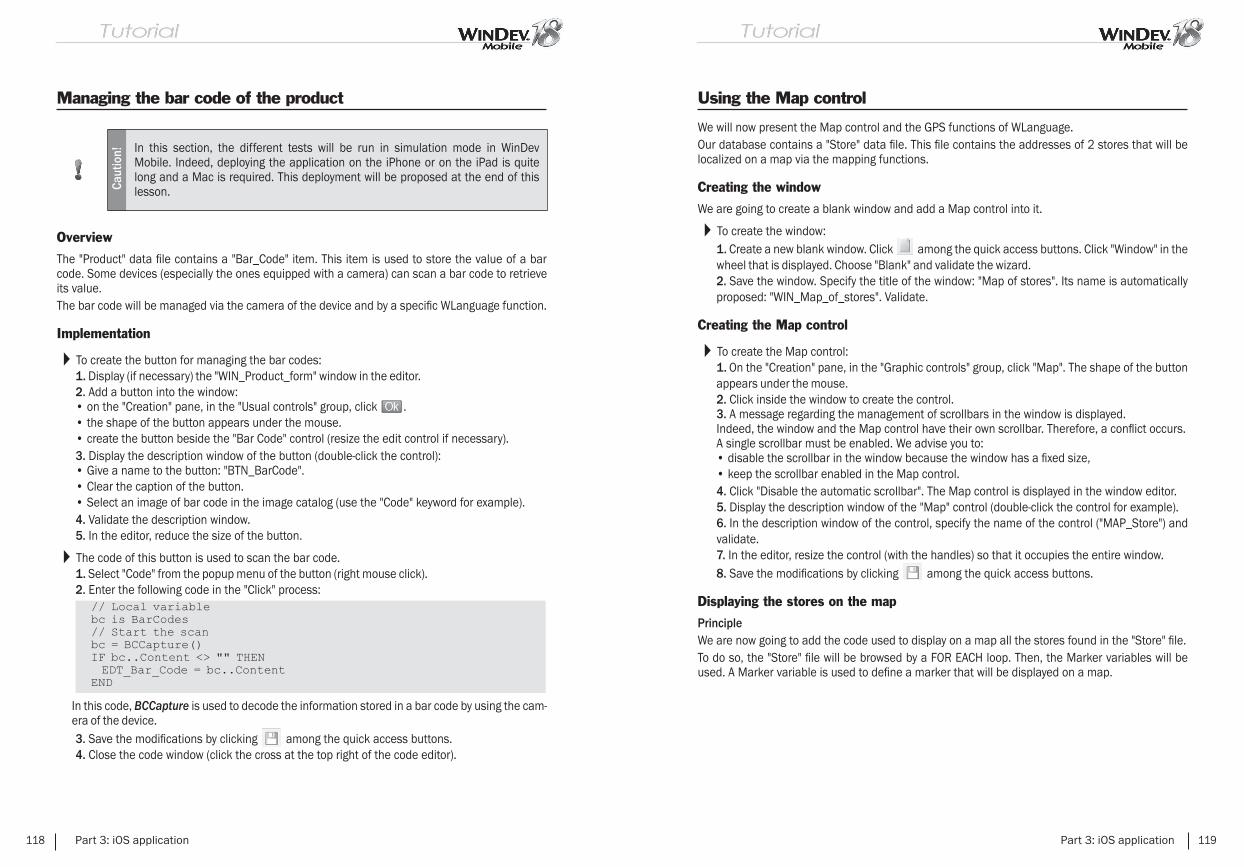
Managing the bar code of the productCa
utio
n! In this section, the different tests will be run in simulation mode in WinDev Mobile. Indeed, deploying the application on the iPhone or on the iPad is quite long and a Mac is required. This deployment will be proposed at the end of this lesson.
Overview
The "Product" data fi le contains a "Bar_Code" item. This item is used to store the value of a bar code. Some devices (especially the ones equipped with a camera) can scan a bar code to retrieve its value.The bar code will be managed via the camera of the device and by a specifi c WLanguage function.
Implementation
To create the button for managing the bar codes:1. Display (if necessary) the "WIN_Product_form" window in the editor.2. Add a button into the window:• on the "Creation" pane, in the "Usual controls" group, click .• the shape of the button appears under the mouse.• create the button beside the "Bar Code" control (resize the edit control if necessary).3. Display the description window of the button (double-click the control):• Give a name to the button: "BTN_BarCode".• Clear the caption of the button.• Select an image of bar code in the image catalog (use the "Code" keyword for example).4. Validate the description window.5. In the editor, reduce the size of the button.
The code of this button is used to scan the bar code.1. Select "Code" from the popup menu of the button (right mouse click).2. Enter the following code in the "Click" process:
In this code, BCCapture is used to decode the information stored in a bar code by using the cam-era of the device.3. Save the modifi cations by clicking among the quick access buttons.4. Close the code window (click the cross at the top right of the code editor).
118 Part 3: iOS application
Using the Map control
We will now present the Map control and the GPS functions of WLanguage.Our database contains a "Store" data fi le. This fi le contains the addresses of 2 stores that will be localized on a map via the mapping functions.
Creating the window
We are going to create a blank window and add a Map control into it.
To create the window:1. Create a new blank window. Click among the quick access buttons. Click "Window" in the wheel that is displayed. Choose "Blank" and validate the wizard.2. Save the window. Specify the title of the window: "Map of stores". Its name is automatically proposed: "WIN_Map_of_stores". Validate.
Creating the Map control
To create the Map control:1. On the "Creation" pane, in the "Graphic controls" group, click "Map". The shape of the button appears under the mouse.2. Click inside the window to create the control.3. A message regarding the management of scrollbars in the window is displayed.Indeed, the window and the Map control have their own scrollbar. Therefore, a confl ict occurs. A single scrollbar must be enabled. We advise you to:• disable the scrollbar in the window because the window has a fi xed size,• keep the scrollbar enabled in the Map control.4. Click "Disable the automatic scrollbar". The Map control is displayed in the window editor.5. Display the description window of the "Map" control (double-click the control for example).6. In the description window of the control, specify the name of the control ("MAP_Store") and validate.7. In the editor, resize the control (with the handles) so that it occupies the entire window.8. Save the modifi cations by clicking among the quick access buttons.
Displaying the stores on the map
PrincipleWe are now going to add the code used to display on a map all the stores found in the "Store" fi le.To do so, the "Store" fi le will be browsed by a FOR EACH loop. Then, the Marker variables will be used. A Marker variable is used to defi ne a marker that will be displayed on a map.
Part 3: iOS application 119
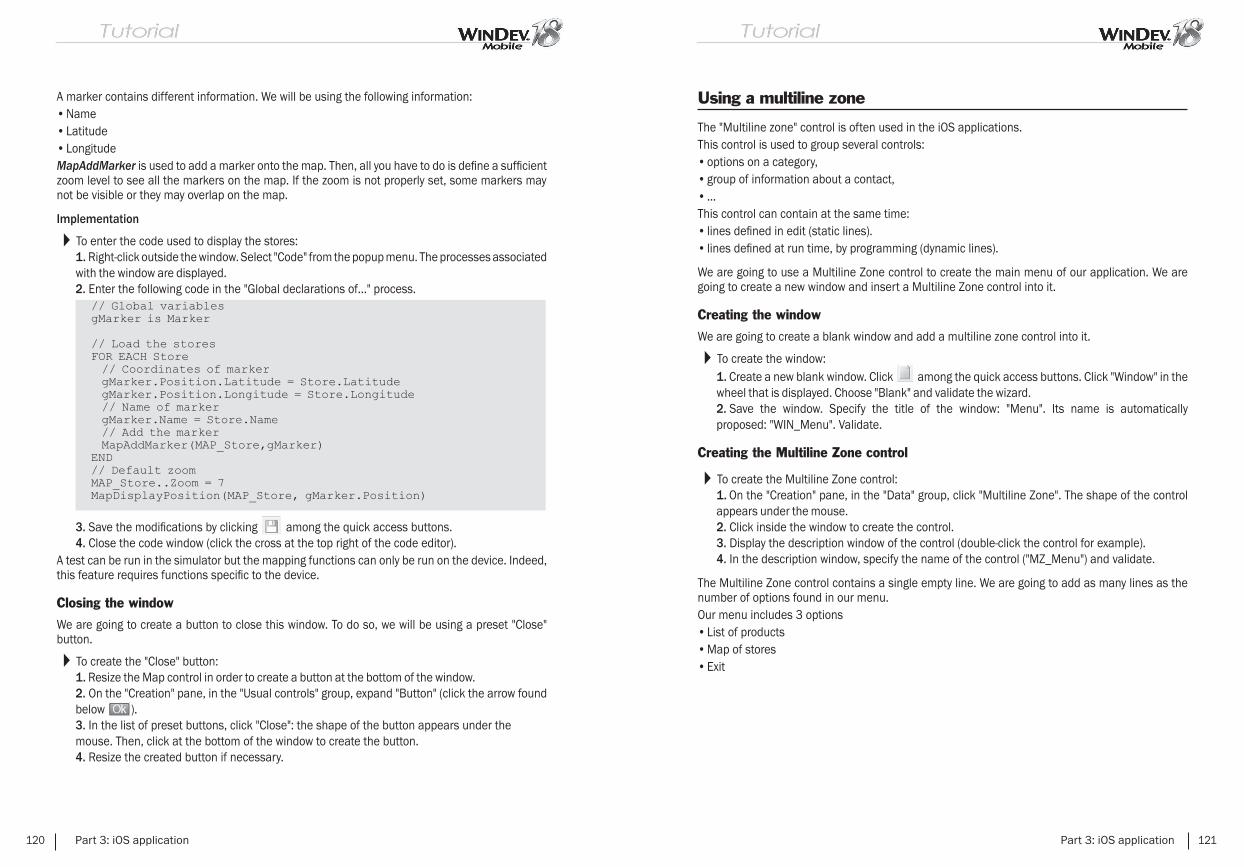
A marker contains different information. We will be using the following information:• Name• Latitude• LongitudeMapAddMarker is used to add a marker onto the map. Then, all you have to do is defi ne a suffi cient zoom level to see all the markers on the map. If the zoom is not properly set, some markers may not be visible or they may overlap on the map.
Implementation
To enter the code used to display the stores:1. Right-click outside the window. Select "Code" from the popup menu. The processes associated with the window are displayed.2. Enter the following code in the "Global declarations of..." process.
3. Save the modifi cations by clicking among the quick access buttons.4. Close the code window (click the cross at the top right of the code editor).
A test can be run in the simulator but the mapping functions can only be run on the device. Indeed, this feature requires functions specifi c to the device.
Closing the window
We are going to create a button to close this window. To do so, we will be using a preset "Close" button.
To create the "Close" button:1. Resize the Map control in order to create a button at the bottom of the window.2. On the "Creation" pane, in the "Usual controls" group, expand "Button" (click the arrow found below ).3. In the list of preset buttons, click "Close": the shape of the button appears under the mouse. Then, click at the bottom of the window to create the button.4. Resize the created button if necessary.
120 Part 3: iOS application
Using a multiline zone
The "Multiline zone" control is often used in the iOS applications.This control is used to group several controls:• options on a category,• group of information about a contact,• ...This control can contain at the same time:• lines defi ned in edit (static lines).• lines defi ned at run time, by programming (dynamic lines).
We are going to use a Multiline Zone control to create the main menu of our application. We are going to create a new window and insert a Multiline Zone control into it.
Creating the window
We are going to create a blank window and add a multiline zone control into it.
To create the window:1. Create a new blank window. Click among the quick access buttons. Click "Window" in the wheel that is displayed. Choose "Blank" and validate the wizard.2. Save the window. Specify the title of the window: "Menu". Its name is automatically proposed: "WIN_Menu". Validate.
Creating the Multiline Zone control
To create the Multiline Zone control:1. On the "Creation" pane, in the "Data" group, click "Multiline Zone". The shape of the control appears under the mouse.2. Click inside the window to create the control.3. Display the description window of the control (double-click the control for example).4. In the description window, specify the name of the control ("MZ_Menu") and validate.
The Multiline Zone control contains a single empty line. We are going to add as many lines as the number of options found in our menu.Our menu includes 3 options• List of products• Map of stores• Exit
Part 3: iOS application 121
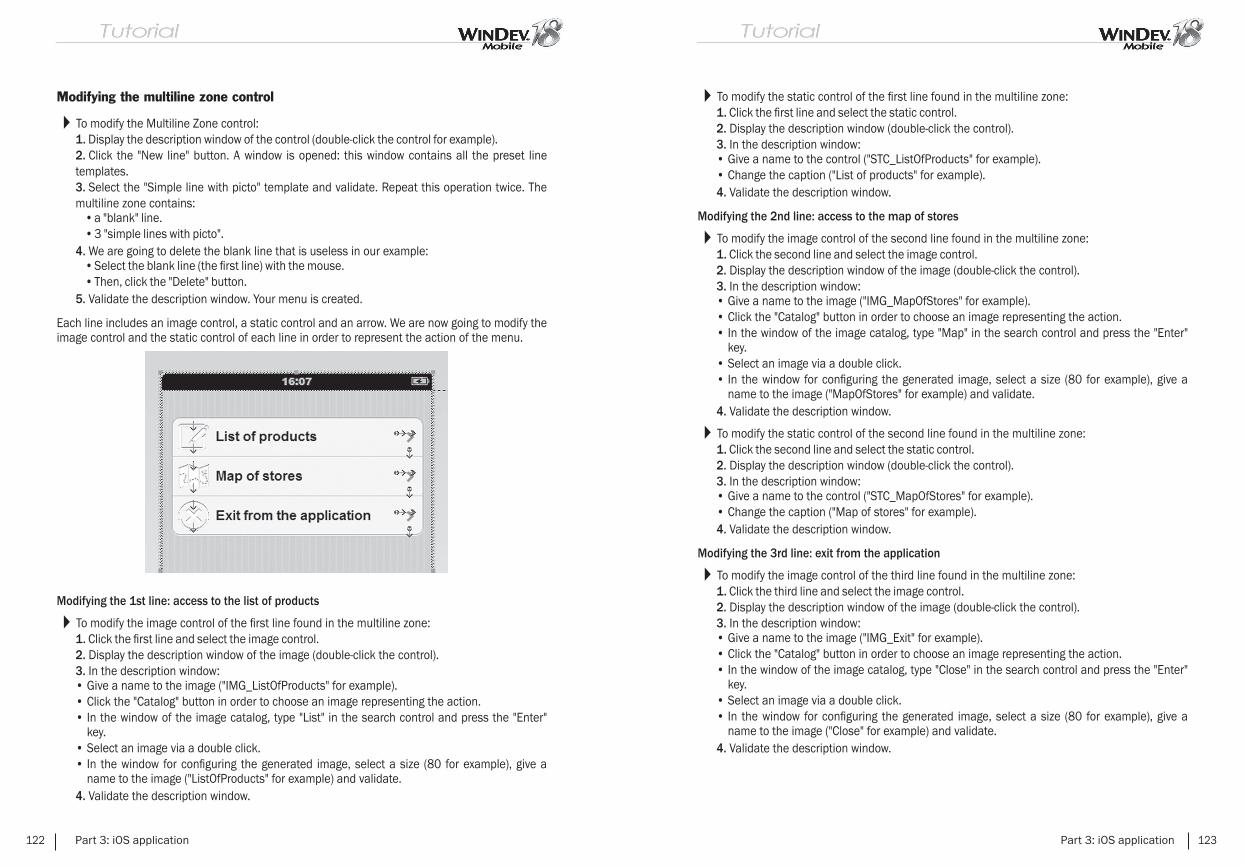
Modifying the multiline zone control
To modify the Multiline Zone control:1. Display the description window of the control (double-click the control for example).2. Click the "New line" button. A window is opened: this window contains all the preset line templates.3. Select the "Simple line with picto" template and validate. Repeat this operation twice. The multiline zone contains:
• a "blank" line.• 3 "simple lines with picto".
4. We are going to delete the blank line that is useless in our example:• Select the blank line (the fi rst line) with the mouse.• Then, click the "Delete" button.
5. Validate the description window. Your menu is created.
Each line includes an image control, a static control and an arrow. We are now going to modify the image control and the static control of each line in order to represent the action of the menu.
Modifying the 1st line: access to the list of products
To modify the image control of the fi rst line found in the multiline zone:1. Click the fi rst line and select the image control.2. Display the description window of the image (double-click the control).3. In the description window:• Give a name to the image ("IMG_ListOfProducts" for example).• Click the "Catalog" button in order to choose an image representing the action.• In the window of the image catalog, type "List" in the search control and press the "Enter"
key.• Select an image via a double click.• In the window for confi guring the generated image, select a size (80 for example), give a
name to the image ("ListOfProducts" for example) and validate.4. Validate the description window.
122 Part 3: iOS application
To modify the static control of the fi rst line found in the multiline zone:1. Click the fi rst line and select the static control.2. Display the description window (double-click the control).3. In the description window:• Give a name to the control ("STC_ListOfProducts" for example).• Change the caption ("List of products" for example).4. Validate the description window.
Modifying the 2nd line: access to the map of stores
To modify the image control of the second line found in the multiline zone:1. Click the second line and select the image control.2. Display the description window of the image (double-click the control).3. In the description window:• Give a name to the image ("IMG_MapOfStores" for example).• Click the "Catalog" button in order to choose an image representing the action.• In the window of the image catalog, type "Map" in the search control and press the "Enter"
key.• Select an image via a double click.• In the window for confi guring the generated image, select a size (80 for example), give a
name to the image ("MapOfStores" for example) and validate.4. Validate the description window.
To modify the static control of the second line found in the multiline zone:1. Click the second line and select the static control.2. Display the description window (double-click the control).3. In the description window:• Give a name to the control ("STC_MapOfStores" for example).• Change the caption ("Map of stores" for example).4. Validate the description window.
Modifying the 3rd line: exit from the application
To modify the image control of the third line found in the multiline zone:1. Click the third line and select the image control.2. Display the description window of the image (double-click the control).3. In the description window:• Give a name to the image ("IMG_Exit" for example).• Click the "Catalog" button in order to choose an image representing the action.• In the window of the image catalog, type "Close" in the search control and press the "Enter"
key.• Select an image via a double click.• In the window for confi guring the generated image, select a size (80 for example), give a
name to the image ("Close" for example) and validate.4. Validate the description window.
Part 3: iOS application 123
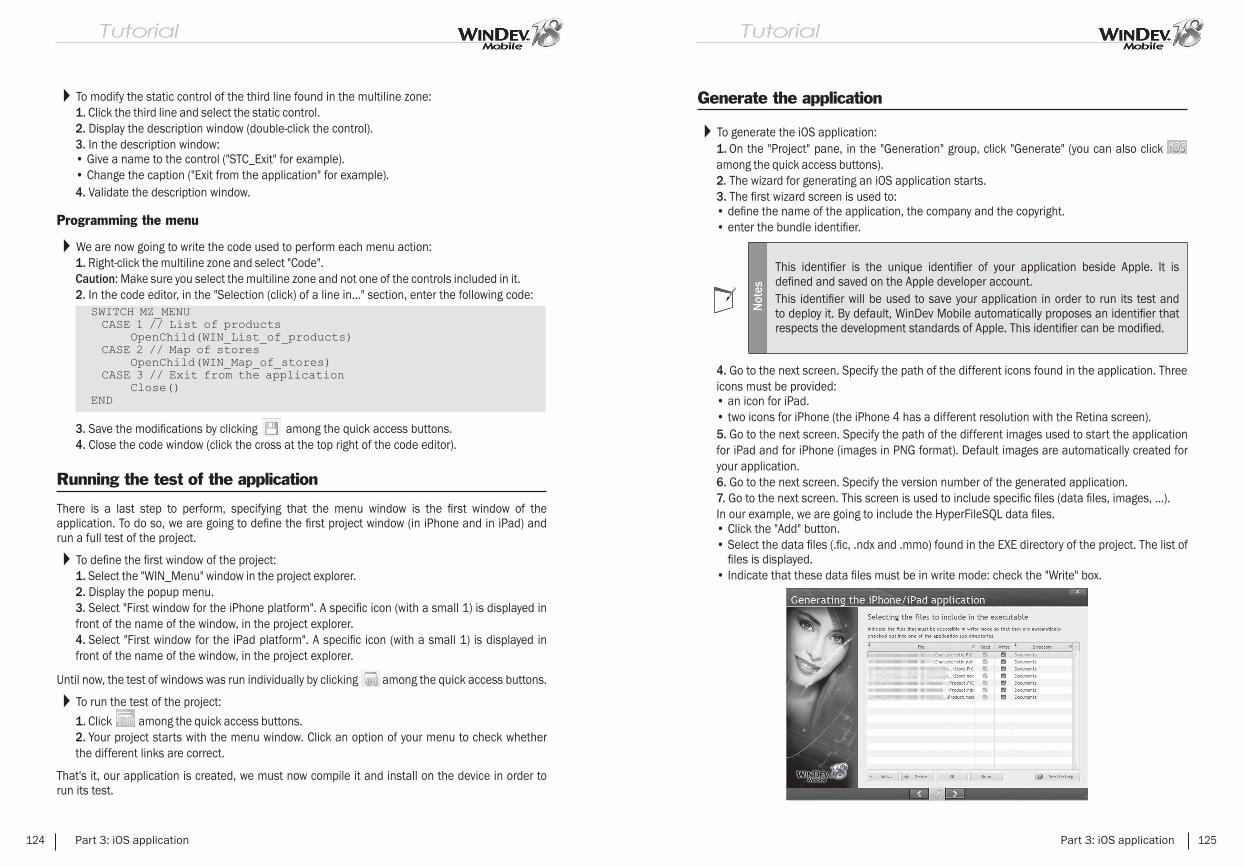
To modify the static control of the third line found in the multiline zone:1. Click the third line and select the static control.2. Display the description window (double-click the control).3. In the description window:• Give a name to the control ("STC_Exit" for example).• Change the caption ("Exit from the application" for example).4. Validate the description window.
Programming the menu
We are now going to write the code used to perform each menu action:1. Right-click the multiline zone and select "Code". Caution: Make sure you select the multiline zone and not one of the controls included in it.2. In the code editor, in the "Selection (click) of a line in..." section, enter the following code:
3. Save the modifi cations by clicking among the quick access buttons.4. Close the code window (click the cross at the top right of the code editor).
Running the test of the application
There is a last step to perform, specifying that the menu window is the fi rst window of the application. To do so, we are going to defi ne the fi rst project window (in iPhone and in iPad) and run a full test of the project.
To defi ne the fi rst window of the project:1. Select the "WIN_Menu" window in the project explorer.2. Display the popup menu.3. Select "First window for the iPhone platform". A specifi c icon (with a small 1) is displayed in front of the name of the window, in the project explorer.4. Select "First window for the iPad platform". A specifi c icon (with a small 1) is displayed in front of the name of the window, in the project explorer.
Until now, the test of windows was run individually by clicking among the quick access buttons.
To run the test of the project:
1. Click among the quick access buttons.2. Your project starts with the menu window. Click an option of your menu to check whether the different links are correct.
That's it, our application is created, we must now compile it and install on the device in order to run its test.
124 Part 3: iOS application
Generate the application
To generate the iOS application:1. On the "Project" pane, in the "Generation" group, click "Generate" (you can also click among the quick access buttons).2. The wizard for generating an iOS application starts.3. The fi rst wizard screen is used to:• defi ne the name of the application, the company and the copyright.• enter the bundle identifi er.
Not
es
This identifi er is the unique identifi er of your application beside Apple. It is defi ned and saved on the Apple developer account.This identifi er will be used to save your application in order to run its test and to deploy it. By default, WinDev Mobile automatically proposes an identifi er that respects the development standards of Apple. This identifi er can be modifi ed.
4. Go to the next screen. Specify the path of the different icons found in the application. Three icons must be provided:• an icon for iPad.• two icons for iPhone (the iPhone 4 has a different resolution with the Retina screen).5. Go to the next screen. Specify the path of the different images used to start the application for iPad and for iPhone (images in PNG format). Default images are automatically created for your application.6. Go to the next screen. Specify the version number of the generated application.7. Go to the next screen. This screen is used to include specifi c fi les (data fi les, images, ...). In our example, we are going to include the HyperFileSQL data fi les.• Click the "Add" button.• Select the data fi les (.fi c, .ndx and .mmo) found in the EXE directory of the project. The list of
fi les is displayed.• Indicate that these data fi les must be in write mode: check the "Write" box.
Part 3: iOS application 125
8. Go to the next screen. This screen is used to specify:• the minimum version of iOS required to run the application.• whether fi les can be shared with iTunes. If this option is checked, you will have the ability to
retrieve the application fi les on MAC during the synchronization. For example, if data fi les have been supplied with the application, the iTunes application will allow you to retrieve these fi les.
9. Validate the wizard. The generation is performed in the EXE folder of the project directory. The directory containing the source codes that will be used on the Mac is named "Project_name.xcode.gen" ("My_iOS_Project.xcode.gen" in our example). This directory must be copied onto the MAC. Click the "Open the generation directory" button.
The other operations must be performed on the Mac. We won't present these operations here. See the online help for more details (keyword: Xcode).
126 Part 3: iOS application
LESSON 3.5. DISTRIBUTING THE APPLICATION
This lesson will teach you the following concepts...
• Available distribution modes
Estimated time: 20 min
Part 3: iOS application 127
Overview
WinDev Mobile allows you to develop applications for the iOS operating system.Once the applications are created, developed and checked, all you have to do is deploy them.
Deployment
Three methods can be used to deploy the application on a device (iPhone or iPad).• Via App Store: This type of distribution allows you to distribute your application without any
restrictions via the sale network of App Store. Your application will include the signature linked to your certifi cate but it will not be linked to a single device.
• Via an In-House network: This type of distribution allows you to distribute your application via a Web server to a group of users working for the same company. To use this type of distribution, you must register to the iOS Developer Enterprise program. Your application will include the signature linked to your certifi cate but it will not be linked to a single device.
• Via an Ad Hoc network: This type of distribution enables you to install the application on a network containing up to 100 devices (iPhone or iPad). The application must be recompiled for the target device by including the certifi cate for the signature as well as the unique identifi er of the device.
Caution: To run the test of the application and/or to deploy the application on a device (iPhone or iPad), you must register toward the iOS Developer Program. This registration is not free of charge. The list of registration programs is available from the following address:http://developer.apple.com/programs/which-program/Three types of registration are available:• iOS Developer Program - Individual• iOS Developer Program - Company• iOS Developer Enterprise Program
This registration is used to get a developer certifi cate allowing you to sign your applications in order to compile them and to distribute them. This certifi cate is not free of charge. This developer certifi cate is required even for a simple setup for test (debug) on a device.
128 Part 3: iOS application
LESSON 3.6. QUESTIONS/ANSWERS
This lesson will teach you the following concepts...
• Questions/Answers
Estimated time: 10 min
Part 3: iOS application 129

Questions/Answers
Question How do I use the messaging of the device?
You can send messages by using the native application for sending emails found on the device. To do so, you must:• initialize the information of the Email structure.• use EmailRunApp.
Question How do I send an email directly?
You have the ability to send emails by using the email functions of WLanguage.
Example for sending emails:
130 Part 3: iOS application
Question How do I establish the dialog with an FTP server?
The iOS system allows you to connect to an FTP server in order to send or retrieve fi les. To do so, you must use the following functions:• FTPConnect to connect to the FTP server• FTPDisconnect to disconnect• FTPSend to send a fi le from the device to the FTP server• FTPGet to get a fi le from the server to the device.
Example for sending fi les onto an FTP server:
Question How do I use the GPS of the device and the geo-localization functions?
The iOS system includes functions for GPS management and for geo-localization. According to the device, the GPS functions will use the GPS chip of the device or a triangulation system by using the wireless networks.
To do so, you must use the following functions:• GPSInitParameter to initialize the GPS (choice of localization system...) • GPSGetPosition to retrieve the current position• geoDistance to retrieve the distance between 2 positions• geoRunApp to start the native mapping application of the device• geoGetAddress to retrieve an address or a list of addresses in relation to a location• etc.
Example for using the GPS functions:
Part 3: iOS application 131
Caution:During the fi rst startup of a GPS function, the system asks the user for the authorization to perform a geo-localization. If the user refuses, all the GPS functions used in the rest of the application will fail.To re-allow the use of GPS for this application, the system confi guration of the application must be modifi ed.
Question How do I display a chart in an iOS application?
WinDev Mobile includes a Chart control. This control allows you to draw a pie chart, a bar chart, a line chart, ... in an iOS application.The principle is as follows:
1. Calculate (via a query or procedures in WLanguage) the values to represent in the chart.2. Create a Chart control in a window (on the "Creation" pane, in the "Graphic controls" group, click "Chart").3. In the wizard for creating the Chart control, specify the data source of the chart (query, fi le, by programming...)
Then, the created chart can be modifi ed by programming with the WLanguage functions. All the functions used to handle a Chart control start with the letters "gr":• grDraw• grLegend• grTitle• grAddData• etc.
132 Part 3: iOS application
Question How do I call native Objective C code from my iOS application?
When you develop an iOS application with WinDev Mobile, the native code is in Objective C. WLanguage is translated into Objective C during the compilation. You have the ability, from the WinDev Mobile environment, to include native procedures in Objective C language. To do so, you must:• create a set of global procedures• create a global procedure• click the gray bar of the procedure header (where the WL word is found).
The header bar becomes light blue. The WL word is transformed into ObjC.
All you have to do is enter or copy native Objective C code.
Caution: Make sure that the code entered or copied is properly written: WinDev Mobile does not check the completion. The errors will occur when compiling the project in Xcode.
Note: You also have the ability to include custom libraries (.h and .a) or system libraries (MediaPlayer.framework for example).
Part 3: iOS application 133

134 Part 3: iOS application
Windows Mobile application
PART 4

136 Part 4: Windows Mobile application
LESSON 4.1. MY FIRST WINDOWS MOBILE PROJECT
This lesson will teach you the following concepts...
• Creating Windows Mobile project• My fi rst window• My fi rst test• First deployment
Estimated time: 1h
Part 4: Windows Mobile application 137
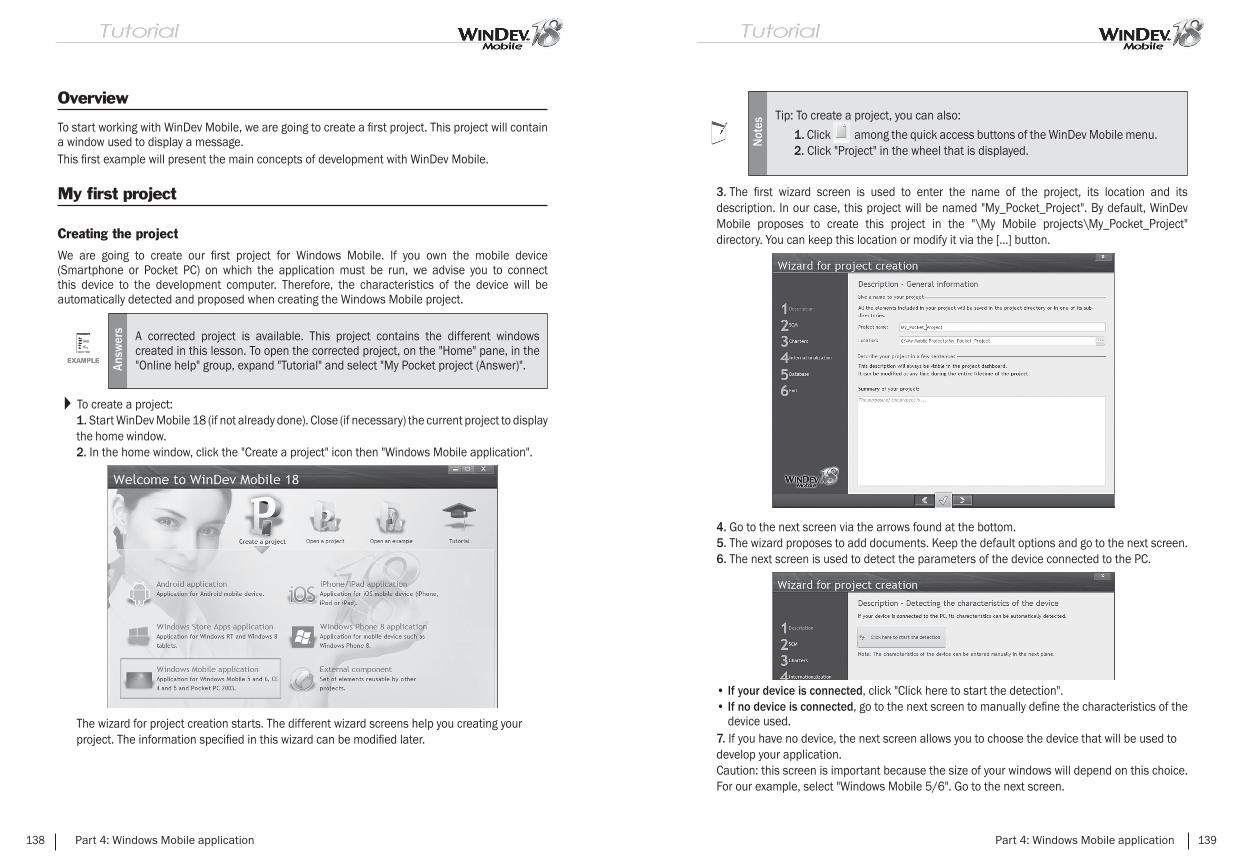
Overview
To start working with WinDev Mobile, we are going to create a fi rst project. This project will contain a window used to display a message.This fi rst example will present the main concepts of development with WinDev Mobile.
My fi rst project
Creating the project
We are going to create our fi rst project for Windows Mobile. If you own the mobile device (Smartphone or Pocket PC) on which the application must be run, we advise you to connect this device to the development computer. Therefore, the characteristics of the device will be automatically detected and proposed when creating the Windows Mobile project.
Answ
ers A corrected project is available. This project contains the different windows
created in this lesson. To open the corrected project, on the "Home" pane, in the "Online help" group, expand "Tutorial" and select "My Pocket project (Answer)".
To create a project:1. Start WinDev Mobile 18 (if not already done). Close (if necessary) the current project to display the home window.2. In the home window, click the "Create a project" icon then "Windows Mobile application".
The wizard for project creation starts. The different wizard screens help you creating your project. The information specifi ed in this wizard can be modifi ed later.
138 Part 4: Windows Mobile application
Not
es
Tip: To create a project, you can also:
1. Click among the quick access buttons of the WinDev Mobile menu.2. Click "Project" in the wheel that is displayed.
3. The fi rst wizard screen is used to enter the name of the project, its location and its description. In our case, this project will be named "My_Pocket_Project". By default, WinDev Mobile proposes to create this project in the "\My Mobile projects\My_Pocket_Project" directory. You can keep this location or modify it via the [...] button.
4. Go to the next screen via the arrows found at the bottom.5. The wizard proposes to add documents. Keep the default options and go to the next screen.6. The next screen is used to detect the parameters of the device connected to the PC.
• If your device is connected, click "Click here to start the detection".• If no device is connected, go to the next screen to manually defi ne the characteristics of the
device used.7. If you have no device, the next screen allows you to choose the device that will be used to develop your application. Caution: this screen is important because the size of your windows will depend on this choice. For our example, select "Windows Mobile 5/6". Go to the next screen.
Part 4: Windows Mobile application 139

8. The description window of your device is displayed.
Go to the next screen.9. In the left section of the wizard, click "3-Charters". This step is used to defi ne the programming charter. Don't modify the suggested options. Go to the next screen via the arrows found at the bottom.10. This step is used to defi ne the style book. Select "Elegant".11. The other wizard steps not being important for our fi rst project, click "6-End" in the left section of the wizard.12. Click the validation button at the bottom of the wizard. The project is automatically created. WinDev Mobile displays the different possible actions.13. Click "WinDev Mobile editor".
My fi rst window
Overview
The fi rst window will allow the user to display a welcome message via the "Display" button.You may think this is too basic, too simple, but we recommend that you create this window. You may be surprised by how intuitive and how easy it is to use the editor of WinDev Mobile. Furthermore, this window will allow you to discover concepts that are fundamental for the rest of this tutorial and to see the entire process for developing a Windows Mobile application with WinDev Mobile.
140 Part 4: Windows Mobile application
Creating the window
To create the window:
1. Click among the quick access buttons of the WinDev Mobile menu:
2. A window shaped like a wheel is displayed. This window is used to create all the elements that can be associated with a project.3. Click "Window". The wizard for window creation starts.4. Select "Blank" in the list of windows displayed on the left. In the list of skin templates found on the right, the "Elegant" skin template is selected by default. You can choose another skin template proposed in the list.
Not
e The skin templates allow you to quickly create outstanding interfaces. A skin template defi nes the style of the window but also the style of all the controls that will be used in this window. No ugly interface anymore.
5. Validate. The window is automatically created in the editor.
Save the window by clicking among the quick access buttons. During the fi rst backup, a specifi c window is displayed. This window proposes to enter:• the title of the element: enter "Welcome". In our case, this title will be displayed in the title
bar of the window.• the name of the element is the name of the window. This name will be used in programming.
By default, this name includes "WIN_" that corresponds to the programing charter and "Welcome" that corresponds to the title of the window.
Not
e
Let's take a look at the window name proposed by WinDev Mobile: this name starts with the letters "WIN_". This prefi x is automatically added because the project uses a programming charter.The programming charter is used to defi ne a prefi x for each type of object, allowing you to quickly identify the element handled:• a window starts with WIN,• a button starts with BTN,• etc.If you don't want to use this charter, all you have to do is disable it: on the "Project" pane, in the "Other actions" group, expand "Charter" and uncheck "Use the charter" .
Part 4: Windows Mobile application 141
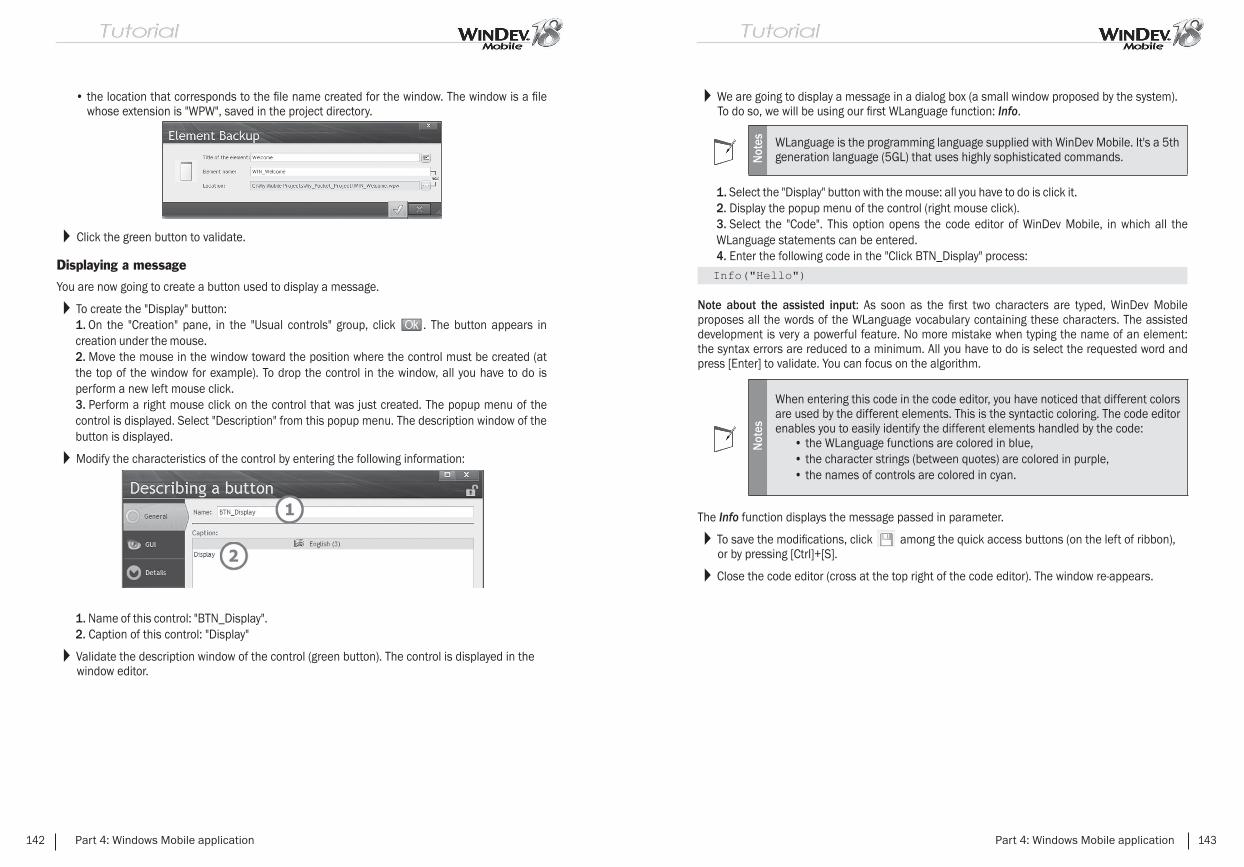
• the location that corresponds to the fi le name created for the window. The window is a fi le whose extension is "WPW", saved in the project directory.
Click the green button to validate.
Displaying a message
You are now going to create a button used to display a message.
To create the "Display" button:1. On the "Creation" pane, in the "Usual controls" group, click . The button appears in creation under the mouse.2. Move the mouse in the window toward the position where the control must be created (at the top of the window for example). To drop the control in the window, all you have to do is perform a new left mouse click.3. Perform a right mouse click on the control that was just created. The popup menu of the control is displayed. Select "Description" from this popup menu. The description window of the button is displayed.
Modify the characteristics of the control by entering the following information:
1. Name of this control: "BTN_Display".2. Caption of this control: "Display"
Validate the description window of the control (green button). The control is displayed in the window editor.
142 Part 4: Windows Mobile application
We are going to display a message in a dialog box (a small window proposed by the system). To do so, we will be using our fi rst WLanguage function: Info.
Not
es WLanguage is the programming language supplied with WinDev Mobile. It's a 5th generation language (5GL) that uses highly sophisticated commands.
1. Select the "Display" button with the mouse: all you have to do is click it.2. Display the popup menu of the control (right mouse click).3. Select the "Code". This option opens the code editor of WinDev Mobile, in which all the WLanguage statements can be entered.4. Enter the following code in the "Click BTN_Display" process:
Note about the assisted input: As soon as the fi rst two characters are typed, WinDev Mobile proposes all the words of the WLanguage vocabulary containing these characters. The assisted development is very a powerful feature. No more mistake when typing the name of an element: the syntax errors are reduced to a minimum. All you have to do is select the requested word and press [Enter] to validate. You can focus on the algorithm.
Not
es
When entering this code in the code editor, you have noticed that different colors are used by the different elements. This is the syntactic coloring. The code editor enables you to easily identify the different elements handled by the code:
• the WLanguage functions are colored in blue,• the character strings (between quotes) are colored in purple,• the names of controls are colored in cyan.
The Info function displays the message passed in parameter.
To save the modifi cations, click among the quick access buttons (on the left of ribbon), or by pressing [Ctrl]+[S].
Close the code editor (cross at the top right of the code editor). The window re-appears.
Part 4: Windows Mobile application 143
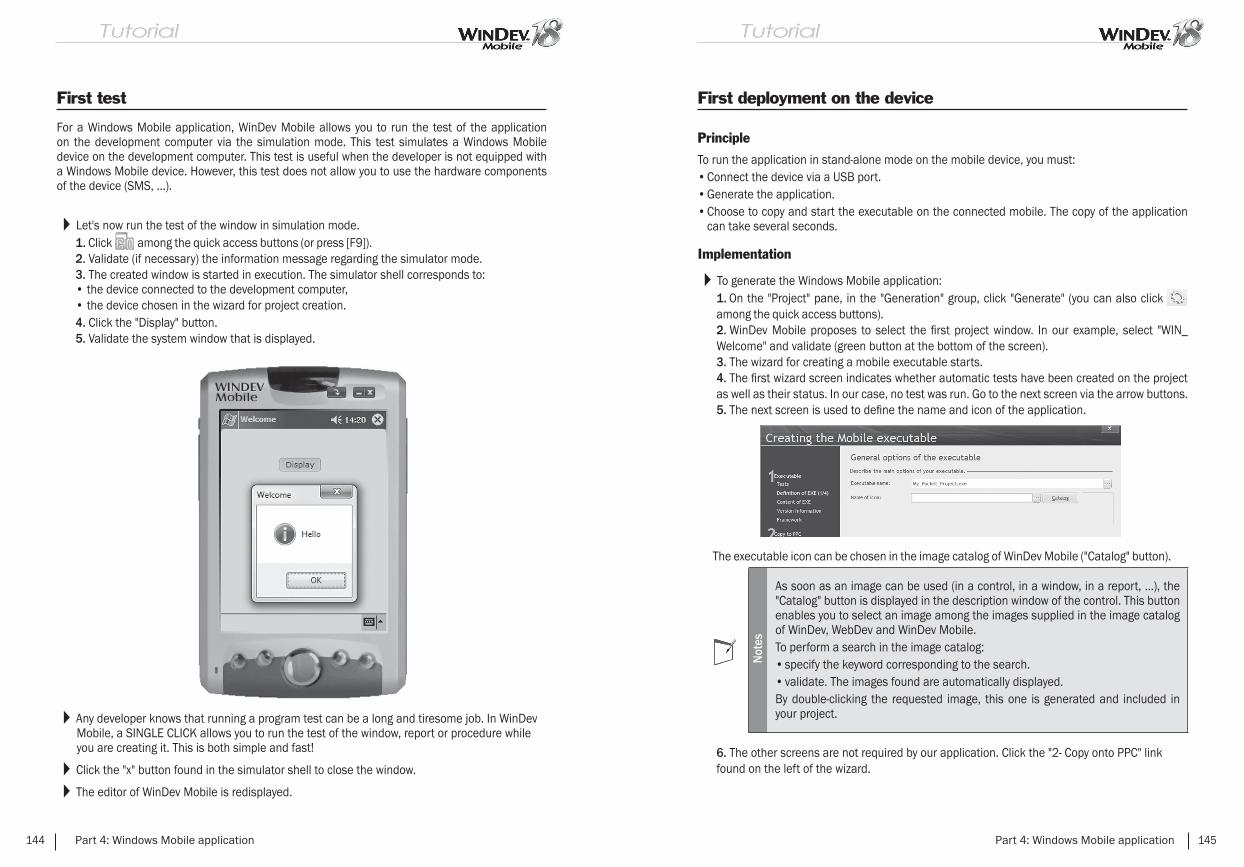
First test
For a Windows Mobile application, WinDev Mobile allows you to run the test of the application on the development computer via the simulation mode. This test simulates a Windows Mobile device on the development computer. This test is useful when the developer is not equipped with a Windows Mobile device. However, this test does not allow you to use the hardware components of the device (SMS, ...).
Let's now run the test of the window in simulation mode.1. Click among the quick access buttons (or press [F9]).2. Validate (if necessary) the information message regarding the simulator mode.3. The created window is started in execution. The simulator shell corresponds to:• the device connected to the development computer,• the device chosen in the wizard for project creation.4. Click the "Display" button.5. Validate the system window that is displayed.
Any developer knows that running a program test can be a long and tiresome job. In WinDev Mobile, a SINGLE CLICK allows you to run the test of the window, report or procedure while you are creating it. This is both simple and fast!
Click the "x" button found in the simulator shell to close the window.
The editor of WinDev Mobile is redisplayed.
144 Part 4: Windows Mobile application
First deployment on the device
Principle
To run the application in stand-alone mode on the mobile device, you must:• Connect the device via a USB port.• Generate the application.• Choose to copy and start the executable on the connected mobile. The copy of the application
can take several seconds.
Implementation
To generate the Windows Mobile application:1. On the "Project" pane, in the "Generation" group, click "Generate" (you can also click among the quick access buttons).2. WinDev Mobile proposes to select the fi rst project window. In our example, select "WIN_Welcome" and validate (green button at the bottom of the screen).3. The wizard for creating a mobile executable starts.4. The fi rst wizard screen indicates whether automatic tests have been created on the project as well as their status. In our case, no test was run. Go to the next screen via the arrow buttons.5. The next screen is used to defi ne the name and icon of the application.
The executable icon can be chosen in the image catalog of WinDev Mobile ("Catalog" button).
Not
es
As soon as an image can be used (in a control, in a window, in a report, ...), the "Catalog" button is displayed in the description window of the control. This button enables you to select an image among the images supplied in the image catalog of WinDev, WebDev and WinDev Mobile.To perform a search in the image catalog:• specify the keyword corresponding to the search.• validate. The images found are automatically displayed.By double-clicking the requested image, this one is generated and included in your project.
6. The other screens are not required by our application. Click the "2- Copy onto PPC" link found on the left of the wizard.
Part 4: Windows Mobile application 145
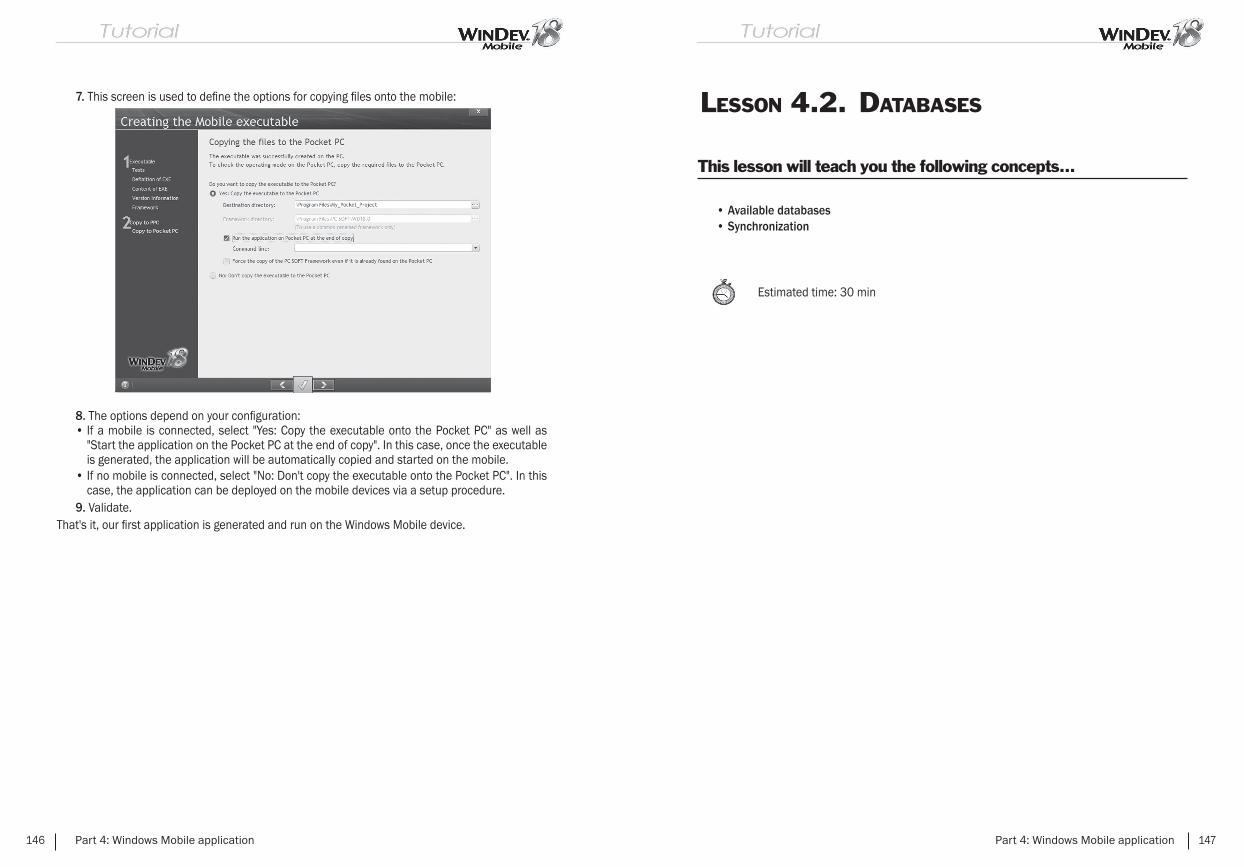
7. This screen is used to defi ne the options for copying fi les onto the mobile:
8. The options depend on your confi guration:• If a mobile is connected, select "Yes: Copy the executable onto the Pocket PC" as well as
"Start the application on the Pocket PC at the end of copy". In this case, once the executable is generated, the application will be automatically copied and started on the mobile.
• If no mobile is connected, select "No: Don't copy the executable onto the Pocket PC". In this case, the application can be deployed on the mobile devices via a setup procedure.
9. Validate.That's it, our fi rst application is generated and run on the Windows Mobile device.
146 Part 4: Windows Mobile application
LESSON 4.2. DATABASES
This lesson will teach you the following concepts...
• Available databases• Synchronization
Estimated time: 30 min
Part 4: Windows Mobile application 147

Format of the databases
A Windows Mobile application can handle the data. The format of these databases can be:• HyperFileSQL (in Classic or Client/Server mode), database system supplied with WinDev
Mobile.• CEDB, database system that can be used in Pocket PC.• AS/400, AS/400 database that can be used in Pocket PC.• ...
HyperFileSQL
The HyperFileSQL format is the database format supplied with WinDev Mobile. This database format is compatible with WinDev, WinDev Mobile and WebDev.It is a freely distributable Relational DBMS.
This format is identical to the HyperFileSQL format of WinDev and WebDev (".WDD" fi le, data fi les, ...).This format can be used by the applications developed for Windows Mobile.However, the available size being limited on the mobile devices and the operating system being also limited, the following features are not supported by HyperFileSQL in Classic mode, especially:
• the transactions.• the log process.• the management of locks for the data fi les and records.• the management of data fi les in Hyper File 5.5 format.
Not
e You still have the ability to open and to use an analysis that uses one of these features (replication, log operations, ...). The same analysis can be used in a WinDev Mobile application and in a standard WinDev application.
Using the HyperFileSQL format allows you to:• quickly access the records,• optimize the search time,• handle the large databases,• synchronize the HyperFileSQL Mobile data fi les found on a Pocket PC with the HyperFileSQL
data fi les found on a PC,• ...
In summary, most of the features of HyperFileSQL are available for the Windows Mobile applications (fi le link, queries, fi lters, views, ...).
Exam
ple The "Pocket Notes", "Pocket Attendance" and "Pocket Telephony" examples
(supplied with WinDev Mobile) handle the HyperFileSQL data fi les.These examples are accessible from the "Wizards, Examples and Components" pane.
148 Part 4: Windows Mobile application
Test
When running the test (in simulation mode) of a WinDev Mobile application that handles HyperFileSQL Mobile data fi les, the data fi les used are the ones found on the PC.
CEDB
The CEDB format is a database format for Pocket PC.A CEDB database corresponds to a ".CDB" fi le. A CEDB database can contain several data fi les (also called "tables").
Two types of CEDB databases are available:• the standard CEDB databases, that correspond to the databases found by default on the
Pocket PC. These databases contain the following data fi les: "Tasks", "Contacts", "Appointments", ...
• the other CEDB databases (called custom databases), that correspond to Access databases (".MDB" fi les) previously exported from a PC.
Note: When an Access database (".MDB" fi le) is copied onto a Pocket PC (via the fi le explorer), this database is automatically transformed into a CEDB database (".CDB" fi le).
A CEDB database can be handled:• from a WinDev Mobile application.• from a standard WinDev application.
These operations are performed via the cdbXXX functions of WLanguage.
Not
e
Caution: From Windows Mobile 5, the access to a standard database (tasks, contacts, appointments, ...) is no longer possible from a Windows application (and therefore from a standard WinDev application).The CDB databases are accessible from the PC, from the simulator, from the Pocket PC.The standard database can only be accessed from the Pocket PC.
Not
e
Caution: The structure of the CEDB databases is not intended to process a large amount of data. Therefore, we recommend that you use HyperFileSQL databases. Furthermore, HyperFileSQL enables you to benefi t from all the features available in WinDev Mobile (RAD, fi le link...).
Part 4: Windows Mobile application 149
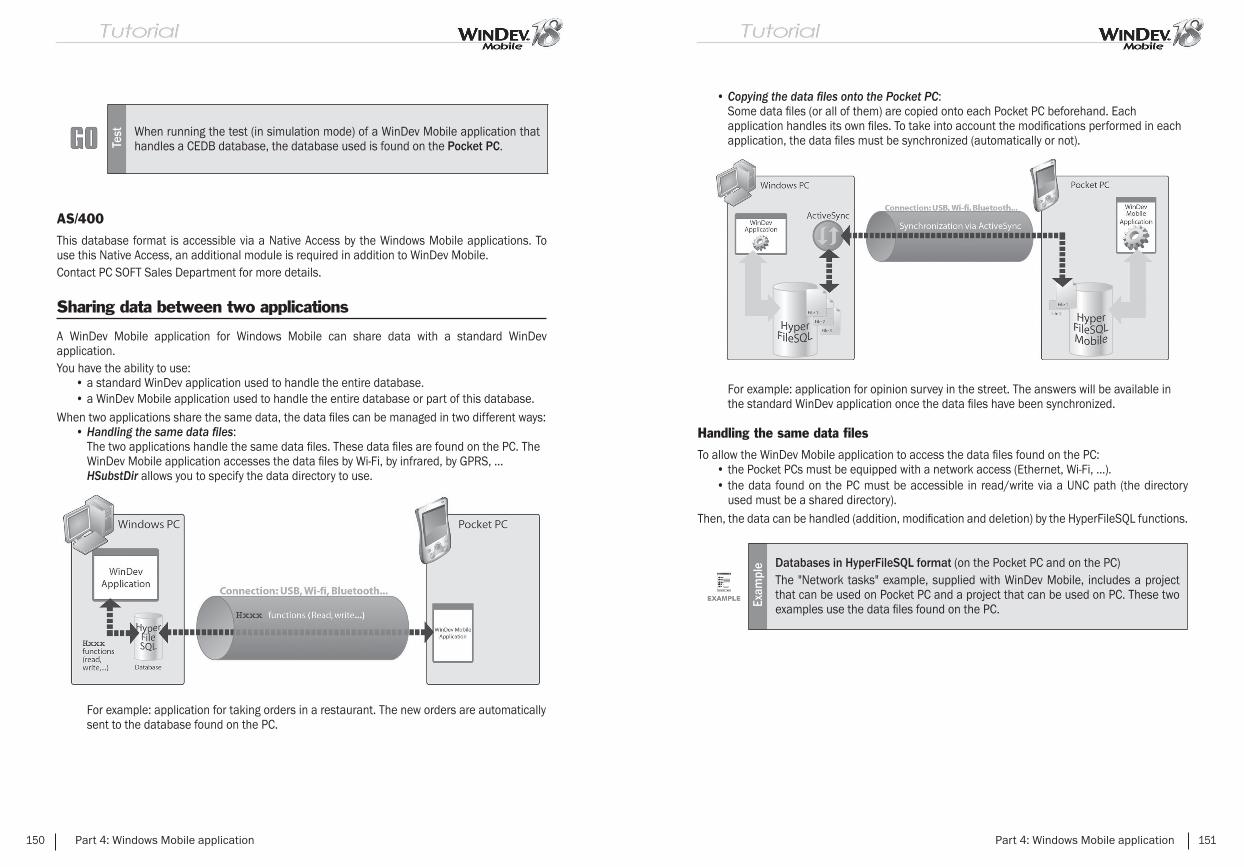
Test When running the test (in simulation mode) of a WinDev Mobile application that
handles a CEDB database, the database used is found on the Pocket PC.
AS/400
This database format is accessible via a Native Access by the Windows Mobile applications. To use this Native Access, an additional module is required in addition to WinDev Mobile.Contact PC SOFT Sales Department for more details.
Sharing data between two applications
A WinDev Mobile application for Windows Mobile can share data with a standard WinDev application.You have the ability to use:
• a standard WinDev application used to handle the entire database.• a WinDev Mobile application used to handle the entire database or part of this database.
When two applications share the same data, the data fi les can be managed in two different ways:• Handling the same data fi les:
The two applications handle the same data fi les. These data fi les are found on the PC. The WinDev Mobile application accesses the data fi les by Wi-Fi, by infrared, by GPRS, ... HSubstDir allows you to specify the data directory to use.
For example: application for taking orders in a restaurant. The new orders are automatically sent to the database found on the PC.
150 Part 4: Windows Mobile application
• Copying the data fi les onto the Pocket PC:Some data fi les (or all of them) are copied onto each Pocket PC beforehand. Each application handles its own fi les. To take into account the modifi cations performed in each application, the data fi les must be synchronized (automatically or not).
For example: application for opinion survey in the street. The answers will be available in the standard WinDev application once the data fi les have been synchronized.
Handling the same data fi les
To allow the WinDev Mobile application to access the data fi les found on the PC:• the Pocket PCs must be equipped with a network access (Ethernet, Wi-Fi, ...).• the data found on the PC must be accessible in read/write via a UNC path (the directory
used must be a shared directory).Then, the data can be handled (addition, modifi cation and deletion) by the HyperFileSQL functions.
Exam
ple Databases in HyperFileSQL format (on the Pocket PC and on the PC)
The "Network tasks" example, supplied with WinDev Mobile, includes a project that can be used on Pocket PC and a project that can be used on PC. These two examples use the data fi les found on the PC.
Part 4: Windows Mobile application 151
Copying the data fi les onto the Pocket PC
To update the data fi les found on the PC with the data entered on the Pocket PCs, all you have to do is synchronize the fi les.If the data fi les used are in HyperFileSQL format, all the Pocket PCs must be connected one by one to the PC. The automatic HyperFileSQL synchronization via ActiveSync takes everything in charge.
If the data fi les used are not in HyperFileSQL format, you must program the synchronization between the WinDev Mobile application and the standard WinDev application. See the examples supplied with WinDev Mobile for more details.
Exam
ple
Databases in HyperFileSQL format (on the Pocket PC and on the PC)The "Sending SMSs", "Managing purchase lists" and "Stocks" examples, supplied with WinDev Mobile, include a project that can be used on Pocket PC and a project that can be used on PC. These examples present the synchronization of data entered in the two projects.
152 Part 4: Windows Mobile application
LESSON 4.3. ADVANCED PROGRAMMING
This lesson will teach you the following concepts...
• Creating a management application• Handling the database
Estimated time: 1h
Part 4: Windows Mobile application 153

Overview
In this lesson, we are going to develop a Windows Mobile application that uses a HyperFileSQL Classic database.This application will allow us to present some specifi c features of the programming for Windows Mobile.
Opening the project
Start WinDev Mobile 18 (if not already done). Close (if necessary) the current project to display the home window.
Open the "Pocket Managing Products" project. To do so, in the home window, click "Tutorial" and select the "Pocket Managing Products (Exercise)" project. Tip: if the home window is not displayed, on the "Home" pane, in the "Online help" group, expand "Tutorial" and select "Pocket Managing Products (Exercise)".
Answ
ers A corrected project is available. This project contains the different windows
created in this lesson. To open the corrected project, on the "Home" pane, in the "Online help" group, expand "Tutorial" and select "Pocket Managing Products (Answer)".
Project description
Let's take a look at our source project. This project is an empty project, already created. It contains no window. It only contains the analysis describing the HyperFileSQL Classic data fi les that will be used. In the EXE directory, the corresponding data fi les are supplied with data in order to run the different tests.
To view the analysis associated with the project:1. Click among the quick access buttons of the WinDev Mobile menu .2. The data model editor is displayed.
154 Part 4: Windows Mobile application
3. This analysis includes 3 data fi les:• A "Product" fi le, that contains the description of the product: name, price, quantity, ...• A "Characteristic" fi le, that contains the different characteristics of the product. For example,
if the product is a tee-shirt, its characteristics will correspond to the size, the color, ... Therefore, the "Characteristic" fi le is linked to the "Product" fi le.
• A "Store" fi le, that contains the GPS coordinates of each store.4. Close the data model editor (click the cross at the top right of the editor).
We are now going to develop our application.
Display the list of products
We are going to create a window used to list the different products. These products will be displayed in a "Table" control.
Creating the window
To create a new window:1. Create a new blank window. Click among the quick access buttons. Click "Window" in the wheel that is displayed. 2. Display the "Standard" tab, choose "Blank" and validate the wizard.3. Save the window by clicking among the quick access buttons.4. In the window that is opened, enter the title of the window: "List of products". The name and location of the window are automatically fi lled. Keep the default values and validate (green button at the bottom of the screen).5. The window is added to the project.
Creating the Table control
To display the list of products, we are going to use a "Table" control. The main information about the products will be displayed in this control.
To create the "Table" control:1. On the "Creation" pane, in the "Data" group, expand "Table" and select "Table (Vertical)".
Part 4: Windows Mobile application 155

2. The control appears under the mouse.3. In the window, click the position where the control must be created (at the top for example). The wizard for table creation starts.4. In the wizard, select "Display the data found in a fi le or in an existing query". Go to the next screen.5. Select the "Product" fi le. Go to the next screen.6. Select the items to display:
7. Keep the "Name", "Description" and "Price" items (a checkmark must be found in front of these items). Go to the next screen.8. Keep the proposed sort item (ProductID). The products will be sorted in the table according to this item. Go to the next screen.9. In the "Additional parameters" screen, keep the default options. Go to the next screen.10. Select the "Vertical" orientation and go to the next screen.11. Keep the default name ("TABLE_Product") and validate.12. The table is displayed in the window editor.
156 Part 4: Windows Mobile application
13. Resize the table and the table columns via the handles in order for the content to be displayed in the window.
Not
es The data automatically appears in the window displayed in the editor. This concept is called "Live Data": you see the data found in your fi les in real time!This feature is very useful to adapt the size of controls to their content.
Save the window by clicking among the quick access buttons.
Part 4: Windows Mobile application 157

We are going to run a fi rst test in the simulator to view the result. Click among the quick access buttons (or press [F9]).
Close the simulator to go back to the window editor.
Creating the form window
We are now going to create a new window used to display the product form. Then, this window will be started from the list of products to display the details of the selected product.
Creating the window
To create the form window:1. Create a new blank window. Click among the quick access buttons. Click "Window" in the wheel that is displayed. 2. In the wizard that is displayed:• Select the "Standard" tab.• Choose "Blank".3. Validate the wizard.4. Save the window. Specify the title of the window: "Product form". Its name is automatically proposed: "WIN_Product_form". Validate.
158 Part 4: Windows Mobile application
Creating the controls
To create an edit control:1. Display the "Analysis" pane if necessary (on the "Home" pane, in the "Environment" group, expand "Panes" and select "Analysis"). The different data fi les described in the "Pocket Managing Products" analysis appear in the pane.2. With the mouse, select the items of the "Product" fi le displayed in the pane (except for the "ProductID" item).3. Drag and Drop these items to the window that was just created.
Part 4: Windows Mobile application 159
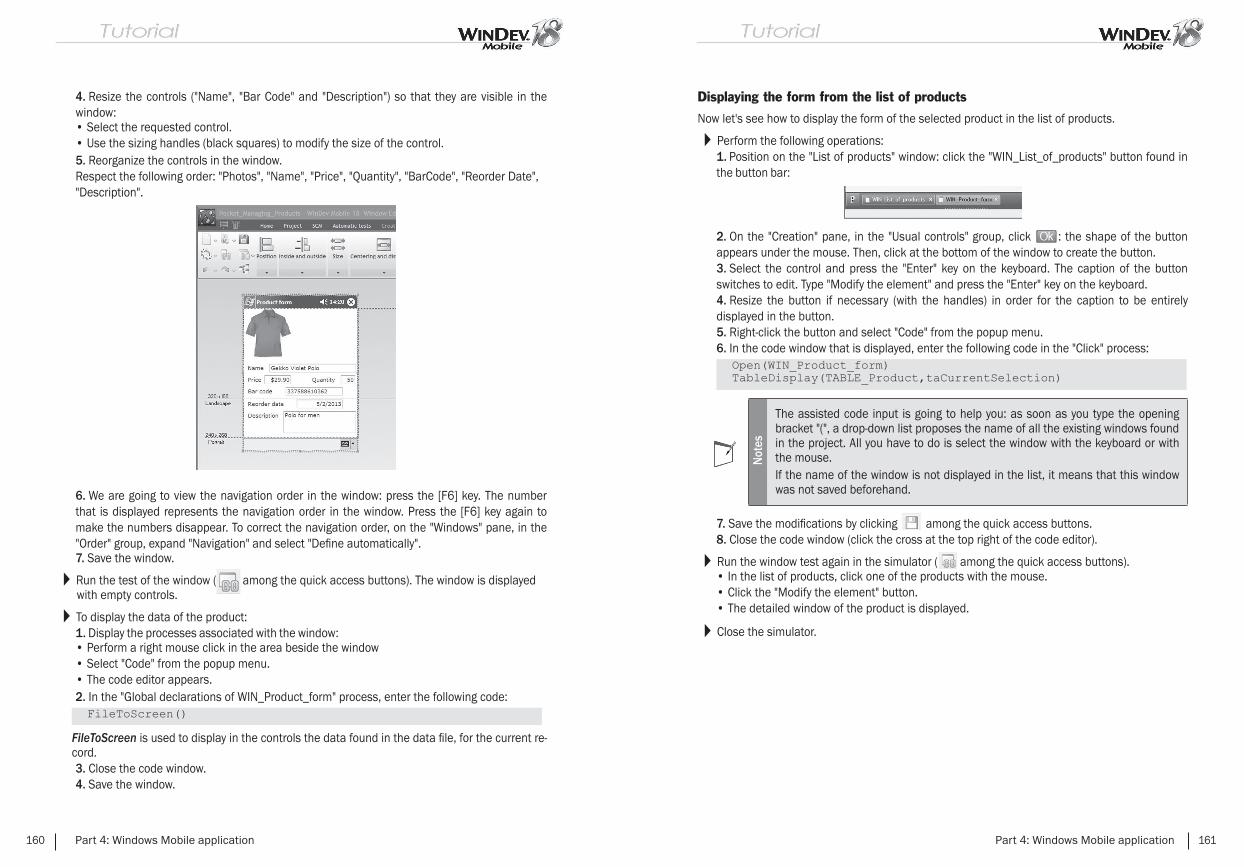
4. Resize the controls ("Name", "Bar Code" and "Description") so that they are visible in the window:• Select the requested control.• Use the sizing handles (black squares) to modify the size of the control.5. Reorganize the controls in the window. Respect the following order: "Photos", "Name", "Price", "Quantity", "BarCode", "Reorder Date", "Description".
6. We are going to view the navigation order in the window: press the [F6] key. The number that is displayed represents the navigation order in the window. Press the [F6] key again to make the numbers disappear. To correct the navigation order, on the "Windows" pane, in the "Order" group, expand "Navigation" and select "Defi ne automatically". 7. Save the window.
Run the test of the window ( among the quick access buttons). The window is displayed with empty controls.
To display the data of the product:1. Display the processes associated with the window:• Perform a right mouse click in the area beside the window• Select "Code" from the popup menu.• The code editor appears.2. In the "Global declarations of WIN_Product_form" process, enter the following code:
FileToScreen is used to display in the controls the data found in the data fi le, for the current re-cord.3. Close the code window.4. Save the window.
160 Part 4: Windows Mobile application
Displaying the form from the list of products
Now let's see how to display the form of the selected product in the list of products.
Perform the following operations:1. Position on the "List of products" window: click the "WIN_List_of_products" button found in the button bar:
2. On the "Creation" pane, in the "Usual controls" group, click : the shape of the button appears under the mouse. Then, click at the bottom of the window to create the button.3. Select the control and press the "Enter" key on the keyboard. The caption of the button switches to edit. Type "Modify the element" and press the "Enter" key on the keyboard.4. Resize the button if necessary (with the handles) in order for the caption to be entirely displayed in the button.5. Right-click the button and select "Code" from the popup menu.6. In the code window that is displayed, enter the following code in the "Click" process:
Not
es
The assisted code input is going to help you: as soon as you type the opening bracket "(", a drop-down list proposes the name of all the existing windows found in the project. All you have to do is select the window with the keyboard or with the mouse.If the name of the window is not displayed in the list, it means that this window was not saved beforehand.
7. Save the modifi cations by clicking among the quick access buttons.8. Close the code window (click the cross at the top right of the code editor).
Run the window test again in the simulator ( among the quick access buttons).• In the list of products, click one of the products with the mouse.• Click the "Modify the element" button.• The detailed window of the product is displayed.
Close the simulator.
Part 4: Windows Mobile application 161

Managing the creation and the modifi cation of a product
We are now going to modify our two windows in order to manage the addition and the modifi cation of a product.
Modifying the product form
We are going to add a button into the "WIN_Product_Form" window: a "Validate" button to manage the validation of modifi cations.
Not
es In the applications for Windows Mobile, the use of a "Cancel" button is not required. Indeed, the user can just click the cross (top right of the window) to cancel the input performed.
Display (if necessary) the "WIN_Product_Form" window in the editor: click the corresponding button in the button bar.
To create the "Validate" button:1. On the "Creation" pane, in the "Usual controls" group, click : the shape of the button appears under the mouse. Then, click inside the window to create the button (beside the image for example).2. Select the control and press the "Enter" key on the keyboard. The caption of the button switches to edit. Type "Validate" and press the "Enter" key on the keyboard.
3. Resize the button if necessary (with the handles) in order for the caption to be entirely displayed in the button.
We are now going to enter the code of the "Validate" button.1. Right-click the button and select "Code" from the popup menu.2. In the "Click" process, enter the following code:
162 Part 4: Windows Mobile application
Let's take a look at this code:• ScreenToFile is used to initialize the items with the values of the linked controls, for the
current record.• HModify is used to update the fi le data for the current record.• Close is used to close the form and to go back to the "WIN_List_of_products" window.
3. Save the modifi cations by clicking among the quick access buttons.4. Close the code window (click the cross at the top right of the code editor).
Display the "WIN_List_of_products" window in the window editor and run its test in the simulator ( among the quick access buttons).• In the list of products, click one of the products with the mouse: for example, the "Polo
Hibiscus Blue" product whose price is 25.90 Dollars.• Click "Modify the element". • The detailed window of the product is displayed. Modify the price of 25.90 Dollars and enter
19.90 Dollars, then click the "Validate" button.• When going back to the list of products, you will notice that the price was updated for this
article.
Close the simulator. The editor of WinDev Mobile is displayed.
Creating a new product
The principle for creating a product is as follows:• In the window for the list of products, we are going to add a "New product" button that will be
used to open the "Product form" window.• Then, we will modify the code of the "Product form" window to manage the addition into the
Product data fi le.
Display (if necessary) the "WIN_List_of_products" window in the editor: click the correspond-ing button in the button bar.
To create a new button:1. On the "Creation" pane, in the "Usual controls" group, click : the shape of the button appears under the mouse. Then, click inside the window to create the button (beside the "Modify the element" button for example).
Part 4: Windows Mobile application 163
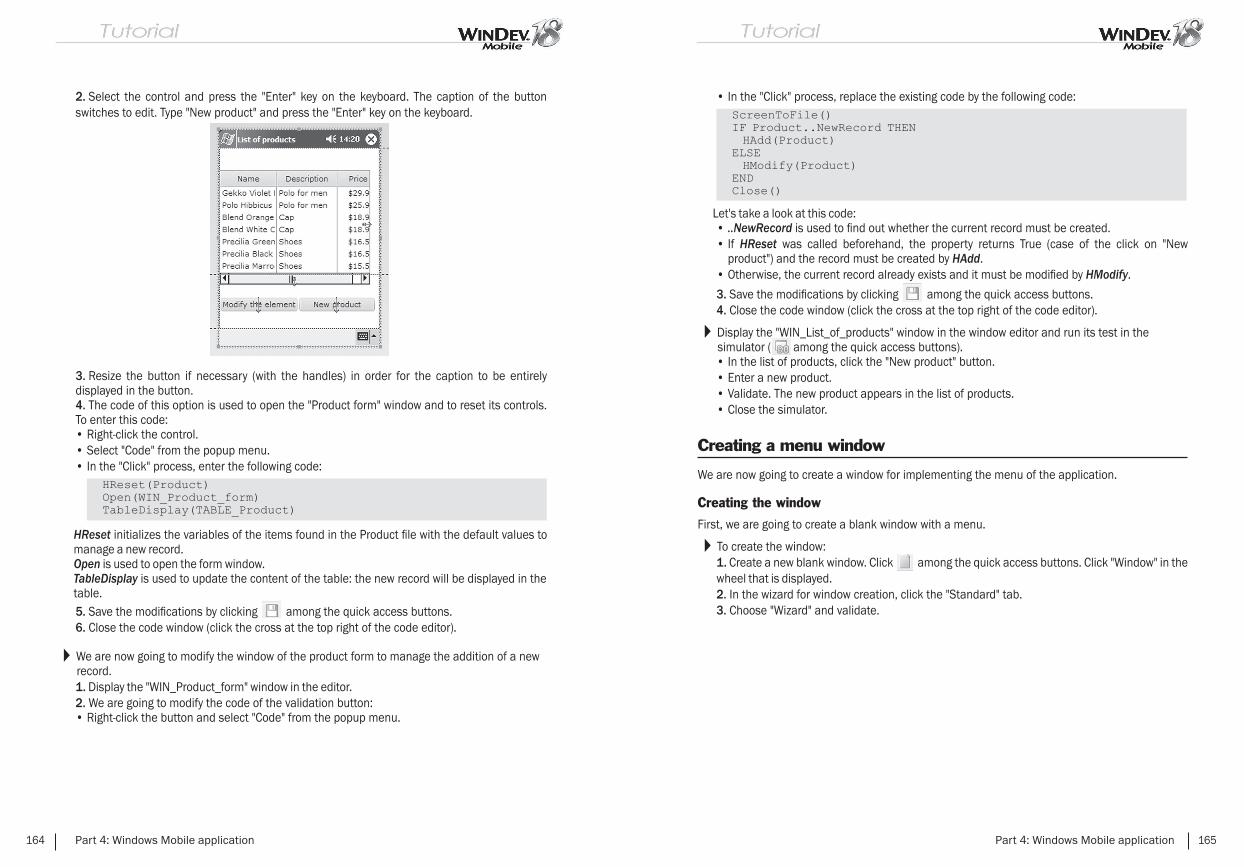
2. Select the control and press the "Enter" key on the keyboard. The caption of the button switches to edit. Type "New product" and press the "Enter" key on the keyboard.
3. Resize the button if necessary (with the handles) in order for the caption to be entirely displayed in the button.4. The code of this option is used to open the "Product form" window and to reset its controls. To enter this code:• Right-click the control.• Select "Code" from the popup menu.• In the "Click" process, enter the following code:
HReset initializes the variables of the items found in the Product fi le with the default values to manage a new record.
Open is used to open the form window. TableDisplay is used to update the content of the table: the new record will be displayed in the
table.5. Save the modifi cations by clicking among the quick access buttons.6. Close the code window (click the cross at the top right of the code editor).
We are now going to modify the window of the product form to manage the addition of a new record.1. Display the "WIN_Product_form" window in the editor.2. We are going to modify the code of the validation button:• Right-click the button and select "Code" from the popup menu.
164 Part 4: Windows Mobile application
• In the "Click" process, replace the existing code by the following code:
Let's take a look at this code:• ..NewRecord is used to fi nd out whether the current record must be created.• If HReset was called beforehand, the property returns True (case of the click on "New
product") and the record must be created by HAdd.• Otherwise, the current record already exists and it must be modifi ed by HModify.
3. Save the modifi cations by clicking among the quick access buttons.4. Close the code window (click the cross at the top right of the code editor).
Display the "WIN_List_of_products" window in the window editor and run its test in the simulator ( among the quick access buttons).• In the list of products, click the "New product" button.• Enter a new product.• Validate. The new product appears in the list of products.• Close the simulator.
Creating a menu window
We are now going to create a window for implementing the menu of the application.
Creating the window
First, we are going to create a blank window with a menu.
To create the window:1. Create a new blank window. Click among the quick access buttons. Click "Window" in the wheel that is displayed. 2. In the wizard for window creation, click the "Standard" tab.3. Choose "Wizard" and validate.
Part 4: Windows Mobile application 165

4. The wizard for creating a Windows Mobile window starts.
5. Select "Maximized" and go to the next screen.6. In the screen of advanced parameters, select "With menu and toolbar".
Go to the next screen.7. Specify the title of the window: "Menu".
166 Part 4: Windows Mobile application
8. Validate the wizard. The window is displayed in the editor:
9. Save the window. The name entered in the wizard is automatically proposed in the backup window. Validate.
Customizing the menu
We are going to modify the menu in order to call the window of list of products and to exit from the application.
To modify the menu option:1. Right-click the option to display the popup menu.2. Select "Option description". The description window is displayed.3. Modify the caption of the option that becomes "Product". Validate the description window.4. Select the menu option again.5. Display the popup menu (right mouse click):
Part 4: Windows Mobile application 167
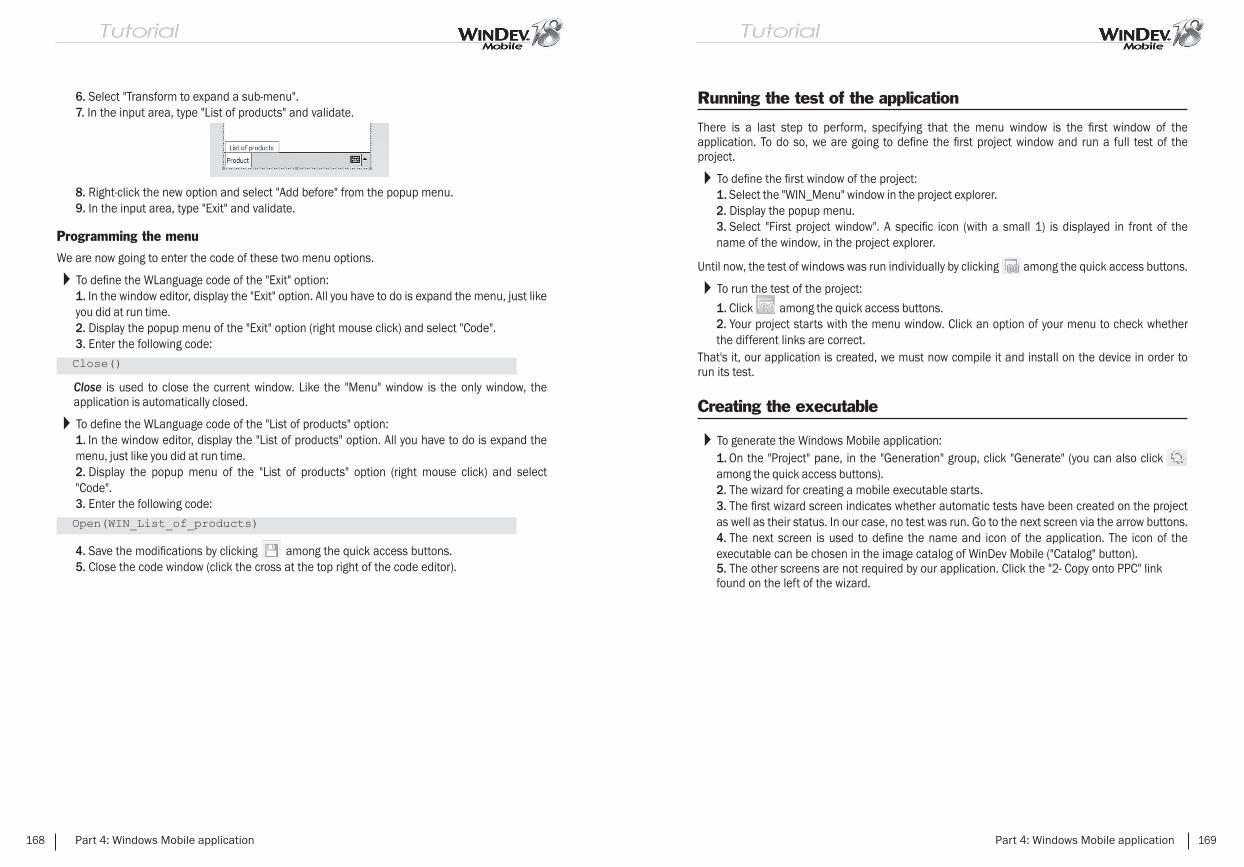
6. Select "Transform to expand a sub-menu".7. In the input area, type "List of products" and validate.
8. Right-click the new option and select "Add before" from the popup menu.9. In the input area, type "Exit" and validate.
Programming the menu
We are now going to enter the code of these two menu options.
To defi ne the WLanguage code of the "Exit" option:1. In the window editor, display the "Exit" option. All you have to do is expand the menu, just like you did at run time.2. Display the popup menu of the "Exit" option (right mouse click) and select "Code".3. Enter the following code:
Close is used to close the current window. Like the "Menu" window is the only window, the application is automatically closed.
To defi ne the WLanguage code of the "List of products" option:1. In the window editor, display the "List of products" option. All you have to do is expand the menu, just like you did at run time.2. Display the popup menu of the "List of products" option (right mouse click) and select "Code".3. Enter the following code:
4. Save the modifi cations by clicking among the quick access buttons.5. Close the code window (click the cross at the top right of the code editor).
168 Part 4: Windows Mobile application
Running the test of the application
There is a last step to perform, specifying that the menu window is the fi rst window of the application. To do so, we are going to defi ne the fi rst project window and run a full test of the project.
To defi ne the fi rst window of the project:1. Select the "WIN_Menu" window in the project explorer.2. Display the popup menu.3. Select "First project window". A specifi c icon (with a small 1) is displayed in front of the name of the window, in the project explorer.
Until now, the test of windows was run individually by clicking among the quick access buttons.
To run the test of the project:
1. Click among the quick access buttons.2. Your project starts with the menu window. Click an option of your menu to check whether the different links are correct.
That's it, our application is created, we must now compile it and install on the device in order to run its test.
Creating the executable
To generate the Windows Mobile application:1. On the "Project" pane, in the "Generation" group, click "Generate" (you can also click among the quick access buttons).2. The wizard for creating a mobile executable starts.3. The fi rst wizard screen indicates whether automatic tests have been created on the project as well as their status. In our case, no test was run. Go to the next screen via the arrow buttons.4. The next screen is used to defi ne the name and icon of the application. The icon of the executable can be chosen in the image catalog of WinDev Mobile ("Catalog" button).5. The other screens are not required by our application. Click the "2- Copy onto PPC" link found on the left of the wizard.
Part 4: Windows Mobile application 169
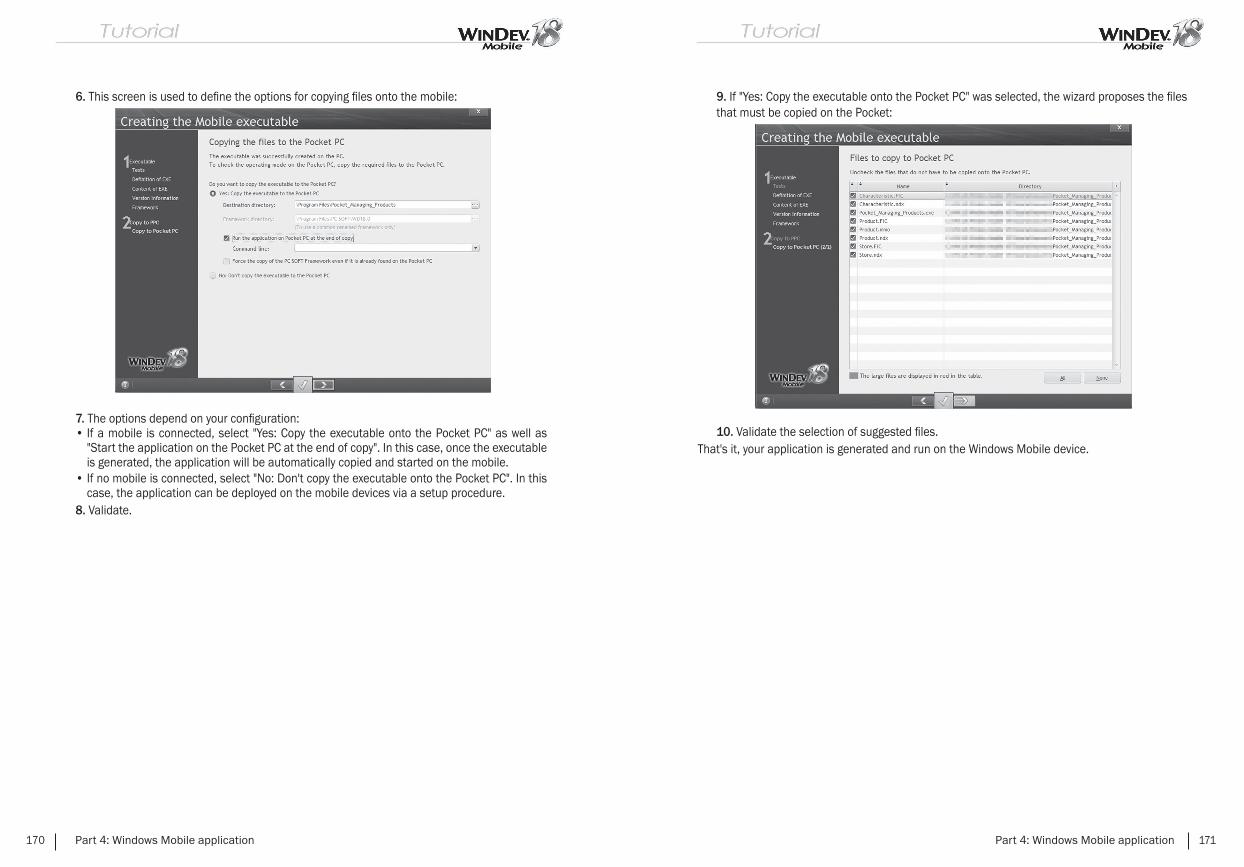
6. This screen is used to defi ne the options for copying fi les onto the mobile:
7. The options depend on your confi guration:• If a mobile is connected, select "Yes: Copy the executable onto the Pocket PC" as well as
"Start the application on the Pocket PC at the end of copy". In this case, once the executable is generated, the application will be automatically copied and started on the mobile.
• If no mobile is connected, select "No: Don't copy the executable onto the Pocket PC". In this case, the application can be deployed on the mobile devices via a setup procedure.
8. Validate.
170 Part 4: Windows Mobile application
9. If "Yes: Copy the executable onto the Pocket PC" was selected, the wizard proposes the fi les that must be copied on the Pocket:
10. Validate the selection of suggested fi les.That's it, your application is generated and run on the Windows Mobile device.
Part 4: Windows Mobile application 171
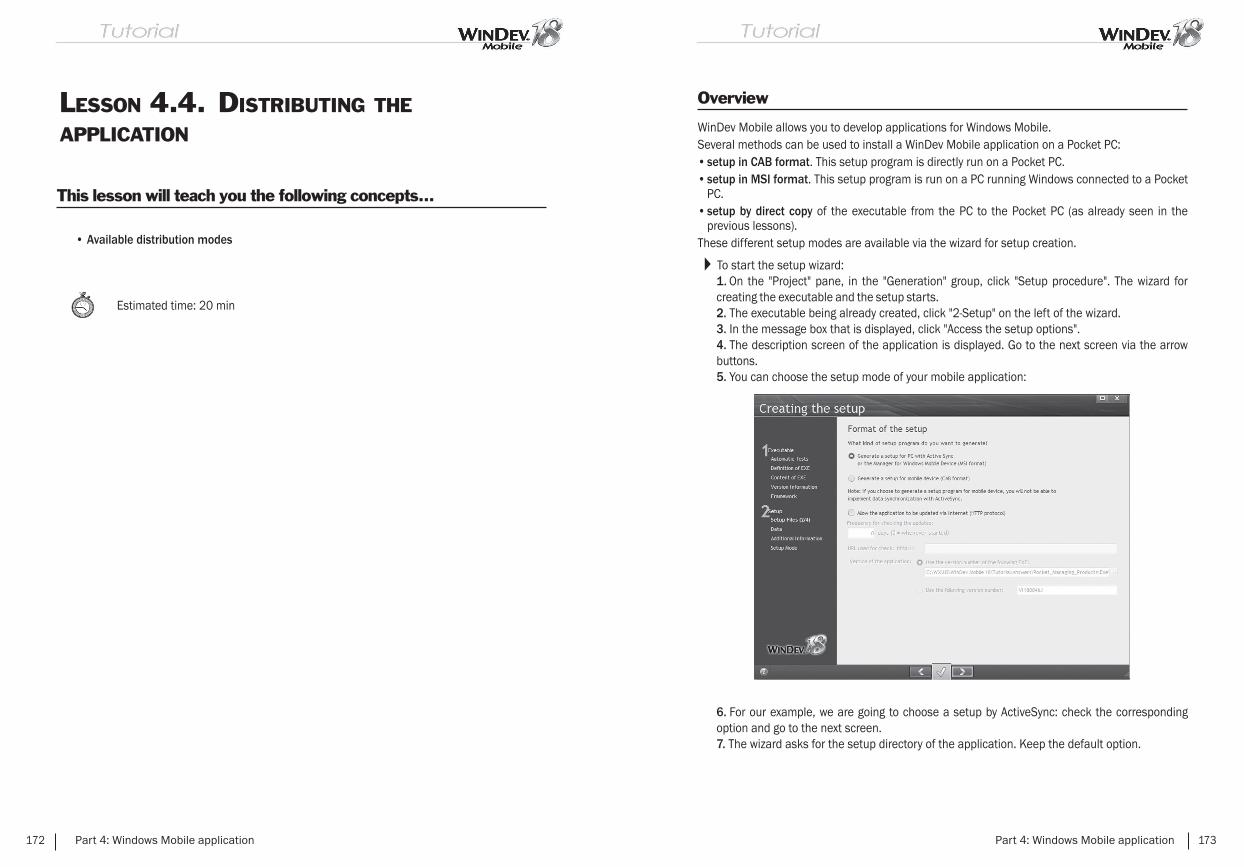
LESSON 4.4. DISTRIBUTING THE APPLICATION
This lesson will teach you the following concepts...
• Available distribution modes
Estimated time: 20 min
172 Part 4: Windows Mobile application
Overview
WinDev Mobile allows you to develop applications for Windows Mobile.Several methods can be used to install a WinDev Mobile application on a Pocket PC:• setup in CAB format. This setup program is directly run on a Pocket PC.• setup in MSI format. This setup program is run on a PC running Windows connected to a Pocket
PC.• setup by direct copy of the executable from the PC to the Pocket PC (as already seen in the
previous lessons).These different setup modes are available via the wizard for setup creation.
To start the setup wizard:1. On the "Project" pane, in the "Generation" group, click "Setup procedure". The wizard for creating the executable and the setup starts.2. The executable being already created, click "2-Setup" on the left of the wizard.3. In the message box that is displayed, click "Access the setup options".4. The description screen of the application is displayed. Go to the next screen via the arrow buttons.5. You can choose the setup mode of your mobile application:
6. For our example, we are going to choose a setup by ActiveSync: check the corresponding option and go to the next screen.7. The wizard asks for the setup directory of the application. Keep the default option.
Part 4: Windows Mobile application 173
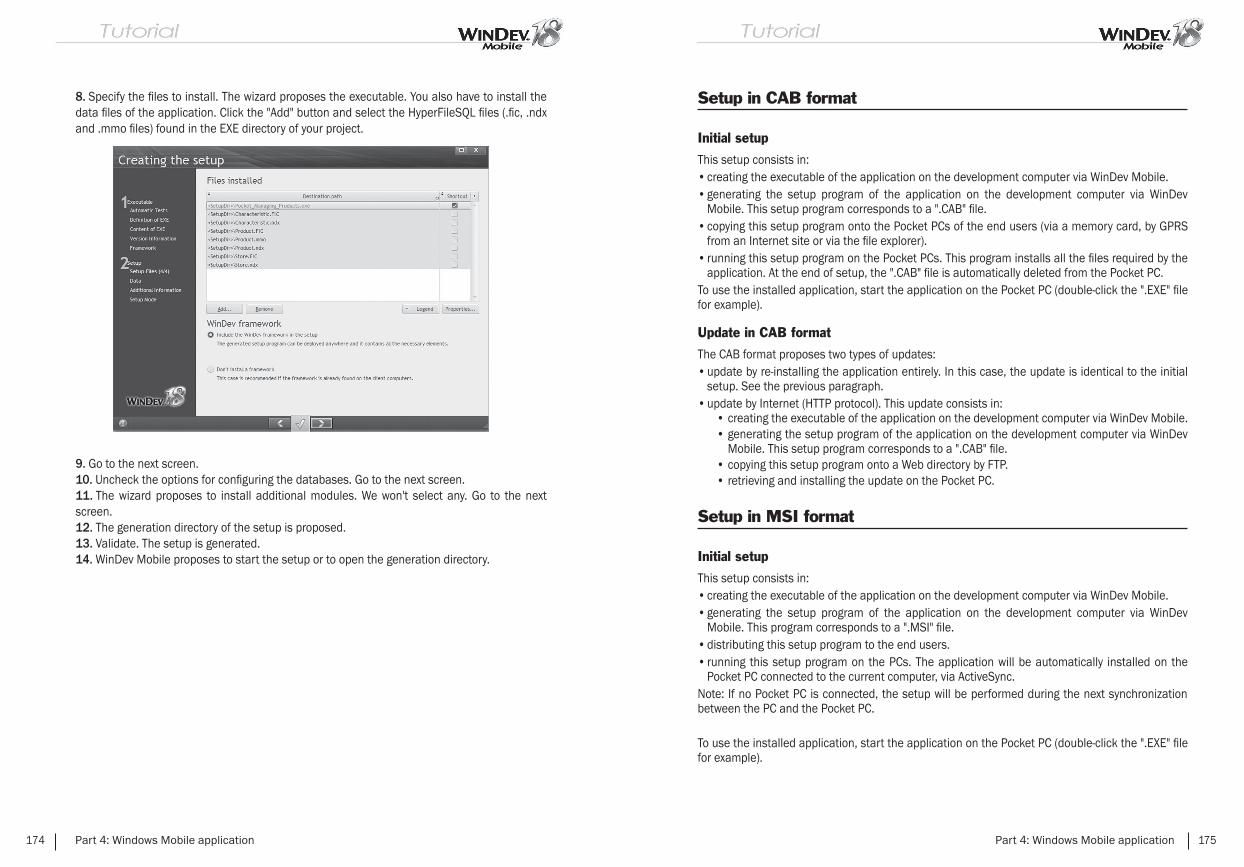
8. Specify the fi les to install. The wizard proposes the executable. You also have to install the data fi les of the application. Click the "Add" button and select the HyperFileSQL fi les (.fi c, .ndx and .mmo fi les) found in the EXE directory of your project.
9. Go to the next screen.10. Uncheck the options for confi guring the databases. Go to the next screen.11. The wizard proposes to install additional modules. We won't select any. Go to the next screen.12. The generation directory of the setup is proposed.13. Validate. The setup is generated.14. WinDev Mobile proposes to start the setup or to open the generation directory.
174 Part 4: Windows Mobile application
Setup in CAB format
Initial setup
This setup consists in:• creating the executable of the application on the development computer via WinDev Mobile.• generating the setup program of the application on the development computer via WinDev
Mobile. This setup program corresponds to a ".CAB" fi le.• copying this setup program onto the Pocket PCs of the end users (via a memory card, by GPRS
from an Internet site or via the fi le explorer).• running this setup program on the Pocket PCs. This program installs all the fi les required by the
application. At the end of setup, the ".CAB" fi le is automatically deleted from the Pocket PC.To use the installed application, start the application on the Pocket PC (double-click the ".EXE" fi le for example).
Update in CAB format
The CAB format proposes two types of updates:• update by re-installing the application entirely. In this case, the update is identical to the initial
setup. See the previous paragraph.• update by Internet (HTTP protocol). This update consists in:
• creating the executable of the application on the development computer via WinDev Mobile.• generating the setup program of the application on the development computer via WinDev
Mobile. This setup program corresponds to a ".CAB" fi le.• copying this setup program onto a Web directory by FTP.• retrieving and installing the update on the Pocket PC.
Setup in MSI format
Initial setup
This setup consists in:• creating the executable of the application on the development computer via WinDev Mobile.• generating the setup program of the application on the development computer via WinDev
Mobile. This program corresponds to a ".MSI" fi le.• distributing this setup program to the end users.• running this setup program on the PCs. The application will be automatically installed on the
Pocket PC connected to the current computer, via ActiveSync.Note: If no Pocket PC is connected, the setup will be performed during the next synchronization between the PC and the Pocket PC.
To use the installed application, start the application on the Pocket PC (double-click the ".EXE" fi le for example).
Part 4: Windows Mobile application 175
Update in MSI format
The MSI format proposes two types of updates:• update by re-installing the application entirely. In this case, the update is identical to the initial
setup.• update by Internet (HTTP protocol) in CAB format. This update consists in:
• creating the executable of the application on the development computer via WinDev Mobile.• generating the setup program of the application on the development computer via WinDev
Mobile. This setup program corresponds to a ".CAB" fi le.• copying this setup program onto a Web directory by FTP.• retrieving and installing the update on the Pocket PC.
176 Part 4: Windows Mobile application
LESSON 4.5. QUESTIONS/ANSWERS
This lesson will teach you the following concepts...
• Questions/Answers
Estimated time: 20 min
Part 4: Windows Mobile application 177

Controls, windows
Question How do I change the type of a window?
Two types of windows can be created in WinDev Mobile:• Maximized window: A maximized window occupies the entire screen of the Pocket PC.• Non-maximized window: A non-maximized window can be resized by the user and it can
occupy part of the screen only.
To change the type of a window:1. Right-click the window and select "Description".2. Display the "Details" tab.3. Select the new type for the window.
Not
e
The "Style" tab can also be used to change the type of a window.
Question How do I modify the type of the "OK/Close" button displayed in the title bar?
The "OK/Close" button found in the title bar of WinDev Mobile windows is used to close or validate the current window.By default, this button is used to automatically close the window.The type of this button can be modifi ed:
• via the popup menu of the button:
• in the "Style" tab of the window description.• by programing (WinSystemButton).
178 Part 4: Windows Mobile application
Question How do I display the keyboard on the Pocket PC?
To allow the users of your applications to enter information, the keyboard of the Pocket PC must be used (also called SIP for Software Input Panel).To display the keyboard on the Pocket PC:
• select "Enable the keyboard in input" ("Details" tab in the description window of an edit control). This option is used to automatically make the current keyboard visible when the control is in edit.
• by programing (SIPVisible).• on the Pocket PC directly, by clicking .
Question How do I display all the drop-down menus of a window?
In edit, when the window is not wide enough to display all the drop-down menus, the icon is displayed. This icon is used to display all the menus.At run time, only the menus that can be contained in the width of the window are visible.
Question How do I manage the planes of a window?
The planes found in a window are used to arrange the controls in "layers" to avoid overcrowding the screens and to keep the number of project windows down.
To associate a control with a plane:1. Right-click the control.2. Select "Associate with a plane".3. Choose the number of the plane to which the control must be associated.
The [Page Up] and [Page Down] keys allow you to go from one plane to another in the editor. The number of the current plane is displayed:
• in the status bar of the editor (bottom right)• in the home window of the current window (top right).
Tip To avoid duplicating the same control in a window, the control can be associated
with "no plane". The control will be visible in all the planes.
Only the controls of the current plane and the controls that belong to no plane are visible in edit and at run time.
You also have the ability to use ..Plane to:• fi nd out and change the current plane in a window.• fi nd out and change the plane associated with a control.
Part 4: Windows Mobile application 179
Question How do I display the progress of a process?
The function named Gauge uses the status bar of your window to display the progress of a process.
In most cases, a progress bar is used to display the progress of a process.To do so, use a Progress Bar control in a window. To create a Progress Bar control:
1. On the "Creation" pane, in the "Graphic controls" group, click "Progress bar".2. In the window, click the position where the Progress Bar control must be created.
Note: Several preset progress bars are proposed. To use these progress bars, on the "Creation" pane, in the "Graphic controls" group, expand "Progress bar".
In the initialization code of the Progress Bar control:1. Initialize the minimum value of the progress bar: 2. Initialize the maximum value of the progress bar:
In the code of the requested process, increment the progress bar at each step of the process:
Question How do I create a popup menu?
A popup menu can be added:• at window level.• at control level.
For a window:1. Right-click the window and select "Description".2. Click the "Details" tab. Click the arrow found beside the "Popup Menu" option and select "Create a new popup menu".
For a control:1. Right-click the control and select "Description".2. Click the "GUI" tab. Click the arrow found beside the "Popup Menu" option and select "Create a new popup menu".
To fi nd out or modify the popup menu of a control or window by programming, use the property named ..PopupMenu.
180 Part 4: Windows Mobile application
Question How do I pass parameters to a window?
The method for passing parameters to a window is similar to the method for passing parameters to a procedure.In the declaration code of the global variables of the window, enter the following WLanguage code:
When the window is opened by Open, pass the parameters after the name of the window, for example:
If a parameter is initialized during the declaration in the window, this parameter becomes optional:
Not
e We advise you to pass parameters to a window rather than declaring global variables in the project.
Question How do I group the controls in order to modify their properties by programing?
Perform the following operation:1. Select several controls with the mouse.2. On the "Modifi cation" pane, in the "Groups" group, expand "Groups" and select "Associate the selection".3. The window for group management is displayed. Select an existing group or click "New" to create a new group.4. Enter the name of the group and validate.
The groups of controls can be used in the windows and in the reports.
The controls will be associated with this group. Then, you can modify the properties of the controls found in this group with the following syntax:
Part 4: Windows Mobile application 181

Caut
ion!
Only the properties common to all the controls can be modifi ed.
Question How do I align the controls?
Several methods can be used to align the controls:• the rulers.• the interface checker.• the real-time interface checker.• the alignment options.
To enable the rulers, press [CTRL] and [R] simultaneously. On the rulers, all you have to do is position "tabulation marks" or "markers" that can be moved (by clicking the ruler at the requested location). Then, when controls are moved in the window (or in the report), these ones will be "magnetized" when they come near these markers.The real-time interface checker is automatically enabled when creating or moving a control. Temporary rulers are used to align the selected control with the other controls found in the window.To enable the interface checked, on the "Alignment" pane, in the "Other alignments" group, click "Interface checker". This wizard proposes different tips to perform alignments in the window.The alignment options are accessible on the "Alignment" pane.After practicing a few minutes, you will soon realize what a good thing proper alignment is!
Question How do I give the same size to the buttons?
Select the button that will be used as reference for the size (height and width). Then, select the button that must be resized.
On the "Alignment" pane, in the "Size" group, click "Same width" or "Same height".
182 Part 4: Windows Mobile application
Environment
Question How do I display or hide the panes?
Press [CTRL] and [W] simultaneously.To display or to hide the pane anchored at the bottom of the screen, press [CTRL] and [Q] simultaneously.
Question How do I add a language to my project?
In the menu of WinDev Mobile, on the "Project" pane, in the "Project" group, click "Description" and select the "Languages" tab. In the window, check the new languages that must be supported.
Question How do I modify the options of WinDev Mobile?
The environment parameters of the editor (directory, language, login, ...) can be modifi ed from the options of WinDev Mobile: on the "Home" pane, in the "Environment" group, expand "Options" and select "General options of WinDev Mobile".
Various
Question What are the image formats supported by WinDev Mobile?
WinDev Mobile supports the following image formats: BMP, JPEG, GIF, PNG or ICO.
Question I want to compress data, can I do it with WinDev Mobile?
WinDev Mobile proposes several functions used to compress and decompress the data. The name of the relevant functions is prefi xed by "Zip".
See the "Pocket Zip" example supplied with WinDev Mobile or the online help (keyword: "Zip") for more details.
Part 4: Windows Mobile application 183
Question How do I uninstall an application developed with WinDev Mobile?
The provider and the name of the application must necessarily be specifi ed when creating the setup program. This information is displayed in the panel for uninstalling programs on the Pocket PC.
To uninstall an application:1. Click the "Start" menu.2. Select "Parameters".3. Display the "System" tab.4. Select "Add/Remove programs".5. Select the application to delete and click "Delete".
Question How do I detect the elements not used by my application?
After months or years of development and maintenance, the directory of your project often contains several fi les that are not used anymore but that you don't dare delete.Test fi les and windows, useless images, ... It's time to clean up! A WinDev Mobile tool is available to automatically detect the unused elements and to delete them from the project. The elements deleted from the project will be archived (in ZIP format or in a backup directory) so that they can be restored later if necessary.
To use this wizard, on the "Project" pane, in the "Other actions" group, expand "Save/Restore" and select "Clean the project directory".
Managing the fi les and disks
Question How do I manage the fi les found on the Pocket PC from a standard WinDev application?
The functions for accessing the Pocket PCs (starting with "ce") allow you to handle the fi les found on the Pocket PC (copy the fi les, fi nd out the size of a fi le, return the list of fi les found in a directory ...).These functions can only be used in a standard WinDev application when a Pocket PC is connected to the current computer.
See the online help (keyword: "Pocket PC, Access functions") for more details.
184 Part 4: Windows Mobile application
HyperFileSQL Mobile
Question Are the formats of the HyperFileSQL and HyperFileSQL Mobile data fi les compatible?
Yes, the HyperFileSQL format and the HyperFileSQL Mobile format are compatible. Their format is identical. The HyperFileSQL data fi les and the HyperFileSQL Mobile data fi les can be used in WinDev Mobile and in WinDev.
However, the available size on a Pocket PC being restricted and the operating system of the Pocket PC being limited, the following features are not supported by HyperFileSQL Mobile:
• the transactions.• the log process.• the HyperFileSQL replication.• the management of locks for the data fi les and records.• the management of data fi les in Hyper File 5.5 format.
Question How do I manage a duplicate error during a write operation in a data fi le?
If a duplicate error occurs when writing into a data fi le (HAdd and HModify), a window for error management is automatically displayed. This window allows the user to modify the values entered.To fi nd out whether a duplicate error occurred and to process it by programming, HErrorDuplicates must be called after HAdd and HModify.
Example of code:
Question How do I manage an integrity error during a write operation or during a deletion in a data fi le?
If an integrity error occurs during a write operation in a data fi le (HAdd and HModify) or during a deletion (HDelete), a window for error management is automatically displayed.To fi nd out whether an integrity error occurred and to process it by programming, HErrorIntegrity must be called after HAdd, HModify and HDelete.
Part 4: Windows Mobile application 185

Example of code:
Question How do I manage a composite key during a search?
Start a search with HFilter or HReadSeek by using the following notation:
Printing
Question How do I print from a WinDev Mobile application?
The PCL format is the format used when printing from a Pocket PC. This print can be performed in a PCL fi le or on a PCL printer directly.
To format the information to print:• create a report via the report editor of WinDev Mobile.• use the print functions of WLanguage.
See the online help (keywords: "Report (Report editor)" and "Printing") for more details.
Question What is the PCL standard?
PCL (Printer Control Language) is a standard allowing the Pocket PC to send commands to a printer that supports it. This standard was developed by Hewlett Packard.A PCL fi le is a binary fi le containing all the commands sent. This fi le contains the commands required to defi ne the print areas.
186 Part 4: Windows Mobile application
Question Why does the font on the printed page differ from the font in my report?
The result of a print performed on a Pocket PC depends on the features of the printer used (management of images and lines, management of fonts, ...). To limit the resources required for printing, WinDev Mobile uses the printer fonts. The printer automatically selects the font that best suits the specifi ed criteria. Check the fonts available on your printer as well as their sizes and effects.
Ports
Question How do I read a bar code?
Two methods can be used to read a bar code:1. If you are using a bar code reader that is directly interfaced with the keyboard, you don't have to write any code in WinDev Mobile. When the bar code is read, the value is returned to the keyboard as if the code was entered directly. To do so, you must be positioned in an edit control.2. If you are using a bar code reader that is connected to the serial port, you must use the functions for managing the serial ports. sOpen, sRead, sWrite, sClose, ... are used to manage the dialog with a serial port.
Question How do I read the data sent by a magnetic card reader?
Proceed exactly the same way as for the bar code readers.
Part 4: Windows Mobile application 187

CONCLUSION
The tutorial is over now!
This course has discussed a variety of subjects, but not all the features of WinDev Mobile, far from it!You are now familiar with the main concepts.We recommend that you spend another day exploring the menu options of WinDev Mobile, for each one of the modules.
You can also explore the examples supplied with WinDev Mobile: some are simple and only address one topic, while others are more complex. These examples will show you the different aspects of WinDev Mobile as well as the development for the different platforms. Reading the source code is also a good way to learn.
It would take too much room to discuss all the available topics (there are hundreds, even thousands!). WinDev Mobile proposes several features that were not presented in this tutorial:
• sockets and HTTP functions,• queries, queries with parameters...• print, ...
See the online help for more details.
We wish you great development experiences with WinDev Mobile 18!
188 Conclusion