Embed Size (px)
Citation preview
The G.A.B. Canvass Reporting System
V4/4/2011 - 1 - The G.A.B. Canvass Reporting System
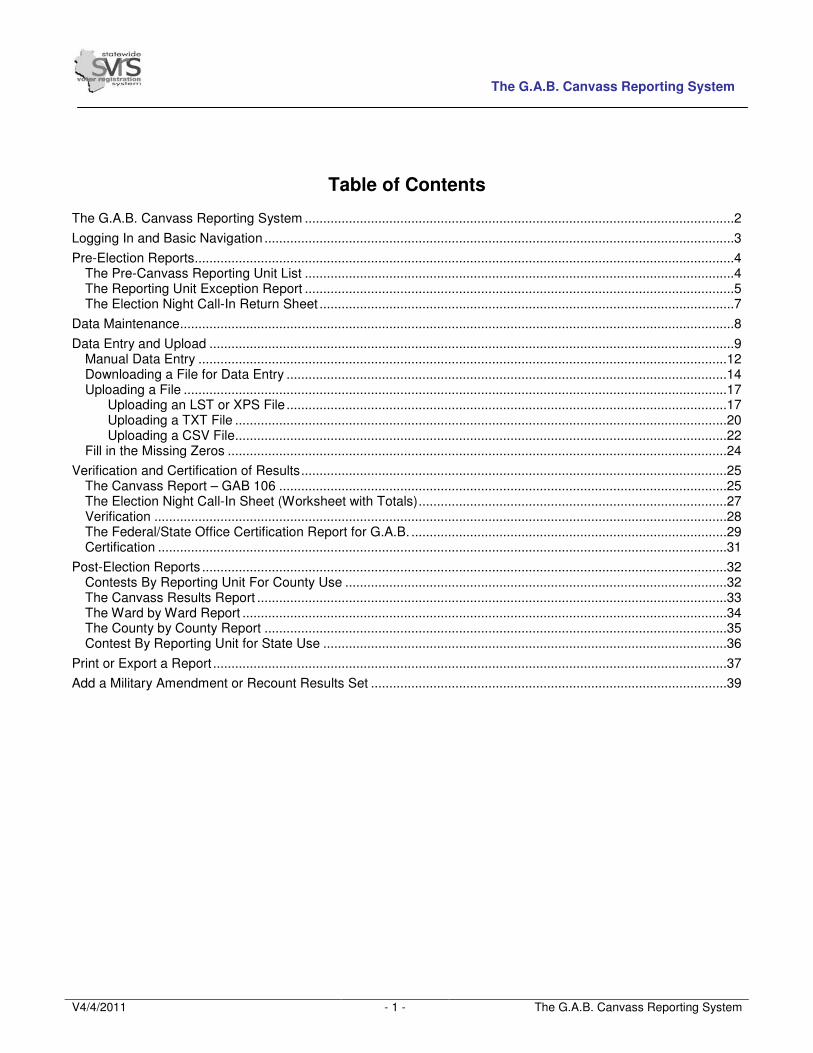
Table of Contents The G.A.B. Canvass Reporting System .....................................................................................................................2
Logging In and Basic Navigation ................................................................................................................................3
Pre-Election Reports...................................................................................................................................................4 The Pre-Canvass Reporting Unit List .....................................................................................................................4 The Reporting Unit Exception Report .....................................................................................................................5 The Election Night Call-In Return Sheet .................................................................................................................7
Data Maintenance.......................................................................................................................................................8
Data Entry and Upload ...............................................................................................................................................9 Manual Data Entry ................................................................................................................................................12 Downloading a File for Data Entry ........................................................................................................................14 Uploading a File ....................................................................................................................................................17
Uploading an LST or XPS File ........................................................................................................................17 Uploading a TXT File ......................................................................................................................................20 Uploading a CSV File......................................................................................................................................22
Fill in the Missing Zeros ........................................................................................................................................24
Verification and Certification of Results....................................................................................................................25 The Canvass Report – GAB 106 ..........................................................................................................................25 The Election Night Call-In Sheet (Worksheet with Totals)....................................................................................27 Verification ............................................................................................................................................................28 The Federal/State Office Certification Report for G.A.B. ......................................................................................29 Certification ...........................................................................................................................................................31
Post-Election Reports ...............................................................................................................................................32 Contests By Reporting Unit For County Use ........................................................................................................32 The Canvass Results Report ................................................................................................................................33 The Ward by Ward Report ....................................................................................................................................34 The County by County Report ..............................................................................................................................35 Contest By Reporting Unit for State Use ..............................................................................................................36
Print or Export a Report ............................................................................................................................................37
Add a Military Amendment or Recount Results Set .................................................................................................39

The G.A.B. Canvass Reporting System
V4/4/2011 - 2 - The G.A.B. Canvass Reporting System
Introduction to the G.A.B. Canvass Reporting System
The G.A.B. Canvass Reporting System is an online database where county clerks enter their canvass results after each election. After Election Day, when the official canvass has been completed, county clerks may upload electronic results from a file generated by their voting machines, or they may enter canvass results by hand. Clerks may also export files from the G.A.B. Canvass Reporting System if desired. A signed Certification Report printed from the Canvass System must be delivered to the G.A.B. by 5:00pm, one week after Election Day.
Overview This chapter is meant to be an in-depth description of all of the available features in the G.A.B. Canvass Reporting System. However, for county clerks who enter the canvass results, the process boils down to three major steps:
1) Run the Pre-Election reports to discover any errors in the election setup. Fix those errors. 2) Enter canvass results manually or upload them from a file. Verify those results.
3) Print the Federal/State Office Certification Report for the G.A.B., have it signed, and send it to the G.A.B.
Key Terms Reporting Unit: Following each election, municipal clerks report the results of the election to their county clerk. These results need to be reported by a specific ward or group of wards. The ward or combination or wards by which clerks report their election results to the county are called reporting units. Some municipalities’ reporting unit is the entire municipality. Some municipalities have multiple reporting units made up of different combinations of wards. All municipalities with a population of over 35,000 have one reporting unit for each ward. Reporting units are entered into SVRS, and must match the reporting units programmed into a municipality’s voting machines. This will allow any results imported into the Canvass System to be correctly matched up with the corresponding reporting unit. For information on setting up reporting units in SVRS, see the Election Setup chapter. Upload means to import or bring in data. For example, you may upload a results file from your voting equipment into the Canvass System. Download means to export or print out data. For example, after you have uploaded a file or manually entered canvass results, you may choose to produce an Excel spreadsheet containing that data, and print it out or post it on your website.

The G.A.B. Canvass Reporting System
V4/4/2011 - 3 - Logging in and Basic Navigation
Logging In and Basic Navigation
1. To log in to the Canvass System, log into the Citrix Web Interface screen, just as if you were logging into SVRS. You will see an icon called GAB Canvass Reporting System.
2. Double-click the GAB Canvass Reporting System icon to open the Canvass System.
If you or someone in your office cannot see the GAB Canvass Reporting System icon when they log into the Citrix Metaframe page, you must call the GAB Help Desk and have them update that user’s Security profile.
3. When the Canvass System opens, you will see the Home page.
a. You may click on Home at any time to return to this page.
b. Data Maintenance allows you to make changes to Elections, Reporting Units, Contests or Candidates in SVRS and instantly make those changes visible in the Canvass System, rather than having to wait for nightly updates. It is only available to state-level users.
c. Reports lets you verify your data and print or export it in a variety of formats.
d. Elections lets you select the current election, see the results entered so far, and upload or enter data.
e. Click Logoff when you wish to exit the system.
Note the message that says these results are Unofficial. Canvass results do not become official until they are certified by the G.A.B. The G.A.B. must have the Federal/State Office Certification Report for the G.A.B. generated out of the Canvass System and signed by the board of canvassers in each county before results are certified. The deadline for certification is two weeks after Election Day.
The G.A.B. Canvass Reporting System
V4/4/2011 - 4 - The Pre-Canvass Reporting Unit List
Pre-Election Reports
Before you upload or enter any data, you should first verify that your election, reporting units, contests and candidates are set up correctly. First, you will use the Pre-Canvass Reporting Unit List and the Reporting Unit Exception Report to verify that the reporting units in the Canvass System are correct. Then you will use one of the Election Night Call-In Sheet reports or the Contests By Reporting Unit For County Use report to verify the contests and candidates.
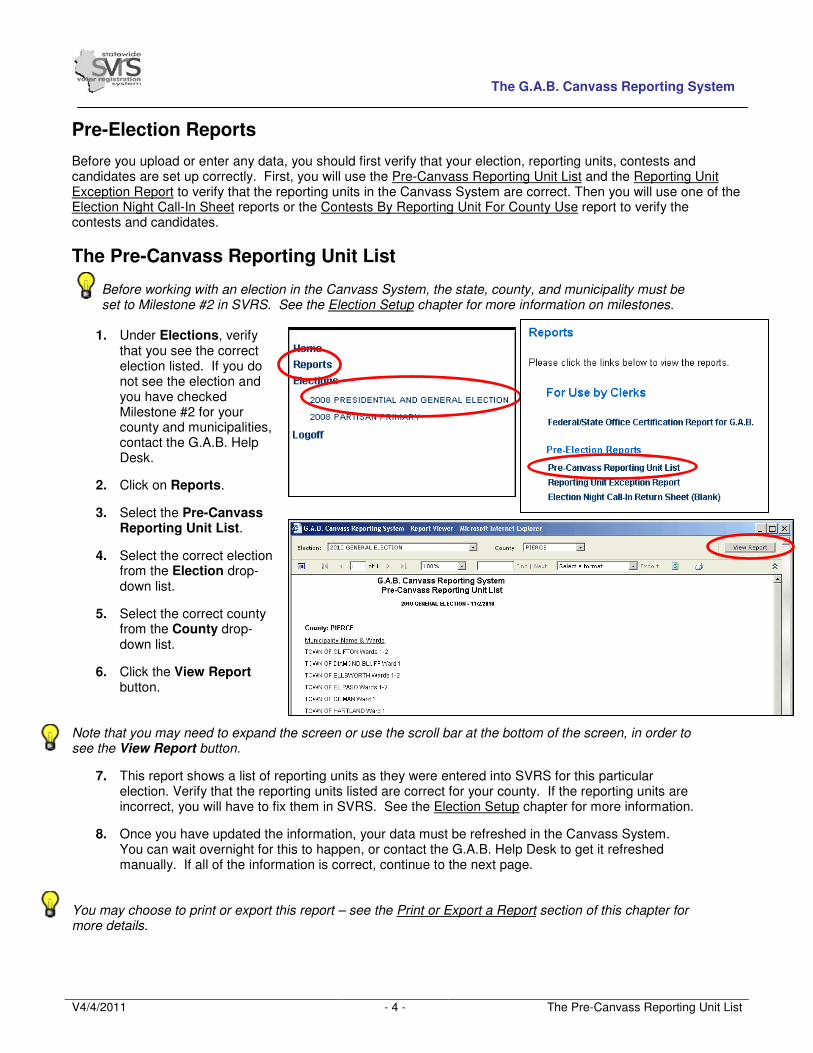
The Pre-Canvass Reporting Unit List
Before working with an election in the Canvass System, the state, county, and municipality must be set to Milestone #2 in SVRS. See the Election Setup chapter for more information on milestones.
1. Under Elections, verify
that you see the correct election listed. If you do not see the election and you have checked Milestone #2 for your county and municipalities, contact the G.A.B. Help Desk.
2. Click on Reports.
3. Select the Pre-Canvass Reporting Unit List.
4. Select the correct election from the Election drop-down list.
5. Select the correct county from the County drop-down list.
6. Click the View Report button.
Note that you may need to expand the screen or use the scroll bar at the bottom of the screen, in order to see the View Report button.
7. This report shows a list of reporting units as they were entered into SVRS for this particular election. Verify that the reporting units listed are correct for your county. If the reporting units are incorrect, you will have to fix them in SVRS. See the Election Setup chapter for more information.
8. Once you have updated the information, your data must be refreshed in the Canvass System. You can wait overnight for this to happen, or contact the G.A.B. Help Desk to get it refreshed manually. If all of the information is correct, continue to the next page.
You may choose to print or export this report – see the Print or Export a Report section of this chapter for more details.

The G.A.B. Canvass Reporting System
V4/4/2011 - 5 - The Reporting Unit Exception Report
The Reporting Unit Exception Report Even if all of the reporting units are present and grouped into the correct wards, you should still check to verify that they are named correctly and do not cross district lines (for example, you may not have two State Assembly districts in the same reporting unit.)
1. Under Elections, verify that you see the correct election listed. If you do not see the election and you have checked Milestone #2 for your county and municipalities, contact the G.A.B. Help Desk.
2. Click on Reports.
3. Select the Reporting Unit Exception Report.
4. Select the
correct election from the Election drop-down list.
5. Select the
correct county from the County drop-down list.
6. Click the View
Report button.
Note that you may have to expand your screen or use the scroll bar at the bottom of the page to see the View Report button.
7. Examine the report for problems.
a. Reporting units will violate the rules if they contain more than one Assembly District, as
shown above. Federal-level or state-level district types like Congressional, State Senate or State Assembly districts should never have more than one district included in a single reporting unit or poll book. If the reporting units are incorrect, you will have to fix them in SVRS. See the Election Setup chapter for more information.

The G.A.B. Canvass Reporting System
V4/4/2011 - 6 - The Reporting Unit Exception Report
b. Reporting Units may also be displayed on this page if all of the districts have not been added into the Reporting Unit Plan in SVRS. You must recruit those districts following the directions in the Election Setup chapter.
c. Reporting units may also be
displayed if the title of the reporting unit is in the wrong format. Note that as of September 2010, reporting unit names must NOT include the municipality name. For example, Wards 1-3 is acceptable, but Town of Lincoln Wards 1-3 is incorrect. You may rename the reporting units in the reporting unit plan, or select a different plan with the names in the correct format. Again, see the Election Setup chapter.
8. Once you have updated the information in SVRS, you can wait overnight for the data to be
refreshed in the Canvass System. If you need the data refreshed immediately, contact the G.A.B. Help Desk.
9. If there are no reporting units displayed on this report, you may continue on to the next page.
You may choose to print or export this report – see the Print or Export a Report section of this chapter for more details.

The G.A.B. Canvass Reporting System
V4/4/2011 - 7 - The Election Night Call In Return Sheet
The Election Night Call In Return Sheets
(Optional) If your municipalities report their results to you by phone, you may wish to print the Election Night Call In Return Sheet (Blank) for each reporting unit and send it along with their poll lists or other documents you give to the municipal clerk. You may also wish to print a copy to keep in your office. This report can also be used to verify that contests and candidate have been entered into SVRS correctly.
1. Under Elections, verify that you see the correct election listed. If you have checked Milestone #2 for your county and municipalities, but do not see the election, contact the G.A.B. Help Desk.
2. Click on Reports.
3. Click on Election Night
Call in Return Sheet.
4. Select the correct election from the Election drop-down list.
5. Select the County.
6. In the Reporting Unit drop-down list, select a reporting unit. You may select ALL if you wish.
7. Click the View Report
button.
8. A sample of the report is shown at the right. It is designed so you may collect results by phone or fax quickly and accurately.
You may choose to print or export this report – see the Print or Export a Report section of this chapter for more details. If you wish to change this report, you may export it to an Excel file and make changes there. If you wish to verify contests and candidates entered into SVRS, you may also use the Contests By Reporting Unit for County Use report. The Election Night Call-In Sheet (Worksheet with Totals) is meant for use after the canvass numbers have been entered into the system. You may use it to print or export canvass results organized by municipality in the format you see here.

The G.A.B. Canvass Reporting System
V4/4/2011 - 8 - Data Maintenance
Data Maintenance .
1. If your election displays correctly, and you have verified your reporting units, contests, and candidates are correct, and all necessary users in your jurisdiction have access to the Canvass System, you may skip this section and proceed to the Data Entry and Upload section.
2. If the Canvass System is not showing the correct data, you will make any necessary changes to
SVRS first. See the Pre-Election Reports section above for directions on finding data problems and fixing them.
Before Election Day, you may use the Election option to update contests and candidates after they have been changed in SVRS. However, if it is after Election Day, and you have changed contests or candidates in SVRS, you must use the Contests/Candidates option instead.
3. Changes you make in SVRS will not instantly appear in the Canvass System. The information will be refreshed nightly, so you should see any updates when you log in the next morning. If you do not see the updates you expect, or if you need to see your updates immediately, you may call the GAB Help Desk at 608-261-2028 and have a state-level user refresh the data for you. Only state-level users will be able to see the Data Maintenance screen, and only state-level users will be able to immediately refresh the data in the G.A.B. Canvass Reporting System.
a. The state-level user will click on Data Maintenance in the main menu. They will see the screen displayed above.
b. Depending on the changes that were made, the state-level user will click Election, Jurisdiction, ReportingUnits, Security, or Contests/Candidates to update that information in the Canvass System.
c. When the changes are successfully uploaded, the state-level user will see a green message that says “…details retrieved successfully.”
4. The state-level user will let you know when your data has been refreshed and you can continue
on to enter or upload canvass information.

The G.A.B. Canvass Reporting System
V4/4/2011 - 9 - Data Entry and Upload
Data Entry and Upload The G.A.B. Canvas Reporting System will allow for multiple ways of reporting canvass results. Some counties will manually type results into the Canvass System. Others will export the reporting units, contests, and candidates from the Canvass System into an Excel spreadsheet and enter results there, then upload those results into the Canvass System. Others will report results using an LST file or a TXT file produced by their voting machines. The Canvass System is able to accommodate all these methods.
The Canvass Status Screen
1. Under Elections, click on the correct election. If you do not see the election, make sure you have inherited the election and checked Milestone #2 in SVRS for your county and municipalities. Contact the G.A.B. Help Desk if you need further assistance.
2. You can control the level of contests you see by clicking State, County, or Municipality.
���� State shows only state and federal level contests like Governor, Congressperson, State Senate and State Assembly.
���� County shows county level contests like County Clerk, County Supervisor, and School Board Member.
���� Municipality shows contests like Mayor, Village Trustee, or Town Supervisor. 3. The Status Bar tells you
where in the canvass process each jurisdiction is.
a. The Total will include all jurisdictions you are eligible to see. State users will see all 72 counties, county users should see only the counties they have access to in SVRS.
b. Not Processed means no results have been entered. Your canvass will start out here.
c. In Process means some results have been entered, but data entry is not yet complete.
d. Verified means that your jurisdiction has finished entering the results and has sent them to the state for review.
e. Certified means the state has reviewed and certified the results. (Counties and municipalities are able to mark county-level and municipal-level contests as Certified.)
f. If a results set is listed under Rejected, the G.A.B. has found a problem and is sending the file back to the county for further review.
The G.A.B. Canvass Reporting System
V4/4/2011 - 10 - Data Entry and Upload
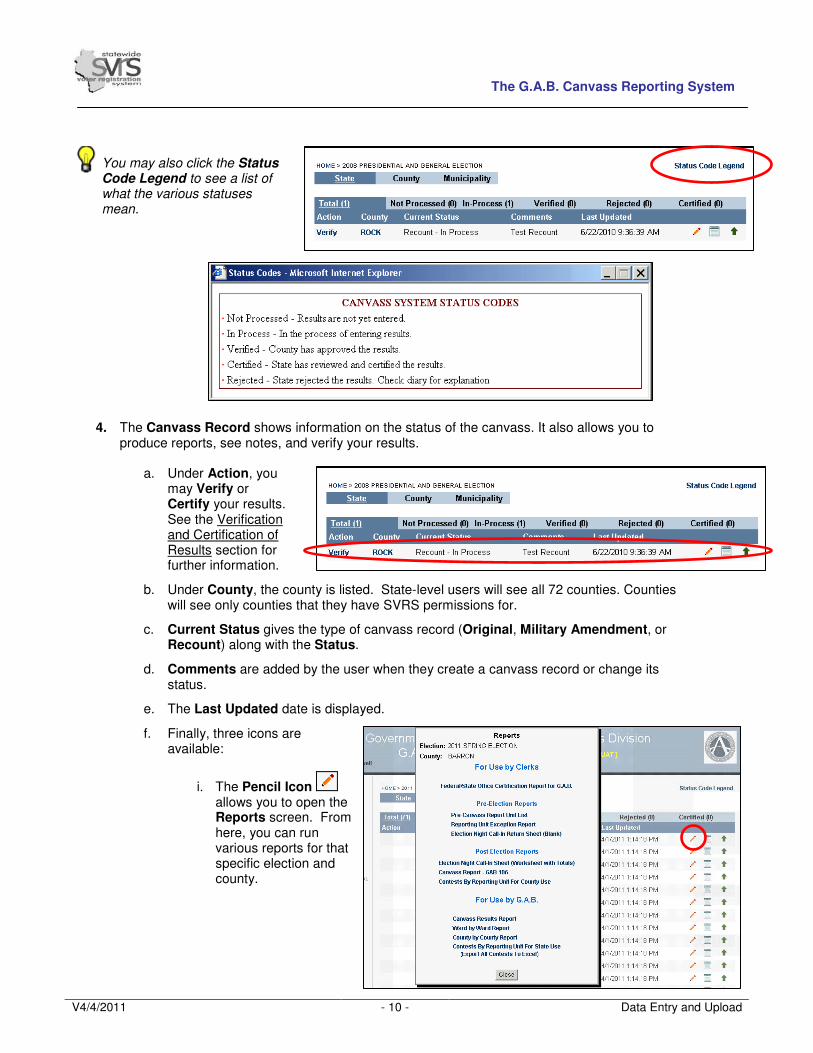
You may also click the Status Code Legend to see a list of what the various statuses mean.
4. The Canvass Record shows information on the status of the canvass. It also allows you to
produce reports, see notes, and verify your results.
a. Under Action, you may Verify or Certify your results. See the Verification and Certification of Results section for further information.
b. Under County, the county is listed. State-level users will see all 72 counties. Counties will see only counties that they have SVRS permissions for.
c. Current Status gives the type of canvass record (Original, Military Amendment, or Recount) along with the Status.
d. Comments are added by the user when they create a canvass record or change its status.
e. The Last Updated date is displayed.
f. Finally, three icons are available:
i. The Pencil Icon allows you to open the Reports screen. From here, you can run various reports for that specific election and county.
The G.A.B. Canvass Reporting System
V4/4/2011 - 11 - Data Entry and Upload
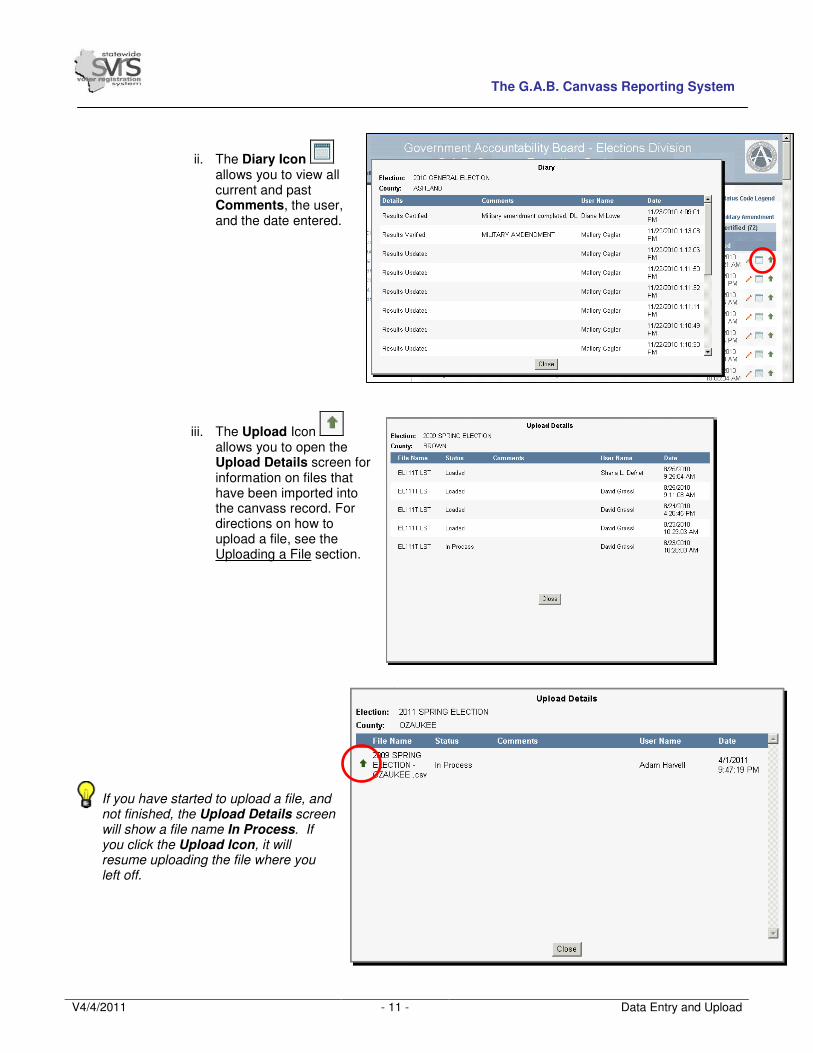
ii. The Diary Icon allows you to view all current and past Comments, the user, and the date entered.
iii. The Upload Icon allows you to open the Upload Details screen for information on files that have been imported into the canvass record. For directions on how to upload a file, see the Uploading a File section.
If you have started to upload a file, and not finished, the Upload Details screen will show a file name In Process. If you click the Upload Icon, it will resume uploading the file where you left off.

The G.A.B. Canvass Reporting System
V4/4/2011 - 12 - Manual Data Entry
Manual Data Entry Entry by Contest
1. Log in to the Canvass System and select the correct election under Elections.
2. Click on the name of your county in the County
column. 3. Once you have selected the county, you will see
the screen displayed above. On the top line, listing State, County, and Municipality, select the level of contest you wish to see.
���� State shows only state and federal level contests like Governor, Congressperson, State Senate and State Assembly.
���� County shows county level contests like County Clerk, County Supervisor, and School Board Member.
���� Municipality shows contests like Mayor, Village Trustee, or Town Supervisor.
You must report State-level contests, County and Municipality-level offices may also be canvassed using this system, but that is optional.
4. In the Contests drop-down, select the contest you want to edit. This will display all the reporting
units in rows and the candidates in columns. You may click in the first open field and begin typing results. Hit Tab to move to the next field.
5. As you type, the Total displayed on the top and bottom will update.
6. Click the Save button whenever you wish to save your work.
7. Click Save & Next when you are done entering all data for all the reporting units on one page.
You will move to the next blank page. The Save & Next button will be disabled when you are on the last screen of reporting units.
8. At the bottom of the screen, you will see a Total of the votes cast for each candidate. You may also change the number of Results per page. You may display between 10 reporting units and ALL of them.

The G.A.B. Canvass Reporting System
V4/4/2011 - 13 - Manual Data Entry
9. You may use the arrow buttons next to the Contest drop-down to move to the next or previous contest.
10. Repeat the steps above until all results are entered and correct. Click Save
after you are finished entering the vote totals. You may move on to the Verification and Certification of Results section.
Entry by Reporting Unit 1. If you wish to enter results for all contests in one reporting unit, instead of
results for all reporting units in one contest, follow Steps 1-3 in the previous section to open the Contests screen. Then click on the desired Reporting Unit name.
2. This will open the Reporting Unit screen. All contests and candidates will be
listed in rows. You may click into the first open field and begin entering vote totals for all candidates. Use the Tab key to move to the next field.
3. When you have finished entering results for the reporting unit, click the Save button. If there are multiple screens for this reporting unit, you may click Save & Next to save one screen and move to another.
4. When you have finished with one reporting unit, choose the next reporting unit out of the Reporting Unit drop-down list, or use the arrow buttons to move to the next or previous reporting unit.
5. Repeat the steps above until all results are entered and correct. Click Save after you are finished entering the vote totals. You may move on to the Verification and Certification of Results section.

The G.A.B. Canvass Reporting System
V4/4/2011 - 14 - Downloading a file for Data Entry
Downloading a File for Data Entry In the past, some counties have pasted canvass results into an Excel spreadsheet and sent that file to the G.A.B. as part of their canvass totals. If you wish, you may download a file from the Canvass System and open it in Excel. All of the contests, candidates, and reporting units will appear, so you may type or paste the canvass results there. Then you can upload the file back into the canvass system so your results will be available to the G.A.B. Please note that you may only download one contest at a time, so this method requires multiple repetitions of downloading a file, pasting the results, and uploading the file.
1. Log in to the Canvass System
and select the correct election under Elections.
2. Click on the name of your
county in the County column.
3. Select the level of contest. State is the default. Canvassing county level and municipal level contests is optional – you do not have to pick County or Municipality if you are not canvassing those offices.
4. Under Contests, select the desired contest name.
5. Click Download.
6. The File Download dialog box will appear asking you Do you want to save this file? Click the Save button.
7. The Save As dialog box will then appear. Select the desired drive in the Save In drop-down list.
You may accept the File name or edit it. Then click the Save button.

The G.A.B. Canvass Reporting System
V4/4/2011 - 15 - Downloading a file for Data Entry
8. The Download complete dialog box will appear. If you
click Open, you will see a file in the Notepad viewer in CSV format that the Canvass System has created. Since you will open this in an Excel spreadsheet later anyway, you can click Close.
9. Open a blank Excel spreadsheet and choose File and
Open.
10. When the Open dialog box appears, browse to find your file, click on it, and click on the Open button.
11. When the file opens, the columns will all be pushed together on the left hand side. To fix this:
a. First click on the corner between Column A and Row 1. The entire sheet will be selected and turn light blue.
b. Then go to the Format menu and chose Column and AutoFit Selection.

The G.A.B. Canvass Reporting System
V4/4/2011 - 16 - Downloading a file for Data Entry
12. Open your file with raw numbers in another Excel spreadsheet. Select the correct numbers for this contest. Use Control-C or Edit and Copy to copy those results.
13. In the file with contests and reporting units, click in the proper cell
and use Control-V or Edit and Paste to paste in the raw numbers.
You may also choose to enter the numbers directly into the Excel spreadsheet.
14. Once you have verified that the results correctly match up with the candidates and reporting units, Save the file.
15. You will follow the directions in the Uploading a CSV File section to bring these results back into
the Canvass System.
The G.A.B. Canvass Reporting System
V4/4/2011 - 17 - Uploading a File
Uploading a File Different types of voting machine software will produce files that you can upload into the Canvass System. The LST can be produced directly by voting software. If you use GEMS software, you can download and install XPS printer software that will print GEMS results to an XPS file. Either an LST or an XPS file can be uploaded by following the directions below.
There are certain options you have when setting up the LST or XPS file. Make sure that only include vote totals only for contests and candidates that you will be canvassing.
.
• You may have an option to include the total number of votes cast for all contests. Eliminate that line from your file.
• Also eliminate any straight-party totals for partisan elections.
• If you are not canvassing municipal-level offices, or using the canvass system to report the results, you should not include municipal-level offices in your file.
• If you are not canvassing county-level offices, or using the canvass system to report the results, you should not include county-level offices.
Uploading an LST or XPS File
1. First, you must obtain the LST or XPS file produced by your tabulating machine. You may save the file to the C: drive on your local computer, or save it to a USB Flash Drive and plug that into your computer instead. If you use a USB Flash Drive, you should plug it into your computer before you log into the Citrix Login screen to ensure that the Canvass System will be able to see the correct drive.
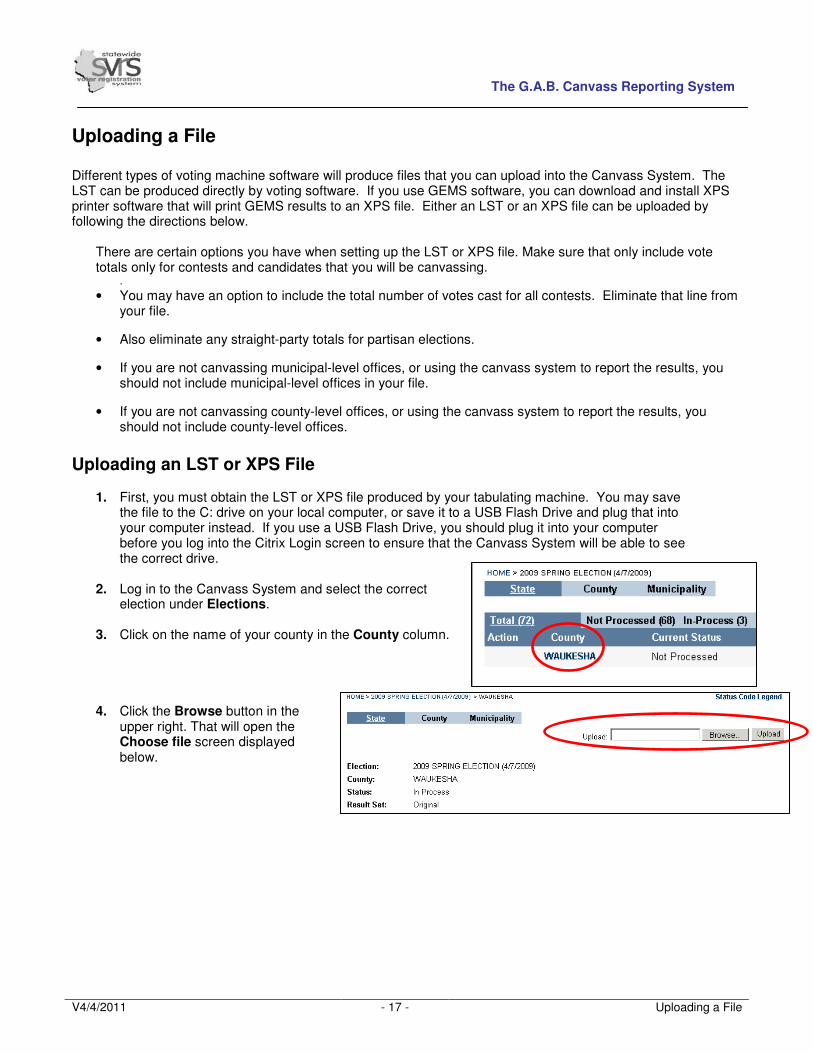
2. Log in to the Canvass System and select the correct
election under Elections. 3. Click on the name of your county in the County column.
4. Click the Browse button in the upper right. That will open the Choose file screen displayed below.
The G.A.B. Canvass Reporting System
V4/4/2011 - 18 - Uploading a File
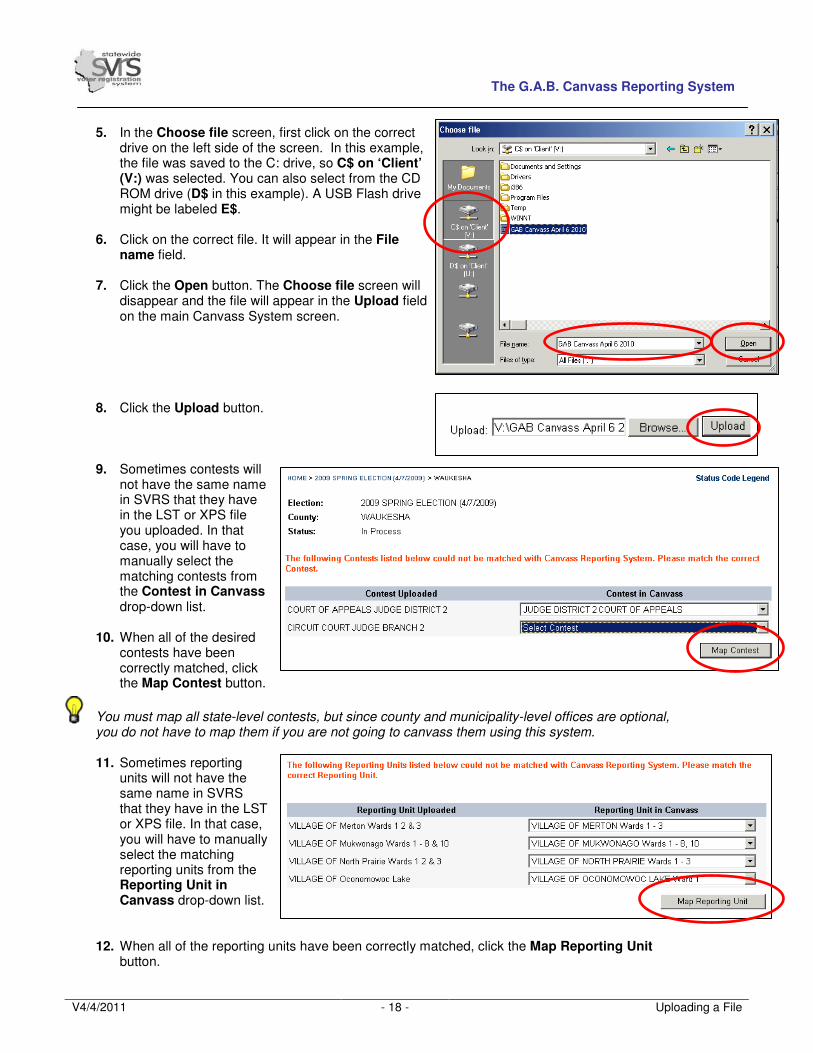
5. In the Choose file screen, first click on the correct
drive on the left side of the screen. In this example, the file was saved to the C: drive, so C$ on ‘Client’ (V:) was selected. You can also select from the CD ROM drive (D$ in this example). A USB Flash drive might be labeled E$.
6. Click on the correct file. It will appear in the File
name field.
7. Click the Open button. The Choose file screen will disappear and the file will appear in the Upload field on the main Canvass System screen.
8. Click the Upload button.
9. Sometimes contests will not have the same name in SVRS that they have in the LST or XPS file you uploaded. In that case, you will have to manually select the matching contests from the Contest in Canvass drop-down list.
10. When all of the desired
contests have been correctly matched, click the Map Contest button.
You must map all state-level contests, but since county and municipality-level offices are optional, you do not have to map them if you are not going to canvass them using this system.
11. Sometimes reporting
units will not have the same name in SVRS that they have in the LST or XPS file. In that case, you will have to manually select the matching reporting units from the Reporting Unit in Canvass drop-down list.
12. When all of the reporting units have been correctly matched, click the Map Reporting Unit
button.

The G.A.B. Canvass Reporting System
V4/4/2011 - 19 - Uploading a File
You must map all reporting units in order for the canvass to work properly. Note that you do not have to map them all at once. You may select one or a few reporting units, and then click Map Reporting Unit. The ones you matched will disappear and you will have a smaller list. 13. After you have mapped
your last reporting unit, the results will upload into the Canvass System. You should see a message that The results from the uploaded file saved successfully. You should spot check your totals and a few reporting units. If your numbers look correct, click Save. You can move on to the Verification and Certification of Results section.
The G.A.B. Canvass Reporting System
V4/4/2011 - 20 - Uploading a File
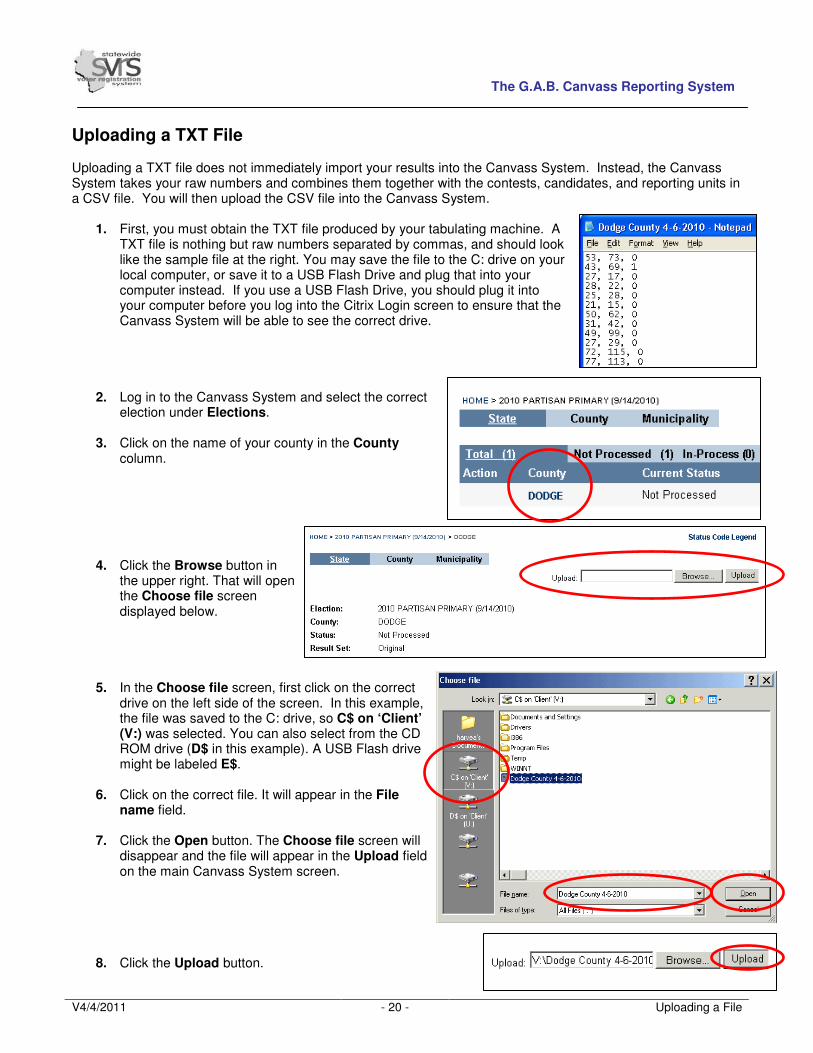
Uploading a TXT File Uploading a TXT file does not immediately import your results into the Canvass System. Instead, the Canvass System takes your raw numbers and combines them together with the contests, candidates, and reporting units in a CSV file. You will then upload the CSV file into the Canvass System.
1. First, you must obtain the TXT file produced by your tabulating machine. A TXT file is nothing but raw numbers separated by commas, and should look like the sample file at the right. You may save the file to the C: drive on your local computer, or save it to a USB Flash Drive and plug that into your computer instead. If you use a USB Flash Drive, you should plug it into your computer before you log into the Citrix Login screen to ensure that the Canvass System will be able to see the correct drive.
2. Log in to the Canvass System and select the correct
election under Elections. 3. Click on the name of your county in the County
column.
4. Click the Browse button in the upper right. That will open the Choose file screen displayed below.
5. In the Choose file screen, first click on the correct drive on the left side of the screen. In this example, the file was saved to the C: drive, so C$ on ‘Client’ (V:) was selected. You can also select from the CD ROM drive (D$ in this example). A USB Flash drive might be labeled E$.
6. Click on the correct file. It will appear in the File
name field.
7. Click the Open button. The Choose file screen will disappear and the file will appear in the Upload field on the main Canvass System screen.
8. Click the Upload button.

The G.A.B. Canvass Reporting System
V4/4/2011 - 21 - Uploading a File
9. The File
Download dialog box will appear asking you Do you want to save this file? Click the Save button.
10. The Save As dialog box will then appear. Select the desired drive in the Save In drop-down list. You may accept the File name or edit it. Then click the Save button.
11. The Download complete dialog box will appear. If you click
Open, you will see a file in CSV format that the Canvass System has created.
A sample file is shown below. Note that the raw numbers have been matched up with the contests, candidates and reporting units from the Canvass System. You should spot check this file and verify that the correct results have been matched with each contest and reporting unit. 12. Once you have
verified that the CSV file has correctly matched the raw numbers with the contests and reporting units, you may proceed to upload the CSV file into the Canvass System. Continue on to the next section, Uploading a CSV File.
The G.A.B. Canvass Reporting System
V4/4/2011 - 22 - Uploading a File
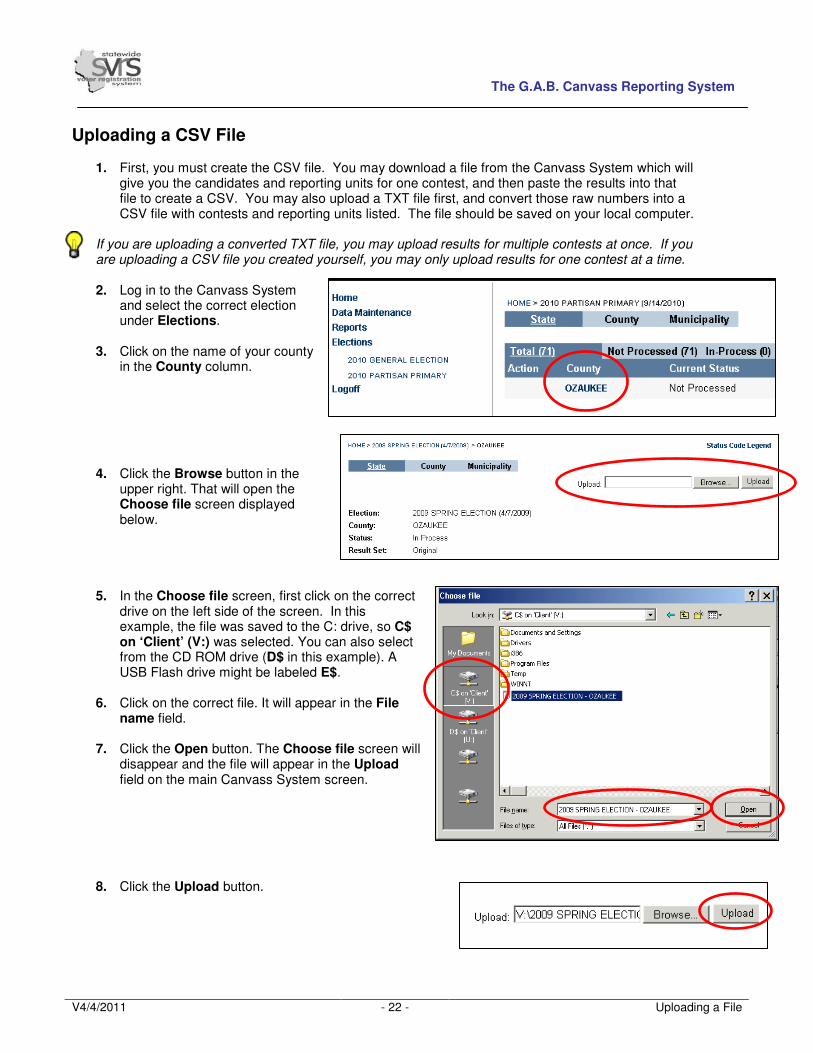
Uploading a CSV File
1. First, you must create the CSV file. You may download a file from the Canvass System which will give you the candidates and reporting units for one contest, and then paste the results into that file to create a CSV. You may also upload a TXT file first, and convert those raw numbers into a CSV file with contests and reporting units listed. The file should be saved on your local computer.
If you are uploading a converted TXT file, you may upload results for multiple contests at once. If you are uploading a CSV file you created yourself, you may only upload results for one contest at a time. 2. Log in to the Canvass System
and select the correct election under Elections.
3. Click on the name of your county
in the County column.
4. Click the Browse button in the upper right. That will open the Choose file screen displayed below.
5. In the Choose file screen, first click on the correct drive on the left side of the screen. In this example, the file was saved to the C: drive, so C$ on ‘Client’ (V:) was selected. You can also select from the CD ROM drive (D$ in this example). A USB Flash drive might be labeled E$.
6. Click on the correct file. It will appear in the File
name field.
7. Click the Open button. The Choose file screen will disappear and the file will appear in the Upload field on the main Canvass System screen.
8. Click the Upload button.

The G.A.B. Canvass Reporting System
V4/4/2011 - 23 - Uploading a File
9. You should see a message
that The results from the uploaded file saved successfully. The contest(s) in the CSV file should have results appear in the lower grid.
10. Repeat the steps above with
additional files if necessary. When all contests have results, you should spot check your totals and a few reporting units. If your numbers look correct, click Save. You can move on to the Verification and Certification of Results section.
The G.A.B. Canvass Reporting System
V4/4/2011 - 24 - Fill in Missing Zeros
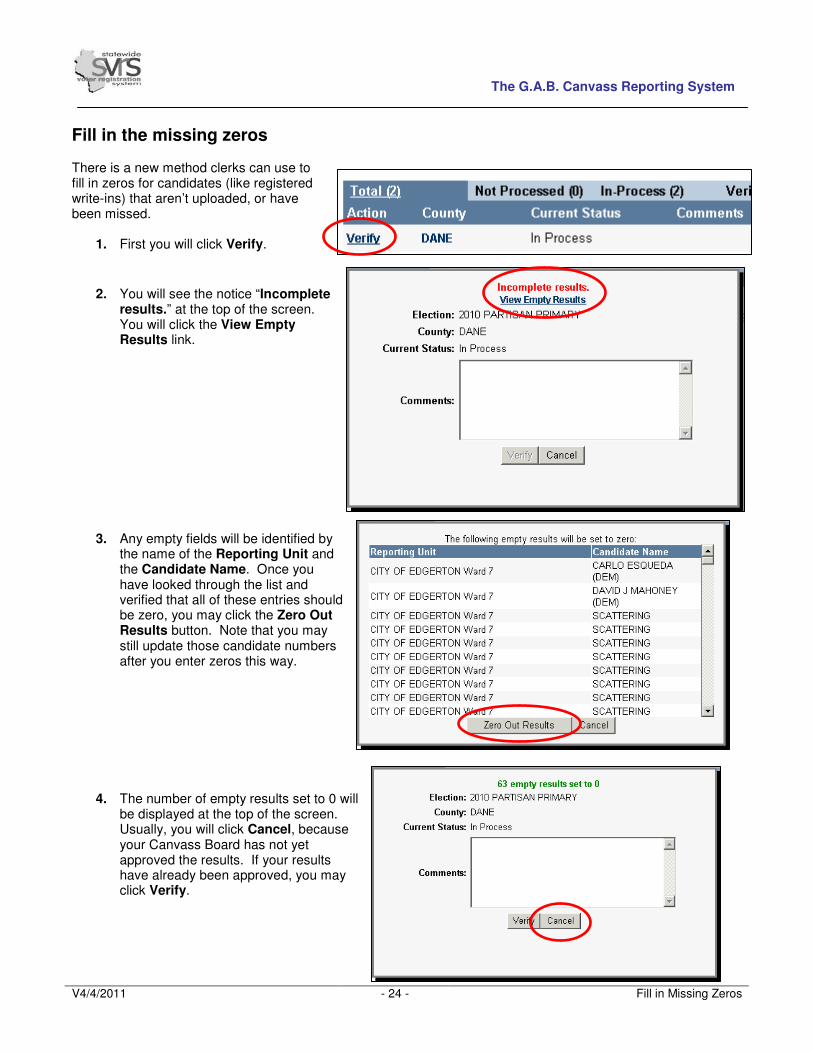
Fill in the missing zeros There is a new method clerks can use to fill in zeros for candidates (like registered write-ins) that aren’t uploaded, or have been missed.
1. First you will click Verify.
2. You will see the notice “Incomplete results.” at the top of the screen. You will click the View Empty Results link.
3. Any empty fields will be identified by the name of the Reporting Unit and the Candidate Name. Once you have looked through the list and verified that all of these entries should be zero, you may click the Zero Out Results button. Note that you may still update those candidate numbers after you enter zeros this way.
4. The number of empty results set to 0 will be displayed at the top of the screen. Usually, you will click Cancel, because your Canvass Board has not yet approved the results. If your results have already been approved, you may click Verify.

The G.A.B. Canvass Reporting System
V4/4/2011 - 25 - Canvass Report – GAB 106
Verification and Certification of Results
After you have entered or uploaded your results, follow the directions below to verify your canvass numbers. These rules must be followed for state and federal-level offices. For county-level offices, you may choose whether or not to use the G.A.B. Canvass System.
1) When you have completed the entry of election results, you may print the Canvass Report – GAB 106. This will give a tabular statement of all votes cast for each contest of candidate, along with a summary sheet of vote totals. The canvassing board can use this report to verify vote totals and make adjustments. You MAY NOT use the Canvass Report – GAB 106 to report results to the G.A.B.
2) Once all necessary amendments have been made, click the Verify option in the Canvass System, and print the Federal/State Office Certification Report for G.A.B. for your Board of Canvassers to sign. Please note: You MUST report results to the G.A.B. using the Federal/State Office Certification Report for G.A.B.
3) Once it is signed, scan the entire document (summary statement and certification) and email it to the G.A.B. at [email protected].
4) Immediately send the original signed document (summary statement and signed certification) to the G.A.B. at P.O. Box 7984, Madison, WI 53707-7984.
5) Keep a copy of the Canvass Report – GAB 106 (or the Election Night Call-In Sheet (Worksheet with Totals), if your canvass board reviewed results by reporting unit, instead of by contest) and retain with your copy of the Summary Statement and Certification.
The Canvass Report – GAB 106 The Canvass Report – GAB 106 report is meant to provide canvassing boards a breakdown of vote totals by contest and candidate. It can be used by your canvassing board to verify vote totals before you officially verify them in the system. You may also use this report to certify county-level and municipal-level offices, using the signature space on the last page. This report cannot be used to certify state or federal-level offices, so there will be no signature area when you print the report for those offices. To certify results to the G.A.B., you must use the Federal/State Office Certification Report for G.A.B.
1. Click on Reports.
2. Select the Canvass Report.

The G.A.B. Canvass Reporting System
V4/4/2011 - 26 - Canvass Report – GAB 106
3. Select the correct election from the Election drop-down list.
4. Select the jurisdiction level from the Jurisdiction drop-down.
5. Select the County.
6. Select the desired contest(s) from the Election Contest list. In the example, the user has selected ALL.
7. Select the correct Election Result Set. You may choose between Original, Military Amendment, and Recount.
8. Click the View Report button. A sample of the report is shown. The report begins with a list of each contest, followed by the number of votes each candidate received in each reporting unit. The report is concluded by a summary statement showing the total votes for each candidate.
9. Print or export the report, and provide
copies to your canvassing board. See the Print or Export a Report section of this chapter if you need help.
10. As the canvassing board reviews results, make corrections on this report, or enter them directly into the canvassing system. When all results are correct, proceed to the next section to Verify your results.
If you choose County or Municipality from the Jurisdiction dropdown list, you will see a certification section at the end of the report. You may use this report to certify county-level and municipality-level contests only.

The G.A.B. Canvass Reporting System
V4/4/2011 - 27 - Election Night Call-In (Worksheet with Totals)
The Election Night Call-In Sheet (Worksheet with Totals)
(Optional) If your canvassing board would like to review results organized by reporting unit, instead of by contest, you may choose to print the Election Night Call-In Sheet (Worksheet with Totals) report. You may also export this report if you wish to post your election results online in a format that is organized by reporting unit.
1. Click on Reports.
2. Click on Election Night Call-in Sheet (Worksheet with Totals).
3. Select the correct election from the Election drop-down list.
4. Select the County.
5. In the Reporting Unit
drop-down list, select a reporting unit. You may select ALL if you wish.
6. Select the correct
Result Set. You may choose from Original, Military Amendment, and Recount.
7. Click the View Report button.
8. A sample of the report is shown. It is designed so you may verify results for each reporting unit
before moving on to the next reporting unit’s results.
9. If your canvassing board is reviewing results by reporting unit, print or export the report, and provide copies to your canvassing board. See the Print or Export a Report section of this chapter if you need help.
10. As the canvassing board reviews results, make corrections on this report, or enter them directly into the canvassing system. When all results are correct, proceed to the next section to Verify your results.
The G.A.B. Canvass Reporting System
V4/4/2011 - 28 - Verification of Results
Verification
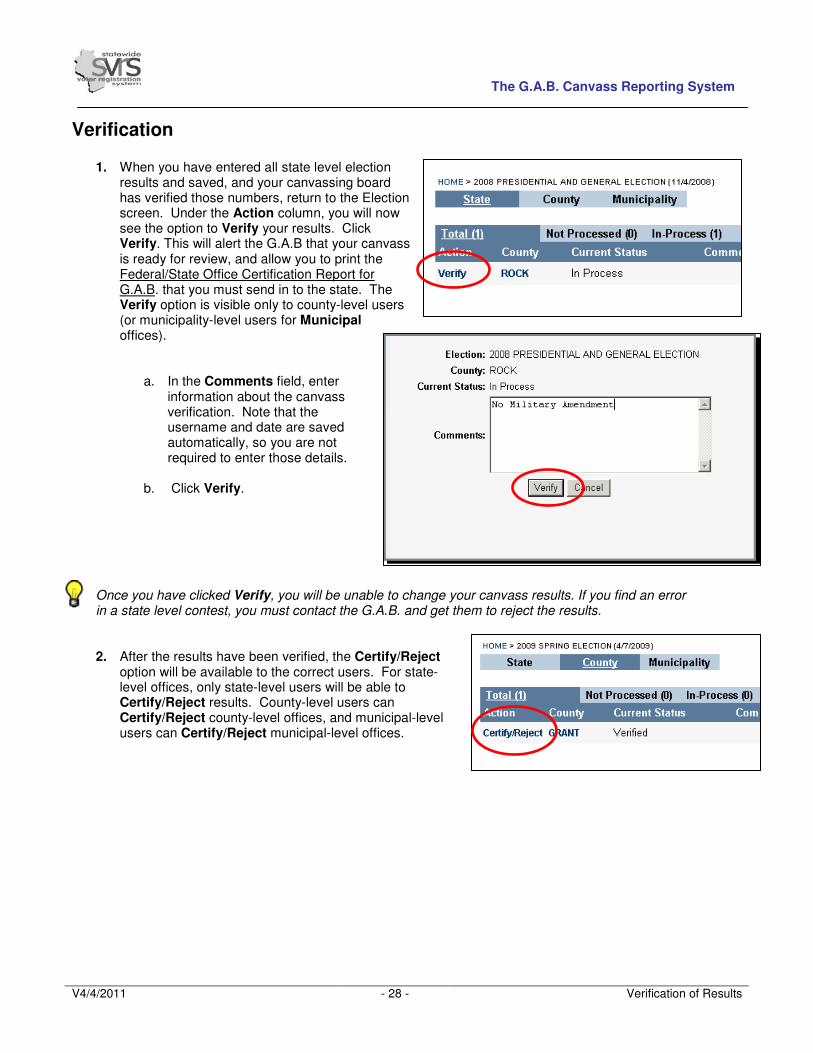
1. When you have entered all state level election results and saved, and your canvassing board has verified those numbers, return to the Election screen. Under the Action column, you will now see the option to Verify your results. Click Verify. This will alert the G.A.B that your canvass is ready for review, and allow you to print the Federal/State Office Certification Report for G.A.B. that you must send in to the state. The Verify option is visible only to county-level users (or municipality-level users for Municipal offices).
a. In the Comments field, enter information about the canvass verification. Note that the username and date are saved automatically, so you are not required to enter those details.
b. Click Verify.
Once you have clicked Verify, you will be unable to change your canvass results. If you find an error in a state level contest, you must contact the G.A.B. and get them to reject the results. 2. After the results have been verified, the Certify/Reject
option will be available to the correct users. For state- level offices, only state-level users will be able to Certify/Reject results. County-level users can Certify/Reject county-level offices, and municipal-level users can Certify/Reject municipal-level offices.

The G.A.B. Canvass Reporting System
V4/4/2011 - 29 - Federal/State Office Certification for G.A.B.
The Federal/State Office Certification Report for the G.A.B.
Before running this report, final data should be entered into the Canvass System. You may not print the Federal/State Office Certification Report for G.A.B. before you verify results. This is only a certification report and does not show vote totals for individual reporting units. If you need a report to help you verify vote totals, you should print the Canvass Report – GAB 106 or the Election Night Call-In Sheet (Worksheet with Totals). Only the Federal/State Office Certification Report for the G.A.B. will be accepted by the state as certification of your canvass results.
Once you Verify your results, you may also print this report from the data entry screen by clicking the Certification Report link. However, from that screen, you may only print the Certification Report for one Contest at a time. You may print the certification for all contests using the directions below.
1. From the Main Menu screen, click Reports.
2. Select the
Federal/State Office Certification Report for G.A.B.
3. Select the correct election from the Election drop-down list.
4. Under Jurisdiction, select the level of contests you want to print out. You are required to print this report for Federal/State contests and submit it to the G.A.B. Canvassing for county-level and municipality-level contests is optional.
5. Select the correct county from the County drop-down list.
6. Select the Contest. In this example, we will choose ALL.
7. For the Election Result Set, choose between Original, Military Amendment, and Recount results.
8. Click the View Report button.

The G.A.B. Canvass Reporting System
V4/4/2011 - 30 - Federal/State Office Certification for G.A.B.
a. The Summary Statement section
will display the total number of votes cast and the total each candidate received.
b. The Certification of the Board of
Canvassers section will display the county and have places for the Board of Canvassers to sign. If a county user is certifying county-level offices, they will also see a section identifying the Highest Candidate.
9. For federal and state offices, you must print this report out and have the Board of Canvassers sign it. Once it is signed, scan the entire document (summary statement and certification) and email it to the G.A.B. at [email protected].
10. Immediately send the original signed document (summary statement and signed certification) to the G.A.B. at P.O. Box 7984, Madison, WI 53707-7984.
11. Keep a copy of the Canvass Report – GAB 106 (or the Election Night Call-In Sheet (Worksheet with Totals), if your canvass board reviewed results by reporting unit, instead of by contest) and retain with your copy of the Summary Statement and Certification from the Federal/State Office Certification Report for G.A.B.
See the Print or Export a Report section of this chapter for more details on how to print or export. If you canvass County or Municipal level offices using the Canvass System, you may use the Canvass Report – GAB 106 report to certify your results, since it includes a certification statement for county and municipal-level offices. You may NOT use the Canvass Report – GAB 106 to certify state or federal-level offices.

The G.A.B. Canvass Reporting System
V4/4/2011 - 31 - Certification
Certification 1. Before certifying the results, the state user must confirm that the date and time the Federal/State
Office Certification Report for G.A.B. was printed is after the date and time any updates were made to the results. County and municipal level users can also use the Canvass Summary – GAB 106 report to certify their results.
a. Check the date/time at the bottom of the Federal/State
Office Certification Report for G.A.B. b. Click the Diary Icon on the right side of the screen.
c. Confirm that the date and time the Federal/State Office Certification
Report for G.A.B. was printed is after the last update made to the results. Results Verified cannot be dated after the Federal/State Office Certification Report for G.A.B. was printed.
2. If the results are correct and can be
certified, click Certify/Reject.
a. In the Comments field, enter information about the certification. Note that the username and date are saved automatically, so you are not required to enter those details.
b. Click Certify.
3. If the results are incorrect, click Certify/Reject.
a. In the Comments field, enter details about why the results were rejected and the user rejecting the results.
b. Click Reject.
4. When results are rejected, the county (or for municipal-level offices, the municipality) will be able
to change their canvass. When results are corrected, users must click Verify again.

The G.A.B. Canvass Reporting System
V4/4/2011 - 32 - Contests By Reporting Unit For County Use
Post-Election Reports
After all data has been entered, you may print or export a variety of reports from the Canvass System.
Contests By Reporting Unit For County Use
You can use this report to get a list of vote totals for each candidate or referendum, and then export results to an Excel spreadsheet. You can alter that spreadsheet as necessary before posting the results to your website. You may also use this report before Election Day to verify that all of the contests and candidates are correctly entered into SVRS.
1. Click on Reports.
2. Click on Contests By Reporting Unit for County Use.
3. Select the correct election from the Election drop-down list.
4. Select the correct Jurisdiction Type.
5. Select the County.
6. In Election Contest, select ALL.
7. In the Election Results Set drop-down, select Original, Military Amendment, or Recount.
8. Click the View Report button. Note you may have to expand your screen or use the scroll bar at the bottom of the screen to see the View Report button.
You may choose to print or export this report – see the Print or Export a Report section of this chapter for more details.
If you are running this report before Election Day to verify your contests and candidates, check that each contest is listed and all candidates’ names are listed and spelled correctly. If changes need to be made, you will have to change the contests and candidates in SVRS. See the Election Setup chapter for more information. After you have made your changes, you can wait overnight for the data to be refreshed in the Canvass System. If you need the data refreshed immediately, contact the G.A.B. Help Desk.

The G.A.B. Canvass Reporting System
V4/4/2011 - 33 - The Canvass Results Report
The Canvass Results Report The Canvass Results Report is meant to provide state-level users a summary of the canvass results for each office. This report will only be available for state-level offices.
1. From the main menu, click on Reports.
2. Select the Canvass Results
Report.
3. Select the correct election from the Election drop-down list.
4. Select the jurisdiction
level from the Jurisdiction drop-down.
5. Click the View Report button.
A sample of the report is shown above. For each contest, the report displays the total number of votes casts, and the number of votes cast for each candidate. The winner is labeled. Note that this report only shows state and federal-level contests – you cannot use this report at the county or municipal level.
You may choose to print or export this report – see the Print or Export a Report section of this chapter for more details.

The G.A.B. Canvass Reporting System
V4/4/2011 - 34 - The Ward by Ward Report
The Ward by Ward Report The Ward by Ward Report provides state-level users a summary of the canvass results from all counties broken down by individual reporting units. This report will only be available for state-level offices.
1. Click on Reports.
2. Select Ward by Ward Report.
3. Select the correct election from the Election drop-down list.
4. Select the correct
Election Result Set. You may choose between Original, Military Amendment, and Recount.
5. From the Type dropdown list, you may select Election Contest to see a list of individual contests (like Columbia County Circuit Court Judge, Branch 2) that you may choose to display on the report. Select Office Type to choose from a list of office types (like all Circuit Court Judge races) to display on the report.
6. Expand the Office Type or Election Contest dropdown list and check off the individual offices or office types you wish to display on the report. You may check one contest, multiple contests, or all contests as desired.
7. Click the View Report button. A sample of the report is shown above. Note that for this statewide contest, each contest and candidate is given vote totals for each reporting unit, then for the county.
You may choose to print or export this report – see the Print or Export a Report section of this chapter for more details.

The G.A.B. Canvass Reporting System
V4/4/2011 - 35 - The County by County Report
The County by County Report The County by County Report provides state-level users a summary of the canvass results from all counties. This report will only be available for state-level offices.
1. Click on Reports.
2. Select County by County Report.
3. Select the correct election from the Election drop-down list.
4. Select the correct Election
Result Set. You may choose between Original, Military Amendment, and Recount.
5. From the Type dropdown
list, you may select Election Contest to see a list of individual contests (like Columbia County Circuit Court Judge, Branch 2) that you may choose to display on the report. Select Office Type to choose from a list of office types (like all Circuit Court Judge races) to display on the report.
6. Expand the Office Type or Election Contest dropdown list and check off the individual offices or office types you wish to display on the report.
7. Click the View Report button. A sample of the report is shown above. Note that for this statewide contest, each contest and candidate is given vote totals for each county.
You may choose to print or export this report – see the Print or Export a Report section of this chapter for more details.

The G.A.B. Canvass Reporting System
V4/4/2011 - 36 - Contests By Reporting Unit for State Use
Contests By Reporting Unit for State Use The Contests By Reporting Unit for State Use report provides state-level users a list of vote totals by contest, candidate, and reporting unit. Contests and candidates are listed horizontally, and reporting units are listed vertically.
1. Click on Reports.
2. Select Canvass Result Report.
3. Select the correct election from the Election drop-down list.
4. Select the jurisdiction level
from the Jurisdiction drop-down.
5. Select the County. You may select one county, multiple counties, or all counties.
6. Select the Election Contest. You may select one contest, or All.
7. Select the correct Election
Result Set. You may choose between Original, Military Amendment, and Recount.
8. Click the View Report button. A sample of the report is shown above.
You may choose to print or export this report – see the Print or Export a Report section of this chapter for more details.

The G.A.B. Canvass Reporting System
V4/4/2011 - 37 - Print or Export a Report
Print or Export a Report All reports can be printed or exported from the Canvass System, and all reports work the same way. This section shows how to print and export a sample report.
1. Follow the directions for the specific report to display a preview of that report.
2. To Print the report:
a. Click on the Printer Icon displayed on the menu bar above the text of the report.
b. In the Name drop-down, select the
desired printer.
c. You may choose to print All pages, or just selected page numbers. Also, you may choose to print one or more copies.
d. Click OK when you are finished.
3. To Export the report:
a. In the Select a format drop-down list, pick a file type (usually Acrobat (PDF) file or Excel.)
b. Click Export.
c. You will see the File Download dialog box. Click Save to export your file.
You may choose to Open this report and view it immediately. However, the file will open in an Excel Viewer or Acrobat Viewer and will be read-only. You will not be able to save it.

The G.A.B. Canvass Reporting System
V4/4/2011 - 38 - Print or Export a Report
d. The Save As dialog box will appear.
i. Click the drive that you wish to save
the file to. Here, the C$ on Client (V:) is selected, meaning the file will paste to the C: drive on the user’s computer. You may also select a CD drive (usually the D$ drive) or a USB Flash drive (which may be listed under E$ or some other drive.
ii. In the File name field, you may
rename the file, or leave the name as is.
iii. Click the Save button.
e. When the file has been exported, you will see the Download Complete dialog box.
i. If you wish to view the file immediately,
click Open.
ii. Otherwise, click Close. The file will be saved on the drive you selected.
A sample of a file is shown to the right. Please note that when you export a report to an Excel file, the Document map portion of the document may end up as a separate worksheet. You must click Sheet 1 (or other sheets) to see the main body of the document.

The G.A.B. Canvass Reporting System
V4/4/2011 - 39 - Add a Military Amendment or Recount Results Set
Add a Military Amendment or Recount Results Set After the original canvass results have been certified, another results set may have to be created for Military Amendment, to count votes from Military voters who are allowed to return their ballots after Election Day. If there is a Recount, another result set will have to be created to record any changes found when the votes are recounted.
1. To create a Military Amendment results set:
a. First, all of the canvass results for that election must be entered, verified, and certified. b. For state-level contests, only the state will be able to create the Military Amendment
results set. For county and municipal-level contests, the county or municipality may initiate the Military Amendment process.
c. When the original results are certified, the words Allow Military Amendment will appear in the election above the status bar. Click Allow Military Amendment.
d. When the Military Amendment dialog box
appears, enter any necessary comments in the Comments field and click the Military Amendment button.
e. In the data entry screen under each county, the
Results Set will now show Military Amendment and Original.
f. The Original results will be locked and ineditable.
g. The Military Amendment
results will be filled in with the Original results that were certified. You may enter changes manually or upload a new file. Follow the same steps you did for the original canvass to enter results, verify, and certify your Military Amendment results.

The G.A.B. Canvass Reporting System
V4/4/2011 - 40 - Add a Military Amendment or Recount Results Set
2. To add a Recount results set:
a. First, all of the canvass results for that election must be entered, verified, and certified, including any Military Amendment.
b. For state-level contests, only the state will be able to create the Recount results set. For
county and municipal-level contests, the county or municipality may initiate the Recount process.
c. When the original results are certified, the words Allow ReCount will appear in the data
entry screen next to each contest. If you have a recount for more than one office, you will click Allow ReCount for each contest. State-level users may initiate this process from any county, and it will create a Recount results set for all counties in the district being recounted.
d. The Contest ReCount screen will appear. Enter any desired comments in the Comments field and click the ReCount button.
e. In the data entry screen under
each county, the Results Set will now show Recount and Original. Military Amendment may be displayed as well.
f. The Original results will be
locked and ineditable.
g. The Recount results will be filled in with the Original results that were certified. You may enter changes manually or upload a new file. Follow the same steps you did for the original canvass to enter results, verify, and certify your Recount results.