Embed Size (px)
Citation preview
1
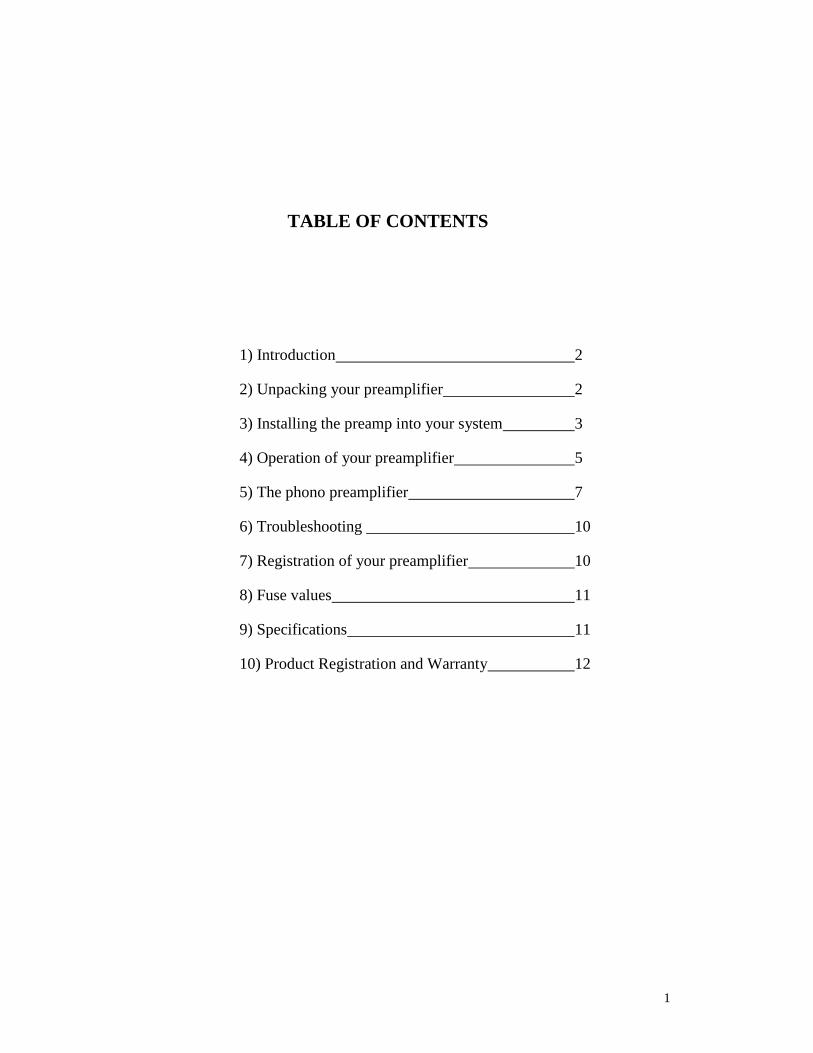
TABLE OF CONTENTS
1) Introduction 2
2) Unpacking your preamplifier 2
3) Installing the preamp into your system 3
4) Operation of your preamplifier 5
5) The phono preamplifier 7
6) Troubleshooting 10
7) Registration of your preamplifier 10
8) Fuse values 11
9) Specifications 11
10) Product Registration and Warranty 12

2
INTRODUCTION
Congratulations on your purchase decision! We at Rogue Audio truly believe that
our equipment provides the “smartest” value in high-end audio. If you have never
owned a vacuum tube preamplifier you will be thrilled by the silky-smooth sound
and incredible detail that only a tube preamplifier can provide. And with the RP-5
preamplifier, you can be sure that you are getting the very best in tube
amplification. We at Rogue Audio are extremely proud of our products and want
you to enjoy them to their fullest potential. So please, take the time to read
through this short manual so that you can be confident that you have set up your
preamplifier properly.
UNPACKING YOUR PREAMPLIFIER
Tools required: none
WARNING - This preamplifier uses voltages that could cause injury or
death. Never open the preamplifier while it is plugged in, and always
wait at least 30 minutes after turning the unit off before unplugging the
electrical cord and opening the unit. Lethal voltages can remain in the
electronics after the unit is unplugged.
Your new preamplifier has been painstakingly inspected for cosmetic flaws
during and after assembly. In order not to damage the cosmetic appearance of
your preamplifier it is important that you follow the unpacking instructions
carefully.
1. Open the shipping carton and remove the box containing the remote control
and power cord from the carton.
2. Carefully lift the preamplifier out of the carton, and remove the foam pads and
plastic bag.
3. Save the packing materials. The packing materials and box have been
carefully designed to protect your valuable equipment during shipping so you
don’t want to throw them away.

3
INSTALLING THE RP-5 INTO YOUR SYSTEM
Place the RP-5 on a flat stable surface with at least 1” of airspace above the
preamplifier for ventilation. Do not place any other electronic components or any
other objects on top of the preamplifier.
Insert the IEC end of the detachable power into the rear of the preamp ( shown in
Figure ). Plug the opposite end of the power cord into an appropriate power outlet.
It is recommended that both the preamplifier and power amplifier are plugged into
the same wall outlet if possible (perhaps using a power outlet strip) in order to
avoid creating a ground loop.
Figure 1
Connecting sources to the RP-5 preamplifier:
Connections are made to the inputs on the rear panel of the preamplifier shown in
Figure 1. Line level (CD player, tuner, DAC, etc…) connections are made via the
four pairs of RCA inputs. If you are using a turntable connect it to the RCA phono
inputs. There is also a grounding lug for the turntable adjacent to the phono
inputs. If you are not using a turntable or you wish to use an external phono
preamp the phono inputs are configurable as line level inputs (see phono setup).
Connecting a home theater processor or surround receiver: The RP-5 features unity gain bypass inputs that allow you to integrate your two
channel music system into a multichannel home theater system. This conveniently
enables you to share speakers and amps between the two without changing
interconnect or speaker cables.
Simply connect the left and right front preamplifier outputs from your processor
to the HT inputs on the RP-5. When the RP-5 is turned off, these inputs
automatically route the home theater signal directly to the power amp completely
bypassing the active circuitry in the RP-5. When turned on, the RP-5 controls
your sources and outputs the audio signal to your power amp. Note that no
additional buttons or switches need to be changed.
Phono
Inputs
RP-5
Preamp
Outputs
Unity
Gain
Inputs
Processor
Loop
RCA
Inputs
IEC
Receptacle
Fixed
Output
Power
Switch

4
Connecting an audio processor to the RP-5:
The RP-5 has a processor loop which allows various types of processors
(equalizer, room correction, bass enhancement, etc.. ) to be used. There are two
sets of RCA jacks on the rear of the preamp labeled “in” and “out”. Connect the
processor “out” on the rear of the RP-5 to the inputs on your processor. Connect
the outputs of the processor to the jacks labeled “in on the rear of the RP-5. When
the processor button is pushed a blue LED below the button will indicate that the
source signal is going through the processor. With the button out the signal
bypasses the processor. Note that if no processor is connected and the button is
pushed then the signal is interrupted and there will be no output from the
preamplifier. This feature is also accessible via the hand held remote.
Connecting the RP-5 to the power amplifier: There are two pairs of variable (preamplifier) ouputs on the RP-5. These volume
controlled outputs are used to connect the RP-5 to your power amplifier and any
other device requiring a variable output (e.g. a subwoofer). Unless you are
biamping you will only need the first pair of outputs (labeled “out 1”) to connect
the RP-5 to your amp.
Connecting a subwoofer:
The second set of preamplifier outputs labeled “out 2” can be used for connecting
a subwoofer to the RP-5. The signal to these outputs is identical to the signal
going to the power amp and varies with the volume control. Note that these
outputs can also be used for biamping or running a second power amp located
elsewhere.
Connection to the fixed outputs:
The RP-5 has one pair of fixed outputs. These outputs are connected to the source
and will output whatever signal is being used for the preamp. The volume is
“fixed” and does not vary with the volume control. You can use these to feed a
signal to an external headphone amp or a cd burner, etc….

5
OPERATION OF THE PREAMPLIFIER
Powering up the System: After all your connections have been made, you are now ready to turn the
preamplifier on. A primary power switch is located on the rear of the unit and is
shown in figure 1. You can leave this switch on all the time and it will keep the
solid state portions of the RP-5 energized even though the unit is powered down.
Very little power is used in standby and the RP-5 will sound its best shortly after
turn on. The power button located on the front panel is shown in figure 2 and is
used to power the RP-5 on and off between listening sessions. Your preamplifier
features soft-starting to prolong tube life as well as to suppress turn-on transients.
A countdown timer on the display shows the time remaining before the RP-5 is
ready to use. A ten second software lockout prevents turning the unit on and off in
quick succession. After turning on the preamplifier, turn on the power amplifier
and source material and you are ready for listening. The first time that your
preamp is turned on (and anytime it has been unplugged from the power outlet) it
is best to let the solid state components charge up for a few moments before
turning on the preamp. To do this, simply plug the RP-5 in and turn on the rear
power switch. Wait a minute or so and then power on at the front panel. This only
needs to be done when the RP-5 has been disconnected from the wall or the rear
switch has been turned off for a prolonged period.
NOTE – The RP-5 will not play music for approximately 45 seconds
after power on while the preamp goes through its sequential start-up.
Figure 2
Headphone
Jack
Processor
Button
Selector
Buttons
witch
Balance
Control
Balance
Button
Mono
Button
Volume
Control
Mute
LED
Power
Button

6
Switches and Controls:
The RP-5 is a full function preamplifier. The volume and balance controls are
extremely accurate stepped attenuators which change in 1 dB increments. The
preamp also has a processor loop, mono button, mute function (on remote), power
on/off button, 4 line level select buttons and a phono button. All of these functions
are conveniently accessible on the hand held remote. A high quality VFD
(vacuum fluorescent display) indicates the input and volume. When using the
balance the relative volumes of the two channels are displayed. The following
sections discuss operation of these controls.
Volume Control
The volume control has 60 steps which vary in 1 dB increments. At turn on the
RP-5 defaults to a relatively low volume. The volume can be turned continuously
until reaching a reading at either 0 (min) or 60 (max).
Balance Control
The balance control has 66 steps which vary in 1dB increments. At turn on the
RP-5 defaults to a left/right balanced output. When the balance knob is turned in
either direction, the relative volume of the attenuated channel is shown in
negative dB. Either channel can be attenuated down to -65dB with the final step
being down -90dB (mute). A tactile switch (button) to the lower right of the
balance knob conveniently rebalances the two channels automatically. When the
balance is shifted on either channel a blue LED above the balance button is lit.
Tactile Switches (buttons)
Power - If the RP-5 is turned off, pressing the power button will initiate the
start-up sequence and the blue LED above the button will light. If the unit is
on, the turn off sequence will begin and the blue LED will be extinguished.
Mono – Combines the left and right channels. When activated the blue LED
above the button will be lit.
Selector buttons – Pressing any of these will engage the chosen input aux1
through aux4 or the phono input. A blue LED above the button indicates the
chosen input which is also displayed on the screen.
Processor - activates the processor loop. When activated the blue LED above
the switch will light. Please note that if there is no processor connected
pushing this button will interrupt the signal (no sound will be heard).
Balance button – If the balance is shifted to either channel, the blue LED
above this button is lit. pushing this button will balance the two channels.
Remote Control
The RP-5 hand held remote contains all of the functions located on the front
panel. In addition, the remote also features a mute button that mutes the output
of the preamplifier. The balance operation on the remote is slightly different

7
than the knob on the faceplate. The remote balance operates in 1dB
increments down to -15dB and then jumps to -90dB. This allows fine
adjustment where it is most typically needed yet facilitates the extinguishing
of the channel without going through all of the intermediate steps.
Headphone Jack
The RP-5 includes a tube based headphone amplifier that uses a ¼” (6.35 mm)
standard headphone jack. For performance reasons the jack does not include a
switch to break the audio signal. To mute the output from the preamp either
mute the preamp or turn off your power amp.
Phono Preamplifier
The RP-5 includes a high performance phono section that is suitable for the vast
majority of phono cartridges available today. It is user configurable and has
adjustments for gain, capacitance and resistive loading. The RP-5 is shipped
with the gain set at 45 dB and the loading set at 47K. This set up is appropriate
for most high output cartridges. Before removing the cover to make any loading
or gain adjustments, power off the RP-5 and let it drain off any voltages for at
least 30 minutes. Leave the RP-5 plugged into the wall during this time so that
the voltages can drain down properly. After the RP-5 has sat for at least 30
minutes disconnect the power cord from the wall or rear of the unit.
WARNING - This preamplifier uses voltages that could cause injury or
death. Never open the preamplifier while it is plugged in, and always
wait at least 30 minutes after turning the unit off before unplugging the
electrical cord and opening the unit. Lethal voltages can remain in the
electronics after the unit is unplugged.
Remove the 10 cover screws using a #2 Phillips screwdriver and pull off the
cover.
Setting the cartridge loading – The cartridge loading switches are located on
the right hand side of the rear circuit board adjacent to the phono inputs (figure 3).
It is important to point out that the cartridge manufacturers recommended loading
should be considered as a starting point and not an absolute. Systems and
turntable setups vary significantly and if you want to get the most out of your
analog setup, take the time to find the settings that sound best in your system.
Phono capacitance - There are two (red ) slide switches to add capacitance
(150pF) to the phono input. With the two switches in the down position there is
no added capacitance. When the switches are in the up position 150 pF
(picofarads) are added at the phono input. The RP-5 ships with these switches set

8
to zero capacitance. Note that for many cartridges this will not affect the sound in
either setting.
Figure 3
Resistive loading – There are two sets of DIP switches for setting the resistive
loading (one for each channel). The four switches are labeled A,B,C and D.
Figure 3 shows the A switch in the on position. The loading options are shown in
Table 1:
A B C D resistance
on on on off 30 Ω
on off off off 50 Ω
off on on off 75 Ω
off on off off 100 Ω
off off on on 230 Ω
off off on off 300 Ω
off off off on 1K Ω
off off off off 47K Ω
Table 1
Setting the phono gain - The two DIP switches for setting the gain are located on
the right rear corner of the main circuit board as shown in Figure 4.
Slide switches
for capacitive
loading
DIP switches for
resistive loading
Shunts for bypassing
phono section

9
Figure 4
Phono gain settings are as follows:
Switch Gain Cartridge Output Cartridge Type
A 40 dB 4mV and up high ouput MM
B 45 dB 1.0 to 3.0 mV high output MC
C 50 dB 0.6 mV to 1.0 mV medium output
D 60 dB below 0.6 mV low output MC
A setting of 45 dB is shown in Figure 4.
Please note that the gain settings recommended for the various cartridge outputs
will vary somewhat depending on the sensitivity of other components in your
system. These are “typical” settings and are a good starting point. If you feel like
you want a bit more or less gain try the setting above or below the value in the
table.
Bypassing the internal phono section – If you have an external phono preamp or
you wish to bypass the internal phono so that it can be used a line level input,
simply move the two shunts from the arrow up position to the arrow left position
(see Figure 3). Please note that the direction of the shunts must follow the
direction of the arrow. If you are using an external phono or a line level device on
this input be sure to turn all the loading switches to the off position.
TROUBLESHOOTING
Speaker Hum
Gain setting DIP switches

10
If hum can be heard from more than a few inches from the loudspeaker, there
is probably a ground loop. Be sure to have the amp and all sources plugged
into the same outlet if possible. If this fails to cure the hum, call customer
service at Rogue Audio for further advice 570-992-9901.
Unit does not turn on
Check that the power cord connection is secure and that the rear power switch
is turned on
Turn off the main power switch on the rear of the RP-5. Wait one minute then
turn the rear panel switch back on. Wait 30 seconds then press the power
button on the front panel (e.g. reboot).
Unit does not play
Check that the interconnects are connected to the proper input or output.
Check that the interconnects are connected securely.
Processor button is pushed in with no processor or with the processor turned
off.
Tape monitor button is pushed in with no signal.
One channel does not play
Check that the balance pot is centered.
Check that the tubes are seated correctly and securely
For further problems, please call Rogue Audio Technical Support at 570-992-9901.
OWNER AND WARRANTY REGISTRATION FORM
Included with this manual is an Owner and Warranty Registration Form. Please
take a minute to fill out this card and return it to Rogue Audio. This card must be
returned within 30 days of purchase to validate the warranty.

11
FUSE VALUES
One 1.25 A slow Blow Type Fuse located on left rear of main circuit board
RP-5 SPECIFICATIONS
Tube Complement Four 12AU7/ECC82 tubes
Frequency Response 1Hz – 100KHz +/- 1dB
THD <0.1%
Gain 10dB
Rated Output 1V RMS
Output Impedance 500 Ohms
Maximum Output 27 V rms
Phono Gain 40dB, 45dB, 50 dB, 60 dB
Main Unit Dimensions 18.5” W x 17” D x 4.5” H
Weight 30 Lb
Shipping Weight 45 Lb
Power Requirements 115/230V – 50/60Hz

12
LIMITED WARRANTY
Warranty Period
This product has been manufactured under the highest standards of quality and workmanship. Rogue Audio
Inc. (hereinafter “Rogue Audio”) warrants this product against defects in material or workmanship as
follows:
With the exception of vacuum tubes, Rogue Audio warrants to the original purchaser of this product all
parts of this product against defects in material and workmanship for a period of three years from the date of
retail purchase. Rogue Audio warrants the vacuum tubes for a period of six months from the date of retail
purchase. Any defective parts will be replaced free of charge, excluding shipping and handling.
Proof of purchase in the form of a bill of sale or recited invoice which indicates that the product is within
the warranty period must be presented to obtain warranty service. Rogue Audio suggests that the purchaser
retain the dealer’s bill of sale as evidence of the date of retail purchase.
What’s Not Covered
This warranty does not cover cosmetic damage or any damage that results from product misuse, product
abuse, installation error, connection to an improper voltage supply, accident, improper maintenance,
alterations, modifications not authorized in writing by Rogue Audio, lightening, power surges, or acts of God.
Use of any other than Rogue Audio factory parts may void this warranty.
This warranty does not cover the cost of parts and labor which would be otherwise provided without charge
under this warranty, obtained from any source other than Rogue Audio.
This warranty applies only to consumer use of this product and does not cover any product that is used in
any trade or business, or in an industrial or commercial application.
This warranty applies only to the original purchaser of this product when purchased from an
Authorized Rogue Audio dealer.
This warranty is valid only in the United States.
YOUR RIGHTS
ROGUE AUDIO LIMITS ITS OBLIGATIONS UNDER ANY IMPLIED WARRANTIES UNDER STATE
LAWS TO A PERIOD NOT TO EXCEED THE WARRANTY PERIOD. SOME STATES DO NOT
ALLOW LIMITATIONS ON HOW LONG AN IMPLIED WARRANTY LASTS, AND SOME STATES
DO NOT ALLOW THE EXCLUSION OR LIMITATION OF INCIDENTAL OR CONSEQUENTIAL
DAMAGES, SO THE ABOVE LIMITATIONS OR EXCLUSIONS MAY NOT APPLY TO YOU. THIS
WARRANTY GIVES YOU SPECIFIC LEGAL RIGHTS, AND YOU MAY HAVE OTHER
RIGHTS WHICH MAY VARY FROM STATE TO STATE.
To Obtain Service
To obtain service, you must contact Rogue Audio and obtain a return authorization number. The product
must be delivered to Rogue Audio in its original packaging prepaid at the following address:
Rogue Audio Inc.
3 Marian Lane
Brodheadsville, PA 18322