Embed Size (px)
Citation preview
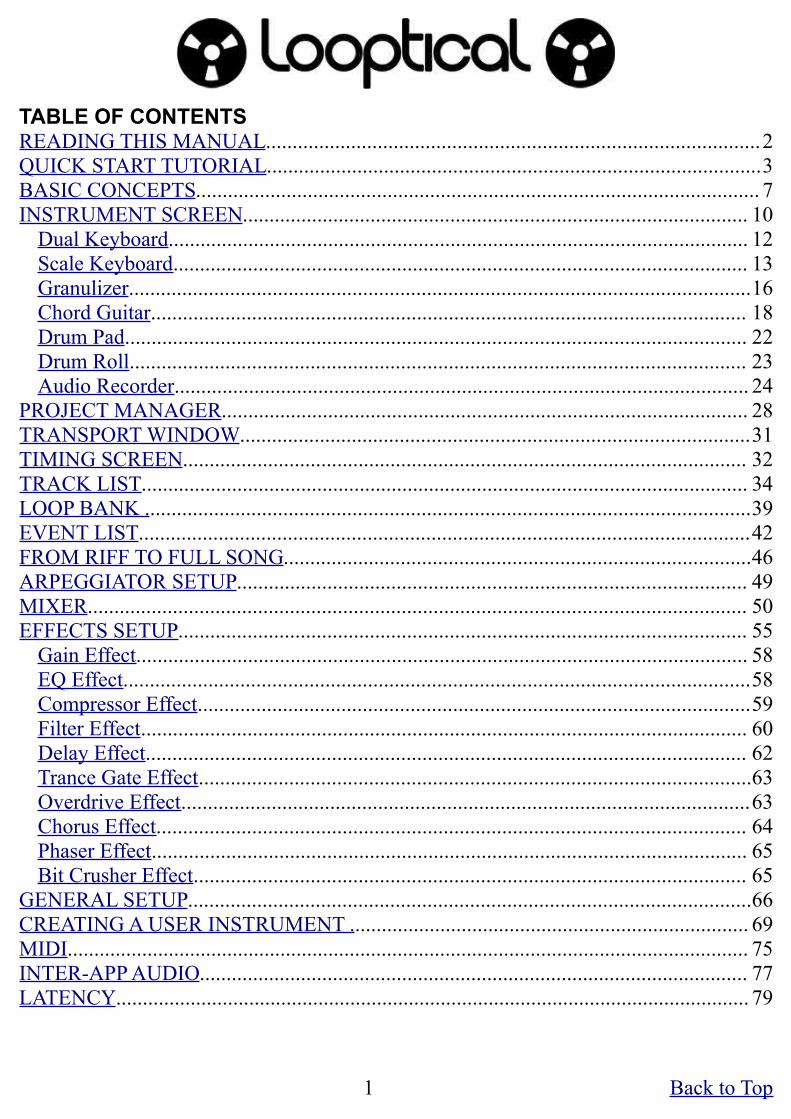
TABLE OF CONTENTSREADING THIS MANUAL.............................................................................................2QUICK START TUTORIAL.............................................................................................3BASIC CONCEPTS.......................................................................................................... 7INSTRUMENT SCREEN............................................................................................... 10
Dual Keyboard............................................................................................................. 12Scale Keyboard............................................................................................................ 13Granulizer.....................................................................................................................16Chord Guitar................................................................................................................ 18Drum Pad..................................................................................................................... 22Drum Roll.................................................................................................................... 23Audio Recorder............................................................................................................ 24
PROJECT MANAGER................................................................................................... 28TRANSPORT WINDOW................................................................................................31TIMING SCREEN.......................................................................................................... 32TRACK LIST.................................................................................................................. 34LOOP BANK ..................................................................................................................39EVENT LIST...................................................................................................................42FROM RIFF TO FULL SONG........................................................................................46ARPEGGIATOR SETUP................................................................................................ 49MIXER............................................................................................................................ 50EFFECTS SETUP........................................................................................................... 55
Gain Effect................................................................................................................... 58EQ Effect......................................................................................................................58Compressor Effect........................................................................................................59Filter Effect.................................................................................................................. 60Delay Effect................................................................................................................. 62Trance Gate Effect........................................................................................................63Overdrive Effect...........................................................................................................63Chorus Effect............................................................................................................... 64Phaser Effect................................................................................................................ 65Bit Crusher Effect........................................................................................................ 65
GENERAL SETUP..........................................................................................................66CREATING A USER INSTRUMENT ........................................................................... 69MIDI................................................................................................................................ 75INTER-APP AUDIO....................................................................................................... 77LATENCY....................................................................................................................... 79
1 Back to Top

READING THIS MANUAL
For your convenience, this manual can be viewed in a number of ways:-
1) Within Looptical via the icon in the Instrument Menu.
2) On an external device such as a PC or Mac, by tapping on the icon in the
Manual screen. This will export the manual as a PDF to the iTunes Shared Folder on your iPad from where you can export it to your PC / Mac.
3) With an installed PDF reader such as iBooks, by tapping on the icon in the Manual screen. This will allow you to have the manual and Looptical open at the same time, and switch from one to the other via the task bar.
[Nb: When reading PDFs in Landscape Mode in iBooks, swipe left and right to turn a page. Each page will appear zoomed fully out, so double tap to fill the screen]
2 Back to Top

QUICK START TUTORIAL
1) Creating a new project
• Tap the Menu Button to bring up the Instrument Menu and tap to bring
up the Project Manager.
• Tap to create a new project, then tap and name your song something
memorable. Leave “Locked” set to “No”. Tap OK. • Tap the outside the dialog to close it and you will see the Instrument Screen for the
current track.• New songs have a single piano track by default, but we will change it to a drum
kit. Tap the word "Piano" at the top right of the screen to bring up the Track List.• Tap REMOVE to remove the Piano track, and tap OK.• Tap ADD, tap DRUMS, and tap a row to select a drum kit. You can drag the
scrolling window to reveal more instrument. Audition the drum kit by repeatedly tapping AUDITION. Then tap LOAD when you have found one you like.
• Tap outside the Track List dialog to close it.• Instead of the piano keyboard, you will now see the Drum Pad interface, which is
the default interface for our chosen drum instrument. Press a few drum pads to get a feel for it.
2) Recording a drum beat
• Tap the circular Record button . It lights up to show that we are in Record Mode.
• A metronome will play, and the Transport Display counts in 4..3..2..1, and then shows you the current bar and beat in the bar.
• Press some drum pads to record them. Notice that we loop endlessly round the same single bar, allowing you to build up the rhythm bit by bit.
• If you make a mistake, you can edit out notes on the fly by changing to Delete Mode . When in Delete mode, hold down a pad momentarily to delete that note from the Loop.
• The third mode, Play Mode plays back the current Loop allowing you to audition it, and also practice any overdubs before recording. Building up a Loop involves regularly changing to Play mode, testing out an additional overdub riff, switching to Record mode and recording it, and deleting any mistakes with the Delete mode. To stop the Loop playback and enter Stop Mode, tap the currently lit mode icon (eg. Play).
3 Back to Top

3) Adding a bassline
• Now we have a drumbeat, we are going to overdub a new instrument.• Tap the name of the current instrument in the top right of the screen to bring up the
Track List.• Tap ADD, SYNTH BASS, and select an appropriate bass sound. Tap LOAD.• Select you new bass track in the Track List, and tap outside the dialog to close.• You will see the Dual Keyboard interface. Above the familiar piano keys is the
Navigation Bar which shows an overview of the entire 10.5 octave range (128 notes) of the keyboard. Tap in the overview to jump to a new octave, or scroll the keys by dragging. To lock scrolling and allow glissando, tap the padlock button. The < and > buttons move up and down an octave.
• We are now going to overdub a bassline onto the drumbeat.• Tap the Record button, and once the Count In has finished and you hear your
drumbeat, record your bassline over the top.• If your overdub really goes wrong then you can erase all the notes you recorded
since you last tapped the Record button by bringing up the Menu and tapping UNDO. During the process of creating a loop, you will find that you often switch from Record mode to Play mode and back as you are happy with an overdub, allowing you to Undo just the most recently recorded notes.
4) Repeating the Loop
• We now have a 1 bar loop. We'll repeat it a few times into a longer loop.
• Tap the Menu Button to bring up the Instrument Menu, and tap to open the
Loop Bank. This is a collection of all the Loops in the current project, represented visually as audio tape reels in a rack. You will see that we have our first Loop in there, called by default "A LOOP".
• Tap on the word "A LOOP" and rename it to "Bassline", and tap “Done” to finish.• We want to repeat this 1 bar Loop a number of times, but we also might want to
use the 1 bar Loop again in the future , so tap DUPLICATE to duplicate the Loop. A new loop appears called "Bassline (copy)". Tap on that and rename it "Verse".
• Now tap REPEAT to repeat the Loop. Leave it at 4 repeats, and tap OK.• We have now repeated our 1 bar loop 4 times to form a new 4 bar loop.• Tap outside the dialog to go back to the piano screen and tap the Play Button and
you will notice that the Transport screen cycles round our 4 bar loop, even if the four bars all sound the same at the moment.
4 Back to Top

5) Modifying the Verse
• Experiment with Record Mode at overdubbing a new riff over the top of the new loop with the Synth Bass instrument.
• Bring up the Track List, go back to your drum instrument, and try not only adding new drums (perhaps a Crash at the start of the loop, or a fill at the end), but also erasing the odd drum hit with Delete Mode.
6) Creating a song
• Using the Menu Button, go back to the Loop Bank and tap NEW to create a new Loop.
• Rename the loop “Chorus” and repeat the process earlier to build up this loop into another 4 bar Loop. This time don't bother to DUPLICATE the loop, just REPEAT the original 1 bar into a 4 bar loop.
• You now have four Loops in the Loop Bank:◦ Bassline (The initial 1 bar)◦ Verse (The 4 bar verse built from Bassline)◦ Chorus (The new 4 bar chorus)
• Let's start building a song. This is done by selecting our pre-recorded loops and combining them to form a larger loop, or song.
• The song needs to start with a Loop, and in our case we will start with the Verse. Select the Verse loop, and DUPLICATE it. We are going to be modifying this Loop and may in the future want our Verse Loop again. Rename the new loop "Song".
• Now tap APPEND, and select Chorus from the loop list, and OK.• The bars from Chorus are added to the end of the Song loop which now becomes
an 8 bar loop.• APPEND another Verse and then another Chorus onto Song.• We now have a 16 bar Song comprising verse-chorus-verse-chorus.• Press the Back Button and we can again overdub and modify the notes in the Song
Loop. Maybe add more drum fills, or modify our bass line in places.• We could also add a third track, perhaps a Lead Synth or Guitar, and overdub a 16
bar riff over the top.• As we will see later, we can also strip out tracks from the loop to break it down
into component parts and combine further.• In this way we can build up the song from the loop building blocks we have
already created.
5 Back to Top

7) Mixing the song
• From the Instrument Screen, tap the Menu Button, and tap .
• The Mixer shows a stereo channel for each track, in 4 banks of 6, together with a stereo master channel.
• Tap the Play button at the top right and manipulate the volume sliders to obtain a good mix.
• Above the volume sliders are various smaller controls. For now, experiment with muting tracks with the M button, and panning the sound with the Pan knob.
• When you are satisfied, tap the Back Button.
8) Saving the song
• From the Instrument Screen, tap the Menu Button, and PROJECTS.• Your song is automatically saved when you enter this screen, and also at various
other points in the application such as modifying instruments or closing the app.• If you want to create a backup or "version" of the song, use the DUPLICATE
button.• You can EXPORT the song as a MIDI file, or Audio file, and even email the
project file to someone to collaborate on your song.
Have a go creating your own loop riffs. There is a further tutorial on using the Loop Bank and Event List to combing loops into a full song here.
6 Back to Top

BASIC CONCEPTS
THE LOOP
In Looptical, a Loop is a number of bars of music. This can be a simple 1 bar drumbeat, an 8 bar chorus, or even a 999 bar concerto. Although you are free to create a single large Loop and record your song straight into it, song-creation in Looptical typically involves creating various smaller Loops and then combining them into larger Loops, perhaps overdubbing the result, until you form a final Loop that is the length of the song.
You create a loop by recording and overdubbing instrument tracks onto it and then splice the Loop at the end or insert it into the middle of another. You can merge (bounce) multiple loops together, and trim out unwanted bars from a Loop. And every loop can be modified by overdubbing new notes and erasing old ones.
As a practical example, you could create a 1 bar Loop, record a drumbeat onto it, then repeat that Loop up to 4 bars and overdub a bass guitar, repeat it twice to 8 bars and overdub a rhythm guitar, rename the Loop "Verse", and then append on the end another 4 bar Loop you created previously called "Chorus". You now have a 12 bar start to your new song including the first verse and chorus, without having to record every single note or painstakingly selecting and dragging tiny boxes about on a sequencer piano-roll.
TRACKS
There are three types of tracks in Looptical: Keys, Pads, or Audio.
KEYS are musical instruments (pianos, synths, guitars) that are mapped to a piano keyboard. The full MIDI range of 128 notes are playable, but many instruments will be mapped to a smaller central range. Keyboard instruments can use pitch-bending functions such as Note Bending, Portamento, or the Pitch Wheel.
PADS are generally single hit (drum) instruments that are mapped to 12 drum pads. They cannot be pitch-bent.
AUDIO tracks are streamed audio recorded via an external or internal microphone for the duration of the loop. This can be used to add a real guitar solo, or vocals, to an existing song sequence. You can also record audio from other apps running on your iPad via Audiobus or Inter-App Audio.
Tracks are added, removed, and reordered via the Track List.
7 Back to Top

SYSTEM RESOURCES
Looptical allows you to create very complex songs with many thousands of notes playing on multiple instruments built on large samples and outputting through multiple effects units. There is, however, a finite resource available to play back your song, and you the user are responsible for how much of that resource you use.
1) MemoryThe iPad has a fixed amount of memory that is used by running apps. It is not the same as “Storage Capacity” that is used to store your apps. When the currently running apps uses most of this memory up, the operating system notifies the running apps that they need to cut down on their memory usage, and if they fail to do so it ultimately forces them to close. Apps running in the background are usually closed first, but it is possible for the foreground app to be forced to close, which often appears to the user that the app has "crashed".
Available memory is dependant on the model of iOS device you are running the app on, and what OS version you have installed. The actual memory that a foreground app has available is also dependant on what apps there are running in the background, which is why some developers suggest that a reboot is performed prior to running their app, ensuring that their app has the maximum possible memory. We would only suggest this for Looptical as a last resort if it becomes impossible to play songs without the app closing. There is no way for a program to determine how much memory is available, so apps are designed to use enough memory to perform their function, but not enough that triggers a memory warning. However, the open-ended nature of Looptical means you free to try to use as much memory as you wish, by adding more tracks,or adding large samples to instruments. You are also therefore responsible for this memory usage.
The first you will know of a problem is when a dialog box appears saying “Low Memory Warning”, which should trigger you to reduce the memory usage of the project, close some background apps, or even reboot. You might consider removing some of your tracks, or if that is not possible editing your instruments and removing unwanted samples. If you only use a couple of drum sounds in a drum instrument then you could delete the samples from the other pads and save some memory. You might want to combine a number of your favourite drum hits into your own kit. For keyboard-based instruments, you might not need the full musical range of the keyboard for your song, and so could delete the unused samples. Although samples make up the majority of used memory, notes also take up space. You might want to tidy up your Loop Bank if you have many copies of very large loops.
The Track List screen shows the current memory usage and the Add Track list shows the memory each instrument will use if loaded.
8 Back to Top

The General Setup screen allows you to set the Maximum Song Memory, which is really just a guide to let you know your song is getting large. If you try to load a new instrument and it will take the total used memory over the Maximum Song Memory then Looptical will refuse to load the instrument. You can change this to suit your own device setup and usage level of the app, reducing it if you start experiencing memory warnings.
Audio Tracks are streamed directly from Storage and so use very little memory. A song can contain multiple audio tracks up to 999 bars long.
2) Song ComplexityTo ensure smooth playback of audio, the processor must render the audio in a timely fashion. The more effects you add, and to a lesser extent the more simultaneous notes you add, the more time it will take to render, and drop-outs or glitches can occur.
To monitor this, the Mixer screen has a CPU Usage bar. If you start to experience glitching or this bar is almost full, you should consider removing some effects. You could also increase the Latency in General Setup, which reduces the load on the processor. And you can change the polyphony of individual instruments, or the song as a whole. But in general it is the effects that require the most processing, and so it is there you should look first.
You might also consider Bouncing Down a track or a number of tracks into a new Audio track, thus “baking in” the effects. Once you have done this, you can erase the notes of those tracks from the current loop, which will reduce the processing required since the silent tracks will not trigger their effects. If you keep the original loop, you can always go back to edit the MIDI notes at a later date.
3) Background Audio"Background Audio" allows a music app to run in the background, while another app is showing on the screen. This is increasingly used to play and mix multiple audio apps at once, particularly when using AudioBus / Inter-App Audio. Enabling Background Audio means that the audio engine continues to run when the app is closed, and the current song remains loaded in memory. Because background apps are using both memory and CPU, the effect of this on Looptical would be that larger songs may not load, and song playback may start to see glitches. We suggest that you be aware of what music apps you have enabled background audio, and close any that are not needed. You can enable background audio in Looptical in General Setup, and again you should only do this when you actually need the app to be running in the background or you will be needlessly preventing other apps from using those resources.
9 Back to Top

INSTRUMENT SCREEN
The main screen in Looptical is the Instrument Screen, from where you record and overdub the current Loop.
Instrument Top Bar
There are a number of different interfaces for controlling instruments, but they all share the same controls at the top of the screen, which we call the Instrument Top Bar.
The Menu Button can be tapped to bring up the Instrument Menu. Press it again to dismiss the menu.
The Transport Display shows the current bar in the loop and beat in the bar. A black bar gives a visual indication on the position in the current loop. Tap on
this area to bring up the Transport Window.
It also shows the current tempo and quantization setting . Tap here to bring up the Timing Screen.
In the centre of the screen are the Play Mode buttons (play, record, delete).
There are four states of play mode:• STOP All buttons are unlit. The loop is not playing.• PLAY Play button lit. Loop is playing and you can practice overdubs
without recording them.• RECORD Record button lit. Any played notes will be recorded into the l
oop.• DELETE Delete button lit. Any notes held down will be removed from the
10 Back to Top

loop at the current point in the song. Use this to surgically remove unwanted notes.
To change play mode, press one of these buttons. Press a lit button again to go back to Stop mode.
The Restart Loop button allows you to instantly jump back to the start of the loop.
The Track Name Display shows the name of the current track for reference. Tap here to bring up the Track List to change instrument or add new tracks.
The Undo Button allows you to undo the notes/events recorded in the last overdub.
Instrument Menu
This is accessible via the Menu Button and allows you to access the various other screens in the application. Tap the Menu Button again to dismiss the menu.
MIXER Go to the Mixer.LOOPS Go to the Loop Bank.EVENTS Go to the Event List.INTERFACE Change the current track interface.SETUP (track) Settings for the current track interface.SETUP (general) General Application Settings.AUDIO Audio Track operations.ARP Go to Arpeggiator Settings.PROJECTS Go to the Project Manager.HELP Display instruction manual.
11 Back to Top

INSTRUMENT INTERFACES
Under the Instrument Top Bar you will find various controls depending on the track type (Key, Pad, Audio) and the current Interface. Each instrument track has a number of different interfaces that can be used to enter notes, providing alternative methods for composition. Key instruments can display dual piano keyboards, a Scale Keyboard, Chord Guitar or Granulizer. Pad instruments can display Drum Pads or a Drum Roll interface. You can select the interface from the Instrument Menu by tapping the INTERFACE icon.
Dual Keyboard
Above the piano keyboard is the Navigation Bar. This gives an overview of the 10.5 octaves (128 notes) in the keyboard range. Tap in the overview to jump to that octave.
• Locks the scrolling so that you can play glissandos. You can still scroll the window via the Nav Bar overview while locked.
• Jumps the window onto the piano keys one octave lower.
• Jumps it one octave higher.
• Links the scrolling of the keyboards. In linked mode, the upper keyboard cannot be moved and will automatically be set to a position just to the right of the lower keyboard, giving maximum contiguous range.
12 Back to Top

There are various settings for the Dual Keyboard which can be found in the Track Setup Dialog under .
• NUM KEYS - The number of white keys to display. • WHEEL MODE - OFF – No wheel control.
PITCH – Wheel controls pitch.MOD – Wheel controls modulation.VELOCITY – Wheel controls note velocity.VOLUME – Wheel controls track volume.FILTER – Wheel controls filter cutoff.
(requires filter effect to be assigned to track)• WHEEL RANGE - Number of notes that pitch wheel will bend.• TRANSPOSE - Live transpose on notes as they are recorded.
Scale Keyboard
The Scale Keyboard displays only the notes on the chosen scale and key.A user-defined number of octaves is displayed, with a darker root note and octave number.
Use and to navigate to higher and lower octaves.
Tap the Scale Button (here displaying “Blues (Pentatonic)” ) to display the Select Scale window.Tap on a Key to set the key to play your scale in.Select Scale Window
13 Back to Top

Here you choose the scale for the Scale Keyboard by dragging the scroll box up and down and tapping a scale to select it. User-defined scales will appear at the top of the list, and when selected an ERASE button will be shown. Tap that to erase the selected scale. Scales are stored independently of songs and only used to enter notes, so you can erase unwanted scales without affecting the songs that they created.
The NEW button brings up the New Scale window. Whatever scale you have selected at the time will form the initial basis for the new scale, allowing you to modify an existing scale.
Press to go back to the scale playback window.
New Scale Window
Here you can create a new scale.
The boxes refer to the octave of notes relative to C, labelled here as “P1”, with the lower row being the white notes C..B and the upper row being the black notes C# to A#. Tap a note to toggle it into (dark) or out of (light) the current scale. P1 is the root note in the scale and cannot be deselected.
Tapping will take you back to the Select Scale Window.Tap SAVE to save your new user scale.
The settings for this interface are in the Instrument Menu under TRACK SETUP .
14 Back to Top

• NUM OCTAVES - The number of octaves to display.
• WHEEL MODE - Pitch wheel mode.OFF – No wheel displayed.PITCH – Wheel controls pitch.MOD – Wheel controls modulation.VELOCITY – Wheel controls note velocity.VOLUME – Wheel controls track volume.FILTER – Wheel controls filter cutoff.
(Requires filter effect to be assigned to track)
• WHEEL RANGE - Number of notes that pitch wheel will bend.
• VERTICAL - The effect of vertical movement on the screen.OFF – No effect.VOLUME – Controls track volume.VELOCITY – Controls note velocity.MOD – Controls modulation.FILTER – Controls filter cutoff.
(Requires filter effect to be assigned to track)FILT / VOL - Both filter cutoff and volume.
15 Back to Top

Granulizer
The Granulizer is a specialized instrument interface allowing you to add special effects to your song using a simplified form of granular synthesis. Instead of playing the sample back in one go, it plays back a tiny looped section of the sample. By changing the pitch of that looped sample, and the position on the larger sample waveform, you can effect both the pitch and playback speed in interesting ways. Granular synths typically use hundreds of simultaneous grains (samples) to achieve a blended effect, but this uses a lot of processor time and so reduces polyphony. For Looptical we compromise with a single grain per track. Where this works best is with a sample with a lot of variation over time, and in particular a sung or spoken vocal. Because of the specialist and somewhat strange use of the Granulizer, we chose to give it the look of a home-brew electronics project built out of spare parts.
The Granulizer is only available for keyboard-based instruments, and it uses the sample assigned to C2.
The largest feature of the Granulizer is the screen which gives a representation of the sample together with the playback point and pitch. You can move both of these about by dragging or tapping.
The switch starts the sample, and depending on the Interface Setup also stops it.
The slider sets the speed that the grain travels through the sample. With 1 being normal speed, 2 being twice as fast, and 0 being no movement. You can even make the playback speed negative to play the sample backwards.
16 Back to Top

The settings for this interface are found in the Instrument Menu under TRACK SETUP.
• VERTICAL - Effect of vertical movement on the screen.PITCH - Changes grain pitch.NONE – No effect.
• LOOP MODE - Pitch wheel mode. REPEAT - Loop back to the start at end of the sample
playing. PLAY ONCE - Stop when end is reached.
• MOVEMENT - Horizontal movementABSOLUTE - The playback pointer is moved to the
touched location. RELATIVE - You can drag the pointer about.
• PLAY FROM - CURRENT - Play from current position.- START - Play from start of sample.
• BUTTON - HOLD - Playback occurs while play button is held.- TOGGLE – Play button toggles on/off.
17 Back to Top

Chord Guitar
The Chord Guitar allows you to strum guitar chords. Although this makes most sense with a guitar instrument, very interesting effects can be achieved by playing guitar chords with other instrument types such as pianos and synths.
The screen is split into two sections. The upper section shows the current Chord Palette for the song, and the lower section the Strumming Area.
To keep with the guitar motif we represent the Chord Palette as a fretboard where the strings have been removed and replaced by chord names. Tap on a chord to select it and “fret it up” in the Strumming Area. The palette contains two rows for a total of 14 chords.
To the left of the Chord Palette a button can be pressed to palm mute the playing strings. In the Chord Guitar, plucking a string starts a note playing, and it will only stop when that string is played again, or the palm mute is pressed. Note that the Palm Mute tells the playing notes to stop according to the ADSR settings of the instrument. If you wish the mute to happen quicker then change the Release setting in the ADSR dialog.
Under the palette lies the Strumming Area. Tap or slide over the strings at the bottom to play at full velocity, and higher up for a reduced velocity. For reference the fret for each string is shown, with “X” meaning that the string is not part of the chord and will not make a sound when tapped.
18 Back to Top

The settings for this interface are found in the Instrument Menu under TRACK SETUP.
• EDIT CHORDS - Show the Chord Editor.
• AUTO PALM MUTE- Toggle whether you automatically palm mute whenyou lift up your finger from a strum.
• OCTAVE OFFSET - Allows you to set which octave to position the low E note in. Useful if you are playing a non-guitar instrument with a different range.
• LEFT HANDED - Set ON for left-handed mode. In this mode the guitar is stringed EBGDAE instead of EADGBE. Preset chords are also reversed so that an E chord 022100 becomes 001220. Chords are strummed with the left hand from right to left. Set to OFF for right-handed mode.
19 Back to Top

Chord Editor
This allows you to edit the chords in the chord palette. Tap an entry in the palette (which can be currently blank) and the lower area of the screen displays the chord.
There are three types of chords:-BLANK - No chord displayed.PRESET - One of a large number of named preset chords.USER - User defines the frets and name of the chord.
Tap BLANK, PRESET, or USER to change the chord to this type.
Use and to move the selected chord about the palette and organise it to suit your song.
For Preset chords, two horizontal scroll-boxes are displayed, one with the key and the other with the chord type. Use these to change the current chord. At the bottom of the screen is a small Strumming Area where you can audition the chord. The name of the chords is fixed, but you can modify the name displayed in the chord palette by first selecting a preset chord, and then tapping USER to change it to a User chord, whereupon you can rename it.
20 Back to Top

For User chords, the Strumming Area is shown with arrows to move each string fret up or down. Pressing down when on fret 0 (ie. the open string) displays an “X” (string not played). Above the arrows is a text box where you can change the name of the chord.
21 Back to Top

Drum Pad
This is the standard interface for Pad (drum) instruments. A Pad instrument has 12 samples, each assigned to a drum pad.
Apart from the reduced number of samples from Key instruments (which can contain up to 128 samples), the main difference for Pad instruments is that they cannot be pitch shifted, and so there is no Pitch Bend wheel available. If you need to have pitch-bending for a particular drum track, or require more than 12 drum sounds in a track, you can create a new user-defined Key instrument with those samples, and play the drums by tapping on the keys in the Dual Keyboard Interface.
Pad instruments also allow you to set up Mute Groups and alter the volume of individual samples. (See Creating a User Instrument).
The settings for this interface are found in the Instrument Menu under TRACK SETUP.
• WHEEL MODE - Pitch wheel mode.OFF – No pitch wheel.VELOCITY – Wheel controls note velocity.VOLUME – Wheel controls track volume.FILTER – Wheel controls filter cutoff.
(Requires filter effect to be assigned to track)• VELOCITY - Determine velocity based on where the pad is hit.
OFF - No change.HORIZONTAL - Velocity increases from left to right.
(Nb: The Velocity slider can be used in addition to Pad velocity for additionalcontrol.)
22 Back to Top

Drum Roll
An alternative interface for pad (drum) instruments, used to play rhythmical drum hits such as drum rolls, or a 16 step hi-hat riff. There are 5 pads, each triggering drum hits while being held to occur at repeating intervals of:
• 1/2 note• 1/4 note• 1/8 note• 1/16 note• 1/32 note
Each pad therefore plays drum hits at twice the frequency of the one to its left. Vertical position on the pad determines velocity. Running a finger round between two pads in a circle therefore both changes velocity and also alternates between the two frequencies, for interesting effect.
Above the pads the current drum sound is shown, with a small representation of the original pad layout for reference. Use the arrow buttons to navigate around the drum sounds in the instrument.
23 Back to Top

Audio Recorder
Audio Tracks in Looptical are audio files streamed directly from iPad Storage. Because very little of the potentially long sample is stored in memory at any one time, they use little of your total song memory. An Audio Track can contain many layers of notes that would otherwise have to be processed and mixed individually. Audio Tracks can also contain audio from an external source such as a guitar or vocal, or from other audio applications running on your iPad via AudioBus or Inter-App Audio.
The Audio Recorder has a built-in gain stage acting like a simple pre-amp. Use the GAIN dial to increase the gain of the incoming audio with 0dB meaning no change. You can set the range of this dial with the RANGE button, toggling between:-
0db to +6dB 0db to +12dB 0db to +24dB
The meter shown you the level of post-gain audio, and you should try to keep this out of the red area above 0dB. A Clip LED will illuminate should the level rise above 0dB.
The OVERDUB button allows you to toggle recording mode from Overdub (LED lit) to Overwrite (LED not lit). Overdubbing audio will merge the new audio recording with the current audio track, whereas Overwriting will punch in from the moment you press Record and replace the current audio with the newly recorded audio.
The ON button allows you to disable the Audio Recorder input, but still hear playback of the current Audio Track. Useful to prevent feedback or unwanted monitoring noise.
You can also make use of the UNDO button just like when recording notes in the Dual Piano or Pads. If you make a mistake while overdubbing (or overwriting) audio, then you can simply UNDO to remove your overdub and go back to the recording.
24 Back to Top

The icon shows the current input path for audio.
For input via the internal microphone, the icon shows the word “MIC”. If you plug in an external audio interface such as the Apogee Jam, then the icon displays “EXT”.
If you connect up to Looptical via AudioBus then the AudioBus icon is displayed.
If you connect to an Inter-App Audio Instrument app (iOS7 only), then the icon for that app is shown.
Tap SELECT to to bring up the Select Audio Input dialog where you can connect to Inter-App Audio apps. See Inter-App Audio for more information.
The Sample Screen shows the current audio sample for the track. You can jump to a bar in the track quickly by trapping or dragging on the Sample Screen. When recording, a checked pattern will obscure the sample until recording stops and the newly recorded audio is merged with the current track.
In Looptical, only the currently selected track can record audio, and only when the Audio Recorder screen is visible. At other times you can monitor the audio input, but it will not be recorded.
The Instrument Menu has a SETUP icon under TRACK, which brings up the
Recorder Setup dialog with the following options:-
MONITOR - Tap to toggle ON/OFF. Monitored audio is send through the signal path and out through the headphones. Usually you will to have this set to ON. However, there may be situations where the latency from live audio (that you can hear from an external source) to the audio being monitored is sufficient to make it difficult to play on time, in which case turn monitoring off. You can continue to watch the VU meter to see the input level. To prevent unpleasant feedback, monitoring is disabled if you are receiving audio from the mic without using headphones. AudioBus users please be aware that monitoring is not disabled when using the iPad speaker. If you are routing an Audiobus app that obtains audio from the microphone to Looptical then you should either plug in headphones or manually disable monitoring before starting that app.
CHANNELS - Tap to cycle between options: STEREO - Record left and right channels as a stereo track.L+R MONO - Merge left and right channels into mono.LEFT ONLY - Record only the left channel.RIGHT ONLY - Record only the right channel.
25 Back to Top

You will usually want to keep this set to STEREO unless your audio interface has a specific setup, such as providing two separate mono inputs with, say, a guitar in the left channel and a mic in the right.
SOFT CLIP - Tap to enable a soft clip (soft limiter) when overdubbing audio. This will reduce distortion when you are overdubbing loud sounds (or repeatedly overdubbing the track) and the total merged signal becomes greater than 0dB, but will introduce colour to the sound.
NOISE GATE - Tap to toggle ON/OFF. A noise gate watches the level of audio and only opens (ie. Allows audio through) when that audio gets to a predefined level, so background noise is muted out during “silence”. Some audio inputs for the iPad (in particular ones that plug into the headphone socket rather than the connector) are prone to noise, and you can use the noise gate to mask this. The bar allows you to set the audio level, with leftmost being “all sound is allowed through” and rightmost being “only loud sounds are allowed through”. In general with good quality “Made for iPad (MFi)” audio interfaces, the noise levels should be so minor that you should not need to use the Noise Gate.
Also on the Instrument Menu is the AUDIO icon under TRACK, which brings up the following dialog to allow you to manipulate the audio-
From here we have the following options-
ERASE - Erase the audio track (in the current loop).
AMPLIFY - Amplify the audio track. When you select this, Looptical calculates the maximum amplification without clipping (Normalisation) and defaults to that. Gain (amplification) is shown in dB, so 0dB will give you 100% of the original volume, 6dB will give you 200% (twice as loud), and -6dB will be 50%. To Normalise the audio track, just click OK. To amplify to less than the maximum, edit the Gain to something between 0 and the value it shows. To amplify to more than the maximum, edit the Gain and make it large. This will, of course, introduce clipping, and you have the option of turning on Soft Clip (which works in the same way as the Soft Limiter). Because soft clipping colours the sound, you should only enable this if you wish to amplify the sample by more than the maximum calculated value.
26 Back to Top

BOUNCE - This will render the entire loop and “bounce it down” (ie. record it) onto the current audio track. If you wish to only bounce down a subset of tracks (perhaps even just one) then use the Solo and Mute buttons in the Mixer first to set up the loop. Once a loop is bounced, you are free to erase the notes from the tracks that were recorded, freeing CPU resources on playback.Some ideas on how you can use this functionality:-
- Bake in effects into a track and remove the old effects, freeing CPU time, or allowing you to layer more effects on the bounced track.
- Erase notes and power off the effects on the bounced tracks, freeing CPU time.Because MIDI tracks (Key or Pad tracks) are far easier to edit, it is useful to keep them around, and you should consider duplicating a loop prior to bouncing and erasing MIDI notes.
IMPORT - You can import audio into the audio track from two sources-- The pasteboard (ie. AudioCopy/Paste). This could be audio from another iPad
application that you previously copied from.- The iTunes Shared Folder. Files must be 44.1Khz 16bit wav files. Use iTunes
to copy files from a PC/Mac to the iTunes Shared Folder.
EXPORT - You can export audio to the following destinations-- The pasteboard (ie. AudioCopy/Paste). You could use this to copy an audio track
and paste it into another iPad application to manipulate it.- The iTunes Shared Folder.
27 Back to Top

PROJECT MANAGER
Access the Project Manager via the Instrument Menu .To load a project, either double tap on it, or tap to select and tap outside the dialog.
Your project is saved when you visit this screen, and at various other times such as whenever you close the app, or create a new instrument. In general you should not need to worry about saving the project you are working on, but at times you may want to save a backup or “version” of the project as you experiment with a new direction. To do this tap the DUPLICATE icon, which will copy the selected project into a new project. You can also use this method to create a new project based on an existing one, perhaps keeping the instruments and effects, but using the Loop Bank to erase the loops and start afresh. As with all computer programs, it is a good idea to occasionally make a backup of your project.
A padlock icon is shown against projects that have “Locked” set to “Yes” in the DETAILS dialog. This prevents the project from auto-saving, and is useful to lock a finished project to avoid any accidental changes to the controls while playing back. If you need to make further changes to a locked project, tap the DETAILS icon and change “Locked” to “No”. The padlock will now disappear.
To create a brand new project tap NEW.
To erase a project in the list, select it and tap ERASE.
To rename a project or lock/unlock it, select it and tap DETAILS.
Tap IMPORT to bring up the Import Dialog.
Tap EXPORT to bring up the Export Dialog.
Import Dialog
28 Back to Top

Use the Import Dialog to import various resources from the iTunes Shared Folder. PROJECT – Import a Looptical Project (*.prj) file.INSTRUMENT – Import a Looptical Instrument (*.ins) file into the project.MIDI – Import a MIDI (*.mid) file and use it to create a new project.
Within Looptical, you can export instruments, projects, and MIDI via email for use in other applications. You can also import those files into Looptical directly from the email by clicking on the file in the iPad Mail app, and selecting “Open In Looptical” from the list of applications.
Export Dialog
The Export Dialog allows you to export various resources.
PROJECT
Export the current Project file. It is a good idea to occasionally backup your project files by exporting them to another device.
• This can be exported to the iTunes Shared Folder.
• It can also be included as an attachment in an email.
AUDIO
Export the current loop as audio:
• This can be copied to the audio pasteboard (ie. Audio Copy) to be pasted eitherinto another app that supports Audio Copy/Paste (such as GarageBand) or back into Looptical as a sample for a drum pad or key in a user-instrument.
• It can also be exported to the iTunes Shared Folder.
◦ Low Quality – m4a file (AAC 32KHz 64Kbps)
◦ Medium Quality – m4a file (AAC 44.1KHz 128Kbps)
◦ High Quality – m4a file (AAC 44.1KHz 256Kbps)
◦ Max Quality – wav file (PCM 44.1KHz)
• It can also be exported as an email attachment at Medium Quality.
[nb: AAC compression always inserts a small silence (about 48ms) before and after the audio being compressed, referred to as "Encoder Delay". If you want to export a looped section of audio then you should use "Max Quality" (Wav) to avoid this]
MIDI
29 Back to Top

Export the current loop as a MIDI file:
– To the iTunes Shared Folder.
– As an attachment in an email.
Accessing the iTunes Shared Folder
The iTunes Shared Folder is the standard method of transferring files to and from the iPad to a PC. Please see the current iTunes help for more information on accessing the Shared Folder from your PC.
30 Back to Top

TRANSPORT WINDOW
Tapping on the bar (here “1.1”) in the Instrument Top Bar brings up the Transport Window, providing additional controls to navigate round the current loop.
It shows the same bar in the loop and beat in the bar. At the bottom is the same black bar showing position in the loop, which can be tapped to jump straight to that bar.
• - Jumps back to the start of the loop.
• - Goes back one bar.
• - Goes forward one bar.
• - Jumps to the end of the loop.
• - Toggles whether the loop repeats or plays through once only. This is mainly used when you have finished your song and are playing back your final loop.
• - Restart the current bar, useful for manually syncing to an external beat.
Tap outside the Transport window to close it.
31 Back to Top

TIMING SCREEN
Tapping on the current tempo (here ) in the Instrument Top Bar brings up the Timing Screen, allowing configuration of the project tempo, metronome, and quantization settings.
Tempo is fixed for a song, and changes cannot be recorded. Use the slider, or arrow buttons to change tempo. Tap the “TAP TIME” button in time to an external rhythm to manually sync temp. Tap RESTART to restart the current bar, useful if you are trying to manually sync a playing loop to an external rhythm.
The metronome plays when you are in Record Mode. You can disable it here, or reduce the volume. The actual sounds that the metronome uses are configurable in the System Settings dialog which you can reach via the Instrument Menu.
Recorded notes are automatically quantized according to the chosen quantization setting.
Quantization periods can be:• OFF• 1/1 Note to 1/64 Note• 1/4 Triplet to 1/32 Triplet Note• 1/8 Swing L (Light swing)• 1/8 Swing M (Medium swing)• 1/8 Swing T (Triplet swing. ie. 1/8Triplet with the second note absent) • 1/16 Swing L (Light swing)• 1/16 Swing M (Medium swing)• 1/16 Swing T (Triplet swing. ie. 1/16Triplet with the second note absent)
Humanize is used to add some randomness into the quantization. At full setting, a
32 Back to Top

random time of +/- 1/64 Note is added to each recorded note.You can also perform quantization with on recorded notes in the Event List, where you have additional Strength and Undo functionality. So where you want to retain more of the original timing and feel of the recording, set the live quantization in the Timing Screen to OFF, record your riff, and then quantize it manually in the Event List.
On the top bar of the screen at the right there is a Play button to play the current loop (tap it again when playing to stop) to aid you in syncing tempo. Next to that is a display with the current bar and total bars in current loop. Tap on that to bring up the Transport Window to navigate around the loop.
33 Back to Top

TRACK LIST
Tapping on the name of the instrument (here “Piano”) at the right of the Instrument Top Bar brings up the Track List.
In Looptical each track can either be a soft instrument (piano, guitar, drums...) or an audio track. There can be up to 24 tracks in a song. Tap a row to select that track. Scroll the track list by dragging it up or down. Tap on the arrows to move the selected track up or down in the list.
Tap DETAILS to show the Track Details Screen.
Tap REMOVE to remove a track from the project. This will also remove any notes associated with that track.
Tap ADD to add a new track.
A to the right of the track name signifies that the track soft instrument is user-created (as opposed to a preset) and will be stored within the project.
Adding a new trackTap ADD to add a new track and bring up the following screen-
Instruments in Looptical have been grouped together in categories. The AUDIO icon
34 Back to Top

allows you to add a new Audio Track. The “NEW INST” button allows you to create a new instrument (see Creating A User instrument).
Tap on a category to bring up a list of instruments for that category.
Here we clicked on the Synth Bass category. Tap a row to select that instrument. Scroll the list by dragging it up or down.
At the top right of the screen the current memory usage is displayed and instruments are displayed with their size. Use this to keep track of the size of your song as some instruments are many times larger than others. You can control the maximum amount of memory that a song can use, given your particular device and setup, in the General Setup Screen (Tap GENERAL SETUP in the Instrument Menu).
If there are any user-defined instruments in this category then they are shown at the top of the list and can be erased (ERASE) if not required any more. User-defined instruments are stored within any project using them but can also be exported and stored in an instrument category for the convenience of being able to import them into future projects. Because of this you can erase a user-defined instrument here without breaking any of your previous projects.
Tap AUDITION to audition the selected instrument.
Tap LOAD to load the selected instrument and create a new track.
35 Back to Top

Track Details Screen
Tapping on DETAILS in the Track List shows the following screen allowing configuration of the track and instrument.
To change the name of a track, tap in the Track Name text box. The track name is the name that appears in the Instrument Screen, the Event List and also the Mixer, so you may want to rename it to something more appropriate to the current song. In this case, we have loaded the “Acoustic Hihat 1” instrument, but named the track ”HiHats”.
The Instrument field shows the name of the instrument, which will remain the same even if you change the Track Name. Tapping on that text box will take you to the instrument category list you saw earlier and allow you to change the instrument for the track.
Tap the SOUNDS icon to edit the samples behind the instrument. (See Creating A User instrument). All the preset instruments can be tweaked and modified to form new user-defined instruments if required.
Tap the ADSR icon to show the ADSR Dialog.
Tap the POLYPHONY icon to show the Polyphony Dialog.
Tap the EXPORT icon to export the instrument. The instrument can be exported to a chosen category in the Instrument List (for easy use in future projects), or to the iTunes Shared Folder or Email for sharing and import into other installations of Looptical.
When exporting to the iTunes Shared Folder, you have the additional option to export a Zip file of the individual sound samples that make up the instrument, which can be used to create the same instrument in an external sampler.
36 Back to Top

ADSR Dialog
Here you can set the ADSR values for the instrument.ATTACK – How fast we fade in the sound.DECAY – How fast we reduce the volume to the sustain level after the attack part.SUSTAIN – The level the sound then plays at until release.RELEASE – How fast we fade out once the note stops.
Generally you will find yourself modifying the Release value most often to change a sound from having a punchy sound to a slower fade out. Adding a long Attack to a sound can turn it into a Pad instrument.
AUDITION auditions the sound and DEFAULT resets settings to a default level.
Polyphony DialogThis varies depending on whether the instrument is a Key or Pad.
For Pad instruments:
POLYPHONY sets the maximum number of notes that this instrument can play at once. If the maximum is reached and a new note is played, one of the currently playing notes will be ended. You can reduce this to ensure that a particular track does not use up all of the Total Polyphony (as set in the General Setup Screen).
For Key instruments:
PLAY STYLE allows you to swap from the standard GLISSANDO mode to PORTAMENTO or NOTE BEND.
37 Back to Top

With Glissando Mode, you play runs of notes and chords normally as if you were playing a piano.
Portamento Mode means that when a key is held and a second key is pressed, instead of playing both notes together, the first note is bent to the pitch of the second key. When the second key is released then the pitch of the note is bent back down to the pitch of the first key. This gives you a sound similar to a monophonic analogue synth, but it can also be used with other instruments (eg. Guitar) for interesting effect.
Note Bend Mode allows you to play chords normally, but when you press a key and slide your finger on the keyboard, instead of hearing a run of notes, the note you first pressed is bent to the key you move to. You can play a number of notes simultaneously and move a single finger to bend just one of the notes. Visually, the original key you pressed is still shown as pressed, but as you move your finger a red dot follows it to indicate the note that you are bending to.
GLIDE TIME is used to set the speed that both Portamento and Note Bends move from the previous pitch to the new one. Set a small value to create a fast-tracking instrument, and a large value to create a slower one.
38 Back to Top
LOOP BANK
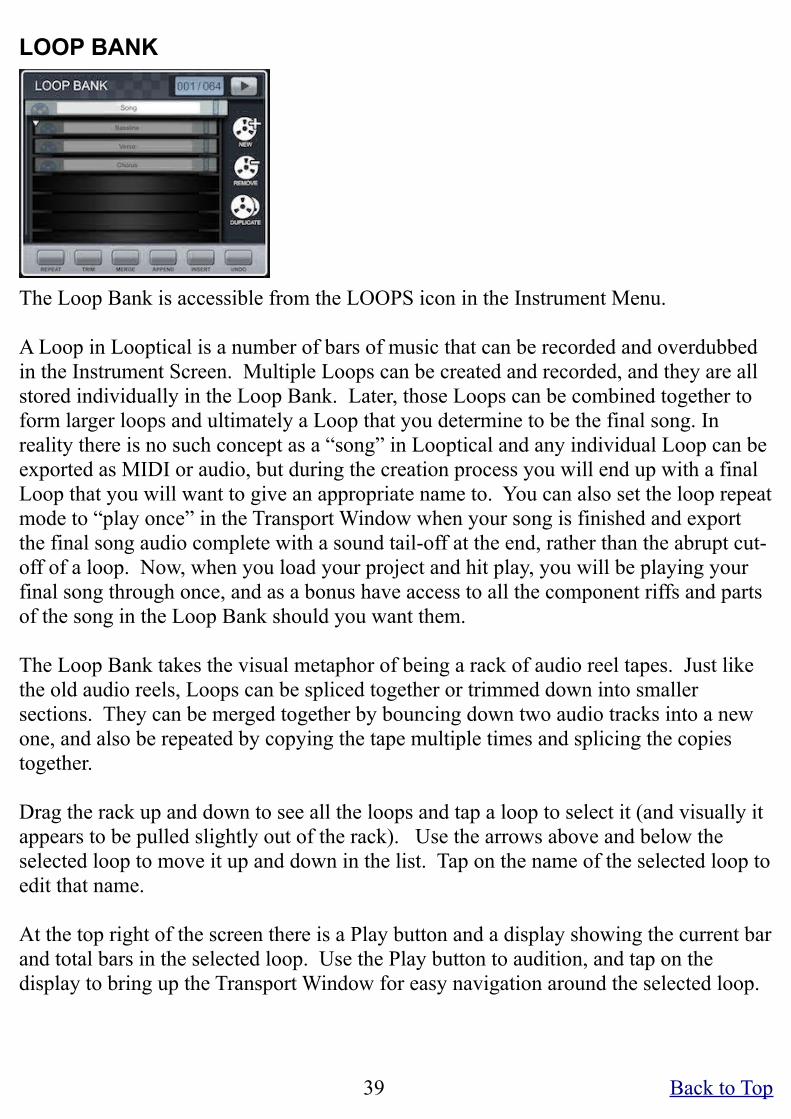
The Loop Bank is accessible from the LOOPS icon in the Instrument Menu.
A Loop in Looptical is a number of bars of music that can be recorded and overdubbed in the Instrument Screen. Multiple Loops can be created and recorded, and they are all stored individually in the Loop Bank. Later, those Loops can be combined together to form larger loops and ultimately a Loop that you determine to be the final song. In reality there is no such concept as a “song” in Looptical and any individual Loop can be exported as MIDI or audio, but during the creation process you will end up with a final Loop that you will want to give an appropriate name to. You can also set the loop repeat mode to “play once” in the Transport Window when your song is finished and export the final song audio complete with a sound tail-off at the end, rather than the abrupt cut-off of a loop. Now, when you load your project and hit play, you will be playing your final song through once, and as a bonus have access to all the component riffs and parts of the song in the Loop Bank should you want them.
The Loop Bank takes the visual metaphor of being a rack of audio reel tapes. Just like the old audio reels, Loops can be spliced together or trimmed down into smaller sections. They can be merged together by bouncing down two audio tracks into a new one, and also be repeated by copying the tape multiple times and splicing the copies together.
Drag the rack up and down to see all the loops and tap a loop to select it (and visually it appears to be pulled slightly out of the rack). Use the arrows above and below the selected loop to move it up and down in the list. Tap on the name of the selected loop to edit that name.
At the top right of the screen there is a Play button and a display showing the current bar and total bars in the selected loop. Use the Play button to audition, and tap on the display to bring up the Transport Window for easy navigation around the selected loop.
39 Back to Top

To the right of the screen there are icons to add and remove loops:
• NEW – Creates a new loop in the bank, allowing you to set the number of bars you want that loop to contain.
• REMOVE – Removes the selected loop from the bank.
• DUPLICATE – Copy the selected loop into a new loop.
Below the loop rack there are controls to modify the selected loop:
• REPEAT – Repeat the selected loop a number of times. For example, a 1 bar loop repeated 4 times would expand that loop to 4 bars, each containing the notes of the original 1 bar.
• TRIM – Either trim the selected loop to a section of bars, or trim out a section of bars from the loop. For example, an 8 bar loop with bars 4 to 5 trimmed OUT would result in a 6 bar loop with the notes from the original bars 1,2,3,6,7 and 8. The same 8 bar loop with bars 4 and 5 trimmed TO would result in a 2 bar loop with the notes from the original bars 4 and 5.
• MERGE – Merge another loop into the selected loop at a certain bar.
• APPEND – Append another loop onto the end of the selected loop.
• INSERT – Insert another loop into the selected loop at a certain bar. For example a loop with bars 1234 inserted at bar 3 into a loop with bars ABCD would result in that loop becoming an 8 bar loop AB1234CD.
• UNDO – Undo the last operation performed.
40 Back to Top

Finding a Loop in the Loop BankYou have three ways of finding a loop in the bank. The quickest method is by name, and so it is good to get in the habit of naming your loops in a style that suits you. For example, when experimenting with initial tunes and rhythms you could use words like:
Riff, Breakbeat, Rhythm, Drums, Bassline.
When combining those loops into larger loops, you could use words like:Song, Verse, Chorus, Bridge, Solo, Intro.
Sometimes you might have a creative session and create a loop with all your instruments playing at once, and then want to strip out various combinations of those instruments to link together into the start of your song progression. In which case you could give your new loops names like:
Drums+Bass, Backing Track, No hi-hats, Main riff + drum fill.
The second method is by auditioning the loop. Select the loop and press the Play button, perhaps bringing up the Transport Window to navigate round the loop.
The final method is to look at the current bar display at the top-right. A loop with a single bar is likely an initial creative experiment, or a very specific song element such as a fill. A 4 bar loop is likely to be a musical unit to be combined into a verse of 8 bars or more. A 48 bar loop is likely to be the loop you are forming into a final song, or a previous version of the song you kept as a backup.
Loop Bank HousekeepingDuring the song-creation process, you will create many loops, and you can keep them all in the Loop Bank to use at a future date. However, at some point you may want to remove a loop because:
• It is becoming harder to find the loop you want in the list.• You are running out of meaningful names to give loops.• You are reaching the available memory limit or have experienced issues to do
with running out of memory.
Remember that it is quite easy to duplicate a complex loop and strip individual tracks out of it with the Event List, or trim out a section of that loop with the Loop Bank. So, many of the loops you have kept in the bank could be recreated from a single loop if required, and can be erased to save space.
You will also find that you want to keep the most current or useful loops towards the top of the Loop Bank for easier access, with your song loop (whatever you name it) at the top.
41 Back to Top

EVENT LIST
The Event List is accessible from the EVENTS icon in the Instrument Menu.
An “event” in Looptical is a change that is recorded by the sequencer. This can be a note played on a piano, a drum hit, a change to a volume slider or pan control, and so on. Anything that is recordable in the application is shown as an event in the Event List. You can use the Event List to modify or delete events in sections of a loop, to correct problems where parameters have been accidentally recorded, and to optimise parameter changes such as rapid filter movements by thinning out the events.
At the top right of the screen there is a Play button, and a display showing the current and total bars in the loop. Tap on that display to bring up the Transport Window to navigate round the loop, and use the play button to audition the changes.
The display shows the section of the loop under scrutiny, in bars. This defaults to being the entire loop, but you can modify the values, for example, to just edit the events in bars “2” to “4” in an 8 bar loop.
When you enter the Event List Screen, a copy of the loop is made. At any time you can tap the COMPARE button (lights up) to listen to the old copy of the loop, and tap COMPARE again (light extinguishes) to go back to the current edit. If you don't like the changes you have made then you can press UNDO to go back to the old loop and undo the changes.
The main area of the screen is the event list display, which displays all the events in the current loop. Navigate the list by dragging it up and down. Each row has a value at the right which is the number of events that it contains. Tap on that row to select and expand it. At the right of the currently selected row is an icon showing a pencil (for “edit”) that brings up a context-sensitive dialog allowing you to edit all the events contained by that row.
42 Back to Top

As an example, imagine we created a loop with three tracks: “Drums”, “Guitar” and “Bass”. We recorded some notes and then in the Mixer we recorded some live changes to various controls such as volume and pan. On entering the Event List, we would see our loop as:-
We can see that we have 107 events in the loop, which are all “Tracks” events. We tap on Tracks to expand that section.
Tracks expanded to show the two tracks that contain events in the loop (note, however, that we may have other tracks loaded but did not record events for).We can see we have 77 events in our Guitar track. We tap on it to expand.
We can see the 77 events broken down into 14 notes and 63 pan events. Notice that only the number of events for the current selected level and its children are shown. We tap on Notes to select it.
The Notes level cannot be expanded any more, but we can now tap on the pencil icon at the end of the Notes row.
43 Back to Top
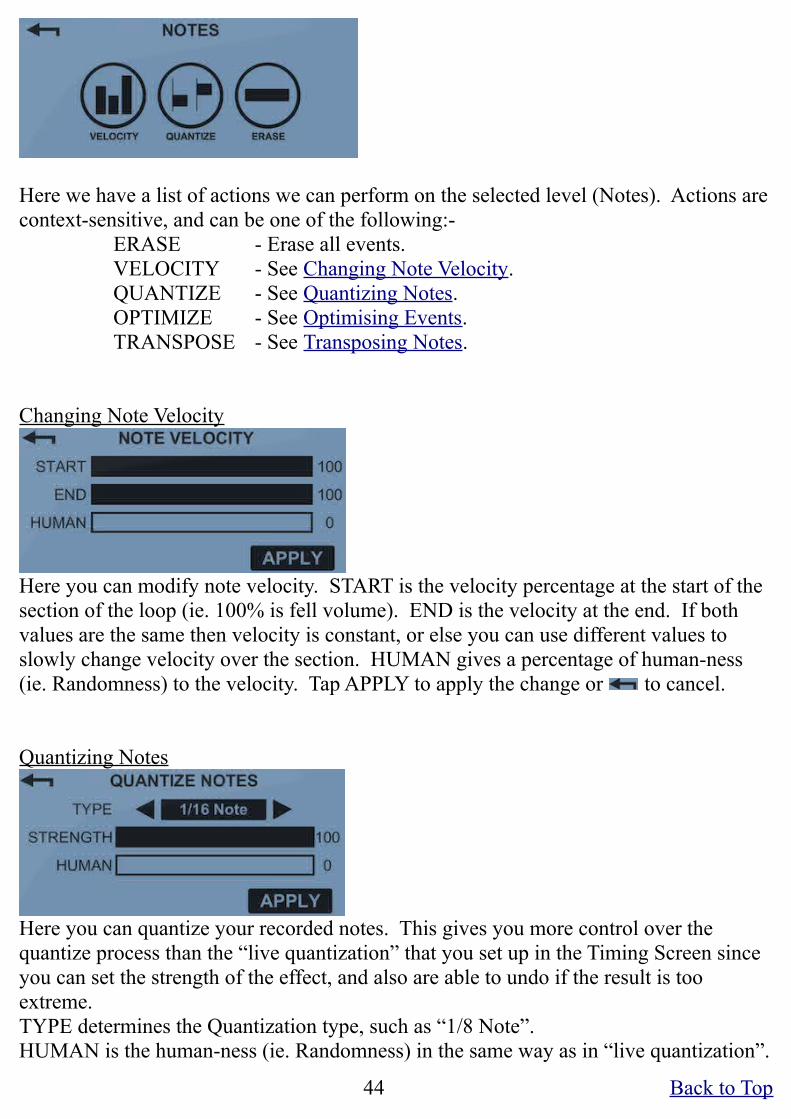
Here we have a list of actions we can perform on the selected level (Notes). Actions are context-sensitive, and can be one of the following:-
ERASE - Erase all events.VELOCITY - See Changing Note Velocity.QUANTIZE - See Quantizing Notes.OPTIMIZE - See Optimising Events.TRANSPOSE - See Transposing Notes.
Changing Note Velocity
Here you can modify note velocity. START is the velocity percentage at the start of the section of the loop (ie. 100% is fell volume). END is the velocity at the end. If both values are the same then velocity is constant, or else you can use different values to slowly change velocity over the section. HUMAN gives a percentage of human-ness (ie. Randomness) to the velocity. Tap APPLY to apply the change or to cancel.
Quantizing Notes
Here you can quantize your recorded notes. This gives you more control over the quantize process than the “live quantization” that you set up in the Timing Screen since you can set the strength of the effect, and also are able to undo if the result is too extreme.TYPE determines the Quantization type, such as “1/8 Note”.HUMAN is the human-ness (ie. Randomness) in the same way as in “live quantization”.
44 Back to Top

STRENGTH is a percentage of how far from the recorded time to the actual quantized time the note is moved. Thus a low percentage strength will only tighten up notes a fraction, with more extreme notes being quantized more. A 100% strength will snap the note to the nearest quantized time.Tap APPLY to apply the change or to cancel.
Optimising Events
Parameter changes in Looptical are not stored as curves or lines, but distinct events. So when you fade an instrument in with the volume fader in the mixer, you are recording many individual events. The more events that are recorded, the more responsive the control will seem (which would be beneficial for a volume or filter control), but also the more memory is used up by events and the more processing time it takes to apply those events when the song is played back. And a volume jump from -40dB to 0dB might happen in a fraction of a second but still contain hundreds of unnecessary events. It is therefore useful to be able to optimise events to thin them out.MAX FREQ sets the maximum frequency of events, as described by the number of events that can take place in a single beat (ie. ¼ Note).INIT AT START OF SECTION is a checkbox that can be toggled on (X) to move the very first event to the start of the section in the loop. This is useful if, for example, you recorded a volume change, and want it to happen exactly at the start of the loop.Tap APPLY to apply the change or to cancel.You can optimise all events in a loop in one go by selecting the “Instruments” row and the pencil icon. However, you may also decide that some parameter changes require more responsive changes than others and optimise them appropriately. Use the Compare and Play button to audition the change and decide if it is acceptable before committing it.
Transposing Notes
Recorded notes can be transposed by up to +/- 2 octaves.Tap APPLY to apply the change or to cancel.
45 Back to Top

FROM RIFF TO FULL SONG
Although powerful, the Loop Bank and Event List can seem initially daunting. Instead of the traditional computer sequencer approach of visually decoding piano rolls of little boxes, Looptical encourages you to listen to your song as you build it up, and perform tasks by ear. Let's take a look at how we would create a full song.
1) Create your riffsImagine we have created two loops in the Loop Bank:-
“Verse” - A 4 bar verse loop, containing multiple tracks / instruments.“Chorus” - A 4 bar chorus loop, again with multiple tracks / instruments.
2) Strip down your loopsWe want our song to build in intensity and show variety, so we create a simpler, stripped-down verse to start the song, and then our second verse will have all the bells and whistles. So Duplicate “Verse” and rename it “Stripped Down Verse”. Go to the Event List and find some tracks that can be removed that are really just embellishments to the main theme. Select them, tap the pencil icon, and Erase. Perhaps use the Drum Pad to individually remove certain drums from the drum track (eg. splash cymbals) with Delete mode.
We now have three loops in the Loop Bank, all 4 bars long:-“Stripped Down Verse”“Verse”“Chorus”
This process can be repeated for a more complex song to create more component loops.
3) Start a new songA song is really just a loop, but it has to start somewhere. For now let's assume we start our song straight into the verse. We can insert an intro later on if we need to. Select “Stripped Down Verse” and Duplicate it. Rename the new loop “Song”.
We want our verse to be 8 bars and not 4, so the easiest thing to do is to select Song and then Append and select “Stripped Down Verse” to add another one.
The Loop Bank is now:-“Song” (8 bars)“Stripped Down Verse” (4 bars)“Verse” (4 bars)“Chorus” (4 bars)
46 Back to Top

4) Append our other loops to SongWe want our Song to be:
StrippedDownVerse(8bars)-Chorus(8bars)-Verse(8)-Chorus(8)
Notice how we want our verses and choruses to be 8 bars and we only have 4 bar loops. Instead of appending everything twice, we can instead create a temporary 8 bar loop out of a4 bar loop, append that, and then remove the temporary one.
Select Chorus, Duplicate it, rename it “Chorus 8 bar”, Repeat, and set Number of Repeats to 2. This gives us a new loop called “Chorus 8 bar” that has 8 bars of the Chorus repeated twice. Now let's add it to our Song. Select Song, Append, select “Chorus 8 bar”.
Repeat this for Verse and another Chorus. You might want to tidy up your Loop Bank by erasing those temporary loops, or you may decide they could be useful again in the near future. For this tutorial I shall erase them.
The Loop Bank is now:-“Song” (32 bars)“Stripped Down Verse” (4 bars)“Verse” (4 bars)“Chorus” (4 bars)
And the Song contains the following bars:-StrippedDownVerse(8bars)-Chorus(8bars)-Verse(8)-Chorus(8)
5) Overdub the songWe have the basic blocks of our song, but it sounds rather repetitive. Let's use the Keyboard and Drum Pads to overdub some notes, erase others, add a guitar solo, and generally embelish the song.
6) Add a BridgeAt this point we decide that it would be nice to have a “bridge” between the second verse and the chorus. We haven't written one yet, but we think it will be 4 bars long and probably have a similar rhythm to the verse, but with a different melody. So first we select “Verse” and Duplicate, and rename the new loop “Bridge”. Luckily this is already 4 bars long so we don't need to trim it. Using the Event List we erase all tracks other than the drum track. We use the Keyboard to build up a new melody.
To find the exact bar we want to insert the bridge into Song, we use the Play button in the Loop Bank, and tap on the bar to open the Transport Window. Moving back and forward in the Song loop, we see that the second chorus starts on bar 25.
47 Back to Top

We select Song, Insert, set the Bar to be 25, and select Bridge.
The Loop Bank is now:-“Song” (36 bars)“Stripped Down Verse” (4 bars)“Verse” (4 bars)“Chorus” (4 bars)“Bridge” (4 bars)
And the Song contains the following bars:-StrippedDownVerse(8bars)-Chorus(8bars)-Verse(8)-Bridge(4)-Chorus(8)
7) Change a section of drumsThe “Stripped Down Verse” was a great idea, and we think it would be cool to do the same with the Chorus - so the first chorus was slightly toned down from the full-on “Chorus” loop. That would give the final chorus an added intensity. What we want is a new, mellow drum beat for that section. So let's begin by stripping out the section so we have something to work with.
Select Song, then Duplicate, and call the new loop “Mellow Chorus”. Then Trim, select “TO” section, from bars 9 to 16. (We can determine the bars by listening to the loop and using the Transport Window) This trims Mellow Chorus down to just the 8 bars of the chorus from the song.
Now let's change the drums in Mellow Chorus using the Drum Pads, deleting some, adding others - until we have our new mellow drum beat.
We want to change the drums in our Song chorus to use this new beat, so first let's strip down our Mellow Chorus until it contains just the new notes to add. Duplicate Mellow Chorus and name it “Mellow Drums”. Use the Event List to erase all the tracks that are not the drum track.
Next we remove the busy drums from Song. Select Song and go to the Event List. Set the start and end bars at the top to 9 and 16 to limit edits in this range, and then select the drum track and erase it.
Lastly we add our mellow drums into the song. Select Song, Merge, set bar to 9, and select Mellow Drums. This merges the Mellow Drums loop into Song at bar 9, and so we get our mellow drums in the first chorus of the song.
48 Back to Top

ARPEGGIATOR SETUP
The Arpeggiator Setup screen is accessible via the ARP icon in the Instrument Menu (for Key instruments).
An arpeggiator takes a chord as an input and outputs an endless run of notes based on that chord. For example, holding down a CEG chord with the arpeggiator on Up mode and you would hear C...E...G...C...E...G... notes being played.
Turn on the arpeggiator with this button . Use to play a simple chord into the
arpeggiator to audition the output.
OCTAVE RANGE sets the number of octaves the arpeggiator operates over.
WIDTH sets the width of the notes that are played.
ARP MODE can be one of:UP - CEG is played as C...E...G...C...E...G...DOWN - CEG is played as G...E...C...G...E...C...U/D - CEG is played as C...E...G...E...C...E...G...
BAR SYNC determines whether the arpeggiator key is reset at the start of a bar.
HALF SPEED sets the arpeggiator to operate with 1/8 Notes instead of 1/16.
LATCH switches on the Latch. With no latch, the arpeggiator outputs notes only as long as the input chord is held down. With the latch enabled, the arpeggiator continues to play even after you lift a chord. This makes it easier to change chords without hearing a pause in the arpeggio. To stop the arpeggiator from playing, press the currently loaded chord a second time.
49 Back to Top

MIXER
The Mixer screen is accessible via the MIXER icon in the Instrument Menu, and allows you to modify and record track and effect parameters.
At the top of the screen, from left to right, is the Back Button (to return to the Instrument Screen), the Bank Select buttons (A,B,C,D), the Transport Display (tap to bring up the Transport Window, and Play and Record buttons.
There are four banks of 6 tracks (total of 24 tracks), and each Track Channel Strip is numbered and labelled with the track name for convenience. Tap on the Bank Select Buttons (A,B,C,D) to highlight it and jump to that bank. The channels appear in the same order as tracks in the Track List, and you can reorder them there if required.
Signal Path
Looptical uses the following signal path
The Track Channel Strip
50 Back to Top

Each track strip contains a volume fader with a scale ranging from -inf dB (0% volume) up to +6dB (200% volume).
You should aim to start with the faders on the thicker 0dB (100% volume) line, and then increase or decrease the volume to suit the mix.
Next to each fader is a VU meter that shows the track loudness during playback.
You should aim to keep the signal out of the red area as much as possible to avoid distortion.
Above the volume faders are controls for:SEND - The amount of the channel signal send to the Reverb Send Effect.
PAN - The L/R pan value for the channel.
M - Mute. Press this to mute this track.
S - Solo . Press this to mute all other tracks and just hear this track.Multiple tracks can be Soloed at once.
EFFECT - If lit, this indicates that effects have been assigned to this channel. Tap on the FX button (whether lit or not) to access the Effects Setup screen for the track.
The Master StripThe red fader sets the master volume for the song. Unlike the Track Strip faders, it cannot be automated. The VU meter shows the overall loudness for the track.
At the top of the strip, the “CPU USAGE” display shows the current load on the CPU. This is only a rough guide, based on the time that it takes to render a single buffer of audio as a percentage of how much time is available. When the bar chart becomes full then you will start to hear drop-outs and glitches in the audio, and it is time to consider reducing CPU load by removing effects, bouncing down tracks, and so on.
The “OVER” LED lights up when the Soft Limiter is disabled and the output audio level (as shown in the Master VU meter) rises above 0dB.
51 Back to Top

Audio louder than 0dB cannot be represented in the 16bit output resolution and is clipped to the maximum value, either with a hard or soft algorithm, depending on whether the Soft Limiter is enabled. This will create distortion, so you should reduce the volume of the track to avoid this LED lighting.
Above the Main Fader are three buttons which access master effects:
REVERB - ReverbCOMP - Mix CompressorLIMIT - Soft Limiter
Soft LimiterWhen disabled, audio levels will be untouched until they reach the maximum level at 0dB whereupon they will be clipped to that level. This results in distortion. The Soft Limiter softens the transition to the limited level by mapping incoming audio levels into a curve.
The horizontal axis shows the input volume from 0 (min) to 1 (max).The vertical axis shows the output volume.
Grey Line - Untouched audio.Red Line - Soft Limited audio.
The Soft Limiter will colour the audio and so should be considered just one tool in the prevention of distortion, another being the Compressor effect.
When enabled, the “OVER” LED does not light, but you can still see the input audio level via the Master VU meter, and again you should aim to keep this level out of the red to reduce the colouration of the limiter.Reverb
52 Back to Top

Reverb is a processor-intensive effect, and so in Looptical it is used as a Send effect rather than an Insert effect. There is only one reverb effect per song, but you can define how much audio from each track is sent through to the reverb via the Send knob.
The POWER button turns the effect on and off. You should turn reverb off to save CPU load if you are not using it in your song and all tracks have 0% Send.
The QUALITY button determines the complexity of the reverb algorithm used, as indicated by the left black bar in the display. When this is fully black then the reverb is using the most complex algorithm with the best output but the most CPU usage. You should start off with this setting, and only reduce the reverb quality as one way of reducing CPU load.
Use the buttons to choose from one of the reverb presets.
The MIX knob allows you to set the overall amount of the reverb that is mixed back into the signal path. The black bar to the right of the display also shows the current mix level.
The SETUP lead can be tapped to bring up the Reverb Parameter Control.
This shows the underlying parameters to the reverb algorithm.
INIT DELAY - The delay before the first reverb echo.REV TIME - The time it takes for the reverb to die out.BRIGHTNESS - The frequency of a low-pass filter on the reverb output.STEREO - The amount of stereo separation of the reverb output.Mix Compressor
53 Back to Top

The Mix Compressor operates in the same way as the normal compressor effect, but applied at the end of the signal chain just before the Master Fader. Unlike the insert compressor effect on a track, the Mix Compressor parameters cannot be automated.
54 Back to Top

EFFECTS SETUP
Looptical contains two different types of effects: Insert effects, and a Send effect.
Insert effects are added to a track (literally “inserted into the signal chain”) and modify the sound on that track alone. They are “pre-fader insert effects”, happening prior to the fader in the signal path.
Send effects are shared between multiple instruments, which decide what fraction of their output they each send to the shared Send effect. Send effects are typically used where a single effect is used against multiple tracks, or where the effect is expensive in terms of processing time.
In Looptical, each track can have up to 5 Insert effects, and there is a single Reverb Send effect.
The signal path for a track looks like this:-
The Reverb Send Effect is accessed by tapping the “R” button just above the Master Fader in the Mixer. The Insert effects for a track are accessed by tapping the “FX” button above the track fader, which shows the Effects Setup Screen.
Initially the screen will look like this-
Just under the usual Top Bar we have a visual representation of the insert effect path, with the signal coming in from the left, passing through 5 signal path boxes (that are currently empty) and leaving to the right.
Below this is the main effect area, but since we have no effect assigned we just see a blank rack plate and a handy post-it note reminding us how to add an effect.
55 Back to Top
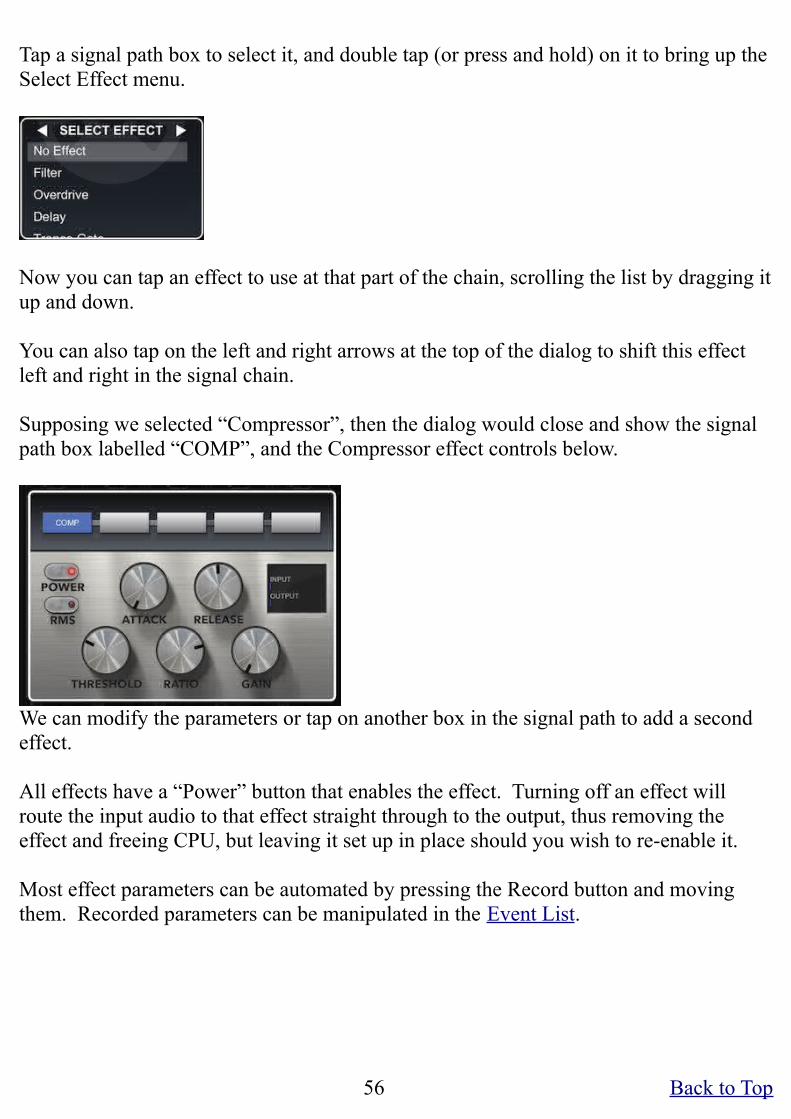
Tap a signal path box to select it, and double tap (or press and hold) on it to bring up the Select Effect menu.
Now you can tap an effect to use at that part of the chain, scrolling the list by dragging it up and down.
You can also tap on the left and right arrows at the top of the dialog to shift this effect left and right in the signal chain.
Supposing we selected “Compressor”, then the dialog would close and show the signal path box labelled “COMP”, and the Compressor effect controls below.
We can modify the parameters or tap on another box in the signal path to add a second effect.
All effects have a “Power” button that enables the effect. Turning off an effect will route the input audio to that effect straight through to the output, thus removing the effect and freeing CPU, but leaving it set up in place should you wish to re-enable it.
Most effect parameters can be automated by pressing the Record button and moving them. Recorded parameters can be manipulated in the Event List.
56 Back to Top

Although Looptical will allow you to compose songs with 24 tracks, each with 5 insert effects, you should be aware of the processor time required for each effect. Keep an eye on the “CPU Usage” bar in the Mixer screen, and be prepared to reduce the CPU load (for example by removing effects) if you hear glitches in the audio.
The following chart shows the relative complexity of each effect.
For example, a single “Reverb High Quality” effect will take as long to render as 33 Gain effects.
57 Back to Top

Gain Effect
The Gain Effect is a simple amplifier. The left meter shows the audio level coming in to the effect, and the right the level going out. The scale is in decibels with 0dB being the maximum level without distortion.
The central knob changes the gain (amplification) level as determined by the RANGE, which can be set to:-
-6dB to +6dB-12dB to +12dB-24dB to +24dB
When powered down, the Gain Effect uses virtually no CPU, so it can be left in the signal chain, and powered up (with a 0dB gain) when a more accurate level is required.
You can use the gain effect at the start of the signal chain as a mixer Trim level to adjust the audio level so the mixer fader can be positioned at around 0dB. This allows for finer fader control during song playback. You can also use the gain as a cheap way of boosting or reducing levels within the signal path between effects.
EQ Effect
The EQ Effect allows you to reduce or boost levels in three frequency bands, low, mid and high.
FREQ - Sets the frequency for the filter.GAIN - Sets the gain to be applied to that frequency band.WIDTH - The width of the band of the bands.
(ie. The number of octaves that the passband covers)
58 Back to Top

Compressor Effect
The compressor reduces the level of an audio signal if the amplitude exceeds a given threshold.
THRESHOLD - Sets the level at which compression starts in dB. Looptical uses a “hard-knee” compressor.
ATTACK - The time it takes for the compressor to open once threshold is reached in ms.DECAY - The time it takes for the compressor to close again in ms.
RATIO - The amount of compression applied once threshold is reached.For example-
1:1 = No compression. Output = input.4:1 = If input is 4dB over threshold, output will be 1dB over.
GAIN - The Makeup Gain applied after compression.
RMS - Toggles whether a Peak or RMS algorithm is used. Peak is typically used for limiting and RMS for compressing audio.
INPUT / OUTPUT - These meters show levels of input and output audio, turning red if the level goes above 0dB.
Dynamic range compression is a complex topic beyond the scope of this manual. A simple setup would be:
1) Set Attack to 1ms.2) Set Release to 500ms.3) Set Gain to 0dB.4) Set Threshold to -15dB.5) Set Ratio to 1:3.6) Adjust Gain to raise the output level to just below 0dB.
59 Back to Top

Filter Effect
The Filter Effect applies an audio filter to the signal. The filter is chosen by tapping on the left and right arrows, and can be one of the following:
• LOW PASS• LOW PASS 24DB• HIGH PASS• BAND PASS• NOTCH• FORMANT AEIOU• FORMANT E..O• FORMANT U..A• FORMANT I..A• WAH
LOW PASSThis is a standard “filter sweep” resonant filter. It only passes frequencies lower than the cutoff point set by FREQUENCY. The RESONANCE control determines the boost to the signal at that cutoff point. The slope of the filter is 12db/oct. It can be used to remove unwanted high frequencies from a signal, as well as a sweep effect placed on a bassline.
LOW PASS 24DBThis is a different algorithm for a low pass filter with a slightly different sound. This filter has a 24db/oct slope, which gives a more extreme sound at higher resonance. HIGH PASSThis only passes frequencies higher than the cutoff point, most commonly used to remove unwanted low frequencies from the signal.
BAND PASSThis only passes frequencies within a band around the chosen FREQUENCY. Instead of a RESONANCE control, it has a BAND WIDTH control that sets the width of the band (in octaves).
NOTCHThe opposite Band Pass, this removes frequencies within a band.
60 Back to Top

FORMANTThis uses three band pass filters set to frequencies that match vowel sounds. The VOWEL slider controls the position between vowels and can be swept to make a vocal wah-wah sound. AMOUNT controls the amount of filter that is applied to the signal. There are four different Formant Filter options using different vowel sounds.
WAHThis is a Band Pass filter with frequency and bandwidth ranges tweaked to best suit a guitar. A smaller BAND WIDTH gives a more pronounced Wah effect.
The Filter Slider can be changed from the default “Relative” mode (press anywhere and drag the filter to a new position) to “Absolute” mode (filter jumps instantly to where you tap) in General Setup/Miscellaneous under the Instrument Menu. Absolute mode is particularly useful for the formant filter where you can record quick jumps between vowel sounds for an interesting effect.
It is sometimes useful to be able to control both Frequency and Resonance with a single finger, and to do this you can use the XY Panel, which you access by tapping on:
This brings up the XY Panel.
The Filter Effect contains an LFO (“Low Frequency Oscillator”) to automatically sweep
the frequency slider for you. This is enabled by tapping on:
To change LFO settings, tap on:
This brings up the LFO Panel. You can remove the panel by tapping to the left or right.
61 Back to Top

At the top of the panel there are the following controls:MIN - Set the minimum frequency.RANGE - Set the range from min to max.RATE - Set the rate of oscillation.
You can also sync the LFO to bars in the song by tapping on one of the buttons below. These show the numbers of bars for an oscillation, so “2” will take 2 bars to sweep from Min to Max and back to Min again.
The buttons are laid out in this way so that you can quickly tap between them while recording to obtain a Dubstep “Wobble Bass” effect.
Delay Effect
The Delay effect adds a delayed signal to the input signal.
MIX - The amount of delayed signal to add.FEEDBACK - The amount of signal fed into the delay. Larger values will create a delay with a longer tail off.STEPS - The number of 16th steps to sync the delay to.TRIPLET - If enabled, uses triplets instead of 16th steps.You can also tap and hold on the Delay Time value and drag left and right to manually set the delay time.
62 Back to Top

Trance Gate Effect
A Gate only allows signal through when open, and a Trance Gate is a sequenced gate, opening and closing over time according to a set sequence. It can be used to add a rhythmic quality to a signal.
Use the arrow buttons on PATTERN to select the gate pattern from one of 40 presets. Changes to pattern can be recorded within the song if required.
Use the AMOUNT dial to set the amount of gate used. 100% will completely mute the signal when the gate is closed and give a very choppy effect. Less than 100% will allow some of the signal through at all times and provide a subtler rhythmic effect.
The FOUR BAR button is used to toggle whether every fourth bar has a different pattern to add variation.
The GATE LED flashes when the gate is open, and the numbered red LEDs show the current 16th step.
Overdrive Effect
The Overdrive effect adds an overdrive / distortion to the input signal.
DRIVE - Amount of overdrive to apply.TONE - Tone of output signal.
63 Back to Top

Chorus Effect
The Chorus Effect thickens the signal and can be used to turn a mono signal into a stereo one. It mixes a varying delayed signal with the original.
A Chorus effect uses no feedback, but when a portion of the output signal is fed back into the effect then you get a different effect known as a Flanger.
MIX - The amount of effected signal that is mixed back in with the original signal. A larger value will give a more pronounced chorus effect.
DEPTH - The depth of the oscillation of the chorus delay.
RATE - The speed of the oscillation of the chorus delay.
FEEDBACK - The amount of output signal fed back into the effect. Adds a flanging sound.
DELAY - An additional fixed delay between the input signal and the chorus signal. This can be swept as a special effect, particularly with Feedback.
STEREO - The amount of stereo width in the final signal.
64 Back to Top

Phaser Effect
The Phaser Effect adds a sweeping sound over the input signal.
MIX - The amount of effected signal mixed with the input.
RATE - The speed of the oscillation of the phaser.
FEEDBACK - The amount of output that is fed back into the input. Increase this for a more pronounced effect.
Bit Crusher Effect
The Bit Crusher adds distortion to the input signal by reducing the sample rate and bit depth.
BITS - The number of bits to resample to.
RATE - The sample rate to resample to.
65 Back to Top

GENERAL SETUP
To access the General Setup dialog, click in the Instrument Menu.
Tap on a category button to drill-down into that category, and the Back button at the top left to back out of a category or close the dialog.
AUDIO SETUPLATENCY - Tap to switch between latency modes.
BACKGROUND AUDIO - Tap to toggle Background Audio on or off.
TOTAL POLYPHONY - Tap to enter a new value. This is the maximum number of notes that can be played at once. You can reduce the number if, for your device and typical setup, you start to get glitches and drop-outs due to CPU load.
METRONOME STYLE - Use the plus and minus buttons to change the sound of the metronome. Choose one that you can hear clearly across the currently playing instruments.
RECORDING DELAY - See Latency.
MIDI SETUPMIDI IN ENABLED - Enable MIDI input.
MIDI CHANNEL - MIDI Channel used as input, from 1 to 16. Clicking Minus when at “1” will select “OMNI” mode, where all channels are used as input.
NOTE MAPPING - Shows the MIDI Note Mapping dialog.
MIDI CC MAPPING - Shows the MIDI CC Mapping dialog.
MIDI NOTE MAPPING
66 Back to Top

DRUM PAD KEY MAPPINGS - The MIDI note that will trigger a particular drum pad. Tap in a box to edit it manually. When editing a box, pressing a MIDI key on an external keyboard will automatically fill the box with that key number. In addition, pressing a note on an external keyboard will highlight the associated box in red for convenience.
DISPLAY MIDDLE C AS - Toggle between C3 and C4. There is no fixed convention over which octave number Middle C (MIDI note 60) is displayed as. The two most popular formats are “C3” and “C4”.
SCALE PIANO START AT - This determines which octave on a MIDI keyboard relates to the leftmost octave shown on the Scale Piano. Change the value if you want to move the scale piano start point to a different place in your external keyboard.
MIDI CC MAPPINGHere you can map MIDI CC (Continuous Controllers) transmitted by an external keyboard to an automation parameter in Looptical.
In the centre of the dialog is a scrolling list of mappings. For example, above we see that CC 1 is mapped to Modulation, and 74 to the Frequency parameter of the Filter Effect.
When mapped, an external MIDI control such as a mod wheel or volume knob will directly control a parameter of the currently selected track, and such parameter changes are recordable into the song. If the parameter does not exist for that track (eg. Filter Frequency for a track that has no filter effect) then it is ignored. If there is more than one filter effect then it will control the rightmost one in the signal path.
Tap a row to select, and EDIT to edit the mapping. You can now tap on the MIDI CC value to enter a new one, or scroll and select a FUNCTION (ie. automation parameter). Click OK to change, or the Back Arrow to cancel.
Tap ADD to add a new mapping in a similar fashion.
67 Back to Top

Tap ERASE to erase the selected mapping.
MISC SETUPMAX SONG MEMORY - Determines the amount of memory (in Mbytes)
available for the song. See here for more information.
AUTO ERASE IMPORTS - By default, when you import a file (song, instrument, sample) from the iTunes Shared Folder, it is erased. This prevents the folder becoming cluttered up with old files. However, there are times when you might want to use that file several times, and then you can set Auto Erase Imports to No and later erase the file manually. For example, you might have a Wav file containing several notes of an external instrument that you are converting into a Looptical instrument, and need to assign and trim that file several times to different keys.
FILTER SLIDER - Tap to change between Relative and Absolute positioning ofthe sliders in the Filter Effect.
68 Back to Top

CREATING A USER INSTRUMENT
To create a new user instrument, go to the Track List and tap then . Then
tap to choose whether you want a Drum-based or Keyboard-based instrument.
The Track Details screen is shown.
Tap on to access the sounds behind the instrument.
Drum-based Instrument SoundsFor a Drum-based instrument, the following screen will be shown:
Press and hold on a pad.
69 Back to Top

Tap on TYPE to change the type of the sound:ONE SHOT - Sound plays right through to the end when you tap the screen.NO LOOP - Sound stops playing when you lift your finger, or it reaches the end.LOOP - Sound stops playing when you lift your finger, and loops.
Tap on LABEL to change the name of the pad.
Use the VOLUME control to fine-tune the volume of this pad relative to the others.
Use GROUP to assign this pad to a Mute Group. When a pad in a group is played, all currently playing pads in that group are silenced. This is especially useful in hi-hats where open and closed sounds can be assigned to a group and hitting a closed hihat will silence a playing open sound.
Tap on .
The Assign Sample screen is shown, listing all the available samples in the iTunes Shared Folder. These must be 44.1Khz 16 bit Wavs, but can be mono or stereo. Tap to select a sample and LOAD to load that sample. Alternatively press PASTE to paste in whatever audio you have currently in the Pasteboard (which could be from another music app).
We now have a sample assigned to that pad (shown by an orange icon).
70 Back to Top

Keyboard-based Instrument SoundsFor a Keyboard-based instrument, the following screen is used.
Tap in the navigation keyboard at the top to move about the 128 key keyboard. White keys show both the note name and octave, and underneath that the MIDI note number.
Use the << and >> buttons to jump by a single octave.
Use to shift all assigned notes up or down an octave. This is useful when you have assigned your notes and want to centre the instrument in the keyboard.
Press and hold on a key.
This is the same as the Drum-based version, but there are no labels, sound volumes, or mute groups, and ONE SHOT types are not possible.
To make it as easy as possible to create an instrument, all you need to do is to assign a sample to a key. You can make an entire instrument out of one sample, but mapping a number of samples across the range will produce a more realistic sounding instrument. You can map as many or as few samples as you want, and Looptical will “fill in the blanks” by pitch-shifting the nearest defined sample to an empty key.
Also within the sound dialog are:REMOVE SAMPLE - Remove the sample from the pad / key.EXPORT SAMPLE - Export the sample as a Wav to the iTunes Shared Folder,
or to the Pasteboard to be copied back into Looptical, or anothermusic app.
EDIT SAMPLE - See below.
71 Back to Top

Editing a Sound
Tap and hold on a pad or key, and tap .
Here we see the sample waveform. There are three points in the sample that can be manipulated by selecting one of the buttons and then either tapping on the sample to set the position, or press and hold the < and > buttons to fine-tune.
START (S) - This is the start of the sample.END (E) - This is the end of the sample.LOOP (L) - The point in the sample that will be jumped back to on looping.
[Note that to hear a loop you will need to make sure that the sound type is set to “LOOP” in the previous dialog]
The button auditions the current sound.
To trim a sample, set Start and End to the correct points and tap .
To fade a sample out, set the Loop point to where you want the fade to start, and tap to fade from that point to the End point. This is useful for One-Shot and No Loop
sounds that fade out.
[Note that Looptical automatically ensures that the final sample is very slightly faded in and out to avoid audio clicks]
The button moves the current pointer to the start of the next loudest sound, useful for automatically setting the Start pointer to the start of the required sample.
The button toggles whether Cross Fading is applied to the final sample, if it is a Loop.
72 Back to Top

The button amplifies the current sample. Set the gain (amplification) level in decibels, where 0 is no gain, +6 is a 200% gain, -6 is a 50% gain, and so on. Initially the Gain box will show the maximum gain possible without clipping the sound, so in most cases you will either want to select that or click in the box to enter a lower value. If you need to make the sample louder than that then you can tap to enable Soft Clipping, and use a higher gain with less distortion, although the sound will be coloured.
The button reverses the sample, for special effects, or a classic “reversed cymbal”.
The icon brings up the Edit Sample Settings dialog:
X-FADE TIME - Set the amount of sample that is cross faded.
SELECT POINT - Can be “At Press”, meaning the pointer is set to exactly whereyou tap on the screen, or “At Zero Crossing”, meaning the pointer is set to the next point where the sample data crosseszero. This is useful when setting loop points.
Creating Looped SoundsCreating a perfect looped tone is an art into itself. You need to ensure that there is a seamless transition from the end point back to the loop point. Without cross-fading, trying to find this point without hearing clicks or artefacts is extremely tricky. Luckily Looptical has some tools to very quickly make loops.
Let's assume we created a great instrument in another music app and wanted to create our own Looptical instrument from it. We recorded a number of notes over several octaves in the other app (say, every C and G note), copied it to the Pasteboard, and then in Looptical we created a new Keyboard-based instrument, added a sound, set it to Loop, tapped Assign Sample, and we have X-FADE turned on.
Here we see the entire sample with various notes, but we are only interested in one note for this key. We set Start and End points around that note . We can check it is the right note with the Audition button. Press the Trim button to trim the sample.
73 Back to Top

Now we see our note, and want to set the Start point to remove that initial silence, so use the button to move the Start pointer to the start of the first sound. Notice that the sound tails out at the end, so we move the End pointer to a point before that tail occurs. We then set the Loop pointer to somewhere before that point. Press Trim to trim the sample again.
We now audition the sound, and fiddle with the Loop and End pointers until we have a sound that we like. There is no need to press Trim each time we change the End point, unless you want the screen to zoom in to show the whole selected sample - the sample is automatically trimmed and cross-faded each time you press Audition. In fact it is useful to be able to move the End pointer back again when trying to find the best loop position.
When we are done, we can tap the Back Button at the top left of the screen to make the change.
There are a few considerations here. A very short time between Loop and End gives a repetitive loop sound, but a longer time increases the size of the sample and hence the instrument. Setting the Loop point too close to the start will mean we start to cross fade into the “attack” part of the sample, which will add artefacts to the loop. If the sound has a slow modulation then it is good to try to set Loop and End points at equivalent points in the modulation so the loop sounds like a continuation of that natural sound. A short cross-fade may be noticeable in the sound as an unexpected drop in volume. A longer cross-fade with a badly placed Loop point may introduce a phasing effect.
As I said: “an art”.
However, with some practice, it is possible to assign a reasonably well looped sound in only a few taps, and all instruments in Looptical were created using these same in-app controls.
74 Back to Top

MIDI
Export Song as MIDILooptical songs (ie. The current loop) can be exported as MIDI. In the Project Manager screen, tap EXPORT, then MIDI, then either ITUNES SHARED FOLDER, or EMAIL.
Basic MIDI notes are exported in each track, along with modulation, pitch-bend, volume and pan CC changes. Effect change parameters are not exported.
Tracks in the exported MIDI file are named with the Track Names in Looptical, allowing you to assign similar soft instruments in your external DAW. You can even export Looptical instruments to the iTunes Shared Folder as a Zip of the individual sample Wav files, and use them to create an identical sounding soft instrument in your DAW sampler. Exported samples will be named something like: “Saw Lead - Key C3 - Loop at 8488 samples.wav”, telling you the instrument name, mapped key, and loop point.
Exporting Audio TracksIn addition to MIDI, you can also export individual tracks (or groups of tracks) as audio, which you can load into an audio track in your DAW. First select the loop you want to export, and then use the Mute and Solo buttons in the Mixer until you can hear only the tracks you wish to export. Then in the Project Manager screen: Export...Audio...iTunes Shared Folder...Max Quality.
Import MIDIYou can import a Standard MIDI File to form the start of your Looptical song. Place the “mid” file in your iTunes Shared Folder, then in the Project Manager screen, select IMPORT, MIDI, and select it from the list. A new project is created for you, with a track for each track defined in the MIDI file. Tracks are given the same name in the MIDI file, which you can use for reference when changing the instrument from the default sine wave to something more appropriate. (To change a track to use a new instrument, select the track in the Track List, then Details, then the Instrument box).
75 Back to Top

External MIDI ControlAn external MIDI keyboard can be used to enter notes into Looptical. Various options exist for the iPad, but must support CoreMIDI. One we recommend is the Line6 MobileKeys 25, which is a 25 key keyboard that plugs directly into the iPad. You can also use the Camera Connection Kit to connect compatible USB MIDI Interfaces and keyboards.
You can enable MIDI in the MIDI Setup dialog, under General Settings. Set MIDI IN ENABLED to YES, and set MIDI CHANNEL to either OMNI or the specific channel your keyboard is sending on. You can assign keys on your keyboard to drum pads, play the Scale Piano directly from the white keys on the keyboard, and assign controls such as volume and modulation to effect parameters.
To reduce complexity, MIDI input only controls the currently selected instrument, and Looptical reacts to all MIDI connections (virtual or hardware ports) for a single channel.
Looptical also opens a Network MIDI session, which can be wirelessly connected to from a Mac via the “Audio MIDI Setup” application. You can then send notes to Looptical wirelessly from your Mac, and even plug an older MIDI keyboard into your Mac and route the MIDI messages out via Network MIDI to the iPad. Troubleshooting Network MIDI is beyond the scope of this document, but there is a lot of information available on the Internet.
When Looptical is showing the Scale Piano interface, white notes on the external keyboard are mapped directly to the notes in the scale, with C in the specified octave mapped to the leftmost key on-screen.
When the Drum Pad interface is showing, specified notes on the external keyboard are mapped to each drum pad.
76 Back to Top

INTER-APP AUDIO
In addition to receiving audio from the internal mic, an external audio interface, and other apps via AudioBus, you can also connect to Inter-App Audio Instrument Nodes.
In the Audio Recorder screen, tap the SELECT button to display the Select Audio Input dialog.
In Looptical, only the currently selected track can record audio, and only when the Audio Recorder screen is visible. Audio input is automatically switched between the internal mic, external audio interface when attached, or AudioBus when Looptical is selected within the AudioBus app. In addition, you can choose to receive audio from any installed Inter-App Audio apps, which are listed in the Select Audio Input dialog. These apps must be Instrument or Generator apps, and not Effect apps.
Tap on an app name to connect to the app. Its icon will be displayed in the Audio Recorder screen, and the external app will be shown. Use the task bar (double tap the Home button) to switch between Looptical and the Instrument app as you require. You can also quickly jump to the Instrument app by tapping on its icon in the Audio Recorder screen, and the remote app should provide a similar short-cut for jumping back to Looptical without using the task bar. It should also provide an interface to perform basic operations in Looptical such as Play and Record.
To disconnect from the remote app, bring up the Select Audio Input dialog again, and tap the first entry in the list, which will show the current non-Inter-App Audio source (Internal Microphone, External Interface, or AudioBus).
To swap to a different remote Instrument app, select it in the “Select Audio Input” dialog.
77 Back to Top

While you are connected to a remote app, Looptical will remain active in the background even if you have Background Audio disabled in the settings. If Looptical is unable to connect to the remote app then that app may be in use by another app, so disconnect it, or close the app completely by swiping it from the task bar.
78 Back to Top

LATENCY
This chapter is rather technical but will help you understand audio latency in iPad music apps, and how to manage it.
The key points are:1) You should set the Looptical latency level to the smallest value you can. (eg 128)2) If you hear glitches in your song, or the CPU load bar is high, consider changing
latency level to a higher setting.3) AudioBus introduces its own latency issues.4) Current system latency is calculated by Looptical and audio recordings adjusted
appropriately, but you can fine-tune this adjustment with the Recording Delay value.
Audio latency is the delay between an audio signal entering and exiting a system. For soft instrument applications it describes the time it takes from pressing a piano key (or tapping a touch screen) to hearing the note. This involves many steps, each taking time to complete and introducing their own delay or latency. Most of these steps are dealt with by the iPad's “CoreAudio” API and hardware, and are identical for all apps. The main decision an app can make is the size of Audio Buffer to use.
Audio Buffer SizeThe Audio Buffer is a small amount of memory that CoreAudio periodically asks an app to fill with audio data, before converting that data into sound via, for example, the speaker. When playing a sustained note, CoreAudio keeps requesting more audio data to play that note, and the app fills the Audio Buffer with the data and passes it back to CoreAudio. The Audio Buffer introduces latency for live sounds because a key might be pressed just after a buffer has been filled, and so the app has to wait until the next buffer is available before it can start outputting the audio data for the note. On the iPad, Audio Buffer size is defined in terms of frames (or samples), and can have values such as: 128, 256, or 512. A 128 buffer will just in itself introduce up to 2.9ms of latency, and a 512 buffer up to 11.6ms. So, given the choice, why would you not always want the smallest buffer possible? A smaller buffer requires filling more often, which adds more work on the CPU. If the app does not have time to finish filling a buffer before a new one is requested, that buffer will not be output properly to the speaker and you will hear glitches and drop-outs in the audio. So we want to choose the smallest latency possible that the CPU can cope with.
With the latest versions of iPad / iPod / iPad you should be able to use the lowest setting of 128 from most projects. Adding more effects and tracks to a project will add more CPU load and if you hear glitching then it is a sign to step up to a larger latency level (eg 256).
79 Back to Top

Setting Audio Buffer SizeFrom the General Setup Screen (in the Instrument Menu), tap on Latency to switch between settings. If another audio application is running in the background that has already requested a buffer size, you will not be able to change the size until you close that background app.
AudioBusAudioBus currently operates with either 256 or 512 buffer sizes, with 256 preferred for more recent devices. For more information on this please see the AudioBus documentation.
Recording LatencyWhen using Audio Tracks in Looptical, you also need to consider the latency involved in recording sound. This contains many steps outside of the control of the app, but it can be reduced by choosing a smaller Audio Buffer size.
If Monitoring is enabled in the Audio Recorder, audio from an external sound source (which you may be able to hear) must be recorded and played back by Looptical, introducing latency from both processes. Additional latency can arise from the use of external audio interfaces, AudioBus, and any filter or effects apps. For this reason you can disable monitoring if latency becomes distracting and monitor the sound from further up the chain, perhaps directly from your audio interface.
Looptical uses the timestamps passed from iOS or Audiobus apps to calculate the current system latency, and uses this to skip over the start of a recorded audio track to sync it to the song. In general this provides minimal latency on playback and is completely automatic. However there are some cases where latency is still audible.
1) Some external apps and hardware may incorrectly report timestamps.2) The placement of mic and speakers on the device add round-trip latency (sound
takes about 1ms to travel 1 foot in a straight line).
To combat this, Looptical includes a “Recording Delay” value under system settings. This works in the same way as the Logic Pro setting of the same name, and is the number of additional frames to skip into a recording. A positive value will mean more skipped frames, so the recording is merged earlier into the song. A negative value will mean the recording is merged later into the song. “0” means just use the iOS calculations unchanged. The value is in “frames”, of which there are 44100 per second, or about 44 per ms.
80 Back to Top

If you feel that with your current setup of audio hardware, IAA/Audiobus apps, and buffer size, a recording has too much latency (ie. is playing back too late), enter a positive value into this box, with a value of “44” moving it earlier by about 1ms.
To more accurately calculate the value, record a fresh audio track with just the metronome playing, export the audio to iTunes Shared Folder, and use a sampler application such as Audacity to see which frame of the audio the first metronome starts at. Enter this value into the box. But note that there are many factors involved in the round-trip latency, so don’t get hung up on obtaining a perfect value.
You should only need to calculate the value once for your setup and then any future recordings will be appropriately trimmed. Be aware that if you change buffer size, interface, or input audio app then the latency may change and so you should be prepared to change this value, or at the very least to set it back to 0.
Usually all this should not be needed with well-behaved hardware and external apps, and audio recording latency should be minimal.
81 Back to Top