Embed Size (px)
Citation preview
IdeaBlade DevForce Installation Guide Table of Contents
IdeaBlade DevForce Installation Guide.docx Copyright © 2012, IdeaBlade, Inc, all rights reserved 2
Table of Contents Preface ........................................................................................................................... 2
Why the Big Document? ........................................................................................................................ 2 Customer Support .................................................................................................................................. 2 Chapter Organization ............................................................................................................................. 2 Product Prerequisites ............................................................................................................................ 2 Compatibility with Optional Third Party Control Suites .......................................................................... 4 Company Facts ...................................................................................................................................... 6
Installation ..................................................................................................................... 7
Pre-installation ........................................................................................................................................... 7
Remove Earlier Versions of DevForce ...................................................................................................... 8
Install DevForce ......................................................................................................................................... 9
Attach the IdeaBladeTutorial Database................................................................................................... 15
After the Install ......................................................................................................................................... 17 Are You New to DevForce? ................................................................................................................. 17 Before You Begin ................................................................................................................................. 17 IdeaBlade DevForce Object Mapper ................................................................................................... 17 DevForce ToolBox ............................................................................................................................... 17 Configuration Editor ............................................................................................................................. 21
Modifying or removing your DevForce Installation .................................................................................. 23
Updating Existing Applications ................................................................................. 27
Consult the IdeaBlade DevForce Release Notes .................................................................................... 27
Upgrading DevForce Versions ................................................................................................................ 27
Updating 3rd
Party UI Control Suites ....................................................................................................... 33 Assembly Redirection For Client Applications ..................................................................................... 33 Assembly Redirection For Developers ................................................................................................ 35
Documentation and Tools .......................................................................................... 37
Documentation ........................................................................................................................................ 37
Using the DevForce Tutorials .................................................................................................................. 38
DevForce Tools ....................................................................................................................................... 39 Configuration Editor ............................................................................................................................. 39 Database Installer ................................................................................................................................ 39 Deployment Test Tool .......................................................................................................................... 40 Toolbox Installer ................................................................................................................................... 40 Trace Viewer ........................................................................................................................................ 41 Assembly Binding Redirector ............................................................................................................... 41
Troubleshooting .......................................................................................................... 42
Self-Help Resources .............................................................................. Error! Bookmark not defined. Customer Support ................................................................................................................................ 42 Identifying your DevForce version ....................................................................................................... 42 Un-install fails ....................................................................................................................................... 43
IdeaBlade DevForce Installation Guide Table of Contents
IdeaBlade DevForce Installation Guide.docx Copyright © 2012, IdeaBlade, Inc, all rights reserved 3
Wizard was Interrupted ........................................................................................................................ 43 Object Mapper install fails .................................................................................................................... 44 “This product is not registered” ............................................................................................................ 48 Toolbox Installer fails ........................................................................................................................... 48 Assembly Reference is listed but VS can’t find it ................................................................................ 49 Manually Installing the Tutorial Database ............................................................................................ 50 Form won’t display in Design View ...................................................................................................... 51 Assembly Binding Redirection Revisited ............................................................................................. 52 Performance ........................................................................................................................................ 53

IdeaBlade DevForce Installation Guide Preface
IdeaBlade DevForce Installation Guide.docx Copyright © 2012, IdeaBlade, Inc, all rights reserved 2
Preface This Installation Guide describes how to install and un-install DevForce.
Why the Big Document?
Installation should be easy so why do we need so many pages to cover this topic?
Installation itself is easy 95% of the time. Just launch the install executable, answer a few questions, and you’re
ready to start building your application.
It’s that remaining 5% of the time that accounts for many of these pages. InstallShield, Visual Studio, SQL Server –
even .NET itself – they all harbor some ugly surprises for the unlucky few. The bulk of this guide will help you
recover. When it can’t, there is always Customer Support.
Customer Support
Support options and how to contact Customer Support are covered in the “Troubleshooting” chapter.
Chapter Organization
Preface, which you are reading now, introduces the contents covered in the balance of the document.
Installation, describes how to install DevForce for the first time.
Updating Existing Applications, covers how to adjust your existing DevForce applications to accommodate the
latest version of DevForce and 3rd
party tools.
Remember to consult the IdeaBlade DevForce Release Notes for version-specific upgrade steps!
Documentation and Tools, introduces the documentation and tools installed with DevForce. It mentions also some
of the resources available on-line.
Troubleshooting, covers how to work through installation issues.
Product Prerequisites
.NET and Visual Studio
DevForce Classic is compiled against .NET Framework 2.0 (CLR 2.0).
DevForce Classic versions from 3.4.0 on support application development using Windows Communications
Foundation (WCF). WCF requires .NET Framework 3.0. Note that this is not required if you are not using WCF.
DevForce Classic versions from 3.6.0.1 on support installation into Visual Studio 2008. We have qualified
DevForce against Visual Studio 2008 RTM.
DevForce Classic versions from 3.7.0 on support installation into Visual Studio 2010. We have qualified DevForce
against Visual Studio 2010 RTM. Applications can be targeted for any version of the .NET Framework.
If DevForce 3.6.0.1 or later versions are installed on a system where both Visual Studio 2008 and Visual Studio
2005 are present, the DevForce Object Mapper and toolbox components will be present in both Visual Studio
versions. Likewise with DevForce 3.7.0 or later versions – the Object Mapper will be installed to all versions of
Visual Studio found.
IdeaBlade DevForce Installation Guide Preface
IdeaBlade DevForce Installation Guide.docx Copyright © 2012, IdeaBlade, Inc, all rights reserved 3
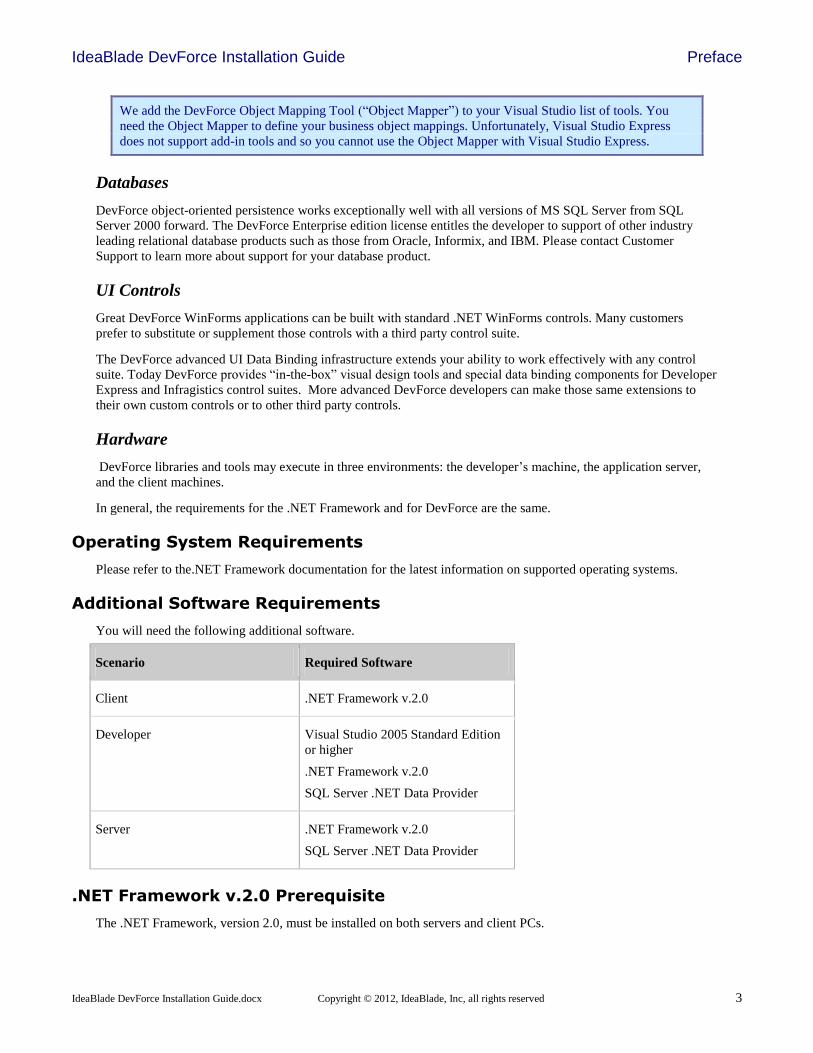
We add the DevForce Object Mapping Tool (“Object Mapper”) to your Visual Studio list of tools. You
need the Object Mapper to define your business object mappings. Unfortunately, Visual Studio Express
does not support add-in tools and so you cannot use the Object Mapper with Visual Studio Express.
Databases
DevForce object-oriented persistence works exceptionally well with all versions of MS SQL Server from SQL
Server 2000 forward. The DevForce Enterprise edition license entitles the developer to support of other industry
leading relational database products such as those from Oracle, Informix, and IBM. Please contact Customer
Support to learn more about support for your database product.
UI Controls
Great DevForce WinForms applications can be built with standard .NET WinForms controls. Many customers
prefer to substitute or supplement those controls with a third party control suite.
The DevForce advanced UI Data Binding infrastructure extends your ability to work effectively with any control
suite. Today DevForce provides “in-the-box” visual design tools and special data binding components for Developer
Express and Infragistics control suites. More advanced DevForce developers can make those same extensions to
their own custom controls or to other third party controls.
Hardware
DevForce libraries and tools may execute in three environments: the developer’s machine, the application server,
and the client machines.
In general, the requirements for the .NET Framework and for DevForce are the same.
Operating System Requirements
Please refer to the.NET Framework documentation for the latest information on supported operating systems.
Additional Software Requirements
You will need the following additional software.
Scenario Required Software
Client .NET Framework v.2.0
Developer Visual Studio 2005 Standard Edition
or higher
.NET Framework v.2.0
SQL Server .NET Data Provider
Server .NET Framework v.2.0
SQL Server .NET Data Provider
.NET Framework v.2.0 Prerequisite
The .NET Framework, version 2.0, must be installed on both servers and client PCs.
IdeaBlade DevForce Installation Guide Preface
IdeaBlade DevForce Installation Guide.docx Copyright © 2012, IdeaBlade, Inc, all rights reserved 4
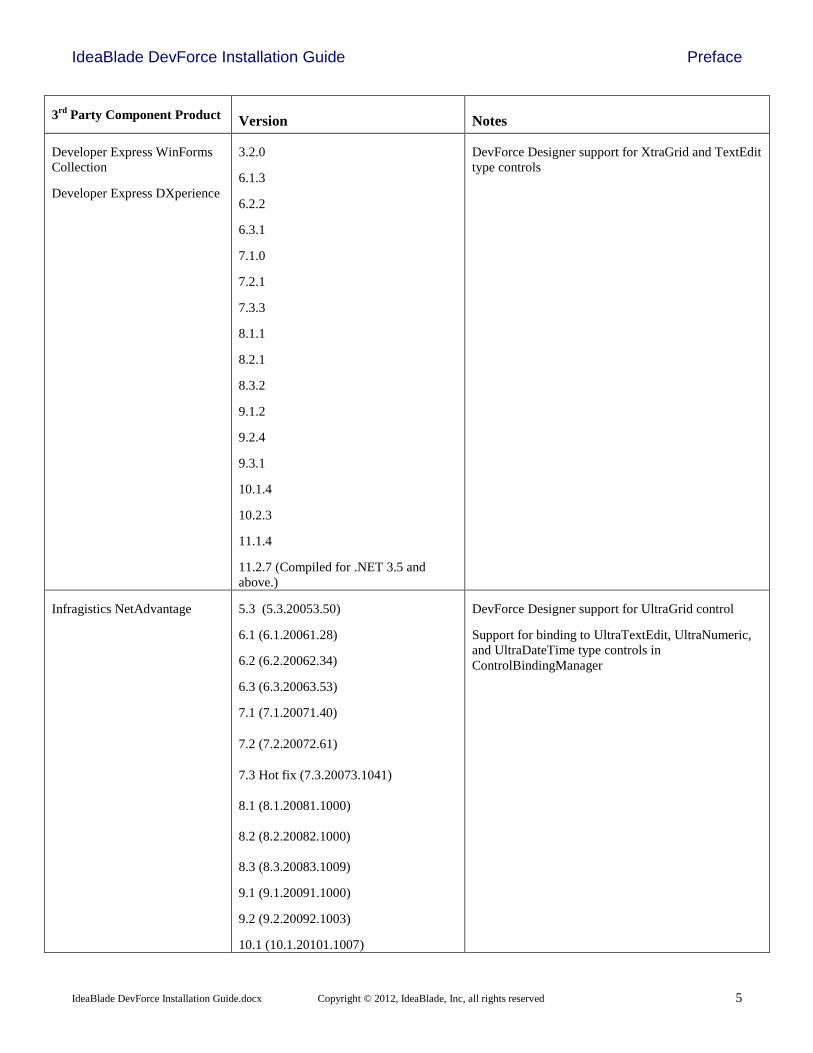
Compatibility with Optional Third Party Control Suites DevForce supports binding to certain third party control suites. These suites are not required in order to use
DevForce, but we supply designer components to facilitate data binding to these suites. The versions of these
products that we support natively on the system where you are doing client-side development using
DevForce are given in the matrix shown below:
IdeaBlade DevForce Installation Guide Preface
IdeaBlade DevForce Installation Guide.docx Copyright © 2012, IdeaBlade, Inc, all rights reserved 5
3rd
Party Component Product Version Notes
Developer Express WinForms
Collection
Developer Express DXperience
3.2.0
6.1.3
6.2.2
6.3.1
7.1.0
7.2.1
7.3.3
8.1.1
8.2.1
8.3.2
9.1.2
9.2.4
9.3.1
10.1.4
10.2.3
11.1.4
11.2.7 (Compiled for .NET 3.5 and
above.)
DevForce Designer support for XtraGrid and TextEdit
type controls
Infragistics NetAdvantage 5.3 (5.3.20053.50)
6.1 (6.1.20061.28)
6.2 (6.2.20062.34)
6.3 (6.3.20063.53)
7.1 (7.1.20071.40)
7.2 (7.2.20072.61)
7.3 Hot fix (7.3.20073.1041)
8.1 (8.1.20081.1000)
8.2 (8.2.20082.1000)
8.3 (8.3.20083.1009)
9.1 (9.1.20091.1000)
9.2 (9.2.20092.1003)
10.1 (10.1.20101.1007)
DevForce Designer support for UltraGrid control
Support for binding to UltraTextEdit, UltraNumeric,
and UltraDateTime type controls in
ControlBindingManager
IdeaBlade DevForce Installation Guide Preface
IdeaBlade DevForce Installation Guide.docx Copyright © 2012, IdeaBlade, Inc, all rights reserved 6
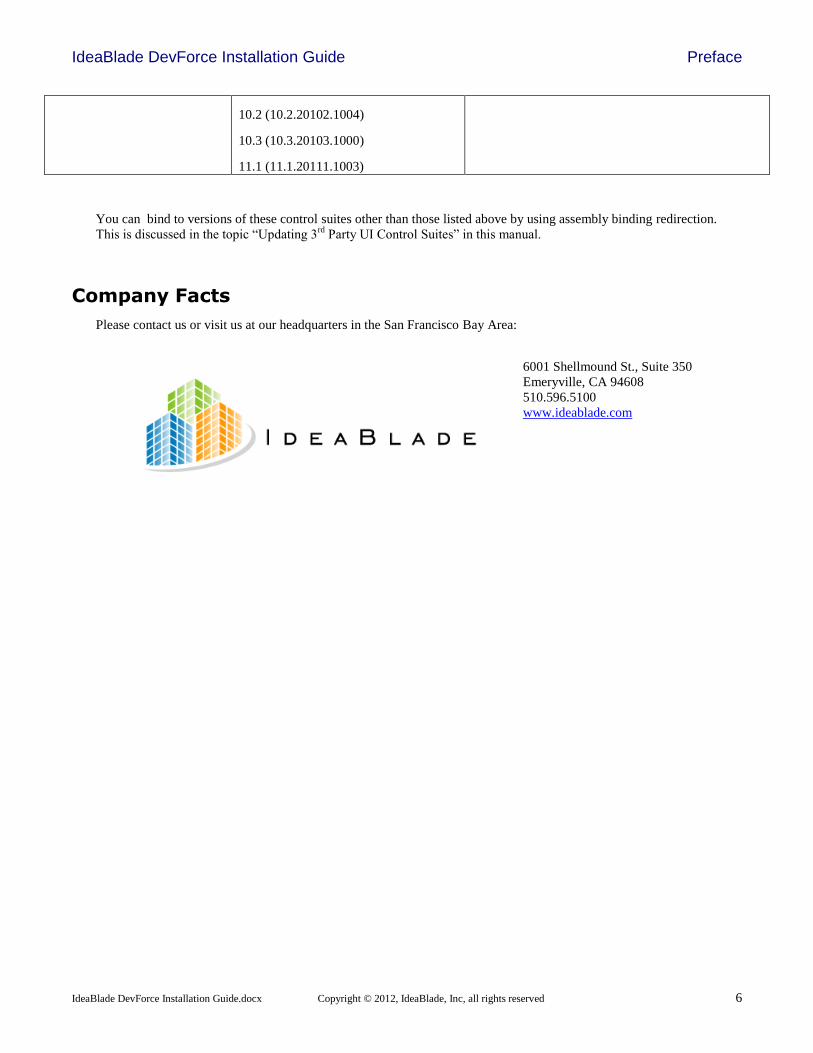
10.2 (10.2.20102.1004)
10.3 (10.3.20103.1000)
11.1 (11.1.20111.1003)
You can bind to versions of these control suites other than those listed above by using assembly binding redirection.
This is discussed in the topic “Updating 3rd
Party UI Control Suites” in this manual.
Company Facts
Please contact us or visit us at our headquarters in the San Francisco Bay Area:
6001 Shellmound St., Suite 350
Emeryville, CA 94608
510.596.5100
www.ideablade.com
IdeaBlade DevForce Installation Guide Installation
IdeaBlade DevForce Installation Guide.docx Copyright © 2012, IdeaBlade, Inc, all rights reserved 7
Installation In this chapter we cover the steps to install DevForce.
Pre-installation steps
Remove earlier versions of DevForce
Run the Installer
Attach the IdeaBladeTutorial Database
Post Installation Tasks
In the “Updating Existing Applications” chapter we explain how to adjust your existing application after installing a
new version of DevForce.
Pre-installation
Install a supported edition of SQL Server
Our tutorials reference the “IdeaBladeTutorial” database which may be loaded into any edition of Microsoft SQL
Server. We recommend that you install an Express version of SQL Server 2005 or 2008 on your development or
evaluation machine even if your application will address a database from a different vendor. Again, the reason has
only to do with facilitating your tutorial learning experience; it is not a product requirement.
Install SQL Server before Visual Studio (if possible)
SQL Server overwrites some registry keys required to efficiently install the DevForce Object Mapping Tool and the
DevForce ToolBox items. If you installed SQL Server after Visual Studio, you may need to repair these registry
entries.
This issue is discussed in http://blogs.msdn.com/chetanc/archive/2005/11/16/493495.aspx. We suggest how
repair the damage in the topic “Toolbox Installer fails” in the Troubleshooting chapter below.
Please visit our contact Customer Support if you require more information.
Verify that Visual Studio Professional (or greater) is installed
You should install Visual Studio before installing DevForce. DevForce versions prior to 3.6.0.1 require Visual
Studio 2005. DevForce versions from 3.6.0.1 on may be installed into either Visual Studio 2005 or Visual Studio
2008. DevForce versions from 3.7.0 may be installed into Visual Studio 2005, Visual Studio 2008 or Visual Studio
2010. If multiple versions of Visual Studio are installed on your system, the DevForce components will be installed
into all versions. Be sure to bring up Visual Studio at least once before installing DevForce.
IdeaBlade DevForce Installation Guide Installation
IdeaBlade DevForce Installation Guide.docx Copyright © 2012, IdeaBlade, Inc, all rights reserved 8
Remove Earlier Versions of DevForce
Skip this section if you are installing DevForce for the first time.
You must uninstall a previous version of DevForce before you can install a new version.
Delete DevForce ToolBox tab from the Visual Studio tool box
If you have manually added any ToolBox items from a previous version of DevForce, make sure that you have
deleted the ToolBox tab and all of the ToolBox items.
Shut down Visual Studio.
Launch “Add or Remove Programs” from the Control Panel.
Find “IdeaBlade DevForce”.
Click “Remove” and follow the dialog instructions.
In rare cases InstallShield is unable to install your previous version of DevForce in which case please refer to the
“Un-install fails” topic in the Troubleshooting chapter.
Replacing the previous IdeaBladeTutorial database
We may have upgrades the IdeaBladeTutorial database that supports the DevForce Tutorials. Check the IdeaBlade
DevForce Release Notes to see if we have done so.
If we have not changed the database, you can skip these steps.
If we have updated the database, you should update your copy as well. We won’t override your copy so you have to
detach it before we will install the new one.
Detach your previous IdeaBladeTutorial database.
Delete or relocate the previous IdeaBladeTutorial database files.
The new release may come with a revised IdeaBladeTutorial database (check the Release Notes for that version).
We recommend that you always keep pace with the most recent tutorial database.
The tutorial database files are “IdeaBladeTutorial_Data.MDF” and “IdeaBladeTutorial_Log.LDF”. Be sure
to delete or relocate both files after detaching the “IdeaBlade Tutorial” database.
If you forget these steps before you install the new DevForce, you can upgrade later. Do them first and then
run the Database Installer shortcut from the Start Menu.

IdeaBlade DevForce Installation Guide Installation
IdeaBlade DevForce Installation Guide.docx Copyright © 2012, IdeaBlade, Inc, all rights reserved 9
Install DevForce
Installing DevForce on Vista and Windows 7
The DevForce installation on these operating systems requires Administrator privileges. You must either be logged
on as a user with Administrator privileges or run the installation as such a user. This requires that you know the
password for one of the Adminstrators who are registered users on the system. If you are not logged on as an
Administrator, do the following:
Right-click on the Setup.exe file
In response to the dialog that appears, fill in the password for one of the Administrators shown.
The installation should proceed normally.
Installing DevForce on all platforms
Double-click on the Setup.exe file in your installation media
You will see the initial welcome screen from InstallShield. InstallShield extracts the IdeaBlade DevForce.msi and
then launches its InstallScript file.
Extracting the .msi Ready to proceed
Installation Interview
Click Next,
Review and then accept the License Agreement.
Fill in your name and organization in the Customer Information page.
Enter your Product Key.
If you purchased a premium version of the product, IdeaBlade gave you a product key to use here.
IdeaBlade DevForce Installation Guide Installation
IdeaBlade DevForce Installation Guide.docx Copyright © 2012, IdeaBlade, Inc, all rights reserved 10
Click [Next]
The installer displays an Invalid key warning message if you entered an unrecognized serial number. Try again. If
the installer refused to recognize your serial number, please contact Customer Support.
Assign the destination folder
Do accept the suggested destination
Of course you can change the destination folder. Picking a custom directory is technically harmless. But it can
complicate technical support. You should only change the directory if you have a very good reason to do so.
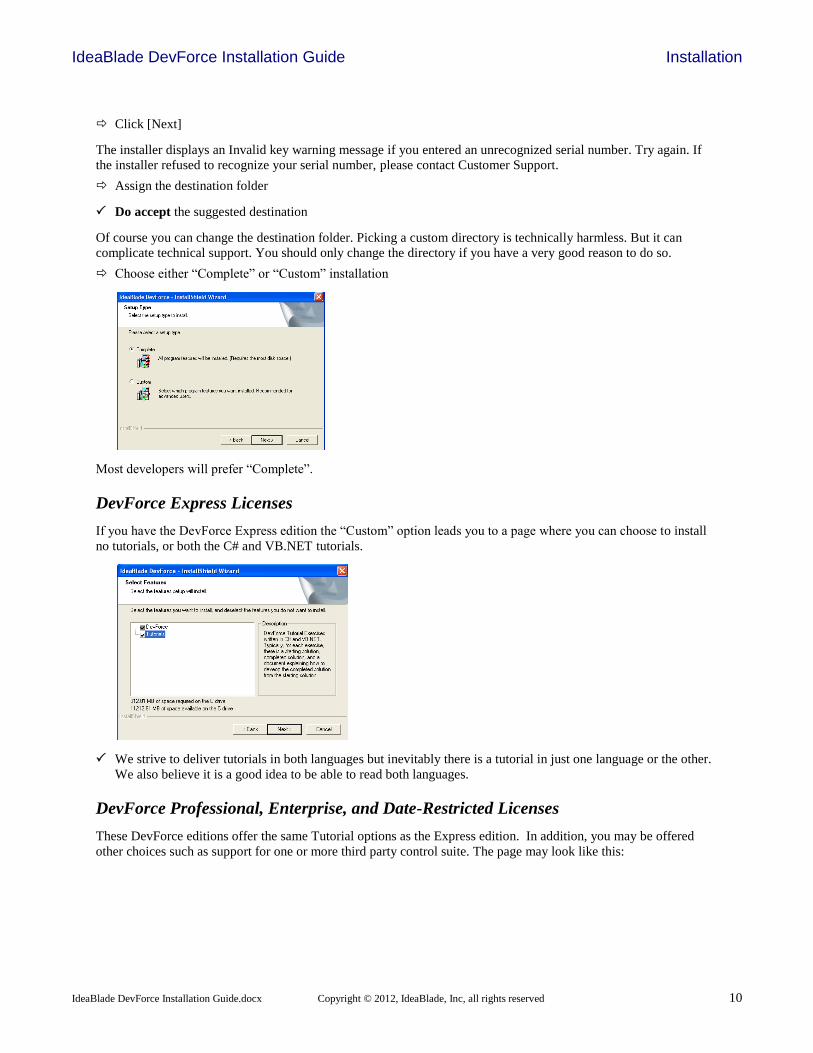
Choose either “Complete” or “Custom” installation
Most developers will prefer “Complete”.
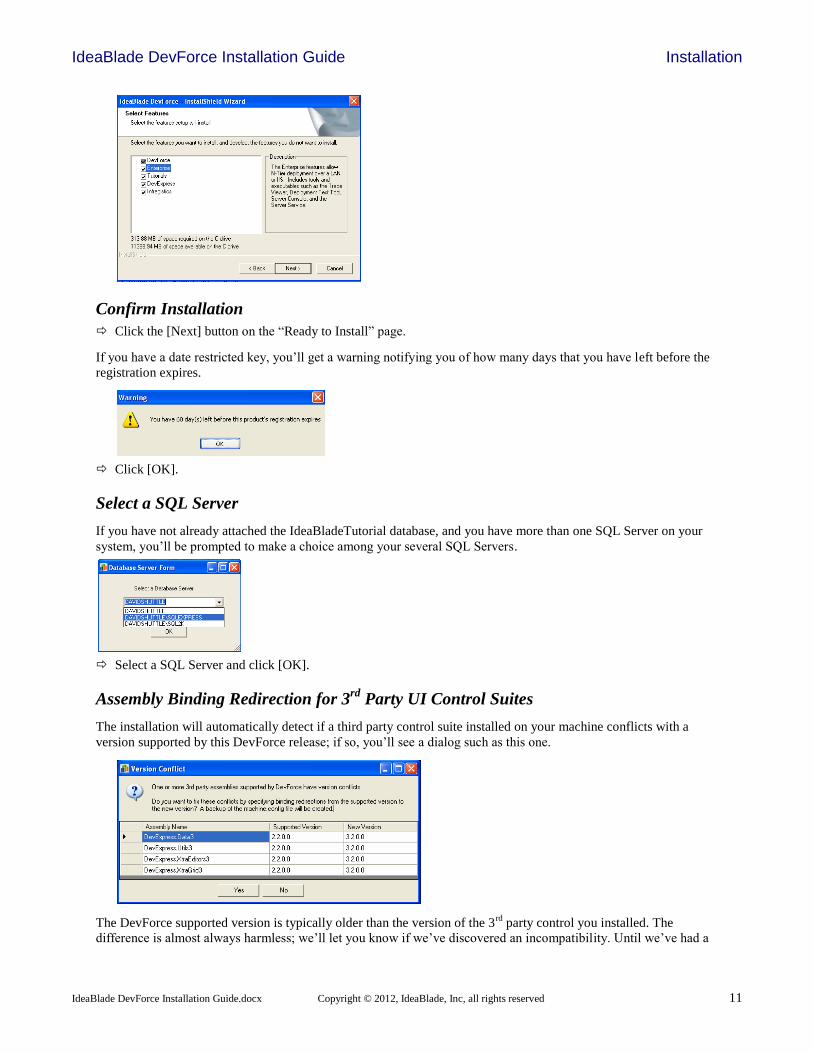
DevForce Express Licenses
If you have the DevForce Express edition the “Custom” option leads you to a page where you can choose to install
no tutorials, or both the C# and VB.NET tutorials.
We strive to deliver tutorials in both languages but inevitably there is a tutorial in just one language or the other.
We also believe it is a good idea to be able to read both languages.
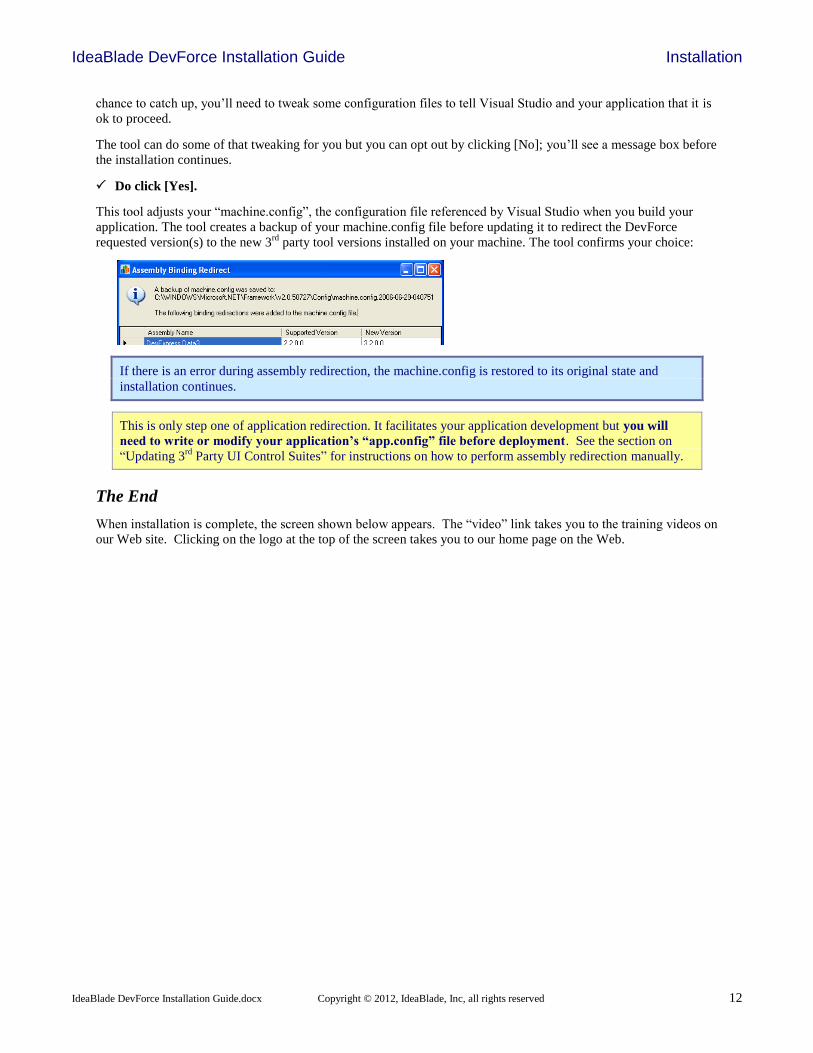
DevForce Professional, Enterprise, and Date-Restricted Licenses
These DevForce editions offer the same Tutorial options as the Express edition. In addition, you may be offered
other choices such as support for one or more third party control suite. The page may look like this:
IdeaBlade DevForce Installation Guide Installation
IdeaBlade DevForce Installation Guide.docx Copyright © 2012, IdeaBlade, Inc, all rights reserved 11
Confirm Installation
Click the [Next] button on the “Ready to Install” page.
If you have a date restricted key, you’ll get a warning notifying you of how many days that you have left before the
registration expires.
Click [OK].
Select a SQL Server
If you have not already attached the IdeaBladeTutorial database, and you have more than one SQL Server on your
system, you’ll be prompted to make a choice among your several SQL Servers.
Select a SQL Server and click [OK].
Assembly Binding Redirection for 3rd
Party UI Control Suites
The installation will automatically detect if a third party control suite installed on your machine conflicts with a
version supported by this DevForce release; if so, you’ll see a dialog such as this one.
The DevForce supported version is typically older than the version of the 3rd
party control you installed. The
difference is almost always harmless; we’ll let you know if we’ve discovered an incompatibility. Until we’ve had a
IdeaBlade DevForce Installation Guide Installation
IdeaBlade DevForce Installation Guide.docx Copyright © 2012, IdeaBlade, Inc, all rights reserved 12
chance to catch up, you’ll need to tweak some configuration files to tell Visual Studio and your application that it is
ok to proceed.
The tool can do some of that tweaking for you but you can opt out by clicking [No]; you’ll see a message box before
the installation continues.
Do click [Yes].
This tool adjusts your “machine.config”, the configuration file referenced by Visual Studio when you build your
application. The tool creates a backup of your machine.config file before updating it to redirect the DevForce
requested version(s) to the new 3rd
party tool versions installed on your machine. The tool confirms your choice:
If there is an error during assembly redirection, the machine.config is restored to its original state and
installation continues.
This is only step one of application redirection. It facilitates your application development but you will
need to write or modify your application’s “app.config” file before deployment. See the section on
“Updating 3rd
Party UI Control Suites” for instructions on how to perform assembly redirection manually.
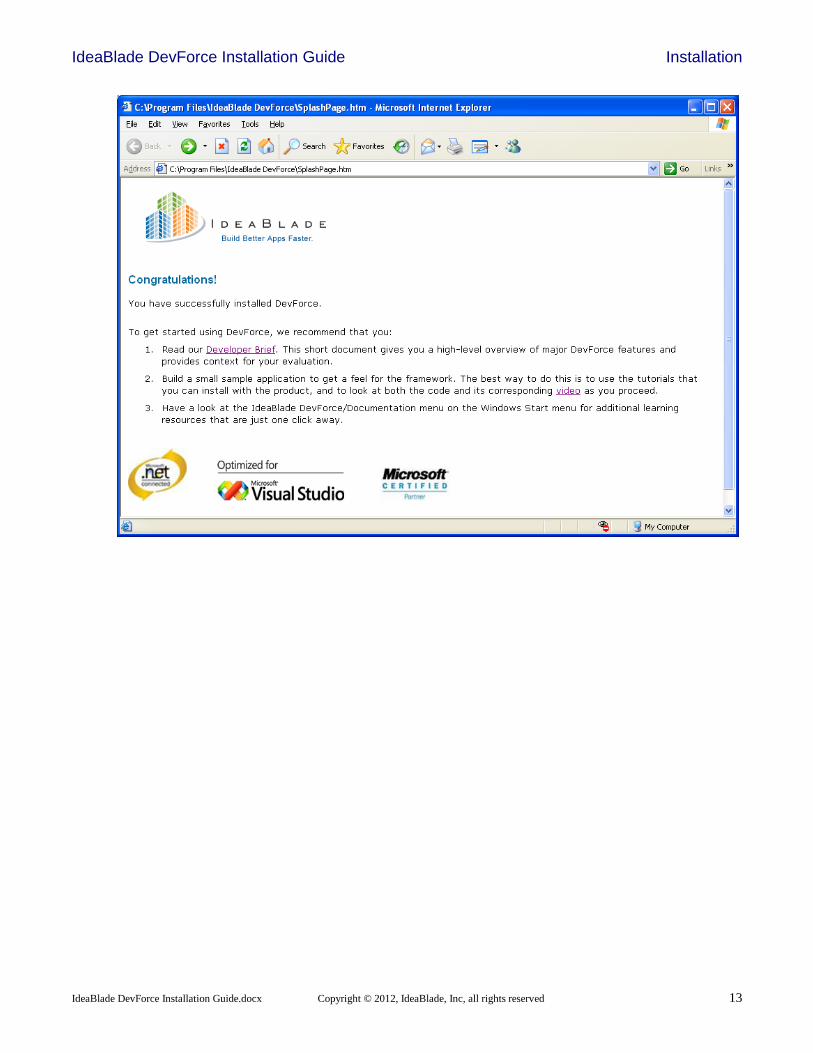
The End
When installation is complete, the screen shown below appears. The “video” link takes you to the training videos on
our Web site. Clicking on the logo at the top of the screen takes you to our home page on the Web.
IdeaBlade DevForce Installation Guide Installation
IdeaBlade DevForce Installation Guide.docx Copyright © 2012, IdeaBlade, Inc, all rights reserved 13
IdeaBlade DevForce Installation Guide Installation
IdeaBlade DevForce Installation Guide.docx Copyright © 2012, IdeaBlade, Inc, all rights reserved 14
Configuring the IdeaBlade Tutorials on Vista
The IdeaBlade Tutorials are located by default in the Instructional Units folder of the Program Files\IdeaBlade
DevForce folder which is an Administrator-only folder.
On Vista it is much more convenient to execute the Tutorials if the Instructional Units folder is moved to a location
where non-administrators have read and write permissions. This is true even if you are an administrator. If you
double-click on a solution in the Tutorials to open it, Visual Studio will be invoked with non-administrative
privileges.
In addition to moving the Instructional Units folder to a less restrictive location, you may want to change the settings
for the Tutorials selection from the IdeaBlade DevForce Documentation submenu so that the Tutorials will be more
convenient to access.
To do this, do the following:
1. Move the Instructional Units folder from Program Files\IdeaBlade DevForce to a less restrictive folder.
2. From the Vista Start menu, select IdeaBlade DevForce, then Documentation..
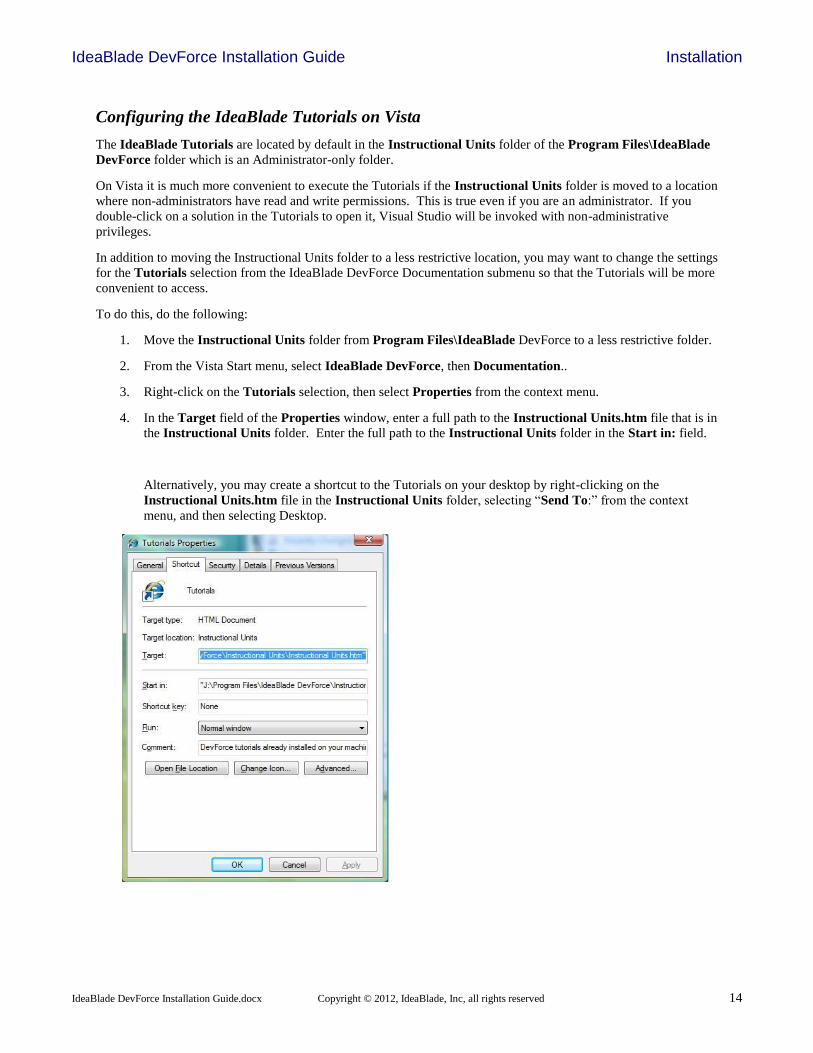
3. Right-click on the Tutorials selection, then select Properties from the context menu.
4. In the Target field of the Properties window, enter a full path to the Instructional Units.htm file that is in
the Instructional Units folder. Enter the full path to the Instructional Units folder in the Start in: field.
Alternatively, you may create a shortcut to the Tutorials on your desktop by right-clicking on the
Instructional Units.htm file in the Instructional Units folder, selecting “Send To:” from the context
menu, and then selecting Desktop.
IdeaBlade DevForce Installation Guide Installation
IdeaBlade DevForce Installation Guide.docx Copyright © 2012, IdeaBlade, Inc, all rights reserved 15
Attach the IdeaBladeTutorial Database
The DevForce tutorials derive their data from the IdeaBladeTutorial database. This is an MS SQL Server 2000
database file in the form of .mdf and .log files. You’ll want to attach them to your SQL Server instance.
The DevForce installer tries to attach the IdeaBladeTutorial database for you.
There are several possible hurdles:
The installer cannot detect an installed version of MS SQL Server.
Your SQL Server is stopped or paused.
You can’t login to SQL Sever
The installer detects a pre-existing attached copy of the tutorial database.
You have multiple instances or a named instance of SQL Server.
The installer cannot attach the tutorial database for some other reason.
The good news is that DevForce installation can complete successfully even without the IdeaBlade Tutorial
database. The less good news is that if the tutorial database the connection strings in the Tutorials will not
be adjusted if you decide to attach the tutorial database manually later.
You can address both problems by running the Database Installer from the “Start Menu ► IdeaBlade
DevForce” as described in the “Documentation and Tools” chapter.
Installer cannot detect MS SQL Server
You can choose either to reverse the DevForce installation or continue without attaching the tutorial database.
MS SQL Server is paused or stopped
You can choose either to reverse the DevForce installation or continue without attaching the tutorial database.
SQL Server log-in failure
The installer tries to access the master database using Windows Integrated Security. If it can, the process moves on
to the next step.
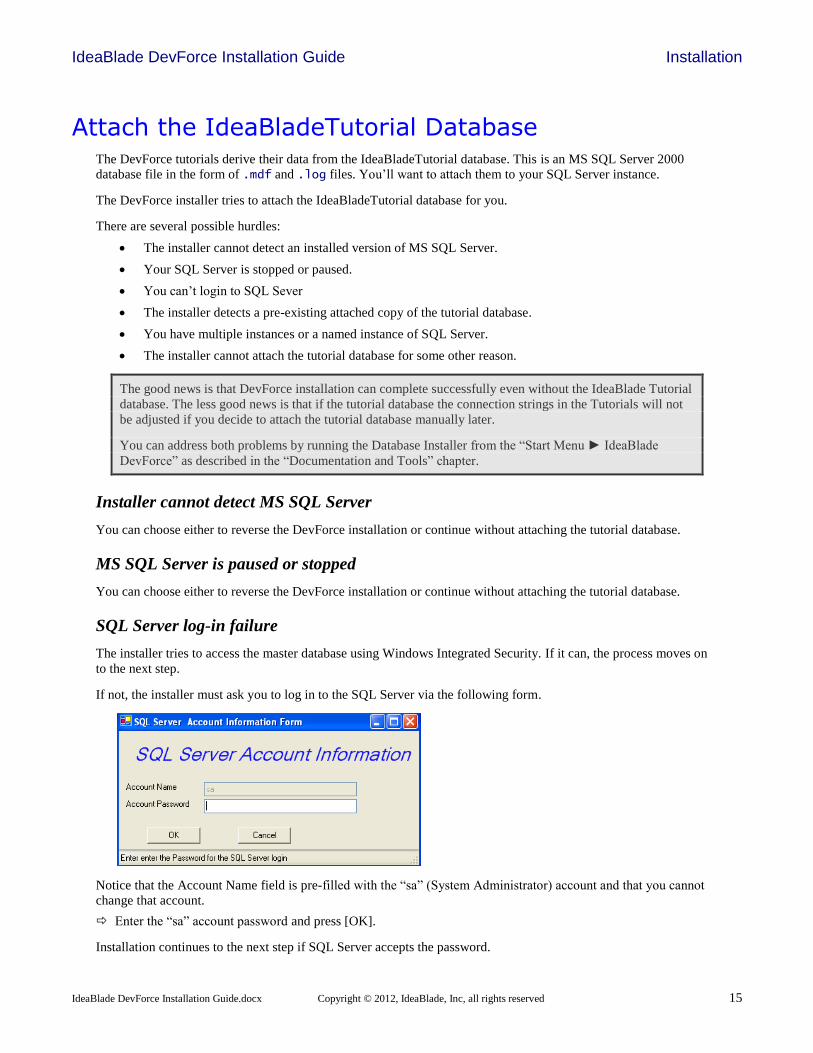
If not, the installer must ask you to log in to the SQL Server via the following form.
Notice that the Account Name field is pre-filled with the “sa” (System Administrator) account and that you cannot
change that account.
Enter the “sa” account password and press [OK].
Installation continues to the next step if SQL Server accepts the password.
IdeaBlade DevForce Installation Guide Installation
IdeaBlade DevForce Installation Guide.docx Copyright © 2012, IdeaBlade, Inc, all rights reserved 16
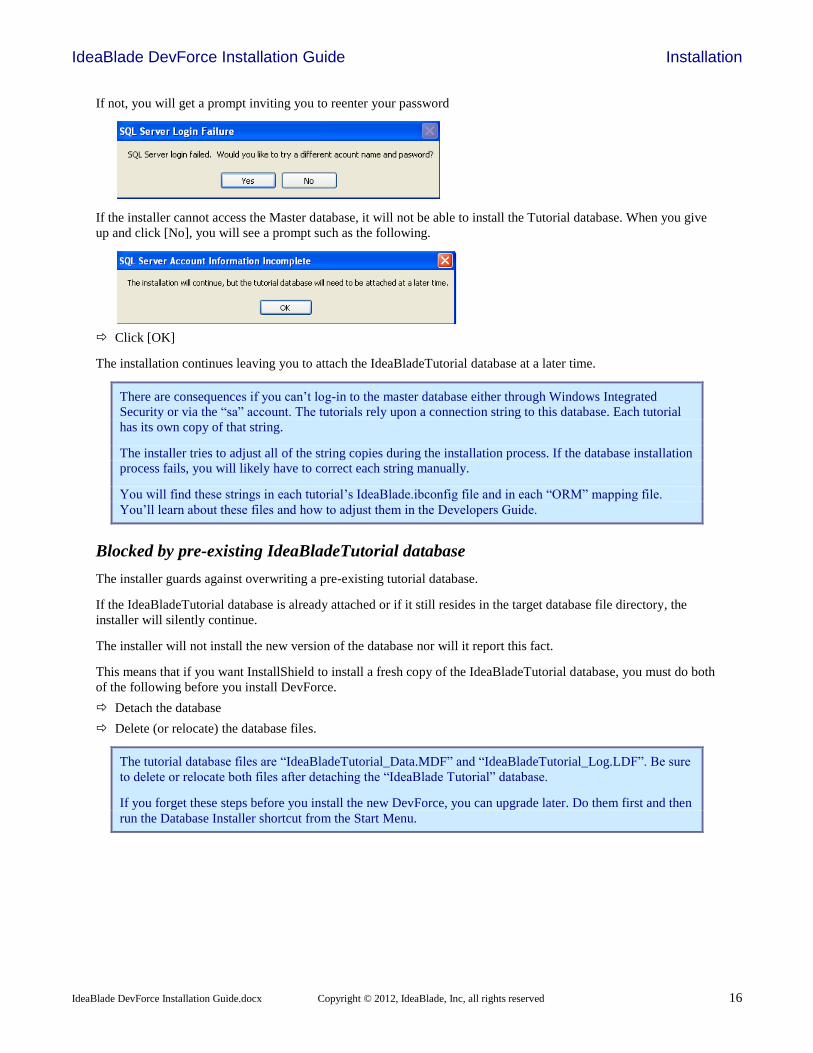
If not, you will get a prompt inviting you to reenter your password
If the installer cannot access the Master database, it will not be able to install the Tutorial database. When you give
up and click [No], you will see a prompt such as the following.
Click [OK]
The installation continues leaving you to attach the IdeaBladeTutorial database at a later time.
There are consequences if you can’t log-in to the master database either through Windows Integrated
Security or via the “sa” account. The tutorials rely upon a connection string to this database. Each tutorial
has its own copy of that string.
The installer tries to adjust all of the string copies during the installation process. If the database installation
process fails, you will likely have to correct each string manually.
You will find these strings in each tutorial’s IdeaBlade.ibconfig file and in each “ORM” mapping file.
You’ll learn about these files and how to adjust them in the Developers Guide.
Blocked by pre-existing IdeaBladeTutorial database
The installer guards against overwriting a pre-existing tutorial database.
If the IdeaBladeTutorial database is already attached or if it still resides in the target database file directory, the
installer will silently continue.
The installer will not install the new version of the database nor will it report this fact.
This means that if you want InstallShield to install a fresh copy of the IdeaBladeTutorial database, you must do both
of the following before you install DevForce.
Detach the database
Delete (or relocate) the database files.
The tutorial database files are “IdeaBladeTutorial_Data.MDF” and “IdeaBladeTutorial_Log.LDF”. Be sure
to delete or relocate both files after detaching the “IdeaBlade Tutorial” database.
If you forget these steps before you install the new DevForce, you can upgrade later. Do them first and then
run the Database Installer shortcut from the Start Menu.
IdeaBlade DevForce Installation Guide Installation
IdeaBlade DevForce Installation Guide.docx Copyright © 2012, IdeaBlade, Inc, all rights reserved 17
After the Install You’ll get a confirmation message when the installation completes. In most cases, the installation is complete, and
you are ready to begin.
Are You New to DevForce?
The installation process loaded a number of helpful resources onto your machine such as tutorials, a concepts
manual and a developer guide. You can learn a bit more about these in the “Documentation and Tools” chapter near
the end of this guide.
Before You Begin
We suggest that you take a quick tour of Visual Studio to confirm the installation. You will want to confirm that
The IdeaBlade DevForce Object Mapping Tool is available in the “Tools” menu.
The Visual Studio Toolbox window shows the DevForce tab and our Toolbox items
IdeaBlade DevForce Object Mapper
IdeaBlade DevForce Object Mapping Tool (AKA, the “Object Mapper”) is essential to building your business object
model. You should be able to launch the Object Mapper from the Visual Studio “Tools” menu.
Launch Visual Studio.
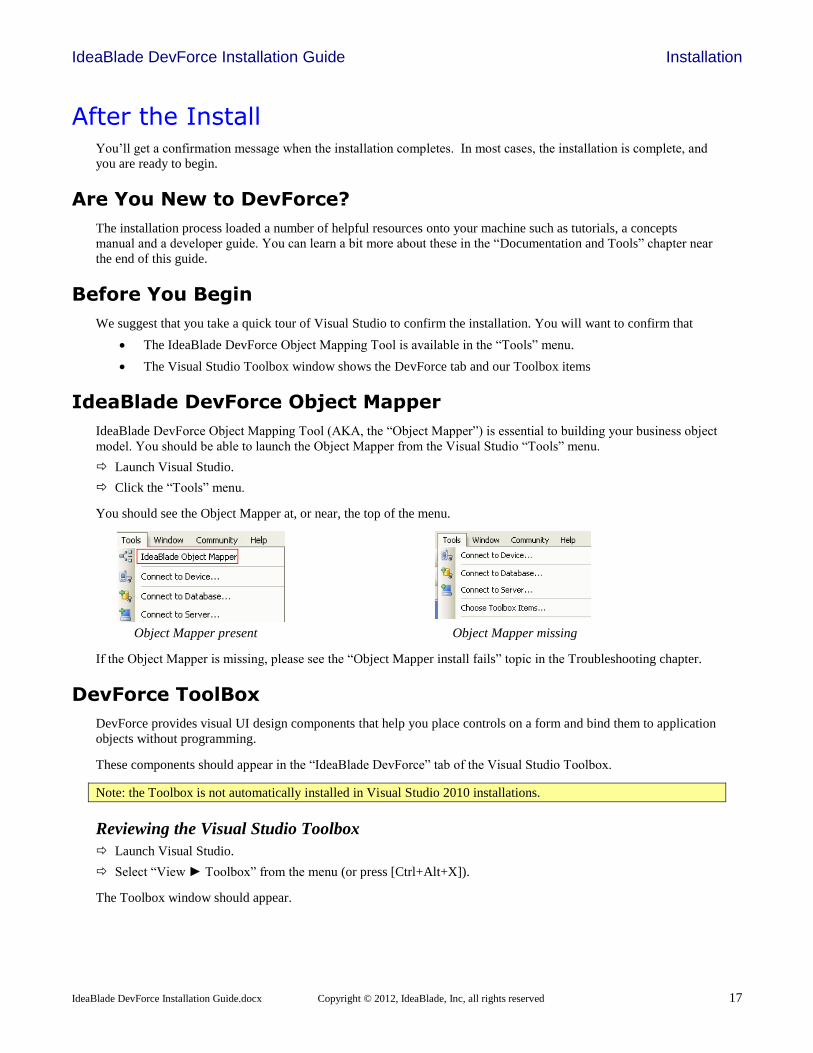
Click the “Tools” menu.
You should see the Object Mapper at, or near, the top of the menu.
Object Mapper present Object Mapper missing
If the Object Mapper is missing, please see the “Object Mapper install fails” topic in the Troubleshooting chapter.
DevForce ToolBox
DevForce provides visual UI design components that help you place controls on a form and bind them to application
objects without programming.
These components should appear in the “IdeaBlade DevForce” tab of the Visual Studio Toolbox.
Note: the Toolbox is not automatically installed in Visual Studio 2010 installations.
Reviewing the Visual Studio Toolbox
Launch Visual Studio.
Select “View ► Toolbox” from the menu (or press [Ctrl+Alt+X]).
The Toolbox window should appear.
IdeaBlade DevForce Installation Guide Installation
IdeaBlade DevForce Installation Guide.docx Copyright © 2012, IdeaBlade, Inc, all rights reserved 18
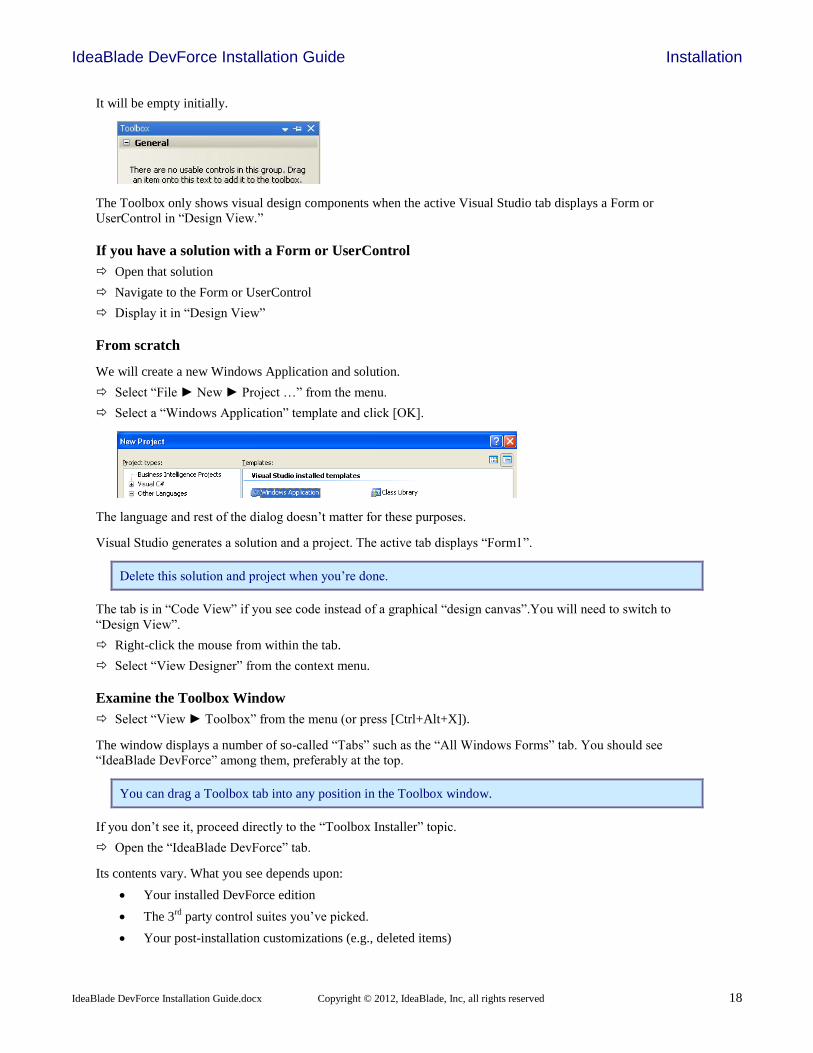
It will be empty initially.
The Toolbox only shows visual design components when the active Visual Studio tab displays a Form or
UserControl in “Design View.”
If you have a solution with a Form or UserControl
Open that solution
Navigate to the Form or UserControl
Display it in “Design View”
From scratch
We will create a new Windows Application and solution.
Select “File ► New ► Project …” from the menu.
Select a “Windows Application” template and click [OK].
The language and rest of the dialog doesn’t matter for these purposes.
Visual Studio generates a solution and a project. The active tab displays “Form1”.
Delete this solution and project when you’re done.
The tab is in “Code View” if you see code instead of a graphical “design canvas”.You will need to switch to
“Design View”.
Right-click the mouse from within the tab.
Select “View Designer” from the context menu.
Examine the Toolbox Window
Select “View ► Toolbox” from the menu (or press [Ctrl+Alt+X]).
The window displays a number of so-called “Tabs” such as the “All Windows Forms” tab. You should see
“IdeaBlade DevForce” among them, preferably at the top.
You can drag a Toolbox tab into any position in the Toolbox window.
If you don’t see it, proceed directly to the “Toolbox Installer” topic.
Open the “IdeaBlade DevForce” tab.
Its contents vary. What you see depends upon:
Your installed DevForce edition
The 3rd
party control suites you’ve picked.
Your post-installation customizations (e.g., deleted items)
IdeaBlade DevForce Installation Guide Installation
IdeaBlade DevForce Installation Guide.docx Copyright © 2012, IdeaBlade, Inc, all rights reserved 19
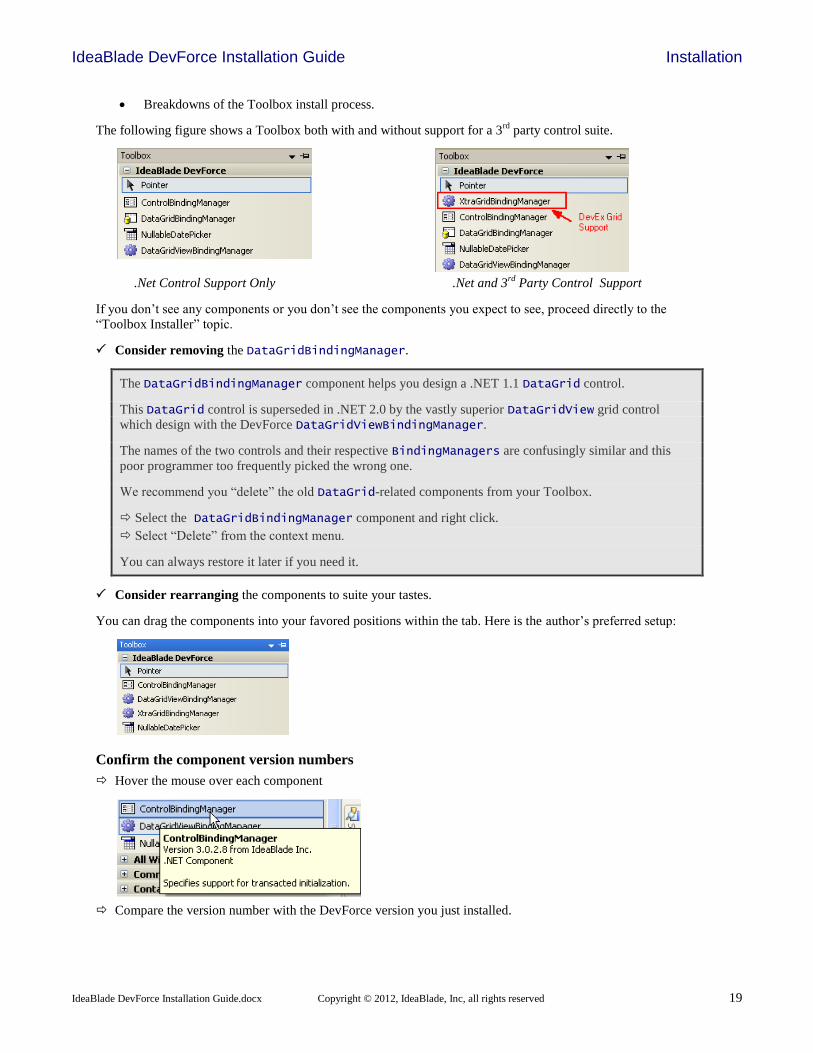
Breakdowns of the Toolbox install process.
The following figure shows a Toolbox both with and without support for a 3rd
party control suite.
.Net Control Support Only .Net and 3rd
Party Control Support
If you don’t see any components or you don’t see the components you expect to see, proceed directly to the
“Toolbox Installer” topic.
Consider removing the DataGridBindingManager.
The DataGridBindingManager component helps you design a .NET 1.1 DataGrid control.
This DataGrid control is superseded in .NET 2.0 by the vastly superior DataGridView grid control
which design with the DevForce DataGridViewBindingManager.
The names of the two controls and their respective BindingManagers are confusingly similar and this
poor programmer too frequently picked the wrong one.
We recommend you “delete” the old DataGrid-related components from your Toolbox.
Select the DataGridBindingManager component and right click.
Select “Delete” from the context menu.
You can always restore it later if you need it.
Consider rearranging the components to suite your tastes.
You can drag the components into your favored positions within the tab. Here is the author’s preferred setup:
Confirm the component version numbers
Hover the mouse over each component
Compare the version number with the DevForce version you just installed.
IdeaBlade DevForce Installation Guide Installation
IdeaBlade DevForce Installation Guide.docx Copyright © 2012, IdeaBlade, Inc, all rights reserved 20
See the “Identifying your DevForce version” topic in the Troubleshooting chapter.
If the component version number does not match the DevForce version number you must remove the mismatched
items from the Toolbox and re-install them.
If all items are mismatched, remove the tab:
Right click the tab.
Select “Delete Tab”
If only some of the items have the wrong version:
Remove each mismatched item
Right-click the item
Select “Delete”
this removes it from the tab; it does not delete the component from your system.
Click [OK]
Proceed directly to the “Toolbox Installer” topic.
Toolbox Installer
There are a number of reasons to install or re-install the DevForce UI visual design components as a separate step:
The main installer did not add the tab or its items.
You choose custom installation and omitted support for a tool suite.
You just purchased a 3rd
party control suite and want to add DevForce support.
You deleted the tab or some of its items and want to re-install them.
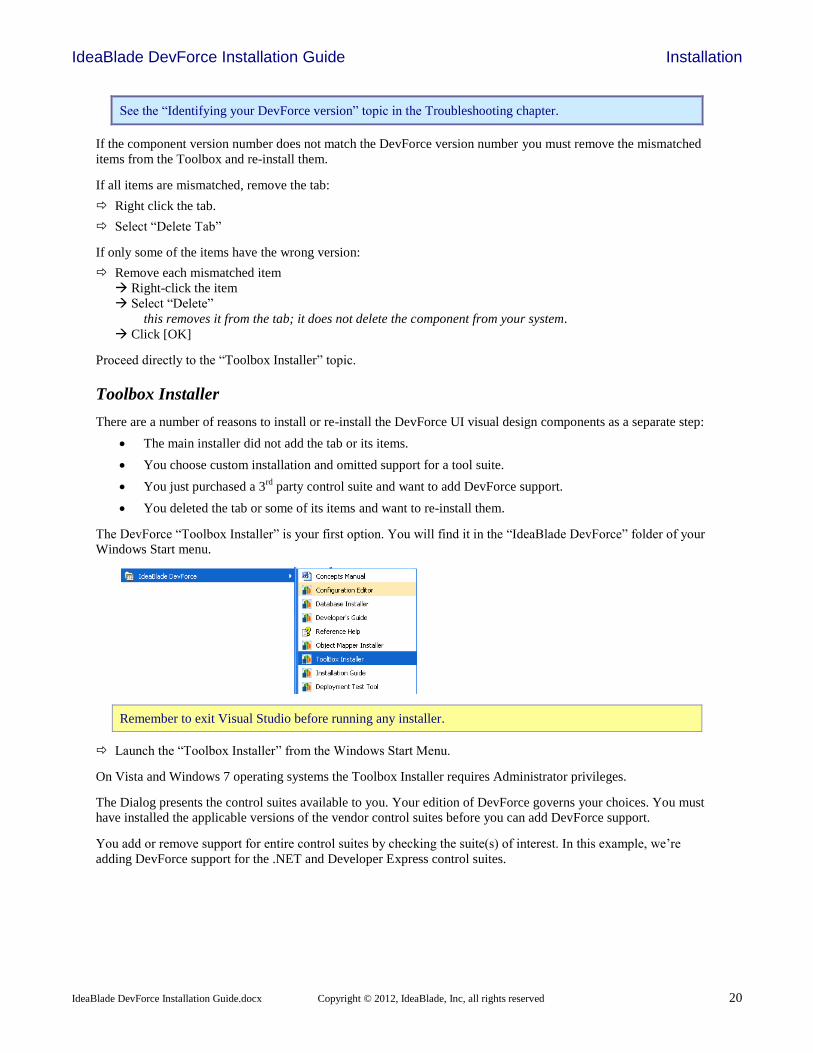
The DevForce “Toolbox Installer” is your first option. You will find it in the “IdeaBlade DevForce” folder of your
Windows Start menu.
Remember to exit Visual Studio before running any installer.
Launch the “Toolbox Installer” from the Windows Start Menu.
On Vista and Windows 7 operating systems the Toolbox Installer requires Administrator privileges.
The Dialog presents the control suites available to you. Your edition of DevForce governs your choices. You must
have installed the applicable versions of the vendor control suites before you can add DevForce support.
You add or remove support for entire control suites by checking the suite(s) of interest. In this example, we’re
adding DevForce support for the .NET and Developer Express control suites.
IdeaBlade DevForce Installation Guide Installation
IdeaBlade DevForce Installation Guide.docx Copyright © 2012, IdeaBlade, Inc, all rights reserved 21
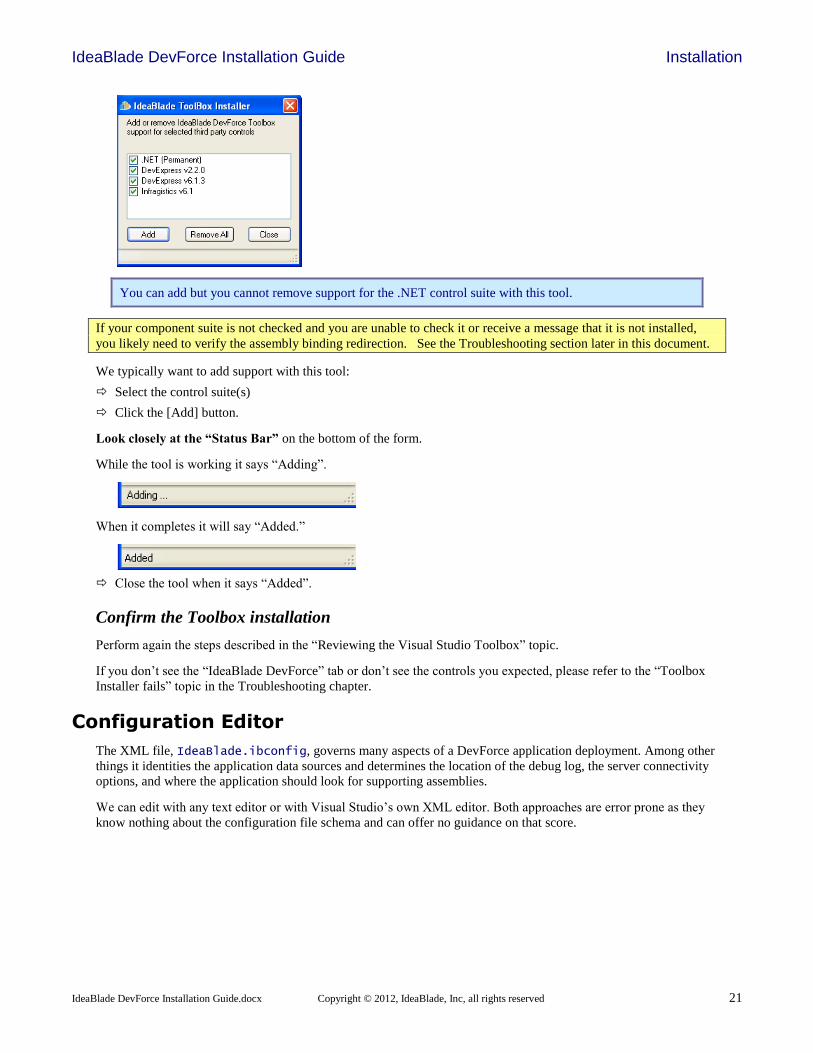
You can add but you cannot remove support for the .NET control suite with this tool.
If your component suite is not checked and you are unable to check it or receive a message that it is not installed,
you likely need to verify the assembly binding redirection. See the Troubleshooting section later in this document.
We typically want to add support with this tool:
Select the control suite(s)
Click the [Add] button.
Look closely at the “Status Bar” on the bottom of the form.
While the tool is working it says “Adding”.
When it completes it will say “Added.”
Close the tool when it says “Added”.
Confirm the Toolbox installation
Perform again the steps described in the “Reviewing the Visual Studio Toolbox” topic.
If you don’t see the “IdeaBlade DevForce” tab or don’t see the controls you expected, please refer to the “Toolbox
Installer fails” topic in the Troubleshooting chapter.
Configuration Editor
The XML file, IdeaBlade.ibconfig, governs many aspects of a DevForce application deployment. Among other
things it identities the application data sources and determines the location of the debug log, the server connectivity
options, and where the application should look for supporting assemblies.
We can edit with any text editor or with Visual Studio’s own XML editor. Both approaches are error prone as they
know nothing about the configuration file schema and can offer no guidance on that score.
IdeaBlade DevForce Installation Guide Installation
IdeaBlade DevForce Installation Guide.docx Copyright © 2012, IdeaBlade, Inc, all rights reserved 22
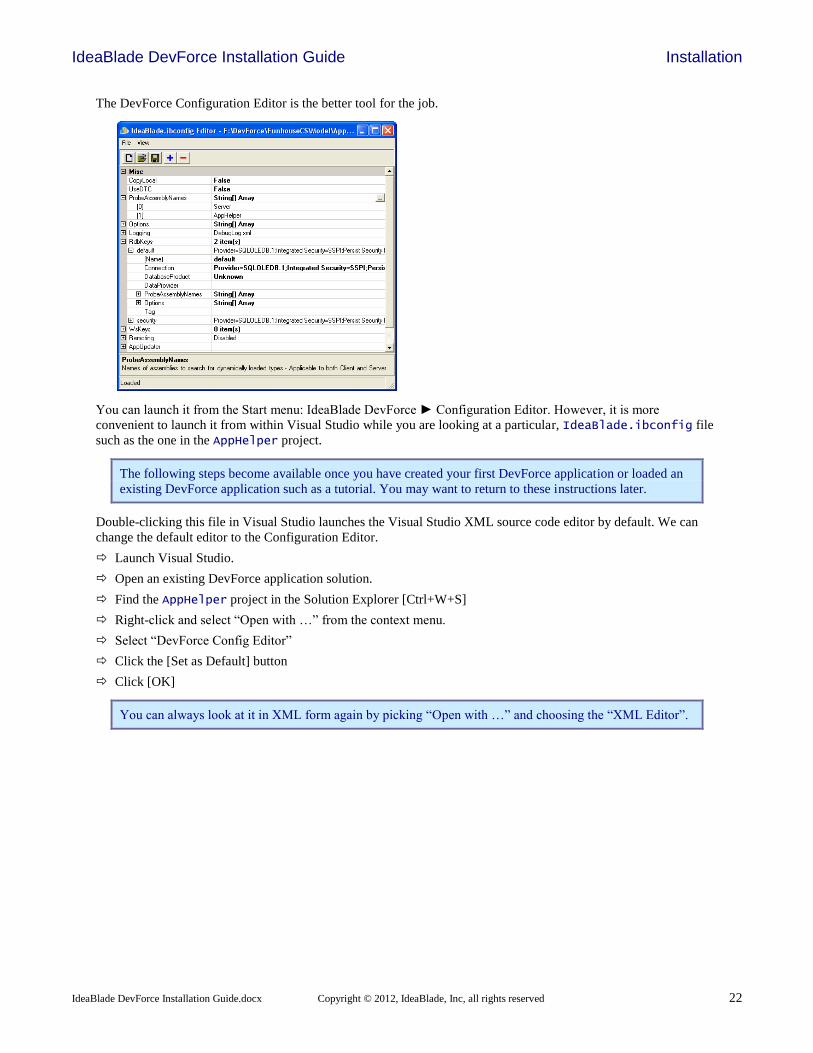
The DevForce Configuration Editor is the better tool for the job.
You can launch it from the Start menu: IdeaBlade DevForce ► Configuration Editor. However, it is more
convenient to launch it from within Visual Studio while you are looking at a particular, IdeaBlade.ibconfig file
such as the one in the AppHelper project.
The following steps become available once you have created your first DevForce application or loaded an
existing DevForce application such as a tutorial. You may want to return to these instructions later.
Double-clicking this file in Visual Studio launches the Visual Studio XML source code editor by default. We can
change the default editor to the Configuration Editor.
Launch Visual Studio.
Open an existing DevForce application solution.
Find the AppHelper project in the Solution Explorer [Ctrl+W+S]
Right-click and select “Open with …” from the context menu.
Select “DevForce Config Editor”
Click the [Set as Default] button
Click [OK]
You can always look at it in XML form again by picking “Open with …” and choosing the “XML Editor”.
IdeaBlade DevForce Installation Guide Installation
IdeaBlade DevForce Installation Guide.docx Copyright © 2012, IdeaBlade, Inc, all rights reserved 23
Modifying or removing your DevForce Installation If you have purchased an upgrade, for example, from Professional to Enterprise, you must uninstall and reinstall
DevForce.
For versions of DevForce prior to 3.5.0, you must uninstall and reinstall if you wish to modify your installation. As
of Release 3.5.0, you can modify your DevForce installation without uninstalling and reinstalling it. You can make
the following types of changes to your existing installation:
Add support for additional third party control suites (if your serial number permits it) if, for example, you
installed a third-party control suite after you installed DevForce. The topic “Compatibility with Optional
Third Party Control Suites” in this manual documents the third party control suites DevForce natively
supports.
Install the Tutorials if you did not previously do so.
In the unlikely event that you wish to remove a feature from your installation, you can do that as well.
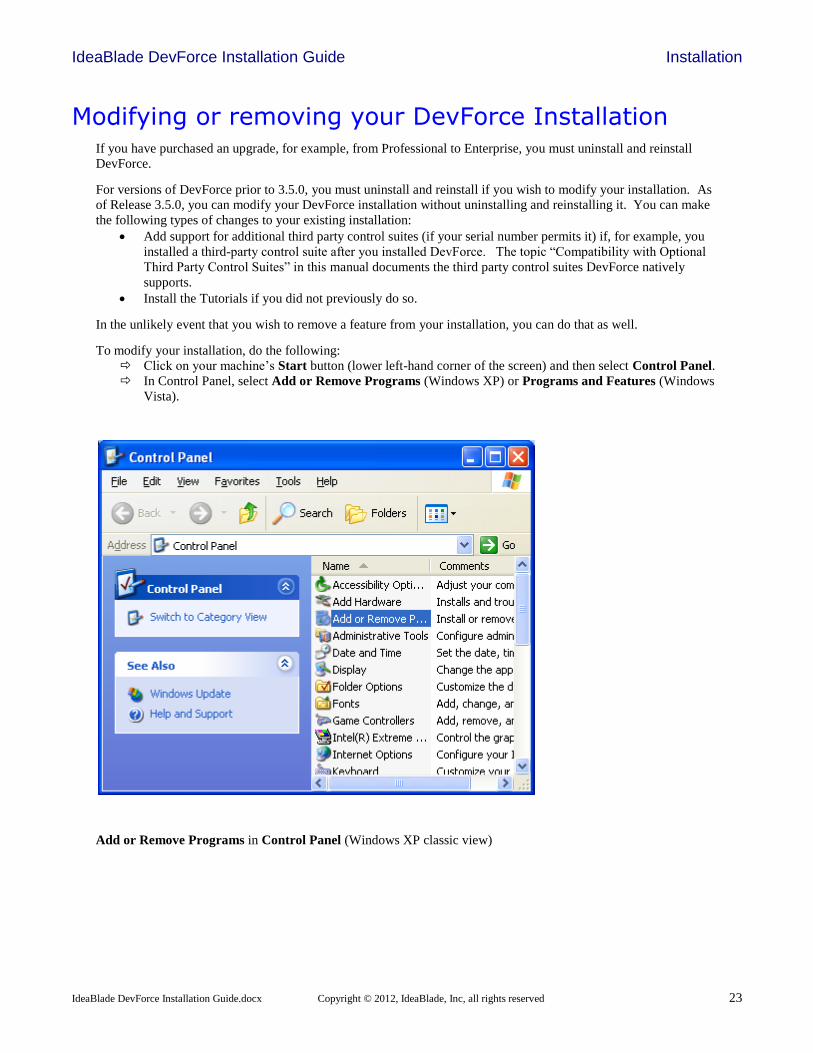
To modify your installation, do the following:
Click on your machine’s Start button (lower left-hand corner of the screen) and then select Control Panel.
In Control Panel, select Add or Remove Programs (Windows XP) or Programs and Features (Windows
Vista).
Add or Remove Programs in Control Panel (Windows XP classic view)
IdeaBlade DevForce Installation Guide Installation
IdeaBlade DevForce Installation Guide.docx Copyright © 2012, IdeaBlade, Inc, all rights reserved 24
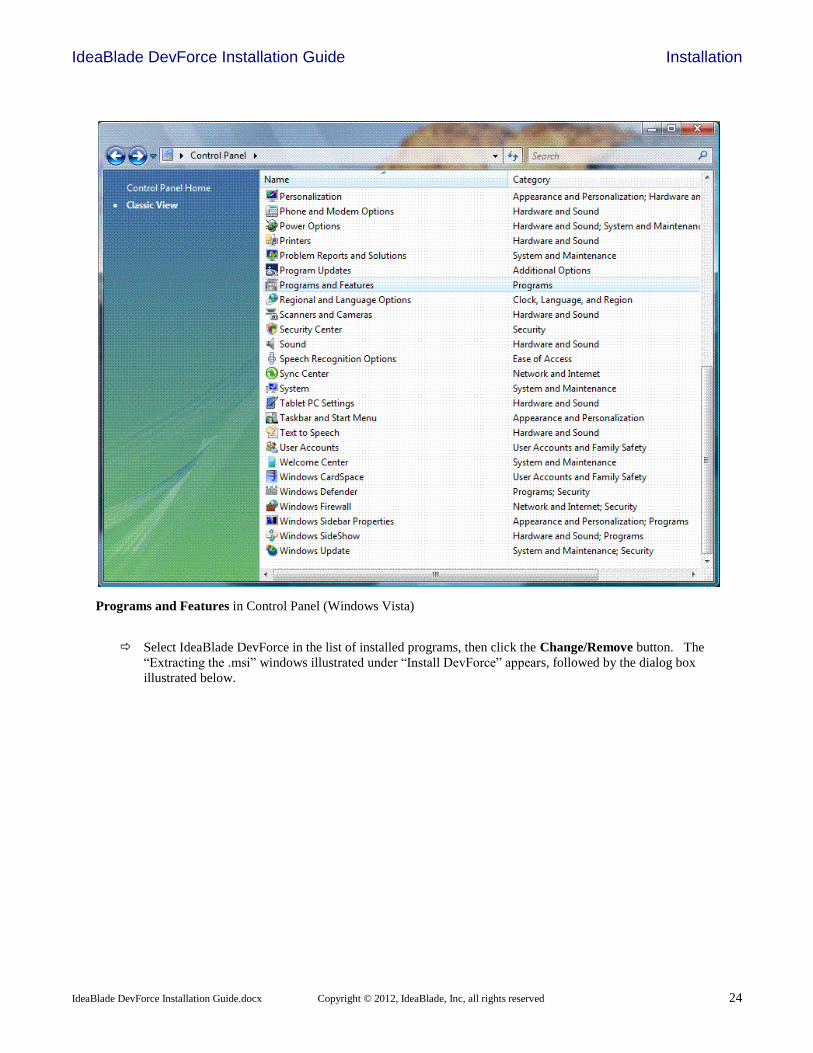
Programs and Features in Control Panel (Windows Vista)
Select IdeaBlade DevForce in the list of installed programs, then click the Change/Remove button. The
“Extracting the .msi” windows illustrated under “Install DevForce” appears, followed by the dialog box
illustrated below.
IdeaBlade DevForce Installation Guide Installation
IdeaBlade DevForce Installation Guide.docx Copyright © 2012, IdeaBlade, Inc, all rights reserved 25
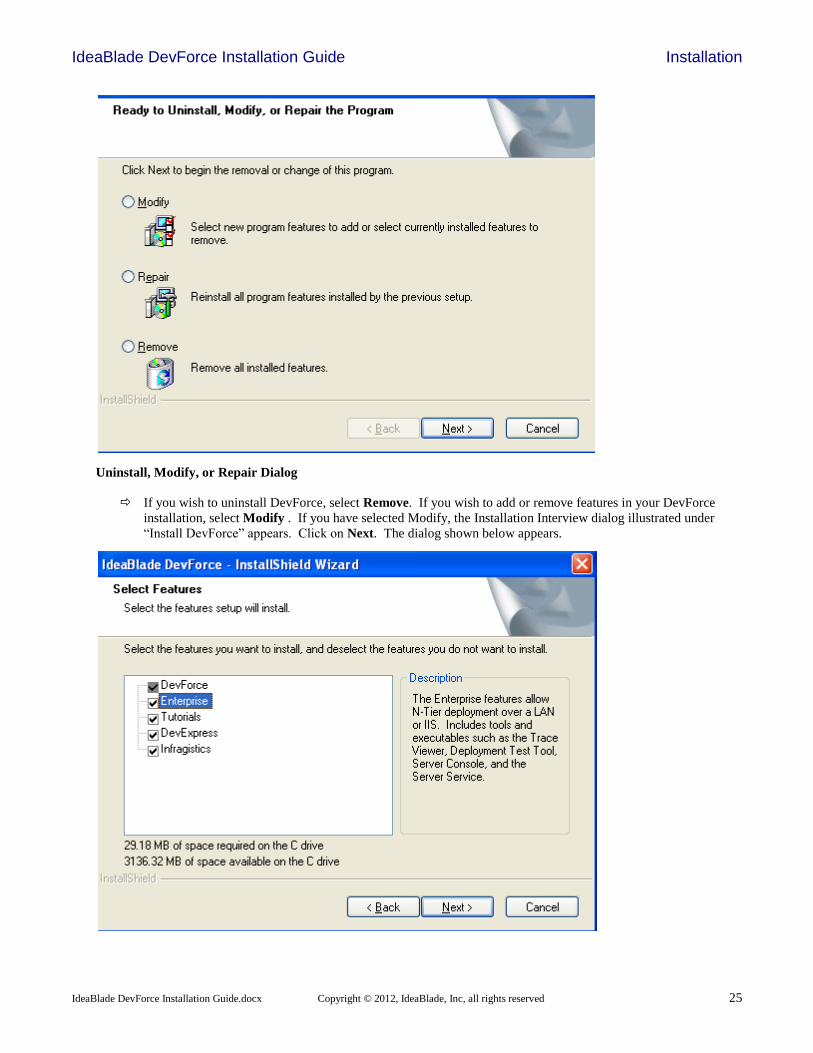
Uninstall, Modify, or Repair Dialog
If you wish to uninstall DevForce, select Remove. If you wish to add or remove features in your DevForce
installation, select Modify . If you have selected Modify, the Installation Interview dialog illustrated under
“Install DevForce” appears. Click on Next. The dialog shown below appears.
IdeaBlade DevForce Installation Guide Installation
IdeaBlade DevForce Installation Guide.docx Copyright © 2012, IdeaBlade, Inc, all rights reserved 26
All features available for the edition of DevForce you have purchased are displayed. Features that have
already been installed are checked and those not installed are unchecked. Check the ones you wish to
install and uncheck the ones you do not wish to install. Features that you have already installed should be
left checked, otherwise they will be uninstalled. Click the Next button to proceed.
A window displaying the progress of the update appears. The installation is complete when this window
exits.
If you have added one or more third party control suites as part of your modification to your DevForce
installation, run the Toolbox Installer after modifying your installation. This will add the DevForce
components that support these controls to the IdeaBlade DevForce toolbox tab.
IdeaBlade DevForce Installation Guide Updating Existing Applications
IdeaBlade DevForce Installation Guide.docx Copyright © 2012, IdeaBlade, Inc, all rights reserved 27
Updating Existing Applications
Consult the IdeaBlade DevForce Release Notes Should you upgrade from one DevForce Release to the next?
We believe it is a good idea to keep up with the current DevForce release. We think it’s important to lag no more
than one “Feature” release behind.
We indicate a “Feature” release by changing in the second digit of the DevForce version number (e.g., 3.1
to 3.2); a “Maintenance” release is a change in the third digit (e.g., 3.1.4 to 3.1.5). The fourth digit varies by
build and does not typically merit a release note.
Changes related to features and maintenance are meticulously documented in the IdeaBlade DevForce Release
Notes.
Access the Release Notes from the “Windows Start Menu | IdeaBlade DevForce | Release Notes”.
Read these notes before installing a new version of DevForce.
Sure they are informative. But more importantly, they tell you about the important, release-specific steps you must
take to upgrade your DevForce application from one release to the next.
Upgrading DevForce Versions You have a working application and you've just upgraded to a new version of DevForce.
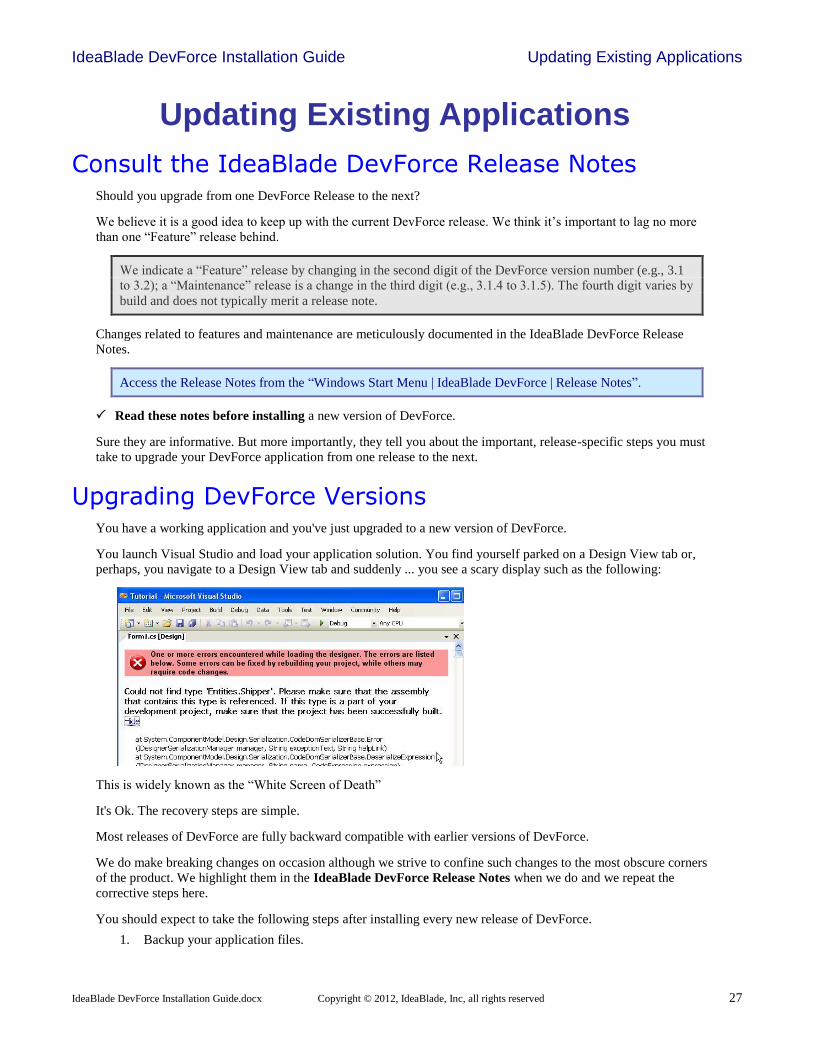
You launch Visual Studio and load your application solution. You find yourself parked on a Design View tab or,
perhaps, you navigate to a Design View tab and suddenly ... you see a scary display such as the following:
This is widely known as the “White Screen of Death”
It's Ok. The recovery steps are simple.
Most releases of DevForce are fully backward compatible with earlier versions of DevForce.
We do make breaking changes on occasion although we strive to confine such changes to the most obscure corners
of the product. We highlight them in the IdeaBlade DevForce Release Notes when we do and we repeat the
corrective steps here.
You should expect to take the following steps after installing every new release of DevForce.
1. Backup your application files.

IdeaBlade DevForce Installation Guide Updating Existing Applications
IdeaBlade DevForce Installation Guide.docx Copyright © 2012, IdeaBlade, Inc, all rights reserved 28
2. Refresh your project references to the IdeaBlade assemblies.
3. Follow the upgrade advice in the for this release in the IdeaBlade DevForce Release Notes
Many release upgrades require you to re-generate your business model entities
4. Rebuild your business object project(s).
Backup your Application Files
We can hardly emphasize enough the importance of backing up your application frequently and especially before
installing development software of any kind.
Do use a good automated source control system.
Refresh IdeaBlade References
You must now update the version numbers of the IdeaBlade assembly references in your solution projects.
Background
If you build a pre-existing DevForce application project after installing a new version of DevForce, you may see a
flood of errors such as these:
Visual Studio suspects that the problem is a missing reference. Its suspicions are correct – the referenced assemblies
may appear to be present in the Project but they are no longer valid.
Visual Studio 2005 changed the way a Project records references to strongly named assemblies. If a Project
references a strongly-named assembly – such as an IdeaBlade assembly in the Global Assembly Cache (GAC) – the
Project can only be build with that exact version of the assembly.
This ensures that Projects built with libraries are not accidentally “undone” by hidden, breaking changes in those
libraries.
All IdeaBlade assemblies are strongly-named and are installed in the GAC on the developer’s machine.
They do not go in the GAC of end user machines – and in general they should not be installed there.
All application development assemblies of a new DevForce release receive a new version number – and this number
is always the same across the development assemblies.
The developer tool assemblies such as the Toolbox Installer may have different version numbers.
Consequently, you must update the IdeaBlade assembly references in all of your projects. This need not be an
onerous task.
IdeaBlade DevForce Installation Guide Updating Existing Applications
IdeaBlade DevForce Installation Guide.docx Copyright © 2012, IdeaBlade, Inc, all rights reserved 29
What is the Project’s referenced version?
There is no visual clue that the IdeaBlade references are out-of-date.
You could inspect the property sheet of each reference separately.
Right-click a reference
Select “Property” from the context menu
In a VB.NET project, to see the references in the Solution Explorer, you must activate “Show All” by
pressing the button in the Solution Explorer tool bar,
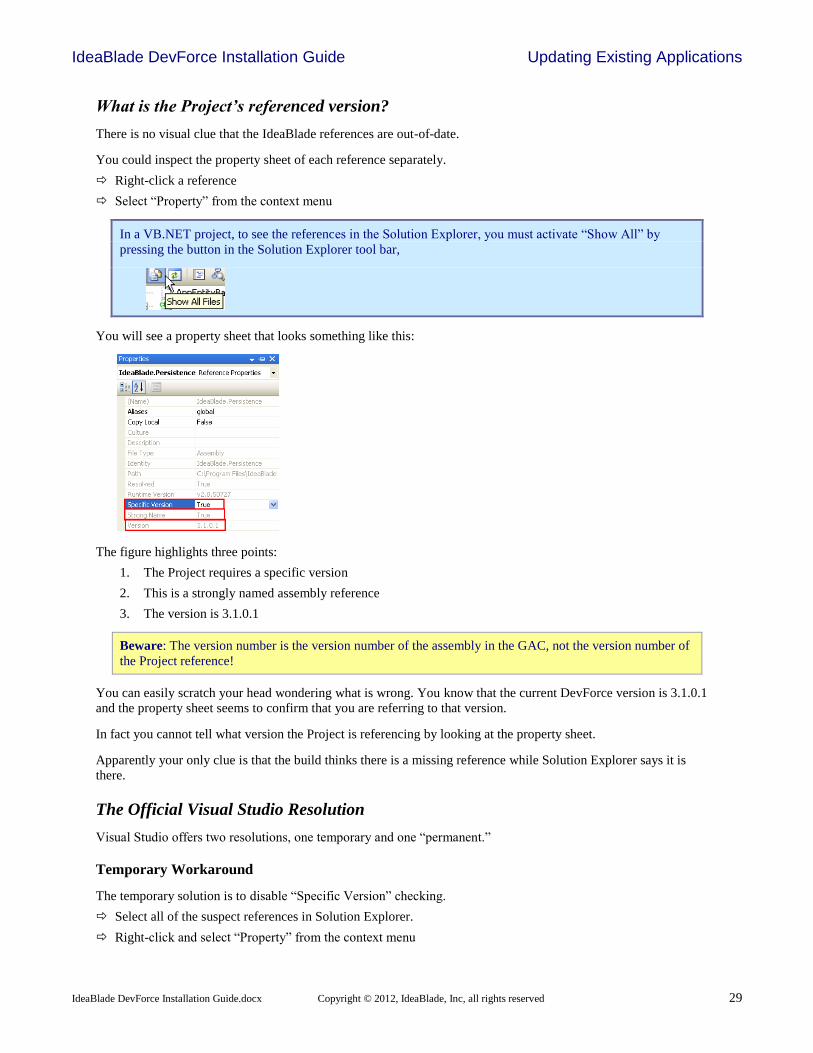
You will see a property sheet that looks something like this:
The figure highlights three points:
1. The Project requires a specific version
2. This is a strongly named assembly reference
3. The version is 3.1.0.1
Beware: The version number is the version number of the assembly in the GAC, not the version number of
the Project reference!
You can easily scratch your head wondering what is wrong. You know that the current DevForce version is 3.1.0.1
and the property sheet seems to confirm that you are referring to that version.
In fact you cannot tell what version the Project is referencing by looking at the property sheet.
Apparently your only clue is that the build thinks there is a missing reference while Solution Explorer says it is
there.
The Official Visual Studio Resolution
Visual Studio offers two resolutions, one temporary and one “permanent.”
Temporary Workaround
The temporary solution is to disable “Specific Version” checking.
Select all of the suspect references in Solution Explorer.
Right-click and select “Property” from the context menu

IdeaBlade DevForce Installation Guide Updating Existing Applications
IdeaBlade DevForce Installation Guide.docx Copyright © 2012, IdeaBlade, Inc, all rights reserved 30
Set the “Specific Version” switch to “False” for the selected references.
Now you can recompile and the project will build (unless some other dependent assembly has the same problem).
What is wrong with this? You surrender the strong version checking that could be important to the quality of your
application.
This is exactly what we do with our Tutorial projects. The consequences do not seem dire.
“Permanent” Resolution
The proper way is to remove all of these references and recreate them. There is no “refresh” button. You have to
Select all of the suspect references in Solution Explorer.
Right-click and select “Remove” from the context menu
Right-click “References” and select “Add Reference …” from the context menu.
Hunt for these references again in the “.NET” tab of the “Add Reference” dialog.
Needless to say, this is a time-consuming and error-prone process.
Moreover, you will just have to repeat it with the your next install of DevForce (or any other referenced library).
The Unofficial Fast Alternative
Fortunately, the Project is defined by an XML file named either ProjectName.csproj or
ProjectName.vbproj. You can edit it in any text editor if you’re careful.
Remember to backup
Here is an example:
The figure highlights the version numbers of the strongly-named IdeaBlade DevForce assemblies. Now we can see
that the referenced versions, 3.0.3.2, are not the same as the versions in the GAC which are 3.1.0.1 at this time.
Update these version numbers
Save the project file
Close the solution in Visual Studio (it has cached the prior Project file)
Re-open the solution.
This is not too painful. With the right tool one could sweep an entire solution full of project files.
Summary
You will have to update your application’s references to IdeaBlade assemblies. Your choices are:
Give up strong version checking.
Remove and re-add references.
Edit the references in the Project files.

IdeaBlade DevForce Installation Guide Updating Existing Applications
IdeaBlade DevForce Installation Guide.docx Copyright © 2012, IdeaBlade, Inc, all rights reserved 31
Follow steps prescribed in the IdeaBlade DevForce Release Notes
Some releases require no further action on your part. Others may require you to re-generate your business object
classes or run other tools that help you migrate your application from one release to the next.
While consulting the Release Notes before upgrading, you may have learned about some change or technique that
you think warrants some manual recoding of your application. You probably want to make the change after
migrating but that may not always be possible.
In certain rare cases, we may have introduced a change that breaks your application; you’ll either have to modify
your code or wait to migrate. We hope you did your due diligence before getting this far.
Regenerate your business object classes
As we just noted, this may not or may not be required by the new release.
We tell you in the IdeaBlade DevForce Release Notes when we think that a release requires regeneration but you
should be prepared to regenerate in any case.
We are constantly evolving our object mapping technology and the improvements often involve changes to the
mapping file and to the structure of DevForce generated DataRow and DataTable classes.
These classes are “owned” by DevForce in the sense that it must always be possible to regenerate them with the
Object Mapper. In this respect they are like the Designer code generated by Visual Studio when you build a Form or
Control in Design View.
You should never alter these class files in any way nor should you depend upon aspects of their internal construction
unless they are marked public or protected.
You should make your changes to the “Final” and “Abstract” classes that descend from the DataRow classes.
Accordingly, we regard the DataRow and DataTable classes as DevForce internal classes and feel empowered to
modify their implementation from release to release without bothering you about it … except for this one thing.
We may ask you to regenerate them with the Object Mapper.
Please do not confuse “rebuilding” or “recompiling” the model with “regenerating” the model.
“Rebuilding” is a Visual Studio operation; you will probably have to rebuild in any case.
You can only “regenerate” the business model with the DevForce Object Mapper. You will rebuild your
solution after you’ve regenerated the model.
The Scary Design View problem
You encountered the scary “Design View” display we described at the opening of this chapter.
Close this form
Take the actions discussed above:
Refresh your IdeaBlade references
Regenerate and rebuild the business object project
Correct for any breaking changes
Rebuild the solution
Re-open the form in Design View
If you still see the same scary red message, that may still be Ok.
IdeaBlade DevForce Installation Guide Updating Existing Applications
IdeaBlade DevForce Installation Guide.docx Copyright © 2012, IdeaBlade, Inc, all rights reserved 32
When you opened the solution, it was probably parked in Design View on this Form or UserControl. Visual Studio
has cached information about that view – information that is no longer true. Visual Studio won't let go. The remedy
is simple.
Shut down Visual Studio and re-launch the solution.
Visual Studio will now load its cache with the correct information and the form should display properly in Design
View.
IdeaBlade DevForce Installation Guide Updating Existing Applications
IdeaBlade DevForce Installation Guide.docx Copyright © 2012, IdeaBlade, Inc, all rights reserved 33
Updating 3rd Party UI Control Suites DevForce extends the native .NET data binding architecture. For example, you can bind to nested and dynamic
properties of any object as when you bind to the “Name” property of the “State” class when displaying an
employee’s home address. The bound data property is HomeAddress.State.Name.
Some DevForce editions provide special and programmatic support for third party control suites. That means there
are vendor-specific “control binders”, binding descriptors, binding managers, and visual UI designers.
We build each DevForce release to work with a particular release of the control vendor’s product. We and our
vendors do not coordinate our release schedules. We do our best to keep up but we may lag a month or more behind
and, in that interim, the vendor may unleash a torrent of update patches, each with a new build number.
We cannot simply refer to their control suites by assembly name. We have to refer to them by their strong names.
We can only certify our product to work with the controls that we’ve tested. Thus, our DLLs are locked to specific
versions of their DLLs.
3rd
party control updates can break our code but most of the time the changes are transparent to DevForce. Our focus
is on the mechanics of binding to their controls. We usually are indifferent to the vendor’s improvements and repairs
to control styles and behavior.
You, on the other hand, may want the latest control suite update – and want it right now because your application is
tripping over a bug or infelicity. What to do?
Fortunately, .NET offers a technique called “Assembly Redirection”. With redirection you get to say, in effect,
“when the application asks for 3.2.1.3 of this DLL, please use the 3.2.2.0 version instead.” If .NET can find that
version, your application can continue.
While we cannot guarantee that our code will work with this alternate version it is certainly worth a try; Customer
Support may be able to confirm that other customers are doing just fine with the vendor’s release.
Assembly Redirection For Client Applications
Your client applications ship with the control vendor’s client libraries. You’ve just downloaded and referenced the
vendor’s latest release.
You don’t want to ship both the current and the DevForce authorized versions of these libraries – even if that is
possible – because these are multi-megabyte libraries and installing two sets makes for an overweight application.
You will fix your user interface Project references to point to the current vendor’s release, perhaps using the same
techniques discussed in “Refresh IdeaBlade References” above. Your own code will refer to this new version
henceforth.
Write down the DevForce referenced version number first. You will need to know it when you write your
re-direction instructions.
Meanwhile, the DevForce assemblies are pointing to an older version. Let’s re-direct them to the new version.
Add an Application Configuration File
You can add a .NET application configuration file to your StartUp Project manually.
Select your StartUp Project in Solution Explorer
Right-click and select “Add ► New Item …” from the context menu.
Find and select the “Application Configuration File” template.
Click [Add], thus accepting the suggested name, “App.config”.
IdeaBlade DevForce Installation Guide Updating Existing Applications
IdeaBlade DevForce Installation Guide.docx Copyright © 2012, IdeaBlade, Inc, all rights reserved 34
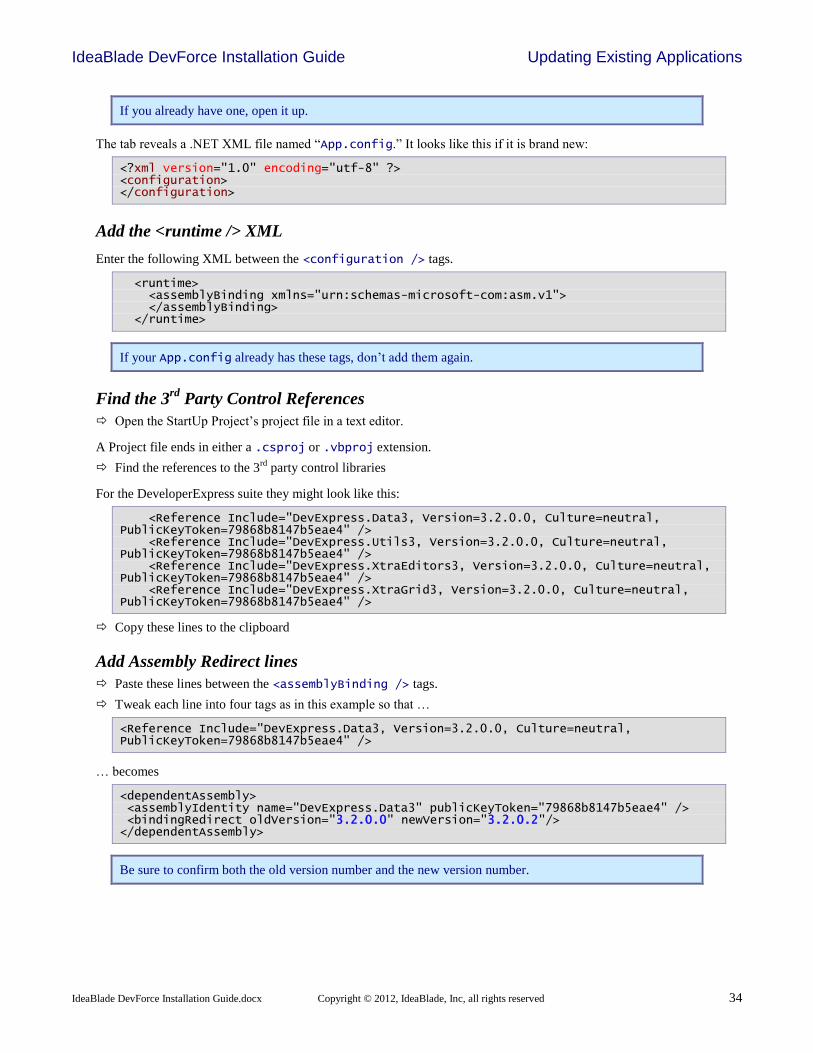
If you already have one, open it up.
The tab reveals a .NET XML file named “App.config.” It looks like this if it is brand new:
<?xml version="1.0" encoding="utf-8" ?> <configuration> </configuration>
Add the <runtime /> XML
Enter the following XML between the <configuration /> tags.
<runtime> <assemblyBinding xmlns="urn:schemas-microsoft-com:asm.v1"> </assemblyBinding> </runtime>
If your App.config already has these tags, don’t add them again.
Find the 3rd
Party Control References
Open the StartUp Project’s project file in a text editor.
A Project file ends in either a .csproj or .vbproj extension.
Find the references to the 3rd
party control libraries
For the DeveloperExpress suite they might look like this:
<Reference Include="DevExpress.Data3, Version=3.2.0.0, Culture=neutral, PublicKeyToken=79868b8147b5eae4" /> <Reference Include="DevExpress.Utils3, Version=3.2.0.0, Culture=neutral, PublicKeyToken=79868b8147b5eae4" /> <Reference Include="DevExpress.XtraEditors3, Version=3.2.0.0, Culture=neutral, PublicKeyToken=79868b8147b5eae4" /> <Reference Include="DevExpress.XtraGrid3, Version=3.2.0.0, Culture=neutral, PublicKeyToken=79868b8147b5eae4" />
Copy these lines to the clipboard
Add Assembly Redirect lines
Paste these lines between the <assemblyBinding /> tags.
Tweak each line into four tags as in this example so that …
<Reference Include="DevExpress.Data3, Version=3.2.0.0, Culture=neutral, PublicKeyToken=79868b8147b5eae4" />
… becomes
<dependentAssembly> <assemblyIdentity name="DevExpress.Data3" publicKeyToken="79868b8147b5eae4" /> <bindingRedirect oldVersion="3.2.0.0" newVersion="3.2.0.2"/> </dependentAssembly>
Be sure to confirm both the old version number and the new version number.
IdeaBlade DevForce Installation Guide Updating Existing Applications
IdeaBlade DevForce Installation Guide.docx Copyright © 2012, IdeaBlade, Inc, all rights reserved 35
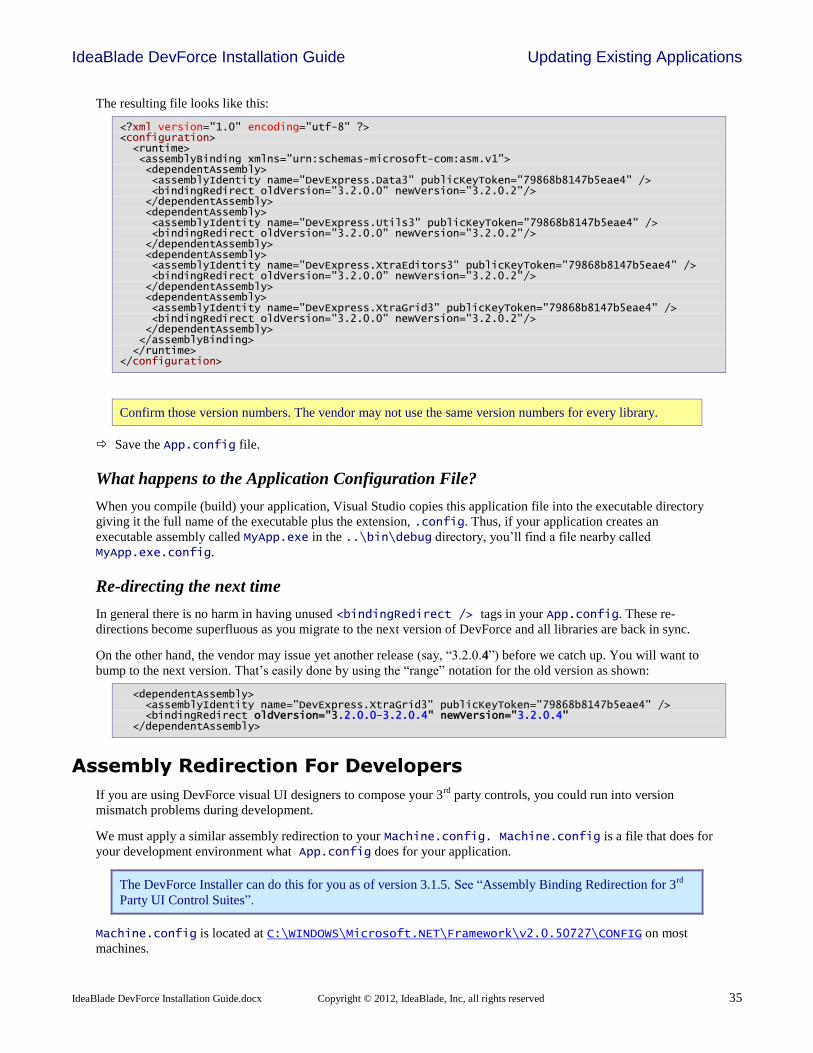
The resulting file looks like this:
<?xml version="1.0" encoding="utf-8" ?> <configuration> <runtime> <assemblyBinding xmlns="urn:schemas-microsoft-com:asm.v1"> <dependentAssembly> <assemblyIdentity name="DevExpress.Data3" publicKeyToken="79868b8147b5eae4" /> <bindingRedirect oldVersion="3.2.0.0" newVersion="3.2.0.2"/> </dependentAssembly> <dependentAssembly> <assemblyIdentity name="DevExpress.Utils3" publicKeyToken="79868b8147b5eae4" /> <bindingRedirect oldVersion="3.2.0.0" newVersion="3.2.0.2"/> </dependentAssembly> <dependentAssembly> <assemblyIdentity name="DevExpress.XtraEditors3" publicKeyToken="79868b8147b5eae4" /> <bindingRedirect oldVersion="3.2.0.0" newVersion="3.2.0.2"/> </dependentAssembly> <dependentAssembly> <assemblyIdentity name="DevExpress.XtraGrid3" publicKeyToken="79868b8147b5eae4" /> <bindingRedirect oldVersion="3.2.0.0" newVersion="3.2.0.2"/> </dependentAssembly> </assemblyBinding> </runtime> </configuration>
Confirm those version numbers. The vendor may not use the same version numbers for every library.
Save the App.config file.
What happens to the Application Configuration File?
When you compile (build) your application, Visual Studio copies this application file into the executable directory
giving it the full name of the executable plus the extension, .config. Thus, if your application creates an
executable assembly called MyApp.exe in the ..\bin\debug directory, you’ll find a file nearby called
MyApp.exe.config.
Re-directing the next time
In general there is no harm in having unused <bindingRedirect /> tags in your App.config. These re-
directions become superfluous as you migrate to the next version of DevForce and all libraries are back in sync.
On the other hand, the vendor may issue yet another release (say, “3.2.0.4”) before we catch up. You will want to
bump to the next version. That’s easily done by using the “range” notation for the old version as shown:
<dependentAssembly> <assemblyIdentity name="DevExpress.XtraGrid3" publicKeyToken="79868b8147b5eae4" /> <bindingRedirect oldVersion="3.2.0.0-3.2.0.4" newVersion="3.2.0.4" </dependentAssembly>
Assembly Redirection For Developers
If you are using DevForce visual UI designers to compose your 3rd
party controls, you could run into version
mismatch problems during development.
We must apply a similar assembly redirection to your Machine.config. Machine.config is a file that does for
your development environment what App.config does for your application.
The DevForce Installer can do this for you as of version 3.1.5. See “Assembly Binding Redirection for 3rd
Party UI Control Suites”.
Machine.config is located at C:\WINDOWS\Microsoft.NET\Framework\v2.0.50727\CONFIG on most
machines.
IdeaBlade DevForce Installation Guide Updating Existing Applications
IdeaBlade DevForce Installation Guide.docx Copyright © 2012, IdeaBlade, Inc, all rights reserved 36
Everyone has a Machine.config and it has a significant amount of material in it. We’re going to add our
redirection tags to it.
Copy everything in the App.config between and including the <runtime> </runtime> tags.
Open Machine.config in a text editor.
Search for the text within these quotes: “<runtime”
If you don’t find the text, “<runtime”, scroll to the bottom just above the </configuration> tag.
Paste in the assembly redirection tags.
If the search found “<runtime />”, we will replace it with the XML we copied to the clipboard.
It there was already a pair of <runtime> </runtime> tags with other redirections, merge the copied
XML with those pre-existing redirections as appropriate.
Save and close the file.
In general there is no harm in having unused <bindingRedirect /> tags in your Machine.config. These re-
directions become superfluous as you migrate to the next version of DevForce and all libraries are back in sync.
If running on a 64-bit OS or using Visual Studio 2010, check the Troubleshooting section for further information on
editing the machine.config.
IdeaBlade DevForce Installation Guide Documentation and Tools
IdeaBlade DevForce Installation Guide.docx Copyright © 2012, IdeaBlade, Inc, all rights reserved 37
Documentation and Tools
Documentation
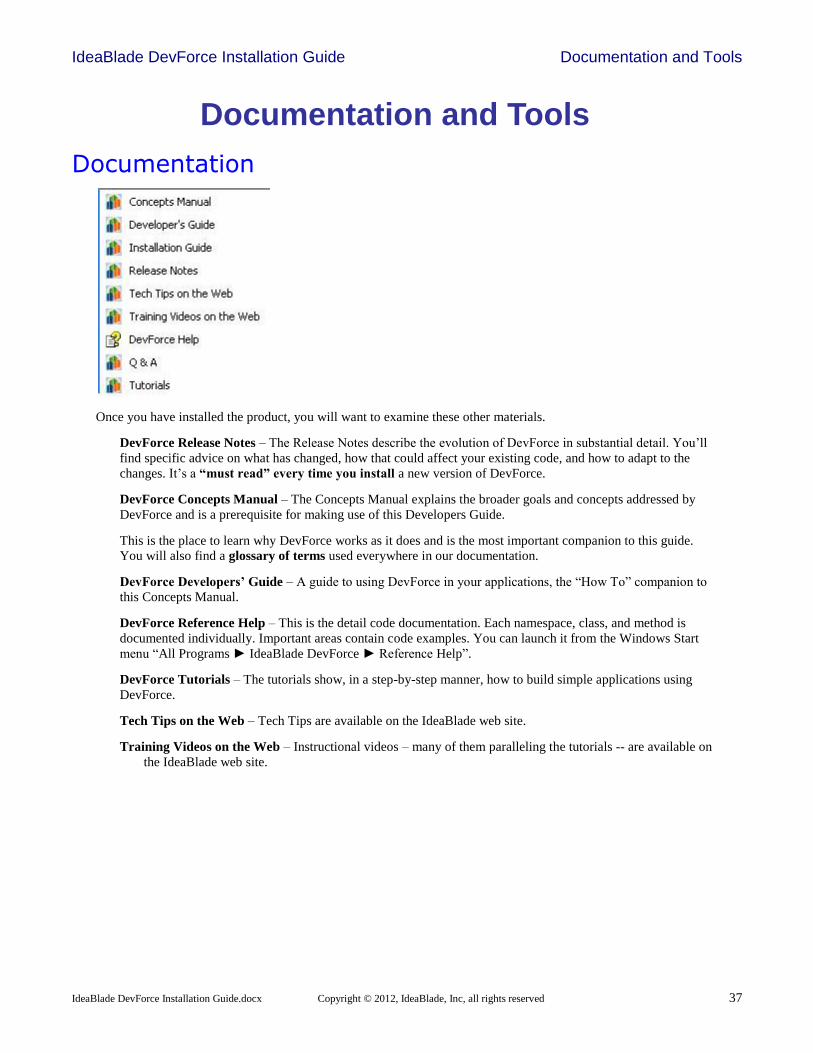
Once you have installed the product, you will want to examine these other materials.
DevForce Release Notes – The Release Notes describe the evolution of DevForce in substantial detail. You’ll
find specific advice on what has changed, how that could affect your existing code, and how to adapt to the
changes. It’s a “must read” every time you install a new version of DevForce.
DevForce Concepts Manual – The Concepts Manual explains the broader goals and concepts addressed by
DevForce and is a prerequisite for making use of this Developers Guide.
This is the place to learn why DevForce works as it does and is the most important companion to this guide.
You will also find a glossary of terms used everywhere in our documentation.
DevForce Developers’ Guide – A guide to using DevForce in your applications, the “How To” companion to
this Concepts Manual.
DevForce Reference Help – This is the detail code documentation. Each namespace, class, and method is
documented individually. Important areas contain code examples. You can launch it from the Windows Start
menu “All Programs ► IdeaBlade DevForce ► Reference Help”.
DevForce Tutorials – The tutorials show, in a step-by-step manner, how to build simple applications using
DevForce.
Tech Tips on the Web – Tech Tips are available on the IdeaBlade web site.
Training Videos on the Web – Instructional videos – many of them paralleling the tutorials -- are available on
the IdeaBlade web site.
IdeaBlade DevForce Installation Guide Documentation and Tools
IdeaBlade DevForce Installation Guide.docx Copyright © 2012, IdeaBlade, Inc, all rights reserved 38
Using the DevForce Tutorials DevForce Tutorials can be accessed via “Windows Start Menu ► All Programs ► IdeaBlade DevForce ►
Tutorials”.
This link launches an HTML page that contains links to DevForce instructional units organized into categories of
Fundamentals, Intermediate, and Advanced. Each instructional unit addresses a single DevForce-related topic, and
contains either a tutorial, or at least some sample code. The instructional units provided with the product installation
are a subset of the materials available from IdeaBlade, having had their PowerPoint slide decks removed in order to
keep the installation executable relatively small. The complete instructional units can be download from the
IdeaBlade web site. Instructions and a link to do that are included in the HTML cover page for the tutorials; the
same link is available on the Start menu at “Windows Start Menu ► All Programs ► IdeaBlade DevForce ►
Instructional Materials on the Web”.
All tutorials use the IdeaBladeTutorial database, which is automatically installed and configured during DevForce
installation. The IdeaBlade Configuration File and ORM file for each of the exercises in the training is also
configured during installation.

IdeaBlade DevForce Installation Guide Documentation and Tools
IdeaBlade DevForce Installation Guide.docx Copyright © 2012, IdeaBlade, Inc, all rights reserved 39
DevForce Tools The following DevForce Tools appear in the IdeaBlade DevForce folder in the Windows Program Files menu.
We’ll comment only about the tools in this section.
Configuration Editor
The application’s IdeaBlade.ibconfig file contains the application’s deployment parameters. The developer
changes how the application is deployed and where it finds its runtime data source by changing these parameters
rather than by recompiling the application. We cover this subject in the Developers Guide.
The IdeaBlade.ibconfig file is an XML text file. We could edit it with any text editor but it is safer to do so
with the help of this Configuration Editor tool.
See “Configuration Editor” for instructions on making this tool your default IdeaBlade.ibconfig editor.
Database Installer
The Database Installer:
Installs and attaches the IdeaBladeTutorial database,
Fixes up the connection strings in the IdeaBlade Tutorials so that you don’t have to fix them up yourself.

IdeaBlade DevForce Installation Guide Documentation and Tools
IdeaBlade DevForce Installation Guide.docx Copyright © 2012, IdeaBlade, Inc, all rights reserved 40
Most of the time, you will never need this tool. Your installation will successfully install the IdeaBladeTutorial
database and fix up the connection strings in the Tutorials, and you decide not to make any additional changes.
However, there are certain cases where this tool can be useful.
You pause or stop the database, and then forget to resume or start the database before you install DevForce.
Using this command, you can install the IdeaBladeTutorial database without having to uninstall and
reinstall DevForce.
You decide to make changes in the IdeaBladeTutorial database that cause the connection string to change,
and you’d like to see these new connection strings propagate to the IdeaBlade tutorials.
To run, click on the shortcut in the DevForce Start menu. After a few seconds, you should get a status message like:
On Vista and Windows 7 operating systems the Database Installer requires Administrator privileges.
Deployment Test Tool
The Deployment Test Tool is a tool that makes it easy for developers to debug the deployment code for simple n-tier
deployments. In fact, the entire deployment can be accomplished without having to write a single line of code.
The following screenshot shows the tool in action in the Deployment Test Tool Tutorial.
Toolbox Installer
The “Toolbox Installer” adds the DevForce UI visual design components to the Visual Studio Toolbox.
You will use this tool when:
You add or remove support for a 3rd
party control suite.
You want to restore a component that you deleted from the Toolbox.
The DevForce installer failed to install these components properly.
We cover the use of this tool in the “Toolbox Installer fails” topic under the Troubleshooting chapter.
Remember that on Vista and Windows 7 operating systems the Toolbox Installer requires Administrator privileges.
IdeaBlade DevForce Installation Guide Documentation and Tools
IdeaBlade DevForce Installation Guide.docx Copyright © 2012, IdeaBlade, Inc, all rights reserved 41
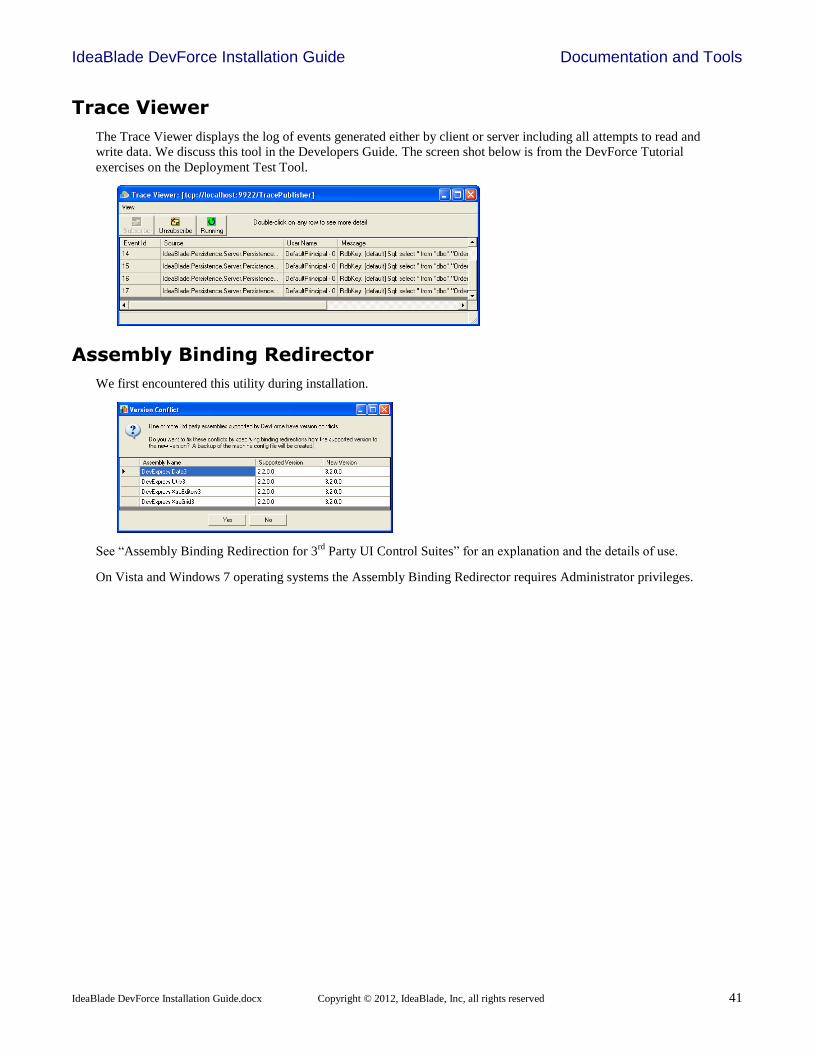
Trace Viewer
The Trace Viewer displays the log of events generated either by client or server including all attempts to read and
write data. We discuss this tool in the Developers Guide. The screen shot below is from the DevForce Tutorial
exercises on the Deployment Test Tool.
Assembly Binding Redirector
We first encountered this utility during installation.
See “Assembly Binding Redirection for 3rd
Party UI Control Suites” for an explanation and the details of use.
On Vista and Windows 7 operating systems the Assembly Binding Redirector requires Administrator privileges.
IdeaBlade DevForce Installation Guide Troubleshooting
IdeaBlade DevForce Installation Guide.docx Copyright © 2012, IdeaBlade, Inc, all rights reserved 42
Troubleshooting
Customer Support
You can access our support forums here: http://www.ideablade.com/forum
Or submit a support request here: http://www.ideablade.com/TechSupport/CustomerSupportRequestForm.aspx
For non-technical issues, please email [email protected] or [email protected].
Identifying your DevForce version
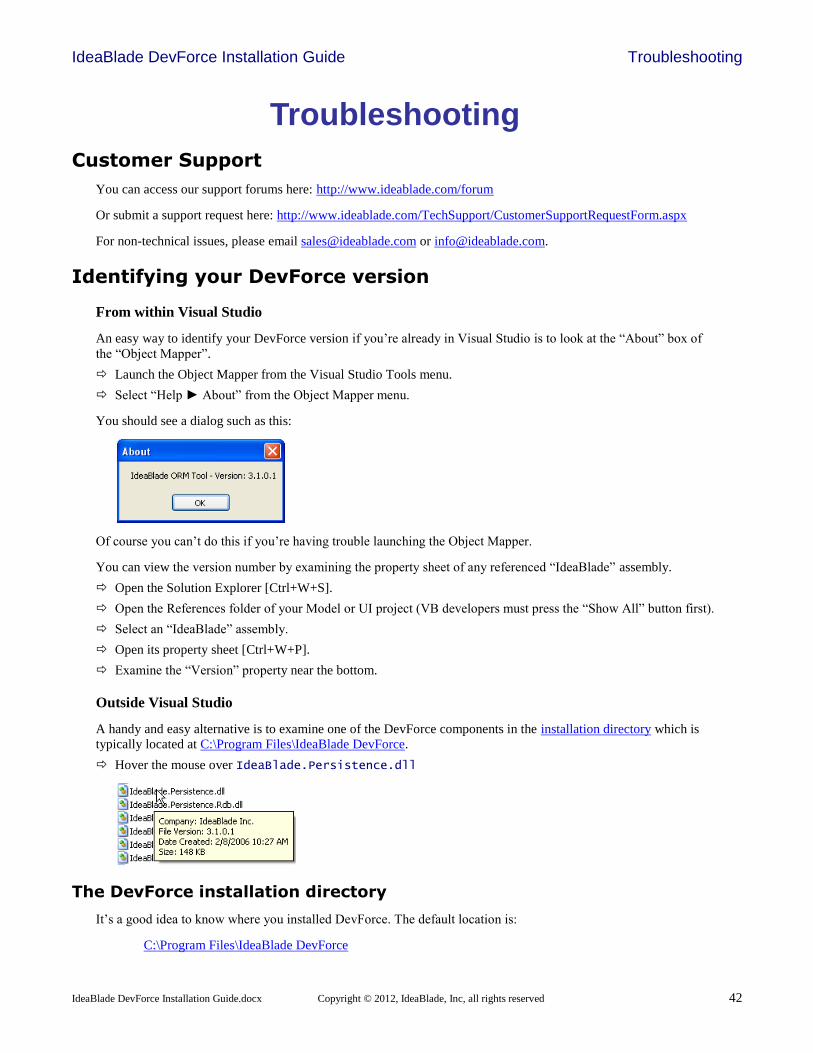
From within Visual Studio
An easy way to identify your DevForce version if you’re already in Visual Studio is to look at the “About” box of
the “Object Mapper”.
Launch the Object Mapper from the Visual Studio Tools menu.
Select “Help ► About” from the Object Mapper menu.
You should see a dialog such as this:
Of course you can’t do this if you’re having trouble launching the Object Mapper.
You can view the version number by examining the property sheet of any referenced “IdeaBlade” assembly.
Open the Solution Explorer [Ctrl+W+S].
Open the References folder of your Model or UI project (VB developers must press the “Show All” button first).
Select an “IdeaBlade” assembly.
Open its property sheet [Ctrl+W+P].
Examine the “Version” property near the bottom.
Outside Visual Studio
A handy and easy alternative is to examine one of the DevForce components in the installation directory which is
typically located at C:\Program Files\IdeaBlade DevForce.
Hover the mouse over IdeaBlade.Persistence.dll
The DevForce installation directory
It’s a good idea to know where you installed DevForce. The default location is:
C:\Program Files\IdeaBlade DevForce

IdeaBlade DevForce Installation Guide Troubleshooting
IdeaBlade DevForce Installation Guide.docx Copyright © 2012, IdeaBlade, Inc, all rights reserved 43
Un-install fails
Sometimes the uninstall process is blocked or fails.
Blocked by IdeaBladeTutorial database issue.
During uninstall you may see this message:
You don’t want to cancel because that terminates uninstallation. The work-around is mercifully easy.
Launch the SQL Server Management Console
Find the IdeaBladeTutorial database
Right-click and select “Tasks ►Take Offline” from the context menu.
Return to the “IdeaBlade DevForce Error” dialog and click [Retry].
After the uninstall completes, return the SQL Server Management Console
Right-click and select “Tasks ►Bring Online” from the context menu.
Fails altogether
At this writing our installer program provider is InstallShield. We hear reports that some versions of InstallShield
fail to install properly. Worse, they make it impossible to un-install the product.
For example, versions of DevForce prior to 3.1.1.2 allowed you to install a new release without first uninstalling the
prior release. InstallShield then bollixed your machine so you couldn’t go forward, you couldn’t go back, and you
couldn’t uninstall.
Microsoft provides a tool, the “Windows Installer Cleanup Utility” that will uninstall just about anything:
http://support.microsoft.com/?scid=kb;en-us;290301&spid=2525&sid=251
Microsoft often shuffles their site so if this link fails, search the web for it under “Windows Installer
Cleanup Utility”.
We have had good luck with it. Of course it leaves material behind.
After running this tool, if you are trying to clear your machine of DevForce altogether, you might try installing a
fresh copy of DevForce and then un-installing it immediately afterwards; this should pick up most if not all of the
detritus from earlier installs.
Wizard was Interrupted
If you get a message saying that the “wizard was interrupted”, you probably have run into a Windows SP2 operating
system security issue. To fix this problem, read the Macrovision Knowledge Base article at:
http://support.installshield.com/kb/view.asp?articleid=Q111303
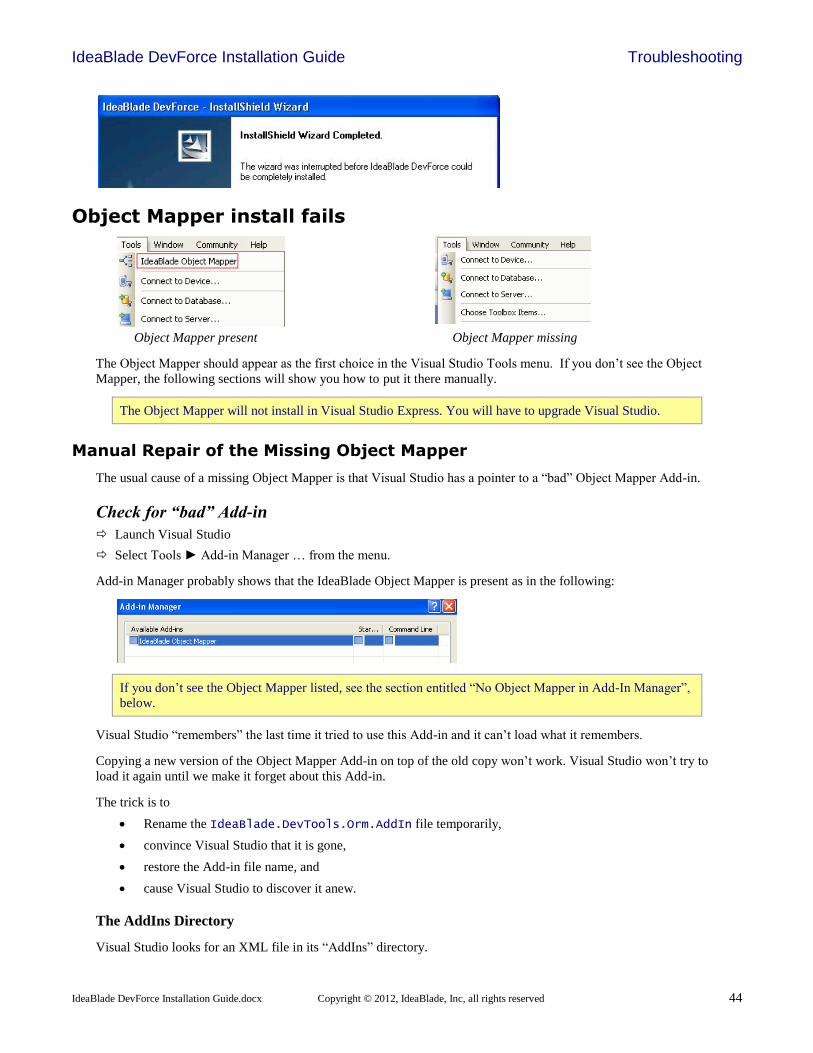
IdeaBlade DevForce Installation Guide Troubleshooting
IdeaBlade DevForce Installation Guide.docx Copyright © 2012, IdeaBlade, Inc, all rights reserved 44
Object Mapper install fails
Object Mapper present Object Mapper missing
The Object Mapper should appear as the first choice in the Visual Studio Tools menu. If you don’t see the Object
Mapper, the following sections will show you how to put it there manually.
The Object Mapper will not install in Visual Studio Express. You will have to upgrade Visual Studio.
Manual Repair of the Missing Object Mapper
The usual cause of a missing Object Mapper is that Visual Studio has a pointer to a “bad” Object Mapper Add-in.
Check for “bad” Add-in
Launch Visual Studio
Select Tools ► Add-in Manager … from the menu.
Add-in Manager probably shows that the IdeaBlade Object Mapper is present as in the following:
If you don’t see the Object Mapper listed, see the section entitled “No Object Mapper in Add-In Manager”,
below.
Visual Studio “remembers” the last time it tried to use this Add-in and it can’t load what it remembers.
Copying a new version of the Object Mapper Add-in on top of the old copy won’t work. Visual Studio won’t try to
load it again until we make it forget about this Add-in.
The trick is to
Rename the IdeaBlade.DevTools.Orm.AddIn file temporarily,
convince Visual Studio that it is gone,
restore the Add-in file name, and
cause Visual Studio to discover it anew.
The AddIns Directory
Visual Studio looks for an XML file in its “AddIns” directory.

IdeaBlade DevForce Installation Guide Troubleshooting
IdeaBlade DevForce Installation Guide.docx Copyright © 2012, IdeaBlade, Inc, all rights reserved 45
That directory varies depending upon your edition of Visual Studio and how you installed it.
The preferred location is:
C:\Documents and Settings\All Users\Application Data\Microsoft\MSEnvShared\AddIns
For the All Users location, you must have the Show Hidden Files and Folders option turned on to see the
Application Data folder.
Alternatively, the directory may be in the user’s directory space at
%HOMEPATH%\My Documents\Visual Studio 8\AddIns
You can copy and paste this into Windows Explorer. Realize that this directory may not exist.
Jiggle the Object Mapper AddIn file
We can proceed now that we know where Visual Studio keeps its Add-in information.
Exit Visual Studio.
Navigate to the Visual Studio “AddIns” directory
Rename IdeaBlade.DevTools.Orm.AddIn to IdeaBlade.DevTools.Orm.AddInXX
Confirm for Windows that it is OK to change the file extension.
Launch Visual Studio.
Select Tools ► Add-in Manager … from the menu.
Verify that “IdeaBlade Object Mapper” is no longer listed.
If you still see the Object Mapper listed, you won’t be able to revive the Object Mapper. There is some
other reference to it somewhere. Please contact Customer Support.
Exit Visual Studio.
Restore IdeaBlade.DevTools.Orm.AddInX back to IdeaBlade.DevTools.Orm.AddIn
That should do it. Now we verify that the Object Mapper is installed.
Launch Visual Studio again.
Look for “IdeaBlade Object Mapper” at the top of the Tools menu.
Still can’t make it appear?
You’ve tried the Object Mapper Installer, you’ve jiggled the AddIn file, and it still won’t appear in the Tools menu.
You can see the Object Mapper in the Add-in Manager; it just won’t appear in the Tools menu.
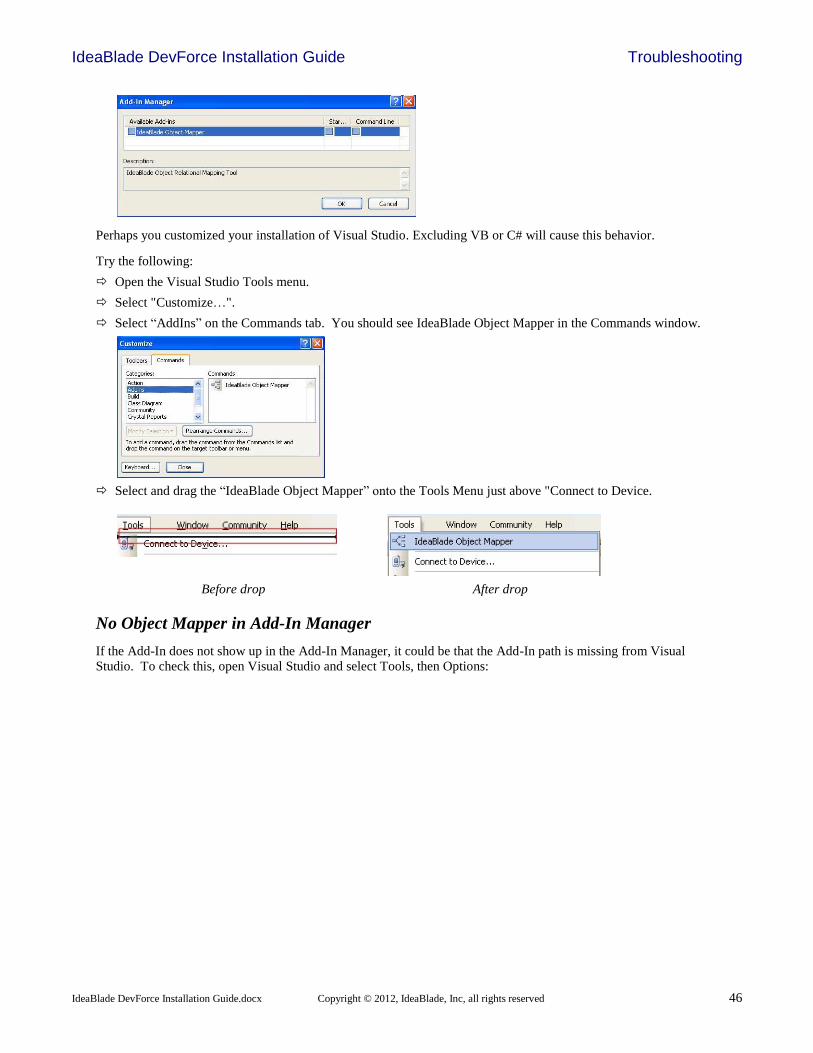
IdeaBlade DevForce Installation Guide Troubleshooting
IdeaBlade DevForce Installation Guide.docx Copyright © 2012, IdeaBlade, Inc, all rights reserved 46
Perhaps you customized your installation of Visual Studio. Excluding VB or C# will cause this behavior.
Try the following:
Open the Visual Studio Tools menu.
Select "Customize…".
Select “AddIns” on the Commands tab. You should see IdeaBlade Object Mapper in the Commands window.
Select and drag the “IdeaBlade Object Mapper” onto the Tools Menu just above "Connect to Device.
Before drop After drop
No Object Mapper in Add-In Manager
If the Add-In does not show up in the Add-In Manager, it could be that the Add-In path is missing from Visual
Studio. To check this, open Visual Studio and select Tools, then Options:
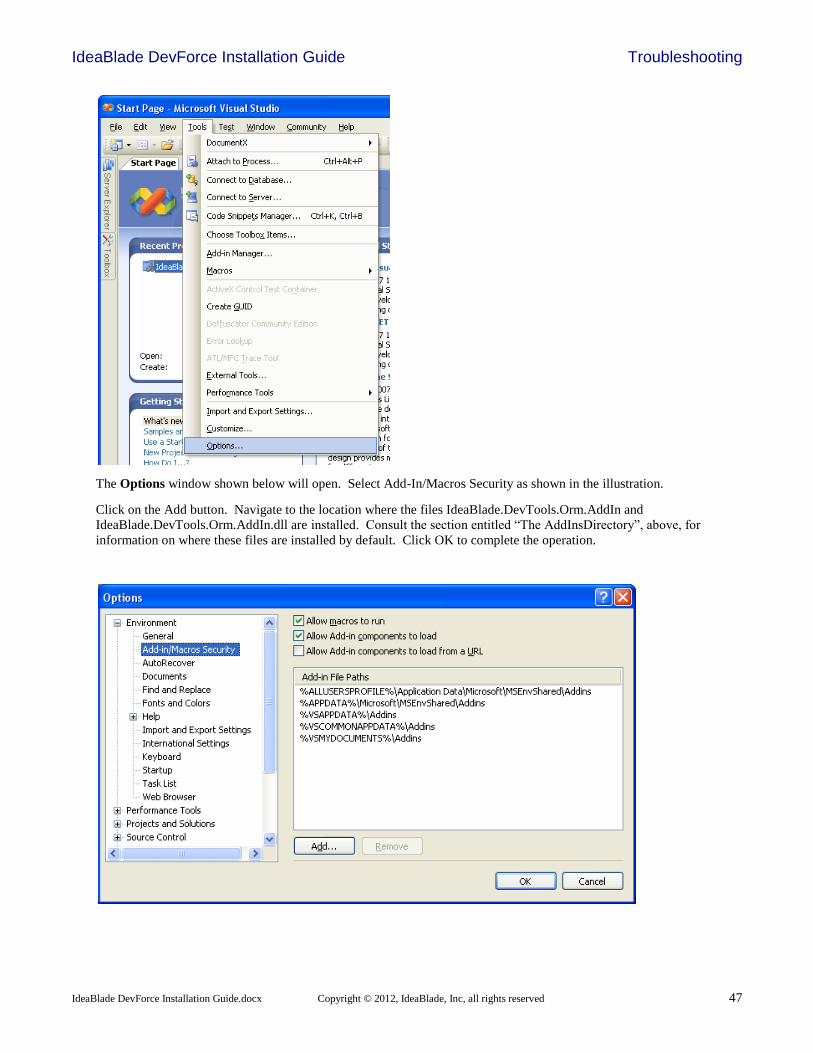
IdeaBlade DevForce Installation Guide Troubleshooting
IdeaBlade DevForce Installation Guide.docx Copyright © 2012, IdeaBlade, Inc, all rights reserved 47
The Options window shown below will open. Select Add-In/Macros Security as shown in the illustration.
Click on the Add button. Navigate to the location where the files IdeaBlade.DevTools.Orm.AddIn and
IdeaBlade.DevTools.Orm.AddIn.dll are installed. Consult the section entitled “The AddInsDirectory”, above, for
information on where these files are installed by default. Click OK to complete the operation.

IdeaBlade DevForce Installation Guide Troubleshooting
IdeaBlade DevForce Installation Guide.docx Copyright © 2012, IdeaBlade, Inc, all rights reserved 48
This situation may particularly apply to installations of the operating system or Visual Studio that are localized to
languages other than English. It may also apply to certain installations on the Windows Vista operating system or to
certain makes or models of laptop computers.
Consult this link on the DevForce Forums for more information:
http://www.ideablade.com/forum/forum_posts.asp?TID=25
“This product is not registered”
You know you put a valid registration key but you get the following error message when you launch the Object
Mapper after a seemingly successful installation.
This is a rare occurrence. Please contact Customer Support.
Toolbox Installer fails
If the installer fails you can add the toolbox content manually. First review the information on 3rd
party assemblies
and assembly binding redirection to ensure that both the installer and Visual Studio can find your assemblies.
On Vista and Windows 7 operating systems the Toolbox Installer requires Administrator privileges.
To manually add Toolbox items:
Launch Visual Studio
Open the Toolbox in “Design View” as described in “Reviewing the Visual Studio Toolbox”.
Right-click any Toolbox tab and select Add Tab from the context menu.
Visual Studio creates a new tab with a blank name.
Name the tab “IdeaBlade DevForce”

IdeaBlade DevForce Installation Guide Troubleshooting
IdeaBlade DevForce Installation Guide.docx Copyright © 2012, IdeaBlade, Inc, all rights reserved 49
Note that the IdeaBlade DevForce tab has no usable controls.
Right click the tab or tab header and select “Choose Items…” from the context menu
Eventually the “Choose Toolbox Items” dialog appears.
Select the “.Net Framework Components” tab if not already selected.
Click the “Namespace” column header to sort by Namespace.
Scroll to the IdeaBlade assemblies.
Check the checkboxes next to the components you want to add to the Toolbox.
Press [OK]
Arrange the items within the tab.
Drag the DevForce components into your favored positions on the IdeaBlade DevForce Tab.
If you installed them onto the wrong tab …
Drag the DevForce components from that wrong tab to the IdeaBlade DevForce Tab.
Assembly Reference is listed but VS can’t find it
This is a bizarre artifact of Visual Studio 2005 that only occurs for some projects after you’ve upgraded versions of
software and / or upgraded Visual Studio or .NET itself.
We’ve seen it with IdeaBlade.Util. We’ve seen it with references to 3rd
party assemblies (e.g.,
nunit.framework) as well.
We have not figured out why it happens but it is easy to address.
Remove the reference from your project.
Re-add the reference.
Re-build the project.
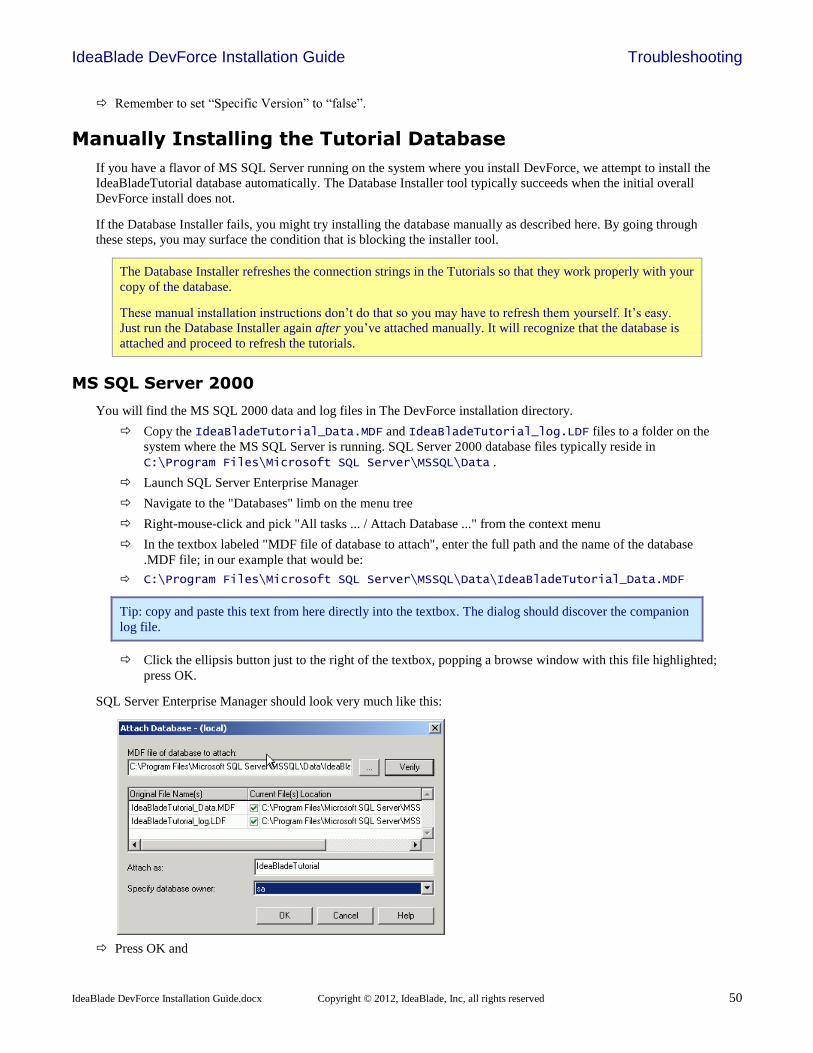
IdeaBlade DevForce Installation Guide Troubleshooting
IdeaBlade DevForce Installation Guide.docx Copyright © 2012, IdeaBlade, Inc, all rights reserved 50
Remember to set “Specific Version” to “false”.
Manually Installing the Tutorial Database
If you have a flavor of MS SQL Server running on the system where you install DevForce, we attempt to install the
IdeaBladeTutorial database automatically. The Database Installer tool typically succeeds when the initial overall
DevForce install does not.
If the Database Installer fails, you might try installing the database manually as described here. By going through
these steps, you may surface the condition that is blocking the installer tool.
The Database Installer refreshes the connection strings in the Tutorials so that they work properly with your
copy of the database.
These manual installation instructions don’t do that so you may have to refresh them yourself. It’s easy.
Just run the Database Installer again after you’ve attached manually. It will recognize that the database is
attached and proceed to refresh the tutorials.
MS SQL Server 2000
You will find the MS SQL 2000 data and log files in The DevForce installation directory.
Copy the IdeaBladeTutorial_Data.MDF and IdeaBladeTutorial_log.LDF files to a folder on the
system where the MS SQL Server is running. SQL Server 2000 database files typically reside in
C:\Program Files\Microsoft SQL Server\MSSQL\Data .
Launch SQL Server Enterprise Manager
Navigate to the "Databases" limb on the menu tree
Right-mouse-click and pick "All tasks ... / Attach Database ..." from the context menu
In the textbox labeled "MDF file of database to attach", enter the full path and the name of the database
.MDF file; in our example that would be:
C:\Program Files\Microsoft SQL Server\MSSQL\Data\IdeaBladeTutorial_Data.MDF
Tip: copy and paste this text from here directly into the textbox. The dialog should discover the companion
log file.
Click the ellipsis button just to the right of the textbox, popping a browse window with this file highlighted;
press OK.
SQL Server Enterprise Manager should look very much like this:
Press OK and
IdeaBlade DevForce Installation Guide Troubleshooting
IdeaBlade DevForce Installation Guide.docx Copyright © 2012, IdeaBlade, Inc, all rights reserved 51
You should see a confirming message box saying that the database is attached. You should also see the
IdeaBladeTutorial database listed.
Explore it here in SQL Server Enterprise Manager to verify that all is in order.
MS SQL Server 2005
The SQL Server Manager for 2005 operates in much the same way although the UI has changed as have the key
strokes. We assume you can follow along.
SQL Server 2005 can attach a SQL 2000 database but it immediately converts it to 2005 format. There is
no going back.
SQL Server Express (2005)
The DevForce Database Installer works just fine with SQL Server Express and can differentiate among multiple
SQL Server instances.
Manual installation is a little tricky. Please contact Customer Support if you need to go this route.
MSDE
SQL Server 2000 and MSDE use the same two .MDF and .LDF database files. If you unzip the files into the MSDE
database file directory and attach the database to the MSDE server you should be fine.
How do you attach? Microsoft doesn't ship MSDE with administration tools but 3rd parties offer them for as little as
$19. Alternatively, you can attach by hand in Transact-SQL, using either the sp_attach_db or the
sp_attach_single_file_db system-stored procedure. Consider the following (which works great in Query Analyzer
for MS SQL Server and should do as well in MSDE after directory adjustments):
/* for safety; ignore failure message */ EXEC sp_detach_db @dbname = 'IdeaBladeTutorial' EXEC sp_attach_single_file_db @dbname = 'IdeaBladeTutorial', @physname= 'c:\Program Files\Microsoft SQL Server\MSSQL\Data\IdeaBladeTutorial_Data.mdf'
For more information, begin with the Microsoft MSDN topic that covers MSDE database deployment.
Not using SQL Server or MSDE?
If you use a database system that does not read MS SQL Server files or are having other problems, contact us at
Customer Support and we'll try to come up with an alternative.
Please understand that the IdeaBladeTutorial database is offered "as is".
Form won’t display in Design View
You open a Form or UserControl in Design View and, instead of a design canvas you see a frightening splash of red
error messages such as this.
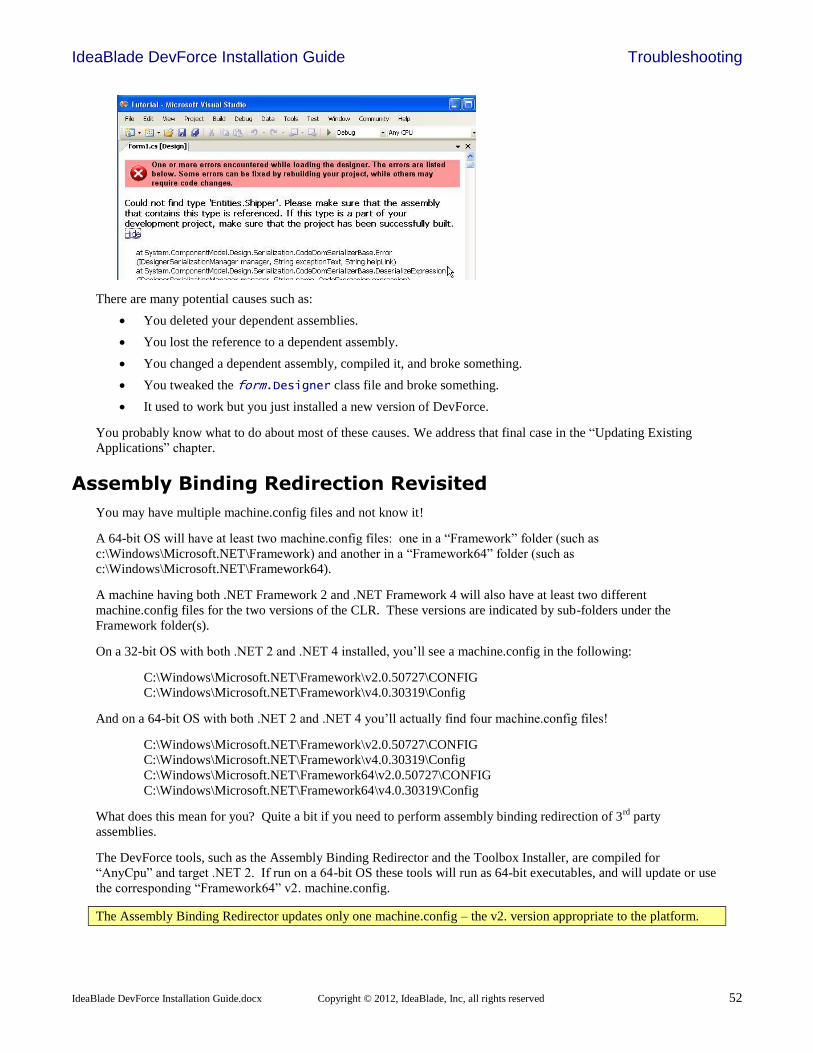
IdeaBlade DevForce Installation Guide Troubleshooting
IdeaBlade DevForce Installation Guide.docx Copyright © 2012, IdeaBlade, Inc, all rights reserved 52
There are many potential causes such as:
You deleted your dependent assemblies.
You lost the reference to a dependent assembly.
You changed a dependent assembly, compiled it, and broke something.
You tweaked the form.Designer class file and broke something.
It used to work but you just installed a new version of DevForce.
You probably know what to do about most of these causes. We address that final case in the “Updating Existing
Applications” chapter.
Assembly Binding Redirection Revisited
You may have multiple machine.config files and not know it!
A 64-bit OS will have at least two machine.config files: one in a “Framework” folder (such as
c:\Windows\Microsoft.NET\Framework) and another in a “Framework64” folder (such as
c:\Windows\Microsoft.NET\Framework64).
A machine having both .NET Framework 2 and .NET Framework 4 will also have at least two different
machine.config files for the two versions of the CLR. These versions are indicated by sub-folders under the
Framework folder(s).
On a 32-bit OS with both .NET 2 and .NET 4 installed, you’ll see a machine.config in the following:
C:\Windows\Microsoft.NET\Framework\v2.0.50727\CONFIG
C:\Windows\Microsoft.NET\Framework\v4.0.30319\Config
And on a 64-bit OS with both .NET 2 and .NET 4 you’ll actually find four machine.config files!
C:\Windows\Microsoft.NET\Framework\v2.0.50727\CONFIG
C:\Windows\Microsoft.NET\Framework\v4.0.30319\Config
C:\Windows\Microsoft.NET\Framework64\v2.0.50727\CONFIG
C:\Windows\Microsoft.NET\Framework64\v4.0.30319\Config
What does this mean for you? Quite a bit if you need to perform assembly binding redirection of 3rd
party
assemblies.
The DevForce tools, such as the Assembly Binding Redirector and the Toolbox Installer, are compiled for
“AnyCpu” and target .NET 2. If run on a 64-bit OS these tools will run as 64-bit executables, and will update or use
the corresponding “Framework64” v2. machine.config.
The Assembly Binding Redirector updates only one machine.config – the v2. version appropriate to the platform.
IdeaBlade DevForce Installation Guide Troubleshooting
IdeaBlade DevForce Installation Guide.docx Copyright © 2012, IdeaBlade, Inc, all rights reserved 53
Visual Studio, however, always runs as a 32-bit executable. Visual Studio 2010 uses .NET 4. This means Visual
Studio itself will use the machine.config in the “Framework” v4. folder! In order for redirected assemblies to show
up in the Toolbox wizard, and for compilation to succeed, this machine.config must also contain the redirections.
Your own assemblies might target .NET 2 or .NET 4, and might be compiled for “AnyCpu” or either x86 or x64
platforms. These decisions all determine the machine.config actually used.
What this all means for you is that you need to be aware of the machine.config to be used, and will likely need the
redirection in multiple files, possibly all of them. You can manually add the redirects needed: see the section on
“Assembly Redirection for Client Applications” earlier in this document for step-by-step directions.
Note that at runtime your application can and should use its own app.config for redirection of 3rd
party assemblies.
This ensures that your deployment to client machines will not need to muck with system-related files.
Also note that Visual Studio has its own configuration file – devenv.exe.config. Placing redirects here will ensure
that Visual Studio finds the correct assemblies and you won’t need to scratch your head figuring out which
machine.config it wants to use.
On Vista and Windows 7 operating systems the Assembly Binding Redirector requires Administrator privileges.
Performance
Slow performance inside Visual Studio
Many developers are astonished to discover that database applications that performed crisply in Visual Studio 2003
suddenly degrade to unacceptable speeds in Visual Studio 2005.
Applications involving database tables with BLOB columns (e.g., NTEXT) become especially painful.
The good news is that good performance returns when you run the application outside of the Visual Studio
debugger.
Consider trying your code outside of Visual Studio.
The Visual Studio debug configuration executable can usually be found in a “\bin” directory under the directory
holding the application’s “StartUp Project”. Look there for the application with the “.exe” extension.
Run that executable and you should see a many-fold improvement.
Fortunately, your customers will run the executable, not inside Visual Studio.
Slow performance inside grid controls
You may discover that your application performs well when you load the grid with tens or hundreds of business
objects. Suddenly the grid slows dramatically as you pour a thousand into it. Clicking on a column to sort causes a
notable initial wait.
After that initial stall, the grid suddenly springs to life and you have no more trouble until you refill the grid with
new objects.
This is not a problem with the grid or with DevForce. It means you are ready to learn about span queries and pre-
caching, a topic covered in the Developers Guide.
There is a known “issue” with all versions of the Infragistics grid for .NET 2.0 – they invoke all public
properties of an object, whether or not those properties are bound to columns of the grid. Infragistics tech
support says there is nothing to be done. The effect on performance can be serious and we have no ready
automated solution at this time. Please contact Customer Support for work-arounds (none of them great).
We are continuing our efforts to finesse the situation.
IdeaBlade DevForce Installation Guide Troubleshooting
IdeaBlade DevForce Installation Guide.docx Copyright © 2012, IdeaBlade, Inc, all rights reserved 54
It appears the Developer Express .NET 2.0 grid has a similar problem.
Other Performance Concerns
We know good performance is critical to your application. DevForce performs extremely well even with fetches of
large amounts of data.
In your pre-DevForce days you would have paid close attention to your hand-coded SQL or stored procedures when
reading thousands of records. DevForce makes data retrieval so easy that we tend to forget it has to generate SQL
too. When the data volume goes up, we need to pay attention to how DevForce is doing its job.
Fortunately there are many tuning options so you can cool down those performance hot-spots. We cover this topic
thoroughly in the Developers Guide.
When the answer there doesn’t quite meet your needs, please contact Customer Support.


![Real photonic waveguides: guiding light through imperfections · these structures, a guiding channel can be obtained by modifying [7] or removing [8,9] a row of holes in the periodic](https://img.dokumen.tips/doc/110x75/5eb9f2a6d44585706f254ba0/real-photonic-waveguides-guiding-light-through-imperfections-these-structures.jpg)