Embed Size (px)
Citation preview


Dubai Financial Services Authority EPRS User Guide v1.9.doc
Page 2 of 45
TABLE OF CONTENTS 1. INTRODUCTION................................................................................................ 3
1.1. OBJECTIVE OF THE USER GUIDE ................................................................................... 3 1.2. ABOUT EPRS.............................................................................................................. 3 1.3. SECURITY .................................................................................................................... 4 1.4. OVERVIEW OF EPRS SUBMISSION PROCESS ................................................................ 4
1.4.1. Data Entry .......................................................................................................... 4 1.4.2. Validation ........................................................................................................... 4 1.4.3. Report Generation ............................................................................................. 5 1.4.4. Submission of Returns to the DFSA.................................................................. 5
2. GETTING STARTED ......................................................................................... 6
2.1. TERMS OF USE ............................................................................................................ 6 2.2. TECHNICAL NOTES....................................................................................................... 6
3. LOGGING ON.................................................................................................... 6
4. USING EPRS..................................................................................................... 9
4.1. SELECTING AN APPLICATION......................................................................................... 9 4.2. SELECTING THE ‘YEAR’ AND ‘PERIOD’.......................................................................... 12
5. ENTERING DATA INTO A FORM ................................................................... 15
5.1. LINKED FORMS .......................................................................................................... 19 5.2. MULTIPLE VALUE SELECTION...................................................................................... 21
6. VALIDATIONS FORM ..................................................................................... 25
7. REPORTS........................................................................................................ 30
7.1. PRINTING INDIVIDUAL REPORTS .................................................................................. 30 7.2. PRINTING ALL REPORTS ............................................................................................. 33 7.3. CONFIRMING THAT THE REPORT PACK HAS BEEN PRINTED........................................... 38
8. PROCESS CONTROL..................................................................................... 40
9. SUBMITTING YOUR RETURN TO THE DFSA ............................................... 43
10. LOGGING OFF................................................................................................ 45

Dubai Financial Services Authority EPRS User Guide v1.9.doc
Page 3 of 45
1. Introduction
1.1. Objective of the User Guide The objective of this User Guide is to provide step by step instruction to Authorised Firms
(“you”) on the use of the DFSA’s Electronic Prudential Reporting System (EPRS) and in particular, the following processes:
• accessing and logging on to EPRS;
• navigating within EPRS;
• data entry;
• validation of data;
• printing reports; and
• submission of returns to the DFSA. The User Guide also contains an FAQ section to address the most common questions you may have. In addition to this User Guide, there is an online demonstration of EPRS that can be viewed via the DFSA website at the following address: http://www.dfsa.ae/dfsa/legislation/eprs/
1.2. About EPRS EPRS is a web based application enabling Authorised Firms to submit their prudential returns
on-line. EPRS contains a database to collect and store data and a software application to analyse the data collected for the purpose of assessing and monitoring prudential risk levels, both on a Firm specific and systemic basis. The application for analysis of data collected is also designed to provide analytical reports to the DFSA that may be used (subject to the DFSA’s obligations for protection, use and disclosure of information set out in Regulatory Law No 1 of 2004) in preparing and providing information on an aggregate basis to external stakeholders. EPRS offers key benefits to Authorised Firms including, validation of returns prior to submission, pre-population of linked data to avoid re-keying and automated acknowledgement of returns submitted to the DFSA.

Dubai Financial Services Authority EPRS User Guide v1.9.doc
Page 4 of 45
1.3. Security EPRS is accessed via an ‘SSL VPN’ tool that will be automatically installed when you first log
in. ‘SSL’ (Secure Socket Layer) is a protocol for managing the security of message transmission on the internet. ‘VPN’ (Virtual Private Network) enables IP traffic to travel securely over the internet by encrypting all traffic from one network (your computer) to another (EPRS). A VPN uses "tunneling" to encrypt all information that is sent from your computer. As such your connection to the EPRS will be via a secure and encrypted channel (SSL VPN), allowing for a secure and safe means of sending your information.
1.4. Overview of EPRS Submission Process The key steps in the EPRS submission process are best summarised in the following flow
diagram.
1.4.1. Data Entry
Once you have logged on to EPRS you will be presented with the forms that are specific to your category of firm and the Financial Services activities conducted. The forms are presented in a task list that you work through systematically. Where possible, data entered in one area that is also required in another form will be pre-populated to avoid re-keying. You simply work through the task list to complete all forms relevant to the category of your firm and the Financial Services activities you perform.
1.4.2. Validation
Validations are built within EPRS to ensure the integrity of data submitted. The validations can be within, or between different forms and ensures, where appropriate, that data reconciles. Prior to submitting your forms you will have to pass all the validations. Where any validations fail, a list will indicate the nature of the validation failure.
Data Entry Validation Report
Generation Submission to
DFSA

Dubai Financial Services Authority EPRS User Guide v1.9.doc
Page 5 of 45
1.4.3. Report Generation
Once validations have been passed, firms should generate a full pack of forms. The EPRS produces the forms in PDF versions of the DFSA return forms. An Authorised Firm must keep a hard copy of the return submitted using EPRS together with the form B100 Declaration of by Authorised Firm, or Statement of Directors (Please refer to PIB Rule 1.6 and PIN Rule 6.5 respectively).
1.4.4. Submission of Returns to the DFSA
The final step in the process is to submit the forms to the DFSA. This is achieved within the EPRS by promoting the forms. Once this has been done firms will receive an automated receipt. Following the submission of the forms the data is locked and cannot be altered.

Dubai Financial Services Authority EPRS User Guide v1.9.doc
Page 6 of 45
2. Getting Started
2.1. Terms of Use The Terms of Use govern each user and its Authorised Firm’s use of EPRS. Before using
EPRS each time, you must signify your acceptance of the Terms of Use by clicking on the ‘I agree to the Terms of Use and Sign In’ button on the welcome and sign in webpage. By clicking that button and/or by using EPRS, you agree to be bound by the Terms of Use, as amended from time to time. If you do not agree with any part of the Terms of Use you must not access and use EPRS.
2.2. Technical Notes Please ensure you have read the ‘Technical Notes’ prior to reading this User Guide. The
‘Technical Notes’ document will ensure you have the necessary and correct system setup to allow you to login and successfully use EPRS. If you experience problems trying to launch EPRS, this may be due to your computer settings not conforming to the requirements specified in the ‘Technical Notes’. To resolve such problems you should contact your IT Support function and ensure your computer settings conform to the requirements specified in the ‘Technical Notes’.
3. Logging On There are 7 main areas within this section. 1. Open an ‘Internet Explorer’ browser session
2. In the ‘Internet Explorer’ address bar enter the following URL: ‘https://dfsaprureporting.dfsa.ae/eprs’
The above URL can be saved to ‘Favourites’ for future access.

Dubai Financial Services Authority EPRS User Guide v1.9.doc
Page 7 of 45
3. You will now be re-directed to the EPRS log in page:
4. Before using EPRS each time, you must signify your acceptance of the Terms of Use by clicking on the ‘I agree to the Terms of Use and Sign In’ button on the welcome and sign in webpage. By clicking that button and/or by using EPRS you are signifying your agreement to the Terms of Use, as amended from time to time. If you do not agree with any part of the Terms of Use, you must not access or use EPRS.
5. After reading the Terms of Use enter the ‘Username’ and ‘Password’ provided by the DFSA.
NOTE: The ‘Username’ is NOT case sensitive; however, the ‘Password’ IS case sensitive. If you cannot remember your username and/or password please contact the EPRS Helpdesk: Tel: +971 (4) 362 1515, email: [email protected].
Dubai Financial Services Authority EPRS User Guide v1.9.doc
Page 8 of 45
6. You have now successfully logged on to EPRS and you should see the following screen. The final step to access EPRS is to click on the ‘EPRS’ hyperlink once:
7. The initial EPRS screen will be displayed. You have now completed the log on process - ensure that the icons to the far right of ‘Help’ and above the text ‘Select Cluster’ appear correctly:
NOTE: If you are unable to see the icons above then please contact your IT Department. Your computer has either not installed WSAM (Steps 6, 7, 8, 9 and 10) or not established a secure connection to EPRS (SSL VPN); as a result you will not be able to use EPRS correctly and will encounter errors.

Dubai Financial Services Authority EPRS User Guide v1.9.doc
Page 9 of 45
4. Using EPRS Once you have successfully logged on to EPRS, you must click on the correct application to
use. You will only have access to the application and forms relevant to the category of your firm and the Financial Services activities you conduct.
4.1. Selecting an Application There are 4 main areas within this section. 1. Once you have successfully logged in to EPRS the following screen will appear, click on
‘HFMCLUSTER’:

Dubai Financial Services Authority EPRS User Guide v1.9.doc
Page 10 of 45
2. If PIB applies to your firm, click on ‘PIBPROD’. If PIN applies to your Firm, click on ‘PINPROD’.
3. On selecting the correct application you will see a task list containing the relevant forms you will need to complete:
NOTE: The screen shot above is illustrative. The task list presented will vary for each user depending on the financial services activities your Firm conducts.

Dubai Financial Services Authority EPRS User Guide v1.9.doc
Page 11 of 45
4. In order to avoid repeating steps 1 & 2 every time you log in, you can set the selected application as default. This means you will see your task list as soon as you log in (step 3). In order to do this click on ‘File’ then ‘Set as Default Application’:
NOTE: Steps 1, 2, 3 and 4 will have to be repeated on each computer being used to access EPRS for the first time. EPRS stores the setting you have selected on to the computer you are using.

Dubai Financial Services Authority EPRS User Guide v1.9.doc
Page 12 of 45
4.2. Selecting the ‘Year’ and ‘Period’ There are 4 main areas within this section. 1. Once you have logged on to EPRS and selected the application, you can click on the first
form in your task list. Single click on the first form in the task list. The right hand pane will update and display the relevant form in a grid format:
2. Before entering data in a form, you must ensure that you are entering data for the correct year and period (quarter). To select the year, click on the ‘Year:’ tab found at the top of the form:

Dubai Financial Services Authority EPRS User Guide v1.9.doc
Page 13 of 45
3. After clicking ‘Year:’ you will see a list of years to choose from. Click on the year that data is to be entered into, then click ‘OK’:

Dubai Financial Services Authority EPRS User Guide v1.9.doc
Page 14 of 45
4. You will need to follow the same process when selecting the ‘Period’. Click on ‘Period’:
Then click on the relevant ‘Quarter’ and finally click ‘OK’:
NOTE: If you incorrectly select the ‘Year’ or ‘Period’, EPRS will not let you enter any data. If you have selected a ‘Year’ or ‘Quarter’ in the past, EPRS will show the previously entered data. If you try and select a ‘Year’ or ‘Quarter’ in the future, EPRS will display ‘NO ACCESS’ and data cannot be entered.

Dubai Financial Services Authority EPRS User Guide v1.9.doc
Page 15 of 45
5. Entering Data into a Form There are 5 main areas within this section. 1. There are 5 different colours of cells in the forms representing the cell’s characteristics:
BLUE CELLS
Data cannot be entered into these cells. These cells are used for descriptive text and/or separators between rows and columns.
CREAM CELLS
Indicates cells in which data can be entered as well as data that has been entered and saved.
YELLOW CELLS
Once data has been entered into a cream cell, the cell will turn yellow. This informs you that data has been entered but not yet saved/submitted.
GREEN CELLS
Data cannot be entered as the cells are automatically populated from data entered into cream cells. These cells are commonly used for totals.
WHITE CELLS
Allows you to enter alpha numeric data (descriptive text).

Dubai Financial Services Authority EPRS User Guide v1.9.doc
Page 16 of 45
2. When you are completing a form, there are a number of buttons available in the toolbar:
Submit
Saves the data that has been keyed into the form to the database
Refresh
Refreshes the form with data from the database – clearing any changes that have been made since the last ‘Save’
Calculate
Calculates any account
Force Calculate
Calculates all cells on the form regardless of whether they have been changed
Cell Text
Shows the cell text window – allows you to input annotations to cells
Instructions
Displays a window of detailed instructions for the form (where appropriate)
Prints the form
Export to Excel
Exports the form to an excel spreadsheet. You can then change data in Microsoft Excel or link it in from other spreadsheets using standard Excel functionality
Import to Excel
Imports the changes made above back in
Suppress Rows
Suppress Rows
Suppress Columns
Suppress Columns
Suppress Lines
Suppress Lines

Dubai Financial Services Authority EPRS User Guide v1.9.doc
Page 17 of 45
3. To enter and submit data, you must first click on the cell that requires data:
4. Enter data and either press the ‘Tab’ key (move to next cell on the right) or the ‘Enter’ key on the keyboard (move to next cell down). After entering a value and moving to another cell, the cell will turn yellow. Indicating data has been entered but not saved:

Dubai Financial Services Authority EPRS User Guide v1.9.doc
Page 18 of 45
5. Finally, to submit the entry into the system click on the submit button . After doing this the cell should turn cream again. Cream is visually informing you that the number has successfully been entered and saved:
NOTE: You can enter data in multiple cells before having to click on the submit button after each entry. Once you have entered your data ensure the ‘Submit’ button is selected to save your data.
NOTE: It is advisable that you submit data (thereby saving) into the EPRS often enough to ensure that in the event that your computer fails (power surge, browser failure etc.), you will not have to re-type all your entries.
NOTE: EPRS has been designed so that you can enter data over a period of time and not necessarily in one sitting. As and when data has been submitted/saved you can log off and come back at a later time to carry on from where you left off.

Dubai Financial Services Authority EPRS User Guide v1.9.doc
Page 19 of 45
5.1. Linked Forms There are certain instances within EPRS where one form has been broken down into two or
more sub-forms. This has been done to allow you to complete sections of a form in a uniform and simple manner.
There are 4 main areas within this section. 1. A linked form can be identified by the text appearing as ‘>> Right Click Here <<’:
2. To open a linked form you must Right Click in the cell and click on ‘Linked Form’:

Dubai Financial Services Authority EPRS User Guide v1.9.doc
Page 20 of 45
3. On clicking ‘Linked Form’ a new form will appear in a new window:
4. You can now complete the form as normal. Once you have entered data and clicked on the
submit button within the linked form you can close the form.

Dubai Financial Services Authority EPRS User Guide v1.9.doc
Page 21 of 45
5.2. Multiple Value Selection There are 8 main areas within this section. 1. When you are completing forms, certain forms will require you to make a number of
selections for a particular entry. One example of this would be the entry of ‘Domicile of Foreign Funds’, here you must select the countries where the foreign fund is domiciled.
2. Whenever you come across a field that requires you to select multiple entries you will see the following icon:

Dubai Financial Services Authority EPRS User Guide v1.9.doc
Page 22 of 45
3. When you left click on the icon you will see all the values you can select from:
4. Ensure you click on the ‘Description’ tick box to display actual values against the codes:
Dubai Financial Services Authority EPRS User Guide v1.9.doc
Page 23 of 45
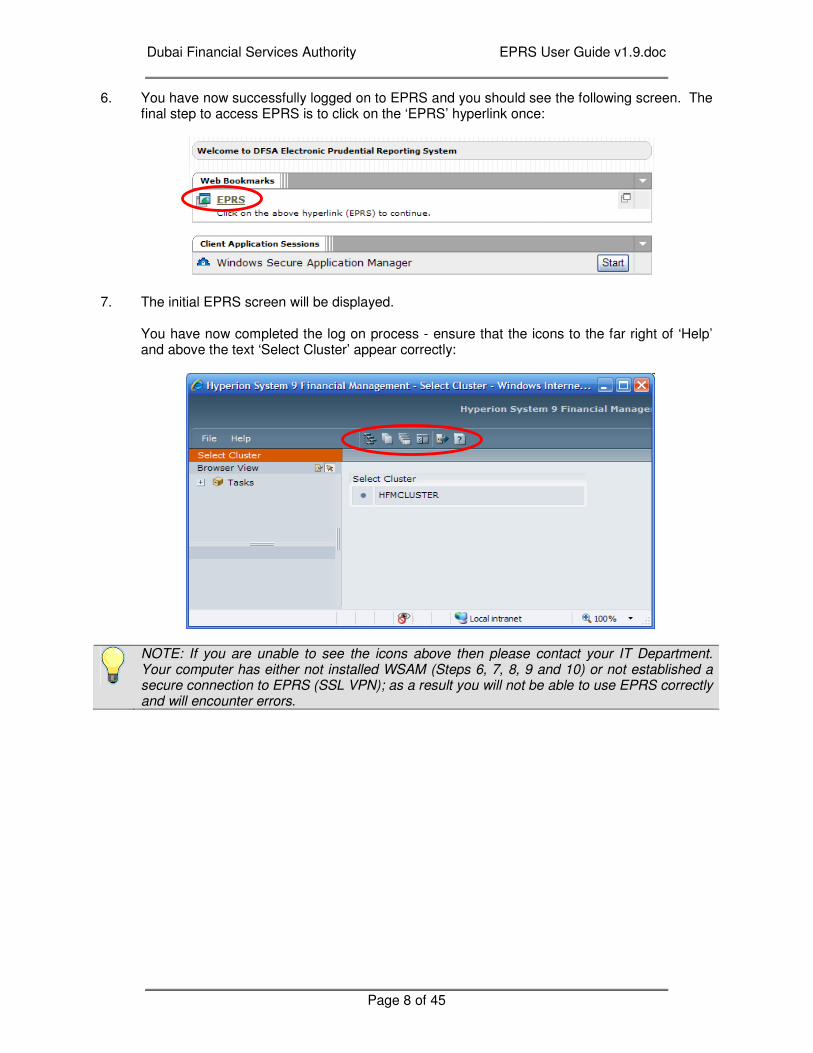
5. To make a selection you must click on the relevant codes:
Observe that your selection also populated the right hand pane.
6. If you left click on the value again, it will remove your selection from the right hand pane:

Dubai Financial Services Authority EPRS User Guide v1.9.doc
Page 24 of 45
7. Once you have selected your preferred values click on ‘OK’:
8. When you click ‘OK’ you will see that the form now has additional lines that relate to your selection:

Dubai Financial Services Authority EPRS User Guide v1.9.doc
Page 25 of 45
6. Validations Form There are 10 main areas within this section. 1. Once you have completed all the forms relevant to your Firm, you will need to complete the
‘Validations’ form. The ‘Validations’ form is used to ensure that, where appropriate, data entered in one form matches the same data entered in another form. E.g. ‘Profit and Loss’ on form B30 must match ‘Provisions for Impairment’ form B130. EPRS will not let you submit your Firm’s return until all validations have been passed. The ‘Validations’ form will help you identify where there are any discrepancies, so that you can go back and make the necessary changes.
2. Click on the ‘Validations’ form within the task pane:
3. Before viewing all the validations you must force EPRS to calculate all your forms, ensuring all calculations are performed and up to date.
In order to do this, click the ‘force calculate’ button

Dubai Financial Services Authority EPRS User Guide v1.9.doc
Page 26 of 45
4. If there are discrepancies in the values you have entered, a value will appear in ‘Total All Validations’, shown in the screenshot below. If all your forms validate correctly, with no discrepancies, the ‘Total All Validations’ cell will be blank:

Dubai Financial Services Authority EPRS User Guide v1.9.doc
Page 27 of 45
5. To find any discrepancies, scroll down the page. You will find where EPRS checks for validations and the respective data element and form the value belongs to. As with step 3, the areas where the data elements are not validating can be identified by a number appearing in the cell that ends with ‘MUST BE ZERO’:
6. To visit the form where there is an incorrect value appearing, right click on the cell and click ‘Linked Form’. The form containing that data element will then open in a new window.

Dubai Financial Services Authority EPRS User Guide v1.9.doc
Page 28 of 45
7. You must now make the necessary changes to ensure the validation is passed:
8. Close the form so that you are back to the validation form
9. Now click on the ‘force calculate’ button The validation form will recalculate and update the validation:
From the above screen you can now see that the ‘MUST BE ZERO’ cell is blank, which means the validation is now correct.

Dubai Financial Services Authority EPRS User Guide v1.9.doc
Page 29 of 45
10. You must complete the previous steps for each validation that is incorrect (i.e. values not equal to zero)

Dubai Financial Services Authority EPRS User Guide v1.9.doc
Page 30 of 45
7. Reports
As part of the process of submitting your prudential returns to the DFSA, you must ensure that a printed copy of all the forms you submit is produced and retained (Please refer to PIB Rule 1.6 and PIN Rule 6.5).
7.1. Printing Individual Reports There are 5 main areas within this section. 1. Click on the report menu from the task list. It can be identified by ‘XXXX Reports Pack’:

Dubai Financial Services Authority EPRS User Guide v1.9.doc
Page 31 of 45
2. A new window will appear showing all the reports in the right hand pane:
3. In the above view mode you can select an individual report and select ‘Show Report’:

Dubai Financial Services Authority EPRS User Guide v1.9.doc
Page 32 of 45
4. A PDF version of your form will appear:
5. To print the report select the ‘print’ icon:

Dubai Financial Services Authority EPRS User Guide v1.9.doc
Page 33 of 45
7.2. Printing all Reports
In addition to printing individual reports, EPRS also allows you to print a complete pack of reports.
There are 6 main areas within this section. 1. Click on the report menu from the task list. It can be identified by ‘XXXX Reports Pack’:

Dubai Financial Services Authority EPRS User Guide v1.9.doc
Page 34 of 45
2. A new window will appear showing all the reports in right hand pane:

Dubai Financial Services Authority EPRS User Guide v1.9.doc
Page 35 of 45
3. Click on the ‘Tips’ icon:
4. The ‘Viewer’ pane will change and you will see an option called ‘Complete Book in PDF’:

Dubai Financial Services Authority EPRS User Guide v1.9.doc
Page 36 of 45
5. Click on ‘Complete Book in PDF’, the right hand pane will now show all the forms consolidated into one PDF:

Dubai Financial Services Authority EPRS User Guide v1.9.doc
Page 37 of 45
6. To print the report select the ‘print’ icon:

Dubai Financial Services Authority EPRS User Guide v1.9.doc
Page 38 of 45
7.3. Confirming that the Report Pack has been Printed The last step prior to submitting your prudential returns to the DFSA is to ensure that you
have confirmed that the report pack has been printed and the relevant individuals have signed the B100 – Declaration by Authorised Firm required by PIB, or the Statement of Directors required by PIN.
There are 4 main areas within this section. 1. Click on ‘Pack Printed’ from within the task list. This will display a form in the right hand
pane:

Dubai Financial Services Authority EPRS User Guide v1.9.doc
Page 39 of 45
2. If you have successfully printed the reports and the relevant individuals have signed the B100 – Declaration by Authorised Firm required by PIB, or the Statement by Directors required by PIN, enter ‘1’ into the cream cell:
3. Finally click on the submit button
4. By clicking on the submit button you have confirmed that the report pack has been printed and the relevant individuals have signed the Form B100 – Declaration by Authorised Firm required by PIB, or the Statement of Directors required by PIN.

Dubai Financial Services Authority EPRS User Guide v1.9.doc
Page 40 of 45
8. Process Control
Process Control is the function used to submit the completed return to the DFSA. This step has two functions:
• informs the DFSA that the return has been submitted and may be reviewed; and
• locks the data – once the return is submitted you cannot make further changes or amendments.
There are 7 main areas within this section. 1. First you must visit the ‘Process Control’ page by clicking ‘Process Control’ in the task list:
Dubai Financial Services Authority EPRS User Guide v1.9.doc
Page 41 of 45
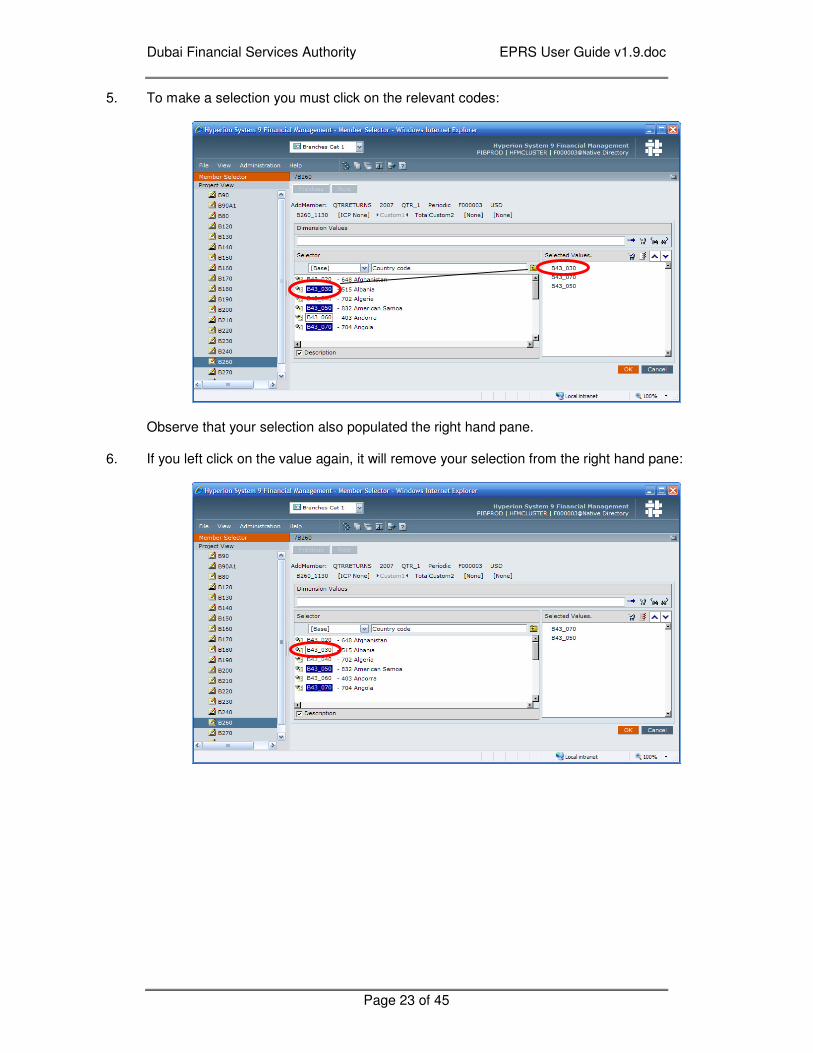
2. The following screen will appear:
3. Before the data can be submitted to the DFSA using process control, all the validations must be passed (refer Chapter 6). If the validations have not been passed, two white crosses on red background circles will be displayed in the last two boxes. This indicates that validations have not been passed. To drill down and see the validations which have not been passed, click the white cross on the red background circle under validations, a new message box will appear detailing all the validations:
4. The message box in the previous step details which validations have been unresolved. You must now revisit the ‘Validations’ form and perform the steps detailed in chapter 6.
5. Once you have passed all your validations, revisit the ‘Process Control’ page as identified in step 1.

Dubai Financial Services Authority EPRS User Guide v1.9.doc
Page 42 of 45
6. If you have correctly resolved your validations, the validation box will contain a green tick:
7. You will now be able to submit your return to the DFSA as a final version.
NOTE: Once the above process has been completed and the return has been submitted, it is locked and cannot be changed. If changes are required, you must contact [email protected] and ask for the return to be unlocked to allow the necessary changes to be made.

Dubai Financial Services Authority EPRS User Guide v1.9.doc
Page 43 of 45
9. Submitting your Return to the DFSA There are 5 main areas within this section. 1. Following on from the previous section, in order to submit the data you will need to ensure
you are in the ‘Process Control’ screen:
2. Click on the firm number, the row will be highlighted in blue:
3. Click on the ‘Process Menu’ and click on ‘Submit’:

Dubai Financial Services Authority EPRS User Guide v1.9.doc
Page 44 of 45
4. You can now enter a comment into the ‘Comments’ box and then select ‘Submit’:
5. After selecting ‘Submit’ your return will be submitted to the DFSA for review:

Dubai Financial Services Authority EPRS User Guide v1.9.doc
Page 45 of 45
10. Logging Off There are Error! Reference source not found. main areas within this section. 1. Click on ‘File’ then click on ‘Exit’