Embed Size (px)
Citation preview

SYSTEMS AND NETWORK ADMINISTRATION
ACTIVITY 4.3 GROUP POLICY
University of Newcastle INFT2031 Systems and Network Administration Module 4: Group Policy
1
In this task you will be working on Group Policy.
SECTION 1 EXPLORING GROUP POLICY
Group Policy allows a consistent manner to deploy configurations across resources in a network. Group Policy can be managed in Windows Server 2019 using Group Policy Management console. 1. Review Group Policy: A good introduction to Group Policy can be found at
https://technet.microsoft.com/en-us/library/hh147307(v=ws.10).aspx . Read this article to refresh Group Policy before attempting moving to next step.
2. Group Policy Management Tool: You can open the Group Policy Management console by
Searching Group Policy Management or from Start Windows Administrative Tools Group Policy Management or Server Manager Tools Group Policy Management.

University of Newcastle INFT2031 Systems and Network Administration Module 4: Group Policy
2
Explore Warabrook forest and all folders in Group Policy Management console.
You will notice that there are two group policies by default:
Default Domain Policy – Applied to the entire domain
Default Domain Controllers Policy – Applied to all DCs in the domain
Click on Default Domain Controllers Policy and click on Settings tab. Click Close if a window pops with web content is blocked by Internet Explorer.
You’ll notice a number of configurations set by the Default Domain Controllers Policy that are applied to DCs in the domain. Note that the Windows Server 2019 that you are currently logged in is a DC. There is a setting “Allow log on locally” set with provides certain groups to logon to the Domain Controller. Note that no groups that you have created (e.g. ITSupportUsers) are included in this list.
Attempt to sign out and log in a DanN (who is a member of ITSupportUser) to the Windows Server 2019. You’ll get an access error.

University of Newcastle INFT2031 Systems and Network Administration Module 4: Group Policy
3
3. Configure Log on Locally configuration setting in a Default Domain Controllers Policy: In this task you will configure Log on Locally configuration setting in the Default Domain
Controllers Policy allowing all users in ITSupportUsers group to be able to log into Domain Controllers.
TASK – LOGGING ON TO DOMAIN CONTROLLERS BY NON-
ADMINISTRATORS
Login to the DC as an Administrator.
Open Group Policy Management console with Administrator privileges
Right-click on Default Domain Controllers Policy and select Edit.
You will see both Computer Configuration and User Configuration. Select Computer Configuration Policies Windows Settings Security Settings Local Policies User Rights Management.
Double-click “Allow log on locally” and click on Explain tab and read the description for the setting.
University of Newcastle INFT2031 Systems and Network Administration Module 4: Group Policy
4
Next, click Security Policy Setting tab add ITSupportUsers group and click Apply and then OK.
Note that Computer Configurations are applied at boot-up or on domain controllers every 5 minutes. To apply the GPOs immediately, we can run the command gpupdate in the command window.
Now any user in ITSupportUsers group can logon to any Doman Controller (DC) in the domain. Verify this fact by logging in as DanN (i.e. a member of ITSupportUsers group) to the DC. Note that while you are able to logon to the server as DanN, you are unable to open Active Directory Users and Computers.
4. Delegate Control over OUs: The delegation of administration allows you to distribute and decentralise the process of administering Active Directory. To accomplish this goal, first step is to design the OU structure so that the administration work can be distributed. The second step in delegating the administrative control is to configure the appropriate level administrative permissions.
TASK – DELEGATE CONTROL OVER OUs
In Warabrook College, there are a number of requests from students to reset their password when they have forgotten their passwords. These requests are overwhelming the domain administrator. Therefore, the domain administrator has decided to delegate the resetting of passwords control of students to be given to the ITSupportUsers group. In this manner, any IT Support personnel can handle a student password reset request.
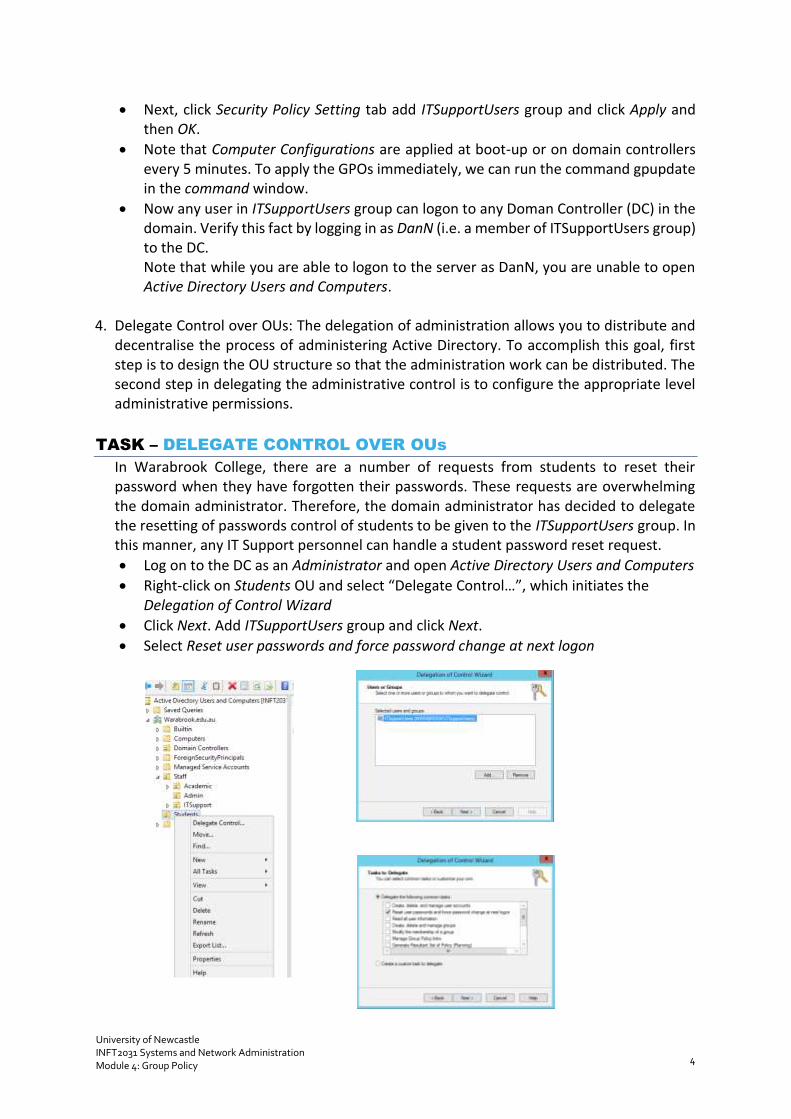
Log on to the DC as an Administrator and open Active Directory Users and Computers
Right-click on Students OU and select “Delegate Control…”, which initiates the Delegation of Control Wizard
Click Next. Add ITSupportUsers group and click Next.
Select Reset user passwords and force password change at next logon
University of Newcastle INFT2031 Systems and Network Administration Module 4: Group Policy
5
Explore: See some of the other existing permissions that can be delegated
Click Next and Finish. Testing: Now you can logon as an ITSupportUser account (e.g. DanN) and verify whether you can reset student passwords. You may be asked to put in Dan’s credentials when opening Active Directory Users and Computers console. Attempt to see whether you can reset a staff account’s password.
Alternatively, you can also use Powershell to reset the password: Set-ADAccountPassword -Identity 'CN=Kathy
Miller,OU=Admin,OU=Staff,DC=Warabrook,DC=edu,DC=au' -Reset -
NewPassword (ConvertTo-SecureString -AsPlainText "P@ssword1"
-Force)
4. Display a logon message for all users: IT Manager at Warabrook College has decided that it
is a good idea to place a disclaimer, under the new security policy, stating that each user account when logged in is responsible his/her actions. This is aimed as a legal issue, discourage of misuse of resources and encourage users not to disclose authentication information by Warabrook College users.
You have decided to implement a new policy called Domain Logon Message GPO and link
it to the domain to apply for all users in the. The steps for creating and configuring the Default Domain Policy Group Policy Object (GPO) are given below:
TASK – DISPLAY LOGON MESSAGE
Logon to the Domain Controller as an Administrator.
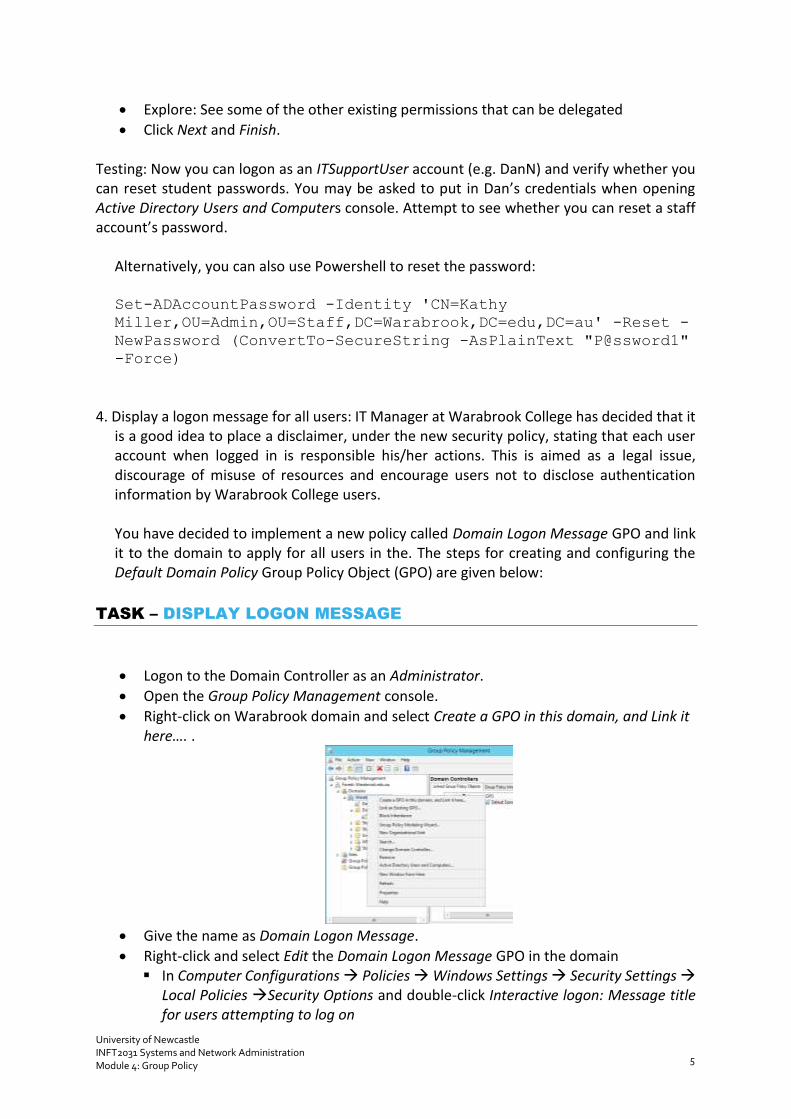
Open the Group Policy Management console.
Right-click on Warabrook domain and select Create a GPO in this domain, and Link it here…. .
Give the name as Domain Logon Message.
Right-click and select Edit the Domain Logon Message GPO in the domain In Computer Configurations Policies Windows Settings Security Settings
Local Policies Security Options and double-click Interactive logon: Message title for users attempting to log on
University of Newcastle INFT2031 Systems and Network Administration Module 4: Group Policy
6
Click Explain tab and review the documentation on setting In Security Policy Setting, select Define this policy setting in the template and type
“Warabrook College Security Policy: Disclaimer”. Click Apply and the OK. Next, double-click on Interactive logon: Message text for users attempting to log
on. Select Explain tab and read. Next click Select Define this policy setting in the template. For the text of message,
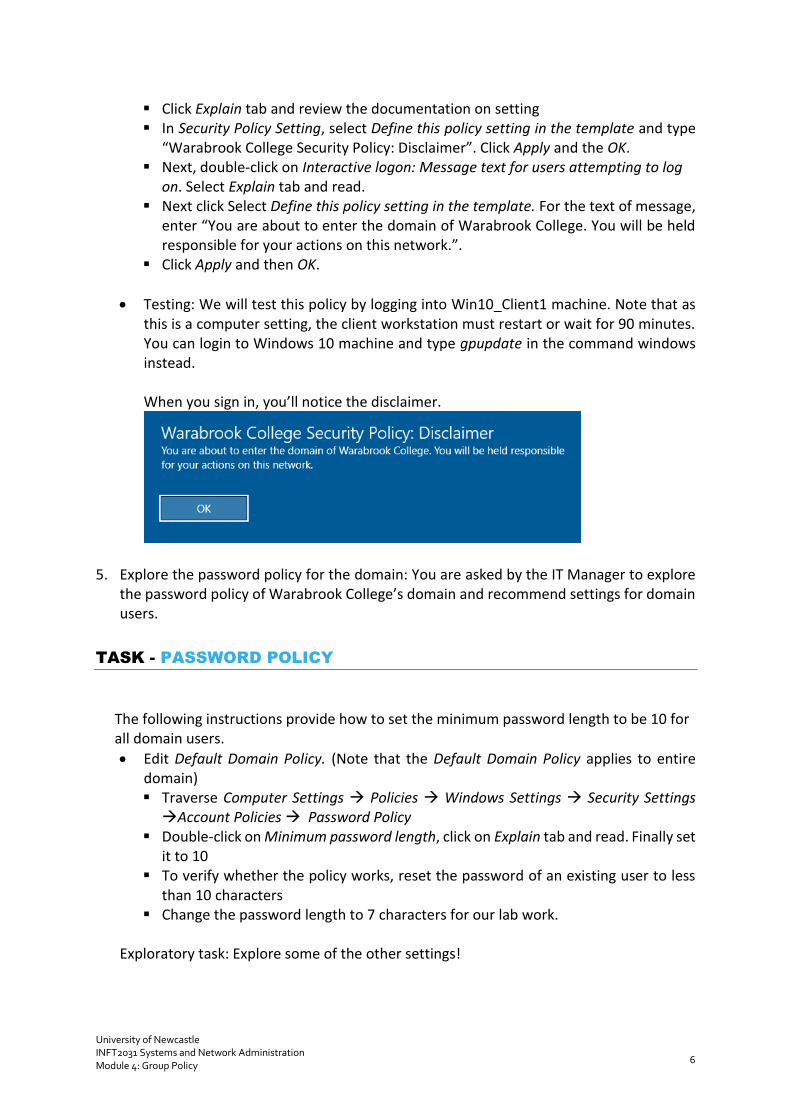
enter “You are about to enter the domain of Warabrook College. You will be held responsible for your actions on this network.”.
Click Apply and then OK.
Testing: We will test this policy by logging into Win10_Client1 machine. Note that as this is a computer setting, the client workstation must restart or wait for 90 minutes. You can login to Windows 10 machine and type gpupdate in the command windows instead. When you sign in, you’ll notice the disclaimer.
5. Explore the password policy for the domain: You are asked by the IT Manager to explore the password policy of Warabrook College’s domain and recommend settings for domain users.
TASK - PASSWORD POLICY
The following instructions provide how to set the minimum password length to be 10 for all domain users.
Edit Default Domain Policy. (Note that the Default Domain Policy applies to entire domain) Traverse Computer Settings Policies Windows Settings Security Settings Account Policies Password Policy
Double-click on Minimum password length, click on Explain tab and read. Finally set it to 10
To verify whether the policy works, reset the password of an existing user to less than 10 characters
Change the password length to 7 characters for our lab work. Exploratory task: Explore some of the other settings!

University of Newcastle INFT2031 Systems and Network Administration Module 4: Group Policy
7
Write down any suggested recommendations for password policy (if you have any). Note you need to consider the usability as well (e.g. too long passwords, complexity etc. can be excessive in the Warabrook College context and may cause more issues/workload to IT Support staff when users forget their passwords etc.).
6. Student Policy (Removing Control Panel, Home Folders and mapping Network Drives):
The IT Manager has discussed with you about managing resources access to students in
Warabrook College and has come with the following recommendations:
Remove access to Control Panel from student users
Create home folders for student users
Provide access to shared folders on the server
You have decided to implement a Group Policy Object (GPO) called Student Policy and
apply it to the Students OU in the AD hierarchy.
TASK - REMOVE CONTROL PANEL FROM ALL STUDENT USERS,
USING GPOs
Firstly, login to the Doman Controller as a Domain Administrator and Open Group
Policy Management Console
Click on +’s to traverse the hierarchy and expand the domain Warabrook
Right-click on Student OU Create a GPO in this domain, and Link it here...
Name the policy as StudentPolicy and save.
Configuring a group policy object
Open Group Policy Object folder and select StudentPolicy and right-click Edit...
Explore: You can explore some of the settings possible in user and computer
configuration
To remove Control Panel from the student start menu, select User Configuration
Policies Administrative Template Control Panel
Double-click on “Prohibit access to the Control Panel and PC settings” and read the
Help text box. Read through to understand the affect of the setting.
Select Enabled to enable restriction and click Apply. Click OK.
Testing: Log onto the client machine as a student and verify the user configuration.
University of Newcastle INFT2031 Systems and Network Administration Module 4: Group Policy
8
Note: If you have an error logging onto the client machine (i.e. error message states that
the no logon servers are available), then you will need to ensure that the client gets an
IP lease from the server and is able to contact the DC. Login the client as the local
administrator and release IP lease and renew it.
Exploratory task: Also, remove the Recycle Bin icon from the desktop of students.
Close the Group Policy Object (GPO) editor after you complete this task.
TASK – CREATING HOME FOLDERS FOR USERS
In this section, we’ll create home folders to student users.
In a single domain environment, or when users from only one domain are assigned access
to a resource, use AGDLP convention:
Accounts are made members of
Global groups, which are made members of
Domain Local groups, which are assigned
Permissions to resources
Creating Domain Local Groups
- Create the following Domain Local groups in AD:
OU Group Name Type Members
Academic AcademicResources Domain Local AcademicUsers
Admin AdminResources Domain Local AdminUsers
Student StudentResources Domain Local StudentUsers
Creating Shared Folder using Server Manager’s File and Storage Services
In this section, we will use Server Manager’s File and Storage Services to create and share
a Shared Folder.
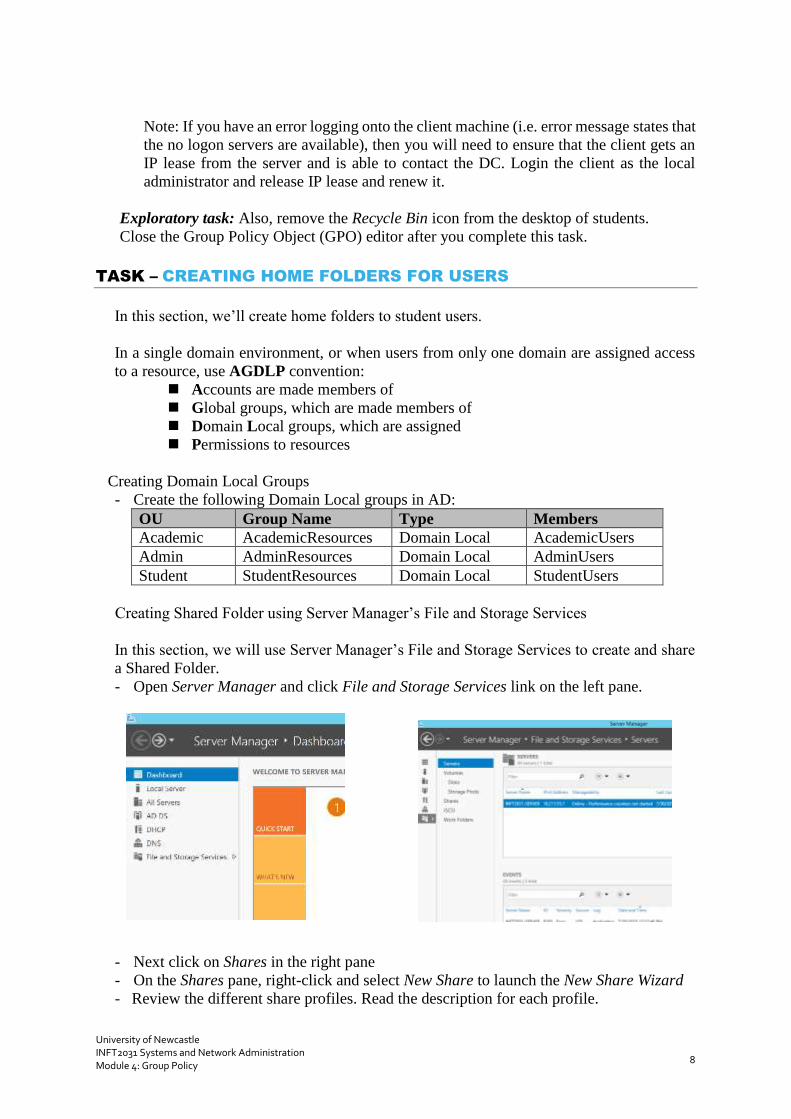
- Open Server Manager and click File and Storage Services link on the left pane.
- Next click on Shares in the right pane
- On the Shares pane, right-click and select New Share to launch the New Share Wizard
- Review the different share profiles. Read the description for each profile.

University of Newcastle INFT2031 Systems and Network Administration Module 4: Group Policy
9
- Select SMB Share –Quick which is the default to create a SMB file share to share with
Windows-based computers and click Next.
- Select the C:\ Drive as the location for the shared folder and click Next
University of Newcastle INFT2031 Systems and Network Administration Module 4: Group Policy
10
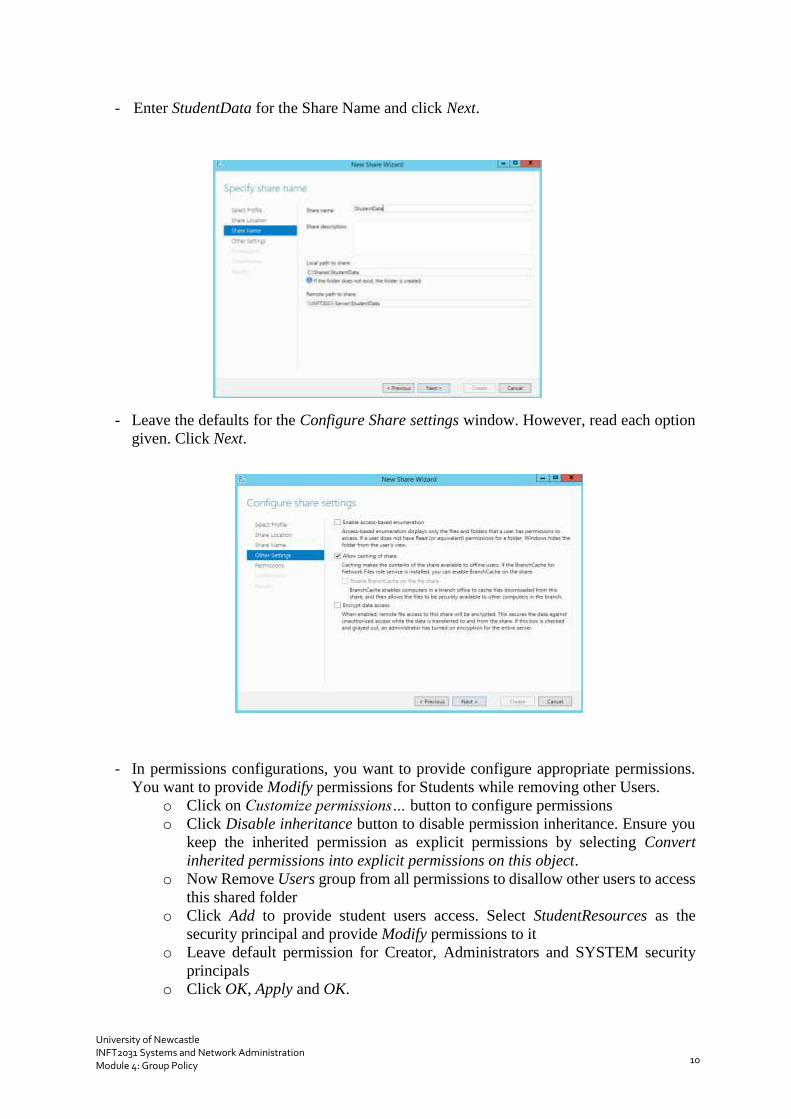
- Enter StudentData for the Share Name and click Next.
- Leave the defaults for the Configure Share settings window. However, read each option
given. Click Next.
- In permissions configurations, you want to provide configure appropriate permissions.
You want to provide Modify permissions for Students while removing other Users.
o Click on Customize permissions… button to configure permissions
o Click Disable inheritance button to disable permission inheritance. Ensure you
keep the inherited permission as explicit permissions by selecting Convert
inherited permissions into explicit permissions on this object.
o Now Remove Users group from all permissions to disallow other users to access
this shared folder
o Click Add to provide student users access. Select StudentResources as the
security principal and provide Modify permissions to it
o Leave default permission for Creator, Administrators and SYSTEM security
principals
o Click OK, Apply and OK.

University of Newcastle INFT2031 Systems and Network Administration Module 4: Group Policy
11
- Click Next and then click Create to create the Shared folder. Finally click Close to close
the Window.
- You can verify the permissions configurations set by looking at the Shared Folder and
NTFS Permissions for the StudentData folder.
Creating Home Folders
- Open Active Directory Users and Computers
- For each student user, right-click and select Properties. Next click Profile tab. In the
Home folder section select Connect H: drive to \\<server>\StudentData\<username-of
–student>
Note that <server> is INFT2031-Server and you can get the user logon name from
Account tab of Properties window.
Testing
- Logon to Windows 10 client machine as a student user and access the H:\ folder. Create
and save some data in the H:\ drive.
- Verify whether there data is saved in the server. Now student users can access their home
folder from any client in the domain.
TASK - MAPPING NETWORKDRIVES USING GROUP POLICY
In this activity, you’ll map network drives for StudentShare and StudentAnnouncements
folders.
- Create the following shared folders (similar to task 2) in the Windows Server 2016
machine’s c:\Shares Drive and configure permissions
Folder Group Permission
StudentAnnouncements StudentResources Read
StudentShare StudentResources Modify
- Except for administrators (i.e. Administrators, Creator Owner and SYSTEM) and
StudentResources group. Other accounts (such as Users group) do not have local access
to C:\Shares\StudentAnnouncements and C:\Shares\StudentShare folders.
- Create a GPO called StudentDriveMappings and link it to the domain
University of Newcastle INFT2031 Systems and Network Administration Module 4: Group Policy
12
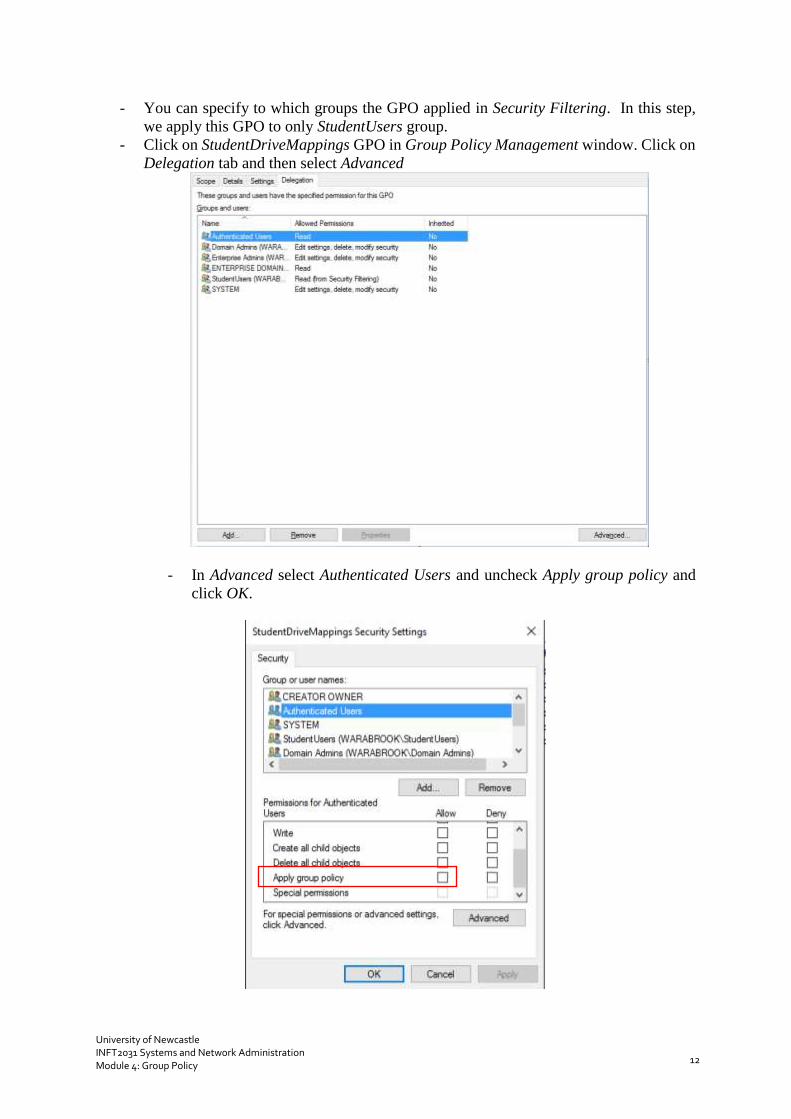
- You can specify to which groups the GPO applied in Security Filtering. In this step,
we apply this GPO to only StudentUsers group.
- Click on StudentDriveMappings GPO in Group Policy Management window. Click on
Delegation tab and then select Advanced
- In Advanced select Authenticated Users and uncheck Apply group policy and
click OK.
University of Newcastle INFT2031 Systems and Network Administration Module 4: Group Policy
13
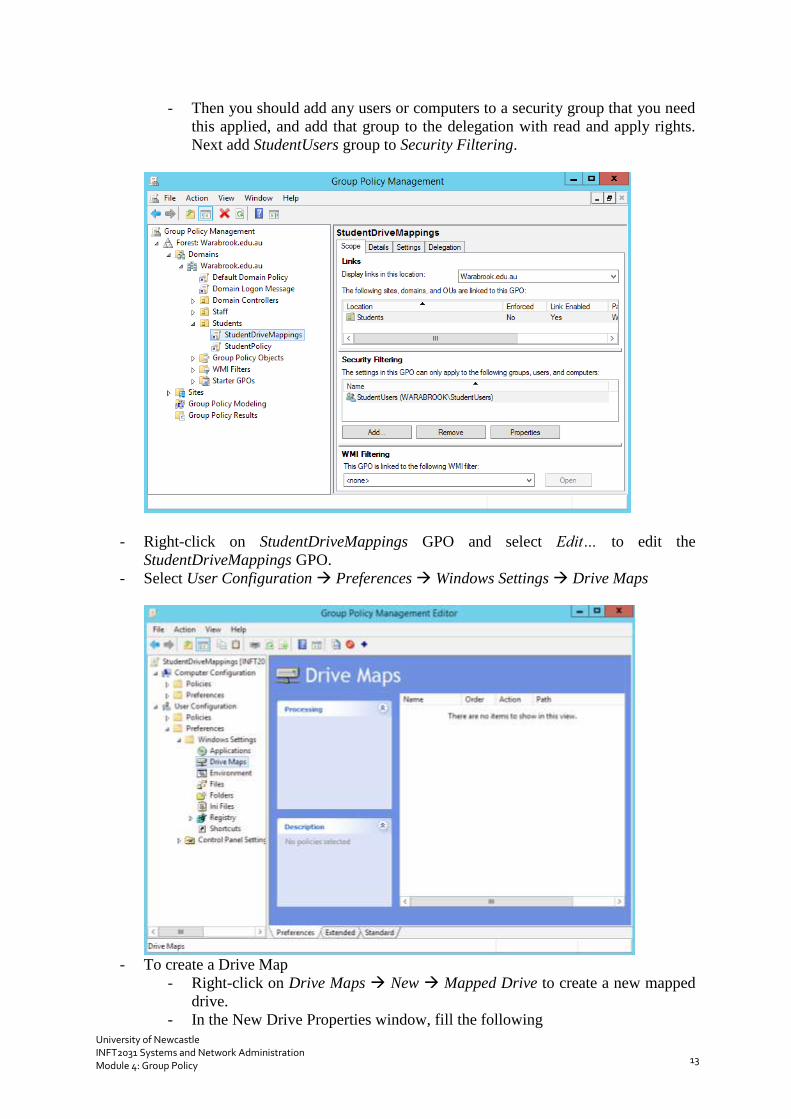
- Then you should add any users or computers to a security group that you need
this applied, and add that group to the delegation with read and apply rights.
Next add StudentUsers group to Security Filtering.
- Right-click on StudentDriveMappings GPO and select Edit… to edit the
StudentDriveMappings GPO.
- Select User Configuration Preferences Windows Settings Drive Maps
- To create a Drive Map
- Right-click on Drive Maps New Mapped Drive to create a new mapped
drive.
- In the New Drive Properties window, fill the following

University of Newcastle INFT2031 Systems and Network Administration Module 4: Group Policy
14
Action: Create
Location: \\INFT2031-SERVER\StudentAnnouncements
Drive Letter Use: S
Hide/Show this drive: Show this drive
- Click Apply and then OK.
- Create another Drive Map in the StudentDriveMappings GPO for StudentShare folder
with the following information.
Action: Create
Location: \\INFT2031-SERVER\StudentShare
Drive Letter Use: T
Hide/Show this drive: Show this drive
- Close the Group Policy Management Editor.
Testing: To verify that mapped drives are working, logon to the client machine as a student
account, open File Explorer to verify that the S: and T: drives are mapped. However, even
though it is applied to the domain, if you logon as anyone other than a student, you will not
have the drives mapped as we filtered which groups this GPO will apply.
TASK - APPLYING GROUP POLICY OBJECTS TO MULTIPLE OUs
In this section, you’ll create and apply a group policy object to both Students and Admin staff.
- Logon to the client either as a student or admin staff member and type regedit in the
Start Run window. This will allow students and staff members to be able to change
registry settings on Windows. We will disable this option using Group Policy.
- Logon to the server as an administrator and open Group Policy Management console
(GPMC):
- Traverse the Warabrook domain and open Group Policy Objects folder in Group Policy
Management console
- Create a new GPO in Group Policy Objects folder and name it RemoveRegistryEditing.
University of Newcastle INFT2031 Systems and Network Administration Module 4: Group Policy
15
- Right-click RemoveRegistryEditing GPO and select Edit...
- Traverse User Configuration PoliciesAdministrative Templates: Policy definitions
(ADMX files) retrieved from the local machine System and double-click on “Prevent
access to registry editing tools”. Read the Help documentation to understand the policy.
Enable the setting.
- Close the GPO Editor windows
Now you’ll apply the RemoveRegistryEditing GPO previously created to Admin OU in Staff
OU and Student OU as well.
- In the Group Policy Management console, right-click Admin OU and select Link an
Existing GPO...
- Select RemoveRegistryEditing and click OK.
- Similarly apply the RemoveRegistryEditing GPO to the Student OU
Testing: Now logon to client machine both as a student and as an admin user and verify
settings
TASK - POLICY INHERITANCE
Group Policy Inheritance: GPOs are applied in the following order:
1. Local GPO
2. Site
3. Domain
4. Parent OU
5. Child OU
All of the individual GPO settings are inherited by default (can be overridden). For example, a
GPO on a parent container is also applied to child containers. At each level, more than one
GPO can be applied. If there is more than one GPO per container, the policies are applied in
bottom up order that they appear in Group Policy tab.
When multiple policies conflict, the following protocol is used to determine which policy to
apply:
1. If there is no conflict, then both policies are applied
2. If there is a conflict, later settings overwrite the earlier settings (by default).
3. Computer policies usually overwrite user policies
Block Policy Inheritance: In this subtask, you’ll test blocking policy inheritance.
- Create an OU within Student OU called ResearchStudents.
- Add a user called Keith Morgan (username KeithM) to the ResearchStudents OU with
password as “P@ssword1”.
- Add Keith Morgan to the StudentUsers group.
- Configure the home folder for Keith Morgan to be the H: drive mapped to
\\<server>\StudentData\<username-of –student>
- Since research students need access to registry and update them you’ll block policy
inheritance as follows:
- Open GPMC
- Right-click on ResearchStudents OU and select “Block Inheritance”
- Now logon as Keith Morgan and verify access to regedit.

University of Newcastle INFT2031 Systems and Network Administration Module 4: Group Policy
16
- Note that you have also blocked the other Policies such as Domain Logon Message,
Default Domain Policy, Student Policy etc.
Enforced Policy: In this subtask, you’ll test “Enforced” capability of GPOs
- You notice that after the previous task, research students are not only able to access
registry but also the control panel (which is set by the “Student Policy”).
- It is determined that resources must adhere to Default Domain Policy GPO while all
students (including research students) should adhere to Student Policy GPO. To
disallow any blocking of Default Domain Policy and Student Policy in OUs in
Warabrook domain and Students OU respectively, you can set the “Enforced” flag as
follows:
- Logon to the server as an Administrator, open Group Policy Management
console (GPMC).
- Traverse to Warabrook domain in GPMC. Right-click on Default Domain
Policy GPO and select Enforced.
- Next, traverse to Students OU in GPMC. Right-click on StudentPolicy GPO and
select Enforced
- Now logon as Keith Morgan and verify access to regedit while no access to the Control
Panel.
Exemptions to Group Policy: In this subtask, you’ll test how exemptions from Group Policy
can be set to specific users.
- A lecturer has decided that student Jeff Kay (username: std0777) requires access to
registry for his project and asked you to enable this setting so as to complete his project
using the lab computers.
- To enable Jeff Kay to access registry, you have decided to exempt Jeff Kay from being
applied the RemoveRegistryEditing GPO
- You can set the exemption as follows:
- Logon as Administrator, open GPMC. Open Group Policy Objects folder in
INFT2031 domain.
- Click on RemoveRegistryEditing GPO and select Delegation tab on the right-
hand windows. Next click on Advanced... button.
- Click on Add button and search for std0777 username.
- In the Permissions for Jeff Kay, select Deny on Apply group policy permission.
- Click Apply and a warning would appear. Read the warning and click OK and
next OK.
- Close GPMC
- Logon as std0777 and verify exemption from RemoveRegistryEditing GPO. Logon as
std0121 and verify that RemoveRegistryEditing GPO is applied.

University of Newcastle INFT2031 Systems and Network Administration Module 4: Group Policy
17
TASK - GROUP POLICY MODELLING
Group Policy application can become complex in a large environment and having a tool to
decide which GPOs are applied can be quite helpful for troubleshooting. For instance, which
setting, policies are applied for containers (OUs), computers, groups or users. The Group
Policy Modeling tool within GPMC is a handy tool for this purpose.
You’ll use the Group Policy Modeling tool to verify the GPOs applied to std0777, std0121
users and Students OU on your client computer:
- Open GPMC
- Traverse Group Policy Modeling in the Warabrook.edu.au forest.
- Right-click on Group Policy Modeling and select Group Policy Modeling Wizard...
- Read the documentation and click Next.
- In the Domain Controller Selection screen, read the documentation. As our DCs ae
running Windows Server 2003 or later, keep default selections and click Next.
- For User and Computer Selection, select user std0777 for GP Modeling.
- Click User in User Information selection group.
- Click Browse and select std0777 user for user.
- For Computer Information, select your client computer (e.g. INFT2031-PC).
- Click Computer in Computer Information
- Click Browse and type INFT2031-PC1 as the client computer
- Select Skip to the final page of this wizard without collecting additional data which
would avoid other selections for the modelling such as WMI Filters etc. and click Next.
- Review the summary of selections, click Next and Finish.
- Review the Details tab.
- Do the same for other users – std0121 etc.
You will notice that std0121 has RemoveRegistryEditing in the Applied GPOs section which
is listed in Denied GPOs for std0777.
Similarly, use Group Policy Modeling tool to verify GPOs applied for KeithM user and Student
OU.