Embed Size (px)
Citation preview
Church Community Builder System Settings Workbook

Welcome! 41. General 5
General 5
Colors 7
Other Sections 9
File Uploads 13
2. Administrative Privileges 14System-wide Privileges 14
Campus-specific Privileges 15
Other Access Levels 16
3. Privacy Defaults 17Basic Users and Limited Access Users 17
Profile 18
4. Customizable Fields 20Pre-labeled Pulldown Menus 20
People 20
Groups 27
Positions 28
Other 29
Custom Label Pulldowns 30
Other Custom Label Fields 31
5. Resources 33
Church Community Builder 2

6. Campuses 34General 34
Addresses 36
Financial 37
7. Chart of Accounts (COAs) 398. API 399. Web Tools 3910. Support 40
Church Community Builder 3

Welcome!Welcome to Church Community Builder, your web-based church management software. The work you do is important, and the best way we can support that work is by better equipping you with the knowledge of how to better lead and manage your areas of responsibility. We know you are making a lasting impact on the lives you touch; we are honored to help you make that impact even greater through our powerful software!
The purpose of the Systems Settings Workbook is to assist with the initial setup of the software, specifically those functionalities impacting the entire system — things like the message people see when they log in, what color scheme for the site fits your culture, and what website users are directed to when they log out. Initially, only the Master Administrator (Master Admin) will be able to set up the software. However, the Master Administrator does have the ability to judiciously grant these privileges to other people, and we’ll walk through the process of how to grant them.
Let’s get started! To begin configuring your settings, log in to your site as the Master Administrator, the only person by default allowed to view or change System Settings.
Church Community Builder 4

1. General First, let’s set up the general settings. Click the Settings gear icon in the upper right, then ‘General’ under ‘System Settings’. There are four sections in this area: ‘General’, ‘Colors’, ‘Other Sections’, and ‘File Uploads’.
GeneralOrganization Information
• Name: The full name of your church
• Phone: Your church’s number; it’s included in the footer of emails sent via the software
Your Public Website Tie-Ins
• Logout URL: When people log out of your Church Community Builder site, you can automatically direct them to another site, such as your public website, by putting the web address in this field.
• Email for Requests: By default, when an individual requests a new login and password using the ‘Sign Up’ link and no profile with a matching email is found in the system, a login notification email is delivered to the Master Admin. If you would like someone else to handle all the requests for logins to the site, put that person’s email address in this field.
• Login Page Text: This is a customizable field for images and text users will see when landing on the login page for your Church Community Builder site (using the ‘Source’ tab, you can use HTML to customize your login page text). In addition to the login box, there is a link to your church’s public calendar and mobile login (Standard and Deluxe versions). Finally, there are links for new users to request a username and password, as well as a link for those already assigned a username and password to retrieve one or both if forgotten.
Church Community Builder 5

Child Protection
• Age Threshold: Choose the age at which you would like children’s profile information to be visible to members of your online community. Children below this age threshold are hidden from logged-in users who are not the family’s Primary Contact or Spouse, are not currently 'Child Work Approved', or do not have the appropriate People admin privilege. Most churches set this to either age 12 (default) or 18. If your youth group is very active in the site, you may want this set to 12 so those teens can ‘see’ each other in the system.
• Who Can Edit: Determine who can set the ‘Child Work Approved’ Start and Stop Dates when editing an individual’s profile. Every individual’s profile contains blank ‘Child Work Approved Start’ and ‘Stop’ date fields. When those fields are populated with dates, the individual can see children’s profile information as detailed above. However, the ability to enter and remove those dates is restricted to a limited group of people, either 1) the Master Admin, or 2) the Master Admin and those with Full Read and Write People admin privileges. From the pulldown, choose one:
• Master Admin Only (default)
• Master Admin and People Admins
Church Community Builder 6
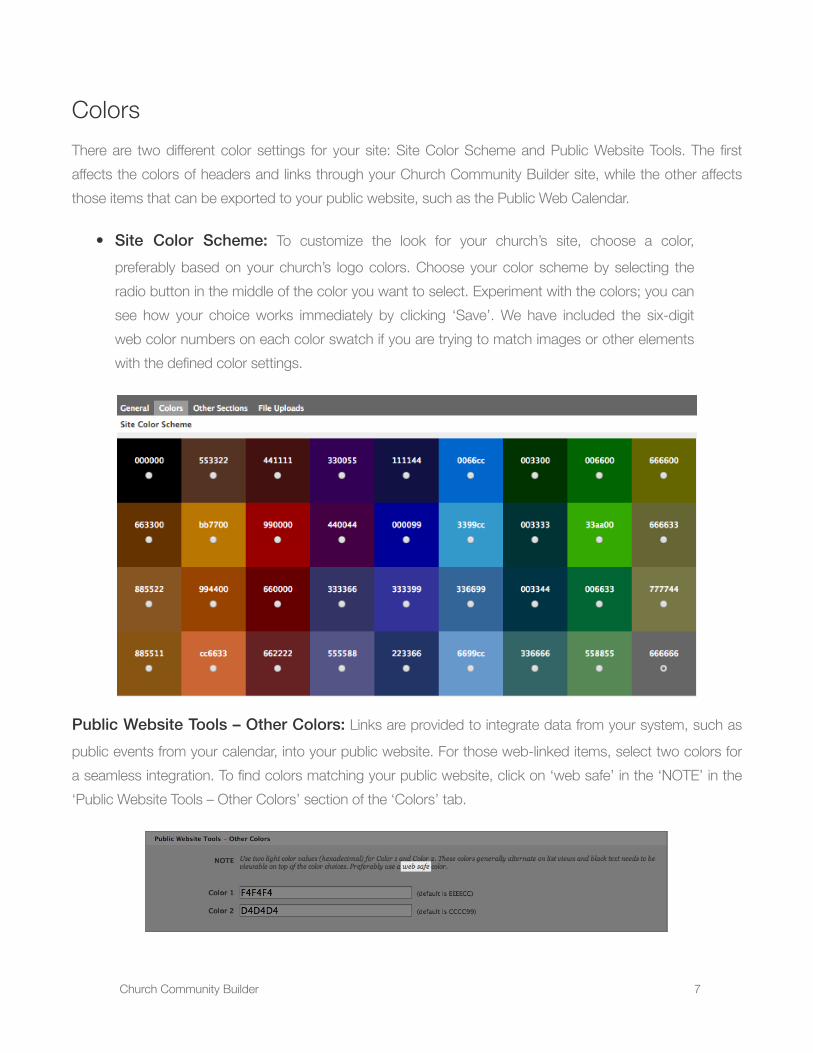
ColorsThere are two different color settings for your site: Site Color Scheme and Public Website Tools. The first affects the colors of headers and links through your Church Community Builder site, while the other affects those items that can be exported to your public website, such as the Public Web Calendar.
• Site Color Scheme: To customize the look for your church’s site, choose a color, preferably based on your church’s logo colors. Choose your color scheme by selecting the radio button in the middle of the color you want to select. Experiment with the colors; you can see how your choice works immediately by clicking ‘Save’. We have included the six-digit web color numbers on each color swatch if you are trying to match images or other elements with the defined color settings.
Public Website Tools – Other Colors: Links are provided to integrate data from your system, such as public events from your calendar, into your public website. For those web-linked items, select two colors for a seamless integration. To find colors matching your public website, click on ‘web safe’ in the ‘NOTE’ in the ‘Public Website Tools – Other Colors’ section of the ‘Colors’ tab.
Church Community Builder 7

We recommend lighter backgrounds to see the black text. Also, alternating two colors for lists enhances readability. See the images below for examples. You can find further information on using the public web tools here.
• Forms List
• Groups List
Church Community Builder 8

Other SectionsThe ‘Other Sections’ tab allows you to select whether you are using Church Community Builder for contribution and donor management, customize the text on the login page for the ‘Find a Group’ link, establish when your church’s Engagement Week starts and stops, and choose whether or not you want members of your online community to be able to edit their own profiles.
Financial
• System-Wide Financials: This pulldown allows you to choose whether you are using Church Community Builder's Financial tool and, if so, who can access financial information within the software.
• On (default): This turns financials on so each logged-in user can see and print their own personal Giving and Pledge Statements whenever they wish. This setting must be used if you would like your donors to use the Online Giving tools for repeating gifts.
• Admin: This turns financials on only for a Financial Admin. Logged-in users will not see their contributions and pledges, but the Financial Admin can still record transactions for users, print out financial management reports, and print Giving Statements for all donors. Nevertheless, donors may submit one-time online debit/credit or checking gifts through the ‘Give’ tab (described below). Finally, donors still have the capability for one-time online debit/credit gifts if ‘Allow Public Gifts’ is enabled (described below).
• Off: This turns financials completely off. Use ‘Off’ only if you do not want to track donor contributions and pledges or are using another program to track this information.
Church Community Builder 9
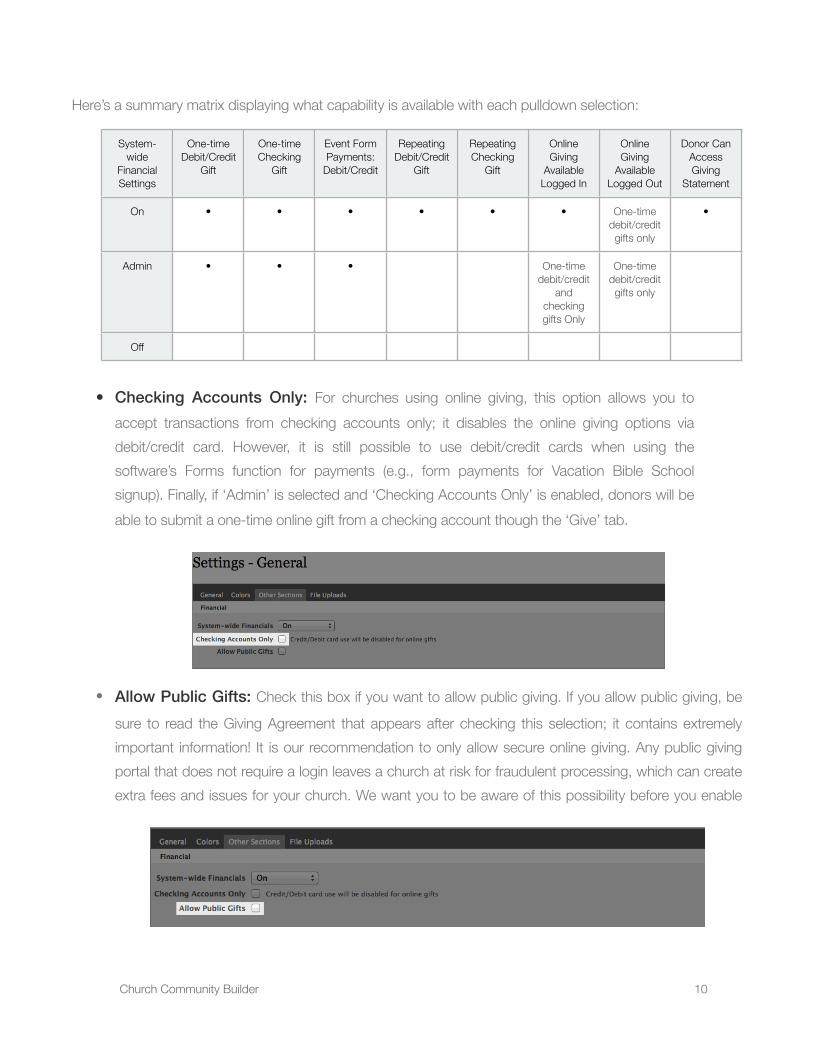
Here’s a summary matrix displaying what capability is available with each pulldown selection:
System-wide
Financial Settings
One-time Debit/Credit
Gift
One-time Checking
Gift
Event Form Payments:
Debit/Credit
Repeating Debit/Credit
Gift
Repeating Checking
Gift
Online Giving
Available Logged In
Online Giving
Available Logged Out
Donor Can Access Giving
Statement
On • • • • • • One-time debit/credit gifts only
•
Admin • • • One-time debit/credit
and checking gifts Only
One-time debit/credit gifts only
Off
• Checking Accounts Only: For churches using online giving, this option allows you to accept transactions from checking accounts only; it disables the online giving options via debit/credit card. However, it is still possible to use debit/credit cards when using the software’s Forms function for payments (e.g., form payments for Vacation Bible School signup). Finally, if ‘Admin’ is selected and ‘Checking Accounts Only’ is enabled, donors will be able to submit a one-time online gift from a checking account though the ‘Give’ tab.
• Allow Public Gifts: Check this box if you want to allow public giving. If you allow public giving, be sure to read the Giving Agreement that appears after checking this selection; it contains extremely important information! It is our recommendation to only allow secure online giving. Any public giving portal that does not require a login leaves a church at risk for fraudulent processing, which can create extra fees and issues for your church. We want you to be aware of this possibility before you enable
Church Community Builder 10

public online giving. Also, be sure you have enabled System-wide Financials as described above.
• Online Gift Receipt URL: If you have selected ‘Allow Public Gifts’ and have integrated a merchant provider with an Account Number and Secret Key in the ‘Financial’ tab under ‘Campuses’ (Settings gear > ‘Campuses’ > ‘Financial’), the ‘Online Gift Receipt URL’ appears.
Leave the URL field blank to use Church Community Builder’s online gift receipt page. If you prefer to direct donors to another website for receipt information, be sure to see the instructions on the page. Finally, be sure to enable online giving for specific Chart of Accounts categories if you want to allow individuals to designate online gifts for a specific category (Settings gear > ‘Chart of Accounts’ > select a specific account > ‘Other’ section).
Enabling online giving for a specific Chart of Accounts category will add a ‘Give’ tab to the main page of your site.
Church Community Builder 11

Find a Group
• Custom Wording for Find a Group: This field allows you to customize the ‘Find a Group' text for the link on the login page. The ‘Find a Group' link on the login page provides the ability for non–logged-in users to search for a group, based on their own needs, using the pull-down menus. This pulldown menu information is determined when the group is created or edited. Simply stated, you control what information is available for public viewing.
Engagement
• Engagement Week: How do you structure your week? Use this pulldown to select your church’s normal week starts and stops. This will be especially relevant when you are running attendance reports. A helpful way to think about which option to choose is to ask yourself if you tend to include your midweek services with the previous Sunday or the upcoming Sunday.
Personal Profile Editing Allowances
• People Can Edit Their Profile: This section allows you to determine whether or not people can edit their own profiles.
• On: Those with a login and password to your site may edit their own profiles. However, reading and/or editing certain administrative information is restricted to those individuals with Full Read or Full Write admin privileges.
• Off for Limited Access Users: Allows only Basic Users to edit their profiles. If the Primary Contact and/or Spouse is a Basic User, they may edit their children's profiles even if the children are designated as Limited Access Users.
Church Community Builder 12

• Off: Only individuals granted Limited or Full Write admin may edit profiles. However, the Full Write admin privilege is required to edit certain administrative information.
File Uploads• Individual File Information: The software allows you to upload files in a variety of places,
like groups (including group messages and group schedules), profiles, mail merges, and forms. To view information about a specific file, navigate to the group, profile, or wherever the file has been uploaded. Details about the file will be displayed along with the name and link.
• System-wide File Information: To view how much storage space you have used on these files, click the Settings gear > ‘General’. From that page, click the ‘File Uploads’ tab. Here you can see how much space you are using and how much space you have left. All versions of the software come with included storage space in the following increments: Essential, 2GB (2,000MB); Standard, 10GB (10,000MB); and Deluxe, 20GB (20,000MB). Additional storage space may be purchased in 50GB increments. If you are nearing your limit, additional space for your file uploads is available for purchase by submitting a ticket. Click the Settings gear > ‘Help’ > ‘Support’ to do so.
Church Community Builder 13

2. Administrative Privileges Most of the users of your online community will be just that — users. In contrast, the Master Admin has access to every aspect of the software. Initially, the Master Admin is the only person with the ability to grant additional privileges, and may designate people to have additional privileges in the software so they can perform in specific roles and functions. These additional privileges provide unique access to information spanning the entire system; across a single campus, if you have more than one; or through a particular software feature.
We most strongly recommend careful consideration before granting these privileges to any individual. You may find it useful to create a matrix of the system privileges and roles/functions that require them before granting privileges in the software. Finally, we strongly recommend reviewing on a monthly basis which people have administrative privileges. The Member Privileges report is a quick way to access a list of who has been given any admin privilege(s). You can produce this report by clicking ‘People’ in the left menu bar > the Reports icon > ‘Member Privileges’, then selecting either On Screen or Excel as your output option and clicking ‘Create Report’.
System-wide PrivilegesThis set of privileges allows a person access to information and settings that affect the entire site. To grant privileges, click the Settings gear > ‘Admin Privileges’ or, from within a person’s profile, click ‘Assign admin privileges’ under the ‘Actions’ menu.
✓ Read the Help Article ‘Admin Privilege Explanations’
Church Community Builder 14

Campus-specific PrivilegesCampus-specific privileges allow you to assign administrative access to people within a specific campus and exclude that same access for other campuses. For churches with a single campus, these privileges function similarly to the System-wide Privileges because the person granted the privilege will have access across the entire single campus.
Click the name of a privilege for a pop-up briefly explaining the privilege. Click and drag each desired privilege to a specific campus to assign it to an individual. Then, a ‘Saved’ icon will appear and the privilege will be listed. When the process is complete, click ‘I’m Finished’ at the bottom of the window. To remove a privilege, simply hover your cursor over the privilege and click on the trash can that appears.
Church Community Builder 15

Other Access Levels In addition to the system-wide and campus-specific administrative privileges, you can also assign individuals to various feature-level roles to give them access to information within their assigned role without giving them system-wide or campus-specific privileges. To grant access to these others other access levels, you will have to assign them through the feature itself. The other access levels (role-based) are:
• Child Work Approved Status• Shared Saved Search• Shared Custom Report• Shared Mail Merge• Group Leader• Assistant Group Leader• Coach (Deluxe)• Director (Deluxe)• Department Admin• Event Organizer• Need Coordinator• Form Manager• Process Manger• Queue Manager
Church Community Builder 16

3. Privacy Defaults The ‘Privacy Defaults’ page determines the settings for each new profile added to your system; these default settings do not change the privacy settings for existing profiles. After the defaults are established and new profiles are created, people may subsequently adjust their own privacy settings (if granted the ability to do so, as presented above). However, we recommend setting the privacy defaults low enough to encourage community among logged-in users. Click the Settings gear > ‘Privacy Defaults’ to access the Privacy Defaults.
Basic Users and Limited Access UsersIn the software, there are two types of users: Basic and Limited Access. Most of your church population will likely be Basic Users. Limited Access Users (LAUs) have very restricted abilities. See the table below.
Basic Users LAUs
Join/Request to Join Listed Groups √ √
View Group Participants List in Members Interact Groups √ √
Have a Personal Event Calendar (My Calendar) √ √
Participate in Group Discussions √ √
Give Online √ √
See the People Tab √ x
Search for People √ x
See Listed Individual Profiles √ x
View Reports (except personal Giving Statements) √ x
Assign Needs √ x
Browse or Hold Positions √ x
Manage Process Queues √ x
Manage Forms √ x
Organize Events √ x
Be Assigned Admin Privileges √ x
Edit Own Profile √ x
Lead Groups √ x
Church Community Builder 17

Now that we have established that foundation, let’s dive into establishing the Privacy Defaults!
Limited Access User: If the ‘Default new profiles to Limited Access User’ checkbox is left unchecked, all new profiles will be set to ‘Basic User’; we recommend leaving this box unchecked to allow for a more interactive online community. If you leave this box unchecked as the default, but want to set a newly created profile to be an LAU, you’ll be able to edit the profile after you create it to make the person an LAU.
To make every new profile a Limited Access User (LAU), select the checkbox labeled ‘Default new profiles to Limited Access User’. Some churches elect to default all newly created profiles as LAUs to ensure non-members complete a membership class or other requirement before becoming a ‘Basic User’.
Remember, the default for this box is unchecked to make every newly created profile a ‘Basic User’.
Profile• Listed or Unlisted: Here you determine whether the default for new profiles added to the
system is ‘Listed’ or ‘Unlisted’. ‘Listed’ means the name, photo, link to email, and social networking icons will be visible to every Basic User with a login and password. ‘Unlisted’ means profile information can only be seen by those who have been given some level of People administrative privileges. Remember, names and photos are available to all group members in ‘Members Interact’ groups and to Group Leaders in ‘Administrative’ and ‘Announce Only’ groups.
Church Community Builder 18

If you set the default as ‘Listed’, you will also need to determine the defaults for each section (e.g., Main, Contact – Phones, etc.) of the profile. The choices are:
• Church Leadership Only: With this setting, information in the profile is visible only to those with the admin privilege of Limited or Full Read.
• Friends Only: Fields with this setting can be viewed only by other people with a login who are on the person's ‘My Friends’ list and those with the Admin Privilege of Limited or Full Read.
• Friends and My Groups Members: In addition to People Admins and those individuals listed as ‘Friends’, this setting provides visibility of information for other members of ‘Members Interact’ groups in which the person is a participant. Remember, names and photos are available to all group members in ‘Members Interact’ groups and to Group Leaders in ‘Administrative’ and ‘Announce Only’ groups.
• Everybody: All users with a login and password to your site may view this information.
Click ‘Save’ to complete the process.
Remember, these are default settings for new profiles you are adding to the system. If you are allowing people to edit their profiles, they will be able to change these default settings after login to meet their personal preferences.
Church Community Builder 19

4. Customizable FieldsCustomizable fields are data entry fields for extra information churches commonly collect. Pre-labeled pulldowns are named with commonly used terminology, and the options within them can be customized to match your church’s language. Custom label pulldowns and fields are completely open for you to use to collect whatever information you want. All these customizable fields are great tools for personalizing the software. Note: The padlocks indicate ‘Admin Data’, which is viewable by individuals with the ‘Full Read’ admin privilege and editable by someone with the ‘Full Write‘ admin privilege.
Pre-labeled Pulldown MenusClick the Settings gear > ‘Customizable Fields’ to view the Pre-labeled Pulldown Menus and default menu options for People, Groups, Positions, and Other settings. Click the name of a pulldown menu, such as ‘Age Bracket’, to edit its available options. Once on the pulldown menu's page, click the name of the option you would like to edit. Type your new choice and press Return on your keyboard to save the change. You will see the new name and a ‘Saved’ message when done correctly. Click ‘I'm Finished’ when you are done. If you’d like to add a new choice, click on ‘Add a new option’ on the right side under the ‘Actions’ bar. You can add unlimited options under each pulldown menu. Finally, you may choose the order the options are listed by sorting the list alphabetically (under the ‘Actions’ bar) or by clicking and dragging each option into the desired order.
PeopleEach individual has a profile containing specific information; the People pulldowns allow you to collect that information. Some of the topics are visible to and editable by the individual, while some are accessible only to those with administrative privileges. In the defaults listed below, the word ‘viewable’ is listed next to the topic heading if individuals can view and enter their own information.
Church Community Builder 20

Age Bracket
Allows you to group individuals by age brackets. Note: This field is not dynamic, meaning that as individuals get older, their position in the grouping will not change.
Default Settings Your Settings
No Default Settings
Area of Town (viewable)Can be used to track where people live; areas might be neighborhoods, developments, or regions. Note: Because this field is used in both groups as well as profiles, you will likely want to include your church name as one of the options to indicate which groups meet on campus.
Default Settings Your Settings
At the Church
Gifts (viewable)
This is used to track an individual’s spiritual gifts to help place them when using the Positions feature. This is the same as Positions – Gifts.
Default Settings Your Settings
Administration
Apostleship
Craftsmanship
Creative Communication
Discernment
Encouragement
Evangelism
Faith
Giving
Helps
Church Community Builder 21

Default Settings Your Settings
Hospitality
Intercession
Knowledge
Leadership
Mercy
Prophecy
Shepherding
Teaching
Wisdom
How Joined Church
This administrative-level pulldown is used to track how an individual joined the church.
Default Settings Your Settings
New Member
From Another Church
Reason Left Church
This administrative-level pulldown is used to track why an individual left the church.
Default Settings Your Settings
Planted Another Church
Moved Away
Changed Churches
Not Attending Any Church
Lost Contact/Unknown
Church Community Builder 22

How They Heard
This administrative-level pulldown is used to track how an individual discovered your church.
Default Settings Your Settings
Web Search
Social Media
Personal Invitation
Word of Mouth
Convenient Location
Paid Advertisement
Yellow Pages
Member Type
This administrative-level pulldown is used to classify the membership status of each individual in your church.
Default Settings Your Settings
Guest
Attender
Member
Business
Passions (viewable)
This is used to track an individual’s particular areas of interest, such as social issues, people groups, etc. This is the same as Positions – Passion.
Default Settings Your Settings
People: Infants
People: Children
People: Youth
Church Community Builder 23

Default Settings Your Settings
People: Young Adults
People: Singles
People: Young Marrieds
People: Parents
People: Empty Nesters
People: Seniors
Activity: Local Outreach
Activity: Global Missions
Activity: Mentoring
Activity: Prayer
Activity: Recreation
School (viewable)
This is used to identify the different schools in your community for grouping youth or school-aged children.
Default Settings Your Settings
No Default Settings
Services Usually Attended (viewable)
This provides choices for the services an individual usually attends.
Default Settings Your Settings
First Service
Second Service
Midweek
Church Community Builder 24

Significant Events
This administrative-level pulldown used to track important (or crisis) events in the lives of individuals. Note: The Essential version allows tracking of up to 5 events per profile; Standard and Deluxe versions can track up to 15 events per profile.
Default Settings Your Settings
High School Graduation
College Graduation
Moved into Town
Moved out of Town
Dedicated at Baby Dedication
Abilities (viewable)
This is used to track an individual’s special skills that can be used for serving the church and others. This is the same as Positions – Abilities.
Default Settings Your Settings Default Settings Your Settings
Skill: Medical Arts: Keyboard/Piano
Skill: Counseling Arts: Drums
Skill: Financial Arts: Lead Worship
Skill: Education Arts: Music – Other
Skill: Child Care Arts: Sound Tech
Skill: Tech/Computers Arts: Lighting
Skill: Marketing/Comm. Arts: Slides
Skill: Media/Graphics Arts: Video
Skill: Office Arts: Production
Skill: Construction Arts: Writer
Skill: Mechanical Arts: Drama
Skill: Security Arts: Dance
Church Community Builder 25

Default Settings Your Settings Default Settings Your Settings
Skill: Translator Arts: Director
Arts: Vocalist Sports: Athlete
Arts: Guitar Sports: Coach
Arts: Bass Guitar Sports: Official
Spiritual Maturity
This administrative-level pulldown used to track an individual’s level of spiritual maturity.
Default Settings Your Settings
Seeker
New Believer
Learning/Growing
Leading/Serving
Personal Style (viewable)
This is used to track an individual’s personal leadership/personality style. Only one may be selected by an individual. This is the same as Positions – Personal Style.
Default Settings Your Settings
Task: Unstructured
Task: Structured
People: Unstructured
People: Structured
Church Community Builder 26

GroupsEvery church has many kinds of groups. Your site provides leaders an easy way to manage their own groups. A group can be a Bible class, ministry team, small group, sports team ... any way you organize and connect people within your church can be used as the basis of a group. There is no limit to the number of groups you can add to your site. Each group has its own homepage with a calendar and a message board. The leader can communicate easily via letters and email, moderate discussions, upload files, and post attendance.
The pulldowns listed for groups are used by individuals searching for public groups to join. For example, a person might want to find a group ‘At the church’ (Area of Town) meeting on ‘Thursday evenings’ (Meeting Day and Time). Only those groups meeting the selected criteria are displayed.
Area of TownThese options help people find groups near their home and are the same options as in People (above).
Meet Day
‘Meet Day’ is also used when searching for groups. To allow for better results in searches, we recommend using options as generic as possible, like ‘Varies’ or ‘Tuesdays’, as opposed to more specific options like ‘Third Sunday of every other month’. If people are available on Thursdays, for example, results that include all groups meeting on Thursdays would be more effective than having to search multiple times to view all of the Thursday options (e.g., First, Second, Every Other, etc.).
Default Settings Your Settings
Varies
Sunday
Monday
Tuesday
Wednesday
Thursday
Friday
Saturday
Church Community Builder 27

Meet Time
Like ‘Meet Day’, ‘Meet Time’ should be generic. ‘Evenings’ provides better search results than ‘7:00pm’.
Default Settings Your Settings
Varies
Morning
Afternoon
Evening
Type
‘Type’ is a second level of categorizing groups. It might represent more the function or purpose of the group. For example, is it a special interest group such as outreach? A small group meeting in a home? A ministry team that needs to perform specific tasks, such as the Production Sound Team? A fellowship group to help moms of preschoolers meet other moms? This field gives you the option to more clearly define your groups and is used in the group search on your public website.
Default Settings Your Settings
Activity
Class
Small Group
Serving
Outreach
System
PositionsThis tool allows a Group Leader to create a job description for a volunteer service opportunity and then use the Position-specific criteria to find a person who matches the specific need. An example might be to search for anyone who marked in the ‘Abilities’ area of their profile indicating they play a musical instrument and then send them an email with the date of worship team auditions. The ‘Gifts’, ‘Passions’, ‘Abilities,’ and ‘Personal Style’ pulldowns are the same fields discussed previously in the People section of this workbook.
Church Community Builder 28
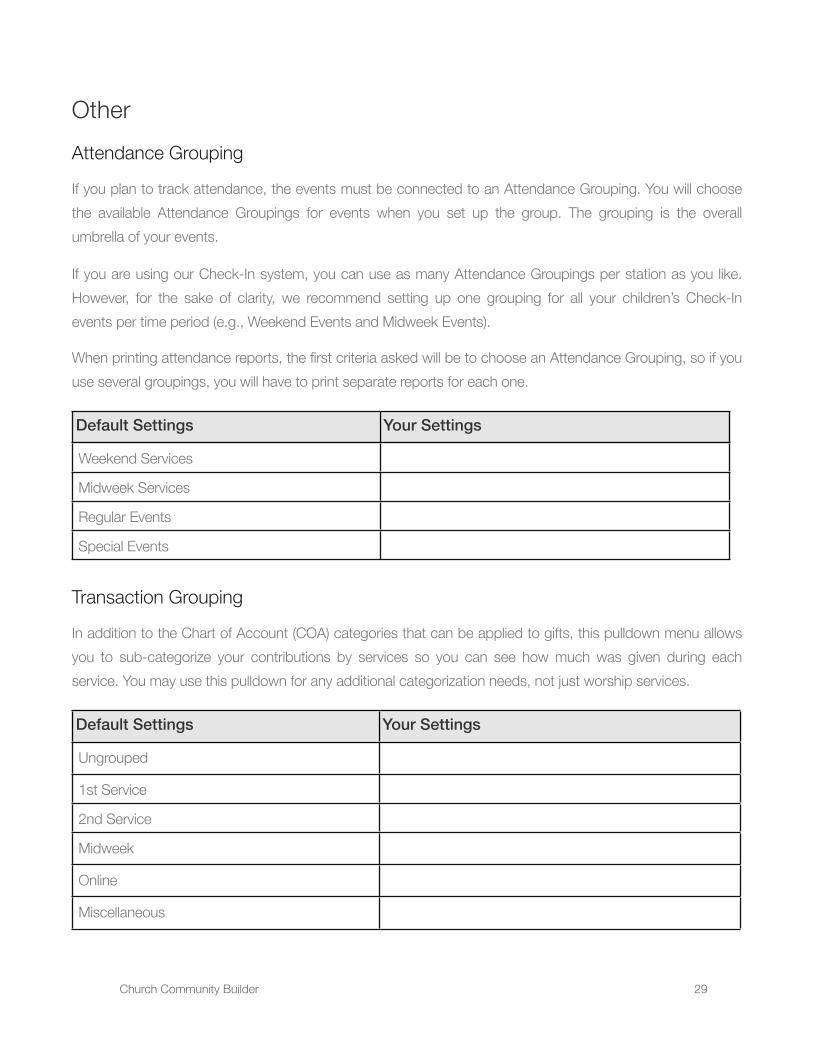
OtherAttendance Grouping
If you plan to track attendance, the events must be connected to an Attendance Grouping. You will choose the available Attendance Groupings for events when you set up the group. The grouping is the overall umbrella of your events.
If you are using our Check-In system, you can use as many Attendance Groupings per station as you like. However, for the sake of clarity, we recommend setting up one grouping for all your children’s Check-In events per time period (e.g., Weekend Events and Midweek Events).
When printing attendance reports, the first criteria asked will be to choose an Attendance Grouping, so if you use several groupings, you will have to print separate reports for each one.
Default Settings Your Settings
Weekend Services
Midweek Services
Regular Events
Special Events
Transaction Grouping
In addition to the Chart of Account (COA) categories that can be applied to gifts, this pulldown menu allows you to sub-categorize your contributions by services so you can see how much was given during each service. You may use this pulldown for any additional categorization needs, not just worship services.
Default Settings Your Settings
Ungrouped
1st Service
2nd Service
Midweek
Online
Miscellaneous
Church Community Builder 29

Custom Label PulldownsYou have several custom pulldowns in the software you can name and use for your own church-specific data. You can choose whether the pulldowns are visible to and editable by individuals on their own profiles or only by Full Write people administrators. Pulldown menus allow you to enter pre-defined options the individual or administrator is able to choose from when editing a profile or group. The custom pulldowns are single selection fields, meaning only one option may be selected in the pulldown. Below is what an administrator sees when naming Custom Label Pulldowns in the Settings gear > ‘Customizable Fields’.
The menu options are edited by clicking on the name of the field.
Church Community Builder 30

People
People pulldowns can be used to collect information about things like school grades, whether a driver is approved, and background check approvals.
Groups
Group pulldowns can be used to collect information about things like age range and childcare type.
ResourcesThe Deluxe version of the software includes an additional custom pulldown field for Resources, which can specify information such as the location of a resource.
Other Custom Label FieldsYou also have several other custom fields in the software you can name and use for your own church-specific data. You can choose whether the field is visible to and editable by individuals on their own profiles or only by Full Write people administrators. ‘Custom Label Fields’ allow you to enter pre-defined options the individual or administrator is able to choose from when editing a profile or group. Below is what an administrator sees when naming ‘Other Custom Label Pulldowns’ in the Settings gear > ‘Customizable Fields’.
The menu options are edited by clicking on the name of the field.
Church Community Builder 31

People—Text
Allows unique information to be typed in the profile of an individual. Below is what an administrator sees when editing Custom Text Fields in an individual’s profile by selecting ‘Edit Profile’ under ‘Actions’ > ‘Profile Settings’.
People—Date
Allows tracking of a specific date in an individual’s profile. Below is what an administrator sees when editing Custom Date Fields in an individual’s profile.
Below is what an administrator sees when viewing Custom Fields in an individual’s profile under the ‘Info’ tab.
Church Community Builder 32

Notice the custom fields are divided between those visible to Basic Users (on left) and those visible only to administrators (on the right, shown with a padlock icon).
5. ResourcesThe Resources feature allows you to list all the church resources (rooms, equipment, etc.) available for event use. You could also list skilled people needed for events, such as Photographer, A/V Technician, Caterer, etc. When an individual puts an event on the calendar, they should book or request the church resources needed for the event. Resources may be edited by a person with Full Event privileges by clicking ‘More’ (in the left menu bar) > ‘Rooms & Resources’ (Standard and Deluxe versions only).
Default Settings Your Settings
Auditorium
Lobby
Fellowship Hall
Gym
Conference Room
Room 101
Church Community Builder 33
TV/DVD Cart
Church Van
Sound System
A/V Technician
Check-In Station
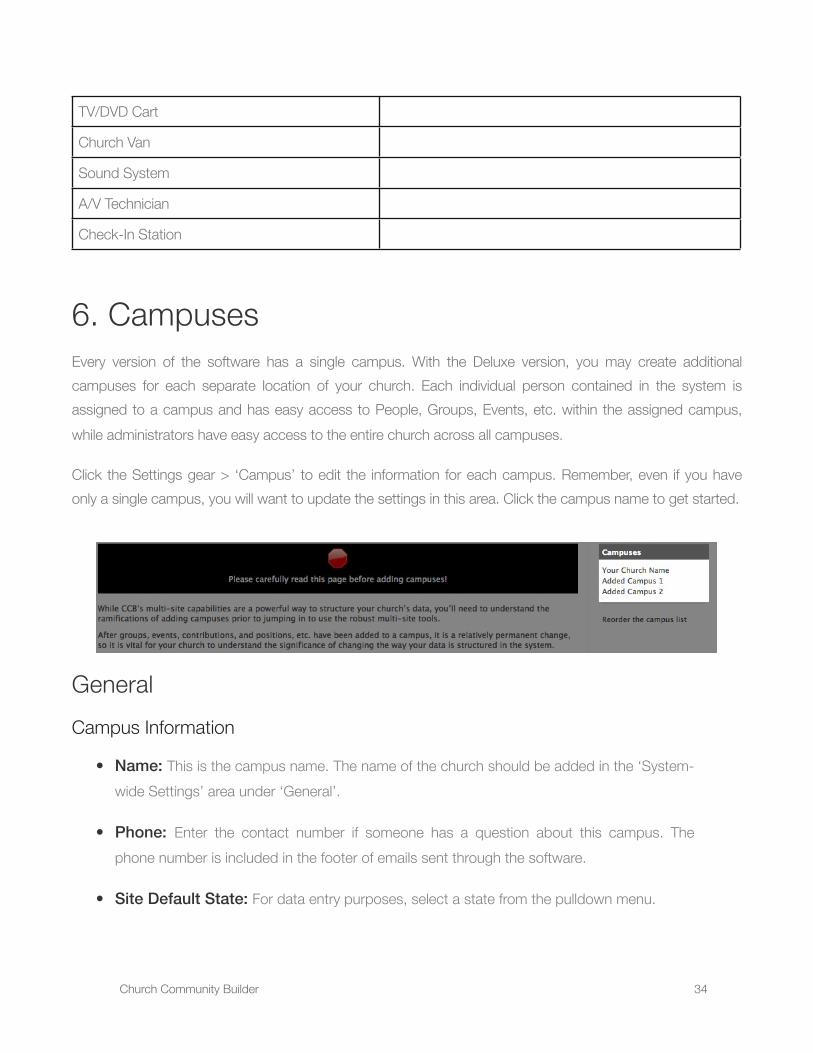
6. CampusesEvery version of the software has a single campus. With the Deluxe version, you may create additional campuses for each separate location of your church. Each individual person contained in the system is assigned to a campus and has easy access to People, Groups, Events, etc. within the assigned campus, while administrators have easy access to the entire church across all campuses.
Click the Settings gear > ‘Campus’ to edit the information for each campus. Remember, even if you have only a single campus, you will want to update the settings in this area. Click the campus name to get started.
GeneralCampus Information
• Name: This is the campus name. The name of the church should be added in the ‘System-wide Settings’ area under ‘General’.
• Phone: Enter the contact number if someone has a question about this campus. The phone number is included in the footer of emails sent through the software.
• Site Default State: For data entry purposes, select a state from the pulldown menu.
Church Community Builder 34

• Campus Timezone: Choose from the list available or select ‘All time zones...’ to see all time zones.
• Campus Locale: This pulldown determines the currency symbol that will be displayed with financial information and sets the format for dates in your site (e.g., 30 May 2013 vs. May 30, 2013 or 30/5/13 vs. 5/30/13).
• Welcome Message: Text or images entered here are visible on the homepage after logging into the software (you can customize your Welcome page text with HTML by clicking the Source button). With multiple campuses, you may use the same text for all campuses or unique text for each.
Default Letter Margin Settings (inches)
Set the default margins used with the Print version of a Mail Merge. This can be adjusted within individual mail merges if needed.
Church Community Builder 35
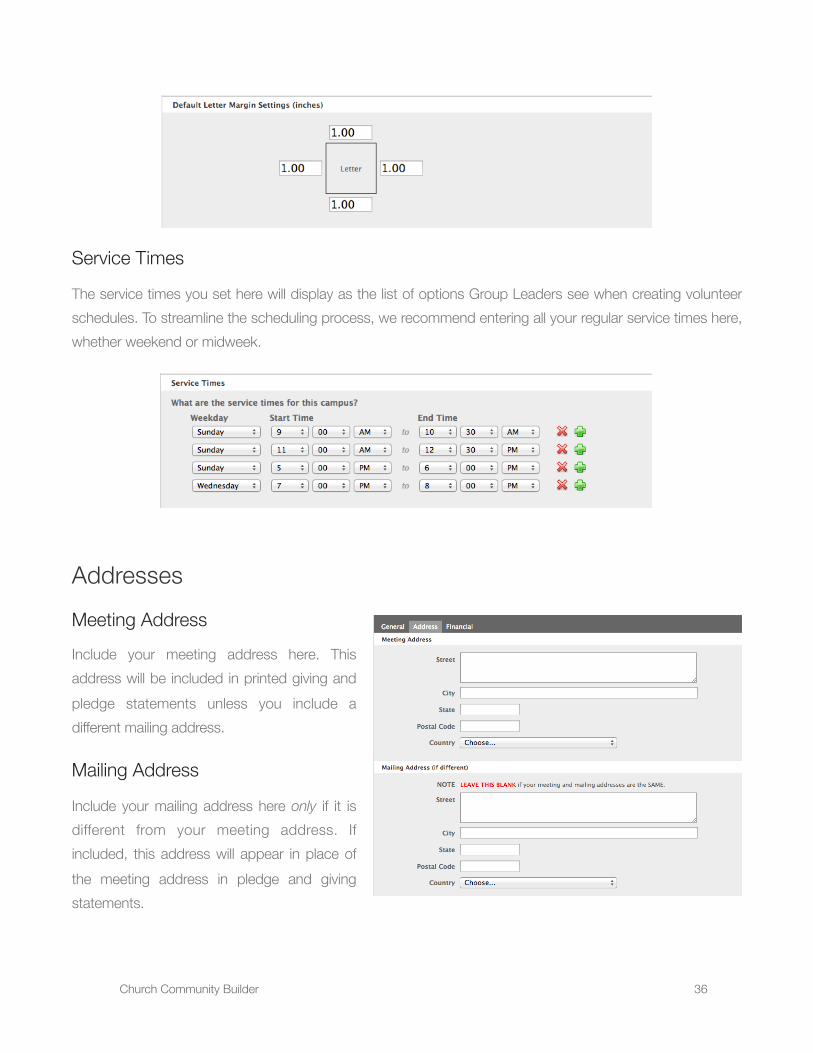
Service Times
The service times you set here will display as the list of options Group Leaders see when creating volunteer schedules. To streamline the scheduling process, we recommend entering all your regular service times here, whether weekend or midweek.
AddressesMeeting AddressInclude your meeting address here. This address will be included in printed giving and pledge statements unless you include a different mailing address.
Mailing Address
Include your mailing address here only if it is different from your meeting address. If included, this address will appear in place of the meeting address in pledge and giving statements.
Church Community Builder 36

FinancialMessages
You can display personalized messages for your donors by entering text into these fields.
Giving Statement Message: The giving statement message appears at the bottom of giving statements generated within the software.
Online Gift Message: The online gift message is the text displayed when whenever donors successfully submit a gift through your online giving interface.
Pledge Statement Message: The pledge statement message appears at the bottom of pledge statements generated within the software.
Merchant Settings
If you offer online giving, this is where you connect your merchant account to the software.
Church Community Builder 37
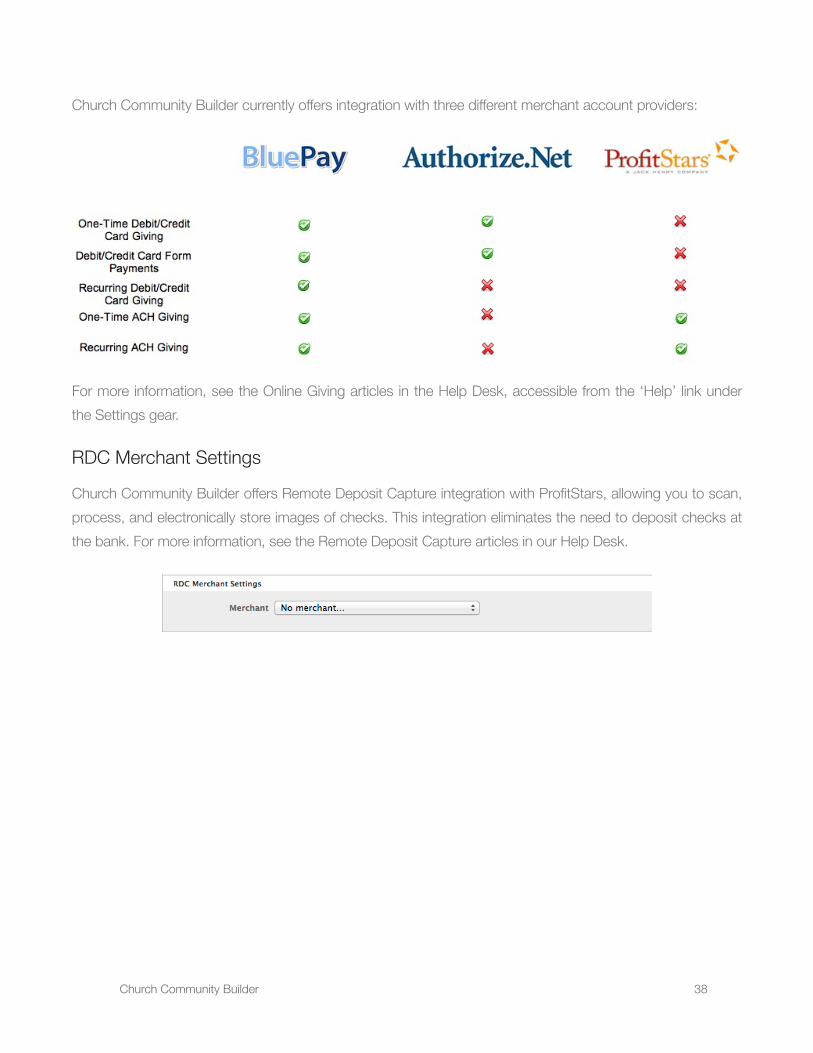
Church Community Builder currently offers integration with three different merchant account providers:
For more information, see the Online Giving articles in the Help Desk, accessible from the ‘Help’ link under the Settings gear.
RDC Merchant Settings
Church Community Builder offers Remote Deposit Capture integration with ProfitStars, allowing you to scan, process, and electronically store images of checks. This integration eliminates the need to deposit checks at the bank. For more information, see the Remote Deposit Capture articles in our Help Desk.
Church Community Builder 38

7. Chart of Accounts (COAs)If you will be using Church Community Builder to track your giving and pledge campaigns, you can create a list of account categories that match the accounts in your financial accounting software. These categories can also be enabled for online giving (with a merchant account) so people can choose specific categories to give toward. There will be three categories available by default: General Fund, Missions, and Non-deductible Payments. The ‘Edit Chart of Accounts’ privilege is required to edit this list. See the Financial Setup video in the Help Desk for further instruction on creating and managing your COA categories.
8. APIYou can use the ‘API User Setup’ area to create API users and choose which services they can access. This feature requires a user with API expertise who can then create a service that pulls data from Church Community Builder into another application, like your public website or a kiosk for the church lobby. Applications can use the API service to do things like find small groups in a particular area of town, for example. The use of API services requires extensive knowledge if your church decides to use this feature.
9. Web ToolsThe Settings gear > ‘Web Tools’ page provides links that let you integrate data from your Church Community Builder site into your public website. Here you will find links for integrating small group searches, a public web calendar, web forms, and even a link for online giving if you have a merchant account set up. The HTML code to embed a login box into a page on your public website is also provided so you can allow members to easily log in to your online community or request a password from your public website. Simply copy and paste the code into the source code of your public website. Remember to set the colors for these pages as previously discussed.
Church Community Builder 39
10. SupportIf you need further assistance setting up and using your software, we offer several further resources for you. Help Desk articles and videos and social media updates are available to everyone with a login to your site. Everything else is available to the Master Administrator and your designated Support Contacts.
• Access our Help Desk article database by logging in to your site and clicking ‘Help’ under the Settings gear.
• Watch the system settings videos on the Help Desk.
• Stay updated by liking our Facebook page at facebook.com/CCBChurch, and stay informed about status updates and technical issues by following us on Twitter @ccbtech.
• Sign up for a free Master Administrator Q&A Session by going to the Settings gear > ‘Help’ > ‘Training’ and clicking the link under the Master Administrator Question & Answer Session.
• For technical difficulties or other assistance, go to the Settings gear > ‘Help’ > ‘Support’ to submit a support ticket.
• For those with Premier Support, you can click ‘Live Support’ under the Settings gear in your site to start a live chat with a member of our Support Team.
Church Community Builder 40