Embed Size (px)
Citation preview
Education Talis Services
Talis System Manager (Beginner)
Student Guide
Document ID: SUB-SG-003
SUB-SG-003 Page 2
About this student guide
This document accompanies the Talis System Management (Beginner) course.
The course is for staff who are responsible for the operation and management of a Talis system, and who need a full understanding of both Talis and UNIX environments.
Attendees should be familiar with basic UNIX commands, navigating around the UNIX file systems, and also the vi text editor
Student guide icons
Throughout this Student Guide, icons have been used where necessary, to draw attention to important information and to help with the completion of the exercises.
Note: When you see this icon, there will be something that you must take note of in order to complete the action successfully.
Tip: When you see this icon, there will be something that you must take note of in order to complete the action successfully.
Warning: When you see this icon, there will be something that you must take note of in order to complete the action successfully.
SUB-SG-003 Page 3
Agenda
1. Introducing the Talis System ..........................................................................................................12
1.1 About this section ......................................................................................................................12
1.2 Overview – What is “Talis”? ......................................................................................................12
1.3 System Components .................................................................................................................12
1.3.1 Client/Server .......................................................................................................................... 12
1.3.2 Multiple Systems..................................................................................................................... 12
1.4 UNIX ..........................................................................................................................................13
1.5 Sybase ......................................................................................................................................13
1.6 SQL ...........................................................................................................................................13
1.7 Scripts .......................................................................................................................................13
1.8 The MIS Machine and Management Information ......................................................................14
1.8.1 Talis Decisions ........................................................................................................................ 14
1.8.2 Perl ....................................................................................................................................... 14
1.9 Processes ..................................................................................................................................15
1.9.1 CRON .................................................................................................................................... 15
1.9.2 Daemons ............................................................................................................................... 15
1.10 Talis Software ..........................................................................................................................15
2. Talis system architecture ................................................................................................................16
2.1 About this section ......................................................................................................................16
2.2 Servers ......................................................................................................................................16
2.2.1 Talis server ............................................................................................................................ 16
2.2.2 MIS server ............................................................................................................................. 16
2.2.3 Linux box ............................................................................................................................... 17
2.2.4 Talis Decisions ........................................................................................................................ 17
2.3 Databases .................................................................................................................................17
2.3.1 prod_talis............................................................................................................................... 17
2.3.2 prod_meta ............................................................................................................................. 18
2.3.3 tutor_talis .............................................................................................................................. 18
2.3.4 tutor_meta ............................................................................................................................. 18
2.3.5 master ................................................................................................................................... 18
2.3.6 temp_db ................................................................................................................................ 18
2.3.7 Other databases ..................................................................................................................... 18
2.3.8 Transaction log ....................................................................................................................... 19
2.4 SQL ...........................................................................................................................................19
2.4.1 Stored procedures .................................................................................................................. 19
System Manager Beginner (UNIX) Student Guide
SUB-SG-001 Page 4
2.4.2 Triggers ................................................................................................................................. 19
2.5 Scripts .......................................................................................................................................19
2.5.1 Perl ....................................................................................................................................... 19
2.6 Client-server architecture ..........................................................................................................20
2.6.1 Talis Alto ............................................................................................................................... 20
2.7 Talis Base 2 ...............................................................................................................................20
3. Stopping and Starting the System ..................................................................................................21
3.1 About this section ......................................................................................................................21
3.2 Introduction ................................................................................................................................21
3.3 Run Levels ................................................................................................................................21
3.4 Starting the system....................................................................................................................21
3.5 Re-booting the system ..............................................................................................................22
3.5.1 Re-boot procedure .................................................................................................................. 22
3.6 Powering the System Down ......................................................................................................23
3.7 Webmin .....................................................................................................................................23
4. Disk hygiene and managing files ....................................................................................................24
4.1 About this section ......................................................................................................................24
4.2 Introduction ................................................................................................................................24
4.3 Monitoring disk space ...............................................................................................................24
4.3.1 df .......................................................................................................................................... 24
4.3.2 du ......................................................................................................................................... 25
4.3.3 Size definitions ....................................................................................................................... 25
4.4 Clearing files out........................................................................................................................25
4.4.1 Deleting files .......................................................................................................................... 26
4.4.2 Deleting directories ................................................................................................................. 26
4.4.3 clear_logs .............................................................................................................................. 27
4.4.4 Mail from cron ........................................................................................................................ 27
4.4.5 Talis daemon report files ......................................................................................................... 27
4.4.6 Perl report files ....................................................................................................................... 27
4.4.7 scratch .................................................................................................................................. 28
4.4.8 Zebra Index file ...................................................................................................................... 28
4.4.9 Looking for clues .................................................................................................................... 28
4.5 Wildcards ...................................................................................................................................29
5. Managing UNIX Processes ..............................................................................................................30
5.1 About this section ......................................................................................................................30
5.2 What is a process? ....................................................................................................................30
5.3 Monitoring system activity .........................................................................................................30
5.3.1 sar ........................................................................................................................................ 30
5.3.2 vmstat ................................................................................................................................... 31
System Manager Beginner (UNIX) Student Guide
SUB-SG-001 Page 5
5.3.3 prstat .................................................................................................................................... 31
5.4 Monitoring processes ................................................................................................................31
5.5 Identifying specific processes ...................................................................................................32
5.6 Terminating a process ...............................................................................................................32
5.6.1 Using the kill command ........................................................................................................... 32
5.7 Other useful commands ............................................................................................................33
5.8 Parent and child processes .......................................................................................................33
5.9 Alto processes ...........................................................................................................................33
6. Backing up the System ....................................................................................................................34
6.1 About this section ......................................................................................................................34
6.2 Introduction ................................................................................................................................34
6.3 Backing up the Talis databases (full_dbdump) .........................................................................34
6.4 Running full_dbdump ................................................................................................................35
6.4.1 Interactively ........................................................................................................................... 35
6.4.2 Automatically ......................................................................................................................... 35
6.4.3 full_dbdump log files ............................................................................................................... 35
6.4.4 When to run ........................................................................................................................... 36
6.4.5 In the event of failure ............................................................................................................. 36
6.5 Backing up databases transactions (trandump) ........................................................................36
6.5.1 Running trandump .................................................................................................................. 37
6.5.2 trandump log files ................................................................................................................... 37
6.5.3 When to run ........................................................................................................................... 37
6.6 Backing up trandumps (archive_trandumps) ............................................................................37
6.6.1 Running archive_trandumps .................................................................................................... 37
6.6.2 archive_trandumps log files ..................................................................................................... 37
6.6.3 When to run ........................................................................................................................... 38
6.6.4 In the event of failure ............................................................................................................. 38
6.7 Backing up disk files (full_softdump) .........................................................................................38
6.7.1 Running full_softdump ............................................................................................................ 38
6.8 Backing up disk files (ufsdump) ................................................................................................38
6.9 Backup cycle and tape life ........................................................................................................38
6.10 Offsite copies ...........................................................................................................................39
7. System security ................................................................................................................................40
7.1 About this section ......................................................................................................................40
7.2 Introduction ................................................................................................................................40
7.3 Justification ................................................................................................................................40
7.4 Techniques ................................................................................................................................40
7.5 Server hardening with Talis Assist ............................................................................................41
8. System user accounts .....................................................................................................................43
System Manager Beginner (UNIX) Student Guide
SUB-SG-001 Page 6
8.1 About this section ......................................................................................................................43
8.2 Introduction ................................................................................................................................43
8.3 Adding a new user to UNIX .......................................................................................................43
8.4 Changing passwords .................................................................................................................43
8.5 Setting the Environment ............................................................................................................44
8.6 Messaging to users ...................................................................................................................44
8.6.1 Unix mail ............................................................................................................................... 44
8.6.2 Reading mail .......................................................................................................................... 44
8.6.3 Writing Email.......................................................................................................................... 45
8.6.4 UNIX write ............................................................................................................................. 45
8.6.5 UNIX wall ............................................................................................................................... 45
9. Scheduling jobs ................................................................................................................................47
9.1 About this section ......................................................................................................................47
9.2 Introduction ................................................................................................................................47
9.3 cron ...........................................................................................................................................47
9.3.1 Description ............................................................................................................................. 47
9.3.2 Command line order ............................................................................................................... 47
9.3.3 Editing the cron ...................................................................................................................... 48
9.3.4 The cron command line syntax ................................................................................................ 48
9.3.5 Comments ............................................................................................................................. 48
9.3.6 Special symbols ...................................................................................................................... 48
9.3.7 Commands ............................................................................................................................. 49
9.3.8 Output files ............................................................................................................................ 49
9.3.9 An example cron line .............................................................................................................. 50
9.3.10 Stopping the cron ................................................................................................................. 50
9.3.11 Once only jobs ...................................................................................................................... 51
9.4 at ...............................................................................................................................................51
9.4.1 Description ............................................................................................................................. 51
9.4.2 Scheduling a job ..................................................................................................................... 51
9.4.3 Checking and cancelling jobs ................................................................................................... 52
10. Talis Daemons ................................................................................................................................53
10.1 About this section ....................................................................................................................53
10.2 Introduction ..............................................................................................................................53
10.3 The daemons ..........................................................................................................................53
10.3.1 work_exp_dae ...................................................................................................................... 53
10.3.2 authorisor_dae (pre Alto 4.1) ................................................................................................. 53
10.3.3 authority_ap (pre Alto 4.1) .................................................................................................... 53
10.3.4 work_merge_dae (pre Alto 4.1).............................................................................................. 54
10.3.5 ord_exp_dae ........................................................................................................................ 54
System Manager Beginner (UNIX) Student Guide
SUB-SG-001 Page 7
10.4 Stopping and starting Talis daemons ......................................................................................54
10.5 Starting archive_daemon_reports ...........................................................................................54
10.5.1 An example cron line ............................................................................................................. 54
10.5.2 Stopping (dae_term) ............................................................................................................. 54
10.5.3 Example cron lines ................................................................................................................ 55
10.6 Reports ....................................................................................................................................55
10.6.1 Directory and names ............................................................................................................. 55
10.7 Removal ..................................................................................................................................55
10.8 Checking Talis daemons .........................................................................................................56
11. SQL ..................................................................................................................................................57
11.1 About this section ....................................................................................................................57
11.2 Introduction ..............................................................................................................................57
11.3 Accessing SQL ........................................................................................................................57
11.4 Database connections .............................................................................................................57
11.5 Bringing a database online ......................................................................................................57
11.6 Quitting SQL ............................................................................................................................58
12. Database Checkers ........................................................................................................................59
12.1 About this section ....................................................................................................................59
12.2 Introduction ..............................................................................................................................59
12.3 checkdb and checkalloc ..........................................................................................................59
12.3.1 Issues with checkdb and checkalloc ........................................................................................ 59
12.3.2 Checking the Output ............................................................................................................. 59
12.4 checkstorage ...........................................................................................................................60
12.4.1 Description ........................................................................................................................... 60
12.4.2 Advantages of using checkstorage .......................................................................................... 60
12.4.3 Running checkstorage ........................................................................................................... 60
12.4.4 Checking checkstorage output................................................................................................ 61
12.5 Maintaining the dbccdb database ...........................................................................................61
12.5.1 sp_dbcc_deletehistory ........................................................................................................... 61
12.6 checkstorage, checkdb or checkalloc? ...................................................................................61
13. update_stats ...................................................................................................................................62
13.1 About this section ....................................................................................................................62
13.2 Introduction ..............................................................................................................................62
13.3 How update_stats works .........................................................................................................62
13.3.1 Running update_stats ........................................................................................................... 62
13.4 Creating a log file ....................................................................................................................63
13.5 Stored Procedures ..................................................................................................................63
14. Tutor system ...................................................................................................................................64
14.1 About this section ....................................................................................................................64
System Manager Beginner (UNIX) Student Guide
SUB-SG-001 Page 8
14.2 What is the tutor system? ........................................................................................................64
14.3 Environment ............................................................................................................................64
14.4 Logging in ................................................................................................................................64
14.4.1 Talis Alto .............................................................................................................................. 64
14.5 Backing up and Restoring .......................................................................................................65
14.5.1 Backing up the tutor_talis system ........................................................................................... 65
14.5.2 Restoring the tutor_talis system ............................................................................................. 65
15. Implementing Talis Alto .................................................................................................................67
15.1 About this section ....................................................................................................................67
15.2 What is Talis Alto?...................................................................................................................67
15.3 Requirements ..........................................................................................................................67
15.4 Installing Talis Alto ..................................................................................................................67
15.5 Database requirements ...........................................................................................................68
15.6 Upgrading the database ..........................................................................................................68
15.7 PC client requirements ............................................................................................................68
15.8 Installing Talis Alto PC software ..............................................................................................68
15.9 Set Talis Alto Database application ........................................................................................69
15.10 Configure Talis Alto application .............................................................................................69
15.11 Reference PC ........................................................................................................................69
15.12 Scripts and batch utilities ......................................................................................................70
16. Managing Alto Processes ..............................................................................................................71
16.1 About this section ....................................................................................................................71
16.2 Introduction ..............................................................................................................................71
16.3 Monitoring Talis Alto activity ....................................................................................................71
16.4 Shutting down Talis Alto sessions...........................................................................................71
17. Adding a new Talis Alto User ........................................................................................................72
17.1 About this section ....................................................................................................................72
17.2 Introduction ..............................................................................................................................72
17.3 Adding a new user to the database ........................................................................................72
17.4 Setting the user password .......................................................................................................72
17.5 Creating new enablements .....................................................................................................72
17.6 Making locations visible ..........................................................................................................73
17.7 Setting environment variables .................................................................................................73
17.7.1 Setting global variables ......................................................................................................... 73
17.7.2 Setting user specific variables ................................................................................................ 73
17.8 User locking .............................................................................................................................74
17.8.1 Unlocking a user account ....................................................................................................... 74
18. Environment Variables...................................................................................................................75
System Manager Beginner (UNIX) Student Guide
SUB-SG-001 Page 9
18.1 About this section ....................................................................................................................75
18.2 Introduction ..............................................................................................................................75
18.2.1 UNIX environment variables ................................................................................................... 75
18.2.2 Talis Alto environment variables ............................................................................................. 75
18.3 Setting Environment Variables in UNIX ..................................................................................75
18.3.1 Files containing variables ....................................................................................................... 76
18.3.2 Identifying your environment ................................................................................................. 76
18.4 UNIX environment variables ...................................................................................................76
18.5 Talis environment variables ....................................................................................................76
18.6 General environment variables ...............................................................................................77
18.7 Functional area variables ........................................................................................................77
18.8 Personal environment variables ..............................................................................................78
18.9 Setting environment variables in Talis Alto .............................................................................78
19. Local catalogue ..............................................................................................................................79
19.1 About this section ....................................................................................................................79
19.2 Introduction ..............................................................................................................................79
19.3 Architecture .............................................................................................................................79
19.4 Updating and re-building the Zebra indexes ...........................................................................79
19.4.1 MARC 21 tags ....................................................................................................................... 80
19.4.2 Updating the Zebra indexes ................................................................................................... 80
19.4.3 Checking the parameter file for the marcgrabber ..................................................................... 80
19.4.4 Checking the parameter file for the marcgrabber ..................................................................... 80
19.4.5 Starting and stopping the marcgrabber ................................................................................... 82
19.4.6 Rotating the log files for the Zebra indexes ............................................................................. 83
19.4.7 Rebuilding the Zebra indexes ................................................................................................. 83
19.4.8 Availability of Zebra indexes during the rebuild ........................................................................ 84
19.4.9 Securing the zebra indexes .................................................................................................... 84
19.4.10 Steps to complete when rebuilding the zebra indexes ............................................................. 84
19.4.11 Checking the progress of the rebuild of the zebra indexes ...................................................... 84
19.4.12 Scheduling the rebuild of the zebra indexes to take place in the cron ....................................... 85
19.5 Updating and rebuilding the LMS indexes ..............................................................................85
19.5.1 Description ........................................................................................................................... 85
19.5.2 Talis MARC tags .................................................................................................................... 85
19.5.3 update_daily_access_points ................................................................................................... 85
19.5.4 access_points_dae.log ........................................................................................................... 86
19.5.5 access_points_dae.rep .......................................................................................................... 86
19.5.6 Interrupting update_daily_access_points ................................................................................. 86
19.5.7 auto_access_points ............................................................................................................... 86
19.5.8 Subordinate processes........................................................................................................... 87
System Manager Beginner (UNIX) Student Guide
SUB-SG-001 Page 10
19.5.9 auto_access_points checklist .................................................................................................. 87
19.5.10 Interrupting auto_access_points ........................................................................................... 88
20. Management Information ...............................................................................................................89
20.1 About this section ....................................................................................................................89
20.2 Introduction ..............................................................................................................................89
20.3 Talis Decisions ........................................................................................................................89
20.3.1 InfoView .............................................................................................................................. 90
20.3.2 Web Intelligence ................................................................................................................... 91
20.3.3 Desktop Intelligence.............................................................................................................. 91
20.4 Perl MIS reports ......................................................................................................................92
20.4.1 Talis Perl report structure ...................................................................................................... 92
20.4.2 Perl MIS environment ............................................................................................................ 93
20.4.3 Running Perl reports ............................................................................................................. 93
20.4.4 Significant Perl MIS reports .................................................................................................... 93
21. Local versions of shell and perl scripts .......................................................................................95
21.1 About this section ....................................................................................................................95
21.2 Introduction ..............................................................................................................................95
22. Webmin ............................................................................................................................................97
22.1 About this section ....................................................................................................................97
22.2 Introduction ..............................................................................................................................97
22.3 Modules ...................................................................................................................................98
22.4 Module description ..................................................................................................................98
22.5 Tutor ........................................................................................................................................99
22.6 Installation ...............................................................................................................................99
22.7 Configuration ...........................................................................................................................99
22.8 Users .....................................................................................................................................100
22.8.1 Admin ................................................................................................................................ 100
22.8.2 Root .................................................................................................................................. 101
22.9 Using Webmin .......................................................................................................................101
22.9.1 Starting and stopping Webmin ............................................................................................. 101
22.9.2 Changing Webmin passwords............................................................................................... 101
22.10 Useful webmin related unix commands ..............................................................................102
22.11 Further Information ..............................................................................................................102
23. Talis Services – Support ..............................................................................................................103
23.1 About this section ..................................................................................................................103
23.2 Availability .............................................................................................................................103
23.3 Preparation ............................................................................................................................103
23.4 Contacting Talis Services ......................................................................................................104
23.4.1 Talis Support ...................................................................................................................... 104

System Manager Beginner (UNIX) Student Guide
SUB-SG-001 Page 11
23.4.2 Telephone .......................................................................................................................... 104
23.5 Processing your case ............................................................................................................104
23.6 Case resolution .....................................................................................................................104
23.7 Escalation ..............................................................................................................................105
23.8 The Talis Community ............................................................................................................105
23.8.1 LIS-TALIS .......................................................................................................................... 105
23.8.2 Talis Developer Network ...................................................................................................... 105
23.8.3 Talis Forums ....................................................................................................................... 105
23.8.4 Documentation ................................................................................................................... 105
System Manager Beginner (UNIX) Student Guide
SUB-SG-001 Page 12
1. Introducing the Talis System
1.1 About this section
The purpose of this chapter is to introduce you to the basic concept of the Talis Library Management System.
Upon completing this chapter, you should be able to:
Understand the basic architecture of the Talis product suite
Understand the various System Components
1.2 Overview – What is “Talis”?
Talis is an integrated library automation system consisting of a series of inter-related business areas that perform the basic library functions such as circulation, OPAC, acquisitions and cataloguing. It has a database, which holds all the library data and work records. It also has a number of "offline" or batch utilities that enable the system to be managed and for management information reports to be generated.
Talis Alto is a Windows based, full client application that accesses the Talis database.
1.3 System Components
1.3.1 Client/Server
The Talis machine uses client server architecture. The client can be considered as the software (Talis Alto) and the users connecting to the system to use it. The server holds the database containing the information that the client needs to access.
Talis Alto does not use the client software held on the Talis machine, rather the PC upon which it resides is considered as the client. It does however connect to the database or “server” on the Talis machine.
1.3.2 Multiple Systems
The command uname -n will give information about the machine you are currently logged onto. This command displays the node name, or the name the machine is known by to a communications network.
You can login to a server from another, by using the rlogin (remote login) command.
To access servers across a network, use the telnet command.
The remote machines are accessed via their node names. These are listed in the file /etc/hosts on the relevant machine.
The telnet command can be used to connect to other machines on the network. This means you can telnet from the main machine to the MIS machine, or vice versa.
System Manager Beginner (UNIX) Student Guide
SUB-SG-001 Page 13
1.4 UNIX
UNIX is a computer operating system. An operating system manages the activities of programs, and manages files and peripheral devices.
One of the most popular and widespread operating systems in the world, UNIX runs on more brands of computers than probably any other operating system. UNIX is the chosen operating system for Talis machines.
Talis provide machines made by Sun Microsystems. Sun systems have their own flavour of UNIX operating system known as Solaris (or SunOS).
Talis offers a course for customers to introduce basic UNIX operating system commands.
1.5 Sybase
Sybase is a third party Relational Database Management System (RDBMS). The Talis database has been built upon the Sybase platform. It is the skeleton upon which the Talis database is constructed. Sybase manages all the requests that relate to the database.
All Talis data is held in a Sybase relational database. There are several databases in this area. The live Talis database, containing the parameters, rules and data, is called prod_talis.
1.6 SQL
SQL (Structured Query Language) is the program or interface into the various Sybase databases. Even though there are many programs that access the database, they all use SQL. Transact-SQL and isql (interactive structured query language), are flavours of SQL favoured by Sybase.
isql can also be executed directly from the UNIX prompt.
Talis offer a one-day course introducing the structure of the Talis database and the use of SQL.
1.7 Scripts
Commands can be run at the UNIX prompt on the Talis machine. It is also possible to string a series of UNIX commands or programs together and incorporate them into a single file. Such a file is known as a script. Typing the name of the script in at the UNIX prompt will cause the contained commands to be executed in sequence.
Talis provides a variety of scripts that carry out tasks, usually involving access to the database.
Large tasks that might have a detrimental affect on performance (for example, financial year rollover, unlock, update works from item update) are performed by batch jobs at quiet times or when there is no on-line activity. Such jobs are run via scripts, which in many cases can be set to run automatically.
System Manager Beginner (UNIX) Student Guide
SUB-SG-001 Page 14
1.8 The MIS Machine and Management Information
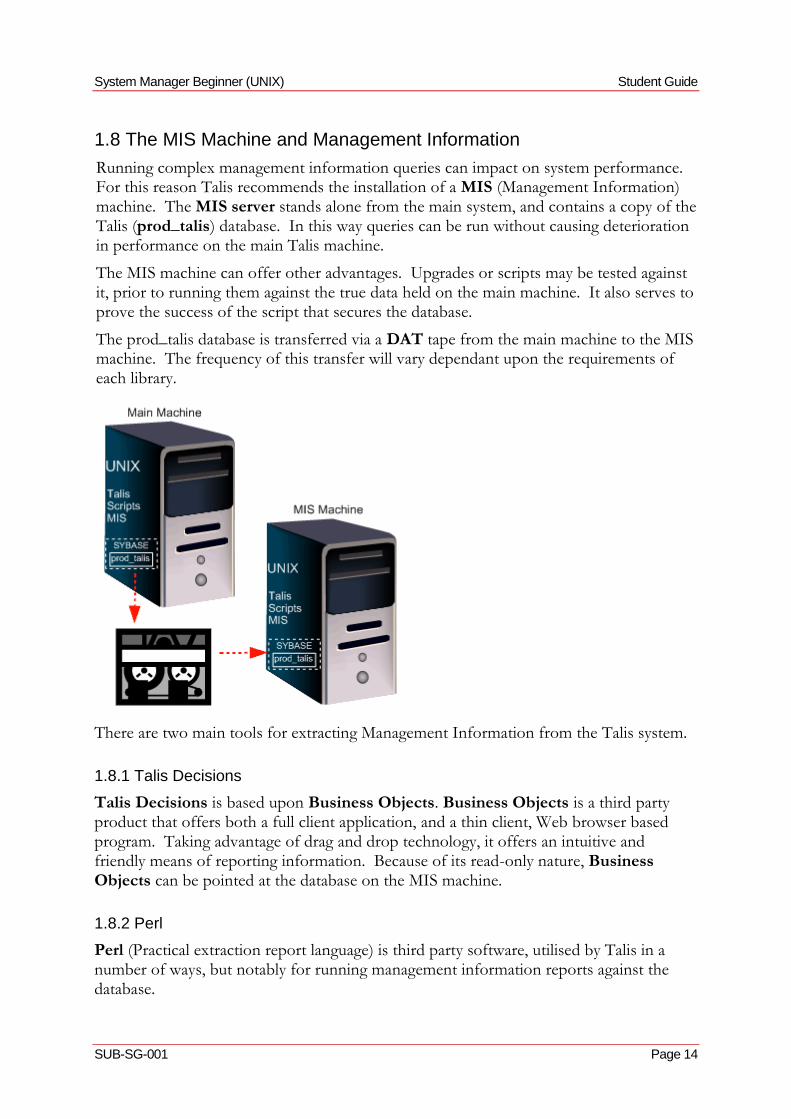
Running complex management information queries can impact on system performance. For this reason Talis recommends the installation of a MIS (Management Information) machine. The MIS server stands alone from the main system, and contains a copy of the Talis (prod_talis) database. In this way queries can be run without causing deterioration in performance on the main Talis machine.
The MIS machine can offer other advantages. Upgrades or scripts may be tested against it, prior to running them against the true data held on the main machine. It also serves to prove the success of the script that secures the database.
The prod_talis database is transferred via a DAT tape from the main machine to the MIS machine. The frequency of this transfer will vary dependant upon the requirements of each library.
There are two main tools for extracting Management Information from the Talis system.
1.8.1 Talis Decisions
Talis Decisions is based upon Business Objects. Business Objects is a third party product that offers both a full client application, and a thin client, Web browser based program. Taking advantage of drag and drop technology, it offers an intuitive and friendly means of reporting information. Because of its read-only nature, Business Objects can be pointed at the database on the MIS machine.
1.8.2 Perl
Perl (Practical extraction report language) is third party software, utilised by Talis in a number of ways, but notably for running management information reports against the database.

System Manager Beginner (UNIX) Student Guide
SUB-SG-001 Page 15
Perl differs from Business Objects in that it is UNIX command prompt driven. Further to this, in many cases, Perl reports will not only report information, but will also update the database. For example, Perl can generate overdue letters, but also increment the letters count within the database, influencing the letter to be sent on any subsequent run.
1.9 Processes
Processes are tasks that run on the Talis machine. These include:
1.9.1 CRON
The CRON is a UNIX process that can be used to schedule tasks, for example scripts or reports.
1.9.2 Daemons
Daemons are UNIX processes that run in the background. Talis has provided its own daemons which process records generated or amended using the Talis application (for example, authority headings or orders).
1.10 Talis Software
In addition to the Talis Alto application, Talis provides a variety of software products and services. Current offerings include:
Talis Alto
Talis Prism
Talis List
Talis Engage
Talis Mobile
Talis Message
Talis Assure
Talis Decisions
Talis Base
Talis Security
Talis Gateway
Talis Additions
Webmin
System Manager Beginner (UNIX) Student Guide
SUB-SG-001 Page 16
2. Talis system architecture
2.1 About this section
The purpose of this chapter is to gain an understanding of what the Main server and the MIS server is used for.
Upon completing this chapter, you should be able to:
Understand the differences between the two servers
Understand the differences between the different databases
2.2 Servers
2.2.1 Talis server
The main Talis machine is loaded with the UNIX operating system and is supplied by Sun Microsystems. The version of UNIX on the machine is that supplied by Sun and is known as Solaris (or SunOS). UNIX is a command prompt driven operating system. This machine is accessed when running the Talis application. The graphical application Talis Alto is PC based, but still needs to communicate with the Talis database which is housed on the main Talis machine. UNIX on the main Talis machine can be accessed through terminal emulation software (such as E-Term) running on a PC.
2.2.2 MIS server
A second machine known as the MIS or Management Information Server may also be supplied. This reflects the main machine, but allows for management information reports to be run against it without impacting upon the performance of the main machine. It is usual for it to have less processing power than the main machine.
The Talis database can be copied and loaded onto this machine as required using the daily backup tape taken from the main machine.
The MIS machine has other possible uses and advantages.
1. The database will be loaded to this machine using a backup taken from your main machine. This will increase confidence in the securities that are being taken.
2. Upgrades to Talis software can be tested.
3. Self-penned reports or queries can be tested.
4. It may be possible to use it for OPAC access in the event of the main system being unavailable.
System Manager Beginner (UNIX) Student Guide
SUB-SG-001 Page 17
2.2.3 Linux box
If you are running Talis Prism (the Web-based catalogue) you are likely to have one or more computers running the Linux operating system. Linux is very like UNIX, and this machine runs Talis Prism and related software.
2.2.4 Talis Decisions
Talis Decisions is a third party offering, providing a suite of management information and decision support reporting tools. The Web-based product called Infoview and WebIntelligence requires software that exists on a computer running Windows 2003. This software accesses the copy of the Alto database residing on the MIS machine. If you do not have a MIS machine, then Talis Decisions software must access the live database on your main Talis machine. This, however, is not a preferred solution as having the application running on the main server could have serious performance implications.
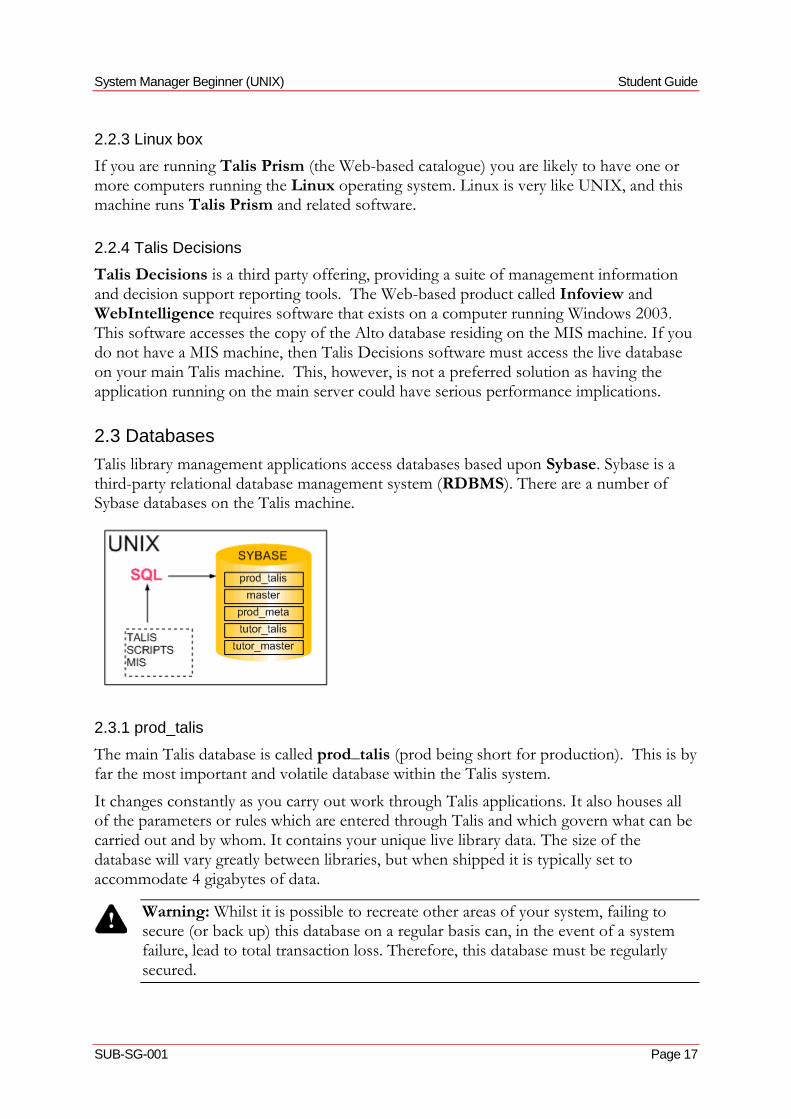
2.3 Databases
Talis library management applications access databases based upon Sybase. Sybase is a third-party relational database management system (RDBMS). There are a number of Sybase databases on the Talis machine.
2.3.1 prod_talis
The main Talis database is called prod_talis (prod being short for production). This is by far the most important and volatile database within the Talis system.
It changes constantly as you carry out work through Talis applications. It also houses all of the parameters or rules which are entered through Talis and which govern what can be carried out and by whom. It contains your unique live library data. The size of the database will vary greatly between libraries, but when shipped it is typically set to accommodate 4 gigabytes of data.
Warning: Whilst it is possible to recreate other areas of your system, failing to secure (or back up) this database on a regular basis can, in the event of a system failure, lead to total transaction loss. Therefore, this database must be regularly secured.
System Manager Beginner (UNIX) Student Guide
SUB-SG-001 Page 18
2.3.2 prod_meta
The prod_meta database contains Talis messages and working information. It should only change when the Talis system is upgraded. However, certain processes can make minor alterations to this database (notably the Talis daemons). It is prudent therefore to take a backup of this database. Consequently it is automatically secured when a backup of the prod_talis database is taken.
2.3.3 tutor_talis
The tutor_talis database will ideally reflect the structure of prod_talis. It can be accessed through Talis Alto, by editing the Set Alto Database application. As such, it can be used for training or testing. The quantity of data it contains is very small, rarely exceeding 50 or 60 MB. It will usually be loaded with sample bibliographic records and it is the library‟s responsibility to add borrowers and items.
A backup of this database is particularly important for new Talis libraries as it is heavily used during training courses and can be used to return the tutor system to a pristine condition.
2.3.4 tutor_meta
Just as the main prod_talis database has a related meta database, so does the tutor system. It‟s content, size and structure effectively mirrors that of prod_meta. It is automatically secured when a backup of the tutor_talis database is taken.
2.3.5 master
Sybase has a small, but very important and controlling database known as master. Changes to such things as database users and options are recorded here. It is beneficial to have a backup of this database and therefore it is secured when any other database is written to tape.
2.3.6 temp_db
Sybase uses this temporary database for storing information as it processes complex queries. This is particularly true when running management information queries that cross multiple tables or which access very large tables. As the query returns results the temporary data is cleared from temp_db. If this database fills then the Talis application will fail to respond. Avoid this by not running untested queries against the prod_talis database.
2.3.7 Other databases
There are other databases held on the Talis machine. Some are system related and others exist if the library has additional Talis products (for example, Talis Inquire™, Talis List™, Talis Signpost™ or Talis Decisions).
System Manager Beginner (UNIX) Student Guide
SUB-SG-001 Page 19
2.3.8 Transaction log
This is an area of a database rather than a database in its own right. Also known as the translog or syslog, each main database has one. Transactions against the database are recorded here, in addition to being added to the main part of the database. Internal Sybase mechanisms can be used to recover data from this area in the event of a problem
2.4 SQL
Structured Query Language or SQL is the language understood by many relational databases. The version in use with Sybase is known as isql (interactive structured query language). Whilst this tool can be used to access the database(s) directly, it is normal to use applications such as Talis Alto to interact with them. Such applications will generate the complex SQL on your behalf.
Talis offer a one-day course which introduces the concepts of the Talis database and basic SQL.
2.4.1 Stored procedures
Stored procedures are often repeated SQL statements that are held within the database. This allows large and repeatable transactions to be executed in a more efficient way. The Talis program does not have to re-create common SQL each time it is required.
Although held within the Sybase database, they are written externally and have to be imported. The original SQL statements are held in files in the /usr/opt/blcmp/talis/database/proc directory.
2.4.2 Triggers
These are also held within the database, and they carry out specific transactions automatically as a result of another action. The original SQL statements files are held in the /usr/opt/blcmp/talis/database/trigger directory.
2.5 Scripts
Scripts are files on the Talis machine that can contain a sequence of UNIX commands or programs. They are used to run regular or repetitive tasks, most usually against the Talis database. Talis provide a number of batch scripts.
2.5.1 Perl
Perl or Practical Extraction and Reporting Language is used as a reporting tool by Talis. However, batch scripts are also being increasing written in Perl to run tasks against the Talis database.
System Manager Beginner (UNIX) Student Guide
SUB-SG-001 Page 20
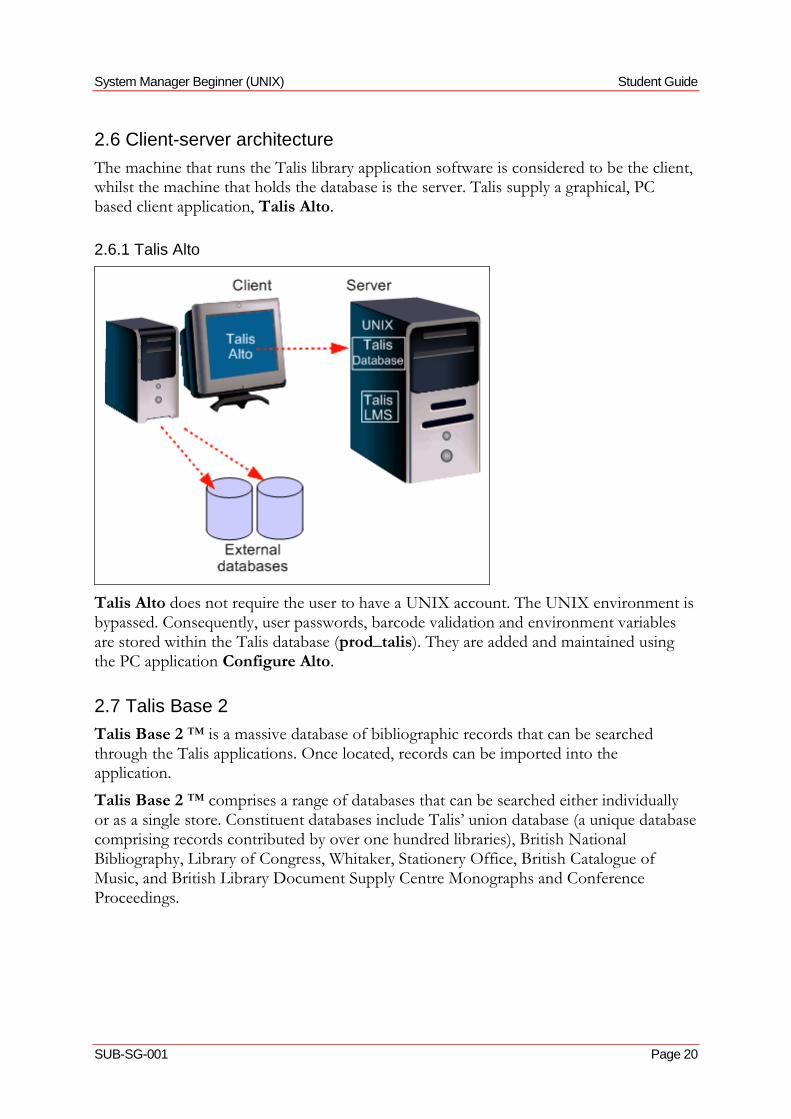
2.6 Client-server architecture
The machine that runs the Talis library application software is considered to be the client, whilst the machine that holds the database is the server. Talis supply a graphical, PC based client application, Talis Alto.
2.6.1 Talis Alto
Talis Alto does not require the user to have a UNIX account. The UNIX environment is bypassed. Consequently, user passwords, barcode validation and environment variables are stored within the Talis database (prod_talis). They are added and maintained using the PC application Configure Alto.
2.7 Talis Base 2
Talis Base 2 ™ is a massive database of bibliographic records that can be searched through the Talis applications. Once located, records can be imported into the application.
Talis Base 2 ™ comprises a range of databases that can be searched either individually or as a single store. Constituent databases include Talis‟ union database (a unique database comprising records contributed by over one hundred libraries), British National Bibliography, Library of Congress, Whitaker, Stationery Office, British Catalogue of Music, and British Library Document Supply Centre Monographs and Conference Proceedings.
System Manager Beginner (UNIX) Student Guide
SUB-SG-001 Page 21
3. Stopping and Starting the System
3.1 About this section
The purpose of this chapter is to introduce you to ways to bring a system up or down.
Upon completing this chapter, you should be able to:
reboot the server
shutdown the server
3.2 Introduction
The main Talis machine can be powered down and switched off. Alternatively it can be re-booted. This is equivalent to „restarting‟ as you might do with a PC running Microsoft Windows.
Clearly it is vital that no important processes are running when either a shutdown or a reboot takes place. Any such processes will of course be terminated.
3.3 Run Levels
Unix servers have a concept of run levels. At each run level certain scripts are executed in order. These „rc scripts‟ are kept in a series of directories in /etc which correspond with the run level. for example, /etc/rc0.d/ , /etc/rc1.d/ and so on.
The run levels are as follows.
S : Single user state (useful for recovery)
0 : Access Sun Firmware ( ok> prompt)
1 : System administrator mode
2 : Multi-user w/o NFS (network filesystems)
3 : Multi-user with NFS
4 : Unused
5 : Completely shutdown the host (like performing a power-off @ OBP)
6 : Reboot but depend upon initdefault entry in /etc/inittab
3.4 Starting the system
To bring the system up from „cold‟, power up any peripherals (e.g. monitor, tape drives) then turn on the power to the main machine. The system will boot automatically, and start any background system processes required for Talis to operate correctly. When it has finished booting you should get a login prompt at the system console. If not, hit Enter to display the prompt.
System Manager Beginner (UNIX) Student Guide
SUB-SG-001 Page 22
Users may now use Talis Alto or log into UNIX.
Please note that background Talis processes, such as Talis daemons (for example work_exp_dae) are not started automatically on power-up. They will need to be started.
3.5 Re-booting the system
It is recommended that you re-boot the Talis machine on a regular basis. This will clear any redundant processes that may be impacting upon system performance.
However, be aware that a system re-boot will terminate all running processes. Whilst system processes will be automatically re-started, Talis sessions or Talis batch jobs will not. It is vital to ensure that no processes will be impacted by the re-boot.
If you are intending on offering a 24 hours per day, 7 days per week service, the system should not be re-booted. It may be possible to switch certain services (such as the OPAC) to alternative machines to allow a system re-boot. Should this be required, please contact Talis Support for guidance.
3.5.1 Re-boot procedure
1. Log onto the system as root.
2. Check all other users are logged out by using the who command.
3. Examine all running processes using the ps –ef command. If necessary you can send out a message warning Talis Alto users that the system is about to be brought down by using the Shutdown tab in Configure Alto. You can warn Talis Text users by use of the UNIX wall command. This command can only be executed by the root user. To send a wall message enter: wall {return} The prompt will be missing. You should now enter your message, for example: The system is about to be brought down. {return} Please log off immediately. {return} When you have finished typing the message, press CTRL-D and your message will appear on all users screens.
4. Enter the following command:
init 6
or alternatively
shutdown -g0 -y -i6
The system will be re-booted. Any users still logged on to the system at this point will be logged out by the reboot.

System Manager Beginner (UNIX) Student Guide
SUB-SG-001 Page 23
3.6 Powering the System Down
To bring the system down completely you must be logged on as the root user. You should enter the command:
shutdown -g0 -y
You will be prompted to input a password to enter System Maintenance. Enter the root password. The system will inform you when the shutdown is complete and you will be returned to the UNIX prompt.
Finally halt the processor with the command:
halt
An OK prompt will be returned. At this point the machine and its peripherals can be powered off .
Alternatively, the command:
shutdown -g0 -i0 -y
will completely stop the operating system. The system will be returned to the OK prompt. Power can then be turned off at the main machine and any peripheral devices.
A further alternative
shutdown -g0 -i5 -y
Uses –i5 which will shutdown and power off the main machine, leaving power only to external devices.
3.7 Webmin
The system can be re-booted or shutdown from within Webmin at the click of a button.

System Manager Beginner (UNIX) Student Guide
SUB-SG-001 Page 24
4. Disk hygiene and managing files
4.1 About this section
The purpose of this chapter is to introduce ways of managing files that may accumulate.
Upon completing this chapter, you should be able to:
Monitor disk space
Find where disk usage is highest
Delete files
Manage log files
4.2 Introduction
Various UNIX directories are written to as processes are executed on the system. If not monitored and maintained, directories may fill and ultimately, so may the disks. This can lead to system performance issues and even to the seizure of Talis programs.
It is important to monitor your disks to ensure there is sufficient free space, and to periodically clear out obsolete files.
4.3 Monitoring disk space
4.3.1 df
The UNIX df command is used to monitor the amount of used and free disk space on the system.
df (-k, -a) status of disk file sytems
For example:
df -k
displays the following and reports on space free and available for all mounted file systems:
Filesystem kbytes used avail capacity Mounted on
/dev/dsk/c0t0d0s0 96391 13280 73481 16% /
/dev/dsk/c0t0d0s3 336871 198536 104655 66% /usr
/dev/dsk/c0t0d0s5 96391 43512 43249 51% /opt
/dev/dsk/c0t1d0s0 192799 29371 144158 17% /usr/opt/sybase
/dev/dsk/c2t0d0s0 962983 219398 647295 26% /usr/opt/blcmp
/dev/dsk/c2t1d0s0 96391 916 85845 2% /users
/dev/dsk/c3t0d0s0 1925934 570408 1162936 33% /scratch
Alternatively, the command:
System Manager Beginner (UNIX) Student Guide
SUB-SG-001 Page 25
df -k /scratch
reports on free space in the specified directory, in this case /scratch
Filesystem Kbytes used avail capacity Mounted on
/dev/dsk/scratch 500000 337093 114757 75% /scratch
4.3.2 du
The UNIX du command can also be used to monitor disk space. It displays disk blocks used.
du (-a, k) number of blocks used by each directory or file
(one block = 512 bytes).
This can be useful to display information about the amount of disk space used beneath specified directories. For example:
du /users
The output can also be sorted in descending order, by size of blocks by adding the UNIX sort command:
du /users | sort –nr
du can also be used to show the disk space used in the current directory by file or file systems:
du –sk * | sort –n
4.3.3 Size definitions
Depending on the command used, listings will display in bytes, kilobytes, or blocks.
1 block = 512 bytes
1 kbyte = 1,024 bytes
1 mbyte = 1,000,000 bytes (or 1,024 kbytes)
1 gigabyte = 1,024 mbytes (or 1,000,000 kbytes, or 1,000,000,000 bytes)
The listing produced by “ls -l” is in bytes.
The listing produced by “df -k” is in Kbytes.
The listing produced by “du” is in blocks, (unless a “-k” switch for kilobytes is used).
4.4 Clearing files out
Redundant disk files can be removed manually using the UNIX rm command. However any available technique to automate such work should be employed. Talis include lines within the scheduling tool known as cron. One such line calls a script called clear_logs.
System Manager Beginner (UNIX) Student Guide
SUB-SG-001 Page 26
In addition, cron lines can be set up to delete files in specified directories that are above a cited number of days in age. For example, this technique is used to clear old Talis daemon report files. The system manager should consider copying this technique to clear older files from other directories, for example those that contain Perl report files and logs.
4.4.1 Deleting files
The UNIX command to delete files is rm. The command syntax is:
rm (-i,-r) {filename}
For example:
rm /users/fred/date.sc
rm -i /users/talis/reports/*.old
Note the use of –i switch in the second example. This causes the system to prompt for confirmation that each file should be deleted, and is a useful means of safeguarding against accidental file deletion.
Warning: Once a file or directory has been deleted, it cannot be recovered, unless you have taken a backup copy of it. Consequently the rm and rmdir commands should be used with caution.
To clear out the contents of a file without deleting the file itself, you can use the following command:
> {filename}
If you do not have the correct access rights to a file, you will not be able to delete it. You must have w (write) access to be able to delete a file. Use the ls -l command to view the access rights of a file.
4.4.2 Deleting directories
To delete a directory use the UNIX rmdir command.
rmdir {directory}
For example
rmdir /users/talis/testfile.out
rmdir will only delete an empty directory. If the directory contains files or other directories, an error will be output, and the directory will not be deleted. As with files, you need write (w) access to a directory in order to be able to delete it.
To delete a directory and its contents, use the command:
rm –r {directory}
For example, to delete an empty directory:
rmdir /users/talis/ill_reports
System Manager Beginner (UNIX) Student Guide
SUB-SG-001 Page 27
or if the directory contains files:
rm -r /users/talis/ill_reports
4.4.3 clear_logs
This Talis UNIX script resides in the /users/talis/admin directory and is set to run on a weekly basis. It truncates a number of system log files that would otherwise grow in size unchecked. These log files include:
/var/adm/messages (system messages)
/var/adm/sulog (log of users logging on as su - the root user)
/var/cron/log (list of all executed cron commands)
The above files are listed in /users/talis/admin/logs_to_clear and it is this file that is used by the clear_logs script to determine which logs to truncate. Consequently, if there are logs you would rather retain, or if there are logs you would like to add to the list, you should edit logs_to_clear.
If your system is Solaris 10 you may find that the /var/adm/messages file is rotated using a solaris 10 utility called logadm.
4.4.4 Mail from cron
Output from cron lines which are not directed at a disk file, will be sent to a UNIX mail account. The root user mail file is particularly likely to grow if an output is not specified. Often the output can be directed to/dev/null which effectively suppresses output either to file or to mail.
4.4.5 Talis daemon report files
Report, log and error files from Talis daemons are held in the directory /usr/opt/blcmp/talis/reports .
They are renamed, usually on a daily basis, by the script archive_daemon_reports. These files need to be cleared out regularly. Whilst this can be done manually using rm, an easier alternative is to implement a line in the cron to delete all files in this directory greater in age than a specified number of days.
For example, to delete any files in the /usr/opt/blcmp/talis/reports directory which are more than thirty days old, the following line can be added to the cron file and will run weekly:
0 7 * * 1 /usr/bin/find /usr/opt/blcmp/talis/reports -mtime +30 exec rm -f {} \; >/dev/null 2>&1
4.4.6 Perl report files
Talis provide numerous scripts written using a third party, programming language called Perl. Perl is the language behind many Talis reports, such as overdues and reservation
System Manager Beginner (UNIX) Student Guide
SUB-SG-001 Page 28
recall letters. Perl reports will rename any existing previous version of a report file with a date extension. Over time, this will result in report files that are no longer required. It is the responsibility of the system manager to remove such redundant files.
4.4.7 /scratch
The /scratch directory is a repository for a variety of files. It is used as a storage area for many temporary files. It frequently commands a large partition of disk space. Like most directories on the system, should it fill, it will cause Talis programs to freeze. Whilst there are likely to be many files that can safely be removed, certain sub-ordinate directories and files must be retained, namely:
/scratch/prod_talis
/scratch/blcmp
/scratch/var_tmp
/scratch/master
If you require guidance, please do not hesitate to call Talis Support.
4.4.8 Zebra Index file
The /var/tmp directory can fill quite quickly if the logging level is set too high for the marcgrabber. If this directory fills up, so that the indexing process cannot write to the log files, it is possible for the indexes to become corrupted, requiring an index rebuild. Set the logging level of the marcgrabber to fatal after the initial build. This can be set by editing the /scratch/altoindexes/marcgrabber_daemon_<database>.cfg file. If the log files are getting too large, they may safely be nulled, even while the marcgrabber is running. The following log files can be nulled:
zebra_bib.log
zebra_auth.log
marcgrabber_prod_talis.out
zebra_bib_index_prod_talis.log
zebra_auth_index_prod_talis.log
grab_delta_prod_talis.log
The indexes exist in /scratch/altoindexes. After the initial index build, the indexes should not grow very quickly. However, once /scratch/altoindexes gets over 90% full it should be allocated more space. Raise a service call with Talis to request this.
4.4.9 Looking for clues
Information often exists that will help you to decide about the importance of a file. As files are created, ownership will be assigned. The df –k command can be used to identify
System Manager Beginner (UNIX) Student Guide
SUB-SG-001 Page 29
the owner of a file, who can be quizzed as to it‟s nature, usefulness and purpose. The same command will reveal the date on which the file was last modified. The age of a file can often indicate its value.
Your own agreed file naming conventions will also make the task of disk hygiene easier. Give files meaningful names and appropriate extensions. You should also consider creating sub-ordinate directories for certain types of file (for example, differing Talis Perl reports).
Once again however, if you have doubts as to the purpose of a file or directory, seek assistance from Talis.
4.5 Wildcards
Wildcards can be used in UNIX to represent one or more characters in a filename or file extension when copying, moving, listing or removing files. They are extremely useful when it is necessary to carry out an operation on multiple files in a single command.
* represents any number of characters at this position
? represents a single character at this position
For example
pg *.rep - will pg all files with a .rep file extension
ls –l *.rep - will list files ending with a .rep extension
Clearly, wildcards can be useful when it is necessary to delete multiple files containing common characters or file extensions. For example the command:
rm *.out
- will remove all files with the .out extension.
However, extreme caution should be used when using wildcards with the rm command. You should check the directory that you are in, and be confident in your command line. Remember, there is no undo button in UNIX.

System Manager Beginner (UNIX) Student Guide
SUB-SG-001 Page 30
5. Managing UNIX Processes
5.1 About this section
The purpose of this chapter is to gain an understanding of how to track and manage UNIX processes.
Upon completing this chapter, you should be able to:
Check process activity
Be confident in using a number of tools to analyse these processes
5.2 What is a process?
A process is created whenever the user or the system runs a program or executes a command. For example, when a user logs on, a login process is created.
As UNIX is a multi-user, multi-tasking operating system, there will be many processes active on the system at any given time. Processes are either system processes or user processes.
System processes are initiated by the system and generally run in the background, for example:
Init (the initial process which is run when the system is booted)
Cron (the UNIX scheduling process)
5.3 Monitoring system activity
The extent of current and recent system activity can be revealed by use of the UNIX sar command.
5.3.1 sar
Current activity
To see a snapshot of current system activity, you can run the UNIX sar command:
sar x y
where x is the interval in seconds, between the number of lines displayed which is represented by y, for example
sar 5 7
This will provide 7 lines of information broken at 5 second intervals, at which point the UNIX prompt will be returned. The sar command can be executed by any user.

System Manager Beginner (UNIX) Student Guide
SUB-SG-001 Page 31
Past activity
Regular snapshots of system activity are run automatically through the cron scheduling tool. These can be viewed in the /var/adm/sa directory. The sar files contained in this directory are updated on a daily cycle and are named in the form saxx where xx represents the date of the month.
These files cannot be read using pg, more, cat or view as they are not text files. To view a file, the sar command must be used in conjunction with the –f switch. For example, to view the file for the 2nd of a month, enter the following command:
sar -f sa02
5.3.2 vmstat
A snapshot of virtual memory usage can be viewed by executing the command:
vmstat x y
where x is the interval in seconds between the number of lines displayed (y). The key figure of importance is that relating to free memory. For further information run the man vmstat command.
5.3.3 prstat
The prstat command will list processes on the system in order of CPU activity. That is, the most CPU hungry processes will be at the top. To enable this, execute the command:
prstat
The command should be terminated with Ctrl C. For further information run the man prstat command from the UNIX prompt.
5.4 Monitoring processes
All processes on the system can be monitored using the UNIX ps command. The ps command accepts a number of switches, as described in the following table:
Switches Function
-e every process now running
-f full listing
-l long listing
-t[pts/nn] only processes associated with pts (terminal) nn
-u uid only processes for this user id (e.g. ps –utalis)
As the output from the ps command can scroll for several screens, it is useful to pipe it to the UNIX pg command
ps -ef | pg
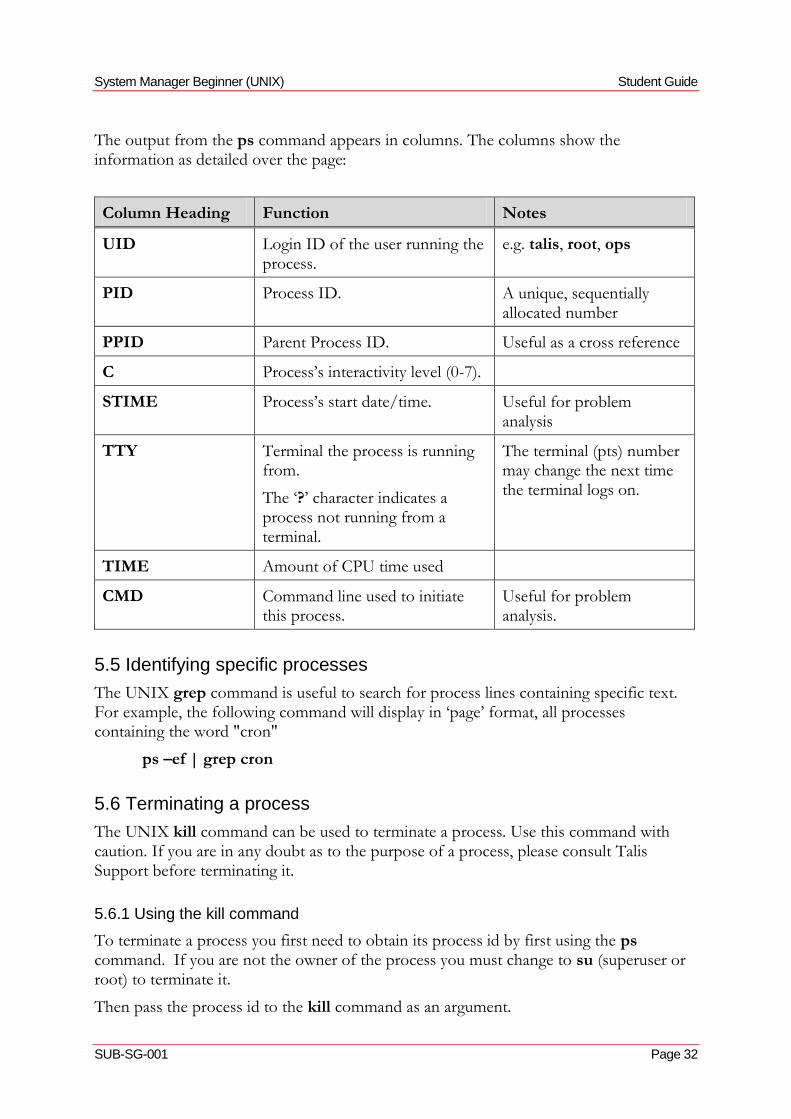
System Manager Beginner (UNIX) Student Guide
SUB-SG-001 Page 32
The output from the ps command appears in columns. The columns show the information as detailed over the page:
Column Heading Function Notes
UID Login ID of the user running the process.
e.g. talis, root, ops
PID Process ID. A unique, sequentially allocated number
PPID Parent Process ID. Useful as a cross reference
C Process‟s interactivity level (0-7).
STIME Process‟s start date/time. Useful for problem analysis
TTY Terminal the process is running from.
The „?‟ character indicates a process not running from a terminal.
The terminal (pts) number may change the next time the terminal logs on.
TIME Amount of CPU time used
CMD Command line used to initiate this process.
Useful for problem analysis.
5.5 Identifying specific processes
The UNIX grep command is useful to search for process lines containing specific text. For example, the following command will display in „page‟ format, all processes containing the word "cron"
ps –ef | grep cron
5.6 Terminating a process
The UNIX kill command can be used to terminate a process. Use this command with caution. If you are in any doubt as to the purpose of a process, please consult Talis Support before terminating it.
5.6.1 Using the kill command
To terminate a process you first need to obtain its process id by first using the ps command. If you are not the owner of the process you must change to su (superuser or root) to terminate it.
Then pass the process id to the kill command as an argument.
System Manager Beginner (UNIX) Student Guide
SUB-SG-001 Page 33
For example, if the ps command identified a process with the process id of 24862, you would use the command:
kill 24862
5.7 Other useful commands
The following table describes other useful commands.
Command Description
who Displays who is logged on to the system.
who am I Displays your login information.
w Displays current activity on the system (a useful summary of who‟s doing what).
id Displays your current username and user ID.
finger {login-name} Displays information about users, whether logged in or not (may be disabled as a result of server hardening by Talis).
last -n {login-name} Displays the specified number of most recent logins of a given name. For example:
last -5 talis
would displays the last five times the user talis logged in.
5.8 Parent and child processes
Many programs and processes (parents) work by creating sub-processes (children). If you need to terminate such processes, you must first kill all the sub-processes (youngest first) and then the master process. You cannot assume that terminating the parent process will also terminate its children.
Failure to do this can result in the program not being terminated, or rogue processes being retained on the system, which may cause performance problems.
After running the kill command, ensure that it has worked by repeating the ps command.
5.9 Alto processes
As the Talis Alto application does not use the UNIX environment, no Talis Alto processes will be visible using the ps –ef command. Rather you should use the Active Users tab within Configure Alto.
System Manager Beginner (UNIX) Student Guide
SUB-SG-001 Page 34
6. Backing up the System
6.1 About this section
This section describes how to back up your system.
Upon completing this chapter, you should be able to:
Back up Sybase databases and Talis and UNIX disk files.
6.2 Introduction
It is crucial to regularly backup Talis and UNIX software and disk files and all Sybase databases. Should the system become corrupted or crash, it can be restored from the most recent successful database and software securities.
You should also secure a copy of your databases and disk files whenever there is to be a major change or system event, for example an upgrade of the Talis system, or repair or replacement of system hardware.
You should take daily securities of the Talis databases and keep at least three weeks of backup tapes, and you are strongly recommended to retain a copy at an off-site location.
It is essential that you have confidence that all system backup processes have been successful. You should validate success by referring to the backup log files. All backup log files are held within the /var/tmp directory.
In order to carry out all database, software and disk file backup activities, you should be logged in as the ops user.
6.3 Backing up the Talis databases (full_dbdump)
The script that is used to backup the prod_talis database is called full_dbdump. This same script can be used to secure all other Sybase databases. It can be executed interactively, but typically is set to run as a regular routine through the UNIX scheduling process, know as the cron.
Run without arguments, full_dbdump will secure the prod_talis, prod_meta and master databases to DAT tape. The DAT tape needs to have been previously loaded into the DAT tape drive. If the tape drive is empty, the full_dbdump will fail.
full_dbdump will always secure the master database in addition to any database(s) you have specified to be backed up.
The script accepts the following switches:
Switch Description
-d Specifies the database to be secured.
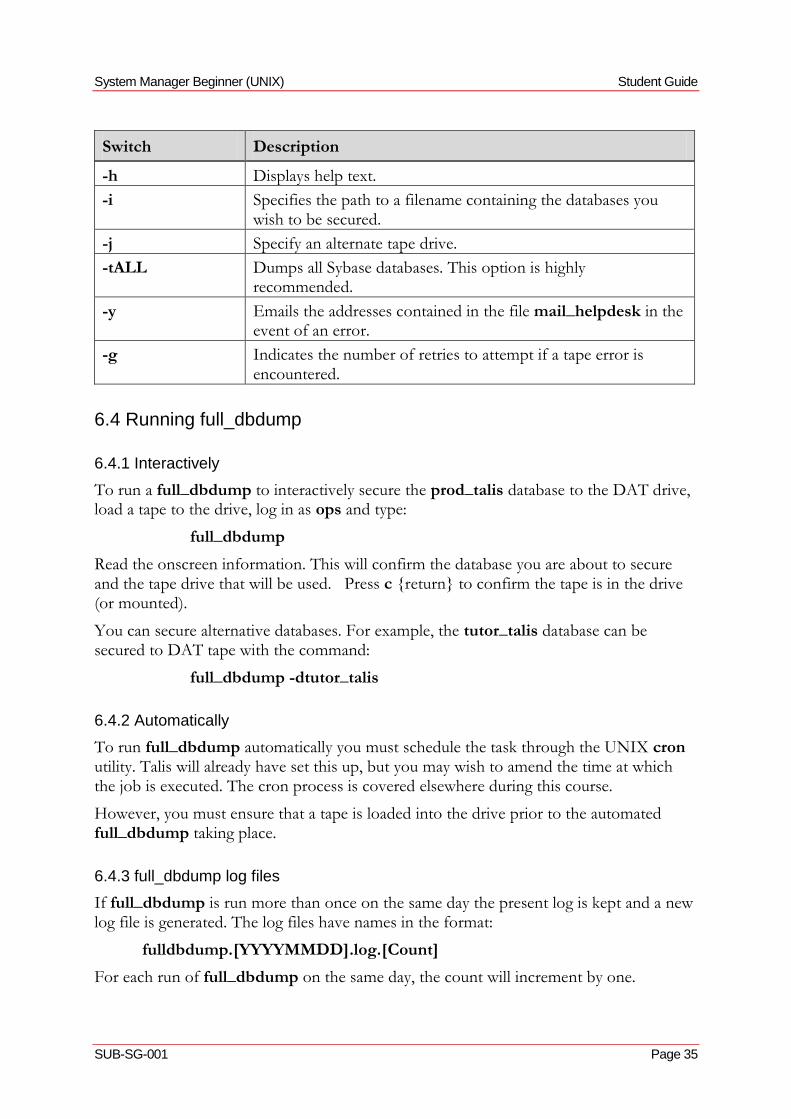
System Manager Beginner (UNIX) Student Guide
SUB-SG-001 Page 35
Switch Description
-h Displays help text.
-i Specifies the path to a filename containing the databases you wish to be secured.
-j Specify an alternate tape drive.
-tALL Dumps all Sybase databases. This option is highly recommended.
-y Emails the addresses contained in the file mail_helpdesk in the event of an error.
-g Indicates the number of retries to attempt if a tape error is encountered.
6.4 Running full_dbdump
6.4.1 Interactively
To run a full_dbdump to interactively secure the prod_talis database to the DAT drive, load a tape to the drive, log in as ops and type:
full_dbdump
Read the onscreen information. This will confirm the database you are about to secure and the tape drive that will be used. Press c {return} to confirm the tape is in the drive (or mounted).
You can secure alternative databases. For example, the tutor_talis database can be secured to DAT tape with the command:
full_dbdump -dtutor_talis
6.4.2 Automatically
To run full_dbdump automatically you must schedule the task through the UNIX cron utility. Talis will already have set this up, but you may wish to amend the time at which the job is executed. The cron process is covered elsewhere during this course.
However, you must ensure that a tape is loaded into the drive prior to the automated full_dbdump taking place.
6.4.3 full_dbdump log files
If full_dbdump is run more than once on the same day the present log is kept and a new log file is generated. The log files have names in the format:
fulldbdump.[YYYYMMDD].log.[Count]
For each run of full_dbdump on the same day, the count will increment by one.
System Manager Beginner (UNIX) Student Guide
SUB-SG-001 Page 36
full_dbdump retains ALL output files generated while attempting to access the backup tape. These are the results of attempting to:
1. Dump the databases.
2. Verify the contents of the tape.
3. Unload the tape.
There will be such output files for each attempt/re-try and the file name formats are:
1) fulldbdump.[YYYYMMDD].dump.[Count].[RunNumber] 2) fulldbdump.[YYYYMMDD].verify.[Count].[RunNumber] 3) fulldbdump.[YYYYMMDD].unload.[Count].[RunNumber]
These log files are created in /var/tmp and it is important that log fulldbdump.[YYYYMMDD].log.[Count] is inspected after each run to ensure full_dbdump completed successfully.
The amount of used space in the database is also reported in this log file. When securing the prod_talis database, you should check the database capacity reported in the log.
6.4.4 When to run
full_dbdump must be executed on a daily basis. It should be run before the start of normal working on the system. Not only does it take a copy of the database(s), it also ensures that trandumps will work correctly throughout the day.
Warning: Failure to run full_dbdump early each morning will render your system insecure. Not only will you be without a recent database copy, but trandumps are also highly likely to fail.
6.4.5 In the event of failure
Talis treats any failure of full_dbdump as a high priority call and you should of course contact Talis Support. However, prior to any call you should carry out a few simple checks and procedures:
1. Ensure a tape has been loaded into the drive.
2. Ensure that the tape is not write-protected.
3. Clean the tape heads.
4. Attempt an interactive full_dbdump, preferably using a new tape.
6.5 Backing up databases transactions (trandump)
Every change to the Talis database is considered to be a transaction, be that an issue of a book, an order for an item or a change to a borrower‟s details. In addition to being recorded in the appropriate place in the database, the transaction is also logged to an area of the database known as the transaction log (also described as translog or syslog).
System Manager Beginner (UNIX) Student Guide
SUB-SG-001 Page 37
This log will reside on a different disk to the rest of the database and it can be used to recover transactions in the event of a failure.
The transaction log is of a limited size, and if it becomes full, Talis Alto will cease to be responsive and the database will not accept further transactions. It becomes necessary to clear the transaction log area whilst retaining the valuable data that it contains.
To this end the script called trandump is executed.
6.5.1 Running trandump
The script, which should be set up in cron to run automatically, copies the contents of the transaction log to disk space in the /scratch/prod_talis directory and then clears the transaction log area of the database. It runs as the ops user.
6.5.2 trandump log files
Log files are created in the /var/tmp for each run of trandump. They take the form:
trandump.log.[Date of Month].[Hour].[Minute]
6.5.3 When to run
trandump must be executed at regular intervals throughout normal working hours. Usually this is on an hourly basis, but this interval may need amending depending upon local circumstances. It usually does not need to run overnight, but this may be required depending upon local circumstances. Please discuss this with Talis Support if you are uncertain. Unsuccessful trandumps will render your system insecure.
6.6 Backing up trandumps (archive_trandumps)
The execution of trandump places a file into the /scratch/prod_talis directory at regular intervals. The files are potentially large, and as such older copies of such files need to be removed from the disk to avoid the disk becoming full. The files are important and should not be removed before being transferred to tape.
A script called archive_trandumps is run to achieve this.
6.6.1 Running archive_trandumps
Whilst this script can be automated through the cron, it is more usual for it to be dealt with manually. Load a tape into the DAT drive and login as the ops user to run this script.
By default the script will transfer all trandump files from disk to tape if they are older than 24 hours.
6.6.2 archive_trandumps log files
archive_trandumps does not create a log file.

System Manager Beginner (UNIX) Student Guide
SUB-SG-001 Page 38
6.6.3 When to run
Typically this script is run weekly, but this interval may need amending depending upon local circumstances.
6.6.4 In the event of failure
Failure of this script should be reported to Talis Support.
6.7 Backing up disk files (full_softdump)
In addition to the Talis supplied script full_softdump, you may wish to consider using the UNIX utility called ufsdump explained in section 6.8.
6.7.1 Running full_softdump
Interactively
To take a full software backup, logon as ops and enter the following command:
full_softdump
This script backs up all files under the root directory ( / ) to your DAT tape drive.
Automatically
Whilst full_softdump can be automated through the cron, more typically the task is carried out manually.
6.8 Backing up disk files (ufsdump)
In addition to the Talis supplied script full_softdump, you may wish to consider using the UNIX utility called ufsdump.
ufsdump offers the advantage of not only securing disk files, but recording valuable information about the way the disks have been partitioned. The ufsdump command makes two passes when backing up a file system.
Some customers are now using a script called full_ufsdump.sh, which will make full_softdump redundant. This script may already be running on your system. If you are interested in setting this up please contact Talis Support.
6.9 Backup cycle and tape life
You should maintain a three-week cycle of backup tapes.
Most DAT tapes can only be safely written to between 20 and 30 times, depending on the quality of the DAT. You should therefore make sure a note of the date is made on the cartridge case each time it is used. An old or worn DAT may start generating errors when dumped to. If in doubt as to how many times a given DAT may be used, check with the manufacturer.
System Manager Beginner (UNIX) Student Guide
SUB-SG-001 Page 39
6.10 Offsite copies
You are strongly recommended to keep copies of all of your tape backups at an offsite location or in a fire-proof box.
System Manager Beginner (UNIX) Student Guide
SUB-SG-001 Page 40
7. System security
7.1 About this section
This section explains the importance of keeping your UNIX server secure.
Upon completing this chapter, you should be:
Aware of the techniques you can use to ensure your system is secure
7.2 Introduction
Any library running a UNIX server needs to make a serious and ongoing commitment to maintaining the machine in a secure manner. You need to perform security maintenance in addition to normal file or user maintenance.
7.3 Justification
Your system will never be absolutely secure, but you can make it more secure than most. Think of it like the neighbourhood watch; it doesn't reduce crime, it just makes it go elsewhere where there are easier pickings.
You also have a responsibility to all other systems. If your security fails, then your machine can be used as a launch pad for a host of other attacks. If root is compromised on your system every other system on your local network is almost certainly compromised immediately.
7.4 Techniques
Protect your passwords. Change passwords regularly. Be particularly protective of the root password.
Enforce good password practices on your users. Have a formal password policy that requires strong passwords. Don‟t use blank passwords. Use a mix of uppercase and lowercase alpha-numerics.
Stay up to date. If you do not stay current you will eventually become vulnerable. Read appropriate news groups and mailing lists on a regular basis. Check your vendor‟s site for new patches weekly. Get on your vendor‟s patch notification list.
Educate your users on good practice. Make sure they don‟t give out their passwords or leave terminals or PCs accessing your system unattended.
Review your logs regularly. Question unusual traffic patterns.
Read CERT advisories. CERT is the ``Computer Emergency Response Team''. It publishes ``advisories'' about security holes from time to time. These are published once the vendors concerned have produced patches. Visit http://www.cert.org for more information.
System Manager Beginner (UNIX) Student Guide
SUB-SG-001 Page 41
Don’t log into root directly. Resist the temptation to run as root all the time. It‟s not good practice for the system manager to always logon as root (or superuser). It‟s easy to make a trivial mistake and damage the system (perhaps by using rm * in an important directory). Instead, logon as a regular user (such as talis), then switch to superuser with the su command when you need it. You are likely to find direct access to the root user via telnet blocked, particularly if your server has been hardened by Talis.
Take backups. Regularly secure your file systems, software and databases.
Install patches. But only if you are confident that they will no have a detrimental effect upon the system. Contact Talis Support if you require guidance. Always backup your system before applying patches.
Use a Firewall.
Consider Anti-Virus. Although anti-virus software is not as large an issue for UNIX users as for users of other systems, it is still an issue. If your UNIX system is used to serve files to Windows machines, then that system should be aware of Windows viruses so as not to redistribute infected files that could be stopped at the server level. Additionally, a small number of UNIX-native viruses do exist, particularly for the Linux platform. For these reasons, UNIX file-serving systems (mail servers, Web servers, FTP servers, Samba servers, etc.) should have up-to-date anti-virus software in place.
Understand file permissions. Question whether files really need rwxrwxrwx permission and avoid using chmod 777.
Read books. Works are available on UNIX system administration and security, for example:
Essential System Administration written by Æleen Frisch, and published by O'Reilly & Associates. ISBN: 0-937175-80-3
The manual pages on your own particular system.
Practical UNIX Security written by Simson Garfinkel and Gene Spafford, and published by O'Reilly & Associates. ISBN: 0-937175-72-2
The Cuckoo's Egg written by Clifford Stoll, and published by The Bodley Head. ISBN: 0-370-31433-6
7.5 Server hardening with Talis Assist
Talis offers a competitively priced system hardening service, Talis Assist. The service comprises:
Single application of all the latest SUN security patches.
Removal/disablement of services not required to run the Talis product set.
Addition of tested secure encryption tools to all administration activities.
Mechanisms to effectively control access for administration/support activities.

System Manager Beginner (UNIX) Student Guide
SUB-SG-001 Page 42
Cycling and checking of all system logs with email notification.
Limiting remote access to mail services.
Automated file system integrity checks.
User account and environment security.
Server hardening report, with recommendations based on best practise.
Security of all third-party applications associated with the Talis product set.
System Manager Beginner (UNIX) Student Guide
SUB-SG-001 Page 43
8. System user accounts
8.1 About this section
This chapter describes system user accounts and how to add users in UNIX.
Upon completing this chapter, you should be able to:
Add and administer UNIX users
Understand the UNIX mail and UNIX write and UNIX wall commands
8.2 Introduction
In pre Alto versions of Talis it was a requirement that each person who logged into Talis also had a unix account for the correct operation of Talis Text. However this is no longer a requirement.
There are now very few situations in which you would want to add a UNIX user. however the following info may be of use when managing current users on the system.
The following procedure describes how to add a new user to UNIX and how to configure the environment for that user.
Note: This assumes that these users do not have a prior account to use UNIX.
8.3 Adding a new user to UNIX
1. Login as talis or ops
2. Enter the command:
su root
3. To add the new user to UNIX, enter the command:
useradd –m –d /users/xxx -g131 xxx
where xxx is the name of your new login
4. To set (or change) the password for your new user, enter the command:
passwd xxx
5. where xxx is the user name.
6. Logout.
8.4 Changing passwords
The following command as the root user will tell you the status of the user account.
passwd -s <username>

System Manager Beginner (UNIX) Student Guide
SUB-SG-001 Page 44
The following command run as the root user will reset a user password, you will be prompted for the new password.
passwd <username>
8.5 Setting the Environment
The Environment is explained in more detail in the section on environment variables
1. Login as the user you have just created.
2. To create a working profile for your new user, enter the command:
cp /users/talis/.profile .profile
3. Logout.
4. Login as the new user.
5. To change the PS1 variable, enter the command:
vi .profile
6. This will change the prompt when you next login.
7. Logout.
8.6 Messaging to users
8.6.1 Unix mail
UNIX user accounts are usually provided with a mailbox. Mail messages may be sent to an inbox from the system or from other user accounts.
If mail messages have been delivered, the user will see a message “You have mail” when logging in.
8.6.2 Reading mail
At the UNIX prompt enter the command:
This will display the most recent message and the prompt will change to the ? symbol. To read the next message, simply hit the <enter >key.
To delete the current message and proceed to the next, enter the command:
dp
To quit from the inbox, enter the command:
q
This will close mail and return you to the UNIX prompt.
System Manager Beginner (UNIX) Student Guide
SUB-SG-001 Page 45
8.6.3 Writing Email
Emails can be sent from the system to external email addresses. this is useful for sending reports to staff in other departments.
The following command would send the file report.txt as the body of the email:
mailx -s”The subject” [email protected] < /path/to/report.txt
The following command (one single line split over several lines) would send the file report.txt as an attachment to the email:
uuencode /path/to/report.txt /path/to/report.txt | mailx -s”The subject” [email protected] < /path/to/message.txt
The above line also uses another file as the message body. Note that the repetition of the filename is deliberate. If a file is attached using the full path, this will become part of the name of the file. If you want to create a text document that will be opened in word by the user, you can call the file report.doc on the server.
These lines can be used from within scripts to email reports as soon as the script is complete.
8.6.4 UNIX write
The write command requires the name of another UNIX account as an argument, for example:
write ops
If the user you specify is logged in, the UNIX prompt will be removed and you will be allowed to type lines of text that will appear on the screen of the specified user.
Close the message by typing:
Ctrl D
Note that if your system has undergone hardening by Talis, the write facility may be disabled as it presents a possible system vulnerability.
8.6.5 UNIX wall
The wall (write all) command allows a message to be broadcast to all users logged into the UNIX system. This will include users of Talis Text. Consequently, it may only be executed by the root user. To send a message to all users, enter the command:
wall
The UNIX prompt will be removed and you will be allowed to type lines of text. These will not appear on the screen of UNIX users until you close the wall dialogue by typing:
Ctrl D
Talis Text users may clear the message and correct the Talis screen by entering:
Ctrl L
System Manager Beginner (UNIX) Student Guide
SUB-SG-001 Page 46
System Manager Beginner (UNIX) Student Guide
SUB-SG-001 Page 47
9. Scheduling jobs
9.1 About this section
This chapter explains how to add jobs to the cron, a UNIX system process used to automate repetitive tasks.
Upon completing this chapter, you should be able to:
Add scripts to the cron to run at times specified.
9.2 Introduction
Many processing jobs, particularly those batch jobs affecting the Talis database, need to be scheduled to run at quieter periods. Some need to be run at regular intervals throughout the working day. The UNIX system process known as cron can be used to automate repetitive tasks.
An alternative UNIX toll known as at allows one-off jobs to be scheduled.
9.3 cron
9.3.1 Description
The cron process enables the system manager to set up jobs that will run automatically on pre-determined days and times. It may be used to schedule overnight or weekend jobs, or jobs that need to run at regular intervals during the day.
The cron process reads a file known as the root cron file into memory and executes the jobs it contains at the times that are specified.
cron files can potentially exist for each UNIX account on the system. However, for ease of maintenance and support, Talis recommend that a cron file exists only for the root user (or superuser).
9.3.2 Command line order
The order of the lines in the cron is not significant. Lines can be entered anywhere in the file, but it is sensible to group related lines together (for example, all daily jobs).
Any line in the cron beginning with “#” is treated as a comment, and is not executed as a command. Liberal commenting of the root cron file will can help others understand the function of each line.

System Manager Beginner (UNIX) Student Guide
SUB-SG-001 Page 48
9.3.3 Editing the cron
In order to make additions or changes to scheduled tasks, the root cron file must be edited and loaded into memory. Editing can be carried out using vi. This is achieved using the crontab -e command whilst logged into UNIX as the root user.
A standard root cron file is provided with the Talis system. This resides in the /var/spool/cron/crontabs directory. You should tailor this file to meet your own requirements.
To edit the cron file:
1. Log into UNIX root account, using the su command and the correct password.
2. Make a backup of the cron file:
cd /var/spool/cron/crontabs cp root root.[date] (where date is today's date)
3. Edit the cron file:
crontab -e
This command will invoke the UNIX vi text editor. Make your required changes then exit the editor using :wq! at the command line prompt. This will update the information held by the cron process.
9.3.4 The cron command line syntax
Each „cron job‟ is composed of six fields: Minute (0-59), Hour (0-23), Day of Month (1-31), Month of Year (1-12), Day of Week (0-6), and the Command.
Minute (0-59)
Hour (0-23)
Day of Month (1-31)
Month of Year (1-12)
Day of Week (0-6)
Command
Note that field 5, the „Day of Week‟, begins with Sunday (0) and ends Saturday (6).
9.3.5 Comments
Hash symbols (#) can be used to comment out entries in the cron file. Commenting your cron lines will help others to understand their purpose.
Be careful not to add blank lines to improve the readability of your file. This can result in problems to your scheduled cron jobs. Instead, precede blank lines with the pound symbol so that the rest of the line will not be interpreted.
9.3.6 Special symbols
An asterisk can be used to signify all values in a field. For example, by placing an asterisk in the third field, the cron daemon will run a job every day. Use asterisks with caution - you may impact on system performance.
System Manager Beginner (UNIX) Student Guide
SUB-SG-001 Page 49
Ranges can also be defined by using the minus (-) symbol. For example, if you wanted to run a job for the first four months of the year, you could add 1-4 to the fourth field.
A comma can also be used to select certain values in the field. If you wanted to run a report every 1st and 15th of the month, you could add 1, 15 to the third field.
9.3.7 Commands
In the sixth field of each cron line, commands can be added. The Talis convention is to use the /bin/su – syntax to run the job as a specified user. For example to run a UNIX script called daliystatus.sc as the user called talis, the following syntax would be appropriate:
/bin/su – talis –c “/users/talis/dailystatus.sc”
Note that the full pathname to the required script is being cited. This is good practice.
You may wish to consider saving such commands in a separate file where they can be commented and pointed to from the cron line. Jobs will be much easier to document, test and maintain and will run sequentially.
9.3.8 Output files
Reference to an output or report file can be made within the quotes surrounding the command. This will generate output just as if the command had been run directly from the UNIX command prompt. For example, to create a report from the dailystatus.sc script, the output could be re-directed thus:
/bin/su – talis –c “/users/talis/dailystatus.sc >/scratch/dailystatus.out”
Note that the full pathname to the output target is used, in this case re-directing the file into the /scratch directory.
In addition to the output from the script, output can be created that relates to the running of the cron line itself. For example:
/bin/su – talis –c “/users/talis/dailystatus.sc >/scratch/dailystatus.out” 1>/var/tmp/dailystatus.cron 2>/var/tmp/dailystatus.err
The 1> is cron output and the 2> is error information. Typically this is re-directed into the /var/tmp directory. You may also see lines that force any cron error output into the same file as the cron output. This done using the syntax 2>&1 for example:
/bin/su – talis –c “/users/talis/dailystatus.sc >/scratch/dailystatus.out” 1>/var/tmp/dailystatus.cron 2>&1
As quite often the cron output is not required, it can be re-directed into /dev/null. This effectively suppresses the output. For example:
/bin/su – talis –c “/users/talis/dailystatus.sc >/scratch/dailystatus.out” 1>/dev/null 2>&1
System Manager Beginner (UNIX) Student Guide
SUB-SG-001 Page 50
If the cron outputs are not directed to a file or to /dev/null then such output will be sent to the UNIX mailbox for the root account. Use re-direction to limit the growth of this mailbox.
9.3.9 An example cron line
The following line would run the dailystatus.sc script as a user called talis, at 8am Monday to Friday. It disregards the date. The script output would be placed into the /scratch directory and the cron output into /var/tmp whilst the cron error output is suppressed.
08 00 * * 1-5 /bin/su – talis –c “/users/talis/dailystatus.sc >/scratch/dailystatus.out” 1>/var/tmp/dailystatus.cronl 2>/dev/null
9.3.10 Stopping the cron
There are two ways to do this. You must be the root user
1. Stop the cron daemon from running.
a. Solaris 8
i. To stop: /etc/init.d/cron stop
ii. To start: /etc/init.d/cron start
b. Solaris 10
i. To stop, as root svcadm disable svc:/system/cron:default
ii. To start svcadm enable svc:/system/cron:default
2. You may wish to still schedule jobs, but only a limited set. You can move the existing cron out of the way and create a temporary cron. (as the root user)
a. The crontab files live in /var/spool/cron/crontabs cd /var/spool/cron/crontabs
b. Move the existing file to a new filename. The cron will only process commands found in the crontab that matches an existing user‟s username. mv root root.save
c. If you need to add a temporary cron, simply create a new file called root with your cron lines in. when you have finished, copy the root.save over the root file. cp root.save root
System Manager Beginner (UNIX) Student Guide
SUB-SG-001 Page 51
9.3.11 Once only jobs
If you have a job which you do not intend to run on a regular basis (rather it is a one-off or an infrequent task) you must always either comment out or delete the line once it has been executed. If you are likely to want to run the job again at some later stage, it is a good idea to comment it out. Then you can use the same line again by un-commenting it and changing the date/time values.
Note: It is especially important to comment out or delete „used‟ cron lines if they contain a day or month template. Failure to do this may lead them to re-run unexpectedly.
An alternative to using the cron for scheduling one-off jobs is to use the UNIX at command.
9.4 at
9.4.1 Description
at is a UNIX command which allows a script to be executed once at a specified time and/or date.
This is an alternative to running one-off jobs in the cron. In using it, you do not need to remember to remove the cron line once it is no longer required.
9.4.2 Scheduling a job
The following syntax used at the UNIX command prompt, allows a job to be scheduled using at:
at {time-to-run) {date-to-run)
For example entering
at 0800 Feb 23
This will produce the at> prompt at which you should enter the command you wish to be run at that time.
If no date is specified, today is assumed.
If no date is specified and the time is less than now, tomorrow is assumed.
If no month is specified, the current month is assumed.
If a month earlier than the current month is given, next year is assumed.
Using CTRL-D will exit the prompt and offer you a job reference number.
When an at job has run, a message will be written to the UNIX mailbox of the account name running the job.
System Manager Beginner (UNIX) Student Guide
SUB-SG-001 Page 52
9.4.3 Checking and cancelling jobs
Your queued jobs can be viewed using the atq command at the UNIX prompt. This will reveal the job reference number, owners and the date and time that jobs are due to run.
To cancel a job, use the command atrm {job reference} at the UNIX prompt. You must have appropriate permissions to do this. The atrm –a command will cancel all jobs for your current UNIX account.
When using these commands, the root user account has the privilege to view or cancel all at jobs.
System Manager Beginner (UNIX) Student Guide
SUB-SG-001 Page 53
10. Talis Daemons
10.1 About this section
This chapter explains Talis daemons, processes provided by Talis that run constantly on the computer.
Upon completing this chapter, you should be able to:
Stop and start Talis demons, and check if they are running
Understand daemons reports
10.2 Introduction
A daemon is a process that is theoretically, running constantly on the computer. The cron process is an example of a system related daemon.
Talis provide a number of processes, which interact with the prod_talis database. They regularly search for changes to the database requiring action.
For example, these real-time daemons must be running when Cataloguing or Acquisitions work is likely to be carried out. They run in the background and continually monitor and process any waiting records (such as orders which are to be transmitted via EDI or catalogue records which are to be added to Talis Base).
10.3 The daemons
The Talis daemon executable files reside in the directory /usr/opt/blcmp/talis/bin.
10.3.1 work_exp_dae
The work exporter daemon transmits catalogued works with „Contribute‟ status to Talis Base. This must be running to enable access to catalogue records and to ensure works appear the following day in the Talis OPACs.
10.3.2 authorisor_dae (pre Alto 4.1)
The authorisor daemon processes works created or edited in Talis. It must be running to enable access to catalogue records and to ensure works will appear in the OPACs. It builds authority records if Authority Control is implemented, but must still be running even if authority control is not employed.
10.3.3 authority_ap (pre Alto 4.1) The authority_ap daemon adds cross references to the old OPAC. The daemon is usually run from the cron after update_daily_access_points.
System Manager Beginner (UNIX) Student Guide
SUB-SG-001 Page 54
10.3.4 work_merge_dae (pre Alto 4.1)
The work merger merges Authority headings and updates headings in works. It need only be run if Authority Control is implemented.
10.3.5 ord_exp_dae
The order exporter daemon Transmits orders to the offices of Talis for forwarding on to suppliers. If EDI has been implemented then this daemon must be executed.
The work_merge and authorisor daemons no longer need to run in Alto 4.1
10.4 Stopping and starting Talis daemons
The ops user must be used when starting or stopping Talis daemons. This user has access to the required scripts. It is essential that daemons are always terminated by the same login that started them. If an attempt to run the scripts whilst logged in as a different user, errors will be reported.
10.5 Starting archive_daemon_reports
Talis daemons should be started using a script called archive_daemon_reports. You will need to edit this script to execute those Talis daemons appropriate to your deployment. The script can be found in the /usr/opt/blcmp/talis/utils/bin directory. The script carries out the following tasks:
1. It attempts to terminate any Talis daemons that may currently running.
2. It renames any existing Talis daemon report, log or error files.
3. It starts the Talis daemons using the dae_start command.
A line is included in the cron to run archive_daemon_reports before the start of work each day, which you may wish to edit to meet local requirements
Note: Talis daemons are not started automatically when the system is powered up or re-booted. In this circumstance it is recommended that you manually rename any daemon reports and then execute archive_daemon_reports.
10.5.1 An example cron line
0 8 * * 1-6 /bin/su - ops -c "archive_daemon_reports" >/dev/null 2>&1
10.5.2 Stopping (dae_term)
The script dae_term is used to terminate Talis daemons. This allows the daemon to cleanly conclude its current processing before terminating.
To stop a Talis daemon:
dae_term [daemon_name]
For example
System Manager Beginner (UNIX) Student Guide
SUB-SG-001 Page 55
dae_term ord_exp_dae
Talis daemons should be terminated each evening following library closure. This can be scheduled and automated through the cron. Lines are included in the cron at the time of installation, but these may need amendment to meet local circumstances. Any processing that has not been completed will be picked up by the daemons when they are next re-started.
10.5.3 Example cron lines
0 20 * * 1-6 /bin/su - ops -c "dae_term work_exp_dae" >/dev/null 2>&1 0 20 * * 1-6 /bin/su - ops -c "dae_term ord_exp_dae" >/dev/null 2>&1
Allowing Talis daemons to run overnight can lead to problems for the processes during subsequent processing. It is for this reason that archive_daemon_reports attempts to terminate the daemons prior to renaming reports and re-starting them.
10.6 Reports
10.6.1 Directory and names
Talis daemon output files are written to the /usr/opt/blcmp/talis/reports directory.
There are three potential output files per daemon:
1. [daemon_name].rep Lists transactions performed by the daemon.
2. [daemon_name].err Lists failed transactions and cause of failure.
3. [daemon_name].log Records start and stop time, and processing information.
Each time the daemons are started dae_start the existing output files are over-written. As they contain potentially useful information, it is appropriate to retain them for a period. To this end, the script archive_daemon_reports renames the report files on a daily basis.
10.7 Removal
If allowed to accumulate indefinitely, the output from Talis daemons will take up disk space. You may move or delete them manually. However, it is also possible to create a scheduled job to remove older files after a set number of days, e.g. the following cron line:
0 7 * * 1 /usr/bin/find /usr/opt/blcmp/talis/reports -mtime +30 -exec rm -f {} \; >/dev/null 2>&1
will delete files in the reports directory that are older than 30 days.
System Manager Beginner (UNIX) Student Guide
SUB-SG-001 Page 56
Note: This powerful command line can be copied and modified to delete older files from other directories, but should be used with extreme caution.
10.8 Checking Talis daemons
The following UNIX command will reveal if Talis daemons are running:
ps –ef | grep dae
- and you are recommended to check for daemon processes each morning.
The output will look similar to this
ops 4727 1 0 08:02:17 ? 0:01 ./work_merge_daeSunOS.exe ops 4719 1 0 08:01:36 ? 0:00 ./ord_exp_daeSunOS.exe ops 4715 1 0 08:01:16 ? 0:01 ./work_exp_daeSunOS.exe ops 4723 1 0 08:01:56 ? 0:03 ./authorisor_daeSunOS.exe
System Manager Beginner (UNIX) Student Guide
SUB-SG-001 Page 57
11. SQL
11.1 About this section
This chapter introduces Structured Query Language or SQL.
Upon completing this chapter, you should be able to:
Access and quit SQL
Bring a database online
11.2 Introduction
Structured Query Language or SQL, is the language understood by the Talis database. Talis system managers will have occasion to use it to access the database system directly to carry out various tasks. The Sybase version of SQL is known as isql or Interactive Structured Query Language.
11.3 Accessing SQL
Log in to a UNIX account for which the operating system prompt is visible (for example ops). Enter the following command line
isql -Usa -P
The SQL prompt will be returned which takes the form:
1>
As you enter SQL lines, the prompt number will be incremented. SQL statements are executed by using the go command.
11.4 Database connections
You can identify the processes currently accessing the database. At the SQL prompt enter:
sp_who go
11.5 Bringing a database online
When a database has been restored, it is necessary to make it available to users by bringing it online. This can be achieved at the SQL prompt by using the command:
online database {database}
For example, the tutor_talis database can be brought online by entering the following commands at the SQL prompt

System Manager Beginner (UNIX) Student Guide
SUB-SG-001 Page 58
online database tutor_talis go <Enter>
11.6 Quitting SQL
You may exit SQL by entering the following command at the SQL prompt:
quit <Enter>
This will return the UNIX command line prompt.
System Manager Beginner (UNIX) Student Guide
SUB-SG-001 Page 59
12. Database Checkers
12.1 About this section
This section describes a number of dbcc (Database Consistency Checker) scripts.
Upon completing this chapter, you should be able to:
Use the scripts to check the integrity of Sybase databases
12.2 Introduction
dbcc (Database Consistency Checker) scripts check the internal integrity of Sybase databases.
It‟s essential that they are run regularly against the main prod_talis database, and this has to be carried out when Talis is not in use. For this reason, both scripts are set up to run in the cron, usually on a Sunday.
12.3 checkdb and checkalloc
12.3.1 Issues with checkdb and checkalloc
There are two main issues with these scripts:
1. Library services (including any Web-based OPACs) must be suspended, as must any scheduled batch jobs. This is because the scripts must run in single-user mode (that is, no other processes can be accessing the database).
2. On older systems, or systems with extremely large databases, they can take many hours to run.
However, it is possible to overcome these difficulties:
1. The scripts can be run against a copy of the prod_talis database that has recently been loaded to a MIS machine.
2. Sybase 12 offers an alternative script called checkstorage, which is more efficient and substantially faster. See below for more detail.
12.3.2 Checking the Output
The names of the output files from checkdb and checkalloc are defined in the relevant cron line, but typically they will be called checkdb.log and checkalloc.log. Like the output from many of the security scripts, the files can be found in the /var/tmp directory.
You should ensure that the checkdb and checkalloc output files are checked after each run. You can use the grep command to search for Sybase error messages (they will contain the text Msg). For example:
System Manager Beginner (UNIX) Student Guide
SUB-SG-001 Page 60
$ grep Msg /var/tmp/checkdb.log
Msg 2506, Level 16, State 2: Msg 2524, Level 16, State 1: Msg 2506, Level 16, State 2: Msg 2524, Level 16, State 1:$
Any errors that you find should immediately be reported to Talis Support.
12.4 checkstorage
12.4.1 Description
Under Sybase 12, the database consistency checker (dbcc) has been improved. It is faster and the way in which it detects, records, and reports errors has been changed.
The checkstorage command can check the database even whilst it is in use, with minimal impact on performance. The results of the check are stored in a new database called dbccdb. When checkstorage has completed, new dbcc stored procedures can be used to generate reports based on the collected data.
12.4.2 Advantages of using checkstorage
The checkstorage command:
Does not lock tables for extended periods, which allows checkstorage to locate errors while allowing concurrent database access
Combines checks provided by other dbcc commands such as checkdb and checkalloc
Provides a description of used database space
Separates checking and reporting functions
Records checkstorage activity and results in the dbccdb database
12.4.3 Running checkstorage
Checkstorage should be run weekly. Log in as ops to run the command. The command takes no switches. It need only be run against prod_talis which it treats as the default database. To check the consistency of other databases, please use checkdb and checkalloc.
checkstorage creates an output file which is housed in the /var/tmp directory. The output file is called checkstorage.md.log where m is month and d is date.
In the light of the improved performance, checkstorage can usually be run against the live database in preference to the MIS machine. Seek advice from Talis Support.

System Manager Beginner (UNIX) Student Guide
SUB-SG-001 Page 61
12.4.4 Checking checkstorage output
The output file contains the start and end time of checkstorage. It will report any hard or soft errors in the database. An example of the critical line is shown below:
DBCC CHECKVERIFY for database 'prod_talis' sequence 3 completed at Oct 15 2002
2:18PM. 0 suspect conditions were resolved as faults, and 0 suspect conditions were
resolved as harmless. 0 objects could not be checked.
If any conditions are identified as faults or suspect, this should be reported to Talis Support.
12.5 Maintaining the dbccdb database
The dbccdb database requires the regular removal of old data to clear free space for the checkstorage output. dbccdb will fill if data is not discarded. The checkstorage command writes its results to the dbccdb system tables. The sp_dbcc_deletehistory stored procedure deletes old data. It is important to run this regularly (typically weekly).
12.5.1 sp_dbcc_deletehistory
This stored procedure can be executed from an isql prompt. You should use the dbccdb database.
The stored procedure is executed with the command:
sp_dbcc_deletehistory [“delete_date”[,”database_name”]]
Where:
delete_date deletes all checkstorage data up to and including the delete_date. If not specified, only the latest checkstorage output is retained.
database_name specifies the database name for which the checkstorage data is to be deleted. If not supplied data is deleted for the databases in the dbcc_config table.
For example:
sp_dbcc_deletehistory “01 Jan 2002”,”prod_talis”
12.6 checkstorage, checkdb or checkalloc?
checkstorage is preferred in preference to checkdb and checkalloc under the following circumstances:
If checkdb and checkalloc take a combined time in excess of 5 hours to run.
If your machine can afford the additional memory and disk space requirement demanded by checkstorage (notably the creation of the dbccdb database). You must be running Sybase 12.
However, be aware that if checkstorage does reveal errors, then it may be necessary to run checkdb or checkalloc to resolve them.

System Manager Beginner (UNIX) Student Guide
SUB-SG-001 Page 62
13. update_stats
13.1 About this section
This section describes the update_stats script, a script that ensures that the information contained in the statistics pages of the tables is kept up to date.
Upon completing this chapter, you should be able to:
Understand how Sybase extracts data from tables
Run the update_stats script
13.2 Introduction
The Talis library management applications access Sybase relational databases, which consist of numerous tables. Each table holds data of a particular type such as Loans or Borrowers. Each time new data is added, a new row is inserted in the appropriate table. Rows can also be updated when changes are made to existing data.
Sybase has two methods of extracting data from tables:
Table scanning: Sybase searches through the relevant table, starting at the first row, until it reaches the data it needs. As some tables have many rows, this can be very time consuming. On the other hand, if the table has few rows, this can be an efficient method of searching.
Indexes: Most tables have associated indexes, which Sybase uses to find the data it needs.
13.3 How update_stats works
Sybase calculates the most efficient way of conducting a search on the basis of information held in an area known as the statistics page for each table in the database. As rows are inserted or updated in the table, the information in the statistics page becomes out of date; accordingly calculations of the most efficient way to search may become invalid. This can result in searches being conducted by scanning each row in the table in turn in large tables, rather than using an index.
The update stats script ensures that the information contained in the statistics pages of the tables is kept up to date. This prevents long response times and consequent degradation of system performance.
13.3.1 Running update_stats
The script should be run regularly, ideally once a week when the Talis system is not in use. The script should be automated through the cron scheduling tool. The output from update_stats should be directed into a log file.
System Manager Beginner (UNIX) Student Guide
SUB-SG-001 Page 63
The script uses the following syntax:
update_stats [database name] [table name(s)]
The database name is mandatory. It does not default to prod_talis.
It is not necessary to specify table names. If no table name is entered, the statistics pages will be updated for all tables (including those which have not changed). Individual table names can however be entered as arguments to the script.
13.4 Creating a log file
You are strongly advised to create a log file when executing update_stats. This can be achieved by using UNIX re-direction in the command line thus:
update_stats prod_talis > /var/tmp/update_stats.log
You should check the log after each weekly run to confirm that it has completed successfully. The UNIX grep command can be used to quickly identify any lines in the log file that contain errors thus:
grep Msg /var/tmp/update_stats.log
13.5 Stored Procedures
The update_stats script also sets a flag against all the stored procedures. The next SQL query which uses a stored procedure will cause it to re-compile. This process is invisible and has no impact on the system.
System Manager Beginner (UNIX) Student Guide
SUB-SG-001 Page 64
14. Tutor system
14.1 About this section
This chapter explains what the tutor database is.
Upon completing this chapter, you should be able to:
Backup a database
Restore a database
14.2 What is the tutor system?
Talis systems are shipped with a tutor environment in place. As the name suggests, the primary purpose of the tutor_talis system is for training. Staff can use this tutor_talis environment to test changes before applying them to the live system, for example, amending parameters. Upgrades to Talis software may also be carried out on tutor_talis first, thus allowing staff to familiarise with new functionality.
14.3 Environment
The tutor_talis database resides on the same machine as the live Talis database (prod_talis). The database is a Sybase relational database and is called tutor_talis. Just as the main prod_talis database has a related meta database, so does the tutor system, in this case it is called tutor_meta.
When shipped, the tutor_talis database contains approximately a thousand example bibliographic records. You will be expected to populate it with dummy borrower and item records prior to your initial circulation training.
14.4 Logging in
tutor_talis can be accessed via Talis Alto. Add the tutor_talis database as a target by using the Set Alto Database application.
14.4.1 Talis Alto
If tutor_talis is not chosen as the default database, you will need to click on the Change Database button at the login dialogue. Once returned to the login dialogue, enter tutor_tali as your User ID (note the absence of the final „s‟) and enter the correct password and choose your site.
If the tutor_talis database is not visible when you use Change Database, you will need to create a new database target through the Set Alto Database application.
System Manager Beginner (UNIX) Student Guide
SUB-SG-001 Page 65
14.5 Backing up and Restoring
14.5.1 Backing up the tutor_talis system
Once you have records entered into the tutor_talis database, you should secure it to tape. You can use the full_dbdump script to do this.
1. Load a tape into the drive.
2. Login as the ops user.
3. Enter the command:
full_dbdump -dtutor_talis
4. Follow the onscreen instructions.
5. Check the report for the full_dbdump by entering the commands
cd /var/tmp pg fulldbdump.[YYYYMMDD].log.[Count]
where Count reflects the number of security dumps carried out on that date. Use <newline> to page down through the document
6. Take the tape out and label it with details of the dump (tutor_talis and the date).
14.5.2 Restoring the tutor_talis system
You can use your backup to return the tutor_talis database to its original status, good for repeated training sessions such as Circulation cascade training.
To recover the tutor_talis database use the full_dbrestore script.
1. Load the tape in the drive.
2. Login as the ops user.
3. Enter the command:
full_dbrestore tutor_talis
4. Follow the onscreen instructions.
5. On completion of the restore, take the tape out of the drive.
6. To bring the database online so it can be accessed by staff, an SQL command must be entered. Enter the following lines at the numbered prompt:
isql -Usa -P 1> online database tutor_talis 2> go 3> quit
For more information on SQL, please refer to the SQL section of the Talis System Management course notes.
System Manager Beginner (UNIX) Student Guide
SUB-SG-001 Page 66
Remember to take a new backup of the tutor_talis database following any changes you make that you wish to retain, particularly following an upgrade to a new revision of Talis.

System Manager Beginner (UNIX) Student Guide
SUB-SG-001 Page 67
15. Implementing Talis Alto
15.1 About this section
This chapter explains how to install and maintain the Alto Application.
Upon completing this chapter, you should be able to:
Install Alto
Upgrade Alto
15.2 What is Talis Alto?
Talis Alto is a full PC client application using its own executable program. Talis Alto does not access the UNIX operating system directly, but it does need to connect to the Talis database. Talis Alto understands and uses Z39.89 search techniques, particularly when accessing Talis Base 2. It can be configured to access other external targets.
15.3 Requirements
The Talis database must be at version 12.2 or greater.
User PCs must have Talis Alto software installed.
User PCs must be able to access the Talis database and Talis Base.
The PCs must have minor configuration carried out following software installation. Specifically, a program called Set Alto Database must be executed to identify the Talis databases to which connection may be required. Typically, this is the prod_talis database. Additionally, it is necessary to know the IP or hostname of the machine on which the Talis database resides.
The Set Alto Database program can be accessed through the Windows Start Menu.
Talis Alto client software will also be loaded to the Talis database and the versions of this and the user PC software must match.
15.4 Installing Talis Alto
Talis Alto software for both database server and PC client can be downloaded from the Web at http://alto.talis.com . When Talis Alto is ordered, Talis will supply you with a login and password to allow you to download software.
If preferred, Talis Alto software can be downloaded from the Talis FTP server. Please contact Talis Support for details.
System Manager Beginner (UNIX) Student Guide
SUB-SG-001 Page 68
15.5 Database requirements
The database must have Sybase version 12 (or greater) installed. New tables, table changes, indexes and amended stored procedures have all been introduced.
The Talis database must be directly visible to the PC clients. To this end, port 2025 must be opened on the Talis machine.
15.6 Upgrading the database
Full instructions on installing Talis Alto and the appropriate directories to use can be found on the Talis Alto Web site. Access the Talis Alto Web site or Talis FTP server and download the following files onto your UNIX machine.
unixAlto.tar (database upgrade)
AltoZipfile.tar (client software to be stored within the database)
Login to the UNIX machine as the talis user, unwrap/tar unixAlto.tar. Stop all access to the database and take a database security using full_dbdump.
Run the server upgrade. This typically will take just a few minutes.
Unwrap/tar AltoZipfile.tar and secure the database once more (using a separate tape).
15.7 PC client requirements
Each Talis Alto PC must meet the following minimum specifications.
128MB RAM or more
300MHz processor or better
50MB spare disc space at least
Screen supporting 1024x768 screen resolution and 16bit colour or better
Windows XP or Windows 2003
MDAC 2.6 or higher
15.8 Installing Talis Alto PC software
A choice of two executable files is available in order to install Talis Alto to a PC:
manualSetup.exe
or
autoSetup.exe
The installation will create an Alto icon on the desktop and an Alto programme group beneath the Windows Start Menu.
When Talis Alto is called by double-clicking on the desktop icon, a comparison is made against the version of the software held in the database. If this does not match, the installation executable file that was chosen determines the subsequent action.
System Manager Beginner (UNIX) Student Guide
SUB-SG-001 Page 69
If manualSetup.exe is used, then the user will see a message advising them to contact the System Manager. The System manager will then have responsibility for installing the latest version of Talis Alto.
However, if the autoSetup.exe is used, the latest version of software will be downloaded from the database and installed to the PC automatically.
15.9 Set Talis Alto Database application
The Set Talis Alto Database application is accessible from the Alto Programme Group, which will have been added to the Windows Start Menu. You should use this to determine the databases that may be accessed from the PC.
Typically, Talis Alto should be set to access the prod_talis database, but you may wish it to be able to connect to other Talis databases such as tutor_talis.
When you use the Set Alto Database application, a file called DataSource.dat is created or edited on the PC. This file holds details of the databases that Talis Alto can connect to. Once created, you can copy this file to other Talis Alto PCs rather than having to run the Set Alto database following every Talis Alto PC installation.
15.10 Configure Talis Alto application
The Configure Talis Alto application is accessible from the Alto Program Group, which will have been created in the Windows Start Menu. You should use this to configure
Environment variables
Barcode validates
External databases and search options
User passwords
Web menu options
For further information, please refer to the online help available with the Configure Talis Alto online help.
15.11 Reference PC
The setting up of a reference PC is a requirement of your SLA (Service Level Agreement) with Talis. This will be used to support your Talis Alto deployment.
The PC should only be loaded with the Windows operating system and minimum driver software. A virgin install of Talis Alto should then be carried out.
The reference PC should be accessible by Talis support staff via remote access wherever possible. It may then be used as a point of reference to verify problems on other Talis Alto PCs.
System Manager Beginner (UNIX) Student Guide
SUB-SG-001 Page 70
It may also be used as a source for copying Talis Alto software and configuration files to other PCs. A further advantage is that upgrades to Talis Alto software may be tested against the reference PC.
15.12 Scripts and batch utilities
Talis provide a number of scripts that carry out system management functions at a database level (for example, updating Talis Prism indexes, processing catalogued records). Such scripts are executed at the UNIX operating system level on the Talis machine. Please note that Talis Alto does not remove the requirement to administer and execute these scripts.
System Manager Beginner (UNIX) Student Guide
SUB-SG-001 Page 71
16. Managing Alto Processes
16.1 About this section
This section describes the best way of monitoring Talis Alto‟s user connections.
Upon completing this chapter, you should be able to:
Check users connected to Alto
Shut down Alto cleanly, sending out notifications
16.2 Introduction
A database process is created whenever a user logs into an Alto application.
16.3 Monitoring Talis Alto activity
The Configure Talis Alto application includes a tab called Active Users. By clicking on the Continue button, all current Alto users will be revealed. User Ids will be displayed as will Location, IP address, PC Name and the application in use. An attribute or combination of attributes can also be used to filter the results prior to clicking the Continue button.
For further guidance, please use the F1 key whilst the Active Users tab is selected. This will provide detailed online help.
16.4 Shutting down Talis Alto sessions
You can automatically shutdown the Talis Alto sessions of all active users by sending a broadcast shutdown message. Once the system has been shutdown, new users will not be able to log into Talis Alto or the Configure Talis Alto application until the shutdown message is removed.
Please note that only users who have Send shutdown message enabled through the Parameter Management tab of Configure Alto will have visibility of the Shutdown tab.
You should further note that the enablement to Logon with shutdown must also be set to Yes. This is essential in order to allow subsequent removal of the shutdown message.
For full information, please use the F1 key whilst the Shutdown tab is selected. This will provide detailed Help. Help is also available on Parameter Management through Configure Alto.
System Manager Beginner (UNIX) Student Guide
SUB-SG-001 Page 72
17. Adding a new Talis Alto User
17.1 About this section
This chapter describes how to add users to Talis Alto.
Upon completing this chapter, you should be able to:
Add a new user to the database
How to configure Talis Alto for new users
17.2 Introduction
The following procedure describes how to add a new user to Talis Alto and further, how to configure Talis Alto for that user. Please note that this assumes that these users do not have a prior account to use Talis Text.
17.3 Adding a new user to the database
1. Open the Configure Alto application.
2. Login as a user with appropriate enablements.
3. Navigate to Parameter Management | Names |Operators | Operators .
4. Click on the Insert button.
5. This will insert a new row allowing you to add a new Login ID (or user) and link it to an Operator Profile.
6. Save your changes and close the Configure Alto application.
17.4 Setting the user password
When set, Talis Alto user passwords are stored (encrypted) within the Talis database.
1. Open the Configure Alto application.
2. Navigate to Operators.
3. Choose the newly-created user from the drop-down list and set the password.
4. Save your changes and close the Configure Alto application
17.5 Creating new enablements
Enablements control which areas of Alto an operator has access to.
1. Open the Configure Alto application.
2. Navigate to Parameter Management |Permissions |Names .
3. Insert the new enablement profile name.
System Manager Beginner (UNIX) Student Guide
SUB-SG-001 Page 73
4. Save your changes.
5. Navigate to Parameter Management |Permissions | Rules
6. Select the new enablement profile from the drop down and enable the options appropriately.
7. Save your changes and close the Configure Alto application.
17.6 Making locations visible
Appropriate user enablement links must also be set up through the parameters interface. Without this, locations will not be visible at initial login to Talis Alto users.
1. Open the Configure Alto application.
2. Login as a user with appropriate enablements.
3. Navigate to Parameter Management | Permissions | Enablements Link .
4. Ensure that the Operator Profile used by your newly created user is linked to a Site Profile and an Enablement [profile]. Create an appropriate link if one does not exist. You may create additional links if required.
5. Save your changes and close the Configure Alto application.
17.7 Setting environment variables
Environment variables in Talis Alto can be set to apply to all users or can be specific to individual user accounts. Once set, such variables are stored in the Talis database and are applicable to the Talis Alto user, regardless of which PC they work at.
17.7.1 Setting global variables
1. Open the Configure Alto application.
2. Choose the Environment Variables tab, then choose Global variables from the drop-down list. Set variables as appropriate. These variables will then be applicable to all Talis Alto users.
3. Save your changes and close the Configure Alto application.
17.7.2 Setting user specific variables
1. Open the Configure Alto application.
2. Choose the Environment Variables tab, then choose the user you wish to set variables for from the drop-down list. Set variables as appropriate. These variables will then be applicable to the specified user in addition to any global variables. A variable previously defined in global settings will be over-ridden if set for a specified user.
3. Save your changes and close the Configure Alto application.
System Manager Beginner (UNIX) Student Guide
SUB-SG-001 Page 74
17.8 User locking
If a user makes a number of unsuccessful attempts to log in to Talis Alto, that user will be locked out of the application. By default the number of unsuccessful login attempts allowed before the user account is locked is set to 5. This number can be over-ridden by setting the environment variable. Where this occurs, the intervention of the System Manager is required to free the account.
The TAL_PASSWORD_MAX_ATTEMPTS variable can be set for each individual user or for all users by setting using Global Default.
17.8.1 Unlocking a user account
Locked user accounts may be released through the Configure Alto application.
1. Open the Configure Alto application.
2. Login as a user with appropriate enablements.
3. Navigate to Parameter Management | Rules | Operators |Operators.
4. Identify the locked user and click on the cell in the Locked column. Set this to No.
5. Save your changes.
6. You may also need to change the user‟s password (see above).
7. Close the Configure Alto application
System Manager Beginner (UNIX) Student Guide
SUB-SG-001 Page 75
18. Environment Variables
18.1 About this section
This chapter explains environment variables, which are used to establish components of the user‟s working environment.
Upon completing this chapter, you should be able to:
Set UNIX environment variables
Set Talis environment variables
18.2 Introduction
An environment variable defines an aspect of a Talis user‟s environment that can vary. Usually set during the login procedure, an environment variable establishes some component of the user's working environment, such as the database to be used, or text editor to be used. Since they are preset values specific to a given user, they save time that would be otherwise used defining values at each login. Many variables affect the way in which Talis works for that user.
18.2.1 UNIX environment variables
The UNIX shell uses environment variables can send information about the user‟s environment (such as the current working directory) to programs being run. The environment variable can then be passed on to any program that is not built into the shell, and can be consulted, or modified by the program.
18.2.2 Talis Alto environment variables
Talis Alto also uses environment variables. These are held within the Talis database and added for a user using the Configure Alto application.
18.3 Setting Environment Variables in UNIX
By convention, environment variables are entered in uppercase.
Variables are only valid in the shell in which they are defined, and since running any subsequent program or process generates a new shell, it is essential to export them after setting them. This is achieved by use of the export command. For example:
PS1=”talis$ ; export PS1
This allows the variable to be carried into any programs that the user executes. Environment variables are normally set up when a user logs in to UNIX. The files in which variables are set, are read in as the user starts a UNIX session. Such files may affect all users, a section of users or may be user specific.
System Manager Beginner (UNIX) Student Guide
SUB-SG-001 Page 76
18.3.1 Files containing variables
/etc/profile
This is the UNIX system profile. This contains global environment variables which affect all users.
/users/{login-name}/.profile
For example, /users/talis/.profile . This is where environment variables are set for an individual user, enabling user-specific values to be set. Variables set in this file will override previously set environments.
18.3.2 Identifying your environment
To identify those environment variables that are currently defined, use the env command.
18.4 UNIX environment variables
The following are examples of environment variables that have specific meaning to the UNIX operating system:
UNIX environment variables Description
PATH A list of directories that will be searched when executing a command.
PS1 The UNIX command prompt. By default this is „$’.
HOME The user‟s home directory.
LOGNAME The user id of the current shell. This variable is often used by a script or program, in order to determine which user is executing it.
TZ The time zone for the current session.
18.5 Talis environment variables
Some environment variables have been developed by Talis to have a specific meaning to a Talis program when it runs. As the variables are carried into the program, they will affect the way in which the application works. Talis makes heavy use of such variables to control or customise its operation. The application or file in which you set the variables will determine which Talis users they affect.
Normally these environment variables will be set through the Configure Talis Alto application or the user‟s unique UNIX .profile, but they can be entered manually for a one-off session or to test their use.
Some Talis environment variables are general purpose, whilst others are specific to a functional area.
System Manager Beginner (UNIX) Student Guide
SUB-SG-001 Page 77
18.6 General environment variables
The following are examples of general Talis environment variables:
UNIX environment variables Description
BLCMP_HOME The directory which the Talis script searches for BLCMP and Talis directories.
TAL_DAEMON_DIR The directory for Talis daemons.
TALIS_HOME The directory for the majority of Talis software
TAL_DEFAULT_DBNAME Determines which database will be used by the Talis program. Typically this is prod_talis.
TAL_LOCATION Sets user‟s location (or library site) at login.
18.7 Functional area variables
The following are just a few examples of Talis function specific environment variables. Definitions of these variables can be found in the Talis Alto online help.
OPAC
TAL_CANCEL_WAITING_RES
TAL_DEWEY_ON
TAL_LC_ON
TAL_NO_CLASS
TAL_NO_BACK_BROWSE
TAL_OPAC_WANTS_NOTE
TAL_TYPE_AHEAD
Circulation
TAL_AUTOCHOP
TAL_BOOKING_AUTOSHELF
TAL_BOOKING_INTERCEPT
TAL_BOOKING_NOBORRLIST
TAL_BOOKING_SHELF
TAL_BOOKING_NO_SLOT
TAL_HOUSEBOUND
Acquisitions
TAL_RECEIPT_STATUS
TAL_ORD_NO_ITEMS
System Manager Beginner (UNIX) Student Guide
SUB-SG-001 Page 78
18.8 Personal environment variables
It is of course possible to set up your own personal variables in UNIX. These can be made available each time you login by including them in the .profile in your own home directory. Remember to include the export command in the line.
18.9 Setting environment variables in Talis Alto
Both UNIX and personal environment variables may not be set for use with Talis Alto as they are not needed. Only Talis environment variables have any significance when using Talis Alto. These are set using the Configure Alto application, which is accessible through the Windows Start Menu.
Choose the Environment tab and pick the user you wish to apply an environment variable to from the drop-down list. To add a new variable click the Add New button and complete the resulting dialogue box.
For information on environment variables, press F1 to invoke the Help system. This contains a listing of variables and their purpose.
Any variables assigned to the Global default user will be applied to all Talis Alto users, thus reducing the need to duplicate common variables against specific users.
System Manager Beginner (UNIX) Student Guide
SUB-SG-001 Page 79
19. Local catalogue
19.1 About this section
This chapter introduces the local catalogue and discuss the ways that the indexes are kept current.
Upon completing this chapter, you should be able to:
Understand the difference between LMS and Zebra indexes
Complete an LMS index rebuild
Complete a Zebra index rebuild
19.2 Introduction
The Online Public Access catalogue (OPAC) is your local Talis catalogue. The library users are most likely to access the OPAC through the Web-based product Talis Prism. Access to Talis Prism can be made available through Talis Alto. Bibliographic searching of the catalogue is also available through Talis Alto.
The OPAC contains Bibliographic and Item information. Bibliographic records (sometimes called Bib or Work records) can be taken from the central database Talis Base, or created locally using Cataloguing or Quick Manage Work. Bib records added through Quick Manage Work are held on the Local Catalogue and can be contributed like other records.
19.3 Architecture
The OPAC is based on the two types of indexes:
The Zebra indexes used extensively in Talis Prism and to support Bibliographic searching in Alto. (They also support Authority search too.) These are held in the UNIX file system (that is, externally to the Sybase database).
The LMS indexes only used in Talis Prism by the browse facility. These are held in tables in the Sybase database.
Both types of indexes need to be maintained to reflect new additions to stock, deletions or changes to existing bib records. Occasionally they may need to be rebuilt. Different mechanisms are used to achieve this for each of the two types of index. These are documented in the following sections
19.4 Updating and re-building the Zebra indexes
New additions to stock and deletions or changes to existing bib records are reflected back into the Zebra indexes using the marcgrabber process. Each time it runs, the
System Manager Beginner (UNIX) Student Guide
SUB-SG-001 Page 80
marcgrabber reads its configuration file which determines whether or not it is updating (delta mode) or rebuilding (initial or build mode) the indexes.
The parameter file also determines whether or not the authority indexes are updated or rebuilt. By default they are included.
19.4.1 MARC 21 tags
There is no interface for amending the MARC 21 tags which are indexed in the Zebra indexes. A full list of all MARC 21 tags indexed can be found on the Talis Alto 4.1 Index Maintenance Manual on the Talis Lyra Pages (http://www.talis.com/lyra).
19.4.2 Updating the Zebra indexes
In the standard implementation the marcgrabber process runs on the LMS server in the background every 30 seconds. Sometimes it is scheduled to run less frequently for performance reasons.
When updating the indexes (delta mode) the marcgrabber does three things:
1. It runs the make collection daemon to add bib records in the appropriate collection.
2. It extracts MARC21 data (grabber process).
3. It runs the zebraidx process to update the zebra indexes.
19.4.3 Checking the parameter file for the marcgrabber The marcgrabber is controlled by a parameter file which it reads each time it starts to run. The parameter file can be found at:
/scratch/altoindexes/marcgrabber_daemon_<database>.cfg
It will look similar to the following:
MCOLL=1
KILL_WAIT=300
LOGLEVEL=fatal
GRAB_MODE=delta
INDEX_MODE=delta
INDEXES='bib auth' If the parameter file contains a line “DELAY = <value>”, this determines the length of time in seconds the marcgrabber waits between each run. By default the line does not appear and the marcgrabber runs every 30 seconds.
Note: More details about the contents of the parameter file can be found in the Talis Alto 4.1 Index Maintenance Manual on the Talis Lyra Pages (http://www.talis.com/lyra).
19.4.4 Checking the parameter file for the marcgrabber
There are three sets of logs which can be checked for the marcgrabber which correspond to the three stages it goes through:
System Manager Beginner (UNIX) Student Guide
SUB-SG-001 Page 81
Mcoll_dae logs
In /usr/opt/blcmp/talis/reports the mcoll_dae reports exist as before: mcoll_dae.log, mcoll_dae.rep and mcoll_dae.err. However as the mcoll_dae.log and mcoll_dae.rep are overwritten each time (the mcoll_dae.err is only overwritten if there is a problem), the marcgrabber script copies the existing files, appending them to mcoll_dae_history.log, mcoll_dae_history.rep and mcoll_dae_history.err in the same directory.
Note: If there are problems with the mcoll daemon then records will appear in Alto Bib search but not on Prism.
Marcgrabber logs (summary of the marcgrabber’s activities)
In /var/tmp the marcgrabber appends to two log files:
marcgrabber_daemon_<database>.out Summarises the marcgrabber progress.
grab_delta_<database>.log Provides more details of the grabbing process provided the logging level is high enough. See the Talis Lyra Pages (http://www.talis.com/lyra) for more details about logging levels.
A sample section of the marcgrabber_daemon_<database>.out looks as follows:
Sun Apr 1 23:35:35 BST 2007 Sun Microsystems Inc. SunOS 5.8 Generic Patch
December 2002
Sun Apr 1 23:35:35 BST 2007 stty: : No such device or address
Sun Apr 1 23:35:35 BST 2007 stty: : No such device or address
Sun Apr 1 23:35:35 BST 2007 Executing /usr/opt/blcmp/talis/mcoll_daeSunOS.exe
Sun Apr 1 23:35:47 BST 2007 Sun Microsystems Inc. SunOS 5.8 Generic Patch
December 2002
Sun Apr 1 23:35:47 BST 2007
/scratch/altoindexes/marcgrabber_daemon_prod_talis.cfg.lck:
No such file or directory
Sun Apr 1 23:35:47 BST 2007 /usr/local/marcgrabber/libexec/marcgrabber -v3 -
l/var/tmp
/grab_delta_prod_talis.log -c/usr/local/marcgrabber/etc/marcgrabber.cfg
Indexing logs (indexing the data)
In /var/tmp, the zebraidx process writes to two files:
zebra_bib_index_<database>.log - relating to the indexing of bib records)
zebra_auth_index_<database>.log - relating to the indexing of authority records)
These reports often contain lots of information. A sample section of the zebra_bib_index_<database>.log would appear as follows.
15:31:54-12/10 zebraidx(6875) [log] zebra_start 2.0.7
/usr/local/idzebra/etc/zebra_bib.cfg
15:31:54-12/10 zebraidx(6875) [log] enabling shadow
spec=/scratch/altoindexes/bib/shadow:8G
15:31:54-12/10 zebraidx(6875) [log] cache_fname =
/scratch/altoindexes/bib/shadow/cache
15:31:54-12/10 zebraidx(6875) [log] dir
/scratch/altoindexes/dump/delta/bib/prod_talis/norm
15:31:54-12/10 zebraidx(6875) [log] key_block_create t=1
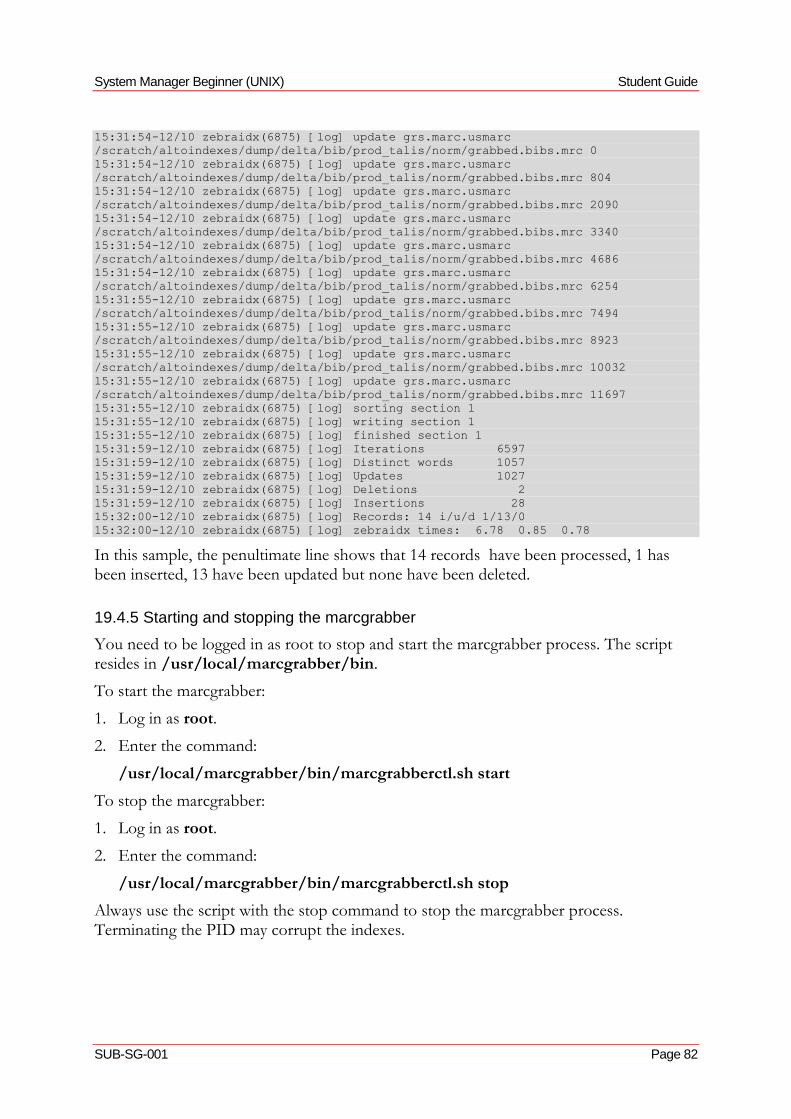
System Manager Beginner (UNIX) Student Guide
SUB-SG-001 Page 82
15:31:54-12/10 zebraidx(6875) [log] update grs.marc.usmarc
/scratch/altoindexes/dump/delta/bib/prod_talis/norm/grabbed.bibs.mrc 0
15:31:54-12/10 zebraidx(6875) [log] update grs.marc.usmarc
/scratch/altoindexes/dump/delta/bib/prod_talis/norm/grabbed.bibs.mrc 804
15:31:54-12/10 zebraidx(6875) [log] update grs.marc.usmarc
/scratch/altoindexes/dump/delta/bib/prod_talis/norm/grabbed.bibs.mrc 2090
15:31:54-12/10 zebraidx(6875) [log] update grs.marc.usmarc
/scratch/altoindexes/dump/delta/bib/prod_talis/norm/grabbed.bibs.mrc 3340
15:31:54-12/10 zebraidx(6875) [log] update grs.marc.usmarc
/scratch/altoindexes/dump/delta/bib/prod_talis/norm/grabbed.bibs.mrc 4686
15:31:54-12/10 zebraidx(6875) [log] update grs.marc.usmarc
/scratch/altoindexes/dump/delta/bib/prod_talis/norm/grabbed.bibs.mrc 6254
15:31:55-12/10 zebraidx(6875) [log] update grs.marc.usmarc
/scratch/altoindexes/dump/delta/bib/prod_talis/norm/grabbed.bibs.mrc 7494
15:31:55-12/10 zebraidx(6875) [log] update grs.marc.usmarc
/scratch/altoindexes/dump/delta/bib/prod_talis/norm/grabbed.bibs.mrc 8923
15:31:55-12/10 zebraidx(6875) [log] update grs.marc.usmarc
/scratch/altoindexes/dump/delta/bib/prod_talis/norm/grabbed.bibs.mrc 10032
15:31:55-12/10 zebraidx(6875) [log] update grs.marc.usmarc
/scratch/altoindexes/dump/delta/bib/prod_talis/norm/grabbed.bibs.mrc 11697
15:31:55-12/10 zebraidx(6875) [log] sorting section 1
15:31:55-12/10 zebraidx(6875) [log] writing section 1
15:31:55-12/10 zebraidx(6875) [log] finished section 1
15:31:59-12/10 zebraidx(6875) [log] Iterations 6597
15:31:59-12/10 zebraidx(6875) [log] Distinct words 1057
15:31:59-12/10 zebraidx(6875) [log] Updates 1027
15:31:59-12/10 zebraidx(6875) [log] Deletions 2
15:31:59-12/10 zebraidx(6875) [log] Insertions 28
15:32:00-12/10 zebraidx(6875) [log] Records: 14 i/u/d 1/13/0
15:32:00-12/10 zebraidx(6875) [log] zebraidx times: 6.78 0.85 0.78
In this sample, the penultimate line shows that 14 records have been processed, 1 has been inserted, 13 have been updated but none have been deleted.
19.4.5 Starting and stopping the marcgrabber
You need to be logged in as root to stop and start the marcgrabber process. The script resides in /usr/local/marcgrabber/bin.
To start the marcgrabber:
1. Log in as root.
2. Enter the command:
/usr/local/marcgrabber/bin/marcgrabberctl.sh start
To stop the marcgrabber:
1. Log in as root.
2. Enter the command:
/usr/local/marcgrabber/bin/marcgrabberctl.sh stop
Always use the script with the stop command to stop the marcgrabber process. Terminating the PID may corrupt the indexes.
System Manager Beginner (UNIX) Student Guide
SUB-SG-001 Page 83
19.4.6 Rotating the log files for the Zebra indexes
The log files for the zebra process grow very quickly so it is important to rotate them on a regular basis. See the Solution: “How do I set up logrotate” for more information. The logs should be rotated at least once per week.
The following logs should be rotated:
In /usr/opt/blcmp/talis/reports:
mcoll_dae_history.log
mcoll_dae_history.rep
mcoll_dae_history.err
In /var/tmp:
marcgrabber_<database>.out
zebra_bib_index_<database>.log
zebra_auth_index_<database>.log
grab_delta_<database>.log
19.4.7 Rebuilding the Zebra indexes
Changes to OPAC collections (also referred to as Mindexes) or indexing criteria will require a complete rebuild of the zebra indexes. The marcgrabberctl.sh is used to set the marcgrabber to build mode to achieve this.
Rebuilding the zebra indexes could impact the general performance of the system so should be completed at a quiet time on the system. The time required is variable depending on a variety of factors, including the processing power, memory and disk space of your hardware, the number of collections, and the number of Work records to be processed. The space required is also dependent on a number of factors. If you have concerns about disk space then contact the Service desk for advice on this.
If you would like the job to run overnight it‟s a good idea to create a script which can then be put into the cron. This section describes the steps to go through to rebuild the indexes and then the things to include in the script.
When rebuilding the indexes (initial or build mode) the marcgrabber does two things:
1. It extracts MARC21 data
2. It runs the zebraidx process to build the zebra indexes
Once the rebuild is complete the marcgrabber will automatically go into update mode.
Note: If you are adding a new collection you will need to run auto_access_points first to ensure all bib records are processed by the mcoll daemon.

System Manager Beginner (UNIX) Student Guide
SUB-SG-001 Page 84
19.4.8 Availability of Zebra indexes during the rebuild
During the index rebuild staff and Prism users will not be able to search the Zebra indexes, they will see “ZOOM ERROR” messages instead. It is possible to point Talis Prism at the LMS indexes temporarily so that they are unaffected by this process. See the Talis Solution “Switching Prism to the old indexes” under Talis Prism 2.1 section.
19.4.9 Securing the zebra indexes
Because the zebra indexes reside in the UNIX file system they will usually be secured as part of a full_softdump or ufs dump. Generally they are comparatively quick to rebuild and therefore it is not usually essential to secure them before starting a rebuild.
19.4.10 Steps to complete when rebuilding the zebra indexes
1. Login as root and stop the marcgrabber using:
/usr/local/marcgrabber/bin/marcgrabberctl.sh stop
2. Empty the log files (so it is easier to see what is going on) using the commands:
>/var/tmp/zebra_auth_index_prod_talis.log >/var/tmp/zebra_bib_index_prod_talis.log >/var/tmp/grab_initial_prod_talis.log
3. Login as root and set the marcgrabber to build mode:
/usr/local/marcgrabber/bin/marcgrabberctl.sh build
4. Login as root and start the marcgrabber:
/usr/local/marcgrabber/bin/marcgrabberctl.sh start
19.4.11 Checking the progress of the rebuild of the zebra indexes
You can check the progress of the build by looking at a number of files.
Periodically look at the marcgrabber parameter file. It will show when the process has switched from initial or build mode to delta (update) mode. (i.e. the build has completed). To do this, enter the command:
pg /scratch/altoindexes/marcgrabber_daemon_<database>.cfg
For more detailed information about how the build is progressing, you can check the following:
The progress of the grab stage. To do this, enter the following commands:
cd /var/tmp grep "Grab range" grab_initial_prod_talis.log
It will return lines similar to the following:
<info> Mon Jul 16 10:08:42 2007: [Launch] Grab range is from WID: 0 to WID:
200000
<info> Mon Jul 16 10:11:40 2007: [Launch] Grab range is from WID: 200001 to WID:
400000
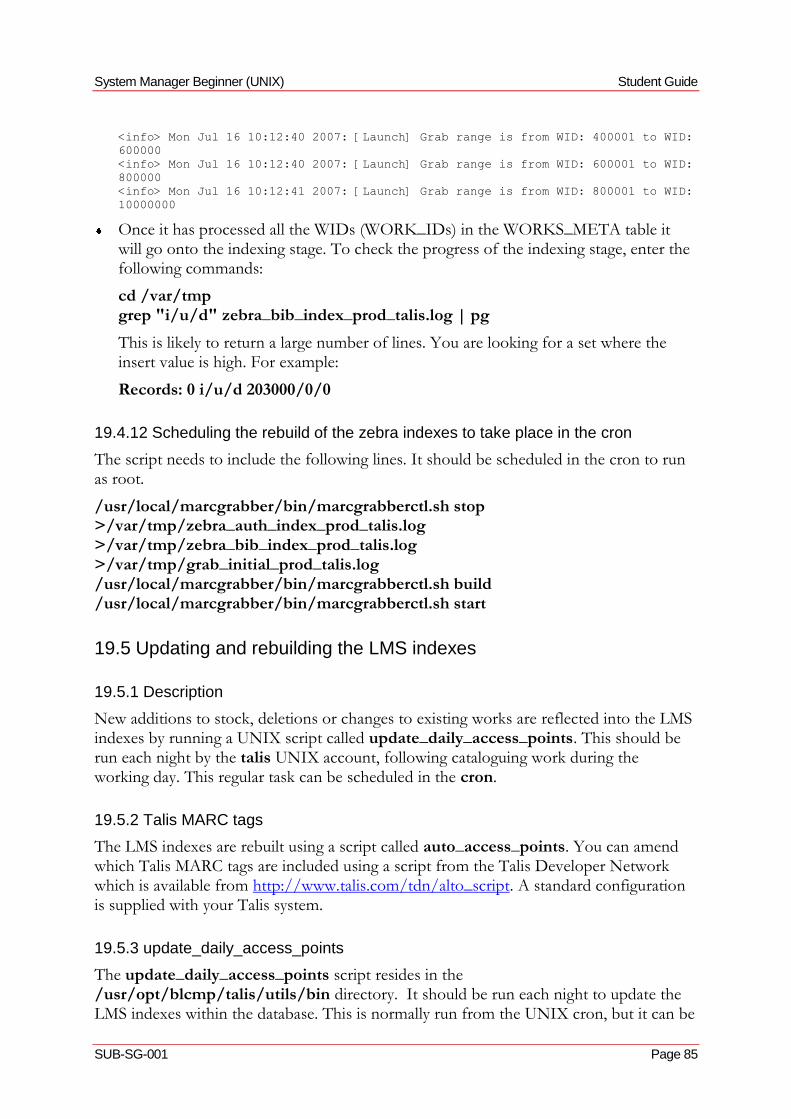
System Manager Beginner (UNIX) Student Guide
SUB-SG-001 Page 85
<info> Mon Jul 16 10:12:40 2007: [Launch] Grab range is from WID: 400001 to WID:
600000
<info> Mon Jul 16 10:12:40 2007: [Launch] Grab range is from WID: 600001 to WID:
800000
<info> Mon Jul 16 10:12:41 2007: [Launch] Grab range is from WID: 800001 to WID:
10000000
Once it has processed all the WIDs (WORK_IDs) in the WORKS_META table it will go onto the indexing stage. To check the progress of the indexing stage, enter the following commands:
cd /var/tmp grep "i/u/d" zebra_bib_index_prod_talis.log | pg
This is likely to return a large number of lines. You are looking for a set where the insert value is high. For example:
Records: 0 i/u/d 203000/0/0
19.4.12 Scheduling the rebuild of the zebra indexes to take place in the cron
The script needs to include the following lines. It should be scheduled in the cron to run as root.
/usr/local/marcgrabber/bin/marcgrabberctl.sh stop >/var/tmp/zebra_auth_index_prod_talis.log >/var/tmp/zebra_bib_index_prod_talis.log >/var/tmp/grab_initial_prod_talis.log /usr/local/marcgrabber/bin/marcgrabberctl.sh build /usr/local/marcgrabber/bin/marcgrabberctl.sh start
19.5 Updating and rebuilding the LMS indexes
19.5.1 Description
New additions to stock, deletions or changes to existing works are reflected into the LMS indexes by running a UNIX script called update_daily_access_points. This should be run each night by the talis UNIX account, following cataloguing work during the working day. This regular task can be scheduled in the cron.
19.5.2 Talis MARC tags
The LMS indexes are rebuilt using a script called auto_access_points. You can amend which Talis MARC tags are included using a script from the Talis Developer Network which is available from http://www.talis.com/tdn/alto_script. A standard configuration is supplied with your Talis system.
19.5.3 update_daily_access_points
The update_daily_access_points script resides in the /usr/opt/blcmp/talis/utils/bin directory. It should be run each night to update the LMS indexes within the database. This is normally run from the UNIX cron, but it can be
System Manager Beginner (UNIX) Student Guide
SUB-SG-001 Page 86
started manually. It is not essential that all users are logged off before running this, although they may experience a slight degradation in performance whilst it is running.
This script calls two daemon processes. The first is mcoll_dae, which identifies which collections works should be part of; the second is access_points_dae, which assigns works to LMS indexes.
Starting update_daily_access_points
1. Logon to UNIX as ops
2. Enter the command:
update_daily_access_points
Checking update_daily_access_points
You must check first thing in the morning that update_daily_access_points has completed successfully. This can be checking the access_points_dae.log file beneath the /usr/opt/blcmp/talis/reports directory. This directory also contains a report file:
19.5.4 access_points_dae.log
This log gives an account of when the process was started. It indicates that the access_points daemon is running in update mode and shows the number of works read so far. If there are large numbers of works then a fresh line will be started for each successive 1,000 works processed. Providing this daemon has been terminated legally, the final line of the log will indicate the date and time when it was stopped.
19.5.5 access_points_dae.rep
This indicates the number of records processed, the speed with which they were processed and the number of updates to the various LMS database indexes.
19.5.6 Interrupting update_daily_access_points
You can check whether update_daily_access_points is still running by entering ps -ef | grep access at the UNIX prompt.
Should you need to do so, update_daily_access_points can safely be interrupted by terminating the process. However, the source of the delay in completing the process should be identified, as any unprocessed works will be carried over to the next run. As such, the delay is likely to re-occur.
19.5.7 auto_access_points
Changes to OPAC collections (also referred to as Mindexes) or indexing criteria will mean that the mcoll daemon should be run against all the bib records. This can be achieved by running the UNIX script called auto_access_points.
System Manager Beginner (UNIX) Student Guide
SUB-SG-001 Page 87
auto_access_points regenerates the LMS indexes, and should be executed with no other processes running against the system, and when there is sufficient time for it to complete. The time required is variable dependent upon a variety of factors, including the processing power, memory and disk space of your hardware, the number of collections, and the number of Work records to be processed.
19.5.8 Subordinate processes
The auto_access_points script calls two main processes:
mcoll_dae (builds the collections)
access_points_dae (rebuilds the LMS indexes)
It also calls the build_opac script with a number of default conditions. By default this will build all indexes. The build_opac script can be run independently if it is necessary to run indexes on an individual basis. For example:
build_opac –sscratch –make_collection –author –title -keyword -class –number –READONLY –LOADONLY
where:
–READONLY specifies that the data will be extracted and processed, but the revised data should not be loaded into the Talis database
and
–LOADONLY specifies that the processed data files should be loaded.
19.5.9 auto_access_points checklist
The following should be considered before running aurto_access_points
Take a backup of the prod_talis database using full_dbdump.
If possible, ensure that sufficient time is available to complete the run. The report file from any previous LMS index re-build may still be available to view. If so, it will be found in the /scratch directory and is called access_points.report. It will include start and end times of previous runs. However, be aware that adding a new collection or new MARC tags as access points, can make a significantly increase the time taken to complete the process.
Suppress the cron process or apply an empty cron file (having first secured a backup).
Ensure that all Web-based LMS index services are suspended i.e. Talis Prism.
auto_access_points appends its output to the previous report file, so may include the information from several previous runs. You are advised to rename the previous report file so that a new file is created by using the UNIX cp command thus:
mv /scratch/access_points.report /scratch/access_points.report.old
Do not delete access_points.report as it provides a useful record for predicting how much disk space and time should be allocated for future runs.
System Manager Beginner (UNIX) Student Guide
SUB-SG-001 Page 88
Schedule the job using cron or at.
Check if auto_access_points is still running: using the following command: ps -ef | grep build_opac
Check the success of the job by viewing /scratch/access_points.report
Take a further backup of the prod_talis database to a different tape, using full_dbdump. After running auto_access_points, it is vital to perform a full_dbdump in order to re-start transaction logging on the database. This applies whether or not the process completed successfully.
19.5.10 Interrupting auto_access_points
Do not terminate the auto_access_points process without consulting Talis Support. The process goes through a number of stages including the removal of the existing LMS indexes. Termination at the wrong point may leave you without any LMS indexes i.e. browse searching in Talis Prism will not work.
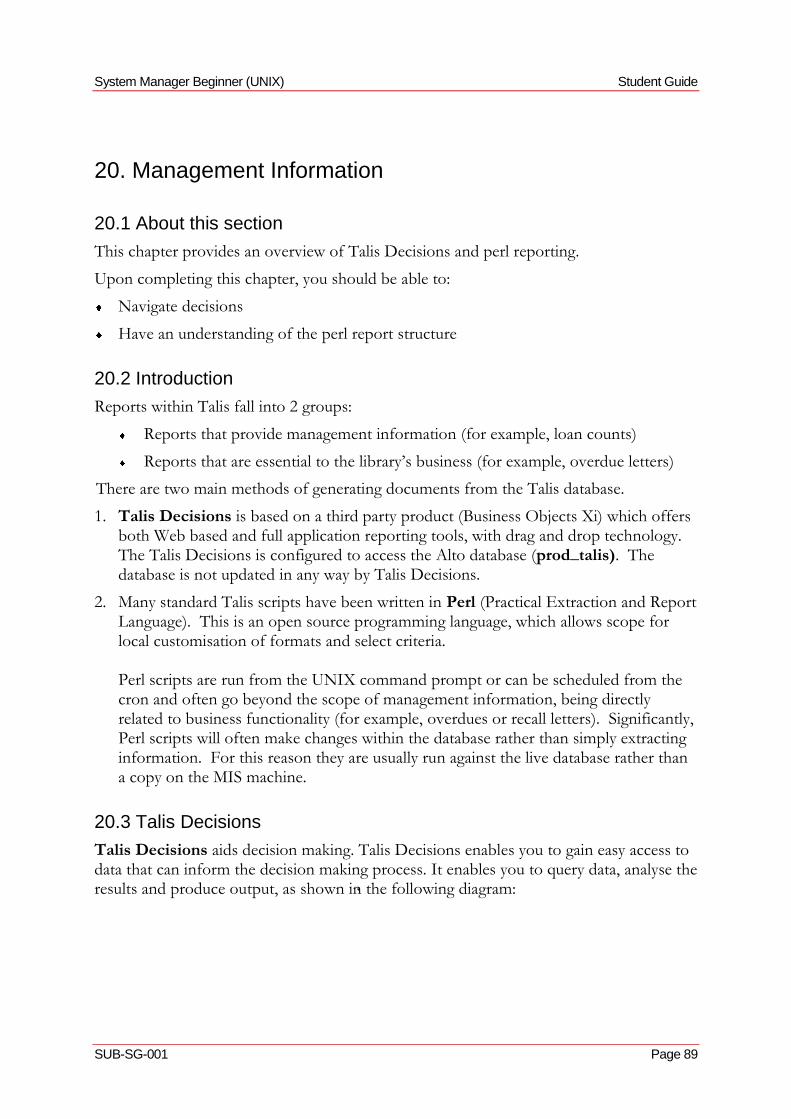
System Manager Beginner (UNIX) Student Guide
SUB-SG-001 Page 89
20. Management Information
20.1 About this section
This chapter provides an overview of Talis Decisions and perl reporting.
Upon completing this chapter, you should be able to:
Navigate decisions
Have an understanding of the perl report structure
20.2 Introduction
Reports within Talis fall into 2 groups:
Reports that provide management information (for example, loan counts)
Reports that are essential to the library‟s business (for example, overdue letters)
There are two main methods of generating documents from the Talis database.
1. Talis Decisions is based on a third party product (Business Objects Xi) which offers both Web based and full application reporting tools, with drag and drop technology. The Talis Decisions is configured to access the Alto database (prod_talis). The database is not updated in any way by Talis Decisions.
2. Many standard Talis scripts have been written in Perl (Practical Extraction and Report Language). This is an open source programming language, which allows scope for local customisation of formats and select criteria. Perl scripts are run from the UNIX command prompt or can be scheduled from the cron and often go beyond the scope of management information, being directly related to business functionality (for example, overdues or recall letters). Significantly, Perl scripts will often make changes within the database rather than simply extracting information. For this reason they are usually run against the live database rather than a copy on the MIS machine.
20.3 Talis Decisions
Talis Decisions aids decision making. Talis Decisions enables you to gain easy access to data that can inform the decision making process. It enables you to query data, analyse the results and produce output, as shown in the following diagram:
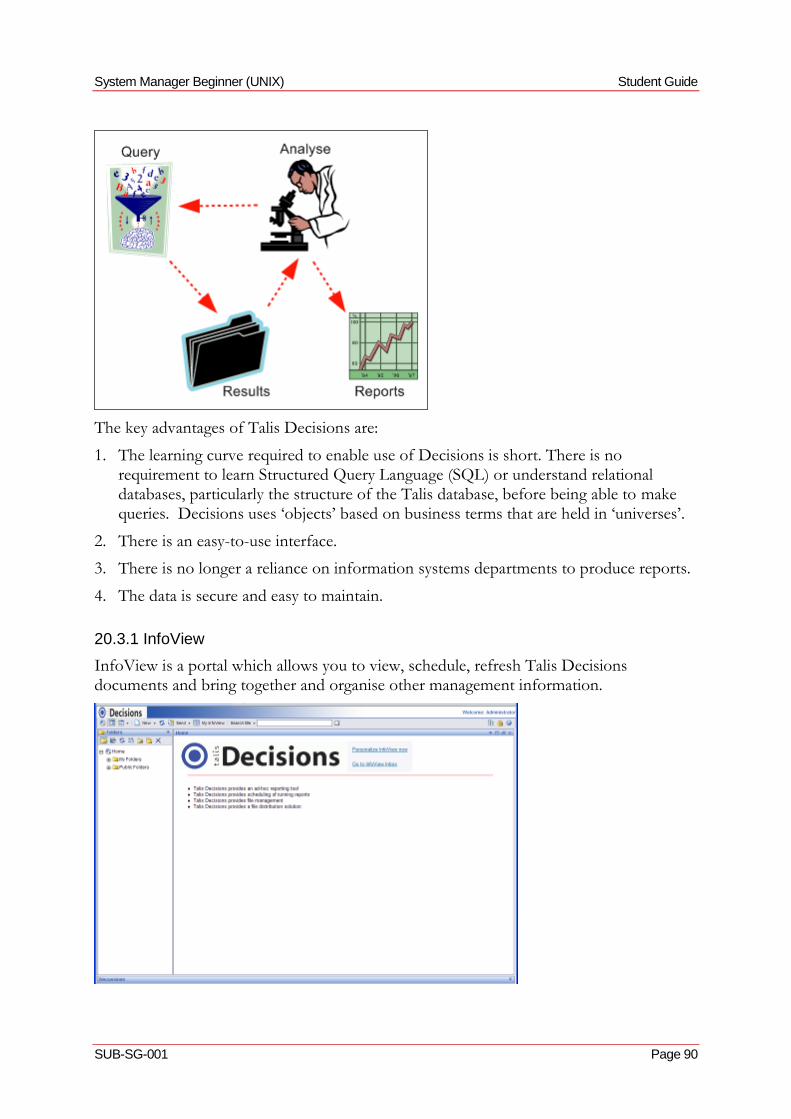
System Manager Beginner (UNIX) Student Guide
SUB-SG-001 Page 90
The key advantages of Talis Decisions are:
1. The learning curve required to enable use of Decisions is short. There is no requirement to learn Structured Query Language (SQL) or understand relational databases, particularly the structure of the Talis database, before being able to make queries. Decisions uses „objects‟ based on business terms that are held in „universes‟.
2. There is an easy-to-use interface.
3. There is no longer a reliance on information systems departments to produce reports.
4. The data is secure and easy to maintain.
20.3.1 InfoView
InfoView is a portal which allows you to view, schedule, refresh Talis Decisions documents and bring together and organise other management information.
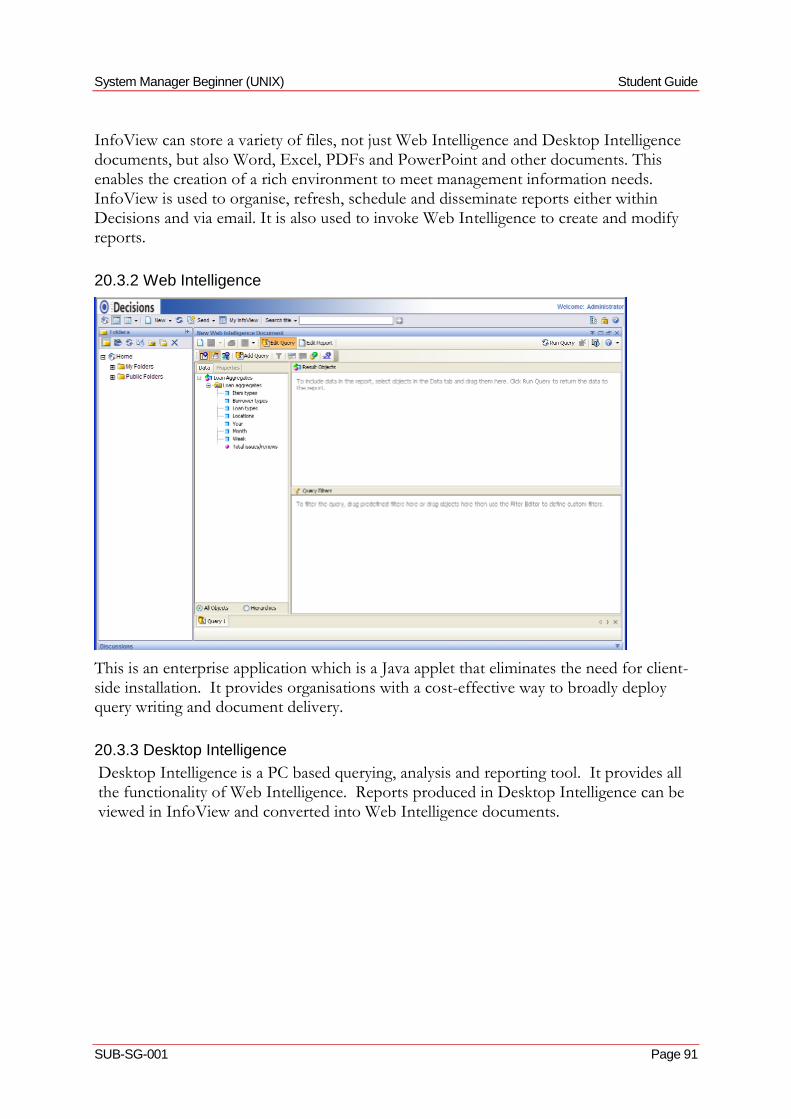
System Manager Beginner (UNIX) Student Guide
SUB-SG-001 Page 91
InfoView can store a variety of files, not just Web Intelligence and Desktop Intelligence documents, but also Word, Excel, PDFs and PowerPoint and other documents. This enables the creation of a rich environment to meet management information needs. InfoView is used to organise, refresh, schedule and disseminate reports either within Decisions and via email. It is also used to invoke Web Intelligence to create and modify reports.
20.3.2 Web Intelligence
This is an enterprise application which is a Java applet that eliminates the need for client-side installation. It provides organisations with a cost-effective way to broadly deploy query writing and document delivery.
20.3.3 Desktop Intelligence
Desktop Intelligence is a PC based querying, analysis and reporting tool. It provides all the functionality of Web Intelligence. Reports produced in Desktop Intelligence can be viewed in InfoView and converted into Web Intelligence documents.

System Manager Beginner (UNIX) Student Guide
SUB-SG-001 Page 92
20.4 Perl MIS reports
A series of Talis Perl reports are shipped as standard (such as overdue letters and printed orders) within Talis Alto. Perl also allows scope for local customisation of formats and select criteria. Talis scripts written in Perl are recognisable by their .pl file extension. A separate UNIX login called report, is provided for running Talis Perl reports.
20.4.1 Talis Perl report structure
Each standard Talis Perl report is made up of a parameter file and five files of Perl code.
The parameter file for each report is located in the /usr/opt/blcmp/talis/mis/param directory and bears the name of the report, for example, orr_order_letter
One of the functions of the parameter file is to indicate whether a local version of, for example, a format is to be used instead of the default version.
The Perl code files are located in a directory, which also bears the name of the report, under /usr/opt/blcmp/talis/mis.
The code files are:
main.pl - the main body of the program
preselect.pl - a template which can be edited if local variations of select criteria are required
select.pl - refines the returned data rows
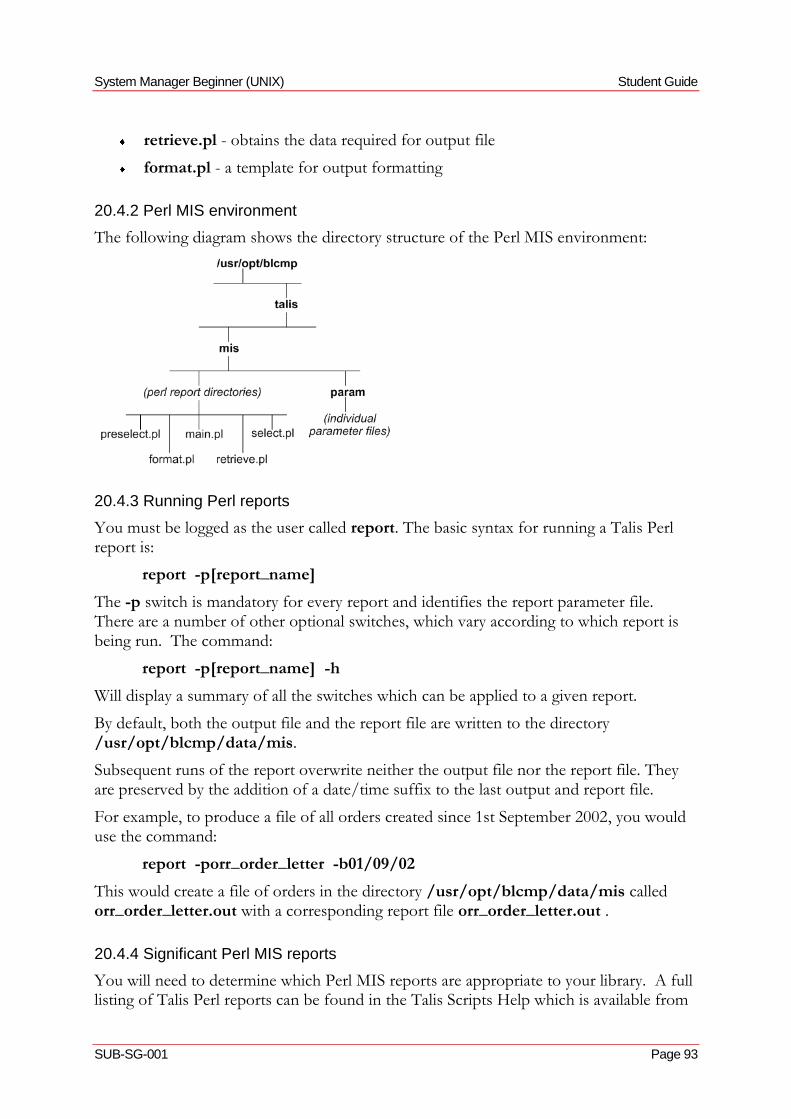
System Manager Beginner (UNIX) Student Guide
SUB-SG-001 Page 93
retrieve.pl - obtains the data required for output file
format.pl - a template for output formatting
20.4.2 Perl MIS environment
The following diagram shows the directory structure of the Perl MIS environment:
20.4.3 Running Perl reports
You must be logged as the user called report. The basic syntax for running a Talis Perl report is:
report -p[report_name]
The -p switch is mandatory for every report and identifies the report parameter file. There are a number of other optional switches, which vary according to which report is being run. The command:
report -p[report_name] -h
Will display a summary of all the switches which can be applied to a given report.
By default, both the output file and the report file are written to the directory /usr/opt/blcmp/data/mis.
Subsequent runs of the report overwrite neither the output file nor the report file. They are preserved by the addition of a date/time suffix to the last output and report file.
For example, to produce a file of all orders created since 1st September 2002, you would use the command:
report -porr_order_letter -b01/09/02
This would create a file of orders in the directory /usr/opt/blcmp/data/mis called orr_order_letter.out with a corresponding report file orr_order_letter.out .
20.4.4 Significant Perl MIS reports
You will need to determine which Perl MIS reports are appropriate to your library. A full listing of Talis Perl reports can be found in the Talis Scripts Help which is available from
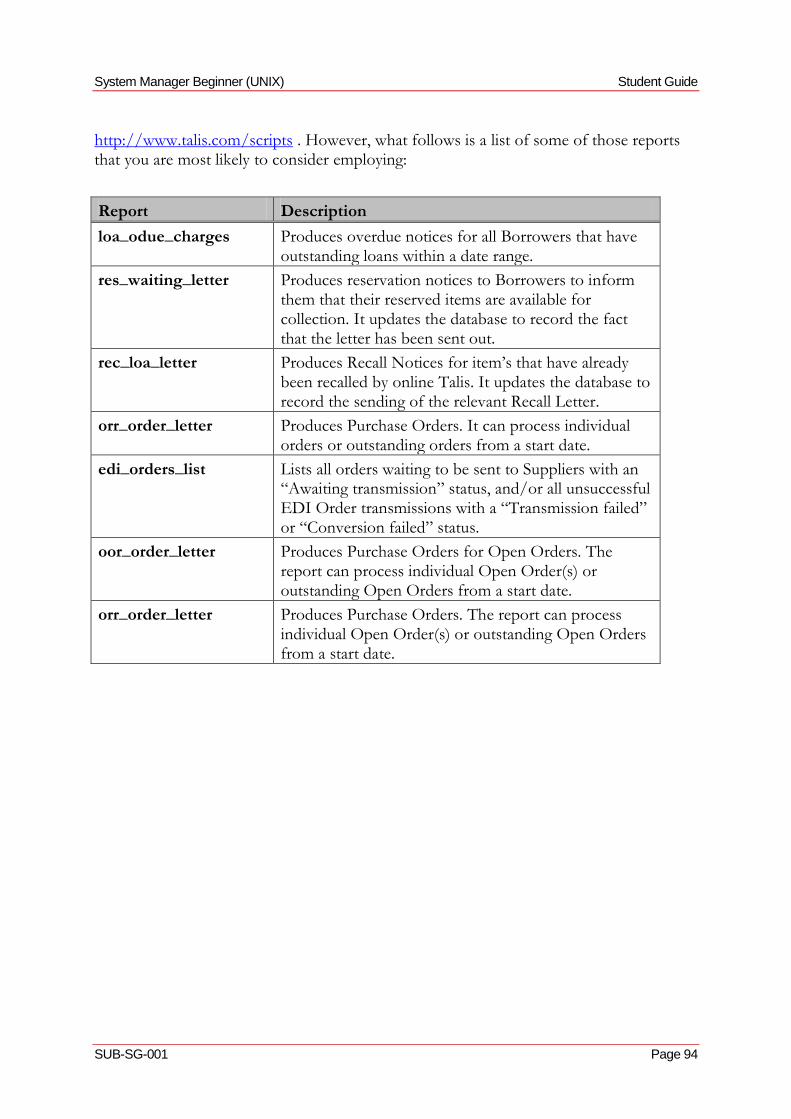
System Manager Beginner (UNIX) Student Guide
SUB-SG-001 Page 94
http://www.talis.com/scripts . However, what follows is a list of some of those reports that you are most likely to consider employing:
Report Description
loa_odue_charges Produces overdue notices for all Borrowers that have outstanding loans within a date range.
res_waiting_letter Produces reservation notices to Borrowers to inform them that their reserved items are available for collection. It updates the database to record the fact that the letter has been sent out.
rec_loa_letter Produces Recall Notices for item‟s that have already been recalled by online Talis. It updates the database to record the sending of the relevant Recall Letter.
orr_order_letter Produces Purchase Orders. It can process individual orders or outstanding orders from a start date.
edi_orders_list Lists all orders waiting to be sent to Suppliers with an “Awaiting transmission” status, and/or all unsuccessful EDI Order transmissions with a “Transmission failed” or “Conversion failed” status.
oor_order_letter Produces Purchase Orders for Open Orders. The report can process individual Open Order(s) or outstanding Open Orders from a start date.
orr_order_letter Produces Purchase Orders. The report can process individual Open Order(s) or outstanding Open Orders from a start date.
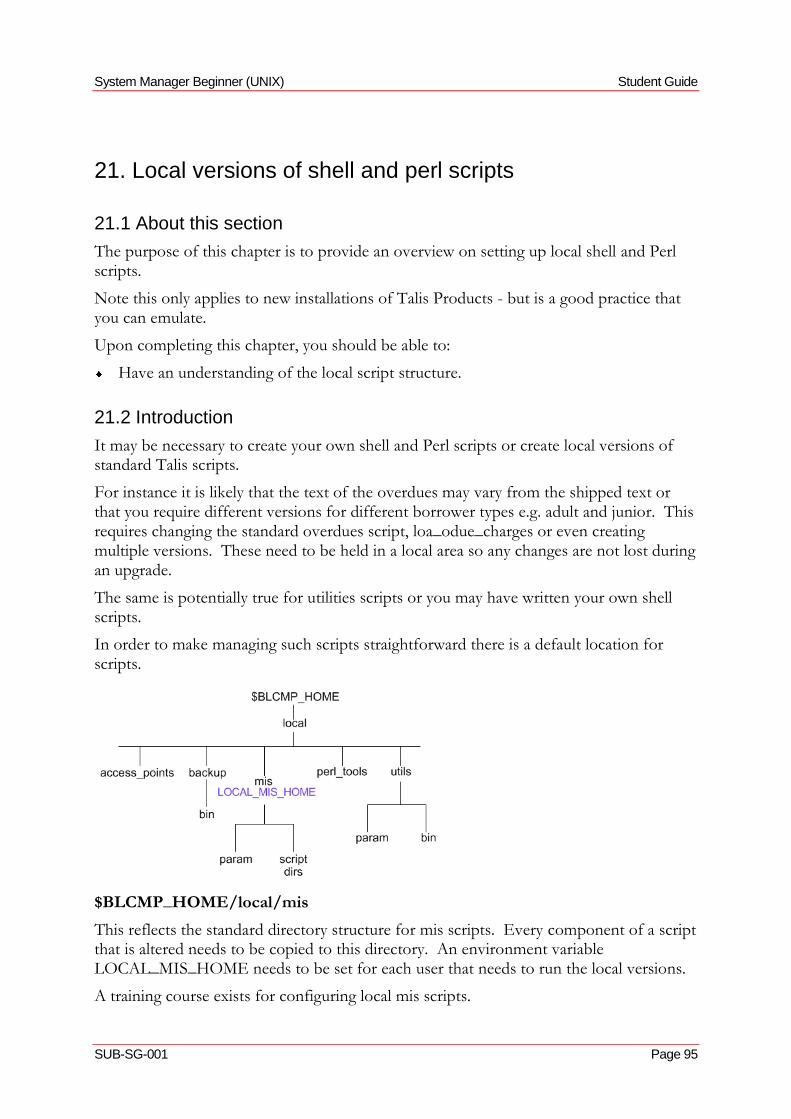
System Manager Beginner (UNIX) Student Guide
SUB-SG-001 Page 95
21. Local versions of shell and perl scripts
21.1 About this section
The purpose of this chapter is to provide an overview on setting up local shell and Perl scripts.
Note this only applies to new installations of Talis Products - but is a good practice that you can emulate.
Upon completing this chapter, you should be able to:
Have an understanding of the local script structure.
21.2 Introduction
It may be necessary to create your own shell and Perl scripts or create local versions of standard Talis scripts.
For instance it is likely that the text of the overdues may vary from the shipped text or that you require different versions for different borrower types e.g. adult and junior. This requires changing the standard overdues script, loa_odue_charges or even creating multiple versions. These need to be held in a local area so any changes are not lost during an upgrade.
The same is potentially true for utilities scripts or you may have written your own shell scripts.
In order to make managing such scripts straightforward there is a default location for scripts.
$BLCMP_HOME/local/mis
This reflects the standard directory structure for mis scripts. Every component of a script that is altered needs to be copied to this directory. An environment variable LOCAL_MIS_HOME needs to be set for each user that needs to run the local versions.
A training course exists for configuring local mis scripts.

System Manager Beginner (UNIX) Student Guide
SUB-SG-001 Page 96
$BLCMP_HOME/perl_tools
The Perl scripts use common subroutines called Perl tools and changing these for one script could affect other scripts detrimentally. Any non standard perl tools can be placed in here and accessed.
Further details on local perl tools is available on the Talis Developer Network.
$BLCMP_HOME/utils/bin and $BLCMP_HOME/utils/params
Variations of utils scripts can be placed here and it is the default location for customers own scripts.
Any scripts need to be called using the full path.
$BLCMP_HOME/access_points
For opac collection stored procedures
$BLCMP_HOME/backup/bin
For variants of database scripts. e.g. dump2disk.pl
It is possible to create additional directories under $BLCMP_HOME/local as required.
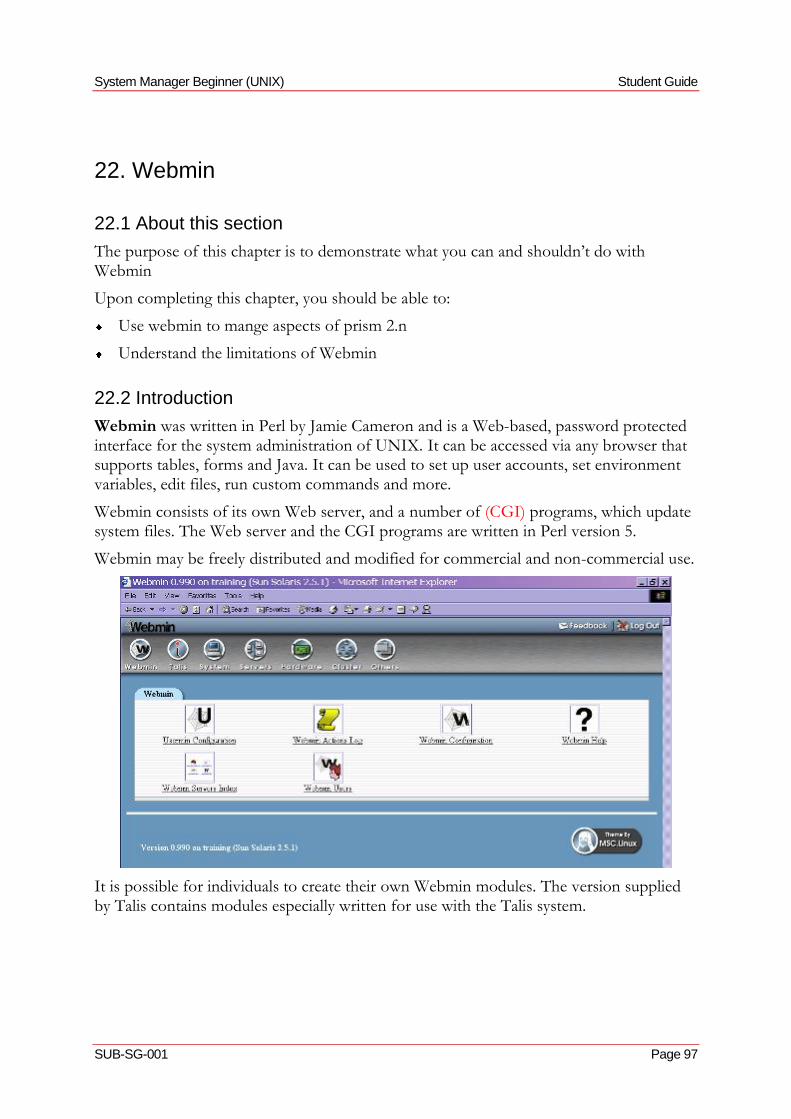
System Manager Beginner (UNIX) Student Guide
SUB-SG-001 Page 97
22. Webmin
22.1 About this section
The purpose of this chapter is to demonstrate what you can and shouldn‟t do with Webmin
Upon completing this chapter, you should be able to:
Use webmin to mange aspects of prism 2.n
Understand the limitations of Webmin
22.2 Introduction
Webmin was written in Perl by Jamie Cameron and is a Web-based, password protected interface for the system administration of UNIX. It can be accessed via any browser that supports tables, forms and Java. It can be used to set up user accounts, set environment variables, edit files, run custom commands and more.
Webmin consists of its own Web server, and a number of (CGI) programs, which update system files. The Web server and the CGI programs are written in Perl version 5.
Webmin may be freely distributed and modified for commercial and non-commercial use.
It is possible for individuals to create their own Webmin modules. The version supplied by Talis contains modules especially written for use with the Talis system.

System Manager Beginner (UNIX) Student Guide
SUB-SG-001 Page 98
22.3 Modules
Each Webmin Module is intended to manage a single service or system administration function. Modules are grouped together under one of four headings, according to the purpose of the Module:
Webmin
Talis
System
Servers
Hardware
Cluster
Others
22.4 Module description
Field Description
Webmin Configuration
Configure settings such as access, colour scheme for Webmin itself.
Webmin Help Search and browse Webmin‟s own help facilities.
Webmin Servers Index
Find and provide links to other servers running Webmin on your network.
Webmin Users Control who can access Webmin and what they can do within Webmin.
Bootup and Shutdown
Configure the boot and shutdown process of your machine; shutdown or re-boot the machine.
Running Processes Examine running processes, kill off processes if required.
Scheduled Cron Jobs
Manage the UNIX „cron‟ (scheduling) facility.
Software Packages Manage software installed using the Solaris „package‟ tool.
Users and Groups Add, edit and remove UNIX users and groups.
Manage Talis GUI Server
Start and stop the Talis GUI server process.
Network Configuration
Configure machine‟s network settings.
Printer Administration
Manage print queues.
System Manager Beginner (UNIX) Student Guide
SUB-SG-001 Page 99
Field Description
Custom Commands Run UNIX programs and commands via Webmin.
External Web Resource
Link to other Web resources.
File Manager Manage Files on UNIX machine.
Install Talis GUI PC Client
Download GUI Client software to PCs from this Module.
Manage Environment Variables
Help with the management of Talis-related environment variables.
Manage Programs and Scheduled Tasks
Enhanced UNIX „cron‟ (scheduling) module. Also includes help on commonly used Talis batch software.
Manage Talis Users Add or remove the privilege to use Talis or Tutor Talis for a UNIX login.
Prism Configure Talis Prism.
22.5 Tutor
There is no equivalent „Tutor‟ environment for Webmin. Thus changes made through Webmin are always „for real‟. This should be borne in mind when familiarising yourself with the operation of Webmin.
22.6 Installation
Webmin requires Perl Version 5.005. This version of Perl software is installed when loading Talis 10.
22.7 Configuration
When Webmin is first installed, it allows access from any IP address. Therefore, as soon as possible after installing you should restrict access to appropriate IP addresses (such as your own PC). To do this, connect to Webmin on your machine by pointing your browser at the URL specified at the end of the Webmin installation. Typically this will be something like:
http://yourmachine.network:10000/
By default, the port number will be set at 10000.
1. Log in using the user name and password that you supplied when you installed Webmin.
2. From the Webmin section click the Webmin Configuration module. You will be presented with a page of sub-modules.
System Manager Beginner (UNIX) Student Guide
SUB-SG-001 Page 100
3. Click the IP Access Control sub-module icon.
4. If the Allow from all addresses radio button is highlighted then Webmin is currently available to users at all locations. If so, restrict access to Webmin to selected IP addresses as shown below:
5. Choose the Only allow from listed addresses radio button and enter the IP addresses (or networks) from which you wish to allow access to Webmin.
6. Click on the Save button to save your changes.
22.8 Users
When you install Webmin, three users are installed, each with differing levels of access to Modules. It is necessary to configure the users so that they reflect the users who need access to Webmin. The supplied default users are:
admin
root
talis
You may wish to change some or all of the above users. Modules may be added to, or removed from, a user‟s login using the Webmin Users module. Webmin users can also be added or deleted using the Webmin Users module.
22.8.1 Admin
You may have chosen a different name for this user when installing Webmin, but hereafter references to this login will use the default name admin. The password for this user will have been set at the time of installation. The admin user has access restricted various modules including the following:
Webmin modules (admin user)
Webmin Configuration Webmin Help
Webmin Servers Index Webmin Users
Bootup and Shutdown Running Processes
Scheduled Cron Jobs Software Packages
Users and Groups Manage Talis GUI Server
Network Configuration Printer Administration
Custom Commands External Web Resource
File Manager Install Talis GUI PC Client
Manage Environment Variables Manage Programs and Scheduled Tasks
Manage Talis Users Telnet Login
System Manager Beginner (UNIX) Student Guide
SUB-SG-001 Page 101
22.8.2 Root
The root login has access to all available Webmin modules. In addition to those available to the admin user, root also has access to the following modules:
Webmin modules (root user)
Disk Quotas Disk and Network Filesystems
NFS Shares SysV Init configuration
System Logs Apache Webserver
BIND 4 DNS Server BIND 8 DNS Server
DHCP Server wu-FTP Server
Internet Services and Protocols Majordomo List Manager
MySQL Database Server Samba Windows File Sharing
Sendmail Configuration Squid Proxy Server
Partitions on Local Disks
22.9 Using Webmin
22.9.1 Starting and stopping Webmin
Webmin exists as a daemon process on the UNIX system. As such, starting or stopping the Webmin process is achieved by entering commands at the UNIX prompt.
For added security, the System Manager may choose to start the Webmin process prior to use and to stop it when finished.
To start Webmin, log in as root and enter:
/etc/webmin/start
To stop Webmin, log in as root and enter:
/etc/webmin/stop
22.9.2 Changing Webmin passwords
This can be achieved via the Webmin interface, whilst logged in as root. Alternatively, passwords can be changed at the UNIX prompt by running the script changepass.pl. This script is supplied within the installation file for Webmin. It is not installed as standard.
System Manager Beginner (UNIX) Student Guide
SUB-SG-001 Page 102
22.10 Useful webmin related unix commands
To see if webmin is running Webmin shows as a script called miniserv.pl
ps -ef | grep mini
To see which port webmin is listening on. look for a port in the 10000 range.
netstat -nap | grep LISTEN
22.11 Further Information
Further information on Webmin can be found online at:
www.webmin.com
There is also an independent guide available from:
www.swelltech.com/support/webminguide/index.html
System Manager Beginner (UNIX) Student Guide
SUB-SG-001 Page 103
23. Talis Services – Support
23.1 About this section
This section explains how to raise support calls with Talis.
Upon completing this chapter, you should be able to:
Have an understanding of how to raise calls and in what format
Raise concerns/issues helpful documentation on LIS Talis and the forums
Access the Talis website/forums and navigate to locate information
23.2 Availability
The core hours of support are between 08:30 and 17:30.
Extended support is available Mon – Fri 17:30 – 20:00 and Sat 09:00 – 16:00 at an additional cost
If you are interested in subscribing to this service, please contact your Account Manager or email [email protected].
23.3 Preparation
Before raising an incident with Talis Services – Support
Gather information about the issue and check for existing solutions on the Talis Support web site. Also consult the relevant Talis documentation (also available online).
What screen were you looking at?
What did you expect to happen?
What actually happened?
Can you reproduce it with a different record?
Provide brief, precise details and examples of what worked and what didn‟t.
Which record were you using?
Authority ID
Bib ID
Can you get a screenshot of the error?
If you can reproduce the problem, then note down the path taken. Also note any special circumstances that surround the problem (for example is it site or date/time specific).

System Manager Beginner (UNIX) Student Guide
SUB-SG-001 Page 104
When raising a hardware call, you will need location and serial number information in addition to a problem statement.
23.4 Contacting Talis Services
23.4.1 Talis Support
The Talis Services Web site offers registered Talis customers the ability to raise, monitor or update support cases in real time. Your requests are logged to Talis Services - My Support.
In addition, customers can obtain answers from a knowledge base of past support cases and new solutions that are immediately visible to you.
The service is available 24 hours per day, 7 days per week.
You will not need to keep paper records of service requests you have raised with Talis Services - Support. Talis Solutions™ allows you to see your open requests, your recent requests and even historical requests.
Talis Support can be accessed directly at http://support.talis.com
23.4.2 Telephone
Talis Services - Support telephone number is 0870 400 5400
23.5 Processing your case
On raising your incident a confirmation email of receipt is sent to the contact, detailing the priority and brief description of the incident.
During an initial 30 minutes analysis the case details are verified and the knowledgebase, FAQ‟s and PERS (Product Enhancement Request) /Defects are examined for previous resolutions. If no immediate resolution is found the case is reassigned for further detailed analysis.
The status of logged incidents can be reviewed and updated at any time via access to Talis Solutions.
23.6 Case resolution
Customers are notified when incidents are closed, this may be verbal or via email.
Hardware calls are closed through the contractors contacting Talis Services - Support on completion of the work.
If a problem is diagnosed as being either a PER or a Defect, the customer is notified of the PER/Defect number and the case is then closed.
Product Enhancement Requests (PER‟s) & Defect fixes to the application will normally be addressed as part of a general or interim product release.
System Manager Beginner (UNIX) Student Guide
SUB-SG-001 Page 105
Existing PERS and Defects are searchable via The Talis My Support Services Portal.
23.7 Escalation
To escalate a call, please contact Sandra Lowe or Kristian Kelly, Senior Support Analysts on 0870 400 5400 or directly via their email address: [email protected] or [email protected]
23.8 The Talis Community
Talis have a community of users who have experience with day to day operations of Talis software. There is plenty of opportunity for you to get involved and share in the wealth of knowledge that Talis users have contributed.
23.8.1 LIS-TALIS
LIS-TALIS is an email list hosted on the jiscmail servers dedicated to system admin level Talis users. This list can be joined by finding the list at http://www.jiscmail.ac.uk/ and following the subscribe instructions. The list is independently managed by customers of Talis.
23.8.2 Talis Developer Network
http://www.talis.com/tdn is a source of extra scripts and utilities contributed by Talis users. This is also a place where you can ask questions on subjects of SQL and Perl scripting.
23.8.3 Talis Forums
http://www.talis.com/forums is where you can ask any question you like, related to both Talis software and issues affecting the library world in general. You can get assistance and guidance on best practice from other Talis Users or Talis staff.
23.8.4 Documentation
http://www.talis.com/applications/services/documentation.shtml
Full documentation of Talis products can be sourced from the website, along with updates on new product releases. RSS feeds are available to keep you in touch.