Embed Size (px)
Citation preview

BlackBerry AtHocSystem Administrator Configuration Guide
7.7

2019-02-06Z
| | 2

Contents
BlackBerry AtHoc setup and administration overview....................................... 6
Manage organizations.......................................................................................7Create and configure an organization.................................................................................................................. 7Duplicate an organization on the same server....................................................................................................8Duplicate organizations across systems............................................................................................................. 8
Configure BlackBerry AtHoc settings................................................................ 9
Configure basic settings................................................................................. 10General settings....................................................................................................................................................10
Organization Details..................................................................................................................................10Enterprise Features...................................................................................................................................10Customization—Text................................................................................................................................. 11Customization—Locale Setting................................................................................................................ 12Customization—Phone Call Setting......................................................................................................... 12Customization—Desktop App...................................................................................................................12Customization—Self Service.................................................................................................................... 12Dependents................................................................................................................................................12Layouts.......................................................................................................................................................12
Manage system settings................................................................................. 14Specify system settings options.........................................................................................................................14Add or remove a disclaimer for the BlackBerry AtHoc Management System.................................................15
Security policy settings...................................................................................17Define password rules......................................................................................................................................... 17Configure password complexity......................................................................................................................... 18Enforce a system-wide password update..........................................................................................................18Set session timeout and continue session values............................................................................................18Limit active sessions........................................................................................................................................... 19Enable operator login using smart cards...........................................................................................................19Require operator login using smart cards......................................................................................................... 19Enable CAPTCHA validation................................................................................................................................20
Monitor system health.................................................................................... 21Overview of system health monitoring...............................................................................................................21Review preconfigured health monitors...............................................................................................................21View the list of system health monitors with errors.........................................................................................23Create a system health monitor......................................................................................................................... 23
| | iii

Edit a health monitor........................................................................................................................................... 24Disable a system health monitor........................................................................................................................25Enable a system health monitor......................................................................................................................... 25Delete a system health monitor..........................................................................................................................25Refresh a system health monitor....................................................................................................................... 26
View the diagnostic log...................................................................................27
Database archiving..........................................................................................28
Organizations Manager................................................................................... 29Create an organization.........................................................................................................................................29
Enable and disable features............................................................................ 30
Manage the agents for integrated devices...................................................... 31
Provision applications that can call the web API............................................. 32
Configure API throttling settings.....................................................................33Whitelist.................................................................................................................................................................33General rules.........................................................................................................................................................33Client rules............................................................................................................................................................ 34
View the operator audit trail report................................................................. 35View an alerts usage summary report............................................................................................................... 35
Manage system jobs....................................................................................... 36View details about system jobs..........................................................................................................................36Create and export a system diagnostics report................................................................................................ 37
Configure device gateways............................................................................. 38Configure the AtHoc Mobile App........................................................................................................................41
Configure the Mobile App gateway.........................................................................................................41Assign an AtHoc Mobile Gateway to a phone....................................................................................... 43Configure mobile phone notification.......................................................................................................44
Configure the Notification Delivery Managed Service gateway....................................................................... 44Configure the Simple Mail Transfer Protocol gateway..................................................................................... 45
Configure devices overview............................................................................ 46Enable devices on the BlackBerry AtHoc server............................................................................................... 46Duplicate a device on the BlackBerry AtHoc server..........................................................................................46
| | iv
Configure devices........................................................................................... 48Enable and disable devices.................................................................................................................................48Add a device to the user details contact information.......................................................................................48Manage mass communication devices............................................................................................................. 50
Mass device types and categories..........................................................................................................50Create a mass device endpoint...............................................................................................................52View and edit device details....................................................................................................................53Configure Giant Voice devices................................................................................................................ 54Configure the AtHoc Connect organization network............................................................................. 54Manage the Cloud Services Gateway..................................................................................................... 54Configure RSS feed information for RSS and Atom content feeds...................................................... 60Configure XML feed information for mass communication devices....................................................60Configure failover delivery gateways...................................................................................................... 61
Configure desktop app settings..........................................................................................................................62Select general desktop software options............................................................................................... 62Customize the desktop client system tray............................................................................................. 63Configure client server communications................................................................................................64Configure failover settings.......................................................................................................................64Set the type of desktop software authentication...................................................................................65
BlackBerry AtHoc customer portal.................................................................. 66
Legal notices...................................................................................................67
| | v

BlackBerry AtHoc setup and administration overviewAdministrators create, configure, and manage the organization settings that operators use to communicate withtheir recipients as well as with other organizations. Setup includes configuring the features used by operators tocommunicate during situations. This guide covers the following administration tasks:
• The Manage organizations section shows you how to create an organization and duplicate an existingorganization. To create or migrate an existing set of organizations to an Enterprise model, see the BlackBerryAtHoc Enterprise Planning Guide.
• The Configure BlackBerry AtHoc settings section shows you how to configure the features provided byBlackBerry AtHoc to communicate and coordinate with teams and recipients during a crisis. The followingtopics are covered in this section:
• Configure basic settings—Personalize your organization with a name, welcome or disclaimer text, and anicon. You can also customize the time zone and time formats, configure, security policy settings, create asecurity policy message, and control default page layouts and enterprise features.
• Manage system settings—Configure the name, URL, time zone, database archive directory, system helpdesk information, support page content, redirection settings, client certificates, and disclaimers for yoursystem.
• Security policy settings—Define password rules and complexity, enforce system-wide password updates,set session timeout, limit active sessions, configure smart card authentication settings, and enableCAPTCHA validation.
• Monitor system health—Create, view, edit, enable, disable, delete, and refresh system health monitors.• View the diagnostic log—Run basic and advanced searches of the diagnostic log.• Organizations Manager —Create organizations, enable and disable features, manage integrated device
agents, provision applications for the Web API, view the operator audit trail report and the alerts usagesummary report.
• Manage system jobs—View details about system jobs, create and export a system diagnostics report.• Configure device gateways —Configure the Mobile app, NDMS, and SMTP gateways.• Configure devices—Enable and disable devices, manage mass communication devices, configure Giant
Voice devices, configure the AtHoc Connect organization network, manage the Cloud Services gateway,configure RSS and XML feed information and failover delivery gateways.
• Configure desktop app settings—Select general desktop software options, customize the desktop clientsystem tray, configure client server communications and failover settings, and set the desktop softwareauthentication type.
For information about creating and managing alert templates, specifying alert folders, managing deliverytemplates, and managing audio settings, see the BlackBerry AtHoc Manage Alert Templates Guide.
For information about managing incoming alerts settings, see the BlackBerry AtHoc Manage Incoming Alerts from theInbox Guide.
For information about setting up Situation teams, maps, and alert types, see the BlackBerry AtHoc Manage theSituation Map Guide.
For information about granting permissions for working with AtHoc Connect and updating sector visibility in theConnect Profile, see the BlackBerry AtHoc Connect User Guide.
| BlackBerry AtHoc setup and administration overview | 6

Manage organizationsThis section describes how to create and duplicate organizations. To learn how to work with Enterpriseorganization hierarchies, see the BlackBerry AtHoc Enterprise Planning and Configuration Guide.
Create and configure an organizationTo create and configure a new Organization in the system, you must be a System Administrator with permissionsto switch between organizations from within the BlackBerry AtHoc user interface.
Step 1: Create a new organization
1. In the navigation bar, click .2. In the System Setup section, click Organizations Manager.3. Click New.4. Enter a name for the new organization.5. Select one of the following organization types:
• Enterprise—Choose this type if you are logged into System Settings and are creating an Enterprise or astand-alone organization.
• Sub Organization—Choose this type if you are logged in to an Enterprise organization and are creating amember organization.
• Basic—Choose this type if you are creating a Basic organization.6. Click Save.
The details of the new organization appear below the list, with default values for the display name, time zone,and homepage URL.
7. To open the new organization, complete the following steps:
a. In the navigation bar, click your username, and then click Change Organization.b. On the Change Organization screen, click the name of the organization you just created.c. Click OK.d. The system refreshes and displays the new organization. You can confirm that this has happened by
looking at the name of the current organization in the top menu bar on the screen.
Step 2: Configure the new organization
After you have created the organization and have switched the BlackBerry AtHoc interface so that you are nowviewing the new organization, you can define the URLs, name, logo images, default alert templates, and SelfService defaults for that organization.
Configure basic settings
1. Log in to the BlackBerry AtHoc management system as an administrator.2. In the navigation bar, click .3. In the Basic section, click General Settings and then complete the steps in General settings.
Configure devices
Complete the tasks described in Configure devices.
| Manage organizations | 7

Configure gateways
Complete the tasks described in Configure device gateways.
Enable devices
Complete the tasks described in Enable devices on the BlackBerry AtHoc server and the "Enable a Device" taskdescribed in Enable and disable devices.
Create attributes
Complete the tasks described in the "Create a user attribute" and "Configure an Organizational Hierarchy attribute"sections of the BlackBerry AtHoc Manage Users Guide.
Add Users
Add users to your organization by completing the steps described in the "Create a user" section of the BlackBerryAtHoc Manage Users Guide.
Duplicate an organization on the same serverYou can copy an existing organization and rename it. Be aware that most settings are copied from the originalorganization, including alert templates, except as specified.
Important Notes
• You must be assigned the System Administrator role to duplicate an organization.• Duplication includes device and protocol duplication.• After duplicating an organization, review all alert templates and make adjustments if necessary.• Creating organizations using the New button in the Organizations Manager should be performed only with
assistance from BlackBerry AtHoc Technical Support to ensure the new system has all the appropriatesettings.
• By default, a duplicated organization will not have a common name. If you plan to access the duplicatedorganization with the BlackBerry AtHoc SDK, you must assign it a common name.
• You can duplicate a peer organization, but not a child (member) organization.
1. In the navigation bar, click .2. In the System Setup section, click Organizations Manager.3. On the Organizations Manager screen, click to select the organization you want to copy.
Note: If the list is extensive, use the list at the top of the screen to filter by status and then sort the results byclicking any of the column headings.
4. Click Duplicate.5. Enter the name of the new Enterprise or sub organization.6. Click OK.
The duplicate organization appears in the list on the main screen.
Duplicate organizations across systemsDuplicating organizations from one server to another is an advanced configuration task. For more information,see the “Advanced Configuration” section in the BlackBerry AtHoc Installation and Configuration Guide.
| Manage organizations | 8

Configure BlackBerry AtHoc settingsImportant: In order to access the screens, features, and functions mentioned in this section, you must haveSystem, Enterprise, or Organization Administrator permissions in the BlackBerry AtHoc organization. If you do nothave these permissions, many of the options on the Settings screen will be grayed out.
Users who have been granted Administrator permissions in BlackBerry AtHoc can set up organizations andmanage settings and users within an organization.
| Configure BlackBerry AtHoc settings | 9
Configure basic settingsThe Basic settings cover the primary settings required for setting up an organization and enabling enterprisefeatures.
General settingsYou can use General Settings to personalize your organization with a name, welcome or disclaimer text, and anicon. You can also customize the time zone and time formats, configure security policy settings, create a securitypolicy message, and control default page layouts and enterprise features.
To configure general settings that are available for enterprise organizations, see Enterprise features.
1. In the navigation bar, click .2. In the Basic section, click General Settings.
The General Settings screen for the organization opens with the following fields prepopulated:
• The Name field displays the name of your organization.• The Organization Code field serves as a short name used to register for Self Service and for the Mobile
App.• The User Login field displays the server address that the users log in to for Self Service.• If Self Registration is enabled for the organization, the Registration URL field displays the server address
that users access in order to register.3. Complete the remaining fields described in the sections below.4. Click Save.
Organization Details1. Optionally, enter a Support Email address.2. In the Logo field, click the Browse button to upload the graphic file you want to have display in the top corner
of each screen. The file type must be .GIF, .JPG, or .PNG.3. In the Logo Text field, enter a text string of up to 100 characters that appears when users hover their cursors
over the logo.
Enterprise FeaturesThe Enterprise Features section is available only for enterprise organizations that have sub organizations.
1. In the navigation bar, click .2. In the Basic section, click General Settings.3. On the General Settings page, scroll down to the Enterprise Features section.4. Complete the steps described in the sections below to require user uniqueness and enable user initiated move,
as needed.5. Click Save.
Enable enterprise features
Enabling enterprise features in your enterprise organization enables the following items:
• A single Enterprise Desktop App
| Configure basic settings | 10

Set up the desktop client to connect to the enterprise. The desktop client will then search for users across theenterprise and connect to the correct sub organization. If the user is not found, a new user is created in theenterprise.
• A single Enterprise Self Service URL
Users in any sub organization can log in using the same Self Service URL for the Enterprise organization or suborganization.
• Mobile registration from an Enterprise organization code
Users can register from their mobile device using the organization code for the Enterprise, or for any suborganization.
• Enforcement of unique usernames and Mapping ID values for all users in an Enterprise organization.
The system checks for uniqueness of usernames and mapping IDs in the enterprise organization and suborganizations when a new user is created through the desktop app, Self Service, CSV import, or the BlackBerryAtHoc management console.
1. Click Check Readiness. The system checks for user uniqueness (no users have the same username ormappingID). If the system finds duplicate users, the Duplicate Users Found window opens and provides a listof duplicate users, their usernames, mappingIDs, and organizations.
2. Modify any duplicate usernames or mappingIDs to proceed with enabling user uniqueness.3. Run the duplicate user check again. If no duplicate users are found, a Check Passed message displays.4. Click Close to return to the General Settings page. The Check Readiness button is replaced by an Enable check
box.5. Select the Enterprise Features Enable check box. The User Initiated Move check box appears.6. Click Save.
Enable user-initiated move
If you have a large enterprise organization where users in your system need to move between organizations, youcan enable the User Initiated Move feature. This reduces the burden on your administrators by enabling users tomove themselves between the sub organizations of your enterprise organization in Self Service.
When a user moves to a different organization, their view of Self Service may change, depending on thesettings of the organization they are moving to. If the user is an operator, any operator permissions they hadin their original organization are revoked. If the user had enterprise administrator permissions in the enterpriseorganization, they are retained. If the users had permissions in other organizations within the enterpriseor organizations outside of the enterprise organization, they are retained. If a user has dependents, thosedependents are also moved.
Before user initiated move can be enabled, require user uniqueness must be enabled.
1. Select the User Initiated Move Enable check box. The Available Organizations list appears. The enterpriseorganization and all sub organizations appear in the Available Organizations list.
2. Select the organizations that you want users to be able to move themselves to, or choose Select All. You cannarrow the list of organizations by typing the name of an organization in the text box.
3. Click Save.
The list of selected organizations is shown to all users in the enterprise. End users will see the selectedorganizations in the Move to Organization screen in Self Service.
Customization—Text1. In the Homepage Welcome Message field, enter text that will appear at the top of the Welcome screen.2. In the Footer Text field, enter text that will appear on the bottom left of every screen.
| Configure basic settings | 11

Note: This text can be a disclaimer, if one is required, or any information that all users need to see.
Customization—Locale Setting1. In the Locale field, select the language and region associated with the organization.2. In the Date Format field, select the date format relevant for your organization.3. In the Time Format field, select the time format relevant for your organization.4. In the Delivery Locales field, select the locales (languages) you to which want to be able to publish alerts. Note
that after support for a locale is enabled, it cannot be disabled.5. In the Time Zone field, select the correct time zone for your server.
Customization—Phone Call Setting1. In the Caller ID field, enter the numeric number you want to show up on the mobile devices of alert recipients
when an alert is published to them.2. In the Default Country Code field, select the country code that will be displayed by default whenever user
managers have to enter a phone number into a field.
Customization—Desktop App1. In the Desktop App Logo field, click Browse to upload the graphic file you want to display in the desktop app.
The file must be a .gif, .jpg, or .png file type. The recommended size is 140 pixels wide by 70 pixels high.
Customization—Self Service1. In the Name on User Pages field, enter your organization name.2. Optionally, include an organization-specific disclaimer message to display to users when they log in to Self
Service. The maximum size of the message is 4000 characters.
DependentsNote: To enable dependents, see Enable and disable features.
Note: The layout for dependent user pages is different than the layout for sponsors. This enables you to keep thelayout page for dependents simple, providing only the needed information.
1. In the Dependent Profile Layout section, click View/Edit. The Dependent Profile Layout dialog opens.2. Make changes to the XML to add, modify, or remove profile page sections.3. Click Save.
LayoutsIn the Layouts section, you can add or update the default view for various users screens such as the user profile inSelf Service, the My Profile or Users page in the management console, and user information when accessed froman alert or accountability event. You can also adjust the display of columns on the Users page and in reports andset group targeting definitions.
Click View/Edit to open a window to modify these settings.
1. User Details - My Profile—(Do not modify this setting without first consulting BlackBerry AtHoc TechnicalSupport.) Determines the layout of standard user attributes (contact information) when viewed through the MyProfile page in the management console.
2. User Details - Full Page—(Do not modify this setting without first consulting BlackBerry AtHoc TechnicalSupport.) Determines the layout of standard user attributes (contact information) when viewed anywhereoutside of the main Users list. For example, when seen through the Inbox or from alert or event publishingscreens.
| Configure basic settings | 12

3. User Details - Popup View—(Do not modify this setting without first consulting BlackBerry AtHoc TechnicalSupport.) Determines the layout of standard user attributes (contact information) when viewed anywhereoutside of the main Users list. For example, when seen through alert publishing screens.
4. Default Columns - User Page—Determines the columns that appear by default from the Users page in themanagement system.
5. Default Columns - User Reports—Determines the columns that will appear by default when viewing alertreports or when the user list is shown in a pop-up window.
6. Targeting Settings—Determines the attributes that are available for targeting in the By Groups tab on the NewAlert and New Event pages. The selected attributes are also available when searching for users by group. Onlyattributes that have predefined values are available.
| Configure basic settings | 13

Manage system settingsThe following sections describe how to configure and maintain your BlackBerry AtHoc organizations at thesystem level.
Specify system settings optionsUse the System Settings options tab to configure the name, URL, time zone, database archive directory, systemhelp desk information, and support page content link that are displayed throughout the BlackBerry AtHoc system.You can also configure the client certificate and AtHoc Cloud Services (PSS) settings.
1. In the navigation bar, click . 2. In the System Setup section, click System Settings.3. Click Edit to configure the global settings described in the following sections.4. Click Save.
System setup parameters
In this section, determine the following values:
• Name—Unique name for each BlackBerry AtHoc installation• Identifier—Unique identifier for the organization determined when the organization is created• System Setup URL—Web address for BlackBerry AtHoc• Desktop Traffic URL—Web address for the AtHoc Desktop Notifier• Time Zone—The time zone for the application server• Database Archive Directory—Location where the database is archived. Provide the full path name relative to
the computer that BlackBerry AtHoc is installed on.
Custom content
Customize messages for the operator in every organization in the system. Within this section, you can configurethe following:
• Management System Help—Display support information text that displays on the log on screen. Typicalinformation includes directions or link when the user forgets their password. HTML formatting is supported.
• System Disclaimer Message—Display a required disclaimer, such as limitations on liability or use ofcopyrighted materials. The limit is 4,000 characters. The disclaimer can display as a splash screen beforeoperators log in or as a banner in the BlackBerry AtHoc Desktop window. The banner displays regardless of themodule selected from the Navigation bar. For example, use a banner to notify Operators that the informationthey are currently viewing is classified and protected from unauthorized use.
Redirection Settings
Select the check box to enable client redirection. Client redirection allows you to set up redirection rules for thedesktop app. To configure redirection rules for the desktop app, click Redirection Rules.
For more information, see the "Redirection" section in the BlackBerry AtHoc Desktop App Installation andConfiguration Guide.
Client certificates
Specify client certificates for the client machine. If you are using a Mobile Alerting Service (MAS) laptop, ensurethat it has the same certificate settings. Use the Microsoft Management Console (MMC) snap-in tool to viewcertificates on a Windows computer. To access, type MMC in the Start menu field. Within this section, you canconfigure the following:
| Manage system settings | 14
• Client Certificate—Select this check box to append a client certificate.• Subject—Enter the value of the Subject parameter found on the Details tab of the certificate settings.• Store Name—Certificates are found in stores. Specify Personal or one of the options in the drop-down list.• Store Location—The stores are located either in the current user store or the local machine store.
AtHoc cloud services
AtHoc Cloud Services checks for messages sent between BlackBerry AtHoc and the mobile application. Withinthis section, you can configure the following:
• Enable Cloud Services—Select this check box to use the Mobile App or AtHoc Connect.• Server Address—Enter the name of the server URL for AtHoc Cloud Services. The server address is provided by
BlackBerry AtHoc Technical Support.• Username—Enter the username that the Polling Agent for AtHoc Cloud Services uses when it polls requests
from the service. The username is provided by BlackBerry AtHoc Technical Support.• Password—Enter the password that the Polling Agent uses when polling requests from the service. The
password is provided by BlackBerry AtHoc Technical Support.
System data maintenance
Specify the frequency of records maintenance for the system.
• Event Viewer—Enter the number of days after which event records are deleted.• Desktop Sessions—Enter the number of days after which data is deleted for sessions of the Desktop App.• Geo History—Enter the number of days after which historical data for geolocation data is deleted.
In-product tutorials
Specify whether product tutorials (Complete a Task) are enabled or disabled.
• Self Service—Select this check box to enable Self Service tutorials.• Management System—Select this check box to enable tutorials for the BlackBerry AtHoc Management
System.• Send Analytics—Select this check box to provide anonymous information to BlackBerry AtHoc so that we can
improve the product.
Add or remove a disclaimer for the BlackBerry AtHoc ManagementSystemIf your organization requires posting a disclaimer, such as limitations on liability or use of copyrighted materials,you can create a disclaimer that displays in the form of a splash screen before operators log in to BlackBerryAtHoc. You can also customize a banner that displays in the BlackBerry AtHoc Desktop window. The bannerdisplays regardless of the module selected from the Navigation bar.
Add a disclaimer
1. Log in to the BlackBerry AtHoc management system as an administrator.2. Change to the System Setup (3) organization.3. In the navigation bar, click .4. In the System Setup section, click System Settings.5. In the text-entry box under the Custom Content section, type the text of the disclaimer. The limit is 4,000
characters.6. Click Save.
These changes are applied at the next login to BlackBerry AtHoc Management System.
| Manage system settings | 15

Remove a disclaimer
To remove a disclaimer, delete the text in the text-entry box, then click Save.
| Manage system settings | 16

Security policy settingsThe security policy manages password rules, sessions settings, and Captcha settings. Additionally, it allows youto force users to change their passwords the next time they log in.
Note: Security policy settings configured on an enterprise organization are inherited by each sub organization.
Define password rulesThreats of security breaches have motivated organizations to develop stringent rules governing passwordcreation and mandatory password change cycles. BlackBerry AtHoc enables customizing the rules for passwordcreation and password complexity to conform to your organization’s policies, including compliance with theUnited States Department of Defense password requirements.
The Enterprise Administrator can access the Security Policy administration screen, change the rules for passwordcreation, and enforce a system-wide password update for all operators the next time the operators log in.
If you have the required permissions, you can define password creation rules by completing the steps below.
Important: In addition to the rules covered on the Security Policy screen, consider communicating the followingguidelines to your organization when defining passwords:
• Avoid words found in a dictionary, or a proper name, spelled forwards or backwards.• Avoid simple keyboard sequences with repeated keystrokes.• Avoid previously used passwords.• Avoid strings that reference personal information.
1. In the navigation bar, click .2. In the System Setup section, click Security Policy.3. In the Password Rules fields on the Security Policy screen, specify values based on the following information:
Note: If a password rule is unnecessary in your organization, type 0 (zero) as its value.
• Renew Password After—Force operators to change their passwords every n number of days. Type thenumber of days that a password is valid. Type 0 to never force operators to change their passwords.
• Renew Password After—Prevent operators from recycling recent passwords. For example, if you type 5 andthe system does not accept any of the last 5 passwords created by an operator. Type 0 to allow operatorsto use any previous password.
• Minimum Password Age—Set the minimum time interval for changing passwords. For example, type 15 toforce users to wait at least 15 days before changing their passwords.
• Minimum Changes in Password—Specify the minimum number of characters in a password, to preventusers from using very similar passwords. For example, type 5 to force users to change at least 5 characterseach time they change their passwords.
• Lock Account After—Prevent unauthorized attempts to guess an operator’s password. Type the maximumnumber of login attempts allowed. Operators cannot log in using the same username after a lockout.Type 0 to allow an unlimited number of login attempts.
• Reset Lockout After—If a lockout occurs, reset it after a specified number of minutes. Set to 0 (zero)to prevent the lockout from being automatically reset. For this last case, to reactivate the account, theAdministrator must go to Users > Users. Click the user's name, then click Edit Operator Permissions on theuser details screen. Click Unlock to change the status.
4. When you have finished updating the security policy settings, click Save.
| Security policy settings | 17

The updated password requirements go into effect for all new operators and for existing operators when theirpasswords expire. Operators whose passwords never expire do not have to change their passwords to conform toupdated password requirements.
Configure password complexityIn addition to creating password rules, if you have the required permissions, you can configure the level ofcomplexity required for user passwords.
1. In the navigation bar, click .2. In the System Setup section, click Security Policy.3. In the Password Complexity field on the Security Policy screen, select values from the drop-down lists for
each of the following components:
• Minimum Length—Specify the minimum number of characters that a password must contain. Select avalue between 7 and 20.
• Minimum Lowercase Characters (a-z)—Specify the minimum number of lowercase characters that apassword must contain. Select a value between 1 and 6. If no lowercase characters are required, select 0.
• Minimum Uppercase Characters (A-Z)—Specify the minimum number of uppercase characters that apassword must contain. Select a value between 1 and 6. If no uppercase characters are required, select 0.
• Minimum Numeric Characters (0-6)—Specify the minimum number of numeric characters (0-9) that apassword must contain. Select a value between 1 and 6. If no numeric characters are required, select 0.
• Minimum Special Characters—Specify the minimum number of special characters (!@#$%^&*()_+)that apassword must contain. Select a value between 1 and 6. If no special characters are required, select 0.
4. Click Save.
The updated rules go into effect for all new operators and for existing operators when their passwords expire.Operators whose passwords never expire do not have to change their passwords to conform to updatedpassword complexity rules.
Enforce a system-wide password updateIf you have the necessary permissions, you can enforce a system-wide password change with present passwordrules and complexity. Selecting this options forces all operators to change their password the next time they login. The operators whose passwords are set to never expire are exempt from this enforcement.
Important: After this action is taken, it cannot be undone.
1. In the navigation bar, click .2. In the System Setup section, click Security Policy.3. On the Security Policy screen, click Enforce password update.
Set session timeout and continue session valuesYou can set the maximum amount of time a user session can be inactive before auto-logout occurs and theamount of time prior to that time that a "Continue session?" pop-up appears.
1. In the navigation bar, click .2. In the System Setup section, click Security Policy.3. On the Security Policy page, in the Login Session section, enter a value in the Session Timeout field.
| Security policy settings | 18

4. In the Warning Before Session Timeout field, enter the number of minutes prior to auto-logout that the warningmessage will appear on the user's screen. If the user does not click to continue the session before the timerruns out, they will be logged out of the system automatically.
5. Click Save.
The Session Timeout value is applied the next time a user logs in to the BlackBerry AtHoc Management System.
Limit active sessionsYou can configure your BlackBerry AtHoc system to limit the number of active sessions a user can have open atthe same time with the same user account. Session information is maintained by a user's browser. Multiple tabson the same browser use the same session. When the active session limit is reached, the user is prompted toclose an existing session. The session that has been inactive for the longest time is terminated and the user isredirected to the login page.
Note: When the limit active sessions setting is configured on an enterprise organization, it is inherited by eachsub organization that does not have this setting defined.
1. In the navigation bar, click .2. In the System Setup section, click Security Policy.3. On the Security Policy page, in the Login Session section, select Limit Active Sessions.4. Select the number of allowed active sessions from the Active Sessions per User Account list. You can select
up to ten active sessions.5. Click Save.
Enable operator login using smart cardsWhen Smart Card authentication is enabled in addition to regular username/password authentication, users havethe option of logging in to BlackBerry AtHoc by inserting their Smart Card into a card reader and then entering aPIN. This is commonly used for Department of Defense systems.
Note: In order to use this option, you must set up Mapping IDs for each user through the Users manager.
1. In the navigation bar, click .2. In the System Setup section, click Security Policy.3. In the Smart Card Authentication field, select Smart Card Login.4. Click Save.
Require operator login using smart cardsWhen Smart Card authentication is required, users can only access BlackBerry AtHoc by inserting their Smart Cardinto a card reader and then entering a PIN. This is commonly used for Department of Defense systems.
Note: In order to use this option, you must set up Mapping IDs for each user through the Users manager.
1. In the navigation bar, click . 2. In the System Setup section, click Security Policy.3. In the Smart Card Authentication field, select Smart Card Login.4. Select Require Smart Card.5. Click Save.
| Security policy settings | 19

Effects of requiring smart card-only authentication
If you choose to require Operators to log in using Smart Cards, the following changes occur in the administrativeside of the BlackBerry AtHoc system:
• All sub organizations of the main organization inherit the Smart Card-Only authentication method.• The log in screen continues to display Username and Password fields because until a user attempts to log
in, the system has no way of knowing what organization the user belongs to and what restrictions, if any, theuser's organization has imposed on authentication.
• After the user attempts to log in with a username or password combination, the system returns an errormessage informing them that they must use their Smart Card for system authentication.
Enable CAPTCHA validationA CAPTCHA field is a security test that validates whether a human is entering content into a field rather than anautomated program by requiring users to enter the specific numbers or text that they see in an image into a text-entry field.
1. In the navigation bar, click .2. In the System Setup section, click Security Policy.3. Under Captcha Settings, select Enabled.4. Click Save.
| Security policy settings | 20

Monitor system healthThe supervision and monitoring framework within BlackBerry AtHoc graphically illustrates current status andabnormal conditions and failures in the Management System homepage, and provides access to its status andadministration functions.
Overview of system health monitoringBlackBerry AtHoc can monitor and supervise the operational status of the following:
• BlackBerry AtHoc internal modules and processes• Integrated systems and devices
This monitoring and supervision framework operates at global and organization levels, allowing you to do thefollowing:
• Define scheduled monitors of different types to check various system operational conditions.• Designate normal and abnormal operating conditions.• Define what actions to take when state transitions take place including proactive notification to system
administration and operation teams.• Access every monitor associated with the system through the System Visibility Console and view all monitors
that are in an Error state from a tab on the BlackBerry AtHoc homepage.
Review preconfigured health monitorsYour BlackBerry AtHoc system includes a set of default health monitors that are grouped into the sectionsdescribed below. When you create a new monitor, you can opt to add it to one of the groups or create a new groupand give it any name you want.
Note: Global monitors can be viewed from both the Global System Health and System Health links. However,organization monitors can be viewed only from the Organization view. In addition, monitors can be edited onlythrough the Global System or organization under which they were created.
The following sections provide brief descriptions of the different kinds of health monitors available in BlackBerryAtHoc.
Database
The following monitors are available in the Database section:
• Database Full Backup—This monitor runs a database query to identify the time of the most recent databasefull backup.
• Database Space—This monitor runs a database query to identify how much space is available in the databaseand throws an error if the TempDB size falls below the threshold that you specify.
• TempDB Size—This monitor identifies the minimum Microsoft TempDB data sizes required by BlackBerryAtHoc. The following sizes are recommended:
• 1 GB for Microsoft SQL Express edition• 2 GB for Microsoft SQL Standard edition• 4 GB for Microsoft SQL Enterprise edition
Web applications
The following monitors are available in the Web Applications section:
| Monitor system health | 21

• Bing GIS—This monitor tests the Bing GIS URL for responsiveness. You can edit this setting through the GlobalSystem Health screen.
• Desktop Client Server Interface—This monitor tests the Desktop Client Server Interface URL forresponsiveness.
• Management System Console—This monitor tests the Management System URL for responsiveness.• OEM—This monitor tests the OEM URL for responsiveness.
Services
The following monitors are available in the Services section:
• IIS Longevity—This monitor tests how well the Web Application is operating by evaluating the BlackBerryAtHoc diagnostic logs.
• Scheduled Job Queue—This monitor tests how well the Scheduled Job Queue is operating by running a queryon the database.
• System Tasks—This monitor tests how well the system task are functioning by running a query on thedatabase.
• Tracking & Reporting—This monitor tests how well the Tracking & Reporting system is operating by running aquery on the database.
Delivery gateways
The following monitors can be in the Delivery Gateway section:
• AtHoc Cloud Delivery Service (East)—This monitor tests the connectivity of the AtHoc cloud delivery service.• AtHoc Cloud Delivery Service (West)—This monitor tests the connectivity of the AtHoc cloud delivery service.• AtHoc Mobile Service—This monitor tests the connectivity between the current organization and the AtHoc
Mobile Service.• OEM Cloud Delivery Service (East)—This monitor tests the connectivity of the OEM cloud delivery service.• OEM Cloud Delivery Service (West)—This monitor tests the connectivity of the OEM cloud delivery service.
General
The following monitors are in the General section:
• CAP Events Process—This monitor checks the CAP events processor to see if it is correctly processing CAPevents.
• CAP Polling Agent—This monitor checks the CAP Polling agent to see if data is being correctly added to thedatabase.
• Database Tables - Identity Seed Max Limit—This monitor checks the identity seed values across tables todetermine if they are within the safe limit.
• Desktop Notifier Load Balancing—Monitors the Desktop App incoming traffic across two or more applicationservers. Warnings are provided when the load is not balanced evenly across all servers.
• Online Users—This monitor identifies the number of Online Users using desktop popup alerts within the past24 hours.
• IIM—This monitor checks the status of connectivity between the BlackBerry AtHoc system and IIM.
Alert publishing
The following monitor is available in the Alert Publishing section.
• Delivery—This monitor checks delivery batches for the alert publishing cycle and report if there have beenpublishing errors within the last 24–48 hours.
• Publishing—This monitor checks live publishing activity, and reports if alerts do not go live within a specifiedamount of time.
| Monitor system health | 22

View the list of system health monitors with errorsYou can review a list of all system health monitors that are currently in an Error state.
1. In the navigation bar, click .2. In the System Setup section, click Global System Health or System Health, depending on whether you want to
review the error list for the global system or organization.
The System or Organization Visibility Console screen opens, displaying an Errors & Warnings section at thetop. The monitors that appear in this section represent all of the monitors that are currently in an Error state.
3. Click any of the monitor names in the Errors & Warnings section to view details about the correspondingmonitor.
The screen that appears contains a large red field at the top that explains why the monitor is in an Error state anda Testing history field below it that shows the state of the monitor during each of the recent tests.
Create a system health monitor1. In the navigation bar, click .2. In the System Setup section, click Global System Health or System Health, depending on which system
contains the monitor that you want to edit.
The System Visibility Console screen opens, displaying all of the system monitors in the system.3. Click Create new monitor at the top of the screen to open the New Health Monitor screen.
Note: You can also click any of the Create new monitor links within the groups on the System VisibilityConsole screen. The difference is that when you click a link within a group, the New Health Monitor screenthat opens has the Is it associated with other Health Monitors? field preset to the name of the group the linkappeared within.
4. Complete the fields in the following sections.5. Click Save. The system evaluate the parameters you set and if they are correct, creates a new monitor. If the
syntax in any of the conditions is incomplete or incorrect, an error message is displayed.
Basic details
• Enter the name of the monitor, the location where you want it to appear on the Visibility Console screen, andthe time and frequency of the monitoring checks.
• Designate whether or not the monitor will appear on the Organization Visibility Console and whether errors andwarnings about the monitor will appear on the System area on the BlackBerry AtHoc homepage.
How does this Monitor test the system?
Select the kind of test the Monitor will run on the system. Note that the type of test cannot be edited after it issaved.
The following options are available:
• Web URL Test• Combined Health Monitors• BlackBerry AtHoc Event Logs• Database Procedure• UAP Health Test
After you make a selection, sample configuration XML for that type of test appears below the Test Configurationfield. Use that as the basis for the XML code you enter into the Test Configuration field.
| Monitor system health | 23

How is the state of this Health Monitor determined?
Designate the way the state of the monitor will be determined by selecting one of the following options:
• Use the most recent test result• Calculate it over multiple test results—If you select this option, use the drop-down lists in the section to
specify how the calculation should be determined. Optionally, select Match the state if if you want to also use"X" number of identical test results as a trigger for a state change, where you set the value for X.
What happens when this Health Monitor reaches a particular state?
For each of the Health Monitor states, specify the following:
• The implications of the state:
• Error—The test returned an error condition on the object being tested.• Warning—The test returned a warning condition on the object being tested.• Good—The test run returned the expected results.• Inoperative—The test process failed. This does not reflect health of the object being tested, rather it
indicates operational status of the monitor itself. For example, if in a database query, the databasereferenced has a typo and the system cannot find the database to query.
• Actions to take when the monitor is in the selected state:
Define the actions that should be taken any time a monitor transitions into each of the states. To make thisprocess faster and less prone to errors, click Show a list of possible actions for each state and then add eitheror both of the actions—Trigger a URL or Send an Email— on the pop-up screen for the Configure field.
Edit a health monitor1. In the navigation bar, click .2. In the System Setup section, click Global System Health or System Health, depending on which system
contains the monitor you want to edit.
The System Visibility Console screen opens, displaying all of the system monitors in the system.3. When you locate the monitor you want to edit, click its name.4. The monitor details screen opens, displaying the current state of the monitor along with its recent testing
history.5. Click any or all of the sections on the screen to edit the fields within them.6. When you have finished editing the monitor details, click Save at the bottom of the screen.
Testing history
Change the granularity of the time frame displayed in the history table by clicking Hourly, Daily, Weekly,or Monthly.
Change the block of time you are looking at by clicking and . If the granularity is set to Monthly, forexample, click the Previous button to display the testing history for the previous month.
Basic details
Change the name of the monitor, its location on the Visibility Console screen, and the time and frequency of themonitoring checks.
Change the setting that determines whether the monitor appears on the Organization Visibility Console andwhether errors and warnings about the monitor appear on the System tab on the BlackBerry AtHoc homepage.
Database Procedure
| Monitor system health | 24

Update the test configuration script that is used in the monitor.
How is the state of this Health Monitor determined?
Change the way the state of the monitor is determined by selecting the other option: most recent result or combinedresults.
What happens when this Health Monitor reaches a particular state?
Change the implications of any or all of the states, and configure different transaction actions for any or all of thestates.
Special Case: Edit the IIS Longevity Health Monitor
If you have more than one application server, you need to modify the default settings for the IIS Longevity healthmonitor using the following values:
• WarningCountThreshold—Default value: 2. This default assumes one application server. For a multipleapplication server installation, change the value of WarningCountThreshold to (application server count) x(default). For example, if there are two application servers, the value should be 4.
• ErrorCountThreshold—Default value: 5. The default setting assumes one application server. For a multipleapplication server installation, change the value of ErrorCountThreshold to (application server count) x(default). For example, if there are two application servers, the value should be 10.
Disable a system health monitor1. In the navigation bar, click .2. In the System Setup section, click Global System Health or System Health, depending on which system
contains the monitor you want to disable.
The System Visibility Console screen opens, displaying all of the system monitors in the system.3. When you locate the monitor you want to disable, click Disable.
The System Visibility Console screen refreshes and the monitor appears with no icon next to its name and twobuttons—Enable and Delete—in the row.
Enable a system health monitor1. In the navigation bar, click .2. In the System Setup section, click Global System Health or System Health, depending on which system
contains the monitor you want to enable.3. The System Visibility Console screen opens, displaying all of the system monitors in the system.4. When you locate the monitor you want to enable, click Enable in its row.5. The System Visibility Console screen refreshes and the monitor appears with either a green or a red next
to its name and Refresh, Disable, and Delete buttons in the row.
Delete a system health monitor1. In the navigation bar, click .2. In the System Setup section, click Global System Health or System Health, depending on which system
contains the monitor you want to delete.
| Monitor system health | 25
The Organization Visibility Console screen opens, displaying all of the system monitors in the system.3. When you locate the monitor you want to delete, click Delete in its row.
A warning screen opens, asking you to confirm that you want to delete the monitor and advising you thatdeleting the monitor will permanently delete all history and configuration for the monitor.
4. Click OK.
The System Visibility Console screen refreshes and the monitor no longer appears on the screen.
Refresh a system health monitorAlthough health monitors refresh automatically based on their internal monitor schedule, you can refresh amonitor manually at any time.
1. In the navigation bar, click .2. In the System Setup section, click Global System Health or System Health, depending on which system
contains the monitor you want to refresh.
The System Visibility Console screen opens, displaying all of the system monitors in the system.3. When you locate the monitor you want to refresh, click Refresh in its row.
The System Visibility Console screen refreshes and the "Last tested" information next to the monitor nameupdates to the current time and date.
4. The Testing history field on the monitor details screen also updates, displaying the time and date you manuallyrefreshed the monitor with the words Manually Run Test.
| Monitor system health | 26
View the diagnostic logThe diagnostic log allows you to view various logs and events and export that information to a .csv file, which canbe then sent to BlackBerry AtHoc Technical Support for troubleshooting purposes. You can export a maximum of30,000 events.
1. In the navigation bar, click .2. In the System Setup section, click Diagnostic Log. The diagnostic log appears.3. Optionally, at any time, click Refresh to refresh the log manually and show the most recently received alerts.4. Optionally, click Clear Log to remove all entries from the log.
Note: You must be logged in to the System Setup (3) organization and have system administrator permissionsto clear the diagnostic log
5. Optionally, click Export to export the contents of the log to a .csv file. As soon as you click Export, a drop-down list appears, allowing you to choose between downloading the current page of results or the last 30,000results.
Run a basic search of the diagnostic log
To limit the number of events displayed in the diagnostic log, you can run a basic or advanced search of thecontents.
1. Enter a single search criteria—such as an event ID, event type, or server name—in the Search field.2. Click .
Run an advanced search of the diagnostic log
1. Click Advanced.2. In the Advanced search section, enter search criteria in any combination of the following fields:
• Event Id• Type• Server• Assembly• Module• Member• Short Message• Time• Thread Id
3. Click Search.
| View the diagnostic log | 27

Database archivingDatabase archiving is an important system task. If the database becomes full, the system will fail. From theDatabase Archiving Job system task, the administrator can see the current size of databases and execute thearchiving job as needed. A warning displays on the BlackBerry AtHoc homepage when the database size reaches90% of capacity.
1. In the navigation bar, click .2. In the System Setup section, click Archive.
Note: If archiving needs to be performed, a status message appears at the top of the Database Archivingscreen that opens.
3. Review the details on the screen to determine which database or databases will be archived. You can do thisby comparing the current size of each database against the maximum size allowed. If previous archiving jobshave been run, details of those jobs appear in the History table below the Database Status table.
4. Click Archive.
A Database Archiving Activation screen opens, listing important information you must know before continuingwith archiving
5. Read the entire screen of explanations and cautions about archiving.6. In the Data Deletion Settings field, specify the minimum number of days old data must be in order to be
archived.7. Select the check box at the bottom of the screen to indicate you have read the explanations and understand
the conditions.8. Click Start Archiving Job.
Note: If an archiving job seems to be running for a long time, check the BlackBerry AtHoc Process status tomake sure that the service is running.
| Database archiving | 28
Organizations ManagerUse Organizations Manager to create organizations for your system.
Note: Administrators who manage multiple organizations must be assigned the System Administrator role.Having only the Administrator role is not sufficient and does not allow assigning operators in other organizations.
To assign roles, see "Manage advanced settings for operators" in the BlackBerry AtHoc Manage Users Guide.
For detailed configuration steps, see "Configure the BlackBerry AtHoc Management System for AtHoc Connect" inthe BlackBerry AtHoc Connect User Guide.
Create an organization1. In the navigation bar, click .2. In the System Setup section, click Organizations Manager.3. Click New.4. Enter a name for the new organization.5. Select one of the following organization types:
• Enterprise—Choose this type if you are logged into System Settings and are creating an Enterpriseorganization.
• Sub Organization—Choose this type if you are logged in to an Enterprise organization and are creating amember organization.
• Basic—Choose this type if you are creating a Basic organization.6. Select a locale for the organization.7. Click Save.
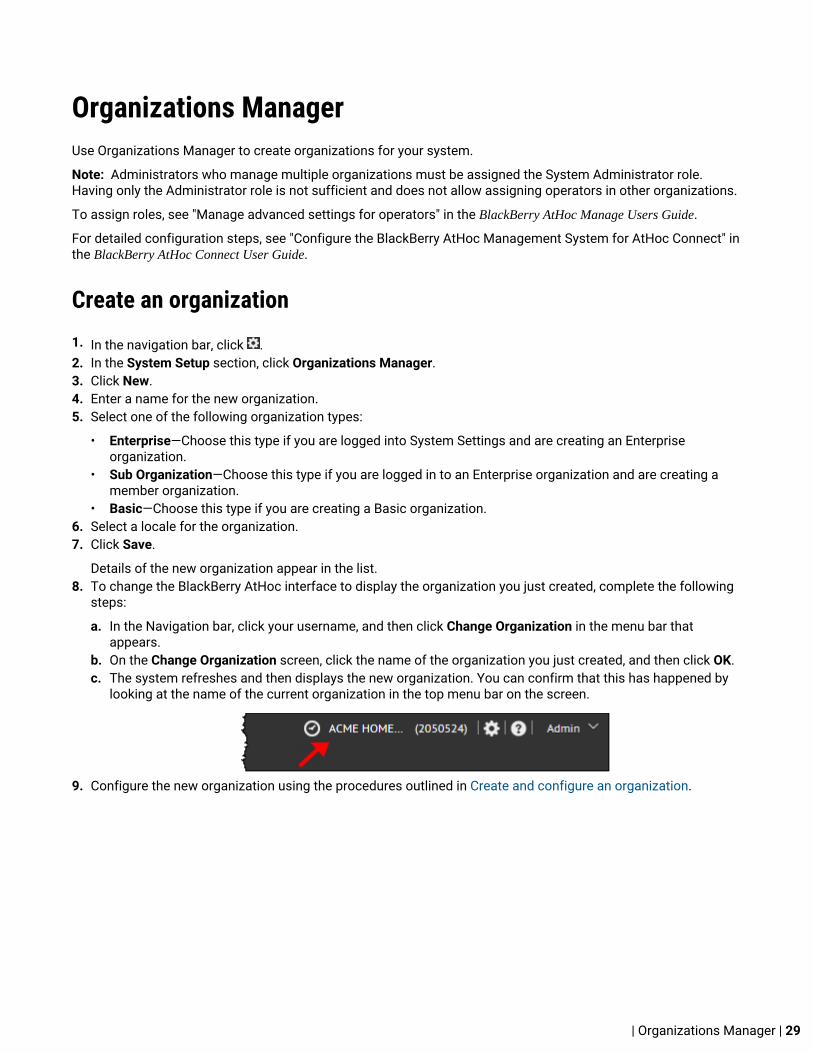
Details of the new organization appear in the list.8. To change the BlackBerry AtHoc interface to display the organization you just created, complete the following
steps:
a. In the Navigation bar, click your username, and then click Change Organization in the menu bar thatappears.
b. On the Change Organization screen, click the name of the organization you just created, and then click OK.c. The system refreshes and then displays the new organization. You can confirm that this has happened by
looking at the name of the current organization in the top menu bar on the screen.
9. Configure the new organization using the procedures outlined in Create and configure an organization.
| Organizations Manager | 29

Enable and disable featuresNote: The Feature Enablement section is for internal BlackBerry AtHoc use only.
You can enable and disable features at a system, enterprise, or individual organization level. You must havesystem administrator permissions to enable or disable features.
Feature enablement is inherited from parent organizations by default. Feature enablement on a system level isinherited by all organizations in the system. Feature enablement on an enterprise organization is inherited by itssub organizations. You can override these inheritance rules by explicitly enabling or disabling a feature on anenterprise or individual organization.
1. Log in to the BlackBerry AtHoc management system as a system administrator.2. In the navigation bar, click .3. In the System Setup section, click Feature Enablement. The Feature Enablement page opens and displays the
features currently available in the system.
The Organization column displays the organization where the feature is explicitly enabled. The Enabled columndisplays the current status of the feature, and whether this value is due to inheritance. For example, True in theEnabled column indicates that the feature is enabled in the current organization, while Inherit (True) indicatesthat the feature is enabled due to inheritance rules.
Note: If a feature has been explicitly enabled or disabled in the organization you are currently logged in to, thefeature row appears in bold.
4. Click the row for the feature you want to enable or disable.5. On the Edit Feature Enablement window, from the Enabled list, select True to enable the feature, False to
disable the feature, or Inherit. If you select Inherit, the feature status is inherited from the parent organization.
Note: The Inherit option is not displayed for a system level organization.6. Optionally, select the Force all children to inherit option if you want the feature status you are setting to be
inherited by all child organizations, regardless of the feature status set on those child organizations.
Note: This option is not available for sub organizations.7. Click Save.
| Enable and disable features | 30

Manage the agents for integrated devicesIf you have the necessary permissions, the Integration Manager screen allows you to view and edit agents forcommunicating with external devices, such as fire panels.
Note: The full Configuration XML for public agents is visible on the System Setup (3) organization. For enabledorganizations, only the relevant Configuration XML is displayed.
For more information about creating, editing, and deleting agents, see the BlackBerry AtHoc Honeywell NotifierCAP Gateway Integration Implementation Guide.
| Manage the agents for integrated devices | 31

Provision applications that can call the web APIYou can provision a new API integration with the BlackBerry AtHoc management system. You must haveorganization administrator, enterprise administrator, or system administrator permissions to provisionapplications. You must have system administrator permissions to enable a provisioned application.
Note: The Client ID and Client Secret can only be used in the organization in which they are created. If the ClientID and Client Secret are created in the System Setup (3) organization, they can be used in any organization. If theClient ID and Client Secret are created in an Enterprise organization, they can be used in any of that Enterprise'ssub organizations. If the Client ID provided does not follow these inheritance rules, a 400 (Bad request) error codeis returned.
To provision a new API integration, complete the following steps:
1. Log in to the BlackBerry AtHoc management system as an organization administrator, enterprise administratoror system administrator.
2. In the navigation bar, click .3. In the System Setup section, click API Applications.4. On the API Applications window, click New.5. On the New API Application window, enter a name for the API integration.6. (System administrators only) Next to Status, select Enabled.7. In the Authentication section, select a Grant Type. Password is the default. If you select Implicit, enter a
redirect URI in the text box that appears.8. Click Save. A Success message appears that includes the Client ID and Client Secret.9. Take note of the displayed Client Secret. It is displayed only once and will need to be regenerated if lost.
Note: After you provision your application in the BlackBerry AtHoc management system, contact BlackBerryAtHoc Customer Support to have the application reviewed and enabled.
Reset the client secret
If you need to reset the client secret for your API integration, complete the following steps:
1. Log in to the BlackBerry AtHoc management system.2. In the navigation bar, click .3. In the System Setup section, click API Applications. The API Applications window opens.4. Optionally, enter a name in the search box to filter the list of applications.5. Optionally, select Enabled Applications or Disabled Applications from the All Applications list to filter the list
of applications.6. Click the application you want to modify.7. Click Reset Client Secret. A confirmation window opens.
Note: Any existing calls to the selected API with the existing client secret will be blocked when you reset theclient secret.
8. Click Continue. You are returned to the API application window. The new client secret is displayed.9. Take note of the displayed client secret.10.Click Save.11.Add the new client secret to your authentication payload.
| Provision applications that can call the web API | 32
Configure API throttling settingsNote: The API Throttling section is for internal BlackBerry AtHoc use only.
Throttling of API usage is required to protect BlackBerry AtHoc server resources from being over-used, or usedin ways that are not intended by BlackBerry AtHoc that can result in slow responsiveness. Throttling limits areapplied to overall API usage by any single caller, client, organization, or endpoint. If an API call has reached itsthrottle limit, the server returns a 429 (Too Many Requests) error.
To configure API throttling settings, complete the following steps:
1. Log in to the BlackBerry AtHoc management system as a system administrator.2. Change to the System Setup (3) organization. 3. In the navigation bar, click .4. In the System Setup section, click API Throttling.5. On the API Throttling window, complete the steps in the following topics to configure client and endpoint
whitelists, general rules, and client rules.6. Click Save.
WhitelistIn the Whitelist section, system administrators can specify endpoints and clients to be whitelisted . Whitelistedclients and endpoints are exempt from API throttling.
1. Select one or more clients from Client Whitelist to add them to the whitelist.2. Click Add Endpoint to add an endpoint to the whitelist. A new row appears in the list.
a. Select a Verb from the list to specify a request type (for example, GET).b. Enter a URL in the URL field.c. Click Save.
The endpoint is added to the endpoint whitelist.3. Optionally, click to edit an endpoint.4. Optionally, click to remove an endpoint.
General rulesIn the General Rules section, system administrators can add general rules that apply to all endpoints.
1. Click Add General Rule. A new row appears in the list.
a. Select a Verb from the list to specify a request type (for example, GET).b. Optionally, in the URL field, append a URL to api/v2/. Use * as a wildcard in a URL. Enter only * to specify all
endpoints.c. Specify a time (in minutes) and a limit for the number of requests.d. Click Save.
2. Optionally, click to edit a general rule.3. Optionally, click to remove a general rule.
| Configure API throttling settings | 33
Client rulesIn the Client Rules section, system administrators can add rules that apply to specific clients. Rules applied to aspecific client override rules specified in the General Rules section.
1. Click Add Client Rule.2. In the Add Client Rule window, select a client from the list.3. Click Add Client Rule. A new row appears.
a. Select a Verb from the list to specify a request type (for example, GET).b. Optionally, in the URL field, enter the client URL.c. Specify a time (in minutes) and a limit for the number of requests.d. Click Save.
4. Optionally, repeat Step 3 to add additional client rules. You can add multiple rules for a single client.5. Click Add.6. Optionally, click to edit a client rule.7. Optionally, click to remove a client rule.
| Configure API throttling settings | 34

View the operator audit trail reportThe Operator Audit Trail report enables authorized users to audit the system based on a specific operator oraction performed in the BlackBerry AtHoc system, such as login attempts or password changes.
1. In the navigation bar, click .2. In the System Setup section, click Operator Audit Trail.3. The Operator Audit Trail screen opens.
From the Operator Audit Trail screen, you can perform any of the following actions:
• Change the report time frame by selecting different From and To dates. Enter the dates manually orclick and select each date on the pop-up calendar. The report that is generated will then include activitiesbetween and including the To and From dates you select.
• Enter an operator name or ID in the Operator field to view their activity in the system. If no value is entered inthis field, all operators are included in the report.
Important: The Operator field is not case-sensitive and you can use the ‘?’ wildcard to substitute for a singleletter or the ‘*’ wildcard to substitute for a string of letters.
• View all activities by leaving the Entity field set to the default value of All Entities or view activities for aspecific entity by selecting one from the list.
To further filter activities, select an entity and then select Search by Specific Action(s). In the Action(s) field,click the list and select each of the actions that you want to use as filter criteria.
Note: If you apply filtering criteria, you must click Search to refresh the screen and view the updated resultslist.
• Export or print the System Log Report by completing either of the following steps:
• If Microsoft Excel is installed on your computer, click Download excel file, then either save the report to alocation on your machine or open the report directly.
• Click Printer friendly report to view the formatted report in a new browser window, then use thebrowser's Print command to print the report.
View an alerts usage summary reportAlerts Usage Summary reports are used to determine how many reports or messages have been sent out withina designated amount of time. To create one of these reports, follow the instructions in the "Create and view analerts usage summary report" section of the BlackBerry AtHoc Manage Alert Tracking and Reporting Guide.
| View the operator audit trail report | 35
Manage system jobsYou can manage common system jobs such as database archiving and purging log data from within BlackBerryAtHoc. If you have Administrator permissions, for each system job you can do any of the following:
• View the status of historical runs (start time, end time, duration, result)• Determine the next scheduled run date and time• Manually run the system task
View details about system jobs1. Log in to the BlackBerry AtHoc management console.2. Click the down arrow beside your log in name and select Change Organization.3. Change to the System Setup (3) organization.4. In the navigation bar, click .5. In the System Setup section, click System Jobs.
The System Tasks screen opens, displaying a list of all automated jobs in the system.6. Click the name of any task to view additional details.
From the task details screen, you can perform any of the following tasks:
• View a description of the task.• View the run interval and the last run time for the task.• View a history of the most recent runs of the task, including the start time, end time, and duration of each
run.• Click Click to Disable (for active tasks) or Click to Enable (for inactive tasks) to change the current status
of the task.• Click Run now to manually initiate the task.• Click OK in the corresponding History table to view the job log for any recent run.
Descriptions of the System Jobs
The following jobs are displayed on the System Tasks screen:
• AtHoc Connect Update Alert Responses—This job updates the AtHoc Connect with organization alertresponses.
• AtHoc Connect User-Base Sync—This job synchronizes the IAC user base with the agreement state in AtHocConnect.
• Auto Delete Users—This job deletes end users based on the settings configured on the Disable and Delete EndUsers screen.
• Auto Disable Users—This job disables end users based on the settings configured on the Disable and DeleteEnd Users screen.
• Cap Event Processor—This job processes captured inbound CAP events and publishes an alert for eachinbound alert based upon the rules configured for the Agent.
• Cap Feed Poller—This job fetches the index feed and creates a queue entry in the BlackBerry AtHoc databasequeue.
• Delivery Batch Recovery—This job recovers batches with incomplete delivery due to gateway related failures.• Delivery Batch Retry—This job resets delivery batches that have either timed out or completed with error.• Desktop Sessions Maintenance—This job cleans up stale sessions and updates the online users graph that is
visible on the homepage.• Email Publisher—This job processes alert publishing requests that are sent by email.
| Manage system jobs | 36

• Export MAS Data—This job builds packages that can be downloaded later as part of the Mobile AlertingSystem (MAS) synchronization process.
• IEM IPAWS Plugin Agent - For All VPS—This job communicates with IPAWS for all organizations on theserver.
• Process Accountability Event Job for Recipient Re-Compute—This job manages accountability eventsrecipient re-computation.
• Process Accountability Event Job for Reminder—This job manages accountability events related to sendingreminder alerts.
• Process Accountability Events for Status Update—This job manages the status attribute value changes foraffected uses during the accountability event lifecycle.
• Process Accountability Events for End—This job manages accountability events lifecycle and statusmanagement.
• Process Accountability Events—This job manages accountability events tracking summary.• Process Alerts Tracking Summaries—This job generates an alert tracking summary for live alerts and alerts
that have ended within the past 4 hours.• Process NDMS Tracking—This job retrieves tracking data from NDMS systems and updates Alert reports
within the system. Each NDMS system appears on a separate line on the screen, allowing you to view thespecific details for that NDMS.
• Process NDS Tracking—This job retrieves tracking data from NDS systems and updates Alert reports withinthe system. Each NDS system appears as a separate line on the screen, allowing you to view the specificdetails for that NDS.
• Purge Older Logging Data—This job removes any temporary or transient data from the database tables that isno longer required. Runs daily at 11:00 PM.
• Rebuild Database Indexes—This job performs weekly index maintenance on the databases.• Sync Cross System Dist Lists—This job synchronizes Distribution Lists within the master organization with the
latest distribution lists in sub organizations.• System Diagnostics Report—This job runs diagnostic stored procedures and collects the output in a
diagnostic log.
Create and export a system diagnostics reportDuring a service call, BlackBerry AtHoc Technical Support might ask you to export the System Diagnostics Reportand then send the results to them. The System Diagnostics Report job runs every day at 12:00 PM and the reportappears in the Diagnostic Log as an event. If asked, you might also need to run the report job before exporting thereport.
1. In the navigation bar, click .2. In the System Setup section, click System Jobs. The System Tasks screen opens, displaying a list of all
automated jobs in the system.3. If requested by BlackBerry AtHoc Technical Support, run the diagnostics job by completing the following steps:
a. Click System Diagnostics Report at the bottom of the tasks list.b. On the System Diagnostics Report screen, click Run now.
4. After the report runs, click the , then click Diagnostic Log in the System to open the diagnostic log.5. Use the search field at the top of the screen to find all of the System Diagnostics Reports in the system.6. In the results list, click the most recent report to open it.7. Click Export at the top of the screen.8. When prompted, save the diagnostic log to the default file, AtHocEventViewer.xml.9. Send the report to your contact in BlackBerry AtHoc Technical Support.
| Manage system jobs | 37

Configure device gatewaysTo set up alert delivery devices, you must configure the gateway for each device. The gateway is an API thattranslates alert text to XML format and delivers it to the provider for a device. The provider can be a BlackBerryAtHoc service (such as AtHoc Cloud telephony) or a third-party provider.
1. In the navigation bar, click .2. In the Devices section, click the name of the device gateway that you want to configure.
The gateway configuration settings screen opens. The values that you need to provide depend on the deviceyou want to configure. The following table specifies how you can find configuration values for a particulardevice.
Gateway Documentation
ADT Giant Voice Custom device gateway: Contact BlackBerry AtHocTechnical Support if you need to configure thisgateway.
AM Radio Broadcast Custom device gateway: Contact BlackBerry AtHocTechnical Support if you need to configure thisgateway.
AM Radio Bluegrass Custom device gateway: Contact BlackBerry AtHocTechnical Support if you need to configure thisgateway.
American Signal Giant Voice Custom device gateway: Contact BlackBerry AtHocTechnical Support if you need to configure thisgateway.
American Signal Giant Voice - V2 Custom device gateway: Contact BlackBerry AtHocTechnical Support if you need to configure thisgateway.
AtHoc Cloud Delivery Service (East Coast) Configure the hosted gateway for cloud services
AtHoc Cloud Delivery Service (West Coast) Configure the hosted gateway for cloud services
Mobile App Configure the AtHoc Mobile App
AtHoc Organization Network BlackBerry AtHoc Connect Plug-in for NDS:Configuration Guide
ATI Giant Voice BlackBerry AtHoc ATI Giant Voice System Installationand Configuration Guide
Benbria Classroom Emergency Notification Custom device gateway: Contact BlackBerry AtHocTechnical Support if you need to configure thisgateway.
BlackBerry Messenger BBM Enterprise Alerts Installation and AdministrationGuide
| Configure device gateways | 38

Gateway Documentation
Cable TV + Radio Custom device gateway: Contact BlackBerry AtHocTechnical Support if you need to configure thisgateway.
Cable TV Scroller Custom device gateway: Contact BlackBerry AtHocTechnical Support if you need to configure thisgateway.
CentrAlert Custom device gateway: Contact BlackBerry AtHocTechnical Support if you need to configure thisgateway.
Cisco Digital Media Player Cisco Digital Media Server Configuration Guide
Cisco UCM (Blast) BlackBerry AtHoc Blast Configuration Guide
Cisco UCM (TAS) BlackBerry AtHoc Telephony Alerts System OperationsGuide
Cisco Unified Communication Manager BlackBerry AtHoc Telephony Alerts System OperationsGuide
Desktop App Configure desktop app settings
BlackBerry AtHoc Desktop App Installation andConfiguration Guide
Eaton WAVES Blackberry AtHoc Eaton WAVES Giant Voice SystemInstallation and Configuration Guide
Emergency Digital Information Service (EDIS) Custom device gateway: Contact BlackBerry AtHocTechnical Support if you need to configure thisgateway.
Federal Signal Giant Voice BlackBerry AtHoc Federal Signal Giant Voice SystemInstallation and Configuration Guide
IPAWS CAP Exchange, EAS, NWEM, and WEA, BlackBerry AtHoc IPAWS Plug-in for NDS Installationand Configuration Guide
Land Mobile Radio Custom device gateway: Contact BlackBerry AtHocTechnical Support if you need to configure thisgateway.
Land Mobile Radio - Eastman Custom device gateway: Contact BlackBerry AtHocTechnical Support if you need to configure thisgateway.
LRAD Giant Voice Blackberry AtHoc LRAD Giant Voice System Installationand Configuration Guide
| Configure device gateways | 39

Gateway Documentation
Microsoft Lync Server Microsoft Lync Server 2013 Plug-In forNDS Configuration Guide
Monaco Warning System BlackBerry AtHoc Monaco Warning System Installationand Configuration Guide
Motorola ACE 3600 Custom device gateway: Contact BlackBerry AtHocTechnical Support if you need to configure thisgateway.
Notification Delivery Managed Service (NDMS) Configure the Notification Delivery Managed Servicegateway
OEM Cloud Delivery Service (East) Configure the hosted gateway for cloud services
MIR3 Installation and Configuration Guide
OEM Cloud Delivery Service (West)
MIR3 Installation and Configuration Guide
On-Premise Email On-Premise Email Installation and Configuration Guide
RGM Digital Signage BlackBerry AtHoc Digital Signage Installation andConfiguration Guide
RSS Feed
Talk-A-Phone Giant Voice Custom device gateway: Contact BlackBerry AtHocTechnical Support if you need to configure thisgateway.
TechRadium Custom device gateway: Contact BlackBerry AtHocTechnical Support if you need to configure thisgateway.
Text Messaging SMS Installation and Configuration Guide
Twitter BlackBerry AtHoc Twitter Configuration and User Guide
Whelen Giant Voice, v1 Custom device gateway: Contact BlackBerry AtHocTechnical Support if you need to configure thisgateway.
Whelen Giant Voice, v2 BlackBerry AtHoc Whelen Giant Voice SystemInstallation and Configuration Guide
Xml Feed Configure XML feed information for masscommunication devices
| Configure device gateways | 40

Gateway Documentation
Xml Feed Reset Custom device gateway: Contact BlackBerry AtHocTechnical Support if you need to configure thisgateway.
Zetron Pager Custom device gateway: Contact BlackBerry AtHocTechnical Support if you need to configure thisgateway.
Zetron Pager Group Custom device gateway: Contact BlackBerry AtHocTechnical Support if you need to configure thisgateway.
3. Configure the values based on the device and information provided by BlackBerry AtHoc Technical Support orthe configuration information provided in the referenced documents.
4. Click Save.
Configure the AtHoc Mobile AppUse the Devices screen to verify available devices, check settings, and if necessary, disable or restore specificdevices such as mobile devices for the Personal Safety Service. You can also control and edit permissions tomake certain device addresses only available to operators, or to end users, or to both roles.
Configure the Mobile App gateway to deliver alerts to and receive alerts from the mobile device.
Configure the Mobile App gatewayContact BlackBerry AtHoc Technical Support for assistance in setting up the Mobile App for BlackBerryAtHoc. Before you begin this process, you should also contact your System Administrator to get the NDS addressused for the notification delivery server.
1. In the navigation bar, click .2. In the Devices section, click Mobile App.
The Mobile App gateway configuration screen opens with the default settings that are listed in the followingtable.
Option Description
Notification Delivery Server Settings
Notification Delivery Server Address https://mobile.athoc.com
Username Should be between 3 and 100 characters long
Password Should be between 3 and 100 characters long
| Configure device gateways | 41

Option Description
Debug Trace Default: No
Yes
Avoid performance degradation by enabling debugtracing for the mobile delivery gateway only whileactively debugging the mobile notifications for theMobile application.
Features
Alerts Selected
Map Unselected
Alert Publishing Unselected
Advanced Features Unselected. When selected, advanced settingsdisplay that required a distribution list for access.Options include Emergencies, Check In, Reports,and Tracking. To learn about the advancedfeatures, Role-based permissions for the mobileapp.
Settings
Photo Quality Default: Low
High
Video Quality Default: Low
High
Emergency Contact Number Designate the emergency contact telephonenumber. If no phone number is entered in the field,the Mobile App will not have an emergency contactnumber button.
Support Email Address Enter an email address that administration log andfeedback from the mobile app can be sent to.
Enable Mobile Analytics Collects mobile app usage analytics. No personal,private, or sensitive information is collected.
Default: No
Yes
| Configure device gateways | 42
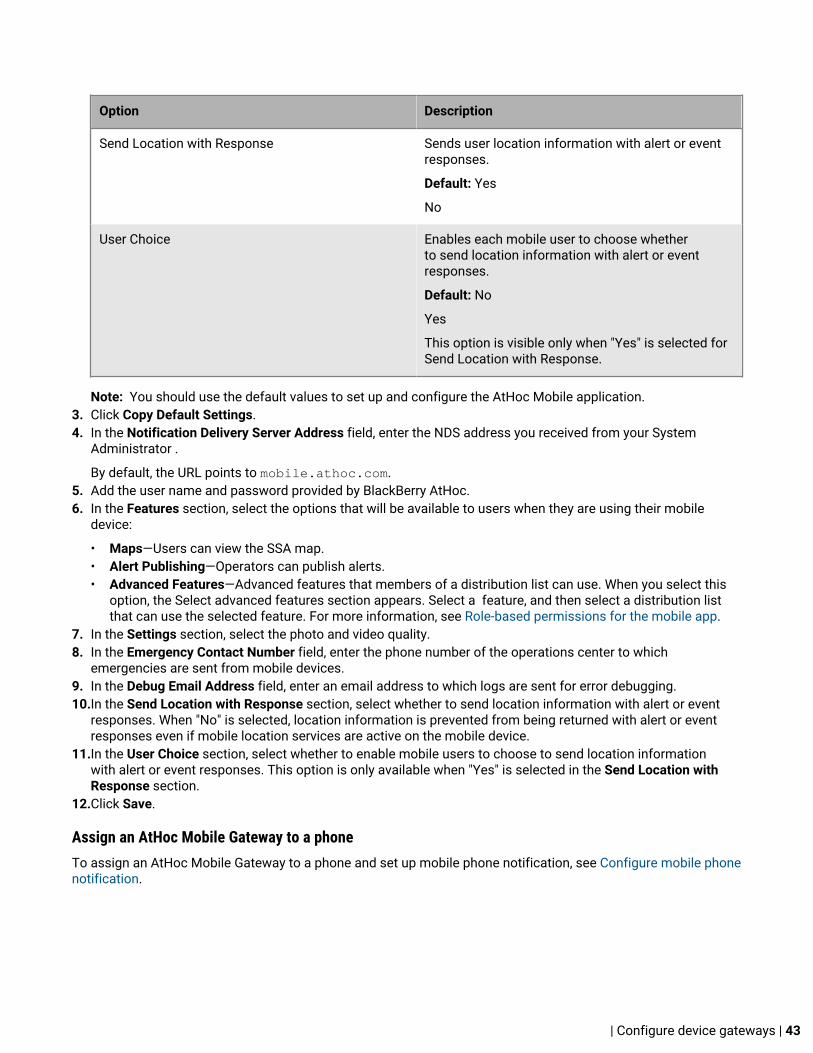
Option Description
Send Location with Response Sends user location information with alert or eventresponses.
Default: Yes
No
User Choice Enables each mobile user to choose whetherto send location information with alert or eventresponses.
Default: No
Yes
This option is visible only when "Yes" is selected forSend Location with Response.
Note: You should use the default values to set up and configure the AtHoc Mobile application.3. Click Copy Default Settings.4. In the Notification Delivery Server Address field, enter the NDS address you received from your System
Administrator .
By default, the URL points to mobile.athoc.com.5. Add the user name and password provided by BlackBerry AtHoc.6. In the Features section, select the options that will be available to users when they are using their mobile
device:
• Maps—Users can view the SSA map.• Alert Publishing—Operators can publish alerts.• Advanced Features—Advanced features that members of a distribution list can use. When you select this
option, the Select advanced features section appears. Select a feature, and then select a distribution listthat can use the selected feature. For more information, see Role-based permissions for the mobile app.
7. In the Settings section, select the photo and video quality.8. In the Emergency Contact Number field, enter the phone number of the operations center to which
emergencies are sent from mobile devices.9. In the Debug Email Address field, enter an email address to which logs are sent for error debugging.10.In the Send Location with Response section, select whether to send location information with alert or event
responses. When "No" is selected, location information is prevented from being returned with alert or eventresponses even if mobile location services are active on the mobile device.
11.In the User Choice section, select whether to enable mobile users to choose to send location informationwith alert or event responses. This option is only available when "Yes" is selected in the Send Location withResponse section.
12.Click Save.
Assign an AtHoc Mobile Gateway to a phoneTo assign an AtHoc Mobile Gateway to a phone and set up mobile phone notification, see Configure mobile phonenotification.
| Configure device gateways | 43

Configure mobile phone notificationAfter BlackBerry AtHoc Technical Support has set up the correct Notification Delivery Server (NDS) address, youcan assign an AtHoc Mobile Gateway to the phone and enable mobile phone notification.
1. In the navigation bar, click .2. In the Devices section, click Devices.3. Click Mobile App to open the details screen.4. Click Edit in the top menu bar.5. In the Name field, enter Mobile App.6. In the Common Namefield, enter the following text with no space between the words: mobileNotification.7. In the Delivery Gateways section, select Mobile App from the Add a Delivery Gateway drop-down list.8. Click Save in the top menu bar9. Click Enable in the top menu bar if the device is not yet enabled.
Role-based permissions for the mobile app
As a system administrator, you can specify what controls a user can see on the mobile device, depending on theirroles and responsibilities (also known as role-based permissions). For example, you might want an emergencyteam to be able to see the map, send field reports, start tracking, and send emergency duress alerts. However,you might want a student on a campus or non-emergency personnel to only be able to receive notifications and tosend duress (emergency) alerts to security without having access to the map or to tracking or field reports.
1. For users who need advanced features, create a distribution list.2.
In the navigation bar, click .3. In the Devices section, click Mobile App.4. In the Mobile Application Features section, select Map to provide access to mobile devices.5. Select Alert Publishing to provide publishing permission to operators.6. Select Advanced Features to provide advanced features to a group of users. When selected, the Select
advanced features section appears.7. In the Select advanced features section, select one or more types of alerts that the user can access from the
mobile application:
• Emergencies—Send duress messages.• Check In—User check ins on the map.• Reports—Send field reports.• Tracking—Track mobile device location for a specified amount of time.
8. After selecting an advanced feature, choose a distribution list that can use the selected feature.9. Make any other needed changes for the Mobile App settings.10.Click Save.
Configure the Notification Delivery Managed Service gatewayUse the Notification Delivery Managed Service (NDMS) gateway to set up device delivery services. You can set upemail , SMS, and phone devices with NDMS.
Use this gateway if you want add custom audio files to alerts.
1.In the navigation bar, click .
2. In the Devices section, click Notification Delivery Managed Service.
| Configure device gateways | 44
3. On the Notification Delivery Managed Service (NDMS) screen, click Copy default settings in the top row.4. In the Publishing and Reporting Settings section of the default template that appears, enter the username and
passwords provided to you by BlackBerry AtHoc Technical Support.5. In the Global Settings section, check the API Version field to ensure that you have the correct version.6. Specify other options that are appropriate for your environment. It is strongly recommended that you use the
default settings unless otherwise specified by BlackBerry AtHoc Technical Support.7. Click Save.
Configure the Simple Mail Transfer Protocol gatewaySimple Mail Transfer Protocol (SMTP) gateways are required to send emails.
1. In the navigation bar, click .2. In the Devices section, click SMTP.3. Enter the following information in the Basic section:
• Server address—If an address appears by default in this field, it is recommended that you leave the fieldunchanged. If you must add a different server address, enter its fully qualified name or IP address.
• Reply-to address—Optionally, enter the email address where you want to receive replies to emails you havesent out.
• Template—Select an option to designate whether you want the emails you send to use plain text only or ifyou want them to be able to support HTML elements.
4. Scroll down to the Advanced section and enter the following information:
• Account name—Enter the email account from which emails will be sent.• Username—If credentials are required to access the account listed in the first field, enter the account
username in this field.• Password—If credentials are required to access the account listed in the first field, enter the account
password in this field.• Port—This field should already be populated. Do not change it.• Debug—If you want to be able to perform SMTP-related debugging even though it might impact
performance, select the Yes option. Otherwise, select No.• Use SSL—If you expect SSL communication to be used with this account, select the Yes option. Otherwise,
select No.• Connection Timeout—Enter the time limit, in seconds, that you want a connection attempt to last. The
default value is 30 seconds.5. Click Save.
| Configure device gateways | 45

Configure devices overviewWhen operators send alerts to a target audience, you must also specify which devices on which users receivethe alerts. For example, a user can receive an alert on multiple devices, including smart phones, tablets, desktoppopups, work or home phones, through loudspeakers, or an email.
When you configure devices that end users receive alerts on, you perform the following high-level tasks, in thefollowing order:
1. Enable devices on the BlackBerry AtHoc server2. Configure the device delivery gateway.3. Configure and enable the device from the Devices screen.4. Verify that the device appears in the End User details display settings.
For additional configuration steps that must be completed for mass communication devices, refer to Managemass communication devices.
Enable devices on the BlackBerry AtHoc serverThe first step in configuring devices for BlackBerry AtHoc is to enable the device on the BlackBerry AtHoc server.When you enable the device, it appears in the list of gateways on the Settings screen and in the list of devices inDevices.
To enable a device, complete the following steps:
1. Log in as an Administrator to the server on which BlackBerry AtHoc runs.2. Navigate to the following folder: ../Program Files (x86)/AtHocENS/ServerObjects/Tools3. Open the following application: AtHoc.Applications.Tools.InstallPackage
The Configure Device Support screen opens.4. Select the check boxes next to each device needed for the organization.5. Click Enable.6. Click Close.
Duplicate a device on the BlackBerry AtHoc serverYou must apply Hot Fix release HF-304 before you can duplicate a device on the BlackBerry AtHoc server.
When you enable a device on the BlackBerry AtHoc server, you have the option to create a duplicate of thatdevice. Only Giant Voice devices can be duplicated. If you attempt to duplicate a non-Giant Voice device fromthe Configure Device Support screen, an error is displayed.
When you duplicate a device, it appears in the list of gateways on the Settings screen and in the list of devices inthe Devices screen with a "-DUP1" extension. You can create additional duplicates of the same device, as needed.Each duplicate is appended with a new "-DUP#" extension. For example, ATI-DUP1, ATI-DUP2, and ATI-DUP3.
You can duplicate a Giant Voice device up to six times. There is a 30 character limit to the ID of the duplicateddevice.
1. Log in as an Administrator to the BlackBerry AtHoc server.2. Navigate to the following folder: ../Program Files (x86)/AtHocENS/ServerObjects/Tools3. Open the following application: AtHoc.Applications.Tools.InstallPackage
The Configure Device Support screen opens.
| Configure devices overview | 46

4. Select the check box next to the device you want to duplicate.5. Click Duplicate.6. Optionally, click Enable.7. Click Close.
| Configure devices overview | 47
Configure devicesIf you are an Administrator, you can use the Devices screen to verify available devices, check settings, andif necessary, enable and disable devices. You can also control and edit permissions to make certain deviceaddresses only available to operators, or to end users, or to both roles.
Availability of delivery devices other than the AtHoc Desktop software depends on the BlackBerry AtHoc editionand licensed delivery devices. Contact your BlackBerry AtHoc account manager for details.
1. In the navigation bar, click .2. In the Devices section, click Devices.
The Devices screen then displays the available devices and their details in a table with the following columns:
• Device Name—Displays a description of the device type• Delivery Gateway—Displays the designated delivery gateways, if applicable• Group—Displays the type of alert that gets delivered, such as email or phone• Status—Displays whether the device is enabled or disabled. Disabled devices are not available for delivering
alerts.
Each device has a default delivery template that defines the appearance and formatting used to deliver alerts.3. Click the device name to configure the related template.
For more information on device configuration, see View and edit device details.
Enable and disable devicesIf you have Administrator permissions, you can use the Device screen to disable and enable specific devices tocontrol which devices appear in the user profile and to add them to the list of devices for alert targeting.
Enable a device
Only devices having at least one associated gateway can be enabled. Although some devices have a gatewayalready assigned to them, for other devices—such as XML Feed, Twitter, or Zetron Pager—you must first open thedevice's details screen and add the gateway manually before attempting to enable the device.
1. In the navigation bar, click .2. In the Devices section, click the name of the device you want to enable.3. Click Enable.4. Click OK.
Disable a device
1. From the list, click a device name.2. Click Disable.3. Click OK.
Add a device to the user details contact informationAfter you enable the gateway and configure the device in the Device manager, you might need to add the device tothe list of available devices for end users. BlackBerry AtHoc provides a draft list that you might need to modify sothat a user can add contact information in their profile.
Prerequisite
| Configure devices | 48

To add devices to the end user device display list, you must know their common device names. To determinewhat those are, complete the following steps:
1. In the navigation bar, click .2. In the Devices section, click Devices.3. Click to open each device you need the common name for.
The Common Name field appears beneath the Name field near the top of the Details section.4. Write down the common name so that you can insert it when adding devices to the end user device list.
To add a device to the end user device display, complete the following steps:
1. Log in to BlackBerry AtHoc as an administrator.2. In the navigation bar, click .3. In the Basic section, click General Settings.4. Scroll down to the Layouts section.5. In the User Details - My Profile row, click View/Edit.6. In the End User details display settings screen, scroll down to the <Online addresses> section.
7. Check to see if the needed devices are in the list. If not, manually add them in the XML file.
| Configure devices | 49

8. If the devices are not in the list, add <field></field> values for each device, using the common device
names that you wrote down in the prerequisite section above.9. Click Update.
Manage mass communication devicesTo manage support for a mass communication device such as a digital sign, a loudspeaker, or an XML feed,complete the following tasks:
• Enable devices on the BlackBerry AtHoc server• Configure devices• Configure device gateways• Create a mass device endpoint
Mass device types and categoriesMass devices in BlackBerry AtHoc are divided into these categories: Giant Voice, Feed, Social, and Common.
The following table lists the supported mass devices and their categories:
Mass device Mass device category
ALERTUS-BEACON Giant Voice
AM-RADIO Common
BENBRIA Common
CATV Common
CENTRALERT Giant Voice
| Configure devices | 50

Mass device Mass device category
COOPER-WAVES Giant Voice
EAS Common
EMERGE-ENOTIFY Common
FIRE-PANEL - 8 Channels Common
FIRE-PANEL - 16 Channels Common
GIANT-VOICE-ACE3600 Giant Voice
GIANT-VOICE-ATI Giant Voice
GIANT-VOICE-CAWS Giant Voice
GIANT-VOICE-FEDSIG Giant Voice
GIANT-VOICE-WHELEN-V2 Giant Voice
IIM-LRAD Giant Voice
INDUSTRIALSTROBE-BEACON Common
LAND-MOBILE-RADIO-EASTMAN Common
LAND-MOBILE-RADIO-V2 Common
MINITOR_V_TWO_TONE Common
MONACO-WARNING-SYSTEM Giant Voice
MOTOTRBO_TWO-WAY_RADIOS Common
PAGER-GROUP Common
PUBLIC-ADDRESS-SYSTEM Common
PUBLIC-FEED (CWS) Common
PUBLIC-FEED-V2 (CWS v2) Common
SN-FEED (XML) Feed
SN-FEED-SECONDARY (RSS) Feed
SN-TWITTER Social
UAP-DS (RMG Digital Signage) Common
| Configure devices | 51
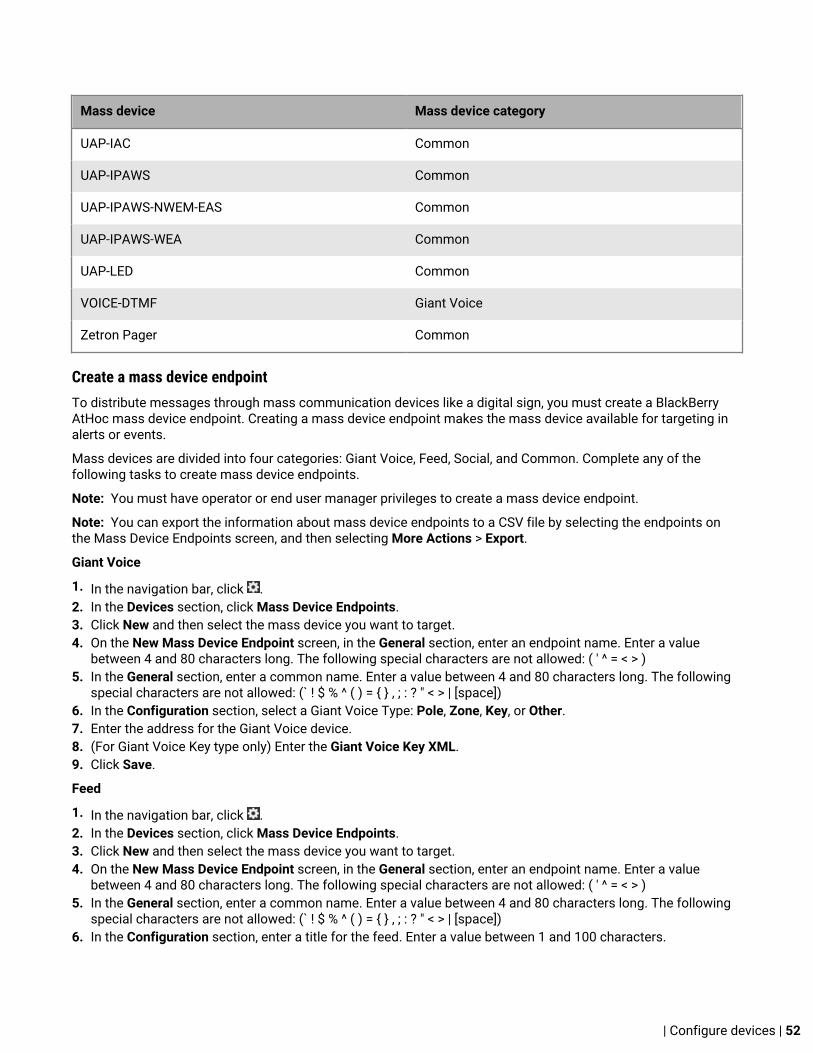
Mass device Mass device category
UAP-IAC Common
UAP-IPAWS Common
UAP-IPAWS-NWEM-EAS Common
UAP-IPAWS-WEA Common
UAP-LED Common
VOICE-DTMF Giant Voice
Zetron Pager Common
Create a mass device endpointTo distribute messages through mass communication devices like a digital sign, you must create a BlackBerryAtHoc mass device endpoint. Creating a mass device endpoint makes the mass device available for targeting inalerts or events.
Mass devices are divided into four categories: Giant Voice, Feed, Social, and Common. Complete any of thefollowing tasks to create mass device endpoints.
Note: You must have operator or end user manager privileges to create a mass device endpoint.
Note: You can export the information about mass device endpoints to a CSV file by selecting the endpoints onthe Mass Device Endpoints screen, and then selecting More Actions > Export.
Giant Voice
1. In the navigation bar, click .2. In the Devices section, click Mass Device Endpoints.3. Click New and then select the mass device you want to target.4. On the New Mass Device Endpoint screen, in the General section, enter an endpoint name. Enter a value
between 4 and 80 characters long. The following special characters are not allowed: ( ' ^ = < > )5. In the General section, enter a common name. Enter a value between 4 and 80 characters long. The following
special characters are not allowed: (` ! $ % ^ ( ) = { } , ; : ? " < > | [space])6. In the Configuration section, select a Giant Voice Type: Pole, Zone, Key, or Other.7. Enter the address for the Giant Voice device.8. (For Giant Voice Key type only) Enter the Giant Voice Key XML.9. Click Save.
Feed
1. In the navigation bar, click .2. In the Devices section, click Mass Device Endpoints.3. Click New and then select the mass device you want to target.4. On the New Mass Device Endpoint screen, in the General section, enter an endpoint name. Enter a value
between 4 and 80 characters long. The following special characters are not allowed: ( ' ^ = < > )5. In the General section, enter a common name. Enter a value between 4 and 80 characters long. The following
special characters are not allowed: (` ! $ % ^ ( ) = { } , ; : ? " < > | [space])6. In the Configuration section, enter a title for the feed. Enter a value between 1 and 100 characters.
| Configure devices | 52

7. Optionally, enter a description for the feed.8. Select whether to require authentication. The default is No. If you select Yes, enter an authentication username
and password.9. Optionally, enter a URL to use to access alerts through the content feed.10.Click Save.
Social
1. In the navigation bar, click .2. In the Devices section, click Mass Device Endpoints.3. Click New and then select the mass device you want to target.4. On the New Mass Device Endpoint screen, in the General section, enter an endpoint name. Enter a value
between 4 and 80 characters long. The following special characters are not allowed: ( ' ^ = < > )5. In the General section, enter a common name. Enter a value between 4 and 80 characters long. The following
special characters are not allowed: (` ! $ % ^ ( ) = { } , ; : ? " < > | [space])6. In the Configuration section, if no Twitter account already exists, click Provide Twitter Credentials. The
Twitter / Authorize an application page opens in a new window.7. Enter the account name and password for your Twitter account.8. Click Authorize app to give permission to BlackBerry AtHoc to tweet to this Twitter account. You are returned
to the New Mass Device Endpoint screen.9. Click Save.
Common
1. In the navigation bar, click .2. In the Devices section, click Mass Device Endpoints.3. Click New and then select the mass device you want to target.4. On the New Mass Device Endpoint screen, in the General section, enter an endpoint name. Enter a value
between 4 and 80 characters long. The following special characters are not allowed: ( ' ^ = < > )5. In the General section, enter a common name. Enter a value between 4 and 80 characters long. The following
special characters are not allowed: (` ! $ % ^ ( ) = { } , ; : ? " < > | [space])6. In the Configuration section, enter the address for the mass device. The following special characters are not
allowed: (`!^=<>)
View and edit device detailsNote: You should consult BlackBerry AtHoc Technical Support before editing the values for a device to ensurethat your changes will not have a negative impact on the way the device operates.
Note: You must have the Enterprise Administrator role to edit the details of a device.
1. In the navigation bar, click .2. In the Devices section, click Devices.3. On the Devices screen, click to select a device.
The screen refreshes to display the settings for the device, divided into the following three sections: Details,Help Text, and Delivery Gateways.
The Details section varies by device. Use the Help Text section to change the help text in the targeting, contact,or contact information tool tip. The Delivery Gateways section provides information about gateways such asNDMS and SMTP. A device must have at least one associated gateway before it can be enabled. For moreinformation on enabling devices, Enable and disable devices.
4. Click Edit to modify the details, help text, or delivery gateway details.5. Click Save.
| Configure devices | 53
Configure Giant Voice devicesThe following integration gateways are related to Giant Voice loudspeaker systems:
• ADT Giant Voice• American Signal Giant Voice• American Signal Giant Voice - v2• ATI Giant Voice• Cape Aural Warning System• Centralalert• Eaton WAVES• Federal Signal Giant Voice• LRAD Giant Voice• Monaco Warning System• Talk-a-Phone Giant Voice• Whelan Giant Voice - v1• Whelan Giant Voice - v2
To learn how to configure Giant Voice gateways, see the BlackBerry AtHoc integrations documentation at thefollowing URL: https://docs.blackberry.com/en/id-comm-collab/blackberry-athoc/integrations/
Configure the AtHoc Connect organization networkThe Organization feature provides inter-agency communications between organizations that have joined AtHocConnect. Organizations are members of AtHoc Connect that you can add as a connection. You can then publishalerts to that connection or subscribe to alerts that they publish.
To set up the Organization feature, refer to the AtHoc Connect Plug-in for NDS: Configuration Guide. To learn how toset up the gateway and device for Connect, see the BlackBerry AtHoc Connect User Guide.
Manage the Cloud Services GatewayBlackBerry AtHoc provides hosted SMS, email, and telephony notification services. If your organization uses anyof these services, you need to configure and enable the gateway.
The following sections describe these configuration tasks:
1. Enable the Cloud Services Gateway on the BlackBerry AtHoc server.2. Enable the Cloud Services Gateway on the Settings screen.3. Configure and enable the Cloud Services devices. Complete only the sections that correspond with the
services your organization uses:
• Hosted SMS Text Messaging• Hosted Email• Hosted Telephony
Configure the hosted gateway for cloud services
Use this gateway to set up devices using the AtHoc or OEM Cloud Delivery Service. After configuring this gateway,you can set up telephony (TAS), email (OPM), and SMS.
1. In the navigation bar, click .2. In the Devices section, click to open one of the following gateways, based on information supplied by your
BlackBerry AtHoc Services representative:
• AtHoc Cloud Delivery Service (East)
| Configure devices | 54

• AtHoc Cloud Delivery Service (West)• OEM Cloud Delivery Service (East)• OEM Cloud Delivery Service (West)
3. Click Copy default settings at the top of the screen.
The default templates for the services appear in the SMS and Email template fields.4. Enter the user name and password values provided to you by BlackBerry AtHoc Technical Support.5. Optionally, for TAS, you can enter a Caller ID (ANI) value to override the default value for the account.
The value should be a valid phone number or extension that is 4-16 numeric characters.6. For the SMS (texting) template, replace the existing template, with the following template:
7. Optionally, modify the SMS XML template fields for your organization by adding placeholders.
The following table describes the parameters that you can add to either the SMS or the Email template. Theplaceholders values are preset:
Placeholder Required Purpose and Values
[MessageBody] Yes The contents of the SMS message (the alerttext).
[MessageTitle] Yes The title of the SMS message.
[MoreInfoLink] No A URL in the body of an alert message thatlinks to additional information that therecipient can access, such as evacuationplans, weather reports, or maps.
Note: Use the [TargetUrl] placeholder toinclude a URL in the "More Info Link" field.
[PublishedAt] No The time at which the alert is published.
[PublishedBy] No The operator account name that sends thealert.
[RecipientName] No The name of recipients which the alert issent.
[ResponseOptions] No The response options provided for therecipient of the text message. If empty, theResponse Option instruction line does notappear in the alert (The default is Reply:,but can be customized text like “Select aresponse.”).
| Configure devices | 55

Placeholder Required Purpose and Values
[SelfServiceUrl] No Link to the user’s Self Service screen.
[Severity] No The value of the Severity field for the alert.
[SystemName] No The name of the current organization.
[TargetUrl] No The URL in the optional "More Info Link"field, provided for more information.
[Type] No The category of alert, such as Safety.
[OrganizationName] No The Organization name that is displayed inthe BlackBerry AtHoc title pane.
8. Optionally, if you use the hosted email service, enter the name of the sender that you want to appear in emailalerts.
Now that you have completed the Cloud Delivery Services Gateway setup, you can configure the related devicesfrom the Devices screen.
• Hosted SMS text messaging• Hosted email• Hosted Telephony
Configure the text messaging device for hosted SMS
1. In the navigation bar, click .2. In the Devices section, click Devices.3. Click Text Messaging.4. Click Edit.5. Modify the values in the Details section with names and information that are valid for your organization.6. In the Contact Info Editing field, select either All or End Users depending on whether you want everyone or just
end users to have the ability to edit their contact info.7. Optionally, select Users must provide contact info for this Device in Self Service if you want to require users
to provide that information. If you do not select this check box, users are still able to provide the information,but it is not a required task.
8. In the Help Text fields, enter text that will appear on the screen when operators are authoring an alert.
Note: You must have the Enterprise Administrator role to edit the Help Text fields.
• Targeting Help Text—When the operator selects this device as a target, the text you enter in this fieldappears at the top of the Review and Publish screen. For example, if you want to remind operators that textmessages have a character limit, you can enter the following text:
"SMS: Alert will be split into multiple messages if it exceeds 140 characters or 70 unicode characters."
The text then appears at the top of the Review and Publish screen.
| Configure devices | 56

• Contact Info Help Text—The text you enter in this field appears under the device name on the End User
details screen. The text should explain what should be entered in the field.
• Contact Info Tool Tip—The text you enter in this field appears as a pop-up tool tip when the user hoverstheir cursor over the device name on the End User details screen. The text should explain what should beentered in the field.
9. In the Delivery Gateway field, select AtHoc Cloud Delivery Service.
You can specify up to three gateways for the Hosted SMS device.10.Click Save.11.Click Enable if you are ready to make the device available for alert publishing.
The Hosted SMS Text Messaging device is then fully configured.
Manage the hosted email service
1. In the navigation bar, click .2. In the Devices section, click Devices.3. Click an email device.4. Click Edit.5. Modify the values in the Details section with names and information that are valid for your organization.6. In the Contact Info Editing field, select either All or End Users depending on whether you want everyone or just
end users to have the ability to edit their contact info.7. Optionally, select the Users must provide contact info for this Device in Self Service check box if you want to
require users to provide that information. If you do not select this check box, providing the information will beoptional.
8. In the Help Text fields, enter text that will appear on the screen when operators are authoring an alert.
| Configure devices | 57

Note: You must have the Enterprise Administrator role to edit the Help Text fields.
• Targeting Help Text—When the operator selects this device as a target, the text you enter in this fieldappears at the top of the Review and Publish screen. For example, if the device is a work email account,you can enter, "Email - Work: Do not use for off-shift alerts" so that users know not to select the device ifthey are trying to contact people who are not at work.
• Contact Info Help Text—The text you enter in this field appears under the device name on the End Userdetails screen. The text should explain what should be entered in the field.
• Contact Info Tool Tip—The text you enter in this field appears as a popup tool tip when the user hovers the
cursor over the device name on the End User details screen. The text should explain what should be enteredin the field.
9. In the Delivery Gateway field, select one of the AtHoc Cloud Delivery Service Gateway or OEM Cloud DeliveryService options, either East or West, based on the information BlackBerry AtHoc Technical Support hasprovided. For on premise, select Notification Delivery Managed Service (NDMS).
You can specify up to three gateways for each phone device.10.Click Save.11.Click Enable.
| Configure devices | 58

The device is available for alert publishing.
Manage the hosted telephony service
To manage the hosted telephony service, complete the following steps:
1. In the navigation bar, click .2. In the Devices section, click Devices.3. On the Devices screen, click a phone device such as Phone-Work or Phone-Mobile.
The settings for the device appear.4. Click Edit.5. Modify the values in the Details section with names and information that are valid for your organization. You
must have the Enterprise Administrator role to update the Name, Common Name, Group Name, and DeviceGroup Order.
6. In the Contact Info Editing field, select either All or End Users depending on whether you want everyone or justend users to have the ability to edit their contact info.
7. Optionally, select the Users must provide contact info for this Device in Self Service check box if you want torequire users to provide that information. If you do not select this check box, users will still be able to providethe information; it just will not be a required task.
8. In the Help Text fields, enter text that will appear on the screen when operators are authoring an alert.
Note: You must have the Enterprise Administrator role to modify the Help Text fields.
• Targeting Help Text—When the operator selects this device as a target, the text you enter in this fieldappears at the top of the Review and Publish screen. For example, if the phone is a work phone, you canenter the following text:
"Work Phone: Use this device for work messages only."
The text then appears at the top of the Review and Publish screen.
• Contact Info Help Text—The text you enter in this field appears under the device name on the End Userdetails screen. The text should explain what should be entered in the field.
| Configure devices | 59

• Contact Info Tool Tip—The text you enter in this field appears as a pop-up tool tip when the user hoverstheir cursor over the device name on the End User details screen. The text should explain what should beentered in the field.
9. In the Delivery Gateway field, select one of the AtHoc Cloud Delivery Service Gateway options, either East orWest. If you are on-premise, select Notification Delivery Managed Service (NDMS).
You can specify up to three gateways for each phone device.10.Click Save.11.Click Enable.
The device is available for alert publishing.
Configure RSS feed information for RSS and Atom content feedsMass communication devices include the IP Integration module for RSS and Atom feeds. These devices use thetemplates for the RSS feed.
1. In the navigation bar, click .2. In the Devices section, click RSS Feed.3. Click Copy default settings at the top of the screen to use the correct settings for the content feed.
RSS or Atom feeds should have the following settings:
• In the Supported Formats field, Syndication: Atom and Syndication: RSS 2.0 are selected.• In the Identity Source field, the End User option is selected.
4. Click Save.
Configure XML feed information for mass communication devicesMass communication devices include IP Integration Module for loud speakers, as well as RSS and Atom feeds.These devices use the templates for the XML Feed.
1. In the navigation bar, click .
| Configure devices | 60
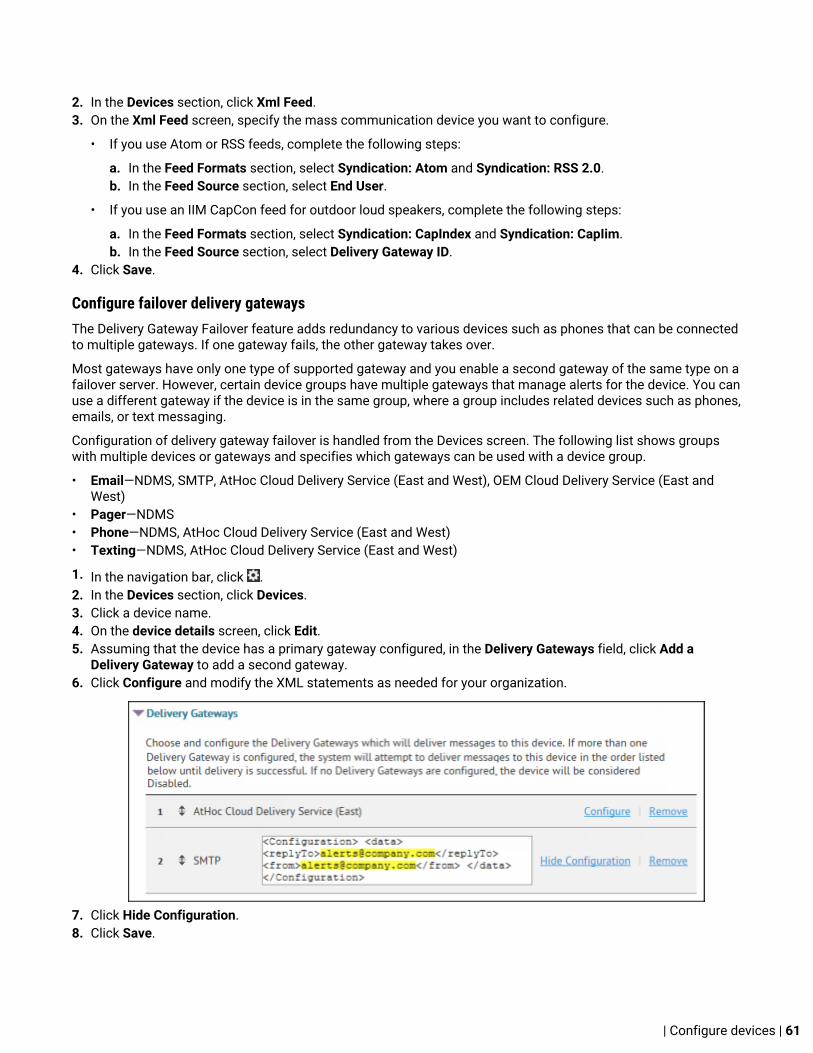
2. In the Devices section, click Xml Feed.3. On the Xml Feed screen, specify the mass communication device you want to configure.
• If you use Atom or RSS feeds, complete the following steps:
a. In the Feed Formats section, select Syndication: Atom and Syndication: RSS 2.0.b. In the Feed Source section, select End User.
• If you use an IIM CapCon feed for outdoor loud speakers, complete the following steps:
a. In the Feed Formats section, select Syndication: CapIndex and Syndication: CapIim.b. In the Feed Source section, select Delivery Gateway ID.
4. Click Save.
Configure failover delivery gatewaysThe Delivery Gateway Failover feature adds redundancy to various devices such as phones that can be connectedto multiple gateways. If one gateway fails, the other gateway takes over.
Most gateways have only one type of supported gateway and you enable a second gateway of the same type on afailover server. However, certain device groups have multiple gateways that manage alerts for the device. You canuse a different gateway if the device is in the same group, where a group includes related devices such as phones,emails, or text messaging.
Configuration of delivery gateway failover is handled from the Devices screen. The following list shows groupswith multiple devices or gateways and specifies which gateways can be used with a device group.
• Email—NDMS, SMTP, AtHoc Cloud Delivery Service (East and West), OEM Cloud Delivery Service (East andWest)
• Pager—NDMS• Phone—NDMS, AtHoc Cloud Delivery Service (East and West)• Texting—NDMS, AtHoc Cloud Delivery Service (East and West)
1. In the navigation bar, click .2. In the Devices section, click Devices.3. Click a device name.4. On the device details screen, click Edit.5. Assuming that the device has a primary gateway configured, in the Delivery Gateways field, click Add a
Delivery Gateway to add a second gateway.6. Click Configure and modify the XML statements as needed for your organization.
7. Click Hide Configuration.8. Click Save.
| Configure devices | 61

Configure desktop app settingsIf you are an Administrator, you can configure desktop app settings such as general display items, the system traymenu, client server communications, and failover.
Most settings for the Desktop App are established during the initial installation and configuration with theassistance of BlackBerry AtHoc Technical Support. However, the settings described in the following sectionsmight require editing over time and are of interest to most administrators because they affect things such as thetime intervals for viewing new alerts and updating user configurations, as well as end user login expiration times.
For information about advanced features such as redirection, see the BlackBerry AtHoc Desktop App Installation andConfiguration Guide.
Select general desktop software optionsNote: Do not modify the following settings without first consulting BlackBerry AtHoc Technical Support.
1. In the navigation bar, click .2. In the Devices section, click Desktop App.3. On the Desktop App window, in the Basic Options section, select or deselect the check boxes beside the
following values:
• Select the check box beside Show Welcome message for first-time sign-on to cause a web page with awelcome message to appear when the desktop app connects for the first time.
• Select the check box beside Right-click to dismiss Desktop pop-up to allow end users to dismiss theDesktop pop-up with a right mouse click.
• Select the check box beside Show uninstall option in control panel and Start menu to show the Uninstallbutton in the toolbar of the "Uninstall or change a program" dialog in Programs and Features when theAtHoc[edition] application is selected from the list of applications.
• Select the check box beside Collect workstation information to allow the desktop app to send the IPaddress, machine name, username, and domain name to the BlackBerry AtHoc server. This reducesthe amount of user information that is transferred over the network. When this option is deselected, IPtargeting does not work.
• Select the check box beside Stop checking for updates when Desktop is locked to prevent the desktopapp from checking for updates when an end user's desktop is locked. This option is useful in environmentswhere users do not turn off their machines.
4. In the Email Address To Send Client Logs field, enter an email address ([email protected]) to sendthe desktop app log to. When the user selects the "Send <organization name> Log" in the Start menu for thedesktop app, the email address entered in this field receives a copy of the log file.
5. In the ActiveX Object Name field, enter the ActiveX object name for the desktop app. This is used whencreating the JavaScript code that is sent by the server to the desktop app in response to requests and in alerts.For example, when the user selects the “Access Self Service” menu option, selects a response option, or clicksa button on an alert.
6. In the Audio section, select how the desktop app works with built-in speakers. Select Consider end usersystem settings to prevent the desktop app from overriding the end user's local system speaker settings.Select Always turn on speaker to override local speaker settings. When this option is selected, the DesktopVolume Threshold slider control appears. This option specifies the volume level that the desktop app sets theaudio to.
Note: The operating system does not provide a way for the desktop app to distinguish between headphonesand speakers. When end users are wearing headphones that are plugged into the computer's audio jack, anincoming alert may sound extremely loud.
| Configure devices | 62

Customize the desktop client system trayThe System tray icon is the white globe icon that appears in the system tray when the desktop app is running. Youcan change the order of the links that appear in the desktop app system tray using an XML-based menu control.You can also move the link separator up or down and add additional link separators as needed.
1. In the navigation bar, click .2. In the Devices section, click Desktop App.3. On the Desktop App window, in the System Tray Menu section, select Display System Tray.4. Click Manage Menu Items.5. On the Desktop App Menu Items window, click Add Menu Item.6. On the Add Menu Item window, enter a name and URL for the new menu item.7. Click Save. Take note of the ID of the new menu item.8. Click Close.9. Add the new menu item to the Menu Configuration XML in the Menu Configuration field.
Menu items have this format: <Item Id="8009" Type="Link"/>10.Optionally, add a separator to the Menu Configuration XML.
Separators have this format: <Item Type="Separator" />11.Optionally, cut and paste the code for each additional function to add or move menu items and separators. 12.Click Save.
The default functions include the following items:
Option Code
Check for New Alerts 8009
Dismiss All Popups 8022
Access Self Service 521
Update My Info 530
Update My Device Info 531
About 8005
The following is a sample Menu Configuration XML:
<SystrayLayout> <Item Id="8009" Type="Link" /> <Item Id="8022" Type="Link" /> <Item Type="Separator" /> <Item Id="521" Type="Link" /> <Item Id="530" Type="Link" /> <Item Id="531" Type="Link" /> <Item Type="Separator" /> <Item Id="8005" Type="Link" /> </SystrayLayout>
For more information, see the "System tray menu" section in the BlackBerry AtHoc Desktop App Installation andConfiguration Guide.
| Configure devices | 63

Configure client server communicationsNote: Do not modify the following settings without first consulting BlackBerry AtHoc Technical Support.
You must have System Administrator permissions to configure client server communications.
Most settings in the Desktop App settings page are established during the initial installation and configurationwith the assistance of BlackBerry AtHoc Technical Support. The settings in the Client Server Communicationssection of the Desktop App settings page are used to configure the settings that govern communication betweenthe BlackBerry AtHoc server and the Desktop app, and the rate at which new alerts and user configuration updatesare checked.
1. In the navigation bar, click .2. In the Devices section, click Desktop App.3. On the Desktop App window, scroll down to the Client Server Communications section.4. Select a value from the Check Update Interval list.
The Check Update Interval (CU) determines how frequently the desktop app polls the server for updates,including alerts. A lower value causes end users to receive desktop pop-up alerts sooner. A higher valuecauses users to receive desktop pop-up alerts later. The minimum value is 30 seconds. The maximum value is15 minutes. The recommended value is 2 minutes.
5. Select a value from the Reconnect Interval list.
The Reconnect Interval specifies the interval the desktop app waits before attempting to contact the serveragain when the connection is lost. The minimum value is 1. The maximum value is 10. The recommendedvalue is 2.
6. Select a value from the Recovery Interval list.
The Recovery Interval specifies the number of check update intervals the desktop app waits before attemptingto contact the server again when the server responds to a Sign On (SO) or CU with an error. The minimumvalue is 1. The maximum value is 10. The recommended value is 2.
7. Enter a value in the Start-up Delay field.
The Start-up Delay setting is a fractional value between 0 and 1 inclusive that is used to determine the amountof delay before the desktop app first attempts to sign on. A value of 0 specifies no delay and a value of 1specifies to wait one full check update interval. A value of .5 specifies a delay of 50% of the check updateinterval.
8. Enter a value in the Communication Session Expires After field.
This option determines when the desktop app session is reset on the server. The default value is 86400seconds (24 hours). When the desktop app session expires, the desktop app performs a sign on at the nextCU.
9. Enter a value in the Override Default Communication Session Expiration Time After field.
This setting cleans up system sessions that were created by the SYSTEM user. Sessions that are created bythe SYSTEM user when desktop apps are deployed with the installation script and RUNAFTERINSTALL is set to"Y". Sessions can be created by the SYSTEM user when the installation script is used to update machines afterthe desktop app is installed.
This option also enables desktop apps to perform a sign on in environments where users do not turn off theircomputer. This option provides a way to configure desktop apps to redirect during SO.
10.Click Save.
For more information, see the BlackBerry AtHoc Desktop App Installation and Configuration Guide.
Configure failover settingsNote: Do not modify the following settings without first consulting BlackBerry AtHoc Technical Support.
| Configure devices | 64
Most settings in the Desktop App settings page are established during the initial installation and configurationwith the assistance of BlackBerry AtHoc Technical Support. The settings in the Failover section of the DesktopApp settings page are used to enable the primary BlackBerry AtHoc server to fail over to a secondary server whenthe primary server becomes unresponsive and CUs fail.
1. In the navigation bar, click .2. In the Devices section, click Desktop App.3. On the Desktop App window, scroll down to the Failover section.4. Enter the URL for the failover server.5. Select a value from the Reconnect attempts before Failover list.
This setting specifies the number of attempts that the Desktop app makes to contact the primary server beforeswitching to the failover server.
6. Click Save.
For more information, see the BlackBerry AtHoc Desktop App Installation and Configuration Guide.
Set the type of desktop software authentication1. In the navigation bar, click .2. In the Users section, click User Authentication.3. On the User Authentication window, in the Assign Authentication Methods to Applications section, select one
of the following authentication methods from the Desktop App > Authentication Method list:
• LDAP Attribute—This option enables the desktop app to authenticate with an Active Directory attribute thatyou provide in the Attribute field. The desktop app queries this attribute directly from the signed-in user'sdirectory profile and sends it to the server. This option allows the desktop app to operate while sending lessuser information to the server. When this option is selected, the desktop app does not send Windows usernames or domain names in sign on or check update query strings.
• This option requires desktop app version 6.2.x.271 or later.• Smart Card—This option enables smart card authentication. Select the number of client certificates to
collect. The recommended value is 3.• Username and Password—This option requires users to sign on to the desktop app using their BlackBerry
AtHoc username and password.• Windows Authentication—This option configures the desktop app to use only the Windows username and
password or to use both the Windows username and the domain.4. Optionally, if LDAP Attribute, Smart Card, or Windows Authentication is selected, you can select the Create new
user if an account is not found check box to configure the desktop app to create a user at sign on if the userdoes not already exist.
5. Click Save.
| Configure devices | 65

BlackBerry AtHoc customer portalBlackBerry AtHoc customers can obtain more information about BlackBerry AtHoc products or get answers toquestions about their BlackBerry AtHoc systems through the Customer Portal:
https://support.athoc.com/customer-support-portal.html
The BlackBerry AtHoc Customer Portal also provides support via computer-based training, Operator checklists,best practice resources, reference manuals, and users guides.
| BlackBerry AtHoc customer portal | 66

Legal noticesCopyright © 2019 BlackBerry Limited. All Rights Reserved.
This document may not be copied, disclosed, transferred, or modified without the prior written consent ofBlackBerry Limited. While all content is believed to be correct at the time of publication, it is provided as generalpurpose information. The content is subject to change without notice and is provided “as is” and with noexpressed or implied warranties whatsoever, including, but not limited to, a warranty for accuracy made byBlackBerry Limited. The software described in this document is provided under written license only, containsvaluable trade secrets and proprietary information, and is protected by the copyright laws of the United Statesand other countries. Unauthorized use of software or its documentation can result in civil damages and criminalprosecution.
Trademarks
Trademarks, including but not limited to ATHOC, EMBLEM Design, ATHOC & Design and the PURPLE GLOBEDesign are the trademarks or registered trademarks of BlackBerry Limited, its subsidiaries and/or affiliates, usedunder license, and the exclusive rights to such trademarks are expressly reserved. All other trademarks are theproperty of their respective owners. Users are not permitted to use these marks without the prior written consentof AtHoc or such third party which may own the mark.
This product includes software developed by Microsoft (http://www.microsoft.com).
This product includes software developed by Intel (http://www.intel.com).
This product includes software developed by BroadCom (http://www.broadcom.com).
All other trademarks mentioned in this document are the property of their respective owners.
Patents
This product includes technology protected under patents and pending patents.
BlackBerry Solution License Agreement
https://us.blackberry.com/legal/blackberry-solution-license-agreement
Contact Information
BlackBerry AtHoc
311 Fairchild Drive
Mountain View, CA 94043
Tel: 1-650-685-3000
Email: [email protected]
Web: http://www.athoc.com
| Legal notices | 67