Embed Size (px)
Citation preview

Engineering White Paper
Using the SYMCLI Configuration Manager
Abstract
This paper provides an introduction to the Configuration Manager functionality that allows you to manage some aspects of the configuration of the Symmetrix array to which your host is attached.
Published 1/25/2005

1/25/2005
Copyright © 2005 EMC Corporation. All rights reserved.
EMC believes the information in this publication is accurate as of its publication date. The information is subject to change without notice.
THE INFORMATION IN THIS PUBLICATION IS PROVIDED “AS IS”. EMC CORPORATION MAKES NO REPRESENTATIONS OR WARRANTIES OF ANY KIND WITH RESPECT TO THE INFORMATION IN THIS PUBLICATION, AND SPECIFICALLY DISCLAIMS IMPLIED WARRANTIES OF MERCHANTABILITY OR FITNESS FOR A PARTICULAR PURPOSE.
Use, copying, and distribution of any EMC software described in this publication requires an applicable software license.
Part Number 300-000-475 REV G
Using the SYMCLI Configuration Manager 2

1/25/2005
Table of Contents
Introduction.........................................................................................................5 Purpose and Scope ..................................................................................................................... 5 Related Documentation ............................................................................................................... 5
Practical Uses .....................................................................................................6
Symmetrix Devices .............................................................................................7
Changing the Symmetrix Configuration .........................................................10 Monitoring a Change Session.................................................................................................... 11 Stopping I/O Activity................................................................................................................... 12 Before Initiating a Change Session ........................................................................................... 12 Aborting a Change Session ....................................................................................................... 13
Creating Additional Symmetrix Devices .........................................................13 Deleting Symmetrix Devices ...................................................................................................... 17
Mapping a Device to a Front-End Director .....................................................18 Unmapping a Device.................................................................................................................. 19
Reconfiguring an Existing Device ...................................................................20
Forming a Meta Device.....................................................................................21 Restrictions When Forming a Meta Device ............................................................................... 24 Removing Meta Members.......................................................................................................... 25 Dissolving a Meta Device........................................................................................................... 25 Converting a Meta Device.......................................................................................................... 25 Preserving Data ......................................................................................................................... 25
Setting Device Attributes and Changing Emulation Type.............................27
Setting Symmetrix-Wide Configuration Parameters......................................28
Swapping Devices in an RA Group .................................................................29
Reserving Physical Disks as Dynamic Spares...............................................30
Setting Front-End Port Attributes....................................................................31
Using the SYMCLI Configuration Manager 3

1/25/2005
RDF (RA) Groups and SRDF/A Operation.......................................................32
Reorganizing a Previously-Created Set of RDF Devices to Form an FBA Meta Device .......................................................................................................33
Creating Devices in Mixed Environments (FBA and CKD)............................34
Creating a Named Pool of Save Devices ........................................................35 Enabling and Disabling Members of a Save Pool...................................................................... 36 Creating Save Devices and Simultaneously Adding Them to a Named Save Pool .................. 36
Example 1: Creating Devices...........................................................................37
Example 2: Mapping Devices...........................................................................43
Example 3: Unmapping Devices......................................................................48
Example 4: Setting Front-End Port Attributes................................................53
Example 5: Forming an FBA Meta Device ......................................................58
Example 6: Creating Dynamic RDF Devices...................................................64
Example 7: Write-Disabling Devices Using symdev ......................................75
Appendix A: Device Emulation Types.............................................................78
Appendix B: Dynamic RDF with Enginuity Versions 5x67 and Higher ........79
Appendix C: Configuration Function Availability ..........................................80
Appendix D: Configuration Functions by Emulation Type ...........................82
Using the SYMCLI Configuration Manager 4

1/25/2005
Introduction The Symmetrix® Manager in the EMC ControlCenter™ Symmetrix Management package1 allows you to manage some aspects of the configuration of the Symmetrix array to which your host is attached. You can perform the following classes (or categories) of configuration control operations:
• Create new Symmetrix devices and configure them for the type of role you want them to perform.
• Delete Symmetrix devices.
• Map devices to a front-end director port. Mapping and unmapping devices constitutes the SDR (Storage Device Reallocation) functionality.
• Unmap devices from front-end director ports.
• Reconfigure an existing device.
• Convert an RDF device from static RDF to dynamic RDF.
• Reserve a physical disk as a dynamic (“hot”) spare.
• Swap RDF source/target attributes for all devices in an RDF (RA) group.
• Enable or disable an RDF (RA) group for remote asynchronous transfer of data (RDFA).
• Form a meta device and subsequently add or remove meta members from the meta device.
• Convert a meta device configuration.
• Dissolve meta devices.
• Change the device emulation type.
• Set device attributes.
• Set front-end port attributes.
• Set a limited number of Symmetrix-wide configuration parameters (or metrics).
Purpose and Scope
This paper provides an introduction to the Configuration Manager functionality included in EMC® Solutions Enabler version 6.0 running on Symmetrix arrays using Enginuity™ versions 5x66 to 5x71. Although this white paper discusses basic configuration concepts, only advanced users or system administrators should change a Symmetrix configuration.
Related Documentation
These EMC manuals and white papers provide information related to concepts discussed in this paper:
• EMC Solutions Enabler Symmetrix Base Management CLI Product Guide
• EMC Solutions Enabler Symmetrix Configuration Change CLI Product Guide
• Using SYMCLI to Obtain Symmetrix Configuration Information (P/N 300-000-285)
• Using the SYMCLI Configuration Manager for Managing CKD Devices (P/N 300-001-889)
1 Part of the EMC ControlCenter/Open Edition suite of software products.
Using the SYMCLI Configuration Manager 5

1/25/2005
Practical Uses Storage requirements are never permanent. Your needs for storage are most likely to grow over time. Consequently, the ability to utilize free disk space on your Symmetrix array to create new storage devices makes the SYMCLI Configuration Manager a practical tool in expanding your storage capabilities. You can add many different types of devices to your Symmetrix configuration, such as devices with various mirroring schemes, static RDF devices, dynamic RDF devices, meta devices, BCVs, and DRVs. You can also reserve physical disks as dynamic spares that can be invoked against a failed disk.
The Configuration Manager also allows you change an existing device to a different type of device if you decide that a device needs to perform a different role, needs additional mirror protection, or needs to have RDF attributes added or removed. Being able to reconfigure existing devices is useful as your storage requirements and device protections continue to evolve.
You can reserve a number of disks as dynamic spares. The dynamic spare disk is held in reserve to support the devices of a Symmetrix disk that fails. When a disk fails, the dynamic spare disk is invoked against the failed disk.
EMC SRDF® software provides an online, host-independent, mirrored data storage solution for duplicating production site data on one or more physically separated target Symmetrix arrays. The local SRDF device, known as the source (R1) device, is configured in a pairing relationship with a remote target (R2) device, forming an SRDF pair. Dynamic SRDF allows you to create SRDF pairs from non-SRDF devices while the Symmetrix array is in operation (“on the fly”). Historically, source and target SRDF device pairing has been permanent once these devices have been configured as RDF1 and RDF2 type devices, and this is still true of devices that you configure this way. However, beginning with the SRDF component of EMC Solutions Enabler version 5.0 running on Symmetrix arrays using Enginuity version 5568, you can now create non-SRDF type devices that acquire the capability of being R1 or R2 devices when you use the Configuration Manager to set the devices and the Symmetrix array for dynamic RDF. Configuring RDF-capable devices allows you to create, delete, and swap dynamic SRDF pairs while the Symmetrix array is in operation and provides greater flexibility in deciding where to copy protected data.
EMC TimeFinder® software provides the capability to use multiple, independently addressable online Business Continuance Volumes (BCVs) for information storage. The BCV device can function as an additional mirror to a standard device or as an independent, host-addressable device. Creating a BCV device and establishing a BCV pair makes it possible for you to access the copied data on a BCV at any later point in time without interfering with business operations. Any time you split one of the BCVs from the standard device, the BCV has a copy of the production data and is available from an appropriate host for uses such as backup, testing, or analysis.
A meta device is a Symmetrix mechanism for defining a device larger than the current hyper-volume maximum size of approximately 32 cylinders (64 cylinders, beginning with Enginuity version 5669). The Symmetrix system allows you to combine existing devices to form the larger device that is then presented to the host as a single addressable device. You can use meta devices to satisfy platform or host requirements where there are not enough available targets and LUNs to access all the presented storage devices, or not enough available Volume Labels, such as in Windows. You can configure the meta device in two ways: concatenated or striped. A striped meta device is a means for removing disk bottlenecks and improving I/O performance. Striping increases the I/O performance of an application by spreading the I/O load across multiple disk spindles.
Symmetrix Optimizer is a tool that automatically balances hyper-volume loads across physical disks within a Symmetrix array by running a process on the Symmetrix service processor that analyzes hyper-volume activity. You can create a DRV device (Dynamic Reallocation Volume) for use by Symmetrix Optimizer to temporarily hold user data while Optimizer reorganizes the devices. Optimizer uses DRVs in device swapping operations in a manner similar to BCV devices in TimeFinder operations. This reorganization takes place on the back end of the Symmetrix and is transparent to the host and end-users. The DRV device maintains the protection level for the device whose backend locations are being optimized.
Using the SYMCLI Configuration Manager 6

1/25/2005
Beginning with EMC Solutions Enabler version 5.4 and the version of Enginuity 5670 released in 2004, the Configuration Manager allows you to create RAID-5 type devices.
Beginning with EMC Solutions Enabler version 6.0 and Enginuity version 5x71, the Configuration Manager allows you to create RAID-5 BCV devices, set Symmetrix-wide parameters for concurrent dynamic RDF and SRDF/A tuning parameters, and manage CKD devices in a z/OS environment.
Symmetrix Devices A Symmetrix system applies a high degree of virtualization between what the host sees and the actual disk drives. A Symmetrix device is not a physical disk. A Symmetrix device is a logical volume with a name that the host can address. From the perspective of the host, these logical volumes in a Symmetrix array appear as physical devices connected to one or more I/O controllers. For a host to “see” the device, you need to define a path by mapping the device to a front-end director, and then you need to use host-specific utilities or the EMC I/O scan option (available with the symcfg command)2 to have the host recognize the device.
The Symmetrix array allows you to configure up to four mirrors for each Symmetrix device. The mirror positions are designated M1, M2, M3, and M4. When a BCV device is established with a standard device as a mirror, it becomes the next available mirror. Therefore, a single BCV device can be the second, third, or fourth mirror of the standard device.
In Figure 1, BCV001 functions as the third mirror (M3) of DEV001 while it is established. The host logically views the Symmetrix M1/M2 mirrored hypers as a single standard device (DEV001).
CLI-000095
Host
BCV001SymmetrixLocal Site
StandardM2
StandardM1
DEV001
BCV
BCV001
Host
StandardDEV001
Not Ready
Symmetrix
BCVPair Copy
Figure 1. Mirroring for a Logical Volume When One Mirror Is a BCV Device
Device DEV001 is configured as a 2-way mirror. Device BCV001 is configured as a BCV. See Table 1 on page 9 for a list of possible device configurations and their mirror set protection schemes.
2 The symcfg scan command is available to update most hosts with new storage device mapping information. This command
activates the necessary processing on the host system to recreate the list of accessible devices.
Using the SYMCLI Configuration Manager 7

1/25/2005
From the perspective of the open systems host, these logical volumes appear as physical disk devices at addresses specified by a SCSI target ID and Logical Unit Number (LUN). However, when fibre is the addressing mechanism and peripheral device addressing is being used, the fibre switch and arbitrated loop generate an equivalent of the target ID, requiring you to specify only the LUN when mapping a device.
When you create a device and specify its configuration type, the Symmetrix system maps the device to one or more complete disks or parts of disks known as hyper volumes or hypers. As a rule, a device maps to at least two mirrors (hypers on two different disks) to maintain multiple copies of the data.
When a Symmetrix array is set up initially, the maximum number of hyper volumes per disk is defined as a Symmetrix-wide parameter. As devices are configured, the Symmetrix configuration server creates up to the maximum hypers initially defined. Figure 2 shows two Symmetrix devices, each mapped to a set of hypers on different disks in a Symmetrix array configured for a maximum of four hypers per disk.
2-Way-Mir
2-Way-Mir
Symmetrix
FourHyperVolumes
Logical VolumesVisible to the Host
Physical Disks Residingin the Symmetrix Unit
CLI-000021
HostDEV002 M2
DEV002 M1
DEV001 M2DEV001 M1
StandardDEV001
StandardDEV002
Figure 2. Two Symmetrix Devices Mapped to Hyper Volumes
Symmetrix standard devices named DEV001 and DEV002 are configured as 2-way mirrored devices. The Symmetrix “knows” that this device type must be mapped to parts of different physical disks to achieve the correct mirror protection for that device. For example, DEV001’s M1 mirror maps to a hyper on one disk, and its M2 mirror maps to a hyper on another disk. Both hyper volumes (M1 and M2) contain identical data because the device type has been designated as a 2-way mirror.
When you create new devices, the Symmetrix configuration server places hypers on disks by first sorting by the level of configuration complexity (most complex to least): RAID devices, 4-way mirror, 3-way mirror, 2-way mirror, and unprotected. Within each category, the configuration server then sorts by the requested size of the device, choosing to handle the largest device first.
The system then places hypers for each device on the disk that currently has the fewest hypers (hypers for gatekeeper devices are not included in the count) and continues a round-robin selection process. Each hyper assigned for a particular device must be on a unique disk, unique disk adapter interface, and unique bus.
Table 1 lists typical mirror set protection schemes and shows the data stored on each mirror (M1 to M4).
Using the SYMCLI Configuration Manager 8

1/25/2005
Table 1. Mirror Set Protection Schemes
Device/Mirror Configuration M1 M2 M3 M4
Unprotected3 Data
2-Way-Mir Data Data
3-Way-Mir Data Data Data
4-Way-Mir Data Data Data Data
RAID-S (in multiples of 3 or 7) RAID Data RAID Parity (shared)
RAID-5 RAID Data RAID Data
RDF1 Data Remote Data
RDF2 Remote Data Data
RDF1-R-S RAID Data Remote Data RAID Parity (shared)
RDF2-R-S Remote Data RAID Data RAID Parity (shared)
RDF1-Mir Data Remote Data Data
RDF2-Mir Remote Data Data Data
RDF1-RAID5 RAID Data Remote Data
RDF2-RAID5 Remote Data RAID Data
BCV Data
2-Way-BCV-Mir Data Data
RDF1-BCV Data Remote Data
RAID-5-BCV RAID Data RAID Data
DRV Data
RDF2-BCV Remote Data Data
RDF1-Mir-BCV Data Remote Data Data
RDF2-Mir-BCV Remote Data Data Data
RDF1-RAID5-BCV RAID Data Remote Data RAID Data
RDF2-RAID5-BCV Remote Data RAID Data RAID Data
Beginning with EMC Solutions Enabler version 5.4, you can create a RAID-5 device. You can do this the same way you create a mirrored device. For example, a 2-way-mirror device has two hypers. You create a RAID-5 device with either four or eight hypers.
Prior to creating a RAID-5 device, you need to set a Symmetrix parameter to enable the use of RAID-5 (refer to the section “Setting Symmetrix-Wide Configuration Parameters”). You also need to set a parameter indicating the number of members in the RAID-5 set, either 3+1 or 7+1. This n+1 designation is the same as for a Parity RAID-S device, where one member is reserved for parity information and data exists on either three or seven members; however, with a RAID-5 device, parity information is spread across all four or eight members of the RAID-5 set.
3 Because production data should not be stored on an unprotected device, a device that is configured as “Unprotected” cannot be
mapped to a front-end director (unless using RPQ) and is therefore not available to be accessed by the host. Consider an “Unprotected” device to be one that is in a temporary unprotected state before converting it to another device type.
Using the SYMCLI Configuration Manager 9
1/25/2005
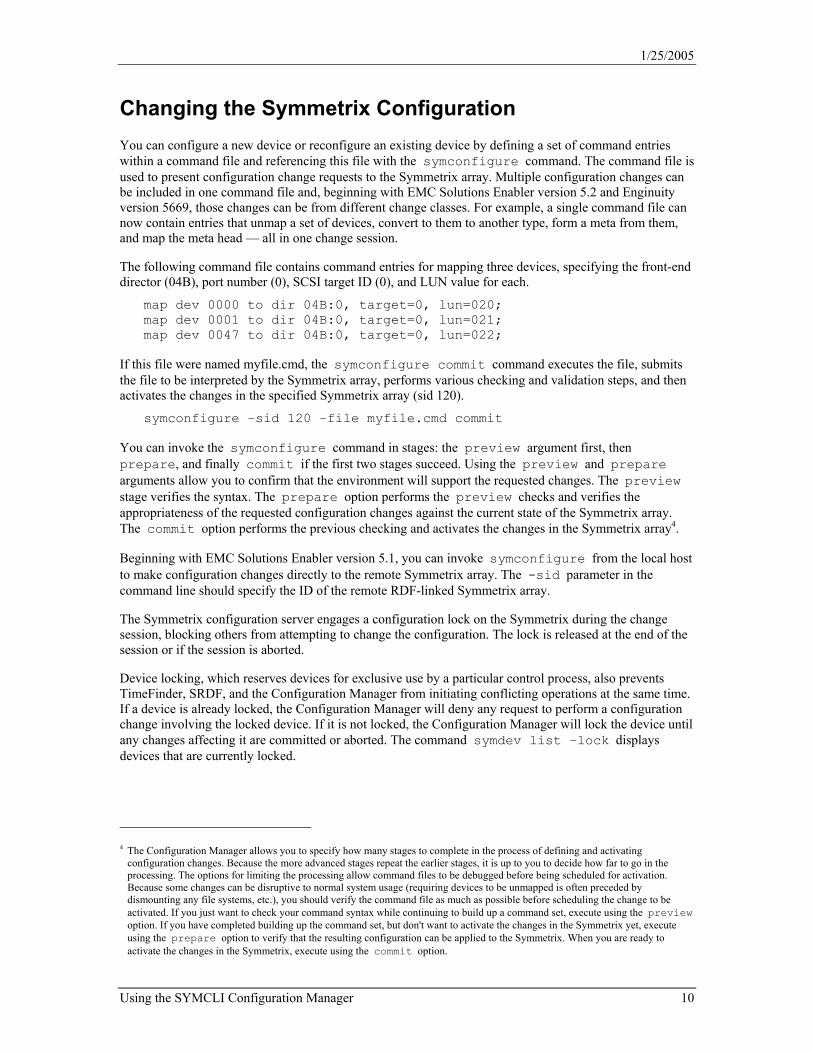
Changing the Symmetrix Configuration You can configure a new device or reconfigure an existing device by defining a set of command entries within a command file and referencing this file with the symconfigure command. The command file is used to present configuration change requests to the Symmetrix array. Multiple configuration changes can be included in one command file and, beginning with EMC Solutions Enabler version 5.2 and Enginuity version 5669, those changes can be from different change classes. For example, a single command file can now contain entries that unmap a set of devices, convert to them to another type, form a meta from them, and map the meta head — all in one change session.
The following command file contains command entries for mapping three devices, specifying the front-end director (04B), port number (0), SCSI target ID (0), and LUN value for each.
map dev 0000 to dir 04B:0, target=0, lun=020; map dev 0001 to dir 04B:0, target=0, lun=021; map dev 0047 to dir 04B:0, target=0, lun=022;
If this file were named myfile.cmd, the symconfigure commit command executes the file, submits the file to be interpreted by the Symmetrix array, performs various checking and validation steps, and then activates the changes in the specified Symmetrix array (sid 120).
symconfigure –sid 120 –file myfile.cmd commit
You can invoke the symconfigure command in stages: the preview argument first, then prepare, and finally commit if the first two stages succeed. Using the preview and prepare arguments allow you to confirm that the environment will support the requested changes. The preview stage verifies the syntax. The prepare option performs the preview checks and verifies the appropriateness of the requested configuration changes against the current state of the Symmetrix array. The commit option performs the previous checking and activates the changes in the Symmetrix array4.
Beginning with EMC Solutions Enabler version 5.1, you can invoke symconfigure from the local host to make configuration changes directly to the remote Symmetrix array. The -sid parameter in the command line should specify the ID of the remote RDF-linked Symmetrix array.
The Symmetrix configuration server engages a configuration lock on the Symmetrix during the change session, blocking others from attempting to change the configuration. The lock is released at the end of the session or if the session is aborted.
Device locking, which reserves devices for exclusive use by a particular control process, also prevents TimeFinder, SRDF, and the Configuration Manager from initiating conflicting operations at the same time. If a device is already locked, the Configuration Manager will deny any request to perform a configuration change involving the locked device. If it is not locked, the Configuration Manager will lock the device until any changes affecting it are committed or aborted. The command symdev list –lock displays devices that are currently locked.
4 The Configuration Manager allows you to specify how many stages to complete in the process of defining and activating
configuration changes. Because the more advanced stages repeat the earlier stages, it is up to you to decide how far to go in the processing. The options for limiting the processing allow command files to be debugged before being scheduled for activation. Because some changes can be disruptive to normal system usage (requiring devices to be unmapped is often preceded by dismounting any file systems, etc.), you should verify the command file as much as possible before scheduling the change to be activated. If you just want to check your command syntax while continuing to build up a command set, execute using the preview option. If you have completed building up the command set, but don't want to activate the changes in the Symmetrix yet, execute using the prepare option to verify that the resulting configuration can be applied to the Symmetrix. When you are ready to activate the changes in the Symmetrix, execute using the commit option.
Using the SYMCLI Configuration Manager 10

1/25/2005
Monitoring a Change Session
Monitoring a change session can be useful in checking the status of a change session, especially during changes to SRDF environments where a change to a Symmetrix array attached to the local host activates a change to a remote Symmetrix array. The system administrator of a host connected to the remote Symmetrix array can monitor the progress of the change. A query operation is also helpful at sites where Symmetrix Optimizer is used to modify the backend volume configuration.
To monitor the configuration change session while the symconfigure commit operation is processing, you can issue the symconfigure query command or use the UNIX tail command (with the –f option) to interactively monitor the SYMAPI log file from a second window. The following query checks the status of the change session on the Symmetrix array (sid 120) twelve times at 10-second intervals. If you omit the –c option, the query checks every 10 seconds until the processing completes.
symconfigure –sid 120 query –i 10 –c 12
The advantage of the tail command is that it provides configuration server messages that are context-sensitive and specify a particular device, director, etc., when a problem occurs, while the Symmetrix API (SYMAPI) provides only generic messages as in the following configuration change session.
# symconfigure -sid 6151 -file meta.cmd -v -noprompt preview A Configuration Change operation is in progress. Please wait... Establishing a configuration change session...............Established. Processing symmetrix 000000006151 { add dev 0412:0414 to meta 040A; } Submitting configuration changes..........................Failed. Definition 1 is in error: The specified device is already a member of a metadevice Terminating the configuration change session..............Done. The configuration change session has failed.
“Definition 1 is in error: The specified device is already a member” says that one of the devices in the range defined in the “add dev” definition is already a member of a meta device. But you would have to determine which device. On the other hand, because it is context-sensitive, the log file tail of this same change session specifies more directly why it failed: “Symdev 412 is already a member in a Metadev.”
# tail -f /var/symapi/log/symapi-20021210.log 12/10/2002 10:55:40.358 29653 Establishing session with Local cfg srvr (000000006151)...Established. 12/10/2002 10:55:40.452 29653 0 EMC:SYMCLI process_load_request Switching to FULL load for 000000006151 because the configuration changed 12/10/2002 10:55:52.673 29653 { 12/10/2002 10:55:52.674 29653 add dev 0412 to meta 040A; 12/10/2002 10:55:52.682 29653 add dev 0413 to meta 040A; 12/10/2002 10:55:52.687 29653 add dev 0414 to meta 040A; 12/10/2002 10:55:52.692 29653 } 12/10/2002 10:55:53.702 29653 Submitting configuration changes..........................Failed. 12/10/2002 10:55:54.713 29653 0 EMC:SYMCLI cfgControlSubmit Local config server msg: 12/10/2002 10:55:54.713 29653 0x40008343: Symdev 412 is already a member in a Metadev. 12/10/2002 10:55:58.753 29653 Terminating session with configuration server.............Done.
Using the SYMCLI Configuration Manager 11

1/25/2005
Stopping I/O Activity
I/O activity occurring on a Symmetrix device before or during a commit action may cause the commit action to fail. At the very least, I/O activity on affected devices will impact the length of time that it takes to complete the configuration changes (for example, when adding a mirror). Some classes of configuration change operations, such as completely changing how a device will be used in the storage environment, require stopping I/O operations to that device (for example, before unmapping a device). If you need to stop I/O activity on any Symmetrix devices that will be altered by the change, shut down your application, unmount file systems5, and suspend I/O before you issue a symconfigure commit command. In cases where there can be no I/O to a device prior to a change operation, the command will fail if this condition has not been satisfied.
One way to stop I/O is to build a device group and make the device status Not Ready or Write Disabled, using the symld command on one device (DEV001) in the group or all devices in the group (ProdBgrp, for example). Refer to “Unmapping a Device” for more information on using a device group to stop I/O.
symld –g ProdBgrp not_ready DEV001 symld –g ProdBgrp not_ready
A device may have a single path or multiple paths. Beginning with EMC Solutions Enabler version 5.0, you can use the symdev command with write_disable or not_ready as an alternative to device groups for stopping I/O on all paths to a device or on only one path to a device. Of the following two commands, the first causes all paths to Symmetrix device 090 to become Not Ready. The second causes one path to device 091 to become Not Ready, the path specified by front-end director 04B, port 0.
symdev –sid 140 not_ready 090 symdev –sid 140 not_ready 091 –sa 04B –p 0
Before Initiating a Change Session
Configuration changes initiated by the symconfigure command should be performed only by advanced users or system administrators to avoid potential issues. As with any critical operation, planning plays an important role. Before making configuration changes, you should observe the following precautionary guidelines:
1. Understand your current Symmetrix configuration and how the devices are being used by host systems.
2. Determine your new requirements and thoroughly understand the proposed reconfiguration prior to making any changes. Document the proposed changes to the configuration.
3. Ensure that your critical data is safely preserved. Do not store data on any device that is not mirrored.
4. Verify that a configuration change session can be performed on the Symmetrix array. This command makes sure that all the requirements for the host and the Symmetrix are correct. For example:
symconfigure verify –sid 120
5. If possible, stop I/O activity on all Symmetrix devices to be altered (by making the devices Not Ready or Write Disabled) before invoking the commit action. Heavy I/O activity on affected devices impacts the length of time it takes to commit changes.
6. Determine if your configuration change is in a change class that requires unmapping the devices before the configuration change session is initiated.
5 Be sure to unmount file systems and vary the volume groups offline before making devices Not Ready or Write Disabled if they are
in use by the host. Before suspending I/O at the Symmetrix level, you need to address the host application level by stopping an application and then unmounting and stopping volume group activity.
Using the SYMCLI Configuration Manager 12

1/25/2005
7. If a device affected by the change is not currently mapped to the host, or if you are working on DRV devices, ensure that the environment option SYMAPI_CTRL_OF_NONVISIBLE_DEVS in the SYMAPI options file is enabled, commented out (the default), or not present in the options file.
8. When swapping the locations of Symmetrix device hyper volumes to produce optimum Symmetrix performance, the Symmetrix Optimizer uses the same configuration change mechanism used by symconfigure. Because only one application can be changing the Symmetrix configuration at a time, one application will fail. If you think contention may arise between Optimizer swapping and the Configuration Manager, you can disable the Optimizer during configuration change sessions using the symoptmz -sid SymmID disable command.
Aborting a Change Session
An abort action allows you to terminate a change session that may be left dangling because the host connection to the configuration server was broken. You can attempt to abort6 a configuration change session by issuing the symconfigure abort –sid SymmID command from any host connected to the Symmetrix array or any host remotely linked to the Symmetrix array. An abort action also releases the configuration session lock.
Creating Additional Symmetrix Devices If a Symmetrix array has enough free disk space to create additional Symmetrix devices, you can create (add) one or more new devices in a Symmetrix array by creating a command file and including the create dev command file entry. Specify the number of devices that you want to present to a host, the desired device configuration, the size of the devices, and the device emulation type. For example, a command file with the following entry:
create dev count=4, config=2-Way-Mir, size=1100, emulation=FBA;
Each of the four added devices is a 2-way mirrored device type with a size of 1100 cylinders (516 MB) and an emulation type of FBA (refer to Appendix A for a list of supported emulation types). You do not need to stop I/O activity when creating new devices. However, the length of time to complete the changes may be affected by high levels of I/O.
When you make a request to create a new device, you are creating a Symmetrix device that the Symmetrix system maps to a physical disk on the back end. In applying a logical volume configuration to physical disks, the Symmetrix system applies the following rules:
• The number of hypers on all disks should be roughly the same.
• All the mirrors or hypers created as a result of the create dev command file entry must be on different physical disks with different access paths (memory bus, disk directors, disk interfaces).
When you create an RDF device type (RDF1, RDF2, RDF1-Mir, or RDF2-Mir) on the local Symmetrix array, the SYMAPI automatically creates that device’s corresponding remote mirror on the remote RDF-linked Symmetrix array at the same time. For example:
create dev count=4, config=rdf1, size=1100, emulation=FBA, remote_config=rdf2, ra_group=1;
The local symconfigure commit command initiates and manages not only the local configuration change session but also a change session on the remote Symmetrix array, creating the four corresponding remote devices and the R1/R2 pair assignments.
6 Note that the Symmetrix array sets an internal “point of no return” in each configuration change session. When this point is reached,
then that configuration change session cannot be aborted.
Using the SYMCLI Configuration Manager 13

1/25/2005
Beginning with EMC Solutions Enabler version 5.1, if you create a device with an emulation type of either CKD-3380 or CKD-3390, you have the option of creating a CKD meta device (four CKD devices addressed as a single device). If you create one CKD meta device, the count parameter must be 4:
create dev count=4, config=bcv, size=1100, emulation=CKD-3390, attribute=ckd_meta;
The Symmetrix configuration server first creates four new devices and then forms a CKD striped meta device, using a predetermined stripe size. On the other hand, FBA and Celerra® FBA meta devices are formed from existing devices using the form meta command file entry (refer to the section “Forming an FBA Meta Device”).
The following steps provide an outline for adding devices to a Symmetrix array:
1. Determine that the Symmetrix array has sufficient free disk space for new devices.
symconfigure –sid 120 list -freespace
2. Determine available space on physical disks and that the desired mirroring can be provided.
symdisk list –sid 120
3. When creating RDF, BCV, DRV, and striped meta devices, determine the size of new devices by reviewing the precise size of existing devices that they may be associated or paired with. If the new device size does not match the size of its paired device, control operations will disallow their pairing. Use symdev/sympd show or symdev/sympd list –cyl to display size information.
symdev list –sid 120 -cyl
4. Determine if the Symmetrix is configured to service both mainframe and open systems hosts (true if an ESCON director is present) and, if so, obtain a sub-system identifier (SSID) for the new devices.
symcfg list –sid 120 –dir all
5. Verify that a configuration change session can be performed on the Symmetrix array.
symconfigure –sid 120 verify
6. Build and process a command file (for example, add_file.cmd) that includes the create dev command entry within the file. Refer to Table 2 for a list of device types that you can create.
symconfigure –sid 120 –file add_file.cmd –v -noprompt commit
7. Confirm that the new devices have been added correctly.
symdev list –sid 120
8. When you make any configuration change except mapping devices to front-end ports, the SYMAPI database file on the host issuing the change is updated automatically on successful completion of the symconfig commit command. To refresh the SYMAPI host database files on all other hosts attached to that Symmetrix array, you can perform the symcfg sync command on those hosts. (For mapping changes, you need to issue symcfg discover command to update the SYMAPI database.)
Keep in mind that creating a new device is only one step in the multi-step process required to make the device ready for use. Some types of new devices require only the step that maps the device to one or more front-end directors. Other types require additional steps. For example, to create dynamic RDF devices, you execute command file sessions that affect both the local and the remote RDF-linked Symmetrix arrays:
Using the SYMCLI Configuration Manager 14

1/25/2005
1. Enable dynamic RDF in the Symmetrix array by executing the command file entry:
set symmetrix dynamic_rdf=enable;
2. Create non-RDF devices that you want to be capable of dynamic RDF operations.
3. Set a dynamic RDF attribute on the new devices that are to be RDF-capable. For example, execute a command file entry that sets the dyn_rdf attribute for a range of devices between 0030 and 0035:
set dev 0030:0035 attribute=dyn_rdf;
4. Map the devices to a Symmetrix front-end director port.
5. Update the host using host-specific utilities to make the devices online and available to the host.
6. Update the SYMAPI database file using the symcfg discover command.
7. When you have performed these steps for the local Symmetrix and any remote RDF-linked Symmetrix arrays, you can create a file that matches local devices to remote devices and use the symrdf createpair command to create dynamic SRDF pairs. For more information about creating dynamic SRDF pairs, refer to the white paper Using SYMCLI to Perform Control Operations with SRDF Family Products (P/N 300-000-076). For more information about creating dynamic RDF devices in a Symmetrix configuration, refer to Example 6.
Beginning with EMC Solutions Enabler version 5.2 and Enginuity version 5669, you can configure virtual devices (VDEV) and the “save” devices on which pre-update data is stored. You configure save devices as mirrored or RAID devices with the savedev attribute. The following command creates two save devices in the default save pool, DEFAULT_POOL. (To create save devices in a named save pool, refer to the section “Creating a Named Pool of Save Devices”).
create dev count=2, config=2-Way-Mir, size=1100, emulation=FBA, attribute=savedev;
It is recommended that you allocate one save device per five to ten virtual devices, depending on the application profile. The following command creates ten virtual devices:
create dev count=10, config=VDEV, size=1100, emulation=FBA;
When you configure virtual devices and save devices, the Symmetrix configuration server enforces the following rules:
• For a given emulation level (FBA, CKD, etc.), all save devices must have the same protection type.
• When you create save devices, the configuration server spreads them out in a round-robin fashion over all available DA's and balances them over physical disks, when possible.
• For a given emulation level, you must configure the size of a save device as less than or equal to the largest size of any existing virtual device (VDEV). If no virtual devices have been configured yet, the save device is created at whatever size specified, but the rule will be enforced when the virtual devices are created. (The configured size of a VDEV is the size that the host sees; both the source and the VDEV must be the same size.)
For meta devices, the size rule applies to each meta member compared to the save device and not the total meta device size as seen by the host.
Table 2 on the next page lists those devices that you can create and the steps required to create them. For example, creating an RDF-BCV requires creating a BCV and then converting it into the appropriate RDF-BCV.
Using the SYMCLI Configuration Manager 15

1/25/2005
Table 2. Steps to Create a Device
Desired Device Configuration Session 1 — create Session 2 — convert
Unprotected Unprotected
2-Way-Mir 2-Way-Mir
3-Way-Mir 3-Way-Mir
4-Way-Mir 4-Way-Mir
RAID-S RAID-S (in multiples of 3 or 7)
RAID-5 RAID-5
CKD-Meta CKD-Meta (in multiples of 4)
RDF1 RDF1
RDF2 RDF2
RDF1-Mir RDF1-Mir
RDF2-Mir RDF2-Mir
RDF1+R-S RAID-S → RDF1+R-S
RDF2+R-S RAID-S → RDF2+R-S
RDF1+R-5 RAID-5 → RDF1+R-5
RDF2+R-5 RAID-5 → RDF2+R-5
BCV BCV
DRV DRV
2-Way-BCV-Mir 2-Way-BCV-Mir
RAID-5-BCV RAID-5 → RAID-5-BCV
RDF1-BCV BCV → RDF1-BCV
RDF2-BCV BCV → RDF2-BCV
RDF1+Mir-BCV RDF1+Mir → RDF1+Mir+BCV
RDF2+Mir-BCV RDF2+Mir → RDF2+Mir+BCV
RDF1+R-5+BCV RAID-5 → RDF1+R-5+BCV
RDF2+R-5+BCV RAID-5 → RDF2+R-5+BCV
VDEV7 VDEV
Creating a RAID-5 device is similar to creating a mirrored device. Where a 2-way-mirror device has two hypers, a RAID-5 device has either four or eight hypers. For example, a command file with the following entry will create two RAID-5 devices with an overall capacity available to the user of 1100 cylinders, striped across the hyper members:
create dev count=2, config=RAID-5, size=1100, emulation=FBA;
The hyper capacity (size) is the physical capacity required to contain the data, the parity stripes, and the tables managing the striping. Because of this overhead, the actual device capacity of the RAID-5 device is less than the sum of the hypers. When a RAID-5 device is created, the capacity available for user data will be the capacity specified in the create request, which is 1100 cylinders in the example above.
7 VDEVs are used in conjunction with save devices, which provide a pool of physical space to store data for the virtual devices.
Creating VDEVs and devices with the savedev attribute require EMC Solutions Enabler version 5.2 or higher, and Enginuity version 5669 or higher.
Using the SYMCLI Configuration Manager 16

1/25/2005
Deleting Symmetrix Devices
You can delete devices that have one of the following emulation types: FBA, CELERRA_FBA, VME_512_FBA, AS400_590, AS400_590R, AS400_6713_30, AS400_6713_50, AS400_6717_50, AS400_9337_5AA, or AS400_9337_5AC. The device to be deleted cannot have an attached BCV or DRV and cannot have any snap sessions. Also the device cannot be:
• Mapped to a front end port
• Masked by VCM
• Held
• A virtual device that is in use
• A DRV device or BCV device (allowed with Solutions Enabler version 5.4 or higher)
• A meta head or a meta member
• WORM protected
• The VCM database device
• An SFS device
• Part of an RDF consistency-enabled composite group
• A save device8 or a COVD device
You can delete a RAID-S protection group by specifying the first member in the group and including the raidset option. To delete all members of the RAID-S group of which device 13D is the first member:
delete dev 013D, raidset=TRUE;
8 Beginning with Solutions Enabler version 6.0, you can delete a save device as long as it is disabled with no active tracks.
Using the SYMCLI Configuration Manager 17

1/25/2005
Mapping a Device to a Front-End Director To access a new device from a host system, you need to map the device to one or more front-end director ports and then update the host and the SYMAPI database. Front-end mapping is a Symmetrix mechanism for exporting the logical view of a device to a host system. However, even after you map the device, the host is usually unaware of the device until you run a host utility that allows the host to recognize it.
It is the create dev command that creates a Symmetrix device and establishes that device’s mirror configuration to physical disks, and it is the Symmetrix system that keeps track of that back-end configuration. When you map a device to a front-end director, you are simply making the device visible to a host. To map a device, use the map command file entry to specify:
• Front-end director number
• Front-end director port number
• For an FBA device:
Logical unit number (LUN) for SCSI or fibre
Target ID for SCSI
Virtual bus (vbus) address for mapping to a fibre adapter (FA) port if volume set addressing is being used (for HP-UX). If volume set addressing is not being used, only the LUN is required.
For optionally updating a device masking database, specify the HBA identifier (WWN, AWWN, or ISCSI name)
• For CKD devices: a range of CKD device names with the starting base address. (Beginning with EMC Solutions Enabler version 6.0 and Enginuity version 5x71, you can map a range of CKD devices to a z/OS host using a starting base address and optionally an SSID.)
The following entries map device 0030 to director 16A, port 0, assigning it SCSI target 0 and SCSI LUN 0; and map device 0031 to the same director port, while assigning it target 0 and LUN 1:
map dev 0030 to dir 16A:0 target=0, lun=0; map dev 0031 to dir 16A:0 target=0, lun=1;
The following entry maps device 0030 to two different directors, providing alternate paths to the same data:
map dev 0030 to dir 15A:0 target=0, lun=0; map dev 0030 to dir 16A:0 target=0, lun=0;
The following entry maps device 0122 to a fibre adapter port that uses volume set addressing:
map dev 0122 to dir 03A:0 vbus=0A, target=0F, lun=3;
The following entry maps a device and also updates the device masking database by specifying the wwn of the Host Bus Adapter (HBA) port through which a host accesses that device:
map dev 0032 to dir 16A:0 target=0, lun=2, wwn=20000000c920b484;
The following entry maps a range of 64 CKD devices (0 through 63) to director 01C, port 1, assigning base addresses beginning with 200. The first digit of the starting base address represents the CU image number (in this case, CU image 2), and the next two digits specify its position within the image’s device list.
map dev 0:63 to dir 01C:1 starting base_address=200;
For more information about mapping CKD devices in z/OS environments, refer to the white paper Using the SYMCLI Configuration Manager for Managing CKD Devices (P/N 300-001-899).
Using the SYMCLI Configuration Manager 18

1/25/2005
After a mapping or unmapping change session, update the host so that it recognizes the new Symmetrix configuration.
Unmapping a Device
When you unmap devices, no I/O activity is allowed on any of the device paths that are being unmapped. To stop I/O, make the device Not Ready or Write Disabled on the path that you want to unmap. If a device has only one path to one front-end director, you do not have to specify the path. However, to unmap only one path of a device that has paths to multiple front-end directors, specify the path to be unmapped.
The following example creates a device group (ProdBgrp), adds two single-path devices (0030 and 0031) to the device group, and places all devices in the device group in the Not Ready state:
symdg create ProdBgrp –type regular symld –g ProdBgrp –sid 140 addall dev –range 0030:0031 symld –g ProdBgrp not_ready
If devices 0030 and 0031 were multi-path devices, all paths to these devices would be made Not Ready, which might be an undesirable effect.
Beginning with EMC Solutions Enabler version 5.0, you can use the symdev command with write_disable or not_ready as an alternative to operating on a device group. For example, to make all paths of device (0031) Not Ready, regardless of whether it is a single-path or a multi-path device:
symdev –sid 140 not_ready 0031
To make one path of a multi-path device (0032) Write Disabled, the path specified by director 04B, port 0:
symdev –sid 140 write_disable 0032 –sa 04B –p 0
The following command unmaps device 0032 from the path specified by director 04B, port 0:
unmap dev 0032 from dir 04B:0;
The following command unmaps devices 030 and 031 from the path specified by director 16A, port 0:
unmap dev 0030:0031 from dir 16A:0;
Beginning with EMC Solutions Enabler version 5.1, if your devices use device masking, you can include the devmask_access option to indicate whether the device masking database (VCMDB) should be updated. The “remove” value indicates that any device masking access entries for this device should be removed from the VCMDB. The “retain” value specifies that these entries remain in the database.
unmap dev 0030:0031 from dir 16A:0 devmask_access=remove;
Beginning with EMC Solutions Enabler version 6.0 and Enginuity version 5x71, you can unmap a range of CKD devices from a z/OS host. The following example unmaps a range of five devices (13B through 13F) from all director ports and assigns these devices an SSID that is different from the one used by the CU image, which will remain active.
unmap dev 13B:13F from dir all:all new_ssid=0160;
For more information about unmapping CKD devices in z/OS environments, refer to the white paper Using the SYMCLI Configuration Manager for Managing CKD Devices (P/N 300-001-889).
Using the SYMCLI Configuration Manager 19

1/25/2005
Reconfiguring an Existing Device The Configuration Manager allows you to reconfigure an existing device. You can:
• Change a device’s configuration type so that the device can perform a different role.
• Increase or decrease device protection by adding or removing mirrors.
• Add or remove RDF attributes.
• Convert a RAID-S group to a set of unprotected devices (beginning with EMC Solutions Enabler version 5.4 and Enginuity version 5670)
You can reconfigure existing devices to form an SRDF pair in which the R2 device is larger than the R1 device. This configuration can be useful if you need to migrate data from smaller devices to larger devices.
The following example reconfigures two BCV type devices to RDF1-BCV type devices:
convert dev 01C:01D to RDF1-BCV, ra_group=1, remote_dev=01C, invalidate=R1, start_copy=yes;
The two target devices on the remote Symmetrix are 01C and the next device in numerical sequence (01D). They will be converted to appropriate RDF2 devices. Data on the reconfigured source R1 devices will be invalidated. The start_copy value of yes means that these new SRDF pairs will be synchronized during the symconfigure commit action (that is, because of the invalidation of the R1 devices and the start_copy setting, data is copied from remote target devices 01C and 01D to local source devices 01C and 01D, respectively).
Reconfiguring devices as RDF devices requires a corresponding configuration change on the remote Symmetrix array. The symconfigure command attempts to perform local and remote changes in parallel, but if another user is executing a configuration change on the remote Symmetrix array, then your RDF change will not be applied to either the local or remote Symmetrix array.
Beginning with Solutions Enabler version 5.3, you can convert a static RDF device to a dynamic RDF device. For example, the following command converts the static RDF1 devices 0091, 0092, and 0093 to dynamic RDF, allowing them to be controlled using dynamic operations:
convert rdf dev 0091:0093 to dynamic;
You can also use a convert dev command to remove the RDF attributes from a device. For example, to convert the RDF1-BCV devices created above back to their original device configurations:
convert dev 01C:01D to BCV;
You should omit RDF-specific options from the command line; these options are necessary only when adding the RDF characteristic. The SYMAPI library detects that this is a change to an RDF environment, finds the remote Symmetrix array and associated RDF2 device, and manages the configuration change on both the local and remote Symmetrix arrays.
To convert a RAID-S group to a set of unprotected devices, specify any member of the group and include the raidset option. For example, to convert all members of the RAID-S group of which device 13D is a member:
convert dev 013D to unprotected, raidset=TRUE;
The RAID-S group cannot include mapped devices or meta members.
Using the SYMCLI Configuration Manager 20

1/25/2005
The following restrictions apply when you reconfigure devices:
• You cannot convert devices to SRDF device type configurations when:
Domino mode is enabled on any current SRDF pairs
There are any invalid tracks on any of the current SRDF devices
Concurrent RDF is enabled on the device
• If you remove all mirrors from a standard device, you cannot map it again until some other form of protection is associated with it, such a RDF or BCV attributes.
• Devices must be unmapped before adding the DRV attribute.
• All existing devices must be unmapped before reconfiguring them as a meta head or a meta member.
• For existing meta devices, you can only change the device configuration of the meta head; the Configuration Manager automatically applies the same changes to the meta members.
• You cannot modify an RDF meta device in one step once it has been established. If any modifications are required, it must be converted to a non-RDF device first.
Naturally, devices that are unmapped before the conversion must be mapped again after the conversion, with the exception of meta members and DRV devices, which are never mapped.
Be careful when reconfiguring devices that are included in a device group. For example, if you perform TimeFinder operations on a standard/BCV pair in a device group and use symconfigure to change the BCV to a non-BCV device, then the conversion leaves the device group in an invalid state. In such cases you should remove from the device group either the standard device or BCV device (whichever is applicable according to circumstances) before beginning the conversion process. Use the symdev list command to determine if a particular device belongs to a device group.
Forming a Meta Device A meta device is composed of two or more devices connected together logically and presented to the host as a single addressable device. This Symmetrix feature allows you to define a device larger than the current hyper-volume maximum size of approximately 32 cylinders (64 cylinders, beginning with Enginuity version 5669). Symmetrix allows you to combine existing devices to form the larger meta device. (For information about creating CKD meta devices, refer to “Creating Additional Symmetrix Devices.”)
As shown in Figure 3, the meta head is the first device in the meta device. The meta head handles all command processing and manages the distribution of I/O requests and the synchronization of meta member and meta tail processing activities. Data layout in a concatenated meta device continues to the end of the first device (meta head) before any data on the next device is added.
MemberDevice
MemberDevice
MetaTail
MetaHead
ConcatenatedMeta Device
UnrelatedHyperVolumes
CLI-000022
Figure 3. Concatenated Meta Device on Four Physical Disk Spindles
Using the SYMCLI Configuration Manager 21

1/25/2005
The following command file entries create a concatenated meta device using device 030 as the meta head and devices 031, 032, and 033 as the meta members:
form meta from dev 030, config=concatenated; add dev 031:033 to meta 030;
If the devices that form the meta device are mirror-protected (for example, 2-way-mir type devices), then the meta device is protected. All members of the meta device must have the same type of mirror protection.
A striped meta device is one that places data on meta members in user-defined stripes or chunks instead of filling an entire device first before addressing the next device. The stripe size (or chunk size) is the amount of data addressed on one device before moving on to the next device in the meta device. The following command forms a striped meta device, specifying a stripe size of 1920 blocks (which can also be specified in cylinders as 2 cyl). This is the recommended stripe size and the default when no size is specified.
form meta from dev 030, config=striped, stripe_size=1920; add dev 031:033 to meta 030;
When you form a striped meta device, EMC currently recommends that you add all members in the same session rather than forming an initial meta membership and adding more members later. Adding members after the initial meta device contains valid data requires a decision on whether or not to preserve the existing data. If you need to preserve the data, you need to include the protect_data option and the bcv_meta_head option, specifying the name of a BCV meta device that matches the original meta device in capacity, stripe count, and stripe size. For example:
add dev 034 to meta 030, protect_data=true, bcv_meta_head=090;
The preceding examples illustrate how you select the meta members of a meta device. However, it is also possible to have the configuration server select the meta members by including a meta count option that specifies how many devices to select to form the meta device. From a pool of unmapped devices, the configuration server selects devices with attributes and size that match the specified meta head. The following command requests the configuration server to form a meta device with four meta members: the meta head (030) and three other members selected by the configuration server. Stripe size is two cylinders.
form meta from dev 030, config=striped, stripe_size = 2 cyl, count=4;
Figure 4 illustrates a striped meta device composed of a hyper volume from each of four physical disk spindles that also include three unrelated hyper volumes. Equal-size stripes of data (for example, 1920 blocks) are written in sequence to the meta head and each meta member. When a stripe has been written to the meta tail, the sequence of writing stripes begins again at the meta head.
CLI-000023
Unprotected StripedMeta Device
Figure 4. Striped Meta Device on Four Physical Disk Spindles
With random I/O, striping data across multiple disk drives benefits random reads by avoiding the stacking of multiple reads to a single spindle and disk director. All patterns of I/O access are random across all members of the striped meta device.
Using the SYMCLI Configuration Manager 22

1/25/2005
With sequential I/O, when there are many sequential I/Os pending, striping causes data to be uniformly spread out. All the Symmetrix disk spindles associated with members of the striped meta device are employed to improve I/O throughput.
Striping is unrelated to data protection. Striping is simply a method of placing data on members of the meta device to enhance performance. Figure 5 illustrates a striped meta device configured with mirrored data protection. For example, this configuration can represent 2-way mirrored devices that have been formed into a meta 2-way mirrored device.
CLI-000024
Mirrored StripedMeta Device
Figure 5. Protected Striped Meta Device on Eight Physical Disk Spindles
If a meta device is protected with Parity RAID 3+1 protection (as shown in Figure 6), the Symmetrix configuration has even more logical volumes that are interrelated during physical disk I/O activity. Writes to the meta device also result in writes to the parity devices. You should consider these interactions when planning which hosts and applications will interact with the various volumes. If you need to eliminate interactions between multiple applications, you can allocate all volumes for a single application on dedicated, private spindles.
CLI-000025
RAID-SProtectionGroup
StripedMetaDevice
13 23 33 43
12 22 32 42
11 21 31 41
Parity Parity Parity Parity
Figure 6. Striped Meta Device Composed of Four Parity RAID 3+1 Protection Groups
Figure 6 shows a striped meta device made up of four different Parity RAID 3+1 protection groups. For example, one protection group consists of RAID data devices (11, 12, and 13) and their shared parity device. The meta members (devices 13, 23, 33, and 43) are each members of a different Parity RAID 3+1 protection group.
Creating meta devices is a multi-step process. For example, creating a meta RDF device requires three steps: creating devices, forming a meta device from these devices, and then converting the meta head device to an RDF device. Table 3 shows the configuration change sessions required to form different types of meta devices: create, form, and convert.
Using the SYMCLI Configuration Manager 23

1/25/2005
Table 3. Steps to Form a Meta Device
Desired Device Configuration Session 1 — create Session 2 — form Session 3 — convert
Meta 2-Way-Mir 2-Way-Mir → Meta 2-Way-Mir
Meta 3-Way-Mir 3-Way-Mir → Meta 3-Way-Mir
Meta 4-Way-Mir 4-Way-Mir → Meta 4-Way-Mir
Meta RAID-S RAID-S (in multiples of 3 or 7) → Meta RAID-S
Meta RAID-5 RAID-5 → Meta RAID-5
Meta RDF1 Unprotected → Meta Unprotected → Meta RDF1
Meta RDF2 Unprotected → Meta Unprotected → Meta RDF2
Meta RDF1+R-S RAID-S (in multiples of 3 or 7) → Meta RAID-S → Meta RDF1+R-S
Meta RDF2+R-S RAID-S (in multiples of 3 or 7) → Meta RAID-S → Meta RDF2+R-S
Meta RDF1+R-5 RAID-5 → Meta RAID-5 → Meta RDF1+R-5
Meta RDF2+R-5 RAID-5 → Meta RAID-5 → Meta RDF2+R-5
Meta RAID-5 BCV RAID-5 → Meta RAID-5 → Meta RAID-5 BCV
Meta BCV BCV → Meta BCV
Meta 2-Way-BCV-Mir 2-Way-BCV-Mir → Meta 2-Way-BCV-Mir
Meta RDF1-BCV BCV → Meta BCV → Meta RDF2-BCV
Meta RDF2-BCV BCV → Meta BCV → MetaRDF2-BCV
Meta 2-Way-Mir-RDF 2-Way-Mir → Meta 2-Way-Mir → Meta 2-Way-Mir-RDF
Meta RDF1+R-5+BCV R-5 BCV11 → Meta R-5 BCV → Meta RDF1+R-5+BCV
Meta RDF2+R-5+BCV R-5 BCV9 → Meta R-5 BCV → Meta RDF2+R-5+BCV
Restrictions When Forming a Meta Device • Devices must be unmapped before they are formed as members of a meta device.
• Currently, meta members cannot be removed from a striped meta device.
• To form a striped meta device, all members must be the same size and have the same mirror protection.
• You cannot remove an inner member from a concatenated meta device. The sequence for removing members must always begin from the meta tail.
• You cannot change the membership of an AS/400 meta device.
• You can only change the device configuration of the meta head; the Configuration Manager automatically applies the changes to the meta members.
• Only the meta head is mapped or assigned to the host.
• A meta device must contain a meta head and at least one meta member at all times.
• A meta device must be composed of devices of the same STD, BCV, or RDF configuration. However, while a STD or BCV is established as a BCV pair, it cannot be used to form a meta device.
• A meta device created with the form meta command file entry must be composed of devices of the same emulation type.
9 Create a RAID-5 device and convert it to a RAID-5-BCV device.
Using the SYMCLI Configuration Manager 24

1/25/2005
• A CKD meta device is created using the create dev command, not the form dev command. Refer to the section “Creating Additional Symmetrix Devices.”
Removing Meta Members
You can remove meta members from a concatenated meta device provided that you begin at the meta tail. For example, the following command file entry removes the meta tail (device 033) first and then device 032. Device 031 becomes the new meta tail:
remove dev 032:033 from meta 030;
Recall that, currently, you cannot remove meta members from a striped meta device.
Dissolving a Meta Device
When you dissolve a meta device, you remove the meta head and meta member configuration from these devices. All the meta members revert to independent devices that you can manage individually.
The following command file entry dissolves the meta device whose meta head is device 030:
dissolve meta dev 030;
Converting a Meta Device
You can convert a concatenated meta device to striped meta device. You can also use convert meta to change the stripe size of a striped meta device. If you need to preserve the data on the meta device while you are converting it, set the protect_data option to TRUE and use the bcv_meta_head option to specify a BCV meta device that can be used for this purpose.
The following command file entry converts a concatenated meta device (030) to a striped meta device and preserves the data during the conversion using BCV meta device 01F:
convert meta 030, config=striped, stripe_size=1920, protect_data=TRUE, bcv_meta_head=01F;
The Configuration Manager automatically creates a protected copy of the original meta device on the BCV meta device. The BCV meta device that you specify must be identical to the original meta device in capacity, stripe count, and stripe size.
When changing protected meta devices, you can make only one change per configuration session. When changing meta devices and not protecting data, you can make any combination of meta changes in a configuration session.
Preserving Data
In general, it is wise to assume that any meta device configuration operation will affect the integrity of the data on the devices involved in that operation. When you issue a command to create a meta device, the meta members lose their independent identities and are no longer addressable by the host. In particular, you should ensure that critical data that exists on devices that will be formed into meta devices is preserved before the meta device is created.
Take care to ensure that configuring a meta device does not risk any critical data on the devices that you use to form the meta device. Table 4 shows how meta device operations impact the preservation of stored data on the devices that become meta members.
Using the SYMCLI Configuration Manager 25

1/25/2005
Table 4. Meta Device Data Preservation
Meta Device Configuration with Data Meta Operation Data Integrity
Concatenated meta device Creating the device (forming the meta head and adding at least one meta member)
Not preserveda
Concatenated meta device Adding a member Preservedb
Concatenated meta device Removing a member Preservedc
Concatenated meta device Dissolving the meta device Not preservedd
Concatenated meta device Converting to a striped meta device using the protect_data=true option
Preserved
Striped meta device Creating the device (forming the meta head and adding at least one meta member)
Not preserved
Striped meta device Adding a meta member when using the protect_data=true option
Preserved
Striped meta device Dissolving the meta device Not preservedd
Striped meta device Converting to a concatenated meta device using the protect_data=true option
Preserved
a. The original data remains on the devices (i.e., it is not altered in any manner), but it cannot be accessed.
b. Preserves data on the existing meta device, but the original data on the new member cannot be accessed. The host must be rebooted on Windows NT systems (no restriction for Windows 2000).
c. Preserves data up to where the meta device is removed. Data on the removed member cannot be accessed. The host must be rebooted on Windows NT systems (no restriction for Windows 2000).
d. Preserves data, but there is no host component to piece the data together, so data on the devices cannot be accessed.
Using the SYMCLI Configuration Manager 26

1/25/2005
Setting Device Attributes and Changing Emulation Type You can set a device attribute and change the device emulation type for a device or range of devices by using the set device command file entry. However, the only device emulation types that you can change are FBA (fixed block architecture), Celerra FBA, or VME 512 FBA emulation.
The following command file entry changes five FBA devices, 030 through 034, to Celerra FBA emulation:
set device 030:034 emulation=CELERRA_FBA;
The following device attributes restrict how a device can be accessed: RAD, RDB_Cksum, VCMdb (for device masking)10, Worm (Write Once Read Many). Beginning with EMC Solutions Enabler version 5.1, you can also set the SCSI3_persist_reserv attribute (persistent group reservation) if you have a Sun Cluster 3.0 environment where more than two channels access the device.
You can enable the Worm attribute on one or more devices to manage them as WORM devices:
set device 030:034 attribute=Worm;
The Configuration Manager does not allow you to disable the Worm attribute. This protection is required to maintain the integrity of a true WORM environment. However, once a device has a track that is WORM-protected, you can contact EMC to disable the Worm attribute if doing so becomes your requirement.
The following command file entry converts five devices so that they are accessible for RDB Checksum operation.
set device 030:034 attribute=RDB_Cksum;
Three device attributes apply to non-RDF devices that you want to use as dynamic RDF devices. The dyn_rdf attribute allows a device to be either an R1 or an R2 device, providing the most flexibility in performing dynamic RDF operations (refer to Appendix B to determine which dynamic RDF operations are possible with your Enginuity version). The following command file entry sets the dynamic RDF attribute so that these five devices can be used to create dynamic SRDF pairs.
set device 030:034 attribute=dyn_rdf;
Only the dyn_rdf attribute allows you to use these devices to perform RDF swaps. The other dynamic RDF attributes, dyn_rdf1_only and dyn_rdf2_only, allow a device to be only an R1 or an R2 device, respectively. Their restriction prevents them from taking part in RDF swaps.
The following restrictions and recommendations apply when setting device attributes or emulation type:
• Before setting emulation type, make sure that the devices are unmapped and have no I/O activity.
• Before setting the RAD attribute, make sure that the devices are unmapped and have no I/O activity.
• Before setting the attribute type of a mapped device, minimize I/O activity to that device.
10 Only one device per Symmetrix array can be established as a VCMdb device. It should be a mirrored device of at least 16 cylinders.
Using the SYMCLI Configuration Manager 27

1/25/2005
Setting Symmetrix-Wide Configuration Parameters You can set Symmetrix-wide configuration parameters (metrics) to allow the use of specific Symmetrix features. Create a command file with entries that use the “set symmetrix parameter = value;” syntax (see examples in this section). You can set the following parameters:
• max_hypers_per_disk
Specifies the maximum number of hyper volumes that can be created on physical disks in a Symmetrix array. Possible values are from 1 to 32 or higher, based on the Enginuity version that you are running on your Symmetrix array (beginning with Enginuity version 5568, this value can be up to 128). You cannot set this parameter to a value that is lower than the number of hypers currently existing on any device. To determine the current setting for maximum hypers, use the symconfigure list command with the verbose (–v) option.
• dynamic_rdf
Enables you to create non-RDF devices that you can use to create dynamic SRDF pairs. You can set its value to ENABLE or DISABLE.
• dynamic_concurrent_rdf (beginning with EMC Solutions Enabler version 6.0)
Enables you to pair dynamic RDF devices for concurrent RDF operation. You can set its value to ENABLE or DISABLE.
• fba_multi_access_cache
Determines whether an FBA read request can share cache slots under some conditions. It must be enabled to create Celerra FBA devices. You can set its value to ENABLE or DISABLE.
• raid_s_support
Supports the creation of Parity RAID-S devices on a Symmetrix array. You can set its value to ENABLE or DISABLE (the default).
• raid_5_support (beginning with Solutions Enabler version 5.4 and Enginuity version 5670)
Supports the creation of RAID-5 devices on a Symmetrix array. You can set its value to ENABLE or DISABLE (the default).
• raid_s_members (RAID-S requires version 5.1 or higher; RAID-5, version 5.4 or higher)
Specifies the number of members required when you create Parity RAID-S or RAID-5 devices. Specify a value of 3 for 3+1 protection, or a value of 7 for 7+1 protection. If you do not set this parameter, the default is 3. All RAID protection groups (RAID-S or RAID-5) on a Symmetrix array must have the same number of members.
• VCMDB_restricted_access
Enables you to restrict access to the device masking database to hosts that have a database entry that includes the VCMDB device. By default, all Host Bus Adapters (HBAs) that log in to the FA port to which the VCMDB device is mapped can access the database. By setting this parameter value to ENABLE, you deny database access to all hosts except those whose HBAs have added the VCMDB device through the symmask add devs command. (You can display the VCMDB device on a Symmetrix array using the sympd list –vcm command.)
Prior to enabling this parameter, you should ensure that at least one host HBA has a valid database entry that includes the VCMDB device. (It is recommended that you have two HBA entries that include this device, in case of an HBA failure.) Without this VCMDB entry, no hosts can access the database. To gain access to the database again, you would need to reset this parameter to DISABLE.
Using the SYMCLI Configuration Manager 28

1/25/2005
• pav_mode (beginning with EMC Solutions Enabler version 6.0 and Enginuity version 5x71)
Enables you to use Parallel Access Volumes (PAV) for CKD devices in a z/OS environment. (For information about PAV, refer to the white paper Using the SYMCLI Configuration Manager for Managing CKD Devices, P/N 300-001-889). You can set the PAV mode value11 to STANDARD or DYNAMIC_STANDARD. If you need to turn off PAV mode once it is set, please contact EMC.
• max_pav_aliases (beginning with EMC Solutions Enabler version 6.0)
Specifies the maximum number of aliases that you can assign to PAV-enabled CKD devices. Values for Symmetrix arrays running Enginuity version 5670 can be 1 through 7; version 5671 can have values 1 through 15.
• rdfa_cache_percent (beginning with EMC Solutions Enabler version 6.0 and Enginuity 5x71)
Specifies percent of system write-pending cache that can be used by SRDF/A (value from 0 to 100).
• rdfa_host_throttle_time (beginning with EMC Solutions Enabler 6.0 and Enginuity 5x71)
Specifies the number of seconds to throttle host writes when the cache is full before dropping an SRDF/A session (value from 0 to 65535).
The following command file entry increases the maximum number of hypers that can be created on any physical disk in the Symmetrix to 32 and allows the sharing of cached data for certain FBA read requests:
set symmetrix max_hypers_per_disk=32, fba_multi_access_cache=enable;
The following command file entry allows you to create RAID-5 devices on the Symmetrix array and sets the RAID-5 devices for 7+1 protection:
set symmetrix raid_5_support=enable, raid_s_members=7;
Swapping Devices in an RA Group When you swap the devices in an RA group, you convert the personality of all the SRDF devices in the RA group and swap the polarity of any ESCON RA directors in the RA group. Source R1 devices become target R2 devices, and vice versa.
The swap ra group command file entry allows you to specify the RA group, which side of RDF devices (R1 source or R2 target) to refresh from any changed data on the other side, and whether the SRDF pairs should be synchronized immediately after the configuration change is committed.
For example, the following command file entry swaps the devices of RA group 1 and refreshes the R1 devices from the R2 devices (copying data from the R2 devices to the R1 devices). The start_copy option causes the synchronizing of the SRDF pairs to begin immediately after the configuration change is committed.
swap ra group 1, refresh=r1, start_copy=yes;
The refresh action identifies which devices do not hold a valid copy of the data before the swap operation begins. For example, after a failover from source to target, the R1 devices will no longer hold a valid copy of the data if processing continues on the R2 side. Also, after a failover, R2 writes are not propagated back to the R1 devices. If you decide not to fail back to the original host after a failover situation is corrected (there may be no reason to shut down the processing of data on the backup target
11 The Configuration Manager cannot set the additional pav_mode values of NONE, SIEMENS, or DYNAMIC_SIEMENS. If your
configuration requires a SIEMENS setting, or if you need to turn off PAV mode once it is set, contact EMC.
Using the SYMCLI Configuration Manager 29

1/25/2005
system then to perform a failback operation), swapping the devices in the RA group is a useful operation. Your original target system becomes the new source system. The original source becomes the new target.
The following restrictions apply to swapping RA groups:
• If FarPoint™ is enabled, all devices must be of the same configuration (RDF1 or RDF2).
• Only one RA group may be swapped per configuration change session.
• There is no need to stop I/O activity to the R2 devices when swapping source and target attributes, but no I/O activity is allowed to the R1 devices. You should place the R1 devices in a Not Ready or Write Disabled state if that is not already the case.
Swapping the devices in an RA group requires a corresponding configuration change on the remote Symmetrix array. The symconfigure command attempts to perform local and remote changes in parallel, but if another user is executing a configuration change on the remote Symmetrix array, then your RA group swap will not be applied to either the local or remote Symmetrix array.
The SYMCLI command symrdf swap provides a similar swap capability, but at the device-pair level rather than the RA-group level12. If you add SRDF devices to a device group, you can use the symrdf swap command to swap the R1/R2 personality of one or more SRDF pairs that you have included in the device group. However, symrdf swap does not swap the RA director polarity as swap ra group does, and in cases where bi-directional communication is absent, swapping the director polarity and all SRDF devices in the RA group is required. For more information on the symrdf swap command and dynamic RDF swaps, refer to the white paper Using SYMCLI to Perform Control Operations with SRDF Family Products (P/N 300-000-076).
Reserving Physical Disks as Dynamic Spares Beginning with EMC Solutions Enabler version 5.0, you can reserve a certain number of disks as dynamic (“hot”) spares. When a physical disk is reserved as a dynamic spare, it cannot be used to hold any devices. The dynamic spare disk is held in reserve to support the hypers of a Symmetrix disk that fails. When a disk fails, the dynamic spare disk is invoked against the failed disk.
The Symmetrix system creates a spare disk only from a disk containing no hypers. The following command file entry sets aside six disks for use as dynamic spares and specifies that their recording format be 512:
create spare count=6, format=512;
Values for the recording format to be used on a spare disk can be either 512 or 520. You should select a format based on the type of disk that the dynamic spare will replace:
• For the Symmetrix 8000-series and all DMX models, use 512 for CKD and FBA type disks, and 520 for AS/400 and Tandem types.
• For Symmetrix models 3330/5330, 3700/5700, and 3430/5430 with selective LLF (Low-Level Format) enabled, use 512 for CKD and FBA, and 520 for AS/400 and Tandem.
• For Symmetrix models 3330/5330, 3700/5700, and 3430/5430 with no AS/400 or Tandem devices, use 512 for CKD and FBA type disks.
• For Symmetrix models 3330/5330, 3700/5700, and 3430/5430 with AS/400 or Tandem devices, use 512 for CKD, and 520 for FBA, AS/400, and Tandem.
12 With ESCON, swapping devices using symrdf swap is permitted unless the configuration includes FarPoint software. FarPoint
protocol does not allow bi-directional communication. Thus, if you need to swap devices and FarPoint is on, you need to swap all devices in the RA group, which swaps the RA director polarity as well.
Using the SYMCLI Configuration Manager 30

1/25/2005
To view a list of disks that have been reserved as dynamic spares, use the symdisk list –hotspares SYMCLI command.
You can use another SYMCLI command, symdev list, to display Symmetrix arrays that have had dynamic spares invoked against failed disks. For example:
# symdev list -hotspare Symmetrix ID: 000184500120 Could not select any Symmetrix devices to list. Symmetrix ID: 000184500180 Device Name Directors Device ---------------------------- ------------ ------------------------------------- Cap Sym Physical SA :P DA :IT Config Attribute Sts (MB) ---------------------------- ------------ ------------------------------------- 0010 Not Visible ???:? 01A:D0 Unprotected N/Grp'd NR 103 0098 Not Visible ???:? 01A:D0 Unprotected N/Grp'd NR 47 00AE Not Visible 13A:0 01A:D0 2-Way Mir N/Grp'd RW 4315 00C7 Not Visible ???:? 01A:D0 Unprotected N/Grp'd NR 47 00DF Not Visible ???:? 01A:D0 Unprotected N/Grp'd NR 47 00F5 Not Visible ???:? 01A:D0 Unprotected N/Grp'd NR 47 0108 Not Visible ???:? 01A:D0 2-Way Mir N/Grp'd RW 469
This display shows that Symmetrix 120 has not had any dynamic spares invoked against failed disks, whereas Symmetrix 180 shows one dynamic spare invocation against disk 01A:D0. Note that “Unprotected” devices with a dynamic spare invoked against them become Not Ready (NR) because unprotected devices have no mirror to duplicate data on the spare hyper. On the other hand, mirrored devices stay Ready (RW) when a dynamic spare is invoked against one of their mirrors.
The following command file entry removes a disk’s reservation as a dynamic spare and makes it available again for normal storage. The disk having its dynamic spare reservation removed has a director number of 16A, a DA SCSI path of D, and a SCSI target ID (hex value) of 0.
delete spare disk=[16A, D, 0];
Keep in mind that you cannot remove a disk’s reservation as a dynamic spare while it is invoked.
Setting Front-End Port Attributes You can use the set port command file entry to set a new value for a particular SCSI, iSCSI, or fibre protocol port flag. The set port entry also has arguments for setting an FA director loop ID and assigning a particular host name. For a complete list of SCSI and fibre protocol port flags, refer to Tables 2-4 and 2-5 in the EMC Solutions Enabler Symmetrix Configuration Change CLI Product Guide.
You can display the current settings of port flags for a particular director (SA) or all front-end directors with one of the following commands. For example, to display port flag settings for director 03A and then for all front-end directors on the Symmetrix array (sid 140):
symcfg list –sid 140 –SA 03A –v symcfg list –sid 140 –SA ALL –v
Using the SYMCLI Configuration Manager 31

1/25/2005
The following command file entries set (or reset) SCSI protocol port flags:
set port 03A:0 Cyl_Count_In_Name=disable; set port 03A:0 Common_Serial_Number=enable; set port 03A:0 Disable_Q_Reset_on_UA=enable;
It is recommended that you temporarily suspend I/O activity to the affected ports when setting front-end port attributes. Beginning with EMC Solutions Enabler version 6.0, you can include GigE options primary_ip_address, primary_netmask, or default_gateway with its respective value (for example, gige primary_ip_address=123.654.789.321).
CAUTION
Incorrectly changing the port flags can render your Symmetrix storage system inaccessible. Be certain of the results of any change before resetting any of these flags.
RDF (RA) Groups and SRDF/A Operation The capability to enable and disable SRDF/A operation for an RDF (RA) group began with EMC Solutions Enabler version 5.3 and Enginuity version 5670. Only one RDF group in a Symmetrix array could be enabled for SRDF/A operation, and that group had to be static and have all members as R1 or R2 devices.
Beginning with Solutions Enabler version 6.0 and Enginuity version 5x71, all RDF groups in a Symmetrix array are capable of SRDF/A operation; thus, you no longer need to configure an RDF group for SRDF/A capability. You can now enable one or more RDF groups for SRDF/A operation on a Symmetrix array, allowing it to have multiple SRDF/A sessions.
Also beginning with Enginuity version 5x71, you can use a command file entry to set RDF group parameters that affect SRDF/A performance. The minimum_cycle_time parameter can have a value from 5 to 59 seconds. You can also set session_priority for a group to a value from 1 to 64, with 1 being the highest priority. For example, to set minimum_cycle_time for RDF group 4 to 20 seconds, and to set the session priority for RDF group 24 to 8:
set rdf group 4 minimum_cycle_time=20; set rdf group 24 session_priority=8;
If you are using Solutions Enabler with Enginuity version 5x70, the enable RDFA on ra_group command file entry requires that you to specify the RA group and whether you want to make the group swappable (that is, capable of swapping the R1 and R2 devices). When the enable request is acted upon, the necessary cache-only virtual devices (COVDs) are created as support devices on the R2 side. To make the group swappable, COVDs are created on both Symmetrix arrays. The following command file entry enables RA group 1 for RDFA operation and makes it possible to swap the R1 and R2 devices if the need arises:
enable RDFA on ra_group 1, make_group_swappable=true;
The disable RDFA on ra_group command file entry requires that you to specify the RA group and whether you want to delete the RDFA support devices. For example, the following command file entry disables RA group 1 for RDFA operation but does not delete the RDFA support devices:
disable RDFA on ra_group 1, delete_support_devices=false;
For information about creating and using RDFA devices, refer to the white paper Using SYMCLI to Perform Control Operations with SRDF Family Products (P/N 300-000-076).
Using the SYMCLI Configuration Manager 32

1/25/2005
Reorganizing a Previously-Created Set of RDF Devices to Form an FBA Meta Device If you have a set of RDF devices in use and want to convert the devices to an FBA meta device, you must follow a series of steps to make that conversion. Meta operations are not allowed on RDF devices or on devices that are mapped.
To convert RDF devices to an FBA meta device, perform the following steps:
1. From one host:
Convert the RDF devices back to non-RDF devices:
convert dev 015:021 to 2-way-mir;
2. From each host:
Unmap the devices:
unmap dev 015:021 from dir all:all;
Form the meta device and add the meta members:
form meta from 015, config=striped, stripe_size=1920; add dev 016:021 to meta 015;
Map the meta head:
map dev 015 to dir 14A:0, lun=012;
3. From one host:
Convert the meta head to an RDF configuration:
convert dev 015 to RDF1-mir, ra_group=1, remote_dev=015, invalidate=R2, start_copy=yes;
Using the SYMCLI Configuration Manager 33

1/25/2005
Creating Devices in Mixed Environments (FBA and CKD) Mainframe systems use sub-system identifiers (SSID) to locate physical disk controllers. Although SSIDs have no meaning or use in an FBA environment, the configuration server serves both open systems and the mainframe environment and therefore needs to handle SSIDs when a Symmetrix array is a “mixed box” (that is, it contains both FBA and CKD emulation devices).
When creating new devices on a Symmetrix array that has both mainframe (CKD) and open system (FBA) devices, you must assign a SSID parameter when you create the new devices. The following example allows you to check if a sub-system identifier (SSID) is required:
symcfg list –sid 120 -dir all
The display provides information about all directors in the Symmetrix array. If the display shows that there is an ESCON director present, the Symmetrix array is a mixed box and you will need to find an available SSID to assign when you create a new device.
Beginning with EMC Solutions Enabler version 5.0, if you do have a mixed environment, you can use the symcfg –ssid list command to display SSID information for existing devices. You can use a SSID from this list provided that “Number of Devices Currently Present” is not already at the “Maximum Number of Devices Allowed” for that SSID. The following output shows that SSID 140 already has the maximum number of devices that can be assigned to it but that SSIDs 141 and 143 are still well below the maximum.
# symcfg -sid 120 -ssid list Symmetrix ID: 000184500120 Symmetrix ID : 000184500120 Sub System Information: Sub System ID : 0x0140 Maximum Number of Devices Allowed : 256 Number of Devices Currently Present: 256 Sub System ID : 0x0143 Maximum Number of Devices Allowed : 256 Number of Devices Currently Present: 1 Sub System ID : 0x0141 Maximum Number of Devices Allowed : 256 Number of Devices Currently Present: 24
The emulation type for a SSID must be the same as the emulation of the new devices that you are adding. To determine if one of these available SSIDs is associated with devices that have the emulation type (FBA, for example) that you will specify for the new devices, issue the symdev list –v command and look for a device that has one of the available SSIDs and the emulation type that you want. All devices assigned to a SSID have the same emulation type.
For more information about managing CKD devices in a z/OS environment, refer to the white paper Using the SYMCLI Configuration Manager for Managing CKD Devices (P/N 300-001-889).
Using the SYMCLI Configuration Manager 34
1/25/2005
Creating a Named Pool of Save Devices TimeFinder/Snap operations use a pool of save devices to store the original data when tracks on the source device are modified. The pool is also used when tracks on the virtual device are modified. Prior to Solutions Enabler version 6.0, all snap sessions used a single default pool.
Now the Configuration Manager allows you to create multiple pools13 with names that can be specified in symsnap commands to avoid having all save devices in the default pool. Using multiple pools alleviates contention for save-device space among several snap sessions and eliminates the possibility of a single session using all of the pool space.
You can create a pool by giving it a unique name of up to 12 characters — any combination of upper and lower case alpha characters (A-Z, a-z), numeric characters (0-9), dash (-), and underscore (_). The name “DEFAULT_POOL” is reserved as the container for all save devices that do not belong to a named pool. The following command file entry creates a pool called “Finance.”
create pool Finance, type=savedev;
Adding save devices to a named pool effectively moves the devices from the default pool to the named pool. To perform this operation, you must first ensure that the devices are disabled and inactive. The following command file entry adds save devices 1B, 1C, and 1D to a pool called “Finance,” using an option that enables the devices as they are placed in the pool. If you do not enable the devices here, you can do so later with the enable in pool command file entry (refer to “Enabling and Disabling Members of a Save Pool”).
add dev 1B:1D to pool Finance, type=savedev, member_state=enable;
To remove save devices from a save pool, the devices must first be disabled and inactive (requiring all snap sessions using that pool to be terminated). Removing save devices from a named pool moves the devices to the default pool. For example, to move device 1D to the default pool:
remove dev 1D from pool Finance, type=savedev;
If all save devices in a named pool are disabled and inactive, you can delete the pool. The following command file entry deletes the pool named “Finance” and moves its members to the default pool.
delete pool Finance, type=savedev;
13 Save devices can be created if either the Configuration Change license or the TimeFinder/Snap license is available. Save pool
management requires a TimeFinder/Snap license.
Using the SYMCLI Configuration Manager 35

1/25/2005
Enabling and Disabling Members of a Save Pool
You can enable or disable a range of save devices in the same save pool. Devices in the save pool are not required to be in the same state. The pool itself becomes enabled whenever any save device within the pool is enabled. Conversely, if all members of the pool are disabled, the pool itself becomes disabled.
The following command file entry enables a range of save devices (1B, 1C, and 1D) in the pool called “Finance.”
enable dev 1B:1D in pool Finance, type=savedev;
The following command file entry disables save device 1D in the pool “Finance.”
disable dev 1D in pool Finance, type=savedev;
When a save device becomes disabled, no new data can be written to it. However, there may still be active snap sessions that point to it. The device is not considered inactive until these snap sessions are terminated. The device cannot be removed from its current pool until it is disabled and inactive.
The following command file session disables a range of save devices in the pool “Finance.”
disable dev 01D:01F in pool Finance, type=savedev;
The following command file session creates a new pool named “HR” and moves the save devices that were in the existing pool to this pool, enabling the save devices at the same time.
create pool HR, type=savedev; add dev 01D:01F to pool HR, member_state=enable;
Creating Save Devices and Simultaneously Adding Them to a Named Save Pool
The Configuration Manager allows you to create save devices and, beginning with Solutions Enabler version 6.0, to optionally specify an existing save pool that should contain the new devices. If you do not specify a save pool while creating the save devices, the devices are placed in the default save pool, DEFAULT_POOL. As described previously, you can move save devices from the default save pool to a named save pool using the command file entry add to pool.
The following command file entry creates three save devices and adds them to the pool named “Finance.”
create dev count=3, config=2-way-mir, size=2200, emulation=FBA, attribute=savedev in pool Finance;
By default, all devices created in this manner are added to pool Finance in the disabled state. You can include the member_state option to create them in the enabled state.
Using the SYMCLI Configuration Manager 36

1/25/2005
Example 1: Creating Devices This hardware setup consists of an HP-UX host (api157) and two Solaris hosts (api145 and api146), each connected to a Symmetrix array (sid 120) running Enginuity version 5568. All commands are issued from Solaris host api145. The example creates four new Symmetrix devices for this Symmetrix array. Each new device is a 2-way mirrored type device with a size of 220 cylinders (103 MB) and an emulation of FBA.
The symconfigure list -freespace command displays the Symmetrix array’s free physical disk space that you can use to create new devices. The Unformatted column shows free disk space available for any emulation mode. The Formatted column shows free space on disks that have been partially used for devices configured with the same emulation mode (in this case, FBA). The free space on formatted disks can be used only to create new devices of the same emulation mode. The output here shows that there is sufficient free disk space to create four new FBA-emulation devices of 220 cylinders. To display free space in megabytes rather than cylinders (the default), include the –units MB option on the command line.
# symconfigure -sid 120 list -freespace Symmetrix ID: 000184500120 Emulation Formatted Unformatted (Cyl) (Cyl) --------------------- --------- ----------- FBA 14207954 0
For more detailed information about a Symmetrix configuration, use symconfigure list with the verbose (–v) option. When checking the current number of hypers on disks and their capacity to add additional hypers (new devices), it is particularly important to note the Symmetrix setting for “Max Hypers per Disk.” The output below indicates that each disk in this Symmetrix array may have a maximum of 24 hypers. The ellipsis (……) represents an area where a portion of the output was omitted for brevity.
# symconfigure -sid 120 list -v Symmetrix ID : 000184500120 Configuration Server Version : 5568.31.14 Configuration Server Protocol : 0x20D Configuration Server Date : 12.28.2001 …………………………………………………………………………………………………………………………… Max Hypers per Disk : 24 FBA Multi Access Cache : Enabled Dynamic RDF Configuration : Enabled RAID-S support : Enabled
Using the SYMCLI Configuration Manager 37

1/25/2005
Two commands can check free disk space on a Symmetrix array. Beginning with SYMCLI version 5.0, the symdisk list command displays available space (in cylinders) on physical disks and whether those disks can hold additional hypers. A disk is identified by its DA director, the DA path or interface (Int), and the disk’s SCSI target ID (TID). When you create 2-way mirrored devices, the Symmetrix system maps each mirror of the device to a different disk, accessed through a different memory bus and DA director.
# symdisk -sid 120 list Symmetrix ID: 000184500120 Symmetrix ID : 000184500120 Disks Selected : 60 Capacity(Cyl) Ident Symb Int TID Vendor Type Hypers Total Free ------ ---- --- --- ---------- ---------- ------ -------- -------- DA-1A 01A C 0 SEAGATE CHET_73 1 149348 143208 DA-1A 01A C 1 SEAGATE CHET_73 2 149348 148909 DA-1A 01A C 2 SEAGATE CHET_73 2 149348 148909 DA-1A 01A C 3 SEAGATE CHET_73 1 149348 149128 DA-1A 01A C 4 SEAGATE CHET_73 1 149348 149128 DA-1A 01A C 5 SEAGATE CHET_73 2 149348 148909 DA-1A 01A D 0 SEAGATE CHET_73 1 149348 149128 ……………………………………………………………………………………………………………………………………………………………………………… DA-2A 02A C 0 SEAGATE CHET_73 1 149348 149128 ………………………………………………………………………………………………………………………………………………………………………………
The symdev list command also displays free disk space. Using the -da all and -space options displays the distribution of free disk space across those formatted disks in the Symmetrix array that are mapped to DA (disk) directors. You can examine the Hypers column to determine if there are at least two disks (each mirror of a 2-way mirrored device must be on a different spindle) that have fewer hypers than the “Max Hypers per Disk” setting for the Symmetrix array. Both displays show enough available space to allocate the new hypers when the example creates new devices. As time elapses between displays (as is the case with these two displays), the later display is likely to show added numbers of hypers on a disk, depending on the frequency of Symmetrix configuration sessions by this host and other hosts.
# symdev list -sid 120 -da all -space Symmetrix ID: 000184500120 DA Capacity (MegaBytes) Details ------------- -------------------------------------- ----------------- Ident Int TID Total Configured Unconfigured Hypers Format ----- --- --- ------------ ------------ ------------ ------ ---------- 01A C 0 70007 778 69229 4 FBA 01A C 1 70007 675 69332 3 FBA 01A C 2 70007 726 69281 5 FBA 01A C 3 70007 600 69407 6 FBA 01A C 4 70007 675 69332 3 FBA 01A C 5 70007 572 69435 2 FBA 01A D 0 70007 103 69904 1 FBA ……………………………………………………………………………………………………………………………………………………………………… 02A C 0 70007 618 69389 6 FBA ………………………………………………………………………………………………………………………………………………………………………
Using the SYMCLI Configuration Manager 38

1/25/2005
The symdev list command with the –cyl option displays information about all devices in the Symmetrix array, including the capacity (size) of each device. Note that the size of existing 2-Way Mir devices (the type and size that the example will create) is 220 cylinders. Checking device size is useful when you need to size existing RDF, BCV, DRV, and meta devices for matching new devices to their size. Note that device 009A is the last device currently configured in this Symmetrix array. The Symmetrix system will name new devices beginning with 009B.
# symdev list -sid 120 -cyl Symmetrix ID: 000184500120 Device Name Directors Device ---------------------------- ------------ ------------------------------------- Cap Sym Physical SA :P DA :IT Config Attribute Sts (CYL) ---------------------------- ------------ ------------------------------------- 0000 Not Visible ???:? 01A:C0 Unprotected N/Grp'd RW 220 0001 Not Visible ???:? 16A:D4 Unprotected N/Grp'd RW 220 ………………………………………………………………………………………………………………………………………………………………………………………………………………… 000A Not Visible ???:? 02B:C0 BCV N/Asst'd RW 220 000B Not Visible ???:? 15B:C4 Unprotected N/Grp'd (M) RW 660 000C Not Visible ???:? 15B:C0 Unprotected N/Grp'd (m) RW - 000D Not Visible ???:? 02B:C4 Unprotected N/Grp'd (m) RW - 000E Not Visible ???:? 16B:C0 Unprotected N/Grp'd RW 220 000F Not Visible ???:? 01B:C4 Unprotected N/Grp'd RW 220 0010 Not Visible ???:? 01A:D0 Unprotected N/Grp'd (M) RW 1100 0011 Not Visible ???:? 16A:C4 Unprotected N/Grp'd (m) RW - 0012 Not Visible ???:? 02A:D0 Unprotected N/Grp'd (m) RW - 0013 Not Visible ???:? 15A:C4 Unprotected N/Grp'd (m) RW - 0014 Not Visible ???:? 15A:D0 Unprotected N/Grp'd (m) RW - 0015 Not Visible ???:? 02A:C4 2-Way Mir N/Grp'd RW 220 0016 Not Visible ???:? 16A:D0 3-Way Mir N/Grp'd RW 220 0017 Not Visible ???:? 01A:C4 4-Way Mir N/Grp'd RW 220 0018 Not Visible ???:? 01B:D0 Unprotected N/Grp'd RW 220 0019 Not Visible ???:? 16B:D3 Unprotected N/Grp'd RW 220 …………………………………………………………………………………………………………………………………………………………………………………………………………… 006F Not Visible ???:? 15B:C2 Unprotected N/Grp'd RW 220 0070 Not Visible ???:? 16B:C0 2-Way Mir N/Grp'd RW 220 0071 Not Visible ???:? 15A:C0 2-Way BCV Mir N/Asst'd RW 220 0072 Not Visible ???:? 02B:C4 3-Way Mir N/Grp'd RW 220 0073 Not Visible ???:? 16A:C0 3-Way Mir N/Grp'd RW 220 0074 Not Visible ???:? 16B:C3 3-Way Mir N/Grp'd RW 220 0075 Not Visible 04B:0 01A:C0 Unprotected Grp'd RW 220 0076 Not Visible ???:? 01A:C2 Unprotected Grp'd RW 220 0077 Not Visible ???:? 01A:C3 3-Way Mir N/Grp'd RW 220 0078 Not Visible ???:? 01A:C1 RDF1 N/Grp'd RW 1000 0079 Not Visible ???:? 01A:C4 RDF2 N/Grp'd WD 1000 007A Not Visible ???:? 01A:C2 RDF2 N/Grp'd WD 1000 007B Not Visible ???:? 01A:C0 RDF1 N/Grp'd RW 1000 ………………………………………………………………………………………………………………………………………………………………………………………………………………… 0098 Not Visible ???:? 02A:C3 Unprotected N/Grp'd RW 220 0099 Not Visible ???:? 15B:C1 Unprotected N/Grp'd RW 220 009A Not Visible ???:? 01A:C3 Unprotected N/Grp'd RW 220
Using the SYMCLI Configuration Manager 39

1/25/2005
To check if this Symmetrix array is operating in a mixed environment, use the symcfg list command with the -dir all option to display information about all directors in the Symmetrix array. The following output shows that there are no ESCON directors present, so this is not a mixed environment. A sub-system identifier (SSID) will not be required when creating new devices.
# symcfg list -sid 120 -dir all Symmetrix ID: 000184500120 S Y M M E T R I X D I R E C T O R S Ident Symbolic Numeric Slot Type Status DA-1A 01A 1 1 DISK Online DA-2A 02A 2 2 DISK Online RF-3A 03A 3 3 RDF-BI-DIR Online FA-4A 04A 4 4 FibreChannel Online SA-13A 13A 13 13 SCSI Online SA-14A 14A 14 14 SCSI Online DA-15A 15A 15 15 DISK Online DA-16A 16A 16 16 DISK Online DA-1B 01B 17 1 DISK Online DA-2B 02B 18 2 DISK Online RF-3B 03B 19 3 RDF-BI-DIR Online FA-4B 04B 20 4 FibreChannel Online ……………………………………………………………………………………………………………………………………………………
The symconfigure verify command verifies that the current Symmetrix configuration is available for host-initiated configuration changes (that is, a configuration change session can be opened).
# symconfigure -sid 120 verify A Configuration Change Verification is in progress. Please wait... Establishing a configuration change session...............Established. Verifying configuration...................................Verified. Terminating the configuration change session..............Done. The configuration verification session has succeeded.
The following command uses the vi text editor to create a text file named create_dev.cmd. As was done here, you can enter into the file the create dev entry that defines four new devices as 2-way mirrored type devices, each mirror with a size of 220 cylinders.
# vi create_dev.cmd create dev, count=4, size=220, emulation=fba, config=2-way-mir;
Using the SYMCLI Configuration Manager 40

1/25/2005
The symconfigure command with the commit argument executes the command file and begins the process of creating the devices. Including the verbose (–v) option displays the details of the change session as it executes.
# symconfigure -sid 120 -file create_dev.cmd -v -noprompt commit Establishing a configuration change session...............Established. Processing symmetrix 000184500120 { create dev count=4, size=220, emulation=FBA, config=2-Way Mir; } Submitting configuration changes..........................Submitted. Validating configuration changes..........................Validated. Initiating PREPARE of configuration changes...............Queued. PREPARE requesting required resources.....................Obtained. Step 003 of 011 steps.....................................Executing. Step 005 of 011 steps.....................................Executing. Step 007 of 011 steps.....................................Executing. Step 008 of 011 steps.....................................Executing. Step 008 of 011 steps.....................................Executing. Local: PREPARE...........................................Done. Initiating COMMIT of configuration changes................Queued. COMMIT requesting required resources......................Obtained. Step 003 of 103 steps.....................................Executing. …………………………………………………………………………………………………………………………………………………………………………………… Step 101 of 103 steps.....................................Executing. Local: COMMIT............................................Done. Terminating the configuration change session..............Done.
To monitor the configuration change session while the symconfigure commit operation is processing, issue the symconfigure query command (as shown in examples 3 and 4) or the following UNIX tail command from a second window. The –f option causes all new output written to the file to be written to the screen. Any error messages from the configuration server are displayed here. Configuration server messages are generally context-sensitive and specify a particular device, director, etc., when a problem occurs. The SYMAPI provides only generic messages. The default path on UNIX for log files is /var/symapi/log. On Windows NT, the default path is C:\Program Files\EMC\symapi\log. The Symmetrix system creates a new log file daily, using the file name format of symapi-yyyymmdd.log. The following log file acquired its name on December 28, 2001.
# tail -f /var/symapi/log/symapi-20011228.log 12/28/2001 14:13:25.059 22018 0 EMC:SYMCLI iCfgChgSessionStart Called to start a local session for SID 000184500120 12/28/2001 14:14:08.050 22018 Establishing session with Local cfg srvr (000184500120)...Established. 12/28/2001 14:14:14.367 22018 { 12/28/2001 14:14:14.367 22018 create dev count=4, size=220 cyl, emulation=FBA, config=2-Way Mir; 12/28/2001 14:14:14.371 22018 } 12/28/2001 14:14:19.377 22018 Submitting configuration changes..........Submitted. 12/28/2001 14:14:30.387 22018 Validating configuration changes..........Validated. 12/28/2001 14:14:42.407 22018 Initiating PREPARE of configuration changes. Queued. 12/28/2001 14:14:54.408 22018 PREPARE requesting required resources......Obtained. 12/28/2001 14:14:56.418 22018 Step 005 of 011 steps.....................Executing. 12/28/2001 14:15:02.428 22018 Step 007 of 011 steps.....................Executing.
Using the SYMCLI Configuration Manager 41

1/25/2005
12/28/2001 14:15:08.438 22018 Step 008 of 011 steps.....................Executing. 12/28/2001 14:15:31.458 22018 Local: PREPARE................................Done. 12/28/2001 14:15:42.568 22018 Initiating COMMIT of configuration changes...Queued. 12/28/2001 14:15:54.569 22018 COMMIT requesting required resources.......Obtained. 12/28/2001 14:15:55.578 22018 Step 003 of 103 steps.....................Executing. 12/28/2001 14:16:02.589 22018 Step 005 of 103 steps.....................Executing. ………………………………………………………………………………………………………………………………………………………………………………………………………… 12/28/2001 14:29:23.310 22018 Step 099 of 103 steps.....................Executing. 12/28/2001 14:29:29.321 22018 Step 100 of 103 steps.....................Executing. 12/28/2001 14:29:35.330 22018 Step 102 of 103 steps.....................Executing. 12/28/2001 14:29:41.341 22018 Local: COMMIT.................................Done. 12/28/2001 14:29:41.355 22018 0 EMC:SYMCLI process_load_request Switching to FULL load for 000184500120 because the configuration changed 12/28/2001 14:29:49.059 22018 Terminating session with configuration server..Done.
When you add new devices, the SYMAPI host database file on the host issuing the configuration change is updated automatically on successful completion of the symconfig commit command. (Automatic update of the local SYMAPI database occurs for all configuration changes except mapping changes.) To refresh the SYMAPI host database files on all other hosts attached to that Symmetrix array, you can perform the symcfg sync command on those hosts. To confirm that the new devices have been added correctly, issue another symdev list command. The following display shows that four new 2-way mirrored devices (009B, 009C, 009D, and 009E) were added to the Symmetrix array. Recall that the last device name displayed before adding these devices was 009A. Therefore, the Symmetrix system began naming the new devices starting with 009B.
# symdev list -sid 120 Symmetrix ID: 000184500120 Device Name Directors Device ---------------------------- ------------ ------------------------------------- Cap Sym Physical SA :P DA :IT Config Attribute Sts (MB) ---------------------------- ------------ ------------------------------------- 0000 Not Visible ???:? 01A:C0 Unprotected N/Grp'd RW 103 0001 Not Visible ???:? 16A:D4 Unprotected N/Grp'd RW 103 ………………………………………………………………………………………………………………………………………………………………………………………………………………… 0097 Not Visible ???:? 16A:C3 Unprotected N/Grp'd RW 103 0098 Not Visible ???:? 02A:C3 Unprotected N/Grp'd RW 103 0099 Not Visible ???:? 15B:C1 Unprotected N/Grp'd RW 103 009A Not Visible ???:? 01A:C3 Unprotected N/Grp'd RW 103 009B Not Visible ???:? 01A:C5 2-Way Mir N/Grp'd RW 103 009C Not Visible ???:? 02B:C1 2-Way Mir N/Grp'd RW 103 009D Not Visible ???:? 16A:C4 2-Way Mir N/Grp'd RW 103 009E Not Visible ???:? 15B:C3 2-Way Mir N/Grp'd RW 103
Using the SYMCLI Configuration Manager 42

1/25/2005
Example 2: Mapping Devices The hardware setup remains the same as Example 1: an HP-UX host (api157) and two Solaris hosts (api145 and api146), each connected to a Symmetrix array (sid 120) running Enginuity version 5568. All commands are issued from Solaris host api145. The example maps the four new Symmetrix devices to front-end director FA-4B so that these devices can be made visible to host api145.
Using the –connections option with symcfg list allows you to see the host connections to a Symmetrix array connected to a host running SYMAPI software. The following display shows the front-end directors that each host uses to reach the Symmetrix (sid 120). Although a host can use more than one front-end director to connect to the same Symmetrix array, host api145 here uses only director FA-4B. The “FA” prefix indicates a fibre front-end adapter, while an “SA” prefix indicates a SCSI front-end adapter.
# symcfg list -connections -sid 120 Symmetrix ID : 000185500120 Symmetrix Host ------------- ----------------------------------------------------------- Director Port Node Name IP Address HW Type OS Name OS Revision -------- ---- ------------- --------------- -------- -------- ----------- FA-5B 0 api146 172.23.65.146 sun4u SunOS 5.7 FA-4B 0 api145 172.23.65.145 sun4u SunOS 5.6 SA-14A 1 api157 172.23.65.157 9000/897 HPUX B.11.00
The symdev list command with the –noport option displays devices that are not yet mapped to any front-end (SA) adapter ports, including the newly-created devices (009B through 009E).
# symdev list -sid 120 -noport Symmetrix ID: 000184500120 Device Name Directors Device ---------------------------- ------------ ------------------------------------- Cap Sym Physical SA :P DA :IT Config Attribute Sts (MB) ---------------------------- ------------ ------------------------------------- 0000 Not Visible ???:? 01A:C0 Unprotected N/Grp'd RW 103 000A Not Visible ???:? 02B:C0 BCV N/Asst'd RW 103 000B Not Visible ???:? 15B:C4 Unprotected N/Grp'd (M) RW 309 000E Not Visible ???:? 16B:C0 Unprotected N/Grp'd RW 103 000F Not Visible ???:? 01B:C4 Unprotected N/Grp'd RW 103 0010 Not Visible ???:? 01A:D0 Unprotected N/Grp'd (M) RW 516 0015 Not Visible ???:? 02A:C4 2-Way Mir N/Grp'd RW 103 0016 Not Visible ???:? 16A:D0 3-Way Mir N/Grp'd RW 103 0017 Not Visible ???:? 01A:C4 4-Way Mir N/Grp'd RW 103 ………………………………………………………………………………………………………………………………………………………………………………………………………………… 0099 Not Visible ???:? 15B:C1 Unprotected N/Grp'd RW 103 009A Not Visible ???:? 01A:C3 Unprotected N/Grp'd RW 103 009B Not Visible ???:? 01A:C5 2-Way Mir N/Grp'd RW 103 009C Not Visible ???:? 02B:C1 2-Way Mir N/Grp'd RW 103 009D Not Visible ???:? 16A:C4 2-Way Mir N/Grp'd RW 103 009E Not Visible ???:? 15B:C3 2-Way Mir N/Grp'd RW 103
Using the SYMCLI Configuration Manager 43

1/25/2005
The sympd list command displays devices that are visible to this host, meaning that these devices are currently the only ones on the Symmetrix array that have been mapped to a front-end director (04B) and recognized by performing a host update.
# sympd list -sid 120 Symmetrix ID: 000184500120 Device Name Directors Device ---------------------------- ------------ ------------------------------------- Cap Physical Sym SA :P DA :IT Config Attribute Sts (MB) ---------------------------- ------------ ------------------------------------- /dev/rdsk/c1t0d1s2 0029 04B:0 16B:C3 RDF2 N/Grp'd WD 103 /dev/rdsk/c1t0d2s2 0033 04B:0 15A:C3 RDF1 N/Grp'd RW 103 /dev/rdsk/c1t0d3s2 003D 04B:0 02B:D2 Unprotected N/Grp'd RW 3
This symcfg list –addresses –available command displays the VBUS, TID, and LUN addresses associated with front-end director 04B, port 0, and indicates the next available LUN address (generated by adding 1 to the last LUN address used). To decide on a LUN value, consider the LUN conventions for your host platform. The example uses LUN 00B as the address for the first new device.
# symcfg list -sid 120 -sa 04B -p 0 -addresses -available Symmetrix ID: 000184500120 Director Device Name Attr Address ---------------------- ----------------------------- ---- -------------- Ident Symbolic Port Sym Physical VBUS TID LUN ------ -------- ---- ---- ----------------------- ---- --- --- FA-4B 04B 0 - AVAILABLE 0 0 000 * 0029 /dev/rdsk/c1t0d1s2 0 0 001 0033 /dev/rdsk/c1t0d2s2 0 0 002 003D /dev/rdsk/c1t0d3s2 0 0 003 0046 Not Visible 0 0 004 - AVAILABLE 0 0 005 * 0075 Not Visible 0 0 00A - AVAILABLE 0 0 00B * Legend for Available address: (*): The VBUS, TID, LUN address values represent a gap in the address assignments or are the next available address in the run
The symconfigure verify command verifies that the current Symmetrix configuration is available for host-initiated configuration changes (that is, a configuration change session can be opened).
# symconfigure -sid 120 verify A Configuration Change Verification is in progress. Please wait... Establishing a configuration change session...............Established. Verifying configuration...................................Verified. Terminating the configuration change session..............Done. The configuration verification session has succeeded.
Using the SYMCLI Configuration Manager 44

1/25/2005
The following command uses the vi text editor to create a text file named map_dev.cmd. As was done here, you can enter into the file the map dev entries that define the director, port, and LUN addresses for the four new devices. If you are mapping to a fibre adapter (FA) port system and are not using volume set addressing (as is the case for this example), only the LUN address is required (not the VBUS or TID).
# vi map_dev.cmd map dev 09B to dir 04B:0, lun=00B; map dev 09C to dir 04B:0, lun=00C; map dev 09D to dir 04B:0, lun=00D; map dev 09E to dir 04B:0, lun=00E;
The symconfigure command with the commit argument executes the command file and begins the process of mapping the devices.
# symconfigure -sid 120 -file map_dev.cmd -v -noprompt commit Establishing a monitoring session.........................Established. The session changes are in the class of: Mapping/unmapping devices { map dev 009B to dir 4B:0, target=00, lun=0B; map dev 009C to dir 4B:0, target=00, lun=0C; map dev 009D to dir 4B:0, target=00, lun=0D; map dev 009E to dir 4B:0, target=00, lun=0E; } The last action requested was: PREPARE The state of the last action is: Running PREPARE...................................................Done. The last action requested was: COMMIT The state of the last action is: Running Step 05 of 44 steps.......................................Executing. …………………………………………………………………………………………………………………………………………………………………………………… Step 43 of 44 steps.......................................Executing. Monitored session has terminated Terminating the monitoring session........................Done.
To monitor the configuration change session while the symconfigure commit operation is processing, issue the symconfigure query command (as shown in examples 3 and 4) or the following UNIX tail command from a second window.
# tail -f /var/symapi/log/symapi-20011228.log 12/28/2001 15:07:06.746 22054 0 EMC:SYMCLI iCfgChgSessionStart Called to start a local session for SID 000184500120 12/28/2001 15:07:12.868 22054 Establishing session with Local cfg srvr (000184500120)...Established. 12/28/2001 15:07:19.224 22054 { 12/28/2001 15:07:19.225 22054 map dev 009B to dir 4B:0, lun=00B; 12/28/2001 15:07:19.228 22054 map dev 009C to dir 4B:0, lun=00C; 12/28/2001 15:07:19.231 22054 map dev 009D to dir 4B:0, lun=00D; 12/28/2001 15:07:19.233 22054 map dev 009E to dir 4B:0, lun=00E; 12/28/2001 15:07:19.235 22054 } 12/28/2001 15:07:24.244 22054 Submitting configuration changes..........Submitted. 12/28/2001 15:07:36.255 22054 Validating configuration changes..........Validated. 12/28/2001 15:07:47.275 22054 Initiating PREPARE of configuration changes..Queued. 12/28/2001 15:07:59.275 22054 PREPARE requesting required resources......Obtained.
Using the SYMCLI Configuration Manager 45

1/25/2005
12/28/2001 15:08:00.285 22054 Step 004 of 011 steps.....................Executing. 12/28/2001 15:08:06.295 22054 Step 007 of 011 steps.....................Executing. 12/28/2001 15:08:12.305 22054 Step 008 of 011 steps.....................Executing. 12/28/2001 15:08:34.326 22054 Local: PREPARE................................Done. 12/28/2001 15:08:45.435 22054 Initiating COMMIT of configuration changes...Queued. 12/28/2001 15:08:57.437 22054 COMMIT requesting required resources.......Obtained. 12/28/2001 15:08:58.446 22054 Step 004 of 044 steps.....................Executing. ………………………………………………………………………………………………………………………………………………………………………………………………………… 12/28/2001 15:14:13.651 22054 Step 039 of 044 steps.....................Executing. 12/28/2001 15:14:35.671 22054 Local: COMMIT.................................Done. 12/28/2001 15:14:35.686 22054 0 EMC:SYMCLI process_load_request Switching to FULL load for 000184500120 because the configuration changed 12/28/2001 15:14:42.317 22054 Terminating session with configuration server..Done.
The symdev list command shows that devices 009B through 009E are now mapped to a Symmetrix front-end port (04B:0) but that the new devices are not yet visible to the host.
# symdev list -sid 120 Symmetrix ID: 000184500120 Device Name Directors Device ---------------------------- ------------ ------------------------------------- Cap Sym Physical SA :P DA :IT Config Attribute Sts (MB) ---------------------------- ------------ ------------------------------------- 0000 Not Visible ???:? 01A:C0 Unprotected N/Grp'd RW 103 0001 Not Visible ???:? 16A:D4 Unprotected N/Grp'd RW 103 0002 Not Visible 13A:0 02A:C0 Unprotected N/Grp'd RW 103 0003 Not Visible 13A:1 15A:D4 Unprotected N/Grp'd RW 103 0004 Not Visible 13B:0 15A:C0 Unprotected N/Grp'd RW 103 0005 Not Visible 13B:1 02A:D4 Unprotected N/Grp'd RW 103 0006 Not Visible 14A:0 16A:C0 Unprotected N/Grp'd RW 103 0007 Not Visible 14A:1 01A:D4 Unprotected N/Grp'd RW 103 0008 Not Visible 14B:0 01B:C0 Unprotected N/Grp'd RW 103 0009 Not Visible 14B:1 16B:C4 Unprotected N/Grp'd RW 103 000A Not Visible ???:? 02B:C0 BCV N/Asst'd RW 103 000B Not Visible ???:? 15B:C4 Unprotected N/Grp'd (M) RW 309 000C Not Visible ???:? 15B:C0 Unprotected N/Grp'd (m) RW - 000D Not Visible ???:? 02B:C4 Unprotected N/Grp'd (m) RW - 000E Not Visible ???:? 16B:C0 Unprotected N/Grp'd RW 103 000F Not Visible ???:? 01B:C4 Unprotected N/Grp'd RW 103 0010 Not Visible ???:? 01A:D0 Unprotected N/Grp'd (M) RW 516 0011 Not Visible ???:? 16A:C4 Unprotected N/Grp'd (m) RW - 0012 Not Visible ???:? 02A:D0 Unprotected N/Grp'd (m) RW - 0013 Not Visible ???:? 15A:C4 Unprotected N/Grp'd (m) RW - ………………………………………………………………………………………………………………………………………………………………………………………………………………… 0099 Not Visible ???:? 15B:C1 Unprotected N/Grp'd RW 103 009A Not Visible ???:? 01A:C3 Unprotected N/Grp'd RW 103 009B Not Visible 04B:0 01A:C5 2-Way Mir N/Grp'd RW 103 009C Not Visible 04B:0 02B:C1 2-Way Mir N/Grp'd RW 103 009D Not Visible 04B:0 16A:C4 2-Way Mir N/Grp'd RW 103 009E Not Visible 04B:0 15B:C3 2-Way Mir N/Grp'd RW 103
Using the SYMCLI Configuration Manager 46

1/25/2005
The sympd list command confirms that the new devices are not visible to the host. This command displays only those devices that have a physical device name, which means that host can “see” them.
# sympd list -sid 120 Symmetrix ID: 000184500120 Device Name Directors Device ---------------------------- ------------ ------------------------------------- Cap Physical Sym SA :P DA :IT Config Attribute Sts (MB) ---------------------------- ------------ ------------------------------------- /dev/rdsk/c1t0d1s2 0029 04B:0 16B:C3 RDF2 N/Grp'd WD 103 /dev/rdsk/c1t0d2s2 0033 04B:0 15A:C3 RDF1 N/Grp'd RW 103 /dev/rdsk/c1t0d3s2 003D 04B:0 02B:D2 Unprotected N/Grp'd RW 3
Executing the following utilities introduces the new devices to the host in a Sun Solaris environment.
# drvconfig # disks # devlinks
After performing the proper host procedures to update the host view, you need to complete host addressing by making sure that the host address is recognized in the SYMAPI view. To update the SYMAPI database on your host, issue the symcfg discover command.
# symcfg discover This operation may take up to a few minutes. Please be patient...
The sympd list command shows that the new devices are now visible to the host.
# sympd list -sid 120 Symmetrix ID: 000184500120 Device Name Directors Device ---------------------------- ------------ ------------------------------------- Cap Physical Sym SA :P DA :IT Config Attribute Sts (MB) ---------------------------- ------------ ------------------------------------- /dev/rdsk/c1t0d1s2 0029 04B:0 16B:C3 RDF2 N/Grp'd WD 103 /dev/rdsk/c1t0d2s2 0033 04B:0 15A:C3 RDF1 N/Grp'd RW 103 /dev/rdsk/c1t0d3s2 003D 04B:0 02B:D2 Unprotected N/Grp'd RW 3 /dev/rdsk/c1t0d32s2 009B 04B:0 01A:C0 2-Way Mir N/Grp'd RW 103 /dev/rdsk/c1t0d33s2 009C 04B:0 16A:D4 2-Way Mir N/Grp'd RW 103 /dev/rdsk/c1t0d34s2 009D 04B:0 01A:D2 2-Way Mir N/Grp'd RW 103 /dev/rdsk/c1t0d35s2 009E 04B:0 01A:D2 2-Way Mir N/Grp'd RW 103
Using the SYMCLI Configuration Manager 47

1/25/2005
Example 3: Unmapping Devices This example unmaps a device (0001) that was previously mapped to multiple paths.
The symdev show command output provides a section labeled “Front Director Paths” that shows a device's front-end mappings even if there is only one path. The following command shows the mapping of device 0001 before unmapping it. Note that this device is mapped to multiple paths, but only the path that maps to front-end director 04B is visible to this host. If you know that device 0001 has multiple paths, you can also display these paths with symdev list –sid120 –range 0001:0001 –multiport, which provides a very brief display of summary information.
# symdev show 0001 -sid 120 Device Physical Name : /dev/rdsk/c1t0d36s2 Device Symmetrix Name : 0001 Device Serial ID : 20001200 Symmetrix ID : 000184500120 Attached BCV Device : N/A Attached Snap TGT Device : N/A Vendor ID : EMC Product ID : SYMMETRIX Product Revision : 5568 Device Emulation Type : FBA Device Defined Label Type: N/A Device Defined Label : N/A Device Sub System Id : N/A Device Block Size : 512 Device Capacity { Cylinders : 220 Tracks : 3300 512-byte Blocks : 211200 MegaBytes : 103 KiloBytes : 105600 } Device Configuration : Unprotected Dynamic Spare Invoked : No Dynamic RDF Capability : Not_RDF_Capable Device Service State : Normal Device Status : Ready (RW) Device SA Status : Ready (RW)
Using the SYMCLI Configuration Manager 48

1/25/2005
Front Director Paths (2): { ---------------------------------------------------------------------- POWERPATH DIRECTOR PORT --------- ---------- -------- ------------ PdevName Type Num Type Num Sts VBUS TID LUN ---------------------------------------------------------------------- /dev/rdsk/c1t0d36s2 N/A 04B FA 0 RW 000 00 021 Not Visible N/A 04A FA 0 RW 000 00 000 } ………………………………………………………………………………………………………………………………………………………………………………………………………………
When unmapping a device, there can be no I/O activity in the specified mapped path. If you want to unmap only one path to a device that has paths to multiple front-end directors, you can write-disable just that path. Beginning with EMC Solutions Enabler version 5.0, you can use the symdev command to write-disable the device-0001 path specified by director 04B, port 0.
# symdev –sid 120 write_disable 0001 –sa 04B –p 0 Write Disable operation successfully completed for the device.
The symconfigure verify command verifies that the current Symmetrix configuration is available for host-initiated configuration changes (that is, a configuration change session can be opened).
# symconfigure -sid 120 verify A Configuration Change Verification is in progress. Please wait... Establishing a configuration change session...............Established. Verifying configuration...................................Verified. Terminating the configuration change session..............Done. The configuration verification session has succeeded.
The following command uses the vi text editor to create a text file named unmap.cmd. As was done here, you can enter into the file the unmap dev entry that defines the path (director: port) that you want to unmap.
# vi unmap.cmd unmap dev 0001 from dir 04B:0;
Using the SYMCLI Configuration Manager 49

1/25/2005
The symconfigure command with the commit argument executes the command file and begins the process of unmapping the device.
# symconfigure -sid 120 -file unmap.cmd -v -noprompt commit Establishing a configuration change session...............Established. Processing symmetrix 000184500120 { unmap dev 0001 from dir 4B:0; } Submitting configuration changes..........................Submitted. Validating configuration changes..........................Validated. Initiating PREPARE of configuration changes...............Queued. PREPARE requesting required resources.....................Obtained. Step 004 of 011 steps.....................................Executing. …………………………………………………………………………………………………………………………………………………………………………………… Step 008 of 011 steps.....................................Executing. Local: PREPARE...........................................Done. Initiating COMMIT of configuration changes................Queued. COMMIT requesting required resources......................Obtained. Step 003 of 044 steps.....................................Executing. …………………………………………………………………………………………………………………………………………………………………………………… Step 043 of 044 steps.....................................Executing. Local: COMMIT............................................Done. Terminating the configuration change session..............Done.
To monitor the configuration change session while the symconfigure commit operation is processing, you can issue the symconfigure query command or the following UNIX tail command from a second window. The following two commands allow you to compare outputs from the tail command and from symconfigure query.
# tail -f /var/symapi/log/symapi-20011228.log 12/28/2001 15:33:47.328 22089 0 EMC:SYMCLI iCfgChgSessionStart Called to start a local session for SID 000184500120 12/28/2001 15:33:53.452 22089 Establishing session with Local cfg srvr (000184500120) ...Established. 12/28/2001 15:34:00.779 22089 { 12/28/2001 15:34:00.786 22089 unmap dev 0001 from dir 4B:0, lun=021; (generated) 12/28/2001 15:34:00.786 22089 unmap dev 0001 from dir 4B:0; 12/28/2001 15:34:00.794 22089 } 12/28/2001 15:34:05.799 22089 Submitting configuration changes..........Submitted. 12/28/2001 15:34:16.809 22089 Validating configuration changes..........Validated. 12/28/2001 15:34:27.829 22089 Initiating PREPARE of configuration changes..Queued. 12/28/2001 15:34:39.830 22089 PREPARE requesting required resources......Obtained. 12/28/2001 15:34:40.840 22089 Step 004 of 011 steps.....................Executing. 12/28/2001 15:34:47.849 22089 Step 007 of 011 steps.....................Executing. 12/28/2001 15:34:53.860 22089 Step 008 of 011 steps.....................Executing. 12/28/2001 15:35:16.880 22089 Local: PREPARE................................Done. 12/28/2001 15:35:27.990 22089 Initiating COMMIT of configuration changes...Queued. 12/28/2001 15:35:39.990 22089 COMMIT requesting required resources.......Obtained. 12/28/2001 15:35:40.000 22089 Step 004 of 044 steps.....................Executing. ………………………………………………………………………………………………………………………………………………………………………………………………………… 12/28/2001 15:40:56.905 22089 Step 039 of 044 steps.....................Executing. 12/28/2001 15:41:18.925 22089 Local: COMMIT.................................Done. 12/28/2001 15:41:18.940 22089 0 EMC:SYMCLI process_load_request Switching to FULL load for 000184500120 because the configuration changed
Using the SYMCLI Configuration Manager 50

1/25/2005
12/28/2001 15:41:25.573 22089 Terminating session with configuration server..Done.
The symconfigure query command issued from a second window checks the status of the configuration change session 30 times at 10-second intervals.
# symconfigure query -sid 120 -i 10 -c 30 Establishing a monitoring session.........................Established. The session changes are in the class of: Mapping/unmapping devices { unmap dev 0001 from dir 4B:0; } The last action requested was: PREPARE The state of the last action is: Running Step 08 of 11 steps.......................................Executing. PREPARE...................................................Done. The last action requested was: COMMIT The state of the last action is: Running Step 04 of 44 steps.......................................Executing. …………………………………………………………………………………………………………………………………………………………………………………… Step 39 of 44 steps.......................................Executing. Step 42 of 44 steps.......................................Executing. Monitored session has terminated Terminating the monitoring session........................Done.
Executing the following utilities updates the host view.
# drvconfig # disks # devlinks
The symcfg discover command updates the SYMAPI database.
# symcfg discover
Using the SYMCLI Configuration Manager 51

1/25/2005
The symdev show command output now provides an updated SYMAPI view after unmapping one of the paths of device 0001. The “Front Director Paths” section no longer shows any mapping to this device that the example unmapped. The path using director 04B, port 0, has been deleted.
# symdev show 0001 -sid 120 Device Physical Name : Not Visible Device Symmetrix Name : 0001 Device Serial ID : 20001200 Symmetrix ID : 000184500120 Attached BCV Device : N/A Attached Snap TGT Device : N/A Vendor ID : EMC Product ID : SYMMETRIX Product Revision : 5568 Device Emulation Type : FBA Device Defined Label Type: N/A Device Defined Label : N/A Device Sub System Id : N/A Device Block Size : 512 Device Capacity { Cylinders : 220 Tracks : 3300 512-byte Blocks : 211200 MegaBytes : 103 KiloBytes : 105600 } Device Configuration : Unprotected Dynamic Spare Invoked : No Dynamic RDF Capability : Not_RDF_Capable Device Service State : Normal Device Status : Write Disabled (WD) Device SA Status : Write Disabled (WD) Front Director Paths (1): { ---------------------------------------------------------------------- POWERPATH DIRECTOR PORT --------- ---------- -------- ------------ PdevName Type Num Type Num Sts VBUS TID LUN ---------------------------------------------------------------------- Not Visible N/A 04A FA 0 WD 000 00 000 } ………………………………………………………………………………………………………………………………………………………………………………………………………………
Using the SYMCLI Configuration Manager 52

1/25/2005
Example 4: Setting Front-End Port Attributes The hardware setup for this example is a Solaris host (api145) connected to a Symmetrix array (sid 120) running Enginuity version 5568. The host is connected to front-end director FA-4A, which is a “Fibre Channel” type director. The example illustrates how to modify a front-end port attribute (VCM_State).
Using the –connections option with symcfg list allows you to see the host connections to a Symmetrix array. The following display shows the front-end director (FA-4A) that this host uses to reach the Symmetrix (sid 120).
# symcfg list -sid 120 -connections Symmetrix ID : 000184500120 Symmetrix Host ------------- ----------------------------------------------------------- Director Port Node Name IP Address HW Type OS Name OS Revision -------- ---- ------------- --------------- -------- -------- ----------- FA-4A 0 api145 172.23.65.145 sun4u SunOS 5.6
The Symmetrix port attribute VCM_State is a fibre protocol flag that can be either enabled or disabled (the default). You need to enable this flag for device masking or Volume Logix software (which provides volume management controls to handle access to Symmetrix devices). The symcfg list command provides detailed (–v) information about the Symmetrix configuration and the front-end director/port that connects the host to the Symmetrix array. The section “Fibre Specific Flags” shows that VCM_State is currently disabled. The ellipsis (……) indicates where some output was omitted for brevity.
# symcfg list -sid 120 -sa 04A -p 0 -v Symmetrix ID: 000184500120 Product Model : 8430 Symmetrix ID : 000184500120 Microcode Version (Number) : 5568 Microcode Date : 11.12.2001 Microcode Patch Date : 11.12.2001 Microcode Patch Level : 37 ………………………………………………………………………………………………………………………………………………… Number of Configured (Sym) Devices : 159 Number of Visible (Host) Devices : 6 Number of Configured Actual Disks : 96 Number of Configured Hot Spares : 0 Number of Powerpath Devices : 0 Powerpath Run Time Version : N/A SDDF Configuration State : Enabled Configuration Change State : Enabled WORM Configuration Level : N/A WORM Charateristics : N/A Symmetrix Configuration Checksum : 8FB66
Using the SYMCLI Configuration Manager 53

1/25/2005
Switched RDF Configuration State : Disabled Concurrent RDF Configuration State : Disabled Dynamic RDF Configuration State : Disabled RDF Data Mobility Configuration State: Disabled Access Control Configuration State : Disabled Device Masking (VCM) Config State : Disabled Director Identification: FA-4A Director Type : FibreChannel Director Status : Online Number of Director Ports : 1 Director Ports Status : [ON,N/A,N/A,N/A] Director Symbolic Number : 04A Director Numeric Number : 4 Director Slot Number : 4 Director Port: 0 WWN Node Name : 50060482bfcfe603 WWN Port Name : 50060482bfcfe603 Fibre Channel Loop ID : 0 Fibre Adapter Type : N/A SCSI Flags { Tagged_Commands : Enabled Linked_Commands : Disabled Sync_Transfer : Disabled Wide_Transfer : Disabled Negotiate_Reset : Disabled Soft_Reset : Disabled Environ_Set : Disabled Cyl_Count_In_Name : Disabled …………………………………………………………………………………………………………………………………………… } Fibre Specific Flags { Disk_Array : Disabled Volume_Set_Addressing : Disabled Hard_Addressing : Enabled Non_Participating : Disabled Global_3rdParty_Logout : Disabled Init_Point_to_Point : Disabled Unique_WWN : Enabled Generic_VSA : Disabled VCM_State : Disabled Class_2_Service : Disabled OpenVMS : Disabled }
Using the SYMCLI Configuration Manager 54

1/25/2005
The symconfigure verify command verifies that the current Symmetrix configuration is available for host-initiated configuration changes (that is, a configuration change session can be opened).
# symconfigure -sid 120 verify A Configuration Change Verification is in progress. Please wait... Establishing a configuration change session...............Established. Verifying configuration...................................Verified. Terminating the configuration change session..............Done. The configuration verification session has succeeded.
The following command uses the vi text editor to create a text file named port.cmd. As was done here, you can enter into the file the set port entry that enables the VCM_State flag for director 04A, port 0, of this Symmetrix array.
# vi port.cmd set port 04A:0 vcm_state=enable;
The symconfigure command with the commit argument executes the command file and begins the process of setting the VCM_State port flag to “enable.”
# symconfigure -sid 120 -file port.cmd -v -noprompt commit Establishing a configuration change session...............Established. Processing symmetrix 000184500120 { set port 4A:0 VCM_State=enable; } Submitting configuration changes..........................Submitted. Validating configuration changes..........................Validated. Initiating PREPARE of configuration changes...............Queued. PREPARE requesting required resources.....................Obtained. Step 004 of 011 steps.....................................Executing. Step 006 of 011 steps.....................................Executing. Step 007 of 011 steps.....................................Executing. Step 008 of 011 steps.....................................Executing. Step 008 of 011 steps.....................................Executing. Local: PREPARE...........................................Done. Initiating COMMIT of configuration changes................Queued. COMMIT requesting required resources......................Obtained. Step 003 of 039 steps.....................................Executing. …………………………………………………………………………………………………………………………………………………………………………………… Step 038 of 039 steps.....................................Executing. Local: COMMIT............................................Done. Terminating the configuration change session..............Done.
Using the SYMCLI Configuration Manager 55

1/25/2005
To monitor the configuration change session while the symconfigure commit operation is processing, you can issue the symconfigure query command or the following UNIX tail command from a second window. The following two commands allow you to compare outputs from the tail command and from symconfigure query.
# tail -f /var/symapi/log/symapi-20011228.log 12/28/2001 16:10:34.404 22122 0 EMC:SYMCLI iCfgChgSessionStart Called to start a local session for SID 000184500120 12/28/2001 16:10:40.524 22122 Establishing session with Local cfg srvr (000184500120)...Established. 12/28/2001 16:10:47.871 22122 { 12/28/2001 16:10:47.878 22122 set port 4A:0 VCM_State=ENABLE; 12/28/2001 16:10:47.881 22122 } 12/28/2001 16:10:52.891 22122 Submitting configuration changes..........Submitted. 12/28/2001 16:11:03.901 22122 Validating configuration changes..........Validated. 12/28/2001 16:11:14.922 22122 Initiating PREPARE of configuration changes..Queued. 12/28/2001 16:11:26.922 22122 PREPARE requesting required resources......Obtained. 12/28/2001 16:11:28.932 22122 Step 004 of 011 steps.....................Executing. 12/28/2001 16:11:34.942 22122 Step 007 of 011 steps.....................Executing. 12/28/2001 16:11:41.952 22122 Step 008 of 011 steps.....................Executing. 12/28/2001 16:12:03.972 22122 Local: PREPARE................................Done. 12/28/2001 16:12:15.082 22122 Initiating COMMIT of configuration changes...Queued. 12/28/2001 16:12:27.083 22122 COMMIT requesting required resources.......Obtained. 12/28/2001 16:12:28.093 22122 Step 004 of 039 steps.....................Executing. ………………………………………………………………………………………………………………………………………………………………………………………………………… 12/28/2001 16:17:13.577 22122 Step 038 of 039 steps.....................Executing. 12/28/2001 16:17:19.587 22122 Local: COMMIT.................................Done. 12/28/2001 16:17:19.602 22122 0 EMC:SYMCLI process_load_request Switching to FULL load for 000184500120 because the configuration changed 12/28/2001 16:17:26.275 22122 Terminating session with configuration server..Done.
The symconfigure query command issued from a second window checks the status of the configuration change session 30 times at 10-second intervals.
# symconfigure query -sid 120 -i 10 -c 30 Establishing a monitoring session.........................Established. The session changes are in the class of: Modifying port configurations { set port 4A:0 VCM_State=enable; } The last action requested was: PREPARE The state of the last action is: Running PREPARE...................................................Done. The last action requested was: COMMIT The state of the last action is: Running Step 06 of 39 steps.......................................Executing. …………………………………………………………………………………………………………………………………………………………………………………… Step 38 of 39 steps.......................................Executing. COMMIT....................................................Done. Monitored session has terminated Terminating the monitoring session........................Done.
Using the SYMCLI Configuration Manager 56

1/25/2005
The symcfg list command again provides the detailed (–v) information about the Symmetrix configuration and the front-end director/port that connects the host to the Symmetrix array. The section “Fibre Specific Flags” shows that VCM_State is now enabled.
# symcfg -sa 04A -p 0 list -v -sid 120 Symmetrix ID: 000184500120 Product Model : 8430 Symmetrix ID : 000184500120 Microcode Version (Number) : 5568 (15BFAA01) Microcode Date : 11.12.2001 Microcode Patch Date : 11.12.2001 Microcode Patch Level : 37 ………………………………………………………………………………………………………………………………………………………………… Director Identification: FA-4A Director Type : FibreChannel Director Status : Online Number of Director Ports : 1 Director Ports Status : [ON,N/A,N/A,N/A] Director Symbolic Number : 04A Director Numeric Number : 4 Director Slot Number : 4 Director Port: 0 WWN Node Name : 50060482bfcfe603 WWN Port Name : 50060482bfcfe603 Fibre Channel Loop ID : 0 Fibre Adapter Type : N/A ………………………………………………………………………………………………………………………………………………………………… Fibre Specific Flags { Disk_Array : Disabled Volume_Set_Addressing : Disabled Hard_Addressing : Enabled Non_Participating : Disabled Global_3rdParty_Logout : Disabled Init_Point_to_Point : Disabled Unique_WWN : Enabled Generic_VSA : Disabled VCM_State : Enabled Class_2_Service : Disabled OpenVMS : Disabled }
Using the SYMCLI Configuration Manager 57

1/25/2005
Example 5: Forming an FBA Meta Device This example creates two 2-way mirrored devices on the Symmetrix array (sid 40) and then forms them into a concatenated meta device. The meta device is mapped to (and then unmapped from) a front-end port. The example illustrates the use of input redirection, rather than a command file, to input change commands and parameters to the symconfigure commit command. Although not used in this example, it is recommended that you use symconfigure verify prior to a commit action (see previous examples).
The symconfigure list -freespace command displays the Symmetrix array’s free physical disk space that you can use to create new devices. The Unformatted column shows free disk space available for any emulation mode. The Formatted column shows free space on disks that have been partially used for devices configured with the same emulation mode (in this case, FBA). The free space on formatted disks can be used only to create new devices of the same emulation mode.
# symconfigure –sid 40 list -freespace Symmetrix ID: 000184600040 Emulation Formatted Unformatted (Cyl) (Cyl) --------------------- --------- ----------- FBA 2732468 0
The symdev list command displays existing devices. Notice that the last device in the display is 012.
# symdev list –sid 40 Symmetrix ID: 000184600040 Device Name Directors Device --------------------------- ------------ -------------------------------------- Cap Sym Physical SA :P DA :IT Config Attribute Sts (MB) --------------------------- ------------ -------------------------------------- 000 /dev/rdsk/c1t0d0s2 03B:0 01B:C1 2-Way Mir N/Grp'd WD 8 001 /dev/rdsk/c1t0d1s2 03B:0 02B:C1 Unprotected N/Grp'd RW 3 002 /dev/rdsk/c1t0d2s2 03B:0 01A:C2 Unprotected N/Grp'd RW 3 003 Not Visible ???:? 01A:C0 Unprotected N/Grp'd RW 1875 004 Not Visible ???:? 02B:C3 Unprotected N/Grp'd RW 1875 005 Not Visible ???:? 02A:C0 Unprotected N/Grp'd RW 1875 006 Not Visible ???:? 01B:C3 Unprotected N/Grp'd RW 1875 007 Not Visible ???:? 01B:C0 2-Way Mir N/Grp'd (M) RW 7500 008 Not Visible ???:? 02B:C0 2-Way Mir N/Grp'd (m) RW - 009 Not Visible ???:? 01A:D0 2-Way Mir N/Grp'd (m) RW - 00A Not Visible ???:? 02A:D0 2-Way Mir N/Grp'd (m) RW - 00B Not Visible ???:? 01B:D0 BCV N/Asst'd RW 1875 00C Not Visible ???:? 02A:D2 BCV N/Asst'd RW 1875 00D /dev/rdsk/c1t0d13s2 03B:0 02B:D0 2-Way BCV Mir N/Asst'd RW 1875 00E /dev/rdsk/c1t0d14s2 03B:0 01A:C1 2-Way BCV Mir N/Asst'd RW 1875 00F Not Visible ???:? 02A:C1 DRV N/Grp'd RW 1875 010 Not Visible ???:? 01B:C2 DRV N/Grp'd RW 1875 011 Not Visible ???:? 01A:D1 2-Way Mir N/A (FS) RW 2878 012 Not Visible ???:? 02A:D1 2-Way Mir N/A (FS) RW 2878
Using the SYMCLI Configuration Manager 58

1/25/2005
On UNIX platforms, you can use input redirection, rather than a command file, to input the create dev command and its parameters to the symconfigure commit command. Use a beginning delimiter (like <<EOF) and a corresponding end delimiter to frame the change command. The size of each device will be 1024 cylinders (or 480 MB). The ellipsis (……) represents output that was omitted for brevity.
# symconfigure –sid 40 commit <<EOF create dev count=2, size=1024, emulation=FBA, config=2-Way-Mir; EOF A Configuration Change operation is in progress. Please wait... Establishing a configuration change session...............Established. Processing symmetrix 000185400123 Submitting configuration changes..........................Submitted. Validating configuration changes..........................Validated. Initiating PREPARE of configuration changes...............Queued. PREPARE requesting required resources.....................Obtained. Step 006 of 010 steps.....................................Executing. ………………………………………………………………………………………………………………………………………………………………………………………… Step 009 of 010 steps.....................................Executing. Local: PREPARE...........................................Done. Initiating COMMIT of configuration changes................Queued. COMMIT requesting required resources......................Obtained. Step 004 of 097 steps.....................................Executing. ………………………………………………………………………………………………………………………………………………………………………………………… Step 097 of 097 steps.....................................Executing. Local: COMMIT............................................Done. Terminating the configuration change session..............Done. The configuration change session has successfully completed.
When you add new devices and form meta devices, the SYMAPI host database file on the host issuing the configuration change is updated automatically on successful completion of the symconfig commit command. (Automatic update of the local SYMAPI database occurs for all configuration changes except mapping changes.) To refresh the SYMAPI host database files on all other hosts attached to that Symmetrix array, you can perform the symcfg sync command on those hosts. The symdev list command displays the two new devices, 013 and 014. Each device is 480 MB.
# symdev list –sid 40 Symmetrix ID: 000184600040 Device Name Directors Device --------------------------- ------------ -------------------------------------- Cap Sym Physical SA :P DA :IT Config Attribute Sts (MB) --------------------------- ------------ -------------------------------------- 000 /dev/rdsk/c1t0d0s2 03B:0 01B:C1 2-Way Mir N/Grp'd WD 8 …………………………………………………………………………………………………………………………………………………………………………………………………………… 012 Not Visible ???:? 02A:D1 2-Way Mir N/A (FS) RW 2878 013 Not Visible ???:? 02B:C3 2-Way Mir N/Grp'd RW 480 014 Not Visible ???:? 01A:C0 2-Way Mir N/Grp'd RW 480
Using the SYMCLI Configuration Manager 59
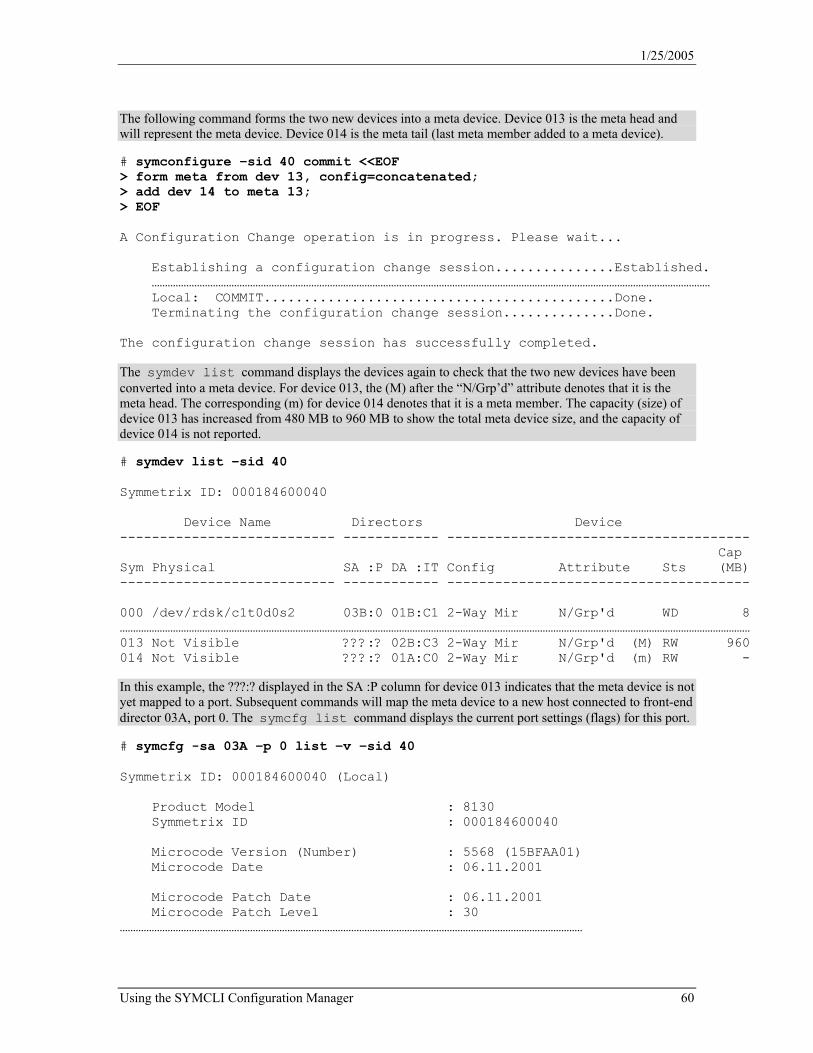
1/25/2005
The following command forms the two new devices into a meta device. Device 013 is the meta head and will represent the meta device. Device 014 is the meta tail (last meta member added to a meta device).
# symconfigure –sid 40 commit <<EOF > form meta from dev 13, config=concatenated; > add dev 14 to meta 13; > EOF A Configuration Change operation is in progress. Please wait... Establishing a configuration change session...............Established. ………………………………………………………………………………………………………………………………………………………………………………………… Local: COMMIT............................................Done. Terminating the configuration change session..............Done. The configuration change session has successfully completed.
The symdev list command displays the devices again to check that the two new devices have been converted into a meta device. For device 013, the (M) after the “N/Grp’d” attribute denotes that it is the meta head. The corresponding (m) for device 014 denotes that it is a meta member. The capacity (size) of device 013 has increased from 480 MB to 960 MB to show the total meta device size, and the capacity of device 014 is not reported.
# symdev list –sid 40 Symmetrix ID: 000184600040 Device Name Directors Device --------------------------- ------------ -------------------------------------- Cap Sym Physical SA :P DA :IT Config Attribute Sts (MB) --------------------------- ------------ -------------------------------------- 000 /dev/rdsk/c1t0d0s2 03B:0 01B:C1 2-Way Mir N/Grp'd WD 8 ………………………………………………………………………………………………………………………………………………………………………………………………………………… 013 Not Visible ???:? 02B:C3 2-Way Mir N/Grp'd (M) RW 960 014 Not Visible ???:? 01A:C0 2-Way Mir N/Grp'd (m) RW -
In this example, the ???:? displayed in the SA :P column for device 013 indicates that the meta device is not yet mapped to a port. Subsequent commands will map the meta device to a new host connected to front-end director 03A, port 0. The symcfg list command displays the current port settings (flags) for this port.
# symcfg -sa 03A –p 0 list –v –sid 40 Symmetrix ID: 000184600040 (Local) Product Model : 8130 Symmetrix ID : 000184600040 Microcode Version (Number) : 5568 (15BFAA01) Microcode Date : 06.11.2001 Microcode Patch Date : 06.11.2001 Microcode Patch Level : 30 …………………………………………………………………………………………………………………………………………………………
Using the SYMCLI Configuration Manager 60

1/25/2005
Fibre Specific Flags { Disk_Array : Enabled Volume_Set_Addressing : Enabled Hard_Addressing : Disabled Non_Participating : Disabled Global_3rdParty_Logout : Disabled Init_Point_to_Point : Enabled Unique_WWN : Enabled Generic_VSA : Disabled VCM_Enabled : Enabled Class_2_Service : Disabled OpenVMS : Disabled }
The old host connected to director/port 03A:0 was running HP-UX and required special port settings (Disk Array enabled and Volume Set Addressing enabled). The new host does not require these settings. The following command disables these port flags.
# symconfigure –sid 40 commit <<EOF > set port 03A:0 Disk_Array=disable, Volume_Set_Addressing=disable; > EOF A Configuration Change operation is in progress. Please wait... Establishing a configuration change session...............Established. Processing symmetrix 000184600040 ………………………………………………………………………………………………………………………………………………………………………………………… Local: COMMIT............................................Done. Terminating the configuration change session..............Done. The configuration change session has successfully completed.
Another symcfg list command confirms that these port settings have been reset to Disabled.
# symcfg -sa 03A –p 0 list -v –sid 40 Symmetrix ID: 000184600040 (Local) …………………………………………………………………………………………………………………………………………… Fibre Specific Flags { Disk_Array : Disabled Volume_Set_Addressing : Disabled Hard_Addressing : Disabled Non_Participating : Disabled Global_3rdParty_Logout : Disabled Init_Point_to_Point : Enabled Unique_WWN : Enabled Generic_VSA : Disabled VCM_Enabled : Enabled Class_2_Service : Disabled OpenVMS : Disabled }
Using the SYMCLI Configuration Manager 61

1/25/2005
Now that port settings are correct for the new host, the meta device can be mapped to the port. However, the mapping operation requires specifying a LUN address. The symcfg list –addresses command displays the fibre channel addresses to determine the next available LUN address.
# symcfg –sid 40 -sa 3A -addresses list Symmetrix ID: 000184600040 (Local) Director Device Name Address ---------------------- ----------------------------- -------------- Ident Symbolic Port Sym Physical VBUS TID LUN ------ -------- ---- ---- ----------------------- ---- --- --- FA-3A 03A 0 000 Not Visible 0 0 000 001 Not Visible 0 0 001 002 Not Visible 0 0 002 003 Not Visible 0 0 003 004 Not Visible 0 0 004 005 Not Visible 0 0 005 006 Not Visible 0 0 006 007 Not Visible 0 0 007 00B Not Visible 0 0 00B 00C Not Visible 0 0 00C 00D Not Visible 0 0 00D 00E Not Visible 0 0 00E
The example uses the LUN address 00F to map the meta device.
# symconfigure –sid 40 commit <<EOF > map dev 13 to dir 03A:0 lun=00F; > EOF A Configuration Change operation is in progress. Please wait... Establishing a configuration change session...............Established.
The symdev list command displays that the mapping operation was successful, indicated by the presence now of 03A:0 in the SA: P column of the meta head (013) and meta tail (014). The meta members will continue to be marked “Not Visible” until you execute the host update utilities that assign the host names. Instead of updating the host, this example now proceeds directly to unmapping the meta device.
# symdev list –sid 40 Symmetrix ID: 000184600040 Device Name Directors Device --------------------------- ------------ -------------------------------------- Cap Sym Physical SA :P DA :IT Config Attribute Sts (MB) --------------------------- ------------ -------------------------------------- 000 /dev/rdsk/c1t0d0s2 03B:0 01B:C1 2-Way Mir N/Grp'd WD 8 ………………………………………………………………………………………………………………………………………………………………………………………………………………… 013 Not Visible 03A:0 02B:C3 2-Way Mir N/Grp'd (M) RW 960 014 Not Visible 03A:0 01A:C0 2-Way Mir N/Grp'd (m) RW -
Using the SYMCLI Configuration Manager 62

1/25/2005
The second part of this example unmaps the meta device from the director/port. Before unmapping any device, you need to ensure that there is no host I/O to the device. Beginning with EMC Solutions Enabler version 5.0, you can use the symdev command to make the meta device Not Ready for any I/O. (Previous versions use a device group to make devices Not Ready.) Recall that the meta head (device 013) represents the entire meta device.
# symdev –sid 40 not_ready 013 -noprompt Not Ready operation successfully completed for the device.
A symdev list command shows that the status of the meta device has changed to Not Ready (NR).
# symdev list –sid 40 Symmetrix ID: 000184600040 Device Name Directors Device --------------------------- ------------ -------------------------------------- Cap Sym Physical SA :P DA :IT Config Attribute Sts (MB) --------------------------- ------------ -------------------------------------- 000 /dev/rdsk/c1t0d0s2 03B:0 01B:C1 2-Way Mir N/Grp'd WD 8 ………………………………………………………………………………………………………………………………………………………………………………………………………………… 013 Not Visible 03A:0 02B:C3 2-Way Mir N/Grp'd (M) NR 960 014 Not Visible 03A:0 01A:C0 2-Way Mir N/Grp'd (m) NR -
The following command uses input redirection to unmap the meta device.
# symconfigure –sid 40 commit <<EOF > unmap dev 13 from dir 03A:0; > EOF A Configuration Change operation is in progress. Please wait... Establishing a configuration change session...............Established.
The SA :P column displayed by the symdev list command confirms that the meta device has been unmapped (denoted when ???:? appear in the column). Note that a device whose status is NR (Not Ready) can be mapped again and that a side effect of the mapping operation is to make the device Ready (RW).
# symdev list –sid 40 Symmetrix ID: 000184600040 Device Name Directors Device --------------------------- ------------ -------------------------------------- Cap Sym Physical SA :P DA :IT Config Attribute Sts (MB) --------------------------- ------------ -------------------------------------- 000 /dev/rdsk/c1t0d0s2 03B:0 01B:C1 2-Way Mir N/Grp'd WD 8 ………………………………………………………………………………………………………………………………………………………………………………………………………………… 013 Not Visible ???:? 02B:C3 2-Way Mir N/Grp'd (M) NR 960 014 Not Visible ???:? 01A:C0 2-Way Mir N/Grp'd (m) NR -
Using the SYMCLI Configuration Manager 63

1/25/2005
Example 6: Creating Dynamic RDF Devices Beginning with EMC Solutions Enabler version 5.0, you can create dynamic RDF devices, making it possible to create dynamic SRDF pairs while the Symmetrix array is running. The hardware setup for this example is a Solaris host (api60) connected to a local Symmetrix array (sid 605) running Enginuity version 5568. The host is connected to front-end director FA-4A, which is a “Fibre Channel” type director. The local Symmetrix array is connected via RDF links to a remote Symmetrix array (sid 85). The example illustrates the steps required to create dynamic RDF devices on the local Symmetrix array. It omits the same steps that were used to create the dynamic RDF devices on the remote Symmetrix array for the subsequent R1/R2 matching of dynamic SRDF pairs.
The following command uses the vi text editor to create a text file named set_sym.cmd. As was done here, you can enter into the file the set symmetrix entry that enables dynamic RDF in the Symmetrix array attached to your host (in this case, the local Symmetrix connected to host api60).
# vi set_sym.cmd set symmetrix dynamic_rdf=enable;
The symconfigure commit command executes the command file and initiates setting the Symmetrix dynamic_rdf parameter to enable. The ellipsis (……) indicates output that was omitted for brevity.
# symconfigure –sid 605 –file set_sym.cmd –v –noprompt commit Establishing a configuration change session...............Established. Processing symmetrix 000000005605 { set symmetrix dynamic_rdf_configuration = Enabled; } Submitting configuration changes..........................Submitted. Validating configuration changes..........................Validated. Initiating PREPARE of configuration changes...............Queued. PREPARE requesting required resources.....................Obtained. Step 008 of 011 steps.....................................Executing. Local: PREPARE...........................................Done. Initiating COMMIT of configuration changes................Queued. COMMIT requesting required resources......................Obtained. Step 012 of 034 steps.....................................Executing. ……………………………………………………………………………………………………………………………………………………………………………………………… Step 032 of 034 steps.....................................Executing. Local: COMMIT............................................Done. Terminating the configuration change session..............Done.
The following command uses the vi text editor to create a text file named create_std.cmd. As was done here, you can enter into the file the create dev entry that defines six new devices as unprotected type devices (a temporary protection state until the example transforms the devices into dynamic R1 devices that are mirrored by R2 devices). Each device will have a size of 1100 cylinders.
# vi create_std.cmd create dev, count=6, size=1100, emulation=fba, config=unprotected;
Using the SYMCLI Configuration Manager 64

1/25/2005
The symconfigure commit command executes the command file and initiates the processing to create six new standard devices.
# symconfigure -sid 605 -file create_std.cmd -v -noprompt commit Establishing a configuration change session...............Established. Processing symmetrix 000000005605 { create dev count=6, size=1100, emulation=FBA, config=Unprotected; } Submitting configuration changes..........................Submitted. Validating configuration changes..........................Validated. Initiating PREPARE of configuration changes...............Queued. PREPARE requesting required resources.....................Obtained. Step 004 of 011 steps.....................................Executing. Step 008 of 011 steps.....................................Executing. Step 010 of 011 steps.....................................Executing. Local: PREPARE...........................................Done. Initiating COMMIT of configuration changes................Queued. COMMIT requesting required resources......................Obtained. Step 011 of 102 steps.....................................Executing. ……………………………………………………………………………………………………………………………………………………………………………………… Step 089 of 102 steps.....................................Executing. Local: COMMIT............................................Done. Terminating the configuration change session..............Done.
The symdev list command displays the six new devices (091 through 096).
# symdev list Symmetrix ID: 000000005605 Device Name Directors Device ---------------------------- ------------ ------------------------------------- Cap Sym Physical SA :P DA :IT Config Attribute Sts (MB) ---------------------------- ------------ ------------------------------------- 0000 Not Visible ???:? 01B:C0 Unprotected Grp'd RW 516 0001 /dev/rdsk/c1t0d1s2 04A:0 16B:C1 Unprotected Grp'd RW 516 ………………………………………………………………………………………………………………………………………………………………………………………………………………… 0091 Not Visible ???:? 16B:C0 Unprotected N/Grp'd RW 516 0092 Not Visible ???:? 02B:C1 Unprotected N/Grp'd RW 516 0093 Not Visible ???:? 15B:C1 Unprotected N/Grp'd RW 516 0094 Not Visible ???:? 16B:D0 Unprotected N/Grp'd RW 516 0095 Not Visible ???:? 02B:D1 Unprotected N/Grp'd RW 516 0096 Not Visible ???:? 15A:D1 Unprotected N/Grp'd RW 516
Using the SYMCLI Configuration Manager 65

1/25/2005
The following command uses the vi text editor to create a text file named set_dyn_devices.cmd. As was done here, you can enter into the file the set dev entry that sets the dynamic RDF attribute for the six new devices.
# vi set_dyn_devices.cmd set dev 0091:0096 attribute=dyn_rdf;
The symconfigure commit command executes the command file and initiates the processing to set the dynamic RDF-capable attribute for the six devices.
# symconfigure -sid 605 -file set_dyn_devices.cmd -v -noprompt commit Establishing a configuration change session...............Established. Processing symmetrix 000000005605 { set dev 0091:0096 attribute = DYN_RDF; } Submitting configuration changes..........................Submitted. Validating configuration changes..........................Validated. Initiating PREPARE of configuration changes...............Queued. PREPARE requesting required resources.....................Obtained. Step 007 of 011 steps.....................................Executing. Step 008 of 011 steps.....................................Executing. Local: PREPARE...........................................Done. Initiating COMMIT of configuration changes................Queued. COMMIT requesting required resources......................Obtained. Step 014 of 041 steps.....................................Executing. ……………………………………………………………………………………………………………………………………………………………………………………… Step 037 of 041 steps.....................................Executing. Local: COMMIT............................................Done. Terminating the configuration change session..............Done.
Using the SYMCLI Configuration Manager 66

1/25/2005
The symdev show command confirms that device 091 was set to have a “Dynamic RDF Capability” of either an R1 or an R2 device. The example assumes that the configuration change session also set this attribute for the other devices specified by the set dev command file entry.
# symdev show 0091 Symmetrix ID: 000000005605 Device Physical Name : Not Visible Device Symmetrix Name : 0091 Device Serial ID : N/A Symmetrix ID : 000000005605 Attached BCV Device : N/A Attached Snap TGT Device : N/A Vendor ID : EMC Product ID : SYMMETRIX Product Revision : 5568 ……………………………………………………………………………………………………………………………………………………………………………………………… Device Configuration : Unprotected Device is WORM Enabled : No Device is WORM Protected : No Dynamic Spare Invoked : No Dynamic RDF Capability : RDF1_OR_RDF2_Capable ………………………………………………………………………………………………………………………………………………………………………………………………
Using the –connections option with symcfg list allows you to see the host connections to a Symmetrix array. The following display shows the front-end director (FA-4A) that this host (api60) uses to reach the Symmetrix (sid 605).
# symcfg list –sid 605 -connections Symmetrix ID : 000000005605 Symmetrix Host ------------- ----------------------------------------------------------- Director Port Node Name IP Address HW Type OS Name OS Revision -------- ---- ------------- --------------- -------- -------- ----------- FA-4A 0 api60 172.23.65.60 sun4u SunOS 5.6
Using the SYMCLI Configuration Manager 67

1/25/2005
The following symcfg list command with the –addresses –available options displays the VBUS, TID, and LUN addresses associated with front-end director 04B, port 0, and indicates the next available address in the run. To decide on a LUN value, consider the LUN conventions for your host platform. Because there is a large run of available LUN addresses between 004 and 060, the example uses LUN addresses 004 through 009 for the six new devices.
# symcfg list –sid 605 -sa 04A –p 0 -addresses -available Symmetrix ID: 000000005605 (Local) Director Device Name Attr Address ---------------------- ----------------------------- ---- -------------- Ident Symbolic Port Sym Physical VBUS TID LUN ------ -------- ---- ---- ----------------------- ---- --- --- FA-4A 04A 0 - AVAILABLE 0 0 000 * 0001 /dev/rdsk/c1t0d1s2 0 0 001 0002 /dev/rdsk/c1t0d2s2 0 0 002 0003 /dev/rdsk/c1t0d3s2 0 0 003 - AVAILABLE 0 0 004 * 0040 /dev/rdsk/c1t0d96s2 0 0 060 0041 /dev/rdsk/c1t0d97s2 0 0 061 0042 /dev/rdsk/c1t0d98s2 0 0 062 0043 /dev/rdsk/c1t0d99s2 0 0 063 - AVAILABLE 0 0 064 * Symmetrix ID: 000184600085 (Remote) No director was found to match the selection criterion. Legend for Available address: (*): The VBUS, TID, LUN address values represent a gap in the address assignments or are the next available address in the run
The following command uses the vi text editor to create a text file named map_dyn_devices.cmd. As was done here, you can enter into the file the map dev entries that map the six new devices.
# vi map_dyn_devices.cmd map dev 091 to dir 04A:0, lun=004; map dev 092 to dir 04A:0, lun=005; map dev 093 to dir 04A:0, lun=006; map dev 094 to dir 04A:0, lun=007; map dev 095 to dir 04A:0, lun=008; map dev 096 to dir 04A:0, lun=009;
Using the SYMCLI Configuration Manager 68

1/25/2005
The symconfigure commit command executes the command file and initiates processing of the mapping operations.
# symconfigure -sid 605 -file map_dyn_devices.cmd -v -noprompt commit Establishing a configuration change session...............Established. Processing symmetrix 000000005605 { map dev 0091 to dir 4A:0, lun=004; map dev 0092 to dir 4A:0, lun=005; map dev 0093 to dir 4A:0, lun=006; map dev 0094 to dir 4A:0, lun=007; map dev 0095 to dir 4A:0, lun=008; map dev 0096 to dir 4A:0, lun=009; } Submitting configuration changes..........................Submitted. Validating configuration changes..........................Validated. Initiating PREPARE of configuration changes...............Queued. PREPARE requesting required resources.....................Obtained. Step 008 of 011 steps.....................................Executing. Local: PREPARE...........................................Done. Initiating COMMIT of configuration changes................Queued. COMMIT requesting required resources......................Obtained. Step 012 of 046 steps.....................................Executing. …………………………………………………………………………………………………………………………………………………………………………………… Step 041 of 046 steps.....................................Executing. Step 041 of 046 steps.....................................Executing. Local: COMMIT............................................Done. Terminating the configuration change session..............Done.
Executing the following utilities in a Sun Solaris environment makes the new devices visible to the host.
# drvconfig # disks # devlinks
The symcfg discover command updates the SYMAPI database on the host.
# symcfg discover This operation may take up to a few minutes. Please be patient...
Using the SYMCLI Configuration Manager 69

1/25/2005
The sympd list command shows that the newly-mapped devices are now visible to the host.
# sympd list Symmetrix ID: 000000005605 Device Name Directors Device ---------------------------- ------------ ------------------------------------- Cap Physical Sym SA :P DA :IT Config Attribute Sts (MB) ---------------------------- ------------ ------------------------------------- /dev/rdsk/c1t0d1s2 0001 04A:0 16B:C1 Unprotected Grp'd RW 516 /dev/rdsk/c1t0d2s2 0002 04A:0 02B:C0 Unprotected Grp'd RW 516 /dev/rdsk/c1t0d3s2 0003 04A:0 15A:C0 Unprotected Grp'd RW 516 /dev/rdsk/c1t0d4s2 0091 04A:0 16B:C0 Unprotected N/Grp'd RW 516 /dev/rdsk/c1t0d5s2 0092 04A:0 02B:C1 Unprotected N/Grp'd RW 516 /dev/rdsk/c1t0d6s2 0093 04A:0 15B:C1 Unprotected N/Grp'd RW 516 /dev/rdsk/c1t0d7s2 0094 04A:0 16B:D0 Unprotected N/Grp'd RW 516 /dev/rdsk/c1t0d8s2 0095 04A:0 02B:D1 Unprotected N/Grp'd RW 516 /dev/rdsk/c1t0d9s2 0096 04A:0 15A:D1 Unprotected N/Grp'd RW 516 /dev/rdsk/c1t0d96s2 0040 04A:0 02B:C1 Unprotected N/Grp'd RW 3 /dev/rdsk/c1t0d97s2 0041 04A:0 15A:C1 Unprotected N/Grp'd RW 3 /dev/rdsk/c1t0d98s2 0042 04A:0 01B:C1 Unprotected N/Grp'd RW 3 /dev/rdsk/c1t0d99s2 0043 04A:0 16A:C1 Unprotected N/Grp'd RW 3
At this point, the example needs to return to the beginning and repeat the same steps to create dynamic RDF devices (010 through 015) on the remote RDF-linked Symmetrix array (085). For the sake of brevity, the example does not repeat these steps. Now that the devices are created, available for use as dynamic RDF devices, and mapped, subsequent processing is now handled using the symrdf utility. The following command uses the vi text editor to create a text file named create_pair.cmd. As was done here, you can enter into the file those device names that will constitute the dynamic SRDF pairs. The R1 devices are listed in first column, and the R2 devices created on the remote Symmetrix are listed in the second column on the same line as their respective R1 source. For more information about creating and using dynamic SRDF pairs, refer to the white paper Using SYMCLI to Perform Control Operations with SRDF Family Products (P/N 300-000-076).
# vi create_pair.cmd 0091 0010 0092 0011 0093 0012 0094 0013 0095 0014 0096 0015
Using the SYMCLI Configuration Manager 70

1/25/2005
If your initial operation is to establish the pairs, use the –establish option or –invalidate R2 option when performing the create operation. The example will use the –invalidate option, which allows the creation of dynamic SRDF pairs without bringing up the RDF links and initiating the copying of data. However, when invalidating, you need to first write-disable the devices on both local and remote Symmetrix arrays. The following commands show only the write disable operation for the six R1 devices on the local Symmetrix array (sid 605). Assume that the example performs these steps also for the six R2 devices (010 through 015) on the remote Symmetrix array (sid 085). The following commands create a Regular type device group (new_dyn_rdf_grp), add the range of devices (091 through 096) to the device group, and place all devices in the device group in the Write Disable state. (Refer to Example 7 for an alternative method of write-disabling devices using the symdev command.)
# symdg create new_dyn_rdf_grp –type regular # symld –g new_dyn_rdf_grp –sid 605 addall dev –range 091:096 # symld –g new_dyn_rdf_grp write_disable
The symdg list command displays the new device group (new_dyn_rdf_grp) among those device groups defined on this host.
# symdg list D E V I C E G R O U P S Num of Num of Num of Name Type Valid Symmetrix ID Devices GK's BCV's oracle_1 REGULAR Yes 000000005605 3 0 0 doc REGULAR Yes 000000005605 5 0 0 payroll RDF2 Yes 000000005605 3 0 0 records RDF1 Yes 000000005605 4 0 0 new_dyn_rdf_grp REGULAR Yes 000000005605 6 0 0
The symrdf createpair command parses the file called create_pair.cmd that defines the dynamic SRDF pairs and specifies that the column-1 devices in the file are R1 devices (–type RDF1) on the local Symmetrix (sid 605). The device group containing these devices will be changed from a Regular device group to an RDF device group. Communication is via RDF group 1 (–rdfg 1). The –invalidate r2 option invalidates all tracks on the R2 devices in preparation for a subsequent establish operation that will copy data from the R1 devices to the R2 devices.
# symrdf createpair -file create_pair.cmd -sid 605 -rdfg 1 -type RDF1 \ -invalidate R2 -noprompt An RDF 'Create Pair' operation execution is in progress for device file 'create_pair.cmd'. Please wait... Create RDF Pair.................................................Done. Mark target device(s) in (5605,01) for full copy from source....Started. Device: 0091 .................................................. Marked. Device: 0092 .................................................. Marked. Device: 0093 .................................................. Marked. Device: 0094 .................................................. Marked. Device: 0095 .................................................. Marked. Device: 0096 .................................................. Marked. Mark target device(s) in (5605,01) for full copy from source....Done.
Using the SYMCLI Configuration Manager 71

1/25/2005
The RDF 'Create Pair' operation successfully executed for device file 'create_pair.cmd'.
The symdg list command displays the new RDF device group (new_dyn_rdf_grp) among those device groups defined on this host. Note that the new_dyn_rdf_grp device group has been changed from a Regular type group to an RDF1 type device group.
# symdg list D E V I C E G R O U P S Num of Num of Num of Name Type Valid Symmetrix ID Devices GK's BCV's oracle_1 REGULAR Yes 000000005605 3 0 0 doc REGULAR Yes 000000005605 5 0 0 payroll RDF2 Yes 000000005605 3 0 0 records RDF1 Yes 000000005605 4 0 0 new_dyn_rdf_grp RDF1 Yes 000000005605 6 0 0
The symrdf query command shows the configuration and status of the new dynamic SRDF pairs within this device group. The new SRDF pairs are in the Suspended state and, as expected, the RDF links are Not Ready (NR).
# symrdf -g new_dyn_rdf_grp query Device Group (DG) Name: new_dyn_rdf_grp DG's Type : RDF1 DG's Symmetrix ID : 000000005605 Source (R1) View Target (R2) View M O D E S ----------------------------- --------------------- ----------- ------------ ST LI ST M Standard A N A o Logical T R1 Inv R2 Inv K T R1 Inv R2 Inv d RDF Pair Device Dev E Tracks Tracks S Dev E Tracks Tracks e Dom ACp STATE ----------------------------- -- --------------------- ----------- ------------ DEV001 0091 WD 0 16500 NR 0010 WD 0 16500 SYN DIS OFF Suspended DEV002 0092 WD 0 16500 NR 0011 WD 0 16500 SYN DIS OFF Suspended DEV003 0093 WD 0 16500 NR 0012 WD 0 16500 SYN DIS OFF Suspended DEV004 0094 WD 0 16500 NR 0013 WD 0 16500 SYN DIS OFF Suspended DEV005 0095 WD 0 16500 NR 0014 WD 0 16500 SYN DIS OFF Suspended DEV006 0096 WD 0 16500 NR 0015 WD 0 16500 SYN DIS OFF Suspended Total ------ ------ ------ ------ Track(s) 0 99000 0 99000 MB(s) 0.0 3093.6 0.0 3093.6
Using the SYMCLI Configuration Manager 72

1/25/2005
The symrdf establish command initiates copying R1 data to R2 devices. The –invalidate r2 option from the previous command invalidated the R2 devices, a step that is usually carried out during a full establish operation. Consequently, you do not need the –full option here. The invalidate step is not repeated, regardless of whether you use the –full option or not. If subsequently you re-establish or restore the dynamic SRDF pairs, omitting or including the –full option will affect how the copy occurs (either incremental copy or full copy, respectively). The output below says “Incremental Establish” because the –full option was omitted. However, because all tracks on the R2 devices were previously invalidated, the result is a full copy of all R1 tracks to the R2 tracks.
# symrdf -g new_dyn_rdf_grp establish -noprompt An RDF 'Incremental Establish' operation execution is in progress for device group 'new_dyn_rdf_grp'. Please wait... Suspend RDF link(s).......................................Done. Read/Write Enable device(s) on SA at source (R1)..........Done. Resume RDF link(s)........................................Not Done. Merge device track tables between source and target.......Started. Devices: 0091-0096 ...................................... Merged. Merge device track tables between source and target.......Done. Resume RDF link(s)........................................Done. The RDF 'Incremental Establish' operation successfully initiated for device group 'new_dyn_rdf_grp'.
The following query displays the status of the dynamic SRDF pairs. The pairs are currently in the process of synchronizing (pair state is SyncInProg).
# symrdf -g new_dyn_rdf_grp query Device Group (DG) Name: new_dyn_rdf_grp DG's Type : RDF1 DG's Symmetrix ID : 000000005605 Source (R1) View Target (R2) View M O D E S ----------------------------- --------------------- ----------- ------------ ST LI ST M Standard A N A o Logical T R1 Inv R2 Inv K T R1 Inv R2 Inv d RDF Pair Device Dev E Tracks Tracks S Dev E Tracks Tracks e Dom ACp STATE ----------------------------- -- --------------------- ----------- ------------ DEV001 0091 RW 0 16500 RW 0010 WD 0 16500 SYN DIS OFF SyncInProg DEV002 0092 RW 0 16500 RW 0011 WD 0 16500 SYN DIS OFF SyncInProg DEV003 0093 RW 0 16500 RW 0012 WD 0 16500 SYN DIS OFF SyncInProg DEV004 0094 RW 0 16500 RW 0013 WD 0 16500 SYN DIS OFF SyncInProg DEV005 0095 RW 0 16500 RW 0014 WD 0 16500 SYN DIS OFF SyncInProg DEV006 0096 RW 0 16500 RW 0015 WD 0 16500 SYN DIS OFF SyncInProg Total ------ ------ ------ ------ Track(s) 0 99000 0 99000 MB(s) 0.0 3093.6 0.0 3093.6
Using the SYMCLI Configuration Manager 73

1/25/2005
The symrdf verify command checks at five-second intervals and verifies when the dynamic SRDF pairs have reached the Synchronized state. The ellipsis (……) represents repetitive output that was omitted.
# symrdf verify -g new_dyn_rdf_grp -i 5 NONE of the mirrored pairs are in the 'Synchronized' state NONE of the mirrored pairs are in the 'Synchronized' state ………………………………………………………………………………………………………………………………………………………………………………………………………………… All devices in the RDF group 'new_dyn_rdf_grp' are in the 'Synchronized' state.
Another query confirms the SRDF pairs are now in the Synchronized state.
# symrdf -g new_dyn_rdf_grp query Device Group (DG) Name: new_dyn_rdf_grp DG's Type : RDF1 DG's Symmetrix ID : 000000005605 Source (R1) View Target (R2) View M O D E S ----------------------------- --------------------- ----------- ------------ ST LI ST M Standard A N A o Logical T R1 Inv R2 Inv K T R1 Inv R2 Inv d RDF Pair Device Dev E Tracks Tracks S Dev E Tracks Tracks e Dom ACp STATE ----------------------------- -- --------------------- ----------- ------------ DEV001 0091 RW 0 0 RW 0010 WD 0 0 SYN DIS OFF Synchronized DEV002 0092 RW 0 0 RW 0011 WD 0 0 SYN DIS OFF Synchronized DEV003 0093 RW 0 0 RW 0012 WD 0 0 SYN DIS OFF Synchronized DEV004 0094 RW 0 0 RW 0013 WD 0 0 SYN DIS OFF Synchronized DEV005 0095 RW 0 0 RW 0014 WD 0 0 SYN DIS OFF Synchronized DEV006 0096 RW 0 0 RW 0015 WD 0 0 SYN DIS OFF Synchronized Total ------ ------ ------ ------ Track(s) 0 0 0 0 MB(s) 0.0 0.0 0.0 0.0
Using the SYMCLI Configuration Manager 74

1/25/2005
Example 7: Write-Disabling Devices Using symdev Beginning with EMC Solutions Enabler version 5.0, you can use the symdev command with write_disable or not_ready as an alternative to using device groups for this operation. This example repeats the “Write Disable” portion of Example 6, using the symdev command. A device group is created as an option to the symrdf createpair command.
The following command uses the vi text editor to create a text file named create_pair.cmd. As was done here, you can enter into the file those device names that will constitute the dynamic SRDF pairs. The R1 devices are listed in first column, and the R2 devices created on the remote Symmetrix are listed in the second column on the same line as their respective R1 source.
# vi create_pair.cmd 0091 0010 0092 0011 0093 0012 0094 0013 0095 0014 0096 0015
If your initial operation is to establish the pairs, use the –establish option or –invalidate R2 option when performing the create operation. The example will use the –invalidate option, which allows the creation of dynamic SRDF pairs without bringing up the RDF links and initiating the copying of data. However, when invalidating, you need to first write-disable the devices on both local and remote Symmetrix arrays. The following commands show the write disable operation for the six R1 devices on the local Symmetrix array (sid 605).
# symdev -sid 605 write_disable -nop 091 Write Disable operation successfully completed for the device. # symdev -sid 605 write_disable -nop 092 Write Disable operation successfully completed for the device. # symdev -sid 605 write_disable -nop 093 Write Disable operation successfully completed for the device. # symdev -sid 605 write_disable -nop 094 Write Disable operation successfully completed for the device. # symdev -sid 605 write_disable -nop 095 Write Disable operation successfully completed for the device. # symdev -sid 605 write_disable -nop 096 Write Disable operation successfully completed for the device.
Using the SYMCLI Configuration Manager 75

1/25/2005
The following commands are issued from the remote host and perform the write disable operation for the six R2 devices (010 through 015) on the remote Symmetrix array (sid 085).
# symdev -sid 085 write_disable -nop 010 Write Disable operation successfully completed for the device. # symdev -sid 085 write_disable -nop 011 Write Disable operation successfully completed for the device. # symdev -sid 085 write_disable -nop 012 Write Disable operation successfully completed for the device. # symdev -sid 085 write_disable -nop 013 Write Disable operation successfully completed for the device. # symdev -sid 085 write_disable -nop 014 Write Disable operation successfully completed for the device. # symdev -sid 085 write_disable -nop 015 Write Disable operation successfully completed for the device.
The following commands are issued once again from the local host. The symrdf createpair command parses the file called create_pair.cmd that defines the dynamic SRDF pairs and specifies that the column-1 devices in the file are R1 devices (–type RDF1) on the local Symmetrix (sid 605). Communication with the remote Symmetrix is via RDF group 1 (–rdfg 1). The –invalidate r2 option invalidates all tracks on the R2 devices in preparation for a subsequent establish operation that will copy data from the R1 devices to the R2 devices. The –g option creates a device group new_dyn_rdf_grp and adds the dynamic SRDF pairs to the group.
# symrdf -g new_dyn_rdf_grp createpair -file create_pair.cmd -sid 605 \ -rdfg 1 -type RDF1 -invalidate R2 -noprompt An RDF 'Create Pair' operation execution is in progress for device file 'create_pair.cmd'. Please wait... Create RDF Pair.................................................Done. Mark target device(s) in (5605,01) for full copy from source....Started. Device: 0091 .................................................. Marked. Device: 0092 .................................................. Marked. Device: 0093 .................................................. Marked. Device: 0094 .................................................. Marked. Device: 0095 .................................................. Marked. Device: 0096 .................................................. Marked. Mark target device(s) in (5605,01) for full copy from source....Done. The RDF 'Create Pair' operation successfully executed for device file 'create_pair.cmd'.
Using the SYMCLI Configuration Manager 76

1/25/2005
The symdg list command displays the new RDF device group (new_dyn_rdf_grp) among those device groups defined on this host.
# symdg list D E V I C E G R O U P S Num of Num of Num of Name Type Valid Symmetrix ID Devices GK's BCV's oracle_1 REGULAR Yes 000000005605 3 0 0 doc REGULAR Yes 000000005605 5 0 0 payroll RDF2 Yes 000000005605 3 0 0 records RDF1 Yes 000000005605 4 0 0 new_dyn_rdf_grp RDF1 Yes 000000005605 6 0 0
The symrdf query command shows the configuration and status of the new dynamic SRDF pairs within this device group. The new SRDF pairs are in the Suspended state and, as expected, the RDF links are Not Ready (NR).
# symrdf -g new_dyn_rdf_grp query Device Group (DG) Name: new_dyn_rdf_grp DG's Type : RDF1 DG's Symmetrix ID : 000000005605 Source (R1) View Target (R2) View M O D E S ----------------------------- --------------------- ----------- ------------ ST LI ST M Standard A N A o Logical T R1 Inv R2 Inv K T R1 Inv R2 Inv d RDF Pair Device Dev E Tracks Tracks S Dev E Tracks Tracks e Dom ACp STATE ----------------------------- -- --------------------- ----------- ------------ DEV001 0091 WD 0 16500 NR 0010 WD 0 16500 SYN DIS OFF Suspended DEV002 0092 WD 0 16500 NR 0011 WD 0 16500 SYN DIS OFF Suspended DEV003 0093 WD 0 16500 NR 0012 WD 0 16500 SYN DIS OFF Suspended DEV004 0094 WD 0 16500 NR 0013 WD 0 16500 SYN DIS OFF Suspended DEV005 0095 WD 0 16500 NR 0014 WD 0 16500 SYN DIS OFF Suspended DEV006 0096 WD 0 16500 NR 0015 WD 0 16500 SYN DIS OFF Suspended Total ------ ------ ------ ------ Track(s) 0 99000 0 99000 MB(s) 0.0 3093.6 0.0 3093.6
Using the SYMCLI Configuration Manager 77

1/25/2005
Appendix A: Device Emulation Types Previously, when you created a Symmetrix device, you could specify the device emulation type as either FBA (fixed block architecture) or Celerra FBA. Beginning with EMC Solutions Enabler version 5.1, you can now create VME 512 FBA devices as well as devices that have various CKD or AS/400 emulations.
Table 5 lists the valid SYMAPI emulation types.
AS/400 devices have specific sizes that you must use. However, some AS400 sizes cannot be created as a single device, because the AS400 size exceeds the maximum size supported by the Symmetrix. You must create one of these AS/400 emulation types as multiple smaller devices and form them into a meta device. For example, a meta device made up of four 8930-cylinder devices (4x 8930).
Table 5. Device Emulation Types and Size Restrictions
Device Emulation Type Size (Cylinders) Meta Size (GB)
FBA
CELLERA_FBA
VME_512_FBA
CKD-3380
CKD-3390
AS/400_M6713_30 17540 N/A 8.589
AS/400_M6713_50 17540 N/A 8.589
AS/400_M6717_50 17540 N/A 8.589
AS/400_M6718_50 4x 8930 yes 17.5
AS/400_M9337_590 17484 N/A 8.589
AS/400_M3937_590R 17484 N/A 8.589
AS/400_M9337_5AA 4x 8930 yes 17.548
AS/400_M9337_5AC 4x 8930 yes 17.548
AS/400_M9337_5BA 8x 9158 yes 36.003
AS/400_M9337_5BC 8x 9158 yes 36.003
AS/400_M2105_A01 17484 N/A 8.589
AS/400_M2105_A81 Symmetrix 8000-series or higher
17484 N/A 8.589
AS/400_M2105_A02 4x 8930 yes 17.548
AS/400_M2105_A82 Symmetrix 8000-series or higher
4x 8930 yes 17.548
AS/400_M2105_A03 8x 9158 yes 36.003
AS/400_M2105_A83 8x 9158 yes 36.003
AS/400_M2105_A04 16x 9150 yes 70.564
AS/400_M2105_A84 16x 9150 yes 70.564
Note that some AS400 emulation types are not supported until Enginuity version 5x69.
Using the SYMCLI Configuration Manager 78

1/25/2005
Appendix B: Dynamic RDF with Enginuity Versions 5x67 and Higher Dynamic SRDF allows you to create SRDF pairs from non-SRDF devices and subsequently cancel these dynamic SRDF pairings if they are no longer needed. Historically, source and target SRDF device pairing has been static once these devices have been configured as RDF1 and RDF2 type devices, and this is still true of devices that you configure this way.
However, beginning with the SRDF component of EMC Solutions Enabler version 5.0 running on Symmetrix arrays using Enginuity version 5568, you can create non-SRDF type devices that acquire the capability of being R1 or R2 devices when you use the Configuration Manager to set these devices and the Symmetrix array for dynamic RDF.
Table 6 shows which dynamic RDF operations are valid for the Enginuity version that you are using.
Table 6. SRDF Devices with Various Enginuity Versions
Enginuity Version Description
5x66 and 5x67 You can create static SRDF devices using the Configuration Manager.
5x67 only Dynamic RDF needs to be enabled in the Symmetrix array, and RDF devices need to be marked as dynamic RDF devices. Only the Symmetrix service processor can create this configuration. The only dynamic RDF operation that you can perform from the host is symrdf swap.
You can use the Configuration Manager to enable the dynamic RDF feature in the Symmetrix array and set existing non-RDF devices to be capable of being dynamic RDF (R1 or R2, R1 only, or R2 only).
If the dynamic RDF feature is enabled in the Symmetrix array, and if these devices are marked as dynamic-RDF-capable devices, you can use these dynamic RDF devices to create RDF pairs. Use either the Configuration Manager syntax (requires a Configuration Manager license) or the symrdf createpair command (requires an RDF license only).
5568 or higher
If the dynamic RDF feature is not enabled in the Symmetrix, but all devices in the request are capable of being dynamic RDF devices, the Configuration Manager creates these devices as static RDF devices (as Enginuity versions 5x66 and 5x67). If the devices in the request are mixed (some capable of being dynamic RDF devices and some are not), the request is rejected.
Using the SYMCLI Configuration Manager 79

1/25/2005
Appendix C: Configuration Function Availability Table 7 lists Configuration Manager operations that you can perform with your version of the software.
Table 7. Minimum Solutions Enabler Version Required for Various Enginuity Versions
Operation 5x66 5x67 5x68 5669 5670 5x71
Create Device:
FBA 4.2 4.2 4.2 4.2 5.2 5.2
Celerra FBA 4.3 4.3 4.3 4.3 5.2 5.2
RAID-S (Parity RAID 3+1) 5.0 5.0 5.0 5.2 5.24
RAID-S (Parity RAID 7+1) 5.1 5.1 5.2 5.24
RAID-5 5.4 5.4
RAID-5 BCV 6.0
CKD 5.1 5.1 5.1 5.2 5.2
CKD meta devices 5.1 5.1 5.2 5.2
AS/400 5.1 5.1 5.1 5.2 5.2
VME 512 FBA 5.1 5.1 5.1 5.2 5.2
VDEV 5.2 5.2 5.2
Save devices (for VDEVs) 5.2 5.2 5.2
Delete Device 5.3 5.3
Delete RAID-S group 5.4 5.4
Convert Device:
Adding or removing BCV/DRV
4.2 4.2 4.2 4.2 5.2 5.2
Adding or removing RDF 4.2 4.2 4.2 4.2 5.2 5.2
Dynamic RDF 1 5.0 5.0 5.2 5.2
Converting static RDF to dynamic RDF 1
5.3 5.3
Adding another mirror 4.3 4.3 4.3 5.2 5.2 Removing a mirror 5.0 5.0 5.0 5.2 5.2 Convert RAID-S group to unprotected devices
5.4 5.4
Change Device Emulation: FBA and Celerra FBA 4.3 4.3 4.3 5.2 5.2
Set Device Attributes: VCMdb 5.0 5.0 5.0 5.2 5.2 RDB_Cksum 5.0 5.0 5.0 5.2 5.2 dyn_rdf 1 5.0 5.0 5.2 5.2 dyn_rdf1_only 1 5.0 5.0 5.2 5.2 dyn_rdf2_only 1 5.0 5.0 5.2 5.2 Worm 5.0 5.0 5.2 5.2 SCSI3_persist_reserv 5.1 5.1 5.1 5.2 5.2
Using the SYMCLI Configuration Manager 80

1/25/2005
Operation 5x66 5x67 5x68 5669 5670 5x71
Map Device: 4.2 4.2 4.2 4.2 5.2 5.2 AS/400 5.0 5.0 5.0 5.0 5.2 5.2 Range of CKD devices N/A N/A N/A N/A 6.0
Unmap Device: 4.2 4.2 4.2 4.2 5.2 5.2 AS/400 5.0 5.0 5.0 5.0 5.2 5.2 Range of CKD devices N/A N/A N/A N/A 6.0
Form Meta 4.2 4.2 4.2 4.2 5.2 5.2 Add Meta Member:
Concatenated 4.2 4.2 4.2 4.2 5.2 5.2 Striped 1 2 5.0 5.0 5.0 5.2 5.2
Remove Meta Member: Concatenated 4.2 4.2 4.2 4.2 5.2 5.2 Striped 3
Dissolve Meta 4.2 4.2 4.2 4.2 5.2 5.2 Swap RA Group 4.2 4.2 4.2 4.2 5.2 5.2
Swap Hyper (available only to Optimizer)
4.2 4.2 4.2 4.2 5.2 5.2
Swap RDF Device 4.2 4.2 4.2 4.2 5.2 5.2
Dynamic RDF devices 1 5.0 5.0 5.2 5.2 Set Front-End Port Attributes
4.2 4.2 4.2 4.2 5.2 5.2
Set Symmetrix-Wide Parameters:
max_hypers_per_disk 4.3 4.3 4.3 5.2 5.2 fba_multi_access_cache 4.3 4.3 4.3 5.2 5.2 dynamic_rdf 1 5.0 5.0 5.2 5.2 raid_s_support 5.0 5.0 5.0 5.2 5.2 raid_5_support 5.4 5.4 raid_s_members 5.1 5.1 5.2 5.2 VCMDB_restricted_access 5.1 5.1 5.1 5.2 5.2 concurrent_dynamic_rdf 6.0 pav_mode 6.0 max_pav_aliases 6.0 rdfa_cache_percent 6.0 rdfa_host_throttle_time 6.0
Add Dynamic Spare 5.0 5.0 5.0 5.2 5.2 Remove Dynamic Spare 5.0 5.0 5.0 5.2 5.2 Enable/Disable RA Group 5.3 5.3
1 Symmetrix 8000-series or higher 2 Requires that you contact EMC 3 A striped meta member cannot be removed 4 Using Enginuity version 5671 only.
Using the SYMCLI Configuration Manager 81

1/25/2005
Appendix D: Configuration Functions by Emulation Type Table 8 lists Configuration Manager operations that you can perform on a device with various emulation types.
Table 8. Configuration Operations on a Device
Emulation Type Configuration Manager Operations on a Device FBA
FBA Celerra VME 512
CKD AS/400
Create Device Yes Yes Yes
Create CKD Meta Device No Yes No
Convert Device:
Adding or removing BCV/DRV/Standard Yes Yes Yes
Adding or removing RDF Yes Yes Yes
Adding another mirror Yes Yes Yes Removing a mirror Yes Yes Yes
Set Device Emulation Yes No No Set Device Attributes:
VCMdb Yes No Yes RDB_Cksum Yes No No dyn_rdf Yes Yes Yes dyn_rdf1_only Yes Yes Yes dyn_rdf2_only Yes Yes Yes Worm Yes No No SCSI3_persist_reserv Yes No No
Map Device Yes Yes Yes Unmap Device Yes Yes Yes Form Meta Yes No Yes Add Meta Member:
Concatenated Yes No No Striped Yes No No
Dissolve Meta Yes No Yes Convert Meta Yes No Yes
Using the SYMCLI Configuration Manager 82