Embed Size (px)
Citation preview

SureSeq™ NGS Library Preparation
Kit Handbook
Catalogue Number:
500070 (16 reactions)
500073 (48 reactions)

SureSeq NGS Library Preparation Handbook
Version 1.2: March 2016 2
Oxford Gene Technology
Founded by Professor Ed Southern, Oxford Gene Technology (OGT) brings world-class genetics research solutions to leading clinical and academic research institutions.
CytoSure™ — Class-leading products and services offering the complete array solution for clinical genetics research
Cytocell® — High-quality fluorescence in situ hybridisation (FISH) probes for the detection of gene rearrangements related to inherited genetic disease and cancer
SureSeq™ — Delivering comprehensive, high–quality targeted sequencing products to clinical and academic researchers
Genefficiency™ — A tailored microarray and sequencing service enabling high-throughput, high-quality genomic studies for a variety of applications
For more information, visit www.ogt.com.

SureSeq NGS Library Preparation Handbook
Version 1.2: March 2016 3
Contents
Introduction ........................................................................................................................ 4
Pack contents .................................................................................................................... 4
Storage ............................................................................................................................... 5
Safety .................................................................................................................................. 5
Data analysis software ...................................................................................................... 5
Equipment and reagents required .................................................................................... 6
Sample preparation and experimental design ................................................................ 8
Pre-hybridisation library preparation ............................................................................. 11
Recommended hybridisation protocol .......................................................................... 21
Addition of indexes by post-capture PCR ..................................................................... 22
MiSeq sequencing ........................................................................................................... 26
Low multiplexing guidelines ........................................................................................... 29
Legal information ............................................................................................................. 30
Ordering information ....................................................................................................... 31

SureSeq NGS Library Preparation Handbook
Version 1.2: March 2016 4
Introduction
This handbook is for use with the SureSeq NGS Library Preparation Kit and SureSeq NGS Panels from Oxford Gene Technology (OGT). For information about OGT products, visit www.ogt.com.
The SureSeq NGS Library Preparation Kit has been designed to prepare libraries of hybridisation captured genomic regions which will subsequently be run on Illumina MiSeq™, NextSeq™ or HiSeq™ instruments. By carefully designing the buffers, and optimising the protocol the number of clean-up steps is reduced over standard next generation library preparation methods, yet libraries of the highest quality are delivered. The adaptor oligonucleotides are included in the kit and libraries can be prepared using either the 16 (16 reaction kit) or 48 (48 reaction kit) indexes also included.
The kit is designed for use with OGT SureSeq NGS bait panels, but can be used with any DNA bait set. Panels are supplied separately.
Pack contents
Component Contents
SureSeq NGS LPK (16) #500074
(1 is supplied with 16 reaction kit)
(3 are supplied with 48 reaction kit)
Shipped on dry ice, store at –20°C
Step 1: ER Buffer
Step 1: ER Enzyme Mix
Step 2: Ligation Buffer
Step 2: Adaptor A
Step 2: Adaptor B
Step 2: Ligase
Step 3: PCR Buffer
Step 3: Primer Mix
Step 3: DNA Polymerase
Step 4: PCR Buffer
Step 4: Primer
Step 4: DNA Polymerase
Nuclease Free Water

SureSeq NGS Library Preparation Handbook
Version 1.2: March 2016 5
Component Contents
SureSeq NGS Index Kit – Collection A #500071
16 reaction kit only
Shipped on dry ice, store at –20°C
Index 1 – Index 16
Supplied in tubes
SureSeq NGS Index Kit – Collection B #500072
48 reaction kit only
Shipped on dry ice, store at –20°C
Index 1 – Index 48
Supplied in 96 well microtitre plate
Component Contents
SureSeq Blocking Oligos #500078
1 tube is supplied for 16 reaction kit
3 tubes are supplied for 48 reaction kit
Shipped on dry ice, store at –20°C
SureSeq Blocking Oligos
Storage The SureSeq NGS Library Preparation Kit should be stored at –20°C and used within the expiry date specified on the packaging of each kit.
Safety Handling of the SureSeq NGS Library Preparation Kit should be carried out by trained laboratory staff in accordance with good laboratory practice, using the correct protective equipment such as laboratory coats, safety glasses and gloves. Any chemicals used are potentially hazardous.
Data analysis software Data generated with the SureSeq NGS Library Preparation Kit and SureSeq NGS Panels may be analysed using OGT’s powerful, standalone data analysis package — SureSeq Interpret Software — provided with the panel, or using your usual analysis pipeline. Please contact OGT for more details.

SureSeq NGS Library Preparation Handbook
Version 1.2: March 2016 6
Equipment and reagents required
Equipment required (not supplied)
Covaris® Focused-ultrasonicator (or equivalent)
Agilent® 2200 TapeStation (cat. no. G2965A, or equivalent) and relevant
reagents
NanoDrop microvolume spectrophotometer (Thermo Fisher Scientific) or
equivalent
SpeedVac® (Thermo Fisher Scientific) or equivalent
Thermal cycler (e.g. BioRad MJ Research DNA Engine PTC-200) or equivalent
Laboratory vortex mixer + adapter for a standard microwell plate
Hot block for 1.5 ml tubes
Microfuge – for standard 1.5 ml tubes and 8-Strip PCR tubes
Appropriate magnetic rack for 96–well microwell plates and 1.5 ml tubes
Qubit® fluorimeter (Life technologies cat. no. Q32857)
20-200 µl 8-Channel pipette
Illumina MiSeq, NextSeq or HiSeq
Reagents and consumables required (not supplied)
SeqCap® EZ Hybridization and wash kits (Roche NimbleGen, cat. no. 05634253001) N.B. This kit contains formamide and tertramethylammonium
Dynabeads M-270 Streptavidin (Life technologies, cat. no. 65305)
COT Human DNA (250 µl) (OGT, cat. no. 500025)
Agencourt AMPure® beads (Beckman-Coulter, cat. no. A63880)
Molecular biology grade 100% ethanol (Sigma Aldrich, cat. no. E7023 or equivalent)
Molecular biology grade water (Sigma Aldrich, cat. no. W4502-1L or equivalent)
Covaris microTUBES (cat. no. 520045)
Quant-iT™ dsDNA HS Assay Kit and Quant-iT dsDNA BR Assay Kit (Life
Technologies, cat. no. Q32850, Q32853)

SureSeq NGS Library Preparation Handbook
Version 1.2: March 2016 7
Qubit® Assay Tubes (Life Technologies, cat. no. Q32856)
Agilent D1000 and High Sensitivity D1000 Reagents and ScreenTapes (cat. no.
5067-5582, 5067-2283, 5067-5584, 5067-5585)
DNA LoBind Tubes (Eppendorf, cat. no. 022431021 or equivalent)
96-well microwell plates (Starlab, cat. no. E1403-0100) and 8-Strip PCR tubes
(Starlab cat. no. A1402-3700) or equivalent
Sequencing reagents required for the MiSeq / HiSeq (e.g. Illumina, cat. no. MS–
102-2002, MS-102-2022, GD-401-3001, FC-401-3001)
5.0 M Sodium hydroxide solution, molecular biology-grade (e.g. Sigma-Aldrich,
cat. no. S8263)
15 ml or 50 ml Falcon Tubes or similar

SureSeq NGS Library Preparation Handbook
Version 1.2: March 2016 8
Sample preparation and experimental design
The following section contains instructions for library production specific to the Illumina sequencing platform. For each sample, individual library preparations, hybridisations, and captures are performed. The samples are then tagged by PCR with an index (barcode) sequence and prepared for sequencing.
Sample requirements For best results the recommended starting amount of DNA is 1–3 μg, although excellent results can be achieved with as little as 500 ng of fresh, high quality starting material.
Figure 1: Workflow of sample library preparation indicating the expected DNA fragment size at each step of the procedure.

SureSeq NGS Library Preparation Handbook
Version 1.2: March 2016 9
Sample throughput
Low-throughput (LT) protocol: All incubations are performed in 0.2 ml tubes. Post incubation, each reaction volume is transferred to a fresh 1.5 ml tube and sample clean-up performed using the volumes highlighted in blue (marked with a ▲). All wash steps are performed using a magnetic rack capable of holding 1.5 ml tubes.
High-throughput (HT) protocol: All incubations are performed in 0.2 ml tubes or non-skirted PCR plate. Post incubation, the sample clean-up is performed in the same 0.2 ml tubes or non-skirted PCR plate using volumes highlighted in red (marked with a ●). All wash steps are performed using a magnetic rack capable of holding 0.2 ml tubes or 96-well non-skirted PCR plate (0.2 ml volume).
Sample preparation
Sample QC We highly recommend that quality control (QC) assessments are carried out for all samples prior to starting the SureSeq™ NGS Library Preparation protocol to assess the DNA integrity, concentration and purity.
Testing sample integrity, concentration and purity
DNA integrity — Use Agilent Genomic DNA ScreenTape (cat. no. 5067-5365) and Genomic DNA Reagents (cat. no. 5067-5366) (or similar)
Concentration — Use Invitrogen Qubit (or similar)
Purity — Use Thermo Scientific NanoDrop™ (or similar)
DNA integrity — Genomic DNA TapeStation Assessing DNA integrity
1. Add 3 µl of Genomic DNA Ladder into the first tube/well of the strip tube or plate.
2. Add 10 µl of Genomic DNA Sample Buffer to as many additional tubes/wells as required.
3. For each sample under assessment, add 1 µl of DNA sample to 10 µl of Genomic DNA Sample Buffer. Seal all the tubes/wells.
4. Vortex the tubes or plate for 5 sec.
5. Briefly spin down to consolidate the sample to the bottom of the tubes/wells.
6. Load strip of tubes or plate into the Agilent 2200 TapeStation.

SureSeq NGS Library Preparation Handbook
Version 1.2: March 2016 10
7. Highlight the required samples on the controller software and fill in the sample names in the sample sheet.
8. Select “Start” and provide a filename to save your results.
9. Check that the electropherogram shows that the integrity of the Genomic DNA is intact.
Concentration — Qubit
Assessing DNA concentration
1. Prepare the Qubit working solution by diluting the Qubit reagent 1:200 in Qubit buffer.
2. Load 190 μl of Qubit working solution into each of the tubes used for standards and 199 μl of Qubit working solution into each of the tubes used for samples.
3. Add 10 μl of each Qubit standard and 1 μl of sample to the appropriate tubes.
4. Mix by vortexing for 2–3 sec being careful not to generate bubbles.
5. Incubate the tubes at room temperature for 2 min.
6. Measure DNA concentrations following the on-screen prompts.
Purity — NanoDrop
Assessing DNA purity
1. Load 1 µl of each sample onto the pedestal.
2. Click “Measure”.
3. Record the readings for 260/230, 260/280 and the concentration (ng/µl).
An OD 260/280 ratio of 1.8 to 2.0 and OD 260/230 ratio of 1.5 to 1.8 is recommended.
Use of DNA samples with lower ratios may result in poor performance.

SureSeq NGS Library Preparation Handbook
Version 1.2: March 2016 11
Pre-hybridisation library preparation
DNA shearing
Genomic DNA is mechanically sheared using a sonicator to prepare fragments of suitable size for use with the Illumina NGS system. The sheared DNA fragments should have a size distribution with a peak at between 150-200bp.
Estimated time: 6 min shearing per sample.
Preparation Take the AMPure XP beads out of the fridge at least 30 min before use to allow them
to warm to room temperature.
Make up fresh solution of 70% ethanol using molecular biology grade ethanol and molecular biology grade water.
Refer to the Covaris instrument user guide for set up. For example (for a Covaris S2/E210 System);
o Fill the Covaris tank with fresh deionised water to level 12 on the fill line label.
o When a Covaris microTUBE is inserted ensure the water covers the visible glass part of the tube.
o Set the chiller temperature to 4°C.
o Open the Covaris control software. Degassing should start automatically but if not, select the Degas button. Degas the instrument for at least 30 min before use.
Shear the DNA 1. Prepare DNA with 1x TE Buffer in a 1.5 ml LoBind tube to a total volume of
130 μl
2. Put a Covaris microTUBE into the loading and unloading station. Keep the cap on the tube.
3. Use a tapered pipette tip to slowly transfer the 130 μl DNA sample through the pre-split septa. Be careful not to introduce a bubble into the bottom of the tube.
4. Secure the microTUBE in the tube holder and shear the DNA with the settings in Table 1. The target peak for base pair size is 150 to 200 bp.

SureSeq NGS Library Preparation Handbook
Version 1.2: March 2016 12
Settings Value
Duty Cycle 10%
Intensity/Peak Incident Power (W) 5/175
Cycles per Burst 200
Time 6 cycles of 1 min each
Set Mode Frequency sweeping
Temperature 4–7°C
Table 1: Covaris shear settings for the S2/E210 or S220/E220 Focused ultrasonicator.
Note: For all other models or sonicators, see manufacturer’s instructions for settings to achieve a target peak between 150-200 bp.
5. Place the microTUBE into an appropriately sized tube adapter and spin in a picofuge for 5 sec to collect all liquid in the bottom of the microTUBE.
6. Put the Covaris microTUBE back into the loading and unloading station.
7. While keeping the snap-cap on, insert a tapered pipette tip through the pre-split septa, and then slowly remove the sheared DNA.
8. Transfer the sheared DNA into a new 1.5 ml LoBind tube.
Note: Purification post-shearing is the same for both LT and HT protocols.
Post-shear purification
Estimated time: 40 min for 8–16 samples.
1. Use only room temperature AMPure XP beads.
2. Mix well so that the AMPure XP beads appear homogeneous and consistent in colour.
3. Dispense 180 μl of homogenous AMPure XP beads to a 1.5 ml LoBind tube and add each 130 μl sheared DNA sample. Mix well on a vortex mixer and incubate for 5 min.
4. Put the tube in the magnetic stand and wait for the solution to clear (approx. 3–5 min).
5. Keep the tube in the magnetic stand. Do not touch the beads while you carefully discard the cleared solution from the tubes.
6. Continue to keep the tube in the magnetic stand while you dispense 500 μl of 70% ethanol in each tube.
7. Let the tube sit for 1 min to allow any disturbed beads to settle, and remove the ethanol.
8. Repeat step 6 and step 7 step once.

SureSeq NGS Library Preparation Handbook
Version 1.2: March 2016 13
9. After the second wash, spin the tube briefly and return to the magnetic rack. Ensure that all ethanol is completely removed using a 20µl pipette and tip to remove any remaining ethanol.
10. Dry the samples on a 37°C heat block for 3–5 min or until the residual ethanol completely evaporates.
IMPORTANT: Do not over-dry as this will decrease yield.
Note: Bead pellet is dry when the appearance of the surface changes from shiny to matt.
11. Add 27 μl nuclease-free water directly to the bead pellet, mix well on a vortex mixer and incubate for 3 min at room temperature.
12. Spin the tube briefly and place on the magnetic stand and leave for 2–3 min until the solution is clear.
13. Remove 27 μl of the supernatant to a fresh 0.2 ml tube or 96-well plate. The beads can be discarded at this time.
14. The quality and quantity of DNA obtained after shearing should be assessed using the Agilent 2200 TapeStation, Agilent Bioanalyser or similar. An example of a good DNA trace is shown in Figure 3. Ensure a distribution with a peak height between 150 and 200 nucleotides is achieved. Set up the machine and prepare the tape, samples and ladder following the manufacturer’s instructions.
IMPORTANT: If using the TapeStation the DNA1000 kit can be used. However, if starting with 500 ng assess the quality and quantity using High-Sensitivity kits.
Figure 2: Analysis of sheared DNA using an Agilent High Sensitivity D1K ScreenTape assay. Size distribution with a peak between 150 to 200 bp (+/– 10%).
Note: Post purification, typically >25% of input DNA should be returned. If yield is lower than 25% of input, do not proceed with the processing until additional DNA from the same source can be added.
STOPPING POINT: If the samples are not to be used immediately for the end repair step, store them at –20°C.

SureSeq NGS Library Preparation Handbook
Version 1.2: March 2016 14
End repair and 3’ end ‘A’ Tailing
The sheared dsDNA is repaired with enzymes in the Step 1: ER enzyme mix to create blunt ends. At the same time a 3’ adenine overhang is created in preparation for adaptor ligation.
Estimated time: 1 hr 15 min for 8–16 samples. Hands-on time: 15 min.
Preparation
Remove the Step 1 reagents (green cap) from storage (–15°C to –25°C). Place all Step 1 enzymes on ice and allow all the other Step 1 reagents to thaw to room temperature.
Prepare End Repair/‘A’ Tailing Master Mix
To process multiple samples, prepare a master mix on ice. The volume of each reagent to add to the master mix for processing 16 samples (including excess) is shown below as an example.
For multiple samples, prepare the reaction mix as shown in Table 2. Mix well on a vortex mixer.
Reagent 1x library (µl) ___ x library (µl) 16x library (µl)
DNA sample 25 - -
Nuclease-free H2O 9 153
Step 1 (green cap): ER Buffer
10 170
Step 1 (green cap): ER Enzyme Mix
6 102
TOTAL 50 425
Table 2: End Repair Mix/‘A’ Tailing Master Mix
1. Add 25 μl of the reaction mix to each well or tube.
2. Add 25 μl of each DNA sample to the relevant well or tube. Mix by pipetting 10 times, remembering to change pipette tips between samples.
3. Set up the incubation using the profile and settings as shown in Table 3.

SureSeq NGS Library Preparation Handbook
Version 1.2: March 2016 15
Step Temperature (°C) Time
1 20 30 min
2 72 30 min
3 4 Hold
Table 3: Incubation profile
IMPORTANT: Ensure the samples are held at 4°C for at least 5 min before proceeding immediately with adaptor ligation.
Adaptor ligation
Illumina compatible adaptor sequences are ligated onto the repaired dsDNA fragments with Step 2: Ligase, using the 3’ overhang created during end repair/A tailing
Estimated time: 30 min for 8–16 samples. Hands-on time: 15 min.
Preparation
Remove the Step 2 reagents (yellow cap) from storage (–15°C to –25°C). Place the Step 2 enzyme on ice and allow all other Step 2 reagents to thaw to room temperature.
Prepare Ligation Master Mix
Prepare a master mix (on ice) based on the starting input DNA using the volumes
shown in Table 4. Mix well on a vortex mixer.

SureSeq NGS Library Preparation Handbook
Version 1.2: March 2016 16
Starting DNA 1x (1–3 µg) 1x (0.5–0.99 µg) ___ x library (µl)
DNA sample 50 μl 50 μl -
Step 2 (yellow cap): Ligation Buffer
3 μl 3 μl
Step 2 (yellow cap): Adaptor A
5 μl 1.5 μl
Step 2 (yellow cap): Adaptor B
5 μl 1.5 μl
Step 2 (yellow cap): Ligase
2 μl 2 μl
Nuclease-free H2O 0 μl 7 μl
TOTAL 65 μl 65 μl
Table 4: Ligation reaction mixes
1. Add 15 μl of the reaction mix to each well or tube on ice. Mix by pipetting 10 times, remembering to change pipette tips between samples.
2. Incubate in a thermal cycler for 15 min at 20°C. Do not use a heated lid.
Ligated library purification Estimated time: 40 min for 8–16 samples.
1. Use only room temperature AMPure XP beads.
2. Mix the reagent well so that the reagent appears homogeneous and consistent in colour.
3. Add 117 μl of homogenous AMPure XP beads to each adaptor ligated DNA sample (in either 1.5 ml LoBind tubes or 0.2 ml tubes/96-well plate). Mix well using a vortex mixer (1.5 ml tube) or pipetting up and down at least 10 times (0.2 ml tubes/plate). Incubate at room temperature for 5 min.
4. Put the tube in the magnetic stand and wait for the solution to clear (which should take approximately 3–5 min).
5. Keep the tube in the magnetic stand. Do not touch the beads whilst carefully removing ~180 μl of the cleared solution.
6. Continue to keep the tube in the magnetic stand/rack whilst adding ▲ 500 μl (or ● 200 μl) of 70% ethanol to each tube.
7. Let the tube sit for 1 min to allow any disturbed beads to settle, and remove the ethanol.
8. Repeat wash (step 6 and step 7).
SureSeq NGS Library Preparation Handbook
Version 1.2: March 2016 17
9. After the second wash seal the tube or plate and centrifuge briefly (260 x g for 30 sec).
10. Return the tube or plate to the magnetic stand/rack and wait 1 min. Remove any remaining ethanol using a 20 µl pipette and tip, being careful to not touch the bead pellet.
11. Dry the samples at 37°C on a heat block for 3–5 min or until the residual ethanol completely evaporates.
IMPORTANT: Do not over-dry as this will decrease yield.
Note: Bead pellet is dry when the appearance of the surface changes from shiny to matt.
12. Add 32 μl nuclease-free water directly to the bead pellet, mix well using a vortex mixer (1.5 ml tube) or pipetting up and down at least 10 times (0.2 ml tubes/plate). Incubate for 3 min at room temperature. Centrifuge briefly to consolidate the sample and place on a magnetic stand/rack for 2–3 min or until the solution is clear.
13. Remove 30 μl of the supernatant and transfer to a fresh 0.2 ml tube or 96-well plate. The beads can be discarded at this time.
14. Assess yield using Qubit BR Kit as per manufacturer’s instructions.
IMPORTANT: If starting with less than 500 ng assess the yield using a Qubit High-Sensitivity kit.
STOPPING POINT: If the samples are not to be used immediately, store at 4°C.
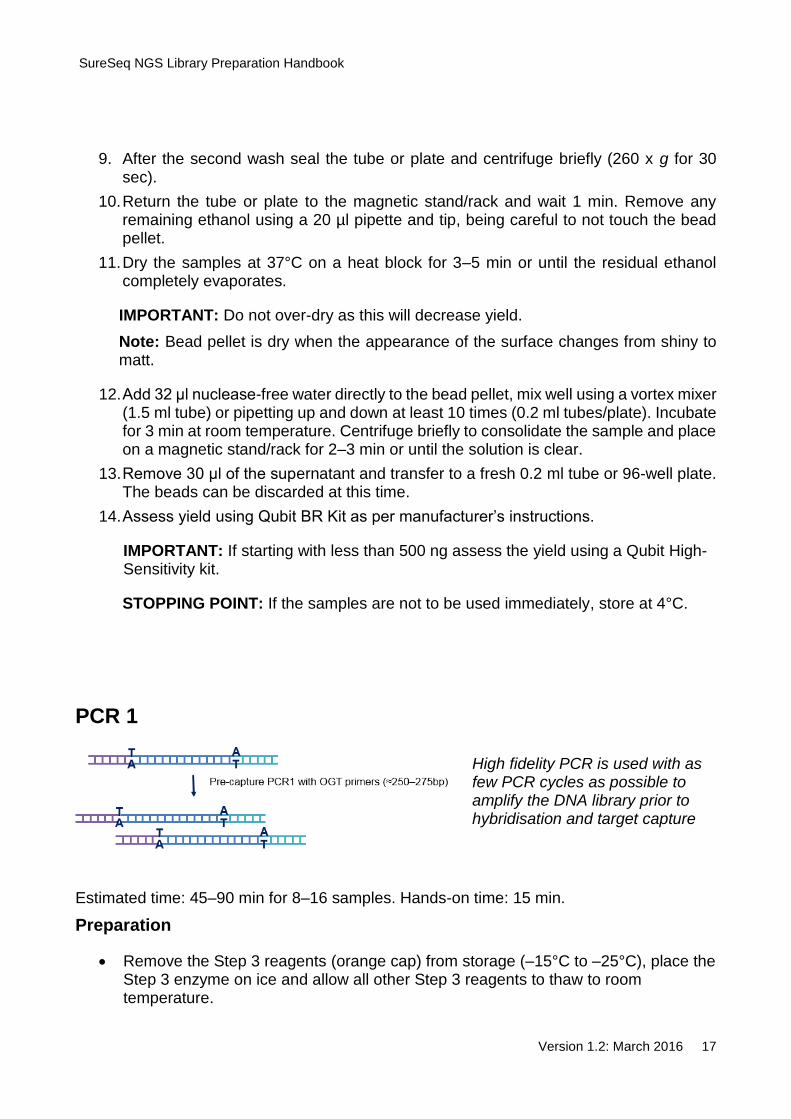
PCR 1
High fidelity PCR is used with as few PCR cycles as possible to amplify the DNA library prior to hybridisation and target capture
Estimated time: 45–90 min for 8–16 samples. Hands-on time: 15 min.
Preparation
Remove the Step 3 reagents (orange cap) from storage (–15°C to –25°C), place the Step 3 enzyme on ice and allow all other Step 3 reagents to thaw to room temperature.

SureSeq NGS Library Preparation Handbook
Version 1.2: March 2016 18
The number of cycles (from step 2 to step 4) required can be determined using to the guidelines in Table 5.
DNA concentration (ng/µl) post adaptor ligation
Cycle numbers Average expected
duplication following sequencing* >20 ng 5 <10%
9–20 ng 6 ≤10%
4–8 ng 7 10–20%
2–3 ng 8 20–30%
1–1.9 ng 9 30–40%
<1 ng 10 or more >40%
Table 5: Cycle numbers — based on results from Agilent TapeStation post adaptor ligation purification
* These values are very approximate and can vary significantly dependent on the size and type of bait library used. These percentage values will be higher for poor quality samples.
Prepare PCR Master Mix
For multiple samples, prepare the reaction mixes as shown in Table 6 on ice and mix well on a vortex mixer
1. Add 15 μl of each DNA sample to the relevant well or tube.
2. Add 35 μl of the master mix to each well or tube and mix by pipetting 10 times, remembering to change pipette tips between samples
Reagent 1x library (µl) ___ x library
(µl) 16x library (µl)
Ligated Library 15 - -
Nuclease-free H2O 23 391
Step 3 (orange cap): PCR Buffer
5 85
Step 3 (orange cap): Primer Mix
5 85
Step 3 (orange cap): DNA Polymerase
2 34
TOTAL 50 595
Table 6: Components for PCR reaction mix

SureSeq NGS Library Preparation Handbook
Version 1.2: March 2016 19
Set up PCR using the profile and settings as shown in Table 7.
Step Temperature (°C) Time
1 98 3 min
2 98 30 sec
3 65 30 sec
4 72 1 min
5 Repeat Step 2 to Step 4 (for cycle numbers see Table 6)
6 72 10 min
7 4 Hold
Table 7: PCR Profile
Place the tubes in a thermal cycler and run the PCR programme.
Note: It is not recommended to perform >10 cycles of PCR as this will increase the percentage of duplication.
PCR 1 purification
Estimated time: 40 min for 8–16 samples.
1. Use only room temperature AMPure XP beads.
2. Mix the reagent well so that the reagent appears homogeneous and consistent in colour.
3. Add 90 µl of homogenous AMPure XP beads to each PCR reaction (in either 1.5 ml LoBind tubes or 0.2 ml tubes/96-well plate). Mix well using a vortex mixer (1.5 ml tube) or by pipetting up and down at least 10 times (0.2 ml tubes/plate). Incubate at room temperature for 5 min.
4. Put the tube in the magnetic stand and wait for the solution to clear (which should take approximately 3–5 min).
5. Keep the tube in the magnetic stand. Do not touch the beads whilst carefully removing 130 μl of the cleared solution.
6. Continue to keep the tube in the magnetic stand/rack whilst adding ▲ 500 μl (or ● 200 μl) of 70% ethanol to each tube.
7. Let the tube sit for 1 min to allow any disturbed beads to settle, and remove the ethanol.
8. Repeat wash (step 6 and step 7).

SureSeq NGS Library Preparation Handbook
Version 1.2: March 2016 20
9. After the second wash, seal the tube or plate and centrifuge briefly (260 x g for 30 sec).
10. Return the tube or plate to the magnetic stand/rack and wait 1 min. Remove any remaining ethanol using a 20 µl pipette and tip, being careful to not touch the bead pellet.
11. Dry the samples at 37°C on a heat block for 3–5 min or until the residual ethanol completely evaporates.
IMPORTANT: Do not over-dry as this will decrease yield.
Note: Bead pellet is dry when the appearance of the surface changes from shiny to matt.
12. Add 32 μl nuclease-free water directly to the bead pellet, mix well by either using a vortex mixer (1.5 ml tube) or pipetting up and down at least 10 times (0.2 ml tubes/plate). Incubate for 3 min at room temperature. Centrifuge briefly, to consolidate the sample and place on a magnetic stand/rack for 2–3 min or until the solution is clear.
13. Remove 30 μl of the supernatant and transfer to a fresh 0.2 ml tube or 96-well plate. The beads can be discarded at this time.
14. Optional: Assess the quality of the DNA with an Agilent DNA1000 TapeStation and check that the electropherogram shows a distribution with a peak height between 250 and 275 bp (+/– 10%) (Figure 4). Setup the instrument and prepare the tape, samples and ladder following manufacturer’s instructions.
15. Assess the quantity using Qubit BR kit.
16. Calculate the amount of sample required for 500–750 ng (minimum 250 ng) to proceed to hybridisation. If not enough amplified sample is available repeat the PCR with the remaining elution from post-ligation.
Figure 3: Analysis of amplified prepared library DNA using an Agilent D1000 ScreenTape assay. The electropherogram shows a single peak in the size range of 200 to 275 bp (+/– 10%).
STOPPING POINT: If the samples are not to be used immediately, store at –20°C.
SureSeq NGS Library Preparation Handbook
Version 1.2: March 2016 21
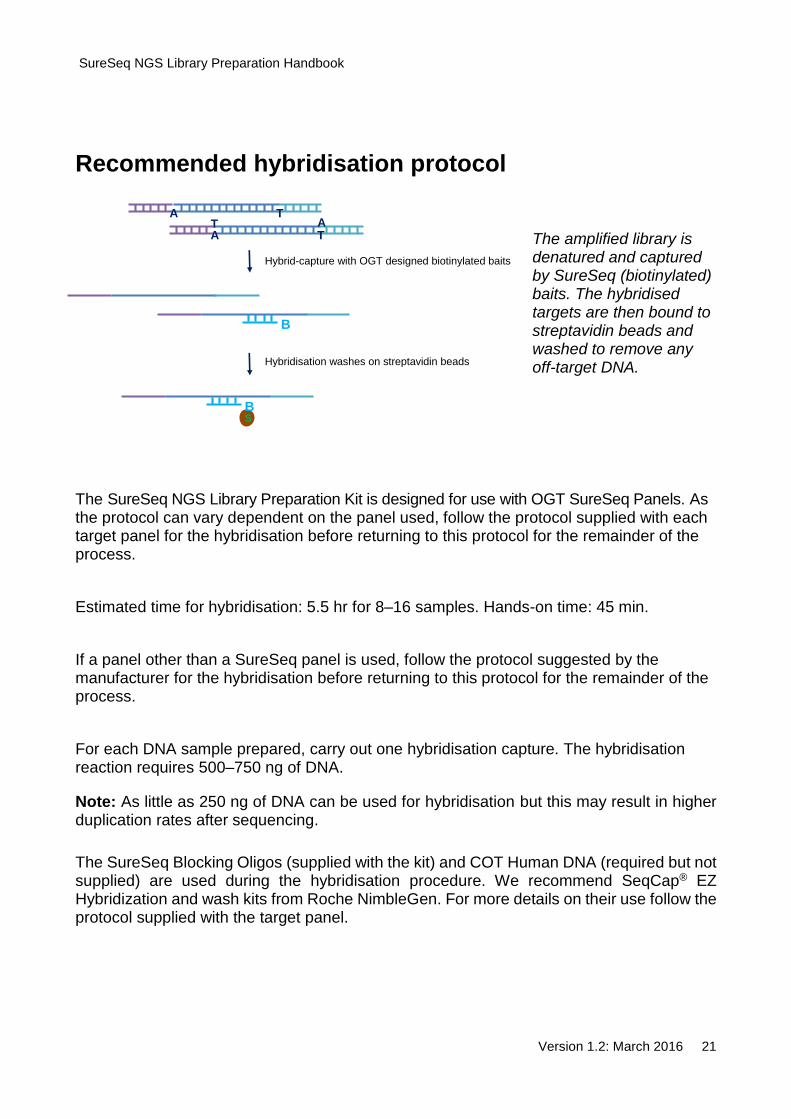
Recommended hybridisation protocol
The amplified library is denatured and captured by SureSeq (biotinylated) baits. The hybridised targets are then bound to streptavidin beads and washed to remove any off-target DNA.
The SureSeq NGS Library Preparation Kit is designed for use with OGT SureSeq Panels. As the protocol can vary dependent on the panel used, follow the protocol supplied with each target panel for the hybridisation before returning to this protocol for the remainder of the process.
Estimated time for hybridisation: 5.5 hr for 8–16 samples. Hands-on time: 45 min.
If a panel other than a SureSeq panel is used, follow the protocol suggested by the manufacturer for the hybridisation before returning to this protocol for the remainder of the process.
For each DNA sample prepared, carry out one hybridisation capture. The hybridisation reaction requires 500–750 ng of DNA.
Note: As little as 250 ng of DNA can be used for hybridisation but this may result in higher duplication rates after sequencing.
The SureSeq Blocking Oligos (supplied with the kit) and COT Human DNA (required but not supplied) are used during the hybridisation procedure. We recommend SeqCap® EZ Hybridization and wash kits from Roche NimbleGen. For more details on their use follow the protocol supplied with the target panel.
B
S
Hybrid-capture with OGT designed biotinylated baits
Hybridisation washes on streptavidin beads
A T
A T
T A
B

SureSeq NGS Library Preparation Handbook
Version 1.2: March 2016 22
Addition of indexes by post-capture PCR
After capture of target sequences, indexes are added using PCR. The index sequences identify the sample source of each sequence in the sequencing run. The dsDNA PCR products then contain both adaptor sequences and index sequences.
Estimated time: 1.75 hr for 8–16 samples. Hands-on time: 15 min.
Preparation
Remove the Step 4 reagents (purple cap) from storage (–15°C to –25°C). Place the Step 4 enzyme on ice and allow all other Step 4 reagents to thaw to room temperature.
The number of cycles (from step 2 to step 4) required can be determined using the guidelines in Table 8.
Capture size Cycle numbers
SureSeq Myeloid and Ovarian panels
20 cycles
1Kb – 0.5Mb 16+ cycles
0.5Mb – 1.49Mb 14 cycles
>1.5Mb 12 cycles
All Exon 10-12 cycles
Table 8: Cycle numbers — based on capture size of custom bait library

SureSeq NGS Library Preparation Handbook
Version 1.2: March 2016 23
Prepare PCR reaction mixes
For multiple samples, prepare the reaction mix as shown in Table 9, on ice. Mix well on a vortex mixer.
Reagent 1x library (µl) __x library (µl) 16x library (µl)
Captured DNA and Bead Slurry 14 - -
Index (1-48) 5 - -
Nuclease-free H2O 23 391
Step 4: (Purple Cap) PCR Buffer 5 85
Step 4: (Purple Cap) Primer 1 17
Step 4: (Purple Cap) DNA Polymerase
2 34
TOTAL 50 µl 527
Table 9: Components for PCR
1. Add 31 μl of the reaction mix to each well or tube.
2. Add 5 μl of the appropriate index PCR Primer (1–48, Table 15) to each well and mix by pipetting remembering to use a different index primer for each sample to be sequenced in the same lane.
Note: If the final sequencing pool is to contain less than eight samples ensure the colour balance for each base on the index read is maintained. See Low Multiplexing Guidelines on page 30 for further details.
3. Add 14 μl of each DNA sample and bead slurry to the relevant well or tube. Mix by pipetting up and down, remembering to change pipette tips between samples to avoid cross-contamination.

SureSeq NGS Library Preparation Handbook
Version 1.2: March 2016 24
Perform PCR
Set up PCR using the profile and settings below in Table 10.
1. Place the tubes in a thermal cycler and run the PCR programme.
Step Temperature
(°C) Time
1 98 3 min
2 98 30 sec
3 65 30 sec
4 72 1 min
5 Repeat Step 2 to Step 4 (for cycle numbers see Table 8)
6 72 10 min
7 4 Hold
Table 10: PCR Programme
Post-capture PCR purification
1. Use only room temperature AMPure XP beads.
2. Mix the reagent well so that the reagent appears homogeneous and consistent in colour.
3. Add 90 μl of homogenous AMPure XP beads to each post-hybridisation PCR reaction (in either 1.5 ml LoBind tubes or 0.2 ml tubes/96-well plate). Mix well using a vortex mixer (1.5 ml tube) or pipetting up and down at least 10 times (0.2 ml tubes/plate). Incubate at room temperature for 5 min.
4. Put the tube in the magnetic stand and wait for the solution to clear (which should take approximately 3–5 min).
5. Keep the tube in the magnetic stand. Do not touch the beads whilst carefully removing 130 μl of the cleared solution.
6. Continue to keep the tube in the magnetic stand/rack whilst adding ▲ 500 μl (or ● 200 μl) of 70% ethanol to each tube.
7. Let the tube sit for 1 min to allow any disturbed beads to settle, and remove the ethanol.
8. Repeat wash (step 6 and step 7).
9. After the second wash seal the tube or plate and centrifuge briefly (260 x g for 30 sec).

SureSeq NGS Library Preparation Handbook
Version 1.2: March 2016 25
10. Return the tube or plate to the magnetic stand/rack and wait 1 min. Remove any remaining ethanol using a 20 µl pipette and tip, being careful to not touch the bead pellet.
11. Dry the samples at 37°C on a heat block for 3–5 min or until the residual ethanol completely evaporates.
IMPORTANT: Do not over-dry as this will decrease yield.
Note: Bead pellet is dry when the appearance of the surface changes from shiny to matt.
12. Add 32 μl nuclease-free water directly to the bead pellet, mix well by either using a vortex mixer (1.5 ml tube) or pipetting up and down at least 10 times (0.2 ml tubes/plate). Incubate for 3 min at room temperature. Centrifuge briefly to consolidate the sample and place on a magnetic stand/rack for 2–3 min or until the solution is clear.
13. Remove approximately 30 μl of the supernatant to a fresh 1.5 ml LoBind tube. The beads can be discarded at this time.
14. Analyse amplified product size using the Agilent TapeStation (High Sensitivity Kit) or similar, to determine the peak size for each DNA sample. The electropherogram should show a peak height between 300 and 400 bp (+/– 10%) (Figure 5). Set up the instrument and prepare the chip, samples and ladder following manufacturer’s instructions.
15. Assess the PCR yield using High Sensitivity dsDNA Qubit assay. If the yield is <1 ng/μl repeat the PCR with the remaining bead slurry.
IMPORTANT: If the samples are not to be used immediately, store at –20°C.
Figure 4: Analysis of amplified capture DNA using an Agilent High Sensitivity D1000 ScreenTape assay. The electropherogram shows a peak in the size range of approximately 300–400 bp (+/– 10%).

SureSeq NGS Library Preparation Handbook
Version 1.2: March 2016 26
MiSeq sequencing
The DNA samples prepared in the previous section (Addition of indexes by post-capture PCR) need to be combined such that each index-tagged sample is present in equimolar amounts in the final pool. This requires both accurate determination of peak size (bp), provided by Agilent TapeStation (High-Sensitivity Kit), and accurate determination of sample concentration (ng/µl), provided by Life Technologies Qubit (High-Sensitivity) assay.
Preparing the sequencing pool
To determine the volume (µl) of each indexed DNA sample required generate the 4nM Sequencing Pool, use the MiSeq pooling template file provided on the USB stick (or the formulae below).
1. Complete the “Pool Parameter” and “Samples” tables in the “Pool” tab of the MiSeq pooling template. Cells in green should be modified as required; parameters marked with * must be completed.
Note: This protocol has been validated with 150-base paired-end reads using the MiSeq Reagent Kit v2 300 cycle (cat. no. MS-102-2002).
2. Add the appropriate volume of each indexed DNA sample to a fresh 1.5 ml LoBind tube labelled “4nM Sequencing Pool”; these can be found in column C of “Volumes to pipette” tab.
3. Add the amount indicated in cell C18 of the “Volumes to pipette” tab to adjust the final volume of the sequencing pool to the desired final concentration (4nM).
Note: If you store the library before sequencing, add Tween 20 to 0.1% v/v and store at –20°C short term.
4. Optional: Validation of Sequencing Pool concentration — Analyse the Sequencing Pool using an Agilent TapeStation (High Sensitivity Kit) to determine peak height. Assess concentration (ng/µl) yield using High Sensitivity Qubit assay.
5. The Sequencing Pool can now be prepared for loading on to the MiSeq. Refer to the appropriate Illumina protocol.
As cluster density can vary between machines we recommend loading a final concentration of 8–12 pM if using a V2 300 cycle kit.
Formula 1 – nM of each sample
nM = [Sample concentration (ng/µl)] x 106
([Sample size in bp] x 660) + 157.9
Formula 2 — Volume of each Indexed DNA Sample
Volume of each = Sequencing Pool volume (µl) x pool concentration (4nM) Indexed DNA Sample Number of samples in the pool x nM concentration of the sample

SureSeq NGS Library Preparation Handbook
Version 1.2: March 2016 27
Preparing the MiSeq Sample Sheet
The MiSeq Sample sheet can be created in Excel using the MiSeq pooling template provided.
1. Open the completed MiSeq pooling sheet (from “Preparing the sequencing pool”) and click on the “Sample sheet” tab
2. Highlight all cells with text as shown below. Adjust the number of rows highlighted as appropriate.
Figure 5. Example Sample sheet on the MiSeq pooling template file
3. Copy highlighted cells and paste into a new excel file.
Note: All text in red is for user and sample specific information. All text in black is required to ensure that the MiSeq will recognise the file.
4. Save the new sheet as a CSV (Comma delimited) file.
5. The file needs to be saved using the MiSeq Reagent Tray ID, which begins with MS then has 8 numbers followed by 300V2 (when running the version 2 MiSeq chemistry), e.g. MS2016935-300V2.
6. The MiSeq sample sheet can now be uploaded to the MiSeq.

SureSeq NGS Library Preparation Handbook
Version 1.2: March 2016 28
The nucleotide sequences for the indexes provided are detailed in Table 11 below. SureSeq Index kit – Collection A (16) contains the first 16 indexes, SureSeq Index kit – Collection B (48) contains all 48 indexes
Index Number
Sequence Index
Number Sequence
Index Number
Sequence
1 AACGTGAT 17 AATGCGCT 33 ACTGTAAT
2 AAACATCG 18 GACGGCGC 34 ATTCTACT
3 AGTGGTCA 19 TTAGCTCC 35 TGACCTGA
4 ACCACTGT 20 GTTCAATC 36 GCCTAAGG
5 GATAGACA 21 GAAAGGAT 37 ACTCGCTT
6 GTGTTCTA 22 AGTTCCGC 38 GCGGCGCA
7 TGGAACAA 23 ACGATCGT 39 GGAGCGAC
8 TGGTGGTA 24 CGCCTGAG 40 AGCATGTA
9 ACATTGGC 25 TTACCCTG 41 ACGGGGAA
10 CAGATCTG 26 TTCGACGA 42 ACGATGAT
11 CATCAAGT 27 TCTAGTAC 43 TAGCAGCT
12 AGTACAAG 28 AGTCGGAA 44 TGCGAGCC
13 AGATCGCA 29 ATTAGCGC 45 GGCATATC
14 GACTAGTA 30 GACTACTT 46 CTTGAATC
15 GGTGCGAA 31 ACGTATAT 47 CGCTCAGT
16 TGAAGAGA 32 AAAGTTCT 48 GAACTCGT
Table 11: Index sequences

SureSeq NGS Library Preparation Handbook
Version 1.2: March 2016 29
Low multiplexing guidelines
Illumina MiSeq and HiSeq use a red laser to sequence A/C and a green laser to sequence G/T.
To ensure accurate registration of the index read, both a red and green signal must be present at each cycle.
It is also important to maintain colour balance where possible.
If pooling less than eight samples in the final sequencing pool we suggest using the following index combinations.
Number of samples in pool Index
1 Any index
2 2 & 6
3 Option A: 4, 6 & 7
Option B: 1, 11 & 16
4 Option A: 2, 6, 10 & 14
Option B: 9, 12, 15 & 16
6 Option A: 1, 2, 4, 6, 7 & 8
Option B: 2, 8, 9, 12, 15 & 16
8 Option A: 1-8
Option B: 9-16
Table 12: Index combination guidelines

SureSeq NGS Library Preparation Handbook
Version 1.2: March 2016 30
Legal information
The SureSeq NGS Library Preparation Kit was jointly developed by Oxford Gene Technology and Bioline Reagents Limited.
This handbook and its contents are © Oxford Gene Technology (Operations) Limited 2015. All rights reserved. Reproduction of all or any substantial part of its contents in any form is prohibited except that individual users may print or save portions of the protocol for their own personal use. This licence does not permit users to incorporate the material or any substantial part of it in any other work or publication, whether in hard copy or electronic or any other form. In particular (but without limitation), no substantial part of the handbook may be distributed or copied for any commercial purpose.
NGS library prep assay The purchaser has the non-transferable right to use and consume the product for RESEARCH USE ONLY AND NOT FOR DIAGNOSTICS PROCEDURES. It is not intended for use, and should not be used, for the diagnosis, prevention, monitoring, treatment or alleviation of any disease or condition, or for the investigation of any physiological process, in any identifiable human, or for any other medical purpose.
Trademarks Trademarks: OGT™, SureSeq™, Genefficiency™ (Oxford Gene Technology); Agilent®, (Agilent Technologies Inc.); NanoDrop™, SpeedVac® (Thermo Fisher Scientific); HiSeq™, MiSeq™, NextSeq™ (Illumina Inc.); Human Cot-1 DNA®, Quant-iT™, Qubit® (Life Technologies Corp.); Covaris® (Covaris, Inc.); Dynabeads™ (Dynal Inc.); Ampure® (Backman Coulter Inc.), NimbleGen and SeqCap® (Roche).
Customer’s obligations The Customer acknowledges that Oxford Gene Technology (Operations) Limited (or its group companies) owns all intellectual property rights in the design of the Product, including the choice and configuration of the oligonucleotide sequences used in the Product. The Product may only be reproduced or manufactured by Oxford Gene Technology (Operations) Limited or with its permission.
Contact information Oxford Gene Technology, Begbroke Hill, Woodstock Road, Begbroke, Oxfordshire, OX5 1PF, UK. Oxford Gene Technology (Operations) Ltd. Registered in England No: 03845432 Begbroke Hill, Woodstock Road, Begbroke, Oxfordshire, OX5 1PF.
Tel: +44(0)1865 856826 (US: 914-467-5285)
Email: [email protected] Technical support email: [email protected]
Web: www.ogt.com

SureSeq NGS Library Preparation Handbook
Version 1.2: March 2016 31
Ordering information
Product Contents Cat. no.
SureSeq NGS Library Preparation Kit (16)
Bundle of 1 x library preparation kit (16) containing adaptors, PCR primers and enzymes sufficient for 16 samples and 1 x SureSeq NGS Index Kit – Collection A
500070
SureSeq NGS Library Preparation Kit (48)
Bundle of 3 x library preparation kit (16), containing adaptors, PCR primers and enzymes sufficient for 48 samples and 1 x SureSeq NGS Index Kit – Collection B
500073
SureSeq NGS Index Kit - Collection A
16 different indexes, each sufficient for 4 samples [included with SureSeq NGS Library Preparation Kit (16)]
500071
SureSeq NGS Index Kit - Collection B
48 different indexes, each sufficient for 4 samples [included with SureSeq NGS Library Preparation Kit (48)]
500072
Related products
SureSeq Myeloid Panel (96 reactions)
Enrichment baits sufficient for 96 samples; SureSeq Interpret Software
600076
SureSeq Myeloid Panel (16 reactions)
Enrichment baits sufficient for 16 samples; SureSeq Interpret Software
600075
SureSeq Ovarian Cancer Panel (96 reactions)
Enrichment baits sufficient for 96 samples; SureSeq Interpret Software
600074
SureSeq Ovarian Cancer Panel (16 reactions)
Enrichment baits sufficient for 16 samples; SureSeq Interpret Software
600073
For an up-to-date product list and the latest product information, visit www.ogt.com.
SureSeq NGS Library Preparation Handbook
Version 1.2: March 2016 32
Contact us
Oxford Gene Technology,
Begbroke Hill,
Woodstock Road,
Begbroke,
Oxfordshire
OX5 1PF, UK T: +44(0)1865 856826; (US: 914-467-5285) E: [email protected]; W: www.ogt.com
Technical support: E: [email protected]
T: +44(0)1865 856826
Item number: 990187