Embed Size (px)
Citation preview
Supplier Portal Guide:
Goods/Materials PO Scenario
Version 2.0 Date: February 7, 2011

Table of Contents Scenario Description:................................................................................................................................. 3
Receive PO ............................................................................................................................................. 5
View PO ............................................................................................................................................... 5
Print PO ............................................................................................................................................... 7
Perform Purchase Order Response (Acknowledgement)................................................................ 9
PO Response (Without Change) ..................................................................................................... 9
PO Response (With change – Delivery date only)........................................................................ 9
PO Response (MJN PO Change Required) .................................................................................. 9
PO Response (Partial/Complete Rejection)................................................................................... 9
Create Invoice.......................................................................................................................................11
Invoice based on PO Response/Acknowledgement...................................................................11
Invoice based on Goods Receipt ...................................................................................................16
Create Credit Memo.............................................................................................................................19
Document Search – General Reporting for Various Transactions ...............................................21
For Assistance: Customer Assistance Center (CAC): Procurement Accounts Payable
1-888-339-9491 1-888-339-9491 [email protected] [email protected]
Direct Suppliers: For Supplier Portal “how to” questions, contact your MJN Category Manager or Buyer.
Page 2 of 25

Scenario Description: A Goods type of purchase order is one that has been created for the procurement of Goods/Materials. The purchase order contains the material/part, description, price and unit of measure in the PO item.
Purchase order items created with a quantity of ‘1’ can only be acknowleged and invoiced in full. Purchase order items with a quantity greater than ‘1’ can be acknowledged and invoiced partially.
The following diagram depicts the overall transaction and document flow for a goods type of purchase order. The MJN Requester or Buyer is responsible for the transactions in Gold. Suppliers are responsible for the transactions in Blue in the Portal.
Note: This document provides the details of the steps in Blue only.
Create Shopping Cart
Create PO
GR Required?
YES Enter
Goods Receipt
Create Invoice
Invoice Posted no Block
Accounts Receivable Status
Invoice Posted with Block
Blocked Invoice Notification
Enter Goods Receipt
Accounts Receivable Status
Invoice Posted no Block
Negative Confirmation Email
Accounts Receivable Status
GR does not Exist
NO
1. View PO2. Print PO3. PO Response/ Acknowledgement
1. Invoice2. Credit Memo
Receive & Acknowledge PO
‘
Transaction Responsible Brief Description
Create Shopping Cart
MJN Requester MJN Requester creates a shopping cart. The shopping cart is created using the type ‘Material’.
Create PO MJN Buyer MJN Buyer creates the purchase order based on the purchase
Page 3 of 25

requisition from an approved shopping cart. The PO is sent to the Supplier Portal.
Receive PO & Perform PO Response/ Acknowledgement
Supplier The supplier contact who is setup in the Supplier Portal receives an email for the new/changed PO. The supplier logs into the Portal to view, print and perform a purchase order response (a.k.a., acknowledge receipt of the PO).
Note: PO Response is a required action. Failure to perform a timely and accurate PO Response will result in continued follow-up by the MJN Procurement team and also prevent any subsequent transactions such as goods receipt and invoicing.
Create Invoice/ Credit Memo
Supplier The supplier submits the invoice once the actual goods or materials have been delivered to the MJN Requester.
Note: In order to ensure timely and accurate payment of the invoice, suppliers should submit the invoice based on the goods receipt, if a GR is required for the PO. The supplier can always submit the invoice based on the PO response/ acknowledgement. However, these invoices could be blocked for payment until the MJN Requester performs a GR in the system if the PO requires a goods receipt.
Enter Goods Receipt
MJN Requester/ Receiver
MJN Requester/Goods Recipient performs the goods receipt entry for POs that require a GR.
Blocked Invoice Notifications to the MJN Requester will indicate that an invoice has been received and posted in blocked status and requires a GR for the invoice to clear.
Accounts Receivable Status
Supplier Suppliers can view the status of payment and open invoices.
This section is described in more detail in the training document entitled: “Supplier Portal Guide – Accounts Receivable Status”
Glossary of Terms and Abbreviations used in this document :
Term Description
Goods/Material PO Goods/Material POs refer to purchase orders that have been created for ‘Material’ type of items.
SC Shopping Cart
PO Purchase Order
MJN Mead Johnson Nutrition
Blocked Invoice Notification to MJN Requester/Buyer when invoices are posted with a block due to lack of quantity (GR) or incorrect price. Upon performing the GR or
Page 4 of 25

Notification updating the price on the PO, the block is cleared.
Negative Confirmation Email
Notification to MJN Requester for PO items that do not require a GR. The invoice will be paid as per payment terms unless the MJN Requester responds to the email instructing MJN A/P to stop payment (for e.g., if the goods were not yet received).
MJN Requester The business or contact person at MJN who has requested or created the shopping cart for the goods/services in the MJN eBuy system.
MJN Buyer The buyer who has created the purchase order based on the purchase requisition from an approved shopping cart.
Pre-Requisites:
1. Supplier is setup on the MJN Supplier Portal. Portal URL and access (User ID and Password) has been provided to the supplier. For any new supplier setup and access requests please refer to the “Supplier Request for Portal Access Form” which is located on the MJN Supplier Resource page at http://www.mjn.com/supplierlink/.
2. Supplier is able to login to the Portal and is able to view all web pages. For any technical issues related to internet browser settings, pop-ups, firewall/network settings or security network rules which prevent you from being able to properly view the Portal web pages, refer to the “Technical Troubleshooting” document. If required, contact your company’s Technical Support team to ensure that all web pages in the Supplier Portal are functioning properly.
Receive PO
View PO
1. Email Notification from Supplier Portal
Once a new or changed PO has been created and released to your company, an email notification will be sent to the email address which you have provided to MJN. Below is an example of the email notification:
2. Login to the Supplier Portal
Page 5 of 25

Login to the Supplier Portal by either clicking the link contained in the email notification, or copy and paste the following URL into your internet browser:
http://mjnportal.net.mjn.com:50000
Note: Please add this URL to your Favorites.
3. The URL will take you to the Login Screen. Enter your (1) User ID and (2) Password, and then Click (3) Log on.
4. Click on (1) Purchase Order Collaboration and then (2) Supplier Self Services.
1
2
5. This will take you to the ‘Start Page’ of the Document Collaboration Cockpit in the Supplier Portal.
Click ‘New’ to display all the new purchase orders. Click ‘Changed’ to display purchase orders that were changed.
Page 6 of 25

6. The ‘List of Purchase Orders’ is displayed. Click on the ‘Document Number’ to view the details of a PO.
Print PO
1. To print the PO click ‘Print’ in the ‘Display Purchase Order’ screen. Note: The transactions required for a given purchase order are listed in the field called ‘Requested Follow-On Documents’. In the example below, a Purchase Order Response, Goods Receipt, and Invoice are required for this PO.
Page 7 of 25

2. Another window will pop-up. Click ‘Save’ to save the zip file to your local hard drive. The zip file will contain the PO in a PDF format.
Note: Your Internet Browser may prevent you from downloading the file because of your browser settings. If this occurs refer to the “Technical Troubleshooting” document and contact your company’s Technical Support if required.
Page 8 of 25

3. Double-click on the saved PDF file to open and view the purchase order.
Perform Purchase Order Response (Acknowledgement) 1. Login to the Portal with your User ID and Password.
2. Click ‘Purchase Order Collaboration’ and then ‘Supplier Self Services’.
3. Open the PO you want to acknowledge.
4. Click ‘Process’
Review the purchase order details such as the item description, delivery date, price, quantity and unit of
measure.
PO Response (Without Change)
To accept the PO “as is” click on ‘Confirm All Items’ .
PO Response (With change – Delivery date only) If the ‘Required on’ (delivery date) is in the past, or if you require a different date, update the ‘Confirmed
for’ date click on ‘Confirm’ for the line item(s). The Buyer must agree to the dates proposed and issue a PO change which will require your response/acknowledgement before proceeding further. IMPORTANT: In case the delivery date is in the past please update to a date in the future to avoid error messages during the send.
PO Response (MJN PO Change Required)
If you find a discrepancy with any other PO information then do not make a selection in the system.
Please contact the Buyer listed on the purchase order. Once they issue the PO change it will require
your response/acknowledgement before proceeding further.
PO Response (Partial/Complete Rejection)
Do not use the line item level rejection icon or the ‘Reject All Items’ button. If you
need to reject a line item or have an order cancelled, do not make a selection in the system. Instead,
contact the buyer to initiate a partial or full PO cancellation.
Page 9 of 25

If acknowledging a PO without change, click ‘Confirm All Items’ and a Green Button will display as
5. Click the ‘Send’ pushbutton to submit the PO response/acknowledgement.
A confirmation will display in GREEN like below with the ‘Status’ updated to ‘Confirmed.’
Additional Notes related to PO Response/Acknowledgement:
You may encounter warning messages when processing a PO response/acknowledgement.
Messages displayed with a yellow triangle are soft warning messages and the system will not prevent
you from submitting the PO response.
Warning messages displayed with a red ! icon are a hard stop and will prevent you from submitting
the PO response/acknowledgement.
Page 10 of 25

For example, you will receive the error message above if you clicked the ‘Send’ pushbutton before
acknowledging the items. In this case you need to go back and acknowledge at least one or all items
before clicking the ‘Send’ pushbutton.
Create Invoice IMPORTANT: Portal suppliers must submit invoices through the portal. Hard-copy invoices will be
rejected.
Invoice based on PO Response/Acknowledgement
1. Login to the Portal with your User ID and Password.
2. Click ‘Purchase Order Collaboration’ and then ‘Supplier Self Services’.
3. Click on ‘Confirmed’ in the ‘All Purchase Orders’ section.
4. Click on ‘Create’ in the ‘All Invoices and Credit Memos’ section.
5. Choose the option ‘For a Purchase Order’.
6. Click on the ‘Document Number’ to open the confirmed purchase order for invoicing.
IMPORTANT: Please ensure that the ‘Status’ of the document number is “Confirmed” in order to
prevent processing errors which may delay payment.
Page 11 of 25

7. Click on ‘Create Invoice’
The system will default the values from the PO response/acknowledgement.
Page 12 of 25
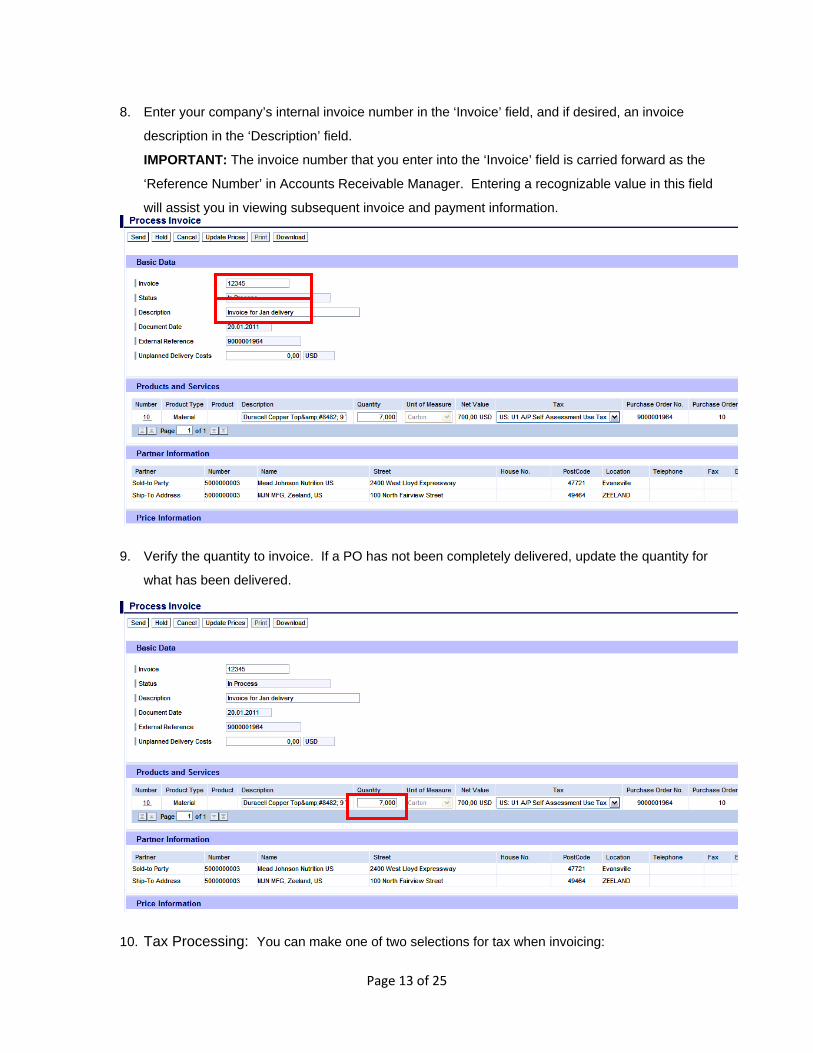
8. Enter your company’s internal invoice number in the ‘Invoice’ field, and if desired, an invoice
description in the ‘Description’ field.
IMPORTANT: The invoice number that you enter into the ‘Invoice’ field is carried forward as the
‘Reference Number’ in Accounts Receivable Manager. Entering a recognizable value in this field
will assist you in viewing subsequent invoice and payment information.
9. Verify the quantity to invoice. If a PO has not been completely delivered, update the quantity for
what has been delivered.
10. Tax Processing: You can make one of two selections for tax when invoicing:
Page 13 of 25

• Use Tax Code I1 if tax is billed on the invoice
• Use Tax Code U1 if no tax is billed on the invoice
Note that the system will only support one tax code and rate per item.
The screen below provides the drop-down for where you can make the tax code selection, in
addition to where you can enter the tax amount when using Tax Code I1. If you enter a tax
amount click ‘Update Prices’ to refresh the screen.
11. If you are a Canadian vendor submitting an invoice for MJN Canada Company, you must select
the appropriate tax code using the drop-down and enter the tax amount for the invoice Net Value.
Click ‘Update Prices’ to refresh the screen.
Page 14 of 25

12. Optional Step: To update the item price to a lower amount, click on the line item ‘Number’ as
shown above to get to the item details. Enter the ‘Net Value’ and then click ‘Update Prices’. Click
‘Back to Item Overview’ to return to the previous screen.
Caution: You can only change the price to a lower amount. If you increase the price the system will
generate a red ! hard stop warning message and prevent you from submitting the invoice.
13. Optional Step: Enter the amount which resulted from Unplanned Delivery Costs. Click ‘Update
Prices’ to refresh the screen.
Page 15 of 25

14. Click for the invoice to post in the system.
Caution: Before sending the invoice, verify that the invoice Net Value is greater than zero. Posting
invoices with a zero amount will cause rework as those invoices must be cancelled.
15. The successful message will display indicating the invoice was successfully submitted.
Invoice based on Goods Receipt
1. Click on ‘Create’ in the ‘All Invoices and Credit Memos’ section.
2. Click on ‘for a Goods Receipt’
Page 16 of 25

3. The Goods Receipt List is displayed. Click on the ‘Document Number’ to view the details.
4. Click on ‘Accept’ to accept the goods receipt
Page 17 of 25

5. Click on ‘Create Invoice’
6. The details of the invoice will display based on the data from the accepted goods receipt.
7. Follow the instructions above in above section entitled “Create Invoice > Based on PO Response/
Acknowledgement” in order to review, update, and submit the invoice.
Page 18 of 25

Invoice status values – Brief description
In Process: This status is set automatically when an invoice is created. This status remains as long as the invoice is not sent by the supplier.
Document Sent: This status is set automatically when you choose Send. The invoice is sent to MJN A/P.
Accepted by Customer: A supplier can choose to set this status manually if MJN has accepted the invoice. This status is not reflected in the AP system nor set automatically on the Portal.
Rejected by Customer: A supplier can choose to set this status manually if MJN has rejected the invoice. This status is not reflected in the AP system nor set automatically on the Portal.
Note: In the case where an invoice must be resubmitted, the supplier must set the status on the original invoice to ‘Rejected by Customer’ in order to submit a new invoice for the same purchase order response or goods receipt. Please note that in exceptional situations MJN Accounts Payable may contact you to resubmit an invoice that fails to post.
Payment Made: A supplier can choose to set this status manually if MJN has initiated payment. This status is not reflected in the AP system nor set automatically on the Portal. Caution: When a status is manually set it can not be changed back to the previous status. For example, it is absolutely necessary to verify that a posted invoice is ‘Free for Payment’ under the Accounts Receivable Manager tab before setting an invoice status to ‘Accepted by Customer’.
Create Credit Memo Certain situations warrant the need to create a credit memo for an invoice, such as when goods have been returned or an incorrect invoice amount was submitted and paid. Suppliers can create a credit memo against the original invoice.
Note: When a credit memo is submitted it will require a payment due to MJN from the supplier, unless that supplier has other invoices issued to MJN to offset the credit.
1. Login to the Portal and enter your User ID and Password.
2. Click ‘Purchase Order Collaboration’ and then ‘Supplier Self Services’.
3. Click on ‘All Invoices and Credit Memos’
Page 19 of 25
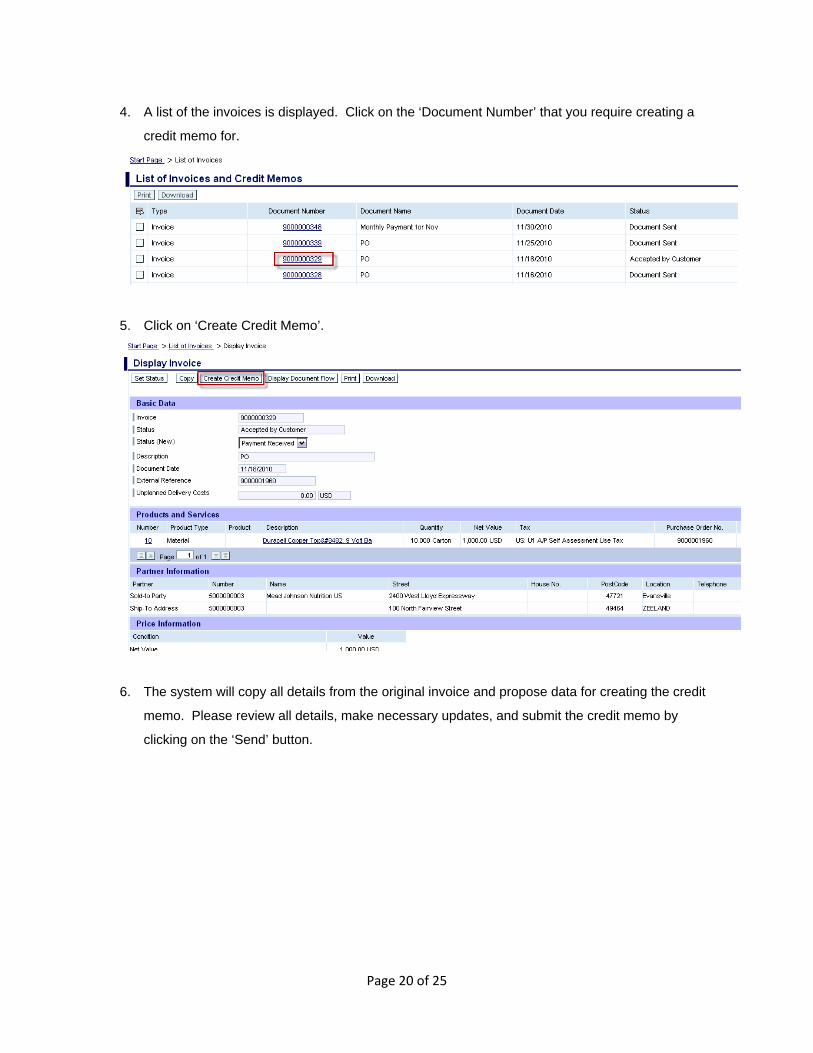
4. A list of the invoices is displayed. Click on the ‘Document Number’ that you require creating a
credit memo for.
5. Click on ‘Create Credit Memo’.
6. The system will copy all details from the original invoice and propose data for creating the credit
memo. Please review all details, make necessary updates, and submit the credit memo by
clicking on the ‘Send’ button.
Page 20 of 25

7. The following message indicates that the credit memo is successfully created.
Document Search – General Reporting for Various Transactions The Supplier Portal provides the ability to search for various documents like Purchase Orders, Confirmations, Invoices or Credit memos, and Goods Receipts based on various criteria. This provides a simple and flexible way to search for documents with the ability to download data.
1. Login to the Portal with your User ID and Password. 2. Click ‘Purchase Order Collaboration’ and then ‘Supplier Self Services’. 3. Click on ‘Document Search’.
Page 21 of 25

a. Click the drop-down for ‘Type’ to display the type of document being searched.
Note: While other options may display, the MJN transactions are: Purchase order,
Confirmation, Invoice or Credit Memo, and Goods Receipt. If you select a different
transaction type the search will result in no output.
Page 22 of 25

b. Click on ‘Timeframe’ to restrict the search for a specific timeframe.
c. Optionally you can enter a specific date using the ‘Created After’ field to display all
documents created after a specific date.
d. Optionally you can search for a specific document using the ‘Document Number’ field.
4. Select the ‘Find’ pushbutton to display the search results.
Page 23 of 25

5. Select the ‘Document Selection’ icon and choose ‘Select All’ in the list to highlight the rows to be
selected. Click on the ‘Download’ pushbutton to download the document data.
Note: A ‘.csv’ and ‘.xml’ file will download for each of the documents selected.
6. Depending on the Internet Browser version and the local user settings for downloading files, the
screen below may appear different. The example below is from Firefox browser version 3.2.
Click on the ‘OK’ pushbutton to save the zip file to your local directory.
Page 24 of 25

7. In this case the file is downloaded to the default download directory that you have setup in
Firefox.
END-OF-DOCUMENT
Page 25 of 25