Embed Size (px)
DESCRIPTION
manual
Citation preview

Citrix XenServer ® 6.1.0 Supplemental Packs & the DDK
Published Tuesday, 25 September 20121.0 Edition
Citrix XenServer ® 6.1.0 Supplemental Packs & the DDK
Copyright © 2012 Citrix Systems. Inc. All Rights Reserved.Version: 6.1.0
Citrix, Inc.851 West Cypress Creek RoadFort Lauderdale, FL 33309United States of America
DisclaimersThis document is furnished "AS IS." Citrix, Inc. disclaims all warranties regarding the contents of this document,including, but not limited to, implied warranties of merchantability and fitness for any particular purpose. Thisdocument may contain technical or other inaccuracies or typographical errors. Citrix, Inc. reserves the right torevise the information in this document at any time without notice. This document and the software describedin this document constitute confidential information of Citrix, Inc. and its licensors, and are furnished under alicense from Citrix, Inc.
Citrix Systems, Inc., the Citrix logo, Citrix XenServer and Citrix XenCenter, are trademarks of Citrix Systems, Inc.and/or one or more of its subsidiaries, and may be registered in the United States Patent and Trademark Officeand in other countries. All other trademarks and registered trademarks are property of their respective owners.
TrademarksCitrix®XenServer ®XenCenter ®
iii
Contents
1. Introduction ................................................................................................... 1
1.1. Purpose of supplemental packs .................................................................................... 1
1.2. Why a separate DDK? .................................................................................................. 1
1.3. Benefits ....................................................................................................................... 1
1.4. What should (not) be in a supplemental pack? .............................................................. 2
2. Getting started .............................................................................................. 4
2.1. Introduction ................................................................................................................ 4
2.2. Installing XenServer ..................................................................................................... 4
2.3. Installing XenCenter ..................................................................................................... 4
2.4. Connect XenCenter to the XenServer host ..................................................................... 4
2.5. Importing the DDK VM through XenCenter .................................................................... 4
2.6. Importing the DDK VM using the CLI ............................................................................ 5
2.7. Using the DDK VM ....................................................................................................... 5
2.8. Adding Extra Packages to the DDK VM .......................................................................... 5
2.9. Accessing the DDK VM console from the host console ................................................... 5
3. Building the example packs .......................................................................... 7
4. Installing packs .............................................................................................. 8
4.1. At installation time ...................................................................................................... 8
4.2. On a running host ........................................................................................................ 8
4.3. Driver-specific considerations ....................................................................................... 8
5. Producing driver RPMs ................................................................................ 10
5.1. Directory structure ..................................................................................................... 10
5.2. Makefile variables ...................................................................................................... 10
5.3. Creating the kernel module specification file ............................................................... 11
5.4. Building the modules ................................................................................................. 11
5.5. Including driver RPMs in supplemental packs .............................................................. 11
5.6. Format for releasing drivers ........................................................................................ 12
5.7. Releasing multiple drivers in a single pack ................................................................... 12
iv
6. Creating a supplemental pack ..................................................................... 13
6.1. Syntax of build-supplemental-pack.sh .......................................................................... 13
6.1.1. Name, vendor, and version information ............................................................ 13
6.1.2. Memory requirements ..................................................................................... 13
6.1.3. Declaring pack dependencies ........................................................................... 14
6.2. Order of RPM installation ........................................................................................... 14
6.3. Pack homogeneity ...................................................................................................... 14
6.4. A brief example ......................................................................................................... 14
6.5. Adding files to Server Status Reports .......................................................................... 15
6.5.1. Extending an existing category ......................................................................... 15
6.5.2. Adding new categories .................................................................................... 17
6.6. Combining multiple packs into one ............................................................................. 18
6.7. Automating pack installation at XenServer installation time .......................................... 18
6.7.1. Combining a pack with the XenServer installation ISO ........................................ 18
6.7.2. Including an answerfile on the XenServer installation ISO .................................. 19
6.8. Pack-specific EULAs .................................................................................................... 19
7. Rules and guidelines ................................................................................... 21
7.1. Kernel modules .......................................................................................................... 21
7.2. Post-install scripts ...................................................................................................... 21
7.3. Handling upgrades ..................................................................................................... 22
7.3.1. Pack upgrade during a XenServer upgrade ........................................................ 22
7.3.2. Pack upgrade on an existing XenServer installation ............................................ 22
7.4. Uninstallation ............................................................................................................ 22
7.5. Building packs in existing build environments .............................................................. 23
7.6. Packaging driver firmware .......................................................................................... 23
7.7. Versioning .................................................................................................................. 24
7.7.1. Supplemental packs ......................................................................................... 24
7.7.2. Kernel modules ............................................................................................... 24
7.8. Packages compiled by, but not in, XenServer ............................................................... 25
7.9. Requirements for submission of drivers for inclusion in XenServer ................................ 25
7.10. Does XenServer already include a driver for my device? ............................................. 26
v
8. Testing & certification ................................................................................. 27
8.1. Testing overview ........................................................................................................ 27
8.2. Testing scope ............................................................................................................. 27
8.3. Running tests ............................................................................................................. 27
8.4. Tests that require an integrated build .......................................................................... 28
8.5. Certification & support ............................................................................................... 28
8.5.1. Drivers ............................................................................................................ 28
8.5.2. Userspace software ......................................................................................... 28
9. Additional Resources ................................................................................... 30
9.1. Introduction ............................................................................................................... 30
9.2. Xen API plug-ins ......................................................................................................... 30
9.3. XenCenter plug-ins ..................................................................................................... 30
9.4. XenServer SDK ........................................................................................................... 30
1
Chapter 1. IntroductionSupplemental packs are used to modify and extend the functionality of a XenServer host, by installing softwareinto the control domain, dom0. For example, an OEM partner might wish to ship XenServer with a suite ofmanagement tools that require SNMP agents to be installed, or provide a driver that supports the latest hardware.Users can add supplemental packs either during initial XenServer installation, or at any time afterwards. Facilitiesalso exist for OEM partners to add their supplemental packs to the XenServer installation repositories, in orderto allow automated factory installations.
1.1. Purpose of supplemental packsSupplemental packs consist of a number of packages along with information describing their relationship to otherpacks. Individual packages are in the Red Hat RPM file format, and must be able to install and uninstall cleanlyon a fresh installation of XenServer.
Packs are created using the XenServer Driver Development Kit (DDK). This has been extended to not only allowthe creation of supplemental packs containing only drivers (also known as driver disks), but also packs containinguserspace software to be installed into dom0.
Examples and tools are included in the XenServer DDK to help developers create their own supplemental packs.However, for partners wishing to integrate pack creation into their existing build environments, only a few scriptstaken from the DDK are necessary.
1.2. Why a separate DDK?XenServer is based on a standard Linux distribution, but for performance, maintainability, and compatibilityreasons ad-hoc modifications to the core Linux components are not supported. As a result, operations that requirerecompiling drivers for the Linux kernel require formal guidance from Citrix, which the DDK provides. In addition,the DDK provides the necessary compile infrastructure to achieve this, whereas a XenServer installation does not.
XenServer integrates the latest device support from kernel.org on a regular basis to provide a current set ofdevice drivers. However, assuming appropriate redistribution agreements can be reached, there are situationswhere including additional device drivers in the shipping XenServer product, such as drivers not availablethrough kernel.org, or drivers that have functionality not available through kernel.org, is greatly beneficial tojoint customers of Citrix and the device manufacturer. The same benefits can apply by supplying device driversindependent of the XenServer product.
In addition, components such as command line interfaces (CLIs) for configuring and managing devices arealso very valuable to include in the shipped XenServer product. Some of these components are simple binaryRPM installs, but in many cases they are combined with the full driver installation making them difficult orimpossible for administrators to install into XenServer. In either case including current versions of everything theadministrator requires to use the device on XenServer in a supplemental pack provides significant value.
The DDK allows driver vendors to perform the necessary packaging and compilation steps with the XenServerkernel, which is not possible with the XenServer product alone. Supplemental packs can be used to package upboth drivers and userspace tools into one convenient ISO that can be easily installed by XenServer users.
1.3. BenefitsSupplemental packs have a variety of benefits over and above partners producing their own methods for installingadd-on software into XenServer:
• Integration with the XenServer installer: users are prompted to provide any extra drivers or supplemental packsat installation time. In addition, on upgrade, users are provided with a list of currently installed packs, andwarned that they may require a new version of them that is compatible with the new version of XenServer.
2
• Flexibility in release cycles: partners are no longer tied to only releasing updates to their add-on softwarewhenever new versions of XenServer are released. Instead, partners are free to release as often as they choose.The only constraint is the need to test packs on the newest version of XenServer when it is released.
• Integration with Server Status Reports: supplemental pack metadata can include lists of files (or commands tobe run) that should be collected when a Server Status Report is collected using XenCenter. Pack authors canchoose to create new categories, or add to existing ones, to provide more user-friendly bug reporting.
• Ensure homogeneity across resource pools: the metadata of a supplemental pack can state that it be installedon all XenServer hosts in a resource pool. This helps partners prevent inconsistencies in the user experienceacross a pool.
• Include formal dependency information: pack metadata can detail installation requirements such as whichversions of XenServer the pack can be installed upon.
• Ensure dom0 memory provision: packs can request that the memory allocation of dom0, where the contentsof the pack will be running, be increased to cope with the software in the pack. This will prevent resourcestarvation in dom0.
• Inclusion in XenCenter check for updates: it is expected that XenCenter will soon have the facility to check forupdates for any supplemental packs that are installed on XenServer hosts. This will aid partners in providingsecurity and functionality updates to their customers.
• Inclusion in the Citrix Ready catalogue: partners whose supplemental packs meet certain certification criteriawill be allowed to list their packs in the Citrix Ready online catalogue, thus increasing their visibility in themarketplace. Note that partners must become members of the program before their packs can be listed: theentry level category of membership is fee-free.
1.4. What should (not) be in a supplemental pack?Citrix recognises that partner organizations can contribute significant value to the XenServer product by buildingsolutions upon it. Examples include host management and monitoring tools, backup utilities, and device-specificfirmware. In many cases, some of these solutions will need to be hosted in the XenServer control domain, dom0,generally because they need privileged access to the hardware.
Whilst supplemental packs provide the mechanism for installing components into dom0, pack authors should tryto install as little as possible using packs. Instead, the majority of partner software should be placed into appliancevirtual machines, which have the advantage that the operating system environment can be configured exactly asrequired by the software to be run in them.
The reasons for this stipulation are:
• XenServer stability and QA: Citrix invests considerable resources in testing the stability of XenServer. Significantmodifications to dom0 are likely to have unpredictable effects on the performance of the product, particularlyif they are resource-hungry.
• Supportability: the XenServer control domain is well-known to Citrix support teams. If it is heavily modified,dom0 becomes very difficult to identify whether the cause of the problem is a component of XenServer, or dueto a supplemental pack. In many cases, customers may be asked to reproduce the problem on an unmodifiedversion of XenServer, which can cause customer dissatisfaction with the organization whose pack has beeninstalled. Similarly, when a pack author is asked to debug a problem perceived to be with their pack, havingthe majority of the components of the pack in an appliance VM of known/static configuration can significantlyease diagnosis.
• Resource starvation: dom0 is limited in memory (maximum 752 MB) and processing power (four virtual CPUs).If resource-hungry processes are installed by a supplemental pack, resource starvation can occur. This canimpact both XenServer stability and the correct functioning of the supplemental pack. Note that Citrix doesnot advise increasing the number of dom0 vCPUs.
• Security: XenServer dom0 is designed to ensure the security of the hosts that it is installed on to. Any securityissues found in software that is installed into dom0 can mean that the host is open to compromise. Hence, thesmaller the quantity of software installed into dom0 by a pack, the lower the likelihood that XenServer hostswill be compromised due to a flaw in the software of the pack.
3
Partners often ask whether supplemental packs can include heavy-weight software, such as the Java runtimeenvironment, or a web server. This type of component is not suitable for inclusion in dom0, and should insteadbe placed in an appliance VM. In many cases, the functionality that is desired can be achieved using such anappliance VM, in conjunction with the Xen API. Citrix can provide advice to partners in such cases.
4
Chapter 2. Getting started2.1. IntroductionThis chapter describes how to setup a base XenServer system, running a DDK Virtual Machine (VM), for examiningthe examples provided in this document, and for use in the development of supplemental packs. Partners whowish to construct supplemental packs as part of their own build systems should consult the appropriate section,later in this document.
The high-level process of setting up a DDK VM to create a supplemental pack is:
1. Obtain matching XenServer product and DDK build ISOs.
2. Install XenServer onto a host server.
3. Install the XenCenter administrator console onto a Windows-based machine.
4. Use XenCenter to import the DDK onto the XenServer host as a new virtual machine.
2.2. Installing XenServerInstalling XenServer only requires booting from the CD-ROM image, and answering a few basic questions. Aftersetup completes, take note of the host IP address shown, as it is required for connection from XenCenter.
Note:
Intel VT or AMD-V CPU support is required to run Windows guests, but is not required in orderto use the DDK, nor for testing drivers in the XenServer control domain (dom0).
2.3. Installing XenCenterXenCenter, the XenServer administration console, must be installed on a separate Windows-based machine.Inserting the XenServer installation CD will run the XenCenter installer automatically. Once installed, theXenCenter console will be displayed with no servers connected.
2.4. Connect XenCenter to the XenServer hostWithin XenCenter select the Server > Add menu option and supply the appropriate host name/IP address andpassword for the XenServer host.
Select the newly connected host in the left-hand tree view.
2.5. Importing the DDK VM through XenCenterNote:
You can also import the DDK directly on the host using the xe Command Line Interface (CLI).
• Insert the DDK CD into the CD-ROM drive of the machine running XenCenter.
• On the VM menu, select the Import option. The VM Import Wizard is displayed.
• Click Browse and on the Files of type drop-down list, select XenServer Virtual Appliance Version 1 (ova.xml).
• Navigate to the DDK CD-ROM and select the ova.xml file within the DDK directory.
• Click Next to use the defaults on the Home Server and Storage pages.
• On the Network page, add a virtual network interface to the VM.
• Finish the VM Import Wizard.
5
The DDK VM will be started automatically.
2.6. Importing the DDK VM using the CLIThe DDK VM can also be imported directly on the XenServer host using the xe CLI and standard Linux commandsto mount the DDK ISO.
• Mount the DDK ISO and import the DDK VM:
mkdir -p /mnt/tmpmount <path_to_DDK_ISO>/ddk.iso /mnt/tmp –o loopxe vm-import filename=/mnt/tmp/ddk/ova.xml
The universally unique identifier (UUID) of the DDK VM is returned when the import completes.
• Add a virtual network interface to the DDK VM:
xe network-list
Note the UUID of the appropriate network to use with the DDK VM, typically this will be the network with aname-label of Pool-wide network associated with eth0.
xe vif-create network-uuid=<network_uuid> vm-uuid=<ddk_vm_uuid> device=0
Note:
Use tab completion to avoid entering more than the first couple of characters of the UUIDs.
2.7. Using the DDK VMAfter the import process completes, the DDK VM will be started automatically. Select the VM in the left paneand then select the Console tab in the right pane to display the console of the DDK VM to provide a terminalwindow in which you can work.
The DDK VM is Linux-based so you are free to use other methods such as ssh to access the DDK VM. You can alsoaccess the DDK VM console directly from the host console.
2.8. Adding Extra Packages to the DDK VMThe DDK is built to be as close as possible to the XenServer control domain (Dom0). This means that only a smallnumber of extra packages are present in the DDK (to enable the compilation of kernel modules) as compared toDom0. In some cases, partners who wish to use the DDK as a build environment may wish to add extra packages(e.g. NIS authentication) to the DDK.
Because the DDK (and Dom0) are based on CentOS, any package that is available for that distribution can beinstalled into the DDK, using the Yum package manager. However, it is necessary to explicitly enable the CentOSrepositories to allow such installation. Package installation must therefore be carried out using the command:
yum --disablerepo=citrix --enablerepo=base,updates install <packageName>
2.9. Accessing the DDK VM console from the host consoleThe DDK VM text console can be accessed directly from the XenServer host console instead of using XenCenter.Note that using this method disables access to the DDK console from XenCenter.
• While the DDK VM is shut down, disable VNC access on the VM record:
xe vm-param-set uuid=<ddk_vm_uuid> other-config:disable_pv_vnc=1
• Start the VM
xe vm-start uuid=<ddk_vm_uuid>

6
• Retrieve the underlying domain ID of the VM:
xe vm-list params=dom-id uuid=<ddk_vm_uuid> --minimal
• Connect to the VM text console:
/usr/lib/xen/bin/xenconsole <dom-id>
• When complete, exit the xenconsole session using CTRL-]
For more information on using with the xe CLI please see the XenServer Administrator's Guide, available online.
7
Chapter 3. Building the example packsA number of examples are supplied in the DDK under /root/examples. These include:
• Userspace: a simple example of a pack containing only programs and files that relate to a userspace.
• Driver: a simple kernel driver.
• Combined: an example which contains kernel and userspace files.
There are specific rules for packaging kernel device drivers. Please refer to Chapter 7, Rules and guidelines fordetails.
Within each directory there is a:
• Source tree: a directory containing a collection of files.
• Specification file: a file that describes how to build an RPM.
• Makefile: a file used to automate the creation of a supplemental pack.
To build a specific example, use the following commands:
cd /root/example/<dir>make build-srctarballsmake build-iso
This will result in the following files being created:
• <pack>.iso - the supplemental pack CD image.
• <pack>metadata.md5 - a fingerprint to be used to verify the integrity of a pack at installation time.
• <pack>.iso.md5 - a fingerprint which can be used to verify the integrity of the ISO at download time.
Where <pack> is the name of the pack.
8
Chapter 4. Installing packs4.1. At installation timeYou can install supplemental packs while installing XenServer on a host in one of two ways:
1. From a CD – during an interactive installation from local media you will be asked if you want to install anysupplemental packs. Any number of packs can be installed in succession.
2. From a Network repository – a HTTP, FTP or NFS repository can be expanded to include one or moresupplemental packs. See the XenServer Installation Guide for instructions on how to extract a supplementalpack to a directory.
If a driver needs to be loaded from a supplemental pack before the XenServer installation can proceed (forexample, to support a new RAID controller), then the user should press the F9 key when prompted by the installer.The media containing the supplemental pack/driver disk can then be provided, and the installer will attempt toload the new driver.
The XenServer installer will allow the user to choose to verify a pack before it is installed. The installer will calculatethe MD5 sum of the metadata of the pack, and present the checksum to the user. The user should then verify thatthe checksum is identical to that distributed with the pack. Pack authors should note that two MD5 checksumsare produced when a supplemental pack is created: one for the metadata of the pack (as described above), andanother for the entire ISO that constitutes the pack.
4.2. On a running hostEach supplemental pack contains an installation script. To install a pack on a XenServer host, copy it to the hostand run the script:
mkdir /tmp/isomount -o loop <pack.iso> /tmp/isocd /tmp/iso./install.shcdumount /tmp/iso
where <pack.iso> is the name of the ISO file containing the pack.
Of course, it is also possible to burn the ISO to physical media, and install from there.
4.3. Driver-specific considerationsThe XenServer installer, when booted, loads kernel modules that are appropriate to the hardware it has detected.If the newer version of a driver is needed in order for the installation to proceed, then the installer version ofthe module must be unloaded, and the new driver loaded from a supplemental pack/driver disk. The procedurefor this is as follows:
1. Reboot the host, leaving the XenServer installation CD-ROM in the drive.
2. At the boot: prompt, type:
shell
3. You will now be presented with a command prompt. Type the following:
rmmod <driver-name>
Where <driver-name> is the name of the driver to be replaced. If this command succeeds (that is, if thereare no error messages printed), the installer version of the driver has been unloaded. If error messages arepresented, it is likely that other drivers depend on the driver you are attempting to unload. If this is the case,please contact Citrix support.
9
4. Type
exit
or press Control+D on your keyboard, to return to the installer.
5. In the installer, press the F9 key when prompted to provide the driver disk, which should now load correctly.
10
Chapter 5. Producing driver RPMsIn order to produce a supplemental pack that contains kernel modules (drivers), the DDK must be used to compilethe driver(s) from their source code, against the two XenServer kernels, namely kdump and xen. This chapterdescribes how this may be done.
5.1. Directory structureAlthough the examples located in the /root/examples/ directory contain various subdirectories, in practice,most supplemental pack authors will not use this structure. The following example considers a supplemental packthat contains both kernel modules and userspace components (as the combined example does).
In the combined case, two RPMs will be created, one containing the kernel modules, and the other the "data"or userspace portions (configuration files, firmware, modprobe rules). Hence, two specification files are present,which specify the contents of each RPM that is to be created.
The kernel driver source code should be placed in the /usr/src/redhat/SOURCES/ directory as a tararchive (may be gzipped or bzip2 compressed), whose name should be of the format <module-name>-<module-version>. Meanwhile, the specification files for the RPMs to be created will be stored in adirectory elsewhere. Citrix recommends authors make a copy of the specification files and Makefile found in theexamples/combined/ directory as a starting point. The Makefile contains various useful build targets thatcan be adjusted for the kernel module sources being used.
Note:
The example driver disks use the build-srctarballs Makefile target to copy thesources from the example directory to /usr/src/redhat/SOURCES/.
All non-kernel module components should be placed in a directory named <module-name>-data-<version>, for example, helloworld-data-1.0. The corresponding specification file would behelloworld-data.spec. It is suggested that this subdirectory be placed in the same directory as thespecification files.
5.2. Makefile variablesThe Makefile includes several metadata attributes which must be customized according to the contents of thepack. These are as follows:
• SPEC: the specification file for the driver RPM.
• DATA_SPEC: the specification file for the userspace components RPM.
• VENDOR_CODE: a single word (no spaces, no special characters) that will act as a namespace for the driver,which is recognisable as corresponding to the vendor name.
• VENDOR_NAME: a free text string corresponding to the full vendor name.
• LABEL: by default, taken from the "Name:" field of the driver RPM specification file, but can be edited if sodesired.
• TEXT: a free text field describing the function of the driver. This is displayed on installation. Note that this islimited to 32 characters in length, as it will be used by the mkisofs command to produce the supplementalpack ISO.
• PACK_VERSION: the version number of the pack (this defaults to the build of the DDK being used, but shouldbe changed by pack authors).
• PACK_BUILD: the build number of the pack (this defaults to the build of the DDK being used, but should bechanged by pack authors).
• RPM_VERSION: the version number to be used for the kernel modules RPM. Citrix advises authors to set thisto the version of the driver source being used.
11
• RPM_RELEASE: the release number of this version of the RPM. For example, the same version of driver mightbe re-released in a supplemental pack, and hence need a new release number.
• DATA_RPM_VERSION: the version number to be used for the userspace RPM.
• DATA_RPM_RELEASE: the release number to be used for the userspace RPM.
5.3. Creating the kernel module specification fileThe kernel module packages are built according to the instructions in the specification file. The following sectionsof the specification file affect the building of a package and should be set to appropriate values:
• Name: a unique ID, preferably the name of the kernel module.
• Source: the exact filename (without the path) of the tar archive that contains the sources for the kernel module,expected to be of the form <module-name>-<module-version>.
• Summary: a short description of the driver.
• %files is a list of files that are to be compiled into the RPM. Kernel modules must be located in a directorynamed extra (within /lib/modules/<kernel-version>/).
• %changelog describes changes that have been made to the driver.
5.4. Building the modulesEach kernel module RPM must be built against multiple kernel versions. The example Makefile provides a build-rpms target that automates the build. The userspace RPM is also built if necessary. The RPMs are output intothe /usr/src/redhat/RPMS/i386/ directory.
If the RPM does not build, it is important that the following be checked:
• The Source parameter of the kernel RPM specification file must be the filename of the compressed tar archivecontaining the source code for the module, located in /usr/src/redhat/SOURCES/.
• The %prep section of the example specification file relies on the compressed tar archive, when expanded,creating a directory named <module-name>-<module-version>. If this is not the case, (for example,if it creates a directory named <module-version>), the %setup -q -n step can be amended to be, forexample, %setup -q -n %{version}.
• The %build section of the example specification file relies on the directory /usr/src/redhat/SOURCES/<module-name>-<module-version>/ containing the Makefile or KMake file that will buildthe kernel module <module-name>. If this Makefile is in a subdirectory, the %build section will need a cd<subdirectory-name> step added to it, before the %{__make} step. Similarly, you will need to add thesame step into the %install section, after the rm -rf $RPM_BUILD_ROOT step.
• If, for any reason, the Makefile included in the compressed tar archive needs to be heavily patched in orderto work correctly with the DDK, Citrix suggests that a new version of the file be created, with the appropriatefixes, then a patch generated using the diff command. This patch can then be applied in the %prep sectionof the specification file, immediately following the %setup step.
• If the kernel module itself fails to compile, (rather than the RPMs failing to build), it may be that the sourcebeing used is incompatible with the kernel version that is used in XenServer. In this case, the author of thedriver should be contacted.
5.5. Including driver RPMs in supplemental packsThe next chapter details exactly how to include not only driver RPMs produced in the above manner in asupplemental pack, but also any other arbitrary RPMs. If a pack is only to include driver RPMs plus someassociated configuration or firmware, it can be produced directly by using the Makefile build-iso target,which runs the build-supplemental-pack.sh script. The script is run with the appropriate arguments toinclude the metadata that was given in the Makefile.
12
5.6. Format for releasing driversIf a supplemental pack contains drivers, it must also be shipped with the source code to those drivers, to fulfillobligations under the GNU General Public License (GPL). Citrix recommends that pack authors create a zip filecontaining the pack ISO, a compressed archive of any relevant source code, and the MD5 checksum files that areassociated with the pack metadata and the ISO, produced by build-supplemental-pack.sh.
5.7. Releasing multiple drivers in a single packServer hardware manufacturers may wish to issue a single supplemental pack that contains multiple drivers.Three options are available, depending on the desired result:
• Produce individual supplemental pack ISOs, as if each driver were to be released individually, then usecombine-supplemental-packs.sh to produce one single supplemental pack ISO that contains all theindividual drivers. Citrix recommends using this approach.
• Make individual copies of the /root/examples/driver directory, one for each driver. Then produce thetwo RPMs (one for the xen kernel, and another for the kdump kernel), for each driver using the build-rpms target in the Makefile. Collect all the RPMs into one place, and then run build-supplemental-pack.sh.
• Create a specification file for each driver (similar to that in /root/examples/driver). Adjustthe Makefile to compile all the drivers and produce RPMs for each one, and then run build-supplemental-pack.sh.
13
Chapter 6. Creating a supplemental packSupplemental packs can be created containing existing RPMs provided they meet the requirements given below.If standard packages that are not shipped in XenServer are to be included, these should be from the appropriateCentOS distribution that the XenServer dom0 is based upon. In XenServer 5.6 this is CentOS 5.4. In XenServer5.6 Feature Pack 1 and XenServer 5.6 Service Pack 2 this is CentOS 5.5, and in XenServer 6.0 it is CentOS 5.6.Alternatively, components can packaged as RPMs using a custom spec file.
If a pack will only contain drivers, it is normally known as a XenServer Driver Disk. However, the mechanisms usedto build and install a driver disk are the same as for any other supplemental pack. One key point is that for drivers,the source code must be provided to the DDK, in order that the drivers be compiled for the correct kernels. Forother pack components, no such compilation is necessary.
6.1. Syntax of build-supplemental-pack.shAll supplemental packs are constructed using the /usr/local/bin/build-supplemental-pack.shscript. This provides a simple way to provide metadata about the pack, by taking a number of options andarguments. The significance of each one is discussed in the sections that follow.
Apart from the metadata switches, any further arguments to build-supplemental-pack.sh are taken tobe names of the RPMs to be included in the supplemental pack.
The options and arguments are used to populate the XS-PACKAGES and XS-REPOSITORY XML files that willbe contained within the pack. Do not edit the XS-PACKAGES -- they contain metadata, such as MD5 checksums.However, pack authors may edit the XS-REPOSITORY file to include information such as dependencies.
6.1.1. Name, vendor, and version information
Basic details concerning the pack authoring organization, name, and version number must be provided. Therelevant switches are:
• --vendor-code: an identifier (namespace label) for the creator of the pack.
• --vendor-name: a free text string specifying the creator of the pack (enclosed by double quote marks).
• --label: an identifier (unique within the vendor-code namespace) that identifies the pack.
• --text: a free text string describing the pack (enclosed by double quote marks). Note that this is limited to32 characters in length, as it will be used by the mkisofs command to produce the supplemental pack ISO.
• --version: the pack version (likely to be of the form 1.2.3).
• --build: the pack build number (optional).
Note:
The vendor-code and label switches expect strings that are entirely lowercase, have nospaces or other special characters, and are not surrounded by quote marks. The reason forthis restriction is that they will be used as Linux directory names. Please also note that thevendor-code of xs is reserved for packs produced by Citrix.
6.1.2. Memory requirements
It is recognised that supplemental packs may well increase the memory requirements of the XenServer controldomain (dom0) into which they are installed. The memory requirement in the metadata of the pack will be usedto ensure that dom0 is always has enough allocated to it for its own usage (approximately 300 MB), plus theprojected usage of the pack. However, memory allocation of dom0 is not permitted to exceed 752 MB. In otherwords, if a pack is created that specifies a requirement of 500 MB of extra memory, the total requested will be300 + 500 = 800 MB, but the allocation of dom0 will only be 752 MB.
14
For this reason, pack authors are strongly encouraged to install only the bare minimum into dom0. All othercomponents should be placed in appliance VMs. A reasonable target for memory usage by a supplemental packis less than 50 MB.
The extra memory (in MB) required by the pack is specified using the --mem switch. The argument must be aninteger.
6.1.3. Declaring pack dependencies
To declare dependencies, create a file containing lines of the form:
<requires originator="<vendor>" name="<label>" test="<t>" product="XenServer" version="<version>" build="<build>"/>
one for each dependency.
The <vendor> and <label> attributes correspond to the pack that is depended on. Note that the productattribute should always be set to XenServer. The version test, <t> must be one of:
• eq: equal to
• ne: not equal to
• lt: less than
• gt: greater than
• le: less than or equal to
• ge: greater than or equal to
and is applied to the version and build values.
To add these dependencies to the metadata of the pack, simply supply the name of the dependency file to the--repo-data switch of build-supplemental-pack.sh.
6.2. Order of RPM installationIt is recognised that the RPMs that will constitute a supplemental packs may have dependencies on each other.By default, build-supplemental-pack.sh will produce a pack where the RPMs are installed in the orderthat they are supplied to build-supplemental-pack.sh. In order to ensure that the RPMs are installedin dependency order, the optional --reorder switch can be supplied. For example, if RPM1 depends on RPM2already being installed, this switch will ensure that RPM2 is installed first.
Note:
Cyclic dependencies between RPMs are not supported.
6.3. Pack homogeneityPack authors can optionally flag supplemental packs with a homogeneity flag to indicate the pack must beinstalled on all hosts in a resource pool. If a pack is flagged as one that must be installed on all hosts in a resourcepool, a warning message appears when users try to join a host (without the pack) to a pool with the pack. Userswill be similarly warned if the versions of the pack do not match (though the build numbers will not be checked,for example, if two packs with the same version, but different build numbers are present, a warning will not bedisplayed). However, users can ignore this message, if desired, and continue to join the host to the pool.
To specify that a pack be homogeneous across a resource pool, give the (optional) --homogeneous switch tobuild-supplemental-pack.sh.
6.4. A brief exampleAs an illustration of how build-supplemental-pack.sh works, pack authors can create an example packby placing all constituent RPMs in a directory:
15
mkdir packagescd packagescp /usr/src/redhat/RPMS/i386/helloworld-1.0-1.i386.rpm .
The pack metadata is then created, using the script. When specifying the vendor and label strings, use onlylowercase letters. Do not include spaces or other special characters. These strings are used to create a Linuxdirectory name.
build-supplemental-pack.sh --vendor-code=example-author-name\--vendor-name="An example organization" --label=example-pack\--text=”An example pack description” --version=1.0 --mem=20\--output=/root *.rpm
A CD image should then be made from the contents of this directory.
6.5. Adding files to Server Status ReportsXenServer provides a convenient mechanism for users to collect a variety of debugging information when openinga support case, known as a Server Status Report in XenCenter, or xen-bugtool on the CLI. In order to aidpartners in supporting their supplemental packs, it is recommended that pack authors add to the list of filescollected as part of these Status Reports, using the method outlined below.
Server Status Reports can include not only files, such as logs, but also the outputs of any normal scripts orcommands that are run in the control domain (dom0). For convenience, the items collected as part of a Reportare divided into categories. For example, the Network Configuration category collects the output of tools such asifconfig, as well as network configuration files. Citrix recommends that pack authors create new categoriesif appropriate, but also consider adding to existing categories.
As an example, partner Acmesoft, who produce software that manages the configuration of a special networkcard, might wish to create a category called Acmesoft, under which various Acmesoft-specific log files arecollected. However, they might also wish to add (other) files related to networking to the Network Configurationcategory, as it makes most sense from a user perspective that they be collected as part of this category.
Each category has a level of confidentiality attached to it, which expresses how much personally identifiableinformation (PII) might be present in the files that are collected as part of that capability. This ensures that usersare made aware before they send Status Reports to support teams of what they might be disclosing. There arefour levels of confidentiality: no PII, possibly some PII if the file to be collected has been customized, possiblycontains some PII, and definitely contains PII.
6.5.1. Extending an existing category
To extend an existing category, an XML file should be created in /etc/xensource/bugtool/<category>/ directory (where <category> is the category name). Three elements within an outer<collect> element will be supported:
• files: a list of one or more files (separated by spaces, hence no spaces are allowed within the file names).
• directory: a directory to be collected, with (optionally) a pattern that will be used to filter objects within.The pattern must be a valid Python regular expression. The negate attribute allows the sense of the patternto be inverted: this attribute is provided for ease of readability purposes, as negation could also be includedin the regular expression itself.
• command: a command to be executed and its output collected. The optional label attribute specifies a namefor the output file. If this is not specified, the command name will be used.
For example:
<collect> <files>file1 file2</files> <directory pattern=".*\.txt$" negate="false">dir</directory> <command label="label">cmd</command></collect>
16
Note:
When extending existing categories, any files added should have the same (or lower)confidentiality levels as the category in question.
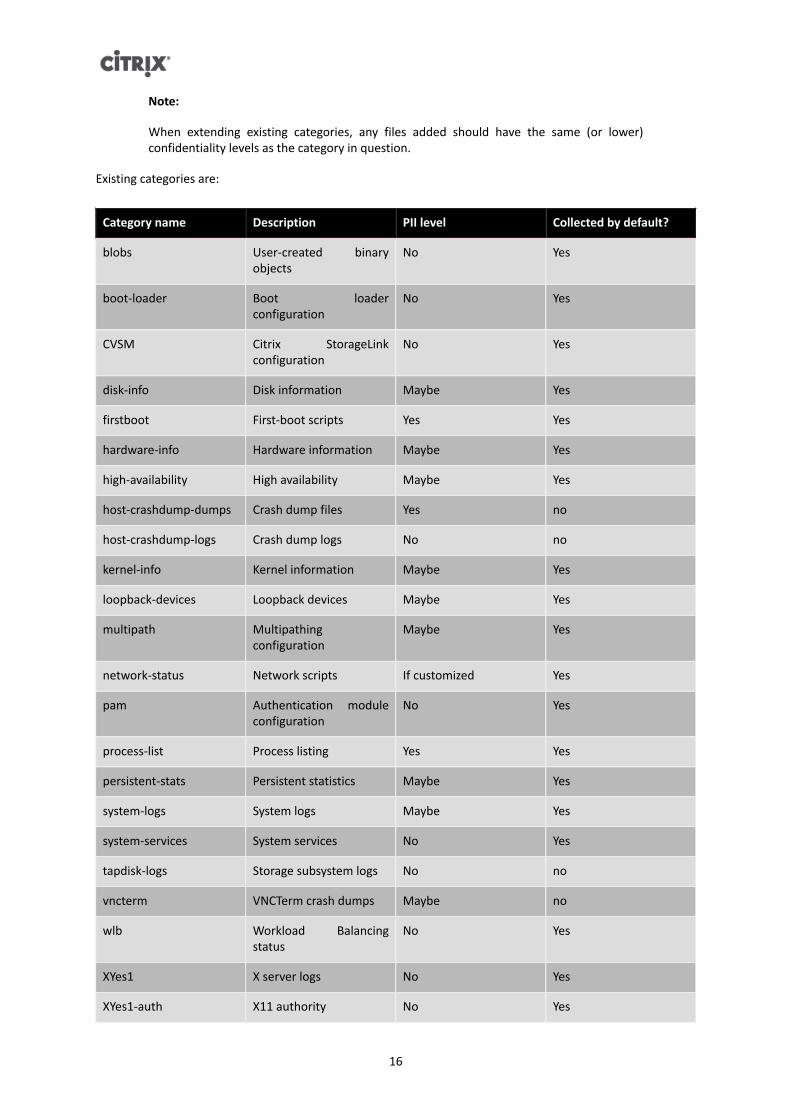
Existing categories are:
Category name Description PII level Collected by default?
blobs User-created binaryobjects
No Yes
boot-loader Boot loaderconfiguration
No Yes
CVSM Citrix StorageLinkconfiguration
No Yes
disk-info Disk information Maybe Yes
firstboot First-boot scripts Yes Yes
hardware-info Hardware information Maybe Yes
high-availability High availability Maybe Yes
host-crashdump-dumps Crash dump files Yes no
host-crashdump-logs Crash dump logs No no
kernel-info Kernel information Maybe Yes
loopback-devices Loopback devices Maybe Yes
multipath Multipathingconfiguration
Maybe Yes
network-status Network scripts If customized Yes
pam Authentication moduleconfiguration
No Yes
process-list Process listing Yes Yes
persistent-stats Persistent statistics Maybe Yes
system-logs System logs Maybe Yes
system-services System services No Yes
tapdisk-logs Storage subsystem logs No no
vncterm VNCTerm crash dumps Maybe no
wlb Workload Balancingstatus
No Yes
XYes1 X server logs No Yes
XYes1-auth X11 authority No Yes
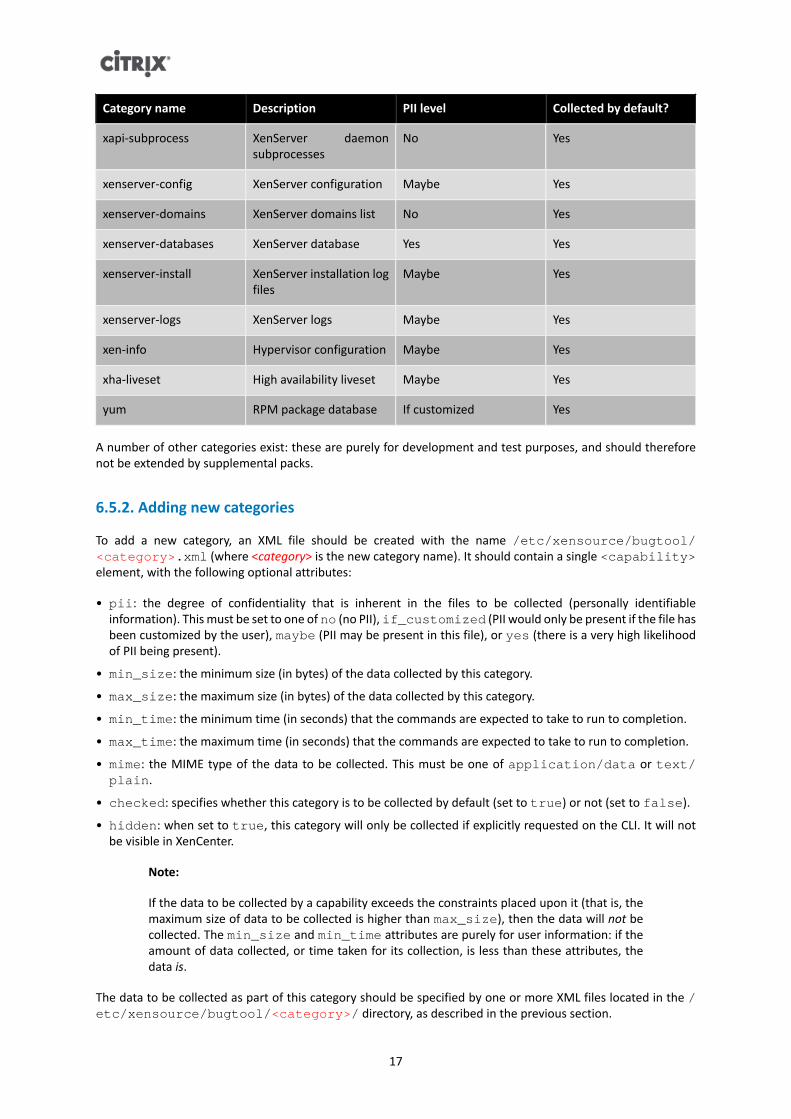
17
Category name Description PII level Collected by default?
xapi-subprocess XenServer daemonsubprocesses
No Yes
xenserver-config XenServer configuration Maybe Yes
xenserver-domains XenServer domains list No Yes
xenserver-databases XenServer database Yes Yes
xenserver-install XenServer installation logfiles
Maybe Yes
xenserver-logs XenServer logs Maybe Yes
xen-info Hypervisor configuration Maybe Yes
xha-liveset High availability liveset Maybe Yes
yum RPM package database If customized Yes
A number of other categories exist: these are purely for development and test purposes, and should thereforenot be extended by supplemental packs.
6.5.2. Adding new categories
To add a new category, an XML file should be created with the name /etc/xensource/bugtool/<category>.xml (where <category> is the new category name). It should contain a single <capability>element, with the following optional attributes:
• pii: the degree of confidentiality that is inherent in the files to be collected (personally identifiableinformation). This must be set to one of no (no PII), if_customized (PII would only be present if the file hasbeen customized by the user), maybe (PII may be present in this file), or yes (there is a very high likelihoodof PII being present).
• min_size: the minimum size (in bytes) of the data collected by this category.
• max_size: the maximum size (in bytes) of the data collected by this category.
• min_time: the minimum time (in seconds) that the commands are expected to take to run to completion.
• max_time: the maximum time (in seconds) that the commands are expected to take to run to completion.
• mime: the MIME type of the data to be collected. This must be one of application/data or text/plain.
• checked: specifies whether this category is to be collected by default (set to true) or not (set to false).
• hidden: when set to true, this category will only be collected if explicitly requested on the CLI. It will notbe visible in XenCenter.
Note:
If the data to be collected by a capability exceeds the constraints placed upon it (that is, themaximum size of data to be collected is higher than max_size), then the data will not becollected. The min_size and min_time attributes are purely for user information: if theamount of data collected, or time taken for its collection, is less than these attributes, thedata is.
The data to be collected as part of this category should be specified by one or more XML files located in the /etc/xensource/bugtool/<category>/ directory, as described in the previous section.
18
At present, XenCenter displays any new categories that are added by supplemental packs, but does not providea mechanism for pack authors to give descriptions of them in the Server Status Report dialogue. Pack authorsshould therefore ensure that any new categories have suitably descriptive names.
6.6. Combining multiple packs into oneIn some cases, pack authors may wish to combine multiple supplemental packs into one. For example, anorganization might release one pack containing drivers, and another containing management software, as wellas a combined pack for those users wishing to install both. This section details how this can be easily achieved.
An additional script, /usr/local/bin/combine-supplemental-packs.sh is provided, that takes asarguments the pack ISOs that should be combined, and outputs a single ISO containing them all.
The exact usage is:
combine-supplemental-pack.sh --output=<combinedIsoFile> [--vol=<volumeName>]
Where <combinedIsoFile> is the resulting ISO file, and the optional <volumeName> is the volume name that willbe given to the resulting ISO (maximum of 32 characters).
6.7. Automating pack installation at XenServer installation timeIf a partner has obtained the necessary agreement from Citrix to distribute XenServer, it is possible to create amodified installation ISO that contains the XenServer installation files, plus one or more supplemental packs. Thisallows a partner to distribute a single ISO that can seamlessly install XenServer and the supplemental pack(s).There are two steps to this process: the first involves combining the installation ISO with the pack ISO; the secondrequires an answerfile to be created.
6.7.1. Combining a pack with the XenServer installation ISO
Supplemental pack ISOs always contain an XS-PACKAGES file, which specifies the RPMs to be installed, andan XS-REPOSITORY file, which expresses the metadata of the pack (pack name, description, and dependencyinformation). Together, these two files make a pack a fully-fledged additional XenServer installation repository.Therefore, all that need be done to ensure that a supplemental pack is installed as part of XenServer installationis to add the supplemental pack to the same ISO as the XenServer base installation repositories.
The XenServer DDK provides shell functions to make the re-packing of the ISO less error-prone. In addition,functions to re-build the initrd are provided, in order that critical drivers can be included directly into theinitial RAMdisk images of the host installer and dom0. The /usr/local/bin/rebuild.functions fileprovides:
• pushiso <in.iso>: takes an ISO, extracts it to a temporary directory, and changes to that temporarydirectory, ready for the contents of the ISO to be edited.
• popiso: deletes the temporary directory and return to previous working directory, discarding anymodifications made to the contents of the ISO.
• writeiso <out.iso>: writes the contents of the temporary directory to the given output filename. If aboot directory exists then the ISO will be created with the usual XenServer boot settings.
• pushinitrd <in.img>: given an existing initrd image, unpacks into a temporary directory, andchanges to that directory.
• popinitrd: deletes the temporary directory, discarding any modifications made to the initrd contents.
• writeinitrd <out.img>: writes the contents of the temporary directory to the given output initrdfilename.
Note:
19
Any script using the above commands should ensure that it uses absolute paths whenreferring to files that will be outside of the temporary directory that is created by pushisoor pushinitrd. This is because these commands both create the directory and change thecurrent working directory to it.
To add a supplemental pack to the XenServer installation CD, simply execute:
pushiso xenserver-main.isomkdir packages.your-supp-pack-namecp /tmp/your-supp-pack/* packages.your-supp-pack-name/
Before writing the ISO back out, you will need to edit the XS-REPOSITORY-LIST file, and add the line:
packages.your-supp-pack-name
This ensures that the repository will be recognised by the XenServer host installer. Once this is complete, execute:
writeiso modified-xenserver-main.iso
to obtain the resulting unified ISO. This can be used by customers who wish to install the supplemental pack(s)included on the modified ISO for normal interactive installations. Note, however, that the packs that are includedon such an ISO will be installed without confirmation by the user, that is, the installer will not give a choice asto whether they are to be installed or not.
6.7.2. Including an answerfile on the XenServer installation ISO
Answerfiles allow the responses to all the questions posed by the XenServer installer to be specified in an XMLfile, rather than needing to run the installer in interactive mode. The XenServer DDK includes a script to add ananswerfile to the XenServer main installation ISO, to allow installation to be carried out in an unattended fashion.The /usr/local/bin/rebuild-iso.sh script can be used within the DDK (though the default root disksize within the DDK is unlikely to be sufficient to perform the necessary ISO re-packing operations, and hencenetwork storage is recommended). Alternatively, the script, plus /usr/local/bin/rebuild.functions,can be copied to an external machine that has mkisofs installed, and used there.
The rebuild-iso.sh script takes in the XenServer installation ISO, plus the files to be added to it, and outputsa combined ISO. Its syntax is:
rebuild-iso.sh [--answerfile=<answerfile>] [--include=<file>|<directory>] [--label=<ISOLabel>] inputFile.iso outputFile.iso
The <answerfile> must be a valid XenServer automated installation file. Details of the syntax of this file are givenin the relevant section of the XenServer Installation Guide. As part of an answerfile, it is possible to specify scriptsthat may be run directly after the installation completes. Whilst such scripts can be on a web server, it is alsopossible to place them on the ISO, with the answerfile. The --include switch allows such files to be addedto the ISO output by rebuild-iso.sh. Finally, the --label switch controls what the volume label of theresulting ISO should be. If no label is specified, the label of the input ISO is used.
It is worth noting that whilst an answerfile specifies the answers to installation questions such as keyboardlayout and target disks, it does not specify which repositories to install from. This is because for an automatedinstallation, all repositories specified in the XS-REPOSITORY-LIST file are installed. Therefore, provided thatall supplemental packs that are to be installed are included in the XS-REPOSITORY-LIST file, they will beinstalled automatically directly following the installation of XenServer itself.
6.8. Pack-specific EULAsIf the constituent RPMs of a pack contain end user license agreements (EULAs), these can be displayed on packinstallation, and the user required to acknowledge them. This is true both for installation on a running XenServerhost and for pack installation as part of XenServer installation.
20
In order to take advantage of this feature, simply name the relevant file(s) in the RPM(s) with the suffixEULA, for example, my-pack-EULA. The install.sh script that is written to the output ISO by build-supplemental-pack.sh will ensure that the EULA(s) is/are displayed.
21
Chapter 7. Rules and guidelines
7.1. Kernel modules
Kernel modules must be built and packaged according to the following:
• Modules must be built against two kernels: the xen kernel and the kdump (crash dump) kernel. TheMakefile provided in the examples does this by default.
• Modules must be placed in an RPM with a group of ‘System Environment/Kernel’.
• All modules must be located under the directory /lib/modules/<kernel>/extra where <kernel> isthe name of the kernel
To ensure a pack is fully conformant, Citrix recommends basing it on one of the examples in the DDK.
Note:
The XenServer build into which a kernel module (driver) is installed must be the identical buildto the DDK that was used to build the pack in which the driver is contained. If it is not, theresulting driver disk will not install on XenServer.
7.2. Post-install scripts
Provided they comply with the following constraints, RPMs may contain scripts that are invoked duringinstallation. Such scripts might be necessary in order to add appropriate firewall rules, or log rotationconfiguration, that is specific to the pack.
1. Scripts must not start processes.
2. Scripts must not assume that XenServer is booted and running (as it may be that the pack is being installedas part of an initial XenServer installation.
3. In the light of the previous point, if firewall rules are to be added using a post-install script, the script mustexecute iptables-restore < /etc/sysconfig/iptables before adding its own rules (usingiptables -A), and then execute iptables-save > /etc/sysconfig/iptables. This ensuresthat the default rules are loaded before the collection of existing and new rules are saved. Failure to savethe existing rules will mean that when a pack is installed as part of a XenServer host installation, the defaultXenServer firewall rules will be lost.
If an RPM needs to distinguish between a running host and an installation environment, the following codefragment may be used:
if runlevel >/dev/null 2>&1; then# running hostelse# installationfi
The following types of file must be placed in the appropriate directories:
• Udev rules: must be located in /etc/udev/rules.d/.
• Firmware: must be located in /lib/firmware.
• Configuration details: must be located in /etc/.
• Documentation: must be located in /usr/share/doc/
• Firewall rules: must be added using iptables -A, having first executed iptables-save > /etc/sysconfig/iptables (see above).
22
Warning:
Pack authors must not modify the install.sh script that is produced by the build-supplemental-pack.sh script. Any scripting that needs to take place as part of theinstallation of the pack must be included in one or more RPMs. If necessary, an RPM thatcontains only a post-install script may be advisable. The reason for this restriction is that whenpacks are installed through the XenServer host installer, the install.sh is not run (theRPMs are simply installed one by one).
7.3. Handling upgrades
Every supplemental pack will contain a Citrix-provided install.sh script, which is built-into it by build-supplemental-pack.sh. This script is responsible for installing the pack, or upgrading an existinginstallation of the pack to a newer version. Upgrades are handled by using the upgrade functionality of therpm tool. On upgrade, pack authors may wish to transfer configuration or state information from the previousinstallation: this section describes how such a transfer may be achieved.
Warning:
Supplemental pack upgrade will only function if the pack to be upgraded from, and the packto be upgraded to, have the same values of vendor-code and vendor-name. Versionor build numbers should not be used in either of these strings. If the vendor-code andvendor-name strings do not match, the packs will be treated as unrelated, and any pack-specific settings that were to be migrated between installations will be lost on upgrade.
7.3.1. Pack upgrade during a XenServer upgrade
When a XenServer host is upgraded, the installer replaces the file system before supplemental packs are installed.This affects the way individual RPMs interact with upgrades. To enable configuration files (or other configurationdata, such as databases) to be carried over, the installer makes the file system of the previous installation(which is automatically backed-up to another partition) available to the RPM scripts. This is done through theXS_PREVIOUS_INSTALLATION environment variable.
Therefore, in order to migrate state across upgrades, supplemental pack authors must create a suitable scriptthat runs as part of an RPM installation, and migrates the state. Specifically, the migration should be from the oldroot file system pointed to by XS_PREVIOUS_INSTALLATION to the new file system mounted on /.
For an example of how this can be done, see the %post script in examples/userspace/helloworld-user.spec.
7.3.2. Pack upgrade on an existing XenServer installation
It is expected that on each release of XenServer, supplemental pack authors are likely to release new versions oftheir packs. However, if a pack author releases an update between XenServer releases, existing installations ofthe old version of the pack would need to be upgraded. This upgrade path is the responsibility of the pack author,as the location of the configuration data of the old version is on the root file system, wherever the RPMs installedit to. The pack installation script will run the rpm -U command for all RPMs contained within the pack, hencethese RPMs should be aware of how to deal with the existence of any relevant configuration files.
7.4. Uninstallation
At present, uninstallation of supplemental packs is not supported. However, to ensure that it is simple toprovide such a feature in the future, all RPMs that are included in supplemental packs must be able to beuninstalled cleanly (using rpm -e). This includes reverting any configuration such as firewall rules or log rotationconfiguration.
23
7.5. Building packs in existing build environmentsCitrix recognises that many partners have existing build systems that are used to produce the software that mightbe integrated into a supplemental pack. To facilitate this, pack authors are not required to make use of the DriverDevelopment Kit VM, if they are producing packs that do not contain drivers (as these need to be compiled forthe correct XenServer kernels).
If a pack author wishes to distribute drivers as part of a supplemental pack, (or a pack consisting solely of drivers,commonly known as a Driver Disk), then the driver(s) will need to be compiled using the DDK. However, thereis no barrier to pack authors including the driver disks that are output by the DDK in their own build processes.Citrix does not support the compilation of drivers for XenServer in any way other than using the DDK VM.
To build a supplemental pack (but not a driver) as part of an existing build process, the only scripts that arenecessary from the DDK VM are:
• /usr/local/bin/build-supplemental-pack.sh
• /usr/local/bin/suppack-install.sh
These can be used in any environment to create an appropriate pack. Note, however, that this environment mustcontain various tools that are normally found in standard Linux distributions, including tar, mkisofs, sed,and rpm.
Warning:
When integrating these scripts as part of another build system, pack authors should bear inmind that Citrix may update these scripts as new versions of XenServer are released. Packauthors should ensure that they update these script from the new version of the DDK beforebuilding packs for the new version of XenServer.
For pack authors who wish to produce a supplemental pack as an output of another build system, but who wishto include drivers, the following procedure should be followed:
1. Copy the driver source into a running DDK VM the corresponds to the build of XenServer that the drivers willbe targeted at.
2. Produce driver RPMs (rather than a supplemental pack ISO). This can be achieved using the standardMakefile provided in the example packs, and running it as:
make build-rpms
3. By default, this command will output three driver RPMs into /usr/src/redhat/RPMS/i386/. Packauthors should ignore the debug-info RPM, and take the xen and kdump RPMs for inclusion in theirsupplemental pack. These RPMs can be treated in the same way as any other RPM to be shipped in the pack.
4. These RPMs should be provided to the non-DDK build system, for inclusion in the finished pack. Evidently,this process assumes that pack authors will be releasing new versions of their packs more frequently than theXenServer kernel is changed, or that introducing new versions of RPMs into the alternative build system ismore acceptable than introducing the DDK as the build system.
7.6. Packaging driver firmwareIt is increasingly common for hardware manufacturers to produce components that load up-to-date firmwarefrom the operating system that is running on the host machine. XenServer supports this mechanism, and firmwarepackages should be installed to /lib/firmware. The firmware should be packaged in an RPM, and includedas part of a supplemental pack.
If pack authors are submitting firmware for inclusion in XenServer dom0, to avoid version number confusion,Citrix requests that the firmware be placed in a tar archive, that when unpacked, creates a directory with a namethat contains the firmware identifier (of the form company-productName) and the firmware version number.The tar archive itself should be similarly named.
24
7.7. Versioning
7.7.1. Supplemental packs
Authors of supplemental packs are free to use whatever version numbering scheme they feel is appropriate fortheir pack. Given that many packs are likely to include RPMs of existing software, it is suggested that the packversion number correspond to the version of the software it contains. For example, if an existing managementconsole RPM is at version 5, it is likely to be less confusing if the first version of the supplemental pack thatcontains this RPM is also version 5.
Warning:
Due to an issue in the XenServer 5.6 host installer, supplemental pack version numbers mustcontain at least one, and no more than two, decimal points. This means that the maximumlength of a version string can be three integers (of any number of digits each), for example,12.345.678. In addition, no hyphens should be used within the version string, as this characteris reserved for separating the version number from the build number of the pack. RPMversioning is not restricted in either of these ways.
Versions of XenServer after 5.6 support version numbers of supplemental packs that have arbitrarily manydecimal points. A version number must contain at least one decimal point. The numbers between each pair ofdecimal points may contain hyphens, for example, 1-2.3-4.5-6 is permitted.
There is no reason why, if it is simple enough, a pack should not be suitable for multiple releases of XenServerprovided that it does not depend on particular versions of other tools. In practice, Citrix is of the opinion that packsshould be re-released for each new version of XenServer, in order that they are also fully tested by the authorson that new release. If a pack author chooses to release one pack for multiple XenServer releases, they shouldensure that the dependency information expressed in the metadata of the pack uses the ge comparator for theXenServer product, where the version to be compared against is the lowest supported version of XenServer.
7.7.2. Kernel modules
Kernel modules must be built for two kernels: the xen kernel that a XenServer host usually runs and the kdumpkernel used to collect a crash dump. The Makefile in the driver example ensures that RPMs for both flavorsare built.
Each kernel module is built against a specific kernel version. This kernel version is included in the RPM name toenable multiple instances to be installed. The version fields of a kernel module RPM are used to track changes toa driver for a single kernel version. Each time a driver is released for a particular kernel, the RPM version must beincreased (as would be expected, given that there will have been changes made to the driver sources).
For example:
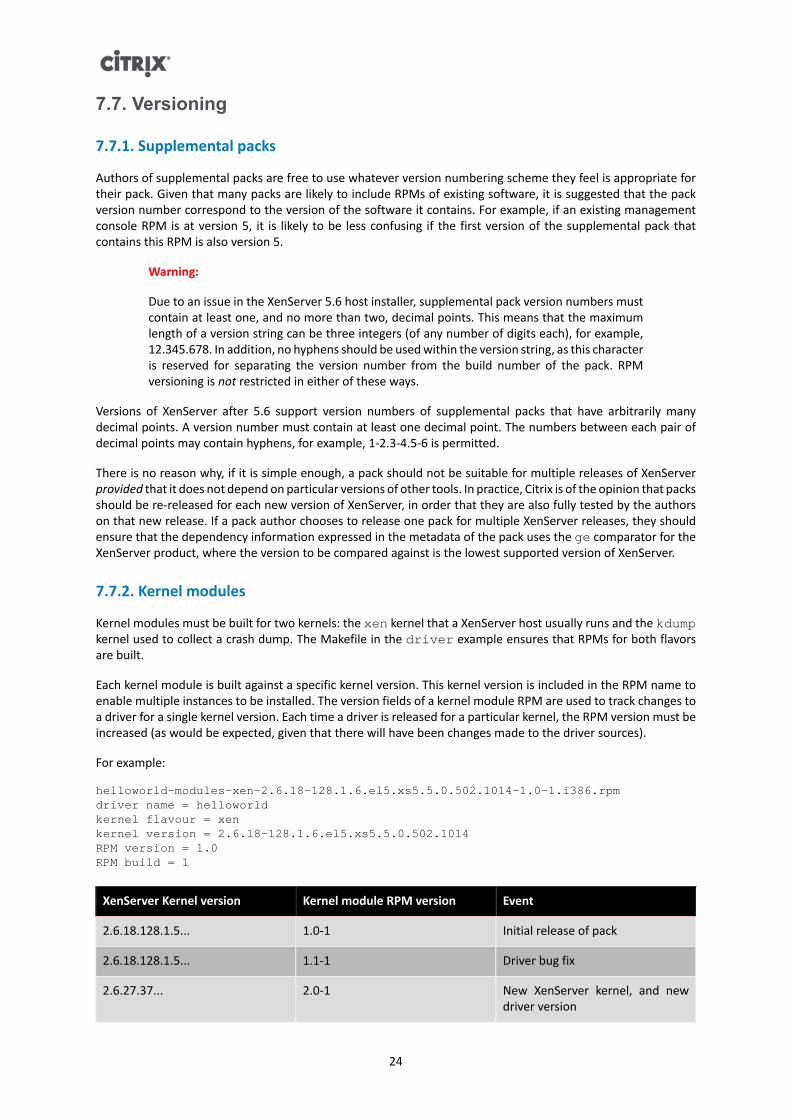
helloworld-modules-xen-2.6.18-128.1.6.el5.xs5.5.0.502.1014-1.0-1.i386.rpmdriver name = helloworldkernel flavour = xenkernel version = 2.6.18-128.1.6.el5.xs5.5.0.502.1014RPM version = 1.0RPM build = 1
XenServer Kernel version Kernel module RPM version Event
2.6.18.128.1.5... 1.0-1 Initial release of pack
2.6.18.128.1.5... 1.1-1 Driver bug fix
2.6.27.37... 2.0-1 New XenServer kernel, and newdriver version
25
Therefore, if a supplemental pack contains a driver, it will be necessary to rebuild that driver for each update andmajor release of XenServer. Note that hotfixes do not normally change the kernel version, and hence the samedriver can be used until a XenServer update ("service pack") is released.
As a general rule, if a pack contains only a single driver, it is strongly recommended that the version numberingof the pack be the same as that of the driver.
7.8. Packages compiled by, but not in, XenServerSome of the packages that are included in the XenServer control domain are taken directly from the base Linuxdistribution, whilst others are modified and re-compiled by Citrix. In some cases, certain source RPMs, whencompiled, result in more than one binary RPM. There exist a variety of packages where XenServer includes some,but not all, of the resulting binaries; for example, the net-snmp package results in the binary packages net-snmp and net-snmp-utils, but net-snmp-utils is not included in dom0.
If a supplemental pack author wishes to include a binary package that falls into this category, that binary packagewill need to have the correct build number for the version of XenServer it is to be installed upon. Because Citrix re-compiles these packages, their build numbers will have a XenServer-specific build number extension. Therefore,pack authors will need to obtain these binary RPMs from Citrix.
To enable this process to be as simple as possible, Citrix produces an extra ISO (binpkg.iso) for each releaseof XenServer that contains all the packages that fall into this category. Partners should contact Citrix to obtainthis ISO.
7.9. Requirements for submission of drivers for inclusion inXenServerCitrix encourages hardware vendors to submit any driver disks released for XenServer to Citrix in order that thedrivers may be incorporated into the next release of the product. In order to make this process as simple aspossible, vendors are requested to take note of the following requirements:
1. Any driver submitted must include its full source code, that is available under an open source licensecompatible with the GNU General Public License (GPL).
2. Any binary firmware submitted must either be already publicly available under a license allowing re-distribution, or the vendor must have a current re-distribution agreement with Citrix.
3. If a new, (rather than an update to an existing) driver is being submitted, Citrix will review it in order to confirmthat it is compatible with the current support statements made concerning XenServer. It may be that a driver isrejected because it is monolithic, or enables a feature which is not currently officially supported. This may alsobe the case with radical changes made to drivers that are already in the product. Partners who consider thattheir driver(s) fall into this category should contact Citrix as early as possible, in order that both organizations'engineering teams are able to ascertain how to proceed.
4. Strict time limits apply to submissions (see below). Vendors should make their drivers available to Citrix assoon as possible, rather than waiting until these deadlines, as testing may result in fixes being required, whichthen need to be integrated into the product.
5. Certain drivers are deemed critical to automated testing by Citrix of XenServer. Any (entire-driver) updates tothese drivers must be provided a minimum of 6 weeks prior to the beta RTM date of the release in which theyare to be included. Partners whose drivers are on this list will be informed of this constraint.
6. All other entire-driver updates (or new drivers) must be provided to Citrix a minimum of 5 weeks prior tobeta RTM.
7. Any updates to drivers (for example, no new drivers) received after these dates must be in the form ofsmall, targeted fixes for specific issues. Patches must be submitted that can be understood by a reasonablyexperienced person, together with a description of the flaw that that particular patch addresses. Each fixshould be in the form of a separate patch, with an indication of what the flaw fixed is, the effects the flawwould have if it is not addressed, and whether such issues have already been seen by customers. Significantadditions of functionality, or very large patches will not be accepted.
26
8. Close to the RTM date of the beta of the release concerned, it is unlikely that patches will be inserted intothe beta release (though they may be incorporated into the final release, if they are judged to be of sufficientimportance). Only in exceptional circumstances will patches received fewer than 2 weeks prior to beta RTM beincorporated into the beta. The preferred target for all driver updates is the beta release, in order to achievemaximum testing benefit.
7.10. Does XenServer already include a driver for my device?XenServer includes a wide variety of drivers, including many that are distributed (inbox) with the kernel thatdom0 is based upon. It may therefore be the case that XenServer includes a driver that enables a device that isnot present on the XenServer Hardware Compatibility List (HCL). This is particularly the case where a device issold by multiple companies, each of which refers to it with a different name.
Because each driver included in XenServer includes information concerning which PCI device IDs it claims, thesimplest way to ascertain whether a device is supported is to first find its device ID.
If the device is present in a running Linux-based system, the lspci -v command can be used, which will provideoutput which includes the information on all devices present in the host. If the -n switch is given, numeric IDswill be provided.
If only the name of the device is known, use the PCI ID database (http://pciids.sourceforge.net/pci.ids) toascertain what the ID of the device is. This database will also provide alternate names for the device, which mayof use if the exact name is not listed in the XenServer HCL.
If the an alternate name for the device is not found on the HCL, then either the device has not been tested onXenServer, or a driver for it is not included in XenServer. To confirm whether a suitable driver is included, consultthe list of PCI IDs the XenServer kernel supports, found in /lib/modules/<version>/modules.pcimap.
27
Chapter 8. Testing & certification8.1. Testing overviewXenServer uses a modified Linux kernel that is similar but not identical to the kernel distributed by a popularLinux distribution. In contrast, the XenServer control domain is currently based on a different distribution. Inaddition, the 32 bit XenServer control domain kernel is running above the 80K lines of code that are the 64 bitXen hypervisor itself. While Citrix is very confident in the stability of the hypervisor, its presence represents adifferent software installation than exists with the stock vendor kernel installed on bare hardware.
In particular, there are issues that may be taken for granted on an x86 processor, such as the difference betweenphysical and device bus memory addresses (for example virt_to_phys() as opposed to virt_to_bus()), timing, andinterrupt delivery which may have subtle differences in a hypervisor environment.
For these reasons hardware drivers should be exposed to a set of testing on the XenServer control domainkernel to ensure the same level of confidence that exists for drivers in enterprise distribution releases. Similarly,userspace software that is included in supplemental packs must be tested comprehensively, to ensure that theassumptions it makes about the environment in which it runs (for example, concerning the presence of certainexecutables) are not invalidated.
The remainder of this section considers driver testing. Partners who wish to release supplemental packs donot only contain drivers should contact Citrix for advice. As a minimum, such pack authors should expect tocomprehensively test the functionality of the software being included in the pack, as well as perform stress testingof the XenServer major features, to ensure that none are impacted by the software in the pack.
8.2. Testing scopeAssuming the driver in question has already undergone verification testing on a Linux distribution very similar tothe one used in the XenServer control domain, a subset of the verification test suite with a focus on representativetests is typically sufficient.
Some common areas of focus are:
• Installation verification. Installation is now performed using an RPM, which may be different from how thedriver is typically installed.
• CLI operation. If a CLI is included, its operation is a key scenario and typically provides a good end-to-endexercising of all related code.
• Adapter configuration, non-volatile/flash RAM, or BIOS upgrades. Any functions that access the physicalhardware should be verified due to the presence of the Xen hypervisor and its role in coordination of hardwareresources amongst virtual machines.
• Data integrity and fault injection. Long-haul and/or stress-based data integrity verification tests to verify nodata corruption issues exist. Basic fault injection tests such as cable un-plug/re-plug and timeout handling forverification of common error conditions.
• Coverage of a representative set of device models. For example, if a Fibre Channel HBA driver supports a set ofmodels that operate at either 2 Gb/s or 4 Gb/s, include one model each from the 2 Gb/s and 4 Gb/s familiesfor testing.
• Key hardware configuration variations. Any hardware configurations that exercise the driver or related codein significantly different ways should be run, such as locally versus remotely attached storage.
8.3. Running testsSince the physical device drivers run in the XenServer control domain, the majority of tests will also be run in thecontrol domain. This allows simple re-use of existing Linux-based tests.
To provide high-performance device I/O to guest domains, XenServer includes synthetic device drivers for storageand networking that run in a guest and communicate their I/O requests with corresponding back-end drivers
28
running in the control domain. The back-end drivers then issue the I/O requests to the physical drivers and devicesand manage transmitting results and completion notifications to the synthetic drivers. This approach providesnear bare-metal performance.
As a result, tests that require direct access to the device will fail when run within a guest domain. However,running load-generation and other tests that do not require direct access to the device and/or driver within Linuxand Windows guest domains is very valuable as such tests represent how the majority of load will be processedin actual XenServer installations.
When running tests in guest domains, ensure that you do so with the XenServer synthetic drivers installed in theguest domain. Installation of the synthetic drivers is a manual process for some guests. See XenServer Help formore details.
8.4. Tests that require an integrated buildOne of the primary goals of the DDK is to allow partners to create, compile, and test their drivers with XenServerwithout requiring a “back-and-forth” of components with the XenServer engineering team.
However, some tests will only be possible after the driver SRPM and any accompanying binary RPMs have beensupplied to Citrix and integrated into the XenServer product. Two examples are installing to, and booting from,Fibre Channel and iSCSI LUNs.
In these cases additional coordination is required after the components have been provided to Citrix to providea pre-release XenServer build with the integrated components for testing.
8.5. Certification & support
8.5.1. Drivers
Citrix maintains a XenServer Hardware Compatibility List (HCL), found at hcl.vmd.citrix.com. This lists all devicesthat have been tested and confirmed to function correctly with the XenServer product.
In order to be listed on the XenServer HCL, hardware vendors must utilize the appropriate certification kit,obtainable from http://www.citrix.com/ready/hcl. The test kits contain a mix of manual and automated teststhat are run on a host that contains the hardware to be certified. In general, two such hosts are required toperform the tests. Test results are submitted to Citrix for validation, and if they are approved, the device is listedon the HCL within a small number of working days, along with a link to the supplemental pack that contains anynecessary driver, if this has not yet been incorporated into the XenServer product. In general, such supplementalpacks will be hosted on partner web sites, though Citrix may additionally opt to link to (or host) the pack on itsown Knowledge Base site.
For certification of converged or hybrid devices, such as CNAs, each function of the device must be separatelycertified. This implies that for a device with both networking and storage (HBA) functionality, both the networkingcertification tests and the storage certification tests must be carried out.
There is no restriction on who is permitted to submit certifications to the XenServer HCL, for example, it is not thecase that only the hardware vendor can submit certifications for their products. Having said this, Citrix stronglyprefers hardware vendors to perform certification testing, as they are best placed to test all of their products'features.
Once a device is listed on the HCL, Citrix will take support calls from customers who are using that device withXenServer. It is expected that partners who submit devices for inclusion in the HCL will collaborate with Citrix toprovide a fix for any issue that is later found with XenServer which is caused by said device.
8.5.2. Userspace software
At present, supplemental packs that contain userspace software to be installed into dom0 may only be issuedby partners who have agreements in place with Citrix where the partner provides level 1 and level 2 support totheir customers.
29
The reason for this is because Citrix will not necessarily have had the opportunity to test a supplemental pack ofa partner, and hence must rely on partner testing of the pack as installed on XenServer. Therefore, only partnerswho perform testing that has been agreed as sufficient by Citrix can ship supplemental packs. If a customer installsa pack that is not from an approved partner, their configuration will be deemed unsupported by Citrix: any issuesfound will need to be reproduced on a standard installation of XenServer, without the pack installed, if supportis to be given.
Partners who wish to produce supplemental packs that contain more than solely drivers should discuss this withtheir Citrix relationship manager as early as possible, in order to discuss what software is appropriate for inclusion,and what testing should be performed.
30
Chapter 9. Additional Resources9.1. IntroductionIn addition to supplemental packs, a variety of mechanisms are available for partners to interface with XenServer,and add value to the user experience. This chapter overviews the mechanisms, and provides web links to furtherinformation.
If pack authors have any questions concerning what should (or should not) be included in a pack, or how aparticular customization goal might be achieved, they are encouraged to contact their Citrix technical accountmanager.
9.2. Xen API plug-insWhilst the Xen API provides a wide variety of calls to interface with XenServer, partners have the opportunity toadd to the API by means of XAPI plug-ins. These consist of Python scripts that are installed as part of supplementalpacks, that can be run by using the host.call_plugin XAPI call. These plug-ins can perform arbitraryoperations, including running commands in dom0, and making further XAPI calls, using the XAPI Python languagebindings.
For examples of how XAPI plug-ins can be used, please see the example plug-ins in the /etc/xapi.d/plugins/ directory of a standard XenServer installation.
9.3. XenCenter plug-insXenCenter plug-ins provides the facility for partners to add new menus and tabs to the XenCenter administrationGUI. In particular, new tabs can have an embedded web browser, meaning that existing web-based managementinterfaces can easily be displayed. When combined with Xen API plug-ins to drive new menu items, this featurecan be used by partners to integrate features from their supplemental packs into one centralized managementinterface for XenServer
For further information, please see http://community.citrix.com/display/xs/XenCenter+Plugins.
9.4. XenServer SDKThe XenServer SDK VM is a virtual machine appliance, ready to be imported into a XenServer host. It containsthe complete set of XenServer SDKs, plus a complete Linux-based development environment. Language bindingsare available for C, C#, Python, and Java, and a Windows PowerShell snap-in is also available. The SDK VM allowspartners to easily develop solutions that utilize the rich API exposed by all XenServer hosts. The SDK VM isintended only as a convenient development environment: for an application developed against the appropriatelanguage bindings to be distributed, only the relevant bindings are required (not the entire SDK VM).
For further information, please see http://community.citrix.com/display/xs/Download+SDKs.