Embed Size (px)
Citation preview

SUPERPLUSWATER FILTRATION SYSTEM
For Model #: SP20-1
INSTRUCTIONS/ASSEMBLY USE AND CARE MANUAL
(Important: Read this manual thoroughly before install)

1© Selecto, Inc.
TABLE OF CONTENTS
General Notes
About Your Product
Installation Procedures for Hard Copper Pipe
Installation Procedures for Rigid Plastic Pipe
Directions to Reverse Water Flow
Cartridge Change-Out Instructions
QR Code Instructions
Troubleshooting & Repair
Limited Warranty
2
3
4
6
8
9
10
11
12
HELP AND SUPPORT
Selecto, Inc.3980 Lakefield Court
Suwanee, GA 30024 USA
WWW.SELECTOINC.COM
Product Customer Support Hotline:Toll Free: 1-800-635-4017
Monday to Friday8:00 a.m. — 5:00 p.m. EST

2© Selecto, Inc.
OPTIONAL PARTS LISTPACKAGE CONTENTS
Twin Head Assembled #: 300-778HDPressure Gauge #: 300-023FAPlastic 3/4” Shut-Off Valve #: 300-743Inlet Fitting 3/4” #: 300-714Outlet Fitting 3/4” #: 300-720Pressure Relief Valve #: 300-7383/4” Plug #: 300-715Blue Retaining Clip #: 300-708E
Plastic Housing (Comes Assembled)1 Filtration CartridgesSpare Parts Kit (1 Lubricant Pack, 2 Clips, 2 O-Rings, 1 Inlet, 1 Outlet)Instructions/Assembly Use and Care Manual
GENERAL NOTES
WARNING
It is important to ensure that you are in compliance with all applicable state and local plumbing codes before you start installation of this product. Use of a licensed technician for installation is recommended. All steps provided throughout are for the typical installation only.
1) Read and understand all of the instructions before attempting to install and operate this equipment. Failure to do so may result in injury and damage to person and/or property.
2) Prior to installation, shut off the water.
3) It is important to ensure the mounting to the wall is strong enough to bear the water weight of the product. 4) Do NOT install system direct to the sunlight or freezing environment.
5) When working with hard copper piping, keep all heat sources at least 18” away from plastic components. The plastic components can be damaged by heat from the torch which may be used in the installation.
6) After installation, check all connections for leaks before operating the unit.
7) Refer to the Installation Procedures to ensure that all clips are in the right position before operating the unit.
THANK YOU FOR PURCHASING OUR PRODUCTEveryone here at Selecto, Inc. would like to thank you for your support and continued use of our products. We believe everyone should have access to safe, clean water. Your purchase is a small step towards a clean future.

3© Selecto, Inc.
SP20-1
• 200,000 gallon capacity at 15 GPM• Temperature range between 34° F and 100° F• Minimum pressure: 40 PSI• Maximum pressure: 120 PSI
Dimensions:22” × 9” × 14.5”
Weight:With Water: 27 lbs.Without Water: 14 lbs.
Replacement Filtration Cartridge:SP20-1RC
ABOUT YOUR PRODUCT

4© Selecto, Inc.
INSTALLATION PROCEDURES
INSTALL FILTER HEAD:
For Hard Copper Pipe Installing (steps 1 to 5 of 10):
A. Filter Head Assembly
1. Center, level, and mount the filter head
3. Pull and separate inlet Shut-Off valve fitting
2. Remove blue clip from inlet side
4. Connect inlet fitting onto 3/4” hard piping
B. You can slide the heads out toward either side of channel to separate backplate for easy installation
5. Reconnect plastic fitting back to the filter head
Tap Water Inlet
Filtered WaterOutlet

5© Selecto, Inc.
INSTALLATION PROCEDURES (CONTINUED)For Hard Copper Pipe Installing (steps 6 to 10 of 10):
6. Re-install retaining blue clip 8. Repeat steps 2-7 for the outlet side of piping
9. Install cartridge w/ align
7. Hand press down the clip and flush w/head surface
10. Now the installation is complete
Tap Water Inlet
Filtered WaterOutlet

6© Selecto, Inc.
INSTALLATION PROCEDURES (CONTINUED)For Rigid Plastic Pipe Installing (steps 1 to 5 of 13):
1. Center, level, and mount the filter head
INSTALL FILTER HEAD:
4. Connect inlet fitting onto 3/4” hard piping
2. Remove blue clip from inlet side
5. Reconnect plastic fitting back to the filter head
3. Pull and separate inlet Shut-Off valve fitting
A. Filter Head Assembly B. You can slide the heads out toward either side of channel to separate backplate for easy installation
Tap Water Inlet
Filtered WaterOutlet

7© Selecto, Inc.
INSTALLATION PROCEDURES (CONTINUED)For Rigid Plastic Pipe Installing (steps 6 to 13 of 13):
8. Repeat steps 2-7 for the outlet side of piping
9. Apply sealant on 3/4” CPVC pipe 10. Reconnect plastic fitting/clip back to the filter head
11. Installed Plastic pipe 12. Install 1st cartridge w/align 4-tags
13. Now the installation is complete
TapWater Inlet
FilteredWaterOutlet
6. Re-install retaining blue clip 7. Hand press down the clip and flush w/head surface

8© Selecto, Inc.
DIRECTIONS TO REVERSE WATER FLOWNOTE: Not recommended, unless necessary
EXCHANGE PROCEDURESSee below diagram. Begin by pulling out the blue clips on either side. Proceed to remove the 4 fittings (two from each end) and exchange with the opposite end. Properly install all fittings back on the filter head. If using hard copper piping, use the same technique from pages 4 and 5 (ref. Steps 2-7). If using rigid plastic piping, use the same technique from pages 6 and 7 (ref. Steps 2-7).
Plug300-715
Plug300-715
Filtered Outlet300-720
Filtered Outlet300-720
Tap Inlet300-714
Tap Inlet300-714
(Reversal of water flow path from right to left completed)
(How to reverse the water flow direction)
Pressure Relief300-738
Pressure Relief300-738
9© Selecto, Inc.
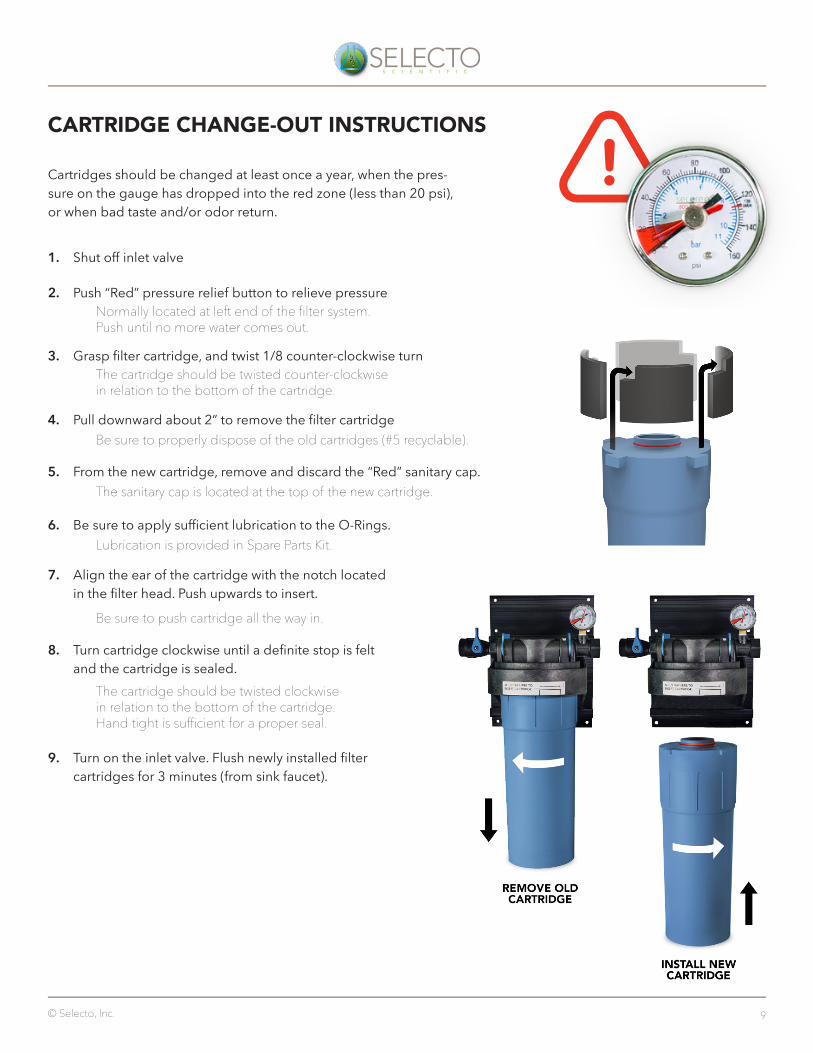
CARTRIDGE CHANGE-OUT INSTRUCTIONS
Normally located at left end of the filter system. Push until no more water comes out.
The cartridge should be twisted counter-clockwise in relation to the bottom of the cartridge.
Be sure to properly dispose of the old cartridges (#5 recyclable).
The sanitary cap is located at the top of the new cartridge.
Lubrication is provided in Spare Parts Kit.
Be sure to push cartridge all the way in.
The cartridge should be twisted clockwise in relation to the bottom of the cartridge. Hand tight is sufficient for a proper seal.
Cartridges should be changed at least once a year, when the pres-sure on the gauge has dropped into the red zone (less than 20 psi), or when bad taste and/or odor return.
1. Shut off inlet valve
2. Push “Red” pressure relief button to relieve pressure
3. Grasp filter cartridge, and twist 1/8 counter-clockwise turn
4. Pull downward about 2” to remove the filter cartridge
5. From the new cartridge, remove and discard the “Red” sanitary cap.
6. Be sure to apply sufficient lubrication to the O-Rings.
7. Align the ear of the cartridge with the notch located in the filter head. Push upwards to insert.
8. Turn cartridge clockwise until a definite stop is felt and the cartridge is sealed.
9. Turn on the inlet valve. Flush newly installed filter cartridges for 3 minutes (from sink faucet).

10© Selecto, Inc.
QR CODE INSTRUCTIONS
It is recommended to replace cartridges at least once a year, or when the pressure on the gauge has dropped into the red zone (less than 20 psi), or when bad taste and/or odor return.
Use the QR code to register and receive an email alert when it’s time to change the filtration cartridges to maximize filter performance.
1. Scan the QR code on filter cartridge label with your smart phone.
2. Follow the instructions on the screen to either register for filter replacement reminders, or to order replacement filters.
3. You will receive reminders via email to change your filter cartridge.
Get email alerts!

11© Selecto, Inc.
TROUBLESHOOTING AND REPAIR
All SuperPlus Filtration Systems are fully inspected and pressure tested by factory. IF LEAKS- Note: The inlet shut-off valve must be turned “OFF” (handle in vertical position), and pressure relieved by pushing the “Red” pressure relief button before attempting to fix any leakage problems.
Leaks at threaded connection points. This type of leak should be repaired by removing the fitting and applying additional Teflon tape or thread sealant compound. Do not attempt to repair by tightening the fitting more. Over tightening fittings into plastic parts may cause the plastic to crack. This type of damage is considered abuse and not covered by the warranty.
1.
2.
3.
4.
5.
Leaks at Junction of Modular Fittings to Filter Head. If leaking persists at the junction points, remove the retainer clip carefully by inserting a screwdriver or other object into to the hole and gently prying “UP” to remove. Gently remove the leaking fitting by “pulling straight out”. Apply additional lubricant (supplied) to the O-ring and re-insert the fitting by gently “pushing all the way in” until the shoulder on the fitting contacts the filter head. Examine the retaining clip for any cracks from removal and re-insert by “pushing straight down” until it is all the way in. If retaining clip is cracked or stretched in any way, discard it and use a new one (supplied). If the above procedure does not cure the leak, repeat the processes above, replacing the O-Ring (supplied).
Leaks Between Cartridge and Filter Head While looking at the top of the filter system, grasp the cartridge and turn slightly counter-clockwise, when viewed from bottom and then back clockwise, making sure that the ears on the cartridge are fully engaged into the filter head. The “blue” locking ears on the cartridge should be fully visible in the 4 recesses on the “black” filter head.
If leakage persists, check all connecting fittings/O-Rings and replace the damage fittings/O-Rings if damaged or remove cartridge by following the procedures outlined in the Cartridge Change-Out Instructions on “Cartridge Change-Out” Page.
Inspect the O-Ring on the top of the cartridge for damage. Replace with a new O-Ring (supplied) and lubricate well with lubricant supplied. Replace the cartridge by following the procedures outlined in the Cartridge Change-Out Instructions on “Cartridge Change-Out” Page.
New O-Ring
Lubricant
Round Locking Tab

12© Selecto, Inc.
SELECTO SUPERPLUS WHOLE HOUSE FILTRATION SYSTEM LIMITED WARRANTY
What is Covered: SELECTO warrants the heads of the Selecto SuperPlus Whole House Filtration System to be free of defects in material and workmanship. Filtration cartridges are excluded from the warranty.
For how long:The Plastic Head on the Product carry a five (5) year limited warranty.
What is not covered:This Warranty does not apply to defects or damage due to abuse, neglect, misuse, accident, alteration, freezing, fire, other acts of God, or damage not caused by SELECTO. In no event will SELECTO be liable for incidental or consequential damages from a defective unit or improper installation.
• Check all connections for leaks before operating the unit. • Check that all clips are in the right position. • The use of replacement filter cartridges other than Selecto brands voids all warranties. • Any modular changes or abuse voids warranty.
What Selecto, Inc. will do: SELECTO’s responsibility under this warranty shall be to replace the product if actually defective, or otherwise in violation of this Warranty. SELECTO shall at its option, either replace the defective Product with a comparable new unit at no charge, or to refund the full purchase price. SELECTO’s obligations of repair, replacement, or refund are conditional upon return of the defective Product to SELECTO. If any Product covered hereby is actually defective within the terms of this warranty, then SELECTO will bear all reasonable and proper shipping or mailing charges incurred in the return of the Product as set forth herein. If the Product proves not to be defective within the terms of this Warranty, then all costs and expenses in connection with processing of the consumer’s claim hereunder shall be borne by the consumer.
How to get service:To receive service under this Warranty, you must contact Selecto, Inc. at 800-635-4017 Ext. 3 or [email protected] within the Warranty Period to describe the problem to a customer service representative who will verify that the product is under warranty. You will be required to provide a proof of purchase. The customer service representative will determine the appropriate next step.
If a return of the product is necessary, whether defective or not, it must be pre-approved by SELECTO and accompanied by a SELECTO pre-approved, valid, return material authorization number (RMA) clearly marked on the outside of the shipping container. You will receive the RMA number from a SELECTO customer service representative. All returned goods must be shipped prepaid to SELECTO from point of origin. Returns not shipped prepaid or missing a RMA number will be refused.
For Product: SP20-1

13© Selecto, Inc.
SELECTO SUPERPLUS WHOLE HOUSE FILTRATION SYSTEM LIMITED WARRANTY (CONTINUED)
When you receive your product:All claims, whether concealed or not, are your responsibility. Any carton damage or shortages should be noted on the bill of lading at the time of receipt of the shipment, in accordance with I.C.C. Regulations. If the concealed damage or loss is noted while unpacking the shipment, the carrier should be notified immediately, per I.C.C. Regulations.
SELECTO must be notified, in writing, including a copy of the carrier’s claim form, of any damage or loss claims with 15 days of receipt. Failure to notify SELECTO releases SELECTO from any liability.
How state law applies: This warranty gives you specific legal rights, and you may also have other rights, which vary from state to state. Warranty is valid only in the continental United States.
For Product: SP20-1