Embed Size (px)
Citation preview

• New conceptual mass• Plan view• Draw a circle & select it• Make dimension permanent
• Select the dimension• Label, add parameter• Instance parameter, "Radius"• Save family as "Mass-Prof-Circle"
• New conceptual mass• Load family "Mass-Prof-Circle"• Place at origin• Set offset and radius• Place another instance• Set offset and radius
• Place 6 instances• Use values in this table
offset radius
151.2 m
60 m0
14 00017 000
28 50025 000
159.6 m
110 m 25 500
5 000176.4 m
1 MASS PROFILE
2 LOFTED FORM
GHERKIN STUDIESFIRST PASS - p 1010

offset radius
110.060.0
0
5.0
25.0
151.2
176.4radius radius
SKIN FRAME FLOORS
• Select all 6 profiles• Uncheck "visible"• Create form• Save the family• "Mass-Gherkin-Skin"
• Use "save as" to create 2 more• "Mass-Gherkin-Frame"• "Mass-Gherkin-Floors"• Change the Radii• Subtract 500 from each for Frame• Subtract 1m from each for Floors
• Open the Frame family• Select the form & pick "dissolve"• Delete the top 2 profiles• Remake the form
This table shows the values youshould have for the 3 mass families
They will sit inside each other likeRussian dolls.
SKIN FRAME FLOORS
• New Project• Load all 3 families• Create 2 grids crossing at 90 deg• Place an instance of each family• Use the grid intersection• The circles should be concentric
159.6 14.017.025.528.5
24.5
16.525.028.0
4.0
24.0
13.016.024.527.5
3 "RUSSIAN DOLL" FAMILIES
4 PLACE IN PROJECT
GHERKIN STUDIESFIRST PASS - p 2011

You should have something abit like this. The next step is tocreate the levels. Go to one ofthe Elevation views.
• name the first level "Level 0"• name "Level 1" set it to 4200• select Level 1, pick "Array"• create an array, spacing 4200• adjust no of items to 39• top level = "Level 40"
• select the "Floors" family• on the ribbon, pick Mass Floors• check the boxes• omit Levels 2, 35&36, 40
these floors either don't exist, orthey are set back from the edge ofthe form.
when you click OK, Revit willcreate floor faces. These are notreal floors, but we will use them tocreate real floors later on.
5 CREATE LEVELS
6 MASS FLOOR FACES
GHERKIN STUDIESFIRST PASS - p 3012
• Open the Skin family• Select one curved face• Divide surface• Change the U & V values• U=72, V=84• Select Rhomboid pattern• Select the form• Uncheck "Visible"• Under "Surface Representation"• Uncheck "Pattern Fill"• Load back into project
• Open the Frame family• Select one curved face• Divide surface• Change the U & V values• U=18, V=18• Select Rhomboid pattern• Uncheck visible for the form• Uncheck pattern fill for the surface• Load back into project• Rotate by 90 degrees
This completes the First Pass. You can now see how the 3 elements fittogether, how the grid of the Glazed Skin is 4 times the frequency of theStructural Frame.
For the second pass, we will make copies of the Skin and Frame familiesand modify them to bring them a little closer to reality.
You can also study the Basic Geometry sheet, which summarises what wehave done so far
GHERKIN STUDIESFIRST PASS - p 4013

Copy each of the families to theside as shown here.
We will keep these 3 copies as arecord of the first pass. The 3families that are nested insideeach other will be developedfurther in the second pass.
• Open the skin family• Save as "Mass-Gherkin-Skin-v2"• Dissolve the form• add another circle at the top• offset 179m radius 2900• Select the 4 upper circles• Create form (the Cone)• Select the 4 lower circles• Create form (the Shaft)
The skin is now in two sectionswhich share a circle in common
U8 V36
U72 V72
• Select one half of the shaft• Divide surface• Change both U & V to 72• Select half the cone surface• Divide• U=8, V=36
Note the coarser grid used for thecone (diamonds twice as big)
Next we will create Curtain Panelcomponents to populate thesesurfaces.
sharedprofile
1 COPY TO ONE SIDE
2 SKIN FAMILY v2
GHERKIN STUDIES2nd PASS - p 1015
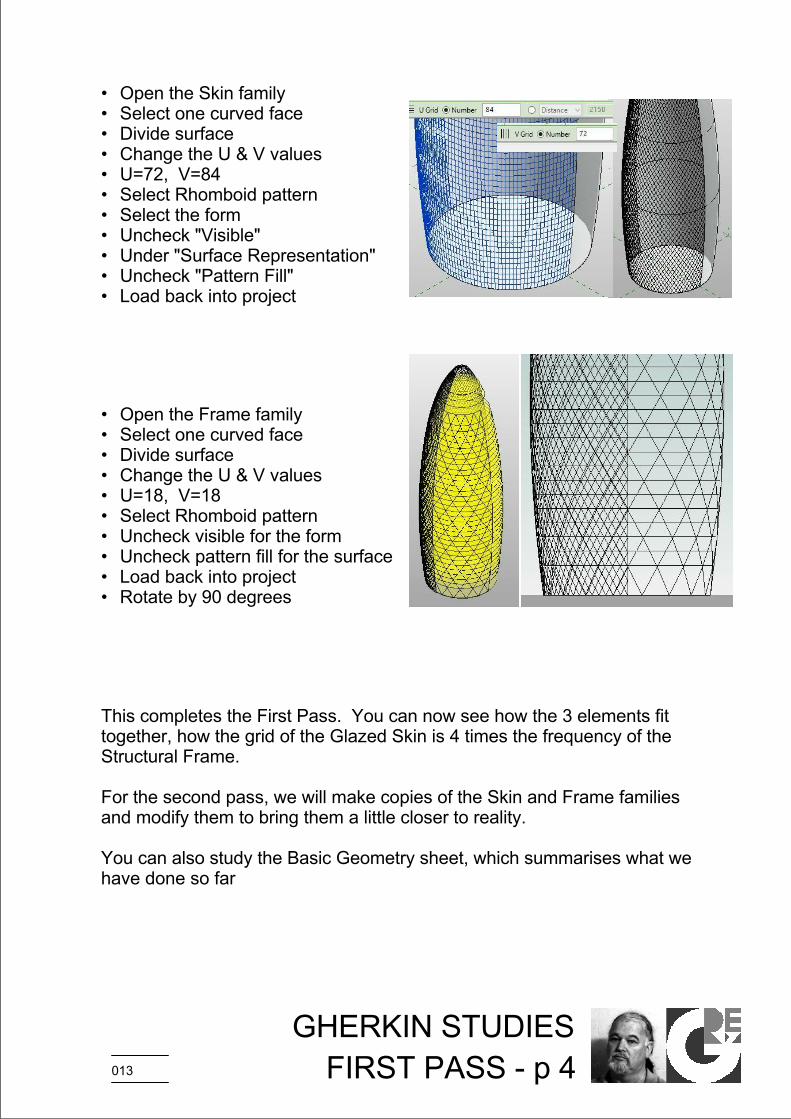
• New Family• Metric Curtain Panel by Pattern• Select the grid• Change type to Rhomboid• Pick a reference line• The entire loop will highlight
change grid typeto rhomboid
select loop ofreference lines
• Create Form• Adjust thickness• Apply material parameter• Create 2 types• Clear Glass & Black Glass• Save family as CPP-just glass• Load into Skin family
associate parameter
• Select cone surface• Drop down type selector• Choose the black glass type• Surface will populate• May take a couple of minutes• Select shaft surface• Populate with clear glass
CPP-just glass/ black glass
CPP-just glass/ clear glass
We have kept the Panel familyvery simple at this stage to reducethe load on the processor. Laterwe could add a frame around theedge of the glass
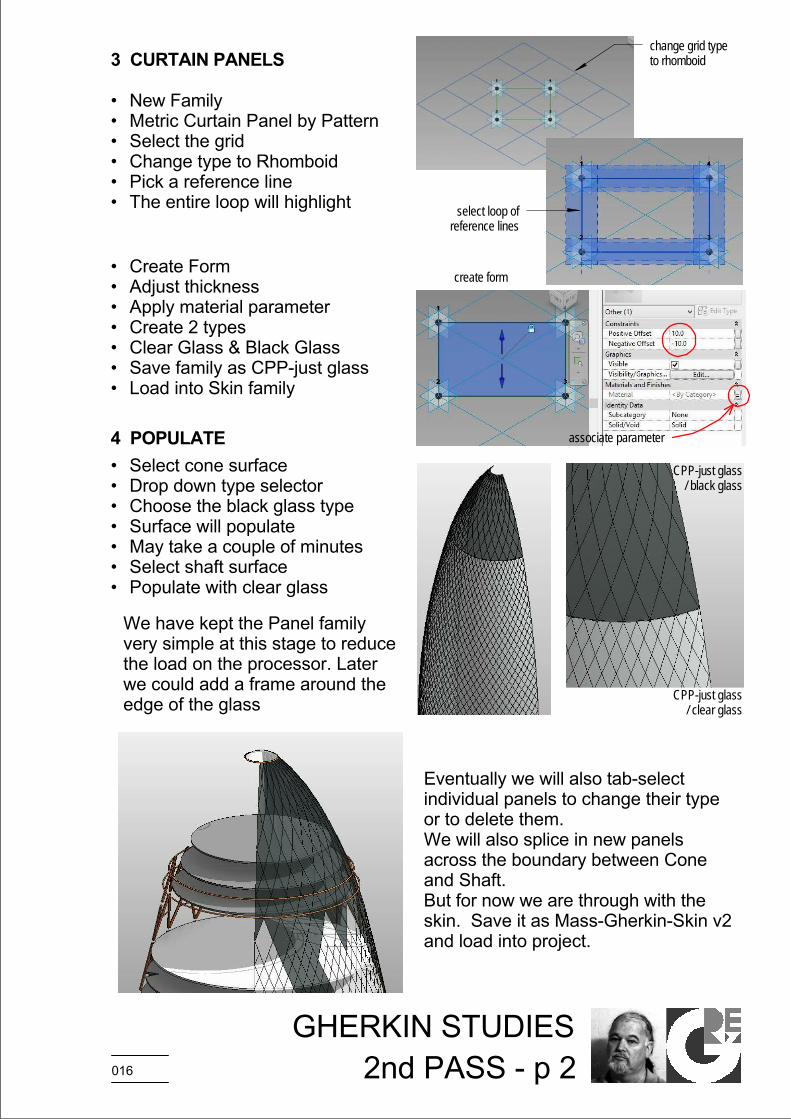
Eventually we will also tab-selectindividual panels to change their typeor to delete them.We will also splice in new panelsacross the boundary between Coneand Shaft.But for now we are through with theskin. Save it as Mass-Gherkin-Skin v2and load into project.
create form
3 CURTAIN PANELS
4 POPULATE
GHERKIN STUDIES2nd PASS - p 2016

• Open Mass-Gherkin-Frame• Save as Mass-Gherkin-Frame v2• Dissolve the form• Add one more circle at the top• Offset 159.6m Radius 13.5m• Select all 5 circles & create form• Select a half surface & divide• U=19, V=18• Change type to 1/2 Step
Next we will make an A framecomponent to populate this new grid.
6 TWO POINT ADAPTIVE
First an adaptive component torepresent a tubular steel member
• New Family• Metric Generic Model Adaptive• Place 2 points, make them adaptive• Connect with a ref line• Place a point, hosted on the line• Host circles on the points• Add radius dimensions & label them• Select circles and ref line• Create Form, add material parameter• Save family
• New Family• Metric Curtain Panel by Pattern• Select the grid, change to 1/2 step• Draw diagonal ref lines as shown• Load the 2 point adaptive family• Place 3 instances• Link parameters for the radii
5 FRAME FAMILY v2
7 STEEL A-FRAME PANEL
GHERKIN STUDIES2nd PASS - p 3017

• Save as "CPP-Aframe_step"• Load into Mass-Gherkin-Frame• Select the 1/2 Step grid• Populate with the A-frame• Save as Mass-Gherkin-Frame v2• Load into project• Update the concentric forms• Skin & Frame should be v2• Add real floors
3 original families as created in First Pass3 concentric familiesFrame & Skin = v2Real floors added
We have now completed the Second PassYour project should look like the image belowIf you can see the mass forms, you may havemissed some visibility settings
Mass floor face material setunder Object StylesChoose Default Floor FaceChange from Red to Yellow
under Visibility Graphics for the viewMass category is onForm subcategory is off
GHERKIN STUDIES2nd PASS - p 4018