Embed Size (px)
Citation preview

Structural Behavior

� Gravity Load System
� Supports Dead, Live, Roof Live, Snow, and other loads that result from gravitational pull.
� Lateral Force System � Supports Wind, Seismic, Fluid, Soil loads that push laterally on the structure
� Both systems must provide a COMPLETE and IDENTIFIABLE load path
� Principles of Statics and Structural Analysis are used to trace the loads through the structure.


� Gravity Loads are generally supported by systems of beams and columns.
� In Timber systems: � Loads are applied to sheathing which acts as a continuous
beam supported by closely spaced beams known as JOISTS or by TRUSSES
� The JOISTS are generally supported by BEAMS or TRUSSES or WALLS
� BEAMS are generally supported by other beams or COLUMNS � Timber Walls consist of a series of closely spaced columns
know as STUDS � BEAMS, COLUMNS, and WALLS can be supported by other
BEAMS, COLUMNS, WALLS, or FOUNDATIONS
� You must always be able to identify the support for each structural element all the way to the ground!

Sheathing supported by joists
Joists supported by beam & wall

Wall consists of columns
called studs
Beam supported by columns


� As in all structures, it is critical that there be identifiable continuous load paths.
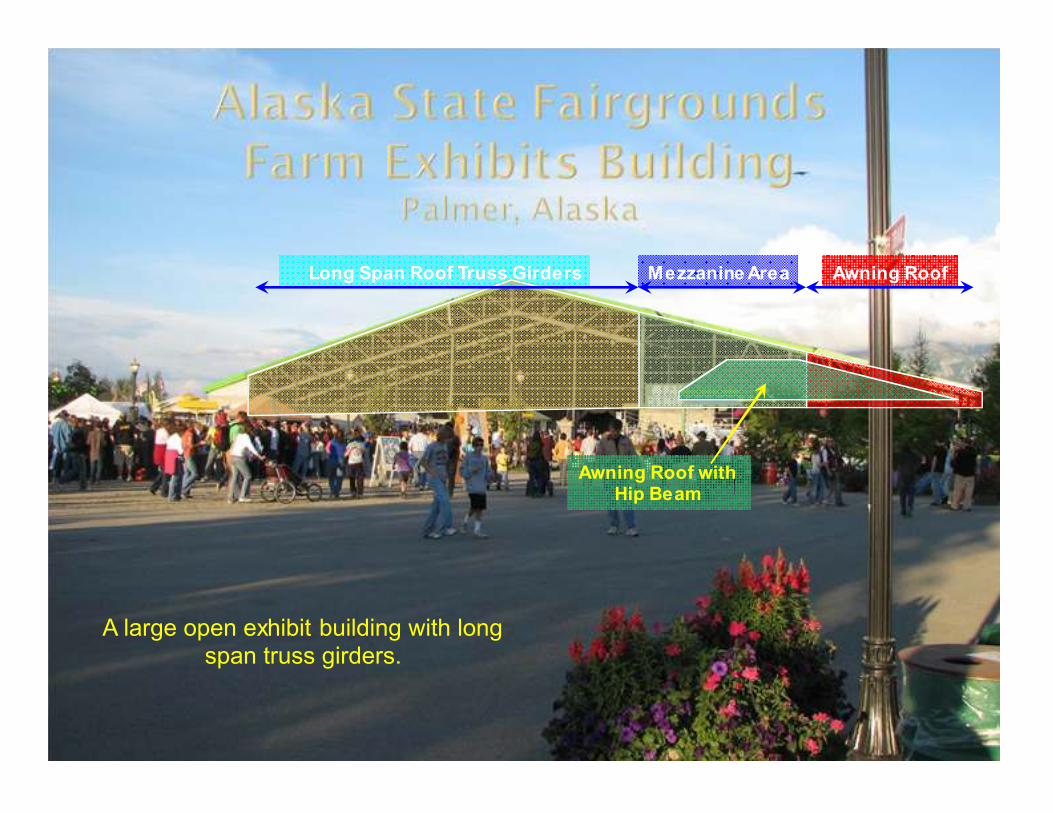
A large open exhibit building with long span truss girders.
Long Span Roof Truss Girders Mezzanine Area Awning Roof
Awning Roof with Hip Beam

Load rests on roof deck
Roof deck transfers load to supporting joists. Each joist supports
an area equal to its
span times half the distance to the joist
on either side.
The joists transfer their loads to the
supporting truss girders.
Each truss girder supports an area equal to its span times
half the distance to the girder on either side. The truss girders
transfer their loads
to the supporting piers and columns.
The pier supports half the area supported by the truss
girder plus area from other structural elements that it
supports.
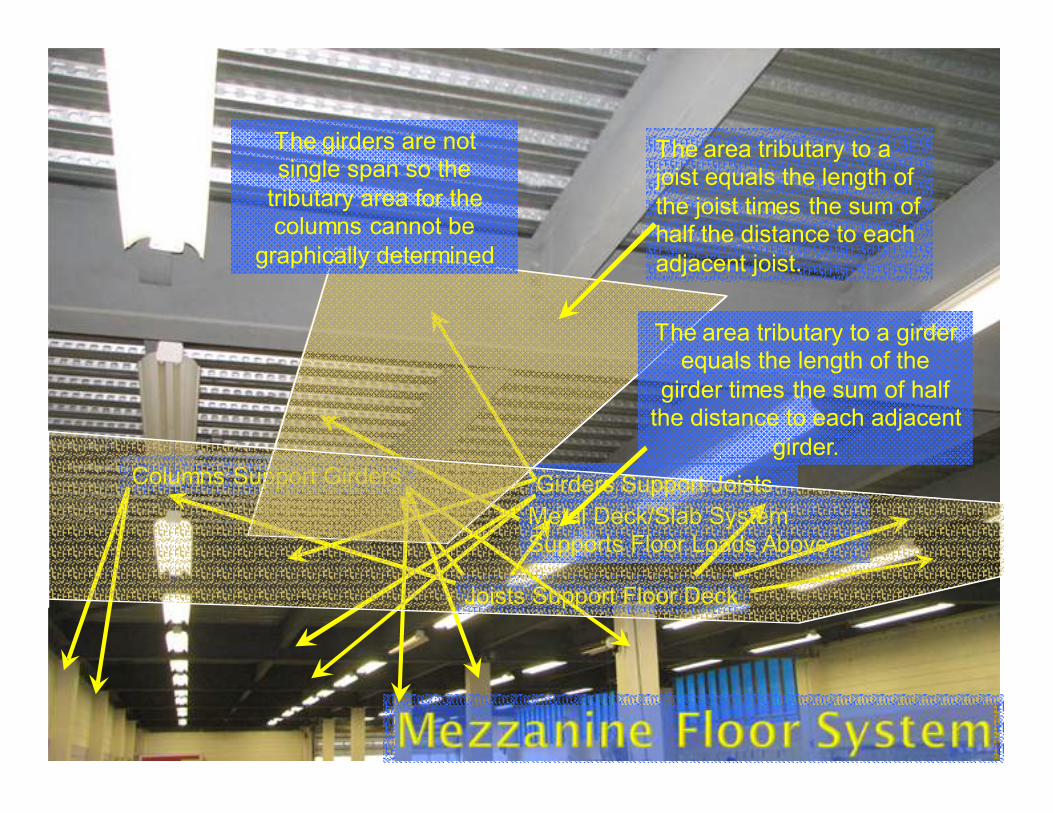
Metal Deck/Slab System Supports Floor Loads Above
Joists Support Floor Deck
Girders Support Joists Columns Support Girders
The area tributary to a joist equals the length of
the joist times the sum of half the distance to each
adjacent joist.
The area tributary to a girder equals the length of the
girder times the sum of half the distance to each adjacent
girder.
The girders are not single span so the
tributary area for the columns cannot be
graphically determined

Deck carries load to edge joist and wall.
Exterior joist carried load to the supporting cantilever
beam ends
The load diagram for the cantilever (excluding self wt)
consists of a single point load at the end of the
cantilever.
The point load consists of the reaction from the two
supported joists which equals the tributary area (1/2
the cantilever span times the
spacing of the cantilevers) times the pressure load on
the floor plus the self weight of the joist.

This beam picks up load from joists of varying lengths. In this case the
resulting load distribution would have a linearly varying component.
The illustrated area is part of the
tributary area at the roof deck level.
The hip beam also picks up a point load reaction from a pair of the roof
girders.

� Check out the drawings for the House found on the website for the Beginner’s Guide to Structural Engineering:
www.bgstructuralengineering.com
� For each member:
� Identify what the member supports
� Draw a load diagram for the member
� Identify what supports the member
� Compute the reactions for the member and identify where they appear on the supporting member


� Lateral forces are applied to wall/roof systems which generally transfer the forces to horizontal diaphragms
� Horizontal diaphragms are used to transfer forces to the vertical components of the LFRS
� The three most common types of vertical LFRS components are: � Rigid Frames
� Vertical Truss
� Lateral forces are resisted by axial forces in the members
� Bracing is used to create a truss
� Connections are generally assumed to be pinned
� Shear Walls
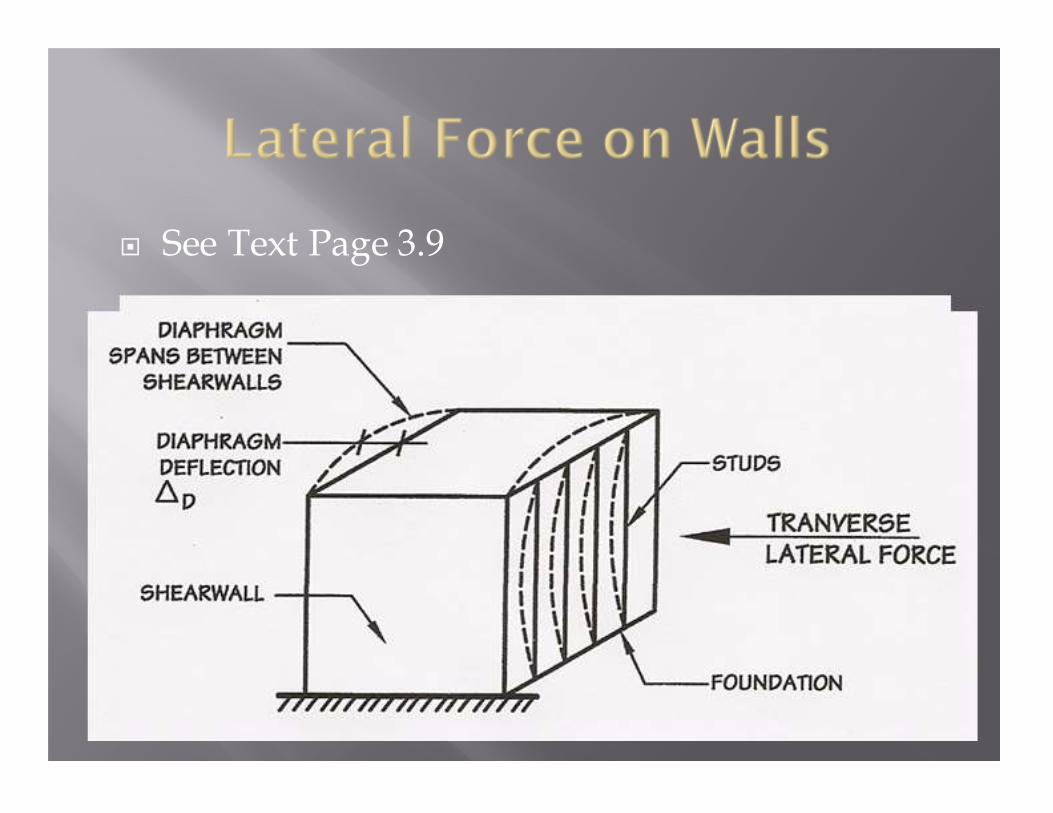
� See Text Page 3.9

For lateral pressures, the siding spans between the
horizontal girts (yet another fancy word for a beam!)
The girts support half the siding to the adjacent girts. This is the
tributary area for one girt.
The girts transfer their lateral load to the supporting beam-
columns.
The beam-columns do not support any roof load, they
are here to resist lateral forces that they receive from
the girts. They support an
area that extends from locations half way to the
adjacent beam-columns on each side and from floor to
roof as shown.
The beam-columns transfer their lateral loads equally to
the roof and foundation.

Lateral Pressures
-Roof = 20 psf -2nd Flr = 15 psf
-1st Flr = 10 psf

Roof = 300 sqft 2nd flr = 340 sqft
1st flr = 180 sqft
Roof = 660 sqft 2nd flr = 510 sqft
1st flr = 270 sqft

Direction #1
Roof = 12,000 # = 200 plf
2nd flr = 6,300 # = 105 plf
1st flr = 2,700 # = 45 plf
Direction #2
Roof = 5,200 # = 60 plf to 200 plf
2nd flr = 4,200 # = 105 plf
1st flr = 1,800 # = 45 plf

� Wood diaphragms are considered to be flexible
� Horizontal diaphragms transfer load collected from the walls by beam action to the supporting vertical LFRS components

Direction #1 Reactions
Roof = 6,000 lb = 150 plf
2nd flr = 3,150 lb = 78.8 plf
Direction #2 Reactions
Roof = 2,600 lb = 43.3 plf
2nd flr = 2,100 lb = 35 plf

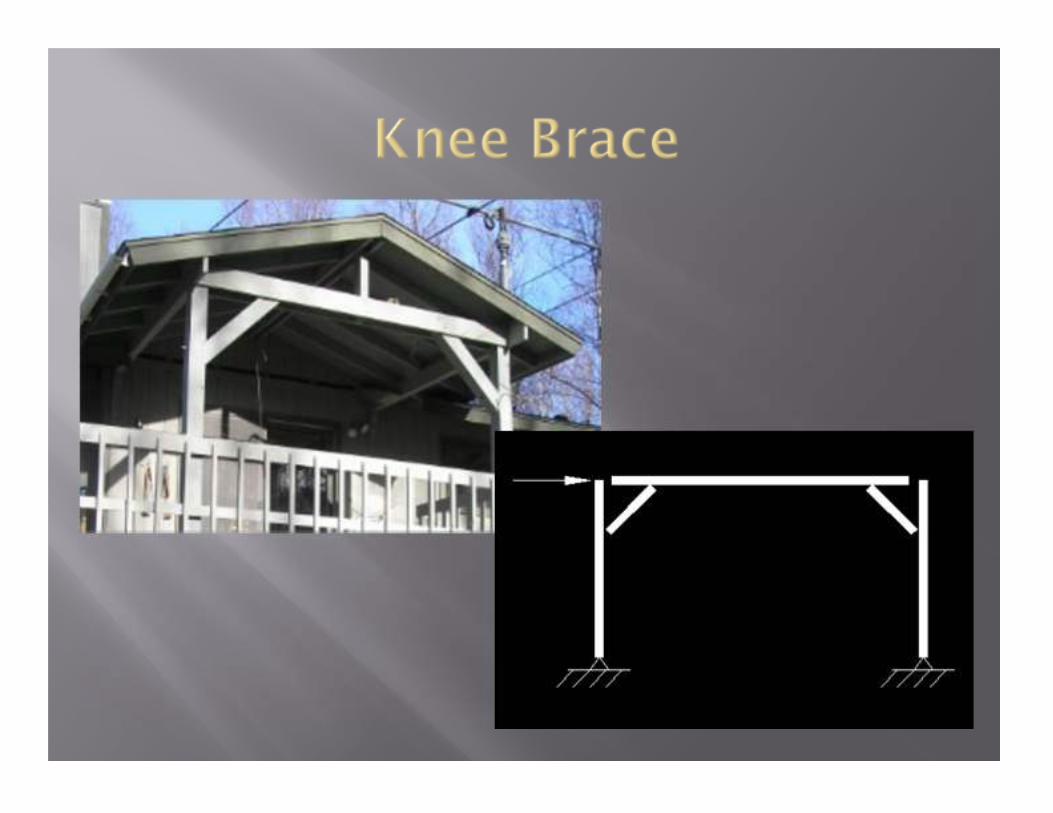
� Lateral forces are resisted by bending in the members
� Moment resisting connections are required
� Difficult to do in timber
� Moment connections can be approximated with KNEE BRACING
� Lots of indeterminate analysis!
� Rigid frames are actually very flexible compared to the other systems
� Called RIGID because the connections are rigid


� Lateral forces are resisted by axial forces in the members
� Bracing is used to create a truss
� Connections are generally assumed to be pinned


� SHEAR WALLS act as vertical cantilever beams
� Shear walls carry the forces via shear in the wall and chord forces to handle the moment
� This is the most common LFRS in timber structures.

Direction #1 Forces
Roof = 6,000 #
2nd flr = 3,150 #
---------------------------
2nd Story Shear = 6,000 lb = 150 plf
1st Story Shear = 9,150 lb = 229 plf
Direction #2 Forces
Roof = 2,600 #
2nd flr = 2,100 #
---------------------------
2nd Story Shear = 2,600 lb = 43.3 plf
1st Story Shear = 4,700 lb = 118 plf