Embed Size (px)
DESCRIPTION
read
Citation preview

User Guide

Legal Notices
Published by Toon Boom Animation Inc.Corporate Headquarters 7 Laurier Avenue East Montreal, Quebec Canada H2T 1E4 Tel: (514) 278-8666 Fax: (514) 278-2666
toonboom.com
DisclaimerThe content of this manual is covered by a specific limited warranty and exclusions and limit of liability under the applicable License Agreement as supplemented by the special terms and conditions for Adobe® Flash® File Format (SWF). Please refer to the License Agreement and to those special terms and conditions for details.
The content of this manual is the property of Toon Boom Animation Inc. and is copyrighted. Any reproduction in whole or in part is strictly prohibited. For additional copies of this manual, please contact Toon Boom Animation Inc. at the Corporate Headquarters address.
Copyright © 2010 by Toon Boom Animation Inc. All rights reserved.
TrademarksToon Boom Storyboard Pro is a trademark owned by Toon Boom Animation Inc. All other trademarks are the property of their respective owners.
CreditsDocumentation Development: Peter Cawthorne
Content Development: Marie-Eve Chartrand, Anouk Whissell, Shabana Ali, Lindsay Brown
Art Development: Marie-Eve Chartrand, Anouk Whissell, Shabana Ali, Tania Gray, Annie Rodrigue
Publication DateOctober 2010

Contents
Chapter 1: Introduction .......................................................................................................................................... 11About Storyboarding ................................................................................................................................................ 12
How to Prepare for Storyboarding ....................................................................................................................... 12First Steps ......................................................................................................................................................... 12Storyboard Basics ............................................................................................................................................. 13
Visual Markers ........................................................................................................................................................... 14Information Icons .................................................................................................................................................. 14
Reference .......................................................................................................................................................... 14Important Note ................................................................................................................................................. 14Tip ..................................................................................................................................................................... 14Tool ................................................................................................................................................................... 14
Chapter 2: Getting Started ................................................................................................................................... 15Launching Toon Boom Storyboard Pro .................................................................................................................... 16The Welcome Screen ................................................................................................................................................ 16
Accessing the Documentation .............................................................................................................................. 17Creating and Opening a Project ............................................................................................................................... 18
Using the Welcome Screen .................................................................................................................................. 18Using the File Menu .............................................................................................................................................. 20new Project From Final Draft Script ..................................................................................................................... 21
Creating a New Project From a Final Draft Script ............................................................................................ 21Creating a New Project From a Final Draft 7 Script ......................................................................................... 23Final Draft Import Settings ............................................................................................................................... 24
Creating a Scene ....................................................................................................................................................... 25Project Properties ..................................................................................................................................................... 26
Settings Tab .......................................................................................................................................................... 26Resolution Tab ...................................................................................................................................................... 27Naming Tab .......................................................................................................................................................... 28
Project Optimization ................................................................................................................................................. 29Optimizing Your Project ....................................................................................................................................... 29Create Optimized Drawings ................................................................................................................................. 29Other Optimization Suggestions .......................................................................................................................... 30
Texture vs. Plain Vector Brush .......................................................................................................................... 30Flattening Your Drawings ................................................................................................................................. 30Bitmap Integration ............................................................................................................................................ 30
Backing Up Projects .................................................................................................................................................. 31Backup Storyboard ............................................................................................................................................... 31Restore and Open Backup .................................................................................................................................... 31
Basic Commands ...................................................................................................................................................... 32
Chapter 3: Discovering the Interface ................................................................................................................ 35User Interface ............................................................................................................................................................ 36
Views and Toolbars ............................................................................................................................................... 36Interface Highlights ............................................................................................................................................... 37
Camera View ..................................................................................................................................................... 38Thumbnails View .............................................................................................................................................. 42Tools Toolbar .................................................................................................................................................... 42Storyboard Toolbar .......................................................................................................................................... 43Playback Toolbar .............................................................................................................................................. 43Panel View ........................................................................................................................................................ 44Storyboard View .............................................................................................................................................. 45Tool Properties View ........................................................................................................................................ 46Colour View ...................................................................................................................................................... 46Menus ............................................................................................................................................................... 48
Managing the Views ................................................................................................................................................. 50Adding a New View .............................................................................................................................................. 50Renaming a View ................................................................................................................................................. 51Closing a View ...................................................................................................................................................... 51
1

Storyboard Pro 2 User Guide
Swapping Views .................................................................................................................................................... 52Resizing a View ..................................................................................................................................................... 52Collapsing and Expanding Views ........................................................................................................................ 53
Managing the Toolbars ............................................................................................................................................ 54Showing or Hiding Toolbars ................................................................................................................................. 54Moving Toolbars ................................................................................................................................................... 54Toolbar Manager .................................................................................................................................................. 55
Managing the Workspace ......................................................................................................................................... 57Storyboard Pro Workspaces ................................................................................................................................ 57Loading a Workspace ........................................................................................................................................... 58Workspace Manager ............................................................................................................................................ 58
Creating a New Workspace .............................................................................................................................. 59Renaming a Workspace .................................................................................................................................... 60Saving a Workspace ......................................................................................................................................... 60Deleting a Workspace ...................................................................................................................................... 60Showing and Hiding a Workspace ................................................................................................................... 61Reordering the Workspace List ........................................................................................................................ 61
Restoring the Default Workspaces ....................................................................................................................... 62Interface Navigation ................................................................................................................................................. 62
Navigation Toolbar .............................................................................................................................................. 64Displaying the Navigation Toolbar .................................................................................................................. 64Using the Navigation Toolbar ......................................................................................................................... 64
Preferences ............................................................................................................................................................... 65Preference Highlights ........................................................................................................................................... 65
Accessing the Preferences Panel ...................................................................................................................... 65User Interface Preferences - General Tab ........................................................................................................ 66User Interface Preferences - Advanced Tab .................................................................................................... 67User Interface Preferences - Global UI tab ...................................................................................................... 68User Interface Preferences - Camera Tab ....................................................................................................... 69
Keyboard Shortcuts .............................................................................................................................................. 72Selecting a Keyboard Shortcut Set ................................................................................................................. 72Customizing a Keyboard Shortcut .................................................................................................................... 72
Chapter 4: Script and Panels................................................................................................................................ 75Importing a Script .................................................................................................................................................... 76
Storyboard View .................................................................................................................................................. 76Project Information .......................................................................................................................................... 76Script Caption .................................................................................................................................................. 76
Import Caption .................................................................................................................................................... 77Importing a Script From Final Draft ...................................................................................................................... 78
Exporting Your Final Draft Version 7 Script as an *.XML File .......................................................................... 79Captions .................................................................................................................................................................... 80
Panel View ............................................................................................................................................................ 80Panel Information ............................................................................................................................................. 80Selection Information ....................................................................................................................................... 80Voice Annotations ............................................................................................................................................ 80Panel Captions .................................................................................................................................................. 81
Adding Text to the Panel Captions ...................................................................................................................... 81Drag and Drop Text ......................................................................................................................................... 81Typing Text ....................................................................................................................................................... 82Formatting Text ................................................................................................................................................ 82Find Text in Captions ....................................................................................................................................... 83
Expanding and Collapsing Captions .................................................................................................................... 84Adding Captions to the Storyboard ..................................................................................................................... 85Adding Captions to the Panels ............................................................................................................................ 86Adding a Sketch Caption to a Panel .................................................................................................................... 87Deleting Captions ................................................................................................................................................. 87Renaming Captions .............................................................................................................................................. 88Saving the Caption Layout as Default .................................................................................................................. 88Update Captions From CSV ................................................................................................................................. 89
Scenes and Panels .................................................................................................................................................... 91
2

Contents
What is the Difference Between Scenes, Panels and Acts? ................................................................................. 91Scenes ................................................................................................................................................................... 91
Creating Scenes ................................................................................................................................................ 92Create Scene Before ......................................................................................................................................... 92Import Images as Scenes .................................................................................................................................. 92Automatic Insertion .......................................................................................................................................... 93Deleting Scenes ................................................................................................................................................ 95Renaming Scenes .............................................................................................................................................. 96Locking and Unlocking Scene and Panel Names ............................................................................................. 97Split Current Scene ........................................................................................................................................... 98
Panels .................................................................................................................................................................... 98Creating Panels ................................................................................................................................................. 99Create Panel Before ......................................................................................................................................... 99Smart Add Panel ............................................................................................................................................. 100Renaming Panels ............................................................................................................................................ 101Locking and Unlocking Scene and Panel Names ........................................................................................... 104Deleting Panels ............................................................................................................................................... 104Duplicating Panels .......................................................................................................................................... 105Moving Panels Around ................................................................................................................................... 105
Acts ..................................................................................................................................................................... 107Enabling Acts .................................................................................................................................................. 107Starting New Acts ........................................................................................................................................... 108Joining Selected Acts ..................................................................................................................................... 108
Navigation Toolbar ................................................................................................................................................. 109Displaying the Navigation Toolbar ..................................................................................................................... 109Using the Navigation Toolbar ............................................................................................................................. 109
First Panel and Last Panel ............................................................................................................................. 109 Previous Scene and Next Scene ................................................................................................................... 109 Previous Panel and Next Panel ..................................................................................................................... 109 First Frame and Last Frame .......................................................................................................................... 109
Preferences ............................................................................................................................................................. 110General Tab ........................................................................................................................................................ 110
Show Rename Dialog Automatically .............................................................................................................. 110Automatically Add Leading Zeros to Scene Names ....................................................................................... 111Minimum Number of Characters .................................................................................................................... 111Allow Custom Panel Names ........................................................................................................................... 111Panel Name Auto-increment Rule .................................................................................................................. 111Display Total Number of Panels in Panel Name ............................................................................................. 112Enable Acts ..................................................................................................................................................... 112
Import/Export Tab .............................................................................................................................................. 113Auto Premultiply Imported Image by Alpha Channel .................................................................................... 113Ask Before Creating Panels when Using Automatic Insertion ....................................................................... 113Ask Before Removing Existing Layer when Using Automatic Insertion ......................................................... 113
Chapter 5: Drawing ................................................................................................................................................ 115How to Draw ........................................................................................................................................................... 116Tool Properties View ............................................................................................................................................... 117
Options ............................................................................................................................................................... 117Operations .......................................................................................................................................................... 117Shape .................................................................................................................................................................. 117Manipulators ....................................................................................................................................................... 117
Drawing with the Brush or the Pencil ..................................................................................................................... 118Viewing the Final Lines as you Draw ....................................................................................................................... 119
Full Scene Antialiasing ....................................................................................................................................... 119Drawing with the Brush Tool .................................................................................................................................. 120
Brush Tool Options ............................................................................................................................................. 121Regular Brush Mode ....................................................................................................................................... 121Draw Behind Mode ......................................................................................................................................... 121Auto Flatten Mode ......................................................................................................................................... 121Brush Styles ..................................................................................................................................................... 122Minimum and Maximum Size ......................................................................................................................... 125Smoothness and Contour Optimization ......................................................................................................... 125
3

Storyboard Pro 2 User Guide
Brush Tips ....................................................................................................................................................... 125Preview ........................................................................................................................................................... 125Line Texture ................................................................................................................................................... 126
Brush Presets ..................................................................................................................................................... 126Managing Brush Presets ................................................................................................................................. 128
Drawing with Line Texture ..................................................................................................................................... 129How to Draw with Texture ................................................................................................................................ 130Adjusting the Line Texture Parameters .............................................................................................................. 131Creating Texture Brushes .................................................................................................................................. 132
Drawing using the Pencil Tool ................................................................................................................................ 133Pencil Tool Options ............................................................................................................................................ 134
Draw Behind ................................................................................................................................................... 134Auto-Close Gap ............................................................................................................................................. 134Auto Flatten Mode ......................................................................................................................................... 135Pen Styles ....................................................................................................................................................... 135Pen Size .......................................................................................................................................................... 136Smoothness .................................................................................................................................................... 136
Drawing using Invisible Lines .................................................................................................................................. 137Pencil Tool ......................................................................................................................................................... 137
Erasing Parts of a Drawing ..................................................................................................................................... 138Eraser Tool Options ............................................................................................................................................ 139
Minimum and Maximum Size ......................................................................................................................... 139Smoothness and Contour Optimization ......................................................................................................... 139Eraser Tips ...................................................................................................................................................... 139Preview ........................................................................................................................................................... 140Eraser Styles ................................................................................................................................................... 140
Reshaping a Drawing Using the Contour Editor Tool ............................................................................................ 142Contour Editor Tool Properties .......................................................................................................................... 143
Lasso and Marquee ........................................................................................................................................ 143Snap to Contour ............................................................................................................................................ 144
Selecting Drawing Objects ..................................................................................................................................... 145Repositioning a Pivot Point ................................................................................................................................ 147Select Tool Properties ........................................................................................................................................ 148
Lasso and Marquee ........................................................................................................................................ 148Snap Options .................................................................................................................................................. 148Select by Colour ............................................................................................................................................ 148Flip Horizontal and Vertical ............................................................................................................................ 149Rotate 90 Degrees CW and CCW .................................................................................................................. 149Smooth ........................................................................................................................................................... 149Flatten ............................................................................................................................................................. 149
Drawing With Shapes ............................................................................................................................................. 151Shape Tool Options ............................................................................................................................................ 152
Line, Rectangle and Ellipse ............................................................................................................................ 152Draw Behind ................................................................................................................................................... 152Snap options ................................................................................................................................................... 152Automatic Filling ............................................................................................................................................ 153Auto Flatten Mode ......................................................................................................................................... 153Auto-Close Gap ............................................................................................................................................. 153Keep Proportion ............................................................................................................................................. 153Pen Styles ....................................................................................................................................................... 153Size Adjustment .............................................................................................................................................. 154
Deforming a Drawing Using the Perspective Tool ................................................................................................. 155Perspective Tool Properties ............................................................................................................................... 155
Lasso and Marquee ........................................................................................................................................ 155Flip Horizontal and Vertical ............................................................................................................................ 156 Rotate 90 Degrees CW and CCW ................................................................................................................ 156
Cutting Drawing Parts ............................................................................................................................................ 157Cutter Tool Options ........................................................................................................................................... 158
Lasso and Marquee ........................................................................................................................................ 158Working With Text ................................................................................................................................................. 159
Creating Text ...................................................................................................................................................... 159
4

Contents
Formatting the Text ........................................................................................................................................... 160Font Type ....................................................................................................................................................... 160Font Style ....................................................................................................................................................... 160Alignment ...................................................................................................................................................... 161Font Size ......................................................................................................................................................... 161Kerning .......................................................................................................................................................... 161Indent ............................................................................................................................................................. 161Line Spacing ................................................................................................................................................... 162
Resizing the Text Box ........................................................................................................................................ 162Converting Text into Separate Objects ............................................................................................................. 163
Override Tool .......................................................................................................................................................... 163Onion Skin .............................................................................................................................................................. 164
Onion Skin Flipbook feature ............................................................................................................................... 165Expand Onion Skin ............................................................................................................................................ 165
Light Table .............................................................................................................................................................. 166More Drawing Tools ............................................................................................................................................... 167
Convert ............................................................................................................................................................... 167Brush Strokes to Pencil Lines .......................................................................................................................... 167Pencil Lines to Brush Strokes .......................................................................................................................... 167Strokes to Pencil Lines .................................................................................................................................... 167
Show Grid ........................................................................................................................................................... 168Group/Ungroup ................................................................................................................................................. 168Hand ................................................................................................................................................................... 168Rotate View ......................................................................................................................................................... 169Zoom ................................................................................................................................................................... 169
Zoom Tool Properties ..................................................................................................................................... 169Drawing Preferences ............................................................................................................................................... 171
Advanced Preferences Tab ................................................................................................................................ 171Memory ......................................................................................................................................................... 171Drawing ........................................................................................................................................................ 171Open GL ....................................................................................................................................................... 172Full Scene Antialiasing .................................................................................................................................... 172Tablet Support ................................................................................................................................................ 172
Camera PreferencesTab ..................................................................................................................................... 173Onion Skin ...................................................................................................................................................... 173
Tools .................................................................................................................................................................. 174Drawing ......................................................................................................................................................... 174
Chapter 6: Adding Colour................................................................................................................................... 175How to Paint .......................................................................................................................................................... 176Colours .................................................................................................................................................................... 177
Adding a Colour Swatch .................................................................................................................................... 178Solid Colour Swatch ...................................................................................................................................... 178Gradient Colour Swatch ................................................................................................................................ 181Bitmap Texture Swatch .................................................................................................................................. 183
Deleting a Colour Swatch .................................................................................................................................. 184Copying and Pasting Colours ............................................................................................................................ 184
Colour Display Modes ........................................................................................................................................... 185Switching Between Swatch and List Display modes .......................................................................................... 185
Selecting the Current Colour of a Tool ................................................................................................................. 186Painting Using the Paint Tool ................................................................................................................................. 188
Paint Tool Properties ......................................................................................................................................... 189 Lasso and Marquee ...................................................................................................................................... 189 Painting Mode .............................................................................................................................................. 189 Automatic Close Gap ................................................................................................................................... 190 Selecting a Colour in a Drawing ................................................................................................................... 191
Editing Gradients and Textures ............................................................................................................................. 193Closing Gaps Manually .......................................................................................................................................... 194Preferences ............................................................................................................................................................ 195
Tools ................................................................................................................................................................... 195Auto Gap Closing .......................................................................................................................................... 195
5

Storyboard Pro 2 User Guide
Chapter 7: Layers .................................................................................................................................................... 197What Are Layers? .................................................................................................................................................... 198
Drawing on a Layer ............................................................................................................................................. 198Managing Layers ..................................................................................................................................................... 199
Adding Layers to a Panel .................................................................................................................................... 199Copying Layers ................................................................................................................................................... 199Renaming Layers ................................................................................................................................................. 200Deleting Layers ................................................................................................................................................... 200Locking and Unlocking Layers ............................................................................................................................ 201Showing and Hiding Layers ................................................................................................................................ 201Layer Thumbnails ................................................................................................................................................ 202Changing Layer Opacity ..................................................................................................................................... 203Ordering Layers .................................................................................................................................................. 204
Reordering Layers via the Layers menu .......................................................................................................... 204Reorder Layers by Dragging .......................................................................................................................... 205
Toggle Background Layers ................................................................................................................................. 205Setting a Layer Layout as Default ....................................................................................................................... 205
Importing Images as Layers .................................................................................................................................... 206Merging Layers ....................................................................................................................................................... 207Layer Export ............................................................................................................................................................ 208preferences ............................................................................................................................................................. 209
Chapter 8: Libraries................................................................................................................................................ 211Understanding the Library Concept ...................................................................................................................... 212
What is a Library? ............................................................................................................................................... 212What is a Template? .......................................................................................................................................... 212
Library View ........................................................................................................................................................... 213Preview .............................................................................................................................................................. 214Quick Search ...................................................................................................................................................... 215Library List ......................................................................................................................................................... 216Templates List .................................................................................................................................................... 216
Structuring the Library ........................................................................................................................................... 217Creating a Library .............................................................................................................................................. 217Opening a Library .............................................................................................................................................. 218Closing a Library ................................................................................................................................................ 218Creating a Folder ............................................................................................................................................... 218
Renaming a Folder ........................................................................................................................................ 218Deleting a Folder ........................................................................................................................................... 219
Refreshing the Library ....................................................................................................................................... 219Generating Thumbnails ..................................................................................................................................... 220
Deleting Thumbnails ....................................................................................................................................... 220Templates .............................................................................................................................................................. 221
Creating a Template ........................................................................................................................................... 221Creating a Template from the Camera view .................................................................................................. 221Creating a Template from the Thumbnails view ............................................................................................ 221Creating a Template from the Timeline view ................................................................................................. 222
Deleting a Template .......................................................................................................................................... 223Importing Files as Templates Using the Library View ........................................................................................... 224
Importing Image Files ........................................................................................................................................ 224Importing Audio Files ........................................................................................................................................ 224Importing Adobe Flash Movie Files ................................................................................................................... 224
Importing Templates ............................................................................................................................................. 225Importing a Template in the Camera view ........................................................................................................ 225Importing a Template in the Thumbnails View .................................................................................................. 225Importing a Template in the Timeline View ....................................................................................................... 226Opening a Template as a Folder ....................................................................................................................... 227
Preferences ............................................................................................................................................................ 228General Tab ........................................................................................................................................................ 228
Automatically Generate Thumbnails in Library .............................................................................................. 228
6

Contents
Chapter 9: Animatic ............................................................................................................................................... 229Timeline View .......................................................................................................................................................... 230Panel Duration ........................................................................................................................................................ 231
Setting the Panel Duration Visually .................................................................................................................... 231Resizing a Panel in the Timeline and Shifting all Other Panels Down ............................................................ 231Resizing a Panel While Only Affecting the Next Panel .................................................................................. 231
Setting the Panel Duration in the Panel View ..................................................................................................... 232Setting the Panel Duration from the Top Menu ................................................................................................. 232Split Panel at Current Frame .............................................................................................................................. 233
Camera .................................................................................................................................................................... 234Camera Status Bar .............................................................................................................................................. 235Camera Tool ....................................................................................................................................................... 235Static Camera ...................................................................................................................................................... 235
Setting the Static Camera ............................................................................................................................... 235Copying the Static Camera from one Scene to Another ............................................................................... 237Resetting the Static Camera ........................................................................................................................... 238
Animating the Camera ............................................................................................................................................ 239Camera Tool Properties ...................................................................................................................................... 239
Add Keyframe at the Beginning of Current Panel .......................................................................................... 239 Add Keyframe ................................................................................................................................................ 239 Add Keyframe at the End of Current Panel ................................................................................................... 239 Reset Camera Animation ............................................................................................................................... 239Ease In/Ease Out ............................................................................................................................................ 240
Camera Keyframes .............................................................................................................................................. 240Keyframes in the Timeline View ...................................................................................................................... 240Keyframes in the Camera view ....................................................................................................................... 241Creating Camera Keyframes ........................................................................................................................... 241Moving Keyframes in the Camera View .......................................................................................................... 243Modifying the Trajectory With Control Points ............................................................................................... 245Moving Keyframes in the Timeline ................................................................................................................. 246Keyframe Synching ......................................................................................................................................... 250Easing ............................................................................................................................................................. 252Deleting Keyframes ........................................................................................................................................ 253Resetting the Camera Animation ................................................................................................................... 253
Animating Layers .................................................................................................................................................... 254Pivot Tool ............................................................................................................................................................ 254
Snap to Contour ............................................................................................................................................ 254 Snap and Align ............................................................................................................................................. 254 Reset Pivot .................................................................................................................................................... 254
Setting the Pivot for a Layer .............................................................................................................................. 255First Frame Transformation and Last Frame Transformation Tools .................................................................... 256
Flip Horizontal and Flip Vertical .................................................................................................................... 256 Rotate 90 degrees CW and Rotate 90 degrees CCW ................................................................................... 256Ease In and Ease Out ...................................................................................................................................... 256Hold Start and Hold End ................................................................................................................................ 256
Set First and Last Frame Positions ...................................................................................................................... 257Adjust First and Last Frame Transformation Positions ....................................................................................... 259
Ease In and Ease Out ...................................................................................................................................... 259old ................................................................................................................................................................... 259Copy End Position from Start Position ........................................................................................................... 260Copy Start Position from End Position ........................................................................................................... 260Spread Layer Motion ...................................................................................................................................... 260Reset Transformation ...................................................................................................................................... 260
Sound ...................................................................................................................................................................... 261Managing Sound Tracks ..................................................................................................................................... 261
Adding a Sound Track .................................................................................................................................... 261Muting a Sound Track ..................................................................................................................................... 262Linking a Sound Track ..................................................................................................................................... 262Deleting a Sound Track .................................................................................................................................. 263
Adding and Deleting Sound Sequences ............................................................................................................ 263Importing a Sound Sequence ......................................................................................................................... 263
7

Storyboard Pro 2 User Guide
Deleting a Sound Sequence ........................................................................................................................... 264Sound Display ..................................................................................................................................................... 264
Show Waveform ............................................................................................................................................. 264Show Volume Envelope .................................................................................................................................. 265
Sound Scrubbing ................................................................................................................................................ 266Adjusting the Sound Length ............................................................................................................................... 266
Shortening and Extending Sound Sequences ................................................................................................ 266Split Sound Sequence at Current Frame ........................................................................................................ 267
Transitions ............................................................................................................................................................... 268Creating Transitions ............................................................................................................................................ 268Modifying a Transition ........................................................................................................................................ 270
Change Transition Type ................................................................................................................................. 270Change Transition Duration ........................................................................................................................... 270
Deleting a Transition .......................................................................................................................................... 270Playing Back Your Animatic .................................................................................................................................... 271Preferences ............................................................................................................................................................. 272
Global UI ............................................................................................................................................................. 272Display Duration in Time Code Format .......................................................................................................... 272
Camera ............................................................................................................................................................... 273Options ........................................................................................................................................................... 273Point of View .................................................................................................................................................. 273Keyframes and Control Points ........................................................................................................................ 274
Tools ................................................................................................................................................................... 274Transform ........................................................................................................................................................ 274
Import/Export ..................................................................................................................................................... 275Import Sound .................................................................................................................................................. 275
Chapter 10: Storyboard Supervision............................................................................................................... 277Tracking Changes ................................................................................................................................................... 278
Auto Tracking Mode ........................................................................................................................................... 278Track Changes By Date ...................................................................................................................................... 279Validating Changes ............................................................................................................................................. 280
Voice Annotations ................................................................................................................................................... 282Recording Voice Annotations ............................................................................................................................. 282Listening to Voice Annotations .......................................................................................................................... 283Deleting Voice Annotations ................................................................................................................................ 283
Chapter 11: Exporting Your Storyboard ....................................................................................................... 285Exporting to PDF ................................................................................................................................................... 286
Setting Up a PDF Export ................................................................................................................................... 286Adding Security to Your PDF ............................................................................................................................ 288Creating a Custom Layout ................................................................................................................................. 289
General Tab .................................................................................................................................................... 290Page Tab ........................................................................................................................................................ 291Storyboard Tab .............................................................................................................................................. 291Header Tab .................................................................................................................................................... 295Footer Tab ..................................................................................................................................................... 296Labeling Tab .................................................................................................................................................. 297
PDF Options Panel ............................................................................................................................................ 298Analyse and Export to PDF ............................................................................................................................... 299Adding Snapshot Markers to a Panel ................................................................................................................ 302Deleting Snapshot Markers from a Panel .......................................................................................................... 302
Export to CSV ........................................................................................................................................................ 303Export Bitmap ........................................................................................................................................................ 304
File Name Patterns When Exporting .................................................................................................................. 304Exporting the Current Image ............................................................................................................................ 305Exporting Your Storyboard to Bitmap ................................................................................................................ 306
Exporting a Movie ................................................................................................................................................. 308Exporting a QuickTime Movie ........................................................................................................................... 308
QuickTime Movie Settings ............................................................................................................................ 310Exporting a QuickTime Movie with Transparency ........................................................................................ 312
8

Contents
Exporting an SWF Movie (Flash) ........................................................................................................................ 313Exporting an Image Sequence .......................................................................................................................... 315
Export to EDL/AAF/XML ....................................................................................................................................... 317File Name Patterns When Exporting .................................................................................................................. 317
Export to Animate ................................................................................................................................................. 321Conformation ......................................................................................................................................................... 322
Export Project .................................................................................................................................................... 322Export Selected Panels ...................................................................................................................................... 323Export Tracked Panels ....................................................................................................................................... 323Import Animatic ................................................................................................................................................. 324
Preferences ............................................................................................................................................................ 325Storyboard Pro Export Preferences ................................................................................................................... 325
Export to Movie ............................................................................................................................................. 325Export to Bitmap ........................................................................................................................................... 326
INDEX .......................................................................................................................................................................... 327
9

Storyboard Pro 2 User Guide
10

Chapter 1 Introduction
Toon Boom Storyboard Pro is a complete storyboarding software with advanced features for all your project’s needs.
Whether you are planning an animation, a live action production or an event, Storyboard Pro takes care of your entire storyboard and animatic project. From importing your script and images, drawing, editing captions, all the way to layer and camera movements and sound editing.
Storyboard Pro features an extensive drawing tools set and exporting options which goes from PDF, images, movie files and even third party editing software to fit all of your sharing and production needs.
To learn all about the features available in Storyboard Pro and how to use them in a production context, read the following chapters:
• Getting Started, on page 15• Discovering the Interface, on page 35• Script and Panels, on page 75• Drawing, on page 115• Adding Colour, on page 175• Layers, on page 197• Libraries, on page 211• Animatic, on page 229• Storyboard Supervision, on page 277• Exporting Your Storyboard, on page 285
A comprehensive index is also included to enhance your learning experience:
• INDEX, on page 327
11

Storyboard Pro 2 User Guide
About StoryboardingStoryboarding is one of the most crucial steps in any production. It is when you plan and build your scenes in accordance with the script, actions and limitations. The storyboard is like the blueprint of your production.
How to Prepare for StoryboardingPlanning ahead can save you time and effort. While storyboarding will save you considerable time during production, some additional planning of your storyboard project will further streamline your workflow.
Including storyboarding in your project planning will allow you to meet a number of production goals, such as:
• Providing a common visual road map to which a team can refer• Reducing overall production time• Reducing the likelihood that production resources are not used on scenes that will eventually be deleted
Using the same logic, taking steps to plan how you will storyboard also eases this early part of production.
First StepsBefore you begin storyboarding, consider the factors that will affect your storyboard project and your final production.
• The Script• The Structure• The Delivery
The Script
Create a complete or well-developed script. The more complete your screenplay is, the easier your ideas will be to storyboard. Storyboarding is also beneficial for completing a script that is in the last stages of development, as it can often help to resolve remaining storytelling issues. For example, storyboarding can highlight the need for modifications to transitions between scenes, or for scenes you did not realize were missing but need to be inserted to enhance the flow of action.
The Structure
Consult your script, try to visualize it as a series of scenes and decide which ones can be placed into panels in your future storyboard. You still do not need to draw anything at this point; you just want to assess if there is a smooth, logical visual flow to the story, and get an idea of the type of scenes that will work in your production.
Breaking down your script into smaller components produces a more manageable structure to work with.
The Delivery
How will your final production be broadcast? Is it designed for television, HDTV or widescreen film? Will it be watched on an iPod, PDA or mobile phone? All of these factors determine the aspect ratio of the final production. The size and dimensions of your production will determine the level of detail and how your scenes are composed.
Assume the viewer’s role for a moment, and try to determine how your project will be best viewed in its final medium.
12

Chapter 1: Introduction About Storyboarding
Storyboard BasicsThere are three recommended steps when preparing your storyboard project:
• Script Analysis and Breakdown• Scene Evaluation• Shot List Creation
Following these steps will help you to develop a clear vision of how you want your production to look, feel and flow. Anyone viewing your storyboard should be able to follow its story in a clear, logical manner by looking at the visual and textual information.
Script Analysis and Breakdown
Break down your script into a series of scenes. The action in a panel is usually composed of the action, dialogue, and effects that occur between a camera being turned on until it is turned off. Typically, a scene can be expressed in a single panel, but more elaborate or complex scenes may require multiple panels.
Before beginning your storyboard, you should analyse your script to find out if it is possible to produce a storyboard using the current structure. You will already have an idea of some of the scenes you will want to use based on the script, structure and delivery requirements.
Taking into consideration these factors early on will make this step even easier and more productive. Using the information from your analysis, determine the scenes that you will require for the production. At this stage, you may not necessarily have information on every detail of the scene, like the camera angle, composition, lighting or type of scene, but if you have some of this information, you can include it. What is more important is the development of the sequence of the scenes. Create a unique panel or write notes for each scene that you intend to use in your production.
Dividing your script into smaller parts will make the job of determining scenes easier.
Scene Evaluation
Determine the important elements of each scene.
The elements you need to determine are:
• Camera angles and movements• The direction of movement of objects within a scene• The mood you want to create
Now that you have broken down your script into separate scenes and have laid out the sequence of scenes in separate storyboard panels, you are ready to determine the most effective scene to use in each panel to convey the type of story you are trying to tell. Your storyboard panel should convey the most important aspects of the scene and you should create each scene to maximize its intended impact. You will need to make a number of decisions, independently or with a partner or team.
Some of the issues to determine are:
• Which characters are in the scene and their position• Which props are in the scene and their position• Whether or not you need to include certain elements to maintain continuity between other scenes• How objects and characters move during the scene• Where the camera is positioned and expected changes in camera movement during the scene• What type of lighting is required for the scene• What type of special effects may be required for the scene• How accompanying dialogue or narration will be integrated into the scene
Scene List Creation
Create an itemized list of each scene used in key sequences or your entire story. With a clearer idea of the sequence and composition of your scenes, you can plan how much you want to storyboard. You can storyboard your entire production. Alternatively, you can storyboard scenes that are pivotal to the emotional impact of the story or that may require a more complex setup. Create a scene list for your production, which, for each scene, details the important elements you worked out during your evaluation of the scenes. You should include the scene’s type and angle, camera effects, lighting, and accompanying dialogue. Entries in the scene list can then be used to complete storyboard panels. These provide you with a guideline to create an informative visual narrative for your production.
13

Storyboard Pro 2 User Guide
Visual MarkersIn this guide, you will find several icons which focus your attention on certain sections and notes:
Information Icons
ReferenceThe Reference icon indicates that another section in this guide provides more information regarding the current topic. If you are reading the digital version of this guide, you can click on the link to go directly to that section.
Important NoteThe Important Note icon is placed before crucial information that you should know, this information will help you to avoid issues and use the software more efficiently.
TipThe Tip icon is placed before a short bit of information which will help you improve your work technique.
ToolThe Tool icon is placed beside a list of tools you should become familiar with before starting a hands-on step-by-step procedure.
14

Chapter 2 Getting Started
Once the software is installed, you are ready to launch the application and start storyboard.
In this chapter, you will learn about:
• Launching Toon Boom Storyboard Pro, on page 16• The Welcome Screen, on page 16• Creating and Opening a Project, on page 18• Project Properties, on page 26• Project Optimization, on page 29• Backing Up Projects, on page 31• Basic Commands, on page 32
15

Storyboard Pro 2 User Guide
Launching Toon Boom Storyboard ProYou can run the software on Mac OS X or Windows operating systems.
To open Toon Boom Storyboard Pro, do one of the following:
Mac OS X: Double-click on the Toon Boom Storyboard Pro icon or select Applications > Toon Boom Storyboard Pro 2 > Storyboard Pro.
Windows: Double-click on the Toon Boom Storyboard Pro icon or select Start > Programs > Toon Boom Animation > Toon Boom Storyboard Pro 2 > Storyboard Pro.
Toon Boom Storyboard Pro opens, displaying the The Welcome Screen.
The Welcome ScreenWhen you open Toon Boom Storyboard Pro, the Welcome Screen appears. If a scene is already open, you can display the Welcome Screen by selecting Help > Show Welcome Screen.
The Welcome Screen allows you to:
1. Create and name projects2. Choose the project resolution3. Add or Delete a custom project resolution4. Open recent projects from a list5. Open projects by browsing6. Open the help documentation7. Click the Create button to create and open your new project.
1
2
4
6
35
7
16

Chapter 2: Getting Started The Welcome Screen
Accessing the DocumentationTo access the documentation:
From the Welcome Screen, in the Documentation section, click on the desired document.
OR
Directly in the software, from the top menu, by selecting Help > Help.
OR
Mac OS X: Applications > Toon Boom Storyboard Pro 2 > Documentation.
OR
Windows: Start > Programs > Toon Boom Animation > Toon Boom Storyboard Pro 2 > Documentation.
17

Storyboard Pro 2 User Guide
Creating and Opening a ProjectAll projects created via Storyboard Pro are independent and local to the computer.
There are three ways to create a new project:
• Using the Welcome Screen, on page 18• Using the File Menu, on page 20• new Project From Final Draft Script, on page 21
Using the Welcome ScreenTo create a project from the Welcome Screen:
1. Select a project directory by clicking on the Choose button.
2. In the Project Name field, type the name of the project. This name will appear as the file name.
3. In the Project Title field, type the name of the project title. It can be a good idea to use the Project Name for the Project Title. You can also type in the name of the Project Subtitle, but it is not mandatory. These titles will appear on the appropriate pages of PDF exports.
4. In the Resolution section, choose the project’s resolution, or continue to step 5 to add a new resolution to the list.
5. You can click on the Add button to add a new resolution to the list.
18

Chapter 2: Getting Started Creating and Opening a Project
The New Resolution dialog box opens.
In the Resolution Name field, name your new resolution.In the Width field, type the resolution width in pixels.In the Height field, type the resolution height in pixels.In the Frame Rate field, type the scene’s frame rate per second.Click on the Create button to confirm creation of the new resolution preset.
You can delete a custom resolution from the Resolution List by selecting it and clicking on the Delete button
under the Resolution window.
6. Click on the Create button to create your project.
To open a project from the Welcome Screen:
1. In the Recent Projects section, click on the Open Project option.
The Open Project browser opens.2. Browse and select the desired *.sboard file.3. Click on the Open button to open the project.
To open a recent project from the Welcome Screen:
1. In the Recent Projects section, select a scene from the list.
19

Storyboard Pro 2 User Guide
Using the File MenuIf a project is already open and you want to create a new one, you can use the File menu.
To create a project from the File menu:
1. Select File > New. You can also click on the New button in the File toolbar or use the default keyboard shortcut [Ctrl]+[N] (Windows) or [ ]+[N] (Mac OS X).
The New Project dialog box opens.
2. Select a project directory by clicking on the Choose button.
3. In the Project Name field, type the name of the project. This name will appear as the file name.
4. In the Project Title field, type the name of the project title. It can be a good idea to use the Project Name for the Project Title. You can also type in the name of the Project Subtitle, but it is not mandatory. These titles will appear on the appropriate pages of PDF renders.
5. In the Resolution section, choose the project’s resolution, or click on the Add button to add a new resolution to the list.
20

Chapter 2: Getting Started Creating and Opening a Project
6. You can click on the Add button to add a new resolution to the list.
The New Resolution dialog box opens.
In the Resolution Name field, name your new resolution.In the Width field, type the resolution width in pixels.In the Height field, type the resolution height in pixels.In the Frame Rate field, type the scene’s frame rate per second.Click on the Create button to confirm creation of the new resolution preset.
You can delete a custom resolution from the Resolution List by selecting it and clicking on the Delete button
under the Resolution window.
7. Click on the Create button to create your project.
To open a project from the File menu:
1. Select File > Open. You can also click on the Open button in the File toolbar or use the default keyboard shortcut [Ctrl]+[O] (Windows) or [ ]+[O] (Mac OS X).
The Open Scene browser opens.2. Browse and select the desired *.sboard file.3. Click on the Open button to open the scene.
new Project From Final Draft ScriptStoryboarding and script writing go hand-in-hand. Toon Boom Storyboard Pro allows you to use your Final Draft script to create a new Storyboard Pro project. This feature is an amazing time saver as it handles the creation of scenes and panels as well as inserting all the text in the proper captions automatically.
There will be 3 topics in this section:
• Creating a New Project From a Final Draft Script, on page 21• Creating a New Project From a Final Draft 7 Script, on page 23• Final Draft Import Settings, on page 24
Creating a New Project From a Final Draft ScriptTo import a Final Draft script:
1. In the Top menu, select File > New From Final Draft Script.
The Import from Final Draft window opens.
21

Storyboard Pro 2 User Guide
2. Use the Browser button to search for a *.fdx or *.xml file exported from Final Draft. After making a file selection the other options in the window become active.
3. Select a tag on the left, then choose an item from the Action drop-down menu to assign this action to the selected tag. In the screen shot below, Action is the selected tag. By assigning this tag the action of New Scene, you are asking Storyboard Pro to create a new scene every time it crosses this tag in the *.fdx or *xml script.
4. For the selected tag, decide whether you would like to enable the following two options:
Combine successive elements: This option will combine the selected tag with an identical tag if it occurs successively in the script. For example, you might choose to create a New Panel for every Dialogue tag that appears in the Final Draft script. However, if there are three Dialogue tags in a row, say without a break due to an Action tag, then checking this option will put these three lines of dialogue together in the same Panel. Include Element Number when available: In a Final Draft script, there are numbers along the right and left margins of the document that indicate a change in scene. By checking this option, you can choose to import these into your Storyboard Pro project.
22

Chapter 2: Getting Started Creating and Opening a Project
5. From the Destination caption field drop-down menu, select the location in the Panel window where you would like the text associated with the selected tag to go.
In the example above, Storyboard Pro will take all the text associated with the Action tag in the Final Draft file and put it in the Action Notes section in the Panel window for each new scene that it creates in this project.
6. When you have finished setting up your import parameters, click on the Import button.7. Now, you will be asked to create your new project. You will be prompted to save changes to your current scene,
before it’s closed and your new project, generated from your script, is opened.
Refer to the Using the Welcome Screen for help on how to create a new Storyboard Pro project.
Creating a New Project From a Final Draft 7 ScriptIf you’re still working with version 7 of Final Draft, you will have to use the Final Draft Tagger to generate the *.xml file needed to use this feature. After you have produced your export, follow the steps detailed in the section above: Creating a New Project From a Final Draft Script, and proceed with the import.
Note: Final Draft 8 uses a new file format, an *.fdx, which can be imported directly into the software, as opposed to the older *.fdr, which needs to be exported from Final Draft Tagger to generate an *.xml file.
To export your script as an XML:
1. Launch the Final Draft Tagger software.2. Select File > Import Script, the keyboard shortcut is [Ctrl]+[I]. The Import dialog box opens.3. In the browser, select your script file and click on the Open button. Your script will appear in Final Draft Tagger.
4. Select File > Export to XML.5. Close the Final Draft Tagger application and proceed to import the *.xml file as in the previous section.
23

Storyboard Pro 2 User Guide
Final Draft Import Settings
For the Import from Final Draft dialog box, below is a list of some sample settings for the most common tags:
Action• Action: New Panel• Destination caption field: Action Notes
Character• Action: none• Destination caption field: Dialogue
Dialogue• Action: none• Enable the Combine successive elements option• Destination caption field: Dialogue
Scene Heading• Action: New Shot• Enable the Combine successive elements option• Destination caption field: Slugging
Transition• Action: New Transition• Destination caption field: Notes
Parenthetical• Action: none• Destination caption field: none
Try different settings with your style of script and see what works best for you. Remember to check the Save as default rules check box once you have your settings just right, so that these settings are used as the default for the next time you create your Storyboard Pro project from a Final Draft script.
24

Chapter 2: Getting Started Creating a Scene
Creating a SceneIn live-action productions, scene changes occur when the location of the action changes, such as from the bedroom to the living room, from the living room to outside, from outside to across town. In traditional animation, every time a painted background has to be changed a “scene” change is required, even if the characters are in the same location. For example, two characters could be talking face-to-face in a forest, however the trees behind each individual character would be different as the shot cuts from one character to another. Each of these shots would require a new scene. A sequence of these scenes taking place in the same location could be referred to as an Act.
In Storyboard Pro, panels in the same scene are grouped together by a dark gray bounding box.
To create a new scene:
1. Do one of the following:
In the Storyboard toolbar, click on the Add Scene button.From the Top menu, select Storyboard > Create Scene.
A new panel is created in the Timeline immediately after the current shot, encased in a separate grey box.
DrawingWorkspace
TimelineWorkspace
New Scene New Scene New Scene
25

Storyboard Pro 2 User Guide
Project PropertiesWhen you created your new project, you chose the name and resolution. However, if you want to change these initial settings later on, you can. To do this, just go to the top menu and select Storyboard > Properties.
The Project Properties dialog box opens.
The different Project Properties are separated into three tabs:• Settings Tab• Resolution Tab• Naming Tab
Settings Tab
In this tab you will find all information related to the name of the current project:
1. Project Title: By default, the Project Name already appears is this field if no Project Title was entered during the creation of this project. The Project Name is the name of the Storyboard Pro project file. The Project Title is the title that will appear in all PDF renders. They can, and often should, be the same.
2. Project Subtitle: In this field, type the name of the project subtitle. This subtitle will appear in the proper places in all PDF renders.
3. Project Episode: Type the episode number in this field. If you want the word “Episode” to appear next to the number, you must include it in the field as well. The information entered into this field will appear after the Project Subtitle in all PDF renders.
4. Project Copyright: In this field, enter in the copyright date. This can be the month and year or just the year. This information will appear at the bottom of the page in all PDF renders.
1234
26

Chapter 2: Getting Started Project Properties
Below, a sample .pdf export, demonstrating the above labels:
Resolution Tab
1. Project Resolution Type:You can select your project’s resolution type from this area. Take into consideration the intended format of the production you are storyboarding for. Your project’s resolution should match.
HDTV - High definition television delivers a higher quality image than standard television does, because it has twice the standard number of scanning lines per frame. To take advantage of the superior quality your output device must be compatible with HDTV technology to make this resolution setting useful.HDTV_Vertical - The "vertical resolution" of HDTV_Vertical refers to the total number of lines scanned from left to right across the screen that are counted vertically (from top to bottom). The resolution of HDTV_Vertical is essentially the same as HDTV, with the exception that its vertical resolution number is static - it doesn't change. In the case of HDTV this number is 1080. Other resolution types are dependent upon the quality of the video signal's source. The Vertical resolution, however, is the same for all TV's manufactured to meet a specified Standard.film-1.33 - Use this resolution setting for the wide screen film format that conforms to the standard 4:3 pixel aspect ratio.film-1.66 - Use this resolution setting for the wide screen film format that conforms to the 16:9 pixel aspect ratio, (where the pixel's width is greater than its height).film-1.66_Vertical - This resolution is essentially the same as film-1.66, with the exception that its vertical resolution number is static - it doesn't change. Other resolution types are dependent upon the quality of the video signal's source. The Vertical resolution, however, is the same for all TV's manufactured to meet a specified Standard.
1 2 3
4
5
23
1
64
27

Storyboard Pro 2 User Guide
NTSC - This is the standard analog television broadcasting system used in most of the Americas, Japan, South Korea, Taiwan, Burma, and some Pacific island nations and territories. It conforms to the North American standards on how rectangular pixels are displayed for computer and television screens.PAL - This is an analog television encoding system used in broadcast television systems in large parts of the world (i.e. western Europe, Asia, Australia, most of Africa and some North American countries). This resolution works best with the European format for television and computer screens, as the rectangular pixels are displayed at a different orientation.low - This format is ideal for videos destined for the web, where size and fast download of a video file might take precedence over quality.
2. Scene Resolution Setting: Displays the scene resolution setting selection.3. Pixel Dimensions: Displays the pixel dimensions for your resolution selection. If you decide to type in the pixel
dimensions, or use the up and down arrows to change the pixel increments, you will have to save your custom selection in order to make it active (6). It will then appear in the resolution selection list (1).
4. Project Frame Rate: Select the frame rate for your project. The higher the frame rate, for example 30 fps, the smoother your animation will look, but the heavier it will be. The lower the frame rate, for example 12 fps, the choppier your animation may look, but the lighter it will be.
5. Aspect Ratio: The aspect ratio describes the shape of the pixel. A square pixel would have the ratio 1:1, where as a pixel of aspect ratio 4:3 is a unit with one side 1.33 times as big as the other side. Each resolution setting has a preset aspect ratio that can not be changed.
6. Save Custom Resolution: Click on the Save button to save and create your custom resolution as a setting. This button becomes active when you create a custom resolution type (3).
Naming TabAll the options in the Naming tab will affect the Panel window. Changes you make in this window will override your Storyboard Pro preferences, and will affect the current project only. Your default preferences will not be affected for new projects.
1. Override naming preference for this project: Enable this object when you would like to override current preferences for this project. Once enabled, all options below become active.
2. Automatic Leading Zeros for Shot Name: Selecting this option will automatically add a zero before the Shot (or Scene) number.
3. Allow Custom Panel Name: Selecting this option will activate the Panel field so that you can enter in a custom name for all panels.
4. Display Total Number of Panels in Panel Name: Selecting this option will display a counter at the end of the Panel field which will indicate the total number of panels in the selected panel’s scene.
5. Enable Acts: Selecting this option will display the Act field, along with the Act number.6. Minimum Number of Characters: This field will determine the minimum number of characters the scene names
will contain, when using leading zeros.7. Panel Name Auto-Increment Rule: By default, panel names are named numerically. Using this preference, you
can select from three other alphabetical increment rules. The difference between each of them is the behaviour once you reach panel Z.
1
2 34 567
28

Chapter 2: Getting Started Project Optimization
Project OptimizationIf file size and speed of use are concerns, there are a few things you can do to optimize your project.
Optimizing Your ProjectTo optimize your current project:
1. In the top menu, select File > Optimize Project.
The Optimize project dialog box opens.
2. Check one or both of the following options:Remove unused elements from the project: As you create a storyboard you will delete panels or layers, update drawings, unlink sounds, etc. The software keeps some of these files for backup purposes. All of these unused files take up space and increase the size of your project on your hard drive. This option will look in your project file and remove these unwanted elements.Flatten drawings in the project: This option will fatten all the brush or pencil line strokes of all the drawings in your project. This means that all overlapping strokes will no longer be editable as single strokes, but only as whole, drawn objects.
NOTE: These operations cannot be undone, and will empty the undo list.
Create Optimized DrawingsWhen using any of the playback options in Storyboard Pro, the software has to calculate the positioning of all the *.tvgs (Toon Boom vector graphics), the file format that is created from all your drawing strokes. This calculation tends to slow down the rate of playback. There is, however, a way to circumvent this problem.
The programmers at Toon Boom have created a second file format. the *.tvgo (Toon Boom vector graphic optimized) that has all the pixel position information precalculated. Using these drawings should significantly speed up the playback process.
To use the Create Optimized Drawing feature:
1. In the top menu, select Edit > Preferences.
The Preferences window opens.2. In the Advanced tab, under the Optimized Playback heading, check the Use Optimized Drawings option.
3. Decide whether to enable the Preload Drawings option. This is optional. If you decide to enable this option, you must also decide on:
Number of Frames to Preload: Divide this number by your project’s frame rate to see how many seconds of your live playback will be pre loaded. For example, if your project’s frame rate is 30 fps and you have entered 120 frames to preload, then you are essentially pre loading 4 seconds of your live playback.Number of Panels to Preload: This option is also time dependant. If each of your panels have a duration of 5 seconds, then pre loading 2 panels will give your live playback a 10 second head start.
4. Click on the OK button.5. In the top menu, select File > Create Optimized Drawings.
A progress bar appears as the software creates the cache. Another message box will appear to let you know when the process has been successfully completed.
29

Storyboard Pro 2 User Guide
Other Optimization Suggestions• Texture vs. Plain Vector Brush• Flattening Your Drawings• Bitmap Integration
Texture vs. Plain Vector BrushIn Toon Boom Storyboard Pro, all the strokes that you create with the Brush tool are vector elements. There are basically two kinds of brushes:
• Plain Brushes: By default, the brush tool creates vector strokes filled with either a colour or a gradient. Vector strokes use a very small amount of memory and can be used rapidly because they don’t contain any pixel information, only mathematical functions.
• Texture Brushes: This type of brush also produces a vector contour for its strokes, but is filled with a bitmap texture. These textures allows you to produce drawings that have natural looking brush strokes that resemble lines drawn using a crayon or airbrush.
Because they are using a bitmap image mapped inside vector strokes, texture brushes use much more memory and processing time than brush strokes filled with colour. Therefore it you wish to make your file size lighter and your drawing speed faster, use only regular brushes to draw your scenes.
If you do choose to use texture brushes, is it important to use a reasonable size bitmap for your texture brush.
Flattening Your DrawingsIn Storyboard Pro, strokes inside a layer are independent. You are able to select a specific stroke and edit its position, scale, rotation, skew, colour and so on, whenever you want. However, this flexibility increases the amount of memory and resources used by the software, especially when you have a lot of strokes in your drawing (which frequently happens when you sketch).
In the Project Optimization intro, you learned that you could flatten all your drawings in one go. However, you can retain partial flexibility and still minimize file size and resources needed by consciously flattening certain drawings as you draw, or even by selecting them after they have been drawn. The Flatten option takes all strokes of the same colour with overlapping areas on the same layer and flattens them together to create a single drawing with a vector contour.
To flatten strokes as you draw:
1. In the Tools toolbar, select the Brush tool .
2. In the Tool Properties panel, enable the Auto-Flatten button .3. In the Camera view, sketch your first drawing.
The drawing strokes will automatically be flattened.
To flatten an existing drawing:
1. In the Camera view, use the Select tool to select a group of strokes.2. From the top menu, select Tools > Flatten, or use the keyboard shortcut [Alt] + [Shift] + [L] (Windows) or [Alt] +
[Shift] + [F] (Mac).
Bitmap IntegrationToon Boom Storyboard Pro allows you to create storyboards by importing scanned images or bitmaps drawn in another software. During the import process, images are vectorized and placed in a new scene in a vector bounding box as a bitmap fill. The bitmap image’s resolution can affect your project’s file size and the speed at which the software functions while handling your project.
When importing bitmaps into your storyboard there is rarely need to use a high resolution. This will not increase the quality of your PDF or animatic. You should import bitmaps with a resolution close to the project resolution. For example, in an NTSC project, using a bitmap with a 720x480 resolution or a 72dpi quality will be sufficient.
30

Chapter 2: Getting Started Backing Up Projects
Backing Up ProjectsAs you work on your storyboard project, it is always a good idea to save continuously. At the end of each workday, it is even better to backup your work. The difference between backing-up and saving is that a backup is a compressed version of your project. Backing-up your work provides a safety net against corrupted files and allows you to have several versions of your project at different stages, in case you ever want to go back and work from an earlier point in the production.
Backup StoryboardTo backup the current version of your Storyboard Pro project:
1. In the Top menu, select File > Backup Storyboard.
The Create Storyboard Backup window opens.2. Browse for a location on your computer to save this backup file. You can also rename it with a date or version
number.3. Click on the Save button.
A *.sbbkp file is created and saved in the assigned location.
NOTE: The place where you save your backup file (*sbbkp) does not necessarily have to be the same place where you have your current project file saved. For example, you can save the backup on your company’s server, even though the current version is saved somewhere on your computer.
Restore and Open BackupTo restore and open a backup file:
1. Do one of the following actions:In Storyboard Pro, from the top menu select File > Restore And Open Backup.The Open Storyboard Backup browser window appears. In the browser window, locate and select the *.sbbkp file and click on the OK button.
OR
On your computer, go to the location where you saved the *.sbbkp file and double-click on its icon. In the browser window, select a place to save the restored file and then click OK.
2. The project opens in Storyboard Pro.
NOTE: The place where you saved your backup (*sbbkp) does not necessarily have to be the same place where you save your restored file. For example, you may open the backup from a location on your company’s server, but save the restored version somewhere on your computer.
31

Storyboard Pro 2 User Guide
Basic Commands This table lists the most common commands used in Storyboard Pro
Command Action Access Methods
New Starts a new scene while closing any scene already open. The New Scene dialog box appears, asking for directory, name and resolution information.
File > New[Ctrl]+[N] (Windows)[ ]+[N] (Mac OS X)
Open Use the Open command to bring up the Open Scene file dialog. Browse your file system for a scene file.The Open command is not disabled when a scene is opened. You can open a new scene from the current one and the previous scene will be closed.
File > Open[Ctrl]+[O] (Windows)[ ]+[O] (Mac OS X)
Open Recent Displays a quick access list to view and open recently used Storyboard Pro files.
File > Open Recent
Close Use the Close command to close the scene that is currently opened, but does not close the Storyboard Pro application.
File > Close
Save Use the Save command to save all changes made to the opened scene, drawings, palettes, and palette lists.
File > Save[Ctrl]+[S] (Windows)[ ]+[S] (Mac OS X)
Save As Use the Save As command to save the current state of a scene as another scene. The Save As window prompts you to give a new name and choose a different location to this scene before saving it. This will create a complete scene directory for the new scene.
File > Save As
Quit Use the Quit command to close Storyboard Pro. If the current scene has changes, it asks if you want to save them before closing.
Windows: File > QuitMac OS X: Animate > Quit Toon Boom Animate
Cut Use the Cut command to remove selected objects. You can then paste the object or its properties to another object.
Edit > Cut[Ctrl]+[X] (Windows)[ ]+[X] (Mac OS X)
Copy Use the Copy command to copy selected objects and properties.
Edit > Copy[Ctrl]+[C] (Windows)[ ]+[C] (Mac OS X)
Paste Use the Paste command to place an object you cut or copied into the location you select in the Camera and Timeline View.
Edit > Paste[Ctrl]+[V] (Windows)[ ]+[V] (Mac OS X)
Delete Use the Delete command to remove selected objects.
Edit > Delete
[Delete]
32

Chapter 2: Getting Started Basic Commands
Select All Use the Select All command to select all drawing objects in the current drawing window in the Timeline and Camera View. This helps you manage the objects as one body when moving them.
Edit > Select All[Ctrl]+[A] (Windows)[ ]+[A] (Mac OS X)
Deselect All Use the Deselect All command to remove the selection from the selected objects in the Drawing and Camera View.
Edit > Deselect All
[Esc]
Select Panels in Current Act Use the Select Panels in Current Act command to select all the panels in the current act.
Edit > Select Panels in Current Act
Select Panels in Current Scene Use the Select Panels in Current Scene command to select all the panels in the currently selected scene.
Edit > Select Panels in Current Scene
Undo Use the Undo command to remove the last change made to your animation project. Storyboard Pro supports multiple undo, so you can revert changes you have made in the order you made them.
Edit > Undo[Ctrl]+[Z] (Windows)[ ]+[Z] (Mac OS X)
Redo Use the Redo command when you have undone an operation that you decide to keep. The Redo command becomes active only after you use the Undo command.
Edit > Redo[Ctrl]+[Y] (Windows)[ ]+[Y] (Mac OS X)
Help Launches the Storyboard Pro Help System PDF, complete with instructions on how to use the system.
Help > Help
[F1]
Toon Boom Storyboard Pro on the Web Launches the Storyboard Pro web site, which features a Support and Community > Forum section.
Help > Toon Boom Storyboard Pro on the Web
Show End User License Agreement This command opens the License dialog box which displays the End User License Agreement.
Help > Show End User License Agreement
About Use the About command to access general information about the software.
Windows: Help > About
Mac OS X: Storyboard Pro > About Toon Boom Storyboard Pro
Command Action Access Methods
33

Storyboard Pro 2 User Guide
34

Chapter 3 Discovering the Interface
Knowing how to manage the Storyboard Pro interface helps you to work efficiently and organize your workspace conveniently. There are a series of views and toolbars you can use as you perform different operations. Each user has a preferred way of working in the interface and which views and toolbars they will use. In this chapter, you will learn about the main elements of the interface and how to manage them.
In this chapter, you will learn about the following topics:
• User Interface, on page 36• Managing the Views, on page 50• Managing the Toolbars, on page 54• Managing the Workspace, on page 57• Interface Navigation, on page 62• Preferences, on page 65
35

Storyboard Pro 2 User Guide
User InterfaceThis section takes you through the most common elements of the User Interface. Throughout the user guide, you will learn about each view and toolbar, and how to use them.
Views and ToolbarsStoryboard Pro has several views and toolbars. The Top toolbars are available at the top of the interface and the different toolbars are in individual windows.
This is a complete list of the views and toolbars available in Storyboard Pro.
Views Toolbars
Camera View Edit
Colour View File
Layers View Layer
Library View Navigation
Panel Views Sound
Panel PDF Options View Storyboard
PDF Export View Tools
Storyboard View View
Thumbnails View Workspace
Timeline View Brush Preset
Tool Properties View Keyframes and Control Points
Onion Skin
Playback
36

Chapter 3: Discovering the Interface User Interface
Interface HighlightsIt is important that you become familiar with the following elements of the user interface, this will help you to start using Storyboard Pro. You can learn more about the highlights described here, and how to use them in a production context, throughout this guide.
When you start Storyboard Pro for the first time, the default workspace is displayed. It contains all of the main elements you need to use.
To learn how to modify the workspace and add more views and toolbars, refer to the following sections:
• Managing the Workspace, on page 57• Managing the Views, on page 50
1
2
6
10
3
4
78
9
5
1. Camera View2. Thumbnails View3. Tools Toolbar4. Storyboard Toolbar5. Playback Toolbar
6. Panel View7. Storyboard View8. Tool Properties View9. Colour View10. Menus
37

Storyboard Pro 2 User Guide
Camera View
The Camera view is the centre of operations in Storyboard Pro. It is in this view that you will build, draw, paint, animate the camera, create layer paths and see your results.
The Camera view has an optional status bar at the bottom. This toolbar is not displayed by default, you can display it through the preferences panel.
To display the Status Bar:
1. Open the Preferences Panel:Select File > Preferences (Windows) or Storyboard Pro > Preferences (Mac OS X).You can also use the default keyboard shortcut [Ctrl]+[U] (Windows) or [ ]+[U] (Mac OS X).
2. In the Preferences Panel, click on the Camera tab, to display the camera options.3. In the Options section, enable the Show Status Bar option.
1 2 3 4 5 6 7 8
15
9 10 11 13 1412
16
1. Thumbnail Mode2. Grid3. Safety4. 4:3 Safety5. 4:3 Area6. Camera Mask7. Camera Label8. Reset View
9. Reset Rotation10. Point of View Drop-down Menu11. Zoom12. Layer Name13. Tool Name14. Colour Picker15. Camera Space16. Layer Tabs
38

Chapter 3: Discovering the Interface User Interface
Thumbnail Mode
The Thumbnail mode switches the Camera view display to the same view mode as in the Thumbnails view. When the Camera view display is set to Thumbnail mode, it is not possible to draw or edit the drawing in any way.
Grid
You can choose to display a grid that appears in the Camera view. The default grid will be a standard 12 field animation grid, but you can choose another.
You can also access this feature from the top menu by selecting View > Grid > Show Grid, the default keyboard shortcut is [Ctrl]+[G] (Windows) or [ ]+[G] (Mac OS X).
Refer to the Drawing chapter to learn more about the grid options.
Safety
The Safe Area button shows or hides the TV safety zone and the centre of the camera frame. The Safe Area will adapt to the scene resolution as well as the safety zone and frame’s centre.
You can also access this feature from the top menu by selecting View > Grid > Show Safe Area.
You can define your own safety limits in the Preferences Panel.
Refer to the User Interface Preferences - Camera Tab section to learn how.
4:3 Safety
The 4:3 Safety button shows or hides the TV safety zone and the centre of the camera frame for a regular 4:3 resolution. This way, if you are working on a widescreen project, for example, you can easily plan in advance the conversion of your project to a tv format. This way, you can create your project so that it fits both resolutions.
You can also access this feature from the top menu by selecting View > Grid > Show 4:3 Safety.
4:3 Area
The 4:3 Area button shows or hides the 4:3 resolution zone without the centre of the camera frame and TV safety zone.
You can also access this feature from the top menu by selecting View > Grid > Show 4:3 Area.
Camera Mask
The Camera Mask button shows or hides a black mask around the scene’s frame to avoid seeing anything outside the Camera frame.
This option is handy when you are setting up the scene. It allows you to see your scene’s composition better.
You can also access this feature from the top menu by selecting Play > Camera Mask.
39

Storyboard Pro 2 User Guide
Camera Label
The Camera Label button shows or hides the IN and OUT indications in the top left corner of the camera frames, on the start and end position of a camera move for the current panel. When the camera tool is selected, the labels switch to alphabetical labels, that clearly show the different camera keyframes.
Refer to the Animatic chapter to learn more about camera moves.
Reset View
The Reset View button will reset any panning, zooming or rotation done in the Camera view and return the display to the initial settings. This option is also available from the top menu, select View > Reset View or use the default keyboard shortcut [Shift]+[M].
This option works in conjunction with the Point of View Drop-down Menu. Refer to this section to learn more.
Reset Rotation
The Reset Rotation button will reset any rotation done in the Camera view and return the display to the initial rotation settings. This option is also available from the top menu, select View > Reset Rotation or use the default keyboard shortcut [Shift]+[X].
This option works in conjunction with the Point of View Drop-down Menu. Refer to this section to learn more.
Point of View Drop-down Menu
The Point of View Drop-down menu is used to change the Point of View behaviour. This determines at which level the current position of the Camera view (zoom, pan and rotation) is remembered when you are flipping through your panels.
•Project: When this option is selected, the same zoom, pan and rotation value of the Camera view is kept for all the panels of the project.•Scene: When this option is selected, the same zoom, pan and rotation value of the Camera view is kept only for the panels that are part of the current scene.•Panel: When this option is selected, every panel of the project has its own zoom, pan and rotation value.
These options are also available from the top menu. Select View > Point of View Mode > Project Level, Scene Level or Panel Level.
The current Point of View mode will also affect the different Reset View commands’ behaviour as they will reset following the Point of View mode.
40

Chapter 3: Discovering the Interface User Interface
Zoom Drop-down Menu
The Zoom Drop-down menu is used to enlarge or reduce the Camera view display. If you want the camera frame size to always match the size of your Camera view, select the Fit to View option. Click on the drop-down arrow and select a zoom level.
You can also use the default keyboard shortcuts [1] to zoom out and [2] to zoom in.
Drawing Name
The Layer Name field displays the name of the selected layer of the current panel.
Tool Name
The Tool Name field displays the name of the selected tool. If you override a tool using an overriding keyboard shortcut, the tool’s name will be highlighted in red letters.
Refer to the Drawing chapter to learn how to temporarily override a tool.
Coordinates
The Coordinates field shows the coordinates of the cursor while in the Camera view.
Colour Picker
The Colour Picker square displays the name of the current selected colour in the colour view as well as the colour itself. You can double-click in the colour to open the Colour Picker window and select a new colour for this colour pot.
Refer to the Adding Colour chapter to learn more about colours and colour pots.
Camera Space
This is where you will draw, animate layers and camera moves, as well as preview your storyboard. It is the main space of the default Drawing workspace.
Refer to the following chapters to learn more about the camera space:
• Drawing, on page 115• Adding Colour, on page 175• Animatic, on page 229
41

Storyboard Pro 2 User Guide
Thumbnails View
In the default workspace, the Thumbnails view is situated in the bottom part of the user interface. The Thumbnails View displays all the panels of your project in chronological order. You can use this view to navigate through your storyboard, rearrange panels and scenes, and select the panel of your choice as the current panel to be displayed in the Camera view.
By default, as to avoid unwanted changes that could occur with the panel manipulation, it is not possible to draw in the Thumbnails view. You can change this behaviour in the Preferences panel.
To enable drawing in the Thumbnails view:
1. Select Edit > Preferences (Windows) or Storyboard Pro > Preferences (Mac OS X) to open the Preferences panel. You can also use the default keyboard shortcut [Ctrl]+[U] (Windows) or [ ]+[U] (Mac OS X).
2. In the Preferences panel, select the General tab.3. Under General, disable the Forbid drawing on panel thumbnails option.
Refer to the Drawing chapter to learn more about drawing your storyboard panels.
Tools Toolbar
The Tools toolbar contains all of the main tools you will use while working in Storyboard Pro. In the default workspace, you will find this toolbar on the left-most side of the interface.
Each tool is explained in detail in the following chapters:
• Drawing, on page 115• Adding Colour, on page 175• Animatic, on page 229
42

Chapter 3: Discovering the Interface User Interface
Storyboard Toolbar
The Storyboard toolbar contains all of the basic commands related to adding and deleting panels, scenes and transitions.
Each commands is explained in detail in the following chapters:
• Getting Started, on page 15• Script and Panels, on page 75• Animatic, on page 229
Playback Toolbar
Use it to play back your storyboard. When you create an animatic with transitions and sound, you can play it back in real-time in the Camera view to check the timing.
• Click on the Go to First Frame of Selection button to automatically place the playback marker to the beginning of the panel selection. This selection can be one or many panels. In the Timeline view, you can see the red marker positioning itself at the first frame of the first panel of the selection.
• Click on the Play Selection button to play back only a selection of panels. You can also do this from the top menu by selecting Play > Play Selection, or use the default keyboard shortcut [Shift]+[Enter].
• Click on the Play button to start and stop the playback of the storyboard. You can also do this from the top menu by selecting Play > Play.
• Click on the Loop button to repeat your playback. You can also do this from the top menu by selecting Play > Loop.
• Click on the Sound button to enable sound in the playback. You can also do this from the top menu by selecting Play > Play Sound.
• Click on the Camera Preview button to enable dynamic camera movements during playback. You can also do this from the top menu by selecting Play > Camera Preview.
Refer to the Animatic chapter to learn more about timing, camera movements and creating an animatic.
Play Menu
Select any of the following from the top menu Play heading:
• First Panel to select the first panel of the storyboard and place the playback marker at the beginning of this panel.
• Previous Scene to select the scene preceding the current one and to place the playback marker at the beginning of that scene.
• Previous Panel or use the shortcut [A] to select the panel preceding the current one and place the playback marker at the beginning of this panel.
• First Frame or use the shortcut [Home] to place to playback marker at the first frame and select the first panel of the storyboard.
• Last Frame or use the shortcut [End] to place the playback marker at the last frame and select the last panel of the storyboard.
• Next Panel or use the shortcut [F] to select the panel next to the current one and place the playback marker at the beginning of that panel.
43

Storyboard Pro 2 User Guide
• Next Scene to select the scene next to the current one and place the playback marker at the beginning of that scene.
• Last Panel to select the last panel of the storyboard and place the playback marker at the last frame.
These options are also available via the Navigation toolbar. Select Windows > Toolbars > Navigation to display this toolbar.
Refer to the Script and Panels chapter to learn more about the Navigation toolbar and to the Animatic chapter to learn more about frames and timing.
Panel ViewThe Panel view displays the different captions related to the current panel, as well as other useful information.
1. Panel Information2. Selection Information3. Voice Annotations4. Panel Captions
Panel Information
This section of the Panel view is where the information such as the duration of the current panel, the name of the current panel and the name of the scene it is part of is displayed. Some of the fields are editable.
To learn more about panel information and renaming it, refer to the Script and Panels chapter.
Selection Information
This collapsible section of the Panel view is where the information such as the number of selected panels, the in and out of the current selection, as well as the duration of the selected panels. These fields are for reference only as they are not editable.
Click on the Collapse button to hide the section and leave more room for the Script caption field. Once it is
collapsed, you can click on the Expand button to display the entire section again.
4
1
2
3
44

Chapter 3: Discovering the Interface User Interface
Voice Annotations
It is possible to add voice annotations to a panel. This collapsible section is used to control and edit these annotations.
To learn more about voice annotations, refer to the Storyboard Supervision chapter.
Panel Captions
These sections are the panel caption fields. You can use the Caption Menu button to access the commands
related to your caption fields, and the Text Formatting button to display a toolbar to format your text.
Refer to the following chapters for more information about using the Panel view:
• Script and Panels, on page 75• Animatic, on page 229• Storyboard Supervision, on page 277
Storyboard View The Storyboard view is usually where you will import or type your script. It also displays valuable information about your storyboard project.
In the default workspace, the Storyboard view is situated behind the Panel view, click on the Storyboard view’s tab to display it.
1. Project Information2. Script Caption
1
2
45

Storyboard Pro 2 User Guide
Project Information
This collapsible section of the Storyboard view is where the information such as the duration, number of scenes and
panels is displayed. If you like, you can click on the Collapse button to hide the section and leave more room for
the Script caption field. Once it is collapsed, you can click on the Expand button to display the entire section
again.
Script Caption
This default caption field is specifically there for your script. You can use the Caption Menu button to access the
import commands and the Text Formatting button to display a toolbar to format your text.
Refer to the Script and Panels chapter for more information about using the Storyboard view.
Tool Properties ViewThe Tool Properties View contains the most common options and operations related to the currently selected tool. As soon as you select a tool from the Tools toolbar, the Tool Properties view will be updated.
For example, if you choose the Select tool in the Tools toolbar, the Tool
Properties view will display the options and operations related to the Select tool.
The content of the Tool Properties view is explained in detail in the following chapters:
• Getting Started, on page 15 • Drawing, on page 115• Adding Colour, on page 175• Animatic, on page 229
Colour ViewIn the default workspace, the Colour view is situated behind the Panel view. Click on the Colour view’s tab to display it.
46

Chapter 3: Discovering the Interface User Interface
The Colour View is where you create colours. The Colour View is also necessary for drawing and painting.
The Colour View has two display modes:
• Swatch Mode• List Mode
To toggle between the display modes:
1. In the Colour View menu, select Swatch Mode.Enable the option to display the swatches. When it’s disabled, the colour list will be displayed.
The Colour View has its own toolbar. Refer to the list below to learn more about its basic functionality.
Refer to Adding Colour chapter to get more information about the Colour view and its advanced features.
Add Colour
The Add Colour button is used to add a colour swatch to your palette. Click on the Add Colour button to add a new swatch to the bottom of your colour list or swatches.
Delete Colour
The Delete Colour button is used to deleted a selected colour swatch from the Colour view.
Add Texture
The Add Texture button is used to add a bitmap colour swatch to your palette. Use this to load photos and textures and paint your drawings with them. The bitmap image must be a TGA or PSD file format.
1 2 3 4 5 6 7
8
9
Swatch Mode List Mode
10
1. Add Colour2. Delete Colour3. Add Texture4. Set Current Brush Colour5. Set Current Pencil Colour
6. Set Current Paint Colour7. Link/Unlink Three Colours8. Colour View Menu9. Colour Swatch10. Colour Swatch Name
These are described later in this section.
47

Storyboard Pro 2 User Guide
Set Current Brush Colour
The Set Current Brush Colour button is used to set the currently selected colour swatch as the colour used by the
Brush tool. If you select a new colour in the Colour view while using the Brush tool, the Set Current Brush Colour swatch will be updated.
Set Current Pencil Colour
The Set Current Pencil Colour button is used to set the currently selected colour swatch as the colour used by the
Pencil , Ellipse , Rectangle and Line tools. If you select a new colour in the Colour view while using any of these tools, the Set Current Pencil Colour swatch will be updated.
Set Current Paint Colour
The Set Current Paint Colour button is used to set the currently selected colour swatch as the colour used by the Paint
tool. If you select a new colour in the Colour view while using the Paint tool, the Set Current Paint Colour swatch will be updated.
Link/Unlink Three Colours
The Link/Unlink Three Colours button is used to link the Set Current Brush Colour, Set Current Pencil Colour and Set Current Paint Colour swatches to the currently selected colour swatches in the Colour view.
Colour View Menu
The Colour View menu allows you to access commands that are specifically related to the Colour view such as creating, copying and deleting colour swatches and changing the display mode.
Colour Swatch
A colour swatch is a specific colour used to paint a certain zone of a character or background. Colour palettes are comprised of colour swatches. They can also be called colour pots.
Colour Swatch Name
Each colour swatch available in the Colour view can have its own name, making it easy to identify which colour is used to paint what part of your character or background.
NOTE: Two colours can have the same name.
MenusIn Storyboard Pro, you can access the commands from the following three menus:
• Top Menu, on page 49• View Menu, on page 49• Quick Access Menu, on page 49
48

Chapter 3: Discovering the Interface User Interface
Top Menu
The top menu contains most of the commands. Depending on the view you are working in and the selected element, some commands are available and others not. The top menu is always located at the very top of the user interface.
The top menu contains the following categories:
• File• Edit• View• Play• Storyboard• Layer• Sound• Caption• Tools• Windows• Help
In the Mac OS X version, there is a Storyboard Pro category containing the following commands:
• Preferences• About Storyboard Pro• Quit Toon Boom Storyboard Pro 2
View Menu
Some views have their own menu. These menus contain commands specifically related to that view.
You can find View and Caption Menus in the following views:
•Panel view•Storyboard view•Colour view
To access the view menu, click on the Menu button in the view’s or caption’s top right corner.
Quick Access Menu
Each view has a Quick Access Menu containing recurring actions. This menu is accessed by right-clicking (Windows) or [Ctrl]+click (Mac OS X) anywhere in the view.
49

Storyboard Pro 2 User Guide
Managing the ViewsThe Storyboard Pro user interface is comprised of different views, each one designed for a specific purpose. This section explains how you can modify the location and accessibility of the views by adding a new view as a tab or as a window. You can also swap the view locations around.
This section covers the following topics:
• Adding a New View, on page 50• Closing a View, on page 51• Swapping Views, on page 52• Resizing a View, on page 52
Workspace modifications are automatically saved when you exit the application. But you can restore the default workspaces by selecting Windows > Restore Default Workspace from the top menu.
Adding a New ViewTo add a view:
Select the view you want to add from Windows > The desired view.
You can also use the Window drop-down menu button included in each view already available in the workspace. Click on the button and select a view from the list. You can only open one instance of the same view. For example, you cannot have two Camera views open at the same time. To dock a floating window in your workspace, drag the window’s tab onto one of the workspace views’ docked tabs.
Depending on the view you choose and the current workspace, the view will appear as either docked or floating.
FloatingDocked
50

Chapter 3: Discovering the Interface Managing the Views
Renaming a View You can rename a view’s tab temporarily. The new name will remain as long as the views stays open. Once closed and reopened, the tab will display the default name of the selected view.
To rename a view:
1. In the view to rename, click on the Drop-Down View Menu button.
2. Select Rename Tab from the list.
The Rename View Tab dialog box opens.
3. Type a new name for the tab you want to rename in the active text field.
4. Click on OK.
The view tab is renamed.
Closing a ViewTo close a view:
1. In the view to close, click on the Close View button.
2. If you have several tabs in the same window, hold [Shift] down and click on the Close View button to close all tabs together.
51

Storyboard Pro 2 User Guide
Swapping ViewsTo swap views around:
1. Select the view tab and drag it onto one of the view’s separators, top area or onto another view’s tab.2. When a rectangle outline appears showing an available location for the view, release the mouse button and drop
the view tab into position. One of three things will happen:
1. The view becomes a tabbed window.2. The view becomes a floating window.3. The view becomes a new docked window.
Resizing a ViewTo change the width and height of the views in the workspace, drag the side of the view.
To resize a view:
1. In the interface, position your cursor on the edge of the view you want to resize.2. When you see the Resizing cursor, click and drag the side of the window to the desired width or height.
1
2
3
52

Chapter 3: Discovering the Interface Managing the Views
Collapsing and Expanding Views You can also temporarily hide a view to get more working space.
To temporarily hide a view:
1. On the edge of the window you want to hide, click on the Collapse/Expand button.
The view is compressed and only the Collapse/Expand button is visible.
2. Click on the same Collapse/Expand button to display the view again.
53

Storyboard Pro 2 User Guide
Managing the ToolbarsThe Storyboard Pro user interface contains several usefultoolbars. These toolbars can be moved around. You can reposition the toolbars to suit your work style or hide unused ones.
This section covers the following topics:
• Showing or Hiding Toolbars, on page 54• Moving Toolbars, on page 54• Toolbar Manager, on page 55
Showing or Hiding ToolbarsTo show or hide a toolbar:
1. Select Windows > Toolbars > the desired toolbar.2. Select Windows > Toolbars > Line Up to align all of your toolbars.
Moving ToolbarsTo move a toolbar:
1. Select the toolbar you want to move by clicking on its anchor point and dragging it into a view toolbar area or another position in the top or side interface toolbar area.
2. When a rectangle outline appears showing an available location for the toolbar, release the mouse button and drop the toolbar into position.
41
3
2
54

Chapter 3: Discovering the Interface Managing the Toolbars
Toolbar ManagerSome of the toolbars can be customized to contain your favourite tools and options. Use the Toolbar Manager window to organize your different toolbars to suit your working preferences.
These are the toolbars that can be customized:
• Layer toolbar• Storyboard toolbar• Navigation toolbar• Sound toolbar
To customize your toolbars:
1. Right-click (Windows) or [Ctrl]+click (Mac OS X) on any button in the toolbar where you wish to add or subtract a button.
2. From the pop-up menu select Customize.
The Toolbar Manager window opens
3. To add a new icon to your toolbar, select the tool or command from the Available Tools list and click on the Right
Arrow button to move it to the Toolbar list.
4. To remove an icon from your toolbar, select the tool or command in the Toolbar list and click on the Left Arrow button to move it to the Available Tools list.
55

Storyboard Pro 2 User Guide
5. To reorder your icons in your Toolbar, select the command to be moved in the Toolbar list and click on the Up
or Down Arrow buttons to move it to the correct location.
6. Click on the OK button when you are finished.
56

Chapter 3: Discovering the Interface Managing the Workspace
Managing the WorkspaceStoryboard Pro’s user interface is comprised of several views. You can customize your workspace to suit your working preferences, save it as a new workspace, and load it from the Workspace toolbar.
This section covers the following topics:
• Storyboard Pro Workspaces, on page 57• Loading a Workspace, on page 58• Workspace Manager, on page 58• Restoring the Default Workspaces, on page 62
Storyboard Pro Workspaces The first time you open Storyboard Pro, the default Drawing workspace is loaded. There is a total of 6 different prebuilt workspaces.
• Drawing This workspace is built to help you efficiently draw your storyboard. With the large Camera view as the space and the Thumbnails view on the bottom. This workspace also gives you quick and easy access to all your tools as well as the Panel and Storyboard views.
• Timeline This workspace is built with the process of animatic creation in mind. With the large Camera view as the main space and the Timeline view on the bottom where you can easily edit the timing of your panels, transitions and sounds. This workspace also gives you quick and easy access to all your tools as well as the Panel and Storyboard views.
• Overview This workspace is built to help you have a neat overview of your project. The main space is the Thumbnails view, which lets you efficiently reorganize the order of your panels.
• Horizontal This workspace displays your project as a classic horizontal paper storyboard layout. You have three panels at a time displayed in the main space, with the panel information below each one of them.
• Vertical This workspace displays your project as a classic vertical paper storyboard layout. You have two panels at a time displayed in the main space, with the panel information on the side of each one of them.
• PDF View This workspace displays your project with the necessary views to efficiently setup your pdf export.
57

Storyboard Pro 2 User Guide
Loading a WorkspaceThere are four ways to load a workspace in Storyboard Pro
To load a workspace:
• From the View toolbar, click on the button representing the workspace of your choice.
In the View toolbar, you also have a quick access to Zoom In and Zoom Out buttons.
OR
• From the top menu, select Windows > Workspace > Workspace > The desired workspace.
OR
• From the Workspace toolbar, click on the drop-down button and select a workspace from the list.
OR
• The keyboard shortcuts 3 thorugh 8 will open the corresponding workspaces, except for the PDF Review.
Workspace ManagerThe Workspace Manager allows you to modify, create, delete, rename and reorder you workspaces.
To open the Workspace Manager:
1. In the Workspace toolbar, click on the Workspace Manager button.2. In the top menu select Windows > Workspace > Workspace Manager.
The Workspace toolbar is not displayed in the default workspace. Before using it, you need to display it.
To display the Workspace toolbar:
Select Windows > Toolbars > Workspace from the top menu.
58

Chapter 3: Discovering the Interface Managing the Workspace
Creating a New WorkspaceTo create a new workspace:
1. Open the Workspace Manager.2. In the Available Workspaces list, select an existing workspace.
3. At the bottom of the Available Workspaces list, click on the Add button to add a workspace.
4. Select the new workspace you created, then click on the Rename button and give it a new name.
5. Select the new workspace and click on the Right Arrow button to send it to the Workspace toolbar.
6. Click on the OK button.
59

Storyboard Pro 2 User Guide
Renaming a WorkspaceTo rename a workspace:
1. Open the Workspace Manager.2. Choose the workspace to be renamed from the list.3. Click on the Rename button. This allows you to edit the name.
4. Type in the new name of the workspace.5. Press the [Return] key to validate the name.6. Click on the OK button.
Saving a WorkspaceStoryboard Pro automatically saves the changes made to a workspace. This means that when you resize, move around, add or delete views, your workspace will be automatically saved at its current state.
You may also save a workspace manually.
To save a workspace manually:
Select Windows > Workspace > Save Workspace from the top menu.
Save your workspace as a new version to avoid over-writing the current one.
To save your workspace as a new version:
1. Select Windows > Workspace > Save Workspace As.
The Save Workspace As dialog box opens.
2. In the text field, enter the new workspace name.3. Click on the OK button to validate.
Deleting a WorkspaceTo delete a workspace:
1. Open the Workspace Manager.
2. In the Workspace Manager, select the workspace to be deleted and click on the Left Arrow button to send it to the Available Workspaces list.
60

Chapter 3: Discovering the Interface Managing the Workspace
3. Select the workspace in the Available Workspaces list then click on the Delete button to delete the workspace.
4. Click on the OK button.
Showing and Hiding a WorkspaceYou can show and hide selected workspaces from the Workspace toolbar’s drop-down menu.
To show a workspace:
1. Open the Workspace Manager.
2. In the Available Workspaces list, select the workspace to be displayed. Click on the Right Arrow button to send it to the Workspace Toolbar.
3. Click on the OK button.
To hide a workspace:
1. Open the Workspace Manager.
2. In the Workspace Manager, select the workspace to be hidden.Click on the Left Arrow button to send it to the Available Workspaces List.
3. Click on the OK button.
Reordering the Workspace ListYou can edit the order that the available workspaces are listed in the Workspace toolbar’s drop-down menu.
To reorder workspaces:
1. Open the Workspace Manager.
2. In the Toolbar section, select the workspace to be reordered and click on the Up or Down Arrow buttons to move it up or down.
3. Click on the OK button.
61

Storyboard Pro 2 User Guide
Restoring the Default WorkspacesYou can restore the modified workspaces to their original default layout.
To restore the default workspaces:
In the top menu select Windows > Restore Default Workspace.
Interface NavigationStoryboard Pro supports Zoom In, Zoom Out, Rotate, Pan and Reset View Position for easy interface navigation.
• Zoom In: Zooms into the view. Use the keyboard shortcut [2] or from the top menu, select View > Zoom In.
• Zoom Out: Zooms out of the view. Use the keyboard shortcut [1] or from the top menu, select View > Zoom Out.
• To Zoom In and Zoom Out: Hold down [Spacebar] and your middle mouse button while moving the mouse up or down.
• To Pan the view: Hold down the keyboard shortcut [Spacebar] and drag your mouse in the direction you want to pan the view.
• Reset View: Resets the view to its default position. Use the keyboard shortcut [Shift]+[M] or from the top menu, select View > Reset View.
• Reset View to Default Drawing Area: Resets the Camera view to show the default drawing area, which is the space situated inside the default camera frame (before the camera is modified). Select View > Reset > Reset View to Default Drawing Area.
• Reset View to Camera Overview: Resets the Camera view to show an overview of the Camera frames. If a Camera movement was created in the selected panel, it will show the entire space within the camera movement. Select View > Reset > Reset View to Camera Overview.
This option is only available when the Point of View Mode is set to the Scene or Panel level. Refer to the Point of View Drop-down Menu to learn how to set the Point of View Mode.
• Reset View to Start Camera: Resets the Camera view to focus on the starting camera position of the camera movement on the current panel. Select View > Reset > Reset View to Start Camera.
This option is only available when the Point of View Mode is set to the Scene or Panel level. Refer to the Point of View Drop-down Menu to learn how to set the Point of View Mode.
• Reset View to End Camera: Resets the Camera view to focus on the ending camera position of the camera movement on the current panel. Select View > Reset > Reset View to End Camera.
62

Chapter 3: Discovering the Interface Interface Navigation
This option is only available when the Point of View Mode is set to the Scene or Panel level. Refer to the Point of View Drop-down Menu to learn how to set the Point of View Mode.
• Reset Rotation: Resets the view’s rotation to its default position. Use the keyboard shortcut [Shift]+[X] or from the top menu, select View > Reset Rotation.
• Reset Pan: Resets the view’s pan to its default position. Use the keyboard shortcut [Shift]+[N] or from the top menu, select View > Reset Pan.
• Reset Zoom: Resets the view’s zoom to its default position. Use the keyboard shortcut [Shift]+[Z] or from the top menu, select View > Reset Zoom.
• Rotate CW: Rotates the Camera View clockwise, like an animation table. Use the keyboard shortcut [V] or from the top menu, select View > Rotate View CW.
• Rotate CCW: Rotates the Camera View counter-clockwise, like an animation table. Use the keyboard shortcut [C] or from the top menu, select View > Rotate View CCW.
• Toggle Full Screen: Maximizes the application on your screen space. Use the keybord shortcut [Ctrl]+[F] (Windows) or [ ]+[F] (Mac OS X) once to make the application go full screen, click again to resolve to normal view. You can also use View > Toggle Full Screen from the top menu.
63

Storyboard Pro 2 User Guide
Navigation Toolbar Storyboards can easily become very extensive projects. The Navigation toolbar is there to help you find your way through your storyboard panels and scene.
Displaying the Navigation Toolbar By default, the Navigation toolbar is not displayed in the interface.
To display the Navigation toolbar:
In the top menu, select Windows > Toolbar > Navigation.
The Navigation toolbar will appear docked in the top of the interface.
Using the Navigation Toolbar Using the Navigation toolbar is really simple, here are the different buttons and what they do.
First Panel and Last Panel
Use the First Panel and Last Panel buttons to quickly select the first or last panel of the storyboard as the current panel.
Previous Scene and Next Scene
Use the Previous Scene and Next Scene buttons to quickly navigate through all scenes, backward and forward. The first panel of each scene will be selected as the current panel when skipping from one to another.
Previous Panel and Next Panel
Use the Previous Panel and Next Panel buttons to quickly navigate through all panels, backward and forward. Each panel will be selected as the current panel as you skip through the storyboard.
First Frame and Last Frame
Use the First Frame and Last Frame buttons to quickly go to the complete beginning or ending of your storyboard. Frames refer to a timing value used when creating your animatic.
Refer to the Animatic chapter to learn more about animatics and timing.
64

Chapter 3: Discovering the Interface Preferences
PreferencesAn important feature of Toon Boom Storyboard Pro is the Preferences panel. From here you can customize your interface, tools behaviour and shortcuts. Throughout this guide, you are often required to go to the Preferences panel to set parameters and options.
In this section you will learn how to access the Preferences panel and also find a general description of its functionality.
To learn about the different preferences available, refer to the next chapters:
This section covers the following topics:
• Preference Highlights, on page 65• Keyboard Shortcuts, on page 72
Preference HighlightsYou can set up your preferences in the Preferences panel. You will learn about them as you read through this guide.
The Preferences panel is divided into the following tabbed sections:
• Shortcuts• General• Advanced• Global UI• Camera• Tools• Import/Export
Some preferences require you to exit and restart the application or to close a view and reopen it before changes are applied.
Accessing the Preferences PanelTo access the Preferences panel:
1. In the top menu, select Edit > Preferences (Windows) or Storyboard Pro > Preferences (Mac OS X). You can also use the default keyboard shortcut [Ctrl]+[U] (Windows) or [ ]+[U] (Mac OS X).
65

Storyboard Pro 2 User Guide
User Interface Preferences - General TabTo customize your interface, you will use some of the preferences located in the General as well as the Terminology Style categories.
Forbid drawing on panel thumbnails
By default, this preference is enabled, meaning that it is not possible to draw in the panels in the Thumbnails view. You can disable this preferences to make it possible to use all of the Drawing tools directly in the Thumbnails view.
Refer to the Drawing chapter to learn more about drawing tools.
Terminology Style
By default, Storyboard Pro is set on Animation terminology style. This means it will use the word Scene as opposed to Shot which is more commonly used in Live Action projects. You can change this preference so that the project and interface uses Live Action terminology.
To switch between terminology styles:
Enable Live Action to use Shot.
Enable Animation to use Scene.
This guide is written using the Animation terminology style. Some command names will differ when using Live Action terminology, as the user interface will use the concept of Shots rather than Scenes.
66

Chapter 3: Discovering the Interface Preferences
User Interface Preferences - Advanced Tab To customize your interface, you will use some of the preferences located in the Memory category.
Levels of Undo The Levels of Undo preference determines the number of actions retained by the Undo List. By default, the system stores 50 actions in the list. You can alter the number if you want to.
This preference requires you to restart the application.
Auto-save (minutes)
By default the Auto-save preferences is disabled, it will never auto-save your work. You can enable the Auto-save preference by using the slider. The value you choose represents minutes and will determine at which time range your work will be automatically saved.
67

Storyboard Pro 2 User Guide
User Interface Preferences - Global UI tab To customize your interface, you will use preferences located in the Global UI tab.
Colours
You can customize some of the colours displayed in the user interface. The colour swatch displayed beside each of the elements listed represents its current colour.
You can modify any of the colours from the list. Some of the changes may require you to restart the application or close the view and reopen it to see them.
• Click on any of the colour swatches and select a new colour from the Colour Picker window.• To restore all of the default interface’s colours, click on the Restore All Defaults button.
68

Chapter 3: Discovering the Interface Preferences
Display Duration in Time Code Format
In the user interface, the durations are either displayed in Time Code format or Frames. You can use this section of the Preferences Panel to decide when to use which format.
• Enabled options use Time Code as the duration format.• Disabled options use Frame as the duration format.
User Interface Preferences - Camera Tab To customize your interface, you will use preferences located in the Options, Point of View and Safety Areas sections.
Show Status Bar
The Camera view has a status bar at the bottom. This toolbar is not displayed by default, you can display it through the preferences panel.
• Enable the option to make the Status Bar visible in the Camera view.
Refer to the Camera View topic to learn more about the options available in the Status Bar.
69

Storyboard Pro 2 User Guide
Point of View Drop-down Menu
Use the Point of View drop-down menu to define the Point of View behaviour. This determines at which level the current position of the Camera view (zoom, pan and rotation) is remembered when you are flipping through your panels.
• Project: When this option is selected, the same zoom, pan and rotation value of the Camera view is kept for all the panels of the project.
• Scene: When this option is selected, the same zoom, pan and rotation value of the Camera view is kept only for the panels that are part of the current scene.
• Panel: When this option is selected, every panel of the project has its own zoom, pan and rotation value.
You can also set the Point of View mode using the top menu or the Status Bar options. Select View > Point of View Mode > Project Level, Scene Level or Panel Level.
The current Point of View mode will also affect the different Reset View commands behaviour.
Refer to the Resetting Point of View Drop-down Menu section to learn how to set it using the Status Bar.
Reset View Mode Drop-down Menu
Use the Reset View Mode drop-down menu to define the behaviour of the Reset View command. By default it is set to Reset View to Drawing Area.
The three other options will only work when the Point of View Mode is set to the Scene or Panel level. When the Point of View Mode is set to Project level, the Reset View command will reset the view to the default Drawing Area.
• Reset View to Drawing Area: Resets the Camera view to show the default drawing area, which is the space situated inside the default camera frame (before the camera is modified).
• Reset View to Camera Overview: Resets the Camera view to show an overview of the Camera frames. If a Camera movement was created in the selected panel, it will show the entire space within the camera movement.
• Reset View to Start Camera: Resets the Camera view to focus on the starting camera position of the camera movement on the current panel.
• Reset View to End Camera: Resets the Camera view to focus on the ending camera position of the camera movement on the current panel.
You can also use similar commands from the top menu to reset the view to the desired behaviour once, without modifying the default behaviour of the Reset View command. Select View > Reset View to > the desired option.
Refer to the Interface Navigation topic to learn more.
70

Chapter 3: Discovering the Interface Preferences
Safety Areas
You can set your own Camera view safety area limits using these two fields. These two values are expressed using a percentage of the view.
You can display the Safety Area in the Camera view using the Safety Area button from the Status Bar.
Refer to the Camera View topic to learn how to show the Status Bar.
Action Safe Area
Title Safe Area
71

Storyboard Pro 2 User Guide
Keyboard ShortcutsTo speed up your work, all of Toon Boom Storyboard Pro’s keyboard shortcuts can be customized and you can even choose other software keyboard shortcut sets.
This section covers the following topics:
• Selecting a Keyboard Shortcut Set, on page 72• Customizing a Keyboard Shortcut, on page 72
Selecting a Keyboard Shortcut Set In Storyboard Pro, you can choose a set of default keyboard shortcuts you are familiar with. You can choose between the following:
• Toon Boom Storyboard Pro (Default)• Toon Boom Harmony
To switch keyboard shortcut sets:
1. Open the Preferences panel. Use the default keyboard shortcut [Ctrl]+[U] (Windows) or [ ]+[U] (Mac OS X).
2. In the Preferences panel, go to the Shortcuts tab.3. In the Shortcut Set drop-down menu, select the desired set.
Customizing a Keyboard ShortcutYou can also customize most of the shortcuts by opening the Preferences panel and going to the Shortcuts tab.
To set a shortcut:
1. Open the Preferences panel. Use the default keyboard shortcut [Ctrl]+[U] (Windows) or [ ]+[U] (Mac OS X).
2. In the Preferences panel, go to the Shortcuts tab.3. In the left window, select the command to modify.4. Click on the shortcut rectangle (above the right window).
5. On your keyboard, click on the desired shortcut.To reset a command’s default keyboard shortcut, click on the Default button.To remove any keyboard shortcut associated to a command, click on the Clear button.
6. Click on the OK button.
Clears the current keyboard shortcut.
Current keyboard shortcut.
Resets the keyboard shortcut to its default value.
72

Chapter 3: Discovering the Interface Preferences
NOTE:
If a keyboard shortcut is already in use, the Conflict Detected dialog box will appear notifying you of the command to which it is already associated. You can continue to associate the shortcut or cancel the operation and choose another command.
The Replace button associates the selected keyboard shortcut and removes it from any commands already using it.
The Duplicate button associates the selected keyboard shortcut with the command and allows other commands in the list to use the same one.
The Cancel button stops the operation and lets you select another keyboard shortcut.
73

Storyboard Pro 2 User Guide
74

Chapter 4 Script and Panels
A complete storyboard is not only made of drawing panels, but also valuable written directions and information, such as action notes, dialogue and more. In Toon Boom Storyboard Pro, the editing of these text fields, called captions, is as easy as a drag and drop. You can also reorder, rearrange and modify your panels and scenes very easily, without having to go back to the photocopy machine, scissors and tape.
This chapter is divided as follows:
• Importing a Script, on page 76• Captions, on page 80• Scenes and Panels, on page 91• Navigation Toolbar, on page 109• Preferences, on page 110
75
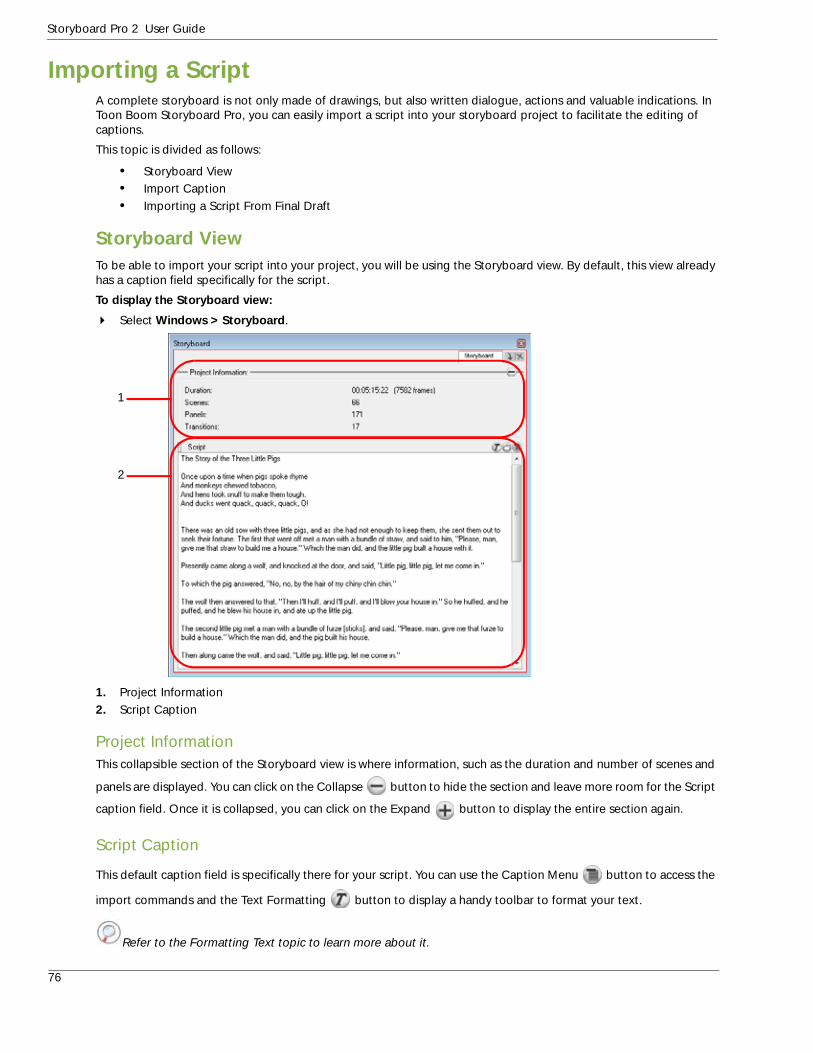
Storyboard Pro 2 User Guide
Importing a Script A complete storyboard is not only made of drawings, but also written dialogue, actions and valuable indications. In Toon Boom Storyboard Pro, you can easily import a script into your storyboard project to facilitate the editing of captions.
This topic is divided as follows:
• Storyboard View• Import Caption• Importing a Script From Final Draft
Storyboard View To be able to import your script into your project, you will be using the Storyboard view. By default, this view already has a caption field specifically for the script.
To display the Storyboard view:
Select Windows > Storyboard.
1. Project Information2. Script Caption
Project Information This collapsible section of the Storyboard view is where information, such as the duration and number of scenes and
panels are displayed. You can click on the Collapse button to hide the section and leave more room for the Script
caption field. Once it is collapsed, you can click on the Expand button to display the entire section again.
Script Caption
This default caption field is specifically there for your script. You can use the Caption Menu button to access the
import commands and the Text Formatting button to display a handy toolbar to format your text.
Refer to the Formatting Text topic to learn more about it.
1
2
76

Chapter 4: Script and Panels Importing a Script
Once a script is imported into the Script caption field, you can easily copy the text to other caption fields with a simple drag and drop action.
Refer to the Drag and Drop Text topic to learn more.
Import Caption If your script is in a *.txt or *.rtf file format, you can use the Import Caption command to import it into the Script caption.
To use the Import Caption command to import your script:
1. In the Storyboard view, click on the Caption Menu button and select Import Caption.
The Import Caption browser opens.2. Browse to your *.txt or *.rtf file and press Open.
The script appears in the Script caption field.
77

Storyboard Pro 2 User Guide
Importing a Script From Final DraftIf you created your script in Final Draft, importing it into Storyboard Pro should be your next step. While importing your Final Draft script, you will retain the rich text formatting.
If you are working with Final Draft version 8, you can import the project file which is a *.fdx file. If you are working with Final Draft version 7, you need to export your project as an *.xml first.
Refer to the Exporting Your Final Draft Version 7 Script as an *.XML File topic to learn how.
To import your Final Draft script:
1. In the Storyboard view, click on the Caption Menu button and select Import Final Draft Script.
The Select Final Draft browser opens.2. Browse to your Final Draft *.fdx or *.xml file and click on Open.
The script appears in the Script caption field, with all notes and formatting intact.
Note that if you are working with Final Draft v.8, Storyboard Pro can directly import the *.fdx project file. If you are working with Final Draft v.7 and earlier, you will need to export your project from Final Draft as an *.xml first, in order to be able to import it in Storyboard Pro.
78

Chapter 4: Script and Panels Importing a Script
Exporting Your Final Draft Version 7 Script as an *.XML FileHere is a simple step by step to help you export your Final Draft *.fdr project to an *.xml file using Final Draft Tagger in version 7.
To export a Final Draft version 7 script as an *.xml file:
1. Start the Final Draft Tagger software.2. Select File > Import Script, the keyboard shortcut is [Ctrl]+[I].
The Import dialog box opens.3. In the browser, select your script file and click on the Open button.
Your script will appear in Final Draft Tagger.
4. Select File > Export to XML.5. Close the Final Draft Tagger application.
79

Storyboard Pro 2 User Guide
CaptionsCaptions are text fields you can edit to include special indications and notes specific to a panel in your Storyboard. These texts indications can be dialogue, action notes, sound effects, etc.
Panel ViewTo add information to a particular panel, you will use the Panel view. This view displays the different captions related to a panel, as well as other useful information.
1. Panel Information2. Selection Information3. Voice Annotations4. Captions
Panel InformationThis section of the Panel view is where you will find information such as the duration of the current panel, its name and the name of the scene it is part of. You can use the Scene and Panel fields to rename the current selection.
Refer to the Renaming Scenes and Renaming Panels sections to learn more.
You can also use the Duration field to edit the panel’s duration.
Refer to the Animatic chapter to learn more about timing your panels.
Selection InformationThis collapsible section of the Panel view is where to find information such as the number of panels selected, the timing and frame number where the selection starts and ends, as well as the total duration of the selected panels.
These fields are for reference only as they are not editable. You can click on the Collapse button to hide the
section and leave more for the Script caption field. Once it is collapsed, you can click on the Expand button to
display the entire section again.
Voice AnnotationsIt is possible to add voice annotations to a panel. This collapsible section is used to control and edit these annotations.
Refer to the Storyboard Supervision chapter to learn more about voice annotations.
4
1
2
3
80

Chapter 4: Script and Panels Captions
Panel CaptionsThese sections are the panel caption fields. You can customize these caption fields. You can use the Caption Menu
button to access the commands related to your caption field, and the Text Formatting button to display a handy toolbar to format your text.
Refer to the Adding Text to the Panel Captions to learn more.
Adding Text to the Panel CaptionsThere are several ways to add text to a Caption field, and editing it is very easy.
• Drag and Drop Text• Typing Text• Formatting Text• Find Text in Captions
Drag and Drop TextThe quickest and easiest way to add text to your caption fields is to drag and drop it from another one. For example, if you imported your script into the Storyboard view’s Script caption field, you can select the text you need and drop it in the desired panel’s caption field.
To drag and drop text from your imported script:
1. Switch to the Vertical Workspace, click on the Vertical Workspace button or select Windows > Workspace > Workspace > Vertical. This is not mandatary but it provides a good layout for the next steps.
2. In the Thumbnails view, select the panel to which you want to add text to a caption.3. Display the Storyboard view:
In the Vertical Workspace, the Storyboard view is situated on the right of the screen under the Panel view. Simply click on the Storyboard tab to switch to this view.If the Storyboard view is not displayed in your workspace, select Windows > Storyboard.
4. In the Script caption field, highlight the part of the text you want to drag and drop. (Note that you can drag and drop text from any caption field to another; it does not absolutely have to be from the Script caption.)
81

Storyboard Pro 2 User Guide
5. In the Script caption, click and drag your selected text and drop it in the destination caption of your panel.
6. Repeat until you have copied all the necessary text into your project’s caption fields.
Typing TextIf you did not import a script, or if you want to add more text, you can simply type in the needed indications and information into the caption field of your choice.
To type text in a caption field:
1. In the Thumbnails view, select the panel of your choice.2. In the Panel view, click in the caption field of your choice to activate text edit, and type the information,
dialogue or notes you need.
In the default workspace, the Panel view is displayed on the right of the Camera view.If the Panel view is not in your current workspace, select Windows > Panel.
Formatting TextOnce you have imported, dragged and dropped, or typed some text into your storyboard captions, you can use the Text Formatting toolbar to enhance it.
To apply Rich Text formatting to caption text:
1. In the Panel or Storyboard view, click on one of the captions’ Text Formatting button.
2. In the caption of your choice, select the text you want to format.
82

Chapter 4: Script and Panels Captions
3. Use the Text Formatting toolbar buttons and options to edit the text.
Font Type: Choose the font type of your choice from this drop-down menu.
Font Size: Change the size of the text using this drop-down menu.
Bold: Click on this button to change the text to bold.
Italic: Click on this button to change your text to italic.
Underline: Click on this button to underline your text.
Align Left: Click on this button to align your text to the left.
Center: Click on this button to center your text.
Align Right: Click on this button to align your text to the right.
Justify: Click on this button to justify your text.
Colour: Click on this button to open the Select Colour dialog box and choose a new colour for your text.
Find Text in CaptionsYou can search captions to find a specific part of your text. This can become very handy when you have a large amount of captions and text in your project.
To find text in captions:
1. In the Panel or Storyboard view, select any caption field.2. Click on the Caption Menu button and select Find Text in Captions. You can also select
Caption > Find Text in Captions from the top menu or use the default keyboard shortcut [Ctrl]+[Shift]+[F] (Windows) or [ ]+[Shift]+[F] (Mac OS X).
The Find Text in Captions dialog box opens.
3. Edit the search options:
Type in the word you are looking for in the Find field.Enable the Case sensitive option if you want the search to consider case.Enable Forward or Backward for the search direction.
83

Storyboard Pro 2 User Guide
4. Press on the Find button.5. The caption containing the first word fitting your search options will be displayed in either the Storyboard or
Panel view, and the word will be highlighted in yellow. The Find Text in Caption dialog box will display information about the caption where the word was found.
6. Click on Find to display the next results.7. When you are done, click on the Close button.
Expanding and Collapsing Captions
When you have more than one caption field in a panel, you can use the Expand and Collapse button to expand and collapse them.
To expand and collapse captions:
1. Display the Panel or Storyboard view. Note that there must be more than one caption field in a panel in order to be able to collapse or expand one.
2. Click on the Expand and Collapse button of the desired caption.
3. On the first click, the selected caption will expand and the other ones will collapse.
84

Chapter 4: Script and Panels Captions
4. On the second click, the selected caption will collapse and the other ones will expand.
5. On the third click, all the captions will return to their original state.
Adding Captions to the StoryboardIn the Storyboard view, by default, there is only one caption field which is called Script. If you need to, you can add more captions to this view.
To add captions in the Storyboard view:
1. Display the Storyboard view.If the Storyboard view is not part of your current workspace, select Windows > Storyboard.
2. Press on the Script Caption Menu button and select Add Caption. You can also select Caption > Add Caption to Storyboard from the top menu.
The Choose Field Name dialog box opens.
3. Type a name for your new Caption field and click on the OK button.
The new caption appears below the Script caption. This one is named Director Notes, for example.
85

Storyboard Pro 2 User Guide
Adding Captions to the PanelsBy default, in each panel, there are two caption fields: Dialogue and Action Notes. If you need to enter more information, you can always add a new caption for your panels.
To add captions to a panel:
1. In the Thumbnails view, select a panel.2. Display the Panel view.
If the Panel view is not part of your current workspace, select Windows > Panel.
3. In the Panel view, click on one of the Caption Menu buttons and select Add Caption. You can also select Caption > Add Caption to Panels from the top menu.
The Choose Field Name dialog box opens.
4. Type a name for your new Caption field and press on the OK button.
The new caption appears below the existing ones, and is available for every panel of your storyboard.
86

Chapter 4: Script and Panels Captions
Adding a Sketch Caption to a PanelJust like in a traditional storyboard, you can add drawn indications to a panel’s caption. For this, you need to add a Sketch Caption to your panel.
Note that you can not add a sketch caption to the Storyboard view.
To add a sketch to a panel:
1. In the Thumbnails view, select the panel to which you want to add a sketch.2. Display the Panel view.
If the Panel view is not part of your current workspace, select Windows > Panel.
3. In the Panel view, click on one of the Caption Menu buttons and select Add Sketch. You can also select Caption > Add Sketch to Current Panel from the top menu.
The Choose Field Name dialog box opens.
4. Type a name for your Sketch field and click on OK.5. The Sketch field appears below the existing captions for this panel only.
6. Once you added a sketch caption field, you can use any drawing tool to sketch in it!
Refer to the Drawing chapter and the Adding Colour chapter to learn more about the drawing tools.
Deleting CaptionsIf you have a caption that is no longer needed, you can delete it. But be careful, if you remove a caption that has been filled with text or a sketch, they will both be removed permanently.
87

Storyboard Pro 2 User Guide
To delete captions:
1. Display the Panel or Storyboard view, depending on whether it is a panel caption or storyboard caption you want to delete.
If the Panel or Storyboard view is not part of your current workspace, select Windows > Panel or Storyboard.
2. In the Panel or Storyboard view, click on the Caption Menu button for the caption you want to delete and select Delete Caption.
You can also use the top menu to delete captions. Select Caption > Delete Caption > select the caption you want to delete from the list.
A warning message opens.
If you are sure you want to delete the caption, click Yes.If you want to cancel the process, click No.
Renaming CaptionsYou can easily rename a caption.
To rename a caption:
1. Display the Panel view or Storyboard view, depending on whether it is a panel caption or a storyboard caption you want to rename.
If the Panel or Storyboard view is not part of your current workspace, select Windows > Panel or Storyboard.
2. In the Panel or Storyboard view, click on the Caption Menu buttons for the caption you want to rename and select Rename Caption.
You can also use the top menu to rename captions. Select Caption > Rename Caption > select the caption you want to rename from the list.
The Renaming a Field dialog box opens.
3. Type a new name for your caption field and press OK.4. The selected caption field will be renamed.
Saving the Caption Layout as DefaultWhen you are satisfied with your current caption combination and layout, you can save it as the default caption layout for any future Storyboard Pro projects. The next projects you will create will automatically have this captions layout by default.
To save the caption layout as default:
1. In the top menu, select Caption > Save Captions Layout as Default.
88

Chapter 4: Script and Panels Captions
Update Captions From CSVAn efficient way to update the captions in your Storyboard Pro project would be to use the Update Captions From CSV option. If you generate an .csv (comma separated values) sheet from your project, you can update the file, then import it into Storyboard Pro. Doing so will update all caption fields automatically.
You must first generate the CSV from your current project.
To generate a CSV from your current project:
1. Make sure your caption fields are up to date, and save your project.2. From the top menu, choose File > Export > CSV.
The Export to CSV dialogue opens.
Once you have generated the CSV, you can update it in your spreadsheet software if there are major changes to such things as dialogue. Working this way will allow you to import the updated CSV into Storyboard Pro and have all caption fields be updated.
Using the Update Captions from CSV option:
1. When you open the .csv file in your spreadsheet software, select the field separator you used, for example comma.
The heading of each column will be the name of the caption field. Use this to determine where to add your caption updates.
2. Find the captions you need to modify within the .csv file. When you are finished, save and close your file.3. Open the Storyboard Pro project you need to update.4. From the top menu, choose File > Update Captions from CSV. The Import CSV window will open.5. Click on the folder to browse to your .csv file.
Make sure at least these options are checked before you export:
• Include Column Names
• Include Scene Names
• Include Panel Names
• Include Captions
89

Storyboard Pro 2 User Guide
6. Once you’ve selected the correct .csv, hit Import.7. In the Report section, notice which caption fields have been updated.
In your Storyboard Pro project, any modifications you made to captions in the .csv file, will be updated in the caption fields.
Note: CSV files exported from Storyboard Pro are UTF-8. CSV files can be modified in Excel if all the characters are part of the latin character set. If non latin characters are used, the CSV files can be edited using Open Office.
CSV files exported from Storyboard Pro can be edited in either Microsoft Excel or OpenOffice. However, Excel will not display non-English characters properly, and any non-English characters typed in Excel will not be recognized when importing back to Storyboard Pro.
90

Chapter 4: Script and Panels Scenes and Panels
Scenes and PanelsTo build and organize your storyboard project, you will use Panels, Scenes and Acts. You have many options to customize these project elements in order to keep things clear and organized.
This section is divided in the following topics:
• What is the Difference Between Scenes, Panels and Acts?, on page 91• Scenes, on page 91• Panels, on page 98• Acts, on page 107
What is the Difference Between Scenes, Panels and Acts?
1. A Panel represents an action and is the smallest element of the three. It is the white rectangle representing the camera view. An action can be drawn over several panels. By default the current panel will be highlighted in dark blue in the Thumbnails view.
2. A Scene is composed of one or several panels. In animation, a scene is comprised of the panels of an action happening within the same background, straight without cuts. By default in Storyboard Pro, a grey rectangle connects the panels of a scene.
3. An Act is composed of one or several scenes. An act is a certain time lapse in the story, perhaps all action taking place within a specific location. A storyboard can be created without having acts. In Storyboard Pro, a dark grey rectangle connects the all the scenes of the same act.
ScenesIn Toon Boom Storyboard Pro, you can easily create, import, rename, split and delete scenes.
This section contains the following topics:
• Creating Scenes, on page 92• Create Scene Before, on page 92• Import Images as Scenes, on page 92• Deleting Scenes, on page 95• Renaming Scenes, on page 96• Locking and Unlocking Scene and Panel Names, on page 97• Split Current Scene, on page 98
1
2 3
1
2
3
The difference between Scenes, Panels and Acts, as seen in the Timeline view.
91

Storyboard Pro 2 User Guide
Creating ScenesTo create a scene:
In the Storyboard toolbar, click on the Create Scene button. You can also select Storyboard > Create Scene from the top menu.
A new scene, containing one blank panel, will be added after the current scene.
Create Scene BeforeYou can also create a scene that will appear before the current scene.
To create a scene before current scene:
Select Storyboard > Create Scene Before from the top menu.
A new scene, containing a blank panel will be added before the current scene.
Import Images as ScenesYou can quickly import one or several images and have Storyboard Pro automatically create a new scene for each one. Use this option if you have a series of bitmap images that you need to bring in, such as backgrounds or scanned storyboards.
The supported image formats are: *.bmp, *.jpg, *.omf, *.opt, *.pal, *.png, *.psd, *.scan, *.sgi, *.tga, *.tif, *.tvg, and *.yuv.
To import images as Scenes:
1. Select Storyboard > Import Images as Scenes from the top menu.
The Chose Image Files browser opens.2. Browse to the desired image(s).
92

Chapter 4: Script and Panels Scenes and Panels
3. Select one or more images and click on Open.
The images will be imported and a new scene created for each of them.
Automatic InsertionWhen using the Import Images as Scenes function, you can save a little time by using the following naming convention for your bitmap images when you scan. Having your bitmap images named in the following manner, will allow acts, scenes, panels and layers to be created upon import into Storyboard Pro.
To use Automatic Insertion:
1. When scanning your images, name them according to the following example:
<name>-A#-S#-E#-P#-L<layer name>.<extension>
• Name - This is the name of the project. This string will not be inserted into the Storyboard Pro project, but it is mandatory.
• A - This attribute indicates which act the image will be placed in. Replace the # with the number of the act.• S - This attribute indicates the first (or only) scene the image will be placed in. Replace the # with the
number of the first scene this image will be used in.• E - (Optional attribute) Use this attribute along with the S attribute if you would like the image to be
included in multiple scenes. Replace the # with the number of the last scene this image will be used in.• P - (Optional attribute) This attribute is to indicate which panel the image will be placed in. Replace the #
with the number of the panel in the scene.
• L - (Optional string) This string is to indicate the name of the layer where the image will be placed. Replace the # with the number of the layer in the scene.
2. From the top menu choose Storyboard > Import Images as Scenes, and browse to the location on your computer where your images are saved.
The following are two examples of how the Automatic Insertion could be used:
93

Storyboard Pro 2 User Guide
In the first example:
1. The drawings are scanned and named as such:• LittlePigs-A1-S1-P1-LBackground.jpeg• LittlePigs-A1-S1-P2-LBackground.jpeg• LittlePigs-A1-S1-P3-LBackground.jpeg• LittlePigs-A1-S2-P1-LBackground.jpeg
2. Then, imported using the Storyboard > Import Images as Scenes command, they would be imported in the following order in the Storyboard Pro project:
In the second example:
1. A drawing is scanned and named as such:• LittlePigs-A1-S5-E7-P1-LBackground.jpeg
2. Then, imported using the Storyboard > Import Images as Sc ens command, the image would have been placed in act 1, in scenes 5 through 7, on panel 1 on a layer called Background:
If the element you are set to create upon import does not already exist in your project, a window will open prompting you to create the element, or cancel the operation. Check the Don’t show this dialog again box if you never want to see this message again.
Refer to the Preferences section.
Act 1, Scene 1, Panel 1 of 3,
Layer - Background
Act 1, Scene 1, Panel 2 of 3,
Layer - Background
Act 1, Scene 1, Panel 3 of 3,
Layer - Background
Act 1, Scene 2, Panel 1 of 3,
Layer - Background
Act 1, Scene 5, Panel 1 of 1,
Layer - Background
Act 1, Scene 6, Panel 1 of 1,
Layer - Background
Act 1, Scene 7, Panel 1 of 1,
Layer - Background
94

Chapter 4: Script and Panels Scenes and Panels
If the element you are set to create upon import does already exist in your project, a window will open prompting you to remove the original element, or keep it. Check the Don’t show this dialog again box if you never want to see this message again.
Refer to the Preferences section for more information regarding this.
Deleting ScenesIf you have one or more scenes that you need to remove, you can easily do so.
To delete one scene:
1. In the Thumbnails view, select the scene you need to delete.
2. Select Storyboard > Delete Scene from the top menu or use the default keyboard shortcut [Delete].
The selected scene is deleted from your storyboard.
The Delete Scene command will only delete one scene at a time.
Note: When a scene is deleted, or a new scene is inserted between two pre-existing scenes, you will notice the numbering of the scenes will be out of order. By default, there is no automatic renaming of scenes. You can change this behaviour in the Preferences Panel.
Refer to the Preferences section to learn more. You can also simply rename the scenes you need to, refer to the Renaming Scenes section to learn how.
To delete more than one scene at once, you can use the Delete Panel command, or the [Delete] key.
To delete many scenes:
1. In the Thumbnails view, [Shift] + click to select the scenes you need to delete.
95

Storyboard Pro 2 User Guide
2. In the Storyboard toolbar, click on the Delete Panel button. You can also select Storyboard > Delete Panel from the top menu or use the default keyboard shortcut [Delete].
Renaming ScenesWhen you start moving scenes and panels around, you will notice the Rename Scene dialog box automatically opens and prompts you to rename every time. You can also rename selected scenes as needed, using the Rename Scene command or the Panel view.
Renaming Scenes Using the Rename Scene Command
This command will let you rename a selected scene, as well as all the other scenes following it to make sure they are in order.
To rename scenes with the Rename Scene command:
1. In the Thumbnails view, select the scene you want to rename.2. Select Storyboard > Rename Scene from the top menu.
The Rename Scene dialog box opens.
3. In the New name field, type the new name for the selected scene. You can type either a number or a name. If you type a name or a number that is already used by another scene, a warning message will appear.
1 23 4
96

Chapter 4: Script and Panels Scenes and Panels
4. You can use the Renaming Rule for Subsequent Scene drop-down menu and choose if the next scenes should be renamed and how to proceed. The Renumbered Scene Names section will display the current and new names for all the scenes that will be affected by the renaming process.
• Current Scene Only: Choose this option if you want only the selected scene to be renamed.
• Renumber Scenes: Choose this option if you want the current scene to be renumbered, as well as all the scenes that follow.
• Renumber Selected Scenes: Choose this option if you want the first selected scene of a multi selection to be renumbered as well as all the following scenes that are part of the multi selection.
• Renumber Prefix Only: Choose this option to renumber the scenes numerical prefixes beginning at the selected scene. Note that the new name must be a numerical value.
5. Enable the Reset Panel Name option to reset all panel names according to the current panel time automatic increment rule.
Refer to the Preferences section to learn how to define the auto-increment rule.
6. Enable the Do not show this dialog automatically to prevent it from automatically opening every time you move scenes around.
Refer to Show Rename Dialog Automatically in the Preferences section to learn more.
7. Click on the OK button when you are done.
Rename a Scene Using the Panel view
You can rename scenes one at a time using the Panel view.
To rename a scene using the Panel view:
1. In the Thumbnails view, select the scene you want to rename.2. Display the Panel view. If the Panel view is not part of your current workspace, select Windows > Panel.3. In the Scene field, type the new name or number for your scene.
4. Press [Enter] to validate.
A warning message appears if the name is invalid or already used by another scene. If this happens, it is recommended to use the rename command and rename all subsequent scenes.
Refer to the Panel Information section to learn more about the Panel view.
Locking and Unlocking Scene and Panel NamesIt is possible to lock scene and panel names to prevent any unwanted modification.
97

Storyboard Pro 2 User Guide
Locking Scene and Panel Names
To lock scene and panel names:
1. Select Storyboard > Lock Scene and Panel Names from the top menu.The Scene and Panel fields become deactivated.
The Thumbnail view will display a locked icon in the header.
Unlock Scene and Panel Names
To unlock scene and panel names:
1. Select Storyboard > Unlock Scene and Panel Names from the top menu.
The names will be unlocked and become editable again.
Split Current SceneUsing Storyboard Pro, you can split the current scene in two.
To split the current scene:
1. In the Thumbnails view, select the scene you need to split. In order to use the split command, the current scene must contain two or more panels. The split will occur before the current panel.
2. Select Storyboard > Split Current Panel from the top menu.The scene has been split into two scenes.
PanelsYour scenes should be comprised of as many panels as needed to describe the actions taking place. With Storyboard Pro, you can create the different panels of your project quickly and easily.
By default, on the top of each panel, you can find this information:
98

Chapter 4: Script and Panels Scenes and Panels
This section contains the following information:• Creating Panels• Create Panel Before• Smart Add Panel• Renaming Panels• Deleting Panels• Duplicating Panels• Moving Panels Around
Creating PanelsWhen you are creating a panel, the new panel is added after the current panel.
To create panels:
1. In the Thumbnail view, select a panel of the scene you want to add a panel to.
2. In the Storyboard toolbar, click on the Create Panel button. You can also select Storyboard > Create Panel or use the default keyboard shortcut [P].
A new panel is added to the storyboard, and will be part of the same scene as the current panel.
Create Panel BeforeYou can also create a new panel to be added before the current panel.
A B C
• A. Scene number.• B. Panel number/Total number of panels in the scene.• C. Duration of the panel in frames.
You can also access all of this information in the Panel view.
99

Storyboard Pro 2 User Guide
To create a panel before:
1. In the Thumbnails view, select a panel.
2. Select Storyboard > Create Panel Before from the top menu.
A new panel is added before the current panel and inside the same scene.
Smart Add PanelUse the Smart Add Panel function to create a new panel that contains elements from another panel.
To smart add a panel:
1. In the Thumbnails view, select the panel containing the elements you want to be duplicated into your new panel.
2. In the Storyboard toolbar, click on the Smart Add Panel button. You can also select Storyboard > Smart Add Panel from the top menu.
3. The Smart Add Panel dialog box opens.
Select the layers that contain material you need to have copied into the new panel.Enable the Add default layer if missing option to create the default layers of the new panel if they are not part of the Smart Add Panel selection list.
4. Click on the OK button.
100

Chapter 4: Script and Panels Scenes and Panels
A new panel will be created next to the selected panel. All layers are copied into the new panel, but only the layers you chose will contain artwork.
Renaming PanelsBy default in Storyboard Pro, the rename panels option is locked. You can allow custom panel names via the preferences.
Note, unless you enable this preference, you cannot rename panels.
To enable the Allow Custom Panel Name preferences:
1. Open the Preferences Panel:Select File > Preferences (Windows) or Storyboard Pro > Preferences (Mac OS X).You can also use the default keyboard shortcut [Ctrl]+[U] (Windows) or [ ]+[U] (Mac OS X).
2. In the Preferences Panel, click on the General tab.3. In the Naming section, enable the Allow Custom Panel Name option.
4. Click on the OK button.
Once you enable this preference, the Panel name field in the Panel view becomes editable.
Renaming Panels Using the Panel View
You can rename one panel at a time using the Panel view.
Refer to the Panel Information section to learn more about the Panel view.
101

Storyboard Pro 2 User Guide
To rename a panel from the Panel view:
1. In the Thumbnails view, select the panel you want to rename.
2. Display the Panel view.If the Panel view is not part of your current workspace, select Windows > Panel.
3. In the Panel view, type a new name in the Panel field and press [Enter] to validate.
The panel will be renamed.
You can rename one or more panels simultaneously using the Rename Panel command.
Renaming Panels Using the Rename Panels Command
To rename panels using the Rename Panels command:
1. In the Thumbnails view, select the panel you want to rename.
2. Select Storyboard > Rename Panel from the top menu.
The Rename Panel dialog box opens.
3. Type a new name in the New name field.
102
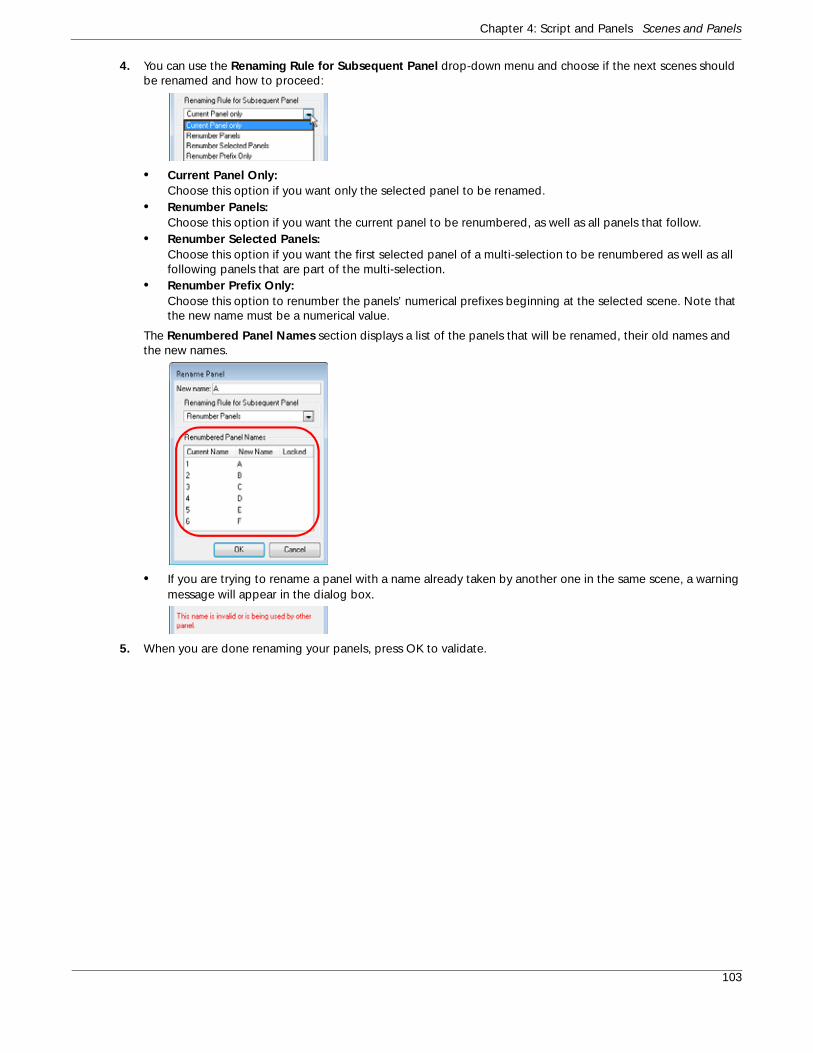
Chapter 4: Script and Panels Scenes and Panels
4. You can use the Renaming Rule for Subsequent Panel drop-down menu and choose if the next scenes should be renamed and how to proceed:
• Current Panel Only: Choose this option if you want only the selected panel to be renamed.
• Renumber Panels: Choose this option if you want the current panel to be renumbered, as well as all panels that follow.
• Renumber Selected Panels: Choose this option if you want the first selected panel of a multi-selection to be renumbered as well as all following panels that are part of the multi-selection.
• Renumber Prefix Only: Choose this option to renumber the panels’ numerical prefixes beginning at the selected scene. Note that the new name must be a numerical value.
The Renumbered Panel Names section displays a list of the panels that will be renamed, their old names and the new names.
• If you are trying to rename a panel with a name already taken by another one in the same scene, a warning message will appear in the dialog box.
5. When you are done renaming your panels, press OK to validate.
103

Storyboard Pro 2 User Guide
Locking and Unlocking Scene and Panel NamesIt is possible to lock scene and panel names to prevent any unwanted modification.
Locking Scene and Panel Names
To lock scene and panel names:
1. Select Storyboard > Lock Scene and Panel Names from the top menu.The Scene and Panel fields become deactivated.
The Thumbnail view will display a Locked icon in the header.
Unlock Scene and Panel Names
To unlock scene and panel names:
1. Select Storyboard > Unlock Scene and Panel Names from the top menu.
The names will be unlocked and become editable again.
Deleting PanelsOnce you started adding panels, you can also delete some. Note that it is impossible to have an empty project, there is a minimum of one panel.
To delete panels:
1. In the Thumbnails view, select one or more panels you want to delete.
2. In the Storyboard toolbar, click on the Delete Selected Panels button. You can also select Storyboard > Delete Selected Panels from the top menu or use the default keyboard shortcut [Delete].
The selected panels are deleted from your storyboard.
104

Chapter 4: Script and Panels Scenes and Panels
Duplicating PanelsYou can duplicate panels when you need to create an exact copy of an already existing one.
To duplicate panels:
1. In the Thumbnails view, select the panel or range of panels you want to duplicate.
2. In the Storyboard toolbar, click on the Duplicate Selected Panels button. You can also select Storyboard > Duplicate Selected Panels from the top menu.
3. The duplicated panels are added at the end of the current scene. If the selection included panels from different scenes, new scenes are created for them.
Moving Panels AroundYou can easily move panels around in the Thumbnail view using drag and drop. You can use drag and drop to reorder, separate or join selected panels. Joining selected panels will make them part of the same scene.
Selecting Panels
To drag and drop panels:
1. In the Thumbnail view, select one or more panels that you want to move around.
2. Click on the header of one of the panels and drag it.
When you move your cursor around, you will notice a smaller version of the first selected panel with a number in it. The number represents how many panels are selected and being moved around.A straight blue line or a blue bracket represents what the movement will do.
105

Storyboard Pro 2 User Guide
Reordering Panels
To reorder panels, drag and drop your selection when you see a blue straight line. You can drop your selection between 2 scenes or in the middle of a scene. Dropping a panel in the middle of a scene will include it in the scene, it will not split it.
Separating Panels
You can drag and drop a selection to remove it from a scene. Just drag the selection out and drop it between two scenes when you see a straight blue line.
Joining Panels
You can drag and drop a selection so it joins another scene. Just drag the panel onto the very border of the scene you want it to attach to, and drop it when you see a right or left facing bracket.
Joining Selected Panels Using the Top Menu
You can also use the top menu to join panels together.
To join selected panels:
1. In the Thumbnails view, select two or more panels that are not part of the same scene.
2. Select Storyboard > Join Selected Panels from the top menu.
106

Chapter 4: Script and Panels Scenes and Panels
The selected panels will be joined together in the same scene.
ActsAn act is a particular section of the story delimited by a particular event or mood.
For example, a story could be constructed in three acts:
• Act 1: The initial situation, character introduction.• Act 2: The journey.• Act 3: The resolution.
Like scenes and panels, you can manipulate acts when building your storyboard. In order to be able to add acts to your storyboard, you must first enable the option.
• Enabling Acts• Starting New Acts• Joining Selected Acts
Enabling ActsBy default, the acts are disabled, you need to enable them in the Preferences Panel.
To enable acts:
1. Open the Preferences Panel:Select File > Preferences (Windows) or Storyboard Pro > Preferences (Mac OS X).You can also use the default keyboard shortcut [Ctrl]+[U] (Windows) or [ ]+[U] (Mac OS X).
2. In the Preferences Panel, click on the General tab.3. In the Naming section, enable the Enable Acts check box.4. Click on the OK button.
Once you enabled the preference, you may notice that there is a dark grey rectangle behind all of your panels. An act has been created, encompassing all scenes and panels.
[
107

Storyboard Pro 2 User Guide
Starting New ActsOnce you have enabled acts in your storyboard project, it indicates that your storyboard is made of a single long act. You need to break it in several smaller acts. To split your project into acts, you need to define the starting panel for each act in your story.
To start new acts:
1. In the Thumbnails view, where you want to create a new act.
2. Select Storyboard > Start New Act from the top menu.
The act will then be split into two where you had selected.
Joining Selected ActsOnce an act has been split, you can decide to rejoin acts at any time.
To join selected acts:
1. In the Thumbnails view, select the last panel and first panel of the acts you want to join. You could also decide to join more than two sections by selecting the last panel of the first section until the first panel of the last section you want to join.
2. Select Storyboard > Join Selected Acts from the top menu.
The selected acts will once again be joined.
108

Chapter 4: Script and Panels Navigation Toolbar
Navigation ToolbarStoryboards can easily become very extensive projects. The Navigation toolbar is there to help you find your way through your storyboard panels and scenes.
Displaying the Navigation ToolbarBy default, the Navigation toolbar is not displayed in the interface.
To display the Navigation toolbar:
In the top menu, select Windows > Toolbar > Navigation.
The Navigation toolbar will appear docked in the top of the interface.
Using the Navigation ToolbarUsing the Navigation toolbar is really simple, here are the different buttons and what they do.
First Panel and Last PanelUse the First Panel and Last Panel buttons to quickly select the first or last panel of the storyboard as the current panel.
Previous Scene and Next SceneUse the Previous Scene and Next Scene buttons to quickly navigate through each scene backward and forward. The first panel of each scene will be selected as the current panel when skipping for one to another.
Previous Panel and Next PanelUse the Previous Panel and Next Panel buttons to quickly navigate through each panel, backward and forward. Each panel will be selected as the current panel as you skip through the storyboard.
First Frame and Last FrameUse the First Frame and Last Frame buttons to quickly go to the complete beginning or end of your storyboard. Frames refer to a timing value used when creating your animatic.
Refer to the Animatic chapter to learn more about animatic and timing.
109

Storyboard Pro 2 User Guide
PreferencesIn Toon Boom Storyboard Pro, there are a series of preferences that are available to customize the behaviours and help you set up an efficient workflow.
To open the Preferences Panel:
Windows: Select File > Preferences. You can also use the default keyboard shortcut [Ctrl]+[U]. Mac OS X: Select Storyboard Pro > Preferences. You can also use the default keyboard shortcut [ ]+[U].
General TabThe preferences related to script and panels editing are principally grouped under the General tab, in the General and Naming sections.
Show Rename Dialog AutomaticallyBy default this preference is enabled. This means that every time you move scenes around, the Rename Scene dialog box will open, asking you how you want to rename the scenes. You can disabled this preference to change this behaviour so that the already existing scenes will keep their original name and new scenes will automatically be named without the Rename Scene dialog box opening.
Refer to the Renaming Scenes topic to learn more about the settings and options of this dialog box.
110

Chapter 4: Script and Panels Preferences
Automatically Add Leading Zeros to Scene NamesBy default, new added scenes are named without a leading zero: 1, 2, 3, 4, 5, etc... You can change the default behaviour so that new scenes have leading zeros in their name: 01, 02, 03, 04, 05, etc... When this preference is enabled, the Minimum Number Characters option become available.
Note that enabling this preference will not add leading zeros to already existing scenes in your project.
Minimum Number of CharactersBy default this preference is disabled. You need to enable the Automatically Add Leading Zeros to Scene Names option before, because they work in conjunction. This field will determine what is the minimum number of characters the scene names will contain, using leading zeros.
• For example, the default value is “2”: 01, 02, 03, 04, 05, 06, 07, 08, 09, 10, etc...• If you type “4”: 0001, 0002, 0003, 0004, 0005, 0006, 0007, 0008, 0009, 0010, etc...
Allow Custom Panel NamesBy default, it is not possible to rename panels in Storyboard Pro, but you can change this behaviour if you need to. Once you enable this preference, the Storyboard > Rename Panel command as well as the Panel name field in the Panel view become active.
Refer to the Renaming Panels section to learn more.
Panel Name Auto-increment RuleBy default, panel names are named numerically. Using this preference, you can select from three other alphabetical increment rules. The difference between each of them is the behaviour once you reach panel Z.
• Default: 1, 2, 3 etc.• A to Z, then AA, AB, to AZ, etc.• A to Z, then ZA, ZB, to ZZ, etc.• A to Z, ZA to ZZ, then ZZA, ZZB, to ZZZ, etc.
111

Storyboard Pro 2 User Guide
Display Total Number of Panels in Panel NameBy default, the total number of panels is displayed with the panel name. You can change this default behaviour by disabling this preference.
Enabled
Disabled
Enable ActsIn Storyboard Pro, you can organize your panels in scenes but also in acts. By default, acts are not available, because it is not relevant to every script. If you have a story divided in acts, you can easily enable this preferences in order to be able to display and manipulate these sections.
Refer to the Acts section to learn more about acts.
112

Chapter 4: Script and Panels Preferences
Import/Export TabYou will found some more preferences related to panels and script under the Import/Export tab of the Preferences panel.
Auto Premultiply Imported Image by Alpha Channel• Enable this preference to premultiply the channels with the alpha value of the layer, resulting in an opaque
layer. This is helpful when creating layers used by other effects, or in certain compositing situations. Use this option if you’re importing a semi-transparent image.
• Disable this option if you’re importing a PSD image.
Ask Before Creating Panels when Using Automatic InsertionThis preference refers to the behaviour when using Storyboard > Import Images as Scenes function. If the element you are set to create upon import does not already exist in your project, a window will open prompting you to create the element, or cancel the operation. Use this preference to enable or disable the window that opens.
Ask Before Removing Existing Layer when Using Automatic InsertionThis preference refers to the behaviour when using Storyboard > Import Images as Scenes function. If the element you are set to create upon import does already exist in your project, a window will open prompting you to remove the original element, or keep it. Check the Don’t show this dialog again box if you never want to see this message again.
113

Storyboard Pro 2 User Guide
114

Chapter 5 Drawing
In Toon Boom Storyboard Pro, many powerful tools, views and features are available so you sketch and draw with ease. This chapter explains the main assets needed when drawing and animating in the software as well as tips on how to start and use these tools efficiently.
In this chapter, you will learn about the following:
• How to Draw, on page 116• Tool Properties View, on page 117• Drawing with the Brush or the Pencil, on page 118• Viewing the Final Lines as you Draw, on page 119• Drawing with the Brush Tool, on page 120• Drawing with Line Texture, on page 129• Drawing using the Pencil Tool, on page 133• Drawing using Invisible Lines, on page 137• Erasing Parts of a Drawing, on page 138• Reshaping a Drawing Using the Contour Editor Tool, on page 142• Selecting Drawing Objects, on page 145• Drawing With Shapes, on page 151• Deforming a Drawing Using the Perspective Tool, on page 155• Cutting Drawing Parts, on page 157• Working With Text, on page 159• Override Tool, on page 163• Onion Skin, on page 164• Light Table, on page 166• More Drawing Tools, on page 167• Drawing Preferences, on page 171
115

Storyboard Pro 2 User Guide
How to DrawAs soon as Storyboard Pro is launched, you can start to draw straight away using the default panel.
How to draw:
1. In the Tools toolbar, select the Brush tool, you can also use the default keyboard shortcut [Alt]+[B].
2. In the Timeline or Thumbnails view, click in the first panel.
3. In the Camera view, start drawing.
4. You can change the colour of the Brush in the Colour view, using the default colour palette swatches. Click on the desired colour.
Refer to Adding Colour > Adding a Colour Swatch, on page 178 if you want to use more colours.
116

Chapter 5: Drawing Tool Properties View
Tool Properties ViewThe Tool Properties view is where you can customize the currently selected tool. The options and operations displayed change according to each tool you select.
1. The icon displayed here shows the currently selected tool.2. The Options section contains the possible options for the current tool.3. The Operations section contains the possible operations for the current tool.4. The Shape section becomes available when you can choose different shapes for the selected tool.5. The Manipulators section contains shortcuts to similar tools.
OptionsOptions are different modes you can apply to a selected tool to modify its behaviour to fit the current task’s needs.
OperationsOperations are actual actions you can perform while using the selected tool.
ShapeThis is available for certain tools, such as the Shape tools, and will let you switch quickly between different available shapes.
ManipulatorsManipulators are buttons which let you switch quickly between similar tools such as the Select tool and the Transform tool or the Line, Rectangle and Ellipse tools.
2
3
1
4
5
117

Storyboard Pro 2 User Guide
Drawing with the Brush or the Pencil
The Brush and Pencil tools are used to draw and sketch with.
The Brush tool has pressure sensitivity, allowing you to create lines with variable thicknesses. The Pencil and Shape tools produce a uniform thickness as they use a central vector.
To adjust the thickness, use the Contour Editor tool.
Refer to the Reshaping a Drawing Using the Contour Editor Tool topic to learn more about adjusting the Brush line’s thickness.
Refer to the Selecting Drawing Objects topic to learn more about the Brush line to Pencil Line option.
118

Chapter 5: Drawing Viewing the Final Lines as you Draw
Viewing the Final Lines as you DrawEverything you draw in Storyboard Pro is vector-based. Although, when you draw in the Camera view, you will notice that your lines may be jagged. This is the fast, real-time display called OpenGL.
If you prefer to see smooth lines as you draw, you can enable the antialiasing.
Full Scene Antialiasing
The Full Scene antialiasing is generated by your computer’s graphic card.
Full Scene Antialiasing is a preference you can turn on and off. By default, the Full Scene Antialiasing preference is disabled.
NOTE:
Full Scene Antialiasing parameters are only valid while you work in your scene. The scene will be rendered out to 100% of its resolution regardless of your settings in the Preferences or graphic card panel.
To customize the Full Scene Antialiasing parameters:
NOTE: This procedure requires that if you have a Mac OS you must restart Toon Boom Storyboard Pro AFTER YOU HAVE CHANGED THE PARAMETERS.
1. If you are using Windows, you must enable your graphic card’s antialiasing parameter. Refer to your graphic card manufacturer’s user guide to learn how to do so. For example, the parameters for an NVIDIA GeForce card may look like this:
2. In Storyboard Pro, select Edit > Preferences (Windows) or Storyboard Pro > Preferences (Mac OS X).
You can also use the default keyboard shortcut [Ctrl]+[U] (Windows) or [ ]+[U] (Mac OS X).
The Preferences dialog box opens.3. In the Advanced tab, go to the Full Scene Antialiasing section.
Enable check box: Click on the Enable check box to enable or disable the Full Scene Antialiasing.Number or samples (For Mac OS): If you are using a Mac computer;
You must enter the number of samples you want to be used for the antialiasing process. The number of samples is basically equivalent to the number of times a pixel will be enlarged to
119

Storyboard Pro 2 User Guide
calculate the antialiasing. This technique is called supersampling. The higher the number of samples, the better the antialiasing quality will be, but the longer it will take to calculate.Once done, you must restart Toon Boom Storyboard Pro.
Drawing with the Brush Tool
The Brush tool is pressure sensitive and can create a contour shape which gives a thick and thin line effect, as if the drawing was made with a brush.
To draw with the Brush tool:
1. In the Thumbnails or Timeline view, select the panel where you want to draw.
2. In the Thumbnails or the Camera view, click to select the layer you wish to draw on.
3. In the Tools toolbar, select the Brush tool. You can also use the default keyboard shortcut [Alt]+[B].
4. In the Colour View, click on a colour swatch to select a colour.
5. In the Camera view, start drawing.Hold [Ctrl] (Windows) or [ ] (Mac OS X) to force a line to join the end and start of your shape while drawing.
120

Chapter 5: Drawing Drawing with the Brush Tool
NOTE: The last colour you select while using the Brush tool is recalled the next time you select the Brush tool.
Brush Tool OptionsWhen you select the Brush tool, its properties and options appear in the Tool Properties view.
Regular Brush ModeThe Regular Brush tool creates contour lines as you draw, adding each brush lines on top of the last ones.
Draw Behind ModeThe Draw Behind mode is used to paint behind the existing art.
Auto Flatten ModeWhen enabled, the Auto Flatten mode will automatically flatten the new brush lines created with the existing artwork as you draw in the Camera view.
[Ctrl] (Windows)
[ ] (Mac OS X)
121

Storyboard Pro 2 User Guide
Brush StylesA variety of brush styles are provided allowing you to create and save your own. This way you can create brushes with precise sizes and parameters and save them so you can draw and design.
Selecting a Brush Style
To select a brush style:
1. Click on the arrow button to get the Brush Style drop-down menu.2. Select a brush style from the list.
Adding a Brush Style
To add a Brush Style:
Click on the Add Brush Style button.
The new brush style will appear at the end of the Brush Styles drop-down menu list.
Adding a Dynamic Brush
The Dynamic Brush can be created to enable drawing with patterns created from your artwork. Create a new Dynamic Brush to copy a pattern you have drawn to reproduce it quickly.
To create a new Dynamic Brush:
1. Use the drawing tools to create a small swatch.
2. With the Select tool, choose the parts of the drawing you want to repeat.
122

Chapter 5: Drawing Drawing with the Brush Tool
3. Click the Add Dynamic Brush button.
4. Use the new Dynamic Brush to quickly repeat a pattern.
To create a Dynamic Brush with multiple drawings:
1. Create drawings on the same layer of multiple panels or multiple layers of the same panel.
2. In the Thumbnails, Timeline or Camera view, [Shift] + click to create a multiple selection of all the panels or layers you want to use to create the Dynamic Brush.
3. Click the Add Dynamic Brush button.
123

Storyboard Pro 2 User Guide
4. In the Tool Properties view, move the slider left or right to see the properties of the Dynamic Brush.
Now your new Dynamic Brush will contain all the selected drawings. When you use this brush, you will cycle through the drawings.
Renaming a Brush Style
To rename a Brush Style:
1. Click on the arrow button of the Brush Style drop-down menu.2. Select the brush style you want to rename.
3. Click on the Rename Brush Style button.
The Rename Pen dialog box opens.
4. Type in a name for the selected Brush Style.5. Click on the OK button.
Deleting a Brush Style
To delete a Brush Style:
1. Click on the arrow button of the Brush Style drop-down menu.2. Select the brush style you want to delete from the Brush Style list.
3. Click on the Delete Brush Style button.
124

Chapter 5: Drawing Drawing with the Brush Tool
Minimum and Maximum SizeThis is where you set the minimum and maximum sizes of the Brush tool which will produce the thick and thin effect on your brush line. This works with the pressure sensitivity of a pen tablet. You can see a preview of this effect in the Preview space.
1. Minimum Size field: Type a value in this field to set the minimum width of the brush.2. Maximum Size field: Type a value in this field to set the maximum width of the brush.3. Up/Down arrows: Use the up and down arrows to set the minimum size value.4. Up/Down arrows: Use the up and down arrows to set the maximum size value.
Smoothness and Contour Optimization
Smoothness
You can modify the central line smoothness of your line using this option. This parameter smoothes the initial movement of your line. Increasing the value will result in a smoother line with less control points.
Contour Optimization
You can optimize the contour line smoothness of your brush line using this option. This parameter will smooth the contour of your line once the line has been traced, the higher the value the less control points will compose your line.
1. Smoothness field: Type a value to set the smoothness of the line.2. Contour Optimization field: Type a value to set the contour optimization of the line.3. Up/Down arrows: Use the up and down arrows to set smoothness value.4. Up/Down arrows: Use the up and down arrows to set the contour optimization value.
Brush Tips
In this drop-down menu, you can find a variety of brush shapes from round and square ones to star shaped, select the one you need.
PreviewThe Preview field lets you see a preview of the brush line that will be produced after you customize the different parameters in the Tool Properties view.
1. The Arrow button lets you show or hide the Preview.2. The Preview field is where the brush line is displayed.
12
34
12
34
2
1
125

Storyboard Pro 2 User Guide
Line Texture In Storyboard Pro, you can draw with a textured line. Textured lines are a mixed bitmap image contained in a vector frame. This allows you to sketch as if you are drawing on paper.
Refer to the Drawing with Line Texture topic to learn everything about line texture and its parameters.
Brush Presets Brush Presets will allow you to create predefined brushes with specific parameters, and reuse them for repeated tasks.
There are two ways to access the Brush Presets:
• From the Brush Presets toolbar. To show the Brush Presets toolbar, from the top menu choose Windows > Toolbars > Brush Presets.
• From the Brush Presets view. To show the Brush Presets view, from the top menu choose Windows > Brush Presets.
You can create as many brush presets as you need. There are also 4 default brush presets you can choose from.
To create a brush preset:
1. Make sure that your current brush settings match what you would like to have as a preset.2. To create a new brush preset from the current settings, do one of the following:
• From the Brush Presets toolbar, click the Add Preset button.
OR
• In the Brush Preset view, click the Add Preset button .
OR
• From the Brush Preset view menu , choose New Brush Preset.
126

Chapter 5: Drawing Drawing with the Brush Tool
3. In the Add Brush Preset window, change your settings:
1. Name: Type a name for your new Brush Preset.2. Show in Toolbar: If this box is unchecked, this Brush Preset will only be available via the Brush Preset view, and not the toolbar. In this case, you will not be able to specify an icon.3. Icon: Click on the brush icon to choose one of the default icons, or browse yo use your own.4. Brush: These values will be set by your current brush settings and selected colour.5. Layer: Select a layer to apply this preset brush to. Choose No Layer if you do not wish the preset be assosicated with a particular layer.
If you draw on a panel that does not have the specified layer, the layer will be created for you.
4. Click OK to confirm the new preset, or Cancel to close the window without applying changes.
To update a Brush Preset:
1. Select the Brush Preset you wish to update.2. Using the Tool Properties view, change the current brush options.3. To apply changes to the preset, do one of the following:
• In the Brush Preset view, click the Update Brush Preset button.
OR
• From the Brush Preset view menu , choose Update Preset.
To delete a Brush Preset:
1. Select the Brush Preset you wish to delete.2. To delete the selected preset, do one of the following:
• In the Brush Preset view, click the Delete Brush Preset button .
OR
• From the Brush Preset view menu , choose Delete Preset.
OR
• Open the Manage Presets window to delete a brush preset. See the following section to learn how to do this.
3
1
5
4
2
127

Storyboard Pro 2 User Guide
Managing Brush PresetsOnce you have created Brush Presets, it is possible to make adjustments.
To Manage Brush Presets:
1. In the Bruset Preset view, from the menu choose Manage Presets, or click the Manage Presets button in
the Brush Presets toolbar .
The Manage Brush Preset window opens.
2. Choose a Brush Preset from the list on the left.In the Manage Preset window you can:• Modify the settings for the selected preset.• Click on Update to apply current brush parameters to the selected preset.• Click on Delete to remove the current preset from the list.• Click OK to apply the changes, or Cancel to close the window with applying changes.
128

Chapter 5: Drawing Drawing with Line Texture
Drawing with Line Texture
In Storyboard Pro, using the Brush tool, you can enable the texture option and draw with bitmap textured lines.
In the Brush Tool Properties view, you will find a series of default textured brushes but you can also create your own collection by importing either PSD or TGA files in the Pen list.
NOTE: The textured brush only works with the Brush tool. It does not work with the Pencil, Line, Ellipse or Rectangle tools.
This topic is divided as follows:
• How to Draw with Texture, on page 130• Adjusting the Line Texture Parameters, on page 131• Creating Texture Brushes, on page 132
129

Storyboard Pro 2 User Guide
How to Draw with Texture To draw with textured lines, use the Brush tool and the correct pen in the list.
To draw with textured lines:
1. In the Tools toolbar, select the Brush tool. The default keyboard shortcut is [Alt]+[B].
2. In the Tool Properties view, select a textured brush from the Pen drop-down list.
3. Select the panel and layer you wish to draw in.4. In the Camera view, start drawing
Refer to the Drawing with the Brush Tool section to learn more about drawing with the Brush tool.
130

Chapter 5: Drawing Drawing with Line Texture
Adjusting the Line Texture ParametersIn the Brush Tool Properties view, there are a number of parameters you can use to adjust the look and feel of your textured brush.
• 1. Enable Texture: Enable this option to allow your brush to draw with texture. If you disable this option, the brush will trace fully vector based lines.
• 2. Minimum Opacity:This value corresponds to the opacity of the brush when the pressure is very light. The closer to zero the value is, the more transparent the line will be.
.
• 3. Maximum Opacity: This value corresponds to the opacity of the brush when the pressure is heavy. The closer to 1 the value is the more opaque the line will be.
• 4. Hardness: The hardness value corresponds to the smoothness of the line edge. The lower the value, the more blurry and smooth the line edge will be. The higher the value, the sharper the line edge will be.
• 5. Texture File: The Texture File button displays the texture currently in use or allows you to browse for a texture file to import. Browsing for a texture file in a brush already using texture will replace the file currently in use, although it will not replace the texture in the lines already drawn.
• 6. Texture Scale: The Texture Scale value changes the size of the texture file in the line. If you are using a plaid texture, the
12
3
4
5
6
131

Storyboard Pro 2 User Guide
squares will be larger if you increase the value and smaller if you decrease it.
Creating Texture Brushes To create your own texture brush, you must prepare your texture file in a third-party software such as Adobe®
Photoshop®. If your image has transparency in it, it will be supported. The texture file must be either a PSD or TGA file.
It is recommended that you maintain your texture resolution between 100 x 100 pixels and 400 x 400 pixels.
To create your own texture brush:
1. In the Tools toolbar, select the Brush tool. The default keyboard shortcut is [Alt]+[B].
2. In the Tool Properties view, click on the New Brush button to add a new brush to your list.
3. In the Texture section, check the Enable Texture option.
4. Click on the Texture File button and browse for your bitmap texture file. Note: the image colour will not be used, only the pattern in it.
5. In the Camera view, draw some lines and adjust the parameters to fit the style you are looking for. Note: your pen list will be automatically saved.
132

Chapter 5: Drawing Drawing using the Pencil Tool
Drawing using the Pencil Tool
The Pencil tool creates a centreline shape of constant width, making a clean line.
To draw with the Pencil tool:
1. In the Thumbnails or Timeline view, select the panel where you want to draw.
2. In the Thumbnails or Camera view, click to select the layer you wish to draw on.
3. In the Tools toolbar, select the Pencil tool, you can also use the default keyboard shortcut [Alt]+[9].
4. In the Colour View, click on a colour swatch to select a colour.
133

Storyboard Pro 2 User Guide
5. In the Camera view, start drawing.Hold [Alt] to draw a straight line.Hold [Ctrl] (Windows) or [ ] (Mac OS X) to keep a line joining the end and start of your shape while drawing.
NOTE: The last colour which you selected while using the Pencil tool will be remembered the next time you select it.
Pencil Tool OptionsWhen you select the Pencil tool, its properties and options appear in the Tool Properties view.
Draw BehindWhen the Draw Behind mode is enabled, the lines you draw will appear behind the art that already exists.
Auto-Close Gap When enabled, the Auto-Close Gap mode will automatically connect with an invisible stroke, the pencil lines you draw close to each other in the Camera view.
[Ctrl] (Windows)
[ ] (Mac OS X)
134

Chapter 5: Drawing Drawing using the Pencil Tool
Auto Flatten ModeWhen enabled, the Auto Flatten mode will automatically flatten the pencil lines created with the existing ones as you draw in the Camera view.
Using the Select tool, you can select a segment of flattened pencil line. Use this technique to create a nice finish to lines and corners in your artwork.
Pen StylesStoryboard Pro provides a variety of pen styles and also lets you create and save your own. It is a good idea to create and save pencils with precise sizes and parameters when you draw and design.
Selecting a Pen Style
To select a pen style:
1. Click on the arrow button of the Pen Style drop-down menu.2. Select a pen style from the list.
Adding a Pen Style
To add a Pen Style:
Click on the Add Pen Style button. The new pen style will appear in the Pen Styles drop-down menu list.
Renaming a Pen Style
To rename a pen style:
1. Click on the arrow button of the Pen Style drop-down menu.2. Select the pen style you want to rename.
135

Storyboard Pro 2 User Guide
3. Click on the Rename Pen Style button. The Rename Pen dialog box opens.
4. Type in a name for the selected pen style.5. Click on the OK button.
Deleting a Pen Style
To delete a pen style:
1. Click on the arrow button of the Pen Style drop-down menu.2. Select the pen style you want to delete from the Pen Style list.
3. Click on the Delete Pen Style button.
Pen SizeThis is where you set the pencil size value. The Pencil tool is not pressure sensitive, it creates a line of constant width with no thick and thin effect.
1. Size: Type a value in this field to set the Shape’s line size.2. Up/Down arrows: Use the up and down arrows to modify the value contained in the Thickness value field.
SmoothnessYou can modify the central line smoothness of your line using this option. This parameter smoothes the initial movement of your line. Increasing the value will result in a smoother line with less control points.
1. Size: Type a value in this field to set the smoothness of the line.2. Up/Down arrows: Use the up and down arrows to modify the value in the Smoothness value field.
1 2
1 2
136

Chapter 5: Drawing Drawing using Invisible Lines
Drawing using Invisible Lines
Pencil Tool Using the Pencil tool, you can draw invisible lines. This can be useful to draw tones and highlights directly on the character.
To draw invisible lines with the Pencil tool:
1. Select the panel and layer where you want to draw.
2. In the Tools toolbar, select the Pencil tool; you can also use the default keyboard shortcut [Alt]+[9].3. In the Top menu, select View > Show Strokes. The default keyboard shortcut is [K].4. In the Tool Properties view, set the Pen Style size to “0”. You can also adjust the smoothness.5. In the Camera view, start drawing.
If you forgot to enable the Show Strokes option before drawing, as soon as you draw a first stroke, a Message dialog box opens.
Enable the Don’t Show This Message Again check box if you don’t want the dialog box to pop up and notify you about the Show Strokes option.Click on the OK button to close the dialog box.
6. You can modify the stroke shape with the Contour Editor tool.
137

Storyboard Pro 2 User Guide
Erasing Parts of a Drawing
The Eraser tool is pressure sensitive, like the Brush tool, giving you more precision when erasing parts of a drawing.
To erase with the Eraser tool:
1. In the Thumbnails or Timeline view, select the panel where you want to erase.
2. In the Thumbnails or Camera view, click to select the layer you wish to draw on.
3. In the Tools toolbar, select the Eraser tool, you can also use the default keyboard shortcut [Alt]+[E].4. In the Camera view, start erasing.
You can also use the select tool to select drawing objects and delete them instead of erasing.
138

Chapter 5: Drawing Erasing Parts of a Drawing
Eraser Tool OptionsWhen you select the Eraser tool, its properties and options appear in the Tool Properties view.
Minimum and Maximum SizeThis is where you set the minimum and maximum sizes of the Eraser tool which will produce the thick and thin effect when you erase. This works with the pressure sensitivity of a pen tablet.
Smoothness and Contour Optimization
Smoothness
You can modify the central line smoothness of your Eraser line using this option. This parameter smoothes the initial movement of your line. Increasing the value will result in a smoother line with less control points.
Contour Optimization
You can modify the contour line smoothness of your eraser line using this option. This parameter will smooth the contour of your line once the line has been traced, the higher the value the less control points will compose your line.
Eraser Tips
In this drop-down menu, you can find a variety of eraser shapes from round and square ones to star shaped, select the one you need.
139

Storyboard Pro 2 User Guide
PreviewThe Preview field lets you see a preview of the eraser line that will be produced after you customized the different parameters in the Tool Properties view.
• 1. The Arrow button lets you show or hide the Preview.• 2. The Preview field displays the eraser style.
Eraser StylesThe Eraser tool uses the same Brush Styles as the Brush tool. Storyboard Pro provides a variety of eraser styles and allows you to create and save your own. It is a good idea to create and save eraser brushes with precise sizes and parameters to draw and design.
Selecting a Brush Style
To select a brush style:
1. Click on the arrow button of the Brush Style drop-down menu.2. Select a brush style from the list.
Adding a Brush Style
To add a Brush Style:
Click on the Add Brush Style button.
The new brush style will appear at the end of the Brush Styles drop-down menu list.
Renaming a Brush Style
To rename a brush style:
1. Click on the arrow button of the Brush Style drop-down menu.2. Select the brush style you want to rename.
2
1
140

Chapter 5: Drawing Erasing Parts of a Drawing
3. Click on the Rename Brush Style button.
The Rename Pen dialog box opens.
4. Type in a name for the selected Brush Style.5. Click on the OK button.
Deleting a Brush Style
To delete a brush style:
1. Click on the arrow button of the Brush Style drop-down menu.2. Select the brush style you want to delete from the Brush Style list.
3. Click on the Delete Brush Style button.
141

Storyboard Pro 2 User Guide
Reshaping a Drawing Using the Contour Editor Tool
The Contour Editor Tool is powerful, it allows you to add, remove or modify points on a vector line and to control them with Bezier handles. It is used to correct line shapes and to modify a single part of a colour zone. If a line is too thin or has a gap in it, you can modify and correct it with the Contour Editor tool. This tool can also be used to create elaborate shapes.
The Contour Editor displays vector points around a shape and the central vector points in a pencil line. Pulling or pushing on these points adjusts the brush’s line thickness. Points can be selected and deleted. Each point has two Bezier handles used to correct the curves between two points. Shapes can be modified by pulling and pushing directly on the segment between the points. You can use it to perfect a central shape pencil line, a contour shape brush line or even create an elaborate shape from a basic ellipse, or square.
To reshape with the Contour Editor tool:
1. In the Timeline or Thumbnails view, select the cell and layer into which you want to draw.
2. In the Tools toolbar, select a Shape tool.
3. In the Tool Properties view, click on the Ellipse mode button, click on the Auto Fill mode button and set the pencil size to 0.
4. In the Camera view, draw a circle.
5. In the Tools toolbar, select the Contour Editor tool.6. In the Camera view, click on the line to reshape it.
7. Select one or several points by clicking on them or circling around.
142

Chapter 5: Drawing Reshaping a Drawing Using the Contour Editor Tool
8. To modify the shape, you can:Pull on the Bezier handle. Both point’s handles will move as one.
Hold [Alt] down and pull on one of the Bezier handles. The point’s handle will move independently from the other one.
Move the selected points to a new area.
Pull directly on the line in-between two points. No selection is necessary. Holding down the [Shift] key will limit the contour modification to the curve between the two first points.
If an anchor point has no visible bezier, hold down the [Alt] key to get them.
Contour Editor Tool PropertiesWhen you select the Contour Editor tool, its properties and options appear in the Tool Properties view.
Lasso and MarqueeChoose between the Lasso and the Marquee, to change the style of the Select tool.
• Click and hold [Alt] to temporarily switch from the current mode to the other.
143

Storyboard Pro 2 User Guide
Snap to Contour The Snap to Contour option will snap the selected anchor point to any line you position it on.
The Snap to Contour option will snap the selected anchor point to any line you position it on.
To snap two shapes together:
1. In the Tools toolbar, select the Contour Editor tool.
2. In the Contour Editor Tool Properties view, click on the Snap to Contour button.
3. In the Camera view, click on an anchor point you want to snap to the other shape, drag it on top of the contour line area and release it.
Smooth Selection
The Smooth Selection operation is used to smooth out selected drawing strokes and remove extra points. Smoothing is applied to the entire stroke.
144

Chapter 5: Drawing Selecting Drawing Objects
Selecting Drawing Objects
The Select tool is used to select drawing strokes in the Camera view, and apply basic transformations such as repositioning, rotating, scaling or skewing, using the different handles of the bounding box.
To select with the Select tool:
1. In the Timeline or Thumbnails view, select the panel and layer where you want to select drawing objects.
2. In the Tools toolbar, select the Select tool, you can also use the default keyboard shortcut [Alt]+[S].3. In the Camera view, select the drawing objects.
You can select all the drawing objects in a drawing by using the default keyboard shortcut [Ctrl]+[A] on (Windows) or [ ]+[A] on (Mac OS X).
Skew
Scale
Rotate
Skew
Scale
Pivot Point
145

Storyboard Pro 2 User Guide
4. To deform or reposition a selection:To reposition, click on the selected drawing object and drag the selection to a new area.
To rotate, rotate the selection box handle.
To scale, pull or push either on the top, side, bottom or corner control point. Hold down [Shift] to lock the selection’s ratio.
To skew, drag sideway or up and down the sides or top and bottom segments, between the control points.
146

Chapter 5: Drawing Selecting Drawing Objects
Repositioning a Pivot PointSome of the transformations such as rotation, scale, skew and flip, are done relative to the position of the pivot point.
You can temporarily reposition this pivot point for a transformation using the Select tool.
To temporarily reposition the pivot point:
1. In the Camera view, select the drawing object you want to transform.
The pivot point will appear in the middle of your selection.
2. Click on the pivot point and drag it to a new position.
This becomes the new position of the pivot point for the current transformation and will remain there until you make a new selection.
147

Storyboard Pro 2 User Guide
Select Tool PropertiesWhen you choose the Select tool, its properties and options appear in the Tool Properties view.
Lasso and MarqueeChoose between the Lasso and the Marquee, to change the style of the Select tool.
• Click and hold [Alt] to temporarily switch from the current mode to the other.
Snap OptionsYou can enable different snapping modes to help you when repositioning your drawings using the Select tool.
Snap to Contour
The Snap to Contour option will snap your selection to any line you position it on.
Snap and Align
The Snap and Align option lets you snap the selected anchor point to any existing line while displaying temporary rulers as a guide that you can also snap your anchor point to.
Refer to the Reshaping a Drawing Using the Contour Editor Tool topic to learn more about the Snap Options utility.
Select by Colour Use this option to turn on select by colour, which will allow you to rapidly select all drawing parts painted or drawn with the colour you have selected in the Colour view.
148

Chapter 5: Drawing Selecting Drawing Objects
Flip Horizontal and Vertical
The Flip Horizontal and Flip Vertical operations flip the current selection Horizontally or Vertically. You can also use the top menu to flip a selection, select Tools > Flip Selection Horizontally or Flip Selection Vertically or use the default keyboard shortcuts [Alt] + [H] and [Alt] + [V].
Rotate 90 Degrees CW and CCWRotate 90 Degrees CW and Rotate 90 Degrees CCW operations rotate the current selection 90 degrees clockwise or counter-clockwise.
SmoothThe Smooth operation is used to smooth out selected drawing strokes and remove extra points.
FlattenThe Flatten operation is used to merge drawing objects and brush strokes into a single layer. If you draw new lines to fix a drawing or a line with many brush strokes, it can be useful to flatten them all into a single shape. By default, lines are drawn one on top of each other, if you intend repainting the lines or modifying their shape, it will be easier if they are flattened.
You can also access this feature through the top menu, by selecting Tools > Flatten or by using the default keyboard shortcut [Alt]+[Shift]+[F].
149

Storyboard Pro 2 User Guide
Pencil SelectionUse the Pencil Selection field to resize the selected centreline strokes. This operation is not permitted on contour line shapes such as brush strokes or shape fills.
1. Thickness: Type a value in this field to increase or decrease the thickness of the selected centreline stroke.2. Up/Down arrows: Use the up and down arrows to modify the value contained in the Thickness value field.
Note that when you select text with the Select tool, the Select Tool Properties will display the Text tool options on the bottom of the view. You can also use the Text tool keyboard shortcut [Ctrl] + [Shift] + [T] (Windows) or [ ] + [Shift] + [T] (Mac OS X).
Refer to Working With Text > Formatting the Text to learn more about the Text Tool Properties.
1 2
150

Chapter 5: Drawing Drawing With Shapes
Drawing With Shapes
In Storyboard Pro, you can use the Shape tool to draw with circles, lines and squares. You can also easily reshape a square or circle into a much more complex drawing such as these butterfly wings.
Refer to Reshaping a Drawing Using the Contour Editor Tool topic to learn more about the Contour Editor tool.
To draw with a Shape tool:
1. In the Timeline or Thumbnails view, select the panel and layer where you want to draw.
2. In the Tools toolbar, select a Shape tool.
3. In the Shape Tool Properties view, you can switch between the different shapes mode. Select either the Ellipse
or Square tool.
4. In the Camera view, click and drag your mouse to draw the shape.
Hold down [Shift] to lock the rectangle or the ellipse ratio to 1:1.Hold down [Alt] to draw the rectangle or ellipse from its centre.Hold down [Shift] to snap the line every 15 degrees.Hold down [Alt] to snap the starting or end point of the line to a close by stroke.
5. Use the Contour Editor tool to deform your shape and create your drawing.
Refer to the Reshaping a Drawing Using the Contour Editor Tool topic to learn more about using the Contour Editor to deform a shape.
151

Storyboard Pro 2 User Guide
Shape Tool OptionsWhen you select the Shape tool, its properties and options appear in the Tool Properties view.
Line, Rectangle and Ellipse Click on the button corresponding to the shape you want. Click and drag your mouse to draw the selected shape. The Shape tool creates centre lines.
Using the Ellipse or Rectangle option, press [Shift] to create a perfect round or a perfect square and press [Alt] to create the shape from its centre.Using the Line option, press [Shift] to create a line which snaps-to every 15 degrees and then press [Alt] to connect the start or end point of that line to another nearby line.
Draw BehindWhen the Draw Behind mode is enabled, whichever shape you draw appears behind existing art.
Snap optionsWhen drawing a shape, you can enable different snap modes to help you create your shape.
Snap to Contour
The Snap to Contour option snaps your shape to any line you position it on.
Snap and Align
The Snap and Align option snaps the selected anchor point to any existing line, while displaying temporary rulers as a guide that you can also snap your anchor point to.
Refer to the Show Grid topic to learn more about the Grid feature.
Refer to the Reshaping a Drawing Using the Contour Editor Tool topic to learn more about the Snapping options utilities.
152

Chapter 5: Drawing Drawing With Shapes
Automatic FillingUse the Automatic Filling option to automatically fill your shape with the selected colour as you draw it. By default the Shape tool creates the contour of an empty shape that you can later fill using the Paint tool.
Refer to Adding Colour > Selecting the Current Colour of a Tool, on page 186 to learn more about selecting a fill colour.
Auto Flatten ModeWhen enabled, the Auto Flatten mode automatically flattens the created shape with the existing artwork in the Drawing or Camera view.
Auto-Close Gap When enabled, the Auto-Close Gap mode will automatically connect with an invisible stroke, the lines you draw close to each other in the Camera or Drawing view.
Refer to Selecting Drawing Objects to learn how to use the Store Colour Gradient option.
Keep ProportionWhen the Ellipse or Square mode is enabled in the Shape tool’s Tool Properties view, the Draw Circle or Draw Square check box appears. When enabling these check boxes, the shape produced will either be a circle or a square. Holding down the [Shift] key as you create your shape will maintain proportion.
Pen StylesStoryboard Pro provides a variety of pencil styles and allows you to create and save your own. This way, you can create and save pencils with precise sizes and parameters to draw and design. The Pen Styles of the Pen and Shape tools are interconnected.
Selecting a Pen Style
To select a pen style:
1. Click on the arrow button of the Pen Style drop-down menu.2. Select a pen style from the list.
153

Storyboard Pro 2 User Guide
Adding a Pen Style
To add a Pen Style:
Click on the Add Pen Style button. The new pen style will appear in the Pen Styles drop-down menu list.
Renaming a Pen Style
To rename a pen style:
1. Click on the arrow button of the Pen Style drop-down menu.2. Select the pen style you want to rename.
3. Click on the Rename Pen Style button.
The Rename Pen dialog box opens.
4. Type in a name for the selected pen style.5. Click on the OK button.
Deleting a Pen Style
To delete a pen style:
1. Click on the arrow button of the Pen Style drop-down menu.2. Select the pen style you want to delete from the Pen Style list.
3. Click on the Delete Pen Style button.
Size AdjustmentUse the Size Adjustment field to set the size of the shape’s line.
1. Size: Type a value in this field to set the Shape’s line size.2. Up/Down arrows: Use the up and down arrows to modify the value contained in the Thickness value field.
1 2
154

Chapter 5: Drawing Deforming a Drawing Using the Perspective Tool
Deforming a Drawing Using the Perspective Tool
The Perspective tool is used to deform a drawing selection and alter its perspective.
To deform a drawing with the Perspective tool:
1. In the Tools toolbar, select the Perspective tool.
2. In the Camera view, select the drawing you want to deform.3. Click and drag the different anchor points to deform the shape.
Perspective Tool PropertiesSelecting the Perspective tool, displays its properties and options in the Tool Properties view.
Lasso and MarqueeSelect the desired mode between the Lasso and the Marquee, to change the selection style of the Perspective tool.
• Click and hold [Alt] to temporarily switch from the current selected mode to the other.
155

Storyboard Pro 2 User Guide
Flip Horizontal and Vertical
The Flip Horizontal and Flip Vertical operations flips the current selection Horizontally or Vertically. You can also use the top menu to flip a selection, select Tools > Flip Selection Horizontally or Flip Selection Vertically or use the default keyboard shortcuts [Alt] + [H] and [Alt] + [V].
Rotate 90 Degrees CW and CCWThe Rotate 90 Degrees CW and Rotate 90 Degrees CCW operations rotate the current selection 90 degrees clockwise or counter-clockwise.
156

Chapter 5: Drawing Cutting Drawing Parts
Cutting Drawing Parts
The Cutter tool is used to cut a drawing area to move, copy, cut or delete it.
To cut with the Cutter tool:
1. In the Tools toolbar, select the Cutter tool.
2. In the Camera view, trace a selection around the part to cut away.
To delete the selected zone, press [Delete].To move the selection, click on the selection and drag it to a new area.Use the bounding box controls to scale, skew or rotate the cut piece.
Resize
Rotate
Skew
157

Storyboard Pro 2 User Guide
Cutter Tool OptionsWhen you select the Cutter tool, its properties and options appear in the Tool Properties view.
Lasso and MarqueeSelect Lasso or Marquee mode to change the selection style of the Cutter tool.
• Click and hold [Alt] to temporarily switch from the selected mode to the other.
158

Chapter 5: Drawing Working With Text
Working With Text With the Text tool, you can type text in your project, using various fonts and texts attributes. Text objects are part of a drawing, so you can manipulate them the same way.
This topic is divided as follows:
• Creating Text, on page 159• Formatting the Text, on page 160• Resizing the Text Box, on page 162• Converting Text into Separate Objects, on page 163
Creating TextTo add text to your drawings:
1. In the Tools toolbar, select the Text tool or use the keyboard shortcut [Ctrl] + [Shift] + [T] (Windows) or [ ] + [Shift] + [T] (Mac OS X). You can also select it in the top menu under Tools > Text.
2. In the Timeline or Thumbnails view, select the panel and layer containing the drawing you want to add text to.3. In the Camera view, click on the location you want your text to begin.
4. You can use the Text view to select the font, font size and format the text you will type. To learn more see the next topic Formatting the Text, on page 160.
5. Type in the desired text.
6. Click outside the text box to exit the typing mode.If you want to create another text object, click outside the currently active text box. You can always return to
edit the text by selecting the Text tool and clicking in the text.
159

Storyboard Pro 2 User Guide
Formatting the Text Use the Text Tool Properties view to select the font type and other formatting options you want to apply to the text.
• 1. Font Type, on page 160• 2. Font Style, on page 160• 3. Alignment, on page 161• 4. Font Size, on page 161• 5. Kerning, on page 161• 6. Indent, on page 161• 7. Line Spacing, on page 162
If you already wrote your text, you must first use the Text tool and select the text portion you want to format.
Font Type Use this drop-down menu to select the desired font, from the list of fonts available in your system.
Font Style Use these buttons to select a desired style for your text:
• Bold
• Italic
12
7
3
456
Vivaldi font Copperplate Gothic Light
160

Chapter 5: Drawing Working With Text
Alignment Use these buttons to align the paragraph.
Font SizeType the desired size for the text in this field. You can also use the up and down arrow buttons to set the desired value.
Kerning Use the kerning field to modify the spacing between letters and characters. You can select the Auto Kern option to set the kerning automatically, based on the font’s predefined standard. A negative value decreases spacing between each character creating a letter overlap and a positive value increases it.
Indent Enter a value in the Indent field to increase or decrease the indentation on the first line of your text. A positive value sets the first line of your paragraph farther to the right and a negative value sets it farther to the left.
Left Centred
Right Justified
161

Storyboard Pro 2 User Guide
Line Spacing Enter a value in the Line Spacing field to decrease or increase the space between each line of text.
Resizing the Text Box
You can resize the text box by selecting your text box with the Text tool and moving the anchor point right or left.
Using the Select tool will distort and scale your text itself rather than changing the width and height of your text box.
162

Chapter 5: Drawing Override Tool
Converting Text into Separate Objects Text contained in a text field is treated as a single drawing object. You can easily separate the text so that each character becomes an individual drawing object that you can select and modify independently.
To break a text object:
1. In the Tools toolbar, click on the Select tool. You can also use the default keyboard shortcut [Alt]+[S].2. In the Camera view, select the text object you want to break.
3. Right-click on the text and choose Convert > Break Apart Text Layers.
Each character is now surrounded by its own bounding box that you can modify, they remain text objects that you can edit.
4. If you want to convert your independent letter to a complete vector object that you can deform, using the Select tool, select the letters to convert.
5. Right-click on the text and choose Convert > Break Apart Text Layers to break the selection into a regular drawing object, with no more text attributes.
Override ToolThe Override Tool feature allows you to increase productivity by rapidly switching between tools used for short tasks and your previous tool. Most drawing tool shortcuts are accessed using the [Alt] key followed by another key, such as the Eraser tool which is accessed by pressing [Alt]+[E]. If you are drawing with the Brush tool and need to briefly switch to the Eraser before continuing, hold down the [E] key while you are erasing. Once done, release [E] to return to the previous tool, in this case, the Brush. You can do the same for most drawing tools that have a shortcut composed of [Alt] followed by another key.
Selected tool
Override tool
163

Storyboard Pro 2 User Guide
Onion Skin With onion skinning in Storyboard Pro, you can display the drawings from previous panels in the current panel so you can see where to place the drawings for the next panel. You can also display drawings from next panels in the current panel so you can see where to place the drawings for the previous panel. You can use these drawings as a reference to determine the size, angle or position of the drawing in the current panel.
By default, the previous drawings will appear with a shade of red and the next drawings will be displayed with a shade of green but you can change the display options in the Preferences panel.
Refer to the Drawing Preferences topic to learn about the Onion Skin preferences.
To use the Onion Skin feature:
1. Enable the Onion Skin feature:
In the Onion Skin toolbar, click on the Show Onion Skin button.In the Camera view, right-click and choose Onion Skin > Show Onion SkinYou can also use the default keyboard shortcut [Alt]+[O] (Windows) or [ ]+[Alt]+[O] (Mac OS X) or from the top menu, select View > Onion Skin > Show Onion Skin.
2. You can select the number of previous and next drawings you want to show:
Select View > Onion Skin > No Previous Drawing
Select View > Onion Skin > Previous Drawing
Select View > Onion Skin > Previous Two Drawings
Select View > Onion Skin > Previous Three Drawings
Select View > Onion Skin > No Next Drawing
Select View > Onion Skin > Next Drawing
Select View > Onion Skin > Next Two Drawings
Select View > Onion Skin > Next Three Drawings3. The previous and next drawings will appear in the Camera view.
164

Chapter 5: Drawing Onion Skin
Onion Skin Flipbook featureStoryboard Pro makes use of a flipbook feature allowing you to rapidly move between onion-skinned drawings.
• In the Onion Skin toolbar, click and drag the flipbook slider to flip between the drawings you have already selected with the onion skin tool. This is an extremely useful and time saving feature. To automatically play the onion-skinned drawings as a flipbook, click on the play button in the flipbook slider.
Expand Onion Skin
You can expand your Onion Skin to show more than the default of 3 previous and next drawings. Using the Expand Onion Skin option, you can see some or all of the 15 previous or next drawings.
To open the Expand Onion Skin feature, click the button located in the Onion Skin toolbar.
You can also set the default number of available Onion Skin levels in the Storyboard Pro preferences.
165

Storyboard Pro 2 User Guide
Light Table
The Light Table is used to preview the previous and subsequent active layers in washed-out colours. It is useful to be able to see the other layers when designing or cleaning up your storyboard.
In the Camera view, when the Light Table is activated all layers apart from the currently selected one are shown washed-out. The display returns to the normal mode when the Camera and Layer tools are selected.
To use the Light Table feature:
1. Enable the Light Table feature:In the top menu, select View > Light Table.
2. The drawings for the other layers are displayed as washed-out colours in the Camera view.
Light Table off Light Table on
166

Chapter 5: Drawing More Drawing Tools
More Drawing Tools• Convert• Show Grid• Group/Ungroup• Hand• Rotate View• Zoom
Convert
Brush Strokes to Pencil LinesThe Brushes Strokes to Pencil Lines operation converts the selected contour strokes into centreline pencil strokes.
• Select the art you wish to convert.• In the Camera view, Right-click > Convert > Brush Strokes to Pencil Lines.
Pencil Lines to Brush StrokesThe Pencil Lines to Brush Strokes operation converts the selected centreline pencil strokes into contour strokes brush lines.
• Select the art you wish to convert.• In the Camera view, Right-click > Convert > Pencil Lines to Brush Strokes.
Strokes to Pencil Lines The Strokes to Pencil Lines operation converts the selected invisible line to a Pencil Line.
• Select the art you wish to convert.• In the Camera view, Right-click > Convert > Strokes to Pencil Lines.
167

Storyboard Pro 2 User Guide
Show Grid
Use the Show Grid option to display a grid in the Camera view.
• Select View > Grid > Show Grid. You can also press the keyboard shortcut [Ctrl]+[G] (Windows) or [ ]+[G] (Mac OS X).
• Select View > Grid > Square to display a standard square grid.
• Select View > Grid > 12 Field Grid to display a 12 field size grid.
• Select View > Grid > 16 Field Grid to display a 16 field size grid.
• Select View > Grid > Underlay to display the grid behind the drawing elements.
• Select View > Grid > Overlay to display the grid over the drawing elements.
• Select View > Grid > Grid Outline Only to display only the contour of the grid.
You can also turn on the Grid via the Camera view Status Bar.
Group/Ungroup Use the Group option to group selected drawing objects. This can help in the selection, repositioning, re-scaling and other transformations to be applied to multiple objects of a drawing.
• With your drawing elements selected, in the Camera view choose Right-click > Group > Group or Right-click > Group > Ungroup.
HandUse the Hand tool to pan through the Camera view.
• In the Tools toolbar, select the Hand tool, click in the Camera view and drag your cursor. You can also select the Hand tool from the top menu, select Tools > Pan.
• You can also Hold down the keyboard shortcut [Spacebar], click in the Camera view and move your mouse in the direction you want to pan the view.
168

Chapter 5: Drawing More Drawing Tools
Rotate ViewUse the Rotate View tool to rotate the Camera view, the same way as you would do with a real animation disc.
• From the Tools toolbar select Rotate View.
• You can also hold down the keyboard shortcut [Ctrl]+[Alt] (Windows) or [ ]+[Alt] (Mac OS X).
You can also use the menu options to rotate the Camera view in 90 degree increments.
1. From the top menu choose View > Rotate view CW for Clockwise or View > Rotate view CCW for counterclockwise.
ZoomUse the Zoom tool to zoom in and zoom out in the Camera view.
• The default keyboard shortcut is [1] for zoom in and [2] for zoom out.• When the Zoom In mode is selected, hold [Alt] as you click to zoom out.
Zoom Tool PropertiesWhen you select the Zoom tool, its properties are displayed in the Tool Properties view.
Zoom In
Enable the Zoom In mode in the Options field to zoom in when using the Zoom tool.
Zoom Out
Enable the Zoom Out mode in the Options field to zoom out when using the Zoom tool.
169

Storyboard Pro 2 User Guide
Perform Zoom In
Use the Zoom In operation to perform a Zoom in the Camera.
• The default keyboard shortcut is [1].
Perform Zoom Out
Use the Zoom Out operation to perform a Zoom out in the Camera or Drawing view.
• The default keyboard shortcut is [2].
Reset Zoom
Use the Reset Zoom operation to restore the current zoom level to 100%.
• You can also use the default keyboard shortcut [Shift]+[Z].
Reset View
The Reset View restores the original display by resetting pan, rotation or zoom actions.
170

Chapter 5: Drawing Drawing Preferences
Drawing PreferencesWhen drawing or animating traditionally in Storyboard Pro, there are preferences you can set to help you work more efficiently.
To open the Preferences panel:
Windows: Select Edit > Preferences.Mac OS X: Select Storyboard Pro > Preferences.You can also use the default keyboard shortcut [Ctrl]+[U] (Windows) or [ ]+[U] (Mac OS X).
This topic is divided as follows:
• Advanced Preferences Tab, on page 171• Camera PreferencesTab, on page 173• Tools, on page 174
Advanced Preferences Tab These are the preferences you will find in the Advanced tab:
Memory • Loaded Drawing Limit: When you work with Toon Boom Storyboard Pro, the OpenGL drawing are loaded
in the cache to optimize the display and playback. If you want to reduce or increase the amount of drawings loaded in your cache, you can change the value in the field. The default value is 50.
Drawing • Delay Before Drawing Vectorized Strokes (ms): When you draw in Toon Boom Storyboard Pro, the strokes
are vectorized as you go. As soon as you release the pen, you lines are vectorized. When you sketch really quickly a numerous series of lines, it may happen that the vectorization process interferes with your drawing
171

Storyboard Pro 2 User Guide
action. To avoid this conflit, you can delay the vectorization process by moving the slider to the right to increase the delay value.
• Delay Before Updating Thumbnails (ms): When you modify a drawing, the thumbnail shown in the Thumbnail and Timeline views are updated. By default, the update process is delayed so that it does not slow down the application while you draw. You can reduce the delay by sliding the cursor to the left so that the thumbnails get updated faster or to the right so that they get updated later.
Open GL • Smooth Textures: When turned on, improves the appearance of bitmaps.• Support Transparency in Pencil Lines: When the option is enabled, the pencil lines are displayed normally.
The lines will be opaque (unless there are transparencies). Disabling this option will reduce rendering times, but will display additive opacities for overlapping pencil lines and unevenly filled curved pencil lines.
Full Scene AntialiasingBy default, the Full Scene Antialiasing preference is disabled. This option lets you see smooth lines as you draw as well as an antialiased drawing area. You can change the value of the Full Scene Antialiasing using the Preferences dialog box to fit the current level used in the Camera view.
Refer to the Viewing the Final Lines as you Draw to learn more about the Full Scene Antialiasing, on page 119.
Tablet Support• Use QT Wintab Tablet Support: Use Qt Build in Wintab API (Application Programing Interface) to support
the tablet, instead of the Windows Realtime stylus API. If your Pen Tablet is not responding as expected, you can disable this function to use the Windows Realtime stylus API. This preference is enabled by default.
172

Chapter 5: Drawing Drawing Preferences
Camera PreferencesTab These are the preferences you can find in the Camera tab.
Onion Skin• Enable Shade: The previous onion skinned drawings are displayed in washed out red shades and the next
onion skinned drawings are displayed in washed out green shades.• Enable Across Shot (Scene) Boundary: Enable the display of onion skin layers from panels outside of the
current shot or scene.• Apply Camera Motion: Enables the camera motion on the onion skin layers.• Maximum Number of Previous Panels: This value corresponds to the amount of previous panels you will
see in the Onion Skin preview. The default value is 3.• Maximum Number of Next Panels: This value corresponds to the amount of next panels you will see in the
Onion Skin preview. The default value is 3.
173

Storyboard Pro 2 User Guide
Tools These are the preferences you can find in the Tools tab.
Drawing • Stroke Texture Quality: Specify a texture quality value between very low and very high for the brush stroke,
or accept the default value of low.• Use Lasso Selection as Default: When turned on, the selection tool is a lasso and a rectangular marquee
when [Alt] is pressed. When turned off, the selection tool is a rectangular marquee and a lasso when [Alt] is pressed.
• Auto-Gap Closing: Specify the initial default setting for automatically closing gaps as you paint. Select from the following tolerance levels:
0 - disabled1 - small gap2 - medium gap3 - large gap
174

Chapter 6 Adding Colour
With Storyboard Pro, you can add colour to your projects.
In this chapter, you will learn about the following:
• How to Paint, on page 176• Colours, on page 177• Colour Display Modes, on page 185• Selecting the Current Colour of a Tool, on page 186• Painting Using the Paint Tool, on page 188• Selecting a Colour in a Drawing, on page 191• Editing Gradients and Textures, on page 193• Closing Gaps Manually, on page 194• Preferences, on page 195
175

Storyboard Pro 2 User Guide
How to Paint Learn how to paint your drawings by following these instructions.
To paint your drawings:
1. In the Tools toolbar, select the Paint tool. The default keyboard shortcut is [Alt]+[I]. You can also select the Paint tool using Tools > Paint in the top menu.
2. In the Colour view, select a colour from the palette.
3. In the Camera view, start painting the colours on your drawing by clicking in the area to be painted.
176

Chapter 6: Adding Colour Colours
ColoursTo paint your drawings you will use different colour swatches, unlike some paint programs where you modify one swatch each time you want to paint with a different colour.
In the Colour view, you choose a different colour swatch for each colour you want to paint in your drawing. You can add as many swatches as you want. You can also rename them and modify existing ones.
This topic is divided as follows:
• Adding a Colour Swatch, on page 178• Deleting a Colour Swatch, on page 184
177

Storyboard Pro 2 User Guide
Adding a Colour Swatch You can use three different types of colour swatches, these are described in the following sections:
• Solid Colour Swatch, on page 178• Gradient Colour Swatch, on page 181• Bitmap Texture Swatch, on page 183
Solid Colour Swatch
To add or modify a solid colour swatch:
1. In the Colour view, click on the New Colour button, or from the Colour View menu select New to create a new colour swatch.
178

Chapter 6: Adding Colour Colours
2. Double-click on your new colour to open the Colour Picker window.
3. To set your colour:In the colour picker, select the desired colour.
ORType in the HSV or RGB values in the corresponding fields. Click on the R,G,B or the H,S,V radio buttons to change the look of the colour picking area.
OR
Click on the Dropper button to select any colour on your screen. It can be from the Storyboard Pro interface, your Operating System or any other open application.
179

Storyboard Pro 2 User Guide
You can also click on the Multi Wheel Mode button to open the Multiwheel Colour dialog box. This displays all the picking area styles together and also contains a picking undo list. Click on the Single Wheel Mode button to go back to the regular Colour Picker window.
4. If needed, click on the Shade Scale’s swatches to modify the shade of the selected colour.
5. If necessary, adjust the desired level of transparency with the Alpha slider, or type the value directly in the Alpha field.
6. If necessary, click on the Add button to add the current selected colour to the Colour Storage Library, so you can quickly access it later.
7. You can rename the colour swatch in the Colour Picker window or directly in the colour list by double-clicking on its name.
Picking Areas
Picking Undo List
DisplayOptions
180

Chapter 6: Adding Colour Colours
Gradient Colour Swatch
To create a gradient colour swatch:
1. In the Colour View, select the colour to be modified.
2. In the Colour View menu, choose Edit. You can also double-click on the colour swatch.
The Colour Picker window opens.
181

Storyboard Pro 2 User Guide
3. Enable the Gradient option.
4. Select the Linear or Radial option.5. Select the Gradient arrows to modify the colours.
Click between the arrows to add extra colours.
Pull down the arrows to remove them.
Move the arrows left and right to modify the gradient distance.
Refer to the Editing Gradients and Textures topic to learn how to reposition your gradient zones in your drawings.
182

Chapter 6: Adding Colour Colours
Bitmap Texture Swatch
To create a texture colour:
1. In the Colour View menu, select New Texture... or click on the New Texture button.
The Browser window opens.2. Browse for a PSD or TGA bitmap file created in a third party software.
3. Click on the Open button to create the colour swatch.
To edit a texture swatch:
1. In the Colour view, select the colour swatch to edit.2. From the Colour view menu, select Edit Texture. You can also double-click on the Colour swatch.
The Browser window opens.3. Browse for a PSD or TGA bitmap file created in a third party software.
Once you choose a new texture, the colour swatch will be updated.
Refer to the Editing Gradients and Textures topic to learn how to reposition your textured zones in your drawings.
183

Storyboard Pro 2 User Guide
Deleting a Colour Swatch To delete a colour swatch:
1. In the Colour view, select the colour swatches to delete.
2. In the Colour View menu, select Delete. You can also click on the Delete Colour button. The default keyboard shortcut is [Delete].
Copying and Pasting Colours When you are painting your storyboards, you may want to copy colour swatches to save time.
To copy and paste colours:
1. In the Colour view, click to select the colour to copy.
2. In the Colour View menu, select Copy. The default keyboard shortcut is [Ctrl]+[C] (Windows) or [ ]+[C] (Mac OS X).
3. In the Colour View menu, select Paste as New Colours. The default keyboard shortcut is [Ctrl]+[V] (Windows) or [ ]+[V] (Mac OS X).
If you want to paste the colour values of the copied swatch over an existing colour swatch, select Paste Colour Values.
184

Chapter 6: Adding Colour Colour Display Modes
Colour Display Modes
Switching Between Swatch and List Display modes The Colour view has two display modes:
• List Mode• Swatch Mode
To toggle between the display modes:
1. In the Colour View menu, select Swatch Mode.Enable the option to display the swatches.Disable the option to display the colour list.
List Mode
Swatch Mode
185

Storyboard Pro 2 User Guide
Selecting the Current Colour of a Tool
While drawing and painting, you can let Storyboard Pro retain the last colour you selected for each one of the following tools:
• Brush• Paint• Pencil, Ellipse, Line, Rectangle
The Colour view has three swatches where you can set a colour for the Brush , Paint and Pencil tools.
To unlink the storage swatches:
1. In the Colour view, if the storage swatches are linked, click on the Linking button to unlink them.
2. Click on the Brush storage swatch.
3. In the Colour list, select the desired colour.
4. Click on the Pencil storage swatch.
5. In the Colour list, select the desired colour.
6. Click on the Paint storage swatch.
7. In the Colour list, select the desired colour.
186

Chapter 6: Adding Colour Selecting the Current Colour of a Tool
If you prefer not to use this behaviour and have Storyboard Pro use the same colour swatches regardless of the selected tool, you can link the three swatches together.
To link the storage swatches:
1. In the Tools toolbar, select one of the following tool:Pencil tools:
Pencil tool
Line tool
Ellipse tool
Rectangle tool
Brush tool
Paint tool
2. In the Colour view, if the storage swatches are linked, click on the Linking button to link them.
Each time you select a new colour for your current tool, all the storage swatches are updated.
187

Storyboard Pro 2 User Guide
Painting Using the Paint Tool
The main tool you will use to paint your drawings is the Paint tool. The Paint tool can be used in several different modes, these can be customized in the Tool Properties view.
The Paint tool only paints closed zones. If you have gaps in your lines, you will have to close them using either the Brush, Pencil, or Close Gap tools.
To paint with the Paint tool:
1. In the Timeline or Thumbnails view, select the panel and layer where you want to paint.
2. In the Tools toolbar, click on the Paint tool. The default keyboard shortcut is [Alt]+[I]. You can also select the Paint tool in the top menu under Tools > Paint.
3. In the Colour view, select a colour.
4. In the Camera view, start painting. You can either point and click to paint a zone or trace a lasso or marquee selection to paint several zones at once.
NOTE:
The last colour you select while using the Paint tool will be remembered the next time you select the Paint tool.
188

Chapter 6: Adding Colour Painting Using the Paint Tool
Paint Tool Properties When you select the Paint tool, its properties and options appear in the Tools Properties view.
Lasso and Marquee The Lasso and Marquee options let you choose what type of selection the Paint tool will do when you will click and drag your cursor to paint your drawings. The default selection mode is Lasso.
The Marquee option makes a rectangle selection box. Everything inside the selection will be painted according to the painting mode you selected.
The Lasso option lets you draw a custom selection box around the zones to be painted. Everything inside the selection will be painted according to the painting mode you selected.
Hold down the [Alt] key to switch to the opposite mode of your selection.
Painting Mode The Paint tool has three different modes available:
Paint Mode
Paint Unpainted Mode
Unpaint Mode
You can also find these tools directly in the Tools toolbar and in the Tools menu.
Paint Mode
The Paint mode paints everything it touches, including empty and filled zones.
189

Storyboard Pro 2 User Guide
Paint Unpainted Mode
The Paint Unpainted mode paints only empty zones. Any line or filled zone will remain unchanged.
Unpaint Mode
The Unpaint mode unpaints everything it touches, including empty and filled zones.
Automatic Close Gap The Automatic Close Gap option has four modes available:
No Close Gap
Close Small Gap
Close Medium Gap
Close Large Gap
190

Chapter 6: Adding Colour Painting Using the Paint Tool
The Automatic Close Gap option is used while painting drawings with small gaps. Instead of having to close them manually either with the Brush tool or Close Gap tool, Storyboard Pro will analyse the drawing and close the gaps while you paint according to the selected mode.
The automated gap closing should be done using the zoom function setting of your Camera view. If your eye does not see the gap, Storyboard Pro won’t either.
Selecting a Colour in a Drawing
While working in your Camera view, you can use the Dropper tool to pick a colour from your drawing without
going to the Colour view.
To use the Dropper tool:
1. In the Tools toolbar, select the Dropper tool. The default keyboard shortcut is [Alt]+[D]. You can also select
the Dropper tool from Tools > Dropper in the top menu.2. In the Camera view, click on the desired colour.
If you are using another drawing tool such as the Paint tool, you can temporarily hold down the [D] key and click in your drawing before releasing the key to pick your colour. Once you let go of the hot key, Storyboard Pro will go back to your previous tool.If the colour you pick is not already in your Colour view, you may get the following warning, prompting you to either add the new colour or not.
191

Storyboard Pro 2 User Guide
You may also want to select the zones painted with the colour currently selected in the Colour view. This can be useful to remove rough lines from a clean drawing.
To select the zones painted with the current colour:
1. In the Colour view, select the colour you want to select the corresponding zones from.
2. Right-click and choose Select Strokes with Current Colour.
192

Chapter 6: Adding Colour Editing Gradients and Textures
Editing Gradients and Textures
If you paint a zone with a gradient or texture colour you can use the Edit Gradient/Texture tool to modify its position in the zone. You can move, scale, rotate and skew your texture.
To use Edit Gradient/Texture tool:
1. In the Tools toolbar, select the Edit Gradient/Texture tool. You can also select this tool from the top menu
under Tools > Edit Gradient/Texture.2. Click on the Gradient or Texture zone to be modified.
If you want to modify several areas at once, hold down the [Shift] key and click in the zones to be modified.
3. Move the edit texture’s anchor points to the desired result.If the same modification needs to be applied to another gradient in another drawing or texture zone, you can select the modified zone and select Edit > Copy. Select the zone to be modified in the other drawing and select Edit > Paste.
Linear Gradient Radial Gradient
12
193

Storyboard Pro 2 User Guide
Closing Gaps Manually
When painting, you will notice that some of your drawing areas are not closed. To close the zone you can either draw the missing line with the Brush or Pencil tool, but you can also close the gap with an invisible line. To do so, you will
use the Close Gap tool.
The Close Gap tool is used to close small gaps in a drawing. The Paint tool only paints closed areas. The Close Gap tool will create a small, invisible stroke between the two closest points to close the colour zone. You do not need to trace directly over the gap. You can draw it a few millimetres away and the Close Gap will automatically choose the two closest points and close the gap.
To use the Close Gap tool:
1. In the Tools toolbar, select the Close Gap tool. You can also select the Close Gap tool from the top menu
under Tools > Close Gap.
Enable the Auto Flatten option in the Tool Properties view if you want the stroke you will draw to be flattened in your drawing instead of being on top.You can display the invisible lines with the Show Strokes option under View > Show Strokes. The default shortcut is [K].If you do not display the strokes, a Message dialog box will appear.
Enabling the Don’t Show This Message Again option prevents this Message from appearing.2. In the Camera view, trace an invisible line near to the gap to be closed. The gap will automatically close.
194

Chapter 6: Adding Colour Preferences
Preferences Adjusting preferences to suit your techniques allows you to paint your drawings more efficiently.
To open the Preferences panel:
Windows: Select Edit > Preferences.Mac OS X: Select Storyboard Pro > Preferences.You can also use the default keyboard shortcut [Ctrl]+[U] (Windows) or [ ]+[U] (Mac OS X).
In the Preferences panel, you will find the following preferences that are related to adding colours to your project.
Tools
Auto Gap Closing The values for automatic gap closing while painting drawings are:
• 0 = Disabled • 1 = Small• 2 = Medium• 3 = Big
195

Storyboard Pro 2 User Guide
196

Chapter 7 Layers
Storyboard Pro allows you to work with layers within your individual storyboard panels. Working with layers helps to keep your artwork organized and permits advanced editing of individual components.
Working on multiple layers increases the reusability of your drawing as you move from shot- to-shot or scene-to-scene. Each layer or part of a layer can be dragged from the selected shot into any other shot reducing drawing time.
In this chapter, you will learn about the following:
• Drawing on a Layer, on page 198• Adding Layers to a Panel, on page 199• Copying Layers, on page 199• Renaming Layers, on page 200• Deleting Layers, on page 200• Locking and Unlocking Layers, on page 201• Showing and Hiding Layers, on page 201• Layer Thumbnails, on page 202• Changing Layer Opacity, on page 203• Ordering Layers, on page 204• Toggle Background Layers, on page 205• Importing Images as Layers, on page 206• Merging Layers, on page 207• preferences, on page 209
197

Storyboard Pro 2 User Guide
What Are Layers?In animation, a layer is an individual column, level or character. The scene’s layers are superposed to form the final image.
When you import an image or draw in a panel, you are actually adding artwork to one of its layers. By default, each panel has two layers, a background (BG) and a foreground layer (A). As you add layers, they are automatically assigned subsequent letters in alphabetical order, but they can be renamed manually. They are also placed on top of the selected layer or at the very top of the other layers if there is not layer selected in the panel.
Drawing on a LayerWhen you open a project, the Camera view is displayed by default in the Storyboard Pro window. In the Camera view, tabs are always displayed, allowing you to navigate between layers. If the Thumbnails view is large enough, layer tabs are displayed for each pane there as well.
The layers as they are displayed in the Camera view:
The layers as they are displayed in the Thumbnails view:
To draw on a layer:
1. Select the layer you want to use by clicking on it. The active layer will be highlighted in blue.2. Choose a drawing tool and begin drawing in the Camera view.
Active Layer
Inactive Layer
198

Chapter 7: Layers Managing Layers
Managing LayersThis section will cover all the different ways you can work with layers within your storyboard project.
Adding Layers to a PanelYou can add an unlimited amount of layers to a panel.
To add a drawing layer to a panel:
1. Select the panel to which you want to add a new layer.2. Do one of the following:
From the top menu, select Layer > Add Layer.In the Camera or Thumbnails view, right-click in the layer section and select Add Layer.In the Layer Toolbar, click the Add Layer button.
In the bottom right of the Layers view, click the Add Layer button.
Copying LayersYou can reuse drawings from other panels throughout your storyboard. You can also modify drawing objects and transformations after they’ve been copied to a new layer, rather than redrawing objects that are similar.
To copy a layer to another panel by dragging:
1. Click the tab(s) of the layer(s) you want to copy. You can copy multiple layers simultaneously by holding the [Ctrl] key while you make your selection.
2. Drag the tab you want to copy to the layer section of the destination panel. Drop it on the tabs at a specific position to place it in a specific layer order.
When you copy a layer it retains its original layer name in the new panel. If a layer with the same name already exists, then you will be prompted to give it a new name, or overwrite the existing layer.
199

Storyboard Pro 2 User Guide
For example, if layer A is copied to a panel, where a layer A already exists, the copied layer will be named A_1 by default. If it is copied into the panel a second time, the new layer will be named A_2.
To copy a layer to another panel by using copy and paste:
1. Click the tab(s) of the layer(s) you want to copy. You can copy multiple layers at one time by holding the [Ctrl] key while you make your selection.
2. Do one of the following:From the top menu choose Layer > Copy Layers. Then, with the destination panel selected, from the top menu choose Layer > Paste Layers.Right-click your selection and choose Copy Selected Layers. Then, with the destination panel selected, right click the layers section and choose Paste Layer.
Renaming LayersRelevant naming can help you to work faster and better keep track of layers.
To bring up the rename layer dialog box:
1. Select the panel with the layer you want to rename.2. Do one of the following:
Select Layer > Rename Layers.Right-click the layer’s tab and select Rename Layer.Double-click on the layer.
Deleting LayersYou can delete the currently selected layer using the Delete Layer command.
To delete a layer from a panel:
1. Select the layer you wish to delete.2. Do one of the following:
From the top menu select Layer > Delete Layer.Right-click the layer’s tab and select Delete Layers.In the Layer Toolbar, click the Delete Layer button.
From the Layers view, select the Delete Layer button.
200

Chapter 7: Layers Managing Layers
Locking and Unlocking LayersYou can lock the currently selected layer to protect any objects on it from being changed. Once locked, you can unlock the layer to make changes to any objects on it.
To lock or unlock a layer:
1. Select the tab of the layer you want to lock or unlock.2. Click the lock icon, located directly under the layer name.
Layers that are locked will display a lock icon to show that they’re locked.
Other ways to lock or unlock a layer:
Select Layer > Lock/Unlock Layers.In the Layer Toolbar, click the Lock/Unlock Layers button.
Use the [Alt]+[L] shortcut.
Showing and Hiding LayersWorking with layers, it may be useful at times to hide certain layers.
To show or hide a layer:
1. Select the tab of the layer you wish to show or hide.2. Click the show/hide layer icon.
Other ways to show or hide a layer:
Select Layer > Show/Hide Layers.Right-click the layer tab and choose Show/Hide Layers.
This icon is prominent when a layer has been locked.
When a layer is not visible, the layer visibility icon will be greyed out.
201

Storyboard Pro 2 User Guide
Layer ThumbnailsYou can view your layers as thumbnails to easily identify them.
To view layer thumbnails in the Camera view:
1. In the Camera view, click on the arrow button to expand the layer tabs.
To view layer thumbnails in the Layers view:
1. Open the View drop-down menu and choose Layers to open the Layers view, or from the top menu choose Windows > Layers.
The Layer view will now be visible and display all the layers in the selected panel as thumbnails.
Once expanded, each layer will have its own thumbnail displaying its containing artwork.
202

Chapter 7: Layers Managing Layers
Changing Layer OpacityIf necessary, you can modify the opacity of your layers either temporarily, or for export. There are several different ways to do this within Storyboard Pro.
To change the layer opacity:
1. Expand the layer section by clicking on the arrow.
2. Select the tab of the layer you wish to modify the opacity for.3. Type in a new opacity between 0 and 100, or use the up/down arrows to set the opacity.
The changes you make will be reflected in the Camera view.
Other ways to modify the layer opacity:
Right-click a layer tab and choose Change Layers Opacity.From the top menu choose Layer > Change Layers Opacity.
These will open the Change Layer Opacity window.
Enter a new opacity in the field and click OK to apply the changes.
203

Storyboard Pro 2 User Guide
Ordering LayersLayers can be repositioned. They can be brought closer to the front or the back in relation to the other layers in a panel. For example, if you want to have a character move to the front of a shot, you can click on the character’s layer and move it above the others. In Storyboard Pro, the layers that are at the top of the list will be displayed above the other layers in the Camera view. The layer order will be reflected in the final export.
There are several different ways to change the order of your panel’s layers.
Reordering Layers via the Layers menuThe following four commands will be useful when modifying the order of your layers.
• Bring Layer to Front• Bring Layer Forward• Send Layer to Back• Send Layer Backward
Bring Layer to Front
This option will move the selected layer in front of all other layers in the current panel.
1. Select the tab for the layer you wish to bring to the front.2. From the top menu select Layer > Bring Layer to Front.
Bring Layer Forward
This option will move the selected layer up one spot in the current panel.
1. Select the tab for the layer you wish to move forward.2. From the top menu select Layer > Bring Layer Forward.
Send Layer to Back
This option will move the selected layer behind all other layers in the current panel.
1. Select the tab for the layer you wish to send to the back.2. From the top menu select Layer > Send Layer to Back.
204

Chapter 7: Layers Managing Layers
Send Layer Backward
This option will move the selected layer down one spot in the current panel.
1. Select the tab for the layer you wish to move backward.2. From the top menu select Layer > Bring Layer Backward.
Reorder Layers by DraggingYou can also change the order of layers by clicking and dragging them to a new location, above or below another layer.
1. Select the tab for the layer you wish to move.2. Drag the layer above or below other layers to change their display priority in the Camera view.
Toggle Background LayersSometimes it is helpful not to have the Onion Skinning feature applied to certain layers while working. The Toggle Background Layer option allows you to set certain layers as background elements so that they will not interfere with the Onion Skinning feature.
To set a layer as a background element:
1. Turn on the Onion Skinning feature .
With the Onion Skinning feature on, the Toggle Background layer button will appear on each layer tab.
2. Click the Toggle Background Layer button on to set a particular layer as a background element. Now this layer will not have Onion Skinning applied to it. You can also select Layer > Toggle Background Layers.
When a layer has been set to be a background element, the icon will change to colour.
Setting a Layer Layout as DefaultOnce you setup a layer layout in a panel, you can select that panel and save this layout as the default layout to use whenever a new panel is added. The art contained in the default layer
Click on this button to set this layer as a Background element.
205
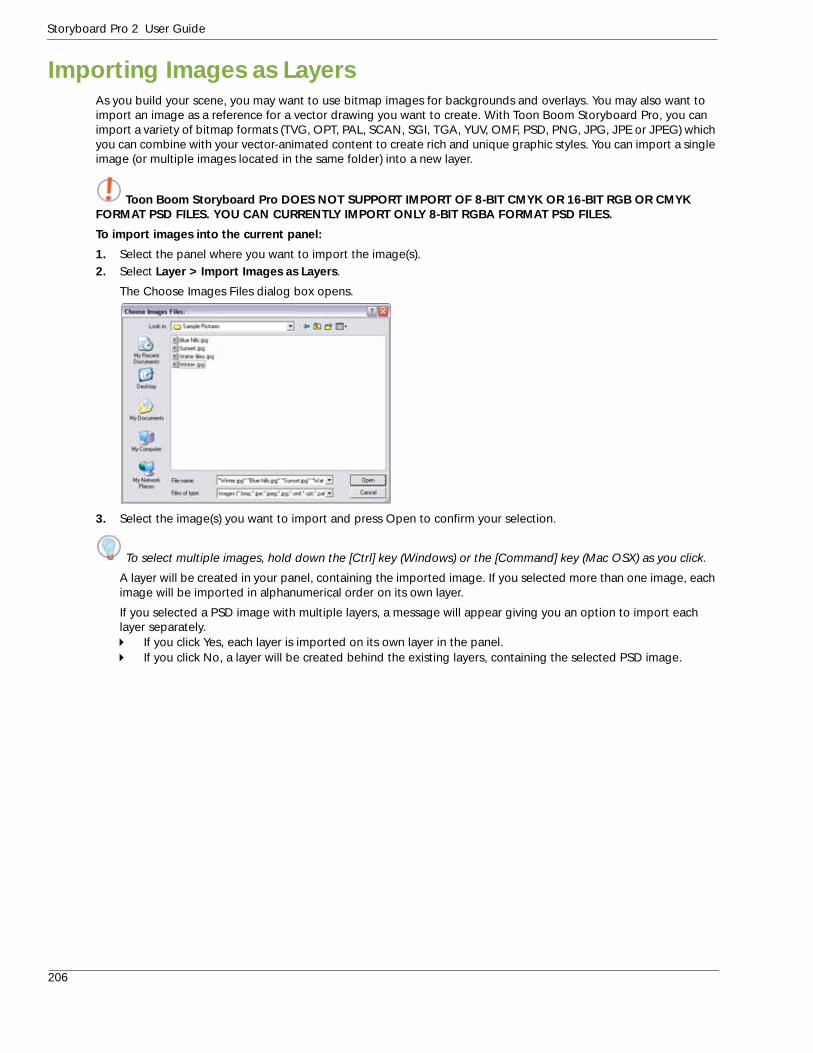
Storyboard Pro 2 User Guide
Importing Images as LayersAs you build your scene, you may want to use bitmap images for backgrounds and overlays. You may also want to import an image as a reference for a vector drawing you want to create. With Toon Boom Storyboard Pro, you can import a variety of bitmap formats (TVG, OPT, PAL, SCAN, SGI, TGA, YUV, OMF, PSD, PNG, JPG, JPE or JPEG) which you can combine with your vector-animated content to create rich and unique graphic styles. You can import a single image (or multiple images located in the same folder) into a new layer.
Toon Boom Storyboard Pro DOES NOT SUPPORT IMPORT OF 8-BIT CMYK OR 16-BIT RGB OR CMYK FORMAT PSD FILES. YOU CAN CURRENTLY IMPORT ONLY 8-BIT RGBA FORMAT PSD FILES.
To import images into the current panel:
1. Select the panel where you want to import the image(s).2. Select Layer > Import Images as Layers.
The Choose Images Files dialog box opens.
3. Select the image(s) you want to import and press Open to confirm your selection.
To select multiple images, hold down the [Ctrl] key (Windows) or the [Command] key (Mac OSX) as you click.
A layer will be created in your panel, containing the imported image. If you selected more than one image, each image will be imported in alphanumerical order on its own layer.
If you selected a PSD image with multiple layers, a message will appear giving you an option to import each layer separately.
If you click Yes, each layer is imported on its own layer in the panel.If you click No, a layer will be created behind the existing layers, containing the selected PSD image.
206

Chapter 7: Layers Merging Layers
Merging LayersYou can merge one or more layers together into one layer.
To merge layers together:
1. Select the panel with the layers you want to merge.2. Do one of the following:
Select Layer > Merge Layers.Right-click a layer tab and select Merge Layers.
The Merge Layers dialog box opens.
3. Select the layers you want to merge from the Panel Layers To Merge list.4. Do one or all of the following:
To make the merged layer editable, check Make New Layer Editable. Any previously defined motion in the source layers will be lost. If you choose not to make the layer editable, transform motion will be kept. You can draw on top of merged layers but cannot modify them. After you have merged layers it is possible to modify them using Convert To Drawing. To do this right click on the drawing and select Convert To Drawing from the popup menu, or from the top menu choose Layer > Convert to Drawing.To delete the original layers, select Delete Source Layers.
5. In the New Tab Name field, enter the name of the new tab. By default, the name of the tab is MergedLayer. Any newly merged layers will use this tab name and add a numerical suffix, i.e., MergedLayer_1, MergedLayer_2, and so on.
6. Click OK to confirm your changes.
207

Storyboard Pro 2 User Guide
Layer ExportYou can choose the export behaviour for each individual layer. This can come in handy if you have imported reference layers that you do not necessarily want to see in your final export. Set individual layer export settings via the Layers view.
To change individual layer export behaviour:
1. Select the panel that contains the layers you wish to modify.2. Open the Layers view.3. Select the layer you need to modify export settings for.4. Depending on your needs, check the boxes for the formats for which you wish to include the selected layer.
For example, if you do not want a certain layer to appear when you export a movie, uncheck the Movie box for that particular layer.
208

Chapter 7: Layers preferences
preferencesYou can change the way layers are displayed in Storyboard Pro via the Global UI tab of the Preferences.
To open the Preferences panel:
Windows: Select Edit > Preferences.Mac OS X: Select Storyboard Pro > Preferences.
You can also use the default keyboard shortcut [Ctrl]+[U] (Windows) or [ ]+[U] (Mac OS X).
Below is the Global UI tab of the Preferences, where you will find the settings to change the way layers look in the software.
• Current Layer Colour: Change the colour of the active layer.• Selected Layer Colour: Changes the colour of selected layers which are not active.• Default Layer Colour: Changes the default colour of a layer• Current Layer Text Colour: Changes the colour of the layer text when the layer is active• Selected Layer Text Colour: Changes the colour of the layer text when the layer is selected, but not active.• Default Layer Text Colour: Changes the default colour of the layer text.
209

Storyboard Pro 2 User Guide
210

Chapter 8 Libraries
You can share and reuse any elements you create in Storyboard Pro using Templates. Storyboard Pro has a library where you can store several different elements such as characters, sets, props, layers and camera moves.
In this chapter, you will learn about the following:
• Understanding the Library Concept, on page 212• Library View, on page 213• Structuring the Library, on page 217• Templates, on page 221• Importing Files as Templates Using the Library View, on page 224• Importing Templates, on page 225• Preferences, on page 228
211

Storyboard Pro 2 User Guide
Understanding the Library Concept
The Library view lets you reuse your artwork and panels in other scenes and projects.
This topic is divided as follows:
• What is a Library?, on page 212• What is a Template?, on page 212
What is a Library?A library is a folder where you store your Templates. You can access these folders from different projects. Using the library is easy, just drag the content into the library to store your artwork and then drag it into your Camera, Timeline or Thumbnail view where you want to reuse it. Organize your library using subfolders. You can keep several different library folders on your hard drive or network.
What is a Template? A template is an individual copy of the artwork stored in the library. This artwork can be reused in different scenes. Once a template is stored in the library it can be accessed from any project, as many time as needed.Dragging a template into your project copies the content in it. It does not link it to the original so this individual copy can be modified at will.
212

Chapter 8: Libraries Library View
Library View
The Library view is used to create and manage templates as well as the folders containing them.
1. Preview2. Quick Search3. Library List4. Templates List
1
2
3
4
213

Storyboard Pro 2 User Guide
Preview
The Preview window, allows you to preview the contents of a template.
To preview a template:
1. Click on the down arrow button above the Quick Search section to expand the preview section.
2. Double-click on the template you want to preview from the template list. You can also right-click (Windows) or [Ctrl] + click (Mac OS X) on the selected template and select Preview Template.
You can also double-click on a template from the template list while the preview section is collapsed to expand the preview section and preview the selected template at once.
3. When you created a template out of a panel containing a layer motion, click on the Play button or drag the slider to scrub through the panel.
214

Chapter 8: Libraries Library View
Quick Search
You can use the Quick Search field to rapidly locate a particular template using a keyword contained in the template’s name.
To search for a template:
1. In the Quick Search field, type a word or part of a word contained in the template’s name. You can select a folder in the Library’s List to limit the search to this specific library.
2. Press on the [Enter] key to validate.
The first template found with the keyword you used is being selected and displayed in the right side of the Library view along with the other templates contained in the same folder.
3. Click on the Right Arrow button to find the next template containing the keyword, or on the
Left Arrow button to see the previous result.
215

Storyboard Pro 2 User Guide
Library List
The Library List is used to navigate through the different libraries and subfolders. You can also open, close and create new libraries from here.
The Library has two default Library folders:
• GlobalThis folder is empty, you can use it to organize your own templates. This Library is automatically shared between different projects. You can organize this library folder using subfolders.
• TemplatesThis folder contains default templates provided with Storyboard Pro and is stored on your hard drive. The content of this Library is automatically shared between the different projects.
Templates List
The templates contained in the selected Library list can be displayed on the right side of the Library view as thumbnails, in a list or as details.
To access the Template display options:
In the Library view’s right side, right-click (Windows) or [Ctrl]+click (Mac OS X) and select View > List, Thumbnails or Details.
216

Chapter 8: Libraries Structuring the Library
Structuring the Library As you will probably create a large number of templates you will soon realize that they need to be organized. You can create different libraries and subfolders so that you can gain easy access to your assets. For example, create a different library for each project and divide it into several categories, such as:
• Characters• Props• Backgrounds• Panels• Sound Clips
This topic is divided as follows:
• Creating a Library, on page 217• Opening a Library, on page 218• Closing a Library, on page 218• Creating a Folder, on page 218• Refreshing the Library, on page 219
Creating a Library There are two ways to create Library folders.
• Using Storyboard Pro’s interface.• Directly through your operating system.
To create a library using your operating system, create a new folder with a relevant name in the location where you want the library to be stored. This can be opened in Storyboard Pro when you require it, see Opening a Library, on page 218 to find out how.
To create a library from Storyboard Pro:
1. In the Library view, right-click (Windows) or [Ctrl]+Click (Mac OS X) in the Library List section and select Open Library from the pop-up menu.
The Browser window opens.2. Browse for the location where you want to store your new library in your computer.3. Click on the Make New Folder button.
The new folder appears.
4. Name the new library with a relevant name.
217

Storyboard Pro 2 User Guide
5. Click on the OK button.
The new library appears in the Library List section.
Opening a Library You can open any folder on your hard drive or network as a library. Opening a library means linking the folder to your Library view. You only need to open the library once. The library folder is available every time you open the application until you decide to close the library and unlink it.
To open a library:
1. In the Library view, right-click (Windows) or [Ctrl]+Click (Mac OS X) in the Library List section and select Open Library from the pop-up menu.
The Browser window opens.2. Browse to the location of the library folder.3. Select the folder.4. Click on the OK button.
The new library appears in the Library List section.
Closing a Library You may not always require all of the library folders in the Library List, if this is the case you can close the ones you do not need. Closing it does not delete the folder, it only unlinks it from the Library view. If you want to reopen it later, you only need to locate it on your hard drive or network and open it in the Library view.
To close a library:
1. In the Library view’s right side, select the library folder to close.2. In the Library View menu, select Folders > Close Library.
The library closes.
Creating a Folder Template libraries need to be organized. You can create different subfolders on your hard drive or directly in the Library view so that you can gain easy access to your assets.
To create a folder:
1. In the Library view’s left side, select a library folder that you would like to make subfolders for.2. Right-click (Windows) or [Ctrl]+click (Mac OS X) on the selected library and select New Folder.
The new subfolder is added to the Library (although not immediately visible as it is collapsed in its parent folder). Click on the root library folder containing the new folder and click on the [+] sign to expand it. The new subfolder appears.
Renaming a Folder Once you add a folder, you can rename it, this also renames the folder on your hard drive.
218

Chapter 8: Libraries Structuring the Library
To rename a folder:
1. In the Library view’s left side, select the folder to rename.
2. Right-click (Windows) or [Ctrl]+click (Mac OS X) on the selected library and select Rename Folder.3. Rename the selected folder.
4. Press [Return] to validate the operation.
Deleting a Folder You can delete a folder from the library if its contents are no longer needed.
WARNING: ALL THE TEMPLATES CONTAINED IN THE FOLDER WILL BE DELETED FROM YOUR HARD DRIVE. ONCE DELETED THE DATA CAN NOT BE RETRIEVED.
To delete a folder:
1. In the Library view’s left side, select the folder to delete.
2. Right-click (Windows) or [Ctrl]+click (Mac OS X) on the selected library and select Delete Folder. You can also use the default keyboard shortcut [Delete].
A warning dialog box opens.
Press Yes to delete the folder.Press No to cancel.
Refreshing the Library If you update the content of your libraries through your operating system, you will need to refresh your library folders in the Library view.
To refresh a library:
1. In the Library view’s left side, right-click (Windows) or [Ctrl]+click (Mac OS X) and select Refresh. You can also use the default keyboard shortcut [F5].
219
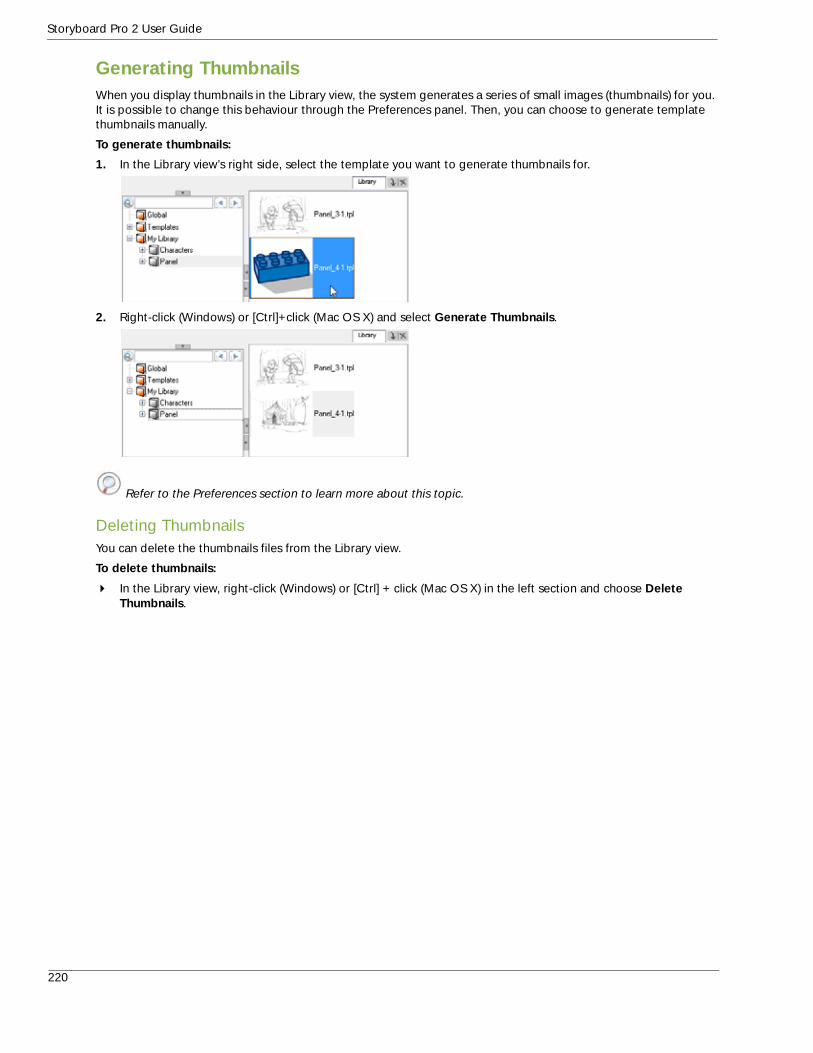
Storyboard Pro 2 User Guide
Generating Thumbnails When you display thumbnails in the Library view, the system generates a series of small images (thumbnails) for you. It is possible to change this behaviour through the Preferences panel. Then, you can choose to generate template thumbnails manually.
To generate thumbnails:
1. In the Library view’s right side, select the template you want to generate thumbnails for.
2. Right-click (Windows) or [Ctrl]+click (Mac OS X) and select Generate Thumbnails.
Refer to the Preferences section to learn more about this topic.
Deleting ThumbnailsYou can delete the thumbnails files from the Library view.
To delete thumbnails:
In the Library view, right-click (Windows) or [Ctrl] + click (Mac OS X) in the left section and choose Delete Thumbnails.
220

Chapter 8: Libraries Templates
Templates If you want to reuse artwork and layer or camera motions from your project into the same or other projects, you need to create a template out of it. A template can be seen as a portable scene or package that you can drag inside your project.
This topic is divided as follows:
• Creating a Template, on page 221• Deleting a Template, on page 223
Creating a TemplateYou can create a template out of many assets of your project. You can create templates from the Camera, Thumbnails or the Timeline view.
Creating a Template from the Camera viewFrom the Camera view, you can create a template out of a panel’s layer or a selection of layers. Note that if a motion was created on the selected layer, it will be included in the template.
To create a template from the Camera view:
1. In the Library view, select the folder in which you want to store your template.2. In the Camera view, select one or more layers’ tabs and drag them to the library view’s right section.
3. In the Rename dialog box, rename the new template.
• If you want to rename a template once it is created, right-click (Windows) or [Ctrl]+click (Mac OS X) on it and select Rename.
4. Click on the OK button.
Creating a Template from the Thumbnails viewFrom the Thumbnails view, you can create a template from an entire panel. Note that if there is a layer or camera motion in the selected panel, it will be included in the template.
221

Storyboard Pro 2 User Guide
To create a template from the Thumbnail view:
1. In the Library view, select the folder in which you want to store your template.2. In the Thumbnails view, select a panel and drag it to the library view’s right section.
3. In the Rename dialog box, rename the new template.• If you want to rename a template once it is created, right-click (Windows) or [Ctrl]+click (Mac OS X) on it
and select Rename.4. Click on the OK button.
Creating a Template from the Timeline viewFrom the Timeline view, you can create a template out of an entire panel or a sound clip. Note that if there is a layer or camera motion in the selected panel, it will be included in the template.
To create a template from the Timeline view:
1. In the Library view, select the folder in which you want to store your template.2. In the Timeline view, select a panel or a sound clip and drag it to the library view’s right section.
222

Chapter 8: Libraries Templates
3. In the Rename dialog box, rename the new template.• If you want to rename a template once it is created, right-click (Windows) or [Ctrl]+click (Mac OS X) on it
and select Rename.4. Click on the OK button.
Deleting a Template To delete templates from your library, use the Library view. Storyboard Pro lets you undo the delete action if necessary.
WARNING: DO NOT DELETE THEM USING THE OPERATING SYSTEM BECAUSE YOU WILL NOT BE ABLE TO UNDO YOUR ACTION.
To delete a template:
1. In the Library view, select the templates to delete.2. Right-click (Windows) or [Ctrl]+click (Mac OS X) on the selection and select Delete. The default keyboard
shortcut is [Delete].
223

Storyboard Pro 2 User Guide
Importing Files as Templates Using the Library View Using the Library view, you can import several types of file and store them in a library folder as a template. Once you have these new templates, you can use them throughout your storyboard projects just as regular ones.
• Importing Image Files , on page 224• Importing Audio Files, on page 224• Importing Flash Movie Files
Importing Image Files You can import all sort of image files using the Library view, to be able to re-use them throughout your projects as templates. You can import bitmap but also vector based images which can be really handy. The supported image formats are *.ai, *.pdf, *.tvg, *.pal, *.scan, *.sgi, *. tga, *.yuv, *omf, *.psd, *.png, *.jpg, *.jpeg, *.bmp and *.tif.
To import an AI or PDF file:
1. Go to the Library view and right-click (Windows) or [Ctrl]+click (Mac OS X) on the Library folder of your choice and select Import Files.
The browser window opens.2. Find and select your image file and click on Open.3. The selected file will appear in the Library view as a *.tpl inside the selected library folder.
Importing Audio Files You can import three types of audio files, which you can drag in the Timeline view when creating your animatic project. The supported audio file formats are: *.wav, *.aif and *.mp3.
To import an audio file:
1. Go to the Library view and right-click (Windows) or [Ctrl]+click (Mac OS X) on the Library folder of your choice and select Import Files.
The browser window opens.2. Find and select your image file and click on Open.3. The selected audio will appear in the Library view as a *.tpl inside the selected library folder.
Importing Adobe Flash Movie FilesYou can import an Adobe Flash movie file, *.swf, into the Library view. The movie file will become a single layer template which will containing the animation.
To import an Adobe Flash movie file:
1. Go to the Library view and right-click (Windows) or [Ctrl]+click (Mac OS X) on the Library folder of your choice and select Import Files.
The browser window opens.2. Find and select your *.swf file and click on Open.3. The selected *.swf will appear in the Library view as a *.tpl inside the selected library folder.
You can preview the animation contained in the new template by using the preview section of the Library view. Refer to the Preview section to learn how.
Note that only the first 20 first frames of the animation will be imported in the template.
224

Chapter 8: Libraries Importing Templates
Importing Templates There are several ways you can import templates in your project.
• Importing a Template in the Camera view• Importing a Template in the Thumbnails View• Importing a Template in the Timeline View
Importing a Template in the Camera view You can import layers and panel templates into the Camera view.
To import a template in the Camera view:
1. In the Thumbnails view, select the panel in which you want to import the template.2. In the Library view, select the template you want to import.3. Drag the selected template to the Camera view.
If you drag a template of an entire panel into a selected panel, it will add all the content of the template into the existing selected panel.
Importing a Template in the Thumbnails View You can import layers and panel templates into the Thumbnails view.
To import a template in the Thumbnails view:
1. In the Thumbnails view, select the panel in which you want to import the template.2. In the Library view, select the template you want to import.
225

Storyboard Pro 2 User Guide
3. Drag the selected template to the selected panel in the Thumbnails view.
Importing a Template in the Timeline ViewYou can import layers, panel and sound clip templates into the Timeline view.
To import a template in the Timeline view:
1. In the Timeline view, select the panel in which you want to import the template.1. In the Library view, select the template you want to import.2. Drag the selected template to the selected panel in the Timeline view.
If you are importing a sound clip template, drag the template into a sound layer in the Timeline view.
226

Chapter 8: Libraries Importing Templates
Opening a Template as a Folder Since a template is like a scene, you can open the template’s folder and select elements inside it such as specific drawings.
You may only want to import a few drawing layers instead of importing the entire contents of a template. In this case, use the Open As Folder command to import the items you want.
To open a template as a folder:
1. In the Library view, select the template to open.2. Right-click (Windows) or [Ctrl]+click (Mac OS X) on the selection and select Open As Folder.
3. In the Library list, explore the template’s folder to display its content.
227

Storyboard Pro 2 User Guide
Preferences In Toon Boom Storyboard Pro, there are a series of preferences that are available to customize behaviour and help you set up an efficient workflow.
To open the Preferences Panel:
Windows: Select File > Preferences. You can also use the default keyboard shortcut [Ctrl]+[U].
Mac OS X: Select Storyboard Pro > Preferences. You can also use the default keyboard shortcut [ ]+[U].
General TabYou can find the preference related to the library under the General tab of the Preferences panel.
Automatically Generate Thumbnails in Library
By default this option is enabled, this means that the thumbnails in the Library view will be automatically generated. You can disable this option as to prevent the thumbnails from being automatically generated.
When you disable the Automatically Generate Thumbnails in Library, you can manually generate them when
desired. Refer to Generating Thumbnails to know how.
228

Chapter 9 Animatic
An animatic is the next step of a storyboard which involves adding sound, camera movements, animation and scene transitions.
Toon Boom Storyboard Pro has all the tools necessary to synchronize your storyboard with sound, add camera and layer movements, and transitions before you finally export to the final video format.
In this chapter, you will learn about the following:
• Timeline View, on page 230• Panel Duration, on page 231• Camera, on page 234• Animating the Camera, on page 239• Animating Layers, on page 254• Sound, on page 261• Transitions, on page 268• Playing Back Your Animatic, on page 271• Preferences, on page 272
229

Storyboard Pro 2 User Guide
Timeline ViewThe Timeline view can be used to assemble the timing of your scene’s visuals and sounds. You can add sound track layers to this timeline, as well as edit audio files imported into the sound tracks. You can also add transitions and control the playback of a selected panel or the entire storyboard from this view.
When setting up your animatic in Storyboard Pro, you will want to be in the Timeline view. This will enable you to easily change the duration of your panels, add sound and transitions, and playback your animation with a display of the time or frames.
Enable the Timeline view in one of the following ways:
• In the top menu, select Windows > Timeline.• In Workspace toolbar, select Timeline.• Use the default keyboard shortcut [4].
Refer to Discovering the Interface > Adding a New View, on page 50 to learn how to add a view and manage it.
230

Chapter 9: Animatic Panel Duration
Panel DurationInitially when panels are created, they will be a default length. When it comes to your animatic, you will want to be more precise. Modifying the duration of a particular panel is key when working out timing. There are a few different ways to accomplish this.
This section is divided as follows:
• Setting the Panel Duration Visually, on page 231• Setting the Panel Duration in the Panel View, on page 232• Setting the Panel Duration from the Top Menu, on page 232• Split Panel at Current Frame, on page 233
Setting the Panel Duration VisuallyIn the Timeline view, it’s very easy to change the duration of a panel just by dragging to resize it. This way you can easily see the length of your panels in relation to one another.
There are two ways to resize a panel this way, depending on how you want the change to affect subsequent panels.
• Resizing a Panel in the Timeline and Shifting all Other Panels Down• Resizing a Panel While Only Affecting the Next Panel
Resizing a Panel in the Timeline and Shifting all Other Panels DownTo resize a panel in the Timeline and shift all other panels down:
Use this method when you are not concerned about modifying the position of all subsequent panels.
1. Place your mouse cursor over the end (right side) of your panel to display the resize icon.
2. Click and drag the edge of the panel to the left or right to set the desired length. Using this method, all subsequent panels will be shifted along with the selected one.
While you drag, the length of your panel will be displayed in this black box so that you can be more precise.
Resizing a Panel While Only Affecting the Next PanelTo resize a panel while only affecting the next panel:
Use this method if you need to keep subsequent panels exactly where they are.
1. Place your mouse cursor over the end (right side) of your panel to display the resize icon.
231

Storyboard Pro 2 User Guide
2. Hold the [Alt] key then click and drag the edge of the panel to the left or right to set the desired length. Only the panel directly after the selected panel will be changed.
Setting the Panel Duration in the Panel ViewA very accurate way to set the duration of a panel is to use the Panel view. The Panel view, amongst other things, will display exact timecode information for the selected panel.
To set the panel duration in the Panel view:
1. In the Timeline or Thumbnail view, select the panel you wish to adjust.2. Open the Panel view.3. In the Duration field, use the up and down arrows or directly type a value to make the selected panel longer or
shorter.
Setting the Panel Duration from the Top MenuOne more way to accurately modify the duration of a selected panel is via the top menu.
To change the duration of a panel via the top menu:
1. In the Timeline or Thumbnail view, select the panel you wish to modify.2. From the top menu, select Storyboard > Set Panel Duration.3. The Modify Scene Duration window opens.
4. Use the up and down arrows, or type directly into the time field to make the selected panel longer or shorter.5. Click on the OK button.
Set the duration of the panel here.
Displays the duration of the selected panel.
Click on theCollapse/Expnbutton to see theSelection Informationsection.
232
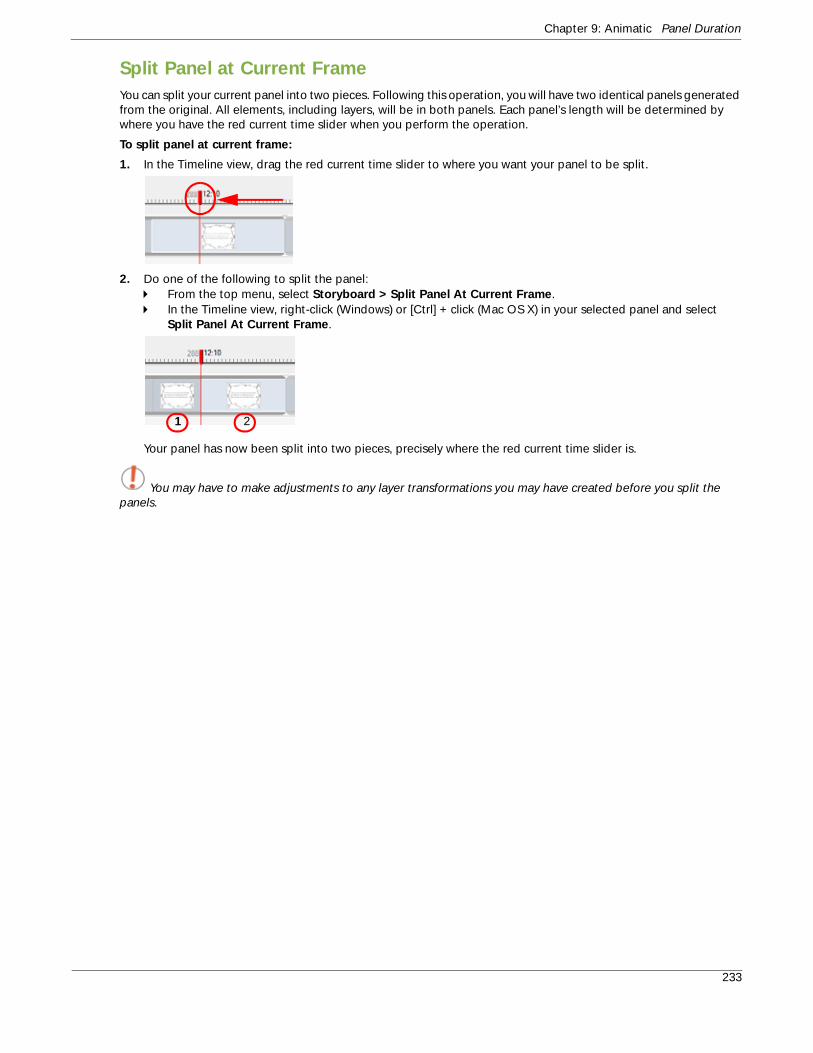
Chapter 9: Animatic Panel Duration
Split Panel at Current FrameYou can split your current panel into two pieces. Following this operation, you will have two identical panels generated from the original. All elements, including layers, will be in both panels. Each panel’s length will be determined by where you have the red current time slider when you perform the operation.
To split panel at current frame:
1. In the Timeline view, drag the red current time slider to where you want your panel to be split.
2. Do one of the following to split the panel:From the top menu, select Storyboard > Split Panel At Current Frame.In the Timeline view, right-click (Windows) or [Ctrl] + click (Mac OS X) in your selected panel and select Split Panel At Current Frame.
Your panel has now been split into two pieces, precisely where the red current time slider is.
You may have to make adjustments to any layer transformations you may have created before you split the panels.
1 2
233

Storyboard Pro 2 User Guide
CameraEach panel in your storyboard will, by default, have a camera frame set to the animation standard of 12 fields. In this section, you will see what the camera frame looks like and how to modify the size and position of the camera.
This section is divided as follows:
• Camera Status Bar, on page 235• Camera Tool, on page 235• Static Camera, on page 235
In the Camera view, the camera is displayed as a frame that matches the aspect ratio of your chosen resolution. Below, we see the camera frame with the 12 field grid displayed:
Refer to Discovering the Interface > Camera View, on page 38 to learn more about the Camera view.
As seen in the Camera view of Storyboard Pro.
Snapshot of the same scene exported to a bitmap image, with static camera preserved.
234

Chapter 9: Animatic Camera
Camera Status BarThe Camera Status Bar appears at the bottom of the Camera view and contains shortcuts to tools quite often used when at the animatic stage of the storyboarding process.
This Status Bar is not visible by default and can be enabled via the Storyboard Pro preferences under the Camera tab.
Refer to Discovering the Interface > Camera View, on page 38 to learn more about the Camera view’s status bar.
Camera ToolUse the Camera tool when you want to make any changes to the framing of your scenes or panels.
You can find the Camera tool in the Tools toolbar or from the top menu under Tools > Camera.
You will use the Camera tool to move the static camera and also when you are setting keyframes to animate it over time.
Static CameraThe term Static Camera is used to describe the framing of a entire scene, where there is to be no changes over time; when the Camera is not moving.
This section is divided as follows:
• Setting the Static Camera, on page 235• Copying the Static Camera from one Scene to Another, on page 237• Resetting the Static Camera, on page 238
Setting the Static CameraYou do not need to create keyframes when making changes to the static camera and the changes you make to the static camera will affect your entire scene.
To position the Static Camera:
1. In the Timeline view, select a panel within the scene that you want to adjust the Camera for.
2. From the Tools toolbar or the Tools menu, choose the Camera tool.
Once the Camera tool is active, your scene’s Camera frame will become visible and is represented by a black box. The default Camera frame will be set to 12 fields.
Once the static camera has been modified, it will be displayed in green in Camera view when the Camera tool is not active.
235

Storyboard Pro 2 User Guide
3. Use one of the following methods to modify the static camera:
To scale the static Camera, drag the top left corner of the frame when you see the Scale icon.
To rotate the Static Camera, drag the top left corner of the frame when you see the Rotation icon.
To move the Static Camera, drag the frame from the centre pivot point or the outer edge of the camera
frame when you see the Drag icon.
236

Chapter 9: Animatic Camera
Copying the Static Camera from one Scene to AnotherIf you need to reuse a camera position, you can copy and paste it from one scene to another. It is not necessary to have the Camera tool selected to perform this operation.
To copy the camera position from one scene and paste it into another:
1. In the Timeline view, select the scene from which you would like to copy the static camera.2. From the top menu, choose Storyboard > Copy Camera.
3. Once again from the Timeline view, select the scene to which you would like to paste the copied camera information.
4. From the top menu, choose Storyboard > Paste Camera.
The static camera for this scene is displayed here in green because the Camera tool is not active.
In this scene, the static camera is sill set to its default 12 fields, displayed here as a black frame.
Now this scene has the same static camera as the original.
237

Storyboard Pro 2 User Guide
Resetting the Static CameraYou can always revert to the original static camera.
1. In the Timeline view, click to the select the scene where you want to reset the static camera.
2. From the top menu, choose Storyboard > Reset Camera. You can also click on the Reset Camera button available in the extra buttons on the Storyboard toolbar.
Refer to Discovering the Interface > Toolbar Manager, on page 55 to learn how to customize your toolbars.
238

Chapter 9: Animatic Animating the Camera
Animating the CameraIn Storyboard Pro, you are able to enhance your animatics by adding camera movements to your scenes. Camera movements can be restricted to one panel, or be set to spread out along an entire scene.
Camera movements are created much in the same way you set the static camera frame, but you will work with keyframes in the Timeline view to be able to set the different camera positions over time. You will once again use the Camera tool to animate the camera.
An example of a camera movement would be if you wanted the camera to go from a wide shot and then zoom in to a close up.
This section is divided as follows:
• Camera Tool Properties, on page 239• Camera Keyframes, on page 240
Camera Tool PropertiesWhen the Camera tool is selected, its properties and options are displayed in the Tool Properties view. These options will be used when animating the camera.
Add Keyframe at the Beginning of Current PanelThis button will add a keyframe at the beginning of the currently selected panel.
Add KeyframeThis button will add a keyframe at the current frame. The current frame is determined by the position of the Timeline red Current Frame slider.
Add Keyframe at the End of Current PanelThis button will add a keyframe at the end of the currently selected panel.
Reset Camera AnimationThis button will delete all keyframes in the currently selected scene.
In this example, the camera starts further out (Position A) and zooms in to the character on the left (Position B).
239

Storyboard Pro 2 User Guide
Ease In/Ease OutUse these operations to set or change the easing properties of your camera animation.
Refer to Ease In/Ease Out, on page 240 to learn more about this feature.
Camera KeyframesCamera keyframes are what will enable you to modify the position of your camera and have it change over time. The camera keyframes are coordinates indicating the position of your camera on a particular frame. In order to create any camera movements, you must set at least two camera keyframes.
With Camera keyframes, you set the camera to go from one position in the frame to another, over a defined number of frames. You will also be able to control the velocity at which the camera attains its final position.
This section is divided as follows:
• Keyframes in the Timeline View, on page 240• Keyframes in the Camera view, on page 241• Creating Camera Keyframes, on page 241• Moving Keyframes in the Camera View, on page 243• Modifying the Trajectory With Control Points, on page 245• Moving Keyframes in the Timeline, on page 246• Keyframe Synching, on page 250• Easing, on page 252• Deleting Keyframes, on page 253• Resetting the Camera Animation, on page 253
Keyframes in the Timeline ViewKeyframes appear as grey diamonds (or half diamonds) in the Timeline view. The space between the keyframes in the Timeline view is the amount of frames it will take the camera to move from one keyframe to the next, determining the speed.
A keyframe that is selected in the Timeline view will be displayed in blue. Camera keyframes will be displayed in the Timeline view only, in a strip above the panel thumbnails.
A selected keyframe will be displayed as blue, while the others will be displayed as grey.
The first and last keyframes in a scene will be shown as half diamonds, while any in between will be full.
240

Chapter 9: Animatic Animating the Camera
Keyframes in the Camera viewIn the Camera view, when you’ve created a keyframe, your camera frame will be blue and there will be a blue dot to indicate the keyframe.
If you have more than one keyframe within a scene, you will see more blue dots here. Use these dots to select the keyframe when moving the frame in Camera view. If you did not modify the position of the camera frame for those keyframes, the order is ascending from left to right.
Refer to Moving Keyframes in the Camera View, on page 243 to learn more.
Creating Camera KeyframesIn order to create any animated camera for a scene, you will need at least two keyframes. Create these keyframes before you change the position of your camera if you plan to move it. Below are four methods to add keyframes to your Timeline view.
Adding a keyframe at the current frame:
1. In the Timeline view, drag the red Current Frame slider to the frame within your panel where you want your keyframe to be.
2. From the Tools toolbar or the Tools menu, choose the Camera tool.3. Do one of the following to add a camera keyframe at the current frame:
From the top menu, choose Storyboard > Add Camera Keyframe at Current Frame.
In the Tool Properties view, click the Add Keyframe button.
A keyframe will be added in your Timeline view, exactly where your red current frame slider was when you performed the operation.
241

Storyboard Pro 2 User Guide
Adding a keyframe at the beginning of the current panel:
1. In the Timeline view, select the panel where you want to add a keyframe.
2. From the Tools toolbar or the Tools menu, choose the Camera tool.3. Do one of the following to add a keyframe here:
From the top menu, choose Storyboard > Add Camera keyframe at beginning of current panel.
In the Tool Properties view, click the Add keyframe at beginning of current panel button.
A keyframe will be added in your Timeline view, at the beginning of the current panel.
Adding a keyframe at the end of the current panel:
1. In the Timeline view, select the panel where you want to add a keyframe.
2. From the Tools toolbar or the Tools menu, choose the Camera tool.3. Do one of the following to add a camera keyframe at the end of your panel:
From the top menu, choose Storyboard > Add Camera keyframe at end of current panel.
In the Tool Properties view, click the Add keyframe at end of current panel button.
A keyframe will be added in your Timeline view, at the end of the current panel.
Using Copy and Paste to add keyframes:
1. In the Timeline view, click to select a camera keyframe. It will become blue when selected.
2. From the top menu choose Edit > Copy Camera Keyframes. The default keyboard shortcut [Ctrl] + [C] (Windows) or [ ] + [C] (Mac OS X).
3. Move the red Current Frame Slider to the position within the same scene where you want to paste the keyframe.
242

Chapter 9: Animatic Animating the Camera
4. From the top menu choose Edit > Paste Camera Keyframes. The default keyboard shortcut [Ctrl] + [V] (Windows) or [ ] + [V] (Mac OS X).
This will work to copy/paste several keyframes at one time if you have several keyframes selected before you perform the operation.
Moving Keyframes in the Camera ViewThe position of the camera keyframes will be set much in the same way as the Static Camera; using the Camera tool in the Camera view. You will do this for every keyframe you have created, so that your camera will move from one keyframe to the next when played back.
Enabling the Camera Label in the Camera view can be very helpful when manipulating keyframes. Do this via the Camera view status bar.
To position Camera keyframes:
1. To display the Camera Status toolbar, select Edit > Preferences (Windows) or Storyboard Pro > Preferences (Mac OS X).
The Preferences panel opens.2. Go to the Camera tab.3. In the Options section, enable the Show Status Bar preference.4. Click on the OK button.
5. From the Tools toolbar or the Tools menu, choose the Camera tool.6. In the Camera view, click to select the camera keyframe you wish to modify. If you have more than one keyframe
within a scene, you will see more blue dots here. Use these dots to select the keyframe when moving the frame in Camera view. The order is ascending from left to right.
Selecting this dot would select camera keyframe A.
243

Storyboard Pro 2 User Guide
7. Use one of the following methods to modify the camera keyframe:
To scale the selected keyframe drag the top left corner of the frame when you see the Scale icon.
Once you let go of the mouse, your keyframe is set, and some blue arrows appear to indicate the direction of the camera movement. In this case, it would be zooming out from position A to position B.
To rotate the selected keyframe, drag the top left corner of the frame when you see the Rotate icon.
To move the selected keyframe, drag the frame from the centre pivot point or the outer edge of the camera
frame when you see the Drag icon.
At this point, if you wanted to, you could select the B position keyframe and move it to a new location. The scene, when played back, will contain a camera that moves from position A to position B.
In this case keyframe B was dragged to the right of keyframe A. When the Camera pans, it will go left to right.
244

Chapter 9: Animatic Animating the Camera
Modifying the Trajectory With Control PointsYou can change the camera path from one keyframe to the next by adding control points to the trajectory.
To add control points to a trajectory:
1. In the Timeline view, select the scene where you want to modify the camera trajectory.
2. From the Tools toolbar or the Tools menu, choose the Camera tool.3. In the Camera view, place the cursor over the trajectory between two keyframes.
4. When you see this icon , click and drag the trajectory to reshape it. A control point will be added when you let go of the mouse button.
Now, instead of the camera going from A to B in a linear fashion, there will be a slight curve to the trajectory.5. Click on the control point to move it and to reshape the trajectory if desired.
245

Storyboard Pro 2 User Guide
Deleting a Control Point
Control Points will be visible in the Timeline, but you can only move them in the Camera view. You will have to go to the Timeline, however, to delete a control point.
To delete a control point:
1. In the Timeline view, click the control point, represented by a small dot between your keyframes. Once selected, it will be blue.
2. Use the default shortcut [Delete] to remove the selected point.
Your trajectory will revert to it’s original shape after you delete the control point.
Moving Keyframes in the TimelineIf you need to change the position of a keyframe in the Timeline view, there are a couple different ways to do this. Note that camera keyframes can only be moved to a new location within the same scene. The two methods below are useful when you want to move a keyframe to a new location, or cut and paste a keyframe.
Dragging camera keyframes to a new location in the Timeline view:
1. In the Timeline view, click to select a camera keyframe. It will become blue when selected.2. Drag the selected keyframe left or right to choose a new position in time. You will only be able to drag it to a
new location within your current scene.
While you drag the keyframe, it’s position relative to the scene will be displayed in a black box. Also displayed is the number of frames off the original position the new keyframe will be located.
You can drag more than one keyframe at a time if you have several selected before you drag them.
Using Cut and Paste to move keyframes:
1. In the Timeline view, click to select a camera keyframe. It will become blue when selected.
On the left the current time, relative to the scene is displayed.
On the right are the number of frames you are moving this keyframe.
246

Chapter 9: Animatic Animating the Camera
2. From the top menu choose Edit > Cut Camera Keyframes. The default keyboard shortcut [Ctrl] + [X] (Windows) or [ ] + [X] (Mac OS X). Your keyframe will be removed from the Timeline view, but will be copied to the clipboard.
3. Move the red current frame slider to the position within the same scene where you want to paste the keyframe.4. From the top menu choose Edit > Paste Camera Keyframes. The default keyboard shortcut [Ctrl] + [V]
(Windows) or [ ] + [V] (Mac OS X).
This will work to cut/paste several keyframes at one time if you have several keyframes selected before you perform the operation.
247

Storyboard Pro 2 User Guide
Adjusting the Continuity, Tension and Bias Between Keyframes
You can adjust the Tension, Bias and Continuity parameters on Keyframes and Control Points by selecting the point in the Timeline view and using the Keyframes and Control Points toolbar.
• Continuity controls the smoothness of a transition between the segments joined by a point.
• Tension controls how sharply the path bends as it passes through a control point or keyframe.
• Bias controls the slope of the path so that it flows towards one side of the motion point or the other.
A Continuity of -1 sharpens the transition on either side of the keyframe.
A Continuity of +1 rounds out the transition, creating two gentle curves on either side of the keyframe.
A Tension of -1 increases the curve on either side of the keyframe.
A Tension of +1 sharpens the curve on either side of the keyframe.
A Bias of -1 favours the left side of the keyframe.
A Bias of +1 favours the right side of the keyframe.
248

Chapter 9: Animatic Animating the Camera
To adjust the Continuity, Tension and Bias parameters:
1. In the Tools toolbar, select the Camera tool.2. In the Timeline view, select the Keyframe or Control Point you want to adjust.3. In the Keyframes and Control Points toolbar, adjust the Continuity, Tension and Bias parameters.
If the Keyframes and Control Points toolbar is not visible, from the top menu choose Windows > Toolbars > Keyframes and Control Points.
If you find that you are using the same Continuity, Tension and Bias settings, you can set a preference to remember your settings.
To adjust the Keyframes and Control Points default preferences:
1. From the top menu, select Edit > Preferences (Windows) or Storyboard Pro > Preferences (Mac OS X).
The Preferences window opens.2. From the top of the Preferences window, select the Camera tab and navigate to the bottom.
3. Type in the defaults for Tension, Continuity and Bias, based on your preferred settings.4. Click on the OK button.
Keyframe Snapping
If you turn on keyframe snapping, your keyframes will snap to the beginning and end of each panel when dragging.
To turn on/off Keyframes Snapping:
1. In the Timeline view, right-click (Windows) [Ctrl] + click (Mac OS X) the area where the camera keyframes are.2. From the quick access menu, select Keyframes Snapping.
If the function is enabled, there will be a check mark visible.
249

Storyboard Pro 2 User Guide
Spreading Camera Motion Across Panels of a Scene
A camera movement is not restricted to a panel. Keyframes for a particular camera movement can span multiple panels within the same scene.
Modifying a camera movement to span across panels of a scene:
1. In the Timeline view, select the panel that contains the camera movement you would like to span multiple panels.
2. Select the keyframe you want to move to a new panel.3. Drag the selected keyframe to another panel within the scene.
Keyframe SynchingWhen you change the duration of your panels, add, delete or drag and drop scenes and panels, it will affect the placement of your keyframes. You have 3 keyframe synching options that will affect keyframes when changing the duration of panels. Depending on what option you have set, your keyframes will be repositioned accordingly.
The following examples demonstrate resizing panels by dragging, but the options will affect your keyframes in the same way, regardless of what method you use to change the duration of your panel.
The three options for keyframe synching are:
• Setting Keyframe Synching to None• Setting Keyframe Synching to Relative to Panels• Setting Keyframe Synching to Relative to Shot
Setting Keyframe Synching Options
Where to change keyframe synching settings:
1. In the Timeline view, right-click (Windows) or [Ctrl] + click (Mac OS X) the area where the camera keyframes are and locate the three keyframe synching options.
2. Choose one of the three options. The active selection will have a check mark beside it.
250

Chapter 9: Animatic Animating the Camera
Setting Keyframe Synching to None
Having your keyframe synching set to None will cause your keyframes to remain exactly where they are when you change the duration of panels. You will lose any keyframes that are no longer within the range of the scene.
Setting Keyframe Synching to Relative to Panels
When you have the Relative to Panels option selected, all the keyframes within the selected panel will be repositioned, relative to where they were placed in the panel. When a panel is deleted, all keyframes within the deleted panel will also be deleted.
The panel at its original length.
The panel, after it has been shortened. The keyframe that was once within the scene, no longer was and therefore was deleted. All other keyframes in the scene are unaffected.
The panel, after it has been lengthened. All other keyframes in the scene are unaffected.
The panel, after it has been shortened. The keyframe within this panel is repositioned relative to where it was in the panel. All keyframes outside current panel are unaffected.
The panel, after it has been lengthened. The keyframe within this panel is repositioned relative to where it was in the panel. All other keyframes in the scene are unaffected.
The panel at its original length.
251

Storyboard Pro 2 User Guide
Setting Keyframe Synching to Relative to Shot
When you have the Relative to Shot option selected, all the keyframes within the selected shot will be repositioned, relative to where they were placed in the shot.
EasingFor effect, you can adjust your camera movements so that they ease into or ease out of the keyframes.
With the Camera tool selected, the Ease In/ Ease Out operations become available in the Tool Properties view.
Ease In
To set ease in for a keyframe:
1. In the Timeline view, click to select the keyframe you wish to set ease in parameters.
2. From the Tools toolbar or the Tools menu, choose the Camera tool.3. In the Ease In section of the Tool Properties view, use the arrows or enter the duration of the ease in after the
first frame in which the gradual change in camera or layer movement begins. For example, if you want to slowly accelerate to the normal camera or layer speed from frame 1-10, enter a value of 10.
The shot, after it has been shortened. All keyframes within this scene are repositioned relative to where they are in the shot.
The shot after it has been lengthened. All keyframes within this shot are repositioned relative to where it was in the shot.
The shot at its original length.
252

Chapter 9: Animatic Animating the Camera
Ease Out
To set ease out for a keyframe:
1. In the Timeline view, click to select the keyframe you wish to set ease out parameters.
2. From the Tools toolbar or the Tools menu, choose the Camera tool.3. In the Ease Out section of the Tool Properties view, use the arrows or enter the duration of the ease out after the
first frame in which the gradual change in camera or layer movement begins.4. Enter the number of frames before the last frame in which the change in camera or layer movement is gradual.
Deleting KeyframesTo delete keyframes from the Timeline view:
1. Select the keyframe or keyframes you wish to delete.2. Do one of the following:
From the top menu, select Storyboard > Remove Camera Keyframe at Current Frame.From the top menu, select Edit > Delete Selected Camera Keyframes.Use the default keyboard shortcut [Delete].
Resetting the Camera AnimationIf necessary, you can remove all the keyframes in your scene, and revert back to the original static camera.
To reset Camera Animation:
1. In the Timeline view, click to select the scene you want to reset the camera animation for.2. Do one of the following:
Select the Camera tool, and in the Tool Properties view, click on the Reset Camera Animation button.From the top menu, select Storyboard > Reset Camera.
At this point, all your camera keyframes for the selected scene will be deleted and your scene’s static camera will be reset.
253

Storyboard Pro 2 User Guide
Animating LayersLike the camera, individual layers can be animated in your panels. This is helpful to test the potential animation of scene elements. In Storyboard Pro, you will be able to set the position of a layer at the beginning of a panel and set a different position for the end. As the panels play back, the layer will move from position A to position B.
To animate a layer, you will use the First and Last Frame Transformation tools with help from the Pivot tool.
This section is divided as follows:
• Pivot Tool, on page 254• Setting the Pivot for a Layer, on page 255• First Frame Transformation and Last Frame Transformation Tools, on page 256• Set First and Last Frame Positions, on page 257• Adjust First and Last Frame Transformation Positions, on page 259
Pivot ToolYou can use the Pivot tool to change the point of rotation for the selected layer. The Pivot tool will be used in conjunction with the layer transformation tools.
With the Pivot tool selected, it’s options and operations will become visible in the Tool Properties view.
Snap to ContourThe Snap to Contour option will snap the selected pivot point to any line you position it on.
Snap and AlignThe Snap and Align option lets you snap the selected pivot point to any existing line while displaying temporary rulers as a guide that you can also snap your pivot point to.
Reset PivotThis operation will reset your current layer’s pivot point to it’s original position at the centre of the camera frame.
254

Chapter 9: Animatic Animating Layers
Setting the Pivot for a LayerIf you plan to animate a layer, it’s wise to first set that layer’s pivot point. If you don’t intend to animate a layer, there is no need to worry about setting it’s pivot.
To set the pivot for a layer:
1. In the Timeline view, click to select the panel where you want to animate a layer.2. In the Camera view, click to select the layer you want to animate.
3. From the Tools toolbar or the Tools menu, choose the Pivot tool.
As soon as the Pivot tool is active, the currently selected layer’s pivot point will become visible as a blue circle
and cross hair . If there has been no changes, it will be located in the centre of the frame.
4. Click in the Camera view to set the pivot for the selected layer.
Now the Layer Transformation tools will use this point as reference when applying the transformations.
The pivot has been moved to the centre of the character. This will be helpful if you decide to scale or rotate the layer.
255

Storyboard Pro 2 User Guide
First Frame Transformation and Last Frame Transformation Tools
The First Frame Transformation and Last Frame Transformation tools are two separate tools that will set either the first or last position for a layer when you want it to move over the length of your panel. You can find them in the Tools toolbar or in the top menu under Tools > First Frame Transform or Last Frame Transform.
With the First Frame Transformation and Last Frame Transformation tools selected, their operations are displayed in the Tool Properties view. Both tools have the same operations.
Flip Horizontal and Flip VerticalUse these buttons when you want to flip your layer horizontally or vertically.
Rotate 90 degrees CW and Rotate 90 degrees CCWUse these buttons when you want to rotate your layer in 90 degree increments either clockwise or counter clockwise.
Ease In and Ease OutModifying these numbers will change the velocity of the layer movement.
Refer to Ease In and Ease Out, on page 259 to learn more.
Hold Start and Hold EndModifying these numbers will change how long the layer will be held without moving, at the beginning and end of the panel.
Refer to old, on page 259 to learn more.
First Frame Transformation Tool
Last Frame Transformation Tool
256

Chapter 9: Animatic Animating Layers
Set First and Last Frame PositionsAnimating a layer is very simple using the First Frame Transformation and Last Frame Transformation tools.
Set the first position for your layer’s animation:
1. In the Timeline view, select the panel which contains the layer you want to animate.2. In the Camera view, click to select the layer to animate.
3. From the Tools toolbar or the Tools menu, choose the First Frame Transformation tool.
In the Camera view, your layer will be framed in blue.
In the Timeline view, your current frame will become the first frame of your current panel.
4. Using the transformation handles, you can scale, rotate and move your layer wherever you want.
Set the Last Position for your layer’s animation:
1. In the Timeline view, select the panel which contains the layer you want to animate.
257

Storyboard Pro 2 User Guide
2. In the Camera view, click to select the layer to animate.
3. From the Tools toolbar or the Tools menu, choose the Last Frame Transformation tool.
In the Camera view, your layer will be framed in blue.
In the Timeline view, your current frame will now be the last frame of your current panel.
4. Using the transformation handles, you can scale, rotate and move your layer wherever you want.
Now when played back, your panel will show the layer you set first and last frame transformations for will be animated.
258

Chapter 9: Animatic Animating Layers
Adjust First and Last Frame Transformation PositionsOnce you set your first and last layer transformation positions, there are several ways to adjust them.
Ease In and Ease OutThe Easing function will allow you to set ease in and ease out cushioning for your layer transformations. This will help adjust the timing of the layer movement.
To set ease in/out for a layer transformation:
1. In the Timeline view, click to select the panel where your layer transformation is located.2. In the Camera view, click to select the layer you wish to modify the ease in and ease out for.
3. From the Tools toolbar or the Tools menu, choose one of the Layer Transformation tools .4. In the Ease In or Ease Out section of the Tool Properties view, use the arrows or enter the duration of the ease in
after the first frame in which the gradual change in layer movement begins. For example, if you want to slowly accelerate to the normal layer speed from frame 1-10, enter a value of 10.
oldUse the Hold function to allow your layer transformations to be delayed at the beginning or end of your panel. This will help adjust the timing of the layer movement.
To create a hold at the beginning of the motion:
1. In the Timeline view, click to select the panel where your layer transformation is located.2. In the Camera view, click to select the layer you wish to modify the hold for.
3. From the Tools toolbar or the Tools menu, choose one of the Layer Transformation tools.4. In the Hold Start section of the Tool Properties view, enter the number of frames you would like to hold the layer
before it starts to move.
To create a hold at the end of the motion:
1. In the Timeline, click to select the panel where your layer transformation is located.2. In the Camera view, click to select the layer you wish to modify the hold for.
3. From the Tools toolbar or the Tools menu, choose one of the Layer Transformation tools .
259

Storyboard Pro 2 User Guide
4. In the Hold End section of the Tool Properties view, enter the number of frames before the end of the panel you would like your layer transformation to end.
Copy End Position from Start PositionUses the position of the first frame from the current layer and pastes it over the last frame.
To copy the end position from the start position:
1. In the Timeline view, select the panel you want to copy the start position from.2. From the top menu, choose Layer > Copy Layer End Position from Start Position.
Copy Start Position from End PositionUses the position of the last frame from the current layer and pastes it over the position of the first frame.
To copy the start position from the end position:
1. Select the layer you want to copy the end position from.2. From the top menu, choose Layer > Copy Layer Start Position from End Position.
Spread Layer MotionYou can spread the current layer motion across all panels in the same shot or a specified number of adjacent panels after the current panel in the same shot.
A new layer will be added and the drawing will be duplicated for those panels that do not have the same name in the defined range.
How to spread the motion from one panel to more than one panel:
1. In the Timeline view, select the layer with the motion you want to spread.2. Do one of the following:
Select Layer > Spread Layer Motion.
In the Layer Toolbar’s extra buttons, press the Spread Layer Motion button.
The Spread Layer Motion dialog box opens.
3. Do one of the following:To spread layer motion over all panels in the same shot, select All panels in the same shot.
ORTo spread layer motion a specified number of adjacent panels after the current panel in the same shot, select Next panel(s) and enter or select the number of adjacent panels.
Reset TransformationTo reset your layer animation back to none, follow these steps.
1. In the Timeline view, select the layer you want to reset the transformations for.2. From the top menu, select Layer > Reset Transform.
260

Chapter 9: Animatic Sound
SoundWhen you decide that you want to add sound to your storyboard, you must first prepare the sound outside Storyboard Pro. To work with sounds in Toon Boom Storyboard Pro, add one or more sound tracks, into which you import the sound sequences.
You can then organize the sounds by organizing sound tracks, mixing sound levels and editing the part of the sound sequence you will use.
You can preview your panels with sound at any time, by playing back an animatic of the current panel or the entire storyboard using the controls in the Play toolbar.
To import sounds and view sound tracks, display the Timeline workspace.
This section is divided as follows:
• Managing Sound Tracks, on page 261• Adding and Deleting Sound Sequences, on page 263• Sound Display, on page 264• Sound Scrubbing, on page 266• Adjusting the Sound Length, on page 266
Managing Sound TracksYou can create a sound track in which you can import one or more sounds. You can add an unlimited number of tracks to your sound track to help you organize your work. For instance, you can have a track for all dialogue or a separate track for each character’s dialogue. You can create a track for ambient sound, music or significant sound effects.
This section is divided as follows:
• Adding a Sound Track, on page 261• Muting a Sound Track, on page 262• Linking a Sound Track, on page 262• Deleting a Sound Track, on page 263
Adding a Sound TrackYou can add new sound tracks to your project. You must work in the Timeline view.
To add a sound track:
1. Display the Timeline view.2. Do one of the following:
Select Sound > New Sound Track.Right-click (Windows) or [Ctrl]-click (Mac OS X) the area below the Timeline thumbnails and select New Sound Track.
In the Sound toolbar, press New Sound Track button.
After you have added a new sound track you are ready to import a sound.
Refer to Import Sound, on page 275 for more information.
261

Storyboard Pro 2 User Guide
Muting a Sound TrackIf you would like to mute all or some of the sound tracks in your project, you can do one of the following.
To turn on and off the sound for all sound tracks:
In the Playback toolbar, click the Sound button. When it is depressed, the sound is on.
To turn on the sound of selected sound tracks:
1. In the selected sound track, click the Sound On/Off button to turn that track’s sound on or off. Layers with sound will display the Sound On button to show its sound is on.
Linking a Sound TrackYou can link a sound track to the current panel to keep sound sequences in sync during editing. Once linked, you can unlink the sound track at any time from the panel. You must work in the Timeline view.
To link a sound track to the current panel:
1. In the Timeline view, select the sound track you want to link to the current panel.2. In the selected sound track, click the link button to link that track’s sound sequences to the current panel. Sound
tracks linked to a panel will display the Link button to show its link is on.
To unlink a sound track from the current panel:
1. In the selected sound track, click the Link button to unlink that track’s sound sequences from the current panel. Sound tracks that are not linked to a panel will display the Unlink button to show its link is off.
Sound on for selected sound track. Sound off for selected sound track.
Sound linked for selected sound track.
Sound unlinked for selected sound track.
262

Chapter 9: Animatic Sound
Deleting a Sound TrackYou can delete a sound track at any time. When you delete a sound track, all of the sounds included in this sound track are also deleted. You must work in the Timeline view.
To delete a sound track:
1. In the Timeline view, select the sound track you want to delete.2. Do one of the following:
Select Sound > Delete Current Sound Track.Right-click (Windows) or [Ctrl]-click (Mac OS X) the sound track and select Delete Current Sound Track.
In the Sound toolbar, press the Delete Current Sound Track button.
The selected sound track is deleted from the Timeline view.
Adding and Deleting Sound SequencesOnce you have created sound tracks, you can now import sound sequences. Sound sequences would be the already edited bits of sound you have in digital format, ready for import.
This section is divided as follows:
• Importing a Sound Sequence, on page 263• Deleting a Sound Sequence, on page 264
Importing a Sound SequenceYou can import a sound sequence (WAV, AIF, AIFF, or MP3) into a sound track at the first frame or at the current frame. If the sound sequence doesn’t already exist in your project, Storyboard Pro copies the file from its present location to the audio folder in your storyboard project folder. You must work in the Timeline view.
To import a sound sequence:
1. In the Timeline view, select the sound track where you want to import the sound.2. Do one of the following:
Select Sound > Import Sound Sequence.Right-click (Windows) or [Ctrl]-click (Mac OS X) the sound track and select Import Sound Sequence.
In the Sound toolbar, press Import Sound Sequence button.
The Import Sound Sequence dialog box opens.
3. Select the sound sequence you want to import by typing in the file path or using the Browse button to search for the file you want to use.
4. In the Target Sound Track section, specify whether you want to create a sound track and import the sequence into it or import the sequence into the selected sound track.
263

Storyboard Pro 2 User Guide
5. In the Target Frame section, select at which frame the sound will begin. If you selected Current Sound Track option, specify the Import Rule:
Overwrite Existing Sound Sequences: by default, when you import a sound, it will replace sounds that exist in the target frames.Fill Next Available Frames: import the sound sequence into the first available empty frames after any existing sound selection.
6. Select the Set as default and don’t show dialogue again option if you want to use the current settings the next time you import sound and open a browse box to select a sound automatically.
Deleting a Sound SequenceFollow these steps to delete a sound sequence.
1. In the Timeline view, select the sound sequence or sequences you wish to delete.2. Do one of the following:
Right-click (Windows) or [Ctrl] + click (Mac OS X) the sound sequence and select Delete Selected Sequences.
In the Sound toolbar, press Delete Sound Sequence button.Use the default keyboard shortcut [Delete].
Sound DisplayThese are the different features that will help make things clear while working with sound.
This section is divided as follows:
• Show Waveform, on page 264• Show Volume Envelope, on page 265
Show Waveform1. To show the waveform of the sound sequences, do one of the following:
From the top menu, select Sound > Show Waveform or right-click (Windows) or [Ctrl] + click (Mac OS X) in the sound track area of the Timeline view and choose Show Waveform.
In the Sound toolbar’s extra buttons, click on the Show Waveform button.
Now the sound is displayed as waveform.
264

Chapter 9: Animatic Sound
Show Volume EnvelopeOnce the waveform is displayed, you can also choose to display the playback sound level for each sound sequence.
To display and adjust the volume levels of a sound sequence:
1. From the top menu, select Sound > Show Waveform. This option must be set first.From the top menu, select Sound > Show Volume Envelope or right-click (Windows) or [Ctrl] + click (Mac OS X) in the sound track area of the Timeline view and choose Show Volume Envelope. In the Sound
toolbar’s extra buttons, click on the Show Volume button.
A blue line, indicating the sound level, is displayed for each sound sequence. White squares mark the points at which the sound changes to a new level.
2. Click the line to add a new marker, or drag an existing marker to adjust the volume at a specific frame.
The slope of the line indicates how quickly the sound changes from one level to another. If the slope is steep, the change is abrupt. If the slope is less inclined, the volume changes at a more gradual rate.
265

Storyboard Pro 2 User Guide
Sound ScrubbingTurn on Sound Scrubbing to listen to the sound as you drag the red Current Frame slider forward and backward.
To turn on sound scrubbing:
From the top menu select Sound > Sound Scrubbing or right-click (Windows) or [Ctrl] + click (Mac OS X) of the Timeline view and choose Sound Scrubbing. In the Sound toolbar’s extra buttons, click on the Sound
Scrubbing button.
With Sound Scrubbing, your sound will play forward or backwards as you scrub through the Timeline view.
Adjusting the Sound LengthMost of the editing must be done to your sound before it is imported into Storyboard Pro. There are however, a few tools to help make minor adjustments.
This section is divided as follows:
• Shortening and Extending Sound Sequences, on page 266• Split Sound Sequence at Current Frame, on page 267
Shortening and Extending Sound SequencesYou can snip the beginning and/or end of the sound sequence if there is too much in your project.
1. Verify that the volume is on for the view and the sound track you want to work with. You may find it easier to edit the sound by customizing the display to show the sound’s waveform.
2. Do one of the following.Drag the cursor that appears at the start frame to the position where you want to set the new start of the clip. This will cut the beginning of the original file from playback.
Drag the cursor that appears at the end frame to the position where you want to the clip to end. This will cut the end of the original file from playback.
You can play back the sound to hear the edited version of the sequence. The original sound sequence is not modified. You can drag the boundaries of the edited sequence closer to or all the way back to their original positions to use more of the sound sequence.
266

Chapter 9: Animatic Sound
Split Sound Sequence at Current FrameYou can cut one clip into many pieces if you wish to move parts of a sound to another location.
To split a sound sequence in two:
1. Move the red Current Frame slider to the frame where you want to begin the second sound sequence that will result from the split.
2. From the top menu, select Sound > Split Sequence at Current Frame or right-click (Windows) or [Ctrl] + click (Mac OS X) in the sound track area of the Timeline view and choose Split Sequence at Current Frame.
Now the sound sequence has been split, and both parts can be moved and controlled independently.
267

Storyboard Pro 2 User Guide
TransitionsBy default, transitions between scenes are defined as cuts - the action in the panel at the end of a shot finishes and immediately displays the next scene. In Storyboard Pro, you can add one of two custom transitions between scenes.
• Wipe• Dissolve
This section is divided as follows:
• Creating Transitions, on page 268• Modifying a Transition, on page 270• Deleting a Transition, on page 270
Creating TransitionsIt’s simple to add a transition between scenes. Once created, then you can customize it.
To create a transition between two scenes:
1. In the Timeline view, click to select a panel in the scene you want to add a transition after.
2. Do one of the following to add a transition after the current scene:
From the Storyboard toolbar, choose the Create Transition button .Select Storyboard > Create Transition from the top menu.Right-click (Windows) or [Ctrl]-click (Mac OS X) the scene thumbnails and select Add Transition.
268

Chapter 9: Animatic Transitions
A transition is inserted between shots. By default, the transition is a wipe. A transition can be changed to a dissolve, by selecting the transition, and either double-clicking it or changing its type in the Panel tab. You can also use the Panel tab to change the duration of the transition.
A Wipe Transition is shown here. The last panel of the first scene gradually glides by, revealing the first panel of the second scene.
A Dissolve Transition is shown here. The last panel of the first scene gradually faces into the first panel of the second scene.
269

Storyboard Pro 2 User Guide
Modifying a TransitionThere are a several ways to modify a transition once you have created it.
Change Transition TypeChange the Transition type:
1. In the Timeline or Thumbnails view, click to select the transition.2. Do one of the following:
In the Panel view, you will see the options for the selected transition. From the Type drop-down menu, choose Wipe or Dissolve.
Double-clicking on a transition in the Timeline view will change the transition type from either Wipe to Dissolve or vice versa.
Change Transition DurationWhen resizing transitions in the Timeline view, the original ending frame will be preserved, while all the panels touching it will be modified.
Change the Transition duration:
1. In the Timeline view, click to select the transition.2. Do one of the following:
Change the duration of a transition in the Timeline view by dragging either end to lengthen or shorten.
From the top menu, choose Storyboard > Change Transition Duration.
The New Transition Duration opens.
3. In the New Transition Duration box, type in a new duration in frames.4. Click on the OK button.
Deleting a TransitionIt’s simple to remove any transitions that are no longer necessary.
1. Click to select the Transition you wish to remove.2. Do one of the following:
Use the default keyboard shortcut [Delete] to remove currently selected transition.Right-click (Windows) or [Ctrl]-click (Mac OS X) the transition and choose Delete Transition from the menu.From the top menu, choose Storyboard > Delete Transition.
Type of transition and duration or visible in the panel view.
270

Chapter 9: Animatic Playing Back Your Animatic
Playing Back Your AnimaticYou can preview your project as an animatic in Toon Boom Storyboard Pro at any time during its development process. You will be able to preview visual content, including transformations, transitions and have it synchronized with sounds using the Playback toolbar.
To preview your animatic in Toon Boom Storyboard Pro:
1. In the Playback toolbar, turn on the Sound button. It is on when it appears pressed in.
2. If you want to see how the shots will look with dynamic camera movement, turn on the Camera Preview button. It is on when it appears pressed in. You will need this option on to preview Camera moves and transitions.
3. In the Timeline or Thumbnail view, select the panel where you want the playback to begin.
4. In the Playback toolbar, click on the Play Selection or Play buttons.
5. To play your project in a continuous loop, click on the Loop button.6. You may also scroll through the Timeline view by dragging the red current frame slider.
271

Storyboard Pro 2 User Guide
PreferencesWhen preparing your animatic in Storyboard Pro, there are preferences you can set to help you work more efficiently.
To open the Preferences panel:
Windows: Select Edit > Preferences.Mac OS X: Select Storyboard Pro > Preferences.You can also use the default keyboard shortcut [Ctrl]+[U] (Windows) or [ ]+[U] (Mac OS X).
This topic is divided as follows:
• Global UI, on page 272• Camera, on page 273• Tools, on page 274• Import/Export, on page 275
Global UI
Display Duration in Time Code Format• Thumbnail Panels in Drawing and Overview Layouts: When turned on this displays the duration in
Timecode format in the Thumbnail panel headers. When turned off the duration is displayed in frames.• Timeline Play head: When turned on this displays the duration in Timecode format when dragging the
current frame slider in the Timeline view. When turned off the duration is displayed in frames.• Timeline Ruler: When turned on this displays the duration in Timecode format in the Timeline ruler. When
turned off the duration is displayed in frames.• Changing Duration Overlapping Timing Info in Timeline View: When turned on this displays the duration
in Timecode format when adjusting the length of a panel in the Timeline view. When turned off the duration is displayed in frames.
272

Chapter 9: Animatic Preferences
Camera
Options• Show Status Bar: Checking this box will display the handy status bar at the bottom of the Camera view.
Point of View• Point of View: Use the drop down menu here to choose how your artwork will be framed in the Camera
view when you go from one panel or scene to the next. The point of view, refers to the zoom level, rotation and transformation of your camera view, not your actual camera keyframes.
Project Level: Select Project Level to have one global point of view for the entire project.Scene Level: Select Scene Level to have one point of view per scene.Panel Level: Select Panel Level to have one point of view per scene.
• Reset View Mode: Choose the behaviour of Storyboard Pro when you choose to use the Reset View command in the Camera view. These options will only affect your project if you are working in Panel Point of View mode. You have four options:
Reset View to Drawing area: This will reset the view to include the original drawing area.Reset View to Camera Overview: This will reset the view to include an overview of the camera movement in the panel.Reset View to Camera Start: This will reset the view to the frame the in position of your camera.Reset View to Camera End: This will reset the view to the frame the out position of your camera.
• Enable Global Layer Navigation: Enable this option to keep layer selection when navigating through panels.
273

Storyboard Pro 2 User Guide
Keyframes and Control Points• Default Tension: Continuity controls the smoothness of a transition between the segments joined by a
point. Enter a value between -1 and 1 to be used as the default for keyframes and control points.• Default Continuity: Tension controls how sharply the path bends as it passes through a control point or
keyframe. Enter a value between -1 and 1 to be used as the default for keyframes and control points.• Default Bias: Bias controls the slope of the path so that it flows towards one side of the motion point or the
other. Enter a value between -1 and 1 to be used as the default for keyframes and control points.
Tools
Transform• Transform Tool Uses Drawing Pivot (Requires relaunch): When enabled the Layer Transformation tool’s
pivot will be at the centre selected layer’s frame. When disabled, the Last Frame Transformation and First Frame Transformation tools’ pivot is initialized at the centre of the selected layer’s bounding box.
Transform Tool Uses Drawing Pivot on Transform Tool Uses Drawing Pivot on
274

Chapter 9: Animatic Preferences
Import/Export
Import Sound• Use Default Sound Import Settings and Do Not Show Dialogue: Use this option to prevent or allow the
opening of the import sound file settings dialogue when importing a sound file. Enabled, the settings dialogue will not open, and default settings will be used. When disabled, the settings dialogue will open every time, and allow you to adjust settings every time.
275

Storyboard Pro 2 User Guide
276

Chapter 10 Storyboard Supervision
Toon Boom Storyboard Pro goes beyond the storyboard and animatic creation tasks. It also provides useful tools for the supervision of the storyboarding project.
Project managers, storyboard supervisors and artistic directors now have an efficient supervision tool to help them track the changes and communicate their feedback, corrections and such to the storyboard artists.
This chapter is divided as follow:
• Tracking Changes, on page 278• Voice Annotations, on page 282
277

Storyboard Pro 2 User Guide
Tracking ChangesIn Toon Boom Storyboard Pro, you can track changes in the storyboard’s panels. This allows the storyboard artist to integrate any comments the supervisor has made, and the supervisor can easily track any changes and validate or comment on them.
• Auto Tracking Mode, on page 278• Track Changes By Date, on page 279• Validating Changes, on page 280
Auto Tracking ModeTo make changes and corrections easier in a storyboard project, you can enable the Auto Tracking Mode. This feature automatically detects and adds a visual notification in the Thumbnails and Timeline views.
To enable Auto Tracking Mode:
In the top menu, select Storyboard > Panel Tracking > Auto Tracking Mode.
Once the Auto Tracking Mode is enabled and you edit a panel, a yellow rectangle will appear around the panel in the Thumbnails and Timeline views. This visual indicator allows the supervisor to rapidly locate any panels which have changed. A new temporary caption field will be added to the tracked panel Panel view.
You can add notes to the Revision Notes caption. Note that the text you type here, will also be displayed in the Track Changes dialog box during the validation process.
Refer to the Validating Changes section to learn more about this.
278

Chapter 10: Storyboard Supervision Tracking Changes
Track Changes By DateYou can also track changes by making use of the Track Changes by Date feature. If a storyboard becomes very large it may be easier to track changes that have been made on a specific date. This dialog box contains options to help you track changes even more efficiently.
To track changes by date:
1. In the top menu, select Storyboard > Panel Tracking > Track Changes by Date.
The Search by Date dialog box opens.
2. Use the From and To fields to define a particular time range to track changes in. If you want to track changes
done on one specific day, just place that day’s date in both the From and To fields. Push on the From button to select the first date.
The Select Date dialog box opens.
Only the dates at which a change occurred will be available. The other dates will be greyed out.3. Select the first date and click on the OK button.4. Repeat these steps to select the To date.
5. Once you set up your dates, the information is updated in the space below:
The first line displays the number of panels found in the storyboard that have been modified during the defined time range, and the panel that is currently selected.
In this example, 5 panels fit the description, and the first panel out of these 5 is the one currently selected.
The second line displays information concerning the currently selected panel, such as which scene it is part of, the name of the panel and the date it was last modified.
6. Use the Next and Previous buttons to jump from one modified panel to the other.
279

Storyboard Pro 2 User Guide
7. You can use the drop-down menu in the bottom-left corner to modify the status of the selected panel.
Click on the black arrow to open the drop-down menu and select the option you want:Mark as Changed: This option marks the currently selected panel as being edited on the current date; this is the default option. Simply click on the button to activate it, no need to open the drop-down menu.
Mark Scene as Changed: This option marks the scene of the currently selected panel as being edited on the current date.
Mark All as Changed: This option marks all of the storyboard panels as being edited on the current date.
Validating ChangesWhen you use the Auto Tracking Mode feature, you can use the Validate Changes option to follow up on these changes.
To validate changes:
1. In the top menu, select Storyboard > Panel Tracking > Validate Changes.
The Track Changes dialog box opens.
Useful information is displayed on the top part of the dialog box:The first line displays the number of panels found in the storyboard that have been modified while the Auto Tracking Mode was enabled, as well as which of the panels that fits the description is currently selected. The second line displays information concerning the currently selected panel, such as which scene it is part of, the name of the panel and the date it was modified.
2. You can use the Notes field to enter text about the selected panel. This information will be available in the tracked panel Panel view in the Revision caption. If notes were added in the Revision Notes caption field, they will be displayed in the Revision Notes field of the Track Changes dialog box.
Note that this caption is temporary, it will be removed when the change is validated.
280

Chapter 10: Storyboard Supervision Tracking Changes
3. Use the Validate drop-down menu to select a validating option:Validate: This option validates the currently selected panel. This is the default option, simply click on the button to activate it, there is no need to use the drop-down menu.
Validate All: This option validates all of the panels in the storyboard. Click on the arrow button to display the drop-down menu and activate the command.
Validate Scene: This option validates the scene that the currently selected panel is part of. Click on the arrow button to display the drop-down menu and activate the command.
4. Use the Next and Previous buttons to navigate from one tracked panel to the other.
Refer to the Auto Tracking Mode section to learn about the Auto Tracking Mode feature and how to enable it.
281

Storyboard Pro 2 User Guide
Voice AnnotationsIn Toon Boom Storyboard Pro, you can provide the storyboard artists with voice annotations as well as written notes.
• Recording Voice Annotations, on page 282• Listening to Voice Annotations, on page 283• Deleting Voice Annotations, on page 283
Recording Voice AnnotationsRecording a voice annotation is quite simple. All you need is a microphone correctly connected to your computer and Storyboard Pro.
To record voice annotations:
1. Verify that you have a working voice recording device and that it is correctly connected to your computer.2. In the Thumbnails view, select the panel you want to leave a voice annotation on.3. Display the Panel view.
If the Panel view is not part of your current workspace, select Windows > Panel from the top menu.
4. In the Voice Annotations section, click on the Record Voice Annotation button.
The Record a Voice Annotation dialog box opens.
Press on the Record button to begin recording your voice.
Press on the Stop button to stop the recording.
Press on the Play button to preview your recording.
Press OK to validate and close the dialog box or on Cancel to cancel the recording session and close the dialog box.
If you try to record your voice and the voice recording device is improperly connected or malfunctioning, a warning message will appear. If this happens, check the voice recording device.
After the voice annotation has been recorded, you will notice that the Voice Annotations section indicates 1 of 1.
This is because the Voice Annotations section displays the order of the current voice annotation in the sequence and the total number of voice annotations associated with the panel. You can record many voice annotations, these will accumulate in sequence without being overwritten. The section will display the total number of voice annotations it contains. You can later select any annotation and play it back.
282

Chapter 10: Storyboard Supervision Voice Annotations
Listening to Voice AnnotationsOnce a voice annotation has been added to a panel, you can listen to it using the playback controls.
1. In the Thumbnails view, select the panel with the voice annotation which you want to listen to.2. Display the Panel view.
If the Panel view is not part of your current workspace, select Windows > Panel from the top menu.3. In the Voice Annotations section:
Click on the Next Voice Annotation and Previous Voice Annotation buttons to select the annotation you want to listen to. Use the order display in the Voice Annotation section to see which annotation is selected.
Click on the Play Voice Annotation button to play back the selected voice annotation.
Click on the Stop Voice Annotation button to stop the playback.
Deleting Voice AnnotationsWhen a voice annotation is not required anymore, you can delete it.
To delete a voice annotation:
1. In the Thumbnails view, select the panel with the voice annotation which you want to delete.2. Display the Panel view.
If the Panel view is not part of your current workspace, select Windows > Panel from the top menu.3. In the Voice Annotations section:
Click on the Next Voice Annotation and Previous Voice Annotation buttons to select the annotation you want to delete. Use the order display in the Voice Annotation section to see which annotation is selected.
Click on the Delete Voice Annotation button to delete it.
283

Storyboard Pro 2 User Guide
284

Chapter 11 Exporting Your Storyboard
Now that you have finished your storyboard or animatic, it is time to export it as images, PDF, movie file. Depending on whether or not you plan to further edit your movie in a third party software or export snapshots, Toon Boom Storyboard Pro supports several other formats for all your sharing needs.
In this chapter, you will learn how to do the following:
• Exporting to PDF, on page 286• Export to CSV, on page 303• Export Bitmap, on page 304• Exporting a Movie, on page 308• Export to EDL/AAF/XML, on page 317• Export to Animate, on page 321• Conformation, on page 322• Preferences, on page 325
285

Storyboard Pro 2 User Guide
Exporting to PDF You can export your storyboard project as a PDF file which you can later print or share electronically. This is where you will find the way to set up your visuals to represent a classic storyboard on paper. An extensive number of options, settings and customization is possible while exporting to PDF.
This section is divided as follows:
• Setting Up a PDF Export• Adding Security to Your PDF• Creating a Custom Layout• PDF Options Panel• Analyse and Export to PDF• Adding Snapshot Markers to a Panel• Deleting Snapshot Markers from a Panel
Setting Up a PDF Export To create a PDF:
1. Select File > Export > PDF.
The Export to PDF dialog box opens.
2. In the Destination Path field, specify the location and name of the file that will contain the PDF. Either type in the path directly or click the Browse button to display a window to select a file.
286

Chapter 11: Exporting Your Storyboard Exporting to PDF
3. In the PDF Export Parameters section, select the desired layout for the PDF file.3 Panels Horizontal: This is a classic layout of a printed storyboard. It consists of 3 panels per page, including captions, in an horizontal arrangement.3 Panels Vertical: This is a classic layout of a printed storyboard. It consists of 3 panels per page, including captions, in a vertical arrangement.Full Page: This layout consists of 1 large panel per page, including captions.Overview 2X4 Panels: This layout consists of a total of 8 panels per page, organized on two rows of 4, with captions in the middle.Overview 4X3: This layout consists of a total of 12 panels per page, organized in 3 rows of 4. No caption is included.
4. In the Export Range section, select whether to generate a file including the entire storyboard, specific shots, or the currently selected panel(s).
All: Enable this option to export your entire storyboard.Selected Scenes: Enable this option and click on the Select button to open the Scenes Picker dialog box, in which you can select specific scenes to export.
Current Panel: Enable this option to export only the currently selected panel.Tracked Panels: Enable this option to export panels that are marked as tracked. The number of tracked panels will appear beside the option. To learn how to track panels, refer to Storyboard Supervision > Tracking Changes.
5. To view the file when it is ready, select Open document after export.6. Click Export to confirm your settings and begin the export.
The Successful Export dialog box opens to confirm that your storyboard has been successfully exported.
7. Click on the OK or Close button.
Refer to the Adding Security to Your PDF section below to learn how to setup a password for your PDF file.
Refer to the Creating a Custom Layout section to learn how to customize the PDF layouts.
287

Storyboard Pro 2 User Guide
Adding Security to Your PDF You can also secure your digital storyboard by giving your PDF file a password and restricting certain features such as printing and editing. When files have restricted features, any tools and menu items related to those features are dimmed.
To protect your PDF:
1. Select File > Export > PDF.
The Export to PDF dialog box opens.2. Setup your PDF export options. Refer to the section Exporting to PDF above to learn about the export options.3. In the Document Security section, setup the protection:
Enable the Need Password Protection option to add password protection to your PDF file.In the Master Password field, type an administrator password. The owners of this password will not be bound by the protection. Confirm the Master Password in the top confirm field. Note that the password must be at least 6 characters long.In the User Password field, type a user password. The owners of this password will be bound to the protection options you have defined. Confirm the User Password in the bottom confirm field. Note that the password must be at least 6 characters long.Define the permissions you want to give to the users:
Printable: Enabling this option will give permission to the user to print the storyboard.Edit All: Enabling this option gives the following PDF permissions to the user:• Changing the Document• Document Assembly• Filling of Form Fields• Signing• Creation of Template PagesCopy: Enabling this option gives the following PDF permissions to the user:• Content Copying• Content Copying for AccessibilityEdit: Enabling this option gives the following PDF permissions to the user:• Commenting• Filling of Form Fields• Signing
Enable the Remember Protection Settings option to keep these settings as default. 4. Click on the Export button.
288

Chapter 11: Exporting Your Storyboard Exporting to PDF
Creating a Custom Layout When exporting your storyboard project to a PDF file, five default page layouts are made available to you. You can also define your own preferences and setup a personalized layout using extensive options.
To create a custom layout:
1. Select File > Export > PDF.
The Export to PDF dialog box opens.2. In the PDF Export Parameters section, click on one of the buttons:
Edit Profile: Click on this button to edit the selected layout from the list. New Profile: Click on this button to create a completely new layout.Delete Profile: Click on this button to delete the selected layout from the list. The Confirm Profile Deletion dialog box opens.
Click on Yes to confirm.Click on No to cancel.
3. Once you clicked on either the Edit Profile or New Profile button, The PDF Profile dialog box opens. Note that if you choose Edit Profile, the options and settings of the selected profile will appear. If you selected New Profile, all the setting and options will be set to default or left blank.
4. Setup your PDF profile:
289

Storyboard Pro 2 User Guide
General Tab
Name: Type in a name for your custom layout. If you choose Edit Profile, you already have the selected profile name displayed in this field, you can rename it if you need to.Description: You can enter a short description of the layout in this field.Icon: You can select an image file representing the custom layout you are creating, to be displayed in the profile list. For best results, your image should be 45x45 pixels.Units: Select the unit of measurement (points, mm, cm or inches) of values used in the Page Layout dialog box.Font: Select any font installed on your system to use for all text in the PDF document. To export Unicode characters to your PDF document, select the language encoding and the embedded PDF font that will be used to display the text in the PDF document.
Font Size: Type in or use the up and down arrow buttons to define the size of the font.Duration in Feet: Enable this option if you want the duration value to be expressed in feet. Render Images in B/W: Enable this option if you want your pdf file in black and white rather than colours.
290

Chapter 11: Exporting Your Storyboard Exporting to PDF
Page Tab
Page Format: Select the type of page you want to print on (Letter, Legal or A4).Orientation: Select if you want the PDF page to be printed in Portrait or Landscape.Rotation: Select the degree of clockwise rotation of the storyboard on the printed page.Pages Per Sheet: Select the number of storyboard pages you want to be printed on each sheet.Reverse Page Layout: Select this option to reverse the position of the captions in relation to the panels.Top Margin field: Enter distance from the top page edge to set the margin.Bottom Margin field: Enter distance from the bottom page edge to set the margin.Left Margin field: Enter distance from the left page edge to set the margin.Right Margin field: Enter distance from the right page edge to set the margin.Background Image: Select an image to use as a watermark on all pages, except the cover.
Storyboard Tab
The options in the storyboard tab are divided into 3 sub-tabs.
• Cover• Panels• Captions
291

Storyboard Pro 2 User Guide
Cover
Show Cover: Insert a cover as the first page of the PDF.Background Image: Select an image (PNG, BMP or JPG file format) to use as a watermark on the cover.Show Title: Display the Project Title defined in the Storyboard properties.Show Subtitle: Display the Project Subtitle defined in the Storyboard properties.Show Duration: Display the duration (as a time code or frame) of the selected storyboard panels.Show Date: Display the date of export.Include Note: Enable this option to include a Revision Note on the cover page. When you will click on the Export button, a dialog box will open in which you can type the desired revision indications.
Panels
292

Chapter 11: Exporting Your Storyboard Exporting to PDF
Panels tabNumber of Rows: Defines the number of panel rows displayed per pageNumber of Columns: Defines the number of panel columns displayed per page.Panel Vertical Spacing: Defines the vertical spacing between panels.Panel Horizontal Spacing: Defines the horizontal spacing between panels.Show Panel Image: Check this to display each panel’s visual content.Image Zoom Level (%): Check this to display the image in the panel at a percentage of the original size.Frame Panel Image: Check this to display a rectangle around the panel’s visual content on each page.Show Camera Label: Enable this option to print the In and Out camera labels of your camera moves to your storyboard.Maximum image height for fullpage panel (Landscape only. C means No Limit): Defines the maximum height a panel can have when it is full page.Start Scene on new page: Enable this option to make each new scene start on a new page.Start Act on new page: Enable this option to make each new act start on a new page.Show Panel Header: Enable this to display each panel’s Shot Name, Panel Number, and Duration as a header.Display Scene Duration: Enable this to display the duration of each scene.Frame Panel Header: Enable this to display a rectangle around the panel header on each page.Display Panel Duration: Enable this to display the duration of each panel.Use Act Name as Scene Name Prefix: Enable this option to display the act name as part of the scenes’ names. To learn more about acts, refer to Script and Panels > Scenes and Panels > What is the Difference Between Scenes, Panels and Acts? Expand Panels: Enable this to display camera motion (such as pan, tilt, or zoom) in the image across several panels.Maximize Panel Height: Defines the maximum height a panel can have.Fit Camera Path: Enable this option to make sure the camera movement is included into a single panel space.Maintain Size Through Scene: Enable this option to keep every panel of your printed storyboard the same size.Display Panel on right: Enable this option when using the Vertical profile to display the images on the right rather than on the left of the page.Show Transition: Enable this to display transition information (Transition Type (Dissolve or Wipe) and Duration).Transition as Panel: Enable this to display a transition as a panel.Display “No Panel” on board: Enable this to replace the panel’s image with an X and the text “No Panel” above it. This is used when there is not enough space to display a panel on the same page. The panel with the image is normally displayed on the next page or the nearest one with enough space to show the image on.Display 4:3 Area: Enable this option to print the 4:3 Area on each panel of your storyboard which has a camera movement. To learn more about the 4:3 Area, refer to Discovering the Interface > User Interface > Interface Highlights > Camera View > 4:3 Area.Display Safe Area: Enable this option to print the Safe Area on each panel of your storyboard which has a camera movement. To learn more about the safe area and how you can define its limit, refer to Discovering the Interface > User Interface > Interface Highlights > Camera View > Safety.Display 4:3 Safe Area: Enable this option to print the 4:3 Safe Area on each panels of your storyboard which has a camera movement. To learn more about the 4:3 Safe Area, refer to Discovering the Interface > User Interface > Interface Highlights > Camera View > 4:3 Safety.Display Hash Marks: Enable this option to display the hash marks. Hash marks are small triangles in the bottom of the camera frames which indicate the ratio of the camera.
293

Storyboard Pro 2 User Guide
Captions
Captions List All: When this option is enabled, every caption will be included in the PDF.Disable this option to activate the browsing button. Click on this button to display the List Picker, which is a list of all your captions and select which ones you wish to export.
Show Empty Captions: Enable this option to include the empty captions of your project into the PDF. When this option is disabled, the empty caption will simply not appear.Trim Captions: Check this to remove empty lines after captions.Frame Captions: By default the option will be set to Box. You have two other choices.
Box: Displays a black rectangle around captions on each page.Line Above: Displays a line above each caption.No Frame: No frames will be displayed around captions.
Specific Font For Caption Names: Check this to enable the Caption Title Font and Caption Title Font Size options.
Caption Title Font: Browse to the font you want to use for the Caption Title.Caption Title Font Size: Sets the size of the font you are using for the Caption Title.
Output Caption in Plain Text: Enable this option to disregard any text formatting (ex. bold, colours...) that you might have done in the caption fields in the interface.Show Sketch: Enable this option to print the Sketch captions to your storyboard.Show Empty Sketch: Enable this option if you want to print the Sketch captions even when they are empty.Sketch Height Policy: Set the height rule for the Sketch captions:
Automatic Height: Select this option to let the application automatically define the height of each Sketch panel depending on the available space in the current layout.Evenly Distributed: Enable this option to keep the same size of sketch boxes throughout the storyboard. Otherwise, the caption boxes are set to fit the content of each sketch independently.Fixed Height: Select this option to keep the same height throughout the storyboard.
294

Chapter 11: Exporting Your Storyboard Exporting to PDF
Max Height: Select this option to enable the Sketch Height field in which you can define the maximum height you want your Sketch caption to follow.
Sketch Height: Define the maximum height a Sketch caption can be. Select Max Height in the Sketch Height Policy to make this option available.Sketch Render Method: Set the rule of how your sketch will appear in the Sketch caption.
Crop: The sketch will keep its original aspect and be cropped if it does not fit the current Sketch caption size.Fit: The height of the sketch will fit the height of the caption, any exceeding part on the width may be cropped.Stretch: The sketch will be resized as to fit inside the caption field and will not be cropped.
Spread Captions and Sketch: When this option is disabled, if a caption text or sketch is too long or big for the space available in the box, it will be cut. Enable this option to adapt the box to the text or sketch and spread it across the next panel if necessary.Distribute Evenly: Enable this option to keep the same size of caption boxes throughout the storyboard. When this option is disabled, the caption boxes are set to fit the content.
Header Tab
Display Header: Enable this to display a header on each page (except the cover). The header includes the Project Title, Project Subtitle, and Project Episode defined in the Storyboard properties.Header Height: Enter the size of the header displayed on each page (except the cover).Header Logo: Browse to a logo image (BMP, JPG, or PNG) to display on the header. Scale the logo to match header's height.Position of Logo: Set the position of your logo in the header:
CentreLeftRight
295

Storyboard Pro 2 User Guide
Show Title: Enable this to display the Project Title defined in the Storyboard properties.Show Subtitle: Enable this to display the Project Subtitle defined in the Storyboard properties.Show Page Number: Enable this to display a page number in the header on each page (except the cover).Use Act Name as Page Number Prefix: Enable this option to display the act name as part of the page number.Show Total Page Number: Enable this option to show the current page number as well as the total number of pages of the storyboard. Ex: 3 / 7Start Page Number: Defines which is the first number to start the page numbering.Sub Page Number: By default, the pages are numbered 1, 2, 3, 4, etc... You can define a sub page number in this field. For example, if you set a subpage number “1”, the pages will be named 11, 12, 13, 14, etc... If you set a subpage “_a”, the pages will be named 1_a, 2_b, 3_c, 4_d, etc...Frame Page Number: Enable this to display a rectangle around the page number in the header on each page.Font: Browse to the font you want to use for the text in the header.Font Size: Sets the size of the font you are using for the text in the header.
Footer Tab
Display Footer: Enable this to display a footer on each page (except cover). The footer includes the Project Copyright defined in the Storyboard properties. Enabling this option will make all the options below available.Footer Height: Enter the size of the footer displayed on each page (except cover).Footer Logo: Browse to an image file to insert as a logo in the footer.Font: Browse to the font you want to use for the text in the footer.Font Size: Sets the size of the font you are using for the text in the footer.Show Title: Enable this option to display the storyboard title in the footer.Title Font: Browse to the font you want to use for the title in the footer.Title Font Size: Sets the size of the font you are using for the title in the footer.
296

Chapter 11: Exporting Your Storyboard Exporting to PDF
Labeling Tab
Use the different fields of the Labeling tab, to specify how the listed labels should appear in the PDF.PageTitleScenePanelTransitionDurationNo Panel
5. Once you are done, click on OK to confirm your layout setup. The new profile you created will be available in the Profile list or the profile you edited will be saved as such in the Profile list.
You can click on Cancel to cancel your setup and close the window without applying the changes to the selected profile or creating your new profile.You can click on Restore All Defaults to restore all the options and fields to the default values.
297

Storyboard Pro 2 User Guide
PDF Options Panel You can setup the PDF export settings for a selected panel. This panel will be exported with all the others, but will follow its own rules.
To specify independent PDF options for selected panels:
1. Display the Panel PDF Options view:
In the Workspace toolbar, click on the PDF View button to Switch to the PDF View workspace.You can also select Windows > Panel PDF Options, to display the view in your current workspace.
2. In the Thumbnails view, select one or many panels.3. In the Panel PDF Options view, set the export options to be applied to the selection of panels:
Options:Export to pdf: This option is enabled by default. You can disable it if you want this particular panel not to be exported.Force new page: Enable this option to force this panel to start a new page.Full Page: Enable this option if you want this panel to be printed on a full page.
Image:Maximum height for full page: This is the maximum height the panel will be when it is full page.Expand: Check this to display camera motion (such as pan, tilt, or zoom) in the image across several panels.Zoom Level (%): This is the size in percentage that the panel will appear within its frame.
Caption & Sketch:Export All Captions: This option is enabled by default. It means every captions from this panel will be exported to pdf. Disable this option to enable the Caption List option, to select specific captions you want to export.Caption List: This option is unavailable when Export All Captions option is enabled. When available, click on the button to open the List Picker, in which you can select only the captions you want to export.
Spread captions: When this option is disabled, if a caption text is too long or big for the space available in the box, it will be cut. Enable this option to adapt the box to the text and spread it across the next panel if necessary.Caption Font Scale (%): Select at which scale, in percentage, the text will appear in the captions of this panel.Export Sketch: Enable this option to export the sketch caption field of this panel.
298

Chapter 11: Exporting Your Storyboard Exporting to PDF
4. Click on Preview to create a quick pdf preview of the page containing the selected panel(s), using the current default pdf export profile for the other panels.
5. Click on Restore All from Profile to reset the options to the current default pdf export profile.
Analyse and Export to PDF Using the PDF Export view, you can setup your pdf export and run an analysis on the result before printing it to a PDF file. This can prove useful to prevent overset text that could result from the selected profile and pdf layout options.
To analyse and export to PDF:
1. Display the PDF Export view:
In the Workspace toolbar, click on the PDF View button to Switch to the PDF View workspace.You can also select Windows > Panel PDF Options, to display the view in your current workspace.
2. In the PDF Export view:
3. In the Profile section, use the drop-down menu to select the profile you want to use for your export. Once a profile is selected, you can press on Edit to modify the current options of the layout. Refer to the Creating a Custom Layout section to learn how to use the settings of the PDF Profile dialog box.
4. Click on the Expand button to display the Export Range section:
By default, the export range is set to All, which means your entire storyboard project will be exported.Selected Scenes: Enable this option and click on the Select button to open the Scenes Picker dialog box, in which you can select specific scenes you wish to export.Current Panel: Enable this option to export only the selected panels to PDF.Tracked Panels: Enable this option to export panels that are marked as tracked. The number of tracked panels will appear beside the option. To learn how to track panels, refer to Storyboard Supervision > Tracking Changes.
299

Storyboard Pro 2 User Guide
5. In the Analysis section:
Use the Filters drop-down menu to select the issue types you want the analysis process to look for:
You can set it to look for Text Overflow, Text Overlap and Camera Pan issues.Click on the Analyse button to launch the analysis process of your pdf options.
If no issue is encountered, the list will remain empty and the word Done! will appear beside the Analyse button.If issues are encountered, they will appear in the list area. The Scene, Panel and Page number will be indicated, as well as a description of the problem found.
If issues were found, you can select them and use the Ignore button to remove them from the list as you verify the critical level these elements have on your pdf export.
300

Chapter 11: Exporting Your Storyboard Exporting to PDF
In the Filters drop-down menu, you can select to show ignored issues, by enabling the Show Ignored option. Rather than being removed from the list, the will appear with a red mark.
When the Show Ignored filter is enabled, you can select an ignored issue, and reset it as not ignored by pressing the Restore Ignored button. This will remove the red mark.
6. You can use the Preview button to generate a quick pdf preview of the selected issue.7. Once you are ready, you can press the Export button to export your PDF file.
The Export to PDF dialog box opens.
In the Destination Path field, specify the location and name of the file that will contain the PDF. Either type in the path directly or click the Browse button to display a window to select a file.Refer to the Adding Security to Your PDF section to learn how to set up password protected security rules.Enable the Open document after export option to automatically open your PDF file when it is ready.
8. Click on Export.
301

Storyboard Pro 2 User Guide
Adding Snapshot Markers to a Panel By default, only the first frame of each panel will be visible in the PDF file you export. Sometimes, you might need to display a specific frame or several frames from a panel. For example, on a panel that has a layer or camera movement. If you want to specify which frames in a panel will be visible in a PDF file, you must add snapshot markers to the panels.
Refer to the Animatic chapter to learn more about Layer and Camera moves.
To add a snapshot marker to a panel:
1. In the Timeline view, select the Panel to which you want to add a snapshot marker.2. Drag the Timeline Slider to the exact position where you want to add the snapshot.
3. Once you positioned the slider, do one of the following:Select Storyboard > Add Snapshot.Right-click (Windows) or [Ctrl] + Click (Mac OS X) on the panel and select Add Snapshot from the pop-up menu.
The Snapshot marker will appear in the timeline view. It is the blue arrow pointing down.
4. Repeat steps 2 and 3 for each snapshot marker you want to add to the panel.
Once you add snapshot markers to your panel, you can select and drag them around to reposition them.
Deleting Snapshot Markers from a Panel You can remove snapshot markers from the currently selected panel.
To delete a snapshot marker:
1. Select the snapshot marker you want to delete. A hand cursor appears over the snapshot marker.
2. Drag the hand cursor outside of the panel in the Timeline View to remove the snapshot marker.
302

Chapter 11: Exporting Your Storyboard Export to CSV
Export to CSV You can export the data in a storyboard project in comma separated value (.CSV) file format. You can view this data in any application that supports comma separated value files, such as Microsoft Excel. If you do not have Microsoft Excel installed, you can save the.CSV file to your computer, and then open the file in another application.
To export a storyboard to a CSV file:
1. Select File > Export > CSV.
The Export to CSV dialog box opens.
2. In the Destination Path field, specify the location and name of the folder that will contain the storyboard project’s data. Either type in the path directly or click the Browse button to display a window to select a file.
3. In the CSV Export Options panel:Use the Field Separator drop-down menu to select the fields separator.
CommaSemicolonTabVertical bar
Enable the options corresponding to the data you want to export.
Refer to the Storyboard Supervision > Tracking Changes to learn about Tracking Information.
4. In the Export Range panel, select whether to export the entire storyboard, specific shots, or the last panel you selected. Either enter a space between shot names or click the Select button to display a window to browse scenes.
5. To view the CSV file directly in Microsoft Excel or another application that recognizes the CSV format, select Launch reader/player after export.
6. Click Export to confirm your settings and begin the export.
303

Storyboard Pro 2 User Guide
Export Bitmap You can easily export your storyboard and selected panel or frame to a TGA, JPEG or PSD image file.
• File Name Patterns When Exporting• Exporting the Current Image• Exporting Your Storyboard to Bitmap
File Name Patterns When ExportingIt is possible to define sequential file name patterns when exporting to Image Sequence, Bitmap, EDL and AAF (movie files).
For example:%4s.%2p.%3f.%4F.tga
%4s => shot name on 4 chars (all export formats) %2p => panel name on 2 chars (all export formats) %3f => frame on 3 chars (Image Sequence and Bitmap) %4F => global frame on 4 chars (Image Sequence Only)
Where:
% means it will be replaced by:
s (shot name) p (panel number) f (local frame number in panel) F (global frame number in timeline)
The number in-between represents the minimum length to display it. If the text-value is shorter than this length, it will be left-padded by 0 (zero).
For example:
If the frame number is 48, and the user specifies the following in file name:
%1f = you will see "48" in file name.
%2f = you will see "48" in file name.
%3f = you will see "048" in file name.
%4f = you will see "0048" in file name.
304

Chapter 11: Exporting Your Storyboard Export Bitmap
Exporting the Current Image You can export the current visible frame to a TGA, JPEG or PSD image. Note that a PSD file will keep each layer separated and named as in the panel.
Note that no caption or camera frame will be exported in the image file.
To export the current frame to TGA, JPEG or PSD image:
1. In the Thumbnails view, select the panel containing the image you would like to export as a bitmap image file.
2. Select File > Export > Export Current Image.
The Save As dialog box opens.
3. Browse to select the destination folder for your image.4. Type a name for the image.5. Select the desired type from the Save as type drop-down menu.6. Click Save to confirm your settings and begin the export.7. The image inside the frame will be exported as a bitmap image file.
305

Storyboard Pro 2 User Guide
Exporting Your Storyboard to BitmapYou can export a storyboard project to bitmap files in PSD with independent layers, TGA or JPG format. Your exported data includes a separate bitmap file for each panel in the storyboard.
Note that in the case of a PSD file, transform and transition animations are not exported. However, camera moves are rendered into an independent layer.
To export a storyboard to a bitmap file:
1. Select File > Export > Bitmap.
The Export to Bitmap dialog box opens.
2. In the Destination Path panel:Specify the location and name of the folder that will contain the storyboard’s assets. Either type in the path directly or click the Browse button to display a window to select its new path.In the File Pattern field, enter a prefix for your image files names. If you leave this field blank, by default, the resulting bitmap files will be named storyboardname-shotnamepanelnumber.psd/jpg/tga. For example, a storyboard named Three Little Pigs containing a scene named BrickHouse with three panels will create three bitmap files named:
Three Little Pigs-BrickHouse-1.psd/jpg/tgaThree Little Pigs-BrickHouse-2.psd/jpg/tgaThree Little Pigs-BrickHouse-3.psd/jpg/tga
306

Chapter 11: Exporting Your Storyboard Export Bitmap
3. In the Setup Bitmap Export Parameters panel:In the Bitmap Format drop-down menu, select whether you want your bitmap files to be in Photoshop, Jpeg, or Targa format.Select the Resolution. This will be a quarter size, half size, or full size of the current storyboard resolution.Select the magnification of the image. Enter a value between 0 and 400 or accept the default of 85%.Transparent Background: This option is only available when the Photoshop (*.psd) file format is selected. By default this option is enabled and will export your .psd file.Export Camera Frame: When this option is enabled, the camera frame black border will be exported in the image file.Rectify Static Camera: When this option is enabled, if there is a rotation in the camera, the camera frame will appear as straight and the image will be rotated instead. When disabled, the camera frame appears as rotated and the image is straight.Include Camera Path: Enable this option to make sure that the camera paths and control points appear inside the image. When this option is disabled, they might appear cropped if they exceed the camera frames area.Allow Camera Scaling: This option is enabled by default. This makes sure that when a very wide zoom camera movement is included in a panel, the image resulting from the export will be bigger in relation to the camera scaling used. If you disable this option, the exported image will not follow the camera scaling and export it to fit a normal camera frame. Maintain Size Through Scene: Enable this option to make sure that all images exported are the same size. If this option is disabled, it is possible that some images export to a bigger size, for example if there is a traveling camera movement.In the Export Range panel, select whether to export the entire storyboard, specific scenes, the last panel you selected or tracked panels. Either enter a space between scene names or click the Select button to display a window to select scenes. To learn how to track panels, refer to Storyboard Supervision > Tracking Changes.
4. To view the location and contents of the exported folder when it is ready, enable the Open folder after export. option
5. Click Export to confirm your settings and begin the export.
307

Storyboard Pro 2 User Guide
Exporting a Movie Once you have created your storyboard and animatic, you can export it as a movie file to share and playback easily for an efficient timing reference.
You can export your movie file in three different formats:
• Exporting a QuickTime Movie, on page 308• Exporting an SWF Movie (Flash), on page 313• Exporting an Image Sequence, on page 315
Exporting a QuickTime Movie To export a QuickTime Movie:
1. From the top menu, select File > Export > Movie.
The Export To Movie dialog box opens.
2. From the Destination Path section, click on the Browse button to choose a destination path to where your movie will be saved, and type an appropriate filename for the export.
3. From the Export Movie Format panel:Select QuickTime Movie (*.mov) from the Movie Format drop-down menu.Select the Resolution from the drop-down menu. This will be a quarter size, half size, or full size of the current storyboard resolution.
4. Click the Movie Options button to modify some of the Quicktime Movie Settings.
Refer to the QuickTime Movie Settings section to learn more about these Movie Settings.
308

Chapter 11: Exporting Your Storyboard Exporting a Movie
5. In the Export Range section:
Decide whether you would like to export the entire scene (All), just a selected frame range, a selected panel or tracked panels. If you decide on the latter, be sure to enter in the frame range in the fields provided. To learn how to track panels, refer to Storyboard Supervision > Tracking Changes.
6. In the Overlay section:Movie Information tab
Print Time Code: Enable this option to print the project time code on the video as an overlay on your video.Print Scene Names and Panel Numbers: Enable this option to print the scene names and panel numbers as an overlay on your video.Print Panel Time Code: Enable this options to print each panel’s time code on the video as an overlay on your video.
You can customize the font type, size, colour and location of the printed time code using the Preferences panel. Refer to Preferences > Storyboard Pro Export Preferences > Export to Movie to learn how.
Camera Grids tab
Project Safety: Enable this option to print the Safe Area on your video. To learn more about the safe area and how you can define its limits, refer to Discovering the Interface > User Interface > Interface Highlights > Camera View > Safety. 4:3 Safety: Enable this option to print the 4:3 Safety on your video. Enable this option to print the 4:3 Safe Area on each panels of your storyboard which has a camera movement. To learn more about the 4:3 Safe Area, refer to Discovering the Interface > User Interface > Interface Highlights > Camera View > 4:3 Safety.4:3 References: Enable this option to print the 4:3 Area on your video. Enable this option to print the 4:3 Area on each panels of your storyboard which has a camera movement. To learn more about the 4:3 Area, refer to Discovering the Interface > User Interface > Interface Highlights > Camera View > 4:3 Area.
7. Enable the Open document/folder after export option to view the file when it is ready.8. Click the Export button.
309

Storyboard Pro 2 User Guide
QuickTime Movie Settings When Quicktime is your chosen export format, the following becomes available via the Movie Options button. Some of the Quicktime Movie Settings will be overridden by the Storyboard Project, or export settings.
This section will cover the following topics:
• QuickTime Video Settings• QuickTime Sound Settings
From the Export to Movie window, click on the Movie Options button to display the Quicktime Movie Settings:
• Video (1): Check this box to enable the customization of the video settings, filters and size. Settings (2): Opens the Standard Video Compression Settings dialog box (see below).Filter (3): Opens the Choose Video Filter dialog box, where you can select from a range of filters to apply to your video export.Size (4): Opens the Export Size Settings dialog box, where you can choose a different export size from the settings predefined for your project.
• Sound (5): Check this box to enable the customization of the sound settings.Settings (6): Opens the Sound Settings dialog box (see below).
• Prepare for Internet Streaming (7): Check this box to enable the customization of the internet streaming options.
Internet Streaming drop-down (8): Select from the drop-down menu options for the type of streaming best suited for your needs.
1
2
3
4
5
6
7
8
310

Chapter 11: Exporting Your Storyboard Exporting a Movie
QuickTime Video Settings
In the Video section, click on the Settings button.
The Standard Video Compression Settings dialog box opens.
1. From the Compression Type drop-down menu, select a codec.
The availability of certain Compression Settings depends on the Compression Type selected. For example, Animation is the default compression type and as a result the Data Rate option is greyed out.
2. In the Motion section, there is a Frame Rate drop-down menu.
The frame rate set in your Storyboard Pro project will override this Quicktime setting.
3. From the same section decide whether you would like key frames inserted by checking the Key frame every box, and if so, the number per frame.
This option is recommended by QuickTime. A further description of this topic is cited below.
Many compressors use "frame differencing" to compress moving images. Frame differencing is the process of determining what information has changed from a starting frame (called a "key frame") to subsequent frames. The key frame contains all of the information for an image. Subsequent frames contain only the information that has changed.
Depending on the compressor you use, you can specify how often you want key frames to occur. If you don't have enough key frames, the quality of your movie might be lower because most frames are generated from others. However, more key frames result in a larger movie with a higher data rate. With some compressors, an additional key frame is inserted automatically if too much of the image has changed from one frame to the next.
A good rule of thumb for general use is to have one key frame every 5 seconds (multiply the frames per second by 5). If you are creating a file for RTSP streaming and have concerns about the reliability of the delivery network (as with the public Internet), you may want to increase key frame frequency to one key frame every 1 or 2 seconds.
4. From the Compressor section, choose a Depth based on your movie’s needs, for example, Millions of Colours+ houses an alpha channel.
5. In the Quality section, use the slider to choose a quality setting. Remember that the better the quality of the export, the larger the file.
6. From the Data Rate section, either choose to allow the program to automatically select the most optimal bit rate, or enter in a Restricted rate to save space and allow for faster downloading at a cost to the quality of your export.
311

Storyboard Pro 2 User Guide
7. In the same section, from the Optimized for drop-down list, select the intended viewing method for your export.8. Click the OK button when you are finished.
The resolution set in the Export to Movie window will override the QuickTme Size settings.
QuickTime Sound Settings
From the Movie Settings dialog box, click-on the Sound Settings button.
The Sound Settings dialog box opens.
1. From the Compressor drop-down menu, choose a compression type.
The default setting is None. This will preserve your original sound file, without the loss of information. However, an uncompressed sound file will inevitably add “weight” to the overall size of your video export.
2. Select a Rate by pressing the down arrow button next to kHz.
It is best to check and match the original properties of your sound file. For example, if your file has an audio sample rate of 48 kHz and you choose a conversion rate of 22.05 kHz, the sound will play at the same speed, but with higher frequencies missing.
For a standard film sound quality, choose 44.1 kHz, or 48 kHz for DVD quality. Anything less will make the sound “dull” or less bright. For things like recorded voice this doesn't matter so much, but for music it can make an audible difference.
If file size is a consideration, such as with videos for the internet, then a lower rate might be more practical.3. Next, choose the Size and the Use, which are related. Once again, it is advisable to check your original sound file
properties. If the file was recorded in one channel (mono), there is little point in choosing the two channel (stereo) option. Although Mono can support a 16-bit channel, the extra information is unnecessary. Mono is generally paired with 8-bit and Stereo with 16-bit.
4. Click on the OK button when you are done.
Exporting a QuickTime Movie with Transparency To render out a QuickTime movie with transparency, you need to set the Depth to Millions of Colours +. To select Millions of Colours +, do the following: Movie Options > (Video) Settings > (Compressor) Depth and select Millions of Colours +.
312

Chapter 11: Exporting Your Storyboard Exporting a Movie
Exporting an SWF Movie (Flash) To export an SWF Movie:
1. From the top menu, select File > Export > Movie.
The Export to Movie dialog box opens.
2. From the Destination Path section, click on the Browse button to choose a destination path to where your movie will be saved and an appropriate filename for the export.
3. From the Export Movie Format panel:
Select Flash (*.swf) from the Movie Format drop-down menu.Select the Resolution from the drop-down menu. This will be a quarter size, half size, or full size of the current storyboard resolution.
4. Click on the Movie Options to display the Flash Export Settings dialog box.
If you want to protect your movie to be imported in another application, enable the Protect from Import option.Enable the Compress Movie option if you want to get a lighter format. The movie may lose some quality, but in turn create a lighter file.Select the quality of the video image with the JPEG Quality slider.
100 = full quality50 = average quality at about 1/5th of the size.
313

Storyboard Pro 2 User Guide
25 = medium quality where loss of high image resolution starts to occur.10 = low quality where “macro-blocking” or large pixelation become obvious.1 = lowest quality where there is extreme loss of colour and detail and where the image becomes nearly unrecognizable.
5. Click on the OK button when you are done.6. Back to the Export to Movie dialog box, from the Export Range section:
Decide whether you would like to export the entire scene (All), just a selected frame range, a selected panel or tracked panels. If you decide on the latter, be sure to enter in the frame range in the fields provided. To learn how to track panels, refer to Storyboard Supervision > Tracking Changes.
7. In the Overlay section:Movie Information tab
Print Time Code: Enable this options to print the project time code on the video as an overlay on your video. Print Scene Names and Panel Numbers: Enable this option to print the scene names and panel numbers as an overlay on your video.Print Panel Time Code: Enable this option to print each panel’s time code on the video as an overlay on your video.
You can customize the font type, size, colour and location of the printed time code using the Preferences panel. Refer to Preferences > Storyboard Pro Export Preferences > Export to Movie to learn how.
Camera Grids tab
Project Safety: Enable this option to print the Safe Area on your video. To learn more about the safe area and how you can define its limits, refer to Discovering the Interface > User Interface > Interface Highlights > Camera View > Safety. 4:3 Safety: Enable this option to print the 4:3 Safety on your video. Enable this option to print the 4:3 Safe Area on each panel of your storyboard that has a camera movement. To learn more about the 4:3 Safe Area, refer to Discovering the Interface > User Interface > Interface Highlights > Camera View > 4:3 Safety.4:3 References: Enable this option to print the 4:3 Area on your video. Enable this option to print the 4:3 Area on each panel of your storyboard that has a camera movement. To learn more about the 4:3 Area, refer to Discovering the Interface > User Interface > Interface Highlights > Camera View > 4:3 Area.
8. Enable the Open document/folder after export option to view the file when it is ready.9. Click the Export button.
314

Chapter 11: Exporting Your Storyboard Exporting a Movie
Exporting an Image Sequence To export an Image Sequence:
1. From the top menu, select File > Export > Movie.
The Export To Movie dialog box opens.
2. From the Destination Path section, click on the Browse button to choose a destination path to where your image sequence will be saved, and type an appropriate filename for the export.
3. From the Export Movie Format panel:
Select either Jpeg (*.jpg) or Targa (*.tga) from the Movie Format drop-down menu.Select the Resolution from the drop-down menu.
4. From the Export Range section:
Decide whether you would like to export the entire scene (All), just a selected frame range, a selected panel or tracked panels. If you decide on the latter, be sure to enter the frame range in the fields provided. To learn how to track panels, refer to Storyboard Supervision > Tracking Changes.
315

Storyboard Pro 2 User Guide
5. In the Overlay section:Movie Information tab
Print Time Code: Enable this option to print the project time code on the images as an overlay on your video.Print Scene Names and Panel Numbers: Enable this option to print the scene names and panel numbers as an overlay on your images.Print Panel Time Code: Enable this option to print each panel’s time code on the images as an overlay on your video.
You can customize the font type, size, colour and location of the printed time code using the Preferences panel. Refer to Preferences > Storyboard Pro Export Preferences > Export to Movie to learn how.
Camera Grids tab
Project Safety: Enable this option to print the Safe Area on your images. To learn more about the safe area and how you can define its limits, refer to Discovering the Interface > User Interface > Interface Highlights > Camera View > Safety. 4:3 Safety: Enable this option to print the 4:3 Safety on your images. Enable this option to print the 4:3 Safe Area on each panel of your storyboard that has a camera movement. To learn more about the 4:3 Safe Area, refer to Discovering the Interface > User Interface > Interface Highlights > Camera View > 4:3 Safety.4:3 References: Enable this option to print the 4:3 Area on your images. Enable this option to print the 4:3 Area on each panel of your storyboard that has a camera movement. To learn more about the 4:3 Area, refer to Discovering the Interface > User Interface > Interface Highlights > Camera View > 4:3 Area.
6. Enable the Open document/folder after export option to open the folder when the images are ready.7. Click the Export button.
316

Chapter 11: Exporting Your Storyboard Export to EDL/AAF/XML
Export to EDL/AAF/XML Once a storyboard is done, there are several reasons to send it to a Non Linear Editing (NLE) system. It could be to complete the animatic in a real editing suite with a direct return on TV, or it could be to use it as a pre editing map to replace the storyboard scenes with the final materials (shot in live action or rendered from a 2D or 3D software).
It is possible to export your storyboard project, and preserve the timing, motions and sounds edited with Toon Boom Storyboard Pro, directly to Apple Final Cut Pro using EDL format or to Adobe Premiere, Avid Xpress or Sony Vegas using AAF format.
File Name Patterns When ExportingIt is possible to define sequential file name patterns when exporting to Image Sequence, Bitmap, EDL and AAF (movie files).
For example:%4s.%2p.%3f.%4F.tga
%4s => shot name on 4 chars (all export formats) %2p => panel name on 2 chars (all export formats) %3f => frame on 3 chars (Image Sequence and Bitmap) %4F => global frame on 4 chars (Image Sequence Only)
Where:
% means it will be replaced by:
s (shot name) p (panel number) f (local frame number in panel) F (global frame number in timeline)
The number in-between represents the minimum length to display it. If the text-value is shorter than this length, it will be left-padded by 0 (zero).
For example:
If the frame number is 48, and the user specifies the following in file name:
%1f = you will see "48" in file name.
%2f = you will see "48" in file name.
%3f = you will see "048" in file name.
%4f = you will see "0048" in file name.
317

Storyboard Pro 2 User Guide
This section will explain how to export your storyboard in EDL or AAF format, then how to import your project into a major NLE system.
To export your storyboard to EDL or AAF or XML
1. Select File > Export > EDL/AAF/XML.
The Export to EDL/AAF/XML dialog box opens.
2. Select where you would like to save your storyboard project on your drive in Destination Path. You can type in
the exact path or use the folder button to browse to a specific folder on your system. You should create a folder for your exported project since Storyboard Pro will generate several files during the export.
3. Define a file pattern, this will be the prefix of the generated files names.4. In Export Type, select in which format to store the timing information (timecode for panels and audio tracks).
The format will be chosen depending on the destination application:Application Format Notes:
Apple Final Cut Pro EDL. In EDL, if you are using audio elements more than once in the timeline, FCP won’t be able to reconnect the medias. AAF is supported in FCP with a plugin from Automatic Duck. Adobe Premiere Pro AAF (Windows)EDL (Mac OS X) With EDL, media will have to be linked manually one by one. Premiere Pro on Windows cannot open AAF coming from Mac OS X (and AAF is not supported on the Mac OS X version of Premiere Pro). Avid Xpress AAF
If your editing system is not in the list, check its specifications to verify which format can be imported.
318

Chapter 11: Exporting Your Storyboard Export to EDL/AAF/XML
5. In the Options panel:
Use the resolution drop-down menu to define the output resolution since you might not always need to export the storyboard at full resolution (you can select Full, Half or Quarter of a project’s resolution).The One Movie Clip Per Panel option is useful if you want to export more than one QuickTime movie clip per scene (which might contain more than one panel) e.g. to obtain better granularity during the editing since the storyboard will have smaller movie clips.The storyboard scenes are exported in QuickTime format. Click on Video Config to configure the video settings (codecs, quality).
Refer to the Exporting a Movie > Exporting a QuickTime Movie topic to learn more about the option available via the Video Config button.
Generate Video Files: If you only need the EDL, AAF or XML files to be generated, you can disable this option. When disabled, no video files will be rendered.Copy Audio Files: By default, during the export to EDL/AAF, the original sound elements used are copied to the same location as the QuickTime movie clip’s and the EDL or AAF file. If sound elements in the timeline are used more than once, the elements won’t be duplicated. The EDL/AAF will refer to the same sound elements. You can disable this option if needed.
6. In the Export Range panel:
Select if you want to export the entire storyboard project, only a selection of panels, the current selected panel or tracked panels. To learn how to track panels, refer to Storyboard Supervision > Tracking Changes.
7. In the Overlay section:Movie Information tab
Print Time Code: Enable this option to print the project time code on the video as an overlay on your video.Print Scene Names and Panel Numbers: Enable this option to print the scene names and panel numbers as an overlay on your video.Print Panel Time Code: Enable this option to print each panel’s time code on the video as an overlay on your video.
You can customize the font type, size, colour and location of the printed time code using the Preferences panel. Refer to Preferences > Storyboard Pro Export Preferences > Export to Movie to learn how.
Camera Grids tab
Project Safety: Enable this option to print the Safe Area on your video. To learn more about the safe area and how you can define its limits, refer to Discovering the Interface > User Interface > Interface Highlights > Camera View > Safety. 4:3 Safety: Enable this option to print the 4:3 Safety on your video. Enable this option to print the 4:3 Safe Area on each panel of your storyboard that has a camera movement. To learn more about the 4:3
319

Storyboard Pro 2 User Guide
Safe Area, refer to Discovering the Interface > User Interface > Interface Highlights > Camera View > 4:3 Safety.4:3 References: Enable this option to print the 4:3 Area on your video. Enable this option to print the 4:3 Area on each panel of your storyboard that has a camera movement. To learn more about the 4:3 Area, refer to Discovering the Interface > User Interface > Interface Highlights > Camera View > 4:3 Area.
8. Enable the Open folder after export option to open the folder when the movie clips are ready.9. Click Export to start the rendering of the QuickTime movie clips.
Refer to the third party software’s user guide to learn how to import and use the EDL/AAF/XML file.
320

Chapter 11: Exporting Your Storyboard Export to Animate
Export to Animate Using Storyboard Pro, you can export your animatic as an Animate 2 or Animate Pro 2 scene. You can select to export your whole storyboard project or only a selection of scenes. Once your export is ready, you can open it in Toon Boom Animate 2 or Toon Boom Animate Pro 2 software. When you will first save this new scene, the exported file will be converted as the proper format depending on the software you used.
The following elements of your storyboard will be exported to the Toon Boom project:
• Layers• Layer motions• Camera moves
In the Animate 2 or Animate Pro 2 software, the elements of your storyboard will be included inside a single symbol containing all of your layers separately.
Prior to exporting to Animate, you can use the Layers view to disabled a specific layer. In the Layer view disable the Toon Boom option from the Export to section. Note that this layer will still be exported to Animate, but it will be disabled. You can enter the symbol and re-enable it at anytime.
Note that transitions and holds in the layer motions are not supported by the Export to Animate option.
Refer to the Layers chapter to learn more about the Layer view.
To export to Animate:
1. In the top menu, select File > Export > Export to Toon Boom.
the Export to Animate/Animate Pro dialog box opens.
2. Select where you would like to save your Animate project on your drive in Destination Path. You can type in the
exact path or use the folder button to browse a specific place on your system. You should create a folder to place your export project since Storyboard Pro will generate several files during the export.
3. From the Export Range section:Decide whether you would like to export the entire scene (All), just a selected frame range, a selected panel or tracked panels. To learn how to track panels, refer to Storyboard Supervision > Tracking Changes.
4. Enable the Open folder after export option to open the folder when the files are ready.
321

Storyboard Pro 2 User Guide
Conformation In Storyboard Pro, you can export your storyboard project to Final Cut Pro 6, an Apple third party editing software, edit it, and then import the changes back into your Storyboard Pro project using the conformation feature. The conformation export will produce an XML file containing all your animatic project structure as well as images of your panels. You can then import it into Final Cut Pro and it will recreate the animatic.
Export Project To export your entire storyboard project:
1. In the top menu, select File > Conformation > Export Project.
The Export Project dialog box opens.
2. In the Destination Path section, click on the Browse button to browse to a folder where you want your files to be exported to.
3. In the Options section:Export one image per layer: Enable this option to keep your layers on separate images rather then flattening each panel’s layers into one flat image file.Maintain image size throughout scene: Enable this option to prevent image files from being different sizes depending on the camera frames and movements on each panel.Bitmap Format: Use this drop-down menu to select the bitmap image format of your choice:
Jpeg (*.jpg)Targa (*.tga)Photoshop (*.psd)Portable Network Graphics (*.png)
4. Enable the Open folder after export option to open the folder when the files are ready.5. Click on the Export button to start the process.
322

Chapter 11: Exporting Your Storyboard Conformation
Export Selected Panels To export selected panels:
1. In the Thumbnails view, select the panels you want to export to a third party software.2. In the top menu, select File > Conformation > Export Selected Panels.
The Export Project dialog box opens.
3. Set your export options in the Export Project dialog box. Refer to the Export Project topic above to learn more about the options available.
4. Click on the Export button to start the process.
Export Tracked Panels In Storyboard Pro, you can track changes in your panels and you can use the conformation feature to export tracked panels only.
To learn how to track panels, refer to Storyboard Supervision > Tracking Changes.
To export tracked panels:
1. Once you have tracked panels in your storyboard project, in the top menu, select File > Conformation > Export Tracked Panels.
The Export Project dialog box opens.
2. Set your export options in the Export Project dialog box. Refer to the Export Project topic above to learn more about the options available.
3. Click on the Export button to start the process.
323

Storyboard Pro 2 User Guide
Import Animatic Once you have imported your project’s conformation XML into Final Cut Pro 6 and completed editing, you will need to export it once again as an XML file to bring it back into your Storyboard Pro project.
Refer to your third party software’s user guide to learn how to export the animatic project in an XML file format.
You can only re-import a modified conformation XML file into the original project from where it was first exported.
To import an animatic:
1. In your original storyboard project, select File > Conformation > Import Animatic Project.2. The Import Project dialog box opens.
3. Click on the Browse button to locate your XML file.
4. In the Options section, the Process Audio is enabled by default, meaning that the audio tracks will be conformed as well. Disable this option if you do not want to conform the audio.
5. Click on the Import button.
The Successful Import dialog box opens, notifying you that the conformation process has been completed.
6. Click on the Ok button to return to the Import Project dialog box.The Report section displays information relative to the conformation process. If an error would happen during the conformation process, this is also where the details relative to this error would appear.
7. Click on the Close button to return to your animatic project.
324

Chapter 11: Exporting Your Storyboard Preferences
Preferences In Storyboard Pro, you will find preferences related to the export under the Import/Export tab.
To open the Preferences panel:
Windows: Select Edit > Preferences.Mac OS X: Select Toon Boom Storyboard Pro > Preferences.You can also use the default keyboard shortcut [Ctrl]+[U] (Windows) or [ ]+[U] (Mac OS X).
Storyboard Pro Export Preferences
Export to Movie The following preferences are related to printed time code when using the File > Export > Movie command.
Refer to Exporting a Movie to learn more about this topic.
• Time Code Font: Use this drop-down menu to select the font in which you want the time code to print when using the Export > Movie feature. The drop-down menu will list all the fonts available on your system.
• Time Code Colour: By default the time code will print in black on your animatic. Click on the colour swatch to open the Select Colour dialog box in which you can pick the colour of your choice.
• Time Code Height: Use this option to set the height (percentage) of the time code font size.• Time Code Position: Use this drop-down menu to set the position rule of the time code of your animatic.
Top LeftTop CentreTop RightBottom LeftBottom LeftBottom Centre
325

Storyboard Pro 2 User Guide
Bottom Right• Draw Box Behind Time Code: Enable this option if you want a colour rectangle to be spread behind the
time code. This can prove useful when you have a very colourful or contrasted animatic and that you can not easily find a font colour that stands out of the images.
• Time Code Background Colour: Click on the colour swatch to pick a colour from the Select Colour dialog box. This is the colour the box behind the time code will appear when the option Draw Box Behind Time Code is enabled.
Export to Bitmap • Limit Size Allowed for Bitmap Export: Enable this option to impose a size limit when exporting bitmaps.
When this option is enabled, you can define the size limit in the two fields below.• Maximum Width: When the Limit Size Allowed for Bitmap Export preference is enabled, use this field to set
the maximum width (in pixels) the exported image can have.• Maximum Height: When the Limit Size Allowed for Bitmap Export preference is enabled, use this field to
set the maximum height (in pixels) the exported image can have.
326

Index
INDEX
AAAF
export to 317
aboutCamera view 38colour 177colour view 46exporting storyboards 285layers 198menus 48Paint tool 188Panel view 44playback toolbar 43storyboarding 12storyboard toolbar 43storyboard view 45thumbnails view 42tool properties view 46tools toolbar 42Welcome screen 16
about navigation toolbar 64accessing
documentationdocumentation
accessing 17preferences panel 65
add colourcolour view 47
adding 50brush styles 122colour swatches 178dynamic brush 122keyframe 239
at start of current panel 239end of current panel 239
new view 50Pen styles 154workspace 59
Adding and Deleting Sound Sequences 263Adding a Sound Track
soundmanage sound tracks 261
Adding Layers to a Panel 199Adding Snapshot Markers to a Panel 302add keyframe 239add texture
colour view 47
Adjust First and Last Frame Transformation Positions 259adjusting the continuity, tension and bias between keyframes
248Adjusting the Sound Length 266Advanced
preferences 171drawing 171memory 171OpenGL 172
Analyze and Export to PDF 299animatic
export 321playing back 271
Animatingtraditionally using digital 171
Animating Layers 254adjust first frame transformation position 259First Frame Transformation 256Last Frame Transformation 256reset pivot 254Set first frame position 257Set last frame position 257Setting the Pivot 255snap and align 254snap to contour 254
animating the camera 239Animation disc
Rotate View tool 169
Anminating Layerspivot tool 254
antialiasingfull scene 119
audio filesimporting 224
Auto-Close gap 153Auto-Close Gap Mode
Pencil tool option 134
Auto Flatten Mode 121Auto-Flatten Mode
Pencil tool option 135shape 153
Auto gap closing 195automatic close gap
option 190
Automatic Fillingshape tool 153
autosave 67
BBacking Up Projects 31Backup Storyboard 31Basic Commands 32bitmap
export 304current image 305sequential filename patterns 304storyboard to 306
bitmap texture swatches 183Brush
Presets 126
Brush Strokes to Pencil Linesconvert 167
brush styles 122adding 122deleting 124renaming 124selecting 122
Brush Tips 125Brush tool
drawing with 118, 120options 121regular brush mode 121
327

Storyboard Pro 2 User Guide
button4-3 area
Camera view 394-3safety
Camera view 39camera label
Camera view 40camera mask
Camera view 39reset rotation 40reset view 40safety
Camera view 39
CCamera 234
animating the 239preferences 173, 273static 235
copying to another scene 237resetting 238setting the 235
camera keyframes 240, 241creating 241in Timeline View 240modifying trajectory 245moving in camera view 243moving keyframes in timeline 246synching 250
camera label button 40Camera Space
camera view 41
Camera Status Bar 235Camera Tab
preferences 173
Camera Tool 235Camera Tool Properties 239
add keyframe at end current panel 239Ease In/Ease Out 240reset camera animation 239
Camera View 404-3 area button 394-3 safety button 39about 38camera mask button 39camera space 41drawing name 41editing stack menu 41frame number 41grid display button
grid button 39point of view drop down menu 40reset rotation 40reset view 40safety button 39Thumbnail modebutton 39tool name 41zoom drop-down menu 41
Camera viewHand
panning 168Rotate view 169Zoom tool 169
changestracking 278
Change Transition Duration 270
Change Transition Type 270changing
layer opacity 203
close gapsmanually 194
closinglibrary 218
closing a view 51collapse
views 53
ColourSelect by 148
colourabout 177adding
swatches 178copying 184pasting 184preferences 195
auto gap closing 195selecting in a drawing 191using swatches 177
colour display modes 185switching between 185
Colour Picker 179colours
preferences 68
colour swatchcolour view 48
colour swatch namecolour view 48
Colour Viewabout 46add colour 47add texture 47colour swatch 48colour swatch name 48colour view menu 48link/unlink three colours 48remove colour 47set current brush colour 48set current paint colour 48set current pencil colour 48
colour view menucolour view 48
commandsbasic
list of 32
conformation 322export project 322
export selected panels 323export tracked panels 323
import animatic 324
Contour Editorsmooth selection 144
Contour Editor Toollasso 143marquee 143Properties 143using 142
Convert tooloptions 167
Copy End Position from Start Positionadjust transformation position 260
328

Index
copyinglayers 199static camera from one scene to another 237
Copy Start Position from End Positionadjust transformation position 260
Create Optimized Drawings 29creating
camera keyframes 241folder 218library 217project 18
usingwelcome screen 18
scene 25Templates
from timeline view 221
Creating Transitions 268CSV
export to 303
current framesplit panel at 233
customizeKeyboard shortcuts 72layout
exporting as pdf 289pdf profile-footer 296pdf profile-general 290pdf profile-header 295pdf profile-labeling 297pdf profile-page 291pdf profile-storyboard 291
Cutter Toolusing 157
Cutter Tool Options 158Cutting Drawing Parts 157
Ddefault
keyboard shortcutschoosing 72
Deformingusing Perspective Tool 155
deletingbrush styles 124colour swatches 184control point 246folder 219
Warning 219keyframes 253layers 200Pen styles 154Sound Track
soundmanage sound tracks 263
Templates 223voice annotations 283workspace 60
Deleting a Sound Sequence 264Deleting a Transition 270Deleting Snapshot Markers from a Panel 302dialogue
working with text 159
Displaysound 264
displaynavigation toolbar 64
Display Duration in Time Code Format 272display duration in time code format
preferences 69
Draw Behind 152Pencil tool option 134
Draw Behind Mode 121Drawing
Auto-Flatten Mode 121Brush Styles 122
adding 122deleting 124renaming 124selecting 122
brush tool options 121Contour Optimization 125Draw Behind Mode 121Dynamic Brush
adding 122line texture parameters 131maximum brush size 125minimum brush size 125Perspective tool 155preview 125Regular Brush Mode 121rotating 169selecting colour in 191Smoothness and Contour Optimization 125Smoothness Optimization 125using brush tool 118, 120using invisible lines 137using pencil tool 118using Pencil Tool 133using Shapes 151view final lines 119
drawingadd text in 159onlayer 198substitution 214
Drawing and Traditional Animation Preferences 171drawing name field
camera view 41
Drawing ObjectsGroup Ungroup 168
drawing objectsselecting 145
Drawing workspaceabout 57
dynamic brushadding 122
EEase In
set ease in for a keyframe 252
Ease In and Ease Outadjust transformation position 259First Frame Transformation Tool 256Last Frame Transformation Tool 256
Ease In/Ease Out 240Ease Out
set ease ou for a keyframe 253
Easingin or out of keyframes 252
329

Storyboard Pro 2 User Guide
Editinggradients 193textures 193
editing stack menucamera view 41
EDLexport
sequential filename patterns 317export to 317
ellipseshape option 152
erasercontour optimization 139smoothness optimization 139
Eraser Styles 140brush 140
adding 140deleting 141renaming 140
eraser tips 139Eraser Tool
options 139
Erasingdrawing parts 138
expandviews 53
exportbitmap 304
current imahe 305sequential filename patterns 304storyboard 306
image sequence 315movie 308
QuickTime 308preferences 325QuickTime movie
settings 310sound settings 312transparency 312video settings 311
storyboardabout 285
storyboard as PDF 286Adding Snapshot Markers to a Panel 302Analyze and Export to PDF 299custom layout 289
pdf profile-footer 296pdf profile general 290pdf profile-general 291pdf profile-header 295pdf profile-labeling 297pdf profile-storyboard 291
Deleting Snapshot Markers from a Panel 302pdf options panel 298security 288setup 286
SWF movie 313to CSV 303
exportinglayers 208
exporting as pdfAdding Snapshot Markers to a Panel 302Analyze and Export to PDF 299pdf options panel 298
export selected panels 323
export toAAF 317
sequential filename patterns 317EDL 317
sequential filename patterns 317Toon Boom 321XML 317
export to bitmappreferences 326
export to moviepreferences 325
export tracked panels 323
Ffield
drawing name 41frame number 41tool name 41
File Menuusing 20
Final Cut Proimporting changes from 322
Final Draftcreating new project from 21import settings 24
First Frame Transformation 256First Frame Transformation Tool 256Flatten 149flip horizontal 149, 156Flip Horizontal and Flip Vertical
First Frame Transformation Tool 256
flip vertical 149, 156floating windows 50folder
creating 218deleting 219
Warning 219renaming 218
fontalignment 161indent 161kerning 161size 161style 160type 160, 162
forbid drawing on thumbnails 66formatting
font kerning 161font size 161font style 160font type 160, 162indent 161text 160text alignment 161
frame number fieldcamera view 41
Full Scene antialiasing 119
GGlobal UI
preferences 272
gradient colour swatches 181gradients
editing 193
330

Index
Group Ungroup 168
HHand tool
Camera viewpan 168
hiding 61layers 201toolbars 54
highlightspreferences panel 65user interface 37
Holdadjust transformation position 259
Hold Start and Hold EndFirst Frame Transformation Tool 256Last Frame Transformation Tool 256
Horizontal workspaceabout 57
How tocreate texture brushes 132draw 116draw with line texture 130paint 176
Iicons
information 14
image filesimporting 224
image sequenceexporting 315
importpreferences 325script 76
import caption 77storyboard view 76
project info 76script caption 76
Symbols 225Templates 225
Camera view 225Thumbnails view 225Timeline view 226
import animatic 324import caption
import script 77
Import/Exportpreferences 275
importingaudio files 224image files 224images as layers 206sound 275sound sequence 263SWF files 224
importing files as templates 224information icons 14interface
Library view 213
Interface Navigation 62invisible lines
drawing using 137
KKeep Proportion
shape 153
Keyboard shortcutschoosing 72choosing a default set of 72customizing 72
keyboard shortcutscommands 32
keyframescamera 240creating
camera 241in camera view 241in Timeline View 240modifying trajectory 245moving in camera view 243moving in the timeline 246snapping 249
Keyframes and Control Pointscamera
preferences 274
keyframe synching 250
Llasso
cutter tool option 158perspective tool option 155select tool 148
Lasso and Marquee 143Last Frame Transformation Tool 256launching
Storyboard Pro 16
Layersabout 198
layerschange opacity 203copying 199deleting 200drawing 198exporting 208hiding 201importing images as 206locking 201managing 199merging 207ordering 204prefernces 209renaming 200setting default layout 205showing 201thumbnails 202toggle background 205unlocking 201
levels of undo 67
331

Storyboard Pro 2 User Guide
Libraryauto generate thumbnails 228closing 218creating 217deleting thumbnials from 220generating
thumbnals 220opening 218refresh 219structuring 217understanding 212
Library list 216Library View
interface 213
Light Tableusing 166
lineshape option 152
line texture 126, 131creating texture brushes 132drawing with 129how to draw with 130parameters 131
line texture parametersEnable Texture 131Hardness 131Maximum Opacity 131Minimum Opacity 131Texture File 131Texture Scale 131
Linking a Sound Tracksound
manage sound tracks 262
link/unlink three colourscolour view 48
listeningto voice annotations 283
list ofbasic commands 32
loadingworkspace 58
lockinglayers 201
Mmanaging
layers 199toolbars 54, 55views 50workspace 57
Managing Sound Tracks 261Manipulators
Tool Properties View 117
marqueecutter tool option 158perspective tool option 155select tool 148
maximumeraser size 139
menuediting stack menu 41pov drop-down 40zoom drop-down 41
menusabout 48Play menu 43Quick Access Menu 49Top Menu 49View Menu 49
merginglayers 207
minimumeraser size 139
Modifyingtrajectory with control points 245
Modifying a Transition 270More Drawing Tools 167movies
exporting 308QuickTime 308
movingkeyframes in camera view 243toolbars 54
moving keyframes in the timeline 246Muting a Sound Track
soundmanage sound tracks 262
Nnaming tab 28Navigation toolbar
about 64displaying 64using 64
first/last frames 64first/last panels 64previous/next panels 64previous/next scenes 64
new project from Final Draft script 21
Oobject
textbreaking 163
Onion Skin 171expand
using 165flipbook feature
using 165using 164
onion skin 173opening
library 218project 18
usingwelcome screen 18
opening template as folder 227Operations
Tool Properties View 117
optimizing a project 29
332

Index
Optionsautomatic close gap 190camera
preferences 273ConvertTool 167eraser tool 139pencil tool 134Show Grid 168Tool Properties View 117
orderinglayers 204
Other Optimization Suggestions 30Override Tool 163Overview workspace
about 57
Ppaint
how to 176
Paint Mode 189Paint tool
properties 189Lasso and Marquee 189painting mode 189
using 188
Paint Unpainted Mode 190panel
split at current frame 233
panel captionspanel view 45
Panel Duration 231panel duration 231
resizingAffecting Next Panel 231
settingfrom top menu 232
setting visually 231
panel informationpanel view 44
panelsexport selected 323export tracked 323
Panel Viewabout 44panel captions 45panel information 44selection information 44voice annotations 45
panel viewsetting duration in 232
Panninguser interface 62
PDFexport storyboard as 286
Adding Snapshot Markers to a Panel 302Analyze and Export to PDF 299custom layout 289
pdf profile-footer 296pdf profile-general 290pdf profile-header 295pdf profile-labeling 297pdf profile-page 291pdf profile-storyboard 291
Deleting Snapshot Markers from a Panel 302pdf options panel 298security 288setup 286
PDF exporting storyboard as 286pdf options panel 298PDF view workspace
about 57
Pencil Selection 150Pencil Styles
Pencil tool option 135shapes 153
Pencil to Brushconvert 167
Pencil tooldrawing with 118using 137
Pencil Tool options 134auto-close gap mode 134auto-flatten mode 135Draw Behind 134pencil styles 135
adding 135deleting 136renaming 135selecting 135
pen size 136smoothness 136
Pen SizePencil tool option 136
Pen Stylesadding 154deleting 154renaming 154selecting 153
perform zoom inZoom tool properties 170
perform zoom outZoom tool properties 170
Perspective Toolproperties 155
Perspective toolusing 155
pivot pointreposition 147
Pivot Toolanimating layers 254
playbackanimatic 271
Playback Toolbarabout 43Play menu 43
Playing Back Your Animatic 271
333

Storyboard Pro 2 User Guide
Play menuplayback toolbar 43
Point of Viewcamera
preferences 273
point of view drop-down menupreferences 70
POV drop-down menucamera view 40
preference 66, 67preferences 65, 228, 272
advanced 171drawing 171memory 171OpenGL 172
Camera 273keyframes and control points 274onion skin 173options 273point of view 273
camera tab 173colour 195
auto gap closing 195export 325
to bitmap 326to movie 325
general tab 228auto generate thumbnails in library 228
Global UI 272highlights 65import 325import/export 275
import sound 275layers 209OpenGL
full scene antialiasing 172panel
accessing 65Tools 274
transform 274Tools Tab 174
drawing 174UI
advanced tab 67autosave 67levels of undo 67
camera tab 69point of view drop-down menu 70reset view mode drop-down menu 70safety areas 71show status bar 69
general tab 66forbid drawing on thumbnails 66Terminology Style 66
global tab 68colours 68display duration in time code format 69
preparing for storyboarding 12Preview
eraser 140
preview window 214project information
storyboard view 46
project optimization 29project properties 26
26, 27, 28
propertiesPaint tool 189
Lasso and Marquee 189painting mode 189
project 26
QQuick Access Menu
about 49
Quick Searchtemplate 215
QuickTime movieexport with transparency 312settings 310sound settings 312video settings 311
Rrecording
voice annotations 282
rectangleshape option 152
refreshlibrary 219
remove colourcolour view 47
renamingbrush styles 124folder 218layers 200Pen styles 154
renaming a view 51reordering
workspace list 61
repositionpivot points 147
Resetcamera animation 239static camera 238
Reset panuser interface 63
Reset Pivotanimating layers 254
Reset rotationuser interface 63
reset rotation buttoncamera view 40
Resetting the Camera Animation 253Reset Transformation
adjust transformation position 260
Reset viewuser interface 62
reset viewZoom tool properties 170
reset view buttonCamera view 40
reset view mode drop-down menupreferences 70
Reset view to camera overviewuser interface 62
Reset view to default drawing areauser interface 62
Reset view to end camerauser interface 62
334

Index
Reset view to start camerauser interface 62
Reset zoomuser interface 63
reset zoomZoom tool properties 170
Resizingtext box 162
resizing 231Resizing a Panel in the Timeline and Shifting all Other Panels
Down 231Resizing a Panel While Only Affecting the Next Panel 231Resizing a View 52resolution tab 27Restore and Open Backup 31restoring
default workspace 62
Rotate90 Degrees CCW 15690 Degrees CW 156
Rotate 90 CCWuser interface 63
Rotate 90 CWuser interface 63
Rotate 90 degrees CCWFirst Frame Transformation Tool 256Last Frame Transformation Tool 256
Rotate 90 degrees CWFirst Frame Transformation Tool 256Last Frame Transformation Tool 256
Rotate operationRotate 90 Degrees CCW 149Rotate 90 Degrees CW 149
Rotate View tool 169rotating
drawingsanimation disc 169
Ssafety areas
preferences 71
savingworkspace 60
scenecreating 25
scriptimporting 76
import caption 77storyboard view 76
project info 76script caption 76
script captionstoryboard view 46
scrubbingsound 266
securityexporting pdfs 288
selectingbrush styles 122current tool colour 186drawing objects 145keyboard shortcuts 72pen styles 153
selection informationpanel view 44
select toollasso 148marquee 148snap options 148
Select Tool Properties 148Separate Objects
converting text into 163
set current brush colourcolour view 48
set current paint colourcolour view 48
set current pencil colourcolour view 48
Set First and Last Frame Positions 257setting
layers layout as default 205
setting keyframe synching options 250setting keyframe synching tonone 251setting keyframe synching toRelative to Panels 251setting keyframe synching to Relative to Shot 252settings
exporting QuickTime movies 310
settings tab 26Setting the Panel Duration from the Top Menu 232Setting the Panel Duration in the Panel View 232Setting the Panel Duration Visually 231Setting the Pivot for a Layer
animating layers 255
Setting the Static Camera 235shapes
drawing using 151
shape toolautomatic fill options 153draw behind option 152options 152snap options 152
Shapingusing Contour Editor Tool 142
shortcutcustomize 72selecting a default set of 72
Shortening and Extending Sound Sequences 266Show Grid
option 168
showing 61layers 201toolbars 54
show status barpreferences 69
Show Volume EnvelopeSound Displayshow volume envelope 265
Show Waveform 264Size Adjustment
shape 154
smooth 149Smoothness
Pencil tool option 136
Smoothness and Contour Optimization 139smooth selection
Contour Editor 144
Snap and Alignanimating layers 254
335

Storyboard Pro 2 User Guide
Snap Options 152select tool 148
Snap optionsSnap and Align 148, 152Snap to Contour 144, 148, 152
Snap to Contouranimating layers 254
solid colour swatches 178Sound 261
adding a sound track 261, 263adding sound sequences 263adjusting sound length 266
extending 266shortening 266split sequence at current frame 267
deleting sound sequences 263, 264importing sound sequences 263import preferences 275linking a sound track 262manage sound tracks 261muting a sound track 262
Sound Display 264show waveform 264
Sound Scrubbing 266sound settings
exporting QuickTime movies 312
soundtracksmanaging 261
Split Panel at Current Frame 233Split Sound Sequence at Current Frame 267Spreading Camera Motion Across Panels of a Scene 250Spread Layer Motion
adjust transformation position 260
Static Camera 235status bar
camera 235
Storyboard Toolbarabout 43
Storyboard Viewabout 45project information 46script caption 46
storyboard viewimport script 76
project info 76script caption 76
Strokes to Pencil linesconvert 167
structinglibrary 217
swapping views 52swatches
adding colour 178bitmap texture 183colour
using 177deleting colour 184gradient colour 181solid colour 178
SWFexporting movies 313
SWF filesimporting 224
switchingbetween colour display modes 185
Symbolsimporting 225
TTemplate
openingas folder 227
Templatescreating
from timeline view 221deleting 223importing 225
Camera view 225Thumbnails view 225Timeline view 226
importing files as 224using 221
templatesunderstanding 212
Templates list 216Terminology Style 66text
alignment 161breaking an object 163converting into objects 163creating in drawings 159font size 161font style 160font type 160, 162formatting 160indent 161kerning 161working with 159
text boxresizing 162
texture brushescreating 132
texturesediting 193line 126
drawing with 129parameters 131
thumbnail modeCamera view 39
thumbnailsdeleting
library 220generating
library 220
Thumbnails Viewabout 42
Timeline View 230Timeline workspace
about 57
togglebackground layers 205
Toolbar Manager 55toolbars
hiding 54managing 54moving 54showing 54
tool name fieldcamera view 41
336

Index
Tool Propertiescamera 239
Tool Properties View 117about 46manipulators 117operations 117options 117
Toolspreferences 274
tools 256camera 235Last Frame Transformation 256pivot 254, 255Rotate View 169
Tools Tab Preferences 174Tools Toolbar
about 42
Toon Boomexport to 321
Top Menuabout 49
trackingchanges 278
tracking changesauto tracking mode 278by date 279validating 280
Traditional Animation Toolsin digital animation
onion skin 171
Traditional animation with digital software 171Transform 274transform
toolpreferences 274
Transitions 268modifying 270
change transition duration 270change transition type 270deleting transition 270
transitionscreating 268
transparencyexporting QuickTime movies with 312
UUngroup Group 168unlocking
layers 201
Unpaint Mode 190
User interface 36highlights 37pan view 62Preferences
advanced tab 67autosave 67levels of undo 67
Camera tab 69point of view drop-down menu 70reset view mode drop-down menu 70safety areas 71show status bar 69
general tab 66forbid drawing on thumbnails 66Terminology Style 66
Global UI tab 68colours 68display duration in time code format 69
Reset pan 63Reset rotation 63Reset view 62Reset view to camera overview area 62Reset view to default drawing area 62Reset view to end camera 62Reset view to start camera 62Reset zoom 63Rotate 90 CCW 63Rotate 90 CW 63views and toolbars, list of 36zoom in 62zoom in and out 62zoom out 62
usingFile Menu 20Light Table 166navigation toolbar 64
first/last frames 64first/last panels 64previous/next panels 64previous/next scenes 64
Onion Skinexpand 165
Onion Skin feature 164Onion Skin flipbook feature 165
Using the File Menu 20
VVertical workspace
about 57
video settingsexporting QuickTime movies 311
viewRotate drawing 169
ViewingFinal Lines 119
View Menuabout 49
viewsadding 50closing 51collapsing 53expanding 53managing 50renaming 51resizing 52swapping 52
337

Storyboard Pro 2 User Guide
views and toolbarslist of 36
visual markers 14voice annotations 282
deleting 283listening to 283panel view 45recording 282
WWarning
deleting a folder 219
Welcome screenabout 16
windowsadding floating 50
workspace 61adding 59delete 60hiding 61loading a 58managing 57renaming 60restoring default 62saving 60showing 61
workspace listreorder 61
Workspace Manager 58 60, 61adding
workspace 59deleting
workspace 60saving
workspace 60workspace
hiding 61
workspacesdrawing
about 57horizontal
about 57list of 57overview
about 57PDF view
about 57timeline
about 57vertical
about 57
Zzoom drop-down menu
camera view 41
Zoom inuser interface 62
Zoom in and outuser interface 62
Zoom outuser interface 62
Zoom toolCamera view 169
Zoom Tool Properties 169
Zoom tool propertiesperform zoom in 170perform zoom out 170reset view 170reset zoom 170zoom in 169zoom out 169
338

Index
339

Storyboard Pro 2 User Guide
340


![Storyboard Pro UserGuide[1]](https://img.dokumen.tips/doc/110x75/577dac671a28ab223f8dc927/storyboard-pro-userguide1.jpg)