Embed Size (px)
Citation preview
Storage Manager 2019 R1Installation Guide
April 2020Rev. C

Notes, cautions, and warnings
NOTE: A NOTE indicates important information that helps you make better use of your product.
CAUTION: A CAUTION indicates either potential damage to hardware or loss of data and tells you how to avoid the
problem.
WARNING: A WARNING indicates a potential for property damage, personal injury, or death.
© 2019 - 2020 Dell Inc. or its subsidiaries. All rights reserved. Dell, EMC, and other trademarks are trademarks of Dell Inc. or its subsidiaries. Othertrademarks may be trademarks of their respective owners.
This guide describes how to install and configure Storage Manager components.
Revision HistoryDocument number: 680-028-025
Revision Date Description
A April 2019 Initial release
B February 2020 Updated for Storage Manager 2019 R1.10
C April 2020 Updated for Storage Manager 2019 R1.20
AudienceStorage administrators make up the target audience for this document. The intended reader has a working knowledge of storage andnetworking concepts.
Related PublicationsThe following documentation is available for storage components managed using Storage Manager.
Storage Manager Documents• Storage Manager Installation Guide
Contains installation and setup information.• Storage Manager Administrator’s Guide
Contains in-depth feature configuration and usage information.• Unisphere and Unisphere Central for SC Series Administrator’s Guide
Contains instructions and information for managing storage devices using Unisphere and Unisphere Central for SC Series.• Storage Manager Release Notes
Provides information about Storage Manager releases, including new features and enhancements, open issues, and resolved issues.• Storage Manager Online Help
Provides context-sensitive help for the Client, Data Collector, and Server Agent.• Unisphere and Unisphere Central for SC Series Online Help
Provides context-sensitive help for Unisphere and Unisphere Central for SC Series.• Dell Storage REST API Release Notes
Contains a list of known issues and workarounds for the Dell Storage REST API.• Dell Storage API PowerShell SDK Release Notes
Contains a list of known issues and workarounds for the Dell Storage API for PowerShell.
Storage Center Documents• Storage Center Release Notes
Contains information about features and open and resolved issues for a particular product version.• Storage Center Deployment Guides
Preface

Provides cabling instructions for Storage Center controllers, switches, and enclosures and provides instructions for configuring a newStorage Center.
• Storage Center Software Update Guide
Describes how to update Storage Center software from an earlier version to the current version.• Storage Center Update Utility Administrator’s Guide
Describes how to update the Storage Center software on storage systems. Updating the Storage Center software using the StorageCenter Update Utility is intended for storage systems that cannot be updated using the standard Storage Center update methods.
• Storage Center Command Utility Reference Guide
Provides instructions for using the Storage Center Command Utility. The Command Utility provides a command-line interface (CLI) toenable management of Storage Center functionality on Windows, Linux, Solaris, and AIX platforms.
• Storage Center Command Set for Windows PowerShell
Provides instructions for getting started with Windows PowerShell cmdlets and scripting objects that interact with the Storage Centervia the PowerShell interactive shell, scripts, and hosting applications. Help for individual cmdlets is available online.
FluidFS Cluster Documents• FluidFS FS8600 Appliance Pre-Deployment Requirements
Provides a checklist that assists in preparing to deploy an FS8600 appliance prior to a Dell installer or certified business partner arrivingon site to perform an FS8600 appliance installation. The target audience for this document is Dell installers and certified businesspartners who perform FS8600 appliance installations.
• FluidFSFS8600 Appliance Deployment Guide
Provides information about deploying an FS8600 appliance, including cabling the appliance to the Storage Center(s) and the network,and deploying the appliance using the Storage Manager software. The target audience for this document is Dell installers and certifiedbusiness partners who perform FS8600 appliance installations.
• FluidFS FS8600 Appliance CLI Reference Guide
Provides information about the FS8600 appliance command-line interface. The target audience for this document is customers.• FluidFSFS8600 Appliance Firmware Update Guide
Provides information about upgrading the FluidFS software. The target audience for this document is customers.• FluidFS Release Notes
Provides information about FluidFS releases, including new features and enhancements, open issues, and resolved issues. The targetaudience for this document is customers.
• Dell FS8600 Appliance Service Guide
Provides information about FS8600 appliance hardware, system component replacement, and system troubleshooting. The targetaudience for this document is Dell installers and certified business partners who perform FS8600 appliance hardware service.
Dell Support• Knowledge Base• Servers, Storage, and Networking• Storage technical documents and videos
Contacting DellDell provides several online and telephone-based support and service options. Availability varies by country and product, and some servicesmight not be available in your area.
To contact Dell for sales, technical support, or customer service issues, go to Dell.com/support.
• For customized support, type your system service tag on the support page and click Submit.• For general support, browse the product list on the support page and select your product.

Chapter 1: Introduction to Storage Manager......................................................................................7Storage Manager Components............................................................................................................................................7Management Compatibility...................................................................................................................................................8Software and Hardware Requirements.............................................................................................................................. 8
Data Collector Requirements......................................................................................................................................... 8Storage Manager Virtual Appliance Requirements......................................................................................................9Storage Manager Client Requirements....................................................................................................................... 10Unisphere Web Browser Requirements...................................................................................................................... 10Server Agent Requirements.......................................................................................................................................... 11
Default Ports Used by Storage Manager...........................................................................................................................11Data Collector Ports....................................................................................................................................................... 11Client Ports......................................................................................................................................................................12Server Agent Ports........................................................................................................................................................ 12
IPv6 Support......................................................................................................................................................................... 13
Chapter 2: Planning and Preparation............................................................................................... 14Choose a Data Storage Method.........................................................................................................................................14Gather Required Installation Information...........................................................................................................................14
Record Database Information....................................................................................................................................... 14Prepare the Database..........................................................................................................................................................15
Prepare a Microsoft SQL Server Database................................................................................................................ 15Prepare a MySQL Database......................................................................................................................................... 16
Chapter 3: Installing and Configuring the Data Collector................................................................... 17Install the Primary Data Collector.......................................................................................................................................17Install a Remote Data Collector.......................................................................................................................................... 18Migrating an Existing Data Collector to a New Data Collector...................................................................................... 19
Data Collector Migration Requirements...................................................................................................................... 19Migrate an Existing Data Collector to a New Data Collector...................................................................................20
Chapter 4: Deploying and Configuring the Storage Manager Virtual Appliance....................................22Virtual Appliance Requirements for vSphere................................................................................................................... 22Deploy the Virtual Appliance.............................................................................................................................................. 22Configure the Virtual Appliance as a Primary Data Collector........................................................................................ 23Configure the Virtual Appliance as a Remote Data Collector........................................................................................25Migrating an Existing Data Collector to the Storage Manager Virtual Appliance....................................................... 25
Data Collector Migration Requirements..................................................................................................................... 26Migrate an Existing Data Collector..............................................................................................................................26Next Steps After Migration.......................................................................................................................................... 27
Chapter 5: Installing and Configuring the Storage Manager Client.....................................................28Connect to the Storage Manager Applications Page..................................................................................................... 28Install the Storage Manager Client on Windows............................................................................................................. 28Install the Storage Manager Client on Linux.................................................................................................................... 29
Contents
Contents 5

Use the Storage Manager Client to Connect to a Storage Center.............................................................................. 29Use the Storage Manager Client to Connect to the Data Collector............................................................................ 30Add Storage Centers to Storage Manager...................................................................................................................... 30Next Steps............................................................................................................................................................................ 31
Chapter 6: Updating Storage Manager Software .............................................................................32Update the Storage Manager Data Collector..................................................................................................................32Update the Storage Manager Client.................................................................................................................................32Update the Storage Manager Server Agent....................................................................................................................33Update the Storage Manager Virtual Appliance..............................................................................................................33
6 Contents

Introduction to Storage ManagerStorage Manager allows you to monitor, manage, and analyze Storage Center SANs, FluidFS clusters, and PS Series groups from acentralized management console. The Storage Manager Data Collector stores data and alerts it gathers from managed storage devices inan external database or an embedded database.
To perform monitoring and administrative tasks for multiple Storage Centers, connect to the Storage Manager Data Collector using theStorage Manager Client or Unisphere Central.
To perform monitoring and administrative tasks for a single Storage Center, connect directly to a Storage Center using the StorageManager Client or Unisphere.
Topics:
• Storage Manager Components• Management Compatibility• Software and Hardware Requirements• Default Ports Used by Storage Manager• IPv6 Support
Storage Manager ComponentsStorage Manager consists of the following components:.
Table 1. Storage Manager Components
Component Description Setup Documentation
Primary Storage Manager DataCollector
Service that gathers reporting data andalerts from managed storage systems.
Storage Manager Installation Guide
Storage Manager Client Windows or Linux application thatconnects to a single Storage Center orconnects to a Storage Manager DataCollector to provide a centralizedmanagement interface for one or morestorage system.
Storage Manager Installation Guide
Remote Storage Manager DataCollector
A secondary Storage Manager DataCollector that is connected to theprimary Storage Manager DataCollector. The remote Storage ManagerData Collector can be used to activate adisaster recovery site if the primaryStorage Manager Data Collectorbecomes unavailable.
Storage Manager Installation Guide and Storage ManagerAdministrator’s Guide
Storage Manager Server Agent Software installed on a Windows serverthat enables the Storage Manager DataCollector to gather information aboutstorage objects on a Windows server.
Storage Manager Administrator’s Guide
1
Introduction to Storage Manager 7

Management CompatibilityStorage Manager is compatible with the products that are listed in the following table:
Product Versions
Storage Center 7.1 – 7.4
PS Series group firmware 9.0 – 10.0
Dell FluidFS 6.0.300135NOTE: You must update FluidFS firmware to 6.0.300135before updating to Storage Manager 2019 R1.
Microsoft System Center Virtual Machine Manager (SCVMM) 2012, 2012 SP1, 2012 R2, 2016, and 2019
VMware vCenter Site Recovery Manager (SRM) 6.0, 6.1, 6.5, 8.1, 8.1.1, and 8.2NOTE: A Storage Center must have Fibre Channel oriSCSI front-end ports to work with SRM.
Dell Storage Replication Adapter (SRA) 18.1.1.173
CITV 4.0
DSITV 4.1 – 6.0
Software and Hardware RequirementsThe following sections list the requirements for the Storage Manager Data Collector, Storage Manager Client, and Storage ManagerServer Agent .
Data Collector RequirementsThe following table lists the Storage Manager Data Collector requirements.
NOTE: For best results, install the Data Collector on a Windows Server VM using a traditional volume source from
shared storage. Do not use a VVol for the Windows Server VM on which the Data Collector is installed.
Component Requirements
Operating system Any of the following 64-bit operating systems with the latest service packs:
• Windows Server 2012 R2• Windows Server 2016• Windows Server 2019
NOTE: Windows Server Core is not supported.
Windows UserGroup
Administrators
CPU 64-bit (x64) microprocessor with two or more cores
The Data Collector requires a microprocessor with four cores for environments that have 100,000 or more ActiveDirectory members or groups.
Memory Varies based on size of the storage environment:
• 4 GB – One to ten Storage Centers, or up to 3000 total volumes• 8 GB – More than ten Storage Centers, or up to 6000 total volumes• 16 GB – More than ten Storage Centers, or up to 12,000 total volumes• 32 GB – More than ten Storage Centers, or more than 12,000 total volumes
Disk space At least 20 GB ; additional space is required to manage FluidFS cluster software updates.
8 Introduction to Storage Manager

Component Requirements
NOTE: Using an embedded database requires an additional 64 GB to store the database on the filesystem. However, an embedded database is not recommended for a production environment.
Software Microsoft .NET Framework 4.5 or later, full installation
Web browser Any of the following web browsers:
• Google Chrome• Internet Explorer 11• Mozilla Firefox
NOTE: Google Chrome is the recommended browser. Other web browsers might work but are notofficially supported.
External database One of the following databases:
• Microsoft SQL Server 2016• Microsoft SQL Server 2016 Express (limited to 10 GB)• Microsoft SQL Server 2017• Microsoft SQL Server 2017 Express (limited to 10 GB)• MySQL 5.6• MySQL 5.7
NOTE: The embedded database stored on the file system can be used instead of an externaldatabase. However, the embedded database is limited to 64 GB and retains only the last 30 days ofdata. The embedded database is not recommended for a production environment.
Storage Manager Virtual Appliance RequirementsThe Storage Manager Virtual Appliance has the following requirements:
Component Requirement
VMware ESXi hostversion
6.0 and later
VMware vCenterServer version
6.0 and later
Datastore size 55 GB
CPU 64-bit (x64) microprocessor with two or more cores
The Data Collector requires a microprocessor with four cores for environments that have 100,000 or more ActiveDirectory members or groups.
Memory Varies based on size of the storage environment:
• 4 GB – One to ten Storage Centers, or up to 3000 total volumes• 8 GB – More than ten Storage Centers, or up to 6000 total volumes• 16 GB – More than ten Storage Centers, or up to 12,000 total volumes• 32 GB – More than ten Storage Centers, or more than 12,000 total volumes
Software • VMware vCenter Server• VMware vSphere High Availability
Introduction to Storage Manager 9

Storage Manager Client RequirementsThe following table lists the requirements for the Storage Manager Client:
Component Requirements
Operating system Any of the following 64-bit operating systems:
• Windows 8.1• Windows 10• Windows Server 2012 R2• Windows Server 2016• Windows Server 2019• SUSE Linux Enterprise 12• Red Hat Enterprise Linux 7.1• Red Hat Enterprise Linux 7.2• Red Hat Enterprise Linux 7.3• Red Hat Enterprise Linux 7.4• Red Hat Enterprise Linux 7.6• Oracle Linux 7.0• Oracle Linux 7.3• Oracle Linux 7.6
NOTE: Windows Server Core is not supported.
CPU 64-bit (x64) microprocessor with two or more cores
Software Microsoft .NET Framework 4.5 or later (Windows only)
Linux VM AccessClient
• VMware vSphere Web Client• Hyper-V Manager
Web browser Any of the following web browsers:
• Google Chrome• Internet Explorer 11• Mozilla Firefox
NOTE: Google Chrome is the recommended browser. Other web browsers might work but are notofficially supported.
Unisphere Web Browser RequirementsUnisphere is supported on the following web browsers:
• Google Chrome• Internet Explorer 11
NOTE: Unisphere might fail to function correctly if website caching is enabled in Internet Explorer 11. To disable
website caching in Internet Explorer 11, open the Internet Options dialog box and click Settings in the Browsing
history area to display the Website Data Settings dialog box. Then, select the Every time I visit the webpage radio
button on the Temporary Internet Files tab and clear the Allow website caches and databases checkbox on the
Caches and databases tab.
• Mozilla Firefox
NOTE: Google Chrome is the recommended browser. Other web browsers might work but are not officially supported.
10 Introduction to Storage Manager

Server Agent RequirementsThe following table lists the requirements for running the Storage Manager Server Agent on Windows servers.
Component Requirements
Operating system Any of the following 64-bit operating systems with the latest service packs:
• Windows Server 2012 R2 (full or core installation)• Windows Server 2016• Windows Server 2019
CPU 64-bit (x64) microprocessor
Software Microsoft .NET Framework 4.5 Full
Default Ports Used by Storage ManagerThe Storage Manager components use network connections to communicate with each other and with other network resources. Thefollowing tables list the default network ports used by the Storage Manager Data Collector, Storage Manager Client, and Storage ManagerServer Agent. Many of the ports are configurable.
NOTE: Some ports might not be needed for your configuration. For details, see the Purpose column in each table.
Data Collector PortsThe following tables list the default ports that are used by the Storage Manager Data Collector:
Inbound Data Collector PortsNOTE: Configure the firewall rules on the server that the Data Collector is installed to enable inbound connections on
the inbound Data Collector ports.
The Data Collector accepts connections on the following ports:
Port Protocol Name Purpose
3033 TCP Web Server Port Receiving:
• Communication from clients, including the Storage ManagerClient, Unisphere Central, and Dell Storage Replication Adapter(SRA)
• Communication with tiebreaker for Automatic Failover• Alerts from FluidFS clusters
3034 TCP Web Server Port Receiving vCenter/ESXi communication for VASA and VVolprovisioning and administration
8080 TCP Legacy Web ServicesPort
Receiving:
• Storage Manager Server Agent communication• Alerts forwarded from Storage Center SANs
5989 TCP SMI-S over HTTPS Receiving encrypted SMI-S communication
Outbound Data Collector PortsThe Data Collector initiates connections to the following ports:
Port Protocol Name Purpose
25 TCP SMTP Sending email notifications
Introduction to Storage Manager 11

Port Protocol Name Purpose
443 TCP SSL • Communicating with the Storage Manager Data Collector• Sending diagnostic data with SupportAssist
1199 TCP SIMS RMI Communicating with managed PS Series groups
1433 TCP Microsoft SQL Server Connecting to an external Microsoft SQL Server database
3033 TCP SSL Communicating with managed Storage Centers
3306 TCP MySQL Connecting to an external MySQL database
8080 TCP VMware SDK Communicating with VMware servers
27355 TCP Server Agent SocketListening Port
Storage Manager Server Agent communication
35451 TCP FluidFS Communicating with managed FluidFS clusters
44421 TCP FluidFS diagnostics Retrieving diagnostics from managed FluidFS clusters
Client PortsStorage Manager clients use the following ports:
Inbound PortsThe Storage Manager Client and Unisphere Central do not use any inbound ports.
Outbound PortsThe Storage Manager Client and Unisphere Central initiate connections to the following port:
Port Protocol Name Purpose
3033 TCP Web Server Port Communicating with the Storage Manager Data Collector
Server Agent PortsThe following tables list the ports used by the Storage Manager Server Agent.
Inbound Server Agent PortThe Server Agent accepts connections on the following port.
Port Protocol Name Purpose
27355 TCP Server Agent Socket Listening Port Receiving communication from the Data Collector
Outbound Server Agent PortThe Server Agent initiates connections to the following port.
Port Protocol Name Purpose
8080 TCP Legacy Web Services Port Communicating with the Data Collector
12 Introduction to Storage Manager
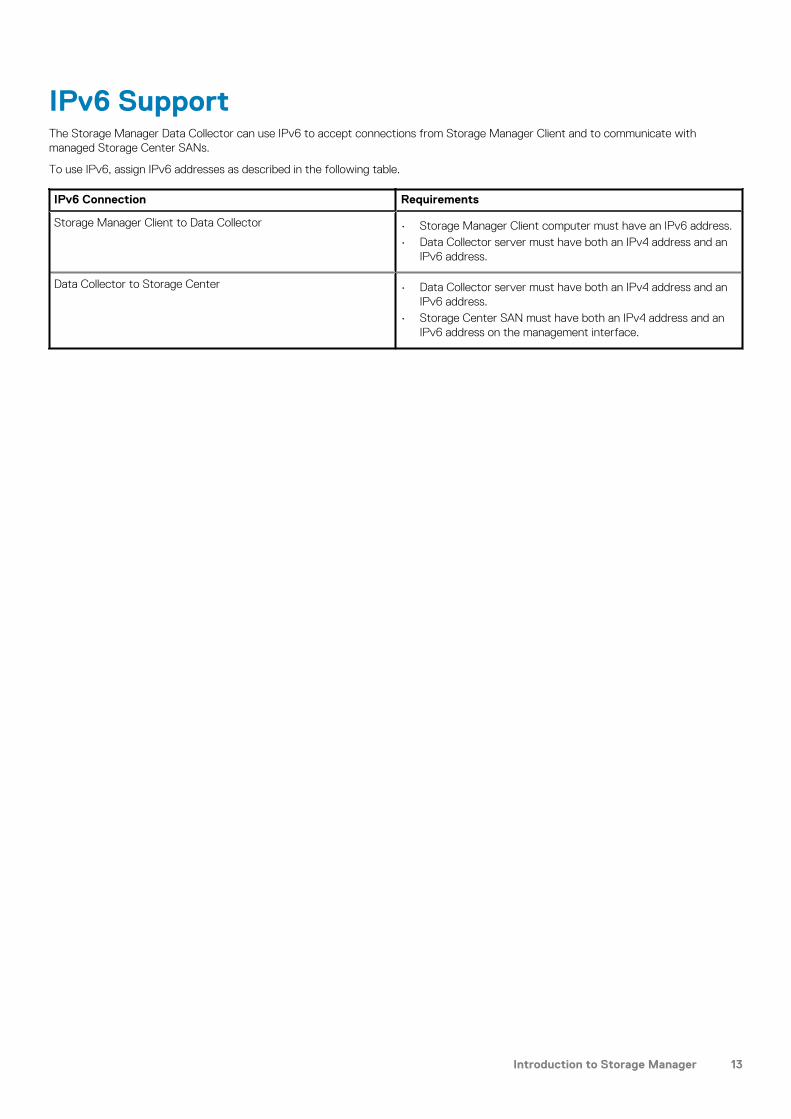
IPv6 SupportThe Storage Manager Data Collector can use IPv6 to accept connections from Storage Manager Client and to communicate withmanaged Storage Center SANs.
To use IPv6, assign IPv6 addresses as described in the following table.
IPv6 Connection Requirements
Storage Manager Client to Data Collector • Storage Manager Client computer must have an IPv6 address.• Data Collector server must have both an IPv4 address and an
IPv6 address.
Data Collector to Storage Center • Data Collector server must have both an IPv4 address and anIPv6 address.
• Storage Center SAN must have both an IPv4 address and anIPv6 address on the management interface.
Introduction to Storage Manager 13

Planning and PreparationBefore you install Storage Manager, plan your configuration and install the required software.
• If you plan to install a new Storage Manager Data Collector instead of updating an existing Data Collector installation, a new DataCollector database must be created during the installation.
• If you plan to use an existing Data Collector database, follow the steps in this guide to migrate from an existing Data Collectorinstallation to a new installation of the Storage Manager Data Collector or Storage Manager Virtual Appliance.
Topics:
• Choose a Data Storage Method• Gather Required Installation Information• Prepare the Database
Choose a Data Storage MethodYou can configure the Data Collector to store data in an external database or in an embedded database on the file system of the hostserver.
Choose the option that is most appropriate for your environment:
• External database: If you decide to use an external database, select the supported database type that best suits your needs.
The following external databases are supported:
○ Microsoft SQL Server 2016○ Microsoft SQL Server 2016 Express (limited to 10 GB)○ Microsoft SQL Server 2017○ Microsoft SQL Server 2017 Express (limited to 10 GB)○ MySQL 5.6○ MySQL 5.7
Storage Manager uses a database administrator account to create a database user named compmsauser and a database namedcompmsadb, which uses a custom schema.
NOTE: To protect data stored on the database, including VVols metadata, configure the external database to take
consistent snapshots.
• Embedded database: If you decide to use the embedded database, the Data Collector can retain only 30 days worth of data, and thedatabase size cannot exceed 64 GB.
NOTE: The embedded database is not recommended for a production environment.
Related References
Data Collector Requirements on page 8
Gather Required Installation InformationBefore installing Storage Manager components, print this page and record the following information.
Record Database Information
About this task
If you plan to use an SQL database, record database information that is needed for installation.
2
14 Planning and Preparation

Item Write down your information
Database version
Name of server that hoststhe database
Database server port
Database user name For security reasons, only record the database username in a secure location.
Database password For security reasons, only record the database password in a secure location.
Prepare the DatabaseIf you plan to use an external database, prepare the database by performing the task that corresponds to your database type.
About this task
NOTE: If you want to store Data Collector data in the embedded database, skip this step.
Steps
• Prepare a Microsoft SQL Server Database• Prepare a MySQL Database
Prepare a Microsoft SQL Server DatabaseSet up the Microsoft SQL Server database or Microsoft SQL Server Express database for the Data Collector.
Steps
1. If necessary, install the database software.2. Make sure you have the credentials for a database administrator account with privileges equivalent to the default sa account.3. Configure the database for mixed-mode authentication (SQL Server and Windows Authentication mode).4. Start the SQL Server Configuration Manager application.5. Set the TCP/IP ports.
a. In the navigation pane, expand SQL Server Network Configuration.b. Click Protocols for MSSQLSERVER or Protocols for SQLEXPRESS.c. Right-click TCP/IP and select Properties. The TCP/IP Properties dialog box appears.d. Click the IP Addresses tab.
Planning and Preparation 15

Figure 1. TCP/IP Properties Dialog Box IP Addresses Tabe. Under IPALL, make sure the TCP Port is set to a valid port number. The default TCP port for SQL Server is 1433.f. Click Apply and click OK to close the dialog box.
6. Enable TCP/IP protocol:
a. In the navigation pane, click Protocols for MSSQLSERVER or Protocols for SQLEXPRESS.b. Right-click TCP/IP and select Enable.
7. Restart SQL Server.
a. In the navigation pane, click SQL Server Services.b. Right-click SQL Server and select Restart.
Prepare a MySQL DatabaseSet up the MySQL database for the Data Collector.
Steps
1. If necessary, install the MySQL database software.2. Make sure that you have administrator rights from remote servers (preferably root user).3. Type the following commands from the MySQL admin tool, where root is the name of the admin user:
update mysql.user set host='%' where host='localhost' and user='root';flush privileges;
16 Planning and Preparation

Installing and Configuring the Data CollectorUse the Data Collector Setup Wizard to install and configure a Data Collector on a Windows server.
Topics:
• Install the Primary Data Collector• Install a Remote Data Collector• Migrating an Existing Data Collector to a New Data Collector
Install the Primary Data CollectorInstall the Data Collector on a Windows server that has network connectivity to your Storage Centers.
Prerequisites
• The Windows server must meet the requirements described in Data Collector Requirements on page 8.• The tasks described in Planning and Preparation on page 14 must be complete.• The user installing the Data Collector must be a member of the Administrators group on the Windows server.
Steps
1. Download the Storage Manager Data Collector software to the Windows server.
The Storage Manager Data Collector is available for download from the Drivers & Downloads tab of the storage system support pagelocated at Dell.com/support.
2. Unzip the software, and double-click the Storage Manager Data Collector Setup file.The Storage Manager Data Collector - InstallShield Wizard opens.
3. Select a language from the drop-down menu, and click OK.4. Click Next.
The License Agreement page appears.5. Read the license agreement and click Yes to accept it.6. (Optional) Change the folder in which to install the Data Collector:
a. Click Browse.b. Navigate to the folder in which to install the Data Collector.c. Click OK.
7. Click Next.
The Data Collector page is displayed.
8. Select the Primary Data Collector radio button.9. Click Next.
The Admin User page is displayed.
a. Type a user name for the administrator user in the Dell Storage Manager User field.b. Type a password for the administrator user in the New Password and Confirm Password fields.
10. Click Next.
The Database page is displayed.
a. Select Microsoft SQL Server or MySQL from the Type drop-down menu.b. Type the host name or IP address of the database server in the Server field.c. Type the TCP port number of the database in the Port field.
The default port for Microsoft SQL Server is 1433, and the default port for MySQL is 3306.
d. Type the user name of a database user that has administrator rights to create databases in the User Name field..e. Type the password of the database user that has administrator rights to create databases in the Password field.f. (Optional) To specify a password for the Data Collector database user (compmsauser), select the Use Custom Password
checkbox, then type a password in the DSM DB User Password and Confirm Password fields.
3
Installing and Configuring the Data Collector 17
NOTE: When the Use Custom Password checkbox is selected, make sure to follow the password policy settings
on the Microsoft SQL Server or MySQL Server.
If you do not select the Use Custom Password checkbox, the Data Collector Initial Setup creates a default 13‐characterpassword for database user (compmsauser).
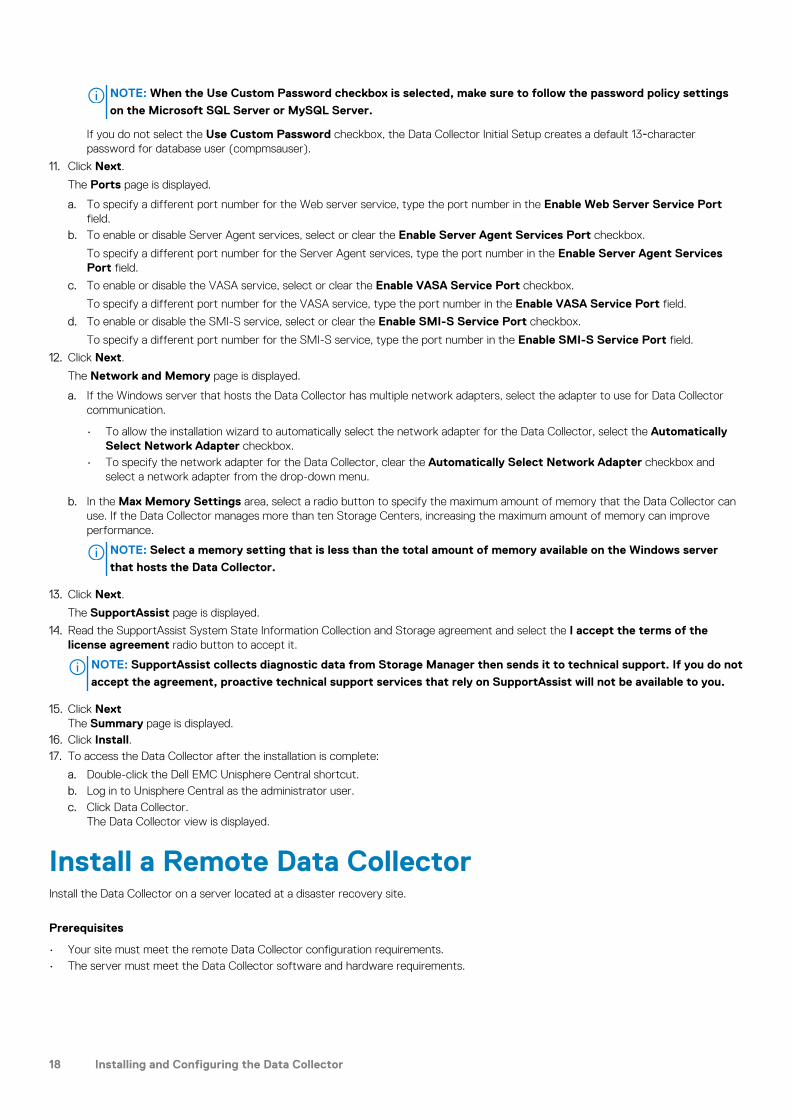
11. Click Next.
The Ports page is displayed.
a. To specify a different port number for the Web server service, type the port number in the Enable Web Server Service Portfield.
b. To enable or disable Server Agent services, select or clear the Enable Server Agent Services Port checkbox.
To specify a different port number for the Server Agent services, type the port number in the Enable Server Agent ServicesPort field.
c. To enable or disable the VASA service, select or clear the Enable VASA Service Port checkbox.
To specify a different port number for the VASA service, type the port number in the Enable VASA Service Port field.
d. To enable or disable the SMI-S service, select or clear the Enable SMI-S Service Port checkbox.
To specify a different port number for the SMI-S service, type the port number in the Enable SMI-S Service Port field.
12. Click Next.
The Network and Memory page is displayed.
a. If the Windows server that hosts the Data Collector has multiple network adapters, select the adapter to use for Data Collectorcommunication.
• To allow the installation wizard to automatically select the network adapter for the Data Collector, select the AutomaticallySelect Network Adapter checkbox.
• To specify the network adapter for the Data Collector, clear the Automatically Select Network Adapter checkbox andselect a network adapter from the drop-down menu.
b. In the Max Memory Settings area, select a radio button to specify the maximum amount of memory that the Data Collector canuse. If the Data Collector manages more than ten Storage Centers, increasing the maximum amount of memory can improveperformance.
NOTE: Select a memory setting that is less than the total amount of memory available on the Windows server
that hosts the Data Collector.
13. Click Next.
The SupportAssist page is displayed.
14. Read the SupportAssist System State Information Collection and Storage agreement and select the I accept the terms of thelicense agreement radio button to accept it.
NOTE: SupportAssist collects diagnostic data from Storage Manager then sends it to technical support. If you do not
accept the agreement, proactive technical support services that rely on SupportAssist will not be available to you.
15. Click NextThe Summary page is displayed.
16. Click Install.17. To access the Data Collector after the installation is complete:
a. Double-click the Dell EMC Unisphere Central shortcut.b. Log in to Unisphere Central as the administrator user.c. Click Data Collector.
The Data Collector view is displayed.
Install a Remote Data CollectorInstall the Data Collector on a server located at a disaster recovery site.
Prerequisites
• Your site must meet the remote Data Collector configuration requirements.• The server must meet the Data Collector software and hardware requirements.
18 Installing and Configuring the Data Collector

Steps
1. Download the Storage Manager Data Collector software.
The Storage Manager Data Collector is available for download from the Drivers & Downloads tab of the storage system support pagelocated at Dell.com/support.
2. Unzip the software, and double-click the Storage Manager Data Collector Setup file.The Storage Manager Data Collector - InstallShield Wizard appears.
3. Select a language from the drop-down menu, and click OK.4. Click Next.
The License Agreement page appears.5. Read the license agreement and click Yes to accept it.6. (Optional) Change the destination folder of Data Collector installation:
a. Click Browse.b. Navigate to the folder in which to install the Data Collector.c. Click OK.
7. Click Next.
The Data Collector page is displayed.
8. Select the Configure as Remote Data Collector radio button.
a. Type the host name or IP address of the Primary Data Collector in the Server field.b. Type the web server service port number of the Primary Data Collector in the Web Server Service Port field.c. Type the user name of the administrator user on the Primary Data Collector in the User Name field.d. Type the password of the administrator user on the Primary Data Collector in the Password field.
9. Click Next.The Remote Data Collector connects to the Primary Data Collector, and the Ports page is displayed.
10. To specify a different port number for the Web server service, type the port number in the Enable Web Server Service Port field.11. To enable Server Agent services, select the Enable Server Agent Services Port checkbox.
To specify a different port number for the Server Agent services, type the port number in the Enable Server Agent Services Portfield.
12. Click Next.The Summary page is displayed.
13. Click Install.
Migrating an Existing Data Collector to a New DataCollectorTo use a new Data Collector as the primary Data Collector, migrate an existing Data Collector to a new Data Collector.
These Data Collector objects are transferred during a migration:
• Users and user groups• Storage Center mappings• Password configuration settings• Internal database information
Data Collector Migration RequirementsThe following requirements must be met to migrate an existing Data Collector to a new Data Collector.
• If the existing Data Collector uses a Microsoft SQL Server database, the firewall on the Windows server that will host the new DataCollector must be configured to allow outbound communication on port 1433.
• If the existing Data Collector uses a MySQL database, the firewall on the Windows server that will host the new Data Collector mustbe configured to allow outbound communication on port 3306.
• The Windows server that will host the new Data Collector must meet the requirements described in Data Collector Requirements onpage 8.
• The Windows server that will host the new Data Collector must be different than the server that hosts VMware vCenter.• The tasks described in Planning and Preparation on page 14 must be complete.• The user installing the Data Collector must be a member of the Administrators group on the Windows server.
Installing and Configuring the Data Collector 19
• The existing Data Collector and new Data Collector must be running the same version of the Storage Manager Data Collectorsoftware.
• The existing Data Collector must not have any ongoing tasks. These tasks may not be reflected in the new installation of the DataCollector after the migration.
• If using VVols, unregister the VASA provider before migrating the Data Collector.
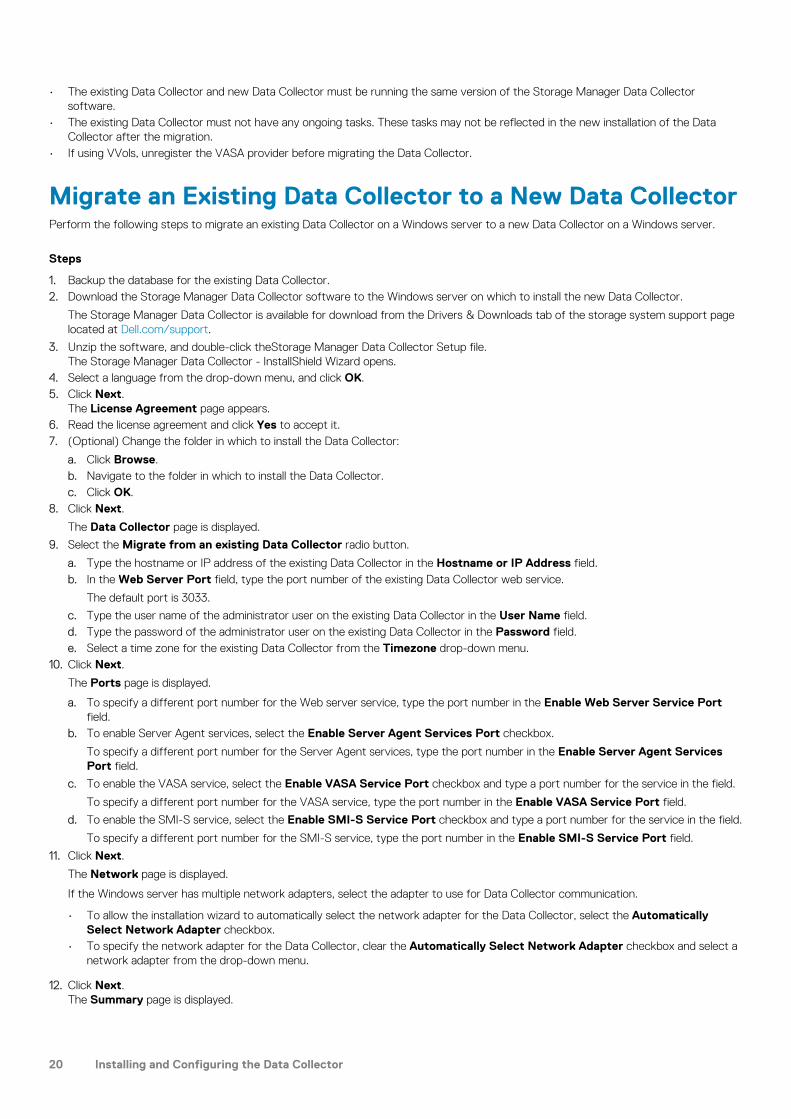
Migrate an Existing Data Collector to a New Data CollectorPerform the following steps to migrate an existing Data Collector on a Windows server to a new Data Collector on a Windows server.
Steps
1. Backup the database for the existing Data Collector.2. Download the Storage Manager Data Collector software to the Windows server on which to install the new Data Collector.
The Storage Manager Data Collector is available for download from the Drivers & Downloads tab of the storage system support pagelocated at Dell.com/support.
3. Unzip the software, and double-click theStorage Manager Data Collector Setup file.The Storage Manager Data Collector - InstallShield Wizard opens.
4. Select a language from the drop-down menu, and click OK.5. Click Next.
The License Agreement page appears.6. Read the license agreement and click Yes to accept it.7. (Optional) Change the folder in which to install the Data Collector:
a. Click Browse.b. Navigate to the folder in which to install the Data Collector.c. Click OK.
8. Click Next.
The Data Collector page is displayed.
9. Select the Migrate from an existing Data Collector radio button.
a. Type the hostname or IP address of the existing Data Collector in the Hostname or IP Address field.b. In the Web Server Port field, type the port number of the existing Data Collector web service.
The default port is 3033.
c. Type the user name of the administrator user on the existing Data Collector in the User Name field.d. Type the password of the administrator user on the existing Data Collector in the Password field.e. Select a time zone for the existing Data Collector from the Timezone drop-down menu.
10. Click Next.
The Ports page is displayed.
a. To specify a different port number for the Web server service, type the port number in the Enable Web Server Service Portfield.
b. To enable Server Agent services, select the Enable Server Agent Services Port checkbox.
To specify a different port number for the Server Agent services, type the port number in the Enable Server Agent ServicesPort field.
c. To enable the VASA service, select the Enable VASA Service Port checkbox and type a port number for the service in the field.
To specify a different port number for the VASA service, type the port number in the Enable VASA Service Port field.
d. To enable the SMI-S service, select the Enable SMI-S Service Port checkbox and type a port number for the service in the field.
To specify a different port number for the SMI-S service, type the port number in the Enable SMI-S Service Port field.
11. Click Next.
The Network page is displayed.
If the Windows server has multiple network adapters, select the adapter to use for Data Collector communication.
• To allow the installation wizard to automatically select the network adapter for the Data Collector, select the AutomaticallySelect Network Adapter checkbox.
• To specify the network adapter for the Data Collector, clear the Automatically Select Network Adapter checkbox and select anetwork adapter from the drop-down menu.
12. Click Next.The Summary page is displayed.
20 Installing and Configuring the Data Collector

13. Verify the information on the Summary page.14. Click Install.15. When the migration is complete, connect to the Windows server with the existing Data Collector and stop the Storage Manager Data
Collector service.
Installing and Configuring the Data Collector 21

Deploying and Configuring the StorageManager Virtual Appliance
Use a VMware vSphere Web Client to deploy the Storage Manager Virtual Appliance on an ESXi server. After the Storage Manager VirtualAppliance is deployed, connect to Virtual Appliance using a web browser and configure the Data Collector settings.
Topics:
• Virtual Appliance Requirements for vSphere• Deploy the Virtual Appliance• Configure the Virtual Appliance as a Primary Data Collector• Configure the Virtual Appliance as a Remote Data Collector• Migrating an Existing Data Collector to the Storage Manager Virtual Appliance
Virtual Appliance Requirements for vSphereThe Storage Manager Virtual Appliance requires the following conditions from the vSphere server.
• The Virtual Appliance must be deployed on a standard datastore. Do not deploy the Virtual Appliance on a VVols datastore.• The vSphere server must be configured to take regular snapshots of the datastore.
Deploy the Virtual ApplianceDeploy the Storage Manager Virtual Appliance on a VMware vCenter server.
Prerequisites
• The VMware ESXi host and VMware vCenter Server must meet the requirements in Storage Manager Virtual Appliance Requirementson page 9.
• The local computer used to deploy the Virtual Appliance must have the VMware Client Integration plug-in installed.
About this task
The Storage Manager Virtual Appliance is available for download from the Drivers & Downloads tab of the storage system support pagelocated at https://www.dell.com/support.
Steps
1. Download the Storage Manager Virtual Appliance zip file.
The name of the zip file is DellEMCStorageManagerVA-x.x.x.x.zip, where x.x.x.x is the version number.
2. Extract the Storage Manager Virtual Appliance OVA file from the DellEMCStorageManagerVA-x.x.x.x.zip file. The filenameof the OVA file is Storage Manager VA x.x.x.x.ova , where x.x.x.x is the version number.
3. Log on to the VMware vCenter server with the vSphere Web Client.4. In the right pane, click Host and Clusters.5. Right-click on ESXi and select Deploy OVF Template.
The Deploy OVF Template wizard opens.6. Select the Local File radio button.7. Click Choose Files and select the Storage Manager Virtual Appliance .ova template file.8. Click Next.
The Select a name and folder page is displayed.9. Type a name for the virtual machine in the Virtual machine name field and select a location for the Storage Manager Virtual
Appliance.10. Click Next.
4
22 Deploying and Configuring the Storage Manager Virtual Appliance

The Select a compute resource page is displayed.11. Select a the destination compute resource on which to deploy the Storage Manager Virtual Appliance.12. Click Next.
The Review details page is displayed.13. Confirm the details for the Storage Manager Virtual Appliance and click Next.
The License agreements page is displayed.14. Select the I accept all license agreements checkbox.15. Click Next.
The Configuration page is displayed.16. Select the size of the Storage Manager Virtual Appliance deployment configuration.
The configuration options are:
• Small – Use this configuration for deployments of one to ten Storage Centers or up to 3000 total volumes. This deploymentrequires 2 vCPUs and 8 GB of memory for the vApp.
• Medium – Use this configuration for deployments of more than ten Storage Centers or up to 6000 total volumes. Thisdeployment requires 4 vCPUs and 16 GB of memory for the vApp.
• Large – Use this configuration for deployments of more than ten Storage Centers or up to 12,000 total volumes. This deploymentrequires 6 vCPUs and 32 GB of memory for the vApp.
• Extra Large – Use this configuration for deployments of more than ten Storage Centers or more 12,000 total volumes. Thisdeployment requires 8 vCPUs and 64 GB of memory for the vApp.
17. Click Next.The Select storage page is displayed.
18. Select Thin Provision from the Select virtual disk format drop-down menu.19. Select the datastore in which to store the Storage Manager Virtual Appliance data.20. Click Next.
The Select networks page is displayed.21. Select a network for the Storage Manager Virtual Appliance from the Destination Network drop-down menu.22. Click Next.
The Customize template page is displayed.
a. Type the hostname for the Storage Manager Virtual Appliance in the Hostname field.b. If DHCP is selected from the IP Address Type drop-down menu, skip to the next step.c. If Static is selected from the IP Address Type drop-down menu, type the IP Address, Netmask, Default Gateway, and DNS
servers for the Virtual Appliance, and click Next.23. Click Next.
The Ready to complete page is displayed.24. Click Finish.25. (Optional) To change the maximum amount of memory available to the Data Collector on theStorage Manager Virtual Appliance:
a. Right-click on the Virtual Appliance in the vSphere Web Client and select Edit Settings.The Edit Settings dialog box opens.
b. Type the maximum amount of memory to allocate for the Virtual Appliance in the Memory field.c. Click OK.
26. Power on the Storage Manager Virtual Appliance after it is deployed.
Results
After a Storage Manager Virtual Appliance is deployed using a static IP address, a different IP address might be displayed in the webconsole. If this issue occurs, reset the Virtual Appliance to force the correct IP address to be displayed in the web console.
Configure the Virtual Appliance as a Primary DataCollectorThe Storage Manager Virtual Appliance uses a database to store Primary Data Collector information.
Prerequisites
The Virtual Appliance must be deployed and powered on.
Deploying and Configuring the Storage Manager Virtual Appliance 23
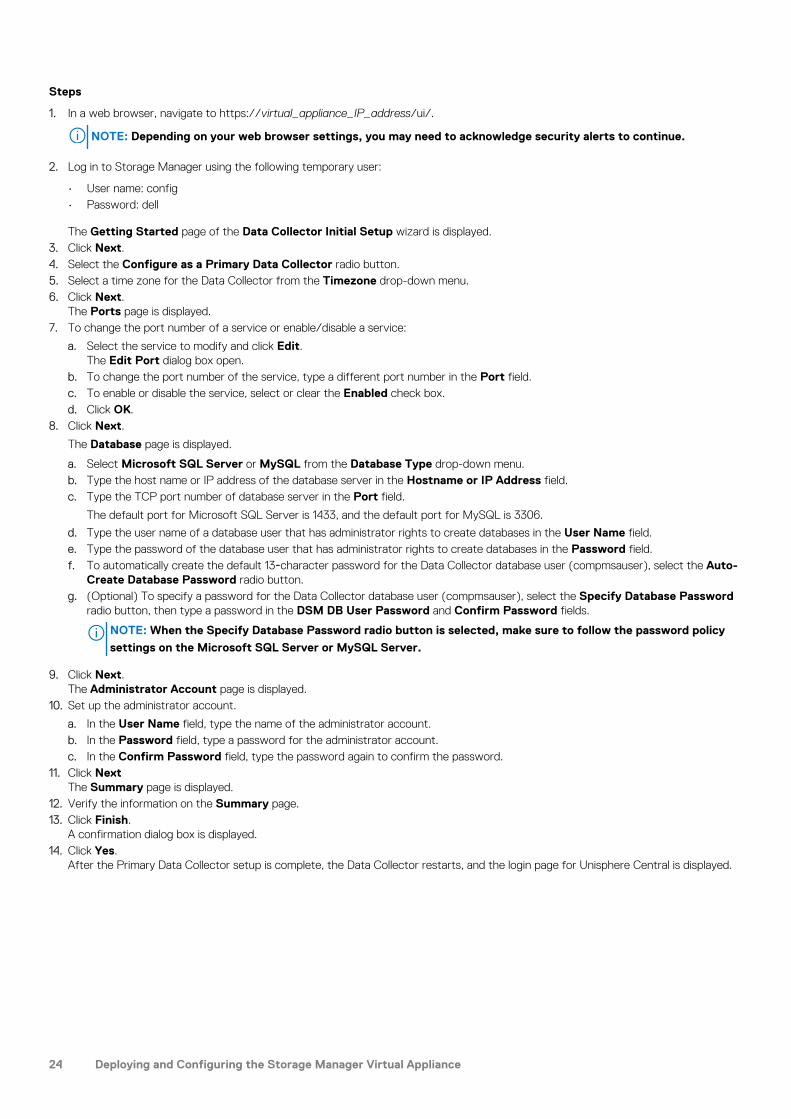
Steps
1. In a web browser, navigate to https://virtual_appliance_IP_address/ui/.
NOTE: Depending on your web browser settings, you may need to acknowledge security alerts to continue.
2. Log in to Storage Manager using the following temporary user:
• User name: config• Password: dell
The Getting Started page of the Data Collector Initial Setup wizard is displayed.3. Click Next.4. Select the Configure as a Primary Data Collector radio button.5. Select a time zone for the Data Collector from the Timezone drop-down menu.6. Click Next.
The Ports page is displayed.7. To change the port number of a service or enable/disable a service:
a. Select the service to modify and click Edit.The Edit Port dialog box open.
b. To change the port number of the service, type a different port number in the Port field.c. To enable or disable the service, select or clear the Enabled check box.d. Click OK.
8. Click Next.
The Database page is displayed.
a. Select Microsoft SQL Server or MySQL from the Database Type drop-down menu.b. Type the host name or IP address of the database server in the Hostname or IP Address field.c. Type the TCP port number of database server in the Port field.
The default port for Microsoft SQL Server is 1433, and the default port for MySQL is 3306.
d. Type the user name of a database user that has administrator rights to create databases in the User Name field.e. Type the password of the database user that has administrator rights to create databases in the Password field.f. To automatically create the default 13‐character password for the Data Collector database user (compmsauser), select the Auto-
Create Database Password radio button.g. (Optional) To specify a password for the Data Collector database user (compmsauser), select the Specify Database Password
radio button, then type a password in the DSM DB User Password and Confirm Password fields.
NOTE: When the Specify Database Password radio button is selected, make sure to follow the password policy
settings on the Microsoft SQL Server or MySQL Server.
9. Click Next.The Administrator Account page is displayed.
10. Set up the administrator account.
a. In the User Name field, type the name of the administrator account.b. In the Password field, type a password for the administrator account.c. In the Confirm Password field, type the password again to confirm the password.
11. Click NextThe Summary page is displayed.
12. Verify the information on the Summary page.13. Click Finish.
A confirmation dialog box is displayed.14. Click Yes.
After the Primary Data Collector setup is complete, the Data Collector restarts, and the login page for Unisphere Central is displayed.
24 Deploying and Configuring the Storage Manager Virtual Appliance

Configure the Virtual Appliance as a Remote DataCollectorConfigure the Virtual Appliance as a Remote Data Collector to use it for disaster recovery when the Primary Data Collector is inaccessible.
Prerequisites
The Virtual Appliance must be deployed.
Steps
1. In a web browser, navigate to https://virtual_appliance_IP_address/ui/.
NOTE: Depending on your web browser settings, you may need to acknowledge security alerts to continue.
2. Log in to Storage Manager using the following temporary user:
• User name: config• Password: dell
The Getting Started page of the Data Collector Initial Setup wizard is displayed.3. Click Next.4. Select the Configure as Remote Data Collector radio button.5. Specify the following information about the Primary Data Collector:
a. Type the hostname or IP address of the Primary Data Collector in the Server field.b. In the Web Server Port field, type the port number of the Primary Data Collector web service.
The default port is 3033.
c. Type the user name of the administrator user on the Primary Data Collector in the User Name field.d. Type the password of the administrator user on the Primary Data Collector in the Password field.e. Select a time zone for the Primary Data Collector from the Timezone drop-down menu.
6. Click Next.The Ports page appears.
7. To change the port number of a service or enable/disable a service:
a. Select the service to modify and click Edit.The Edit Port dialog box open.
b. To change the port number of the service, type a different port number in the Port field.c. To enable or disable the service, select or clear the Enabled check box.d. Click OK.
8. Click Next.The Summary page appears.
9. Verify the information on the Summary page.10. Click Finish.
A confirmation dialog box is displayed.11. Click Yes.
After the Remote Data Collector setup is complete, the Data Collector restarts, and the login page for Unisphere Central is displayed.
Migrating an Existing Data Collector to theStorage Manager Virtual ApplianceMigrate an existing Data Collector to the Storage Manager Virtual Appliance to use the Storage Manager Virtual Appliance as the primaryData Collector.
These Data Collector objects are transferred during a migration:
• Users and user groups• Storage Center mappings• Password configuration settings• Internal database information
Deploying and Configuring the Storage Manager Virtual Appliance 25
Data Collector Migration RequirementsThe following requirements must be met to migrate from a Windows installation of the Data Collector to a Storage Manager VirtualAppliance.
• The Data Collector and Storage Manager Virtual Appliance must be running the same version of the Storage Manager Data Collectorsoftware.
• The Windows installation of the Data Collector must not have any ongoing tasks. These tasks may not be reflected in the StorageManager Virtual Appliance after the migration.
• If using VVols, unregister the VASA provider before migrating the Data Collector.
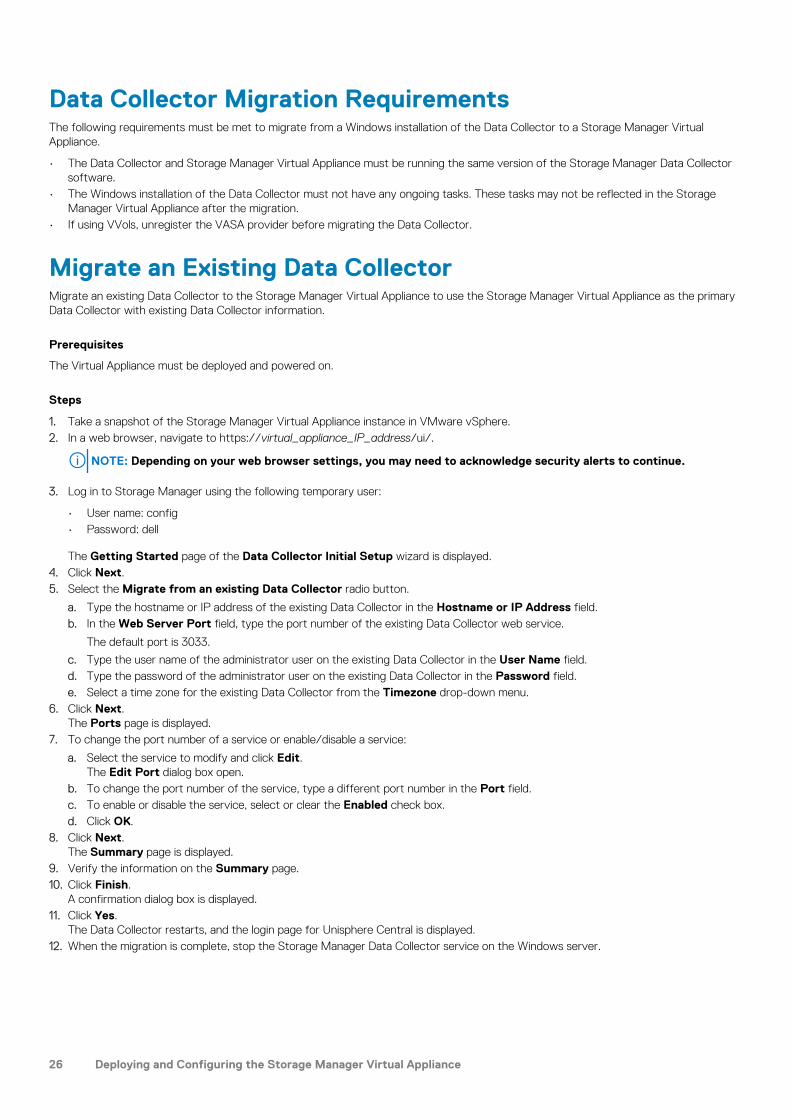
Migrate an Existing Data CollectorMigrate an existing Data Collector to the Storage Manager Virtual Appliance to use the Storage Manager Virtual Appliance as the primaryData Collector with existing Data Collector information.
Prerequisites
The Virtual Appliance must be deployed and powered on.
Steps
1. Take a snapshot of the Storage Manager Virtual Appliance instance in VMware vSphere.2. In a web browser, navigate to https://virtual_appliance_IP_address/ui/.
NOTE: Depending on your web browser settings, you may need to acknowledge security alerts to continue.
3. Log in to Storage Manager using the following temporary user:
• User name: config• Password: dell
The Getting Started page of the Data Collector Initial Setup wizard is displayed.4. Click Next.5. Select the Migrate from an existing Data Collector radio button.
a. Type the hostname or IP address of the existing Data Collector in the Hostname or IP Address field.b. In the Web Server Port field, type the port number of the existing Data Collector web service.
The default port is 3033.
c. Type the user name of the administrator user on the existing Data Collector in the User Name field.d. Type the password of the administrator user on the existing Data Collector in the Password field.e. Select a time zone for the existing Data Collector from the Timezone drop-down menu.
6. Click Next.The Ports page is displayed.
7. To change the port number of a service or enable/disable a service:
a. Select the service to modify and click Edit.The Edit Port dialog box open.
b. To change the port number of the service, type a different port number in the Port field.c. To enable or disable the service, select or clear the Enabled check box.d. Click OK.
8. Click Next.The Summary page is displayed.
9. Verify the information on the Summary page.10. Click Finish.
A confirmation dialog box is displayed.11. Click Yes.
The Data Collector restarts, and the login page for Unisphere Central is displayed.12. When the migration is complete, stop the Storage Manager Data Collector service on the Windows server.
26 Deploying and Configuring the Storage Manager Virtual Appliance

Next Steps After MigrationDepending on the configuration of the existing Data Collector, you may need to perform some additional setup tasks.
• Configure Active Directory• Import SSL certificates or generate new SSL certificates
Deploying and Configuring the Storage Manager Virtual Appliance 27

Installing and Configuring the StorageManager Client
Install the Storage Manager Client on a Windows or Linux computer and use the client to connect to a Storage Center or Data Collector.
Topics:
• Connect to the Storage Manager Applications Page• Install the Storage Manager Client on Windows• Install the Storage Manager Client on Linux• Use the Storage Manager Client to Connect to a Storage Center• Use the Storage Manager Client to Connect to the Data Collector• Add Storage Centers to Storage Manager• Next Steps
Connect to the Storage Manager ApplicationsPageAfter installing and configuring the Storage Manager Data Collector, you can connect to the Storage Manager Applications page anddownload the Storage Manager Client.
You can download the Storage Manager Client for Windows or Storage Manager Client for Linux from the Storage Manager Applicationspage.
The URL to the Storage Manager Applications page is https://data_collector_hostname_ip:web_server_port/dc/Server/• data_collector_hostname_IP: Host name or IP address of the Data Collector.• web_server_port: Web server port of the Data Collector. The default port is 3033.
NOTE: The Storage Manager Client is also available for download from the Drivers & Downloads tab of the storage
system support page located at Dell.com/support.
Install the Storage Manager Client on WindowsThe Storage Manager Client is an application that connects to a Data Collector or directly to a Storage Center. The Storage ManagerClient allows you to view and manage Storage Centers. You can install the Storage Manager Client on the Data Collector server or acomputer that has network connectivity to the Data Collector server.
Prerequisites
The host computer must meet the requirements listed in Storage Manager Client Requirements on page 10.
Steps
1. In a web browser, go to the Storage Manager Applications page.
The URL for this page is https://data_collector_hostname_ip:web_server_port/dc/Server/.
• data_collector_hostname_IP: Host name or IP address of the Data Collector.• web_server_port: Web server port of the Data Collector. The default port is 3033.
If a certificate warning appears, acknowledge the warning and continue.
2. Click Download Windows Installer (.exe) to save the installer file to your computer.3. When the download is complete, open the Storage Manager Client Setup.exe file.
5
28 Installing and Configuring the Storage Manager Client

4. If a Windows security dialog box is displayed, click Yes to start the installation.The InstallShield Wizard opens.
5. (Optional) If you are updating the Storage Manager Client, click Yes on the confirmation dialog box to perform the update.6. Following the steps in the wizard to install the Storage Manager Client.
Install the Storage Manager Client on LinuxThe Storage Manager Client is an application that connects to a Data Collector or directly to a Storage Center. The Storage ManagerClient allows you to view and manage Storage Centers. Install the Storage Manager Client on a Linux computer that has networkconnectivity to the Data Collector server.
Prerequisites
• The host computer must meet the requirements in Storage Manager Client Requirements on page 10.• The user must have root access to the Linux computer.• The Linux computer must have a full X-windows environment.
Steps
1. Download the Storage Manager Client installer from the Data Collector.
a. Change directories to a download directory using the following command:$ cd download_directory
b. Download the Storage Manager Client rpm file using the following command:$ wget data_collector _hostname_IP:web_server_port --no-check-certificate https://data_collector_hostname_IP:web_server_port/dc/Server/web/apps/client/SmClient.rpm• data_collector_hostname_IP – Host name or IP address of the Data Collector.
• web_server_port – Web server port of the Data Collector. The default port is 3033.
2. Install the Storage Manager Client using the following command:# rpm -U SmClient.rpm
Use the Storage Manager Client to Connect to aStorage CenterAfter the Storage Manager Client is installed, you can use the client to connect to a Storage Center.
Steps
1. Start the Storage Manager Client application.
NOTE: On a Linux computer, use the terminal to navigate to the application directory by running:
$ cd /var/lib/dell/bin
Then launch the client by running:
$ ./Client
2. To change the language displayed in the Storage Manager Client, select a language from the Display Language drop-down menu.3. If the Welcome screen appears, click Log into a Storage Center or Data Collector.4. Complete the following fields:
• User Name – Type the name of a Storage Center user.• Password – Type the password for the Storage Center user.• Host/IP – Type the host name or IP address of the Storage Center.• Web Server Port – If the Web Server Port of the Storage Center has changed, type the new port number in the field. The
default port is 3033.• Use Windows Credentials – To log in to the Storage Center using Windows Credentials, select the Use Windows Credentials
checkbox. To use this feature, the Storage Center must be configured to use Active Directory or OpenLDAP.
Installing and Configuring the Storage Manager Client 29

• Remember Password – To make the Storage Manager Client remember the password that is used to log in to the StorageCenter, select the Remember Password checkbox.
5. Click Log In.The Storage Manager Client connects to the Storage Center and displays the Summary tab.
Use the Storage Manager Client to Connect to theData CollectorAfter the Storage Manager Client is installed, you can use the client to connect to the Data Collector.
Steps
1. Start the Storage Manager Client application.
NOTE: On a Linux computer, use the terminal to navigate to the application directory by running:
$ cd /var/lib/dell/bin
Then launch the client by running:
$ ./Client
2. To change the language displayed in the Storage Manager Client, select a language from the Display Language drop-down menu.3. If the Welcome screen appears, click Log into a Storage Center or Data Collector.4. Complete the following fields:
• User Name – Type the name of the Storage Manager user that was created during Data Collector installation. You can also usethe name of a Storage Manager user that was previously created.
• Password – Type the password for the user. You can also use the password of a Storage Manager user that was previouslycreated.
• Host/IP – Type the host name or IP address of the server that hosts the Data Collector. If the Data Collector and StorageManager Client are installed on the same system, you can type localhost instead.
• Web Server Port – If you changed the Web Server Port during the installation of the Data Collector, type the new port number inthe field. The default port is 3033.
• Use Windows Credentials – (Windows only) Do not select the Use Windows Credentials check box at this time. To use thisoption, the Data Collector must be configured to use Active Directory or OpenLDAP.
• Remember Password – To make the Storage Manager Client remember the password that is used to log in to the DataCollector, select the Remember Password checkbox.
5. Click Log In.The Storage Manager Client connects to the Data Collector and displays the Storage view.
Add Storage Centers to Storage ManagerUse the Storage Manager Client to add the Storage Centers that you want to centrally manage in the Storage Manager Data Collector.
Prerequisites
• You must have the hostname or IP address of the Storage Center.• You must have the user name and password for a Storage Center user account.
○ The first time a Storage Center is added to the Storage Manager Data Collector, you must specify a Storage Center user accountthat has the Administrator privilege. When the Storage Center is subsequently added for other Storage Manager users, you canspecify Storage Center user accounts of any privilege level.
○ If your Storage Manager user account has the Reporter privilege, you must specify a Storage Center user account that has theReporter privilege.
• The Storage Manager Data Collector must have connectivity to the Storage Center management interface.• The Storage Center certificate must contain the host name or management IP address that is used to add the Storage Center to
Storage Manager. For instructions on regenerating an SSL certificate, see the Unisphere Administrator’s Guide.
30 Installing and Configuring the Storage Manager Client

Steps
1. In the Storage Manager Client, click Add Storage Center. The Add Storage Center dialog box appears.
NOTE: If one or more Storage Centers are associated with other Storage Manager users, the dialog box allows you to
select an existing Storage Center or add a new Storage Center.
2. Type Storage Center logon information.
• Host Name: Type the host name or IP address of a Storage Center controller. For a dual-controller Storage Center, type the IPaddress or host name of the management controller.
• User Name and Password: Type the user name and password for a Storage Center user.
If you specify a Storage Center user with the Reporter or Volume Manager privilege, access to the Storage Center from StorageManager is restricted based on the privilege and user groups assigned to the Storage Center user.
• Folder: Select the parent folder for the Storage Center.
3. (Optional) Configure the Storage Center to use settings applied to another Storage Center by selecting the Inherit settings fromexisting Storage Center check box. If this check box is selected, after the wizard closes, the Inherit Settings wizard appears.
4. Click Finish.
• If the Inherit settings from existing Storage Center check box was not selected, the Storage Center is added to StorageManager.
• If the Inherit settings from existing Storage Center check box was selected, the Inherit Settings dialog box appears.
5. (Inherit settings only) Choose the Storage Center settings to inherit.
a. Select the Storage Center from which you want to inherit settings, then click Next. The wizard advances to the next page.b. Select the check box for each category of settings that you want to inherit.c. When you are done, click Finish.
• If passwords are not configured for the SupportAssist proxy, Secure Console proxy, or SMTP server, the dialog box closes.• If passwords for the SupportAssist proxy, Secure Console proxy, or SMTP server are configured, you are prompted to retype
the required passwords.
d. Type the required passwords to complete the wizard.
Next StepsAfter installation is complete, perform basic tasks to configure Storage Manager for your environment. These tasks depend on theconfiguration, so some of them might not apply to your site.
See the Storage Manager Administrator’s Guide or Unisphere Administrator’s Guide for detailed configuration instructions, including howto:
• Add Storage Manager users.• Configure the Data Collector to authenticate Storage Manager users using an Active Directory or OpenLDAP directory service.• Add a Storage Center to Storage Manager.• Create Storage Center volumes.• Add servers to Storage Centers.• Add FluidFS clusters to Storage Manager.• Configure email notifications.• Set up remote Storage Centers and Replication QoS.• Configure replications and Live Volumes.• Predefine your disaster recovery plan.• Configure VMware vSphere Virtual Volumes.
Installing and Configuring the Storage Manager Client 31
Updating Storage Manager SoftwareUse the following tasks to update the Storage Manager Data Collector, Storage Manager Client, Storage Manager Server Agent, andStorage Manager Virtual Appliance.
Topics:
• Update the Storage Manager Data Collector• Update the Storage Manager Client• Update the Storage Manager Server Agent• Update the Storage Manager Virtual Appliance
Update the Storage Manager Data CollectorFollow these steps to update the Storage Manager Data Collector to a newer version.
Prerequisites
• The Storage Manager Data Collector that you are updating must be version 15.3.1 or later.• The server that hosts the Data Collector must be running a 64-bit operating system. If the Data Collector is installed on a 32‐bit
server, migrate to a 64-bit operating system.• For each managed Storage Center, the Storage Center certificate must contain the host name or management IP address used to add
the Storage Center to Storage Manager.
Steps
1. Download the Storage Manager Data Collector software to the Windows server.
The Storage Manager Data Collector is available for download from the Drivers & Downloads tab of the storage system support pagelocated at Dell.com/support.
2. Unzip the software, and double-click the Storage Manager Data Collector Setup file to update the Data Collector.
NOTE: Allow at least 60 minutes for the Data Collector service to start after it is updated. If the service takes longer
than 60 minutes to start, contact technical support.
3. Run the Storage Manager Data Collector Setup file4. If you are using a remote Data Collector, repeat the previous steps on the Windows server that hosts the remote Data Collector.
Update the Storage Manager ClientFollow these steps to update an existing installation of the Storage Manager Client to a newer version:
Steps
1. Use the Storage Manager Client to connect to the updated Data Collector.The Storage Manager Client prompts you to download the Storage Manager Client installation file.
2. Click Yes.3. Run the Storage Manager Client installer and follow the steps.
Results
NOTE: The Storage Manager Client is also available for download from the Drivers & Downloads tab of the storage
system support page located at Dell.com/support.
6
32 Updating Storage Manager Software

Update the Storage Manager Server AgentFollow these steps to update the Storage Manager Server Agent. Update the Storage Manager Server Agent on all servers managed bythe Data Collector.
Prerequisites
• The Server Agent must be connected to a Data Collector.• The Data Collector must be updated to the newer version.
Steps
1. Open the Server Agent Manager.2. Click Check for Upgrades.
The server downloads the Server Agent installer from the Data Collector.3. Open the Server Agent installer and follow the instructions to update the Server Agent.
Update the Storage Manager Virtual AppliancePerform the following steps to update the Storage Manager Virtual Appliance:
About this task
The Storage Manager Virtual Appliance is available for download from the Drivers & Downloads tab of the storage system support pagelocated at Dell.com/support.
NOTE: Updating the Storage Manager Virtual Appliance does not change the version number shown in the VMware
vSphere Client. The VMware vSphere Client always displays the version number of the Storage Manager Virtual
Appliance that was initially deployed.
Steps
1. Download the Storage Manager Virtual Appliance zip file.
The name of the zip file is DellEMCStorageManagerVA-x.x.x.x.zip, where x.x.x.x is the version number.
2. Extract the Storage Manager Virtual Appliance update package from the DellEMCStorageManagerVA-x.x.x.x.zip file. Thefilename of the update package is DSM-VA-x.x.x.x.zip , where x.x.x.x is the version number.
NOTE: If you are updating from Storage Manager Virtual Appliance 2016 R2 or earlier, change the last number of the
update package filename to 999 before performing the update. For example, if the filename of the update package is
DSM-VA-19.1.10.1.zip, change the filename to DSM-VA-19.1.10.999.zip.
3. In a web browser, navigate to https://virtual_appliance_IP_address/ui/.
NOTE: Depending on your web browser settings, you may need to acknowledge security alerts to continue.
4. Log in to the Storage Manager Virtual Appliance using a user with Administrator privileges.The Unisphere Central Home page is displayed.
5. Click Data Collector.The Data Collector view is displayed.
6. Click the General tab, then click the Summary subtab.7. Click Install Update.
The Upload Package dialog box opens.8. Click Choose File.
The Open dialog box opens.9. Select the Storage Manager Virtual Appliance update package and click Open.10. Click OK.
The Install Package confirmation dialog box opens.11. Click Yes.
The Storage Manager Virtual Appliance is updated.NOTE: The Storage Manager Virtual Appliance might take up to 15 minutes to update. The Unisphere Central login
page is displayed when the update is complete.
Updating Storage Manager Software 33

NOTE: When performing an update from Storage Manager Virtual Appliance 2016 R3 or earlier to Storage Manager
Virtual Appliance 2018 R1 or later, close the browser, wait up to 15 minutes, then reopen the browser and log in to
the Storage Manager Virtual Appliance.
34 Updating Storage Manager Software