Embed Size (px)
Citation preview

STOKER POWER DRAFT SYSTEM
Rock’s Bar-B-Que
Stoker Users Manual Ver 2.7wt Software

STOKER 2 Rock’s Bar-B-Que

STOKER 3 Rock’s Bar-B-Que
STOKER POWER DRAFT SYSTEM
Rock’s Bar-B-Que
Stoker Users Manual Ver 2.7wt Software

STOKER 4 Rock’s Bar-B-Que

STOKER 5 Rock’s Bar-B-Que
1. PRECAUTIONS .................................................................................................................................. 7
2. INTRODUCTION ............................................................................................................................... 9
BASIC SYSTEM ............................................................................................................................................ 9 HOW IT WORKS .......................................................................................................................................... 9
3. FIRST LOOK......................................................................................................................................10
STOKER FRONT PANEL ...............................................................................................................................10 STOKER REAR PANEL ................................................................................................................................10
4. DEVICES ............................................................................................................................................11
TEMPERATURE SENSORS ............................................................................................................................11 BLOWERS ...................................................................................................................................................12 MORE DEVICE TYPES TO COME .................................................................................................................12
5. QUICK REFERENCE MENU ..........................................................................................................13
6. STOKER USER INTERFACE ..........................................................................................................15
POWER INPUT .............................................................................................................................................15 USER INTERFACE BUTTONS .......................................................................................................................15 MAIN MENU...............................................................................................................................................15 TEMP CONTROL MENU ..............................................................................................................................16
Temperature Sensor Settings Menu ......................................................................................................16 Blower ..................................................................................................................................................17 Alarm Type ...........................................................................................................................................17 BBQ Hi Temp .......................................................................................................................................17 BBQ Lo Temp ......................................................................................................................................17 Target Temp .........................................................................................................................................18 Rename .................................................................................................................................................18 Calibration ............................................................................................................................................18
BLOWERS MENU ........................................................................................................................................19 Blower Pause ........................................................................................................................................19 Blower Rename ....................................................................................................................................19
SYSTEM INFO MENU ..................................................................................................................................20 System Info Select Menu ......................................................................................................................20 Units .....................................................................................................................................................20 Audible .................................................................................................................................................20 Time Zone .............................................................................................................................................21 Date .......................................................................................................................................................21 Time ......................................................................................................................................................21 Auto Time .............................................................................................................................................21 Version..................................................................................................................................................22 Clear DB ...............................................................................................................................................22
NETWORK MENU .......................................................................................................................................23 IP Addr .................................................................................................................................................23 Subnet Mask .........................................................................................................................................23 Gateway ................................................................................................................................................23 DNS ......................................................................................................................................................23 HTTP Port .............................................................................................................................................24 WiFi Enable ..........................................................................................................................................24 WiFi IP .................................................................................................................................................24

STOKER 6 Rock’s Bar-B-Que
7. NETWORK CONNECTION .............................................................................................................25
DHCP ETHERNET CONNECTION SETUP .....................................................................................................25 STATIC IP CONFIGURATION (ETHERNET) ...................................................................................................26 RE-ENABLING DHCP (ETHERNET) ............................................................................................................26 WIRELESS CONNECTION SETUP .................................................................................................................27 AD HOC CONNECTION (DIRECT DEVICE CONNECTION) ................................................................................29
8. BUILT-IN WEB SERVER .................................................................................................................30
SECURING BUILT-IN WEB SERVER .............................................................................................................31 TWITTER ....................................................................................................................................................31
9. MAINTENANCE AND CARE ..........................................................................................................33
STOKER ELECTRONICS ...............................................................................................................................33 TEMPERATURE SENSORS ............................................................................................................................33 BLOWERS ...................................................................................................................................................33
10. FREQUENTLY ASKED QUESTIONS .......................................................................................34
11. TEMPERATURE SENSOR RECORDS ......................................................................................35
STOKER 7 Rock’s Bar-B-Que
1. Precautions
When you use the Stoker, you are dealing with fire and appropriate precautions must be
taken. The Consumer Product Safety Commission reports that every year about 20 deaths and
400 injuries are treated resulting from carbon monoxide poisoning from charcoal grills.
The following tips will help make your barbecue/smoker experience a safe one:
Due to the production of carbon monoxide when charcoal is burned,
barbecue/smokers should not be used inside homes, vehicles, tents, or campers, even
if ventilation is provided. Carbon monoxide is odorless and colorless. You will not be
alerted to the danger until it is too late.
Make sure the barbecue/smoker is at least 10 feet away from your house, garage,
trees, or other materials.
Keep children away from the barbecue/smoker.
Have a fire extinguisher, a garden hose attached to a water supply, or at least 4
gallons water close by in case of a fire.
Use long handled barbecue tools and/or flame resistant mitts.
Keep alcoholic beverages away from the barbecue/smoker.
When finished, remove the charcoal ashes from the barbecue/smoker and place them
into a metal container with a tight fitting metal lid. Add and mix in water with the
ashes, and set aside for several days. Dispose of the mixture in accordance with the
local sanitation guidelines.

STOKER 8 Rock’s Bar-B-Que
STOKER 9 Rock’s Bar-B-Que
2. Introduction
Thank you for purchasing the Stoker from Rock’s Bar-B-Que. The Stoker is a power
draft control system for your barbecue/smoker. The Stoker will allow you to control your
barbecue/smoker like you would control your oven.
Basic System The Basic Stoker System consists of four components: The Stoker, Temperature Sensor,
Blower, and Power Supply. The Stoker is a versatile electronic controller housed inside a
rugged powder coated steel enclosure. The Temperature Sensor is a fast responding
thermocouple housed inside a stainless steel tube. The Blower supplies the draft and is
available in different sizes to fit different barbecue/smokers. The Power Supply plugs into
standard American electrical outlets and powers all of the components.
How It Works A Temperature Sensor is placed inside your barbecue /smoker at the location where you
want the target temperature maintained. A blower is installed so it blows air directly into the
firebox. The Stoker compares the Temperature Sensor measurement to the target temperature
setting in order to control the blower. When the measured temperature is lower than the target
temperature, the blower turns on. When the measured temperature goes above the target
temperature the blower turns off. This cycle continues hundreds of times during your cook to
maintain the target temperature.
Below is a list of some of the key features:
Alarm Features
The Stoker has alarms that you can configure for each Temperature Sensor. You can
choose a “Fire Alarm” that gives you both a high alarm to make sure your fire is not getting
to hot, and a low alarm to make sure your fire is not going out. You can also set a “Food
Alarm” to notify you when your food is done.
Food Measurement Features
The Stoker can also monitor the temperature of the food you are cooking without the
need to open the barbecue/smoker. These sensors can also alarm you when food is done.
Controls Several Barbecues/Smokers
The Stoker is capable of controlling several barbecues/smokers all at once. The Stoker
has 6 device ports but can easily be expanded with a “Device Port Expander”. You need 2
device ports for each barbecue/smoker you want to control; one port for a Temperature
Sensor and one port for a Blower.
Built-in Web Server
Connect the Stoker to a network using the built-in wireless capabilities or an Ethernet
cable and you can control your Stoker from anywhere you have network access. No special
software is required to use your web browser to monitor and control your Stoker. The web
server is also available as a read-only page which allows you to share the information with
the world without fear of someone altering your settings.
STOKER 10 Rock’s Bar-B-Que
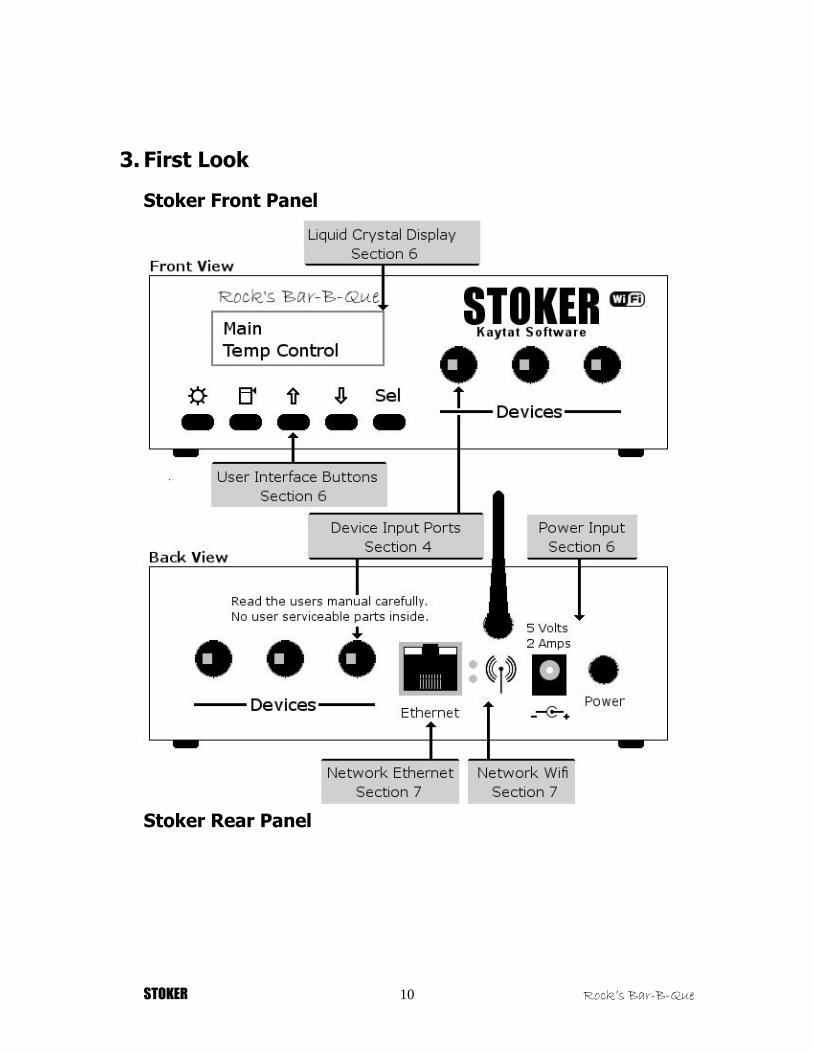
3. First Look
Stoker Front Panel
Stoker Rear Panel

STOKER 11 Rock’s Bar-B-Que
4. Devices
One of the most versatile features of the Stoker is the way the Temperature Sensors and
Blowers connect to the Stoker. There are six (6) device ports on each Stoker; three (3) ports
on the front and, three (3) ports on the back. All of the Device ports are identical and accept
any devices that are compatible with the Stoker.
For convenience, you can plug in and unplug devices at any point during the cook. The
Stoker needs to be turned off before inserting or removing any devices. Your settings and
configurations will not be lost while the Stoker is off. This allows you to add additional
Temperature Sensors or barbecues/smokers throughout your cook.
Caution: Only plug devices from Rock’s Bar-B-Que into the Stoker.
Temperature Sensors Rock’s Bar-B-Que offers a variety of Temperature Sensors; Fire Pit Temperature Sensors
(Pit Sensors) for measuring your fire temperature, and pointed Temperature Sensors for
monitoring internal temperatures of food (Food Probes). The Temperature Sensors are Teflon
coated K-type thermocouples housed inside a stainless steel closed-end tube. Temperature
Sensors can be used for temperatures up to 450˚F. The Temperature Sensors have a special
high temperature silicone rubber strain relief where the lead wire comes out of the tube. Care
should be taken when cleaning not to pull off or damage the strain relief. Do not submerge
the plug end of the Temperature Sensors into water! The plug has electronics inside that can
be damaged.
*** Please Note: Temperature Sensors should not be used for cooks above 450˚F
Fire Pit Temperature Sensors (Pit Sensors)
When measuring the internal temperature of your barbecue/smoker, pay close attention to
the placement of the Pit Sensor. The temperature inside your barbecue/smoker can vary
greatly from one location to another. The greatest temperature difference will be vertically.
Pit Sensors come with an attachment clip to mount the Temperature Sensor in your
barbecue/smoker. The Temperature Sensor has a high temperature silicone rubber sleeve that
thermally isolates the tip of the Temperature Sensor from its mounting, so you get fast and
accurate measurements.
The Pit Sensor should be placed at the same level of, and a few inches away from the
food you are cooking. The optimal place for the attachment clip is on the grill that your food
is on. Be careful to place the Pit Sensor so it is not touching anything and juices from food
does not drip on it. The Pit Sensor should also be positioned to protect the probe wire from
direct flame.
*** Please Note: Temperature sensors should not be used for cooks above 450˚F

STOKER 12 Rock’s Bar-B-Que
Food Temperature Sensors (Food Probes)
Food Probes allow you to monitor the internal temperature of food while it cooks. Rock’s
Bar-B-Que’s Food Probes are made from food grade 304 stainless steel. They have a
moderate point for easy insertion into food.
For proper temperature measurement, the tip of the Food Probe should be inserted into
the thickest part of the food. The Food Probe should also be positioned to protect the probe
wire from direct flame. A Food Alarm can be set to notify you when the food is done. Food
should be cooked in accordance with USDA Recommended Safe Minimum Internal
Temperatures: www.IsItDoneYet.gov
*** Please Note: Temperature sensors should not be used for cooks above 450˚F
Blowers The Blower provides the draft to stoke your fire. Selecting the proper blower size can
have strong effects on temperature stability. If the blower is too large, you will experience
poor fine control and greater temperature swings. If the blower is too small, it will run
constantly and increase your fuel consumption. The standard 5 Cubic Feet/Minute (CFM)
Blower is a good choice for most backyard barbecue/smokers. We also offer 10CFM and
25CFM blowers.
The Blowers come standard with a door that automatically opens and closes when the
blower cycles on and off. Since the blower door automatically closes and seals off the natural
draft, the Stoker is able to maintain very low temperatures.
The blowers also have a pause feature which will turn the blower off for 5 minutes. This
allows you to open the smoker and tend to your meat, without causing the blower to run and
cause overshoots. Each blower can be paused to allow the Stoker to keep running without
affecting other barbecues/smokers.
More Device Types to Come Currently the devices we offer are limited to Temperature Sensors, Blowers, and Device
Expanders. In the future we will possibly offer other devices like louder alarms, damper
controls, and things we have not thought of yet!

STOKER 13 Rock’s Bar-B-Que
5. Quick Reference Menu

STOKER 14 Rock’s Bar-B-Que
STOKER 15 Rock’s Bar-B-Que
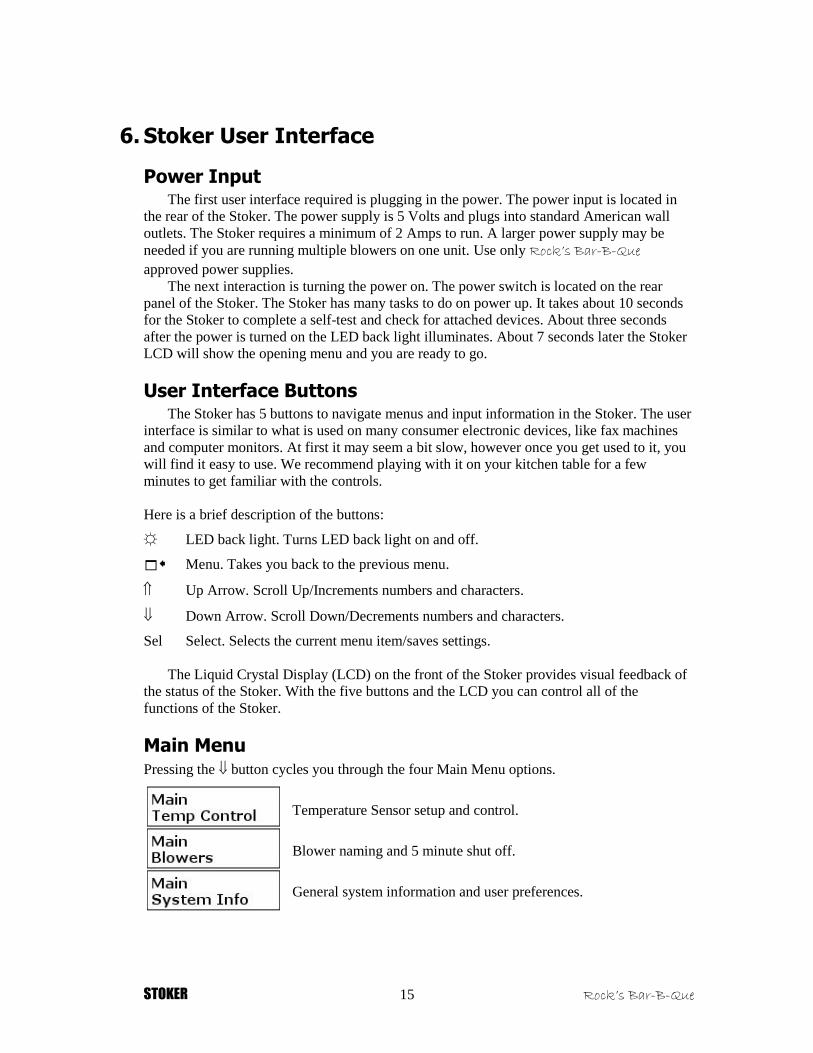
6. Stoker User Interface
Power Input The first user interface required is plugging in the power. The power input is located in
the rear of the Stoker. The power supply is 5 Volts and plugs into standard American wall
outlets. The Stoker requires a minimum of 2 Amps to run. A larger power supply may be
needed if you are running multiple blowers on one unit. Use only Rock’s Bar-B-Que
approved power supplies.
The next interaction is turning the power on. The power switch is located on the rear
panel of the Stoker. The Stoker has many tasks to do on power up. It takes about 10 seconds
for the Stoker to complete a self-test and check for attached devices. About three seconds
after the power is turned on the LED back light illuminates. About 7 seconds later the Stoker
LCD will show the opening menu and you are ready to go.
User Interface Buttons The Stoker has 5 buttons to navigate menus and input information in the Stoker. The user
interface is similar to what is used on many consumer electronic devices, like fax machines
and computer monitors. At first it may seem a bit slow, however once you get used to it, you
will find it easy to use. We recommend playing with it on your kitchen table for a few
minutes to get familiar with the controls.
Here is a brief description of the buttons:
☼ LED back light. Turns LED back light on and off.
Menu. Takes you back to the previous menu.
Up Arrow. Scroll Up/Increments numbers and characters.
Down Arrow. Scroll Down/Decrements numbers and characters.
Sel Select. Selects the current menu item/saves settings.
The Liquid Crystal Display (LCD) on the front of the Stoker provides visual feedback of
the status of the Stoker. With the five buttons and the LCD you can control all of the
functions of the Stoker.
Main Menu Pressing the button cycles you through the four Main Menu options.
Temperature Sensor setup and control.
Blower naming and 5 minute shut off.
General system information and user preferences.

STOKER 16 Rock’s Bar-B-Que
Network connections and controls.
Pressing the button cycles you back through the four Main Menu options.
Temp Control Menu The Temperature Control Menu is the first Menu displayed on startup. This menu
contains the settings for each Temperature Sensor plugged into the Stoker. Each Temperature
Sensor has its own individual settings menu. You must have a Temperature Sensor plugged in
to your Stoker to access the Sensor Menu. After you select a Temperature Sensor you can
select a Blower, set the Target Temperature, and configure the Alarms.
Temperature Sensor Scan Menu
This menu will continuously cycle through all temperature sensors plugged into the Stoker.
To Scan all of the Temperature Sensors plugged into the Stoker:
From the Main Menu Press the Sel button to choose the Temp
Control option.
Press the Sel button again to Automatically scan through all of
the Temperature Sensors connected.
Press the buttons to scroll through the Sensors manually.
Press the button to return to the previous menu.
*Note: Temperature Sensors were identified at the factory as “Sensor 1”,”Sensor 2” etc…
This manual refers to your Temperature Sensors as “Sensor 1”,”Sensor 2”etc… If you have
renamed your Temperature Sensors the “New Name” would be displayed.
Temperature Sensor Settings Menu
Each Temperature Sensor has its own individual setting menu.
To change the settings for a particular sensor:
Press the buttons to scroll to the Sensor you wish to modify.
Press the Sel button to select the Temperature Sensor Settings
Menu. The Temperature Sensor Settings menu is displayed when
the LCD reads “Sensor 1, Blower”.
Press the buttons to cycle the Temperature Sensor options.
Press the Sel button to select the option displayed.
Press the button to return to the previous menu.

STOKER 17 Rock’s Bar-B-Que
Blower
This menu allows you to associate a blower to a temperature sensor. The blower must be
associated to a sensor in order for the Stoker to maintain the target temperature.
To assign a blower:
Press the Sel button to display the available Blowers.
Press the buttons until the desired Blower is displayed.
Press the Sel button to select the Blower. The * indicates the
Blower is assigned to the Sensor. Press the Sel button again to
deselect the blower.
Press the button to return to the previous menu.
*Note: A blower can only be assigned to one Sensor at a time. Be careful not to assign the
blower to any sensor not controlling the cooker temperature.
Alarm Type
This menu allows you to configure Fire and Food Alarms. A Fire alarm has a high and low
alarm for monitoring the fire. A Food alarm is a target only alarm for monitoring food.
To select an alarm type:
Press the Sel button to display the available alarm types.
Press the buttons until the desired alarm is displayed.
Press the Sel button to select the displayed alarm type. The *
indicates which alarm option is selected. Only one alarm type at a
time per sensor is allowed.
Press the button to return to the previous menu.
*Note: press any button to silence alarms.
BBQ Hi Temp
This alarm helps indicate when your fire is too hot.
Press the Sel button to select the BBQ High Temp option.
Press the buttons to set to the desired alarm temperature.
Press Sel to save the desired alarm temperature.
Press the button to return to the previous menu.
*Note: This menu requires the Fire Alarm option.
BBQ Lo Temp
This alarm helps indicate your fire is going out.
Press the Sel button to select the BBQ Lo Temp option.
Press the buttons to set to the desired alarm temperature.
Press Sel to save the desired alarm temperature.
Press the button to return to the previous menu.
*Note: This Menu requires the Fire Alarm option.

STOKER 18 Rock’s Bar-B-Que
Target Temp
This menu is where you set the temperature that you want the Stoker to maintain.
To set a target temperature:
Press the Sel button to select the Target Temp option.
Press the buttons to set to the desired target temperature.
Press Sel to save the desired target temperature.
Press the button to return to the previous menu.
Rename
All of the Sensors can be named to personal preferences.
To rename a Sensor:
Press the Sel button to select the Rename option.
Press the buttons to select a character.
Move to the next characters by pressing the Sel button.
Move to the previous character by pressing the button. When
you have completed setting all 12 characters, press the Sel button
to save changes.
Press the button to return to the previous menu.
Calibration
All Temperature Sensors can be calibrated. For more information about the calibration
procedure, please see the FAQ at the end of this manual.
To change the calibration number of a sensor:
Press the Sel button to select the Cal option.
Press the buttons to set to the desired Calibration number.
Press Sel button to save the Calibration number.
Press the button to return to the previous menu.
*Note: The Stoker Temperature Sensors are calibrated at the factory. If you purchase another
Sensor it will come calibrated from the factory. It is a good idea to record the new Sensor and
calibration number in the back of this manual. You can contact the factory to get calibration
numbers for all sensors manufactured.

STOKER 19 Rock’s Bar-B-Que
Blowers Menu The Blowers Menu is where you can pause each blower for 5 minutes when you need to open
the barbecue/smoker. You can also rename your blowers in this menu.
Blower Select Menu
Each Blower has its own individual setting menu.
From the Main Menu Press the Sel button to select the Blowers
option.
Press the buttons to cycle through the Blowers that are
connected.
Press the Sel button to select the Blower.
Press the button to return to the previous menu
*Note: Your Blowers were identified at the factory as “Blower 1”,”Blower 2” etc…This
manual refers to your Blowers as :”Blower 1”,”Blower 2”etc…If you have renamed your
Blowers the “New Name” would be displayed instead of “Blower 1”etc…
Blower Pause
The 5 minute pause is used to temporarily halt the Blower when you want to open your
cooker. The Blower will start in its normal control cycle after the 5-minute pause.
To pause a blower:
Press the buttons to cycle to the correct blower.
Press Sel to select the Blower Pause option.
Press the buttons to cycle through the Blower Pause Options.
Press the Sel button to select the option desired.
Press the button to return to the previous menu.
Blower Rename
All of the Blowers can be named to personal preferences.
To rename a Blower:
Press the Sel button to select the Rename option.
Press the buttons to select a character.
Move to the next characters by pressing the Sel button.
Move to the previous character by pressing the button. When
you have completed setting all 12 characters press the Sel button
to save.
Press the button to return to the previous menu.
STOKER 20 Rock’s Bar-B-Que
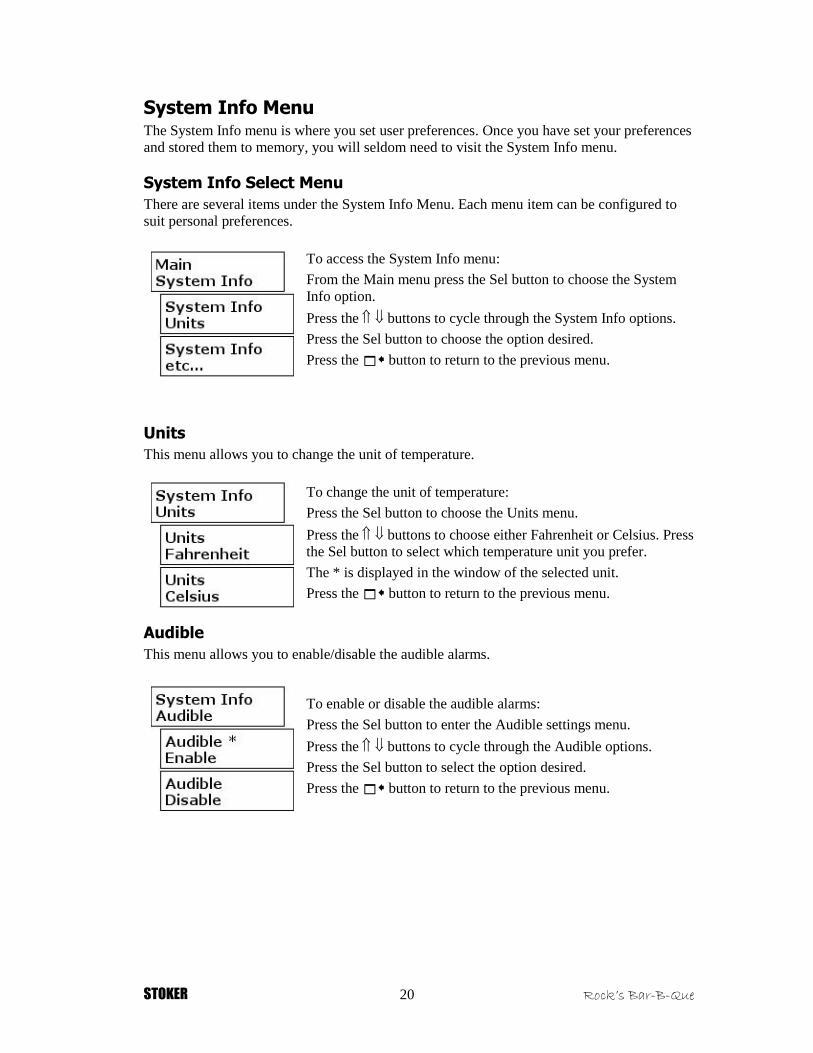
System Info Menu The System Info menu is where you set user preferences. Once you have set your preferences
and stored them to memory, you will seldom need to visit the System Info menu.
System Info Select Menu
There are several items under the System Info Menu. Each menu item can be configured to
suit personal preferences.
To access the System Info menu:
From the Main menu press the Sel button to choose the System
Info option.
Press the buttons to cycle through the System Info options.
Press the Sel button to choose the option desired.
Press the button to return to the previous menu.
Units
This menu allows you to change the unit of temperature.
To change the unit of temperature:
Press the Sel button to choose the Units menu.
Press the buttons to choose either Fahrenheit or Celsius. Press
the Sel button to select which temperature unit you prefer.
The * is displayed in the window of the selected unit.
Press the button to return to the previous menu.
Audible
This menu allows you to enable/disable the audible alarms.
To enable or disable the audible alarms:
Press the Sel button to enter the Audible settings menu.
Press the buttons to cycle through the Audible options.
Press the Sel button to select the option desired.
Press the button to return to the previous menu.

STOKER 21 Rock’s Bar-B-Que
Time Zone
Press the Sel button to select the Time Zone menu.
Press the until the desired zone appears.
Press the Sel button to select it.
An * will appear on the time zone selected.
Press the button to return to the previous menu.
*Note: The Stoker must be connected to a network with a time server for this function to
work. Refer to Section 7 for more information about connecting the Stoker to a network.
Date
Press the Sel button to select the Date menu.
Use the buttons to change the month, day and year.
Move to day/year by pressing the Sel button.
Press Sel to save date.
Press the button to return to the previous menu.
*Note: The Stoker must be connected to a network with a time server for this function to
work. Refer to Section 7 for more information about connecting the Stoker to a network.
Time
Press the Sel button to select the Time menu.
Press the buttons to change the hour/minutes.
Move to minutes by pressing the Sel button.
Press Sel to save time setting.
Press the button to return to the previous menu.
*Note: The Stoker must be connected to a network with a time server for this function to
work. Refer to Section 7 for more information about connecting the Stoker to a network.
Auto Time
Auto Update only works for setting date and time when connected to a network with a
timeserver.
Press the Sel button to select the Auto Update menu.
Press the Sel button to have the Stoker get the time off of a
network timeserver.
If you get the Success screen you are connected to a timeserver
and your time has been set automatically.
If the Stoker could not locate a timeserver you will get the
Failed screen and you will have to set the time through the Time
input screen.
*Note: The Stoker must be connected to a network with a time server for this function to
work. Refer to Section 7 for more information about connecting the Stoker to a network.
STOKER 22 Rock’s Bar-B-Que
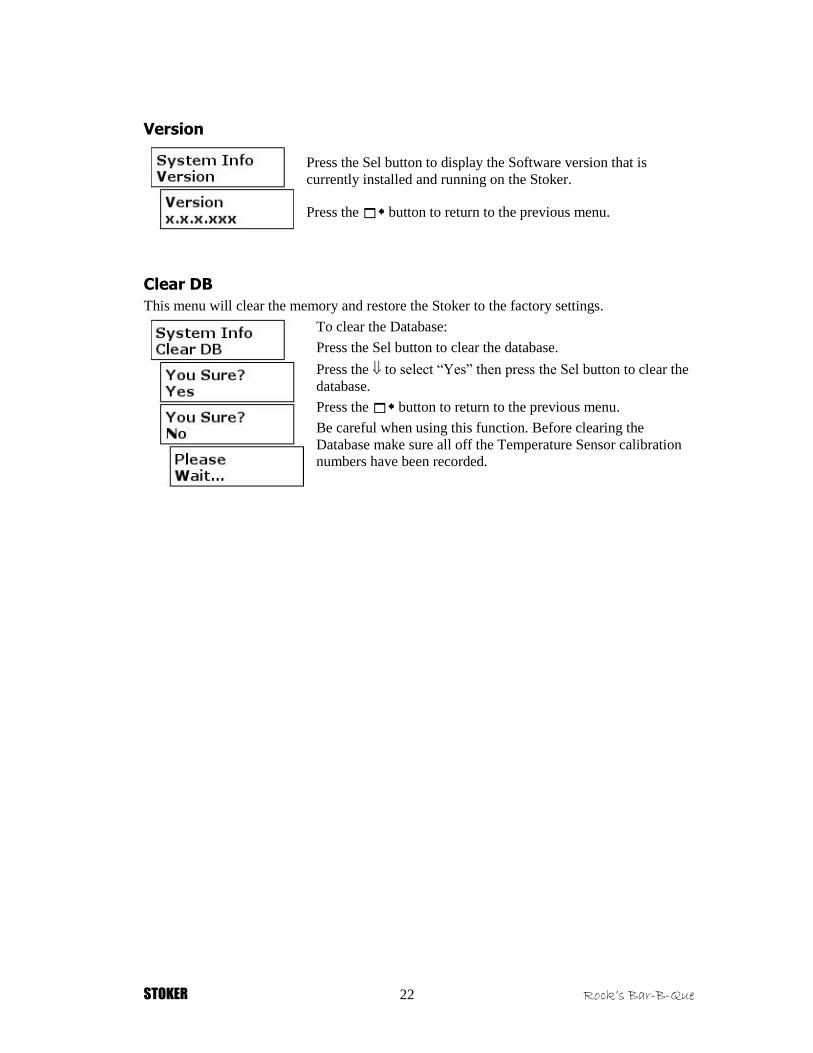
Version
Press the Sel button to display the Software version that is
currently installed and running on the Stoker.
Press the button to return to the previous menu.
Clear DB
This menu will clear the memory and restore the Stoker to the factory settings.
To clear the Database:
Press the Sel button to clear the database.
Press the to select “Yes” then press the Sel button to clear the
database.
Press the button to return to the previous menu.
Be careful when using this function. Before clearing the
Database make sure all off the Temperature Sensor calibration
numbers have been recorded.

STOKER 23 Rock’s Bar-B-Que
Network Menu
IP Addr
This menu displays the IP address to access the built-in web server when connected to a
network using an Ethernet cord.
Press the Sel button to choose the IP address menu. If the Stoker
is in DHCP mode (Default), the IP address will be displayed
when connected to a network.
To set a Static IP, press the to change the first 3 numbers.
Press the Sel button to move to the next set and repeat. When
finished with the 4th set press Sel to save.
Press the button to return to the previous menu.
*Note: The Stoker must be connected to a network for this function to work. Refer to Section
7 for more information about connecting the Stoker to a network.
Subnet Mask
Press the Sel button to display the Subnet Mask.
Press the to change the first 3 numbers. Press the Sel button
to move to the next set and repeat. When finished with the 4th set
press the Sel button to save.
Press the button to return to the previous menu.
*Note: The Stoker must be connected to a network for this function to work. Refer to Section
7 for more information about connecting the Stoker to a network.
Gateway
Press the Sel button to display the Gateway settings.
Press the to change the first 3 numbers. Press the Sel button
to move to the next set and repeat. When finished with the 4th set
press the Sel button to save.
Press the button to return to the previous menu.
*Note: The Stoker must be connected to a network for this function to work. Refer to Section
7 for more information about connecting the Stoker to a network.
DNS
Press the Sel button to display the DNS settings.
Press the to change the first 3 numbers. Press the Sel button
to move to the next set and repeat. When finished with the 4th set
press the Sel button to save.
Press the button to return to the previous menu.
*Note: The Stoker must be connected to a network for this function to work. Refer to Section
7 for more information about connecting the Stoker to a network.

STOKER 24 Rock’s Bar-B-Que
HTTP Port
To access the Stoker from outside your home network (over the internet) the Stoker needs to
be set to receive HTTP requests through a designated port number. This port number is
commonly port 80. The router needs to be set to forward HTTP requests to port 80.
Press the Sel button display the HTTP Port currently selected.
To change the port number, press the . Press the Sel button to
save the forwarding port.
Press the button to return to the previous menu.
*Note: The Stoker must be connected to a network for this function to work. Refer to Section
7 for more information about connecting the Stoker to a network.
WiFi Enable
This menu allows you to enable/disable the wifi settings.
To enable or disable the built-in WiFi:
Press the Sel button to enter the Wifi settings menu.
Press the buttons to cycle through the Wifi options.
Press the Sel button to select the option desired.
Press the button to return to the previous menu.
*Note: Make sure to enter your Router Security settings in the WiFi setup page before
enabling the WiFi capabilities. Refer to Section 7 more information about networking.
WiFi IP
This menu displays the IP address to access the built-in web server when the Stoker connects
wireless to your network.
Press the Sel button to choose the Wifi IP address menu. If the
Stoker is in DHCP mode (Default), the IP address will be
displayed when connected to a network.
To set a Static IP, press the to change the first 3 numbers.
Press the Sel button to move to the next set and repeat. When
finished with the 4th set press Sel to save.
Press the button to return to the previous menu.
*Note: The Stoker must be connected to a network for this function to work. Refer to Section
7 for more information about connecting the Stoker to a network.

STOKER 25 Rock’s Bar-B-Que
7. Network Connection The Stoker has a built-in web server that allows you to monitor and control the Stoker on any
device with network capabilities and a web browser. There are two methods to connect the
Stoker to your network. You can use the built in wireless capabilities to communicate to your
wireless router, or you can connect the Stoker to your network by using an Ethernet cable.
Older versions of the Stoker can also be turned into a wireless 802.11x system by adding a
Wireless Bridge or gaming adapter. They are available from many companies from $60 -$80
or so. Follow the directions of the Wireless Bridge Manufacturer for installation.
DHCP Ethernet Connection Setup You can connect your Stoker to a “DHCP Server” to monitor and control the Stoker with
your network capable device and Web Browser. The DHCP server/client is the most common
configuration for home networks. If you have a Broadband connection (Cable Modem or
DSL) you probably have a DHCP server/client network. The cable modem or DSL adapter
acts as the DHCP Server. When your network capable connects to your network it requests an
IP Address from the DHCP server. This identifies your computer on the network.
Ethernet connection is one of the easiest ways to connect your Stoker to your network.
To connect the Stoker to your network using an Ethernet cord, plug one end of the cable into
the Ethernet port on the Stoker. Connect the other end into an open port on your router
(usually labeled 1-4). When the Stoker powers up, it requests an IP Address from the DHCP
server. The IP Address that was assigned to the Stoker can be found in the System Info Menu
on the Stoker.
To obtain the IP Address of your Stoker:
Press Sel to enter the System Info Menu.
Press the buttons to cycle to the IP Address Menu.
Press the Sel button to display the IP address that was assigned on
power up.
Press the button to return to the previous menu.
To access your Stoker using this IP address, launch your web browser and type the IP
Address http://192.168.0.2 into the URL Address field. The Stoker will serve a Web Page
which allows you to control and monitor your Stoker. When entering the IP into the URL,
you do not need to enter any leading zeros. If the IP reads 192.168.001.002 you should enter
192.168.1.2 ; If it reads 192.168.000.003, enter 192.168.0.3

STOKER 26 Rock’s Bar-B-Que
Static IP Configuration (Ethernet) By default, DHCP is used. However, a custom IP address can be chosen for personal
preference. Make sure the Gateway, DNS, and Subnet Mask match those of your router. This
information can be found on a Windows machine by opening command prompt, then type
ipconfig/all and pressing enter. Make sure the network device you are using is connected to
the same network as the Stoker.
To use a custom IP address:
Press Sel to enter the System Info Menu.
Press the buttons to cycle to the WiFi IP or IP Address
Menu.
Press the Sel button to display the WiFi IP or IP Address that
was assigned on power up.
Use the buttons to change the first three numbers. Press the
Sel button to move to the next set and repeat. When finished
with the 4th set press Sel to save.
Press the button to return to the previous menu.
When setting a Static IP, make sure the first 3 sets of numbers match those of your
network. For the 4th set of numbers, make sure to select IP address that is not already
reserved. Choosing a number above 100 will help minimize IP issues. Ex. 192.168.001.101.
After saving the Static IP address, wait a few seconds for the network parameters to
propagate through the system and to the network. From then on, every time the stoker is
rebooted, this custom IP address will be used.
Re-Enabling DHCP (Ethernet) The Stoker can be reset to DHCP mode with the following steps:
Press Sel to enter the System Info Menu.
Press the buttons to cycle to the WiFi IP or IP Address Menu.
Press the Sel button to enter the WiFi IP or IP Address Menu.
Use the buttons to scroll to 255 for the first set of digits in the
address. Press the Sel button 4 times to move the cursor and save.
Press the button to return to the previous menu.
Wait a few seconds for the DHCP client to acquire a new IP address. From this point on,
DHCP will be used.
For more information about Networking setup, please refer to our Documents and Videos
pages on our website. www.rocksbarbque.com

STOKER 27 Rock’s Bar-B-Que
Wireless Connection Setup The Stoker has the ability to connect to your wireless network much like your laptop or
PC. In order to enable the WiFi capabilities of the Stoker, it must first be connected to the
network using an Ethernet cord. Ethernet connection is required to enter the Network
information and security settings to allow the Stoker to connect to your network.
Once connected to your network via Ethernet cord, obtain the Stoker’s network IP
address as described above and in the IP Addr menu section. Enter the IP Address of the
Stoker into the URL of your web browser with “/wifi.html” at the end.
Ex. 192.168.0.2/wifi.html
The following page will be generated:
To Enable the WiFi capabilities, you will
need to know the SSID, security type, and
passphrase for your network. The SSID is the
name of your network. Ex. NETGEAR,
2WIRE235, or Rock’s Bar-B-Que. The
Security type depends on your network
settings. The passphrase is the code needed to
allow additional devices access to your
network. This information can be found in
your network’s settings page of your router.
Refer to your network equipment users
manuals for more information about
accessing the network settings page.
To Enable Wireless on the Stoker:
1) Click the box “Wireless enabled”.
2) Enter the SSID of your network.
3) Click the DHCP box if you want the
network to assign an IP address to the Stoker.
Otherwise, you will need the Subnet Mask,
Gateway, and DNS server information for a
Static IP.
4) Select the appropriate Security type for
your router. For WPA/WPA2 use PSK.
5) Enter the passphrase for your network.
6) Click Save changes and wait 10 seconds
before rebooting your Stoker.
Once the settings are saved, you will not need to access this page again unless your network
settings change. When the Stoker boots up, you will need the WiFi IP address to access the
built-in web server. The WiFi IP Address may be different than the Ethernet IP Address you
used to enter the network information.
STOKER 28 Rock’s Bar-B-Que
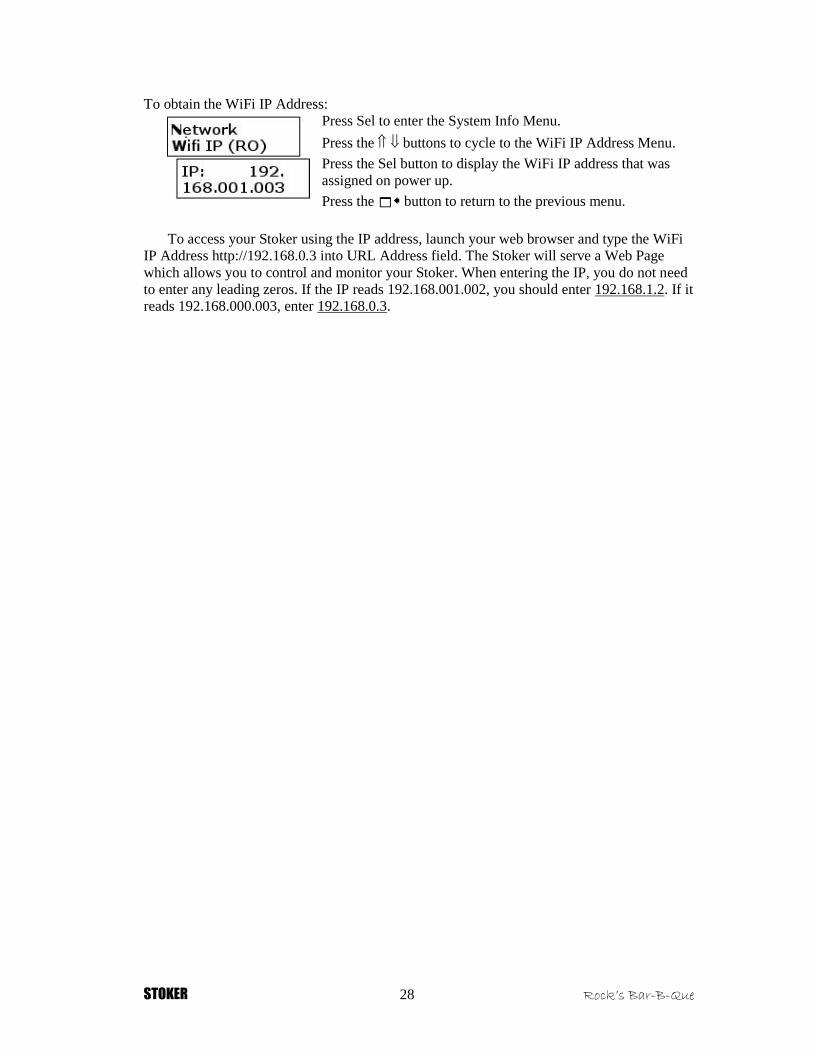
To obtain the WiFi IP Address:
Press Sel to enter the System Info Menu.
Press the buttons to cycle to the WiFi IP Address Menu.
Press the Sel button to display the WiFi IP address that was
assigned on power up.
Press the button to return to the previous menu.
To access your Stoker using the IP address, launch your web browser and type the WiFi
IP Address http://192.168.0.3 into URL Address field. The Stoker will serve a Web Page
which allows you to control and monitor your Stoker. When entering the IP, you do not need
to enter any leading zeros. If the IP reads 192.168.001.002, you should enter 192.168.1.2. If it
reads 192.168.000.003, enter 192.168.0.3.

STOKER 29 Rock’s Bar-B-Que
Ad hoc connection (direct device connection)
Ad hoc connection allows communication directly between the Stoker and a wireless web
enabled device. There is limited device support. Successful testing has been done on laptop and
tablets however smartphones do not support Ad hoc connection. (If your phone is “Rooted” it
may work)
Once connected to your network via Ethernet cord, obtain the Stoker’s network IP address as
described above and in the IP Addr menu section. Enter the IP Address of the Stoker into the
URL of your web browser with “/wifi.html” at the end. Ex. 192.168.0.2/wifi.html
The following page will be generated:
1) Click the box “wireless enabled”
2) Enter your desired SSID (this it the
network name the Stoker will broadcast)
3) DHCP box should not be checked
4) Click the box “Ad hoc”
5) Set security type to “None”
6) Leave Passphrase blank
7) IP address, Subnet mask, Gateway and
DNS server should all be set to
255.255.255.255
8) Click save changes and wait 10 seconds
before rebooting the Stoker
When you reboot your WiFi ip should
appear as 192.168.001.099. With your
wireless device scan for the wireless
network with the SSID that you set and
connect. After connecting you will need to
set a static IP address for the connected
device. This procedure will be dependent on
the operating system being run on the
device. After setting a static IP you will be
able to open your web browser and enter the
Stokers IP address. The IP shows as
192.168.001.099 but should be entered in
the address bar as 192.168.1.99.
STOKER 30 Rock’s Bar-B-Que
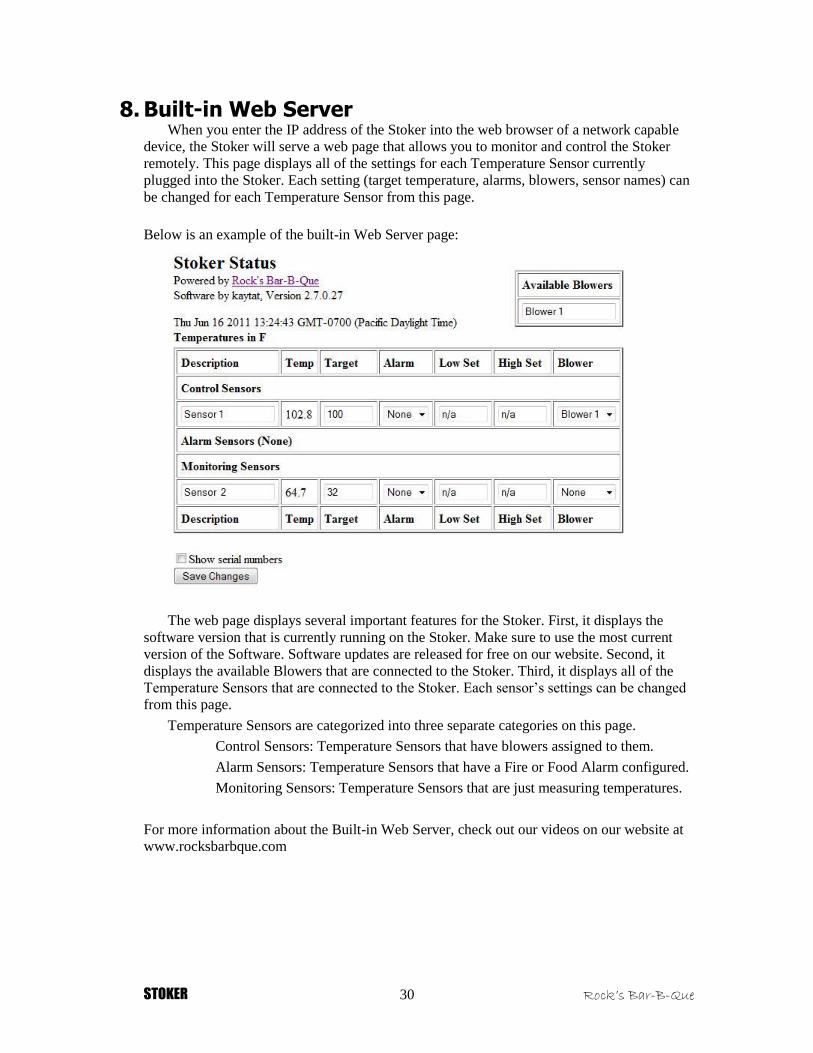
8. Built-in Web Server When you enter the IP address of the Stoker into the web browser of a network capable
device, the Stoker will serve a web page that allows you to monitor and control the Stoker
remotely. This page displays all of the settings for each Temperature Sensor currently
plugged into the Stoker. Each setting (target temperature, alarms, blowers, sensor names) can
be changed for each Temperature Sensor from this page.
Below is an example of the built-in Web Server page:
The web page displays several important features for the Stoker. First, it displays the
software version that is currently running on the Stoker. Make sure to use the most current
version of the Software. Software updates are released for free on our website. Second, it
displays the available Blowers that are connected to the Stoker. Third, it displays all of the
Temperature Sensors that are connected to the Stoker. Each sensor’s settings can be changed
from this page.
Temperature Sensors are categorized into three separate categories on this page.
Control Sensors: Temperature Sensors that have blowers assigned to them.
Alarm Sensors: Temperature Sensors that have a Fire or Food Alarm configured.
Monitoring Sensors: Temperature Sensors that are just measuring temperatures.
For more information about the Built-in Web Server, check out our videos on our website at
www.rocksbarbque.com

STOKER 31 Rock’s Bar-B-Que
Securing Built-in Web Server The built in web server has a security feature which allows you to make it a “read-only”
page, allowing only those with the password to alter the settings of the Stoker. This feature
will come in handy if you are at a BBQ contest or want to share your cooking experience
with friends around the world.
To Secure the Built-in Web Server, type the IP address of the Stoker into the URL of a web
browser with “/ro.html” at the end of the IP address to access the setup page.
Ex. 192.168.1.105/ro.html.
The following page will be generated:
Enter the password information and click the
“Read-Only” box to turn this feature on. Once
you access the web server, the temperature
settings will be locked and cannot be changed
without the password. If you forget your
password, reset the database and the default
settings will be restored.
In order to access this feature, the Stoker must
be connected to a network. Refer to Section 7
for more information about networking.
Twitter Every Stoker is equipped with a built-in Twitter function that will send “tweets” from
your Stoker to your Twitter account. This allows you to receive updates from your stoker on
the condition of the Temperature Sensors without being next to your cooker. You will need to
create a Twitter account. Accounts are free and can be created at www.twitter.com. You will
also need to use a third party website www.supertweet.net.
In order to use the Twitter feature, your Twitter account needs to be configured to accept
information from the Stoker. First, log into your Twitter account and keep the browser open.
In a new tab, go to www.supertweet.net and click “Sign in with Twitter”. This will take you
to Twitter and then click on “Allow”. Once you have clicked allow, it will take you back to
supertweet.net and then click “Activate”. Choose a new password (DO NOT USE YOUR
TWITTER PASSWORD). Your Twitter account is now active to receive tweets from the
Stoker!
For more information about using Twitter, please see the Documents and Video pages on our
website at www.rocksbarbque.com

STOKER 32 Rock’s Bar-B-Que
To enable the Twitter function type the IP address of the Stoker into the URL of the web
browser with “/twitter.html” at the end of the IP address to access the setup page.
Ex. 192.168.1.105/twitter.html.
The following page will be generated:
To Enable Twitter:
1) Click the Enable dot to turn on Twitter.
2) Enter your Twitter username and
Supertweet.net password (Do not enter your
real Twitter Password).
3) Set interval at which you wish to receive
tweets. We recommend 20-30 minute
intervals.
4) You can change the message header to fit
personal preferences.
5) Do not change the OAuth Proxy.
6) Save the changes and your Stoker will
begin Tweeting you!
You can also send custom updates to record
notes about your cook.
STOKER 33 Rock’s Bar-B-Que
9. Maintenance and Care
Stoker Electronics The Stoker is an electronic device and it should be treated as such. The nature of BBQ is
requires use outdoors; however the Stoker control box is not waterproof and should be kept as
dry as possible. If using the Stoker in poor weather, make sure the Stoker unit, plug ends, and
blower are covered to keep as much moisture away as possible. To clean the Stoker, a damp
cloth may be used. Avoid getting water into the connector holes.
Temperature Sensors The plug ends of the Temperature Sensors have electronics inside and should not get wet.
If it gets wet or soiled wipe it off with a cloth and dry it thoroughly. The probe end can be
cleaned with dish soap and warm water.
Temperature Sensors should not be used for cooks above 450F. Subjecting the sensors to
temperatures above this will cause the Teflon coating to melt and lead to inaccurate
temperature readings. Care should be taken to ensure that the Teflon wire is not exposed to
direct flame.
Blowers The blowers are not waterproof and should be kept as dry as possible. Clean the blower
with a damp cloth and dry thoroughly. The connector end of the Blower has electronics inside
and should be kept dry.
STOKER 34 Rock’s Bar-B-Que
10. Frequently Asked Questions
Q: How come there are no High and Lo alarm Menus?
A: You must select the “Fire” alarm in the Alarm Type menu first.
Q: My sensor is reading 32 degrees, is there something wrong?
A: The Stoker is still booting up. Return to the main menu and enter the Temp Sensor menu
again.
Q: My sensors are only monitoring sensors, how do I make them control sensors?
A: Control sensors are those sensors that have had blowers assigned to them. Assign a blower
to the sensor and it will become a control sensor.
Q: My temperature sensor is not at the target temperature and the blower is not on, what do I
do?
A: Make sure the blower is assigned to that sensor.
Q: How do I calibrate the sensor?
A: Boil a pot of water and make sure it is boiling for 10 minutes. Place the Temperature
Sensor probe end into the middle of the pot, making sure the probe end does not touch the
sides or bottom of the pot. The sensor should read the correct boiling point for your altitude.
If it is more than a few degrees off, adjust the calibration number until it reads the correct
temperature.
Q: How do I reset my Stoker into DHCP mode?
A: Set the first 3 digits of the IP Address to 255. Press the Sel button 4 times until the Stoker
reads “Please wait…”. Enter the IP Address menu again to obtain the IP Address.
Q: What should I set my exhaust vents at when using the Stoker?
A: The exhaust vents only need to be cracked to allow a small amount of smoke and heat to
escape the smoker. If the vent is fully open, it can cause a strong draft that will feed more air
into your smoker, causing fluctuations in temperatures.
Q: How should I set my air inlet vents on my smoker?
A: All air inlet vents should be 100% closed. The Stoker operates on the assumption that it is
in a “closed” system. The blower should be the only source of air for the fuel.

STOKER 35 Rock’s Bar-B-Que
11. Temperature Sensor Records
Sensor Serial Number Sensor Name Cal #
1
2
3
4
5
6
7
8
9
10
11
12
13
14
15
16
17
18
19
20

STOKER 36 Rock’s Bar-B-Que

STOKER 37 Rock’s Bar-B-Que