Embed Size (px)
Citation preview

1
Starting your IRB Application
If you are ready to have the IRB review your research project, you first need to have:
Set up a new user account in IRBNet, and
Submitted your IRB training certificate(s).
Instructions for both of these steps are available in the Concordia Connect Portal under the resources
tab if you search for “IRB.”
After completing your new user account registration and uploading your IRB training, you can
share/submit an IRB application. You do this by first sharing your IRB application (called a package) with
your course instructor or dissertation chair. Once your course instructor or dissertation chair has
approved your package (by signing it in IRBNet) he/she will submit it to the IRB for review.
Follow these steps to share your IRB application materials (package) with your instructor or chair:
Log in to www.irbnet.org using your username and password.

2
You will be taken to the main page for your account which should look something like this:
Click “Create New Project” in the upper left corner.
On the Project Information page, type your TITLE (the actual title of your study), FIRST, and LAST NAME.
No other information on this form needs to be entered. For these instructions, a fictional Principal
Investigator (PI) named Charlie Cougar is submitting an IRB application (package).
Click “Continue.”
You will then see a Designer window. Additional menu options will now show on the left had side of
your screen. When you create a new project, IRBNet calls each submission related to this project a
package.

3
Step 1: In this step you will download the forms you’ll need to complete your application (package).
First, note that there is a Concordia University Chicago IRB, River forest, IL Library listed. This is a library
of all IRB forms and documents needed to complete your IRB application (package).
In most cases, your package should include:
An IRB Application form
A Request for Exempt Review form OR Request for Expedite Review form
Evidence of site permission
Consent materials
Data collection tools
Dissertation proposal (doctoral students only)
Signed dissertation proposal defense ballot (doctoral students only)
Begin by highlighting the “IRB Application” in the document drop down menu as shown here:
Then click “Download.”
Open the IRB Application PDF. Complete the form and save it. You will attach it to your package in a
later step. Follow this same process for each document needed for your package. Please note that
several departments at CUC have developed standard templates for site permission and consent. If you
see your program listed, please use the supplied templates. Also note that several of these are available
in Spanish.

4
Step 2: In this step you will assemble the documents needed for your package. First, you should link your
training records. (You should have already uploaded your IRB training by following the steps in the
“Submit your IRB Training Certificate” document.)
Click the blue “Link / Un-Link Training Records” link near the bottom right hand part of your screen.
You will be taken to a “Link Training & Credential” page as shown below:
Check the box next to your name and click “Save.” You will then be taken back to the Designer page. You
must link your training. If you do not link properly, your application will be returned to you for
correction.
You will now add your application materials by clicking “Add New Document.”

5
On the Attach Document page, begin by selecting the appropriate Document Type from the drop down
menu as shown here:
In this example, Charlie Cougar has selected “Application Form.” In the “Description” box, type what the
document is. In this example it is Charlie’s “IRB Application.” Then click “Browse” to find the IRB
Application you’ve downloaded, completed, and saved.
Click “Attach.”
6
You should then be taken back to the Designer window and see the Application Form listed as shown
below:
Repeat this process to attach all of the documents required for your package. Note that each piece of
your package is attached as a separate document. DO NOT try to submit as a single document or as a zip
file. Once you have attached all of your documents, you should see something like this:
7
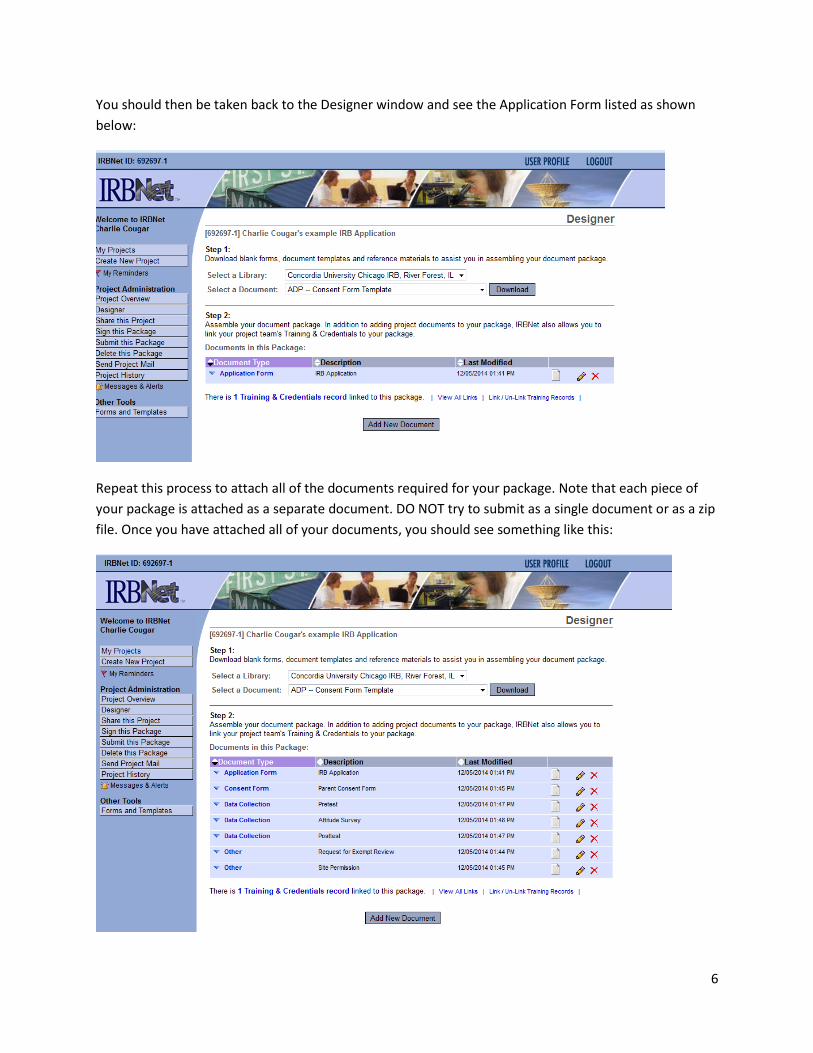
Note, that each document has a “Document Type” that you select. Please be sure to pay attention to the
document types and your descriptions. The more clear you are in describing each document the more
efficiently it can be reviewed. In general, select “Consent Form” for your student and parent permission
forms. Select “Data Collection” for your data collection tools (i.e. pretests, interview questions, surveys).
Select “Other” for your Request for Exempt or Expedited Review forms, site permission, dissertation
ballots, and any other forms that you might need to include. If you need to change a document type
after you have added it, you can do so with the blue arrows
You will sign your package by clicking “Sign this Package” on the left side of your screen.
On the “Sign Package” page you will select “Principal Investigator” from the drop down menu and then
click “Sign.” You will at this step have to re-enter your IRBNet username and password. Once you do that
click “Continue.”

8
Once all of your documents are added to your package and you have signed it, you will need to share
your package with your instructor/dissertation chair. (If you are a staff/faculty member submitting a
project please contact [email protected] before completing this step for an alternative set of
instructions).
Share your package by clicking “Share this Project” on the left side of your screen as shown below:

9
You’ll be taken to a “Share Project” screen.
Click “Share.”
Then select CUC as your organization by highlighting it and then clicking “Select Organization.”
You will then see a long list of IRBNet CUC users. Find your Instructor or Chair’s name. In this case
Charlie Cougar is submitting an IRB application as part of a graduate course he is taking with Dr. River
Forest. Please note that Dr. Forest is not a real person and is just used as an example here.
10
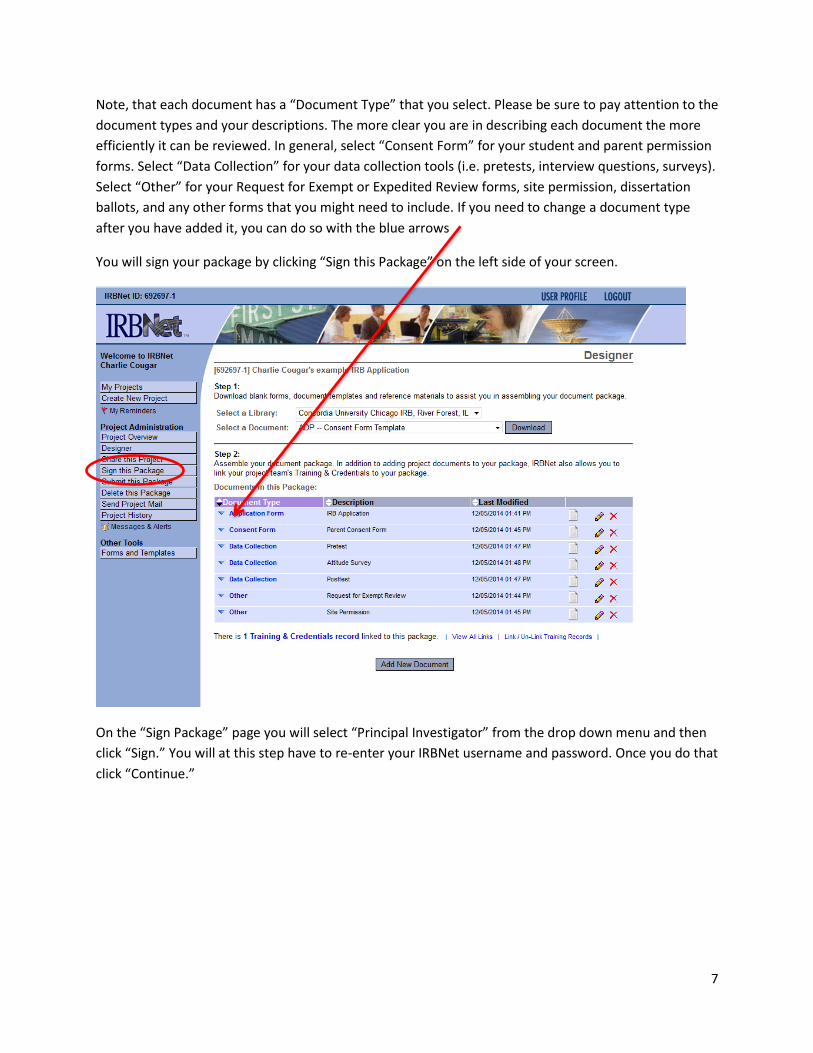
Give Dr. Forest “Full” access to the project and then click “Save.”
Once you click Save an email will be sent to your instructor. In this example, Dr. Forest will get an email
from Charlie Cougar with the subject “IRBNet Project Access.” This alerts Dr. Forest that Charlie’s project
is now available for her to review. Dr. Forest will then log in to IRBNet to review his application.
Once you’ve shared your package, you’ll see this screen:

11
Once Dr. Forest signs your package you will get an automatically generated email to alert you of that.
What’s next? You may need to change or add to your package before your instructor/chair will sign it.
o See the “How to make modifications” document for instruction
You may need to make changes to your project after the IRB has reviewed it and submit a
revised package.
o See the “How to make modifications” document for instruction
Once your project is fully approved you’ll get an automatic email letting you know that.
After your project is over, you’ll need to submit a project completion form.
o See the “How to submit a projection completion form” document for instruction