Embed Size (px)
Citation preview
�Investigating Astronomy: Starry Night Activity Directions
Starry Night Activity Directions: For Students
IntroductionThe IA curriculum makes extensive use of the computer program Starry Night. The Starry Night activities are not simple demonstrations. They are interactive—you will use the program to measure and record data for analysis. Using Starry Night, you can look at the night sky from any location on Earth and view it at any time in ages past or in the distant future. You will use only a few of the hundreds of options and tools contained in the program. If you learn how to use basic Starry Night tools, and practice using them while you do the first activity you work on with the software, you will find that in a short time you will be an expert on observing the night sky.
The BasicsYou will discover that you perform the same operations time and again in the 11 activities that utilize Starry Night. Some of the most common manipulations found in these activities are described below.
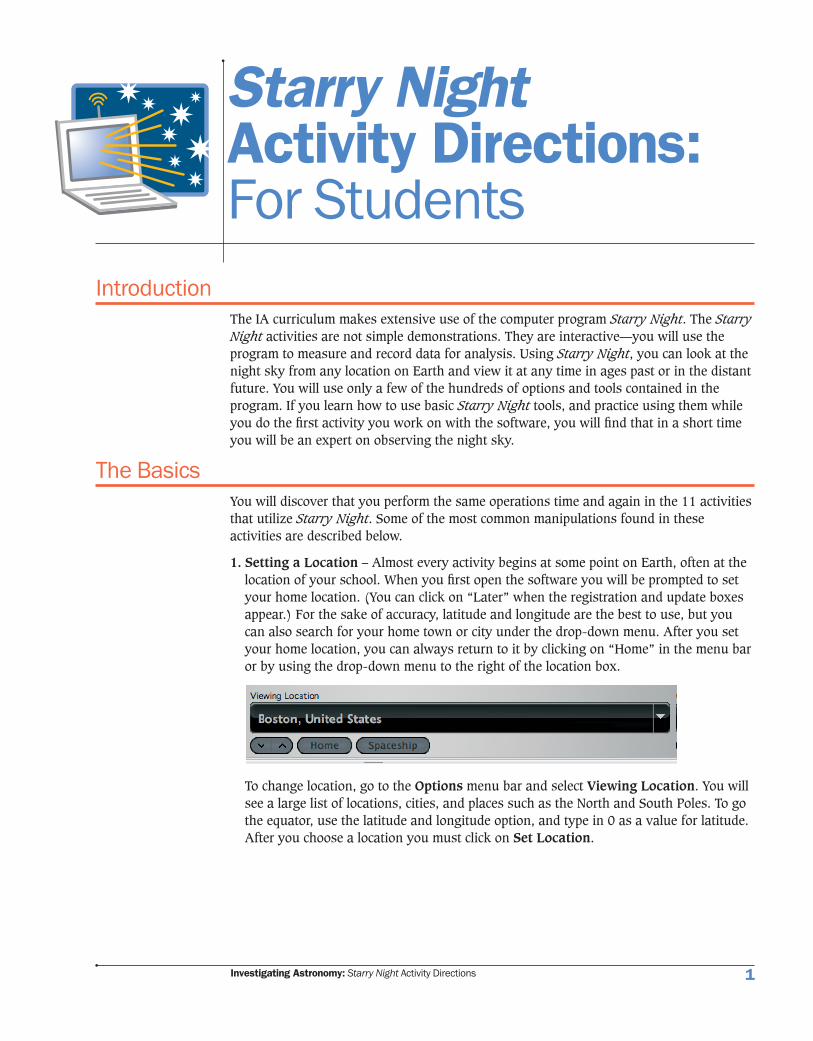
1. Setting a Location – Almost every activity begins at some point on Earth, often at the location of your school. When you first open the software you will be prompted to set your home location. (You can click on “Later” when the registration and update boxes appear.) For the sake of accuracy, latitude and longitude are the best to use, but you can also search for your home town or city under the drop-down menu. After you set your home location, you can always return to it by clicking on “Home” in the menu bar or by using the drop-down menu to the right of the location box.
To change location, go to the Options menu bar and select Viewing Location. You will see a large list of locations, cities, and places such as the North and South Poles. To go the equator, use the latitude and longitude option, and type in 0 as a value for latitude. After you choose a location you must click on Set Location.
Investigating Astronomy: Starry Night Activity Directions�
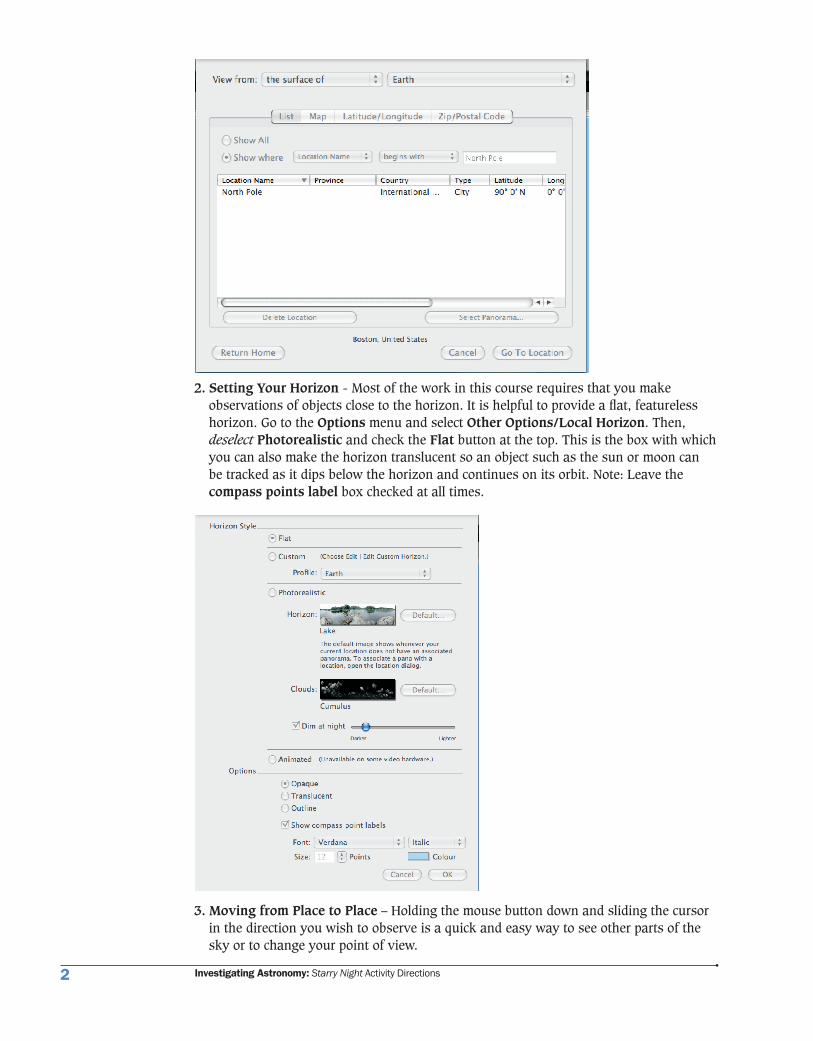
2. Setting Your Horizon - Most of the work in this course requires that you make observations of objects close to the horizon. It is helpful to provide a flat, featureless horizon. Go to the Options menu and select Other Options/Local Horizon. Then, deselect Photorealistic and check the Flat button at the top. This is the box with which you can also make the horizon translucent so an object such as the sun or moon can be tracked as it dips below the horizon and continues on its orbit. Note: Leave the compass points label box checked at all times.
3. Moving from Place to Place – Holding the mouse button down and sliding the cursor in the direction you wish to observe is a quick and easy way to see other parts of the sky or to change your point of view.

�Investigating Astronomy: Starry Night Activity Directions �
To quickly change your view to due east, type “e” and the view will automatically center on east. In a similar way, typing “w” will center the view to due west, and so on. Or, you can use the N, S, E, and W buttons in the Gaze box in the menu bar to change your view. You can also center on your zenith (the point directly overhead at your location) by clicking on the “Z” box.
4. Setting the Date and Time – The software always opens to today’s date and time. In the Motions unit you will be setting the time to sunrise or sunset. This can be done automatically by using the two buttons that are provided (See below). To return to the present date and time, use the “Now” button.
To change the date and/or time, the easiest way is to click once on the month, date, or year number you wish to change and then use the up and down arrows on your computer to increase or decrease the number. Or, you can use the Time Flow Rate box, which allows you to go forward or backward in time incrementally.
5. Changing the Time Flow Rate - You often need to change the time increment used in visualizations. The default time increment is real time, or 1X. To select the appropriate increment use the drop-down menu to the right of the Time Flow Rate box. After you set the time, you can use the four buttons below the box to play at that time interval (forward or backward) or to move by incremental time steps. To stop the time flow, use the red button. Practice setting the time increment with different values and push play to see how quickly the view changes over time.
At many points in this course, you will be observing the motion of various objects in the sky. Sometimes setting the time rate to Minutes and then pressing the forward arrow will allow for a slow and careful observation. At other times, you might try advancing time by hours or days. Again, a shortcut is to highlight the day and then use the up and down keys on your keyboard to change the day.
To change to an odd-number time interval, for example 3 years, click once on the “1” and then hit “y” on your keyboard twice to advance it to 3.
Investigating Astronomy: Starry Night Activity Directions�
6. Finding Stars, Planets, and Other Interesting Objects – At times you will want the sky to be uncluttered and in its natural state, but often you will be focusing on specific objects like planets or constellations. Planets and moons in the night sky should be labeled so you can observe their movement across the celestial sphere. To label planets and moons so you can see them on the screen, go to the View menu, select Solar System, and check Planets and Moons. You will see a long menu of other items to choose from.
Data on stars, planets, and other objects can easily be obtained by mousing over them. A series of data (coordinates like altitude, azimuth, right ascension, distances, etc.) will be displayed each time your cursor rests on an object.
If you wish to search for a particular planet or moon, use the small Find tab that is found on the left edge of the screen. Type in the name of the object you are looking for and select it when it appears in the Search box.

�Investigating Astronomy: Starry Night Activity Directions
Student Directions for Investigating Astronomy Starry Night Activities
�. Unit �, Exp. �, Act. �, pg. �� – Analyzing the Sun’s Daily Path at Different Times of the Year
�. Unit �, Exp. �, Act. �, pg. �0 – Observing the Sun from the Poles and Equator
�. Unit �, Exp. �, Act. �, pg. �� – Investigating the Solstices and Equinoxes
�. Unit �, Exp. �, Act. �, pg. �8 – The Reason for the Seasons
�. Unit �, Exp. �, Act. �, pg. �� – Exploring How and Why the Stars Appear to Move
6. Unit �, Exp. �, Act. �, pg. �� – How the Sun Affects the Visibility of the Stars
7. Unit �, Exp. �, Act. �, pg. �7 – Observing the Planets in Starry Night
8. Unit �, Exp. �, Act. �, pg. 9� – Virtual Moon Journal
9. Unit �, Exp. �, Act. �, pg. ��� – Eclipse Cycles
�0. Unit �, Exp. �, Act. �, pg. ��� – Modeling the Orbits of the Planets
��. Unit �, Exp. �, Act. �, pg. �6� – Kepler’s Laws

Investigating Astronomy: Starry Night Activity Directions6
Unit 1, Exp. 1, Act. 3, pg. 12Analyzing the Sun’s Daily Path at Different Times of the Year
Directions:
All the Starry Night activities in Unit 1 require the same presets. These opening operations will be standard for each activity you do.
1. Set home to Local:
a. Click on the black portion of Viewing Location field.
b. Choose Other and see if you can find the town or city where you go to school.
c. If it or one really close by is in the list, click on it and then click on Save as Home Location.
d. If it isn’t in the list, switch to Latitude/Longitude then type in your local latitude and longitude. Click on Save as Home Location.
2. Set up the Data Tool:
a. Click on the Starry Night menu and choose Preferences (See image below).
b. Near the top of the window that opens, change to Cursor Tracking (HUD).
c. Make sure there are check marks next to the following:
• Altitude• Azimuth• Distance from Sun • Name• Rises• Sets• Transit
d. Uncheck all the other items.
e. Close the window by clicking on the red circle in the upper left-hand corner.
7Investigating Astronomy: Starry Night Activity Directions
3. Watch the sun move across the sky:
a. Set the date to your birthday or other day this year:
• Near the top of the screen under Time and Date, click on the month that is showing.
• Use the up and down arrows on the keyboard to change the month to the month you were born (or to another month).
• Click on the day next to the month (e.g., 15) and again use the up and down arrows to change the day to the day you were born (or to another day).
• Check that the year is still the current one. If it is not, change it so that it is.
b. Set the time to sunrise.
c. Find the sun along the horizon:
• Look for the bright area along the horizon.
• Mouse over the bright area. A drop-down list of information about the sun should appear.
d. Under Time Flow Rate near the top of the screen, click on the play button.
e. Track the sun across the sky, shifting the screen as necessary to keep the sun in view.
• To do this, click and hold down the mouse button and then drag the screen.
f. Once the sun sets, click on the stop button (the square) under Time Flow Rate near the top of the screen.
g. Reset the time to sunrise.
h. Repeat the motion of the sun over a day several more times.
4. Set the time interval to 1 hour:
a. Click on the down-pointing triangle under Time Flow Rate near the top of the screen.
b. In the drop-down menu that appears, select Hours.
5. Gather sun position data once an hour throughout the day:
a. Reset the time to sunrise.
b. Find the sun along the horizon.
c. Mouse over the sun until a drop-down list of data appears.
d. Record the altitude and azimuth of the sun in a data table.
e. Step time forward one hour by clicking once on the step forward button (the right-facing triangle with line) under Time Flow Rate near the top of the screen.
f. Find the altitude and azimuth of the sun again by mousing over the sun.
g. Record your data.
h. Repeat this hourly data collection until the sun has set.
i. If time allows, take another set of data for a day 3 months from your birthday.

Investigating Astronomy: Starry Night Activity Directions8
Unit 1, Exp. 2, Act. 2, pg. 20Observing the Sun from the Poles and Equator
Part 1A – Viewing the Sun in the Sky from the North Pole
Directions:
1. Set your location to the North Pole at 9:00 AM today:
a. Go to the Viewing Location box and click on the black field. Choose Other. Find North Pole in the drop down list and click on it.
2. Set the date to your birthday or other day this year:
a. Near the top of the screen under Time and Date, click on the month that is showing.
b. Use the up and down arrows on the keyboard to change the month to the month you were born (or to another month).
c. Click on the day next to the month (e.g., 15) and again use the up and down arrows to change the day to the day you were born (or to another day).
d. Check that the year is still the current one. If it is not, change it so that it is.
3. Watch the sun move across the sky and record data about the sun’s path.
a. Find the sun in the sky IF YOU CAN:
• If it is fully dark, you will not be able to find the sun.• Otherwise, click and hold on the screen and then drag it until you find the sun or
are confident that it is not visible.
b. Watch what happens over the course of the day:
• Under Time Flow Rate near the top of the screen, click on the play button.• If you found the sun, track it across the sky, shifting the screen as necessary to
keep it in view.• If you didn’t find the sun, watch the sky and look for the sun to appear. • At the end of the day, stop time again by clicking on the stop button (the square)
under Time Flow Rate near the top of the screen.
c. Reset the time to 9:00 AM on your birthday or other day.
4. If you found the sun at any point on your day:
a. Set the time interval to 3 hours:
• Click on the down-pointing triangle under Time Flow Rate near the top of the screen.
• In the drop-down menu that appears, select Hours.
• Click on the number next to the word Hours and change it to a 3 using the up and down arrows on the keyboard.
b. Find the altitude and azimuth of the sun at 9:00 AM:
• Mouse over the sun until a drop-down list of data appears for the sun.
• Record the altitude and azimuth of the sun in a data table.
c. Gather sun position data once every 3 hours, as possible, until 9:00 AM on the following day:

9Investigating Astronomy: Starry Night Activity Directions
• Step time forward three hours by clicking on the step forward button under Time Flow Rate near the top of the screen.
• Find the altitude and azimuth of the sun now by again mousing over the sun.
• Record your data.
• Repeat this, as possible, until 9:00 AM on the following day.
• Reset the time to 9:00 AM on your birthday or other day.
If you never found the sun on your day as viewed from the North Pole, record this fact.
Part 1B – Viewing the Sun in the Sky from the South Pole
5. Set the location to the South Pole, same day, 9:00 AM.
a. Find the sun in the sky IF YOU CAN:
• If it is fully dark, you will not be able to find the sun.
• Otherwise, click and hold on the screen and then drag it until you find the sun or are confident that it is not visible.
b. Watch what happens over the course of the day:
• Under Time Flow Rate near the top of the screen, click on the play button.• If you found the sun, track it across the sky, shifting the screen as necessary to
keep it in view.• If you didn’t find the sun, watch the sky and look for the sun to appear. • At the end of the day, stop time again by clicking on the stop button (the square)
under Time Flow Rate near the top of the screen.
c. Reset the time to 9:00 AM on your birthday or other day.
6. If you found the sun at any point on your day:
a. Set the time interval to 3 hours:
• Click on the down-pointing triangle under Time Flow Rate near the top of the screen.
• In the drop-down menu that appears, select Hours.
• Click on the number next to the word Hours and change it to a 3 using the up and down arrows on the keyboard.
b. Find the altitude and azimuth of the sun at 9:00 AM:
• Mouse over the sun until a drop-down list of data appears for the sun.
• Record the altitude and azimuth of the sun in a data table.
c. Gather sun position data once every 3 hours, as possible, until 9:00 AM on the following day:
• Step time forward three hours by clicking on the step forward button under Time Flow Rate near the top of the screen.
• Find the altitude and azimuth of the sun now by again mousing over the sun.
• Record your data.
• Repeat this, as possible, until 9:00 AM on the following day.
If you did not see the sun from the South Pole, record this fact.
7. Answer the Pause and Reflect questions for Part 1.

Investigating Astronomy: Starry Night Activity Directions�0
Part 2 – Viewing the Sun in the Sky from the Equator
8. Set your location to the Equator at January 1 in the present year:
a. Click on the Viewing Location box and select Latitude/Longitude. Set the location for the equator (O degrees in the latitude box), use the same longitude as that of your school, and set the date the same as before.
b. If necessary, near the top of the screen under Time and Date, click on the year that is showing and use the up and down arrows on the keyboard to change it to the current year.
9. Find the altitude of the sun at transit:
a. Find the sun in the sky:
• Click and hold on the screen and then drag it until you find the sun.
b. Go to the View menu, choose Alt/Az Guides and select Meridian.
c. Advance time until the sun sits on the meridian. This is the time of transit.
d. Mouse over the sun and record the sun’s altitude in your data table.
10. Gather sun position data at transit once every two weeks for a year:
a. Step time forward 14 days.
b. Set the time to transit (you must do this for each location).
c. Find the altitude and azimuth of the sun by again mousing over the sun. Record these data.
d. Repeat this every two weeks throughout the year.
11. Answer the Part 2 Pause and Reflect questions.
��Investigating Astronomy: Starry Night Activity Directions
Unit 1, Exp. 2, Act. 3, pg. 22Investigating the Solstices and Equinoxes
Directions:
Set the location to Local (your school), and set the date to June 21 of the present year, the approximate date of the summer solstice.
1. Find the altitude of the sun at transit:
a. Find the sun in the sky:
• Click and hold on the screen and then drag it until you find the sun.
b. Go to the View menu, choose Alt/Az Guides and select Meridian.
c. Advance time until the sun sits on the meridian. This is the time of transit.
d. Mouse over the sun to find its altitude and azimuth.
• Record the altitude in your data table.
e. Change the date to September 21, December 21, and March 21, in turn.
• Check that the year is the current one. If it is not, change it so that it is.
• Set the time to transit each day. (You need to do this each time you change the date.)
f. Record the altitude of the sun at transit for each day.
g. Change the location to one in the Southern Hemisphere.
• Search the list for a city like Melbourne, Australia, or enter the appropriate latitude and longitude.
• Click on Set Location.
h. Change the date to June 21, September 21, December 21, and March 21, in turn.
• Check that the year is the current one. If it is not, change it so that it is.
i. Set the time to transit each day.
j. Record the altitude of the sun at transit each day.
k. Change the location to the equator and repeat the measurements.
2. Answer the Pause and Reflect questions or go over them in a class discussion.
Investigating Astronomy: Starry Night Activity Directions��
Unit 1, Exp. 2, Act. 4, pg. 28The Reason for the Seasons
Directions:
Set the date to March 21 of the present year, the approximate date of the vernal equinox.
1. Find the distance between Earth and the sun:
a. Go to View/Alt/Az Guides/ to place the celestial meridian on the screen.
b. Find the sun and advance time until it sits on the meridian.
c. Hold the mouse over the sun until the drop down appears.
d. Record the Earth’s distance from the sun in AUs on this date.
2. Repeat these observations for the other equinox and the two solstices.
a. Change the date to June 21, September 21, and December 21, in turn.
b. After you move the sun to transit, the mouse over the sun until the drop-down menu appears.
c. Record the distance of Earth from the sun in AUs, along with the date of each measurement.
3. Repeat these observations for at least five other times of year.
a. Change the date, selecting dates during different seasons of the year.
b. Hold the mouse over the sun until the drop-down list appears.
c. Record the distance of Earth from the sun, along with the date of each measurement.
4. Answer the Pause and Reflect questions or have a class discussion about them.

��Investigating Astronomy: Starry Night Activity Directions
Unit 1, Exp. 3, Act. 1, pg. 34Exploring How and Why the Stars Appear to Move
Directions:
Set the location to the equator (0° latitude) at any longitude, set the time to sunset, and set the screen to the eastern horizon.
1. Watch the stars as they move across the sky and record data about their paths.
a. Set the Time Flow Rate to minutes. Click on the play button (the right-pointing triangle).
b. As the stars begin to become visible, pick one out and follow it.
c. Pick out and follow a few other stars.
d. Draw a diagram of the stars’ paths. Label this diagram: Equator Facing East.
e. Stop time by clicking on the stop button (the square) under Time Flow Rate near the top of the screen.
2. Repeat this while facing south, west, and north.
a. Change the viewing direction—south, west, and north—in turn.
b. Reset the time to sunset.
c. Under Time Flow Rate near the top of the screen, click on the play button.
d. Observe the motion of the stars as before, and draw a diagram of the stars’ paths.
e. Label each diagram appropriately: Equator Facing (N, S, or W).
f. Stop time by clicking on the stop button under Time Flow Rate.
3. Reset the location to your school and the time to sunset.
a. Face each direction — east, south, west, and north—in turn and repeat, observing the motion of the stars as before.
b. Draw a diagram of the stars’ paths. Label each diagram appropriately: Local Facing _____________.
4. Reset the location to the North Pole at 9:00 PM and move the view to one that is looking straight up at the zenith (90° altitude).
• Why are we setting the time to 9:00 PM instead of sunset, as for the other locations? Explain your answer, referring back to what you learned in Explorations One and Two.
• Notice which stars are visible in the sky on the day you are using. If you were observing on a different day, why might they not be visible?
• Why are you looking straight up instead of facing east, south, west, and north as for the other locations?
a. Watch the stars as they move across the sky and observe their general path.
b. Draw a diagram of the stars’ paths. Label this diagram: North Pole Looking Straight Up.
5. Have a summary discussion with your classmates about your observations at the various locations.
Investigating Astronomy: Starry Night Activity Directions��
Unit 1, Exp. 3, Act. 4, pg. 41How the Sun Affects the Visibility of the Stars
Directions:
Set the date to January 1 of the current year, location to Local, and time to 12:00 PM (noon). Go to the View menu and click on Constellations. When the menu opens, click on Labels, Boundaries, and Illustrations.
1. You will track the sun in the sky and record the constellation in which it appears.
• If you were to look outside at the night sky on January 1, would you see this constellation? Explain why or why not.
a. Locate the sun in the sky. To better see the stars, you will need to “turn the sun off” to make your observations. Go to the View menu and click on Hide Daylight. This is what you would see if the sun weren’t blocking our view.
2. Shift the date forward, one day at a time, until the sun appears to move into a different constellation.
a. Set the Time Flow Rate to Days.
b. Click on the step button to advance one day at a time until the sun moves into a new constellation. Note: You may need to shift the screen to keep the sun in view.
c. Record the range of dates the sun was in the first constellation.
d. Continue this through the entire year and place the name of the constellations and the dates during which the sun is in each in your table.
3. Answer the Pause and Reflect questions or have a class discussion about them.
��Investigating Astronomy: Starry Night Activity Directions
Unit 1, Exp. 4, Act. 1, pg. 47Observing the Planets in Starry Night
Directions:
Set the location to Local, date to present day, and time to sunset. Set the direction to south.
1. Observing planets in the night sky.
a. Go to the Labels menu and check Planets and Moons. These objects will now be labeled in the sky.
b. Find at least one planet by clicking and holding on the screen and then drag it until one or more planets come into view.
c. Set the Time Flow Rate to Minutes; click on the play button.
d. Track the planet(s) across the sky, shifting the screen as necessary to keep the planet(s) in view.
e. If your planet(s) set, look for other planets and track them until sunrise.
f. Once the sun rises, stop time by clicking on the stop button under Time Flow Rate.
2. Answer the Pause and Reflect questions or have a class discussion.
3. Reset the time to 9:00 PM of the present day.
a. Find a planet you would like to observe.
b. Note the position of the planet relative to the background stars.
c. Set the Time Flow Rate to Days. Step time forward one day at a time for two months. Observe the motion of the planet
How did the planet appear to move relative to the background of stars?
4. Pick another planet and repeat the observations.
a. Note the position of the planet relative to the background stars.
b. Step time forward one day at a time for two months, and again watch the position of the planet against the stars.
How did this planet appear to move relative to the background of stars?
5. Answer the Pause and Reflect questions or have a class discussion.
6. Reset the date to the first of the current month (or next) and the time to 9:00 PM. You should still be at your school’s location.
a. Examine the entire sky and find and record the following:
• Which planets are visible?
• In which constellation each planet is located?
Investigating Astronomy: Starry Night Activity Directions�6
b. Gather 18 months’ worth of these data for a single planet, moving one month at a time.
c. To change the month, click on the month that is showing near the top of the screen under Time and Date and use the up and down arrows on the keyboard.
7. Examine the 18 months of data and look for patterns. (See the Student Guide.)
8. Set the date to June 1, 2007.
a. Mark the starting position of Mars on the Planetary Motions Star Chart blackline master.
b. Change the date to the 1st of the next month.
c. Mark the new position of Mars on the sheet.
c. Draw a line connecting these two positions on your chart.
d. Repeat, gathering at least a full year of data.

�7Investigating Astronomy: Starry Night Activity Directions
Unit 2, Exp. 3, Act. 1, pg. 94Virtual Moon Journal
Part 1 – Taking Data on the Moon’s Phases
Directions:
1. Prepare to take data
a. Click on the Starry Night menu at the top left of the screen. Open the Preferences menu.
b. Near the top of the window that opens, use the drop down menu to change to Cursor Tracking (HUD).
c. Make sure that there are check marks next to the following: • Altitude
• Azimuth
• Disk Illumination
• Distance from observer
d. Uncheck all the other items.
e. Close the window.

Investigating Astronomy: Starry Night Activity Directions�8
2. Set the date for November 21, 2006 and the time for 6:30 PM. This is Day 1.
a. Record the following data in your table, rounding off all measurements to the nearest whole number.
From the top of the screen:
• Date and time (November 21, 2006; 6:30 PM)
From the drop-down that appears when you hold the cursor over the moon:
• Azimuth
• Altitude
• Disk illumination % (the percentage of the moon’s face that you can see)
Note: Distance will be measured later.
b. Draw a small sketch of the phase of the moon in the appropriate location in your table.
3. Find the angular separation between the moon’s position on Day 1 and its position one day later:
a. Click on the hand icon in the upper left-hand corner of the screen and change the cursor tool to Angular Separation.
b. Hold your cursor (+) over the center of the moon.
c. Set the Time Flow Rate to days.
d. Type “D” on the keyboard. (This advances time forward by one day.)
e. Hold the mouse button down and drag your cursor from its position on Day 1 (where you placed it in Step 2) to the center of the moon’s position on Day 2 (where it is now).
f. Record the angular separation (distance) you have measured, rounding off to the nearest degree. (There are 60 arc minutes in one degree of arc.)
4. Record the following data on the moon as you advance the time day after day until the moon drops below the eastern horizon:
• Date and time (The time will be the same each day.)
• Azimuth
• Altitude
• Disk illumination %
• Sketch of the phase of the moon
• Angular Separation between the moon’s positions each day (e.g., Day 2 to Day 3, Day 3 to Day 4, etc.)
Repeat this, once a day, until December 4, 2006. Shift the screen, as necessary, to keep the moon in view. To do this, use the arrows on the keyboard. You may need to click on the screen to make the arrows work.
5. Answer the Pause and Reflect questions or discuss them as a class.
�9Investigating Astronomy: Starry Night Activity Directions
Part 2
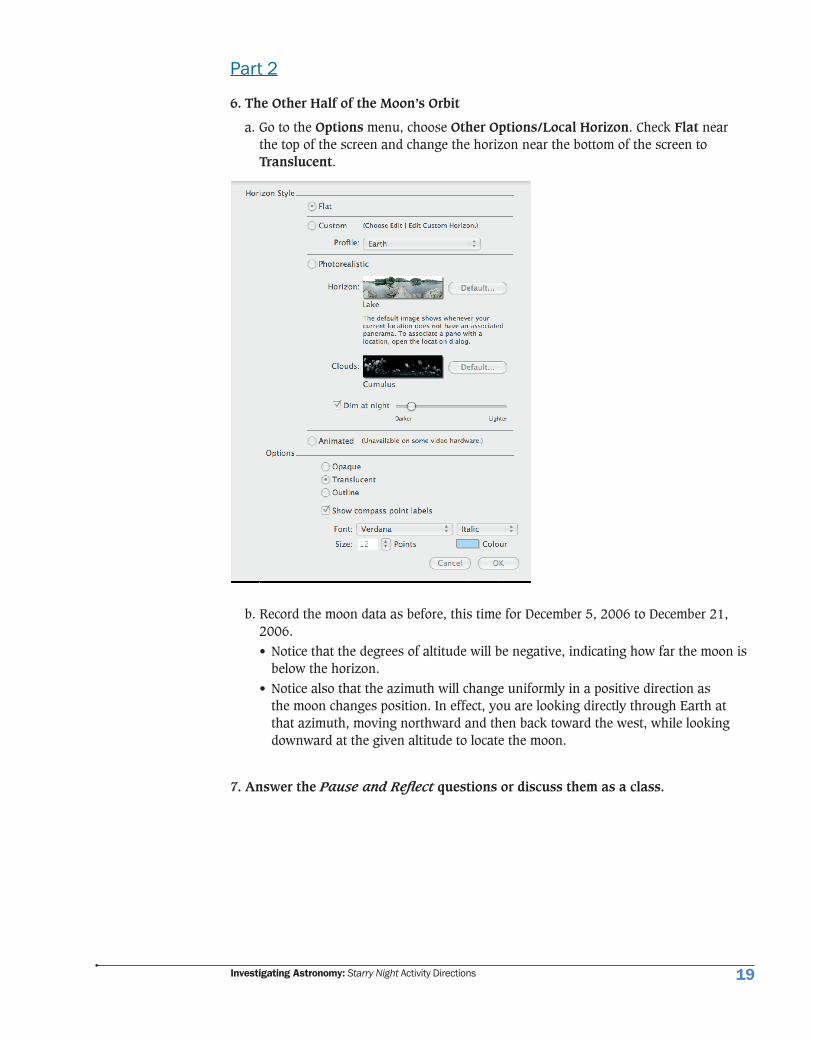
6. The Other Half of the Moon’s Orbit
a. Go to the Options menu, choose Other Options/Local Horizon. Check Flat near the top of the screen and change the horizon near the bottom of the screen to Translucent.
b. Record the moon data as before, this time for December 5, 2006 to December 21, 2006.
• Notice that the degrees of altitude will be negative, indicating how far the moon is below the horizon.
• Notice also that the azimuth will change uniformly in a positive direction as the moon changes position. In effect, you are looking directly through Earth at that azimuth, moving northward and then back toward the west, while looking downward at the given altitude to locate the moon.
7. Answer the Pause and Reflect questions or discuss them as a class.
Investigating Astronomy: Starry Night Activity Directions�0
Unit 2, Exp. 4, Act. 3, pg. 113Eclipse Cycles
Directions:
1. Collecting solar and lunar eclipse data
a. You will use the eclipse tables in Starry Night to find out how many solar and lunar eclipses occurred between 1900 and the present day.
b. Click on the Events tab on the left edge of the screen.
c. Check lunar and solar events at the bottom of the pop up window. Make sure all other events are unchecked.
d. You will take data by decade beginning with 1900. In the Start Date window, type in 1/1/1900. In the End Date window type 1/1/1910, or use the up and down keys on your keyboard to adjust the year.
e. When a warning box appears, click Search Anyway.
f. Find the number of each type of solar and lunar eclipses (total, partial, annular) that occur each year. Then find the total of solar and lunar eclipses for each year.
g. Enter the numbers in separate columns in your table (See pg. 113. Note: Dates = years 1900, 1901, etc. Also, the total integer number of eclipses should be entered, not x’s as indicated.)
h. Your class will need to collect data for each year from 1900 to the present year.
2. If you would prefer online resources that list these data see:
List of Solar Eclipses (by century):
http://en.wikipedia.org/wiki/Lists_of_solar_eclipses
List of Lunar Eclipses (by century):
http://en.wikipedia.org/wiki/List_of_20th_century_lunar_eclipses
��Investigating Astronomy: Starry Night Activity Directions
Unit 3, Exp. 2, Act. 1, pg. 155Modeling the Orbits of the Planets
Directions:
1. Preparing to take data
a. Open Preferences under the Starry Night menu.
b. Near the top of the window that opens, change to Cursor Tracking (HUD).
c. Make sure that there are check marks next to the following: • Distance from sun • Name
d. Uncheck all the other items.
e. Select Brightness/Contrast in the Preferences drop down menu.
f. Under Orbit Line Brightness, change the setting to near, but not all the way, toward the Dimmer end.
g. Close the Preferences window.
h. Set the date to today.
2. Draw and label a diagram on a piece of paper that shows the positions of the sun and visible planets.
Part 1 – The Inner Planets
3. The movement of planets: Inner Planets
a. Go to the Favourites menu, select Solar System/Inner Planets/Inner Solar System.
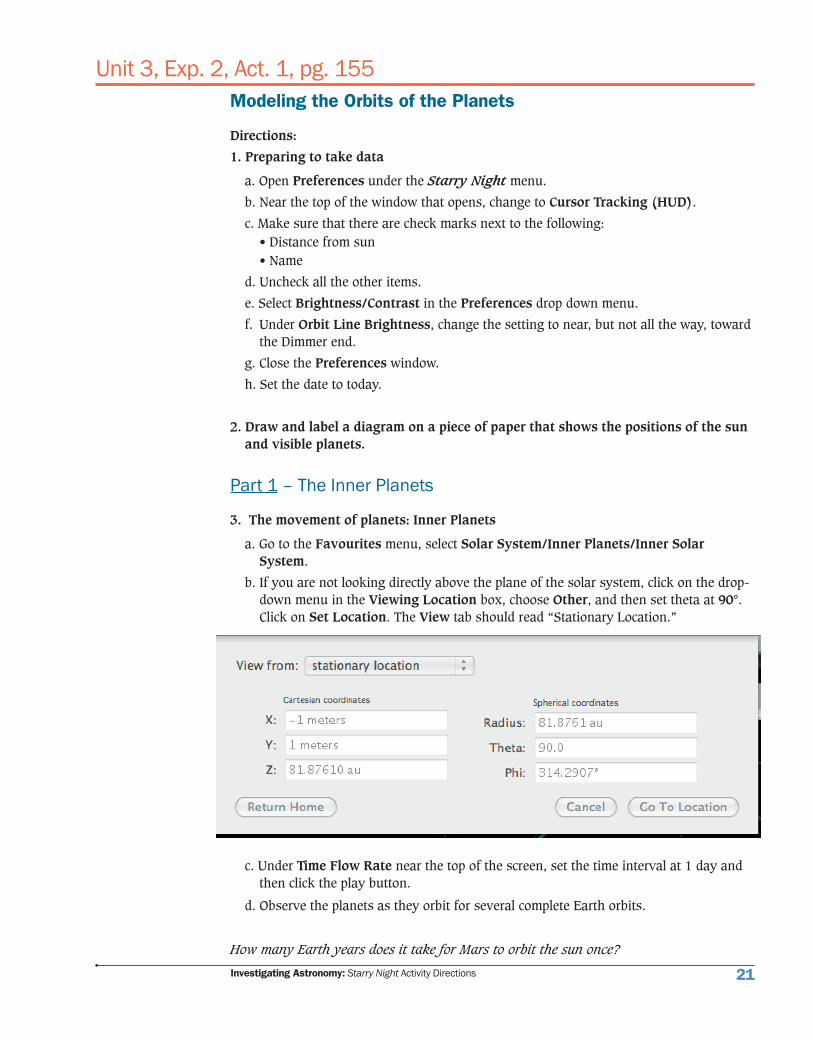
b. If you are not looking directly above the plane of the solar system, click on the drop-down menu in the Viewing Location box, choose Other, and then set theta at 90°. Click on Set Location. The View tab should read “Stationary Location.”
c. Under Time Flow Rate near the top of the screen, set the time interval at 1 day and then click the play button.
d. Observe the planets as they orbit for several complete Earth orbits.
How many Earth years does it take for Mars to orbit the sun once?
Investigating Astronomy: Starry Night Activity Directions��
Part 2 – The Outer Planets
3. The movement of planets: Outer Planets
a. Go to the Favourites menu, select Solar System/Outer Planets/Outer Solar System.
b. Under Time Flow Rate near the top of the screen, set the time interval at 30 days and then click the play button.
c. Observe the planets as they orbit for several complete Neptune orbits.
How many Earth years does it take for Neptune to orbit the sun once?
4. Set the date 3 months from today.
a. Draw and label a diagram on a piece of paper that shows the positions of the sun and visible planets. Title the diagram “today plus 3 months.”
5. Distances between the planets and the sun and Earth
a. Find the distance between the sun and each planet in the inner solar system by holding the mouse over a planet until the drop-down information appears. Record in your table the “Distance from sun” in AUs.
b. Find the distance between Earth and each of the other planets:
• In the upper left-hand corner, change the hand icon from Adaptive to Angular Separation.
• Click on a planet and drag the mouse a short distance. A line and a drop-down list should appear.
• Drag the line so that it connects with Earth. A new piece of information, “Distance,” should appear in the drop down.
• Record in your table the “Distance,” which is the distance from Earth to each planet in AUs.
6. Answer the Pause and Reflect questions or have a class discussion.
7. Explore how changing the angle at which you are viewing the solar system changes the apparent shape of the orbits.
a. You are currently looking straight down at the solar system.
Change the angle of view by doing the following:
• At the right-hand edge of the Viewing Location box at the top of the screen, click on the down arrow.
• Select Other.
• Make sure the View menu says “Stationary,” and then change the value of theta to 15°.
• Click on Set Location.
b. Observe the apparent shape of the orbit as you move to the new viewing position.
c. Draw a diagram on a piece of paper that shows the apparent shape of the orbits as viewed from an angle.
What is the shape of a planet’s orbit when viewed from this angle?

��Investigating Astronomy: Starry Night Activity Directions
Unit 3, Exp. 2, Act. 3, pg. 163Kepler’s Laws
Directions:
1. Preparing to take data
a. Display the inner planet diagram again with theta at 90°. (Favourites/Solar System/Inner Planets/Inner Solar System).
b. Use the magnification button (the “+” symbol) to zoom in so that just the orbit of Mercury fills most of the screen.
2. Observe the orbital motion of Mercury:
a. Under Time Flow Rate near the top of the screen set the time interval to 6 hours and then click on the play button.
b. Observe Mercury as it orbits.
• Where in its orbit is Mercury moving fastest?
• Where is it moving slowest?
c. Stop the movement through time by clicking on the stop button.
3. Record Mercury’s distance from the sun:
a. Position Mercury to where it seems to be moving fastest:
• Under Time Flow Rate near the top of the screen, and step through time in 6-hour increments.
b. Find the distance between Mercury and the sun at this position by holding the mouse over Mercury until the drop-down list appears. Record the distance between Mercury and the sun in AUs.
c. Repeat this for where Mercury seems to be moving slowest.
4. Observe the orbital motion of Earth
a. Use the un-zoom button (the “-“symbol) and set the time interval to one day. Click on the play button.
b. Observe Earth as it orbits.
Can you tell where in its orbit Earth is moving the fastest? The slowest?
c. Stop the movement through time by clicking the stop button.

Investigating Astronomy: Starry Night Activity Directions��
5. Observe the orbital motion of Jupiter:
a. Change to the outer solar system view with a theta of 90°. (Favourites/Solar System/Outer Planets/Outer Solar System).
b. Under Time Flow Rate near the top of the screen, click on the play button.
c. Observe Jupiter as it orbits.
Does Jupiter appear to be moving fast or slowly relative to Earth and Mercury?
6. Observe a dwarf planet: Pluto
a. Click on the Find box at the left edge of the screen. Put “Pluto” in the search box. Check both of the little boxes next to the dwarf planet’s name. Pluto and its orbit will appear on the outer-planet diagram.
b. Set the Time Flow Rate to years and click on the play button.
c. Observe the motion of Pluto and identify where its perihelion point (fastest and closest to the sun) and aphelion point (slowest and farthest from the sun) occur.
What do you notice about the perihelion point of Pluto’s orbit?

��Investigating Astronomy: Starry Night Activity Directions
d. Measure the perihelion distance and aphelion distance for Pluto by using the Angular Separation tool.
Extra Credit: Calculate the eccentricity of Pluto. Hint: Remember that c is equal to the aphelion distance minus the perihelion distance.
e. Go to the drop-down menu to the right of the Viewing Location box again and make sure Stationary Location is chosen. Then choose Other and change theta to 0 degrees. This will place the solar system view to edgewise.
f. Set the time flow to years and click the play button.
Are all the planets orbiting in the same plane all the time?
g. Estimate the inclination of the orbit of Pluto. Look up the actual value. How close were you?
7. Answer the Pause and Reflect questions.