Embed Size (px)
Citation preview
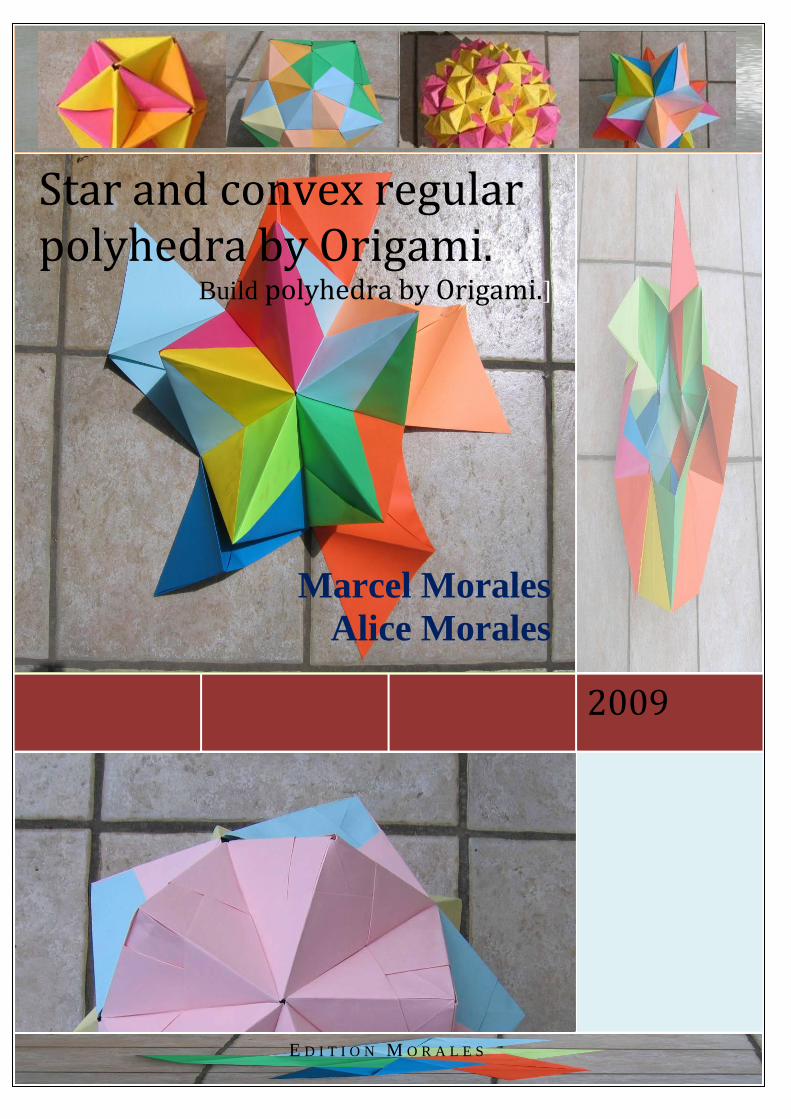
2009
Star and convex regular polyhedra by Origami.
Build polyhedra by Origami.]
Marcel Morales
Alice Morales
E D I T I O N M O R A L E S

Polyhedron by Origami
I) Table of convex regular Polyhedra ................................................................................................. 4
II) Table of star regular Polyhedra (non convex) .............................................................................. 5
III) Some Polyhedra that should be named regular done with equilateral triangles .......................... 6
IV) Some Polyhedra that should be named regular done with rectangle triangles ............................ 7
V) Some geometry of polygons ........................................................................................................ 9
VI) The convex regular polygons ..................................................................................................... 12
VII) The star regular polygons .......................................................................................................... 12
VIII) Regular convex polygons by folding paper ............................................................................. 14
1) The square .......................................................................................................................................... 14
2) The equilateral triangle ....................................................................................................................... 14
3) The regular pentagon .......................................................................................................................... 18
4) A few of vocabulary about Polyhedra .................................................................................................. 21
5) Making regular Polyhedra by folding paper ......................................................................................... 23
IX) Making a cube by folding paper ................................................................................................ 25
1) Making a basic square module ............................................................................................................ 25
2) Assembly the cube .............................................................................................................................. 31
X) Making regular Polyhedra with equilateral triangles as faces ................................................... 36
1) Folding the basic triangle module ........................................................................................................ 36
2) Folding the symmetric basic triangle module ....................................................................................... 40
3) Assembly the Tetrahedron .................................................................................................................. 43
4) Assembly the Octahedron ................................................................................................................... 45
5) Assembly the Icosahedron ................................................................................................................... 49
XI) Assembly the Dodecahedron ..................................................................................................... 54
XII) Assembly of the great triangular star dodecahedron ................................................................ 59
XIII) Assembly the small triangular star dodecahedron .................................................................. 67
XIV) Assembly the great Icosahedron (regular) .............................................................................. 74
Here is a photo of the great Icosahedron. ............................................................................................. 74
XV) Assembly of the regular great dodecahedron ............................................................................ 79
XVI) Assembly the inverse star great dodecahedron also called third stellation of the icosahedron 82
XVII) Making Polyhedra which faces are isosceles triangles rectangles ........................................... 87
1) Folding the special square module ...................................................................................................... 87
2) Assembly the Triakis Icosahedron (small star dodecahedron rectangle) ............................................... 90
3) Assembly of the great dodecahedron rectangle ................................................................................... 97
4) Assembly of the great icosahedron rectangle .................................................................................... 105
5) The rectangular great icosahedron .................................................................................................... 108
XV) Assembly other Polyhedra ...................................................................................................... 109

Marcel Morales, Alice Morales
3
1) The rectangular final Stellation of the Icosahedron............................................................................ 109
2) The Epcot’s ball ................................................................................................................................. 111
3) Making a dipyramide (or hexaedra) with triangular base ................................................................... 114
4) The polyhedron Stella Octangula ....................................................................................................... 116
5) The Stella Octangula-bis .................................................................................................................... 119
6) The star Cube-Octahedron ................................................................................................................. 122
7) The Trihedron or framework ............................................................................................................. 125
8) The Heptahedron .............................................................................................................................. 129
XVI) Star Polyhedra. Stellation and Excavation. ........................................................................... 132
XVII) A few of geometry on the sphere of radius one .................................................................... 136
XVIII) Euler’s formula ..................................................................................................................... 139

Polyhedron by Origami
I) Table of convex regular Polyhedra
Tetrahedron
2 triangular pieces of distinct
type (A+B)
4 faces, 6 edges, 4 vertices
Cube
6 square pieces of the same type,
6 faces, 12 edges, 8 vertices
Octahedron
4 triangular pieces of the same
type, 8 faces, 12 edges, 6
vertices
Dodecahedron
12 pentagons
12 faces, 30 edges, 20 vertices

Marcel Morales, Alice Morales
5
Icosahedron
10 triangular pieces (5A+5B)
20 faces, 30 edges, 12 vertices
II) Table of star regular Polyhedra (non convex)
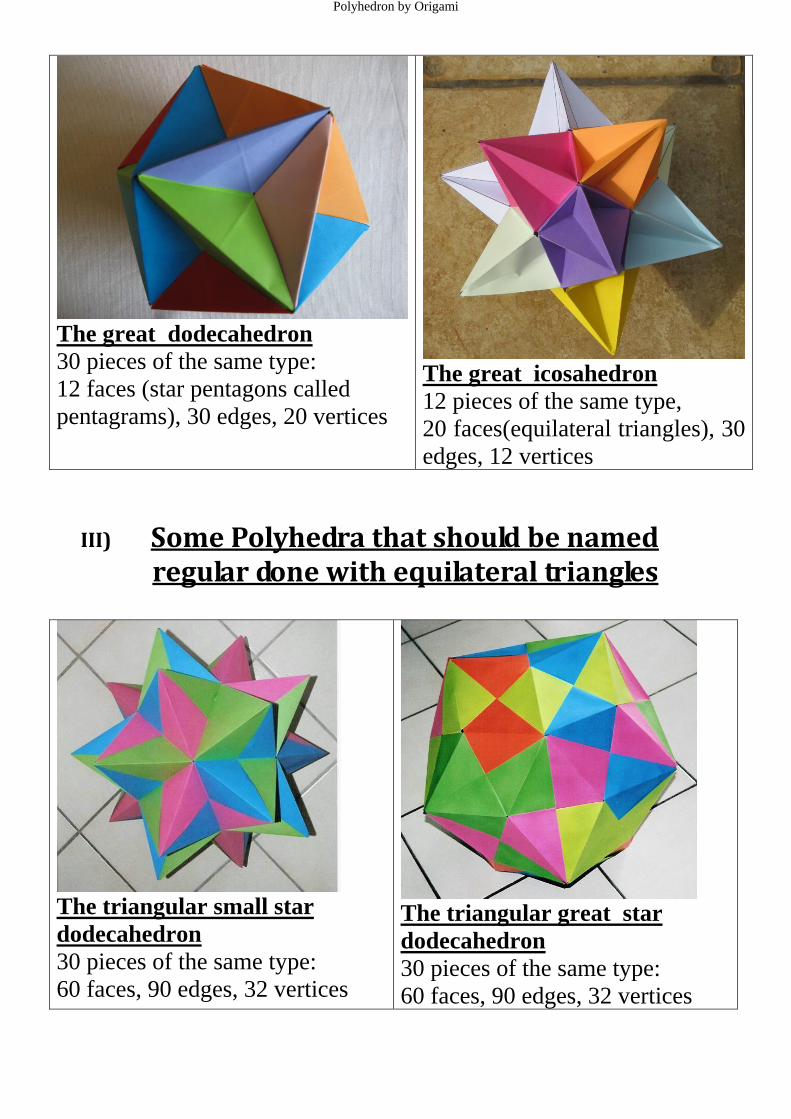
The small star dodecahedron
30 pieces of the same type:
12 faces (star pentagons called
pentagrams), 30 edges, 20 vertices
The great star dodecahedron
30 pieces of the same type:
12 faces (star pentagons called
pentagrams), 30 edges, 20
vertices
Polyhedron by Origami
The great dodecahedron
30 pieces of the same type:
12 faces (star pentagons called
pentagrams), 30 edges, 20 vertices
The great icosahedron
12 pieces of the same type,
20 faces(equilateral triangles), 30
edges, 12 vertices
III) Some Polyhedra that should be named regular done with equilateral triangles
The triangular small star
dodecahedron
30 pieces of the same type:
60 faces, 90 edges, 32 vertices
The triangular great star
dodecahedron
30 pieces of the same type:
60 faces, 90 edges, 32 vertices

Marcel Morales, Alice Morales
7
The triangular great
dodecahedron
30 pieces of the same type:
60 faces, 90 edges, 32 vertices
The triangular great
icosahedron
30 pieces of the same type:
The great star dodecahedron
inversed or the third stellation
of the icosahedron
30 pieces of the same type:
60 faces, 90 edges, 32 vertices
IV) Some Polyhedra that should be named regular done with rectangle triangles

Polyhedron by Origami
The great star
dodecahedron inversed
or the third stellation
of the icosahedron
30 pieces of the same
type:
60 faces, 90 edges, 32
vertices
The small star
dodecahedron
Dodecahedron
rectangle
30 square pieces of
the same type:
60 faces, 90 edges, 32
vertices
Le great
dodecahedron
rectangle
30 square pieces of
the same type:
60 faces, 90 edges, 32
vertices
The rectangular great
icosahedron
120 square pieces of the
same type:
180 faces, 270 edges, 92
vertices
Rectangular Final
Stellation of the
icosahedron
90 square pieces of
the same type.
The Epcot’s ball
270 square pieces of
the same type.

Marcel Morales, Alice Morales
9
V) Some geometry of polygons
A polygon is a figure in the plane bounded by a sequence
of segments of lines, called edges or sides, a point
common to the extremities of two edges is a corner. We
give some examples:
We can see that we can distinguish such polygons, first
by the number of vertices, then by the number of sides,
then by the shape. Let me be more precise:
The number of sides is very important:
Triangle or Polygon with three sides,
Quadrilateral or Polygon with four sides,
Pentagon or Polygon with five sides,

Polyhedron by Origami
Hexagon or Polygon with six sides,
Heptagon or Polygon with seven sides,
Octagon or Polygon with eight sides,
Enneagon or Polygon with nine sides,
Decagon or Polygon with ten sides,
Hendecagon or Polygon with eleven sides,
Dodecagon or Polygon with twelve sides,
Icosagon or Polygon with twenty sides.
Looking for the shape of the figure we can distinguish:
The convex polygons: Each side of the polygon is on
a line, this line divides the plane into two regions,
and we say that the polygon is convex if it is not
divided into two polygons by every line containing
one side.
The star polygons:
Two sides meet in a point which is not an
extremity.

Marcel Morales, Alice Morales
11
The polygon on the left is convex, but the one on the
right is a star polygon.
The regular polygons. Usually a regular polygon is a
convex polygon with all the angles of the same
measure and all sides are of the same length, but
there are also regular star polygons.

Polyhedron by Origami
VI) The convex regular polygons
VII) The star regular polygons

Marcel Morales, Alice Morales
13
The first one is a star pentagon, it is also called
pentagram, and denoted by {5/2}. The second one is a
star hexagon and denoted by {6/2}. The third one is a
star heptagon but if you start with one vertex and go to
another vertex by skipping the next vertex, you draw a
side of a star heptagon, and so on, you can see that you
turn twice around the center of the heptagon, for this
reason this is denoted by {7/2}, and the last one is
denoted by {7/3}. The two last are the star enneagon
{9/2} and {9/4}. Another explanation for this
terminology {9/4} is that we have four kinds of points

Polyhedron by Origami
in the enneagon when the sides meet; here they are
colored with distinct colors.
VIII) Regular convex polygons by folding paper
1) The square
Take any rectangular sheet of paper (for example A4 or
A3) ABCD put the side AB on the side AD, fold the
sheet to determine the point M and N, fold the sheet of
paper long the segment (MN). The figure ABMN is a
square.
2) The equilateral triangle
Take any rectangular sheet of paper (for example A4 or
A3) ABCD, fold it in the middle along AB, you get a
folding line, fold the sheet of paper such that the point B

Marcel Morales, Alice Morales
15
on the side AB will be on the folding line. We can
determine the point B’.
Fold along the line AB’, the triangle ABB’ is
equilateral.
Make a bronze sheet of paper: In order to make regular
Polyhedra by folding paper, we will need special
dimensions on a sheet of paper; people working on
Origami call it a bronze rectangle or bronze sheet of
paper. A bronze sheet of paper is a rectangular sheet
with width l and length l√3. The rectangles AEB’F and
EBGB’ are bronze rectangles.

Polyhedron by Origami
Example
If we have a sheet of paper A4: 210x297 mm.
We can get 3 bronze rectangles of the same dimensions,
the following are bronze rectangles AEB’F, EBGB’ and
FMNO.
We give the lengths in order to cut an A4 sheet of paper.
AE=105mm, AF=182mm, FO=105mm, OD=10mm,
FM=182mm, MG=22mm.
Marcel Morales, Alice Morales
17
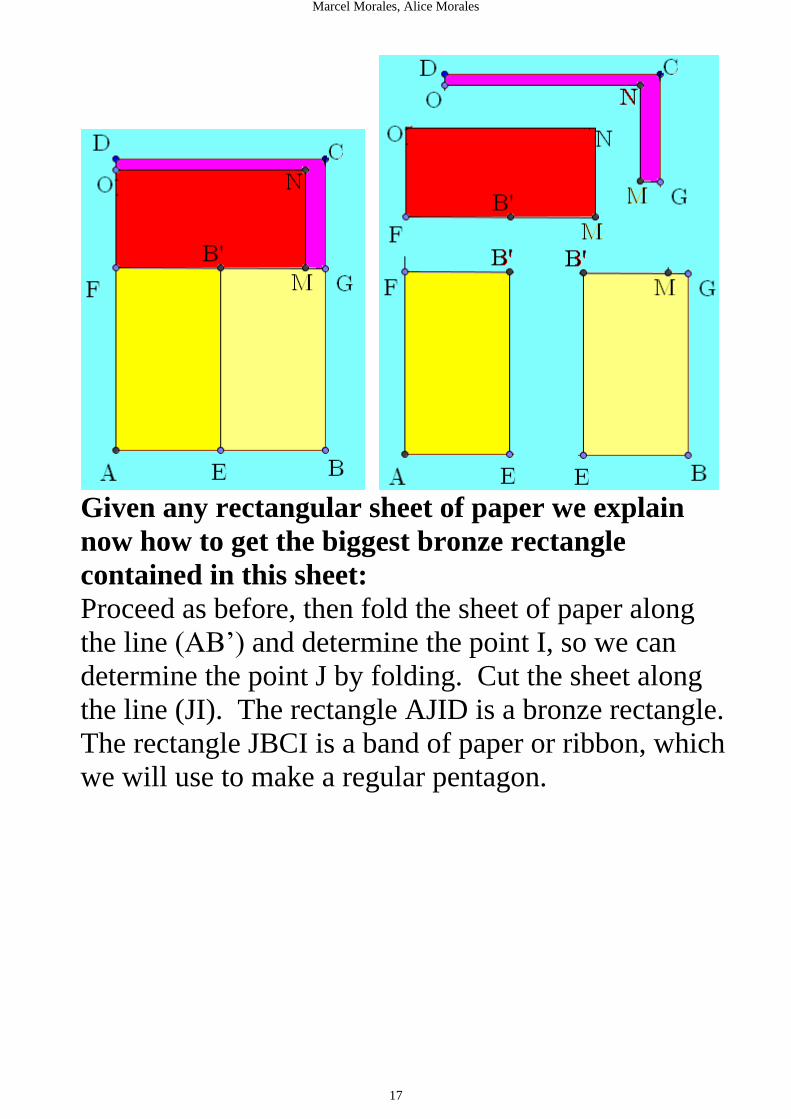
Given any rectangular sheet of paper we explain
now how to get the biggest bronze rectangle
contained in this sheet:
Proceed as before, then fold the sheet of paper along
the line (AB’) and determine the point I, so we can
determine the point J by folding. Cut the sheet along
the line (JI). The rectangle AJID is a bronze rectangle.
The rectangle JBCI is a band of paper or ribbon, which
we will use to make a regular pentagon.

Polyhedron by Origami
3) The regular pentagon
Take a ribbon of paper ABCD; take care that the length
AB should be at least 8 times the width BC. Make a
knot with the ribbon and pull on the two extremities
until the limit position. Use your finger nails to fold the
ribbon. As you can see we have a regular pentagon
with two tabs.
Now we explain why we get a regular pentagon:

Marcel Morales, Alice Morales
19
Remark that in the regular pentagon EFGHI the line EF
is parallel to the line GI. This was proved by Euclid
two thousand years ago.
Take a regular pentagon EFGHI, we draw a rectangle
ABCD in the following way, the line (AB) contains the
points E and G. The line (CD) contains the points H
and I. To fold the rectangle ABCD along the line (GH)
means to make an orthogonal symmetry with axis the
line (GH). The quadrilateral BCHG is transformed by
this symmetry into the quadrilateral C’B’GH (drawn in
mauve). In the same way the quadrilateral AEID is
transformed into the quadrilateral D’A’IE (drawn in
green) by the symmetry of axis the line (EI).

Polyhedron by Origami
In order to get the knot which produces a regular
pentagon from the ribbon ABCD, we still need to
transform the quadrilateral C’B’FE by the symmetry of
axis the line (EF) into the quadrilateral EFB’’C’’.

Marcel Morales, Alice Morales
21
We erase all auxiliary lines and you can see the knot:
4) A few of vocabulary about Polyhedra
A polyhedron is a volume in the space bounded by
polygons (faces of the polyhedron) which are in
distinct planes. Two faces meet in segments of line
(edges of the polyhedron); a meeting point of several
edges (or faces) is called a vertex.

Polyhedron by Origami
Take one face of a polyhedron, this face is contained in
a plane, this plane divide the space in two regions. A
polyhedron is convex if for each one of its faces the
polyhedron is completely contained in one of these two
regions. In this picture we show some convex and non
convex Polyhedra:

Marcel Morales, Alice Morales
23
5) Making regular Polyhedra by folding paper
We start with the convex regular Polyhedra. A
polyhedron is regular convex if it is convex and all its
faces are convex regular polygons of the same type an
dimensions (congruent). Two thousand years ago the
ancient Greeks have discovery that there are exactly
five convex regular Polyhedra:
1. The Tetrahedron has 4 faces; each face of the
Tetrahedron is an equilateral triangle.
2. The Cube has 6 faces; each face of the Cube is a
square.

Polyhedron by Origami
3. The Octahedron has 8 faces; each face of the
Octahedron is an equilateral triangle.
4. The Dodecahedron has 12 faces; each face of the
Dodecahedron is a regular pentagon.
5. The Icosahedron has 20 faces; each face of the
Icosahedron is an equilateral triangle.
Marcel Morales, Alice Morales
25
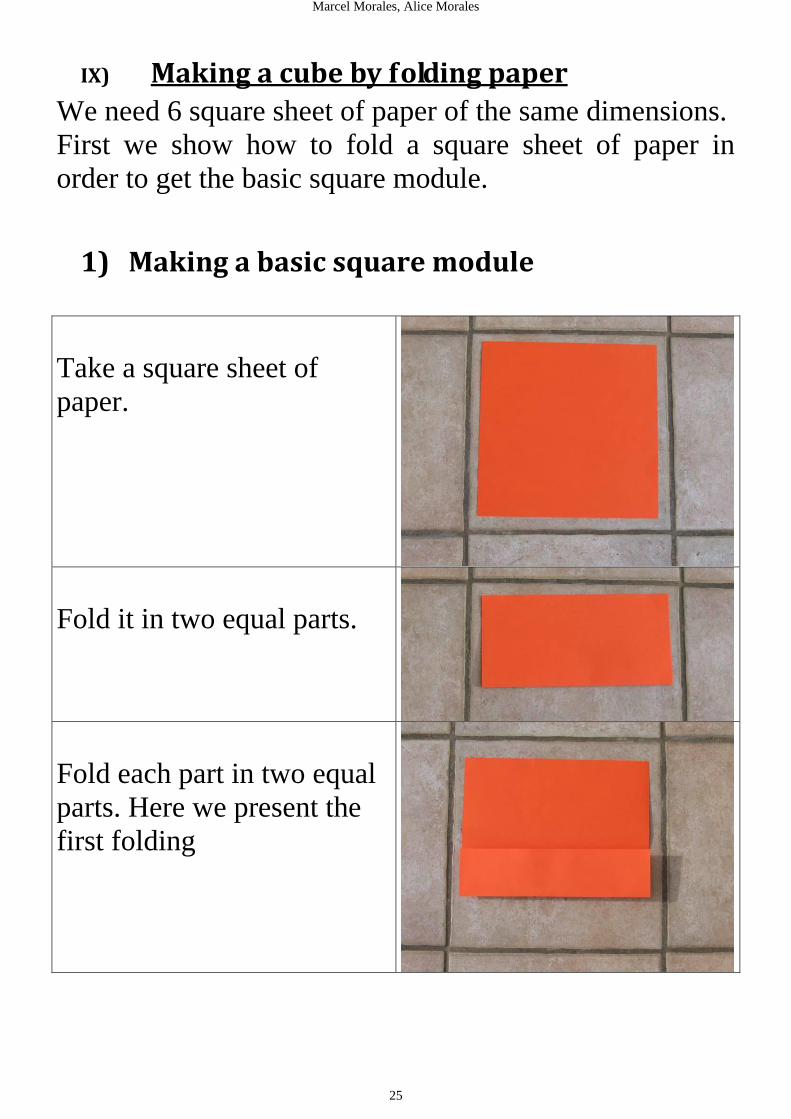
IX) Making a cube by folding paper
We need 6 square sheet of paper of the same dimensions.
First we show how to fold a square sheet of paper in
order to get the basic square module.
1) Making a basic square module
Take a square sheet of
paper.
Fold it in two equal parts.
Fold each part in two equal
parts. Here we present the
first folding

Polyhedron by Origami
Here is the second fold.
Put the right vertical side
[AB] on the down
horizontal side [CA].
Put the left vertical side
[CD] on the up horizontal
side [DE].

Marcel Morales, Alice Morales
27
Open it. We can see two
small triangles A’AC and
B’D’D.
Fold these small triangles
A’AC and B’D’D in the
interior (hide them).
Fold again the right triangle.
We get the triangle BAE.
Fold again the left triangle.
We get the triangle BED.

Polyhedron by Origami
Open it. Insert the triangle
BAE into the fold.
You can see the outcome.
Insert the left triangle into
the fold.
You can see the outcome.
Please remark two slots,
each one cross the other in a
right angle.
Marcel Morales, Alice Morales
29
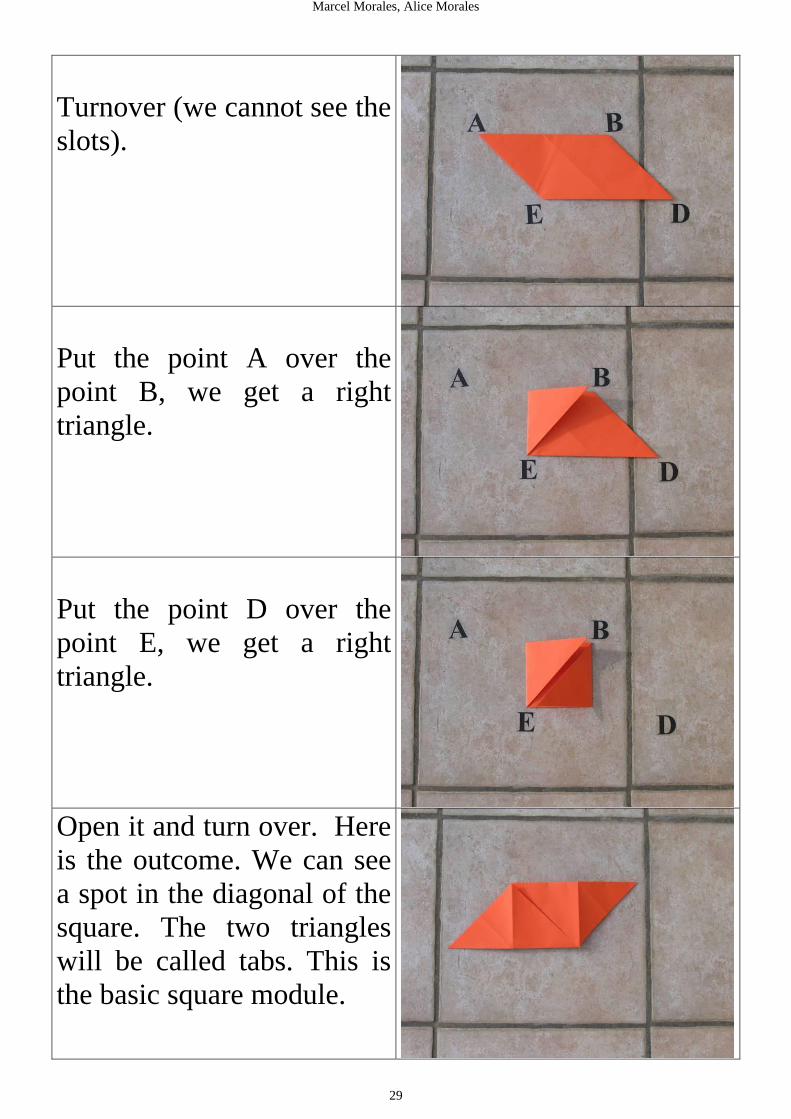
Turnover (we cannot see the
slots).
Put the point A over the
point B, we get a right
triangle.
Put the point D over the
point E, we get a right
triangle.
Open it and turn over. Here
is the outcome. We can see
a spot in the diagonal of the
square. The two triangles
will be called tabs. This is
the basic square module.
Polyhedron by Origami
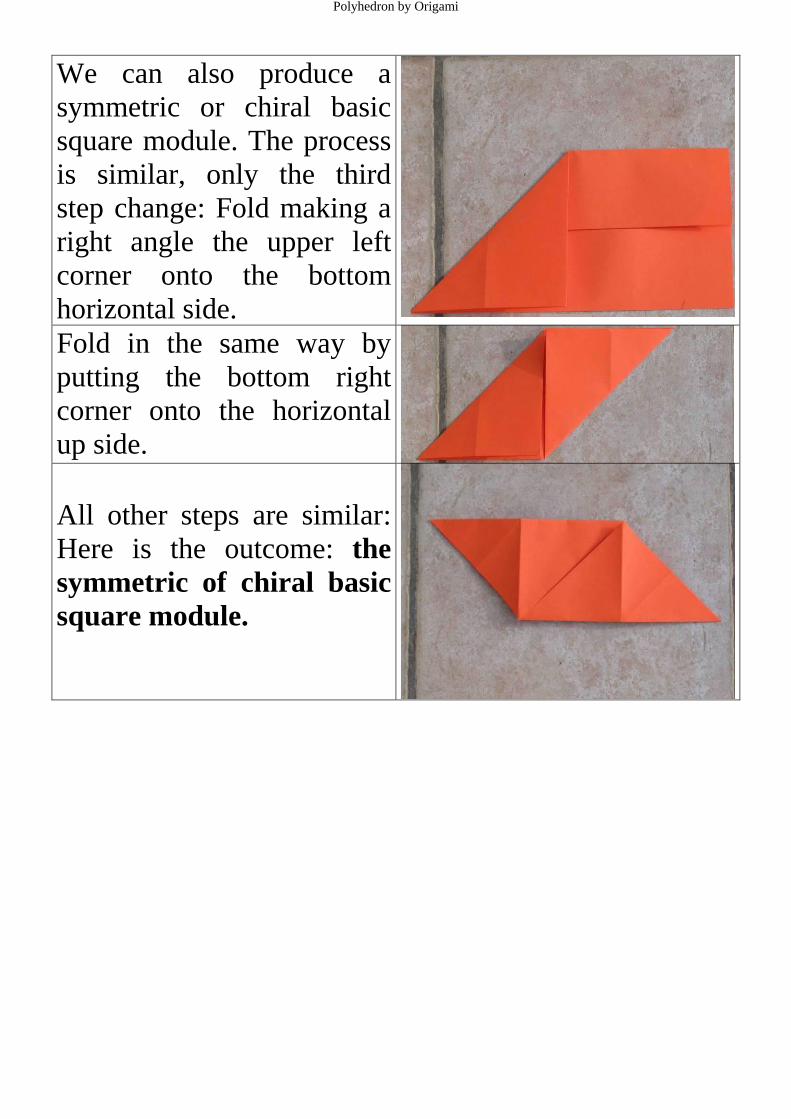
We can also produce a
symmetric or chiral basic
square module. The process
is similar, only the third
step change: Fold making a
right angle the upper left
corner onto the bottom
horizontal side.
Fold in the same way by
putting the bottom right
corner onto the horizontal
up side.
All other steps are similar:
Here is the outcome: the
symmetric of chiral basic
square module.

Marcel Morales, Alice Morales
31
2) Assembly the cube
We take six square sheets of paper, and we fold it in
order to have six identical basic square modules. Before
starting take care to put over all together, and check
that you don’t have chiral modules. If you mix chiral
modules with normal modules you cannot make a
cube.

Polyhedron by Origami
Slot together: Insert a tab
yellow into a green slot.
See the outcome.
Insert a tab of the second
yellow basic module into the
second green slot. The first
face of the cube is finished.

Marcel Morales, Alice Morales
33
Insert a tab of the green
basic module into the slot of
the orange square module.
Then insert the right tab of
the orange square module
into the slot of the yellow
square module.
Insert a tab of the second
green basic module into the
slot of the orange square
module.
Insert a tab of the orange
basic module into the slot of
the yellow square module.
Then insert the tab of the
yellow basic module into the
slot of the green square
module.

Polyhedron by Origami
The outcome is an open
cube with 5 faces and two
tabs of the green module.
Put the last orange module
as in the picture.
Insert the tabs of the green
module into the slots of the
orange module.
Marcel Morales, Alice Morales
35
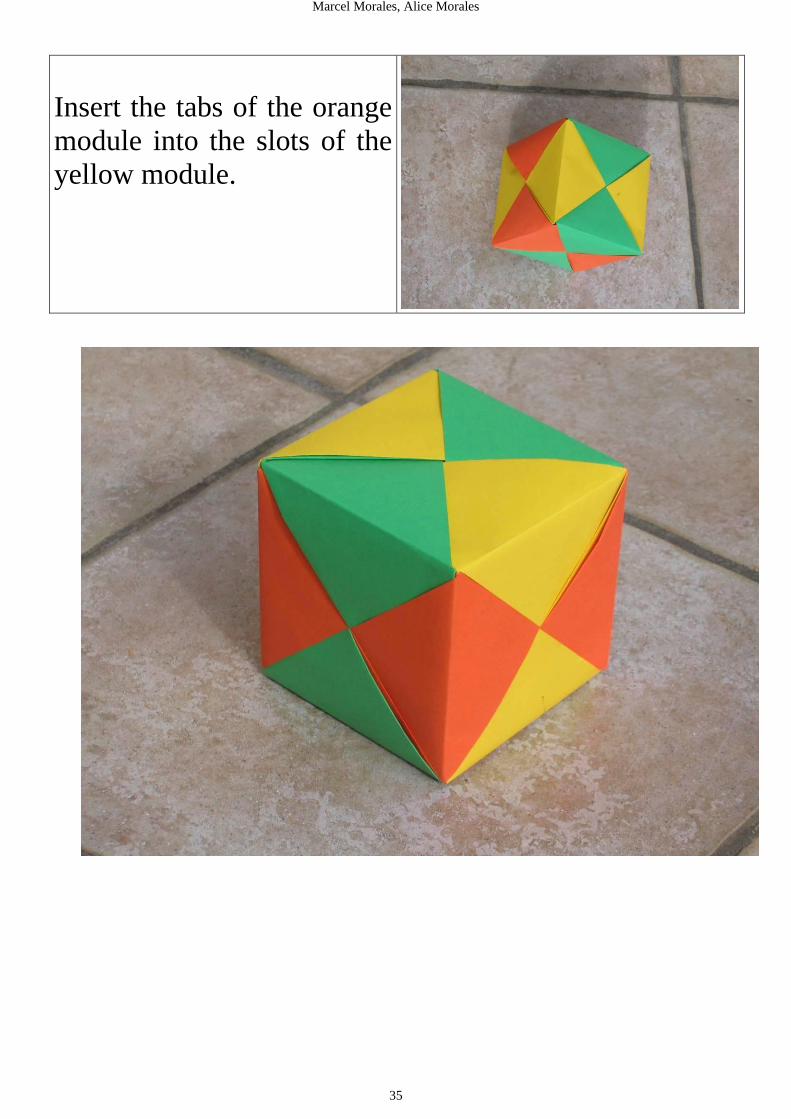
Insert the tabs of the orange
module into the slots of the
yellow module.

Polyhedron by Origami
X) Making regular Polyhedra with equilateral triangles as faces
We will work with bronze rectangular sheets of
paper.
At first we will show how to fold this sheet of paper in
order to get the basic triangle module, and then we
will show how to get the symmetric or chiral basic
triangle module.
1) Folding the basic triangle module
Take a bronze
rectangular sheet of
paper.
Put the left bottom corner of
the sheet of paper over the
right top corner, fold using
your nails.

Marcel Morales, Alice Morales
37
Unfold; we can see a line
(EF).
Put the left bottom corner A
over the point E, by using
the line (EF) as guide. Fold
with the nails along A’F.
Put the right upper corner C
over the point F, by using
the line (EF) as guide. Fold
with the nails along D’E.
Fold the small triangles
D’DF and A’BE.

Polyhedron by Origami
Put inside the two small
triangles.
The outcome is a
parallelogram with one slot
in the diagonal.
Turn over the sheet of
paper, (we cannot see the
slot). Put the segment [D’F]
over the segment [A’F]. We
get an equilateral triangle.
Put the segment [EA’] over
the left vertical side. We get
a second equilateral
triangle, and one rhombus.

Marcel Morales, Alice Morales
39
Turn the piece.
We fold the rhombus along
the segment [A’D’] so that
the slot is apparent. For star
Polyhedra we will fold in
such a way that the slot is
hidden.
Open the piece. We have
divided the parallelogram
into four equilateral
triangles.
Basic triangle module
Polyhedron by Origami
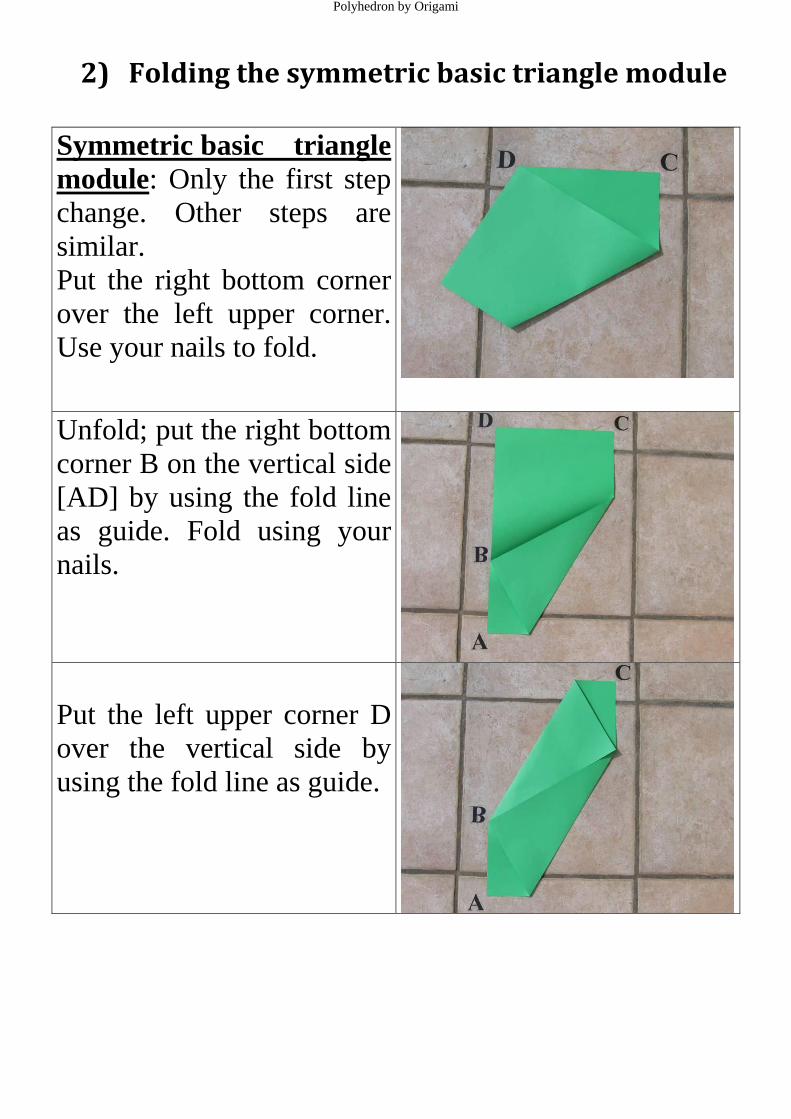
2) Folding the symmetric basic triangle module
Symmetric basic triangle
module: Only the first step
change. Other steps are
similar.
Put the right bottom corner
over the left upper corner.
Use your nails to fold.
Unfold; put the right bottom
corner B on the vertical side
[AD] by using the fold line
as guide. Fold using your
nails.
Put the left upper corner D
over the vertical side by
using the fold line as guide.

Marcel Morales, Alice Morales
41
Fold the two small triangles
in the top and the bottom.
Hide the two small
triangles. We get a
parallelogram.
Turn over the piece.
Put the upper side over the
left side.

Polyhedron by Origami
Put the bottom side over the
right side.
Turn over the piece. We get
a rhombus with slop in the
largest diagonal.
Fold the rhombus along the
shortest diagonal.
This is the symmetric or
chiral triangle module.

Marcel Morales, Alice Morales
43
3) Assembly the Tetrahedron
We must have two bronze rectangular sheet of paper.
To make the Tetrahedron
we need a triangle module
(red) and a chiral triangle
module (green).
We show how to assembly
a triangle module (red)
and a chiral triangle
module. Put the two pieces
(you must see the slots);
Insert the triangle (tab) of
the green module into the
slot of the red module.
Insert the triangle (tab) of
the red module into the slot
of the green module, and
insert the second triangle
(tab) of the green module
into the second slot of the
red module.

Polyhedron by Origami
The Tetrahedron is almost
finished.
Insert the triangle (tab) of
the red module into the slot
of the green module.
The outcome is the Tetrahedron, it has four faces of
the same type and we cannot distinguish one face
from other. If you rotate the Tetrahedron you cannot
see the difference.

Marcel Morales, Alice Morales
45
4) Assembly the Octahedron
The Octahedron is convex regular polyhedron with 8
faces; each face is an equilateral triangle. We need 4
bronze rectangular sheet of paper of the same
dimensions.
We need four triangle
modules: two red and two
green. Overlap the modules
to check that we don’t mix
with chiral modules.
We show how to assembly
a triangle module (red) and
a green triangle module.
Put the two pieces (you must
see the slots); Insert the
triangle (tab) of the red
module into the slot of the
green module. Glue together.
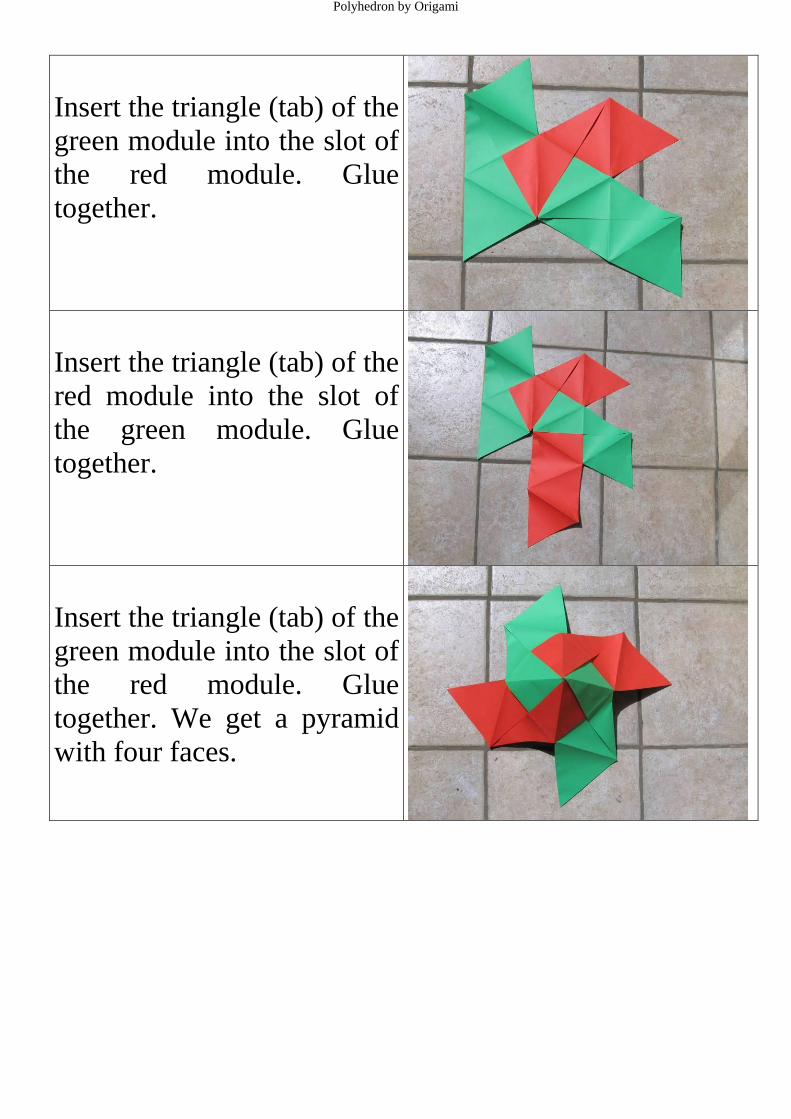
Polyhedron by Origami
Insert the triangle (tab) of the
green module into the slot of
the red module. Glue
together.
Insert the triangle (tab) of the
red module into the slot of
the green module. Glue
together.
Insert the triangle (tab) of the
green module into the slot of
the red module. Glue
together. We get a pyramid
with four faces.
Marcel Morales, Alice Morales
47
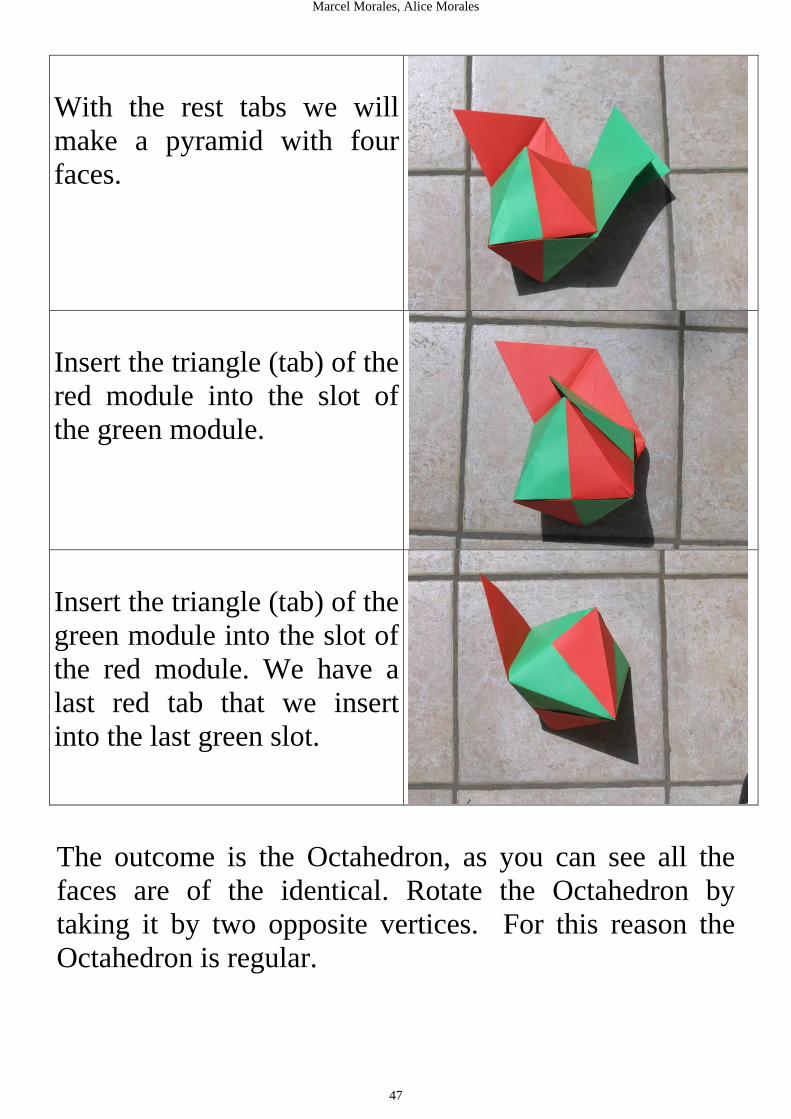
With the rest tabs we will
make a pyramid with four
faces.
Insert the triangle (tab) of the
red module into the slot of
the green module.
Insert the triangle (tab) of the
green module into the slot of
the red module. We have a
last red tab that we insert
into the last green slot.
The outcome is the Octahedron, as you can see all the
faces are of the identical. Rotate the Octahedron by
taking it by two opposite vertices. For this reason the
Octahedron is regular.

Polyhedron by Origami
Marcel Morales, Alice Morales
49
5) Assembly the Icosahedron
The Icosahedron is a convex regular polyhedron with
twenty faces; each face is an equilateral triangle.
We need ten bronze rectangular sheet of paper:
Five triangles modules and five chiral triangle
modules.
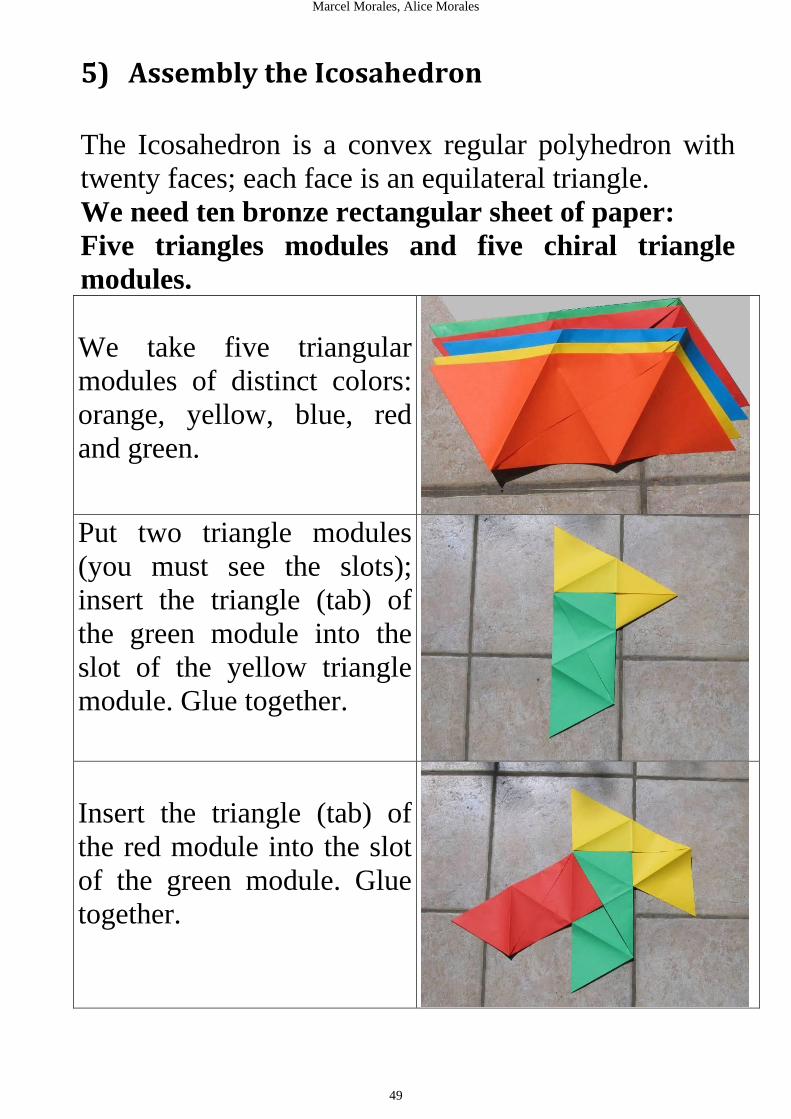
We take five triangular
modules of distinct colors:
orange, yellow, blue, red
and green.
Put two triangle modules
(you must see the slots);
insert the triangle (tab) of
the green module into the
slot of the yellow triangle
module. Glue together.
Insert the triangle (tab) of
the red module into the slot
of the green module. Glue
together.

Polyhedron by Origami
Insert the triangle (tab) of
the blue module into the
slot of the red module. Glue
together.
Insert the triangle (tab) of
the orange module into the
slot of the blue module.
Glue together.
Insert the triangle (tab) of
the yellow module into the
slot of the orange module.
Glue together. We get a
pyramid with five faces
(each face is bicolor).
Repeat the above steps with
the five chiral triangle
modules. So we get a
second pyramid with five
faces (each face is bicolor).
You can see the two
pyramids.


![INSCRIBED CIRCLE OF GENERAL SEMI-REGULAR POLYGON AND … · regular polygon is a regular star polygon.For more about polygons in [4,5,6]. 10. Polygon that is either equiangular or](https://img.dokumen.tips/doc/110x75/5ed5ade788d44222e75fca0a/inscribed-circle-of-general-semi-regular-polygon-and-regular-polygon-is-a-regular.jpg)