Embed Size (px)
Citation preview

AWS Enterprise Accelerator – Compliance
Standardized Architecture for
NIST 800-53 on the AWS Cloud
Quick Start Reference Deployment
January 2016

Amazon Web Services —Standardized Architecture for NIST January 2016
Page 2 of 37
Contents
About This Guide ........................................................................................................... 3
Quick Links .................................................................................................................... 4
About Quick Starts ......................................................................................................... 4
Overview ............................................................................................................................ 4
AWS Enterprise Accelerator – Compliance Architectures ........................................... 4
Sample Architecture for NIST 800-53/RMF on AWS .................................................. 5
AWS Services ................................................................................................................. 7
Best Practices .................................................................................................................8
How You Can Use this Quick Start ................................................................................8
Cost and Licenses .......................................................................................................... 9
AWS CloudFormation Templates ..................................................................................... 9
AWS CloudFormation Stacks ........................................................................................ 9
Templates Used in this Quick Start ............................................................................. 10
Managing the Quick Start Source Files ........................................................................... 11
Uploading the Templates to Amazon S3 ...................................................................... 11
Using the Console .................................................................................................... 12
Using the AWS CLI .................................................................................................. 12
Updating the Amazon S3 URLs ................................................................................... 12
Planning the Deployment ............................................................................................... 13
Prerequisites ................................................................................................................ 13
Specialized Knowledge ............................................................................................. 13
Technical Requirements .......................................................................................... 13
Deployment Scenarios ................................................................................................. 15
Deployment Options .................................................................................................... 16
Deploying the Quick Start Using the AWS CLI .............................................................. 16
Deploying the Quick Start Using the Console ................................................................ 18

Amazon Web Services —Standardized Architecture for NIST January 2016
Page 3 of 37
What We’ll Cover ......................................................................................................... 18
Step 1. Prepare an AWS Account ................................................................................. 18
Step 2. Launch the Stacks ............................................................................................ 21
Step 3. Test Your Deployment ..................................................................................... 25
Deleting the Stacks......................................................................................................... 28
Integrating with AWS Service Catalog .......................................................................... 28
IAM Policy for Deployment ............................................................................................ 29
Additional Resources ..................................................................................................... 30
Appendix A: Bootstrapping Configuration Management .............................................. 31
Appendix B: Using the Optional Deployment Tools ...................................................... 34
Appendix C: IAM Policy Examples ................................................................................. 35
Send Us Feedback ........................................................................................................... 36
For Further Assistance .................................................................................................... 36
Document Revisions ....................................................................................................... 36
About This Guide This Quick Start reference deployment guide discusses architectural considerations
and steps for deploying security-focused baseline environments on the Amazon Web
Services (AWS) cloud. Specifically, this Quick Start deploys a standardized
environment that helps support National Institute of Standards and Technology
(NIST) 800-53 / Risk Management Framework (RMF) certifications, accreditations,
and compliance processes. The deployment guide includes links for viewing and
launching AWS CloudFormation templates that automate the deployment.
This Quick Start is first in a set of AWS Enterprise Accelerator – Compliance offerings,
which provide security-focused, standardized architecture solutions to help Managed
Service Organizations (MSOs), cloud provisioning teams, developers, integrators, and
information system security officers (ISSOs) adhere to strict security, compliance, and
risk management controls.

Amazon Web Services —Standardized Architecture for NIST January 2016
Page 4 of 37
View main template
Launch Quick Start
Quick Links The links in this section are for your convenience. The launch button runs the main
Quick Start template, which sets up a multi-tier, Linux-based web application using
nested templates. For descriptions of the templates included in this Quick Start and
information about using the nested templates separately, see the Templates Used in
this Quick Start section of this guide.
Important Before you launch the Quick Start, please
check the Technical Requirements section to make sure
your account is configured correctly.
The template includes default settings that you can customize
by following the instructions in this guide.
Time to deploy: Approximately 30 minutes
About Quick Starts Quick Starts are automated reference deployments for key workloads on the AWS
cloud. Each Quick Start launches, configures, and runs the AWS compute, network,
storage, and other services required to deploy a specific workload on AWS, using AWS
best practices for security and availability.
Overview
AWS Enterprise Accelerator – Compliance Architectures AWS Enterprise Accelerator – Compliance solutions help streamline, automate, and
implement secure baselines in AWS—from initial design to operational security
readiness. They incorporate the expertise of AWS solutions architects, security and
compliance personnel to help you build a secure and reliable architecture easily
through automation.
This Quick Start includes AWS CloudFormation templates, which can be integrated
with AWS Service Catalog, to automate building an approved reference architecture
following your compliance requirements for NIST 800-53/RMF. It also includes a
Security Controls Matrix (SCM), which maps security controls to architecture
decisions, features, and configuration of the reference architecture.

Amazon Web Services —Standardized Architecture for NIST January 2016
Page 5 of 37
Sample Architecture for NIST 800-53/RMF on AWS Deploying the Quick Start with the default parameters builds a multi-tier, Linux-
based web application in the AWS cloud. The architecture is illustrated in Figures 1
and 2.
Figure 1: Standard 3-Tier Web Architecture with Optional Development and Management
VPCs (High Level)

Amazon Web Services —Standardized Architecture for NIST January 2016
Page 6 of 37
Figure 2: VPC Design (Detail)
The sample architecture includes the following components and features:
Basic AWS Identity and Access Management (IAM) configuration with custom
IAM policies, along with associated groups, roles, and instance profiles
Standard external-facing Amazon Virtual Private Cloud (Amazon VPC) Multi-AZ
architecture with separate subnets for different application tiers, including private
(back-end) subnets for application and database
Optional Amazon Simple Storage Service (Amazon S3) buckets for encrypted web
content, logging, and backup data

Amazon Web Services —Standardized Architecture for NIST January 2016
Page 7 of 37
Standard Amazon VPC security groups for Amazon Elastic Compute Cloud
(Amazon EC2) instances and load balancers used in the sample application stack
3-tier Linux web application using Auto Scaling and Elastic Load Balancing, which
can be modified and/or bootstrapped with customer application
Encrypted, Multi-AZ Amazon Relational Database Service (Amazon RDS) MySQL
database
AWS Services The core AWS components used by this Quick Start include the following AWS
services. (If you are new to AWS, see the Getting Started section of the AWS
documentation.)
Amazon VPC – The Amazon Virtual Private Cloud (Amazon VPC) service lets you
provision a private, isolated section of the AWS cloud where you can launch AWS
services and other resources in a virtual network that you define. You have
complete control over your virtual networking environment, including selection of
your own IP address range, creation of subnets, and configuration of route tables
and network gateways.
Amazon EC2 – The Amazon Elastic Compute Cloud (Amazon EC2) service enables
you to launch virtual machine instances with a variety of operating systems. You
can choose from existing Amazon Machine Images (AMIs) or import your own
virtual machine images.
Amazon EBS – Amazon Elastic Block Store (Amazon EBS) provides persistent
block-level storage volumes for use with Amazon EC2 instances in the AWS cloud.
Each Amazon EBS volume is automatically replicated within its Availability Zone
to protect you from component failure, offering high availability and durability.
Amazon EBS volumes provide the consistent and low-latency performance needed
to run your workloads.
Elastic Load Balancing – Elastic Load Balancing automatically distributes traffic
across multiple EC2 instances, to help achieve better fault tolerance and
availability.
AWS CloudTrail – Amazon CloudTrail records AWS API calls and delivers log files
that include caller identity, time, source IP address, request parameters, and
response elements. The call history and details provided by CloudTrail enable
security analysis, resource change tracking, and compliance auditing.

Amazon Web Services —Standardized Architecture for NIST January 2016
Page 8 of 37
Amazon RDS – Amazon Relational Database Service (Amazon RDS) enables you to
set up, operate, and scale a relational database in the AWS cloud. It also handles
many database management tasks, such as database backups, software patching,
automatic failure detection, and recovery, for database products such as MySQL,
MariaDB, PostgreSQL, Oracle, Microsoft SQL Server, and Amazon Aurora. This
Quick Start includes a MySQL database by default.
Best Practices The architecture built by this Quick Start supports AWS best practices for high
availability and security:
Multi-AZ architecture intended for high availability
Isolation of instances between private/public subnets
Security groups limiting access to only necessary services
Standard IAM policies with associated groups and roles, exercising least privilege
Monitoring and logging; alerts and notifications for critical events
Implementation of proper load balancing and Auto Scaling capabilities
Amazon RDS database backup and encryption
How You Can Use this Quick Start You can build an environment that fits your requirements by setting AWS
configuration values to define:
Encryption requirements; for example, forcing server-side encryption for Amazon
S3 objects
Permissions to resources (which roles apply to certain environments)
Which compute images are authorized (based on gold images of servers you have
authorized)
What kind of logging needs to be enabled (such as enforcing the use of AWS
CloudTrail on all resources)
Since AWS provides a very mature set of configuration options (and new services are
being released all the time), this Quick Start provides security templates that you can
use for your own environment. These security templates (in the form of AWS
CloudFormation templates) provide a more comprehensive rule set that can be

Amazon Web Services —Standardized Architecture for NIST January 2016
Page 9 of 37
systematically enforced. You can use these templates as a starting point and customize
them to match your specific use cases.
Cost and Licenses You are responsible for the cost of the AWS services used while running this Quick
Start reference deployment. There is no additional cost for using the Quick Start. As of
the date of publication, the cost for using the Quick Start with default settings in the
US East (N. Virginia) region is approximately $0.96 per hour. Prices are subject to
change. See the pricing pages for each AWS service you will be using for full details.
AWS CloudFormation Templates An AWS CloudFormation template is a JSON (JavaScript Object Notation)-formatted
text file that describes the AWS infrastructure needed to run an application or service
along with any interconnections among infrastructure components. You can deploy a
template and its associated collection of resources (called a stack) by using the AWS
Management Console, the AWS Command Line Interface (AWS CLI), or the AWS
CloudFormation API. AWS CloudFormation is available at no additional charge, and
you pay only for the AWS resources needed to run your applications. Resources can
consist of any AWS resource you define within the template. For a complete list of
resources that can be defined within an AWS CloudFormation template, see the AWS
Resource Types Reference in the AWS documentation.
AWS CloudFormation Stacks When you use AWS CloudFormation, you manage related resources as a single unit
called a stack. In other words, you create, update, and delete a collection of resources
by creating, updating, and deleting stacks. All the resources in a stack are defined by
the stack’s AWS CloudFormation template.
To update resources, you first modify the stack templates and then update your stack
by submitting the modified template. You can work with stacks by using the AWS
CloudFormation console, AWS CloudFormation API, or AWS CLI.
For more information about AWS CloudFormation and stacks, see Get Started in the AWS CloudFormation documentation.

Amazon Web Services —Standardized Architecture for NIST January 2016
Page 10 of 37
Templates Used in this Quick Start This Quick Start uses nested AWS CloudFormation templates to deploy the
architecture for a multi-tier, Linux-based web application.
The Quick Start consists of a master template and four templates: access, network,
resource, and application. These templates are designed to deploy the architecture
within stacks in alignment with AWS best practices as well as the identified security
framework. The following table describes each template and its dependencies.
Template Description Dependencies
Main stack
(main-webapp-linux.json)
Primary template file that deploys
stacks 1-4 and passes parameters
between nested templates
automatically.
None
Stack 1: Access
(stack1-access-01.json)
Enables AWS CloudTrail, S3
buckets, and IAM settings for S3
bucket access. Creates IAM roles
and groups.
None
Stack 2: Network
(stack2-network-01.json)
Three-tier Amazon VPCs
(management, development, and
production), subnets, gateways,
route tables, network ACLs, EC2
instance within the management
VPC (bastion).
None
Stack 3: Resources
(stack3-resources-01.json)
S3 bucket, policies, security
groups.
None
Stack 4: Application
(stack4-application-01.json)
EC2 instances proxy, web
application and database, or an
Amazon RDS database, Elastic
Load Balancing, Amazon
CloudWatch alarms, Auto Scaling
groups.
Stack 2 output
values
The JSON templates for stacks 1-4 deploy the resources, and the main-webapp-
linux.json template specifies each of these template files as stack resources to launch.
The main-webapp-linux.json template is the entry point for launching the entire
architecture, and also allows parameters to be passed into each of the nested stacks.

Amazon Web Services —Standardized Architecture for NIST January 2016
Page 11 of 37
To deploy the entire architecture (including IAM and Amazon VPC), use the main-
webapp-linux.json template when launching the stacks. To deploy the full package,
the IAM user must have permissions to deploy the resources each template creates,
which includes IAM configuration for groups and roles. This guide provides a sample
IAM policy you can use.
You can also edit main-webapp-linux.json and omit the Amazon S3 URLs for stacks 3
and 4 to only deploy stacks 1 and 2. This can be useful for provisioning teams who
must deploy initial base architecture in accounts for application owners. For more
information about depoloyment options and use cases, see the Deployment Scenarios
section.
Additionally, you can deploy each stack independently. However, this requires that
you pass individual parameters to each template upon launch, instead of relying on the
main template to pass these values automatically.
Managing the Quick Start Source Files We’ve provided a GitHub repository for the tools and templates for this Quick Start so
you can modify, extend, and customize them to meet your needs. You can also use
your own Git or Apache Subversion source code repository, or use AWS CodeCommit.
This is recommended to ensure proper version control, developer collaboration, and
documentation of updates.
The GitHub repository for this Quick Start includes the following directories and
contents:
docs/ Documentation, CRM, and this deployment guide
templates/ Template files for use case package
tools/ Tools and scripts useful in deployment or management: cfdeploy, cfsecuritycheck and
list_resources.py
README.md Readme file for basic information on this package
Uploading the Templates to Amazon S3 The Quick Start templates are available in an Amazon S3 bucket for Quick Starts. If
you’re using your own S3 bucket, you can upload the AWS CloudFormation templates
Amazon Web Services —Standardized Architecture for NIST January 2016
Page 12 of 37
by using the AWS Management Console or the AWS CLI, by following these
instructions.
Using the Console 1. Sign in to the AWS Management Console and choose S3 to open the Amazon S3
console.
2. Choose a bucket to store the templates in.
3. Choose Upload and specify the local location of the file to upload.
4. Upload all four template files to the same S3 bucket.
5. Find the template URLs by selecting each template file, and then choosing
Properties. Make a note of the URLs.
Using the AWS CLI 1. Download the AWS CLI tool from http://aws.amazon.com/cli/.
2. Use the following AWS CLI command to upload each template file:
aws cp <template file>.json s3://<s3bucketname>/
Updating the Amazon S3 URLs The template for the main stack lists the Amazon S3 URLs for the nested stacks. If
you upload the templates to your own S3 bucket and would like to deploy the
templates from there, you must modify the following parameters in main-webapp-
linux.json:
stack1URL
stack2URL
stack3URL
stack4URL

Amazon Web Services —Standardized Architecture for NIST January 2016
Page 13 of 37
Planning the Deployment
Prerequisites
Specialized Knowledge This Quick Start requires a moderate to high level of understanding of the process to
achieve and manage NIST 800-53/RMF certifications, accreditations, and compliance
processes within a traditional hosting environment.
Additionally, this solution is targeted at Information Technology (IT) NIST
800-53/RMF certifiers and security personnel, and assumes familiarity with basic
security concepts in the area of networking, operating systems, data encryption,
operational controls, and cloud computing services.
This deployment guide also requires a moderate level of understanding of AWS
services and requires the following, at a minimum:
Access to a current AWS account with IAM administrator-level permissions
Basic understanding of AWS services and AWS CloudFormation
Knowledge of architecting applications on AWS
Understanding of security and compliance requirements in the customer
organization
AWS offers training and certification programs to help you develop skills to design,
deploy, and operate your infrastructure and applications on the AWS cloud. Whether
you are just getting started or looking to deepen your technical expertise, AWS has a
variety of resources to meet your needs. For more information, see the AWS Training
and Certification website, or read the AWS Training and Certification Overview.
Technical Requirements
Before starting the Quick Start deployment, please check the following to make sure
your account is configured correctly. Otherwise, deployment might fail.
Resources Resource Default Used in this deployment
(by default)
VPCs 5 per region 3
EIPs 5 per region 3

Amazon Web Services —Standardized Architecture for NIST January 2016
Page 14 of 37
IAM groups 100 per account 5
IAM roles 250 per account 6
Amazon EC2 Auto
Scaling groups
20 per region 2
Elastic load
balancers
20 per region 2
Regions The AWS services used in this Quick Start should exist in all commercial
regions, but it is important to be aware of what is available in the region you
choose to deploy. For information about service differences in the AWS
GovCloud (US) region, see Supported Services in the AWS GovCloud
documentation.
AWS CloudTrail The stack 1 (access) template enables AWS CloudTrail. When you launch stack
1, deployment may fail if CloudTrail is already enabled. Before you deploy the
Quick Start, make sure that CloudTrail is not enabled, or set the
pCreateCloudTrail parameter to no in the template.
Amazon Machine Images
(AMIs)
The AMIs you specify in the parameters pWebServerAMI and pAppAmi must
exist in the deployment region. By default, this is the US East (N. Virginia)
region. If you’re using custom AMIs, they must be accessible to your account.
Otherwise, errors may result when deploying instances.
If you’re deploying stack 4, you must specify AMIs by ID in the parameters of
this template package. You may use base AMIs available from AWS or you can
choose pre-built custom AMIs that your account has access to.
Amazon RDS Amazon RDS deployment may fail if the pDBClass you specified does not
support Amazon RDS encryption.
Amazon S3 URLs If you’re using your own S3 bucket, make sure that the stack*URL parameters
in the main template, which specify the locations of the nested templates stored
in S3 buckets, are valid and accessible. Otherwise, deployment will fail.
IAM permissions If you’re deploying the Quick Start using the AWS CLI, the IAM role the
instance is launched into must have an IAM policy that allows access to the
resources that stacks will deploy. If you’re deploying stack 1, this includes
administrator-level IAM permissions.
If you deploy the Quick Start using the console, you must be logged into the
AWS Management Console with IAM permissions for the resources and actions
the templates will deploy. If you’re deploying stack 1, you must have access to
modify the IAM configuration.
S3 buckets If you specify S3 bucket name parameters in the main template for
pWebContentBucketName, pBackupBucketName, or pAppLogsBucketName,
the bucket names must be unique.

Amazon Web Services —Standardized Architecture for NIST January 2016
Page 15 of 37
Deployment Scenarios The following table describes potential deployment scenarios that demonstrate how
you can use the Quick Start templates.
Deployment Templates Description Use case
Full
deployment
(all stacks)
main-webapp-linux.json Use the main template file as
provided to deploy all stacks in
the package at once.
End-to-end deployment of
architecture with test
WordPress application by
administrator.
Stack 1 only stack1-access-01.json Deploy the template for stack 1 to
set up the security infrastructure.
Initial setup of base IAM
groups and roles for your
account (can be used with
multiple apps). Also launches
AWS CloudTrail and the S3
bucket.
Stack 2 only stack2-network-01.json Use the stack 2 template to set
up a network architecture (VPC
structure) for applications to be
deployed into.
Provisioning team (or cloud
team) can use this template to
set up VPCs for workload
owners.
Stacks 2, 3,
4 only
stack2-network-01.json
stack3-resources-01.json
stack4-application-01.json
Use the templates for stacks 2-4
to deploy the entire architecture
except for security and IAM
configuration by deleting the
stack1URL parameter from the
main template.
Deployment of full application
(including VPCs) into an
existing AWS account that
already has the security and
access infrastructure.
Stacks 3
and 4
stack3-resources-01.json
stack4-application-01.json
These templates deploy
applications and can be used by
workload owners with limited
IAM access. To launch only these
stacks, delete the stack1URL
and stack2URL parameters
from the main template.
Workload owners who do not
have permissions to create
VPC or IAM configuration can
deploy applications.
Individual
stacks only
stack1-access-01.json
stack2-network-01.json
stack3-resources-01.json
stack4-application-01.json
Use each template file
independently as needed.
Templates can be reused
independently or as part of
another application in the
form of nested (or individual)
stacks.

Amazon Web Services —Standardized Architecture for NIST January 2016
Page 16 of 37
Deployment Options You can deploy the Quick Start templates directly from the AWS Management Console
or by using AWS CLI commands. You can also deploy the template package as an AWS
Service Catalog product. AWS Service Catalog enables a self-service model for
deploying applications and architecture on AWS. You can create portfolios that
include one or more products, which are defined by AWS CloudFormation templates.
You can grant IAM users, groups, or roles access to specific portfolios, which they can
then launch from a separate interface. We’ve provided step-by-step instructions for
these deployment options in the following sections.
Deploying the Quick Start Using the AWS CLI Follow these step-by-step instructions to quickly deploy the entire Quick Start
architecture (using nested stacks) by using the AWS CLI and APIs. This process uses
the optional cfdeploy script, which you can download. Alternatively, you can use AWS
CLI commands that provide the same functionality.
1. Launch an Amazon EC2 Linux instance in an existing Amazon VPC that you have
access to.
We recommend that you use the Amazon Linux AMI.
The instance must be launched into an IAM role with administrator permissions.
2. Secure Shell (SSH) into the EC2 instance by using the SSH key that you specified
when you launched the instance in step 1.
3. Install Git:
# sudo yum install git –y
4. Pull down the latest version of the Quick Start package from the Git repository or
S3 bucket:
To pull down from the Git repository:
# sudo git clone git@<repository FQDN>:user/<repository>.git
To pull down from an S3 URL link:
# sudo wget <S3 URL>/<package-name>.tgz
# sudo tar xzf<package-name>.tgz

Amazon Web Services —Standardized Architecture for NIST January 2016
Page 17 of 37
5. Install the aws-cf-tools package:
# cd <package-name>
# sudo ./tools-install
6. Edit the example parameters file.
If you’re deploying in the US West (N. California) region:
# vi templates/parameters/example_uswest1.yaml
If you’re deploying in the US East (N. Virginia) region:
# vi templates/parameters/example_useast1.yaml
For the US East (N. Virginia) region, please ensure that you have access to the
Availability Zones listed (us-east-1a, us-east-1c) in your AWS account dashboard,
and modify as needed.
7. In the .yaml file, modify any parameters designated with <INPUT> to add your
own values.
Parameter Description
s3bucketApplicationLogsName S3 bucket for application logs
S3bucketBackupName (Optional) S3 bucket for backup data
S3bucketWebContentName (Optional) S3 bucket for fixed/web content
Keyname Existing SSH key in your account in region
DBName Name to use for Amazon RDS database
DBPassword Password to use for Amazon RDS database
8. Modify any other parameters as necessary for your specific deployment.
9. Launch the main-webapp-linux.json template by using cfdeploy:
If deploying in the US East (N. Virginia) region (us-east-1):
# cfdeploy --deploy FullDeployment --yaml-parameters
templates/parameters/example_useast1.yaml --template
templates/main-webapp-linux.json --region us-east-1

Amazon Web Services —Standardized Architecture for NIST January 2016
Page 18 of 37
If deploying in the US West (N. California) region (us-west-1):
# cfdeploy --deploy FullDeployment --yaml-parameters
templates/parameters/example_uswest1.yaml --template
templates/main-webapp-linux.json --region us-west-1
Deploying the Quick Start Using the Console Follow the step-by-step instructions in this section to set up your AWS account,
customize the Quick Start templates, and deploy the software into your account.
What We’ll Cover The procedure for deploying the Quick Start architecture on AWS consists of the
following steps. For detailed instructions, follow the links for each step.
Step 1. Prepare an AWS account
Sign up for an AWS account, if you don’t already have one.
Configure your account using the information in the Technical Requirements
section.
Choose the region where you want to deploy the stack on AWS.
Create a key pair in the region.
Review account limits for Amazon EC2 instances, and request a limit increase, if
needed.
Step 2. Launch the stacks
Launch the main AWS CloudFormation template into your AWS account.
Enter values for required parameters.
Review the other template parameters, and customize their values if necessary.
Step 3. Test your deployment
Use the URL provided in the Outputs tab for stack 4 to test the deployment.
Step 1. Prepare an AWS Account 1. If you don’t already have an AWS account, create one at http://aws.amazon.com by
following the on-screen instructions. Part of the sign-up process involves receiving
a phone call and entering a PIN using the phone keypad.

Amazon Web Services —Standardized Architecture for NIST January 2016
Page 19 of 37
2. Make sure that your AWS account is configured correctly. See the Technical
Requirements section for a checklist.
3. Use the region selector in the navigation bar to choose the Amazon EC2 region
where you want to deploy the NIST 800-53 architecture on AWS.
Amazon EC2 locations are composed of regions and Availability Zones. Regions
are dispersed and located in separate geographic areas. This Quick Start uses the
m3.large instance type for the WordPress and NGINX portion of the deployment.
m3.large instances are currently available in all AWS regions except China
(Beijing).
Figure 3: Choosing an Amazon EC2 Region
Tip Consider choosing a region closest to your data center or corporate network to reduce network latency between systems running on AWS and the systems and users on your corporate network.
4. Create a key pair in your preferred region. To do this, in the navigation pane of the
Amazon EC2 console, choose Key Pairs, Create Key Pair, type a name, and
then choose Create.

Amazon Web Services —Standardized Architecture for NIST January 2016
Page 20 of 37
Figure 4: Creating a Key Pair
Amazon EC2 uses public-key cryptography to encrypt and decrypt login
information. To be able to log in to your instances, you must create a key pair. On
Linux, we use the key pair to authenticate SSH login.
5. If necessary, request a service limit increase for the Amazon EC2 m3.large instance
type. To do this, in the AWS Support Center, choose Create Case, Service Limit
Increase, EC2 instances, and then complete the fields in the limit increase
form. The current default limit is 20 instances.
You might need to request an increase if you already have an existing deployment
that uses this instance type, and you think you might exceed the default limit with
this reference deployment. It might take a few days for the new service limit to
become effective. For more information, see Amazon EC2 Service Limits in the
AWS documentation.
View the Technical Requirements section for additional resource requirements.

Amazon Web Services —Standardized Architecture for NIST January 2016
Page 21 of 37
Figure 5: Requesting a Service Limit Increase
Step 2. Launch the Stacks
This automated AWS CloudFormation template deploys the Quick Start architecture
in multiple Availability Zones into Amazon VPCs. Please review the technical
requirements before launching the stacks.
1. Launch the AWS CloudFormation template into your AWS
account.
The template is launched in the US East (N. Virginia) region
by default. You can change the region by using the region selector in the navigation
bar. If you change the region, make sure that the AMIs you specify in the
pWebServerAMI and pAppAmi parameters (see the parameter table below) exist
in the deployment region.
Launch

Amazon Web Services —Standardized Architecture for NIST January 2016
Page 22 of 37
The stacks take approximately 30 minutes to create.
Note You are responsible for the cost of the AWS services used while running
this Quick Start reference deployment. There is no additional cost for using this
Quick Start. As of the date of publication, the cost for using the Quick Start with
default settings is approximately $0.96 an hour, and you can complete the initial
deployment for about $3.00. Prices are subject to change. See the pricing pages for
each AWS service you will be using in this Quick Start for full details.
You can also download the template to use it as a starting point for your own
implementation.
2. On the Select Template page, keep the default settings for the template URL, and
then choose Next.
3. On the Specify Details page, review the parameters for the template. These are
described in the following table.
Provide values for the parameters that require your input. Otherwise, the
deployment will fail. For all other parameters, the template provides default
settings that you can customize.
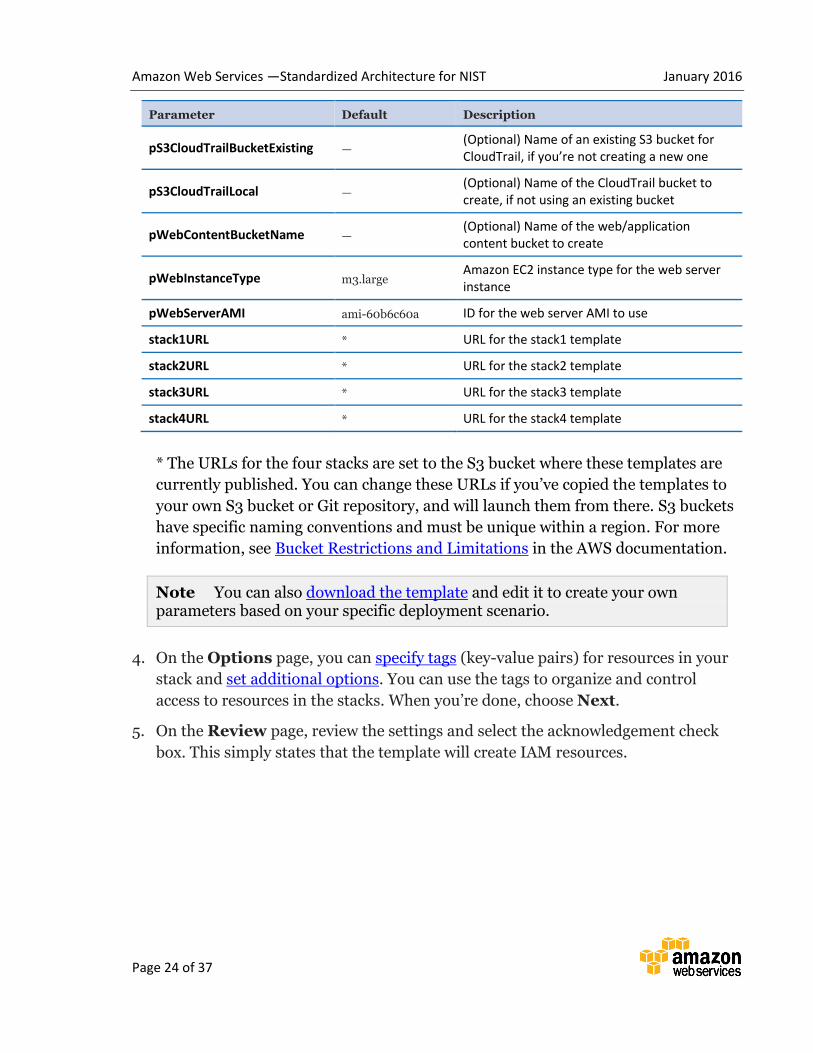
Parameter Default Description
createVPCDevelopment no Set to yes to create an Amazon VPC for development
createVPCManagement yes Set to no if you don’t want to create an Amazon VPC for management
pAppAmi ami-60b6c60a AMI to use for the application instance
pAppInstanceType m3.large Amazon EC2 instance type for the application tier
pAppLogsBucketName — (Optional) Name of the application logs bucket to create
pAppPrivateSubnetACIDR 10.100.10.0/24 CIDR block for web application subnet A
pAppPrivateSubnetBCIDR 10.100.11.0/24 CIDR block for web application subnet B
pBackupBucketName — (Optional) Name of the backup logs bucket to create
pCreateCloudTrail no
Set to yes to set up CloudTrail logging. If yes, you must provide a value for the pS3CloudTrailBucketExisting or pS3CloudTrailLocal parameter.

Amazon Web Services —Standardized Architecture for NIST January 2016
Page 23 of 37
Parameter Default Description
pDBAllocatedStorage 10 Amount of storage (in GiB) to allocate for the Amazon RDS database
pDBClass db.m3.large Size of the Amazon RDS database
pDBName TestDB Name to use for the Amazon RDS database
pDBPassword Requires input Mandatory. Password for the Amazon RDS database (minimum of 8 characters)
pDBPrivateSubnetACIDR 10.100.20.0/24 CIDR block to use for the Amazon RDS database subnet located in private subnet A
pDBPrivateSubnetBCIDR 10.100.21.0/24 CIDR block to use for the Amazon RDS database subnet located in private subnet B
pDBUser Administrator User name to use for the Amazon RDS database
pDevelopmentCIDR 10.20.0.0/16 (Optional) CIDR block for the Amazon VPC used for development
pDevelopmentVPCName Development Name tag for the Amazon VPC used for development
pDevSubnetACIDR 10.20.1.0/24 (Optional) CIDR block for development subnet A
pDevSubnetBCIDR 10.20.2.0/24 (Optional) CIDR block for development subnet B
pDMZSubnetACIDR 10.100.1.0/24 CIDR block to use for the public DMZ subnet A
pDMZSubnetBCIDR 10.100.2.0/24 CIDR block to use for the public DMZ subnet B
pKeyName Requires input Mandatory. Name of existing Amazon EC2 key pair to use in deployment
pManagementCIDR 10.10.0.0/16 (Optional) CIDR block for the Amazon VPC used for management
pManagementSubnetACIDR 10.10.1.0/24 CIDR block for management subnet A
pManagementSubnetBCIDR 10.10.2.0/24 CIDR block for management subnet B
pNatInstanceType t1.micro Amazon EC2 instance type for the NAT instance
pProductionCIDR 10.100.0.0/16 CIDR block for the production subnet
pProductionVPCName Production Name of the Amazon VPC used for production
pRegionAZ1Name Requires input Mandatory. Name for Availability Zone 1
pRegionAZ2Name Requires input Mandatory. Name for Availability Zone 2
pRegionDomain us-east-
1.compute.internal Region where resources will be deployed
Amazon Web Services —Standardized Architecture for NIST January 2016
Page 24 of 37
Parameter Default Description
pS3CloudTrailBucketExisting — (Optional) Name of an existing S3 bucket for CloudTrail, if you’re not creating a new one
pS3CloudTrailLocal — (Optional) Name of the CloudTrail bucket to create, if not using an existing bucket
pWebContentBucketName — (Optional) Name of the web/application content bucket to create
pWebInstanceType m3.large Amazon EC2 instance type for the web server instance
pWebServerAMI ami-60b6c60a ID for the web server AMI to use
stack1URL * URL for the stack1 template
stack2URL * URL for the stack2 template
stack3URL * URL for the stack3 template
stack4URL * URL for the stack4 template
* The URLs for the four stacks are set to the S3 bucket where these templates are
currently published. You can change these URLs if you’ve copied the templates to
your own S3 bucket or Git repository, and will launch them from there. S3 buckets
have specific naming conventions and must be unique within a region. For more
information, see Bucket Restrictions and Limitations in the AWS documentation.
Note You can also download the template and edit it to create your own parameters based on your specific deployment scenario.
4. On the Options page, you can specify tags (key-value pairs) for resources in your
stack and set additional options. You can use the tags to organize and control
access to resources in the stacks. When you’re done, choose Next.
5. On the Review page, review the settings and select the acknowledgement check
box. This simply states that the template will create IAM resources.

Amazon Web Services —Standardized Architecture for NIST January 2016
Page 25 of 37
Figure 6. IAM Resource Acknowledgement
6. Choose Create to deploy the stack.
7. Monitor the status of the stack being deployed. When the status displays
CREATE_COMPLETE, as shown in Figure 7, the cluster for this reference
architecture is ready. Since you’re deploying the full architecture, you’ll see five
stacks listed (for the main template and four nested templates).
Figure 7. Successful Creation of the Stack
Step 3. Test Your Deployment
This deployment builds a working demo of a Multi-AZ WordPress site.
To connect to the WordPress site, use the URL provided in the Outputs tab for stack
4, as shown in Figure 8.

Amazon Web Services —Standardized Architecture for NIST January 2016
Page 26 of 37
Figure 8. URL for the WordPress Site
This URL brings up the page shown in Figure 9. You can install and test the
WordPress deployment from here.

Amazon Web Services —Standardized Architecture for NIST January 2016
Page 27 of 37
Figure 9. Installing WordPress

Amazon Web Services —Standardized Architecture for NIST January 2016
Page 28 of 37
Deleting the Stacks When you’ve finished using the baseline environment, you can delete the stacks.
Deleting a stack, either via CLI and APIs or through the AWS CloudFormation
console, will remove all the resources created by the templates. The only exceptions
are the S3 buckets for logging and backup. By default, the deletion policy for those
buckets is set to “Retain,” so you would have to delete them manually.
Important This Quick Start deployment uses nested AWS CloudFormation
templates, so deleting the main stack will remove the nested stacks and all
associated resources.
Integrating with AWS Service Catalog You can add the AWS CloudFormation templates for this Quick Start to AWS Service
Catalog as portfolios or products to manage them from a central location. This helps
support consistent governance, security, and compliance requirements. It also enables
users to quickly deploy only the approved IT services they need.
For complete information about using AWS Service Catalog, see the AWS
documentation. The following table provides links for specific tasks.
To See
Create a new portfolio Creating and Deleting Portfolios
Create a new product Adding and Removing Products
Give users access Granting Access to Users
Assign IAM roles for deploying stacks Applying Launch Constraints
Make sure that the IAM role has a policy and trust
relationship defined.
Assign tags to portfolios to track resource ownership,
access, and cost allocations
Tagging Portfolios
Perform other administrative tasks AWS Service Catalog Administrator Guide
Launch products from AWS Service Catalog AWS Service Catalog User Guide

Amazon Web Services —Standardized Architecture for NIST January 2016
Page 29 of 37
IAM Policy for Deployment Below is an example of an IAM policy that could be used to deploy stacks 1 to 4, which
were described previously in this document.
{
"Version": "2012-10-17",
"Statement": [
{
"Effect": "Allow",
"Action": [
"catalog-user:*",
"cloudformation:DescribeStackEvents",
"cloudformation:DescribeStackResource",
"cloudformation:DescribeStackResources",
"cloudformation:DescribeStacks",
"cloudformation:ListStackResources*",
"cloudformation:ListStacks",
"cloudformation:GetStackPolicy",
"cloudformation:GetTemplate",
"cloudformation:GetTemplateSummary",
"cloudformation:ValidateTemplate",
"s3:*",
"ec2:*",
"cloudtrail:*",
"cloudwatch:*",
"autoscaling:*",
"rds:*",
"iam:*",
"cloudformation:DescribeStackResources",
"servicecatalog:*"
],
"Resource": "*"
}
]
}

Amazon Web Services –Standardized Architecture for NIST/RMF January 2016
Page 30 of 37
Additional Resources
AWS services
AWS CloudFormation
https://aws.amazon.com/documentation/cloudformation/
Amazon EC2 User Guide for Linux:
https://docs.aws.amazon.com/AWSEC2/latest/UserGuide/concepts.html
Amazon VPC
https://aws.amazon.com/documentation/vpc/
AWS Service Catalog
https://aws.amazon.com/documentation/servicecatalog/
AWS CloudTrail
https://aws.amazon.com/documentation/cloudtrail/
AWS Identity and Access Management
https://aws.amazon.com/documentation/iam/
Amazon RDS
https://aws.amazon.com/documentation/rds/
AWS CLI
https://aws.amazon.com/documentation/cli/
AWS Enterprise Accelerators
AWS Enterprise Accelerators website
https://aws.amazon.com/professional-services/enterprise-accelerators/
Quick Start Reference Deployments
AWS Quick Start home page
https://aws.amazon.com/quickstart/
Quick Start deployment guides
https://aws.amazon.com/documentation/quickstart/

Amazon Web Services –Standardized Architecture for NIST/RMF January 2016
Page 31 of 37
Appendix A: Bootstrapping Configuration
Management You can modify the user data configuration in the stack4-application-01.json template to
bootstrap the installation of custom applications or configuration management soutions
such as Chef or Puppet. The following sections can be modified as needed.
The LaunchConfigurationWeb section of the template provides the Auto Scaling launch
configuration where the proxy/web layer is bootstrapped. Presently, this template installs
and configures an NGINX proxy on these instances.
"LaunchConfigurationWeb": {
"Type": "AWS::AutoScaling::LaunchConfiguration",
"Condition" : "CreateWebInstance",
"DependsOn" : "elbWebApp",
"Metadata" : {
"AWS::CloudFormation::Init" : {
"config" : {
"packages" : {
"yum" : {
"nginx" : [],
"java-1.6.0-openjdk-devel":[],
"git":[]
}
},
"files" : {
"/tmp/nginx/default.conf" : {
"content" : { "Fn::Join" : ["", [
"server {\n",
"listen 80;\n",
"listen [::]:80 default ipv6only=on;\n",
"charset utf-8;\n",
"location / {\n",
"proxy_set_header X-Forwarded-For
$proxy_add_x_forwarded_for;\n",
"proxy_set_header Host $http_host;\n",
"proxy_redirect off;\n\n",
"proxy_pass http://",{"Fn::GetAtt":
["elbWebApp","DNSName" ] },"/;\n","\n","}\n","}\n"]]},"mode" : "000755","owner"
: "root","group" : "root"
}
},
"services" : {
"sysvinit" : {
"nginx" : { "enabled" : "true", "ensureRunning" :
"true", "files": ["/etc/nginx/conf.d/default.conf"] }
}

Amazon Web Services –Standardized Architecture for NIST/RMF January 2016
Page 32 of 37
}
}
}
},
The LaunchConfigurationApp section of the template provides the Auto Scaling launch
configuration where the application layer is bootstrapped.
"LaunchConfigurationApp": {
"Type": "AWS::AutoScaling::LaunchConfiguration",
"DependsOn" : "MySQLRDSInstance",
"Condition" : "CreateAppInstance",
"Metadata" : {
"AWS::CloudFormation::Init" : {
"configSets" : {
"wordpress_install" : ["install_cfn", "install_wordpress" ]
},
"install_cfn" : {
"files": {
"/etc/cfn/cfn-hup.conf": {
"content": { "Fn::Join": [ "", [
"[main]\n",
"stack=", { "Ref": "AWS::StackId" }, "\n",
"region=", { "Ref": "AWS::Region" }, "\n"
]]},
"mode" : "000400",
"owner" : "root",
"group" : "root"
},
"/etc/cfn/hooks.d/cfn-auto-reloader.conf": {
"content": { "Fn::Join": [ "", [
"[cfn-auto-reloader-hook]\n",
"triggers=post.update\n",
"path=Resources.LaunchConfigurationApp.Metadata.AWS::CloudFormation::Init\n",
"action=/opt/aws/bin/cfn-init -v ",
" --stack ", { "Ref" : "AWS::StackName" },
" --resource LaunchConfigurationApp ",
" --configsets wordpress_install ",
" --region ", { "Ref" : "AWS::Region" }, "\n"
]]},
"mode" : "000400",
"owner" : "root",
"group" : "root"
}
},
"services" : {

Amazon Web Services –Standardized Architecture for NIST/RMF January 2016
Page 33 of 37
"sysvinit" : {
"cfn-hup" : { "enabled" : "true", "ensureRunning" : "true",
"files" : ["/etc/cfn/cfn-hup.conf",
"/etc/cfn/hooks.d/cfn-auto-reloader.conf"]}
}
}
},
For more information and example user data configurations for using Chef or Puppet with
AWS CloudFormation, see the following guides:
Using Chef with AWS CloudFormation
Chef Server on the AWS Cloud: Quick Start Reference Deployment Guide
Integrating AWS CloudFormation with Puppet

Amazon Web Services –Standardized Architecture for NIST/RMF January 2016
Page 34 of 37
Appendix B: Using the Optional Deployment
Tools This Quick Start includes a set of Python-based tools to facilitate the deployment of the
AWS CloudFormation templates using the AWS CLI. It consists of the following tools:
cfdeploy The cfdeploy tool uses the AWS Boto API to deploy AWS CloudFormation templates. It is
an alternative to using the AWS CLI create-stack command, and supports additional
features such as the ability to manage input parameters from a YAML-based configuration
file. See the Deploying the Quick Start Using the AWS CLI section and the Readme file for
details on syntax and usage.
cfsecuritycheck Th cfsecuritycheck tool allows customers to build compliance-specific validation templates,
which can be used to verify the AWS CloudFormation templates against specific
architecture rules. It can be especially useful in a CI/CD deployment. See the Readme file
for details on syntax and usage.
list_resources.py The list_resources.py script is a simple, optional script that will enable you to quickly
output a listing of all AWS resources broken down by template into a CSV format.

Amazon Web Services –Standardized Architecture for NIST/RMF January 2016
Page 35 of 37
Appendix C: IAM Policy Examples You can use the following sample IAM policy for IAM users, groups, and roles to deploy the
entire architecture in the AWS Quick Start templates.
{
"Statement": [
{
"Resource": "*",
"Action": "iam:*",
"Effect": "Allow"
},
{
"Resource": "*",
"Action": "cloudformation:*",
"Effect": "Allow"
},
{
"Resource": "*",
"Action": "cloudtrail:*",
"Effect": "Allow"
},
{
"Resource": "*",
"Action": "logs:*",
"Effect": "Allow"
},
{
"Resource": "*",
"Action": "sns:*",
"Effect": "Allow"
},
{
"Resource": "*",
"Action": "s3:*",
"Effect": "Allow"
},
{
"Resource": "*",
"Action": "ec2:*",
"Effect": "Allow"
},
{
"Resource": "*",
"Action": "aws-portal:*Billing",
"Effect": "Deny"
}
],
"Version": "2012-10-17"
}

Amazon Web Services –Standardized Architecture for NIST/RMF January 2016
Page 36 of 37
Send Us Feedback We welcome your questions and comments. Please post your feedback on the AWS Quick
Start Discussion Forum.
You can visit our GitHub repository to download the templates and scripts for this Quick
Start, and to share your customizations with others.
For Further Assistance If you need assistance with an enterprise implementation of the capabilities introduced
through this Quick Start, AWS Professional Services offers an Enterprise Accelerator-
Compliance service to guide and assist with the related training, customization, and
implementation of deployment and maintenance processes. Please contact your AWS
Account Manager for further information, or send an inquiry to compliance-
Document Revisions
Date Change In sections
January 2016 Initial publication —

Amazon Web Services –Standardized Architecture for NIST/RMF January 2016
Page 37 of 37
© 2016, Amazon Web Services, Inc. or its affiliates. All rights reserved.
Notices
This document is provided for informational purposes only. It represents AWS’s current product offerings
and practices as of the date of issue of this document, which are subject to change without notice. Customers
are responsible for making their own independent assessment of the information in this document and any
use of AWS’s products or services, each of which is provided “as is” without warranty of any kind, whether
express or implied. This document does not create any warranties, representations, contractual
commitments, conditions or assurances from AWS, its affiliates, suppliers or licensors. The responsibilities
and liabilities of AWS to its customers are controlled by AWS agreements, and this document is not part of,
nor does it modify, any agreement between AWS and its customers.
The software included with this paper is licensed under the Apache License, Version 2.0 (the "License"). You
may not use this file except in compliance with the License. A copy of the License is located at
http://aws.amazon.com/apache2.0/ or in the "license" file accompanying this file. This code is distributed on
an "AS IS" BASIS, WITHOUT WARRANTIES OR CONDITIONS OF ANY KIND, either express or implied.
See the License for the specific language governing permissions and limitations under the License.


![SOFTWARE-rt1 NIST Enterprise Architecture ModelNIST Enterprise Architecture Model initiated in 1989, one of the earliest frameworks for Enterprise Architecture.[1]](https://img.dokumen.tips/doc/110x75/5513e5e255034646298b5af5/software-rt1-nist-enterprise-architecture-modelnist-enterprise-architecture-model-initiated-in-1989-one-of-the-earliest-frameworks-for-enterprise-architecture1.jpg)