Embed Size (px)
Citation preview

Standard Edition
370 Interlocken Blvd., Suite 600
Broomfield, CO 80021
Tel: 800.451.6845
Tel: 720.873.2500

d i s c l a i m e r Plasmon makes no representations or warranties with respect to the contents or use of this manual, and specifically disclaims any express or implied warranties of merchantability or fitness for any particular purpose. Plasmon reserves the right to revise this publication and to make changes to its content, at any time, without obligation to notify any person or entity of such revisions or changes.
Further, Plasmon reserves the right to make changes to any and all parts of the software, at any time, without any obligation to notify any person or entity of such changes.
t r a d e m a r k s Plasmon has attempted to supply trademark information about company names, products, and services mentioned in this guide.
For additional trademark information, refer to Appendix D, “Third Party Acknowledgements” in the Administrator’s Guide.
Archive File Manager Getting StartedVersion 4.2, October 200730035-000M-PLS
© 2007 Plasmon and its licensors. All rights reserved. No part of this publication may be reproduced, photocopied, stored on a retrieval system, or transmitted without the express written consent of the publisher.
Plasmon 370 Interlocken Blvd., Suite 600Broomfiled, CO 80021 USA

Contents i
CONTENTS
Package Contents. . . . . . . . . . . . . . . . . . . . . . . . . . . . . . . . . . 1Software Overview . . . . . . . . . . . . . . . . . . . . . . . . . . . . . . . . . 1Software Components . . . . . . . . . . . . . . . . . . . . . . . . . . . . . . . 2Documentation . . . . . . . . . . . . . . . . . . . . . . . . . . . . . . . . . . . 3Setup Support . . . . . . . . . . . . . . . . . . . . . . . . . . . . . . . . . . . . 3System Requirements. . . . . . . . . . . . . . . . . . . . . . . . . . . . . . . . 3
Network Requirements . . . . . . . . . . . . . . . . . . . . . . . . . . . . 3ACS System Requirements . . . . . . . . . . . . . . . . . . . . . . . . . . 4Remote Managed Platform and Device Requirements . . . . . . . . . . . . 5Requirement for Accessing the Management Console . . . . . . . . . . . . 5
Preparing To Install the ACS Software . . . . . . . . . . . . . . . . . . . . . . . 6Installing the ACS Software . . . . . . . . . . . . . . . . . . . . . . . . . . . . . 8Initial Setup Process . . . . . . . . . . . . . . . . . . . . . . . . . . . . . . . . 15
Step 1: Running the Initial Setup Wizard . . . . . . . . . . . . . . . . . . . 15Step 2: Verifying the Setup . . . . . . . . . . . . . . . . . . . . . . . . . . 19
Quick Start Roadmap . . . . . . . . . . . . . . . . . . . . . . . . . . . . . . . . 20Technical Support Contact Information . . . . . . . . . . . . . . . . . . . . . . . 25Corporate Contact Information . . . . . . . . . . . . . . . . . . . . . . . . . . . 25

Archive File Manager Getting Started 1
This Getting Started document provides the information you need to get started with the Plasmon Archive File Manager Standard Edition product. Use this card to identify the contents of this package and to complete the initial setup of the software. This card assumes that you are familiar with networking and system administration.
Package ContentsThe Archive File Manager Standard Edition package contains the following:
◆ Getting Started Card
◆ Software and Documentation CD
Archive File Manager Software OverviewThe Archive File Manager software is designed to automate the discovery of information about storage resources and data usage patterns for resources that you designate as remote managed storage. The collected information is then stored in a central meta-data repository that is accessible for policy configuration and monitoring from a web-based Management Console. You can use the collected information to classify and prioritize similar resources together so that you can monitor and manage them as a group. After classifying and prioritizing resources, you define policies for different resource groups based on their stages in the data lifecycle. After the policies are deployed, the Policy-based Automation Engine (PAE) controls automated data migration, movement, copy, or clean-up based on the policies you defined. On an ongoing basis, Archive File Manager continuously monitors data and storage resource utilization for remote managed storage. This way, you can modify existing policies as needed to continually improve efficiency.
The Archive File Manager product software provides you with the ability to manage data and storage resources on a variety of levels. Depending on your data management needs, you can choose from the following software options:
◆ Archive File Manager Standard Edition—a comprehensive solution for Information Lifecycle Management (ILM) that integrates file system data discovery, storage and data classification, monitoring, and automated management to help administrators prioritize data and storage resources.

Archive File Manager Getting Started 2
◆ Archive File Manager Expanded Edition—a comprehensive solution for Information Lifecycle Management (ILM) that integrates all the features of the Standard Edition in addition to support for reporting, policy simulation, and Remote Server Assistants (RSAs). An RSA remotely manages multiple server and storage resources and acts as an extension of the ACS. In addition to providing management without having to install software on each resource, the RSA provides scalability for managing resources within large enterprise environments by off-loading processing from the ACS. RSAs are deployed using an automated push-install technology to dedicated management servers.
Note: For information about upgrading from the Standard Edition to the Expanded Edition, contact Technical Support.
Software ComponentsThe main component of the Archive File Manager is the Central Server (ACS). The ACS software resides on a dedicated Windows® 2003 Server and is the control center for all data collection, monitoring, and policy-based management. The ACS includes a Policy Automation Engine (PAE), a meta-data repository, intelligent data movers, monitoring, and web-based management interface components. Additionally, the ACS is capable of remotely monitoring and managing storage resources without requiring you to install software agents on each resource.

Archive File Manager Getting Started 3
DocumentationThe documentation for this product is located on the Software and Documentation CD. Information about this product is available in the following documentation:
◆ Getting Started Card—instructions for the initial setup of the software.
◆ Archive File Manager Administrator’s Guide—operational information for understanding the Archive File Manager system and information on setting up, configuring, and maintaining the system. Use the Management Console Help button to access a context-sensitive version of this document.
◆ Product Release Notes
Setup SupportIf you encounter issues when setting up the software, email Technical Support at [email protected].
System RequirementsThe following sections provide system requirements for all Archive File Manager components.
Network Requirements
Before implementing the Archive File Manager software, ensure your network supports the following requirements:
◆ Domain Name System (DNS) to enable consistent host name resolution of managed servers.
◆ Static IP address for the ACS.

Archive File Manager Getting Started 4
ACS System Requirements
The minimum and recommended software and hardware requirements for the ACS are as follows:
Note: The ACS does not support the Windows Server 2003 Shadow Copy or Terminal Server features. Ensure that these features are disabled before installing the ACS software. You can use the Remote Desktop feature instead of the Terminal Server feature to obtain remote connectivity. Also ensure that you do not change the authentication settings for the IIS Virtual Directories created by the Archive File Manager software.
Supported Platforms Recommended Hardware
Windows® Server 2003 running the following:
◆ Internet Information Services (IIS) with ASP pages enabled
◆ Internet Explorer 6.0 or higher
◆ Service Pack 1 or above
Processor
◆ Minimum: Intel® Pentium® 3 processor, 1 Ghz or greater
◆ Recommended: Dual Intel® Pentium® 4 Xeon processor, 3 Ghz or greater
Memory
◆ Minimum: 1 GB
◆ Recommended: 2 GB
Free Disk Space
◆ 200 GB
Hard drive recommendation
RAID 5 with dual controller; 10K RPM SCSI hard drives; 128 MB cache

Archive File Manager Getting Started 5
Remote Managed Platform and Device Requirements
Remote resources that you want to manage using the Archive File Manager software must meet the following platform requirements:
◆ Windows NT® 4.0, Windows® 2000, Windows® 2003
◆ Sun Solaris™ 2.6, 2.7, 2.8, 2.9
◆ HP-UX® 11, 11i
◆ IBM-AIX® 4.3.3, 5.x
◆ Red Hat® Linux
◆ SGI® IRIX®
◆ Apple® Mac OS® X
◆ NetApp® Storage Appliances
◆ EMC® Celerra®
◆ NAS devices
Requirement for Accessing the Management Console
To access the Archive File Manager Management Console, you must use Microsoft Internet Explorer 6.0 or higher.

Archive File Manager Getting Started 6
Preparing To Install the ACS SoftwareBefore you install the ACS software, complete the following preinstallation tasks:
1. After connecting the ACS to the network, verify that you can see the network from My Network before running the Initial Setup Wizard as follows:
1a. After you start the ACS, the server displays the standard Windows 2003 Server login screen. Log in as Administrator using the associated password.
1b. Verify the TCP/IP settings by selecting the following:Start > Setting > Control Panel > Network Connections
1c. Right-click Local Connection and select Properties.
1d. Update the Internet Protocol (TCP/IP) Properties to enable network connectivity.
1e. To join the domain, right-click My Computer, then select Properties.
1f. Click the Computer Name Tab and select the Change button to join the domain.
Note: You are prompted to enter a user name and password with the rights required when adding a computer to the domain.
1g. Select the Domain button, enter the Domain Name, and then click OK.
1h. Restart the ACS.
1i. Log in to the Server as the Domain Administrator and verify that My Network displays the rest of the network that contains the storage resources that you want to manage before proceeding. In some cases it may take a few minutes to see the network. You can also run "Net View" from the command prompt to list the computers that are browsable from the Central Server.

Archive File Manager Getting Started 7
2. Verify that the server meets the following prerequisites:
◆ Windows 2003 installed (with or without SP1).
◆ Member of a Windows domain in a CIFS environment.
◆ Not functioning as a Windows domain controller.
◆ Single enabled Network Interface Card (NIC) installed.
◆ Internet Information Services (IIS) installed with ASP pages enabled using the IIS Manager.
◆ Internet Explorer 6.0 or higher installed with Enhanced Security Controls removed.
◆ Terminal Server software removed.
◆ Static IP address assigned.
◆ Domain Name System (DNS) configured to enable consistent name-to-IP and IP-to-name resolution of managed servers.
3. Obtain the domain administrator login and password to install the software. If required, you can also use a domain user login that has local Administrator rights on targeted servers.
4. Insert the Archive File Manager Central Server software CD in the ACS machine.
5. To verify that you can access each targeted server using DNS, you must ensure that all targeted servers use the same name for both NetBIOS and DNS. Complete the verification process by running the following preinstallation check utilities and reviewing the output:
<CD-Drive>:\utilities\preinstallcheck -cifs [server_name]
<CD-Drive>:\utilities\preinstallcheck -nfs [server_name]
The server is now ready for you to install the ACS software.

Archive File Manager Getting Started 8
Installing the ACS SoftwareInstall the software on the ACS as follows:
1. Verify that the Windows Installer service is running on the ACS machine.
2. Access the Central Server software CD and install the software by running the InstallShield wizard (SETUP.EXE).
The Welcome screen is displayed.

Archive File Manager Getting Started 9
3. Click Next to begin the installation.
The License Agreement screen is displayed.
4. To accept the license terms, click the appropriate option and click Next.
The Customer Information screen is displayed.
Archive File Manager Getting Started 10
5. Enter the User Name and Organization name and click Next.
The Custom Setup screen is displayed.
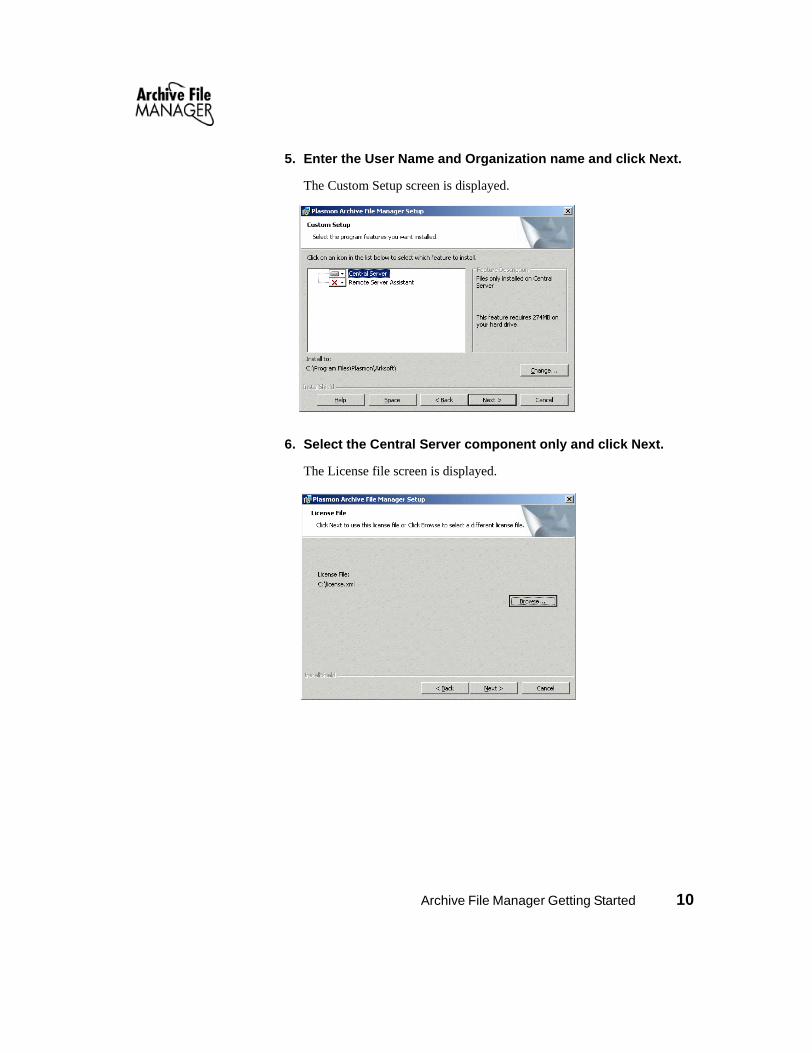
6. Select the Central Server component only and click Next.
The License file screen is displayed.

Archive File Manager Getting Started 11
7. Accept the default license file location or browse to a different license file location and click Next.
The Install NT Service screen is displayed.
8. Select the option to install the NetArc Service to a user account and do the following:
8a. Enter the Domain\User name to use for use with the NetArc service.
8b. Enter the password associated with the user name.
8c. Enter the password again to confirm the entry.
8d. Click Next to continue.

Archive File Manager Getting Started 12
The Domain Controller screen is displayed.
9. If you want to use a specific NT Controller (required for NT 4.0), enter the name of the controller using the fully qualified name and click Next.

Archive File Manager Getting Started 13
The Database Folder screen is displayed.
10. Accept the default database installation folder or browse to select a different folder and click Next.
The Slave Database Folder screen is displayed.
11. Accept the default slave database installation folder or browse to select a different folder and click Next.

Archive File Manager Getting Started 14
The Date Format screen is displayed.
12. Select the correct date format for your location. Click Next.
The Ready to Install the Program screen is displayed.
13. Click Install to begin the installation program.

Archive File Manager Getting Started 15
The installation program begins copying files. When the installation program is complete, the Installation Wizard Completed screen is displayed.
14. Select the option to launch the Management Console and click Finish.
Initial Setup ProcessThe initial setup process consists of two tasks:
1. Running the initial setup wizard
2. Verifying the setup (optional)
Step 1: Running the Initial Setup Wizard
To run the initial setup wizard, complete the following steps:
1. If the Management Console is running, skip to Step 4. If the ACS is not running, start it.
After the server starts, it displays the standard Windows® 2003 Server start-up screens.
2. When prompted, enter the provided password.

Archive File Manager Getting Started 16
3. Start Internet Explorer on the ACS and enter the following URL:
http://Archive_File_Manager_server/mgtcon
Replace Archive_File_Manager_server with the name or IP address of the ACS.
The installation wizard starts and the Copyright Information screen is displayed.
Note: Evaluation licenses expire after the evaluation period as indicated in the About box. Contact Plasmon to obtain a new license.
4. Read the copyright information and click next.
The Service User Account screen is displayed.
5. Accept the Administrator user name and password you entered when you installed the ACS software or enter a new Administrator user name and password. This user name must have the appropriate privileges to install software on remote servers. Click next to continue.
6. If you are installing in a mixed Windows and UNIX environment, enter the NIS server name and domain. Otherwise, leave the fields blank. Click next to continue.
Note: If you do not enter NIS information in a mixed environment, the system uses UNIX UID_uuuu for all users and UNIX GID_uuuu for all groups, where uuuu and gggg represent the numeric values for the UID and GID.
The Server List screen is displayed.
7. Select when to add servers to the Server List.
◆ To add servers later, click next.
◆ To add servers now, do the following:
7a. To add a server, click the new icon (+).
The New Server screen is displayed.
7b. If the server(s) you are adding include NFS volumes only (no CIFS volumes), select the NFS Volumes Only check box.

Archive File Manager Getting Started 17
7c. Enter the Server Name and select the associated system type from the drop-down list.
7d. If you select EMC Celerra or NetApp Filer as the system, enter the following additional information. Otherwise, skip to Step 7e.
◆ If you select EMC Celerra and want to use the server as a source for tag migration, select the Enable CFM option and enter the following information. Otherwise, skip to Step 7e.
User name—specifies the user name to use when connecting to the Celerra server.
Password—specifies the password associated with the user name.Note: You must complete additional configuration steps on the Celerra server before you can implement tag migration. Refer to the Administrator’s Guide for additional information.
◆ If you select NetApp Filer and want to use the NetApp Filer server as a source for tag migration, select the Enable FPolicy option and enter the following information. Otherwise, skip to Step 7e.
User name—specifies the user name to use when recalling NFS files.
Password—specifies the password associated with the user name.
You must enter a minimum of one Archive File Manager server for use with FPolicy migration. You are not required to assign a secondary server. If you assign a primary and a secondary server, the secondary server ensures that migrated files can be recalled in the event that the primary server fails. You cannot enter the same server for both the primary and secondary server.
Primary server—specifies the primary Archive File Manager server to use when recalling FPolicy tag migrated files. Specify the ACS.
Secondary server—specifies the secondary Archive File Manager server to use when recalling FPolicy tag migrated files. This field is not required for the Standard Edition of the software.

Archive File Manager Getting Started 18
Note: You must complete additional configuration steps on the NetApp Filer server before you can implement tag migration. Refer to the Administrator’s Guide for additional information.
7e. Click save.
The new server appears in the list.
7f. Click next.
The Alert Settings screen is displayed.
8. Select when to modify alert settings.
◆ To modify alert settings later, click next.
◆ To modify alert settings now, do the following:
8a. For each level of alert, choose a method of notification.
8b. For email, enter the following:
◆ Administrator’s email address and the name of the SMTP server
◆ SMTP server user name in the format username@domain
◆ Password for the user name
8c. For SNMP, enter the SNMP trap IP addresses.
8d. Identify which alerts to receive (all or specific alerts only).
8e. Click next.
The congratulations screen is displayed.
9. From the congratulations screen, select finish to launch the Management Console.
The installation wizard finishes, the screen closes, and the Management Console appears.
Note: The first time you access the Management Console from a remote computer, a set of ActiveX® components is downloaded to the remote computer. This download is certified and signed. You must accept the certificate for the Management Console to function correctly.
The Archive File Manager software is now installed on your server with an initial configuration. To complete your setup, you must select which servers to manage and configure the features that customize the automation of storage

Archive File Manager Getting Started 19
and data resource management. For instructions on configuring and customizing your Archive File Manager software, refer to the Administrator’s Guide located on the product CD.
Step 2: Verifying the Setup
To verify that all software components are running, complete the following steps:
1. From the Start Menu, select Settings > Control Panel > Administrative Tools > Services.
2. Verify that the following services are installed and started:
◆ Arksoft Discovery
◆ Arksoft My SQL
◆ Arksoft NetArc
◆ Arksoft My SQL Slave
◆ Arksoft Recall
3. From the Start Menu, select Settings > Control Panel > Administrative Tools > Event Viewer.
4. Verify that the following logs are listed:
◆ Application Log
◆ Security Log
◆ System Log
◆ Plasmon Admin Audit Log
◆ Plasmon System Errors Log

Archive File Manager Getting Started 20
Quick Start RoadmapThe following quick start roadmap provides the high-level steps required to set up a simple Archive File Manager configuration. Although additional configuration may be required for a complex configuration, the basic configuration steps remain the same. Therefore, you can use the roadmap as a guide to help you better understand the setup process.
The basic steps required to set up the Archive File Manager system are as follows:
1. Add resources to the Archive File Manager system.
2. Select which resources to manage.
3. Create resource groups to categorize similar file classes to simplify administration.
4. Scan the managed resources.
5. Set up policy-based management.
The following roadmap guides you through the process and provides additional detail about each step. For more detailed information, refer to the Administrator’s Guide.
1. Add the resources to the system using the Server List.
1a. From the Main Screen, select the following:Global Administration > Deployment > Server List

Archive File Manager Getting Started 21
The Server List is displayed.
1b. For each server, click the new icon (+), enter the required information in the Add Server screen, and click save.
1c. After adding all the servers, click save.
The new resources are now included in the Server List.
2. Select which resources to manage.
2a. From the Main Screen, select the following:Global Administration > Deployment > Remote Managed Storage

Archive File Manager Getting Started 22
The Remote Managed Storage screen is displayed.
2b. Select the Add check box for each resource that you want to add to the system and click apply.
2c. Click the links in the Source and Target columns to enable policy actions for the volumes that you want to include in policy actions, and click save.
2d. Click apply.
3. Create resource groups to categorize similar file classes to simplify administration.
3a. From the Main Screen, select the following:Policies > Resource Groups > File Groups

Archive File Manager Getting Started 23
The File Group screen is displayed.
3b. To add a new file group, click the new icon (+), enter the name of the new file group, select the files to include in the group using the available file criteria, and click save.
4. Scan the managed resources. Before you can view information on managed resources, you must run the File Data Collector.
4a. From the Main Screen, select the following:Global Administration > Deployment > Schedule Data Collection

Archive File Manager Getting Started 24
The Schedule data collection screen is displayed.
4b. Enter the domain administrator user name and password.
4c. Select Run Now for the ACS and click apply.
5. Set up policy-based management. Based on your needs, you can set up automated tasks by selecting Policies > Tasks from the Main menu and following the task wizard prompts.

Archive File Manager Getting Started 25
Technical Support Contact InformationYou can contact Technical Support online by emailing [email protected].
Corporate Contact InformationPlasmon370 Interlocken Blvd., Suite 600Broomfiled, CO 80021 USA
Telephone: 800.451.6845Telephone: 720.873.2500Fax: 720.873.2501www.plasmon.com