Embed Size (px)
Citation preview

NoTubes.com 202 Daniel Zenker Dr Big Flats, NY 14814 (607) 562-2877 [email protected]
MAI
NTEN
ANCE
Stan’s 3.30 Series Front & Rear Hub Tech Manual
Revised September 18, 2012
2013

Stan’s 3.30 Series Front & Rear Hub Tech Manual
GREAT CHOICE!
Congratulations on your purchase of a Stan’s ZTR wheel with 3.30 hubs. Please refer to this manual for setup, use, and service of your new hubs. With proper care and maintenance you will enjoy these hubs for many years to come.
Stan’s high performance hubs are designed to be light, smooth and easy to maintain. All of our hubs have 3 pawls with 30 point engagement. Each hub rides on two cartridge sealed bearings and another two are used in the freehub body of our rear hubs. As with all Stan’s bicycle components, we offer high performance products that meet the cycling demands from racers to weekend warriors.
Installation and Bearing adjustment:
Stan’s 3.30 hubs are designed to be easy to maintain and therefore have no bearing preload adjustment. To tighten the quick release: First install the wheel in to the frame or fork. Next hold the QR lever out in line with the hub (perpendicular to the frame or fork). Tighten the QR nut hand tight, and then close the QR lever. You should not notice any play in the wheels while riding.
Maintenance Schedule/Standard Care:
Periodic inspection and cleaning of Stan’s hubs will keep them in excellent working condition. When inspecting the hub, make sure there is not excessive play in the wheel and that the bearings roll smooth. If the wheel is loose or the bearings roll rough one or more cartridge bearings may be worn. Check the free hub for smooth rotation and proper engagement.
Caution: Continued used of worn bearings can cause additional damage to the hub and free hub body of rear hubs.
Lubrication:
The cartridge sealed bearings that are standard in Stan’s hubs can be cleaned and greased by removing the seal with a razor blade, but full bearing replacement is recommended and usually necessary when wear is determined. Use a small amount of lightweight grease on the pawl and drive ring mechanism in the free hub. An extra amount of lightweight grease may be added to the free hub if quieter operation is desired. For extreme cold conditions (below 30°F) mix free hub grease with a few drops of 10w synthetic oil or remove the grease and use synthetic oil alone such as Dumonde Tech® Freehub Grease or Morningstar Free Hub Soup TM. Riding in wet conditions will require more frequent service. High-pressure spray washing, transporting or riding the bicycle in the rain, or submersion in water while riding can all lead to lubricant contamination by water. When these situations occur, more frequent hub service is necessary.
1Revised September 18, 2012

Hub Axle End Cap Conversions:
Stan’s has end cap conversions to fit many of the different frame, fork, and hub axle sizes on the market. Stan’s 3.30 and 3.30Ti Disc front hubs come with standard quick release end caps, but can be converted for use with a 15mm axle. Stan’s 3.30HD Disc front hub comes with end caps to fit a 20mm axle, but can be converted to standard quick release or 15mm axle.
Stan’s 3.30/3.30 Ti Disc Rear hub comes standard as QR x 135, but can be converted to 10mm thru x 135, 12mm thru x 135, and 12mm thru x 142.
Stan’s 3.30HD 12mm x 135 Disc rear hub can be converted to 10mm x 135 or 12mmx142.
Stan’s end cap conversion kits are designed for Stan’s Notubes hubs only.
Freehub Specifications:
Stan’s 3.30, 3.30Ti, 3.30R, and 3.30HD rear cassette hubs are designed to be compatible with Shimano and SRAM 8/9/10 speed cassettes. A 3.30R Campagnolo freehub is available for 10/11 speed Campagnolo cassettes. 3.30R Campagnolo hubs do not come with a cassette lock ring. NOTE: We recommend using cassettes with a rigid alloy carrier (XTR, XT, XO, etc. - Figure 1) for the largest sprockets. Cassettes with individual steel sprockets (Figure 2) may mark the alloy freehub, though marks are only cosmetic and will not affect the performance of the hub.
Warranty Policy:
All NoTubes products are covered under a 1 year warranty against manufacturing defects. Warranty does not cover abuse, misuse, consequential damages, normal wear and tear, and improper installation. Warranties only apply to the original owner. If a product is found defective customer will receive, at the discretion of Stan’s Notubes, free repair or replacement.
2Revised September 18, 2012
Figure 1 - Rigid Body Cassette Figure 2 - Individual Gear Cassette

Table of ContentsI. Disassembly of Stan’s Type II 3.30, 3.30Ti, 3.30SS Rear Hubs: . . . . . . . . . . . . . . . . . . . . . . . 4
II. Reassembly of Stan’s Type II 3.30, 3.30Ti, 3.30SS Rear Hubs: . . . . . . . . . . . . . . . . . . . . . . . 5
III. Disassembly of Stan’s 3.30, 3.30Ti, 3.30R, 3.30SS Rear Hubs: . . . . . . . . . . . . . . . . . . . . . . 6
IV. Reassembly of Stan’s 3.30, 3.30Ti, 3.30R, 3.30SS Rear Hubs: . . . . . . . . . . . . . . . . . . . . . . . 7
V. Disassembly of Stan’s 3.30 HD Series Rear Hubs:. . . . . . . . . . . . . . . . . . . . . . . . . . . . . . . . . 8
VI. Reassembly of Stan’s 3.30 HD Series Rear Hubs: . . . . . . . . . . . . . . . . . . . . . . . . . . . . . . . . . 9
VII. Disassembly and Assembly of Stan’s 3.30, 3.30R, 3.30Ti, 3.30HD, 3.30SS Freehub: . . . . . . 9
VIII. Assembly of Stan’s 3.30, 3.30R, 3.30Ti, 3.30HD, 3.30SS Freehub: . . . . . . . . . . . . . . . . . . . . 10
IX. Disassembly of Stan’s 3.30, 3.30Ti Front Disc Hubs:. . . . . . . . . . . . . . . . . . . . . . . . . . . . . . . 11
X. Disassembly of Stan’s 3.30HD Series Front Disc Hubs: . . . . . . . . . . . . . . . . . . . . . . . . . . . . . 12
XI. Reassembly of Stan’s 3.30, 3.30Ti, 3.30HD Front Disc Hubs: . . . . . . . . . . . . . . . . . . . . . . . . 12
XII. Disassembly of Stan’s 3.30R Front Road Hub: . . . . . . . . . . . . . . . . . . . . . . . . . . . . . . . . . . . 13
XIII. Reassembly of Stan’s 3.30R Front Hub:. . . . . . . . . . . . . . . . . . . . . . . . . . . . . . . . . . . . . . . . . 14
XIV. Chain Line for 3.30SS Rear Hubs: . . . . . . . . . . . . . . . . . . . . . . . . . . . . . . . . . . . . . . . . . . . . . 14
3Revised September 18, 2012
4
MaintenanceI. Disassembly of Stan’s Type II 3.30, 3.30Ti, 3.30SS Rear Hubs:
Note: The Type II hub can be identified by the stainless steel inserts on the end of each end cap where the hub mounts into the frame.
TOOLS NEEDED: one-5mm hex/Allen wrench, one-cone wrench (any size), plastic mallet, bearing press if available. Note: all threaded fasteners are standard right hand.
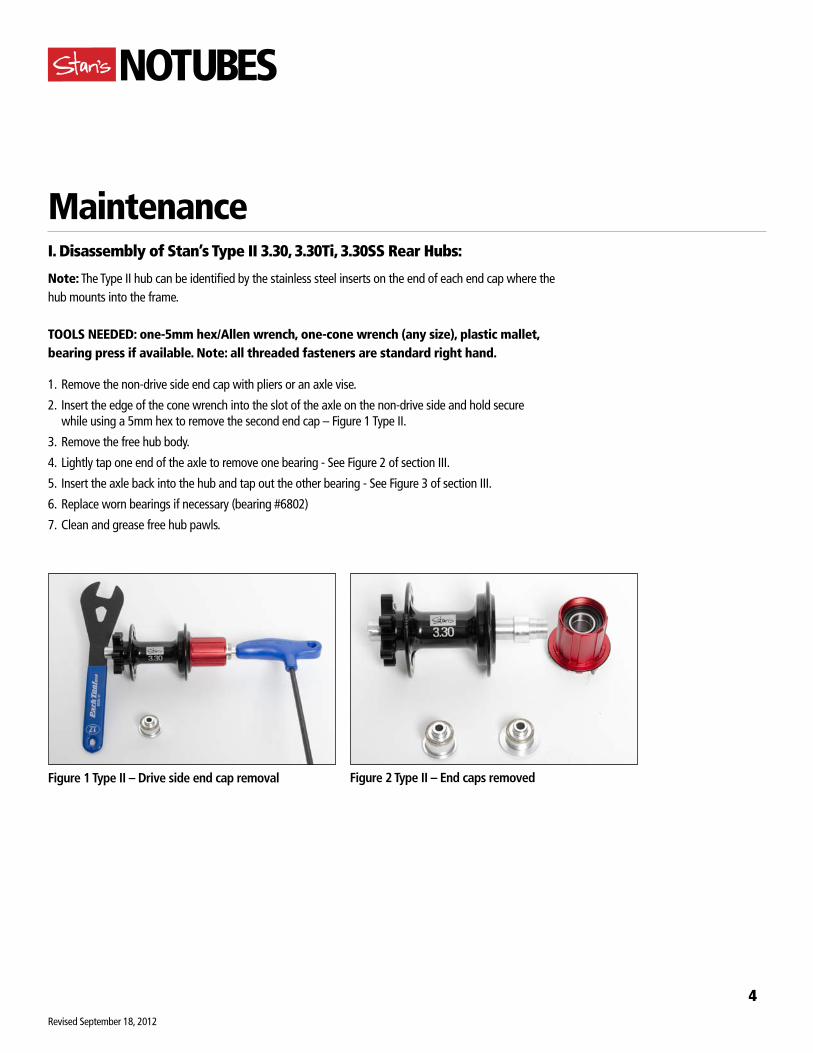
1. Remove the non-drive side end cap with pliers or an axle vise.
2. Insert the edge of the cone wrench into the slot of the axle on the non-drive side and hold secure while using a 5mm hex to remove the second end cap – Figure 1 Type II.
3. Remove the free hub body.
4. Lightly tap one end of the axle to remove one bearing - See Figure 2 of section III.
5. Insert the axle back into the hub and tap out the other bearing - See Figure 3 of section III.
6. Replace worn bearings if necessary (bearing #6802)
7. Clean and grease free hub pawls.
Revised September 18, 2012
Figure 1 Type II – Drive side end cap removal Figure 2 Type II – End caps removed

II. Reassembly of Stan’s Type II 3.30, 3.30Ti, 3.30SS Rear Hubs:
Note: The Type II hub can be identified by the steel inserts on the end of each end cap where the hub mounts into the frame.
1. Apply a thin film of grease to the cartridge bearings, axle and hub bearing seats.
2. Use a bearing press shown in Figure 5 to install the two hub bearings and axle into the hub shell. If a bearing press is not available use a socket, punch or blunt screwdriver and carefully tap on the outer race of one bearing until it is fully seated into the hub, install the axle then tap the second bearing into the hub. Note: Improper installation of bearings can permanently damage the bearing and/or hub shell.
3. Apply a few drops of grease to the free hub pawls and ratchet ring before installing the free hub. Use lightweight grease if cold weather hinders pawl engagement. It may be necessary to press the pawls in with a screwdriver while rotating the free hub until it engages into the ratchet ring and slides into the hub. Apply grease to the underside of the dust seal and press it against the hub.
4. Install the end caps using the reverse of the disassembly procedure.
5Revised September 18, 2012

Figure 1 – End cap removal Figure 2 – Bearing removal non drive side
Figure 3 - Bearing removal drive side
Figure 4 – Hub disassembled
6Revised September 18, 2012
III. Disassembly of Stan’s 3.30, 3.30Ti, 3.30R, 3.30SS Rear Hubs:
TOOLS NEEDED: two-5mm hex/Allen wrench, 10mm hex/Allen wrench, plastic mallet, bearing press if available. Note: all threaded fasteners are standard right hand.
1. Remove one of the hub end caps using two 5mm hex wrenches.
2. Use a 10mm hex wrench and 5mm hex to remove the second end cap – Figure 1.
3. Remove the free hub body.
4. Lightly tap one end of the axle to remove one bearing – Figure 2.
5. Insert the axle back into the hub and tap out the other bearing – Figure 3.
6. Replace worn bearings if necessary (bearing #6802)
7. Clean and grease free hub pawls.

IV. Reassembly of Stan’s 3.30, 3.30Ti, 3.30R, 3.30SS Rear Hubs:5. Apply a thin film of grease to the cartridge bearings, axle and hub bearing seats.
6. Use a bearing press shown in Figure 5 to install the two hub bearings and axle into the hub shell. If a bearing press is not available use a socket, punch or blunt screwdriver and carefully tap on the outer race of one bearing until it is fully seated into the hub, install the axle then tap the second bearing into the hub. Note: Improper installation of bearings can permanently damage the bearing and/or hub shell.
7. Apply a few drops of grease to the free hub pawls and ratchet ring before installing the free hub. Use lightweight grease if cold weather hinders pawl engagement. It may be necessary to press the pawls in with a screwdriver while rotating the free hub until it engages into the ratchet ring and slides into the hub. Apply grease to the underside of the dust seal and press it against the hub.
8. Install the end caps using the reverse of the disassembly procedure. Install the longer end cap on the non-drive side (left side) of the hub.
Caution: If bearings are not fully seated in the hub excessive drag and wear may result.
7Revised September 18, 2012
Figure 5 - Press Fit Bearings

V. Disassembly of Stan’s 3.30 HD Series Rear Hubs:
TOOLS NEEDED: 10mm hex/Allen wrench, plastic mallet, 17mm cone wrench, Slotted Axle tool – Part No. ZH37 (the side of a cone wrench may be substituted), retaining ring pliers, bearing press if available. Note: all threaded fasteners are standard right hand.
1. Remove the non-drive side end cap by hand (End Cap is held on by an o-ring) – Figure 6.
2. Insert a Slotted Axle tool or the side of a cone wrench into the slot of the axle and use a 17mm cone wrench to unscrew the drive side (right side) end cap – Figure 7.
3. Remove the free hub body, shown disassembled in Figure 8.
4. Remove the bearing retaining ring from the non-drive side (left side) of the hub – Figure 8.
5. Lightly tap one end of the axle to remove one bearing.
6. Insert the axle back into the hub and tap out the other bearing.
7. Replace worn bearings if necessary (bearing #6902 drive side, #6002 non-drive)
8. Clean and grease free hub pawls.
8
Figure 6 – End cap removed non-drive side Figure 7 – End cap removal drive side
Figure 8 – Retaining ring removal Figure 9 – Disassembled view
Revised September 18, 2012

VI. Reassembly of Stan’s 3.30 HD Series Rear Hubs:1. Apply a thin film of grease to the cartridge bearings, axle and hub bearing seats.
2. Use a bearing press shown in Figure 5 to install the two hub bearings and axle into the hub shell. If a bearing press is not available use a socket, punch or blunt screwdriver and carefully tap on the outer race of one bearing until it is fully seated into the hub, install the axle then tap the second bearing into the hub. Note: Improper installation of bearings can permanently damage the bearing and/or hub shell.
3. Apply a few drops of lightweight grease to the free hub pawls and ratchet ring before installing the free hub. It may be necessary to press the pawls in with a screwdriver while rotating the free hub until it engages into the ratchet ring and slides into the hub.
4. Install the bearing retaining ring on the non-drive side (left side) of the hub.
5. Install the end caps using the reverse of the disassembly procedure.
Caution: If bearings are not fully seated in the hub excessive drag and wear may result.
VII. Disassembly and Assembly of Stan’s 3.30, 3.30R, 3.30Ti, 3.30HD, 3.30SS Freehub:
TOOLS NEEDED: plastic mallet, 14mm or 15mm socket, 20mm socket, retaining ring pliers, bearing press if available. Note: all threaded fasteners are standard right hand.
1. Remove the bearing retaining ring from the end of the outside bearing – Figure 10.
2. Place the freehub right-side down on a wooden table or board and use a 14mm or 15mm socket and plastic mallet to tap out the two #6902 bearings and bearing spacers – Figure 11.
3. Clean parts and replace worn bearings if necessary (bearing #6902).
9Revised September 18, 2012

VIII. Assembly of Stan’s 3.30, 3.30R, 3.30Ti, 3.30HD, 3.30SS Freehub:1. Lightly grease all parts.
2. Install one bearing into the freehub. Use a bearing press or a 20mm socket and plastic mallet to tap the outer race of the bearing until it is fully seated – Figure 13.
3. Install the inner and outer freehub spacers
4. Install the other bearing in the freehub using a bearing press or 20mm socket and plastic mallet to tap the outer race of the bearing until it is fully seated – Figure 13.
5. Check the bearing on each side of the freehub for smooth rotation. Make sure the inner spacer can move back and forth. If the inner spacer is tight the inner bearing race may be preloaded and cause wear.
6. Install the bearing retaining ring.
Caution: If bearings are not seated properly in the freehub excessive drag and wear may result.
Figure 10 – Retaining ring removal Figure 11 – Bearing Removal
Figure 12 – Freehub Disassembled Figure 13 – Bearing Installation
10Revised September 18, 2012

IX. Disassembly of Stan’s 3.30, 3.30Ti Front Disc Hubs:
TOOLS NEEDED: bench vise, axle vise, metal punch, plastic mallet, retaining clip pliers, bearing press if available.
1. Insert the front hub end cap into the axle vise, tighten down and pull the end cap out of the bearing assembly shown in Figure 14.
2. Repeat the same process on the other end cap.
3. Between the 2 bearings is the axle sleeve. Slide the sleeve to the side to access the inner bearing race; lightly tap the race using a punch or blunt screw driver and mallet while working your way around the race to evenly dislodge the bearing from the hub shell. Axle sleeve shown in Figure 15.
4. Remove the axle sleeve and tap out the other bearing.
5. Replace worn bearings if necessary (bearing #6902).
11
Figure 14 – End Cap removal Figure 15 - View of axle sleeve
Revised September 18, 2012

X. Disassembly of Stan’s 3.30HD Series Front Disc Hubs:
TOOLS NEEDED: bench vise, axle vise, metal punch, plastic mallet, bearing press if available.
1. Remove the end caps from the hub by hand or with an axle vise to access the bearings. Figure 16 shows Stan’s HD hub with QR, 15mm and 20mm end cap options.
2. Between the 2 bearings is the axle sleeve. Slide the sleeve to the side to access the inner bearing race; lightly tap the race using a punch or blunt screw driver and mallet while working your way around the race to evenly dislodge the bearing from the hub shell.
3. Remove the axle sleeve and tap out the other bearing. Figure 17 shows bearing sleeve.
4. Replace worn bearings if necessary (bearing #6804).
XI. Reassembly of Stan’s 3.30, 3.30Ti, 3.30HD Front Disc Hubs:1. Apply a thin film of grease to the cartridge bearings and hub bearing seats.
2. Use a bearing press shown in Figure 5 to install the two hub bearings and axle sleeve into the hub shell. If a bearing press is not available use a socket, punch or blunt screwdriver and carefully tap on the outer race of one bearing until it is fully seated into the hub. Note: Improper installation of bearings can permanently damage the bearing and/or hub shell.
3. Press on both end caps by hand.
Caution: If bearings are not fully seated in the hub excessive drag and wear may result.
12
Figure 16 - Hub and End Caps Figure 17 - Bearing and sleeve removed
Revised September 18, 2012

XII. Disassembly of Stan’s 3.30R Front Road Hub:
TOOLS NEEDED: Two-5mm hex/Allen wrench, plastic mallet, bearing press if available.
1. Remove one end cap from the hub using two 5mm Allen wrenches. Do not insert one wrench all the way otherwise it will engage into the 5mm hex of the axle and prevent removal of the end cap.
2. Insert one 5mm Allen wrench into the axle and use the other to remove the second end cap.
3. Lightly tap one end of the axle with a plastic mallet to remove one bearing.
4. Insert the axle back into the hub and tap out the other bearing.
5. Replace worn bearings if necessary (bearing #6900).
13
Figure 18 - 1st End cap removal Figure 19 - 2nd End cap removal
Figure 20 - Hub disassembled
Revised September 18, 2012

XIII. Reassembly of Stan’s 3.30R Front Hub:1. Apply a thin film of grease to the cartridge bearings, axle and hub bearing seats.
2. Press both bearings into the hub with a bearing press or use a socket, punch or blunt screwdriver to carefully tap on the outer race of one bearing until it is fully seated into the hub, install the axle then install the second bearing into the hub. Note: Improper installation of bearings can permanently damage the bearing and/or hub shell.
3. Thread on end caps using the reverse of the disassembly procedure.
Caution: If bearings are not fully seated in the hub excessive drag and wear may result.
XIV. Chain Line for 3.30SS Rear Hubs:
Proper chain line on your single speed hub is essential for optimal performance. Our Stan’s 3.30SS hubs can fit up to 6 cogs worth of positioning on the freehub to offer the straightest chain line possible. Follow these guidelines to insure proper chain line for 135mm spaced dropouts.
1. Find the measurement from the center of the bottom bracket to the front chain ring.
2. Measure in form the inside of the dropout 67.5mm towards the center of the 3.30SS rear hub.
3. From that center point measure out the distance you measured up front from the BB to the front chain ring.
4. That end measurement on the SS freehub is your position for your cog set up.
14
Revised September 18, 2012


![Algebra 2C Week of 3.30-4.03[4119]](https://img.dokumen.tips/doc/110x75/62b78199daaec44cab6f07e9/algebra-2c-week-of-330-4034119.jpg)