Embed Size (px)
Citation preview
Design Preliminaries
WOODdesigner
by Ness Tillson
stairs

vv
Wood Designer | stairs Design Preliminaries
WoodDesigner.org| | 2
Legal DisclaimersAll contents copyright © 2014 Wood Designer Ltd. All rights reserved worldwide.
No part of this document should be reproduced, trans-mitted or distributed in any form, whether digital or other-wise, without the prior consent of the author.
The opinions stated within this document are based on the views held by the author.
This document offers information only. The author has endeavoured to provide accurate and up to date informa-tion. Nonetheless, it may not be applicable to everyone in every circumstance.
The author disclaims responsibility to all people and enti-ties for any liability, damage or loss that occurs as a result of acting upon the information in this document.
vv
Wood Designer | stairs Design Preliminaries
WoodDesigner.org| | 3
ContentsLegal Disclaimers 2
Preparing your project 4
Wood sections for stairs 4
Hand or CAD sketching 5
Draw a plan 5
Calculate approximate head room 8
Draw sections at arrival 11
How to assemble steps, risers and strings 18
How to assemble steps to strings 20
Boxed string in 3 parts 22
How to assemble strings and handrails to newels 26
How to assemble strings to strings 28
Curved parts - an overview 29
Conclusion 29

vv
Wood Designer | stairs Design Preliminaries
WoodDesigner.org| | 4
Preparing your projectHopefully you have read the tips on taking site measure-ments and are now ready to start designing your stair.
Before throwing yourself into StairDesigner to design your stair you will need to do some ground work to know exactly what parameters you’ll be using.
To start the design process it’s necessary to have a general overview of your project.
This should include:
● List of the wood sections that you’ll be using for each individual component, strings, handrails, risers, etc
● Rough dimensioned sketch of the overall stair ● Dimensioned sketches of the assembly with the upper
floor ● Dimensioned sketches of the assembly details of strings
and handrails with newels and strings to strings ● Dimensioned sketches of the assembly of steps to risers ● Dimensioned sketches of the assembly of steps and
risers to strings
Wood sections for stairsIf you are new to stair building it’s a good idea to research what materials you will have to build your project before starting the design.
The final sections of each of your stair components will depend on a number of parameters:
● The base material you want to use to build your stair (solid wood, laminated boards, manufactured sheet material, etc)
● The dimensions of your local suppliers ● The aesthetics of your project
For general stair building here are my minimum thicknesses in solid wood:
● strings 35mm ● newels 70mm ● steps 30mm ● risers 15mm

vv
Wood Designer | stairs Design Preliminaries
WoodDesigner.org| | 5
Hand or CAD sketchingThe best way to sketch out a project is to use a CAD program. You can download DraftSight, a really good free CAD program from the members area of WoodDesigner.org.
A CAD program will enable you to set out your project precisely and directly provide all the constraints to input into StairDesigner.
The disadvantage of CAD is that you’ll have to know how to use it.
So if you’re not familiar with using CAD you’ll have to sit down and at least learn the basic functionality.
If you make stairs regularly I would strongly suggest that you take the time to learn how to use a CADD system.
On the other hand if your project is fairly straightforward and you only design occasionally and you don’t know how to use CAD it’s perfectly feasible to set up your preliminary sketch with pen and paper.
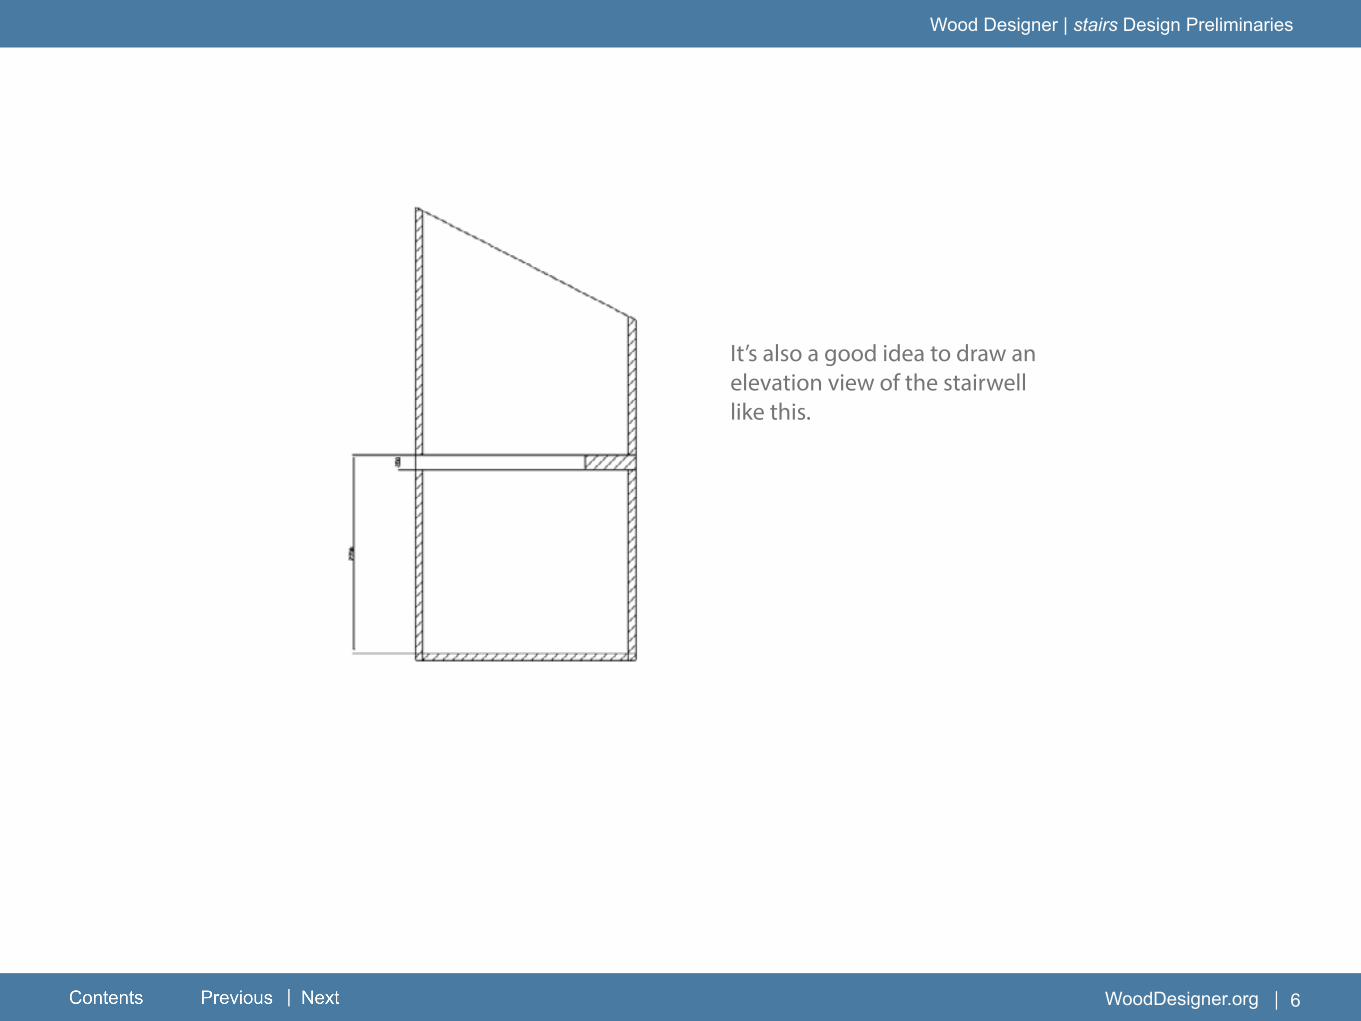
Draw a plan The first job is to draw a scale plan of the existing stairwell. If the project is simple a rough sketch with a few dimensions may be enough.
On the other hand if the stairwell is complicated you’ll have to draw a detailed plan and elevation views of the complete stairwell.
Once the plan of the stairwell is set out draw in where you would like the stair to start and finish.
vv
Wood Designer | stairs Design Preliminaries
WoodDesigner.org| | 6
It’s also a good idea to draw an elevation view of the stairwell like this.
vv
Wood Designer | stairs Design Preliminaries
WoodDesigner.org| | 7
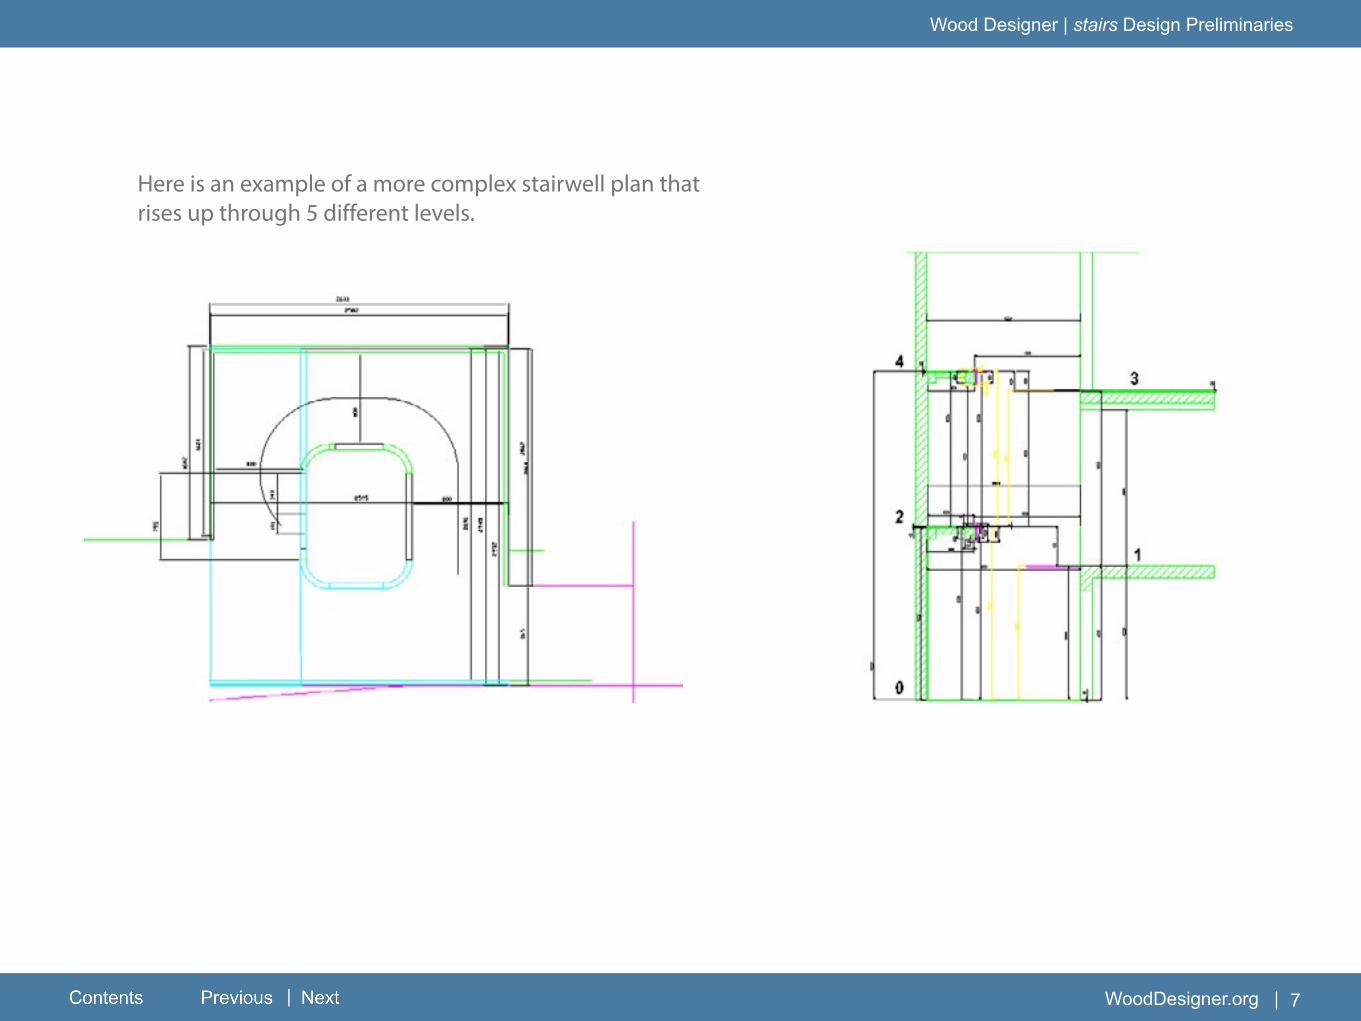
Here is an example of a more complex stairwell plan that rises up through 5 different levels.

vv
Wood Designer | stairs Design Preliminaries
WoodDesigner.org| | 8
Calculate approximate head roomThe start of a stair can depend on the position of other obstacles, doors, windows, other walls etc but more often than not, if the stair moves up inside a stairwell, it will depend on the minimum headroom that has to be allowed as a person climbs up or even more importantly goes down the stair.
The minimum headroom is usually 1m80. This can be very tight for a tall person going down and there remains a risk of
them hitting their head if they are leaning forward. In most situations it’s a good idea to use 1m90 to 2m as a minimum and 1m80 only in extreme situations.
In the following illustration although the stair could start at the door the number of steps outside the stairwell will depend on the minimum headroom.
vv
Wood Designer | stairs Design Preliminaries
WoodDesigner.org| | 9
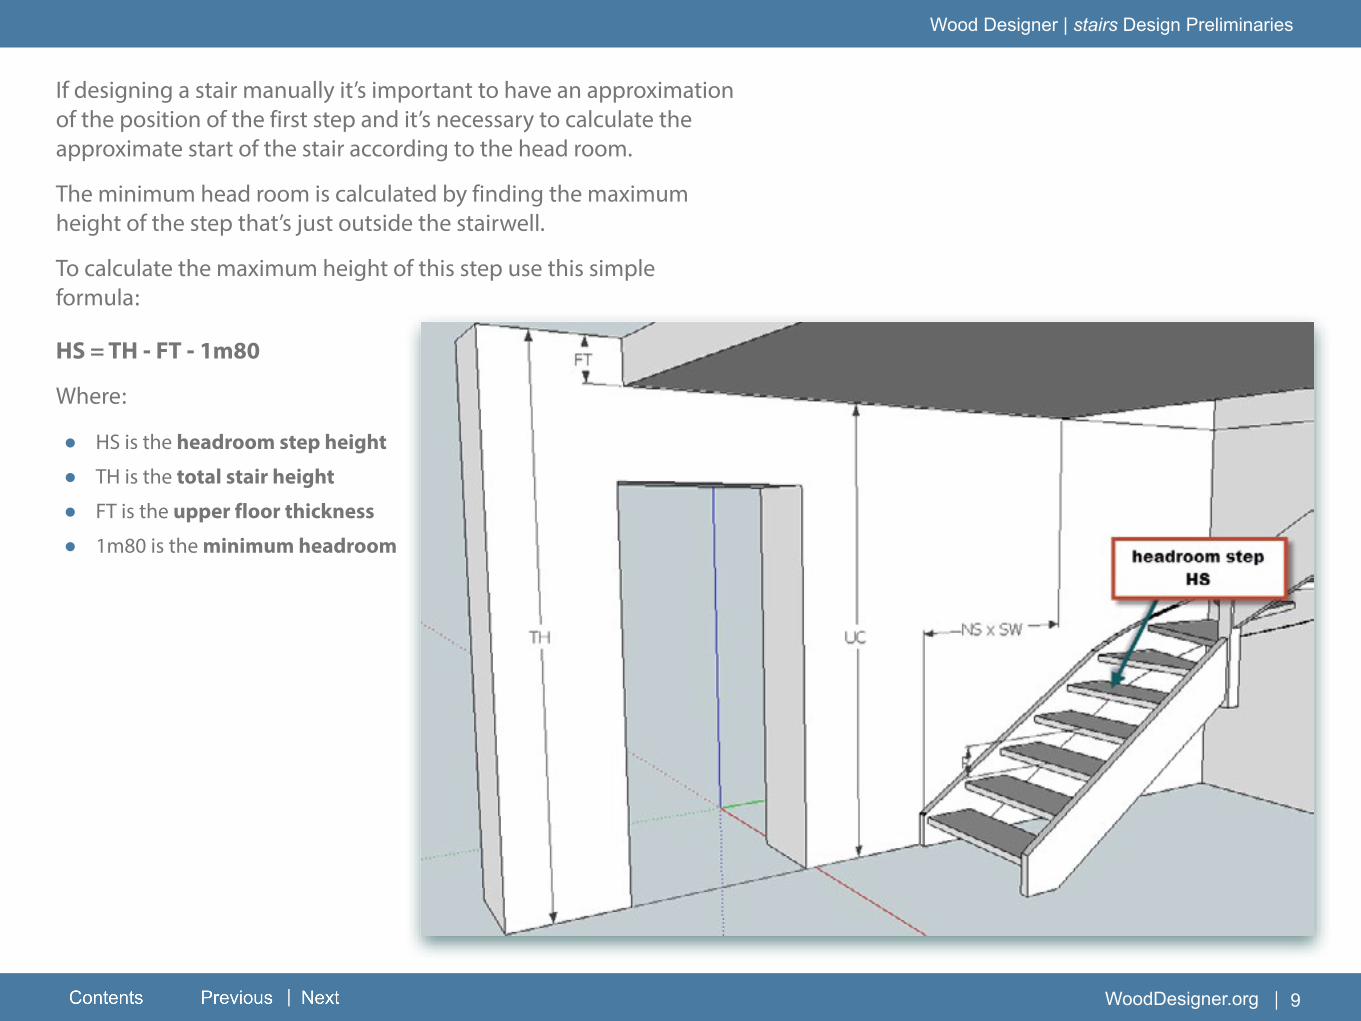
If designing a stair manually it’s important to have an approximation of the position of the first step and it’s necessary to calculate the approximate start of the stair according to the head room.
The minimum head room is calculated by finding the maximum height of the step that’s just outside the stairwell.
To calculate the maximum height of this step use this simple formula:
HS = TH - FT - 1m80
Where:
● HS is the headroom step height
● TH is the total stair height
● FT is the upper floor thickness
● 1m80 is the minimum headroom

vv
Wood Designer | stairs Design Preliminaries
WoodDesigner.org| | 10
Note that it’s often quicker on site to measure the distance from floor to ceiling than the thickness of the upper floor. This under ceiling distance UC is of course equal to TH - FT.
To calculate the number of steps outside the stairwell we have to know the height of each step or rise. To do this, divide the total height TH by a number that gives a rise between 160mm and 210mm. The lower the rise the easier the stair will be to climb.
Then divide the height calculated for the headroom step HS by the rise and you have the number of steps outside the stairwell.
The actual position of the first step will depend on the width of the steps.
To calculate the step width you can use the Blondel’s formula :
2 x rise + width > 600mm < 640mm
This gives the minimum width of each step as 600 - (2 x rise).
Multiply the number of steps NS by the step width SW and you’ll have the approximate distance the first step will be from the edge of the stairwell.
This process is the standard way to calculate stair headroom and it’s important to understand how this is done.
But as we will be using StairDesigner to design our stair, the program proposes some neat tools that will help optimise all these parameters.
To gain time it’s possible to calculate the position of the first step using a default step height and width of 200mm and optimise the stair once set up in StairDesigner.
Please refer to the following members area page for advice on how to optimise the stair using StairDesigner tools:
Stair Optimisation

vv
Wood Designer | stairs Design Preliminaries
WoodDesigner.org| | 11
Draw sections at arrivalOne of the points often ignored by amateur stair builders is the optimisation of the assembly details where the stair will meet the upper floor.
There is an infinite variety of possibilities and each stair will have it’s own problems and solutions according to the situa-tion at hand.
One point before we start is that whenever possible you should add a landing step to your stair.
The landing step creates a harmonious transition from the stair to the upper floor and finishes off the stair allowing the last riser to be assembled to the strings and newels of the stair.

vv
Wood Designer | stairs Design Preliminaries
WoodDesigner.org| | 12
Note that it’s often difficult to get a perfect joint between the landing step and the upper floor so allow for some way to fill any gap.
You can use a strip of wood or a metallic filler.
vv
Wood Designer | stairs Design Preliminaries
WoodDesigner.org| | 13
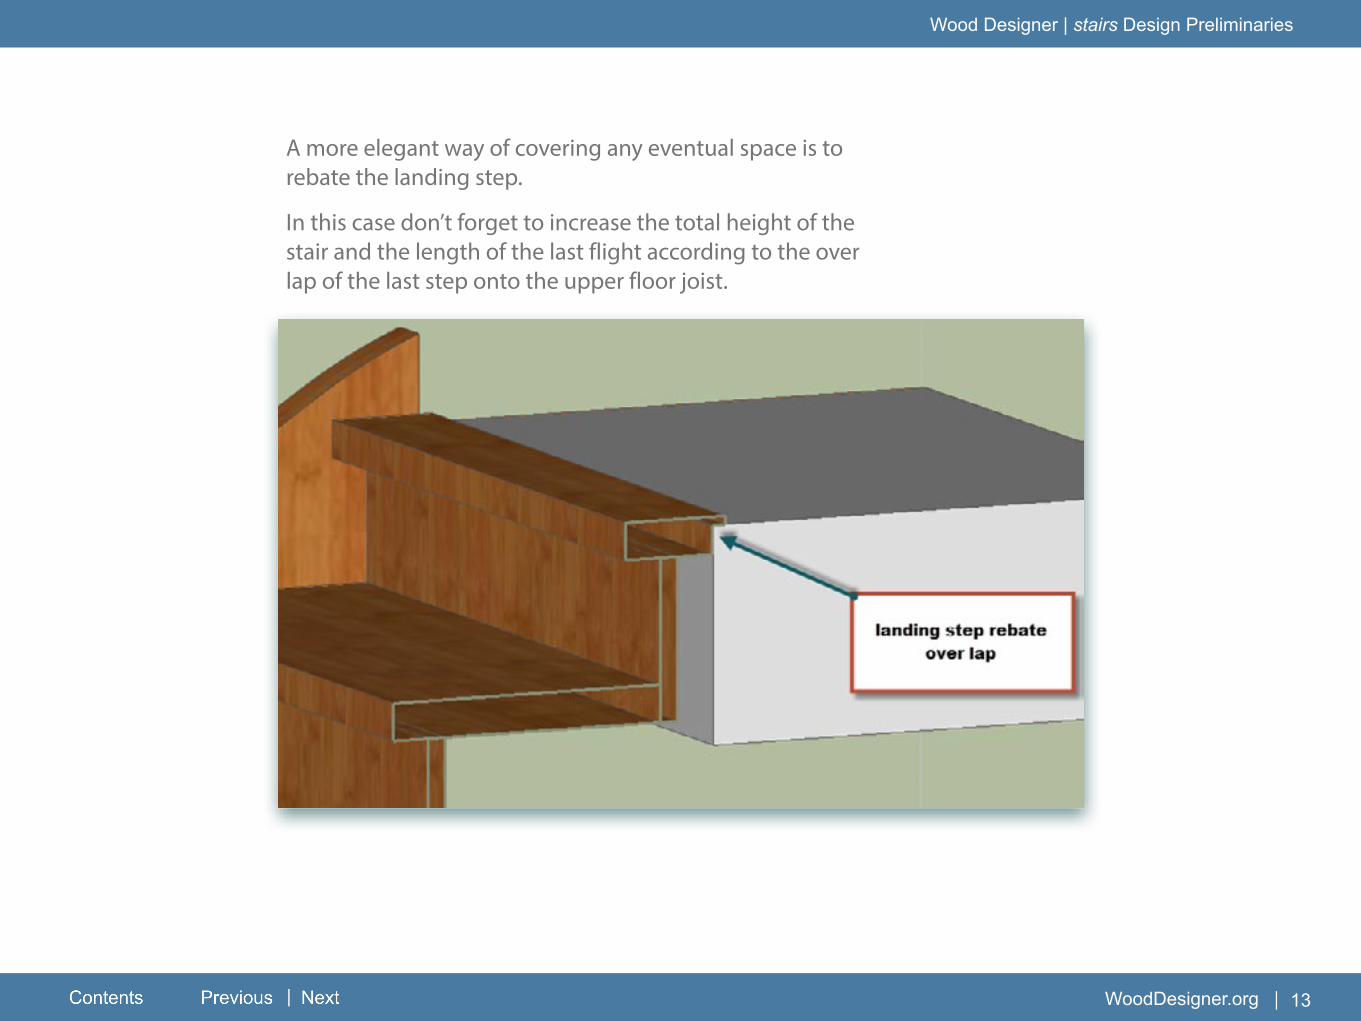
A more elegant way of covering any eventual space is to rebate the landing step.
In this case don’t forget to increase the total height of the stair and the length of the last flight according to the over lap of the last step onto the upper floor joist.
vv
Wood Designer | stairs Design Preliminaries
WoodDesigner.org| | 14
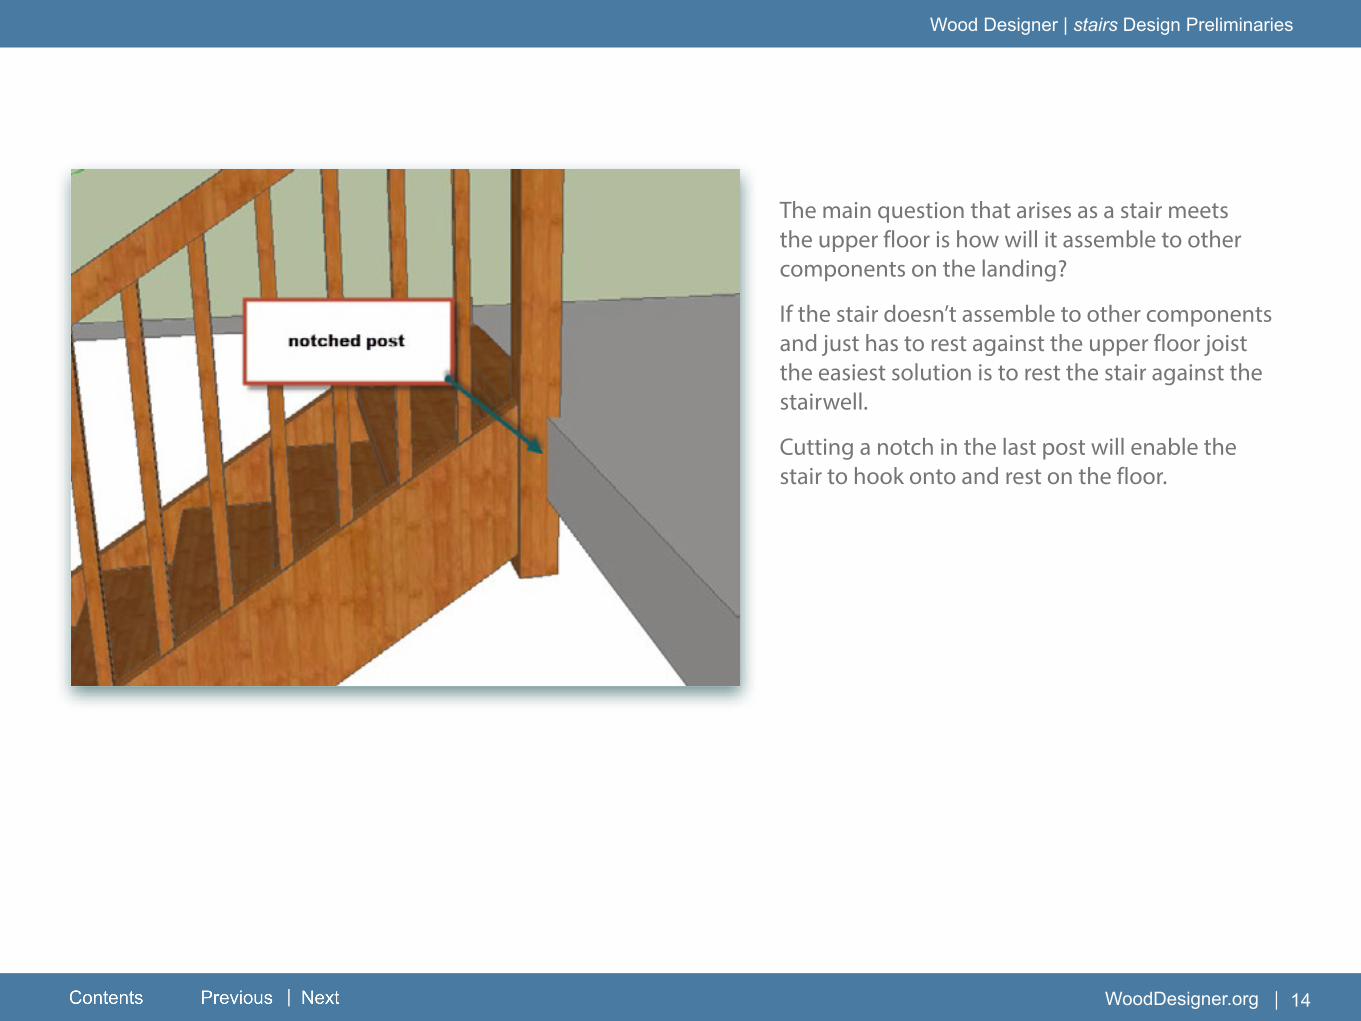
The main question that arises as a stair meets the upper floor is how will it assemble to other components on the landing?
If the stair doesn’t assemble to other components and just has to rest against the upper floor joist the easiest solution is to rest the stair against the stairwell.
Cutting a notch in the last post will enable the stair to hook onto and rest on the floor.
vv
Wood Designer | stairs Design Preliminaries
WoodDesigner.org| | 15
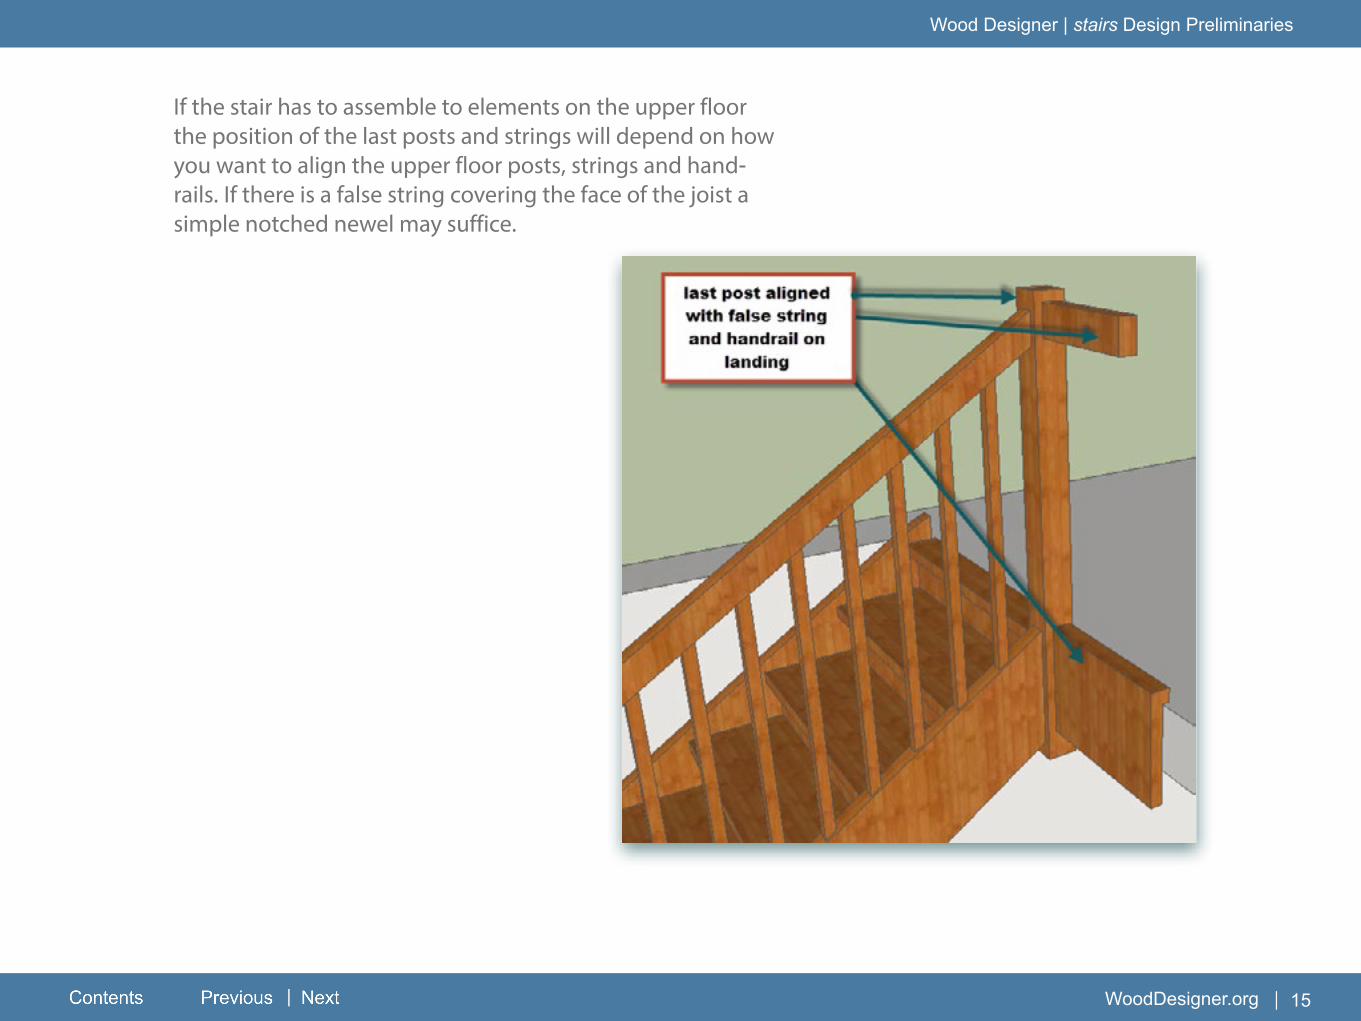
If the stair has to assemble to elements on the upper floor the position of the last posts and strings will depend on how you want to align the upper floor posts, strings and hand-rails. If there is a false string covering the face of the joist a simple notched newel may suffice.

vv
Wood Designer | stairs Design Preliminaries
WoodDesigner.org| | 16
On the other hand if the upper floor balustrade is resting on the edge of the stairwell the deep notching of the last post may weaken it’s assembly with the string.

vv
Wood Designer | stairs Design Preliminaries
WoodDesigner.org| | 17
In this case an arrival with double newels can be easier to make and give a stronger assembly.
Note that in each case the position of the newel and last step relative to the stairwell changes and will vary according to the solution you choose and the also the sections and positions of the newels, strings and handrails.
It’s important to draw how you are going to configure the way the stair assembles onto the upper floor joist to know what parameters you’ll use in StairDesigner.
vv
Wood Designer | stairs Design Preliminaries
WoodDesigner.org| | 18
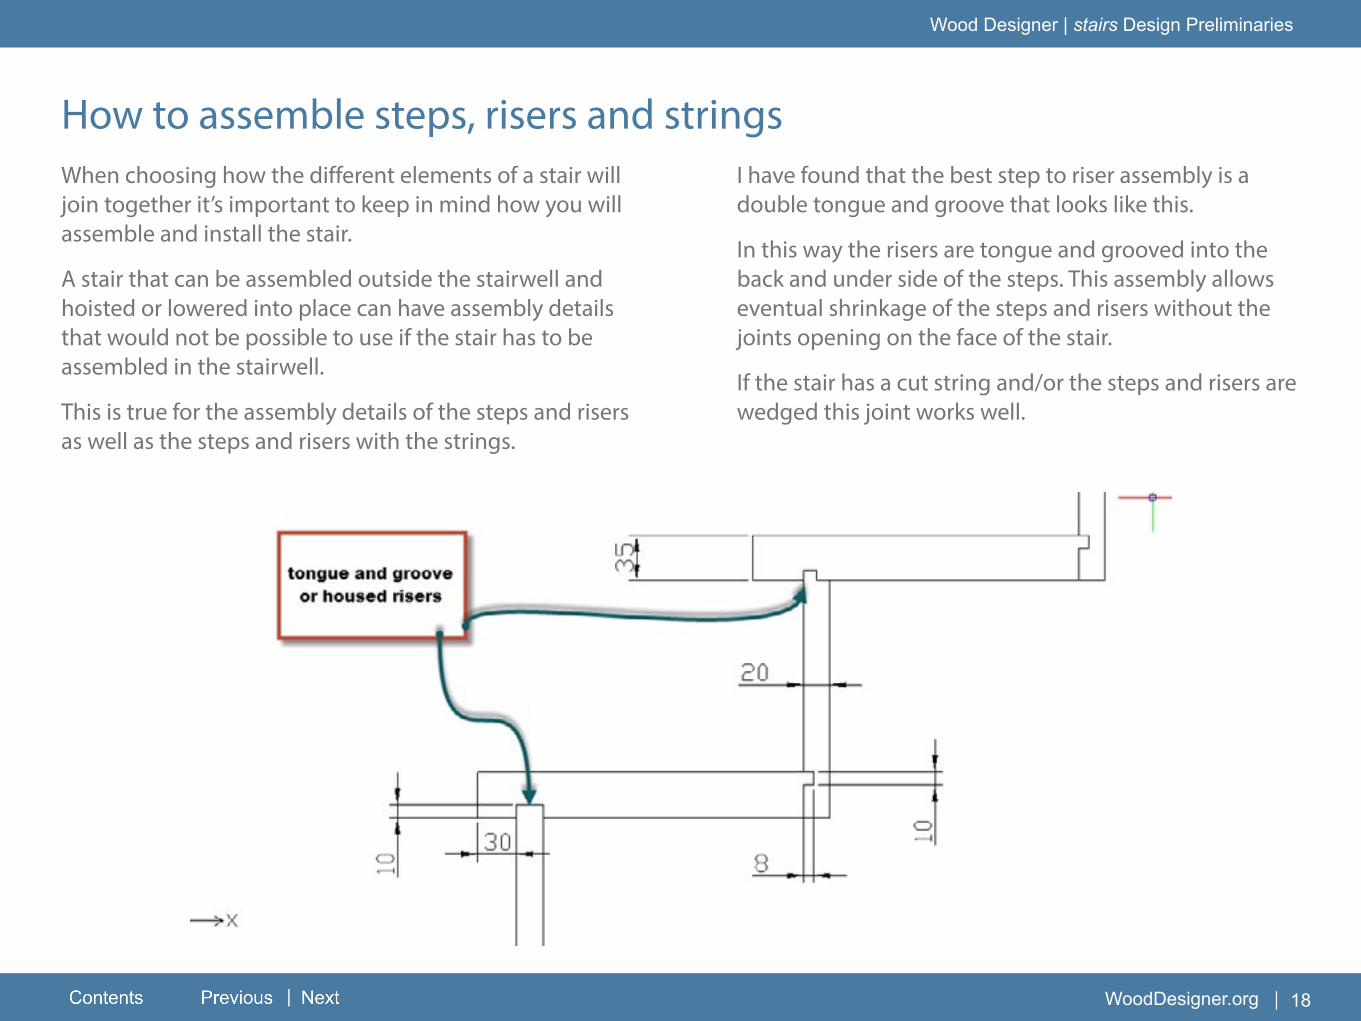
When choosing how the different elements of a stair will join together it’s important to keep in mind how you will assemble and install the stair.
A stair that can be assembled outside the stairwell and hoisted or lowered into place can have assembly details that would not be possible to use if the stair has to be assembled in the stairwell.
This is true for the assembly details of the steps and risers as well as the steps and risers with the strings.
I have found that the best step to riser assembly is a double tongue and groove that looks like this.
In this way the risers are tongue and grooved into the back and under side of the steps. This assembly allows eventual shrinkage of the steps and risers without the joints opening on the face of the stair.
If the stair has a cut string and/or the steps and risers are wedged this joint works well.
How to assemble steps, risers and strings

vv
Wood Designer | stairs Design Preliminaries
WoodDesigner.org| | 19
However when building European housed string type stairs that require a perfect finish on both sides of the steps and risers, the disadvantage of this assembly method is that the steps and riser must be assembled before assembling with the strings.
This means that the stair cannot be assembled in the stair-well if the strings cannot be moved laterally at least the
depth of the step housings. This is the case if the stair is between 2 walls.
In this case where the stair cannot be assembled outside the stairwell the strings have to be installed and fixed onto the wall before the steps and risers can be fixed onto the strings.
For stairs with boxed strings that have to be assembled between 2 walls, a different step to riser and step to string assembly will have to be found.

vv
Wood Designer | stairs Design Preliminaries
WoodDesigner.org| | 20
How to assemble steps to stringsIn France and Europe the traditional way to build stairs allows the stair to be assembled in the stairwell.
In general the outer string is a solid boxed string and the wall string a cut string.
This diagram shows the traditional assembly of European style stairs.
vv
Wood Designer | stairs Design Preliminaries
WoodDesigner.org| | 21
This type of assembly allows one to position the strings, place the risers and then place the steps without moving the strings, much easier and needing less space than having to assemble the complete the stair and then lower into the stairwell.
However this method has two disadvantages:
1. If the steps shrink a gap will appear along the back edge where the step assembles with the next riser.
2. A plinth has to be cut to cover the gap between the steps and the wall. Cutting the plinth to move around the steps and risers is a tedious and time consuming task.
To get around these problems it’s possible to build the wall string in 3 different parts...
vv
Wood Designer | stairs Design Preliminaries
WoodDesigner.org| | 22
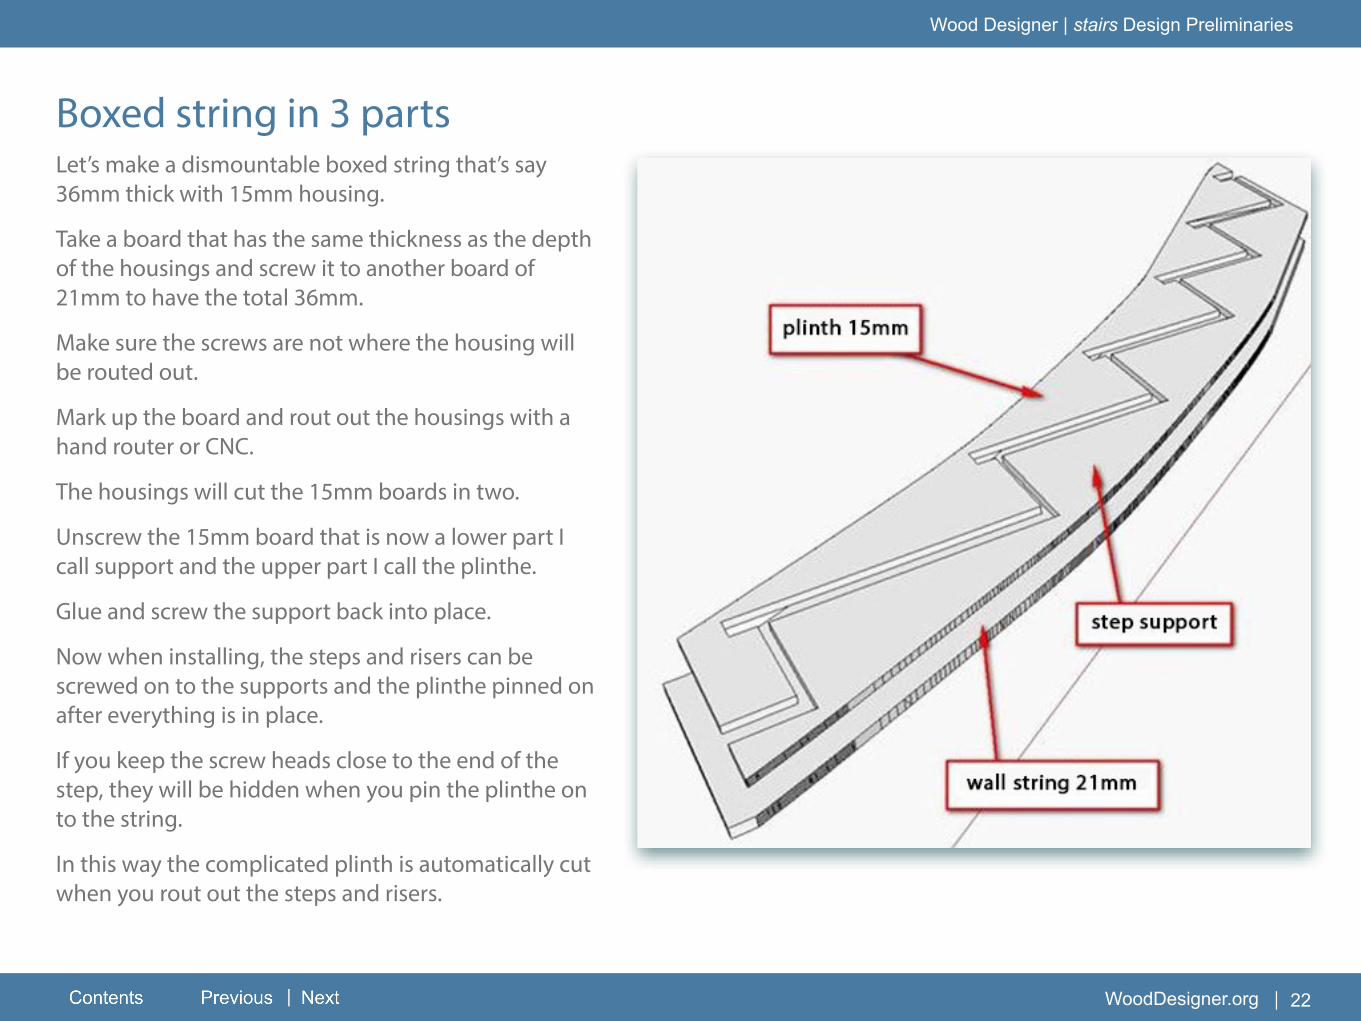
Boxed string in 3 partsLet’s make a dismountable boxed string that’s say 36mm thick with 15mm housing.
Take a board that has the same thickness as the depth of the housings and screw it to another board of 21mm to have the total 36mm.
Make sure the screws are not where the housing will be routed out.
Mark up the board and rout out the housings with a hand router or CNC.
The housings will cut the 15mm boards in two.
Unscrew the 15mm board that is now a lower part I call support and the upper part I call the plinthe.
Glue and screw the support back into place.
Now when installing, the steps and risers can be screwed on to the supports and the plinthe pinned on after everything is in place.
If you keep the screw heads close to the end of the step, they will be hidden when you pin the plinthe on to the string.
In this way the complicated plinth is automatically cut when you rout out the steps and risers.
vv
Wood Designer | stairs Design Preliminaries
WoodDesigner.org| | 23
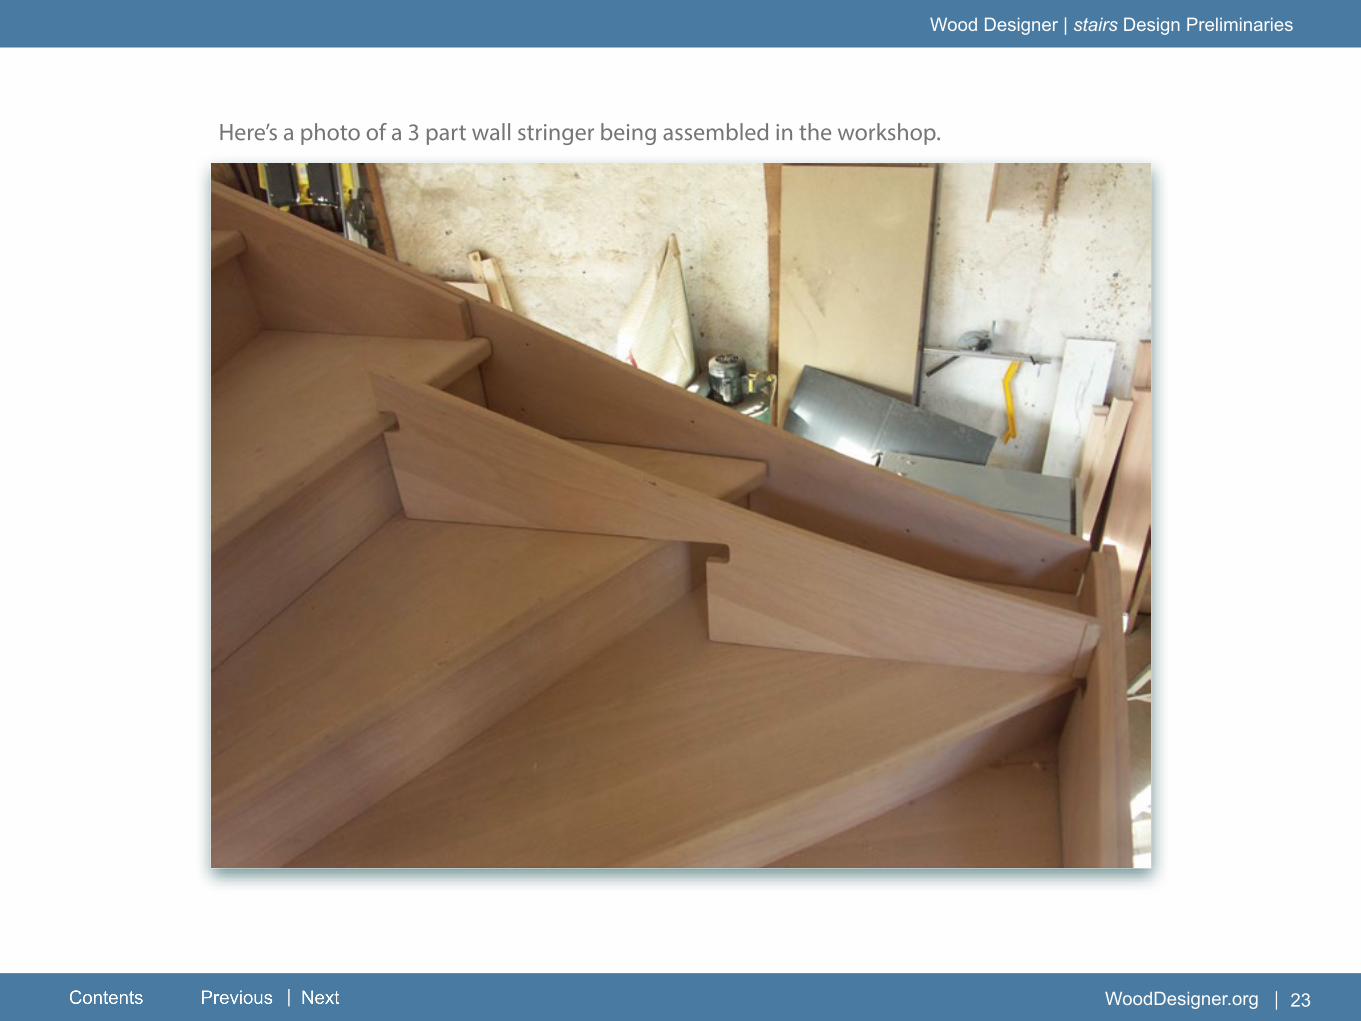
Here’s a photo of a 3 part wall stringer being assembled in the workshop.

vv
Wood Designer | stairs Design Preliminaries
WoodDesigner.org| | 24
To avoid the possibility of a gap showing if the steps shrink it’s possible to rebate the risers to overlap the steps.
In the following drawing the lower edge of the risers has an 8mm deep rebate that allows it overlap the step.
Note also that the step nosings and lower edge of the risers are rounded off with a 8mm radius so that they will fit neatly into the housings routed out with a 16mm router bit.
vv
Wood Designer | stairs Design Preliminaries
WoodDesigner.org| | 25
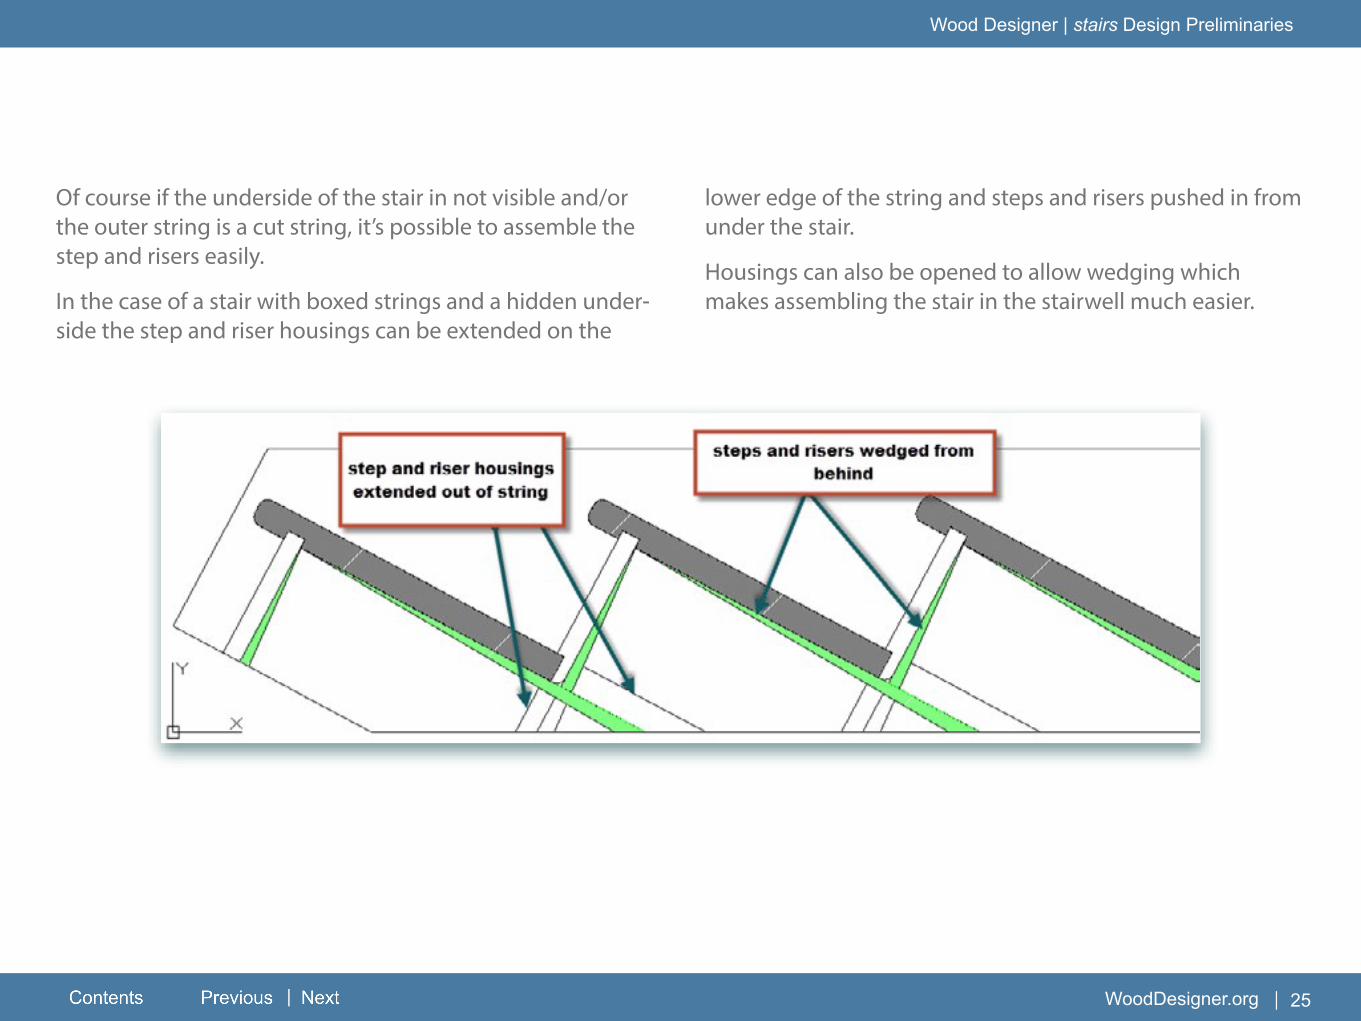
Of course if the underside of the stair in not visible and/or the outer string is a cut string, it’s possible to assemble the step and risers easily.
In the case of a stair with boxed strings and a hidden under-side the step and riser housings can be extended on the
lower edge of the string and steps and risers pushed in from under the stair.
Housings can also be opened to allow wedging which makes assembling the stair in the stairwell much easier.
vv
Wood Designer | stairs Design Preliminaries
WoodDesigner.org| | 26
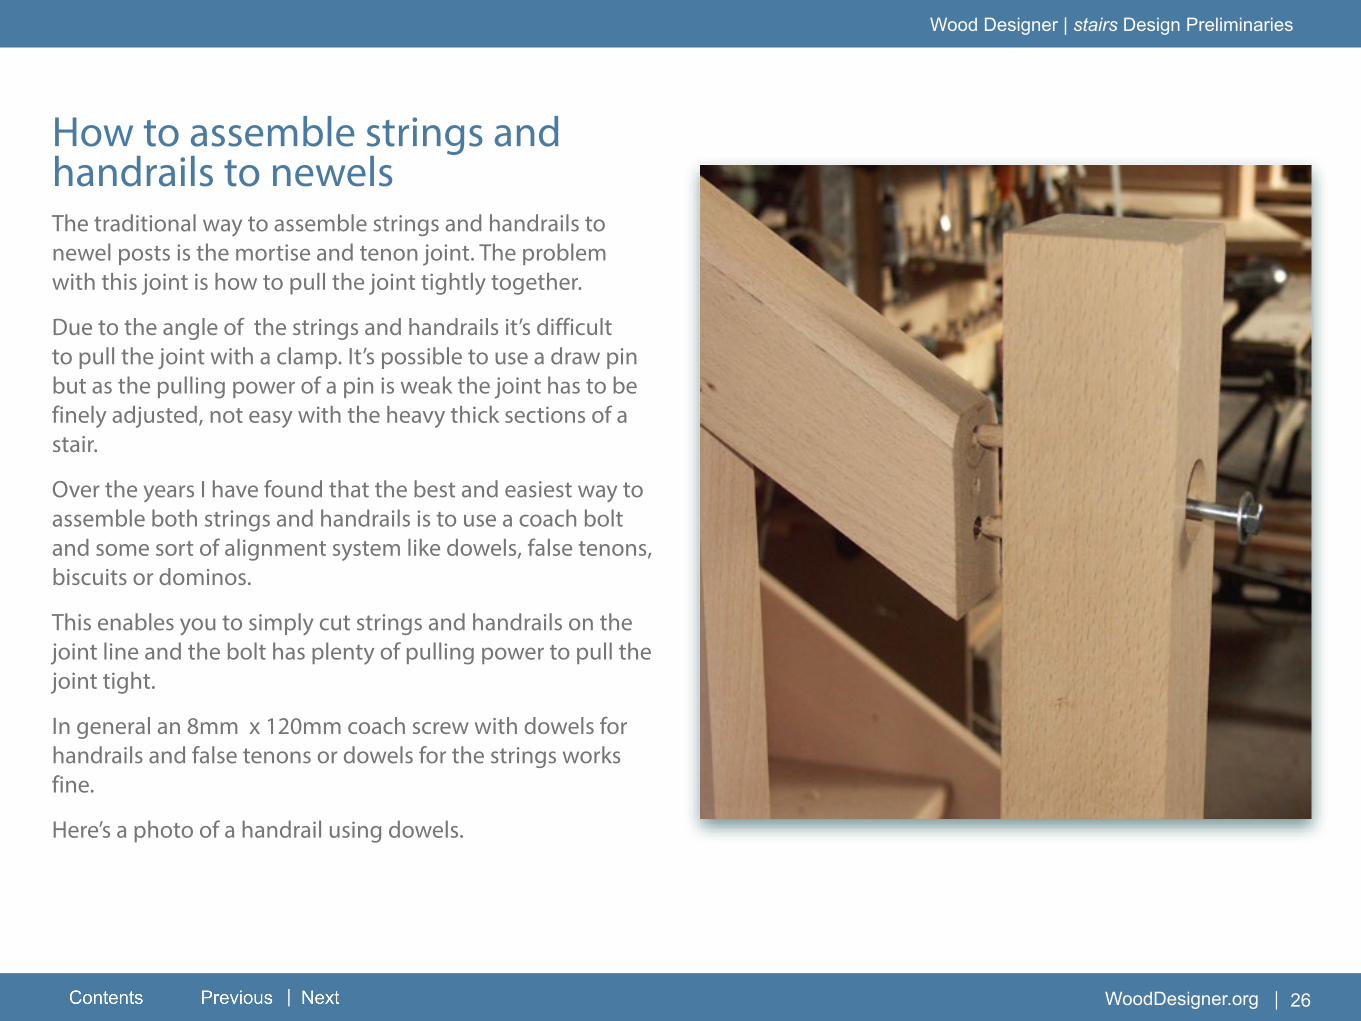
How to assemble strings and handrails to newelsThe traditional way to assemble strings and handrails to newel posts is the mortise and tenon joint. The problem with this joint is how to pull the joint tightly together.
Due to the angle of the strings and handrails it’s difficult to pull the joint with a clamp. It’s possible to use a draw pin but as the pulling power of a pin is weak the joint has to be finely adjusted, not easy with the heavy thick sections of a stair.
Over the years I have found that the best and easiest way to assemble both strings and handrails is to use a coach bolt and some sort of alignment system like dowels, false tenons, biscuits or dominos.
This enables you to simply cut strings and handrails on the joint line and the bolt has plenty of pulling power to pull the joint tight.
In general an 8mm x 120mm coach screw with dowels for handrails and false tenons or dowels for the strings works fine.
Here’s a photo of a handrail using dowels.

vv
Wood Designer | stairs Design Preliminaries
WoodDesigner.org| | 27
The strings and posts have been machined on CNC to receive false tenons and 2 coach bolts.
To design this type of joint in StairDesigner set string and handrail penetration to “0”.

vv
Wood Designer | stairs Design Preliminaries
WoodDesigner.org| | 28
How to assemble strings to stringsWhen there is no newel post, strings must be assembled string to string.
This joint is also best screwed using 6 x 90mm screws.
If possible it’s best to screw through both strings by cutting a crotch joint.
vv
Wood Designer | stairs Design Preliminaries
WoodDesigner.org| | 29
Curved parts - an overviewCurved stairs and building curved stair parts is a particularly complex subject within stair building.
Although StairDesigner will give general drawings and infor-mation to set up a curved stair the detailed manufacturing drawings will have to be drawn up from the StairDesigner drawings.
Setting up these manufacturing drawings will require exten-sive editing of the StairDesigner DXF files or paper plans.
For more information on building curved stair parts have a look at this introductory eBook:
Different Ways to Build Curved Stair Parts
You’ll find it on the Curved Stair eBook Library page.
On the same page you’ll find other eBooks on curved hand-rails and strings.
There is also a range of tutorials in the Stairs: Extended Training area, both in the Design and Parts sections, covering among other topics curved handrails and strings again.
ConclusionYou should now have a good idea of how you are going to build your stair.
If you are not used to stair building I strongly suggest that you note down on paper all the information and keep it ready at hand.
You are now ready to start designing in StairDesigner.
Please be sure you check out the rest of our stair building resources in the members area of WoodDesigner.org.
Happy woodworking.
Ness Tillson


![BETWEEN STAIRS - Stairs | Staircase design · PDF fileHelical Stairs DBBW [NL] 18 ... EeStairs Design Competition 50 Straight Stairs 68 Floating Stairs 69 Helical Stairs 88 Spiral](https://img.dokumen.tips/doc/110x75/5abe57417f8b9ac0598d0063/between-stairs-stairs-staircase-design-stairs-dbbw-nl-18-eestairs-design.jpg)


![Lecture 8 - Stairs Design [Compatibility Mode]](https://img.dokumen.tips/doc/110x75/55cf98af550346d03399199d/lecture-8-stairs-design-compatibility-mode.jpg)

